
DocumentsCorePack Template
Designer for MS CRM 2015/2016
and Dynamics 365
Ver.: 1.0, February 2017
Template Designer Guide
(How to work with DocumentsCorePack Template Designer for MS CRM 2015/2016 and Dynamics 365)
The content of this document is subject to change without notice. “Microsoft” and “Microsoft CRM” are
registered trademarks of Microsoft Inc. All other product- and company names mentioned are trademarks
of their respectful owners.
DocumentsCorePack Template Designer for MSCRM 2015/2016 and Dynamics 365
Page 2 of 168
Content
1 DocumentsCorePack Template Designer Basics ............................................................................................................. 9
1.1 The www.mscrm-addons.com tab ........................................................................................................................... 10
1.2 How to open the DocumentsCorePack Template Designer .......................................................................... 11
1.3 The DocumentsCorePack Template Designer User Interface (Standard) ................................................. 12
1.4 Standard ............................................................................................................................................................................. 12
1.4.1 Type Selector ............................................................................................................................................................... 13
1.4.2 The Attributes TreeView.......................................................................................................................................... 14
1.4.3 The Insert Fields button .......................................................................................................................................... 16
1.4.4 Search with the attributes TreeView .................................................................................................................. 17
1.4.5 Taskpane settings ...................................................................................................................................................... 18
1.5 Advanced Templates Settings ................................................................................................................................... 20
1.5.1 Document Name and Subject .............................................................................................................................. 21
1.5.2 General ........................................................................................................................................................................... 22
1.5.3 Create Activities for................................................................................................................................................... 23
1.5.4 Document Protection ............................................................................................................................................... 24
1.5.5 Sub Folder .................................................................................................................................................................... 26
1.5.6 Client Automation ..................................................................................................................................................... 27
1.5.7 E-Mail (Create CRM Activity) ................................................................................................................................. 28
1.5.8 Additional fields (obsolete) ................................................................................................................................... 29
1.5.9 SharePoint Metadata ............................................................................................................................................... 30
1.5.10 Remove Watermark ............................................................................................................................................. 34
1.6 Notification Area ............................................................................................................................................................. 35
1.7 Additional-tab .................................................................................................................................................................. 36
1.7.1 Add Relationships/Entity ........................................................................................................................................ 37
1.7.2 Table selector .............................................................................................................................................................. 38
1.8 Additional Relationships .............................................................................................................................................. 39
1.8.1 Aggregation ................................................................................................................................................................. 40
1.9 Insert Field Button .......................................................................................................................................................... 43
1.9.1 Insert as Picture Field ............................................................................................................................................... 44
1.9.2 Insert as a Picture-Link Field ................................................................................................................................. 45
1.9.3 Insert as Document ................................................................................................................................................... 46
1.9.4 Insert as HTML ............................................................................................................................................................ 47
DocumentsCorePack Template Designer for MSCRM 2015/2016 and Dynamics 365
Page 3 of 168
1.9.5 Insert Static Item ........................................................................................................................................................ 48
1.9.6 Static document ......................................................................................................................................................... 48
1.9.7 Page Break .................................................................................................................................................................... 48
1.9.8 Remove Empty Lines ................................................................................................................................................ 48
1.9.9 Join Tables .................................................................................................................................................................... 49
1.9.10 Insert [Computed Item] ...................................................................................................................................... 50
1.9.11 Insert [QR Code] ................................................................................................................................................... 50
1.9.12 Insert [Advanced String] .................................................................................................................................... 51
1.9.13 Insert [Calculated field] ...................................................................................................................................... 52
1.9.14 Insert [Hyperlink] .................................................................................................................................................. 53
1.9.15 Insert DocuSign Item .......................................................................................................................................... 54
1.9.16 Insert AssureSign Item........................................................................................................................................ 54
1.10 Field Properties ................................................................................................................................................................ 55
1.10.1 String-fields ............................................................................................................................................................ 56
1.10.2 Date fields................................................................................................................................................................ 56
1.10.3 Number fields ........................................................................................................................................................ 59
1.10.4 Picklist fields ........................................................................................................................................................... 59
2 DocumentsCorePack Template Designer Advanced ................................................................................................... 61
2.1 Manage Tables ................................................................................................................................................................ 62
2.1.1 The manage relationship window ....................................................................................................................... 63
3 Advanced template options .................................................................................................................................................. 65
3.1 DocumentsCorePack Client Property Syntax ....................................................................................................... 66
3.1.1 Strings (basic syntax) ................................................................................................................................................ 66
3.1.2 Strings (advanced syntax) ...................................................................................................................................... 67
3.1.3 Calculations .................................................................................................................................................................. 69
3.1.4 Conditions .................................................................................................................................................................... 70
3.2 Additional field specific formatting capabilities ................................................................................................. 72
3.2.1 Date fields ..................................................................................................................................................................... 72
3.2.2 Number fields ............................................................................................................................................................. 75
3.2.3 Cultures.......................................................................................................................................................................... 76
4 Available demo templates...................................................................................................................................................... 87
5 Tutorials (“How To’s”) ............................................................................................................................................................... 88
5.1 How to create DocumentsCorePack templates .................................................................................................. 88
DocumentsCorePack Template Designer for MSCRM 2015/2016 and Dynamics 365
Page 4 of 168
5.1.1 Step 1. Create a template layout by selecting an entity. ........................................................................... 88
5.1.2 Step 2: Insert Fields ................................................................................................................................................... 89
5.1.3 Step 3: Add line-item relationship ...................................................................................................................... 90
5.1.4 Step 3: Insert the table ............................................................................................................................................ 91
5.1.5 Step 4 Format the table .......................................................................................................................................... 92
5.1.6 Step 5 Get the result! ............................................................................................................................................... 93
5.2 How to test your template .......................................................................................................................................... 94
5.2.1 Step 1: Open your Template ................................................................................................................................. 94
5.2.2 Step 2: Choose CRM Data ...................................................................................................................................... 94
5.2.3 Step 3: Search and Select a CRM record .......................................................................................................... 95
5.2.4 Step 4: Check you document ................................................................................................................................ 95
5.3 How to pre filter result rows before generating a document ....................................................................... 96
5.3.1 Open the Configure Fields and Datasource dialog ...................................................................................... 96
5.3.2 How to pre-filter rows in the Records to show – section .......................................................................... 97
5.4 How to label templates ................................................................................................................................................ 98
5.4.1 How to label templates choosing various records at once ...................................................................... 98
5.4.2 Click on the [Insert Labels] – button .................................................................................................................. 99
5.4.3 Mark the first cell as label cell ........................................................................................................................... 100
5.4.4 Retrieve fields (version A): Select a start entity........................................................................................... 100
5.4.5 Retrieve fields (version B): Create one record and set relations to other records ........................ 101
5.4.6 Define the remaining cells as label cells as well ......................................................................................... 102
5.5 How to create a relation from scratch................................................................................................................. 103
5.5.1 Create a template ................................................................................................................................................... 103
5.5.2 Insert some fields ................................................................................................................................................... 103
5.5.3 Add a new relationship ........................................................................................................................................ 103
5.5.4 Add further relationships..................................................................................................................................... 105
5.6 How to create a relation to a separate entity (no relation) ........................................................................ 107
5.7 How to create an aggregation fetch .................................................................................................................... 108
5.7.1 Open the Template Designer ............................................................................................................................ 108
5.7.2 Open the Configure Fields and Datasource dialog ................................................................................... 108
5.7.3 Activate aggregation ............................................................................................................................................. 108
5.7.4 Set the aggregation functionality .................................................................................................................... 109
5.7.5 Insert the newly resolved relationship ........................................................................................................... 110
DocumentsCorePack Template Designer for MSCRM 2015/2016 and Dynamics 365
Page 5 of 168
5.7.6 The result ................................................................................................................................................................... 110
5.8 How to properly format an address block......................................................................................................... 111
5.8.1 Create an address block with DocumentsCorePack Template Designer ......................................... 111
5.8.2 Choose your CRM Data and get your results .............................................................................................. 112
5.8.3 Merged document with missing data – troubleshooting....................................................................... 113
5.8.4 How to format an address block with missing data properly? ............................................................ 113
5.9 How to Insert as Picture Field ................................................................................................................................. 115
5.9.1 How to insert a picture that has been saved as entity image previously ........................................ 115
5.9.2 How to insert a picture that has been saved as a note ........................................................................... 116
5.10 How to Insert as Picture Link Field ....................................................................................................................... 119
5.10.1 How to insert a picture that has been saved as picture-link previously...................................... 119
5.11 How to insert as document ..................................................................................................................................... 121
5.11.1 Set up a relationship between your entity and the documents’ save location ........................ 121
5.11.2 Insert as document ........................................................................................................................................... 121
5.12 How to Insert as HTML .............................................................................................................................................. 124
5.13 How to insert as static item ..................................................................................................................................... 125
5.14 How to insert as static document ......................................................................................................................... 125
5.14.1 Use the Insert static document option ..................................................................................................... 125
5.14.2 Select a document to insert .......................................................................................................................... 125
5.14.3 Get the results ..................................................................................................................................................... 128
5.15 How to insert Page Break ......................................................................................................................................... 129
5.15.1 Select the Page Break option in the insert fields drop down menu ............................................. 129
5.16 How to insert Remove Empty Lines ..................................................................................................................... 130
5.16.1 Select the Remove Empty Lines option in the insert fields drop down menu .......................... 130
5.17 How to insert Join tables .......................................................................................................................................... 131
5.17.1 Select the Join tables option in the insert fields drop down menu............................................... 131
5.18 How to insert computed items .............................................................................................................................. 132
5.19 How to insert QR Codes ........................................................................................................................................... 133
5.19.1 Use the Insert computed item option ....................................................................................................... 133
5.19.2 Create a QR code............................................................................................................................................... 133
5.19.3 QR Code options ............................................................................................................................................... 134
5.19.4 Don’t forget to save your template ............................................................................................................ 134
5.20 How to insert an Advanced String ........................................................................................................................ 135
DocumentsCorePack Template Designer for MSCRM 2015/2016 and Dynamics 365
Page 6 of 168
5.20.1 Use the Insert Computed item option ...................................................................................................... 135
5.20.2 Create your Advanced String ........................................................................................................................ 135
5.20.3 Advanced String formatting options ......................................................................................................... 136
5.20.1 Don’t forget to save your template ............................................................................................................ 136
5.21 How to insert Calculated Fields ............................................................................................................................. 137
5.21.1 Use the insert computed field option ....................................................................................................... 137
5.21.2 Create your calculation ................................................................................................................................... 137
5.21.3 Additional options ............................................................................................................................................ 138
5.21.4 Don’t forget to save your template ............................................................................................................ 138
5.22 How to insert Hyperlink ............................................................................................................................................ 139
5.22.1 Use the insert computed item option ....................................................................................................... 139
5.22.2 Compose your link ............................................................................................................................................ 139
5.22.3 Additional options ............................................................................................................................................ 140
5.22.4 Don’t forget to save your template ............................................................................................................ 140
5.23 How to modify Field Properties ............................................................................................................................. 141
5.23.1 How to define a custom date format ........................................................................................................ 141
5.23.2 How to create a custom 16-digits number field ................................................................................... 142
5.24 How to add relationships ......................................................................................................................................... 143
5.24.1 Open the Configure fields and data source dialog .............................................................................. 143
5.24.2 Add a new relationship ................................................................................................................................... 145
5.24.3 Get the result ....................................................................................................................................................... 146
5.25 How to add a separate entity ................................................................................................................................. 147
5.25.1 How to add the filter manually .................................................................................................................... 147
6 DocumentsCorePack Template Designer Settings .................................................................................................... 148
6.1 General ............................................................................................................................................................................. 149
6.1.1 Advanced ................................................................................................................................................................... 150
7 General Word functionality that is referenced in this guide ................................................................................. 152
7.1 How to insert a Watermark ..................................................................................................................................... 153
7.2 How to work with field functions .......................................................................................................................... 154
7.3 CRM SharePoint Integration ................................................................................................................................... 155
7.4 What is CRM Metadata ............................................................................................................................................. 156
7.5 Location of files ............................................................................................................................................................ 157
7.5.1 The installation directory ..................................................................................................................................... 157
DocumentsCorePack Template Designer for MSCRM 2015/2016 and Dynamics 365
Page 7 of 168
7.5.2 The application directory ..................................................................................................................................... 157
7.5.3 The temporary directory ...................................................................................................................................... 157
8 DCP Diagnostics ...................................................................................................................................................................... 158
8.1 The DCP Diagnostics surface .................................................................................................................................. 159
8.1.1 The Diagnostics – tab............................................................................................................................................ 159
8.1.2 The System Information-tab .............................................................................................................................. 160
8.1.3 The Tools-tab ........................................................................................................................................................... 160
9 References ................................................................................................................................................................................. 161
10 Glossary ................................................................................................................................................................................ 162
11 Table of Figures ................................................................................................................................................................. 163
12 Contact .................................................................................................................................................................................. 168
DocumentsCorePack Template Designer for MSCRM 2015/2016 and Dynamics 365
Page 8 of 168
Preamble
This documentation is intended to guide you through the generation and design process of templates in
DocumentsCorePack.
This guide applies to version 7.110 (8.110) or higher.
Please read this document carefully and follow the steps as described to achieve the described results.
Target Audience
This guide is intended for users designing templates for DocumentsCorePack who have the following
minimum skills:
Basic Knowledge of Microsoft Office Word
Basic Microsoft Dynamics CRM/Dynamics 365 Knowledge
Purpose of the DocumentsCorePack template designer?
DocumentsCorePack Templates facilitates – among other things - the creation and modification of
DocumentsCorePack Templates in Microsoft Dynamics CRM/Dynamics 365. It has predefined fields, so-
called Mail Merge Fields. These are references to attributes in the Microsoft Dynamics CRM/Dynamics 365-
system (For example Company, Address, Contact, …).
Templates can be created for each MS Dynamics CRM/Dynamics 365 entity (For example Contact,
Opportunities…).
They facilitate the generation of documents.
For example:
1. Account-templates
2. Quote- and invoice-templates
3. Marketing-list-templates for multi-mails etc.
Basically, there are two different types of templates (deprecated Word Standard and Office Open XML).
We recommend you to use the DocumentsCorePack Templates (docx) only, because they are not limited
to a single data source. Due to this fact, our DCP Templates can resolve any relationships between the
entities. In the course of the next chapters, you will learn more about the basics of DocumentsCorePack
template designer, how to create a completely new template and how to handle already created
templates.

DocumentsCorePack Template Designer for MSCRM 2015/2016 and Dynamics 365
Page 9 of 168
1 DocumentsCorePack Template Designer Basics
The DocumentsCorePack Template Designer is a locally installed add-in for Microsoft Office Word which
enables you to
insert placeholders for CRM Data (so called ‘Merge Fields’) within templates.
resolve relationships to gather data from related data from CRM records.
insert advanced objects like QR-Codes or calculations based on CRM data.
pull fields from standard and custom entities into templates.
filter and sort once retrieved records in any imaginable way in the templates.
handle one-to-many and many-to-many relationships easily.
place if and else conditions in order to define conditional content inside templates.
set culture and format of money, integer and decimal fields inside templates.
generate dynamic document names and dynamic save locations for templates.
insert dynamic pictures into templates
insert hyperlinks into templates.
define arithmetic operations and set the corresponding variables as CRM fields.
insert sub-templates or other documents to the main document or template.
configure various settings in the templates.
The DocumentsCorePack Template Designer can be easily accessed via the www.mscrm-addons.com – tab
in the MS Word command bar.
Figure 1: Microsoft Office Word with mscrm-addons.com Ribbon

DocumentsCorePack Template Designer for MSCRM 2015/2016 and Dynamics 365
Page 10 of 168
1.1 The www.mscrm-addons.com tab
There are two main menu items in the www.mscrm-addons.com tab that facilitate the creation of
templates:
The dashed line (❶) marks the DocumentsCorePack Client functionality that does not belong to the
Template Designer guide. This section is described separately in the DocumentsCorePack ClientBased User
Guide.
While the left side contains the option to save and open templates, the right side does not belong to the
default items of the command bar. It only appears after inserting a field from DocumentsCorePack
Template Designer in order to manage the field properties.
The [Insert MailMerge Fields] button allows you to open an extended user interface to create template
from scratch.
Figure 2: www.mscrm-addons.com tab details
1
DocumentsCorePack Template Designer for MSCRM 2015/2016 and Dynamics 365
Page 11 of 168
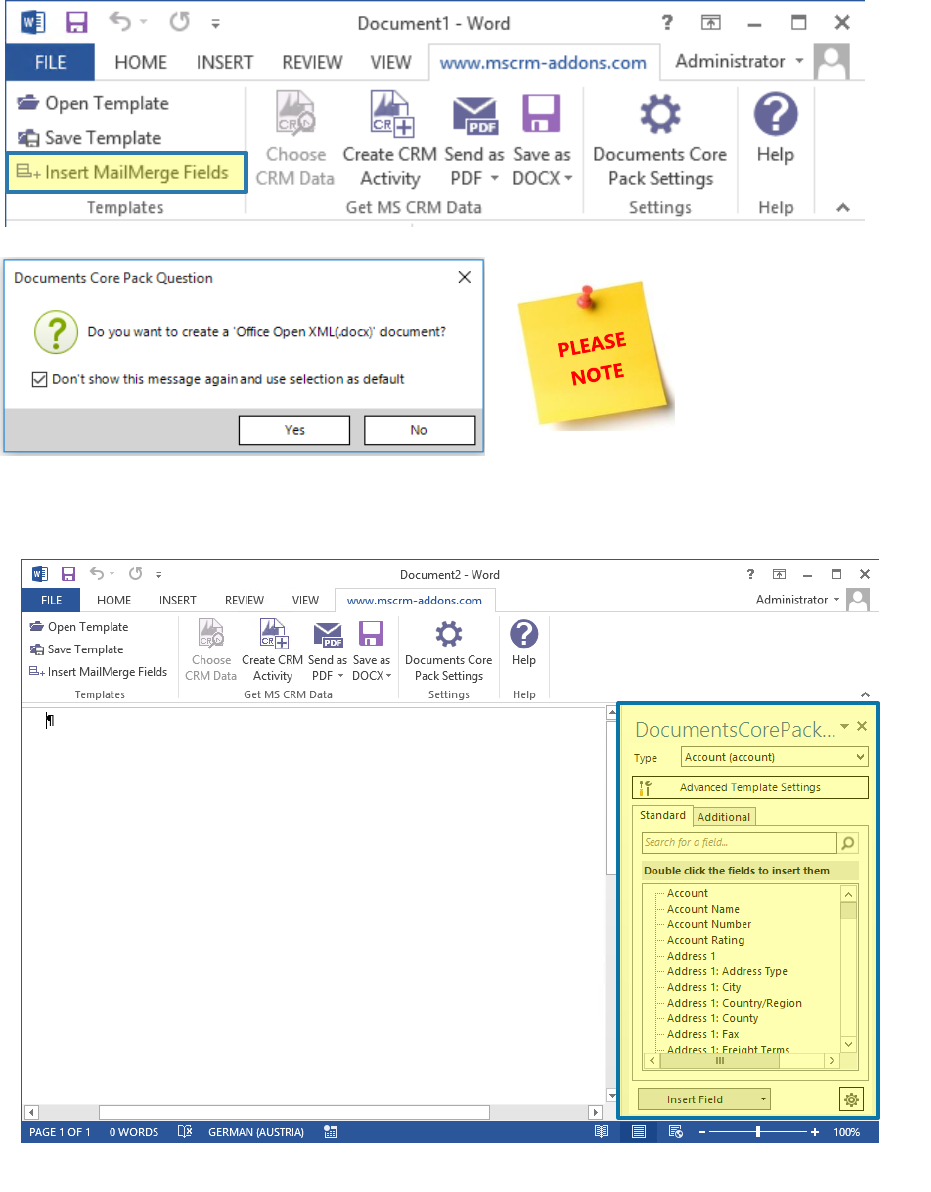
1.2 How to open the DocumentsCorePack Template Designer
Clicking on [Insert MailMerge Fields] in the www.mscrm-addons.com-tab will open the
DocumentsCorePack Template Designer.
Depending on the
configuration, the following
message box could appear.
Should this happen, please
check the checkbox and
click on [Yes].
After these steps The Template Designer will appear on the right hand side docked to your Word window.
Figure 3: www.msccrm-addons.com tab
Figure 4: Office Open XML (docx) question
Figure 5: DocumentsCorePack Template Designer Taskpane in Word

DocumentsCorePack Template Designer for MSCRM 2015/2016 and Dynamics 365
Page 12 of 168
1.3 The DocumentsCorePack Template Designer User Interface (Standard)
The DocumentsCorePack Template Designer is a task pane in Word which extends your local Word
installation with the required tools to insert fields.
1.4 Standard
If you are viewing this document on your computer, you can click on the element to directly jump to the
referenced topic.
Standard Fields
Advanced Template
Settings (SEE PAGE20 1.5
ADVANCED TEMPLATES
SETTINGS)
Type Selector
(SEE PAGE 13: TYPE
SELECTOR)
Additional Relationships
(SEE PAGE 36: 1.7
ADDITIONAL-TAB)
Insert Fields
(SEE PAGE 43: INSERT
FIELD BUTTON)
Taskpane Settings (SEE
PAGE 17: SEARCH WITH THE
ATTRIBUTES TREEVIEW
TreeView (SEE PAGE 14
CHAPTER 1.4.2THE
ATTRIBUTES TREEVIEW)
Search
(SEE PAGE 17:
SEARCH)
Figure 6: DocumentsCorePack Template Designer UI - Standard tab

DocumentsCorePack Template Designer for MSCRM 2015/2016 and Dynamics 365
Page 13 of 168
1.4.1 Type Selector
The first step of creating a new template is always to select the entity the template should be based on. In
the Type Selector-Drop Down Menu, every standard and custom entity is available. This selection is locked,
as soon as a field is inserted or a property is set.
Figure 7: Type selector

DocumentsCorePack Template Designer for MSCRM 2015/2016 and Dynamics 365
Page 14 of 168
1.4.2 The Attributes TreeView
The attributes TreeView displays all available attribute-fields of the entity that had been selected with the
type selector previously. The fields are listed in a TreeView in the root section. Additionally, all related 1:N
relationships form the CRM entity are display in the Standard Tab.
The additional tab does not show the 1:N
relationships automatically, as the relationship
for the additional tab is defined separately.
Figure 9: Standard fields
Figure 9: Standard fields of look up
Figure 10: Treeview in the Additonal Tab

DocumentsCorePack Template Designer for MSCRM 2015/2016 and Dynamics 365
Page 15 of 168
Hovering the mouse cursor over an element in the TreeView, will provide users with a tooltip, which
includes additional information about the field. (SEE: PAGE 17, 1.4.4 SEARCH WITH THE ATTRIBUTES
TREEVIEW)
>
Figure 11: Tooltip of field

DocumentsCorePack Template Designer for MSCRM 2015/2016 and Dynamics 365
Page 16 of 168
1.4.3 The Insert Fields button
This feature allows to insert additional contents in your .docx. The [Insert]-button provides you with
various insert options. It is a simple and centralized way to insert every MSCRM-field as a “special” field. To
get an overview of your options, you need to follow two easy steps:
❶ Select a field in the tree view of the DocumentsCorePack Template Designer
❷ Click on the Drop-Down-menu of the [Insert field]-button at the bottom of the
DocumentsCorePack Template Designer:
Opening the drop-down menu (❷) provides you with a lot of options that are going to be described in
detail within the next chapters:
1
2
Figure 12: Insert fields buttons
Figure 14: Insert Fields drop down
Figure 13: Insert fields drop down computed items

DocumentsCorePack Template Designer for MSCRM 2015/2016 and Dynamics 365
Page 17 of 168
1.4.4 Search with the attributes TreeView
The search capability allows you to search the tree view for a specific field name. The search includes the
display name, the schema name and the description depending on the configuration described in chapter
1.4.5.3 ❸SEARCH options. The “*” is a supported
wildcard character. As a default the search
supports left truncation. Enter you search term in
the textbox (left ❶) and hit the magnifier button
(left ❷).
All fields that match the set search term (right ❶)
will be listed in a filtered view (right ❸). To undo
the search and see all available fields hit the [x]
button (right ❷).
Additional options related to the search can be set
in the Taskpane Settings.
(SEE: PAGE 18, 1.4.5, TASKPANE SETTINGS)
1
2
Figure 15: Attributes Treeview - Search
1
2
Figure 16: Treeview - Search result
3

DocumentsCorePack Template Designer for MSCRM 2015/2016 and Dynamics 365
Page 18 of 168
1.4.5 Taskpane settings
The Taskpane settings allow you to the modify some of the behaviors of the TreeView containing the CRM
attributes.
1.4.5.1 ❶ Tooltip options
A list of available additional information allows you to select the information about the field that you
would like to see in the tooltip of the field.
>
Figure 17: Taskpane settings
>
>
1
2
3
>
Figure 18: Tooltip of field in the attributes tree view

DocumentsCorePack Template Designer for MSCRM 2015/2016 and Dynamics 365
Page 19 of 168
1.4.5.2 ❷ Other settings
“Add fields without Displayname”: Certain fields in CRM are not intended to be used on CRM forms and
therefore do not have a Dsiplayname. Nevertheless, you might have the requirement to use those fields in
your template. With this option to you can enable these fields. The schema name of will be used and the
name begins with “*” (asterisk).
“Mark used fields in Tree”: If a field is already used in the document it will be bold.
“Treeview starting width”: Allows to set the width in pixels when the task pane is opened in Word
1.4.5.3 ❸Search options
The available list of fields (Name, Displayname, Description) allows you to define with information of the
CRM field should be included for the search.
The Name is the schema name in CRM which is usually an internal identifier (e.g. emailaddress1).
The DisplayName is the label which is also used on a CRM form (e.g. Primary Email)
The description is the text-block that contains additional information about the field. (e.g. the purpose or
usage of the field)
>
>
Figure 19: Fields without Displayname (top) and used fields (bottom)

DocumentsCorePack Template Designer for MSCRM 2015/2016 and Dynamics 365
Page 20 of 168
1.5 Advanced Templates Settings
Clicking the [Advanced Template Settings]-button will open a new window.
Figure 20: Advanced Template Settings button
The Advanced Template settings are divided in 3 major categories:
❶ Template Settings
These settings describe the Documents behavior during the document generation
This section contains the possibility to define
❷ Client Automation Settings
These settings are only for the DocumentsCorePack Client which is described here.
❸ Advanced Settings
Includes several additional features for specialized template behavior
Figure 21: Templates settings categories
1
2
3

DocumentsCorePack Template Designer for MSCRM 2015/2016 and Dynamics 365
Page 21 of 168
1.5.1 Document Name and Subject
The "Document name" property allows you to define a name, or a name pattern for your template,
ensuring that the future document has a pretty name the moment it is generated.
The allowed syntax for this property and the available options for this field are described here (SEE: PAGE 66,
3.1.1 STRINGS (BASIC SYNTAX) F.) This is how such a document could look like:
Figure 22: Document Name and Subject
Figure 23: Example of the DocumentName after a merge

DocumentsCorePack Template Designer for MSCRM 2015/2016 and Dynamics 365
Page 22 of 168
1.5.2 General
The “General” property provides you with some general settings options for your future template.
❶ Mark as Label Template
Mark your future template as “Label Template” (which has a special behavior)
❷ Do not compress inserted images
Change your image settings, for example: do not compress inserted images
❸ Target Output (DPI)
Change your image settings, for example: set your target DPI output
❹ Do not remove base 64 strings from data source
Modify the compression of your future template
❺ Workflow
Set a workflow in order to make sure that the template will be processed in a certain way
automatically after its creation.
❻ Preserve Form Fields for PDFs
Check the checkbox to preserve form fields for PDFs. Form fields in PDFs are fields that can be
customized (filled) by users.
Figure 24: Template Settings - General
1
2
3
4
5
6

DocumentsCorePack Template Designer for MSCRM 2015/2016 and Dynamics 365
Page 23 of 168
1.5.3 Create Activities for
The “Create Activities For” property is used to predefine settings for DocumentsCorePack Client based
operations that effect templates. The configuration options allow template editors to define the
“Recipient”, “Regarding” and the “Save Location” of activities based on a template independently.
For further information on DocumentsCorePack Client, please have a look at the documentation of the
same name.
Anyway, to set a “Recipient”, a “Regarding” or a “Save Location”, simply click on the desired entity/location
in the TreeView.
Per default, only the “Recipient” – tab is displayed.
If you want all three tabs to be shown, you have to check the “Enable Advanced
Settings”- checkbox.
Figure 25: Template Settings – Create Activities For

DocumentsCorePack Template Designer for MSCRM 2015/2016 and Dynamics 365
Page 24 of 168
1.5.4 Document Protection
The “Document Protection” property provides you with the possibility to add a password to your future
MS Word document. A practical TreeView supports you with the selection process.
<<addresstype>>
Figure 26: Template Settings – Document Protection: (Owner) Password

DocumentsCorePack Template Designer for MSCRM 2015/2016 and Dynamics 365
Page 25 of 168
For the DocumentsCorePack Server based document generation, you can also set a password for PDFs and
thus, enhance the security of the document.
Figure 27: Template Settings – Document Protection: Advanced PDF Encryption

DocumentsCorePack Template Designer for MSCRM 2015/2016 and Dynamics 365
Page 26 of 168
1.5.5 Sub Folder
The sub folder property can be used to define a certain subfolder if the integrated CRM SharePoint
storage option is enabled for DocumentsCorePack.
The Sub Folder also can be created dynamically and based on CRM fields by following the
DocumentsCorePack Syntax. (SEE: PAGE 66, 3.1.1 STRINGS (BASIC SYNTAX) F.)
The Subfolder will be created on top of the CRM Integrated SharePoint location. This guide also contains a
section for external sources. (SEE: PAGE 155, 7.3 CRM SHAREPOINT INTEGRATION);
Figure 28: Template Settings – Sub Folder

DocumentsCorePack Template Designer for MSCRM 2015/2016 and Dynamics 365
Page 27 of 168
1.5.6 Client Automation
The “Client Automation” property settings work only with DocumentsCorePack
Client based operations. Furthermore, they only take affect when the [Create
CRM Activity] - button of the Client is used and do not work with the
[Send as ….] - option.
If this checkbox is checked, PDFs are sent automatically. If you do not want to press the [SendasPDF] –
button manually, this is the perfect feature for you.
Check this checkbox to automatically skip the “file name”-dialog. Usually, you have
to enter a file name if you press the [SendasPDF]-button. This is not necessary anymore
if you check this checkbox.
Figure 31: Automation Settings – Skip “Send as PDF” file name dialog
Figure 30: Client Automation Settings – Trigger the [SendasPDF] – button automatically
Figure 29: Client Automation Settings – Client Automation

DocumentsCorePack Template Designer for MSCRM 2015/2016 and Dynamics 365
Page 28 of 168
1.5.7 E-Mail (Create CRM Activity)
The “E-Mail (Create CRM Activity)” property enables users to define the “Recipient” (TO), “Carbon Copy”
(CC) and “Blind Carbon Copy” (BCC) – addresses of an e-Mail. It is possible to use data from fields out of
CRM to be part of the entries. The predefined email addresses will show up in every email activity. “to”,
“cc” and “bcc” settings of your future Emails are possible in this section.
Figure 32: Automation Settings – E-Mail (Create CRM Activity)

DocumentsCorePack Template Designer for MSCRM 2015/2016 and Dynamics 365
Page 29 of 168
1.5.8 Additional fields (obsolete)
This area contains fields that are not directly inserted into the template. You do not have to worry about
the settings as all out of the box functionality populates the necessary fields her automatically. (This is not
further described in a separate article)
Figure 33: Advanced Settings – Additional fields with example

DocumentsCorePack Template Designer for MSCRM 2015/2016 and Dynamics 365
Page 30 of 168
1.5.9 SharePoint Metadata
Using the standard CRM SharePoint Integration enables you to define metadata fields and values in your
template automatically. As soon as the generated document is saved also this metadata is updated in
SharePoint. Details about the Standard CRM SharePoint Integration can be found here at
PAGE 155, 7.3 CRM SHAREPOINT INTEGRATION.
The properties are presented in a list view (❹) showing the name of the property and the value set for
this property. Within this dialog you are able to add, edit and delete properties.
SharePoint taxonomy properties are not supported.
1
2
3
4
Figure 34: Sharepoint Metadata Dialog

DocumentsCorePack Template Designer for MSCRM 2015/2016 and Dynamics 365
Page 31 of 168
1.5.9.1 ❶ Add
When you add a new property, a dialog appears. In this dialog you have to set the actual name of the
SharePoint metadata property. To find this name, simply search for the term in the Search-field and click
on the [magnifier]-button. The TreeView will provide you with all fields that a) contain your search term
and b) are related to the main entity (in this example: “Account”).
The name can be set up following the syntax of DocumentsCorePack for strings. (SEE: PAGE 66, 3.1.1 STRINGS
(BASIC SYNTAX) F.)
1.5.9.2 ❷ Edit
By using the edit button on any existing property the same name can be set up following the syntax of
DocumentsCorePack for strings. (SEE: PAGE 66, 3.1.1 STRINGS (BASIC SYNTAX) F.)
Figure 36: SharePoint Metadata Property - Edit
Figure 35: SharePoint Metadata Property
- Add

DocumentsCorePack Template Designer for MSCRM 2015/2016 and Dynamics 365
Page 32 of 168
1.5.9.3 ❸ Delete
Delete removes an existing property form the list.
Using the standard CRM SharePoint Integration enables you to define metadata fields and values in your
template automatically. As soon as the generated document is saved, also this metadata is updated in
Microsoft Dynamics CRM/Dynamics 365.
Figure 37: SharePoint Metadata Property - Delete

DocumentsCorePack Template Designer for MSCRM 2015/2016 and Dynamics 365
Page 33 of 168
1.5.9.4 ❹ Create a new property
To create a new property, simply click on [Add]. The Sharepoint MetaData window pops up. You have to
type in the name of the SharePoint property manually into the SharePoint Field ❶. Select the fields that
should be used in your pattern here (2). The value for the property can be composed from Microsoft
Dynamics CRM/Dynamics 365 fields and fixed text.
2
1
Figure 38: SharePoint Metadata Property – Create new property
Figure 39: SharePoint Metadata Property – Select fields for newly created property

DocumentsCorePack Template Designer for MSCRM 2015/2016 and Dynamics 365
Page 34 of 168
1.5.10 Remove Watermark
Define a condition that removes the Inserted Watermark if the Condition is met. You have to insert a
Watermark in your template first, otherwise this property does not have any effect.
How to insert a watermark is described here at PAGE 153, 7.1 HOW TO INSERT A WATERMARK.
The condition that can be defined follows the DocumentsCorePack syntax for conditions. (SEE PAGE 70, 3.1.4
CONDITIONS)
Figure 40: Remove Watermark

DocumentsCorePack Template Designer for MSCRM 2015/2016 and Dynamics 365
Page 35 of 168
1.6 Notification Area
The notification area provides you with import information about DocumentsCorePack. You will see this
message most likely if the metadata of CRM is out of date.
Notification Area:
In order to keep (especially your
Metadata) up to date, simply click
on the [Update]-button, when
the message appears.
Figure 41: Notification Area – Metadata update

DocumentsCorePack Template Designer for MSCRM 2015/2016 and Dynamics 365
Page 36 of 168
1.7 Additional-tab
This window has been designed to manage and insert additional fields.
Create
Table selector
Delete Table
TreeView
Insert Fields
Edit Table
Figure 42: DocumentsCorePack Template Designer UI - Additional tab

DocumentsCorePack Template Designer for MSCRM 2015/2016 and Dynamics 365
Page 37 of 168
1.7.1 Add Relationships/Entity
A click on the button [Add Relationship/Entity] (1) will open the relationship designer to create a new
relationship from scratch. While a click on the [Dropdown Arrow] (2) expands an extended menu with
predefined relationships.
Clicking on the Dropdown Menu of the [Add Relationship/Entity]-tab opens this dialog:
The marked area includes all predefined
relationships. DocumentsCorePack already has
a variety of different predefined relationships
for standard CRM entities.
e.g. All Contacts of an Account, Quote
Products of a Quote, …
In our example, we decided to select
[All contacts] to get access to the fields from
the entity “Contact by clicking on it.”
Now the Additional tab TreeView is filled with
the predefined relationship [All Contact] and
you can easily insert them into your template.
1
2
Figure 43: Add Relationship/Entity button
Figure 44: Add Relationship/Entity dropdown - predefined relationships

DocumentsCorePack Template Designer for MSCRM 2015/2016 and Dynamics 365
Page 38 of 168
1.7.2 Table selector
The table selector is a drop down menu that contains all added relationships for the current template.
By switching the selection, the corresponding fields in the below TreeView change.
Figure 45: Table Selector
Existing tables:
In this dropdown menu, every resolved entity is
listed as a table. This enables you to switch
between all lists of fields.
[Edit]-button:
This button allows you to edit the
existing entities.
Delete-button:
With this button, you delete the relationship
and all corresponding tables from this entity.
TreeView:
Provides you with full access to every field.

DocumentsCorePack Template Designer for MSCRM 2015/2016 and Dynamics 365
Page 39 of 168
1.8 Additional Relationships
The [Add Relationship/Entity]-button also includes buttons that allow its users to add a new relationship
or to manage existing relationships and tables. For further information on how to manage tables, please
have a look at CHAPTER 2.1 MANAGE TABLES, PAGE 62.
Clicking the [Add New Relationship…]-button opens the dialog shown below. Within it, you can
configure fields, tables and relationships that are important for your document.
Figure 46: Add New Relationship…
Figure 47: Add New Relationship… - Configure Fields and data source dialog
Select existing Relation:
Advanced Settings:
Filter:
Sorting:
Records to show:
Attributes:

DocumentsCorePack Template Designer for MSCRM 2015/2016 and Dynamics 365
Page 40 of 168
1.8.1 Aggregation
Checking the activate aggregation checkbox, allows its users to group relationships in certain ways.
The aggregation function allows you to aggregate attributes via the least/most important and to group
attributes within specified limits. The functionality is very useful when you want to create an overview to
certain data and sum or calculate the average of revenues or sales.
It can also be used to create quarterly, yearly, monthly or daily reports. Aggregation fetches enable you to
calculate sum(s), average minimum & maximum and count items. All aggregation methods supported by
Microsoft Dynamics 365 (CRM) can be easily applied to any template, although the selection depends on
the fields to be inserted.
Figure 48: Aggregation checkbox activated including examples

DocumentsCorePack Template Designer for MSCRM 2015/2016 and Dynamics 365
Page 41 of 168
The following aggregate functions are supported by Microsoft Dynamics 365 (CRM):
AVG
This functionality computes the average values for all entities or relationships used for the template.
0 is not considered when the average is calculated.
However, the result of a calculation including 0 is replaced by zero (0).
COUNT (sub-functionalities: COUNTCOLUMN, COUNT DISTINCT COLUMNS)
This functionality provides you with a count of all entities or relationship used for the template.
MAX
This functionality provides you with the maximum value of a certain selection of entities.
0 is not considered when the maximum value is calculated.
However, the result of a calculation including 0 is replaced by zero (0).
MIN
This functionality provides you with the minimum value of a certain selection of entities.
0 is not considered when the minimum value is calculated.
However, the result of a calculation including 0 is replaced by zero (0).
SUM
This functionality provides you with a sum of all entities or relationships used for the templates.
MULTIPLE AGGREGATES
This functionality enables you to use multiple aggregate attributes to set a minimum and a maximum.
GROUP BY
This functionality enables you to use multiple aggregate attributes and a linked group by attribute.
GROUP BY WITH LINKED ENTITY
This sub-functionality enables you to use the sum aggregate attribute to sum linked entity values.
GROUP BY YEAR, QUARTER, MONTH, WEEK OR DAY
These sub-functionalities enable you to group results by year, quarter, month, week or day.
DocumentsCorePack Template Designer for MSCRM 2015/2016 and Dynamics 365
Page 42 of 168
MULTIPLE GROUP BY
This functionality enables you to use multiple group by clauses.
ORDER BY
This functionality enables you to use multiple order by clauses.
Please find an example on how to use an aggregation properly in chapter 5.7 HOW TO CREATE AN
AGGREGATION FETCH ON PAGE 108.

DocumentsCorePack Template Designer for MSCRM 2015/2016 and Dynamics 365
Page 43 of 168
1.9 Insert Field Button
This feature allows to insert additional contents in your .docx. The [Insert]-button provides you with
various insert options. It is a simple and centralized way to insert every MSCRM-field as a “special”-field.
To get an overview of your options, you need to follow two easy steps:
1) Select a field in the TreeView of the DocumentsCorePack Template Designer
2) Click on the Drop-Down-menu of the [Insert field]-button at the bottom of the
DocumentsCorePack Template Designer:
Opening the drop-down menu provides you with a lot of options that are going to be described in detail
with the next chapters:
[INSERT AS PICTURE FIELD]
[INSERT AS A PICTURE-LINK FIELD]
[INSERT AS A PICTURE-LINK FIELD]
[INSERT AS DOCUMENT]
[INSERT AS HTML]
[INSERT STATIC ITEM]
[INSERT [COMPUTED ITEM]]
[INSERT DOCUSIGN ITEM]
[INSERT ASSURESIGN ITEM]
The functionalities of DocuSign, as well as of AssureSign, are explained in the
e-Signature User Guide, which can be found here.

DocumentsCorePack Template Designer for MSCRM 2015/2016 and Dynamics 365
Page 44 of 168
1.9.1 Insert as Picture Field
This option will insert a place holder for an image.
The image source for the image can be a path to a document.
The Image will be embedded into the document.
This option is not recommended when the generated document will be further used as
source for an email as most email clients are not able to display base64 embedded
image. Or as they do not allow this type of embedded image can also be used for
malicious attacks.
Please find a more detailed tutorial in our How-to-section “HOW TO INSERT AS PICTURE FIELD”, PAGE 115.

DocumentsCorePack Template Designer for MSCRM 2015/2016 and Dynamics 365
Page 45 of 168
1.9.2 Insert as a Picture-Link Field
This option will insert a place holder for an image.
The image path should be accessible from all over the network or the web.
This option is recommended if you would like to insert dynamic pictures in your
document based on data in CRM.
Please find a more detailed tutorial in our How-to-section, “HOW TO INSERT AS PICTURE LINK FIELD”, PAGE 119.

DocumentsCorePack Template Designer for MSCRM 2015/2016 and Dynamics 365
Page 46 of 168
1.9.3 Insert as Document
This option will insert a document that has been previously attached as a note in MS Dynamics
CRM/Dynamics 365.
Attaching a document as note basically works like attaching a picture as note (but
of course, you have to replace the picture by a document).
Please find a more detailed tutorial in our How-to-section “HOW TO INSERT AS DOCUMENT”, PAGE 121.

DocumentsCorePack Template Designer for MSCRM 2015/2016 and Dynamics 365
Page 47 of 168
1.9.4 Insert as HTML
HTML is abbreviation for Hyper Text Markup Language. You will usually come across this term when
talking about websites. HTML defines the layout when view in a browser. As Word is also capable of
creating HTML pages you also can work the other way around and insert HTML into a document.
Insert as HTML enables you to insert various HTML contents into templates. The functionality is able to
interpret HTML-codes stored in CRM and to display the contents appropriately in merged documents.
A HTML editor or some self-created input written in HTML is required to use the
[Insert as HTML] option. We do not automatically provide you with a HTML editor. If
needed, it has to be implemented by you into your CRM system. There are various
free and also some charged HTML editors that you could use.
Please find a more detailed tutorial in our How-to-section “HOW TO INSERT AS HTML”, PAGE 124.
Figure 49: HTML code (left), compiled HTML (right)

DocumentsCorePack Template Designer for MSCRM 2015/2016 and Dynamics 365
Page 48 of 168
1.9.5 Insert Static Item
This option has two main purposes.
It will insert static documents.
It also includes the possibility to format and structure the document.
Please find a more information in our How-to-section “HOW TO INSERT AS STATIC ITEM”, PAGE 125.
1.9.6 Static document
This option allows you to insert a sub template into your current template.
It was as well designed to insert further text documents like, for example, General Terms and Conditions.
Please find a more detailed tutorial in our How-to-section “HOW TO INSERT AS STATIC
DOCUMENT, PAGE 125.
1.9.7 Page Break
This option enables you to insert a dynamical page break into your document.
The Insert Page Break – option also works with table. If you, for example,
have a table with product information and you insert a “Page Break” – item,
you will automatically get an extra page for each product as a result.
Please find a more detailed tutorial in our How-to-section “HOW TO INSERT PAGE BREAK”, PAGE 129.
1.9.8 Remove Empty Lines
“Remove Empty Lines” – fields are a simple way to dynamically structure your document after a merge
process. For example, if you want to delete unnecessary lines between contacts and opportunities, simply
insert such a “Remove Empty Lines”-field. This option enables you to insert dynamical “Remove Empty
Lines” into your document.
The “Remove Empty Lines” – fields are very useful when subdocuments or HTML-
content are inserted.
Please find a more detailed tutorial in our How-to-section “HOW TO INSERT REMOVE EMPTY LINES”, PAGE 130.
DocumentsCorePack Template Designer for MSCRM 2015/2016 and Dynamics 365
Page 49 of 168
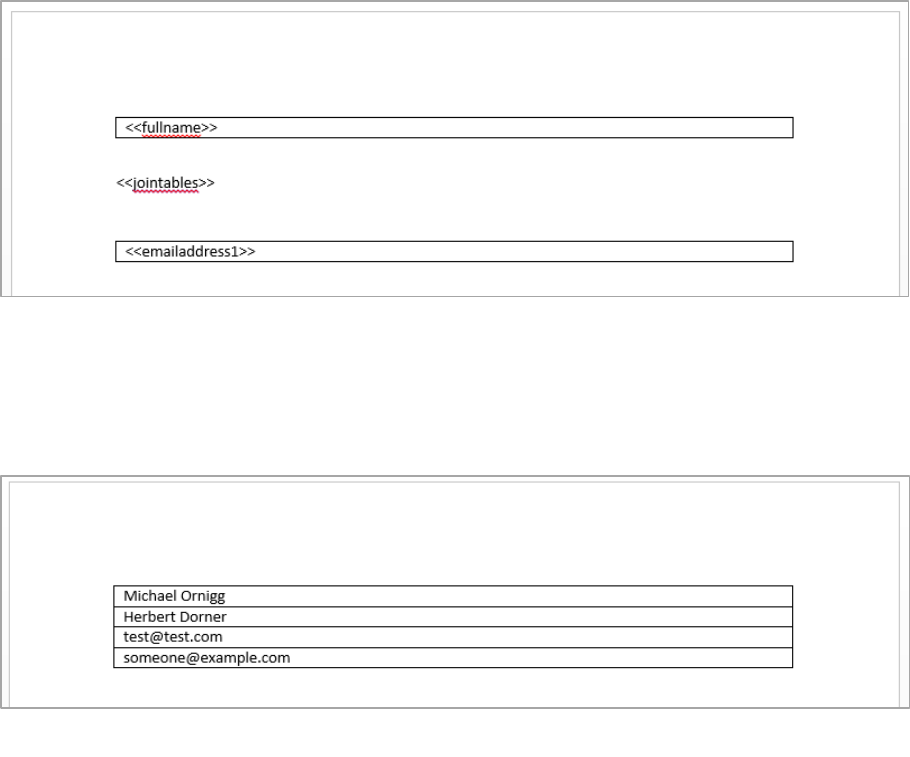
1.9.9 Join Tables
This option combines tables, making a single table out of it.
In this example we have 2 tables from an additional entity but want those two Fields grouped together in
one table. So we have inserted a <<jointables>> between the tables, and if this template will be merged
the tables get joined together.
As you can see in the following screenshot in this Template is just one single table will all merged field
from above.
Please find a more detailed tutorial in our How-to-section “HOW TO INSERT JOIN TABLES”, PAGE 131.
Figure 50: Two tables with the <<jointables>> command before a merge
Figure 51: Two tables with after the <<jointables>> command was executed

DocumentsCorePack Template Designer for MSCRM 2015/2016 and Dynamics 365
Page 50 of 168
1.9.10 Insert [Computed Item]
This option empowers users to make basic arithmetic operations with MS Dynamics CRM/Dynamics 365
number-fields.
Please find a more detailed tutorial in our How-to-section “HOW TO INSERT COMPUTED ITEMS”, PAGE 132.
1.9.11 Insert [QR Code]
“Insert QR Code” – fields help you to define a pattern for a dynamically created QR-Code. The example
below shows a QR-Code (2) that is based on a CRM field in a template ❶.
Please find a more detailed tutorial in our How-to-section “HOW TO INSERT QR CODES”, PAGE 133.
1
2
Figure 52: Example of inserted QR Code and CRM field in a template

DocumentsCorePack Template Designer for MSCRM 2015/2016 and Dynamics 365
Page 51 of 168
1.9.12 Insert [Advanced String]
The "Advanced String" field allows you to define a pattern for a dynamically created string.
The example below shows an advanced string (2) based on placeholder in a template ❶.
Please find a more detailed tutorial in our How-to-section “HOW TO INSERT AN ADVANCED STRING”, PAGE 135.
Figure 53: Example of dynamic string
1
2

DocumentsCorePack Template Designer for MSCRM 2015/2016 and Dynamics 365
Page 52 of 168
1.9.13 Insert [Calculated field]
The “Calculated Field”-option allows you to evaluate calculations of data from CRM.
The example below shows an evaluated calculation based on CRM fields.
Please find a more detailed tutorial in our How-to-section “HOW TO INSERT CALCULATED FIELDS”, PAGE 137.
Figure 54: Example of Computed field
1
2
DocumentsCorePack Template Designer for MSCRM 2015/2016 and Dynamics 365
Page 53 of 168
1.9.14 Insert [Hyperlink]
The “Hyperlink” – option allows you to define a pattern for a dynamically created link.
The syntax for the field is described here. (SEE: PAGE 66, 3.1.1 STRINGS (BASIC SYNTAX) F.)
Please find a more detailed tutorial in our How-to-section “How to insert Hyperlink”, page 139.
DocumentsCorePack Template Designer for MSCRM 2015/2016 and Dynamics 365
Page 54 of 168
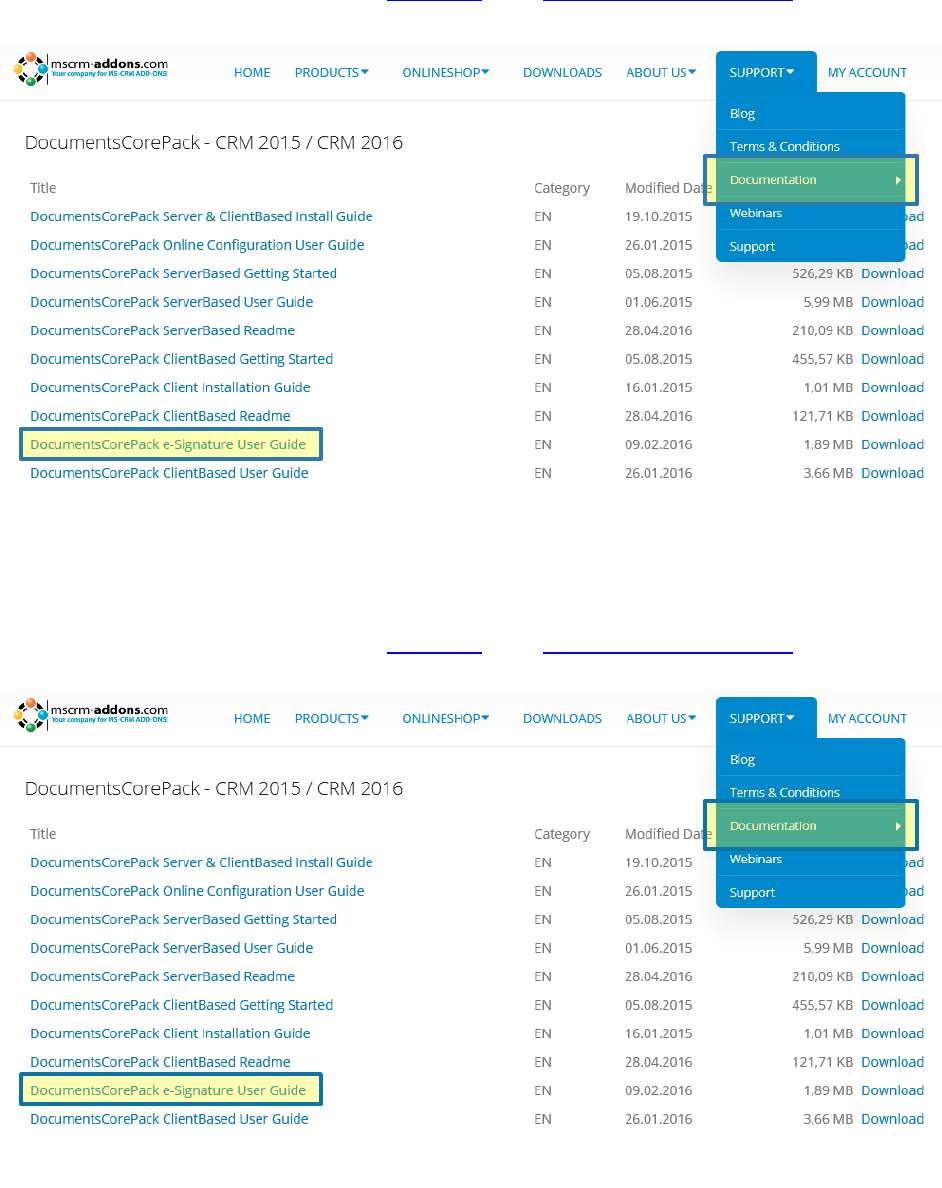
1.9.15 Insert DocuSign Item
This option requires the installation of a different product.
An explicit description can be found on our homepage in the Documentation section here.
The guide describing this functionality is called “DocumentsCorePack e-Signature User Guide”.
1.9.16 Insert AssureSign Item
This option requires the installation of a different product.
An explicit description can be found on our homepage in the Documentation section here.
The guide describing this functionality is called “DocumentsCorePack e-Signature User Guide”.
Figure 55: mscrm-addons.com documentation section
Figure 56: mscrm-addons.com documentation section

DocumentsCorePack Template Designer for MSCRM 2015/2016 and Dynamics 365
Page 55 of 168
1.10 Field Properties
Depending on the type of the field type that you have added in the document, you can call the properties
windows. To do so, simply click on the corresponding field ❶ and then on the [Field properties]-button
❷.
Field properties can also be opened via the context menu. To do so, simply right click on the inserted field.
Please find a more detailed tutorial in our How-to-section “HOW TO MODIFY FIELD PROPERTIES”, PAGE 141.
However, there are a few types of field properties in Microsoft Dynamics 365 (CRM).
Figure 57: mscrm-addons.com documentation section
2
1
Figure 58: Open field properties via the context menu

DocumentsCorePack Template Designer for MSCRM 2015/2016 and Dynamics 365
Page 56 of 168
1.10.1 String-fields
String fields are text fields that support you when it comes to the creation of text.
In order to configure them, simply check the Delete line/row if whole line/row is empty-box if you want to
delete the whole row should the field be empty.
Check the Delete line/row if this field is empty-box if you want to delete the field only if the field is empty.
1.10.2 Date fields
Data fields allow you to insert dates, like for example Created on.
In order to configure them, you can select a format and a culture in the corresponding drop down menu.
Please have a look at CHAPTER 5.23.1 HOW TO DEFINE A CUSTOM DATE FORMAT ON PAGE 141 in order learn how to
create a custom date format.
Figure 59: String fields
Figure 60: Data fields

DocumentsCorePack Template Designer for MSCRM 2015/2016 and Dynamics 365
Page 57 of 168
As you see here, you are provided with many different data formats…
Figure 61: Insert Format

DocumentsCorePack Template Designer for MSCRM 2015/2016 and Dynamics 365
Page 58 of 168
… and culture as well. In order to insert a culture, simply select your preferred one from the list.
Figure 62: Insert Culture

DocumentsCorePack Template Designer for MSCRM 2015/2016 and Dynamics 365
Page 59 of 168
1.10.3 Number fields
Number fields allow you to insert digits, like for example money fields, age fields or quote numbers.
In order to configure them, you can select a format and a culture in the corresponding drop down menu.
Please have a look at CHAPTER 5.23.2 HOW TO CREATE A CUSTOM 16-DIGITS NUMBER field ON PAGE 142 in order
learn how to create a 16-digits custom number.
1.10.4 Picklist fields
Picklist fields allow you to insert picklists. In order to configure them, you can select a format and a culture
in the corresponding drop down menu. Check the use internal Value-checkbox in order to activate a
function that inserts a field independent from the language.
Figure 63: Insert number field
Figure 64: Insert picklist

DocumentsCorePack Template Designer for MSCRM 2015/2016 and Dynamics 365
Page 60 of 168
Once the field is inserted including the internal value, the term ovalue will be added to the field.
Figure 65: Picklist field inserted plus internal value
DocumentsCorePack Template Designer for MSCRM 2015/2016 and Dynamics 365
Page 61 of 168
2 DocumentsCorePack Template Designer Advanced
The following chapters provide you with an overview of the advanced capabilities of Template Designer.
They focus on the following options:
Add entities
Manage tables

DocumentsCorePack Template Designer for MSCRM 2015/2016 and Dynamics 365
Page 62 of 168
2.1 Manage Tables
The manage tables function allows you to insert/manage/edit/customize tables and relationships.
To open it, simply open the [Add Relationship/Entity]-Drop Down menu in the DocumentsCorePack
Additional tab and select the option Manage relationships in the menu you are provided with.
Figure 67: Template Designer – Add Relationship/Entity
Figure 67: Add Relationship/Entity – Drop Down Menu

DocumentsCorePack Template Designer for MSCRM 2015/2016 and Dynamics 365
Page 63 of 168
2.1.1 The manage relationship window
All customizations for tables and relationships can be done here.
❶ Select type drop down
In the select type drop down menu you can select which type of entity you would like to work with.
The details shown in the list (see ❸) vary – depending on which entity you have
previously selected. Global relations (which are checked automatically) are the
same for all entities, whereas special relations have to be checked by the user.
❷
The plus, the minus and the up and down arrows allow you to customize your buttons.
Click on the [Plus]-button in order to add a predefined relationship. For further information on how to do
so please have a look at chapter 1.8 ADDITIONAL RELATIONSHIPS, PAGE 39.
Figure 68: Manage relationships window
1
2
3
5
6
4
Figure 69: Customize entities buttons

DocumentsCorePack Template Designer for MSCRM 2015/2016 and Dynamics 365
Page 64 of 168
The [Minus]-button allows you to delete predefined relationships. To do so, simply mark the relationship
you would like to delete and click on the [Yes]-button when you are asked if you want to delete it.
The [Up] and [Down]- arrow buttons allow you to determine in which order the relationships should
appear in the Add Relationship/Entity drop down menu. For more information on that menu, please have a
look at CHAPTER 1.7.1 ADD RELATIONSHIPS/ENTITY, PAGE 37
❸ The select type list preview gives you an overview of the relations that are displayed in the Add
Relationship/Entity drop down menu. For more information on that menu, please have a look at CHAPTER
1.7.1 ADD RELATIONSHIPS/ENTITY, PAGE 37.
❹ The select localization list preview offers you the possibility to customize your entities regarding to the
languages that you use in your Microsoft Dynamics CRM/Dynamics 365 settings.
❺
The entity settings at the right side allow you to customize the entity that is related to your previously
selected main entity in the type selector. If the checkbox next to Global is checked, the entity will be added
to the global entities of this relation.
❻ Hit the [Plus]-button in order to add a new field to the select localization list preview. Hit the [Minus]-
button in order to delete a previously marked field.
Figure 70: Manage Relationships – how to delete relationships
Figure 71: Manage predefined relationships – entity settings
DocumentsCorePack Template Designer for MSCRM 2015/2016 and Dynamics 365
Page 65 of 168
3 Advanced template options
Besides the standard options, DocumentsCorePack Template Designer offers additional options that
facilitate the designing of templates, such as:
Advanced syntax structures
Calculate (advanced) arithmetic issues
The following chapters provide you with an overview of the advanced template options.

DocumentsCorePack Template Designer for MSCRM 2015/2016 and Dynamics 365
Page 66 of 168
3.1 DocumentsCorePack Client Property Syntax
Certain properties of DocumentsCorePack templates can consist of fixed text and CRM fields. There are
also some additional function calls available. Also, data from CRM can be manipulated.
Several DocumentsCorePack properties support the same syntax. The 3 major different syntax types are
strings, calculations and conditions.
3.1.1 Strings (basic syntax)
The basic syntax for string properties follows the following rules.
Fixed text has to be typed manually in the text field and has to be enclose with single quotes (" ' ")
Fixed text has to be typed manually in the text field and has to be enclose with single quotes (" ' ").
To combine several CRM fields and fixed text you have to use the plus sign ("+").
Figure 72: Property syntax - fixed text
Figure 73: Property syntax - fields
Figure 74: Property syntax - plus signs

DocumentsCorePack Template Designer for MSCRM 2015/2016 and Dynamics 365
Page 67 of 168
3.1.2 Strings (advanced syntax)
Function calls can be applied to CRM fields by using the "." and the actual function call.
There are also standalone method calls supported. The function call has to end with brackets. Certain
functions also support parameters or have mandatory parameters.
The following table contains a list with all available functions that can be applied to CRM fields.
For all examples bellow please assume the <<name>> field will be "MSCRM-addons.com" after the merge.
Function
Description
Example
<<name>>.pos(x,y)
will insert y signs from the xth
position.
<<name>>.pos(2,5)
Result: "CRM-a"
<<name>>.left(x)
will insert the first x – signs.
E.g.: <<name>>.left(5)
<<name>>.left(5)
Result: "MSCRM"
<<name>>.right(x)
will insert the last x signs of the string. E.g.:
<<name>>.right(3)
<<name>>.right(3)
Result: "com"
<<name>>.upper()
displays all values in the field in capital letters.
Result: "MSCRM-
ADDONS.COM"
<<name>>.lower()
displays all values in the field in small letters.
Result: "mscrm-
addons.com"
<<name>>.caps()
displays the first letter in the field before as
capital letter.
Result: "Mscrm-
addons.com"
<<name>>.firstcaps()
displays the first letter in a
sentence in capital letter
Mscrm-addons.com
<<name>>.invert()
reverses every case
Result: "mscrm-
ADDONS.COM"
Figure 77: Table - List of function calls for fields
Figure 75: Property syntax - function call pos with parameters 2
and 5
Figure 76: Property syntax - Standalone function DATETIME
without parameters

DocumentsCorePack Template Designer for MSCRM 2015/2016 and Dynamics 365
Page 68 of 168
The following table contains a list with all available functions that can stand alone to CRM fields
Function
Description
Example
guid()
generates a unique serial number
b8a4d649-342e-4bfc-9a6f-
b4afd4741b4
DATETIME()
inserts the actual and local date
and time
06.12.2013 16:06
DATETIME(DD.MMMM.YY
mm:ss, de-DE)
There are many different
formatting options for displaying
the culture name for different
countries For more information
please have a look at CHAPTER 3.2.3 CULTURES
ON PAGE 76.
06.Dezember.1316:06
DATETIME(DD.MMMM.YY
' '
mm:ss, de-DE)
For more information about the
different cultures which can be
displayed, please have a look at CHAPTER
3.2.3 CULTURES ON PAGE 76.
06.Dezember.13 16:06
Figure 78: Table - List of standalone functions

DocumentsCorePack Template Designer for MSCRM 2015/2016 and Dynamics 365
Page 69 of 168
3.1.3 Calculations
The syntax for this field supports the basic arithmetic operations.
/ divide
* multiply
+ add up
- substract

DocumentsCorePack Template Designer for MSCRM 2015/2016 and Dynamics 365
Page 70 of 168
3.1.4 Conditions
Certain properties of DocumentsCorePack templates consist of conditions based on Microsoft Dynamics
CRM/Dynamics 365 fields. This chapter covers the basic syntax, as well as the advanced options that can
be used. Several DocumentsCorePack properties support the same syntax. A list of these properties can be
found at the end of this chapter.
A) The basic Syntax
Fixed text has to be typed manually into the text field and must be enclosed with single quotes (‘)
Figure 79: Example for fixed text
Fields from Dynamics 365 (CRM) are enclosed by << and >> when you insert them from the tree view.
Figure 80: Example for fields from CRM
To apply different functions to several Microsoft Dynamics 365 (CRM) fields, the fields and the fixed text
must contain one of the operators that are listed in the tables in section B) and C) of this chapter.
Figure 81: Example for operators from CRM

DocumentsCorePack Template Designer for MSCRM 2015/2016 and Dynamics 365
Page 71 of 168
B) Supported datatypes and available operators
Datatype
Value
Bool
True, false, 0, 1
Decimal/Numbers
Format z.B.: 1.1
Currency
€ 1.1 or $ 1.1 (when decimal, the currency symbols €, $ are deleted)
Date
#2015-12-13# or #2015-12-13T12:00:59+01:30#
Text
Figure 82: Table – Supported Datatypes
Operator
Description
Used with the following datatypes
=
equals
for each
<>
does not equal
for each
>
greater than
for each
<
less than
for each
>=
greater than or equal
for each
<=
less than or equal
for each
+
addition
Decimal, Numbers, Currency, Text
-
substraction
Decimal, Numbers, Currency
*
multiplication
Decimal, Numbers, Currency
/
division
Decimal, Numbers, Currency
%
modulo
Decimal, Numbers, Currency
LIKE
LIKE comparison, wildcard
*,%
text
Figure 83: Table – Available Operators
Boolean Operators: AND, OR, NOT
C) Special values and functions
Null / NULL
null
true
true
false
false
ISNULL
ISNULL(field, substitute value)
LEN
LEN(text) returns the string-length
IIF
IIF(condition, valuetrue, valuefalse)
TRIM
TRIM(text) deletes the whitespace at the beginning/end
SUBSTRING
SUBSTRING(text, start, len)
CONVERT
CONVERT(value, destType) destType must be a .Net datatype, e.g.: System.Int32
Figure 84: Table – Special values and functions
This syntax applies to the following properties and special fields:
Template Properties > Remove Watermark

DocumentsCorePack Template Designer for MSCRM 2015/2016 and Dynamics 365
Page 72 of 168
3.2 Additional field specific formatting capabilities
This chapter provides you with an overview of the additional field specific formatting capabilities of
DocumentsCorePack Template Designer. Please have a look at CHAPTER 1.10 FIELD PROPERTIES ON PAGE 55 for
some general information on field properties.
3.2.1 Date fields
This table provides you with an overview of all possible additional date field customizations. Please have a
look at CHAPTER 5.23.1 HOW TO DEFINE A CUSTOM DATE FORMAT ON PAGE 141 in order learn how to create a
custom date format.
Format
specifier
Description
Example
"d"
The day of the month,
from 1 through 31.
6/1/2009 1:45:30 PM -> 1
6/15/2009 1:45:30 PM -> 15
"dd"
The day of the month,
from 01 through 31.
6/1/2009 1:45:30 PM -> 01
6/15/2009 1:45:30 PM -> 15
"ddd"
The abbreviated name of
the day of the week.
6/15/2009 1:45:30 PM -> Mon (en-US)
6/15/2009 1:45:30 PM -> Пн (ru-RU)
6/15/2009 1:45:30 PM -> lun. (fr-FR)
"f"
The tenths of a second in a
date and time value.
6/15/2009 13:45:30.617 -> 6
6/15/2009 13:45:30.050 -> 0
"ff"
The hundredths of a
second in a date and time
value.
6/15/2009 13:45:30.617 -> 61
6/15/2009 13:45:30.005 -> 00
"fff"
The milliseconds in a date
and time value.
6/15/2009 13:45:30.617 -> 617
6/15/2009 13:45:30.0005 -> 000
"ffff"
The ten thousandths of a
second in a date and time
value.
6/15/2009 13:45:30.6175 -> 6175
6/15/2009 13:45:30.00005 -> 0000
"fffff"
The hundred thousandths
of a second in a date and
time value.
6/15/2009 13:45:30.61754 -> 61754
6/15/2009 13:45:30.000005 -> 00000
"ffffff"
The millionths of a second
in a date and time value.
6/15/2009 13:45:30.617542 -> 617542
6/15/2009 13:45:30.0000005 -> 000000
"fffffff"
The ten millionths of a
second in a date and time
value.
6/15/2009 13:45:30.6175425 -> 6175425
6/15/2009 13:45:30.0001150 -> 0001150
"F"
If non-zero, the tenths of a
second in a date and time
value.
6/15/2009 13:45:30.617 -> 6
6/15/2009 13:45:30.050 -> (no output)
"FF"
If non-zero, the
hundredths of a second in
a date and time value.
6/15/2009 13:45:30.617 -> 61
6/15/2009 13:45:30.005 -> (no output)
"FFF"
If non-zero, the
milliseconds in a date and
time value.
6/15/2009 13:45:30.617 -> 617
6/15/2009 13:45:30.0005 -> (no output)

DocumentsCorePack Template Designer for MSCRM 2015/2016 and Dynamics 365
Page 73 of 168
"FFFF"
If non-zero, the ten
thousandths of a second in
a date and time value.
6/1/2009 13:45:30.5275 -> 5275
6/15/2009 13:45:30.00005 -> (no output)
"FFFFF"
If non-zero, the hundred
thousandths of a second in
a date and time value.
6/15/2009 13:45:30.61754 -> 61754
6/15/2009 13:45:30.000005 -> (no output)
"FFFFFF"
If non-zero, the millionths
of a second in a date and
time value.
6/15/2009 13:45:30.617542 -> 617542
6/15/2009 13:45:30.0000005 -> (no output)
"FFFFFFF"
If non-zero, the ten
millionths of a second in a
date and time value.
6/15/2009 13:45:30.6175425 -> 6175425
6/15/2009 13:45:30.0001150 -> 000115
"g", "gg"
The period or era.
6/15/2009 1:45:30 PM -> A.D.
"h"
The hour, using a 12-hour
clock from 01 to 12.
6/15/2009 1:45:30 AM -> 1
6/15/2009 1:45:30 PM -> 1
"hh"
The hour, using a 12-hour
clock from 01 to 12.
6/15/2009 1:45:30 AM -> 01
6/15/2009 1:45:30 PM -> 01
"H"
The hour, using a 24-hour
clock from 0 to 23.
6/15/2009 1:45:30 AM -> 1
6/15/2009 1:45:30 PM -> 13
"HH"
The hour, using a 24-hour
clock from 00 to 23.
6/15/2009 1:45:30 AM -> 01
6/15/2009 1:45:30 PM -> 13
"K"
Time zone information.
With DateTime values:
6/15/2009 1:45:30 PM, Kind Unspecified -> 6/15/2009 1:45:30
PM, Kind Utc –> Z
6/15/2009 1:45:30 PM, Kind Local -> -07:00 (depends on local
computer settings)
With DateTimeOffset values:
6/15/2009 1:45:30 AM -07:00 --> -07:00
6/15/2009 8:45:30 AM +00:00 --> +00:00
"m"
The minute, from 0
through 59.
6/15/2009 1:09:30 AM -> 9
6/15/2009 1:09:30 PM -> 9
"mm"
The minute, from 00
through 59.
6/15/2009 1:09:30 AM -> 09
6/15/2009 1:09:30 PM -> 09
"M"
The month, from 1
through 12.
6/15/2009 1:45:30 PM -> 6
"MM"
The month, from 01
through 12.
6/15/2009 1:45:30 PM -> 06
"MMM"
The abbreviated name of
the month.
6/15/2009 1:45:30 PM -> Jun (en-US)
6/15/2009 1:45:30 PM -> juin (fr-FR)
6/15/2009 1:45:30 PM -> Jun (zu-ZA)
"MMMM"
The full name of the
month.
6/15/2009 1:45:30 PM -> June (en-US)
6/15/2009 1:45:30 PM -> juni (da-DK)
6/15/2009 1:45:30 PM -> uJuni (zu-ZA)
"s"
The second, from 0
through 59.
6/15/2009 1:45:09 PM -> 9
"ss"
The second, from 00
through 59.
6/15/2009 1:45:09 PM -> 09

DocumentsCorePack Template Designer for MSCRM 2015/2016 and Dynamics 365
Page 74 of 168
"t"
The first character of the
AM/PM designator.
6/15/2009 1:45:30 PM -> P (en-US)
6/15/2009 1:45:30 PM -> 午 (ja-JP)
6/15/2009 1:45:30 PM -> (fr-FR)
"tt"
The AM/PM designator.
6/15/2009 1:45:30 PM -> PM (en-US)
6/15/2009 1:45:30 PM -> 午後 (ja-JP)
6/15/2009 1:45:30 PM -> (fr-FR)
"y"
The year, from 0 to 99.
1/1/0001 12:00:00 AM -> 1
1/1/0900 12:00:00 AM -> 0
1/1/1900 12:00:00 AM -> 0
6/15/2009 1:45:30 PM -> 9
"yy"
The year, from 00 to 99.
1/1/0001 12:00:00 AM -> 01
1/1/0900 12:00:00 AM -> 00
1/1/1900 12:00:00 AM -> 00
6/15/2009 1:45:30 PM -> 09
"yyy"
The year, with a minimum
of three digits.
1/1/0001 12:00:00 AM -> 001
1/1/0900 12:00:00 AM -> 900
1/1/1900 12:00:00 AM -> 1900
6/15/2009 1:45:30 PM -> 2009
"yyyy"
The year as a four-digit
number.
1/1/0001 12:00:00 AM -> 0001
1/1/0900 12:00:00 AM -> 0900
1/1/1900 12:00:00 AM -> 1900
6/15/2009 1:45:30 PM -> 2009
"yyyyy"
The year as a five-digit
number.
1/1/0001 12:00:00 AM -> 00001
6/15/2009 1:45:30 PM -> 02009
"z"
Hours offset from UTC,
with no leading zeros.
6/15/2009 1:45:30 PM -07:00 -> -7
"zz"
Hours offset from UTC,
with a leading zero for a
single-digit value.
6/15/2009 1:45:30 PM -07:00 -> -07
"zzz"
Hours and minutes offset
from UTC.
6/15/2009 1:45:30 PM -07:00 -> -07:00
":"
The time separator.
6/15/2009 1:45:30 PM -> : (en-US)
6/15/2009 1:45:30 PM -> . (it-IT)
6/15/2009 1:45:30 PM -> : (ja-JP)
"/"
The date separator.
6/15/2009 1:45:30 PM -> / (en-US)
6/15/2009 1:45:30 PM -> - (ar-DZ)
6/15/2009 1:45:30 PM -> . (tr-TR)
"string"
'string'
Literal string delimiter.
6/15/2009 1:45:30 PM ("arr:" h:m t) -> arr: 1:45 P
6/15/2009 1:45:30 PM ('arr:' h:m t) -> arr: 1:45 P
%
Defines the following
character as a custom
format specifier.
6/15/2009 1:45:30 PM (%h) -> 1
\
The escape character.
6/15/2009 1:45:30 PM (h \h) -> 1 h
Any other
character
The character is copied to
the result string
unchanged.
6/15/2009 1:45:30 AM (arr hh:mm t) -> arr 01:45 A

DocumentsCorePack Template Designer for MSCRM 2015/2016 and Dynamics 365
Page 75 of 168
3.2.2 Number fields
This table provides you with an overview of all possible additional number field customizations. Please
have a look at CHAPTER 5.23.2 HOW TO CREATE A CUSTOM 16-DIGITS NUMBER FIELD ON PAGE 142 in order learn how
to create a custom number field.
Format
specifier
Name
Description
Examples
"0"
Zero
placeholder
Replaces the zero with the
corresponding digit if one is present;
otherwise, zero appears in the result
string.
1234.5678 ("00000") -> 01235
0.45678 ("0.00", en-US) -> 0.46
0.45678 ("0.00", fr-FR) -> 0,46
"#"
Digit
placeholder
Replaces the "#" symbol with the
corresponding digit if one is present;
otherwise, no digit appears in the
result string.
Note that no digit appears in the
result string if the corresponding digit
in the input string is a non-significant
0. For example, 0003 ("####") -> 3.
1234.5678 ("#####") -> 1235
0.45678 ("#.##", en-US) -> .46
0.45678 ("#.##", fr-FR) -> ,46
"."
Decimal point
Determines the location of the decimal
separator in the result string.
0.45678 ("0.00", en-US) -> 0.46
0.45678 ("0.00", fr-FR) -> 0,46
","
Group
separator and
number scaling
Serves as both a group separator and
a number scaling specifier. As a group
separator, it inserts a localized group
separator character between each
group. As a number scaling specifier, it
divides a number by 1000 for each
comma specified.
Group separator specifier:
2147483647 ("##,#", en-US) ->
2,147,483,647
2147483647 ("##,#", es-ES) ->
2.147.483.647
Scaling specifier:
2147483647 ("#,#,,", en-US) ->
2,147
2147483647 ("#,#,,", es-ES) ->
2.147

DocumentsCorePack Template Designer for MSCRM 2015/2016 and Dynamics 365
Page 76 of 168
3.2.3 Cultures
This table provides you with an overview of all possible culture customizations. These customizations are
important if it comes to numbers, dates or currencies. Please have a look at chapter 5.23 How to modify
Field Properties on page 141 in order to get an overview of when to use culture customizations.
Culture Name
Language-Country/Region
af
Afrikaans
af-ZA
Afrikaans - South Africa
sq
Albanian
sq-AL
Albanian - Albania
ar
Arabic
ar-DZ
Arabic - Algeria
ar-BH
Arabic - Bahrain
ar-EG
Arabic - Egypt
ar-IQ
Arabic - Iraq
ar-JO
Arabic - Jordan
ar-KW
Arabic - Kuwait
ar-LB
Arabic - Lebanon
ar-LY
Arabic - Libya
ar-MA
Arabic - Morocco
ar-OM
Arabic - Oman
ar-QA
Arabic - Qatar
ar-SA
Arabic - Saudi Arabia

DocumentsCorePack Template Designer for MSCRM 2015/2016 and Dynamics 365
Page 77 of 168
ar-SY
Arabic - Syria
ar-TN
Arabic - Tunisia
ar-AE
Arabic - United Arab Emirates
ar-YE
Arabic - Yemen
hy
Armenian
hy-AM
Armenian - Armenia
az
Azeri
az-AZ-Cyrl
Azeri (Cyrillic) - Azerbaijan
az-AZ-Latn
Azeri (Latin) - Azerbaijan
eu
Basque
eu-ES
Basque - Basque
be
Belarusian
be-BY
Belarusian - Belarus
bg
Bulgarian
bg-BG
Bulgarian - Bulgaria
ca
Catalan
ca-ES
Catalan - Catalan
zh-HK
Chinese - Hong Kong SAR
zh-MO
Chinese - Macau SAR
zh-CN
Chinese - China

DocumentsCorePack Template Designer for MSCRM 2015/2016 and Dynamics 365
Page 78 of 168
zh-CHS
Chinese (Simplified)
zh-SG
Chinese - Singapore
zh-TW
Chinese - Taiwan
zh-CHT
Chinese (Traditional)
hr
Croatian
hr-HR
Croatian - Croatia
cs
Czech
cs-CZ
Czech - Czech Republic
da
Danish
da-DK
Danish - Denmark
div
Dhivehi
div-MV
Dhivehi - Maldives
nl
Dutch
nl-BE
Dutch - Belgium
nl-NL
Dutch - The Netherlands
en
English
en-AU
English - Australia
en-BZ
English - Belize
en-CA
English - Canada
en-CB
English - Caribbean

DocumentsCorePack Template Designer for MSCRM 2015/2016 and Dynamics 365
Page 79 of 168
en-IE
English - Ireland
en-JM
English - Jamaica
en-NZ
English - New Zealand
en-PH
English - Philippines
en-ZA
English - South Africa
en-TT
English - Trinidad and Tobago
en-GB
English - United Kingdom
en-US
English - United States
en-ZW
English - Zimbabwe
et
Estonian
et-EE
Estonian - Estonia
fo
Faroese
fo-FO
Faroese - Faroe Islands
fa
Farsi
fa-IR
Farsi - Iran
fi
Finnish
fi-FI
Finnish - Finland
fr
French
fr-BE
French - Belgium
fr-CA
French - Canada

DocumentsCorePack Template Designer for MSCRM 2015/2016 and Dynamics 365
Page 80 of 168
fr-FR
French - France
fr-LU
French - Luxembourg
fr-MC
French - Monaco
fr-CH
French - Switzerland
gl
Galician
gl-ES
Galician - Galician
ka
Georgian
ka-GE
Georgian - Georgia
de
German
de-AT
German - Austria
de-DE
German - Germany
de-LI
German - Liechtenstein
de-LU
German - Luxembourg
de-CH
German - Switzerland
el
Greek
el-GR
Greek - Greece
gu
Gujarati
gu-IN
Gujarati - India
he
Hebrew
he-IL
Hebrew - Israel

DocumentsCorePack Template Designer for MSCRM 2015/2016 and Dynamics 365
Page 81 of 168
hi
Hindi
hi-IN
Hindi - India
hu
Hungarian
hu-HU
Hungarian - Hungary
is
Icelandic
is-IS
Icelandic - Iceland
id
Indonesian
id-ID
Indonesian - Indonesia
it
Italian
it-IT
Italian - Italy
it-CH
Italian - Switzerland
ja
Japanese
ja-JP
Japanese - Japan
kn
Kannada
kn-IN
Kannada - India
kk
Kazakh
kk-KZ
Kazakh - Kazakhstan
kok
Konkani
kok-IN
Konkani - India
ko
Korean

DocumentsCorePack Template Designer for MSCRM 2015/2016 and Dynamics 365
Page 82 of 168
ko-KR
Korean - Korea
ky
Kyrgyz
ky-KZ
Kyrgyz - Kazakhstan
lv
Latvian
lv-LV
Latvian - Latvia
lt
Lithuanian
lt-LT
Lithuanian - Lithuania
mk
Macedonian
mk-MK
Macedonian - FYROM
ms
Malay
ms-BN
Malay - Brunei
ms-MY
Malay - Malaysia
mr
Marathi
mr-IN
Marathi - India
mn
Mongolian
mn-MN
Mongolian - Mongolia
no
Norwegian
nb-NO
Norwegian (Bokml) - Norway
nn-NO
Norwegian (Nynorsk) - Norway
pl
Polish

DocumentsCorePack Template Designer for MSCRM 2015/2016 and Dynamics 365
Page 83 of 168
pl-PL
Polish - Poland
pt
Portuguese
pt-BR
Portuguese - Brazil
pt-PT
Portuguese - Portugal
pa
Punjabi
pa-IN
Punjabi - India
ro
Romanian
ro-RO
Romanian - Romania
ru
Russian
ru-RU
Russian - Russia
sa
Sanskrit
sa-IN
Sanskrit - India
sr-SP-Cyrl
Serbian (Cyrillic) - Serbia
sr-SP-Latn
Serbian (Latin) - Serbia
sk
Slovak
sk-SK
Slovak - Slovakia
sl
Slovenian
sl-SI
Slovenian - Slovenia
es
Spanish
es-AR
Spanish - Argentina

DocumentsCorePack Template Designer for MSCRM 2015/2016 and Dynamics 365
Page 84 of 168
es-BO
Spanish - Bolivia
es-CL
Spanish - Chile
es-CO
Spanish - Colombia
es-CR
Spanish - Costa Rica
es-DO
Spanish - Dominican Republic
es-EC
Spanish - Ecuador
es-SV
Spanish - El Salvador
es-GT
Spanish - Guatemala
es-HN
Spanish - Honduras
es-MX
Spanish - Mexico
es-NI
Spanish - Nicaragua
es-PA
Spanish - Panama
es-PY
Spanish - Paraguay
es-PE
Spanish - Peru
es-PR
Spanish - Puerto Rico
es-ES
Spanish - Spain
es-UY
Spanish - Uruguay
es-VE
Spanish - Venezuela
sw
Swahili
sw-KE
Swahili - Kenya

DocumentsCorePack Template Designer for MSCRM 2015/2016 and Dynamics 365
Page 85 of 168
sv
Swedish
sv-FI
Swedish - Finland
sv-SE
Swedish - Sweden
syr
Syriac
syr-SY
Syriac - Syria
ta
Tamil
ta-IN
Tamil - India
tt
Tatar
tt-RU
Tatar - Russia
te
Telugu
te-IN
Telugu - India
th
Thai
th-TH
Thai - Thailand
tr
Turkish
tr-TR
Turkish - Turkey
uk
Ukrainian
uk-UA
Ukrainian - Ukraine
ur
Urdu
ur-PK
Urdu - Pakistan
uz
Uzbek

DocumentsCorePack Template Designer for MSCRM 2015/2016 and Dynamics 365
Page 86 of 168
uz-UZ-Cyrl
Uzbek (Cyrillic) - Uzbekistan
uz-UZ-Latn
Uzbek (Latin) - Uzbekistan
vi
Vietnamese
vi-VN
Vietnamese - Vietnam

DocumentsCorePack Template Designer for MSCRM 2015/2016 and Dynamics 365
Page 87 of 168
4 Available demo templates
DocumentsCorePack already has a set of template to allow you to quickly start
Name
Function/Usage
Minimum Data Input
Account reconnect
Simple account template just with fields
from account entity.
The sample data
Account overview
Simple account template with tables
which contain data from the given
entities.
The sample data and data from
each additional entity
Contemporary letter
List of accounts related to
this account
Shows all accounts related to the selected
account.
The selected account should
contain other related accounts.
List of contacts related to
this account
Shows all contacts related to the selected
account.
The selected account should
contain other related contacts.
Account QR Code
How to use the QR-Code-Field with the
Account entity
The sample data
Activity Overview
Simple activity template with tables which
contain data from the given extra entities.
The sample data and data from
each additional entity.
Contact Reconnect – Gift
Certificate
Simple Activity Template just with fields
from the Activity entity.
The sample data
List of Accounts related to
this contact.
Shows all accounts from the selected
contact.
The selected contact should
contain other related contacts.
Quote Base
Simple Quote Template just with fields
from the quote entity.
You should have at least one
quote.
Quote with Grouping
Base
Simple Quote Template.
You should at least have one
quote, some products and
some prices.
Quote QR Template
How to use the QR-Code-Field with the
Quote entity.
You should at least have one
quote, some products and
some prices.
Invoice Base
Simple invoice template just with fields
from the invoice entity.
The sample data
Invoice with grouping
base
Simple invoice template.
The sample data.
Newsletter to all accounts
of this marketing list
Generates a document for each account in
a marketing list.
You should have a marketing
list with at least one account.
Opportunity Base
A simple sample template for an
opportunity letter.
The sample data.
Figure 85: Table - List of demo templates

DocumentsCorePack Template Designer for MSCRM 2015/2016 and Dynamics 365
Page 88 of 168
5 Tutorials (“How To’s”)
Please find a list of all available “How-To’s” that are described in this document.
5.1 How to create DocumentsCorePack templates
Office Open XML has been invented to enable the creation of very complex templates that would normally
require the use of macros.
This chapter contains a step-by-step description about how to create a template. We decided to create a
so called “quote-with-grouping-template”, because it is most likely used by Microsoft Dynamics
CRM/Dynamics 365 users. (“Quote-with-grouping” means that the quote-products are grouped by the
value of a specific CRM-attribute, e.g. subject.)
5.1.1 Step 1. Create a template layout by selecting an entity.
First, we need to create the basic layout of the template. Clicking on the [Insert MailMerge Fields] menu
button in the www.mscrm-addons.com command bar will open the DocumentsCorePack Template
Designer. Please see CHAPTER 1.2 HOW TO OPEN THE DOCUMENTSCOREPACK TEMPLATE DESIGNER ON PAGE 8 for
details.
Anyway, to create the basic layout for, e.g. a quote-with-grouping-template, we must select the type
“Quote” in the Type-Selector-Dropdown Menu. Each template is based on a specific entity.
Figure 86 Template Designer – Selected entity: Quote

DocumentsCorePack Template Designer for MSCRM 2015/2016 and Dynamics 365
Page 89 of 168
5.1.2 Step 2: Insert Fields
Now that we have selected an entity, we need to insert fields to our template. To do so, we set the cursor
at the position where we would like to insert a certain entity. Then, we double click the field. You could as
well insert a field via the [Insert field]-button. (SEE CHAPTER 1.9 INSERT FIELD BUTTON, PAGE 43)
Once you have inserted all the fields you would like to insert, your template could look like this:
Figure 87 Template Designer – Insert fields
Header
(including customer information)
List of products
(grouped by subject and footer
Placeholder
(for your logo)
Figure 88 Template with inserted fields

DocumentsCorePack Template Designer for MSCRM 2015/2016 and Dynamics 365
Page 90 of 168
5.1.3 Step 3: Add line-item relationship
The next step is to resolve the quote-quote product relationship. To do so, we need to click on the
[Additional]-tab in the DocumentsCorePack Template Designer. The „Additional“ section allows to resolve
any relation/entity within CRM and brings up a list of all attributes from the related entities so that they
can be used within the document too.
Here, we click on the [Add Relationship/Entity]-button
in order to add a new relationship. Learn more
about how to add relationships and entities
in CHAPTER 1.7.1 ADD RELATIONSHIPS/ENTITY ON PAGE 37.
We use the Configure fields and data source – dialog to resolve the fields, tables and relationships we need
for our document. Please find further information on how to configure additional fields and relationships
in CHAPTER 1.8 ADDITIONAL RELATIONSHIPS PAGE 39.
Figure 89 Template Designer Additional tab
Figure 90 Configure fields and data source dialog
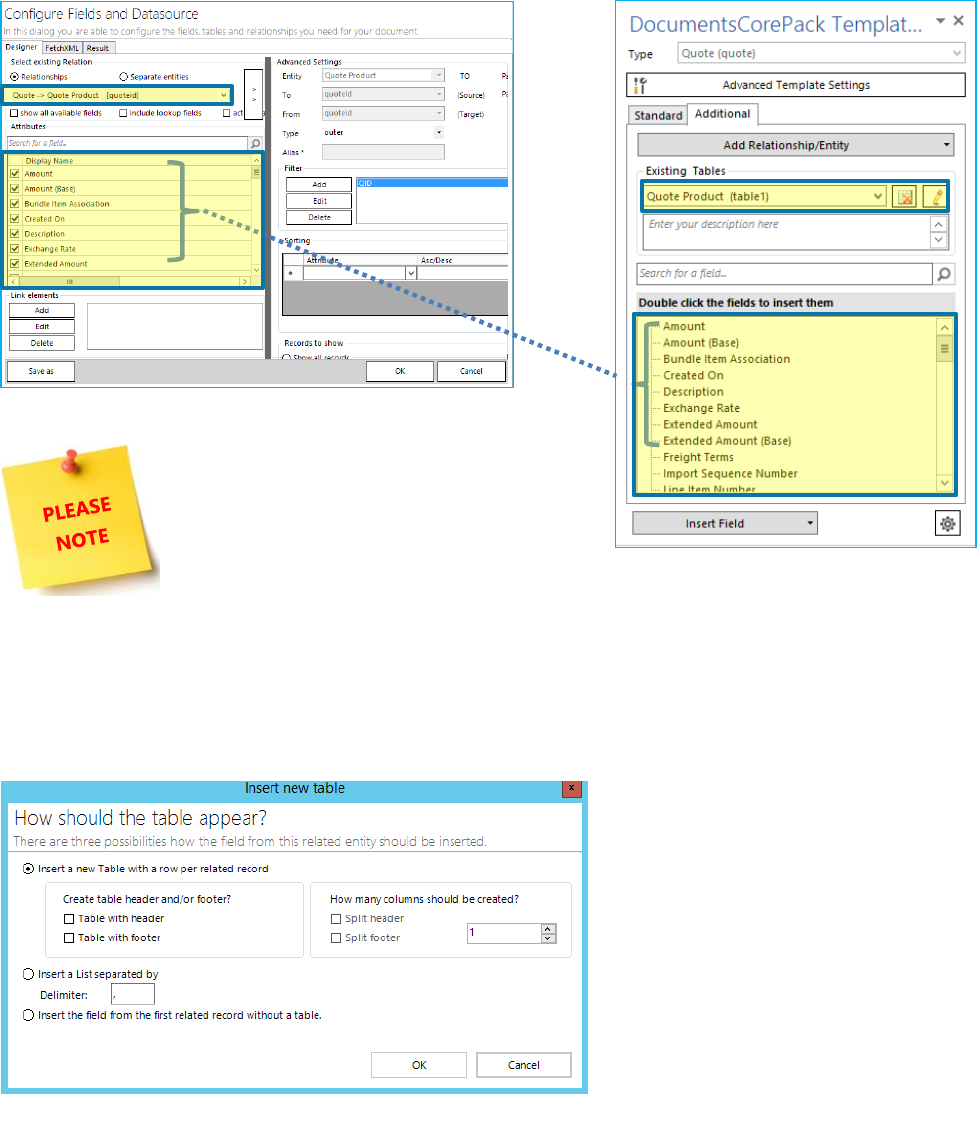
DocumentsCorePack Template Designer for MSCRM 2015/2016 and Dynamics 365
Page 91 of 168
For our example we decided to select Quote -> Quote Product [quoteid]. As a result, the available fields of
this relationship are displayed in the Attributes field of the Configure fields and data source dialog. As soon
as we click on the [OK]-button, all the selected fields will be related to the Quote Product table.
Only the fields checked in the Attributes
field will later be visible in the
DocumentsCorePack Template Designer.
5.1.4 Step 3: Insert the table
The procedure of inserting a table of items is completely automated, so we just need to set the curser to
the position where we want to add the table and double click on one of the fields that we have previously
added to the table. As soon as we do so, the following dialog appears:
Within this dialog, you can select between three possibilities how the fields should be inserted to the table.
In our example, we decided to insert a new table with a header and a footer and clicked on [OK].
As a result, the table will be inserted at the determined position:
Figure 92 Configure fields and data source dialog with selected relationship
Figure 91 – Template Designer: Additional tab with
table and corresponding fields.
Figure 93 – Insert new table

DocumentsCorePack Template Designer for MSCRM 2015/2016 and Dynamics 365
Page 92 of 168
5.1.5 Step 4 Format the table
Once we have inserted the table, we can add fields like quantity, product-name or even a table header
including column-names with the formatting options available in the www.mscrm-addons.com - tab.
With a click on the Rows and Columns – Dropdown, you get the possibility to split
or merge the columns, to insert a right or left column, to delete a row or a table
and to add a header or a footer row. For further information on how to configure
field properties, please have a look at CHAPTER 1.10 FIELD PROPERTIES PAGE 55.
It is of upmost importance to insert the header, as well as the footer, exclusively via
the www.mscrm-addons.com – tab in the command bar!
Do not enter them via Microsoft Word!
Figure 94 – Insert table (Result)
Figure 95 – mscrm-addons.com tab – Rows and Columns
Figure 96 – column
customization

DocumentsCorePack Template Designer for MSCRM 2015/2016 and Dynamics 365
Page 93 of 168
5.1.6 Step 5 Get the result!
After saving the document and selecting our CRM-data we can see the result with the replaced fields at
the top ❶, the line item table including the sum in the middle ❷ and the bank-details at the bottom ❸.
That is how you create a DocumentsCorePack Template! In the course of the next chapter, you will learn
how to test your template!
1
2
3
Figure 97 – DocumentsCorePack Template - Result

DocumentsCorePack Template Designer for MSCRM 2015/2016 and Dynamics 365
Page 94 of 168
5.2 How to test your template
So you have successfully created or modified a template and now you would like to give it a try. With our
Step-by-Step instruction on how to do so in DocumentsCorePack Client, this is a piece of cake.
5.2.1 Step 1: Open your Template
Ensure yourself that you have opened your template in Word by using the [Open Template]-button. If the
template is not opened in Word or if the template is not a DocumentsCorePack template the following
steps will most likely not work.
5.2.2 Step 2: Choose CRM Data
Press [Choose CRM Data] in the www.mscrm-addons.com tab.
Figure 98: www.mscrm-addons.com tab - Open Template:
Figure 99: www.mscrm-addons.com tab - Choose CRM Data

DocumentsCorePack Template Designer for MSCRM 2015/2016 and Dynamics 365
Page 95 of 168
5.2.3 Step 3: Search and Select a CRM record
Enter a search term corresponding to the template you have created previously and hit the [Search]-
button (❶). Select one of the records from the result windows ❷ and press [Select] ❸.
5.2.4 Step 4: Check you document
Now check your template and verify if your modification and design is as expected. Please be aware that
some special settings may NOT take effect at this point! To ensure that every think works like expected,
please also use the template in one complete work process.
1
2
3
Figure 100: Choose CRM Data dialog with data

DocumentsCorePack Template Designer for MSCRM 2015/2016 and Dynamics 365
Page 96 of 168
5.3 How to pre filter result rows before generating a document
This functionality is helpful when the user needs to select a specific related entity (for example, “contact”)
before starting to generate the document.
5.3.1 Open the Configure Fields and Datasource dialog
In order to do so, you have to open the additional tab, select a relationship and click on the [Edit]-button.
If have not worked with the additional tab yet, please SEE CHAPTER 1.7 ADDITIONAL-TAB, PAGE 36.
In the so opened Configure Fields and Datasource dialog (FOR MORE DETAILED INFORMATION SEE CHAPTER 1.8
ADDITIONAL RELATIONSHIPS, PAGE 39), go to the Records to Show-section.
Figure 101: Configure fields and datasource-dialog – Records to show (default settings)

DocumentsCorePack Template Designer for MSCRM 2015/2016 and Dynamics 365
Page 97 of 168
5.3.2 How to pre-filter rows in the Records to show – section
The Records to show – section you can choose if you want a selection and if so, which type.
You can choose between single or multiple rows. The “Width(px)”-section enables you to determine the
order and the width of te columns in pixel within the lookup window.
Figure 102: Records to show – Show a look up window to select a single row
Figure 103: Records to show – Show a look up window to select multiple rows inclusive width(px)-settings

DocumentsCorePack Template Designer for MSCRM 2015/2016 and Dynamics 365
Page 98 of 168
5.4 How to label templates
This “How to” describes how to create label templates with DocumentsCorePack Template Designer.
Basically, there are two options how a label template can be created and merged:
A) By choosing various records at once
(in this case, each label equals one record form the main entity of the template)
B) By choosing one record and then, setting relations to other records
(in this case, each label equals one record from the predefined relationship)
This “How to” shows how to retrieve fields for version A), as well as for version B).
5.4.1 How to label templates choosing various records at once
In order to prepare for a new template, you have to open the Template Settings, then go to the General-
section, check Mark as label template and click on the [OK]-button. (SEE CHAPTER 1.5 ADVANCED TEMPLATES
SETTINGS, PAGE 20 FOR MORE INFORMATION ON THE GENERAL TEMPLATE SETTINGS.) You will see, that now there is a
new block in the www.mscrm-addons.com – tab of the command bar.
Figure 104: New “label block” in the www.mscrm-addons.com - tab.

DocumentsCorePack Template Designer for MSCRM 2015/2016 and Dynamics 365
Page 99 of 168
5.4.2 Click on the [Insert Labels] – button
Within the window that opens now, you can customize the label options for your future template.
You can select between various trays, label vendors and the corresponding product numbers. In the label
information section on the right side, you get additional information on the selected label. Select your
desired label and click on the [OK]-button.
Figure 105: Label Options dialog

DocumentsCorePack Template Designer for MSCRM 2015/2016 and Dynamics 365
Page 100 of 168
5.4.3 Mark the first cell as label cell
Once the label is inserted in your document you have to mark the first cell as label cell. To do so, simply
set the cursor in the first cell and click on the [Mark as Label Cell]-button in the
www.mscrm-addons.com – tab.
Figure 106: Mark cell as label cell (Please note that the cell is enlarged due to demonstration purpose)
5.4.4 Retrieve fields (version A): Select a start entity
Once the cell is marked as Label cell you must select a start entity (for example “Quote” and insert the
appropriate fields. Once you have finished, please proceed with CHAPTER 5.4.6, PAGE 102.
Make sure that you use the Standard-tab only to insert the corresponding
entities.
Figure 107: Mark cell as label cell
(Please note that the cell is
enlarged due to demonstration
purpose)

DocumentsCorePack Template Designer for MSCRM 2015/2016 and Dynamics 365
Page 101 of 168
5.4.5 Retrieve fields (version B): Create one record and set relations to other records
Once the cell is marked as Label cell you must build up a relation for your entity.
When working with version B it is crucial to insert the fields via the
Additional-tab of the Template Designer. Once you have finished, please proceed
with CHAPTER 5.4.6, PAGE 102.
To set a relation, simply open the Add Relationship/Entity
drop down menu and select the relation you would like
to insert (for example: Quote Products). For further
information on how to set a relation and how to add new
relationships/entities, please SEE CHAPTER 1.7.1 ADD
RELATIONSHIPS/ENTITY, PAGE 37
Now the relation is set and you can, as well, select the
fields from the corresponding table that has been
created.
Figure 108: Additional tab: Add relationship/entity
: Result: Label templates based on various records at once

DocumentsCorePack Template Designer for MSCRM 2015/2016 and Dynamics 365
Page 102 of 168
5.4.6 Define the remaining cells as label cells as well
Now you need to define the remaining cells as label cells as well. To do so, place your cursor in the first
cell and click on the [Duplicate Labels]-button in the www.mscrm-addons.com – tab.
The following dialog appears. Please click on the [Yes]-button to continue:
Well done! Now, this is how a possible result could look like. Please do not forget to Save your template
by clicking on the [Save template]-button in the www.mscrm-addons.com command bar.
Figure 110: Result: Label templates based on various records at once
Figure 109: DocumentsCorePack Information dialog

DocumentsCorePack Template Designer for MSCRM 2015/2016 and Dynamics 365
Page 103 of 168
5.5 How to create a relation from scratch
This “How to” describes how to create a relation from scratch with DocumentsCorePack Template
Designer. Basically, relations can be solved for 1:N (1:many) and N:N (many:many) relationships. All,
custom entities, as well as system entities, are supported.
5.5.1 Create a template
For further information on how to create a template, please have a look at CHAPTER 5.1 HOW TO CREATE
DOCUMENTSCOREPACK TEMPLATES ON PAGE 88. In our example, we will create a template for an Account
overview.
5.5.2 Insert some fields
For further information on how to insert fields, please have a look at chapter 5.1.2 STEP 2: INSERT FIELDS ON
PAGE 89. As you see below, we have inserted the following fields: <<accountid>> and <<name>>
5.5.3 Add a new relationship
Next, go to the additional tab and open the [Add Relationship/Entity]-drop down menu. There, select
Add New Relationship… For further information on the Additional tab, please have a look at chapter 1.7
ADDITIONAL-TAB ON PAGE 36.
Figure 111: Insert fields
Figure 112: Add new relationship

DocumentsCorePack Template Designer for MSCRM 2015/2016 and Dynamics 365
Page 104 of 168
In the so opened Configure Fields and Datasource-dialog, select a relationship you would like to insert ❶
and add some attributes by checking the boxes next to the attributes ❷
We decided to go with the Relationship Account -> Activity [regardingobjectid] and added the following
attributes: Activity, Actual End, Actual Start, Due Date.
As you can see, the resolved entities are now also visible in the Additional-tab of the Template Designer
and you could insert any of the fields into the document. But usually, there are more complex relationships
needed. That is why you may expand the complexity of the relationship by adding more levels.
Figure 113: Add a new relationship
1
2
Figure 114: Resolved fields

DocumentsCorePack Template Designer for MSCRM 2015/2016 and Dynamics 365
Page 105 of 168
5.5.4 Add further relationships
If you would like to add further relationships, please simply click on the [Edit]-button in the Additional-
tab.
This actions opens the Configure Fields and Datasource-dialog again, providing you with the former
established relationship. Please click on the [Add]-button ❶ and add another relationship ❷ here. We
decided to add Activity [activityid] -> Attachment [objected] and the entities Attachment Number, Entity,
File Name, Subject. ❸
Figure 115: Click on the [Edit]-button
Figure 116: Add another relationship
1
2
3

DocumentsCorePack Template Designer for MSCRM 2015/2016 and Dynamics 365
Page 106 of 168
As you can see, the resolved entities are now also visible in the Additional-tab of the Template Designer
and you could insert any of the fields into the document.
You may repeat these steps as often as you would like to in order to enhance the
complexity of your relationships.
Once you have created all the necessary relationships, you may enter the corresponding fields into your
template. Do not forget to save your template! Last but not least, test your template. Please have a look at
CHAPTER 5.2 HOW TO TEST YOUR TEMPLATE ON PAGE 94 in order to learn how to do so.
Figure 117: Additionally resolved fields

DocumentsCorePack Template Designer for MSCRM 2015/2016 and Dynamics 365
Page 107 of 168
5.6 How to create a relation to a separate entity (no relation)
This “How to” describes how to create a relation to a separate entity with DocumentsCorePack Template
Designer. Basically, the creation of a relation to a separate entity follows the same rules as the creation of
an entity from scratch with one exception. Therefore, in order to create a relation to a separate entity,
follow the steps in CHAPTER 5.5 HOW TO CREATE A RELATION FROM SCRATCH ON PAGE 103 carefully, but make sure
that change the following parameter when you select a new relationship: Instead of Relationships, check
Separate Entities ❶ in the Select existing Relation-section. The main difference is, that you will now be
provided with separate entities ❷ instead of relationships.
Figure 118: Insert separate entities
1
2

DocumentsCorePack Template Designer for MSCRM 2015/2016 and Dynamics 365
Page 108 of 168
5.7 How to create an aggregation fetch
This “How to” describes how to create an aggregation fetch. Aggregated fetches are a useful functionality
when you create templates. Please click here to get an overview on aggregation in DocumentsCorePack.
5.7.1 Open the Template Designer
For further information on how to open the Template Designer, please have a look at CHAPTER 1.2 HOW TO
OPEN THE DOCUMENTSCOREPACK TEMPLATE DESIGNER ON PAGE 11.
5.7.2 Open the Configure Fields and Datasource dialog
Next, select the entity type you would like to work on (here. Account), click on the Additional-tab and then,
on the [Add Relationship/Entity]-button. For further information on the Additional-tab, please have a
look at CHAPTER 1.7 ADDITIONAL-TAB ON PAGE 36.
5.7.3 Activate aggregation
In the so opened dialog, select a relationship in the drop down menu ❶ (in our example Account –>
Contact [parentcustomerid]) and check the activate aggregation ❷ functionality. Hit the [Yes]-button in
the now appearing DocumentsCorePack Warning - question dialog. ❸
Figure 119: Add Relationship/Entity
Figure 120: Activate aggregation
1
2
3

DocumentsCorePack Template Designer for MSCRM 2015/2016 and Dynamics 365
Page 109 of 168
5.7.4 Set the aggregation functionality
In the window that opens now, you may set certain aggregation functionalities. The attribute-drop down
menu enables you to select an attribute-field, while the aggregate/group by drop down menu provides
you with an overview of which aggregation functionalities can be applied to this particular field. Click on
the [OK]-button in order to proceed.
The aggregation functionalities depend on the attribute-field you select.
Figure 121: Set the aggregation functionality

DocumentsCorePack Template Designer for MSCRM 2015/2016 and Dynamics 365
Page 110 of 168
5.7.5 Insert the newly resolved relationship
Now click somewhere into your template and double-click the new relationship on the right side ❶ in
order to insert it. The relationship consists of two parts: Aging 30 (count)
While Aging 30 is the name of the field, the item in brackets explains the aggregation functionality that has
been applied to the relationship. However, insert your preferred table settings ❷ and click on the [OK]-
button in order to proceed.
5.7.6 The result
We decided to insert a table with a split header and a footer in our example. The resolved relationship has
been added to our template and may look similar to the below table.
<<address1_composite>>
When you have inserted all the fields you wanted to insert, make sure that you save your template. Next,
merge it with CRM data and test it if you want to. If you haven’t ever merged and/or tested a template
before, please have a look at CHAPTER 5.2 HOW TO TEST YOUR TEMPLATE ON PAGE 94.
Figure 122: Insert resolved relationship
1
2

DocumentsCorePack Template Designer for MSCRM 2015/2016 and Dynamics 365
Page 111 of 168
5.8 How to properly format an address block
This “How to” describes how to create and form an address block properly.
5.8.1 Create an address block with DocumentsCorePack Template Designer
In order to prepare an address block, you have to open the Template Designer, select your main entity and
insert the fields you want to be displayed in the block. (SEE CHAPTER 1.4.3 HOW TO CREATE
DOCUMENTSCOREPACK TEMPLATES, PAGE 88 FOR MORE INFORMATION ON HOW TO CREATE TEMPLATES AND INSERT FIELDS.)
If you have chosen for example “Account” and inserted all required fields, do not forget to save the
template! A possible result could look like this:
Figure 123: Example address block created with DocumentsCorePack Template Designer Standard-tab fields

DocumentsCorePack Template Designer for MSCRM 2015/2016 and Dynamics 365
Page 112 of 168
5.8.2 Choose your CRM Data and get your results
Once your template is saved, click on the [Choose CRM Data]-button. In the Name – field you can search
for the account you want to insert. Select the appropriate record and click on the [Select]-button in order
to continue.
If you check the Active Records – checkbox, only the active records will be displayed.
If not, you will be provided with all records (no matter if inactive or not).
Figure 124: Choose CRM data from MailMerge with Microsoft CRM Data dialog.

DocumentsCorePack Template Designer for MSCRM 2015/2016 and Dynamics 365
Page 113 of 168
5.8.3 Merged document with missing data – troubleshooting
Now after we have merged our template, we got a rather dissatisfying result, which is shown in Figure 93.
On the right side, you can see that there is lots of important data missing in the result. The reason
therefore is, that the data is also missing in the source, say, it has never been saved in Microsoft Dynamics
CRM/Dynamics 365 properly. That is why DocumentsCorePack cannot merge it. Now, how do we solve this
issue?
5.8.4 How to format an address block with missing data properly?
To format an address block, simply click in one of the fields you want to format and click on [Field
properties] in the www.mscrm-addons.com – tab and the String Properties dialog will open. For further
information on Field properties, please SEE CHAPTER 1.10 FIELD PROPERTIES, PAGE 55.
Figure 125: Template (left) vs Merged address block with missing information (right)
Figure 126: String properties dialog with template in the background

DocumentsCorePack Template Designer for MSCRM 2015/2016 and Dynamics 365
Page 114 of 168
The String Property dialog provides you with two options on how to proceed with empty lines:
❶ Activating this checkbox will delete the line/row if the
whole line/row is empty after the merge process.
❷ Activating this checkbox will delete the line/row if the
selected field is empty. If you, for example, select the
field <<address1_postalcode>> and activate this
checkbox, the line will be deleted if there was no data
stored in the postalcode-field in CRM. No matter if
there was data information in the field address1 or
or not.
All characters like hyphens, colons, commas, as well as words or additional text are
also counted as signs and therefore the whole line will not be deleted. Should you
stumble over such a case, simply check checkbox ❷.
Figure 127: String properties dialog
1
2

DocumentsCorePack Template Designer for MSCRM 2015/2016 and Dynamics 365
Page 115 of 168
5.9 How to Insert as Picture Field
Before you can insert a field as a picture field, you have to save at least one picture in your CRM.
Pictures can be saved as entity image (e.g. with “Contact” or “Account”) or as a note.
Once saved, pictures will be embedded into the future document as base 64 image.
Select this option if you know, that the document’s recipient has a bad or no internet
connection. Do not choose this option if you want to send a document with a lot of
images. (In this case rather use theHow TO INSERT AS PICTURE Link Field (PLEASE SEE AS WELL
CHAPTER 1.9.2 INSERT AS A PICTURE-LINK FIELD, PAGE 45)
However, as soon as you have saved at least one picture, you can start.
5.9.1 How to insert a picture that has been saved as entity image previously
Open the DocumentsCorePack Template Designer and select the entity you would like to work with, for
example Contact. Now look for entity image in the Standard Tab. The best way to do this is via the search.
Learn more about the search functionality in chapter 1.4.4 SEARCH WITH THE ATTRIBUTES TREEVIEW, PAGE 17.
Once you have found the field Entity Image, simply click on it and then click on the Insert Field Drop Down
Menu. There, select the option Insert ‘Entity Image’ as Picture Field. As soon as you have done so, a
placeholder will be displayed in your document. Once merged, the picture will be visible instead.
Figure 128 Insert ‘Entity Image’ as Picture Field

DocumentsCorePack Template Designer for MSCRM 2015/2016 and Dynamics 365
Page 116 of 168
5.9.2 How to insert a picture that has been saved as a note
Open the DocumentsCorePack Template Designer and select the entity you would like to work with, for
example Contact. Now open the Additional Tab and click on the [Add Relationship/Entity] – button.
(SEE CHAPTER 1.7.1 ADD RELATIONSHIPS/ENTITY, PAGE 37 FOR FURTHER INFORMATION).
Within the Configure fields and data source – window, set up a relation between your entity and the
location where you have saved your picture previously. To do so, select, for example, Contact -> Note in
the Relationship dropdown – menu. Then look for Note in the attributes’ section and mark the field. Press
the [OK]-button to proceed.
Figure 129 Configure Fields and data source – set up relation between entity and note

DocumentsCorePack Template Designer for MSCRM 2015/2016 and Dynamics 365
Page 117 of 168
Your previously created Contact <> Note relationship is now to be seen in the DocumentsCorePack
Template Designer Additional tab as a table. Click on the location in your template where you would like
to insert the picture, then click on Note and on Insert ‘Note’ as Picture Field.
The next dialog allows you to decide whether you want to insert the newly generated relation field as a
table or not. We decided not to do so in our example (that is why we marked the option Insert the field
from the first related record without a table, but you could as well customize the picture as a table. SEE
CHAPTER 5.1.4 STEP 3: INSERT THE TABLE, PAGE 91 for more information on how to format a table. However, click
on the [OK]-button in order to proceed.
Figure 130 Additional Tab – Contact <> Note relationship
Figure 131 Insert as picture field – insert new table dialog

DocumentsCorePack Template Designer for MSCRM 2015/2016 and Dynamics 365
Page 118 of 168
That’s it! You are provided with a beautiful placeholder, which will be replaced by the picture in the future
document.
Figure 132: Insert as picture field – Placeholder

DocumentsCorePack Template Designer for MSCRM 2015/2016 and Dynamics 365
Page 119 of 168
5.10 How to Insert as Picture Link Field
Before you can insert a field as a picture-link-field, you have to save at least one link to a certain picture in
a random text-field in your CRM.
Select this option if you want to create a document that will contain lots of pictures.
Due to the functionality of this insert as-option, the documents’ size will be smaller
than the size of a document that had its pictures directly inserted. This option is also
very useful if you use pictures in your document that are subject to seasonal changes.
Do not use this option if you know that the recipient has a bad or no internet
connection (In this case rather use the INSERT AS PICTURE FIELD OPTION – SEE CHAPTER 1.9.1 INSERT AS PICTURE
FIELD PAGE 44.)
However, as soon as you have saved at least one picture-link, you can start.
5.10.1 How to insert a picture that has been saved as picture-link previously
We have saved our picture-link in the description-field previously in Microsoft Dynamics CRM/Dynamics
365. You can save your picture-link in any available text-field in your CRM. However, please do not forget
to save your changes.
Figure 133: Add link as picture link to the description field

DocumentsCorePack Template Designer for MSCRM 2015/2016 and Dynamics 365
Page 120 of 168
Once you have created such a save-location, open the DocumentsCorePack Template Designer and select
the entity you would like to work with. We use the entity Account and the field Description in this example.
Now look for the field in which you have saved the picture link previously in the Standard Tab. The best
way to do this is via the search. Learn more about the search functionality in chapter 1.4.4 SEARCH WITH THE
ATTRIBUTES TREEVIEW, PAGE 17.
Click on the location in your template where you would like to insert the picture, then click on Description
and on Insert ‘Description’ as Picture-Link-Field. (At least, that is what we do in our example – if you have
saved your picture-link in another location, you must enter the corresponding field.)
That’s it! You are provided with a beautiful placeholder, which will be replaced by the picture in the future
document.
Figure 134: Insert the description-field as picture-link-field

DocumentsCorePack Template Designer for MSCRM 2015/2016 and Dynamics 365
Page 121 of 168
5.11 How to insert as document
Before you can insert a field as document, you have to save at least document as a note in your CRM.
This option can only be executed in the Additional tab. For further information about
the additional tab, please have a look at CHAPTER 1.7 ADDITIONAL-TAB ON PAGE 36.
Once you have saved a document as a note in your CRM, you can proceed.
5.11.1 Set up a relationship between your entity and the documents’ save location
Open the DocumentsCorePack Template Designer and select the entity you would like to work with, for
example Account. Now open the Additional Tab and click on the [Add Relationship/Entity] – button.
(SEE CHAPTER 1.7.1 ADD RELATIONSHIPS/ENTITY, PAGE 37 FOR FURTHER INFORMATION).
Within the Configure fields and data source – window, set up a relation between your entity and the
location where you have saved your document previously. To do so, select, for example, Account -> Note
in the Relationship dropdown – menu. Then look for Note in the attributes’ section and mark the field.
Press the [OK]-button to proceed. (In chapter 5.9.2 HOW TO INSERT A PICTURE THAT HAS BEEN SAVED AS A NOTE
PAGE 116, we provide you with an example on how to resolve such a relationship correctly.)
5.11.2 Insert as document
As soon as you have created your note, click on Insert ‘Note’ as document in the Additional Tab.
Figure 135: Additional Tab – Contact <> Note relationship – Insert as Document

DocumentsCorePack Template Designer for MSCRM 2015/2016 and Dynamics 365
Page 122 of 168
You will be asked to select a source field for your embedded document. In our example there is only one
possible source field (Note) because we have only saved one document. But if you had saved more than
one document, we could have selected our field source in this field. Click on the [OK]-button in order to
proceed.
The next dialog allows you to decide whether you want to insert the newly generated relation field as a
table or not. We decided to do so in our example (that is why we marked the option Insert a new Table
with a row per related record, but you could as well use another option. SEE CHAPTER 5.1.4 STEP 3: INSERT THE
TABLE, PAGE 91 for more information on how to format a table. However, click on the [OK]-button in order
to proceed.
Figure 136: Field properties – insert note as source field
Figure 137: Insert document: Insert document as table or not?

DocumentsCorePack Template Designer for MSCRM 2015/2016 and Dynamics 365
Page 123 of 168
That’s it! You are provided with a placeholder and a table.
Figure 138: Insert document – placeholder

DocumentsCorePack Template Designer for MSCRM 2015/2016 and Dynamics 365
Page 124 of 168
5.12 How to Insert as HTML
Before you can insert a field as HTML, you have to save the HTML code in your CRM.
CRM offers a field that is called ‘HTML’ description. You must save the
HTML-code there.
Open the DocumentsCorePack Template Designer and select the entity you would like to work with, for
example Account. Now look for HTML-description in the Standard Tab. The best way to do this is via the
search. Learn more about the search functionality in chapter 1.4.4 SEARCH WITH THE ATTRIBUTES TREEVIEW, PAGE
17.
Once you have found the field HTML-description, simply click on it and then click on the Insert Field Drop
Down Menu. There, select the option Insert ‘HTML_description’ as HTML. As soon as you have done so, a
placeholder will be displayed in your document.
Figure 139: Insert HTML_description as HTML field
DocumentsCorePack Template Designer for MSCRM 2015/2016 and Dynamics 365
Page 125 of 168
5.13 How to insert as static item
Insert Static Item contains the following submenus:
Static Document (SEE 5.14 HOW TO INSERT AS STATIC DOCUMENT)
Page Break (SEE 5.15 HOW TO INSERT PAGE BREAK)
Remove Empty Lines (SEE 5.16 HOW TO INSERT REMOVE EMPTY LINES)
Join Tables (SEE 5.17 HOW TO INSERT JOIN TABLES)
5.14 How to insert as static document
Before you can insert a field as static document, make sure that you have saved
some documents before.
5.14.1 Use the Insert static document option
Select a type in the type selector of the standard tab, press insert field, hit insert static document and select
static document.
5.14.2 Select a document to insert
At this point you have two options: You can either select a sub template and provide the necessary field as
a merge parameter or you can skip this step and select a static document only (which does not require
parameters for merging).
Figure 140: Insert static item drop down menu

DocumentsCorePack Template Designer for MSCRM 2015/2016 and Dynamics 365
Page 126 of 168
OPTIONAL: Provide a merge parameter
Select an ID-field from the TreeView (for example Contact) and check the Provide the selected field as
parameter-checkbox.
Figure 141: Static document properties – provide
a parameter

DocumentsCorePack Template Designer for MSCRM 2015/2016 and Dynamics 365
Page 127 of 168
If you do not want to provide the selected field as parameter, simply hit the [Select Document]-button
and select a sub template or a static document in the Look Up Record that opens afterwards.
Figure 142: Click [Select Document] and a Look Up Record Dialog will open

DocumentsCorePack Template Designer for MSCRM 2015/2016 and Dynamics 365
Page 128 of 168
5.14.3 Get the results
The name of the selected template is now to be seen in the new window. Click the [OK]-button to apply
the new window. To ensure that your future document has the desired formatting, the static document
dialog provides you with two formatting options:
a) Suppress additional Line breaks (unnecessarily set line breaks will be suppressed)
b) Keep formatting of source document (the source documents’ formatting will be kept)
Make sure that you check the corresponding checkbox next to the formatting options in order to execute
it on the future document.
Now – that’s it!
Figure 143: Insert static document dialog with result in the background

DocumentsCorePack Template Designer for MSCRM 2015/2016 and Dynamics 365
Page 129 of 168
5.15 How to insert Page Break
In order to use this functionality to its full extends, you need to open an existing
template or to create a new one.
5.15.1 Select the Page Break option in the insert fields drop down menu
Please place your cursor where you want to have the page break. Now click on Page Break in the insert
fields drop down menu and that’s it! A placeholder is displayed until you merge the document.
Figure 144: Select Page Break in the insert fields drop down menu

DocumentsCorePack Template Designer for MSCRM 2015/2016 and Dynamics 365
Page 130 of 168
5.16 How to insert Remove Empty Lines
In order to use this functionality to its full extends, you need to open an existing
template or to create a new one.
5.16.1 Select the Remove Empty Lines option in the insert fields drop down menu
Please place your cursor where you want to have the empty lines removed. Now click on Remove Empty
Lines in the insert fields drop down menu and that’s it! A placeholder is displayed until you merge the
document. As a result, every empty line is deleted and the document is structured in a proper way.
Figure 145: Select Remove Empty Lines in the insert fields drop down menu

DocumentsCorePack Template Designer for MSCRM 2015/2016 and Dynamics 365
Page 131 of 168
5.17 How to insert Join tables
In order to use this functionality to its full extends, you need to open an existing
template or to create a new one that includes a table.
5.17.1 Select the Join tables option in the insert fields drop down menu
Please place your cursor where you want to have tables joined. Now click on Join tables in the insert fields
drop down menu and that’s it! A placeholder is displayed until you merge the document. As a result, tables
are joined and structured in a proper way.
Figure 146: Select Join Tables in the insert fields drop down menu

DocumentsCorePack Template Designer for MSCRM 2015/2016 and Dynamics 365
Page 132 of 168
5.18 How to insert computed items
“Insert Computed Item contains the following submenus:
QR Code (SEE CHAPTER 5.19 HOW TO INSERT QR CODES PAGE 133)
Advanced String (SEE CHAPTER 5.20 HOW TO INSERT AN ADVANCED STRING PAGE 135)
Calculated Field (SEE CHAPTER 5.21 HOW TO INSERT CALCULATED FIELDS PAGE 137)
Hyperlink (SEE CHAPTER 5.22 HOW TO INSERT HYPERLINK PAGE 139)
It is crucial that the used CRM-fields contain numbers!

DocumentsCorePack Template Designer for MSCRM 2015/2016 and Dynamics 365
Page 133 of 168
5.19 How to insert QR Codes
The following description will show you how to insert QR Codes properly.
5.19.1 Use the Insert computed item option
Press insert field, hit insert computed item and select QR Code.
5.19.2 Create a QR code
Define your QR code pattern. The used text will be transformed into a QR-code. The syntax for this field is
described in chapter 3.1 DOCUMENTSCOREPACK CLIENT PROPERTY SYNTAX, PAGE 66.
Figure 147: Select QR Code in the Insert Field section
Figure 148: QR Code properties

DocumentsCorePack Template Designer for MSCRM 2015/2016 and Dynamics 365
Page 134 of 168
5.19.3 QR Code options
The QR Code Level
shows the displayed level of the QR-Code. The default setting detects the smallest value.
If e.g.: the value of this option is set with 5 with a maximum sign-length of 108, then only 108 signs will be
displayed. All signs that exceed the maximum length are cut.
The Error Correction
defines the capacity and fault tolerance of the QR-code. The value shows the amount that can be restored
in percent.
The available options are:
- Level L =7 % of the code words/data can be recovered
- Level M = 15 % of the code words/data can be recovered
- Level Q = 25 % of the code words/data can be recovered
- Level H = 30 % of the code words/data can be recovered
The Max Length is not editable and depends on the above settings.
5.19.4 Don’t forget to save your template
Click on the [OK]-button in the QR Code properties field and you will be provided with a beautiful
placeholder for your future QR-Code.
Figure 150: QR Code placeholder
Figure 149: QR Code options

DocumentsCorePack Template Designer for MSCRM 2015/2016 and Dynamics 365
Page 135 of 168
5.20 How to insert an Advanced String
The following description will show you how to insert Advanced Strings properly.
5.20.1 Use the Insert Computed item option
Press insert field, hit insert computed item and select Advanced String.
5.20.2 Create your Advanced String
Define your link pattern here. The used text will be transformed into an Advanced String. The syntax for
this field is described in chapter 3.1 DOCUMENTSCOREPACK CLIENT PROPERTY SYNTAX, PAGE 66.
Optionally, you can set a placeholder name for
your field (so the template is easier to find if
you want to modify it in the future).
Figure 151: Select Advanced String in the Insert Field section
Figure 152: Advanced String properties

DocumentsCorePack Template Designer for MSCRM 2015/2016 and Dynamics 365
Page 136 of 168
5.20.3 Advanced String formatting options
Delete line/row if whole line/row is empty
will delete each line/row that is empty if checked
Delete line/row if this field is empty
Will delete the whole line/row (no matter if empty or not)
if this field is empty
5.20.1 Don’t forget to save your template
Click on the [OK]-button in the Advanced String properties field and you will be provided with a beautiful
placeholder for your future String.
Figure 153: Advanced String formatting options
Figure 154: The example shows two inserted advanced strings: One inserted with PLACEHOLDER function, one without.

DocumentsCorePack Template Designer for MSCRM 2015/2016 and Dynamics 365
Page 137 of 168
5.21 How to insert Calculated Fields
Computed fields allow you to do calculations based on CRM data.
5.21.1 Use the insert computed field option
Press insert field, hit insert computed item and select Calculated field.
5.21.2 Create your calculation
Define your calculation pattern. The syntax for this field supports the basic arithmetic operations. Other
than the usual DocumentsCorePack syntax, numeric values are added without single quotes. For further
information on the syntax, please have a look at chapter 3.1 DOCUMENTSCOREPACK CLIENT PROPERTY SYNTAX,
PAGE 66.
Figure 155: Select Calculated field in the Insert Field section
Figure 156: Computed field properties -
insert calculation

DocumentsCorePack Template Designer for MSCRM 2015/2016 and Dynamics 365
Page 138 of 168
5.21.3 Additional options
Placeholder Text
Optionally, you can set a placeholder name for your field
(so the template is easier to find if you want to modify it
in the future).
Example
In the example field, an example is shown that includes
your selected formatting options.
Format
Applies a special format to your calculation (for example,
a certain percentage)
Culture
Applies a certain culture to your calculation
5.21.4 Don’t forget to save your template
Click on the [OK]-button in the Computed field properties field and you will be provided with your
calculated field.
Figure 157: Formatting options
Figure 158: The example shows two inserted calculated fields: One inserted with PLACEHOLDER function, one without.

DocumentsCorePack Template Designer for MSCRM 2015/2016 and Dynamics 365
Page 139 of 168
5.22 How to insert Hyperlink
This option allows you to define a patter for a dynamically created link.
5.22.1 Use the insert computed item option
Press insert field, hit insert computed item and select Hyperlink.
5.22.2 Compose your link
Select the Link tab and define your Hyperlink pattern. For further information on the syntax, please have a
look at chapter 3.1 DOCUMENTSCOREPACK CLIENT PROPERTY SYNTAX, PAGE 66.
Figure 159: Select Hyperlink in the Insert Field section
Figure 160: Hyperlink properties window

DocumentsCorePack Template Designer for MSCRM 2015/2016 and Dynamics 365
Page 140 of 168
5.22.3 Additional options
Placeholder Text
Optionally, you can set a placeholder name for your field
(so the template is easier to find if you want to modify it
in the future).
Show when one if the used fields is empty
Display the link even if one of the fields does not return data
Delete Row/Line if hyperlink is empty
Remove the link completely if there is no data returned.
5.22.4 Don’t forget to save your template
Click on the [OK]-button in the Hyperlink properties field and you will be provided with the result.
Figure 161: Additional hyperlink options
Figure 162: The example shows two inserted hyperlinks: One inserted with the PLACEHOLDER function, one without.

DocumentsCorePack Template Designer for MSCRM 2015/2016 and Dynamics 365
Page 141 of 168
5.23 How to modify Field Properties
Fields can be inserted in many different ways. The following two tutorials will show you how to insert a
custom date format and a 16-digits number. Please have a look at CHAPTER 1.10 FIELD PROPERTIES ON PAGE 55
for some general information on field properties.
5.23.1 How to define a custom date format
Data fields, like the Created on can be displayed in different formats.
In order to configure them, you are able to select a format and a culture in the corresponding drop down
menu. For further information, have a look at CHAPTER 1.10.2 DATE FIELDS ON PAGE 56.
In case none of the predefined formats covers your needs, you can define your own, based on specific
formatting rules. To do so, simply type the formatting characters directly into the Format-field.
The format is case sensitive.
As soon as you have inserted a custom date, an example will appear in the Example-field.
Please find a table with an overview on all possible customizations for data fields in CHAPTER 3.2.1 DATE
FIELDS ON PAGE 72. Besides, you may also change the culture. Please find an overview of all possibilities in
CHAPTER 3.2.3 CULTURES ON PAGE 76.
Figure 163: Field properties – Create a custom data field

DocumentsCorePack Template Designer for MSCRM 2015/2016 and Dynamics 365
Page 142 of 168
5.23.2 How to create a custom 16-digits number field
Number fields like discountamount_base can as well be displayed in different formats.
In order to configure them, you are able to select a format and a culture in the corresponding drop down
menu. For further information, please have a look at CHAPTER 1.10.3 NUMBER FIELDS ON PAGE 59.
In case none of the predefined formats covers your needs, you can define your own, based on specific
formatting rules. To do so, simply type the formatting characters directly into the Format-field.
The format is case sensitive.
As soon as you have changed the format, an example will appear in the Example-field.
Please find a table with an overview on all possible customizations for number fields in CHAPTER 3.2.2
NUMBER FIELDS ON PAGE 75. Besides, you may also change the culture. Please find an overview of all
possibilities in CHAPTER 3.2.3 CULTURES ON PAGE 76.

DocumentsCorePack Template Designer for MSCRM 2015/2016 and Dynamics 365
Page 143 of 168
5.24 How to add relationships
This functionality enables you to add a relationship to a certain entity in Microsoft Dynamics
CRM/Dynamics 365.
5.24.1 Open the Configure fields and data source dialog
The [Add Relationship/Entity]-button also includes buttons that allow its users to add a new relationship
or to manage existing relationships and tables. For further information on how to manage tables, please
have a look at CHAPTER 2.1 MANAGE TABLES, PAGE 62.
Figure 164: Add New Relationship…

DocumentsCorePack Template Designer for MSCRM 2015/2016 and Dynamics 365
Page 144 of 168
Clicking the [Add New Relationship…]-button opens the dialog shown below. Within it, you can
configure fields, tables and relationships that are important for your document.
Figure 165: Add New Relationship… - Configure Fields and data source dialog
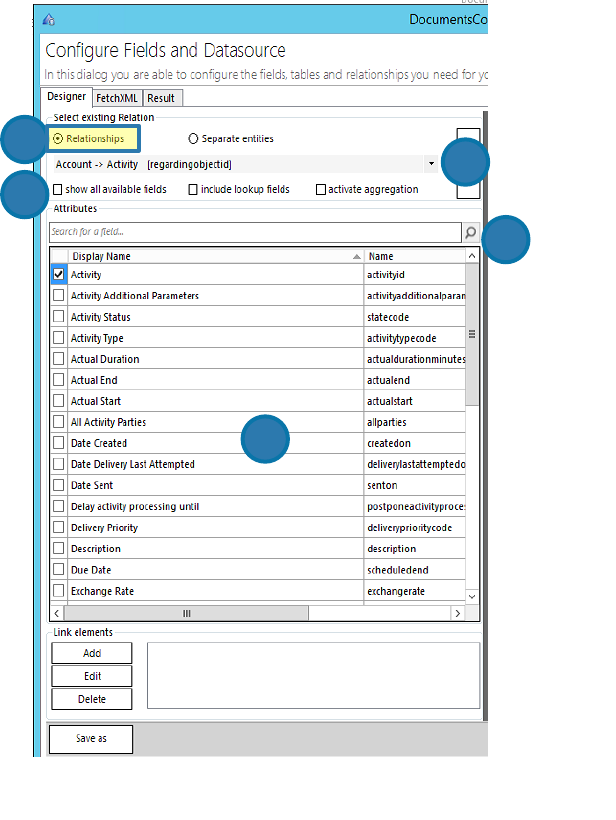
DocumentsCorePack Template Designer for MSCRM 2015/2016 and Dynamics 365
Page 145 of 168
5.24.2 Add a new relationship
Adding a new relationship mostly requires the left part of the Configure fields and data source dialog
(except for the [OK]-button that adds the relationship which you find at the right side of the Configure
Fields and data source dialog.)
❶ Make sure that you have selected
Relationships in order to create a
relationship. Marking Separate Entities
would create entities that have no
filter applied. If you want to do so,
please have a look at chapter 5.25
HOW TO ADD A SEPARATE ENTITY ON PAGE
147.
❷ Look for the relationship you want
to establish in the drop down menu.
❸ The 3 options allow you to modify
the displayed fields.
Check show all available fields if you
want all available fields to be
displayed.
Check include lookup fields if you want
lookup fields to be added to your
results.
Check activate aggregation if you want
to use the aggregation functionality. For further information on the aggregation functionality, have a look
at 1.8.1 AGGREGATION, PAGE 40.
❹ The attributes list view shows all attributes that can be applied to your relationship. Select the ones you
would like to add by checking the checkbox in front of the attribute.
❺ The search-functionality allows you to search for attributes.
Figure 166: Add New Relationship - Configure Fields and data source dialog section
3
2
1
4
5

DocumentsCorePack Template Designer for MSCRM 2015/2016 and Dynamics 365
Page 146 of 168
5.24.3 Get the result
Click on the [OK]-button in the Configure fields and data source dialog and you will be provided with the
following dialog. Here, you can modify the new table. Please have a look at CHAPTER 5.1.4 STEP 3: INSERT THE
TABLE, ON PAGE 91 for details.
As soon as you have decided how you would like to insert your new table, click on the [OK]-button. We
decided to insert the field from the first related record without a table, so you can see that there exists also
the possibility to insert the fields without table-function. You are provided with a new table ❶. If you
move your mouse cursor over Activity, a Boolean field ❷ is displayed. It contains all the information
regarding to the relation. A click on the [Insert field]-button inserts the result (a placeholder ❸) into your
template.
Figure 167 – Insert new table
3
2
1
Figure 168 – Add new relationship – result

DocumentsCorePack Template Designer for MSCRM 2015/2016 and Dynamics 365
Page 147 of 168
5.25 How to add a separate entity
When you add a separate entity, you must be well aware, that the so added entity
does not have any filter applied. If you use this option, you have to add the filter
manually.
In order to add a separate entity, follow the steps shown in CHAPTER 5.24
HOW TO ADD RELATIONSHIPS, PAGE 143, but take care to check the Separate
entities option in the Select existing relation part of the dialog and to add
a filter manually (see next chapter).
5.25.1 How to add the filter manually
To add a filter manually, click on the [Add]-button in the filter section (1). Then select which type of
condition you would like to apply (2) and click on the [Add]-button (3) in order to set the conditions
attributes and values. Have a look at chapter 3.1 DOCUMENTSCOREPACK CLIENT PROPERTY SYNTAX ON PAGE 66 to
learn more about the DocumentsCorePack syntax settings.
Figure 169 – Configure fields – separate
entities section
4
3
2
1
Figure 170 – Configure fields and entities dialog: Add filter manually

DocumentsCorePack Template Designer for MSCRM 2015/2016 and Dynamics 365
Page 148 of 168
6 DocumentsCorePack Template Designer Settings
The DocumentsCorePack Settings summarize application settings for both intended usages of the client.
This chapter will only cover the settings that are of interest for the Template Designer functionality.
The DocumentsCorePack Settings can be accessed from within the Word Ribbon.
The settings are grouped in several sections. This guide will only explain some of the options that are
available in the general and advanced section.
Figure 171: Microsoft Office Word with mscrm-addons.com Ribbon – Documents Core Pack Settings
Figure 172: Documents Core Pack Settings

DocumentsCorePack Template Designer for MSCRM 2015/2016 and Dynamics 365
Page 149 of 168
6.1 General
The general section contains several settings for the DocumentsCorePack client.
❶ Default Entity
The default entity is the entity that is automatically selected in the task pane. (Please SEE CHAPTER 1.3 THE
DOCUMENTSCOREPACK TEMPLATE DESIGNER USER INTERFACE (STANDARD) ON PAGE 12)
❷ Ribbon Settings
With the Ribbon settings you can change the layout of the www.mscrm-addons.com-ribbon. If you don’t
want to see the client functionality at all you can disable the “Send as PDF” or “Save Document” options.
This can be also set on a global setting for all DCP client users.
1
2
3
Figure 173: Documents Core Pack Settings - General

DocumentsCorePack Template Designer for MSCRM 2015/2016 and Dynamics 365
Page 150 of 168
❸ Activate Debugging
In case you experience problems with DocumentsCorePack you might be asked to enable debugging for
the client. This setting will start tracing and write logging information into the log folder location
(“%temp%\DCP\Logs). Additionally, the ribbon will be extended with debugging options. You can open
the log folder location form there and also single log files.
6.1.1 Advanced
The advanced options are more specific options
1
2
3
4
5
6
7
Figure 175: DocumentsCorePack Settings - Advanced
Figure 174: Word Ribbon with Debugging options

DocumentsCorePack Template Designer for MSCRM 2015/2016 and Dynamics 365
Page 151 of 168
❶ Once checked, the aggregation switch warning is not shown again. For further information on
aggregation fetches, please have a look at CHAPTER 5.7 HOW TO CREATE AN AGGREGATION FETCH, PAGE 108.
❷ Once checked, the template type selection message is not displayed again in the beginning. The type
selection message enables you to select between .dot and .docx templates. We recommend you to stick
with the .docx templates.
❸ When checked, insert bool is not displayed as checkbox message.
❹ When checked, metadata from CRM is updated automatically. We recommend this box to be checked
because you do not have to update the metadata manually each time it has changed.
❺ Once checked, you are notified if your metadata should have changed.
❻ When checked, destination style is preferred for bulk merge.
❼ When checked, a blank is automatically inserted when a field is inserted and emails are automatically
sent as carbon copy.
Options ❶ to ❸ are only enabled when the “Do not show again” option was set
once on for any of these dialogs.
Figure 176: DocumentsCorePack Template Designer type selection message
DocumentsCorePack Template Designer for MSCRM 2015/2016 and Dynamics 365
Page 152 of 168
7 General Word functionality that is referenced in this guide
Within this chapter, you find some word short How-To’s related to Word functionalities that could be
useful in order to work with templates.

DocumentsCorePack Template Designer for MSCRM 2015/2016 and Dynamics 365
Page 153 of 168
7.1 How to insert a Watermark
Watermarks can be viewed only in Print Layout and Full Screen Reading views and on the printed page.
You can insert a predesigned watermark from a gallery of watermark text, or you can insert a watermark
with custom text.
How to
On the Page Layout tab, in the Page Background group, click Watermark.
Do one of the following:
Click a predesigned watermark, such as Confidential or Urgent, in the gallery of watermarks.
Click Custom Watermark, click Text watermark and then select or type the text that you want. You can
also format the text. To view a watermark as it will appear on the printed page, use Print Layout view.
Source: https://support.office.com/en-us/article/Insert-a-watermark-or-change-a-watermark-f90f26a5-
2101-4a75-bbfe-f27ef05002de
For further information on watermarks have a look at https://support.office.com/en-us/article/Insert-a-
watermark-or-change-a-watermark-f90f26a5-2101-4a75-bbfe-f27ef05002de

DocumentsCorePack Template Designer for MSCRM 2015/2016 and Dynamics 365
Page 154 of 168
7.2 How to work with field functions
Insert a field
1. Click where you want to insert a field.
2. On the Insert tab, in the Text group, click Quick Parts, and then click Field.
3. In the Categories list, select a category.
4. In the Field names list, select a field name.
5. Select any properties or options that you want.
If you want to see the codes for a particular field in the Field dialog box, click Field Codes.
To nest a field within another field, first insert the outer, or container, field, by using the Field dialog box. In
your document, place the insertion point inside the field code where you want to insert the inner field. Then
use the Field dialog box to insert the inner field.
If you know the field code for the field that you want to insert, you can also type it directly in your
document. First press CTRL+F9, and then type the code within the brackets.
Source: https://support.office.com/en-US/article/Insert-and-format-field-codes-in-Word-2010-7E9EA3B4-
83EC-4203-9E66-4EFC027F2CF3#bm1
For further information on fields, please have a look at https://support.office.com/en-US/article/Insert-
and-format-field-codes-in-Word-2010-7E9EA3B4-83EC-4203-9E66-4EFC027F2CF3#bm1

DocumentsCorePack Template Designer for MSCRM 2015/2016 and Dynamics 365
Page 155 of 168
7.3 CRM SharePoint Integration
Microsoft SharePoint Server is a collaboration and content management application that simplifies how
people store, find, and share information. It helps people to collaborate effectively by having secure access
to documents and information that they require to make business decisions.
The SharePoint integration feature enables you to store and manage documents on SharePoint in the
context of a Microsoft Dynamics CRM/Dynamics 365 record, and use the SharePoint document
management abilities in Microsoft Dynamics CRM/Dynamics 365, such as checking the document in and
out, viewing version history, and changing document properties.
Source: https://msdn.microsoft.com/en-us/library/gg334768.aspx
For more information on CRM SharePoint Integration please have a look at
https://msdn.microsoft.com/en-us/library/gg334768.aspx

DocumentsCorePack Template Designer for MSCRM 2015/2016 and Dynamics 365
Page 156 of 168
7.4 What is CRM Metadata
Microsoft Dynamics CRM 2016, Microsoft Dynamics CRM Online and Dynamics 365 uses a metadata
driven architecture to provide the flexibility to create custom entities and additional system entity
attributes. This structure also makes upgrades and the transportation of customizations easier. The data
structure can change without requiring any change to code in the Microsoft Dynamics CRM server, client
or Dynamics 365 applications.
Source: https://msdn.microsoft.com/en-us/library/gg309434.aspx
For more information on CRM Metadata, please have a look at: https://msdn.microsoft.com/en-
us/library/gg309434.aspx

DocumentsCorePack Template Designer for MSCRM 2015/2016 and Dynamics 365
Page 157 of 168
7.5 Location of files
There are three major save locations for files that are used by the DocumentsCorePack Client.
The CRM numbers in the below paths are displayed as “20XX”, because the path
depends on the CRM version you are currently using. Please insert your version
number instead of the “XX”. (For example: For CRM 2015, insert 15 instead of XX).
If you upgrade from an older version, the DCP version number can change too.
7.5.1 The installation directory
The installation files of DocumentsCorePack can be found here:
C:\Program Files\PTM EDV-Systeme GmbH\Documents Core Pack Client for MS CRM 20XX.
Alternatively:
C:\Program Files(x86)\PTM EDV-Systeme GmbH\Documents Core Pack Client for MS CRM 20XX
(depending on your Windows and Office version)
If you have changed the installation path during the installation process you will find the files there.
This directory contains the needed assemblies and resources.
Do NOT ever delete, change or modify any files in this location.
7.5.2 The application directory
The application data location can be found here: %APPDATA%\DCP
The above location is equal to C:\Users\[YourUsername]\AppData\Roaming\DCP.
This location may contain volatile subfolders and documents. The most important subfolder here is called
metadata. This folder contains the metadata information of your CRM organization(s).
7.5.3 The temporary directory
The application data location can be found here: %TEMP%\DCP
The above location is equal to C:\Users\[YourUsername]\AppData\Local\Temp\DCP
This location contains temporary files, like for example downloaded templates. The most important
subfolder in this location is the subfolder log, which contains debug files if debugging is enabled.

DocumentsCorePack Template Designer for MSCRM 2015/2016 and Dynamics 365
Page 158 of 168
8 DCP Diagnostics
The DCP Diagnostics is an extended application that troubleshoots issues with the DocumentsCorePack
Client. It can be found in the installation folder of DocumentsCorePack (for further information, please
have a look at CHAPTER 7.5.1 THE INSTALLATION DIRECTORY ON PAGE 157).
The name of the application in this folder is DCPDiagnostics.exe.
If you are no local administrator, some functionalities of the tool may not work
properly. Executing the program as administrator avoids any issues.
If you are no administrator, you will get the below error message when you click on DCPDiagnostics.exe.
Simply click on the [Yes]-button in order to proceed.
You will be then forwarded to the DCP Diagnostics surface.
Figure 177 – Warning message

DocumentsCorePack Template Designer for MSCRM 2015/2016 and Dynamics 365
Page 159 of 168
8.1 The DCP Diagnostics surface
The DCP Diagnostics surface consists of 3 tabs: Diagnostics, System Information and Tools.
The functionality of the different tabs is displayed in the next chapters.
8.1.1 THE DIAGNOSTICS – TAB
The tab provides you with a general overview.
❶ DIAGNOSTICS
The tab offers a short overview of the most important system settings required by DCP.
The information regarding the system ❷ is displayed in different colors:
Green = OK
Orange = still quite OK, but not in a green way and not as bad as a red alert
Red = Action might be needed (there might be some trouble, but it’s not clear yet)
❸ THE [REPAIR]-BUTTON
Serves as a kind of fast repair, if a red/orange alert occurs.
❹ THE [RE-RUN]-BUTTON
Starts the repair process once again
1
2
3
Figure 178 The DCP Diagnostics-tab
4

DocumentsCorePack Template Designer for MSCRM 2015/2016 and Dynamics 365
Page 160 of 168
8.1.2 The System Information-tab
The tab provides you with a quick overview of the operating system version, the Browser version, the Net
framework version, the Office version, the DCP version etc. …
8.1.3 The Tools-tab
Provides you with a little collection of tools that support you when you need some troubleshooting.
Figure 179 The System Information-tab
Figure 180 The Tools-tab
DocumentsCorePack Template Designer for MSCRM 2015/2016 and Dynamics 365
Page 161 of 168
9 References
MSDN. (n.d.). Retrieved from https://msdn.microsoft.com: https://msdn.microsoft.com/en-
us/library/gg328332.aspx

DocumentsCorePack Template Designer for MSCRM 2015/2016 and Dynamics 365
Page 162 of 168
10 Glossary
Attribute
An attribute is a container for a piece of data in an entity. Microsoft Dynamics CRM/Dynamics 365
supports a wide variety of attribute types.
SharePoint
SharePoint is a web application platform in the Microsoft Office server suite. SharePoint combines various
functions. In combination with Microsoft Dynamics CRM/Dynamics 365 the document management is in
focus.
SharePoint Metadata
The document management capability of SharePoint allows you to define
CRM MetaData
Microsoft Dynamics CRM 2016, Microsoft Dynamics CRM Online and Dynamics 365 uses a metadata
driven architecture to provide the flexibility to create custom entities and additional system entity
attributes. This structure also makes upgrades and the transportation of customizations easier. The data
structure can change without requiring any change to code in the Microsoft Dynamics CRM/Dynamics 365
server or client applications.
Relationship
A relationship defines an association between two entities: one-to-many, many-to-one, many-to-many,
and self-referential.
Entity
An entity is a container for data, similar to a table in a traditional database. Each entity contains a set of
attributes. For Microsoft Dynamics CRM/Dynamics 365, there are a set of entities that exist when you first
install. Some of these are customizable. In addition, you can create custom entities to contain business
data.
Form Fields
https://msdn.microsoft.com/en-us/library/gg309434.aspx
Watermarks
Watermarks are text or pictures that appear behind document text. They often add interest or identify the
document status, such as marking a document as a Draft. You can see watermarks in Print Layout view and
Full Screen Reading view or in a printed document.
(Source: https://support.office.com/en-us/article/Insert-a-watermark-or-change-a-watermark-f90f26a5-
2101-4a75-bbfe-f27ef05002de)
DocumentsCorePack Template Designer for MSCRM 2015/2016 and Dynamics 365
Page 163 of 168
11 Table of Figures
Figure 1: Microsoft Office Word with mscrm-addons.com Ribbon .................................................................................. 9
Figure 2: www.mscrm-addons.com tab details ....................................................................................................................... 10
Figure 3: www.msccrm-addons.com tab ................................................................................................................................... 11
Figure 4: Office Open XML (docx) question ............................................................................................................................. 11
Figure 5: DocumentsCorePack Template Designer Taskpane in Word ......................................................................... 11
Figure 6: DocumentsCorePack Template Designer UI - Standard tab ........................................................................... 12
Figure 7: Type selector ...................................................................................................................................................................... 13
Figure 9: Standard fields .................................................................................................................................................................. 14
Figure 9: Standard fields of look up ............................................................................................................................................ 14
Figure 10: Treeview in the Additonal Tab .................................................................................................................................. 14
Figure 11: Tooltip of field................................................................................................................................................................. 15
Figure 12: Insert fields buttons ...................................................................................................................................................... 16
Figure 13: Insert fields drop down computed items ............................................................................................................. 16
Figure 14: Insert Fields drop down .............................................................................................................................................. 16
Figure 15: Attributes Treeview - Search ..................................................................................................................................... 17
Figure 16: Treeview - Search result .............................................................................................................................................. 17
Figure 17: Taskpane settings .......................................................................................................................................................... 18
Figure 18: Tooltip of field in the attributes tree view ........................................................................................................... 18
Figure 19: Fields without Displayname (top) and used fields (bottom) ........................................................................ 19
Figure 20: Advanced Template Settings button ..................................................................................................................... 20
Figure 21: Templates settings categories .................................................................................................................................. 20
Figure 22: Document Name and Subject .................................................................................................................................. 21
Figure 23: Example of the DocumentName after a merge................................................................................................. 21
Figure 24: Template Settings - General ...................................................................................................................................... 22
Figure 25: Template Settings – Create Activities For ............................................................................................................ 23
Figure 26: Template Settings – Document Protection: (Owner) Password .................................................................. 24
Figure 27: Template Settings – Document Protection: Advanced PDF Encryption .................................................. 25
Figure 28: Template Settings – Sub Folder ............................................................................................................................... 26
Figure 29: Client Automation Settings – Client Automation ............................................................................................. 27
Figure 30: Client Automation Settings – Trigger the [SendasPDF] – button automatically .................................. 27
Figure 31: Automation Settings – Skip “Send as PDF” file name dialog ....................................................................... 27
Figure 32: Automation Settings – E-Mail (Create CRM Activity) ...................................................................................... 28
Figure 33: Advanced Settings – Additional fields with example ...................................................................................... 29
Figure 34: Sharepoint Metadata Dialog ..................................................................................................................................... 30
Figure 35: SharePoint Metadata Property - Add .................................................................................................................... 31
Figure 36: SharePoint Metadata Property - Edit ..................................................................................................................... 31
Figure 37: SharePoint Metadata Property - Delete ............................................................................................................... 32
Figure 38: SharePoint Metadata Property – Create new property .................................................................................. 33
Figure 39: SharePoint Metadata Property – Select fields for newly created property ............................................ 33
Figure 40: Remove Watermark ...................................................................................................................................................... 34
Figure 41: Notification Area – Metadata update .................................................................................................................... 35
Figure 42: DocumentsCorePack Template Designer UI - Additional tab ..................................................................... 36
DocumentsCorePack Template Designer for MSCRM 2015/2016 and Dynamics 365
Page 164 of 168
Figure 43: Add Relationship/Entity button ............................................................................................................................... 37
Figure 44: Add Relationship/Entity dropdown - predefined relationships .................................................................. 37
Figure 45: Table Selector .................................................................................................................................................................. 38
Figure 46: Add New Relationship… .............................................................................................................................................. 39
Figure 47: Add New Relationship… - Configure Fields and data source dialog ........................................................ 39
Figure 48: Aggregation checkbox activated including examples .................................................................................... 40
Figure 49: HTML code (left), compiled HTML (right) ............................................................................................................ 47
Figure 50: Two tables with the <<jointables>> command before a merge ............................................................... 49
Figure 51: Two tables with after the <<jointables>> command was executed ........................................................ 49
Figure 52: Example of inserted QR Code and CRM field in a template......................................................................... 50
Figure 53: Example of dynamic string ......................................................................................................................................... 51
Figure 54: Example of Computed field ....................................................................................................................................... 52
Figure 55: mscrm-addons.com documentation section ...................................................................................................... 54
Figure 56: mscrm-addons.com documentation section ...................................................................................................... 54
Figure 57: mscrm-addons.com documentation section ...................................................................................................... 55
Figure 58: Open field properties via the context menu ....................................................................................................... 55
Figure 59: String fields ...................................................................................................................................................................... 56
Figure 60: Data fields ......................................................................................................................................................................... 56
Figure 61: Insert Format ................................................................................................................................................................... 57
Figure 62: Insert Culture ................................................................................................................................................................... 58
Figure 63: Insert number field ........................................................................................................................................................ 59
Figure 64: Insert picklist .................................................................................................................................................................... 59
Figure 65: Picklist field inserted plus internal value .............................................................................................................. 60
Figure 67: Template Designer – Add Relationship/Entity ................................................................................................... 62
Figure 67: Add Relationship/Entity – Drop Down Menu ..................................................................................................... 62
Figure 68: Manage relationships window.................................................................................................................................. 63
Figure 69: Customize entities buttons ........................................................................................................................................ 63
Figure 70: Manage Relationships – how to delete relationships ..................................................................................... 64
Figure 71: Manage predefined relationships – entity settings.......................................................................................... 64
Figure 72: Property syntax - fixed text ........................................................................................................................................ 66
Figure 73: Property syntax - fields ................................................................................................................................................ 66
Figure 74: Property syntax - plus signs ...................................................................................................................................... 66
Figure 75: Property syntax - function call pos with parameters 2 and 5 ...................................................................... 67
Figure 76: Property syntax - Standalone function DATETIME without parameters .................................................. 67
Figure 77: Table - List of function calls for fields.................................................................................................................... 67
Figure 78: Table - List of standalone functions ....................................................................................................................... 68
Figure 79: Example for fixed text .................................................................................................................................................. 70
Figure 80: Example for fields from CRM .................................................................................................................................... 70
Figure 81: Example for operators from CRM ........................................................................................................................... 70
Figure 82: Table – Supported Datatypes ................................................................................................................................... 71
Figure 83: Table – Available Operators ...................................................................................................................................... 71
Figure 84: Table – Special values and functions ..................................................................................................................... 71
Figure 85: Table - List of demo templates ................................................................................................................................ 87
DocumentsCorePack Template Designer for MSCRM 2015/2016 and Dynamics 365
Page 165 of 168
Figure 86 Template Designer – Selected entity: Quote ....................................................................................................... 88
Figure 87 Template Designer – Insert fields ............................................................................................................................. 89
Figure 88 Template with inserted fields ..................................................................................................................................... 89
Figure 89 Template Designer Additional tab ........................................................................................................................... 90
Figure 90 Configure fields and data source dialog ............................................................................................................... 90
Figure 91 – Template Designer: Additional tab with table and corresponding fields............................................ 91
Figure 92 Configure fields and data source dialog with selected relationship .......................................................... 91
Figure 93 – Insert new table ........................................................................................................................................................... 91
Figure 94 – Insert table (Result) .................................................................................................................................................... 92
Figure 95 – mscrm-addons.com tab – Rows and Columns ................................................................................................ 92
Figure 96 – column customization ............................................................................................................................................... 92
Figure 97 – DocumentsCorePack Template - Result ............................................................................................................ 93
Figure 98: www.mscrm-addons.com tab - Open Template: .............................................................................................. 94
Figure 99: www.mscrm-addons.com tab - Choose CRM Data.......................................................................................... 94
Figure 100: Choose CRM Data dialog with data ..................................................................................................................... 95
Figure 101: Configure fields and datasource-dialog – Records to show (default settings) .................................. 96
Figure 102: Records to show – Show a look up window to select a single row ........................................................ 97
Figure 103: Records to show – Show a look up window to select multiple rows inclusive width(px)-settings
.................................................................................................................................................................................................................... 97
Figure 104: New “label block” in the www.mscrm-addons.com - tab. .......................................................................... 98
Figure 105: Label Options dialog .................................................................................................................................................. 99
Figure 106: Mark cell as label cell (Please note that the cell is enlarged due to demonstration purpose) . 100
Figure 107: Mark cell as label cell (Please note that the cell is enlarged due to demonstration purpose)
................................................................................................................................................................................................................. 100
Figure 108: Additional tab: Add relationship/entity ........................................................................................................... 101
Figure 109: DocumentsCorePack Information dialog ....................................................................................................... 102
Figure 110: Result: Label templates based on various records at once ..................................................................... 102
Figure 111: Insert fields ................................................................................................................................................................. 103
Figure 112: Add new relationship .............................................................................................................................................. 103
Figure 113: Add a new relationship .......................................................................................................................................... 104
Figure 114: Resolved fields........................................................................................................................................................... 104
Figure 115: Click on the [Edit]-button ..................................................................................................................................... 105
Figure 116: Add another relationship ...................................................................................................................................... 105
Figure 117: Additionally resolved fields .................................................................................................................................. 106
Figure 118: Insert separate entities ........................................................................................................................................... 107
Figure 119: Add Relationship/Entity ......................................................................................................................................... 108
Figure 120: Activate aggregation .............................................................................................................................................. 108
Figure 121: Set the aggregation functionality ...................................................................................................................... 109
Figure 122: Insert resolved relationship .................................................................................................................................. 110
Figure 123: Example address block created with DocumentsCorePack Template Designer Standard-tab
fields ...................................................................................................................................................................................................... 111
Figure 124: Choose CRM data from MailMerge with Microsoft CRM Data dialog. .............................................. 112
Figure 125: Template (left) vs Merged address block with missing information (right) ...................................... 113
DocumentsCorePack Template Designer for MSCRM 2015/2016 and Dynamics 365
Page 166 of 168
Figure 126: String properties dialog with template in the background ..................................................................... 113
Figure 127: String properties dialog ......................................................................................................................................... 114
Figure 128 Insert ‘Entity Image’ as Picture Field .................................................................................................................. 115
Figure 129 Configure Fields and data source – set up relation between entity and note.................................. 116
Figure 130 Additional Tab – Contact <> Note relationship ........................................................................................... 117
Figure 131 Insert as picture field – insert new table dialog ............................................................................................ 117
Figure 132: Insert as picture field – Placeholder .................................................................................................................. 118
Figure 133: Add link as picture link to the description field ........................................................................................... 119
Figure 134: Insert the description-field as picture-link-field .......................................................................................... 120
Figure 135: Additional Tab – Contact <> Note relationship – Insert as Document .............................................. 121
Figure 136: Field properties – insert note as source field ................................................................................................ 122
Figure 137: Insert document: Insert document as table or not? ................................................................................... 122
Figure 138: Insert document – placeholder ........................................................................................................................... 123
Figure 139: Insert HTML_description as HTML field........................................................................................................... 124
Figure 140: Insert static item drop down menu ................................................................................................................... 125
Figure 141: Static document properties – provide a parameter ................................................................................... 126
Figure 142: Click [Select Document] and a Look Up Record Dialog will open ........................................................ 127
Figure 143: Insert static document dialog with result in the background ................................................................ 128
Figure 144: Select Page Break in the insert fields drop down menu ........................................................................... 129
Figure 145: Select Remove Empty Lines in the insert fields drop down menu ....................................................... 130
Figure 146: Select Join Tables in the insert fields drop down menu ........................................................................... 131
Figure 147: Select QR Code in the Insert Field section ..................................................................................................... 133
Figure 148: QR Code properties ................................................................................................................................................. 133
Figure 149: QR Code options ...................................................................................................................................................... 134
Figure 150: QR Code placeholder ............................................................................................................................................. 134
Figure 151: Select Advanced String in the Insert Field section ...................................................................................... 135
Figure 152: Advanced String properties ................................................................................................................................. 135
Figure 153: Advanced String formatting options ................................................................................................................ 136
Figure 154: The example shows two inserted advanced strings: One inserted with PLACEHOLDER function,
one without. ....................................................................................................................................................................................... 136
Figure 155: Select Calculated field in the Insert Field section ........................................................................................ 137
Figure 156: Computed field properties - insert calculation ........................................................................................... 137
Figure 157: Formatting options .................................................................................................................................................. 138
Figure 158: The example shows two inserted calculated fields: One inserted with PLACEHOLDER function,
one without. ....................................................................................................................................................................................... 138
Figure 159: Select Hyperlink in the Insert Field section .................................................................................................... 139
Figure 160: Hyperlink properties window .............................................................................................................................. 139
Figure 161: Additional hyperlink options ............................................................................................................................... 140
Figure 162: The example shows two inserted hyperlinks: One inserted with the PLACEHOLDER function,
one without. ....................................................................................................................................................................................... 140
Figure 163: Field properties – Create a custom data field ............................................................................................... 141
Figure 164: Add New Relationship… ........................................................................................................................................ 143
Figure 165: Add New Relationship… - Configure Fields and data source dialog ................................................... 144
DocumentsCorePack Template Designer for MSCRM 2015/2016 and Dynamics 365
Page 167 of 168
Figure 166: Add New Relationship - Configure Fields and data source dialog section ...................................... 145
Figure 167 – Insert new table ...................................................................................................................................................... 146
Figure 168 – Add new relationship – result ........................................................................................................................... 146
Figure 169 – Configure fields – separate entities section ................................................................................................ 147
Figure 170 – Configure fields and entities dialog: Add filter manually ...................................................................... 147
Figure 171: Microsoft Office Word with mscrm-addons.com Ribbon – Documents Core Pack Settings..... 148
Figure 172: Documents Core Pack Settings .......................................................................................................................... 148
Figure 173: Documents Core Pack Settings - General ...................................................................................................... 149
Figure 174: Word Ribbon with Debugging options ........................................................................................................... 150
Figure 175: DocumentsCorePack Settings - Advanced .................................................................................................... 150
Figure 176: DocumentsCorePack Template Designer type selection message ...................................................... 151
Figure 177 – Warning message .................................................................................................................................................. 158
Figure 178 The DCP Diagnostics-tab ....................................................................................................................................... 159
Figure 179 The System Information-tab ................................................................................................................................. 160
Figure 180 The Tools-tab .............................................................................................................................................................. 160

DocumentsCorePack Template Designer for MSCRM 2015/2016 and Dynamics 365
Page 168 of 168
12 Contact
For further technical questions, please visit our blog http://blogs.mscrm-addons.com
or contact support@mscrm-addons.com.
For sales and licensing questions please contact office@mscrm-addons.com, or the corresponding contact
information below.
Headquarter – Europe
PTM EDV-Systeme GmbH
Bahnhofgürtel 59
A-8020 Graz
Austria
Tel Austria +43 316 680-880-0
Fax +43 316 680-880-25
Support:
7AM - 8PM GMT+1 (Monday-Friday)
Sales:
+43 316 680 880 14
sales@mscrm-addons.com
www.ptm-edv.at
www.mscrm-addons.com
Headquarter – US
mscrm-addons.com Corp
1860 North Rock Springs Rd
Atlanta, GA 30324
United States
Tel US +1 404.720.6066
Support:
9AM - 6PM EST (Monday-Friday)
Sales:
+1 404 720 6046
mark.watson@mscrm-addons.com
www.mscrm-addons.com
