
AVEVA™
ArchestrA Alarm Control Guide

© 2020 AVEVA Group plc and its subsidiaries. All rights reserved.
No part of this documentation shall be reproduced, stored in a retrieval system, or transmitted by any
means, electronic, mechanical, photocopying, rec ording, or otherwise, without the prior written
permission of AVEVA. No liability is assumed with respect to the use of the information contained herein.
Although precaution has been taken in the preparation of this documentation, AVEVA assumes no
responsibility for errors or omissions. The information in this documentation is subject to change without
notice and does not represent a commitment on the part of AVEVA. The software described in this
documentation is furnished under a license agreement. This software may be used or copied only in
accordance with the terms of such license agreement.
ArchestrA, Aquis, Avantis, Citect, DYNSIM, eDNA, EYESIM, InBatch, InduSoft, InStep, IntelaTrac,
InTouch, OASyS, PIPEPHASE, PRiSM, PRO/II, PROVISION, ROMeo, SIM4ME, SimCentral, SimSci,
Skelta, SmartGlance, Spiral Software, Termis, WindowMaker, WindowViewer, and Wonderware are
trademarks of AVEVA and/or its subsidiaries. An extensive listing of AVEVA trademarks can be found at:
https://sw.aveva.com/legal. All other brands may be trademarks of their respective owners.
Publication date: Thursday, November 19, 2020
Contact Information
AVEVA Group plc
High Cross
Madingley Road
Cambridge
CB3 0HB. UK
https://sw.aveva.com/
For information on how to contact sales and customer training, see https://sw.aveva.com/contact.
For information on how to contact technical support, see https://sw.aveva.com/support.

AVEVA™ ArchestrA Alarm Control Guide
3
Chapter 1 About the ArchestrA Alarm Control ................................................................ 11
About the ArchestrA Alarm Control Working with the ArchestrA Alarm Control .......................... 11
Client Modes .......................................................................................................................... 11
InTouch Alarm Manager .................................................................................................... 11
Current Alarms ............................................................................................................ 11
Recent Alarms and Events ........................................................................................... 11
Alarm and Event Storage ................................................................................................... 11
Switching Between Client Modes........................................................................................ 12
Using the Alarm Control in Industrial Graphics .......................................................................... 12
Alarm Acknowledgement ......................................................................................................... 12
Current Value and Quality Display............................................................................................ 13
Working With Alarm Queries and Filters ................................................................................... 13
Alarm Queries......................................................................................................................... 13
Alarm Query Syntax when Register Using Galaxy_<GalaxyName> is Enabled ...................... 14
Alarm Filtering ........................................................................................................................ 15
Alarm Queries to Filters Translation.................................................................................... 15
Alarm Shelving ....................................................................................................................... 15
Shelving Alarms During Run Time ...................................................................................... 16
Unshelving Alarms During Run Time .................................................................................. 16
Alarm Hiding ........................................................................................................................... 16
Alarm Control Grid Freezing .................................................................................................... 16
Alarm Sorting.......................................................................................................................... 17
Support for a Redundant Historian Server................................................................................. 17
Status Bar .............................................................................................................................. 17
Chapter 2 Configure the Alarm Control ............................................................................ 19
About Configuring the Alarm Control ........................................................................................ 19
Placing the Alarm Control into an Industrial Graphic .................................................................. 19
Setting Alarm Control Properties .............................................................................................. 21
Showing Current Alarms or Recent Alarms and Events ............................................................. 21
Showing Historical Alarms and/or Events.................................................................................. 23
Set Alarm Control Colors ......................................................................................................... 26
Set Event Record Colors ................................................................................................... 26
Set Alarm Return To Normal Record Colors ........................................................................ 27
Set Heading, Grid, and Window Color................................................................................. 28
Set Alarm Shelving Colors ................................................................................................. 28
Set Priority Ranges for Alarm Records ................................................................................ 29
Contents

AVEVA™ ArchestrA Alarm Control Guide Contents
4
Set Colors for Acknowledged Alarms .................................................................................. 30
Set Colors for Unacknowledged Alarms .............................................................................. 30
Set Unacknowledged Alarms to Flash................................................................................. 31
Rename, Resize, and Reorder Column Headers ....................................................................... 32
Rename Column Headers.................................................................................................. 32
Resize Columns ................................................................................................................ 33
Change the Order of Columns............................................................................................ 34
Sort Alarms ............................................................................................................................ 35
Filter Alarms ........................................................................................................................... 37
Using Wildcards in Queries ................................................................................................ 37
Use an Existing Query or Filter........................................................................................... 37
Add a New Query or Filter.................................................................................................. 38
Construct Filters ................................................................................................................ 40
Modify an Existing Query or Filter ....................................................................................... 41
Delete a Query or Filter Favorite ........................................................................................ 41
Export Query and Filter Favorites ....................................................................................... 42
Import Query and Filter Favorites ....................................................................................... 42
Setting Time Zone and Format................................................................................................. 43
Set the Time Zone............................................................................................................. 43
Set a Time Format............................................................................................................. 44
Set a .NET Datetime Format .............................................................................................. 45
Configuring Run-Time Behavior ............................................................................................... 46
Show Heading, Grid, or Status Bar ..................................................................................... 47
Automatic Query for Alarms on Start Up ............................................................................. 48
Scroll Automatically to New Alarms .................................................................................... 48
Hide Errors, Warnings, and Status Messages ..................................................................... 48
Restrict User Access to Rows and Columns........................................................................ 49
Retain Hiding when Changing Alarm Query Filter ................................................................ 49
Override the Frozen Grid ................................................................................................... 49
Customize the "No Records" Message ............................................................................... 50
Changing the Language of the "No Records" Message .................................................. 50
Configure the Alarm Control to Require an ACK Signature ................................................... 50
Configuring the Alarm Control to Require a SHELVE Signature ............................................ 52
Configuring the Run-Time Shortcut Menu ........................................................................... 53
Chapter 3 Use the Alarm Control at Run Time ............................................................... 55
Refresh the Alarm Control Grid ................................................................................................ 55
View Status Bar Information..................................................................................................... 55
Using Status Bar Information of Current Modes ................................................................... 55
Using Status Bar Information of Historical Modes ................................................................ 56
Acknowledge Alarms............................................................................................................... 57
Provide a Signature to Acknowledge Alarms ....................................................................... 57
Providing a Signature to Acknowledge Alarms Using Smart Cards ....................................... 58
Shelve and Unshelve Alarms at Run Time ................................................................................ 59
Shelving Alarms ................................................................................................................ 60
Show Shelved Alarms .................................................................................................. 61
Unshelve Alarms ............................................................................................................... 62
Sort Alarms at Run Time ......................................................................................................... 63
Filter Alarms at Run Time ........................................................................................................ 63

Contents AVEVA™ ArchestrA Alarm Control Guide
5
Use an Existing Query Filter............................................................................................... 64
Adding a New Query or Filter at Run Time .......................................................................... 64
Modifying an Existing Query or Filter at Run Time ............................................................... 64
Saving Run-Time Modifications to Queries and Filters ......................................................... 65
Deleting a Query or Filter at Run Time ................................................................................ 65
Importing Query and Filter Favorites at Runtime.................................................................. 66
Exporting Query and Filter Favorites at Runtime.................................................................. 66
Filtering Alarms with Client-Based Filtering ......................................................................... 66
Reset the Grid ........................................................................................................................ 69
Hide Alarms............................................................................................................................ 69
Freeze and Unfreeze the Alarm Control Grid ............................................................................ 70
Show Alarm Statistics.............................................................................................................. 71
Switching between Client Modes.............................................................................................. 72
Switching Run-Time Languages............................................................................................... 73
Chapter 4 Scripting the Alarm Control.............................................................................. 75
Alarm Control Properties ......................................................................................................... 75
AckComment.DefaultValue Property................................................................................... 75
AckComment.UseDefault Property ..................................................................................... 75
AckSignature.MaxPriority Property ..................................................................................... 75
AckSignature.MinPriority Property ...................................................................................... 76
AckSignature.Required Property ........................................................................................ 76
AlarmColor.Ack.BackGround Property ................................................................................ 77
AlarmColor.Ack.ForeGround Property................................................................................. 77
AlarmColor.Ack.RTN.BackGround Property ........................................................................ 78
AlarmColor.Ack.RTN.ForeGround Property ......................................................................... 79
AlarmColor.Range Property ............................................................................................... 79
AlarmColor.RTN.BackGround Property ............................................................................... 80
AlarmColor.RTN.ForeGround Property ............................................................................... 80
AlarmColor.UnAck.BackGround Property ............................................................................ 81
AlarmColor.UnAck.Flash.BackGround Property................................................................... 81
AlarmColor.UnAck.Flash.ForeGround Property ................................................................... 82
AlarmColor.UnAck.ForeGround Property ............................................................................ 83
AlarmColor.UnAck.RTN.BackGround Property .................................................................... 84
AlarmColor.UnAck.RTN.ForeGround Property .................................................................... 84
AlarmQuery Property ......................................................................................................... 85
AllowColumnResize Property ............................................................................................. 85
AutoResumeDuration Property........................................................................................... 85
AutoScroll Property ........................................................................................................... 85
ClientMode Property.......................................................................................................... 86
ConnectStatus Property..................................................................................................... 86
ContextMenu.AckAll Property............................................................................................. 86
ContextMenu.AckOthers Property ...................................................................................... 87
ContextMenu.AckSelected Property ................................................................................... 87
ContextMenu.AckSelectedGroups Property ........................................................................ 87
ContextMenu.AckSelectedPriorities Property ...................................................................... 87
ContextMenu.AckSelectedTags Property ............................................................................ 87
ContextMenu.AckVisible Property ...................................................................................... 88
ContextMenu.Favorites Property ........................................................................................ 88
ContextMenu.Freeze Property ........................................................................................... 88
ContextMenu.Hidden Property ........................................................................................... 88
ContextMenu.HideAll Property ........................................................................................... 88
ContextMenu.HideOthers Property ..................................................................................... 89

AVEVA™ ArchestrA Alarm Control Guide Contents
6
ContextMenu.HideSelected Property .................................................................................. 89
ContextMenu.HideSelectedGroups Property ....................................................................... 89
ContextMenu.HideSelectedPriorities Property ..................................................................... 89
ContextMenu.HideSelectedTags Property........................................................................... 90
ContextMenu.HideVisible Property ..................................................................................... 90
ContextMenu.Requery Property ......................................................................................... 90
ContextMenu.Reset Property ............................................................................................. 90
ContextMenu.ShelveAll Property ........................................................................................ 90
ContextMenu.ShelveOthers Property.................................................................................. 91
ContextMenu.ShelveSelected Property............................................................................... 91
ContextMenu.ShelveSelectedGroups Property .................................................................... 92
ContextMenu.ShelveSelectedPriorities Property .................................................................. 92
ContextMenu.ShelveSelectedSeverities Property ................................................................ 92
ContextMenu.ShelveSelectedTags Property ....................................................................... 93
ContextMenu.ShelveVisible Property .................................................................................. 93
ContextMenu.Sort Property................................................................................................ 93
ContextMenu.Statistics Property ........................................................................................ 94
ContextMenu.UnhideAll Property........................................................................................ 94
ContextMenu.UnshelveAll Property .................................................................................... 94
ContextMenu.UnshelveOthers Property .............................................................................. 94
ContextMenu.UnshelveSelected Property ........................................................................... 95
ContextMenu.UnshelveSelectedGroups Property ................................................................ 95
ContextMenu.UnshelveSelectedPriorities Property .............................................................. 96
ContextMenu.UnshelveSelectedSeverities Property ............................................................ 96
ContextMenu.UnshelveSelectedTags Property.................................................................... 96
ContextMenu.UnshelveVisible Property .............................................................................. 97
Database.Authentication Property ...................................................................................... 97
Database.Name Property .................................................................................................. 97
Database.Password Property ............................................................................................. 98
Database.ServerName Property......................................................................................... 98
Database.UserID Property ................................................................................................. 98
DisableFileBrowsing Property ............................................................................................ 98
Domain Property ............................................................................................................... 98
Enabled Property .............................................................................................................. 99
EventColor.BackGround Property....................................................................................... 99
EventColor.ForeGround Property ....................................................................................... 99
Favorite Property............................................................................................................. 100
FlashUnAckAlarms Property ............................................................................................ 100
GridColor Property .......................................................................................................... 100
HeadingColor.BackGround Property................................................................................. 101
HeadingColor.ForeGround Property ................................................................................. 101
Height Property ............................................................................................................... 102
HiddenAlarms Property.................................................................................................... 102
HideErrors Property......................................................................................................... 102
MaxDatabaseRecords Property........................................................................................ 102
NewAlarmEventMode Property ........................................................................................ 102
NoRecordsMessage.Enabled Property ............................................................................. 103
NoRecordsMessage.Message Property ............................................................................ 103
SaveUserQueryFilter Property ......................................................................................... 103
QueryStartup Property ..................................................................................................... 104
RequiresShelveSignature Property ................................................................................... 104
RetainHidden Property .................................................................................................... 104
RowCount Property ......................................................................................................... 105
RowSelection Property .................................................................................................... 105
SelectedCount Property................................................................................................... 105
ShelveColor.BackGround Property ................................................................................... 106
ShelveColor.ForeGround Property.................................................................................... 106

Contents AVEVA™ ArchestrA Alarm Control Guide
7
ShowContextMenu Property ............................................................................................ 107
ShowGrid Property .......................................................................................................... 107
ShowGroupByHeader Property ........................................................................................ 107
ShowHeading Property .................................................................................................... 107
ShowStatusBar Property.................................................................................................. 107
SortColumn.First Property................................................................................................ 107
SortColumn.Second Property........................................................................................... 108
SortColumn.Third Property .............................................................................................. 108
SortColumn.Fourth Property ............................................................................................ 108
SortOrder.First Property................................................................................................... 108
SortOrder.Second Property.............................................................................................. 109
SortOrder.Third Property ................................................................................................. 109
SortOrder.Fourth Property ............................................................................................... 109
Time.Format Property...................................................................................................... 110
Time.Type Property ......................................................................................................... 110
TimeSelector Property ..................................................................................................... 111
TimeSelector.DurationMS Property .................................................................................. 111
TimeSelector.EndDate Property ....................................................................................... 111
TimeSelector.StartDate Property ...................................................................................... 112
TimeSelector.TimeDuration Property ................................................................................ 112
TimeZone.TimeZone Property.......................................................................................... 114
TotalRowCount Property.................................................................................................. 114
UnAckAlarms Property .................................................................................................... 114
UpdateToCurrentTime Property ....................................................................................... 115
UserQueryFilterFilePath Property ..................................................................................... 115
Visible Property ............................................................................................................... 115
Width Property ................................................................................................................ 116
WindowColor Property ..................................................................................................... 116
X Property ...................................................................................................................... 116
Y Property ...................................................................................................................... 116
Alarm Control Methods .......................................................................................................... 116
AboutBox() Method ......................................................................................................... 117
Ack.All() Method.............................................................................................................. 117
Ack.Group() Method ........................................................................................................ 117
Ack.Priority() Method ....................................................................................................... 117
Ack.Selected() Method .................................................................................................... 118
Ack.SelectedGroup() Method ........................................................................................... 118
Ack.SelectedPriority () Method ......................................................................................... 118
Ack.SelectedTag() Method............................................................................................... 119
Ack.Tag() Method............................................................................................................ 119
Ack.Visible() Method........................................................................................................ 119
Connect() Method ........................................................................................................... 120
Disconnect() Method ....................................................................................................... 120
Favorites.Export() Method................................................................................................ 120
Favorites.Import() Method ................................................................................................ 120
FreezeDisplay() Method................................................................................................... 121
GetItem() Method ............................................................................................................ 121
GetLastError() Method ..................................................................................................... 121
GetSelectedItem() Method ............................................................................................... 122
Hide.All() Method ............................................................................................................ 122
Hide.Group() Method ....................................................................................................... 122
Hide.Priority() Method...................................................................................................... 123
Hide.Selected() Method ................................................................................................... 123
Hide.SelectedGroup() Method .......................................................................................... 123
Hide.SelectedPriority() Method......................................................................................... 123
Hide.SelectedTag() Method ............................................................................................. 123

AVEVA™ ArchestrA Alarm Control Guide Contents
8
Hide.Tag() Method .......................................................................................................... 124
Hide.Visible() Method ...................................................................................................... 124
LoadQueryFilterFile ......................................................................................................... 124
MoveWindow() Method .................................................................................................... 125
Requery() Method ........................................................................................................... 125
Reset() Method ............................................................................................................... 126
ResetSortCriteria() Method .............................................................................................. 126
RunQuery() Method......................................................................................................... 126
RunQueryFromFile() Method............................................................................................ 126
Select.All() Method .......................................................................................................... 127
Select.Group() Method .................................................................................................... 127
Select.Item() Method ....................................................................................................... 127
Select.Priority() Method ................................................................................................... 127
Select.Tag() Method ........................................................................................................ 128
SetSort() Method............................................................................................................. 128
SetSortCriteria() Method .................................................................................................. 129
Shelve.All() Method ......................................................................................................... 130
Shelve.Group() Method ................................................................................................... 130
Shelve.Priority() Method .................................................................................................. 131
Shelve.Selected() Method ................................................................................................ 131
Shelve.SelectedGroup() Method ...................................................................................... 132
Shelve.SelectedPriority() Method ..................................................................................... 132
Shelve.SelectedSeverity() Method.................................................................................... 133
Shelve.SelectedTag() Method .......................................................................................... 134
Shelve.Severity() Method................................................................................................. 134
Shelve.Tag() Method ....................................................................................................... 135
Shelve.Visible() Method ................................................................................................... 136
Show.Context() Method ................................................................................................... 136
Show.Favorite() Method................................................................................................... 136
Show.Hidden() Method .................................................................................................... 136
Show.Sort() Method ........................................................................................................ 136
Show.Statistics() Method ................................................................................................. 137
TimeSelector.GetStartAndEndTimes() Method .................................................................. 137
TimeSelector.RefreshTimes() Method............................................................................... 137
TimeSelector.SetStartAndEndTimes() Method .................................................................. 137
Toggle.All() Method ......................................................................................................... 138
Toggle.Item() Method ...................................................................................................... 138
UnhideAll() Method.......................................................................................................... 138
UnSelectAll() Method....................................................................................................... 138
Unshelve.All() Method ..................................................................................................... 138
Unshelve.Group() Method ................................................................................................ 139
Unshelve.Priority() Method............................................................................................... 139
Unshelve.Selected() Method ............................................................................................ 140
Unshelve.SelectedGroup() Method ................................................................................... 141
Unshelve.SelectedPriority() Method.................................................................................. 141
Unshelve.SelectedSeverity() Method ................................................................................ 141
Unshelve.SelectedTag() Method ...................................................................................... 142
Unshelve.Severity() Method ............................................................................................. 142
Unshelve.Tag() Method ................................................................................................... 143
Unshelve.Visible() Method ............................................................................................... 144
Configuring Events................................................................................................................ 144
Configuring the NewAlarm Event...................................................................................... 144
.NET Colors.......................................................................................................................... 145
Chapter 5 Transferring Alarm Configuration from InTouch ......................................... 149
Transferring the InTouch Alarm Viewer Control Configuration .................................................. 149

Contents AVEVA™ ArchestrA Alarm Control Guide
9
Transferring Configuration of the Control Name Tab .......................................................... 149
Transferring Configuration of the General Tab................................................................... 150
Transferring Configuration of the Color Tab....................................................................... 152
Transferring Configuration of the Time Format Tab............................................................ 153
Transferring Configuration of the Query Tab ..................................................................... 154
Transferring Configuration of the Properties Tab ............................................................... 155
Transferring Script Configuration on the Events Tab .......................................................... 155
Transferring the InTouch Alarm DB View Control Configuration................................................ 156
Transferring Configuration of the Alarm DB View Control Name Tab................................... 156
Transferring Configuration of the InTouch Alarm DB View General Tab .............................. 157
Transferring Configuration of the InTouch Alarm DB View Color Tab .................................. 158
Transferring Configuration of the Database Tab ................................................................ 159
Transferring Configuration of the Selection Tab ................................................................. 160
Transferring Configuration of the Time/Sort Tab ................................................................ 161
Transferring Configuration of the Query Filter Tab ............................................................. 162
Transferring Configuration of the InTouch Alarm DB View Properties Tab ........................... 163
Transferring Scripts Configuration on the Events Tab ........................................................ 163
Transferring Query Favorites Configuration ............................................................................ 163
Mapping Properties and Methods........................................................................................... 164
Index ....................................................................................................................................... 173

AVEVA™ ArchestrA Alarm Control Guide
11
Working with the ArchestrA Alarm Control
The ArchestrA Alarm Control is a graphical element you can use in your Industrial Graphics to show
current and historical alarms and events.
The ArchestrA Alarm Control replaces the Alarm Viewer control and Alarm DB View control in the
InTouch® HMI and extends alarm visualization to the Industrial graphics environment.
You can place the ArchestrA Alarm Control directly from the Tools panel in the Industrial Graphic
Editor onto the canvas. You can customize it to your needs by adding further graphics, interactions, and
scripts.
You can deploy a managed InTouch application containing ArchestrA Alarm Controls to a remote node
and visualize and interact with alarms at run time with InTouch WindowViewer.
For this documentation, the ArchestrA Alarm Control is simply referred to as "Alarm Control."
We recommend you have a basic understanding of the InTouch Alarm system before continuing. For
more information, see the InTouch HMI Alarms and Events Guide.
Client Modes
The Alarm Control supports five different client modes, which can be grouped depending on their data
source. The Alarm Control supports an ArchestrA Database (A2ALMDB), and the Historian History
Blocks.
InTouch Alarm Manager
The Alarm Control manages currently active alarms (summary alarms) and recent alarms (historical
alarms). These types of alarms are saved to internal alarm memory.
Current Alarms
When the Alarm Control is showing alarms in "Current Alarms" mode, it is showing currently active
alarms directly from the Alarm Manager.
Recent Alarms and Events
When the Alarm Control is showing alarms in "Recent Alarms and Events" mode, it is showing historical
alarms and events stored in Alarm Manager.
Unlike the "Current Alarms" mode, the "Recent Alarms and Events mode" shows time point data, such as
alarm transitions and events, instead of continuous conditions.
Alarm and Event Storage
Alarms and events can be stored to the ArchestrA alarm database (A2ALMDB) or the Historian history
blocks.
When the Alarm Control is configured in "Historical Alarms" mode, only alarms stored in the Alarm
Database are shown.
CHAPTER 1
About the ArchestrA Alarm Control

AVEVA™ ArchestrA Alarm Control Guide About the ArchestrA Alarm Control
12
When the Alarm Control is configured in "Historical Events" mode, only events stored in the Alarm
Database are shown.
When the Alarm Control is configured in "Historical Alarms and Events" mode, both alarms and events
stored in the Alarm Database are shown.
Switching Between Client Modes
The client mode and many other features are controlled by properties and methods.
By default, the Alarm Control is set to show current alarms. You can also change the client mode at run
time by using the Alarm Control properties.
Using the Alarm Control in Industrial Graphics
You can use the ArchestrA Alarm Control as a faceplate so that when the operator clicks an icon, an
ArchestrA Alarm control showing a specific alarm area opens.
You can also configure the ArchestrA Alarm Control to interact with the Galaxy namespace and other
Industrial graphics by mapping its properties to ArchestrA attributes and symbol elements.
The Alarm Control can be placed into Industrial Graphics hosted by Automation Object templates and
instances. You can configure them to retrieve alarms from their hosting Area object or their hosting
Automation object.
Alarm Acknowledgement
You can configure the Alarm Control to require an alarm to be acknowledged even if the condition
causing the alarm has passed. This ensures that an operator is aware of events that caused a temporary
alarm state but have returned to normal.
You acknowledge alarms at run time using a shortcut menu or through script methods.

About the ArchestrA Alarm Control AVEVA™ ArchestrA Alarm Control Guide
13
Current Value and Quality Display
The Alarm Control in one of the current client modes shows continuously the current value and quality of
a tag or attribute in alarm state.
You can see the current value and quality of tags or attributes in alarm from:
InTouch running on the local computer
Galaxy namespace
Note: You cannot see current value and quality data from InTouch tags running on a remote computer.
Working With Alarm Queries and Filters
Queries and filters are two methods to retrieve data at RunTime, with queries being a superset of filters.
You can run a query at run time to retrieve data, then run another query to narrow the search criteria
without re-running the query or retrieving the same data. This allows the Alarm Control to use data from
a current subscription without re-subscribing. For more information, see Filtering Alarms on page 37.
Alarm Queries
The Alarm control supports standard Galaxy alarm query formats, such as:
\galaxy!Area_001
Alarm query syntax is the same for both Current Alarms Mode and Recent Alarms and Events Mode.
Queries in Historical Alarms, Historical Events, and Historical Alarms and Events Modes are actually
Alarm Database queries, which follow rules and syntax for SQL Server database queries.
The alarm query syntax changes when you use the run-time alarm comment language switching feature.
For more information, see Alarm Query Syntax when Register Using Galaxy_<GalaxyName> is Enabled
on page 14.
The Alarm control also supports relative references for Galaxy alarms in alarm queries. For all alarm
modes, relative references are resolved at run time at the point of query to the Alarm Manager or Alarm
Database.
You must put the reference part of the alarm query between less-than (<) and greater-than (>)
characters.
The following table shows examples of alarm queries.
Alarm Query
Description
\provider!group
Shows all alarms from the given provider and group.
For example:
\intouch!Group_A
\provider!group!tagname
Shows all alarms from the given provider, group and
tag. For example:
\galaxy!Mixing_Area!RotorCtrl

AVEVA™ ArchestrA Alarm Control Guide About the ArchestrA Alarm Control
14
Alarm Query
Description
\\node\provider!group
Shows all alarms from the given provider and group
from a given node. For example:
\\remote\intouch!Group_B
\\node\provider!group!tagname
Shows all alarms from the given provider, group and
tag from a given node. For example:
\\grnode\galaxy!Packaging_Area!Wrappe
r1
HotBackupName
Shows all alarms from primary or backup alarm
provider as configured in the Hot Backup Manager.
\galaxy!<me.Area>!<me.tagname>.*
Shows all alarms from the Automation Object.
Alarms from other Automation Objects in the same
area are ignored.
\galaxy!<myArea.tagname>
or
\galaxy!<me.Area>
Shows all alarms from the Area object hosting the
Automation Object
\galaxy!<myPlatform.tagname>
Shows all alarms from the Winplatform object
hosting the Automation Object.
\galaxy!<me.area>!<myContainer.tagna
me>.*
Shows all alarms from the container Automation
Object. At run-time the Alarm Control resolves the
Container attribute to detect the container.
\galaxy!<myEngine.tagname>
Shows all alarms from the AppEngine object hosting
the Automation Object. At run-time the Alarm
Control resolves the MyEngine attribute to detect
the host.
Alarm Query Syntax when Register Using Galaxy_<GalaxyName> is
Enabled
The run-time alarm comment language switching feature requires slightly different alarm query syntax. In
the WinPlatform object, when you enable InTouch alarm provider, you can enable Register using
Galaxy_<GalaxyName> instead of Galaxy.
This option will register the platform to the alarm subsystem using the Galaxy name preferred by
"Galaxy_" instead of just the word "Galaxy". This allows an InTouch application to monitor alarms from
multiple Galaxies and avoid name conflicts.
Syntax changes slightly when Galaxy_GalaxyName is enabled:
o Use \\ for computer name
o Use \ for Galaxy or Galaxy_<GalaxyName>
o Use ! for Area
For example: \\Galaxy\MyGalaxy!Area001

About the ArchestrA Alarm Control AVEVA™ ArchestrA Alarm Control Guide
15
If Galaxy_GalaxyName is not enabled in WinPlatform, then the default behavior described in Alarm
Queries on page 13 applies.
You can determine if Galaxy_<GalaxyName> has been enabled by monitoring the run -time attribute of
the platform ITAlarmProvider.ProviderNameAsGalaxyNameEnabled.
Alarm Filtering
The Query Favorites of InTouch Alarm Viewer control define a set of alarm provider, alarm group, an
optional node name, and a priority range under one name. The alarm provider, alarm group, and the
node name are used for subscribing to a specific alarm group. The priority range on the other hand is
used to filter the alarms from the given alarm group.
The Filter Favorites of InTouch Alarm DB View control define a set of any number of criteria you want to
filter from the Alarm Database under one name.
In summary, Filter Favorites fulfill a purely filtering function whereas Query Favorites fulfill a subscription
and a filtering function at the same time.
The Alarm Control filtering feature unites both these concepts by exclusively using filter conditions an d
subscribing to the necessary alarm providers on demand.
Filters can be saved and used in both run time and historical modes.
The filter conditions can be re-used between different client modes. For example, if you define node
name, provider name, alarm group, and a priority range for the current alarms, you can also use this filter
to retrieve the historized alarm data of the same source from the Alarm Database instead.
Filter definitions will be saved per user so operators working on the same server can access different
saved filters.
Alarm Queries to Filters Translation
You can define queries for current alarms in the \\node\provider!group format, but they are translated by
the Alarm Control to a filter after you save.
For example, the query string \\GRNode\galaxy!MixingArea is translated to the following filter string:
Node = ‘GRNode’ AND Provider=’galaxy’ AND Group=’MixingA rea’
You can modify the filter in a tree to query only alarms in the priority range 1 to 250, such as:
AND
Node = ‘GRNode’
Provider = ‘Galaxy’
Group = ‘MixingArea’
Priority >= ‘1’
Priority <= ‘250’
Alarm Shelving
Operators can temporarily shelve selected alarms from the list of an Alarm Control’s active alarms. A
shelved alarm is suppressed and removed from the list of active alarms. Typically, operators shelve
lower severity nuisance alarms because they provide little diagnostic value and interfere with the
operator’s ability to manage a plant process.
An alarm is shelved for a specified period. After the period ends, alarms are automatically unshelved and
appear again in the list of active alarms. Operators can also manually unshelve an alarm before the end
of the specified shelved period.
By default, Medium and Low severity alarms are enabled for shelving. Critical and High severity alarms
are not because of the potential risk of shelving and ignoring alarms that represent serious operating
states. For more information about enabling shelving based on alarm severity, see "Configuring Alarm
Severity to Priority Mapping" in the Application Server User Guide.

AVEVA™ ArchestrA Alarm Control Guide About the ArchestrA Alarm Control
16
Shelving Alarms During Run Time
When shelving an alarm from the Alarm Control, operators set an associated time period in which the
alarm remains shelved and enter a mandatory comment. Operators can select from a list of Alarm
Control Context commands during run-time to:
Shelve one or more selected alarms
Shelve all alarms
Shelve only those alarms visible in the Alarm Control
Shelve all alarms within the same alarm group as an alarm selected from the Alarm Control
Shelve alarms by selected tags or attributes
Shelve alarms by selected alarm priorities
Shelve all alarms that have the same severity as an alarm selected from the Alarm Control
For more information about configuring shelve Context commands, see Configuring the Run-Time
Shortcut Menu on page 53.
When application security is used, alarms can be shelved and unshelved only by operators with proper
authorization. For more information about setting shelving authorization, see Configuring the Alarm
Control to Require a SHELVE Signature on page 52.
Unshelving Alarms During Run Time
Alarms are unshelved automatically at the end of the shelving time period. An unshelved alarm
reappears in the Alarm Control active list and resumes its state at the time it was shelved. Operators can
manually unshelve a shelved alarm before the end of the shelved period and enter an optional comment.
Alarm Hiding
The "hiding" and "unhiding" of alarm records is known in the corresponding InTouch alarm controls as
"suppressing" and "unsuppressing".
When the Alarm Control is hiding alarms, it ignores certain alarms. If an alarm matches the exclusion
criteria, it is not visible.
The actual alarm generation is completely unaffected by hiding. Alarm records are still logged into the
alarm history.
As in the InTouch HMI, you can unhide specific alarms and also use properties and methods to interact
with the alarm hiding feature at run time.
Alarm Control Grid Freezing
You can freeze the Alarm Control to prevent the Alarm control tree from being updated with any further
changes.
For example, if new alarms occur while the Alarm Control is frozen, the new alarms are only shown after
you unfreeze the Alarm Control.
You can configure a time period after which the Alarm Control automatically unfreezes to avoid the Alarm
Control being unknowingly frozen. For example, the operator leaves the workstation and returns without
realizing that the Alarm Control is still frozen.
The Alarm Control unfreezes automatically if one of the following changes:
Alarm Mode
Alarm Query

About the ArchestrA Alarm Control AVEVA™ ArchestrA Alarm Control Guide
17
Filter
Alarm Sorting
Like InTouch alarm controls, you can sort the alarms in ascending or descending direction for selected
columns.
The Alarm Control supports alarm sorting for up to four columns at design time and run time. At run-time,
the operator can configure sorting of even more columns by clicking on the column headers of the Alarm
Control while pressing the Shift key.
Support for a Redundant Historian Server
A Historian may be configured to have a symmetrical "partner" Historian that can be used as a backup if
the primary, or main, historian is not available. This is known as a "redundant historian" setup. No control
configuration is required to take advantage of a redundant historian.
When the primary historian is unavailable, the Alarm Control automatically switches over to the
configured partner historian. The control remains connected to the partner historian, even when the
primary historian becomes available again. The Alarm Control switches back to an available primary
historian if it fails to connect to the partner or during a new attempt to connect to the primary historian.
One example of this would be restarting the Trend Control, which initiates a new connection to the
primary historian. For a redundant historian setup, both historians must be configured to store events to
the same location, either to history blocks or the A2ALMDB database.
When the Alarm Control successfully connects to either the primary historian or its partner, the following
columns are updated with the connected historian server name in the tags list of the selected tags:
Server
I/O Address
The historian name shown in the Tag Picker is always the name of the primary historian, even when the
control is connected to the partner.
There is no automatic synchronization built in to the redundant historian setup; it is up to the historian
server administrator to make sure that the two historians in the pair are symmetrical and synchronized.
If the SQL Server Service is running while Historian Service is not running, this is not recognized by the
Alarm Control as a scenario in which the Historian Server is unavailable.
Status Bar
The status bar of the Alarm Control resembles the status bars of the InTouch alarm controls, with the
following differences:
Alarm Control also shows the alarm client time zone
Alarm Control querying the Alarm Database has a Requery button to more easily retrieve data from
the Alarm Database
Alarm Control shows the current client mode as an icon

AVEVA™ ArchestrA Alarm Control Guide
19
This section shows you how to place an Alarm Control onto the canvas and configure it. You can
configure it either with the Edit Animations dialog box, or by changing individual properties in the
Properties Editor.
About Configuring the Alarm Control
After placing the Alarm Control onto the canvas, you can configure the:
Client Mode to show current alarms, recent alarms and events, or historical alarms and/or events.
Colors for the Alarm Control grid, window, heading, and alarm records.
Order and width of the grid columns and their headers.
Sorting order of alarm records.
Filtering for alarm records and save the filters as favorites for re-use.
Time format and zone for the alarm record time stamps.
Run-time behavior for the Alarm Control, such as:
o If the operator can resize columns or select multiple records at run time.
o Access to specified options of the shortcut menu at run time.
Placing the Alarm Control into an Industrial Graphic
You can easily place the ArchestrA Alarm Control into an Industrial Graphic by placing it onto the canvas.
To place the Alarm Control into an Industrial Graphic
1. Open the Industrial graphic in the Industrial Graphic Editor.
2. On the Tools panel, click the ArchestrA Alarm Control icon. The cursor appears in insert mode.
CHAPTER 2
Configure the Alarm Control
AVEVA™ ArchestrA Alarm Control Guide Configure the Alarm Control
20
3. Click the canvas where you want to place the Alarm Control.

Configure the Alarm Control AVEVA™ ArchestrA Alarm Control Guide
21
Setting Alarm Control Properties
Like all other graphical objects in the Industrial GraphicEditor, you can set some of the properties of the
selected Alarm Control directly in the Properties Editor.
We recommend you configure the Alarm Control with the Edit Animations dialog box and only use the
Properties Editor to edit the configuration afterward.
Showing Current Alarms or Recent Alarms and Events
You can set the Alarm Control to show either of the following:
Current alarms
Recent alarms and events
You use the ClientMode Property integer property in scripting to switch the Alarm Control to show current
alarms or recent alarms and events at run time.
You can also configure a comment to use when alarms are acknowledged at run time. Use the
AckComment.UseDefault Property Boolean property and AckComment.DefaultValue Property string
property in scripting to use a default acknowledgement comment at run time.

AVEVA™ ArchestrA Alarm Control Guide Configure the Alarm Control
22
To show current alarms
1. Double-click the Alarm Control on the canvas. The Edit Animations dialog box appears.
2. If necessary, click Alarm Mode. The Alarm Mode page appears.
3. In the Client Mode list, click Current Alarms.
4. In the Alarm Query box, type the alarm query. To create a new line in the Alarm Query box, press
Ctrl + Enter. For more information on the valid syntax, see Alarm Queries on page 13.
5. If you want to use a default acknowledgement comment, select the Use Default Ack Comment
check box and type a comment in the text box.
6. Click OK.
To show recent alarms and events
1. Double-click Alarm Control on the canvas. The Edit Animations dialog box appears.
2. Click Alarm Mode. The Alarm Mode page appears.

Configure the Alarm Control AVEVA™ ArchestrA Alarm Control Guide
23
3. In the Client Mode list, click Recent Alarms and Events.
4. In the Alarm Query box, type the alarm query. To create a new line in the Alarm Query box, press
Ctrl + Enter.
The alarm query must follow one of the following syntax:
o \\node\provider!group
o \provider!group
o HotBackupName
For example:
\galaxy!Area_001
For Alarm Controls hosted by Automation Object templates or instances, you can specify one of the
following alarm queries:
o \galaxy!<myArea.Tagname> to retrieve alarms and events from the Area object hosting the
Automation Object template or instance.
o \galaxy!<me.Area>!<me.Tagname>.* to retrieve alarms and events from the Automation Object
template or instance.
For more information on alarm queries, see Alarm Queries on page 13.
5. If you want to use a default acknowledgement comment, select the Use Default Ack Comment
check box and type a comment in the text box.
6. Click OK.
Showing Historical Alarms and/or Events
You can set the Alarm Control to show one of the following:
Historical alarms from the Alarm Database
Historical events from the Alarm Database
Historical alarms and events from the Alarm Database
Historical events from History Blocks
Historical alarms from History Blocks

AVEVA™ ArchestrA Alarm Control Guide Configure the Alarm Control
24
Historical alarms and events from History Blocks
When you configure the Alarm Control to show historical alarms and/or events, you also configure the
following:
Server name hosting the Alarm Database
Authentication information to connect to the Alarm Database
Maximum number of records to retrieve from the Alarm Database
Time range or duration to show in the Alarm Control
If the Alarm Control should update to the current client time
Alarm Control works with both the ArchestrA Database (A2ALMDB) and with History Blocks.
Use the following properties in scripting to switch the client mode and configure the database connection,
such as:
ClientMode Property on page 86
Database.Authentication Property on page 97
Database.Name Property on page 97
Database.Password Property on page 98
Database.ServerName Property on page 98
Database.UserID Property on page 98
Domain Property on page 98
To show historical alarms and/or events
1. Double-click the Alarm Control on the canvas. The Edit Animations dialog box appears.
2. Click Alarm Mode. The Alarm Mode page appears.
3. In the Client Mode list, click:
o Historical Alarms to only show alarms from the Alarm Database. No events are shown
o Historical Events to only show events from the Alarm Database. No alarms are shown

Configure the Alarm Control AVEVA™ ArchestrA Alarm Control Guide
25
o Historical Alarms and Events to show both alarms and events from the Alarm Database
4. In the Authentication Mode list, click one of the following:
o Windows Integrated to use the authentication of the currently logged-on Windows user
o Windows Account to use a given Windows user authentication
o SQL Server to use SQL Server authentication mode
5. In the Server Name list, either select or type the name of the server hosting the Alarm Database.
6. In the Database Name box, type the name of the Alarm Database. For the ArchestrA Database,
enter A2ALMDB, and for Historian block storage enter History Blocks.
For the History Blocks option to function correctly, the InSight/REST TCP port (Default 32569) on the
Historian Server needs to be opened in the firewall, and configured for both inbound and outbound
traffic.
Note: For History Blocks, select Windows Integrated or Windows Account as the authentication
mode.
7. If you are using Windows Account authentication mode, type the domain, user name, and
password in the Domain, User Name and Password boxes.
8. If you are using SQL Server authentication mode, type user name and password in the User Name
and Password boxes.
9. Click Test Connection. The connection to the Alarm Database is tested and a result message
appears. If necessary, check your authentication information.
10. Click OK.
To set maximum records and time range
1. Double-click the Alarm Control on the canvas. The Edit Animations dialog box appears.
2. Click Alarm Mode. The Alarm Mode page appears.
3. Make sure the Client Mode is set to Historical Alarms, Historical Events, or Historical Alarms
and Events.

AVEVA™ ArchestrA Alarm Control Guide Configure the Alarm Control
26
4. In the Maximum Records box, type the number of records to view from the control at one instance.
The valid range of maximum records is from 1 to 32766.
You can also use the MaxDatabaseRecords Property in scripting to set the maximum records at run
time.
5. To use a pre-defined time interval, select an interval from the middle list of the Time Range pickers.
6. To use a specific start time and end time, clear Update to Current Time, and select the start time
from the list at the left and the end time from the list at the right of the Time Range pickers.
You can also use the TimeSelector.* methods and properties in scripting to set the start date, end
date, or duration at run time. For more information, see
7. Click OK.
Set Alarm Control Colors
You can show different types of alarm records with different colors to more easily identify certain types of
alarms.
You can configure the Alarm Control with priority breakpoints to show alarm records within the resulting
priority ranges in different colors.
You can also configure the control background color, the grid color, and the heading colors.
Set Event Record Colors
You can set text color and background color for event records. Use the EventColor.ForeGround Property
and EventColor.BackGround Property properties in scripting to set the event alarm record text color and
background color at run time.
To set text and background colors for event records
1. Double-click the Alarm Control on the canvas. The Edit Animations dialog box appears.

Configure the Alarm Control AVEVA™ ArchestrA Alarm Control Guide
27
2. Click the Colors. The Colors page appears.
3. Configure the event record text color. Do the following:
a. Click the color field next to Event and under Text. The color picker appears.
b. Select a color and click OK.
4. Configure the event record background color. Do the following:
a. Click the color field next to Event and under Background. The color picker appears.
b. Select a color and click OK.
5. Click OK.
Set Alarm Return To Normal Record Colors
You can set text color and background color for "return to normal" alarm records. Use the
AlarmColor.Ack.RTN.ForeGround Property and AlarmColor.Ack.RTN.BackGround Property properties
in scripting to set the "return to normal" alarm record text color and background color at run time.
To set text and background colors for "return to normal" records
1. Double-click the Alarm Control on the canvas. The Edit Animations dialog box appears.
2. Click Colors. The Colors page appears.
3. Configure the "return to normal" record text color. Do the following:
a. Click the color field next to Alarm RTN and under Text. The color picker appears.
b. Select a color and click OK.
4. Configure the "return to normal" record background color. Do the following:
a. Click the color field next to Alarm RTN and under Background. The color picker appears.
b. Select a color and click OK.

AVEVA™ ArchestrA Alarm Control Guide Configure the Alarm Control
28
5. Click OK.
Set Heading, Grid, and Window Color
You can set text color and background color for the heading, the grid color, and the Alarm Control
window color. Use the corresponding HeadingColor.ForeGround Property, HeadingColor.BackGround
Property, GridColor Property, and WindowColor Property properties in scripting to set the colors for
heading, grid, and window.
To set heading, grid, and window color for the Alarm Control
1. Double-click the Alarm Control on the canvas. The Edit Animations dialog box appears.
2. Click Colors. The Colors page appears.
3. Do one of the following:
a. Configure the heading text color by clicking the color box next to Heading and under Text. If the
color box does not open, you need to select the Show Heading option on the Run-Time
Behavior page first.
b. Configure the heading background color by clicking the color box next to Heading and under
Background. If the color box does not open, you need to select the Show Heading option on
the Run-Time Behavior page first.
c. Configure the grid color by clicking the color box next to Grid. If the color box does not open, you
need to select the Show Grid option on the Run-Time Behavior page first.
d. Configure the window color by clicking the color box next to Window.
Set Alarm Shelving Colors
You can set text color and background color for alarms that are temporarily shelved.
To set alarm shelved colors
1. Double-click the Alarm Control on the canvas. The Edit Animations dialog box appears.
2. Click Colors. The Colors page appears.
3. Configure the shelve record text color. Do the following:

Configure the Alarm Control AVEVA™ ArchestrA Alarm Control Guide
29
a. Click the color field next to Shelve and under Text. The color picker appears.
b. Select a color and click OK.
4. Configure the shelve record background color. Do the following:
a. Click the color field next to Shelve and under Background. The color picker appears.
b. Select a color and click OK.
5. Click OK.
Set Priority Ranges for Alarm Records
You can use alarm priority ranges to filter alarms. The Alarm Control can show alarms within a given
range with a different text and background color. Use the AlarmColor.Range Property group in scripting
to set the breakpoints at run time.
The Alarm Control supports four alarm ranges defined by three breakpoints:
1 < breakpoint 1 < breakpoint 2 < breakpoint 3 < 999
To set priority ranges for alarm records
1. Double-click the Alarm Control on the canvas. The Edit Animations dialog box appears.
2. Click Colors. The Colors page appears.
3. In the From Pri column in the list at the right, locate the break point you want to change. These are
values except 1 or 999.
4. Click the value and type a new value in the range between the previous breakpoint and the next
breakpoint.
5. Press Enter. All priority values in the list are updated.
6. Click OK.

AVEVA™ ArchestrA Alarm Control Guide Configure the Alarm Control
30
Example
If you use the color configuration in the procedure above, the Alarm Control at run time could have
following appearance:
Set Colors for Acknowledged Alarms
You can set the text and background colors for records of acknowledged alarms. For each of the priority
ranges, you can set a text color and a background color. Use the AlarmColor.Ack.ForeGround Property
and AlarmColor.Ack.BackGround Property property groups in scripting to set the text color and
background color for acknowledged alarms in each priority range at run time.
To set colors for acknowledged alarm records
1. Double-click the Alarm Control on the canvas. The Edit Animations dialog box appears.
2. Click Colors. The Colors page appears.
3. In the list at the right, locate the Ack record and priority range for which you want to change the text
or background color.
4. Click the color box in the Text or Background column of the line. The color picker appears.
5. Select a color and click OK.
6. Click OK.
Set Colors for Unacknowledged Alarms
You can set the text and background colors for records of unacknowledged alarms. For each of the
priority ranges, you can set a text color and a background color. Use the AlarmColor.UnAck.ForeGround
Property and AlarmColor.UnAck.BackGround Property property groups in scripting to set the text color
and background color for unacknowledged alarms in each priority range at run time.
To set colors for unacknowledged alarm records
1. Double-click the Alarm Control on the canvas. The Edit Animations dialog box appears.
2. Click Colors. The Colors page appears.
3. In the list at the right, locate the Unack record and priority range for which you want to change the
text or background color.
4. Click the color box in the Text or Background column of the line. The color picker appears.

Configure the Alarm Control AVEVA™ ArchestrA Alarm Control Guide
31
5. Select a color and click OK.
Set Unacknowledged Alarms to Flash
Instead of showing unacknowledged alarm records in predefined constant text and background color,
you can configure the Alarm Control to flash unacknowledged alarms in another text and background
colors.
Note: The Flash Unack Alarms setting is checked by default for instances of the Alarm Control that are
embedded in Situational Awareness Library symbols.
The unacknowledged alarm records flash between the colors of the Unack alarms and the colors of the
Flash Unack alarms. Use the FlashUnAckAlarms Property Boolean property in scripting to set
unacknowledged alarm records to flash at run time.
Use the AlarmColor.UnAck.Flash.ForeGround Property and AlarmColor.UnAck.Flash.BackGround
Property property groups in scripting to set the text color and background color for flashing
unacknowledged alarms in each priority range at run time.
To set flashing and colors for unacknowledged alarm records
1. Double-click the Alarm Control on the canvas. The Edit Animations dialog box appears.
2. Click Colors. The Colors page appears.
3. Select the Flash Unack Alarms check box.
Note: You cannot select the Flash UnAck Alarms check box if the client mode is set to one of the
historical modes.
4. In the list on the right, locate the Unack record and priority range for which you want to change the
text or background color. Do the following:
a. Click the color box in the Text or Background column of the line. The color picker appears.
b. Select a color and click OK.
5. Locate the Flash Unack record and priority range for which you want to change the text or
background color. Do the following:
a. Click the color box in the Text or Background column of the line. The color picker appears.
b. Select a color and click OK.
6. Click OK.

AVEVA™ ArchestrA Alarm Control Guide Configure the Alarm Control
32
Rename, Resize, and Reorder Column Headers
You can rename, resize, and change the order of column headers in the Alarm Control.
All changes you make in the Column Details list are shown in the grid preview.
You can also use the grid preview to resize columns or change their order with the pointer.
Column headers can be localized along with other symbol text when you export, translate, and reimport
language files. The translated language files must be imported to the InTouch HMI for run-time language
switching. For further information, see Chapter 11 Working with Languages in the Application Server
User’s Guide.
Important: If you rename or reorder column headers, you must repeat the symbol text translation
procedures. If you do not, your changes will not be available for run-time language switching.
Rename Column Headers
You can rename the column headers in the Alarm Control.
To rename column headers
1. Double-click the Alarm Control on the canvas. The Edit Animations dialog box appears.
2. Click Column Details tab. The Column Details page appears.
3. In the Column Details list, locate the column header you want to rename and click on it.

Configure the Alarm Control AVEVA™ ArchestrA Alarm Control Guide
33
4. Type a new name and press Enter. The Column Details list and the grid preview are updated with
the new name.
5. Click OK.
Resize Columns
You can resize the column headers in the Alarm Control either by:
Typing in a numeric value
Dragging the column header boundary width with the pointer in the grid preview
To resize the column numerically
1. Double-click the Alarm Control on the canvas. The Edit Animations dialog box appears.
2. Click Column Details. The Column Details page appears.
3. In the Column Details list, locate the name of the column you want to resize and click on the Width
value in the row.

AVEVA™ ArchestrA Alarm Control Guide Configure the Alarm Control
34
4. Type a new width in pixels and press Enter. The Column Details list and the grid preview are
updated.
5. Click OK.
To resize the column graphically
1. Double-click the Alarm Control on the canvas. The Edit Animations dialog box appears.
2. Click Column Details. The Column Details page appears.
3. In the grid preview, locate the column you want to resize and drag the column boundary to resize the
column. The width value of the Column Details list is updated.
4. Click OK.
Change the Order of Columns
You can change the order of the columns in the Alarm Control by:
Moving column names up and down in the Column Details list using buttons
Dragging the column header with the pointer in the grid preview
You also can reset the column widths and order to their default values. Resetting the column widths and
order also resets the names to their default values.
To change the column order
1. Double-click the Alarm Control on the canvas. The Edit Animations dialog box appears.
2. Click Column Details. The Column Details page appears.
3. Do one of the following:

Configure the Alarm Control AVEVA™ ArchestrA Alarm Control Guide
35
o Click arrow up and arrow down to reposition the columns
o In the grid preview, drag the name of the column you want to reposition and drop it to the left of
another column to reposition it
The grid preview and the Column Details list shows the new column order.
4. Click OK.
To reset column widths and order
1. Double-click the Alarm Control on the canvas. The Edit Animations dialog box appears.
2. Click Column Details. The Column Details page appears.
3. Click Reset. The column widths, names, and order are reset to their default values.
4. Click OK.
Sort Alarms
You can configure how the Alarm Control sorts alarm records at run time. By default, the Alarm Control
lists alarm records by time in ascending order.

AVEVA™ ArchestrA Alarm Control Guide Configure the Alarm Control
36
You can sort alarm records in ascending or descending order based on a first sort criteria, an optional
second sort criteria, an optional third sort criteria, and and optional fourth sort criteria.
You can configure the sorting columns and directions either in lists or with the grid preview. Use the
SortColumn.First Property, SortColumn.Second Property, and SortColumn.Third Property properties in
scripting to set the columns to be sorted at run time. Use the SortOrder.First Property, SortOrder.Second
Property, and SortOrder.Third Property properties in scripting to set the sort direction for each at run
time.
To set sorting columns and directions with lists
1. Double-click the Alarm Control on the canvas. The Edit Animations dialog box appears.
2. Click Column Details. The Column Details page appears.
3. In the Sorting area, do the following:
a. Select the primary sort column in the First Sort Column list and a sorting direction in the list to
its right.
b. Optionally, select the secondary sort column in the Second Sort Column list and a sorting
direction in the list to its right.
c. If you set the Second Sort Column, optionally select the tertiary sort column in the Third Sort
Column list and a sorting direction in the list to its right.
The grid preview is updated and shows arrows for the sorted columns and their sort directions.
To set sorting columns and directions with the grid preview
1. Double-click the Alarm Control on the canvas. The Edit Animations dialog box appears.
2. Click Column Details. The Column Details page appears.
3. In the grid preview, click on a column to select it for sorting. An arrow appears on the column header
and the change is also shown in the Sorting area lists.
4. To change the sorting direction, click on the column header again. The arrow changes on the column
header and the change is also shown in the Sorting area lists.

Configure the Alarm Control AVEVA™ ArchestrA Alarm Control Guide
37
Note: If you click on a column header after releasing the Shift key, all sorting information is lost and
the selected column is the new primary sorting criteria.
5. To set second, third, and fourth sorting, hold the Shift key and repeat from step 3.
6. Release the Shift key.
7. Click OK.
Filter Alarms
You can filter current and historical alarms by using queries and filters. Queries and filters are collections
of filter criteria in a logical construct.
For example, you can filter alarms by defining a query or a filter that only shows alarms with priorities
larger than 500 and smaller than 750.
You can re-use the filters and queries you define for historical alarms for current alarms and vice versa.
You can also re-use filters and queries you define at design time at run time and vice versa.
Important: Queries and filters for current alarms and recent alarms and events require at least a
Provider and Group as filter criteria. These must use the equals sign or a message asking for those
fields will appear.
When you use TimeLCT, TimeOAT, or TimeLCTOAT as filter criteria for historical alarm modes, you
need make sure that the TimeSelector.StartDate and TimeSelector.EndDate properties do not limit the
query. Otherwise the Alarm Control can possibly not return all alarm and event records.
Set the TimeSelector.StartDate property earlier than any time filtering requirement, and the
TimeSelector.EndDate later than any time filtering requirement.
Using Wildcards in Queries
In current alarm queries, you can use wildcards only in the Tagname part of the query and not in the
Provider, Group, or Node part of the query. A valid example is:
\galaxy!Mixing!RotorBlade*
In query filters that are used for current queries, the same restrictions apply.
In query filters that are used for historical queries, you must convert the operator and wildcard to SQL
syntax according to the following table:
Current Query
Historical Query
Operator
=
Like
Wildcard
*
%
For example:
Provider = ‘galaxy’ AND Group = ‘Mixing’
AND Name Like ‘RotorBlade%’
If you want to use a query filter containing a wildcard for a current query and a historical query, create two
separate query filters. If a column contains null data, it cannot be retrieved using the Like operator.
Use an Existing Query or Filter
You can use an existing query filter to filter the alarms shown in the ArchestrA Alarm Control. You can
also use the Favorite Property string property in scripting to switch to an existing query filter at run-time.
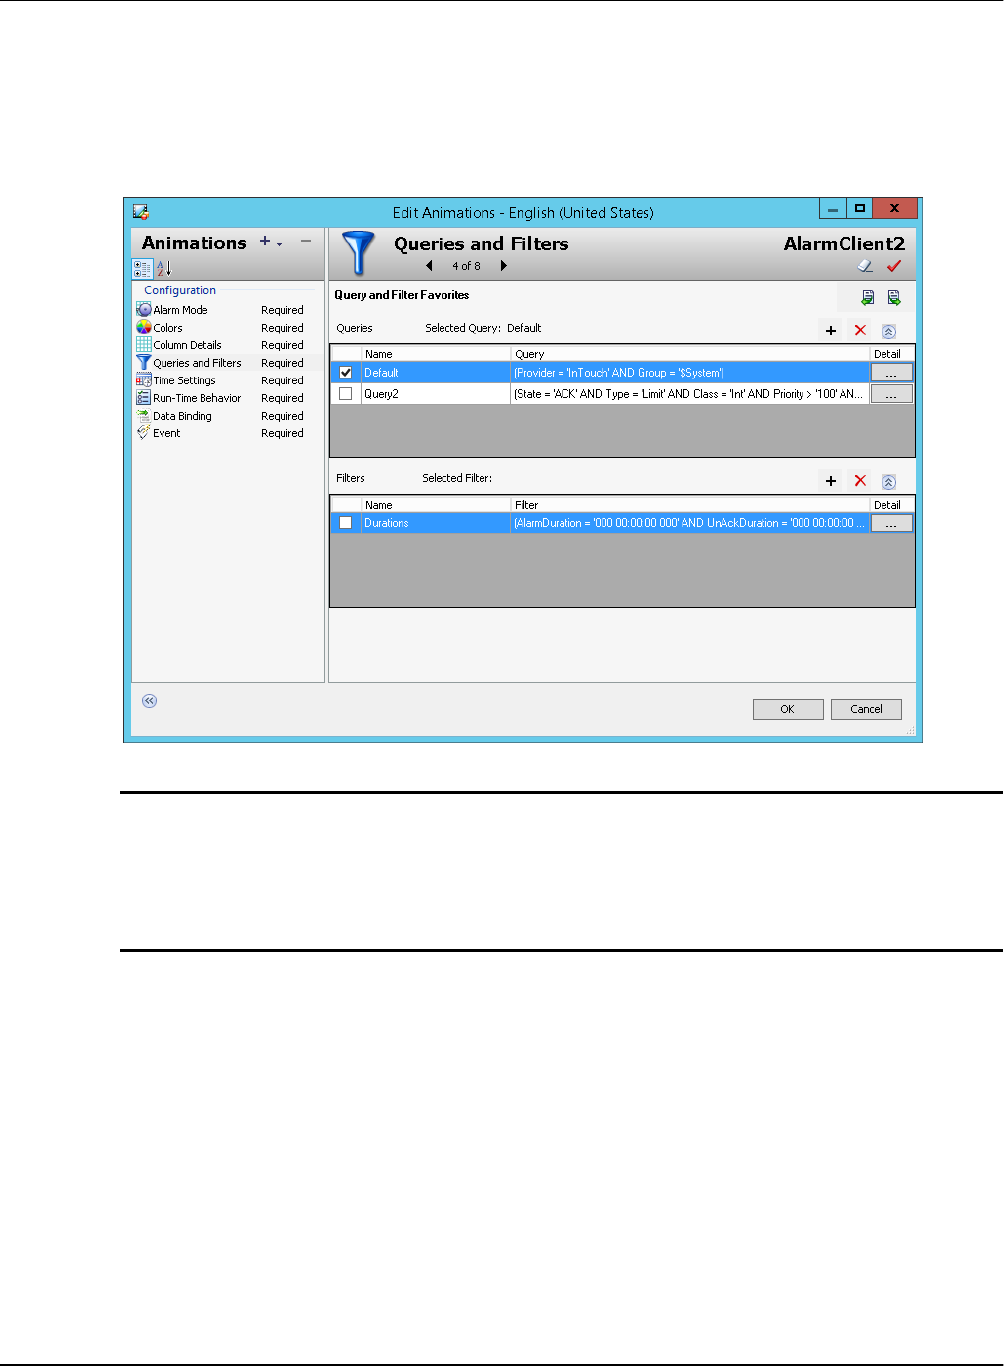
AVEVA™ ArchestrA Alarm Control Guide Configure the Alarm Control
38
To use an existing query filter
1. Double-click the Alarm Control on the canvas. The Edit Animations dialog box appears.
2. Click Queries and Filters. The Query and Filter Favorites page appears.
3. In the Query and Filter Favorites list, select a query or filter by clicking the check box before each
query or filter name.
4. Click OK.
Note: In Current Alarms mode, if you try to proceed from Queries and Filters page with no query or
filter selected, you will be prompted with a message to confirm you want to continue. Upon click of
Yes the default query will be selected and you can continue. Upon click of No, you will be returned to
the Queries and Filters page. If a query is selected but no filter, no message will display.
In Historical Alarms mode, if you proceed without a query selected but have selected a filter, the filter
will be applied. If neither query nor filter is selected, you will be prompted with the same message.
Add a New Query or Filter
You can define a new query filter to filter the alarms shown in the ArchestrA Alarm Control. The new
query filter is saved as a favorite in the Query Filter Favorites list.
To add a new query filter
1. Double-click the Alarm Control on the canvas. The Edit Animations dialog box appears.

Configure the Alarm Control AVEVA™ ArchestrA Alarm Control Guide
39
2. Click Queries and Filters. The Query and Filter Favorites page appears.
3. Click the Add New Query button above the saved query favorites box or click the Add New Filter
button above the saved filter favorites box.
The Add Query or Filter dialog box appears.
4. Construct queries or filters as needed.
For more information, see Construct Filters on page 40.
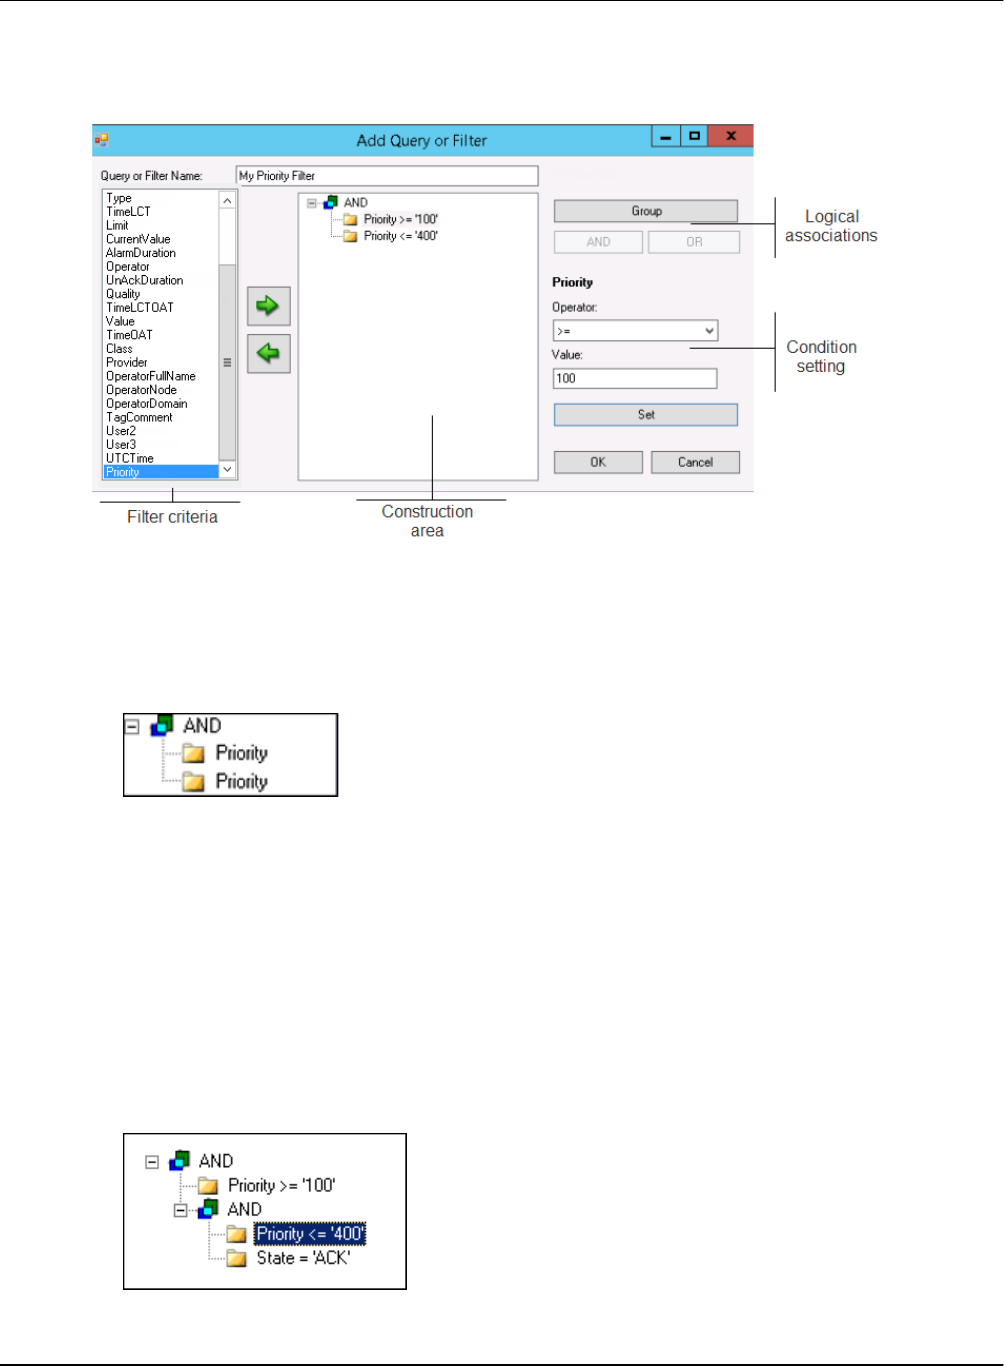
AVEVA™ ArchestrA Alarm Control Guide Configure the Alarm Control
40
Construct Filters
You use the Add Query or Filter dialog box to create or edit a filter graphically.
To construct a filter
1. If you want to change the filter name, type a new unique name in the Filter Name box.
2. Add filter criteria to the construction area by selecting a column name on the left and clicking the right
arrow button. When you add filter criteria to the construction area, they are automatically logically
connected by AND.
3. If necessary, remove filter criteria by selecting them in the filter construction area and clicking the left
arrow button.
4. To change the logical operator, select it in the filter construction area, and then either:
o Click AND or OR
o Right-click and select AND or OR from the shortcut menu
5. To group filter criteria logically, either:
o Drag a filter criteria in the construction area over another filter criteria
o Select one filter criteria, click Group, and then click the other filter criteria
By default, the filter criteria are logically grouped with AND. If necessary, you can select the AND
item in the tree and click OR to change it to an OR grouping.
6. Assign values to filter criteria.
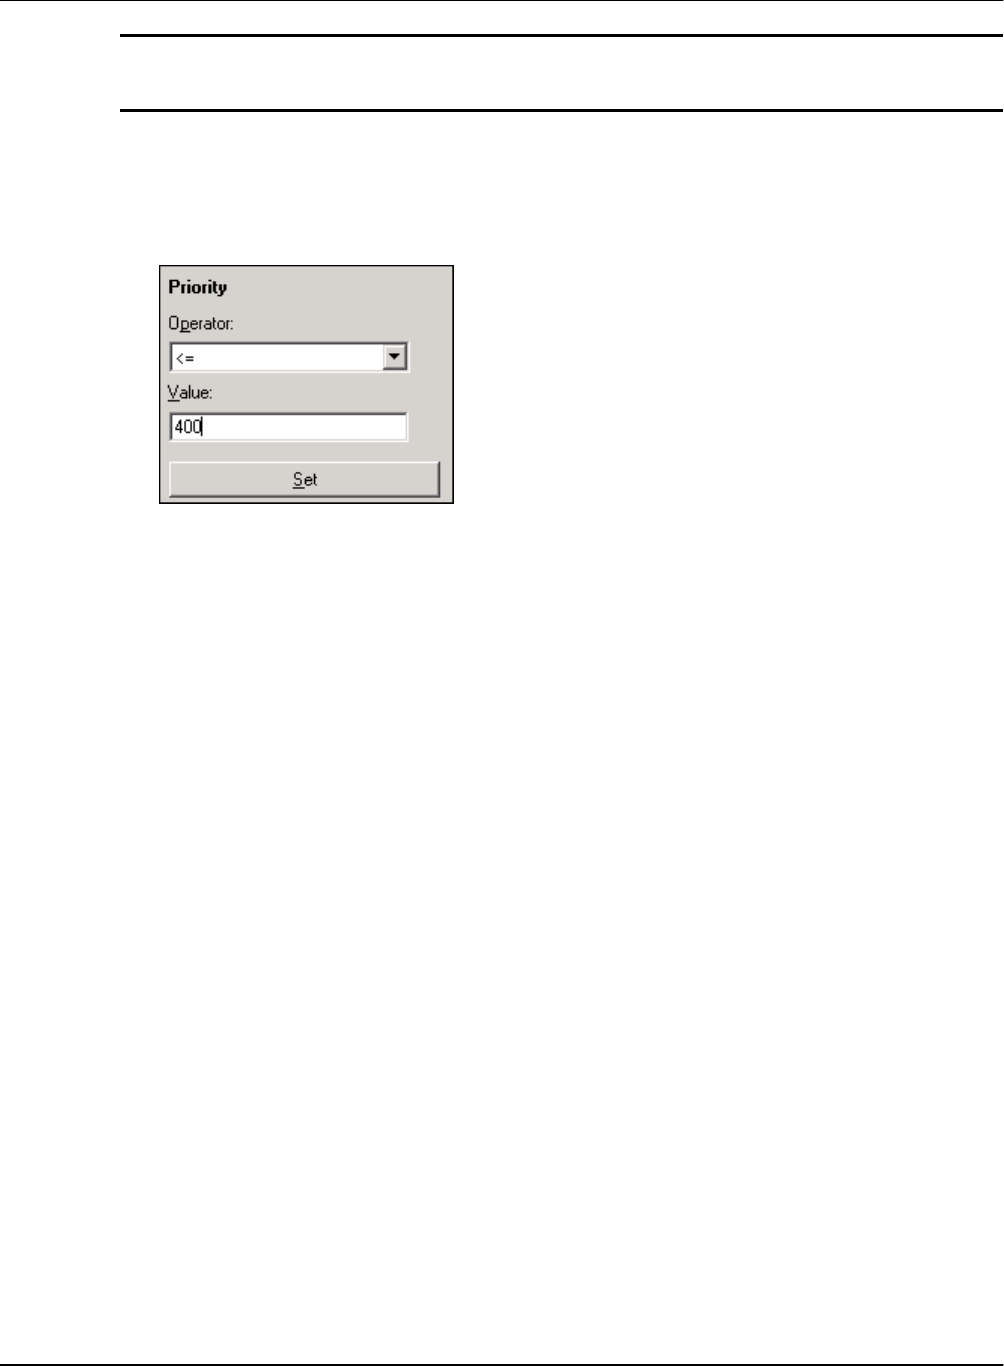
Configure the Alarm Control AVEVA™ ArchestrA Alarm Control Guide
41
Note: If you are using the Value column as a filter criteria, you may get unexpected results at run
time. The items in the Value column are sorted alphabetically, not numerically. This is because the
Value column can contain strings.
Do the following:
a. Select a filter criteria in the construction area.
b. Select an operator from the Operator list.
c. Type or select a value in the Value box.
d. Click Set. The filter criteria is updated in the construction area.
7. To cut, copy, or paste individual filter criteria or filter criteria branches, right-click on the filter criteria
and select the appropriate option from the shortcut menu.
8. When you are done, click OK.
Modify an Existing Query or Filter
You can modify an existing query or filter using the Modify Query or Filter dialog box.
To modify an existing query or filter
1. Double-click the Alarm Control on the canvas. The Edit Animations dialog box appears.
2. Click Queries and Filters. The Queries and Filters page appears.
3. Select an existing query or filter in the Query and Filter Favorites list by clicking on the check box
before each query or filter name.
4. Click the ellipsis button. The Modify Query or Filter dialog box appears. For more information, see
Construct Filters on page 40.
5. Click OK.
Delete a Query or Filter Favorite
You can delete any non-default query or filter favorite.
To delete a query or filter favorite
1. Double-click the Alarm Control on the canvas. The Edit Animations dialog box appears.
2. Click Queries and Filters. The Queries and Filters page appears.
3. Select an existing query or filter in the Queries and Filter Favorites list by clicking on the check box
before each query or filter name.
4. Click the Delete selected query button or click the Delete selected filter button.
5. When a message appears, click Yes.
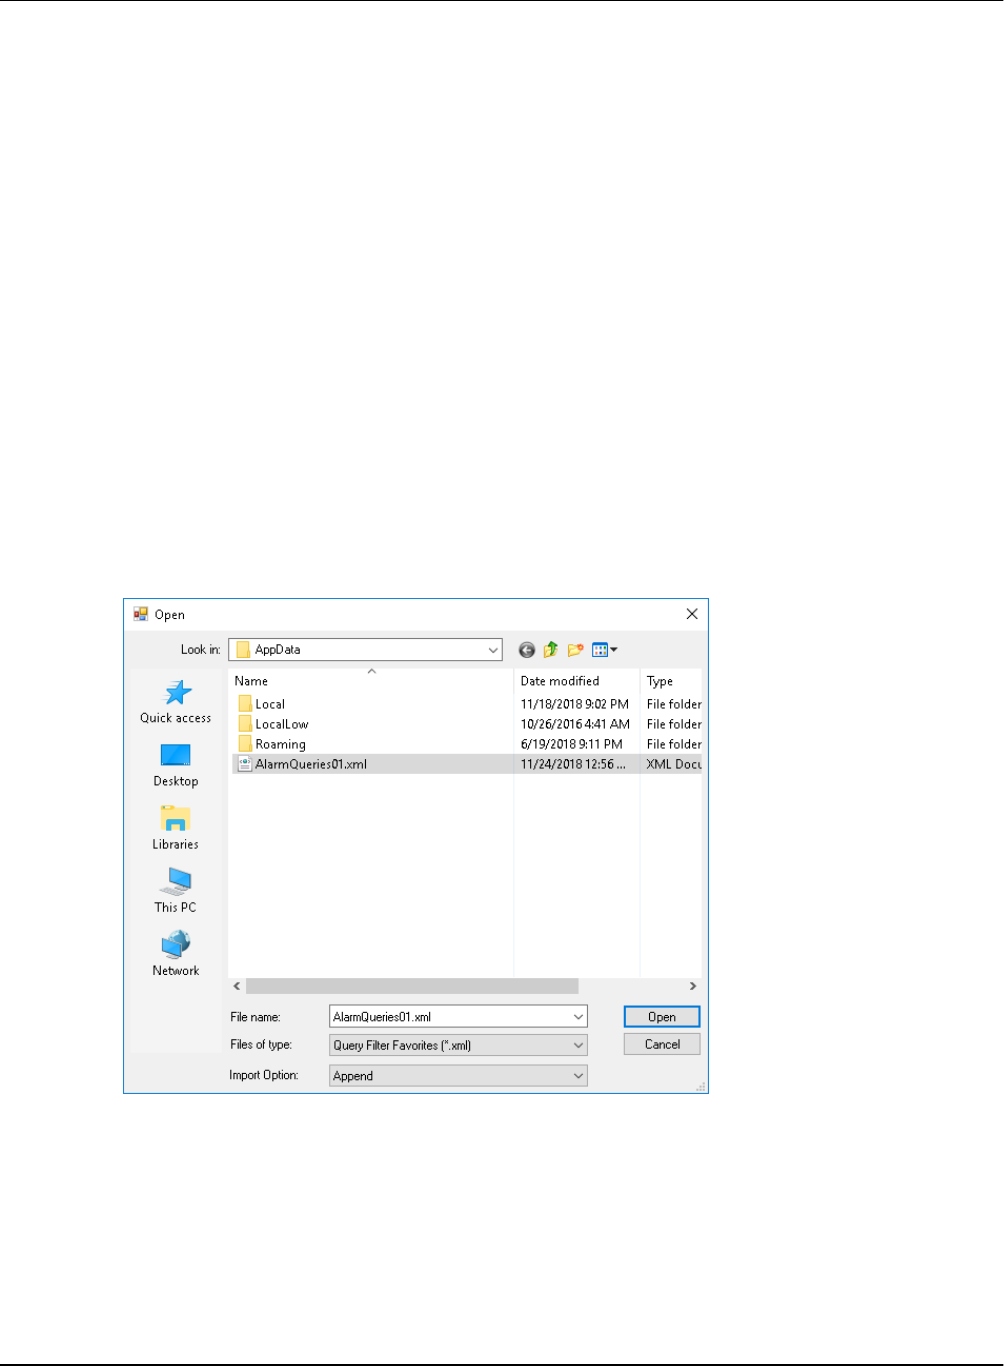
AVEVA™ ArchestrA Alarm Control Guide Configure the Alarm Control
42
Export Query and Filter Favorites
You can export the query and filter favorites lists to an XML file. The XML file containing the query and
filter favorites can be imported to other Alarm Control in design time or run time. Do not edit this file
directly. The default query is also exported to the XML file.
To export the query and filter favorites lists
1. Double-click the Alarm Control on the canvas. The Edit Animations dialog box appears.
2. Click Queries and Filters. The Queries and Filters page appears.
3. Select an existing query or filter in the Query and Filter Favorites list by selecting the check box
before each query or filter name.
4. Click the Export button. Select a location and a name for the XML file and click Save.
Import Query and Filter Favorites
You can import the query filter favorites list from an XML file.
To import the query filter favorites list
1. Double-click the Alarm Control on the canvas. The Edit Animations dialog box appears.
2. Click Queries and Filters. The Queries and Filters page appears.
3. Click Import. Navigate to the XML file you want to import.
4. In the Import Option list, click either:
o Append to append the imported query filters to the existing query filters. If query filter names in
the imported XML conflict with existing query filters, you are prompted to confirm the import for
each filter
o Overwrite to replace all existing query filters with the imported query filters
5. Select the XML file and click Open.

Configure the Alarm Control AVEVA™ ArchestrA Alarm Control Guide
43
Setting Time Zone and Format
You can set the time zone in which the client shows the alarm and event records. By default, the time
zone is set to the client computer’s current time zone at design time. Use the TimeZone.TimeZone
Property, Time.Type Property, and Time.Format Property properties in scripting to set the time zone,
time type, and time format at run time.
You can also set the time format of the alarm and event records. You can select between two different
time format sets:
Default Time Format: same as the InTouch Alarm Viewer control and InTouch Alarm DB View control
of InTouch version 10.0 and later
.NET Time Format: defined by Microsoft .NET Framework time format conventions
Set the Time Zone
You can set the time zone in which the Alarm Control shows the alarm and event records.
You can either set the time display to a predefined time zone, or to the client time zone. The client time
zone is the time zone of the computer on which the Alarm Control is running.
The Client Time Zone setting is useful if you are deploying an application using the Alarm Control to a
different time zone.
For example, if you develop your application in the Pacific Time zone and deploy it to two computers in
the time zones Central Time and Eastern Time, you can ensure the Alarm Control shows the local time
for each deployment by setting the time zone to Client Time Zone.
To set the time zone
1. Double-click the Alarm Control on the canvas. The Edit Animations dialog box appears.
2. Click Time Settings. The Time Settings page appears.

AVEVA™ ArchestrA Alarm Control Guide Configure the Alarm Control
44
3. In the Time Zone list, select a time zone.
4. Click OK.
Set a Time Format
You can set the time format in which the Alarm Control shows the alarm and event records. You can
either use a predefined datetime format, or compose one.
To set the time format
1. Double-click the Alarm Control on the canvas. The Edit Animations dialog box appears.
2. Select Time Settings.
3. In the Time Format area, do the following:
a. Make sure Use .NET Time Format is cleared.
b. Select date format codes from the list at the right. The equivalent date format code appears in
the box above.
c. Select time format codes from the list at the right. The equivalent time format code is appended
to the date format string.
4. If you want to customize the datetime format, modify the codes in the box as follows:
Code
Purpose
Example
%m
Two-digit month
03
%b
Three-letter month
Mar
%B
Full month name
March
%d
Two-digit day
17
%Y
Four-digit year
2008
%y
Two-digit year
08
%#x
Full day and date
Tuesday, March 11, 2008

Configure the Alarm Control AVEVA™ ArchestrA Alarm Control Guide
45
Code
Purpose
Example
%H
Hours in 24 hour format
14
%I
Hours in 12 hour format
2
%M
Minutes
55
%S
Seconds
34
%s
Milliseconds
223
%p
AM or PM
PM
5. Click OK.
Set a .NET Datetime Format
You can set the .NET datetime format in which the Alarm Control shows the alarm and event records.
You can either use a predefined datetime format, or compose one. The predefined date format is based
on the short date format setting of the operating system and may vary from computer to computer.
To set the .NET datetime format
1. Double-click the Alarm Control on the canvas. The Edit Animations dialog box appears.
2. Click Time Settings. The Time Settings page appears.
3. In the Time Format area, do the following:
a. Select the Use .NET Time Format check box.
b. Select date format codes from the list at the right. The equivalent date format code appears in
the box above.
c. Select time format codes from the list at the right. The equivalent time format code is appended
to the time format string.
4. If you want to customize the datetime format, modify the codes in the box as in the table below. For
more information, see the Microsoft Knowledge database on .NET datetime formats.
Code
Purpose
Example
M
Single-digit month
9
MM
Two-digit month
09
MMM
Three-letter month
Sep
MMMM
Full month name
September
d
Single-digit day
8
dd
Two-digit day
08
ddd
Abbreviated day of the week
Mon.
dddd
Day of the week
Monday

AVEVA™ ArchestrA Alarm Control Guide Configure the Alarm Control
46
Code
Purpose
Example
yyyy
Four-digit year
2008
yy
Two-digit year
08
HH
Hours in 24 hour format
14
hh
Hours in 12 hour format
2
mm
Minutes
55
ss
Seconds
34
fff
Milliseconds
223
tt
AM or PM
PM
5. Click OK.
Configuring Run-Time Behavior
You can configure the behavior and appearance of the Alarm Control at run time, for example:
Showing and Hiding parts of the Alarm Control
Specifying if the Alarm Control queries the alarm database when it starts up
Scrolling to new alarms
Hiding warnings, errors, and messages
Restricting operator access to parts of the Alarm Control
Specifying Alarm Control freeze behavior
Customizing the "no records" message
Configuring alarms to require an ACK signature
Configuring alarms to require a SHELVE signature

Configure the Alarm Control AVEVA™ ArchestrA Alarm Control Guide
47
Customizing the run-time shortcut menu
Show Heading, Grid, or Status Bar
You can show and hide parts of the Alarm Control at run time, such as the heading, grid, or status bar.
Use the ShowHeading Property, ShowGrid Property, and ShowStatusBar Property properties in scripts
to show or hide the heading, grid, and status bar at run time.
To show the heading, grid, or status bar at run time
1. Double-click the Alarm Control on the canvas. The Edit Animations dialog box appears.
2. Click Run-Time Behavior. The Run-Time Behavior page appears.
3. To show or hide parts of the Alarm Control during run time, do any of the following:
o Select the Show Heading check box to show the heading at run time, or clear it to hide the
heading at run time.
o Select the Show Grid check box to show the grid at run time, or clear it to hide the grid at run
time.

AVEVA™ ArchestrA Alarm Control Guide Configure the Alarm Control
48
o Select the Show Status Bar check box to show the status bar at run time, or clear it to hide the
status bar at run time.
Caution: If you hide the status bar, you will not be able to see important indicators, such as the
New Alarms, Hidden Alarms, and Frozen Grid indicators.
4. Click OK.
Automatic Query for Alarms on Start Up
You can configure the Alarm Control to automatically query the Alarm Database when the control starts
up at run time. Use the QueryStartup Property in scripts to control query behavior when the Alarm
Control starts.
By default, current alarms and recent alarms and events are automatically queried when the Alarm
Control starts at run time. You can disable the automatic query if the Alarm Control is:
Configured to mainly use query filters
Controlled mainly by scripts
To query the Alarm Database automatically on start up
1. Double-click the Alarm Control on the canvas. The Edit Animations dialog box appears.
2. Click Run-Time Behavior. The Run-Time Behavior page appears.
3. Select the Query on Startup check box.
4. Click OK.
Scroll Automatically to New Alarms
If an operator views multiple pages of alarms, new alarms may go unnoticed. You can configure the
Alarm Control to scroll automatically to show new alarms. Use the AutoScroll Boolean property in scripts
to scroll automatically to new alarms.
However, if the Alarm Control scrolls automatically to new alarms, it may be hard for the operator to view
and analyze older alarms if new alarms occur. If the Alarm Control is frozen, it will not scroll automatically
to new alarms.
To scroll automatically to new alarms
1. Double-click the Alarm Control on the canvas. The Edit Animations dialog box appears.
2. Click Run-Time Behavior. The Run-Time Behavior page appears.
3. Select the Auto Scroll to New Alarms check box.
4. Click OK.
Hide Errors, Warnings, and Status Messages
You can prevent a message dialog box from opening when errors, warnings, or status messages occur
in the Alarm Control. Even if you hide errors, warnings and status messages are sent to the ArchestrA
Logger. Use the HideErrors property in scripts to hide error, warning, and status messages at run time.
To hide error and warning messages
1. Double-click the Alarm Control on the canvas. The Edit Animations dialog box appears.
2. Click Run-Time Behavior. The Run-Time Behavior page appears.
3. Select the Hide Errors and Warnings check box.
4. Click OK.

Configure the Alarm Control AVEVA™ ArchestrA Alarm Control Guide
49
Restrict User Access to Rows and Columns
You can prevent the operator from:
Resizing columns
Selecting rows
Selecting multiple rows
Use this feature for interfaces where it is easy to accidentally resize columns or select rows. For
example, if the Alarm Control is running on a small display, use the AllowColumnResize Property and
RowSelection Property properties in scripting to control the ability to resize columns and select rows at
run time.
To prevent the operator from resizing columns
1. Double-click the Alarm Control on the canvas. The Edit Animations dialog box appears.
2. Click Run-Time Behavior. The Run-Time Behavior page appears.
3. Clear the Allow Column Resizing check box.
4. Click OK.
To prevent the operator from selecting rows
1. Double-click the Alarm Control on the canvas. The Edit Animations dialog box appears.
2. Click Run-Time Behavior. The Run-Time Behavior page appears.
3. In the Row Selection list, click:
o No to prevent operator from selecting rows
o Single to allow operator to only select one row
o Multiple to allow operator select multiple rows
4. Click OK.
Retain Hiding when Changing Alarm Query Filter
You can configure the Alarm Control to hide alarms even if the alarm query filter changes. Use the
RetainHidden Property in scripts to retain the hiding of alarms at run time.
To retain hiding when change the alarm query filter
1. Double-click the Alarm Control on the canvas. The Edit Animations dialog box appears.
2. Click Run-Time Behavior. The Run-Time Behavior page appears.
3. Select the Retain Hidden check box.
4. Click OK.
Override the Frozen Grid
You can configure the Alarm Control to unfreeze the grid after a given time in seconds. Use this option to
make sure that new alarms appear on the grid after a specified time. Use the AutoResumeDuration
Property in scripts to unfreeze the Alarm Control after a certain duration at run time.
The Alarm Control also unfreezes if you change one of the following:
Alarm Mode
Alarm Query

AVEVA™ ArchestrA Alarm Control Guide Configure the Alarm Control
50
Query Filter
To override the frozen grid
1. Double-click the Alarm Control on the canvas. The Edit Animations dialog box appears.
2. Click Run-Time Behavior. The Run-Time Behavior page appears.
3. Select the Auto Resume after check box and type the number of seconds after which the grid
unfreezes.
4. Click OK.
Customize the "No Records" Message
You can customize the message that appears when there are no records to show in the grid. Use the
NoRecordsMessage.Enabled Property and NoRecordsMessage.Message Property in scriptw to
customize the "no records" message at run time.
To customize the "no records" message
1. Double-click the Alarm Control on the canvas. The Edit Animations dialog box appears.
2. Click Run-Time Behavior. The Run-Time Behavior page appears.
3. Select the Show Custom ‘No Records’ Message check box and type a message you want to show
in the Alarm Control when there are no alarm records.
4. Click OK.
Changing the Language of the "No Records" Message
You can change the language of the message that appears when there are no records to show in the
Alarm Control grid.
To change the language of the "No Records" Message
1. Right-click on the canvas and click Scripts. The Edit Scripts dialog box appears.
2. Click the Add icon and give the script a name, for example ChangeLanguage.
3. In the Expression box, type:
intouch:$Language
4. In the Trigger list, click DataChange.
5. In the script area, type the following:
If intouch:$Language == 1033 then ' Switch to English
AlarmClient1.NoRecordsMessage.Message = "No Records";
else If intouch:$Language == 1031 then ' Switch to German
AlarmClient1.NoRecordsMessage.Message = "Keine Einträge";
else if intouch:$Language == 1036 then ' Switch to French
AlarmClient1.NoRecordsMessage.Message = "Aucun enregistrement";
endif;
endif;
endif;
6. Click OK.
Configure the Alarm Control to Require an ACK Signature
Even if you are logged into the InTouch application, acknowledging the alarms that fall within a specific
priority range may need to be authenticated by you if required by your company or industry. You can
configure the Alarm Control to provide such functionality by selecting the Requires ACK Signature
check box in the Object Properties dialog of the Alarm Control.

Configure the Alarm Control AVEVA™ ArchestrA Alarm Control Guide
51
After the Alarm Control has been configured to require a signature for acknowledgement, you need to set
its minimum and maximum priority values. The valid range of the minimum and maximum priority values
is 1 to 999.
To configure the Alarm Control to require ACK signature
1. Place an Alarm Control in the drawing canvas.
2. Double-click the Alarm Control on the canvas. The Edit Animations dialog box appears.
3. Click Run-Time Behavior. The Run-Time Behavior page appears.
4. Select the Requires ACK Signature check box. The Min Priority and Max Priority boxes are
enabled.
5. Enter the minimum and maximum priority values for the alarm range that will require authentication.
6. Click OK.
You can configure the alarm signature requirement as well as the minimum and maximum values in run
time using the Object Editor. For more information about using the Object Editor, see the Application
Server User’s Guide, Chapter 3, Working with Objects.
For more information about configuring the Alarm Control in run time to require an alarm
acknowledgement signature, see the "SignedAlarmAck() Applied Examples" topic in the Creating and
Managing Industrial Graphics User’s Guide.
Note: If your computer supports Smart Cards, you can use them for alarm authentication at run time.
You need to have the Smart Card mapped to your user account in the domain. If the Smart Card is
already in the reader and you enter the correct PIN, the system will allow you to acknowledge the alarms.

AVEVA™ ArchestrA Alarm Control Guide Configure the Alarm Control
52
Configuring the Alarm Control to Require a SHELVE Signature
Operators can temporarily shelve selected alarms from the list of an Alarm Control’s active alarms. A
shelved alarm is suppressed and removed from the list of active alarms. Typically, operators shelve
lower severity nuisance alarms because they provide little diagnostic value and interfere with the
operator’s ability to manage a plant process.
An alarm is shelved for a specified period. After the period ends, alarms are automatically unshelved and
appear again in the list of active alarms. Operators can also manually unshelve an alarm before the end
of the specified shelved period.
By default, Medium and Low severity alarms are enabled for shelving. Critical and High severity alarms
are not because of the potential risk of shelving and ignoring alarms that represent serious operating
states. For more information about enabling shelving based on alarm severity, see "Configuring Alarm
Severity to Priority Mapping" in the Application Server User Guide.
The Alarm Control provides a configuration option to restrict alarm shelving only to operators authorized
by application security. When an operator selects one or more alarms and attempts to shelve them, the
Alarm Control verifies if a shelve signature is required.
If no SHELVE signature is required
The Alarm Control shows a simple Shelve Comment dialog box with a Duration field to select the
number of hours (1, 2, 4, 8, 12) to shelve the alarm and a Reason field to enter a mandatory
comment.
If a SHELVE signature is required and application security is active
The Alarm Control shows a Shelve Comment dialog box with fields for the operator to enter user
credentials (name, password, domain) in addition to selecting a shelve duration and entering a
mandatory comment.
By default, the logged-in user appears in the Username field. If the application security type is
ArchestrA, then ArchestrA appears in the Domain field and cannot be edited. If the credentials are
valid, the Alarm Control attempts to shelve the selected alarms.

Configure the Alarm Control AVEVA™ ArchestrA Alarm Control Guide
53
The Alarm Control shows an error message if the operator enters invalid credentials. When the
operator clicks OK on the error message, the Shelve Comment dialog appears again with the
entered user name, comment, and duration. The Password (or PIN) is blank. The operator can
attempt to authenticate again or cancel.
To configure the Alarm Control to require a SHELVE signature
1. Place an Alarm Control in the drawing canvas.
2. Double-click the Alarm Control on the canvas. The Edit Animations dialog box appears.
3. Click Run-Time Behavior. The Run-Time Behavior page appears.
4. Select or clear Requires SHELVE Signature based on whether operators need to enter their
credentials to shelve alarms or not.
5. Click OK.
Configuring the Run-Time Shortcut Menu
You can configure the Alarm Control’s shortcut menu to show only selected options at run time. The
shortcut menus showing historical alarms (or events) and current alarms (or recent alarms and events)
are different.
For the current alarms Context menu, you can also show or hide entire shortcut submenus. Use the
ContextMenu and the ShowContextMenu Property in scripting to control if shortcut menu items appear
or not at run time.
To hide the Context menu
1. Double-click the Alarm Control on the canvas. The Edit Animations dialog box appears.
2. Click Run-Time Behavior. The Run-Time Behavior page appears.
3. Clear the Show Context Menu check box.
4. Click OK.

AVEVA™ ArchestrA Alarm Control Guide Configure the Alarm Control
54
To show or hide Context menu options
1. Double-click the Alarm Control on the canvas. The Edit Animations dialog box appears.
2. Click Run-Time Behavior. The Run-Time Behavior page appears.
3. Make sure the Show Context Menu check box is selected.In the shortcut menu lists, do the
following:
a. Select the options you want to appear on the run-time Context menu (if applicable for the
selected client mode).
b. Clear the options you want to hide from the operator on the run-time Context menu.
4. Click OK.

AVEVA™ ArchestrA Alarm Control Guide
55
During run time, users can show a shortcut menu containing options to monitor and manage alarms.
Also, other options enable users to sort and filter alarms shown by the Alarm control.
Refresh the Alarm Control Grid
You can refresh the Alarm Control grid at run time. The Alarm Control retrieves alarm record data based
on the Alarm Database time range settings.
To refresh the alarm control
1. Right-click the Alarm Control grid at run time. The shortcut menu appears.
2. Click Requery.
View Status Bar Information
The status bar shows you information about the current Alarm Control grid. Depending on the client
mode, the status bar information shows different information.
Using Status Bar Information of Current Modes
If the Alarm Control is showing current alarms or recent alarms and events, the status bar shows the
following:
Element
Icon(s)
Description
Client Mode
Indicates the Alarm Control is showing current alarms (or recent
alarms and events).
New Alarms
Appears if new alarms have occurred. If you move the pointer over
the indicator, the tooltip shows how many alarms are
unacknowledged.
Hidden Alarms
Appears if any alarms are currently hidden. If you move the pointer
over the indicator, the tooltip shows how many alarms are hidden.
Frozen Grid
Appears if the Alarm Control is currently frozen.
Alarm Records
Shows the total number of alarm records and which alarms are
currently shown.
Query Filter
Shows the name of the current query filter favorite.
CHAPTER 3
Use the Alarm Control at Run Time
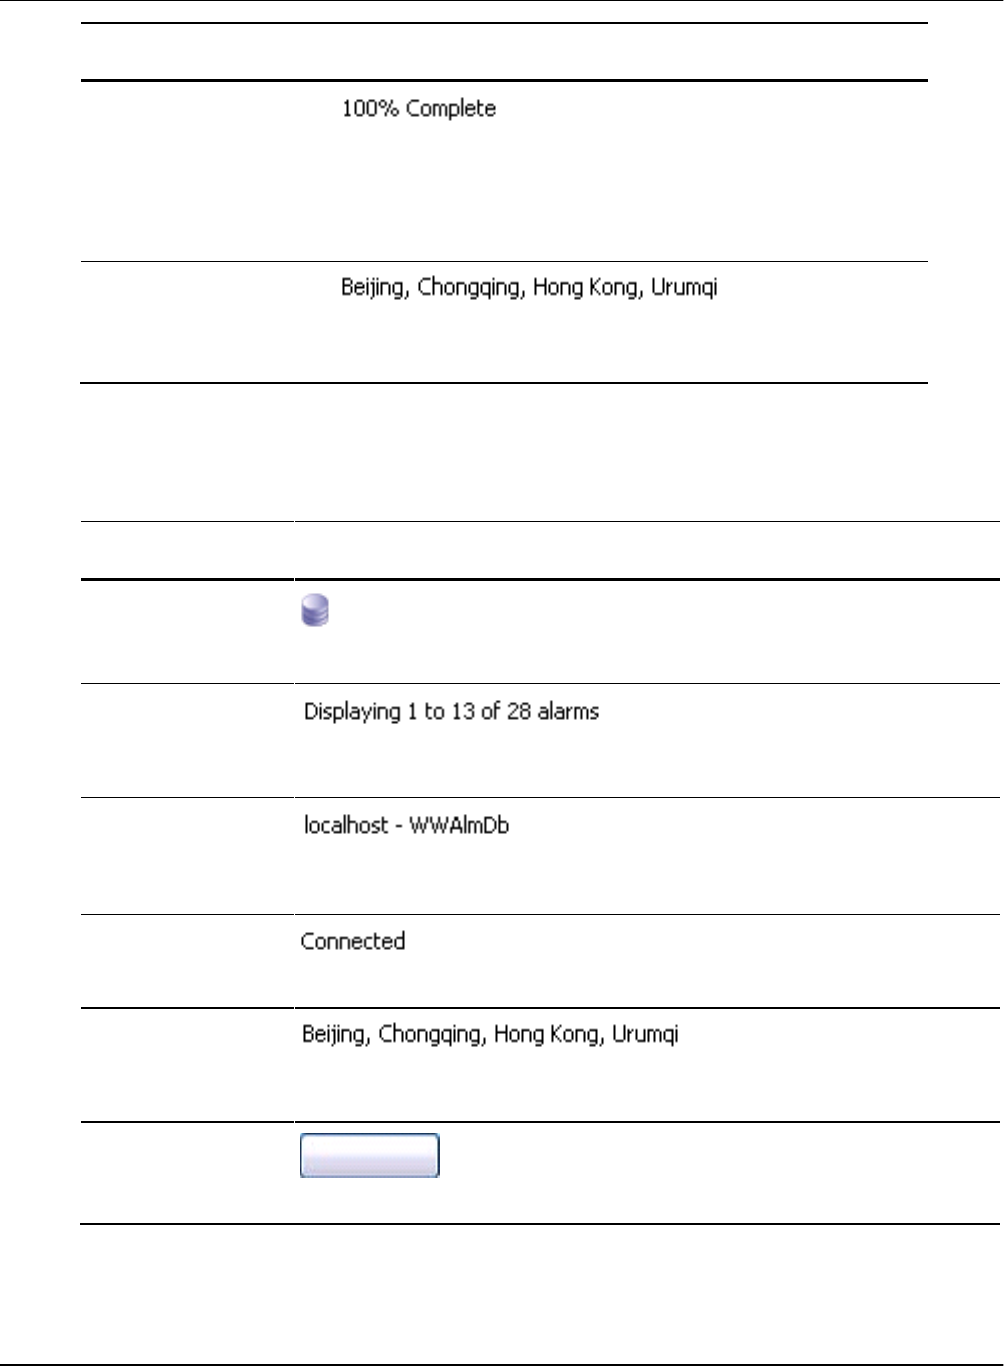
AVEVA™ ArchestrA Alarm Control Guide Use the Alarm Control at Run Time
56
Element
Icon(s)
Description
Retrieval
Shows the percentage of alarms retrieved from all alarm providers.
If this percentage is less than 100%, not all alarm providers are
providing alarm data. Use the Alarm Statistics dialog box to
detect which alarm providers are not providing alarm data.
Time Zone
Shows the current time zone of the Alarm Control. Move the
pointer over the time zone to show the full information in a tool tip.
Using Status Bar Information of Historical Modes
If the Alarm Control shows historical alarms or events, the status bar shows the following fields:
Element
Description
Client Mode
Indicates the Alarm Control is showing historical alarms and/or events.
Alarm Records
Shows the total number of alarm records and the number of alarms shown by
the Alarm Control.
Alarm Database
Shows the name of the server hosting the Alarm Database and the Alarm
Database name.
Connection Status
Shows the connection status to the Alarm Database.
Time Zone
Shows the current time zone of the Alarm Control. Move the pointer over the
time zone to show complete time zone information in a tool tip.
Requery
Click this button to retrieve latest alarm records from the Alarm Database.

Use the Alarm Control at Run Time AVEVA™ ArchestrA Alarm Control Guide
57
Acknowledge Alarms
You can configure the Alarm Control to require an alarm to be acknowledged even if the condition
causing the alarm has passed. This ensures that an operator is aware of events that caused a temporary
alarm state, but have returned to normal. You acknowledge alarms at run time using a shortcut menu or
by script methods.
You can acknowledge alarm records directly from the Alarm Control. You can acknowledge:
One or more selected alarms
All alarms, including alarms not visible due to the limited space of the Alarm Control
All visible alarms
All alarms with common values, such as provider names, group names, priority ranges, and tag
names. You can simplify alarm acknowledgement for the operator by using methods in scripting. For
more information, see the Ack.All() Method on page 117.
To acknowledge selected alarms using the Alarm Control grid
1. Select one or more alarms in alarm state.
2. Right-click on an alarm shown in the Alarm Control and click Ack Selected.
If no default acknowledgement statement is configured for the Alarm Control, the Ack Comment
dialog box appears.
3. Type an alarm acknowledgement comment and click OK.
To acknowledge other alarms using the Alarm Control grid
1. Select one or more alarms in alarm state.
2. Right-click the Alarm Control grid, point to Ack Others, and click one of the following:
o Ack All to acknowledge all alarms in alarm state
o Ack Visible to acknowledge all visible alarms
o Ack Selected Group to acknowledge alarms with the same provider names and group names
of one or more selected alarms in alarm state.
o Ack Selected Tag to acknowledge alarms with the same provider names, group names, and tag
names within the priority ranges of one or more selected alarms in alarm state.
o Ack Selected Priority to acknowledge alarms with the same provider names, group names,
and within the priority ranges of one or more selected alarms in alarm state.
3. If no default acknowledgement statement is configured for the Alarm Control, the Ack Comment
dialog box appears.
4. Type an alarm acknowledgement comment and click OK.
Provide a Signature to Acknowledge Alarms
You must provide your signature in the Ack Alarms dialog box to acknowledge alarms. A signature is
required when the Require ACK Signature check box is selected and any of the selected alarms falls
within the configured priority range, or if no one is logged on to the InTouch application. You a re not
required to be logged on to the InTouch application to acknowledge alarms. However, if you are logged
on, the Username box displays the username.
When you select the Require ACK Signature check box, the acknowledgment comment is prefixed in
the updated Alarm Record. If one or more of the selected alarms falls within the configured priority range,
the comment is prefixed with "Signed ACK -" indicating that it is a signed acknowledgment. Otherwise, it
is prefixed with "Std ACK -" indicating that it is a standard acknowledgment.
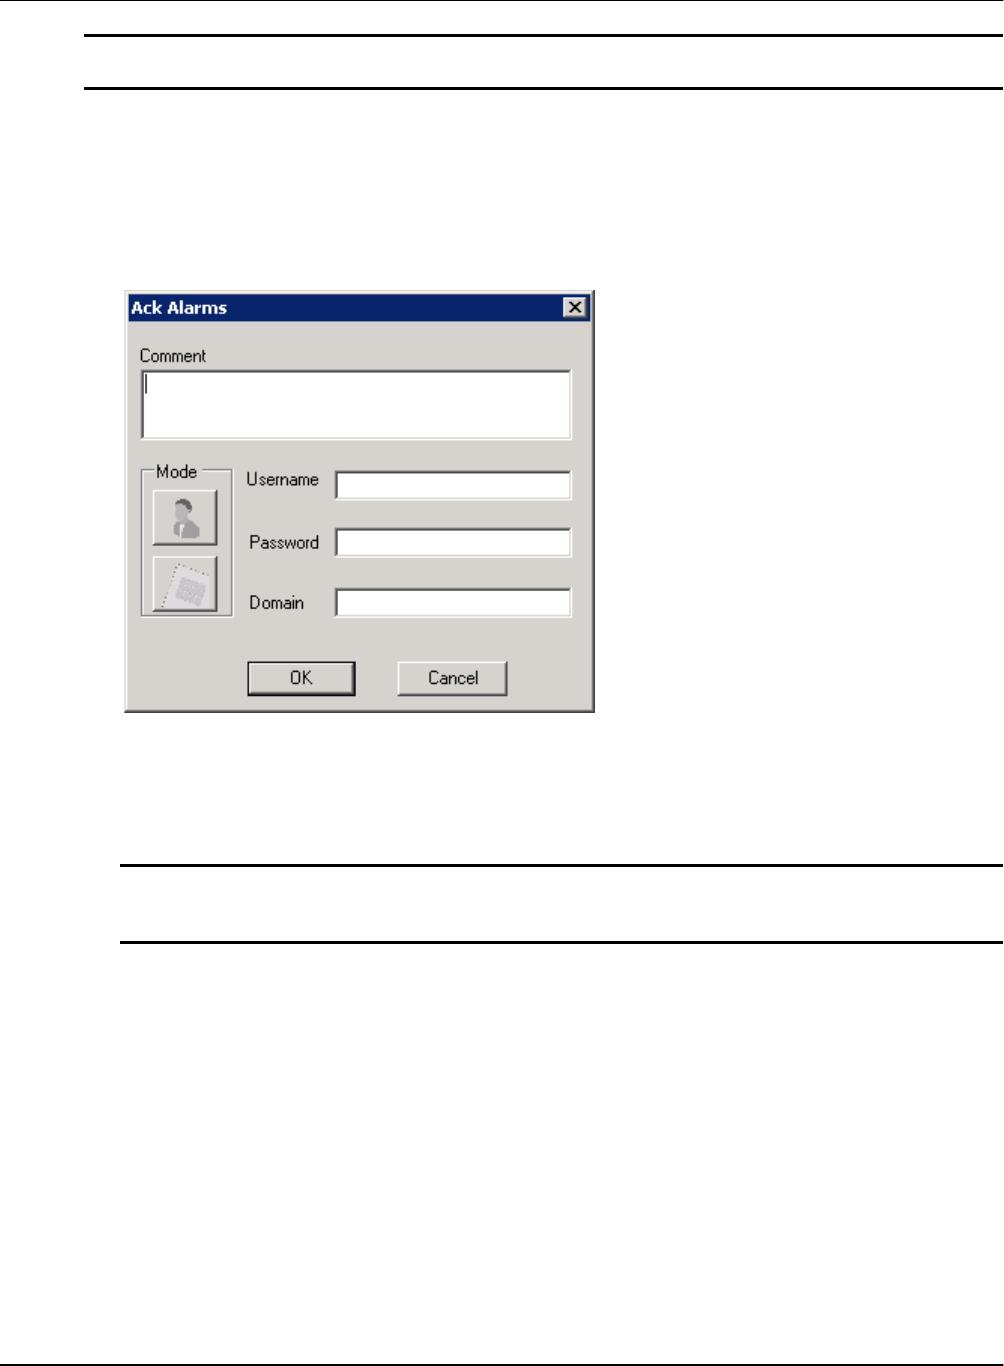
AVEVA™ ArchestrA Alarm Control Guide Use the Alarm Control at Run Time
58
Note: If the selected alarms do not require a signature, then the Ack Alarms dialog box displays the
Comment box. You can enter a comment before acknowledging the alarm.
To provide a signature to acknowledge alarms with user name
1. Select one or more alarms in the alarm state.
2. Right-click the Alarm Control grid and click Ack Selected.
3. If the selected alarms require a signature, or if you are not logged on to InTouch, then the Ack
Alarms dialog box appears. If the Smart Card authentication system is not configured on your
computer, the following dialog appears:
4. In the Comment box, enter or modify the alarm comment.
5. In the Username box, enter your user name.
6. In the Password box, enter your password.
7. In the Domain box, enter the domain and click OK.
Note: If you enter invalid credentials, the Alarm Control displays an error message. When you click
OK, the ACK Alarms dialog box appears again with the user name and the comment you had
provided. You must enter the correct password.
Providing a Signature to Acknowledge Alarms Using Smart Cards
You can use a Smart Card to provide the authentication to acknowledge alarms if your computer
supports Smart Card authentication. In that case, the Alarm Control displays the Ack Alarms dialog box
with the Smart Card authentication dialog. You must have the Smart Card inserted in the Smart Card
reader attached to your computer.
To provide a signature to acknowledge alarms using Smart Cards
1. Select one or more alarms in an alarm state.
2. Right-click the Alarm Control grid and click Ack Selected.

Use the Alarm Control at Run Time AVEVA™ ArchestrA Alarm Control Guide
59
3. If the selected alarms are configured to require a signature and if Smart Card Authentication is
selected in InTouch, the Ack Alarms dialog box appears where the Smart Card button under Mode
is disabled.
4. In the Comment box, enter or modify the comment.
5. From the Certificate list, select the Smart Card currently inserted into the reader in your system.
Note: If a card is newly-inserted or removed from the reader, you can update the list of cards by
selecting the appropriate Smart Card from the Certificate list.
6. In the PIN box, enter the personal identification number and click OK.
a. If you enter an invalid PIN, the system displays an error message. When you click OK, the ACK
Alarms dialog box appears again with the user credential and the comment you had provided.
You must enter the correct PIN.
b. If you need to provide your log on credentials instead of the Smart Card details to verify your
signature, click the User Name Authentication button under Mode. A different version of the
Ack Alarms dialog box appears where the Smart Card button under Mode is enabled.
Shelve and Unshelve Alarms at Run Time
Operators can shelve alarms to temporarily suppress them for a fixed period. Shelving an alarm means
temporarily removing it from the Alarm Control’s main alarm list and placing it on a shelved list. Shelvi ng
is normally controlled by an operator to handle irrelevant nuisance alarms that have not been caught by
filtering or alarm suppression mechanisms.

AVEVA™ ArchestrA Alarm Control Guide Use the Alarm Control at Run Time
60
When shelving an alarm from the Alarm Control, operators set an associated time period in which the
alarm remains shelved and enter a mandatory comment. Operators can select from a list of Alarm
Control Context commands during run time to:
Shelve one or more selected alarms
Shelve all alarms
Shelve only those alarms visible in the Alarm Control
Shelve all alarms within the same alarm group as an alarm selected from the Alarm Control
Shelve alarms by selected tags or attributes
Shelve alarms by selected alarm priorities
Shelve all alarms that have the same severity as an alarm selected from the Alarm Control
When application security is used, alarms can be shelved and unshelved only by operators with proper
authorization. For more information about setting shelving authorization, see Configuring the Alarm
Control to Require a SHELVE Signature on page 52.
Shelved alarms are automatically unshelved at the end of the specified time period.Operators can also
manually unshelve alarms and return them to an active state. Alarms are unshelved automatically at the
end of the shelving time period. An unshelved alarm reappears in the Alarm Control active list and
resumes its state at the time it was shelved. Operators can manually unshelve a shelved alarm before
the end of the shelved period and enter an optional comment.
Shelving Alarms
You can shelve alarms directly from the Alarm Control by selecting commands from the Alarm Control’s
Context menu.
To shelve selected alarms using the Alarm Control
1. Select one or more alarms in alarm state.
2. Right-click the Alarm Control grid and click Shelve Selected from the shortcut menu.
The Shelve Comment dialog box appears to set a shelf duration and enter a comment.
Note: If the application runs under security and the Alarm Control has been configured to require a
SHELVE signature, operators must authenticate themselves. The Shelve Comment dialog box
includes additional fields for an operator to enter a username, password, and domain.
3. Select an alarm shelving duration from the Duration field.
4. Type a mandatory alarm shelving comment in the Reason field and click OK.
To shelve other alarms using the Alarm Control
1. Select one or more alarms in alarm state.
2. Right-click the Alarm Control, point to Shelve Others, and click one of the following shortcut
commands:
o Shelve All to shelve all alarms in alarm state
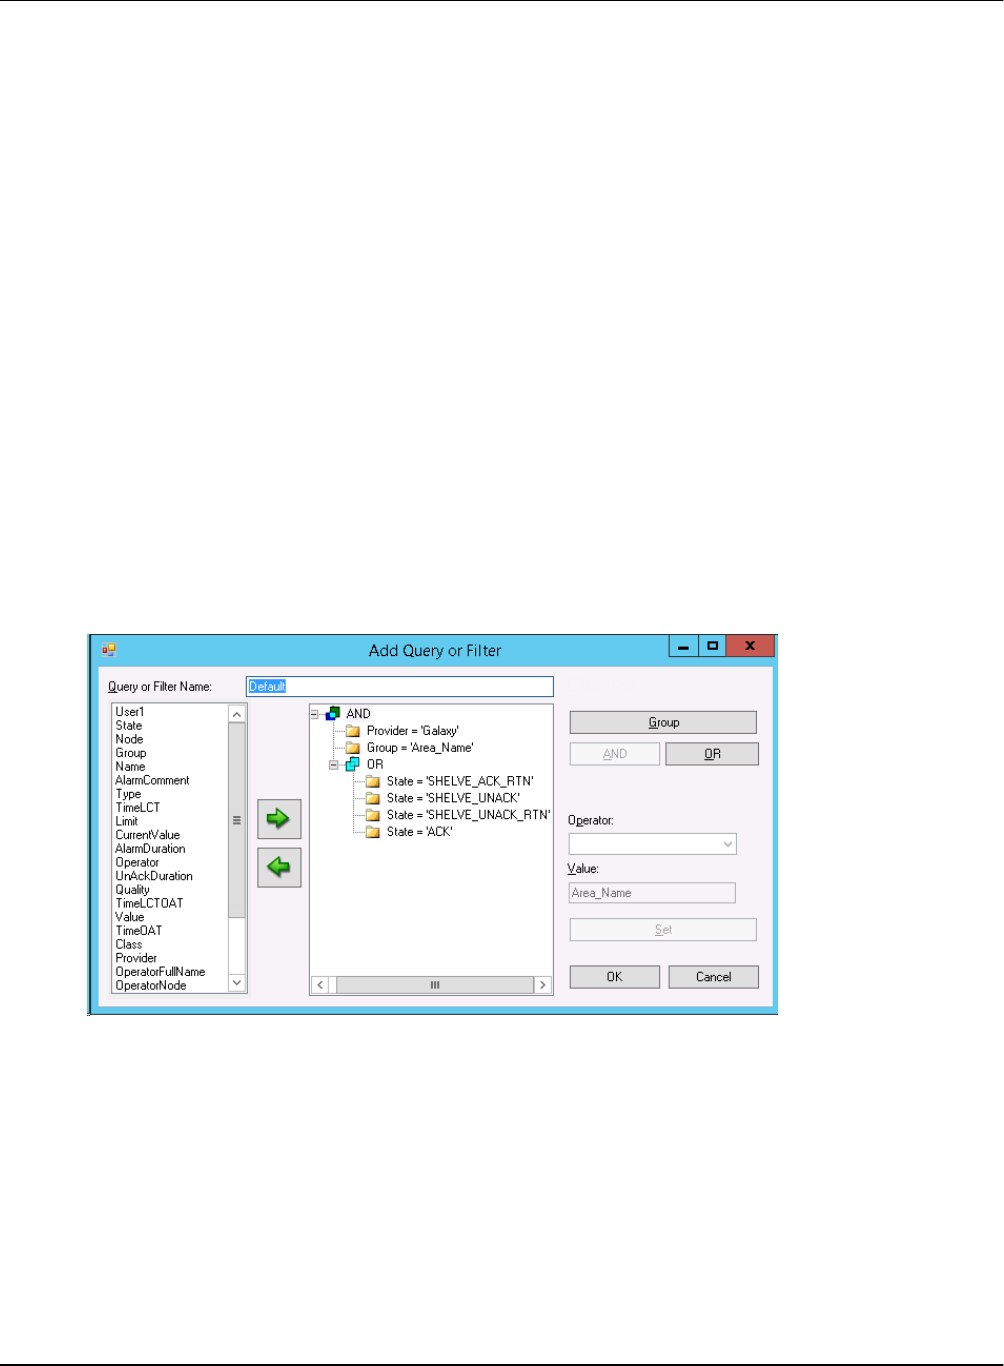
Use the Alarm Control at Run Time AVEVA™ ArchestrA Alarm Control Guide
61
o Shelve Visible to shelve all visible alarms
o Shelve Selected Groups to shelve alarms with the same provider names and group names of
one or more selected active alarms
o Shelve Selected Tags to shelve alarms with the same provider names, group names, and tag
names of one or more selected active alarms
o Shelve Selected Priorities to shelve alarms with the same provider names, group names, and
within the same priority ranges of one or more selected active alarms
o Shelve Selected Severities to shelve alarms with the same provider names, group names, and
within the same severity ranges of one or more selected active alarms
The Shelve Comment dialog box appears with fields to set a shelf duration and enter a comment.
3. Select an alarm shelving duration from the Duration field.
4. Type an alarm shelving comment in the Reason field and click OK.
Show Shelved Alarms
After alarms are shelved, they no longer appear as active alarms in an Alarm Control. Filters only filter
active alarms, so applying only a filter will not return shelved alarms. To show shelved alarms, you must
use a query and apply a filter that is configured for shelved alarms.
For example:
(Provider = 'Galaxy' AND Group = 'Area_Name' AND (State = 'SHELVE_ACK_RTN' OR State =
'SHELVE_UNACK' OR State = 'SHELVE_UNACK_RTN' OR State = 'SHELVE_ACK'))"
For more information about configuring queries to filter alarms, see Filter Alarms on page 37.

AVEVA™ ArchestrA Alarm Control Guide Use the Alarm Control at Run Time
62
Unshelve Alarms
Manually unshelving alarms follows a similar sequence of steps to shelve alarms using Context menu
commands. You should have created a query that shows the current shelved alarms.
To unshelve selected alarms using the Alarm Control
1. Select one or more shelved alarms.
2. Right-click the Alarm Control grid and click Unshelve Selected from the Context menu.
The Unshelve Comment dialog box appears.
3. Type an optional alarm unshelving comment in the Reason field and click OK.
To unshelve other alarms using the Alarm Control
1. Select one or more alarms in alarm state.
2. Right-click the Alarm Control, point to Unshelve Others, and click one of the following shortcut
commands:
o Unshelve All to unshelve all shelved alarms
o Unshelve Visible to unshelve all visible shelved alarms
o Unshelve Selected Groups to unshelve alarms with the same provider names and group
names of one or more selected shelved alarms
o Unshelve Selected Tags to unshelve alarms with the same provider names, group names, and
tag names of one or more selected shelved alarms
o Unshelve Selected Priorities to unshelve alarms with the same provider names, group names,
and within the same priority ranges of one or more selected shelved alarms
o Unshelve Selected Severities to unshelve alarms with the same provider names, group
names, and within the same severity ranges of one or more selected shelved alarms
The Unshelve Comment dialog box appears.
3. Type an optional alarm unshelving comment in the Reason field and click OK.
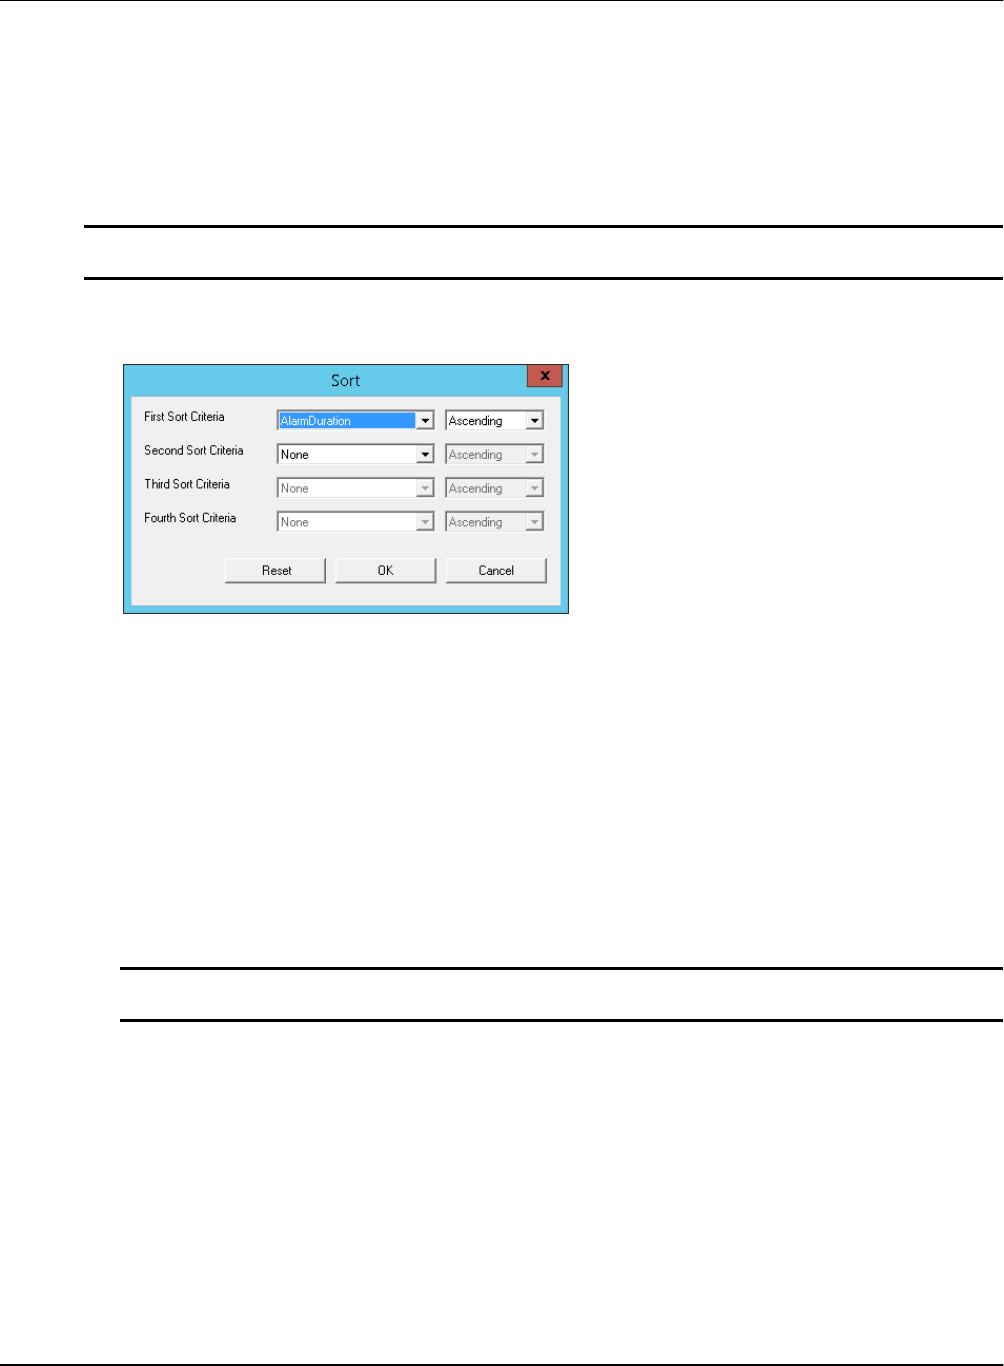
Use the Alarm Control at Run Time AVEVA™ ArchestrA Alarm Control Guide
63
Sort Alarms at Run Time
The Alarm Control supports alarm sorting for up to three columns at design time and run time. At run
time, operators can configure sorting of even more columns by clicking on the column headers of the
Alarm Control. You can sort alarms in ascending or descending direction for selected columns.
You can sort alarms at run time in similar way as design time. Any changes you make to the sorting at run
time are lost when you switch back to design time.
Note: If you are sorting by the Value column, the items in the column are sorted alphabetically, not
numerically. This is because the Value column can contain strings.
To set sorting columns and directions with lists at run time
1. Right-click the Alarm Control grid and click Sort. The Sort dialog box appears.
2. In the First Sort Criteria list, select the first sort column and a sorting direction in the list to its right.
3. Optionally, select the second sort column in the Second Sort Criteria list and a sorting direction in
the list to its right.
4. If you set the Second Sort Column, optionally select the third sort column in the Third Sort Criteria
list and a sorting direction in the list to its right.
5. Click OK.
To set sorting columns and directions in the grid at run time
1. In the Alarm Control grid, click on a column header to set sorting for the column. An arrow appears
on the column header.
2. To change the sorting direction, click on the column header again. The arrow changes direction on
the header.
Note: If you click on a column header after releasing the Shift key, all sorting information is lost and
the selected column is the new primary sorting criteria.
3. To set sorting for second and third columns, repeat step 3 while pressing the Shift key.
4. Release the Shift key.
Filter Alarms at Run Time
You can filter alarms at run time by using the filters you defined at design time.
If you did not define a filter according to your needs at design time, you can still create new filters at run
time, or modify existing filters.
If you saved filters to an XML file, you can load them from a file at run time.
Filters you define at run-time are not saved for use at design-time. To re-use filters you create or modify
at run-time, export the filter list to an XML file, and import the XML file at design-time.

AVEVA™ ArchestrA Alarm Control Guide Use the Alarm Control at Run Time
64
Naming conflicts may occur between the run-time and design-time XML lists. To resolve naming conflicts
between the XML files, leave the Overwrite design time queries and filters option checked in the
Run-Time Behaviors tab of the Edit Animations dialog box. The run-time query or filter list will
overwrite the design-time list and resolve the naming conflict.
If you are showing historical alarms or events, you can use the filtering mechanism provided by the grid
technology instead of using filter favorites.
Use an Existing Query Filter
At run time, you can use any filter you defined at design time, regardless if you defined it for the current
modes or historical modes. You can also use scripting to switch to an existing query filter. For more
information, see Favorite Property on page 100.
To use an existing query filter
1. Right-click the Alarm Control grid and click Queries and Filters. The Queries and Filters dialog box
appears.
2. Select the filter from the list and click OK. The alarm records are filtered and the current filter name
appears in the status bar.
Adding a New Query or Filter at Run Time
At run time, you can create new queries or filters to limit the number of alarm records.
New queries or filters are saved and can be reused for future sessions.Upon close and restart of either
the Alarm Control window or WindowViewer, added queries or filters will be available. For details see
Saving Run-Time Modifications to Queries and Filters on page 65.
To add a new query or filter at run time
1. Right-click the Alarm Control grid and click Queries and Filters. The Queries and Filters dialog box
appears.
2. The configuration is the same as in design time. For more information, see Adding a New Query or
Filter on page 38.
Modifying an Existing Query or Filter at Run Time
At run time, you can modify a query filter.
The modification of query filters is not saved for future use and is only valid for the current session. If you
want to save the modifications, you must also export the query filters to an XML file. For more
information, see Exporting Query and Filter Favorites at Runtime on page 66
To modify an existing query filter
1. Right-click the Alarm Control grid and click Query Filters. The Query Filters dialog box appears.
2. The configuration is the same as in design time. For more information, see Modify an Existing Query
or Filter on page 41.

Use the Alarm Control at Run Time AVEVA™ ArchestrA Alarm Control Guide
65
Saving Run-Time Modifications to Queries and Filters
You can save modifications made to queries and filters at run time. There is an option to save user
queries and filters in the Run-Time Behavior tab of the Edit Animations dialog box. It is selected by
default, as shown below:
When this option is selected, modifications made to queries or filters at run-time are saved on a per user
and alarm control instance to a XML file. For example, a saved query will save as
UserQueryFilter_001.xml.
Modifications are saved in the following default directory:
C:\Users\<OS Login Name>\AppData\Local\Wonderware
The map between the Alarm Control instance and the above XML file is saved in a map file,
"InstancesMap.dat".
Modified queries and filters will be available upon closing and restarting the alarm control window or
WindowViewer.
If you uncheck the Save User Queries and Filters option, updates made to queries and filters during
run-time will not be saved.
Note: When the Save User Queries and Filter option is checked, the Overwrite Design Time Queries
and Filters option is enabled and checked by default. When checked, this option resolves naming
conflicts between design-time queries and filters and run-time queries and filters loaded from the XML
file. Naming conflicts will be resolved by overwriting the design time queries and filters.
Deleting a Query or Filter at Run Time
At run time, you can delete a query filter.
After you delete a query or filter at run time, it is only deleted for the current session. If you want to save
the list of query filters without the deleted query filter, you must export the query filters to an XML file. For
more information, see Export Query and Filter Favorites on page 42.
To delete an existing query or filter at RunTime
1. Right-click the Alarm Control grid and click Queries and Filters. The Queries and Filters dialog box
appears.

AVEVA™ ArchestrA Alarm Control Guide Use the Alarm Control at Run Time
66
2. The configuration is the same as in design time. For more information, see Delete a Query or Filter
Favorite on page 41.
Importing Query and Filter Favorites at Runtime
At run time, you can import the list of query filters from an XML file.
To import Query Filter Favorites
1. Right-click the Alarm Control grid and click Query and Filters. The Query and Filters dialog box
appears.
2. The configuration is the same as in design time. For more information, see Import Query and Filter
Favorites on page 42.
Exporting Query and Filter Favorites at Runtime
At run time, you can export the list of query filters to an XML file for future use. After exporting, you can
import the query filter from the XML into design time.
Note: The default query filter favorite is not exported to the XML file.
To export Query Filter Favorites
1. Right-click the Alarm Control grid and click Query and Filters. The Query and Filters dialog box
appears.
2. The configuration is the same as in design time. For more information, see Export Query and Filter
Favorites on page 42.
Filtering Alarms with Client-Based Filtering
The grid technology used in the Alarm Control enables you to filter the grid contents after the data has
been retrieved from the data source.
You can filter historical alarms and/or events in the following ways for any selected column:
Filter
Description
(All)
No filtering, all records are shown for the selected column.
(Custom)
Lets you configure a more complex filter for the selected column, for
example a filter that can compare values of different columns.
(Blanks)
Filters by showing blank values only.
(NonBlanks)
Filters by showing non blank values only.
Values
Filters by the selected value.

Use the Alarm Control at Run Time AVEVA™ ArchestrA Alarm Control Guide
67
If a filter is applied to any column in the Alarm Control, the filter icon in the column header appears in
blue.
To filter alarms with client-based filtering
1. Click the filter icon on the column you want to filter by. A menu appears.
2. Select one of the following:
o (All) to switch off filtering
o (Custom) to define a more complex filter
o (Blanks) to filter by blank values
o (NonBlanks) to filter by non blank values
o A value to filter by the value
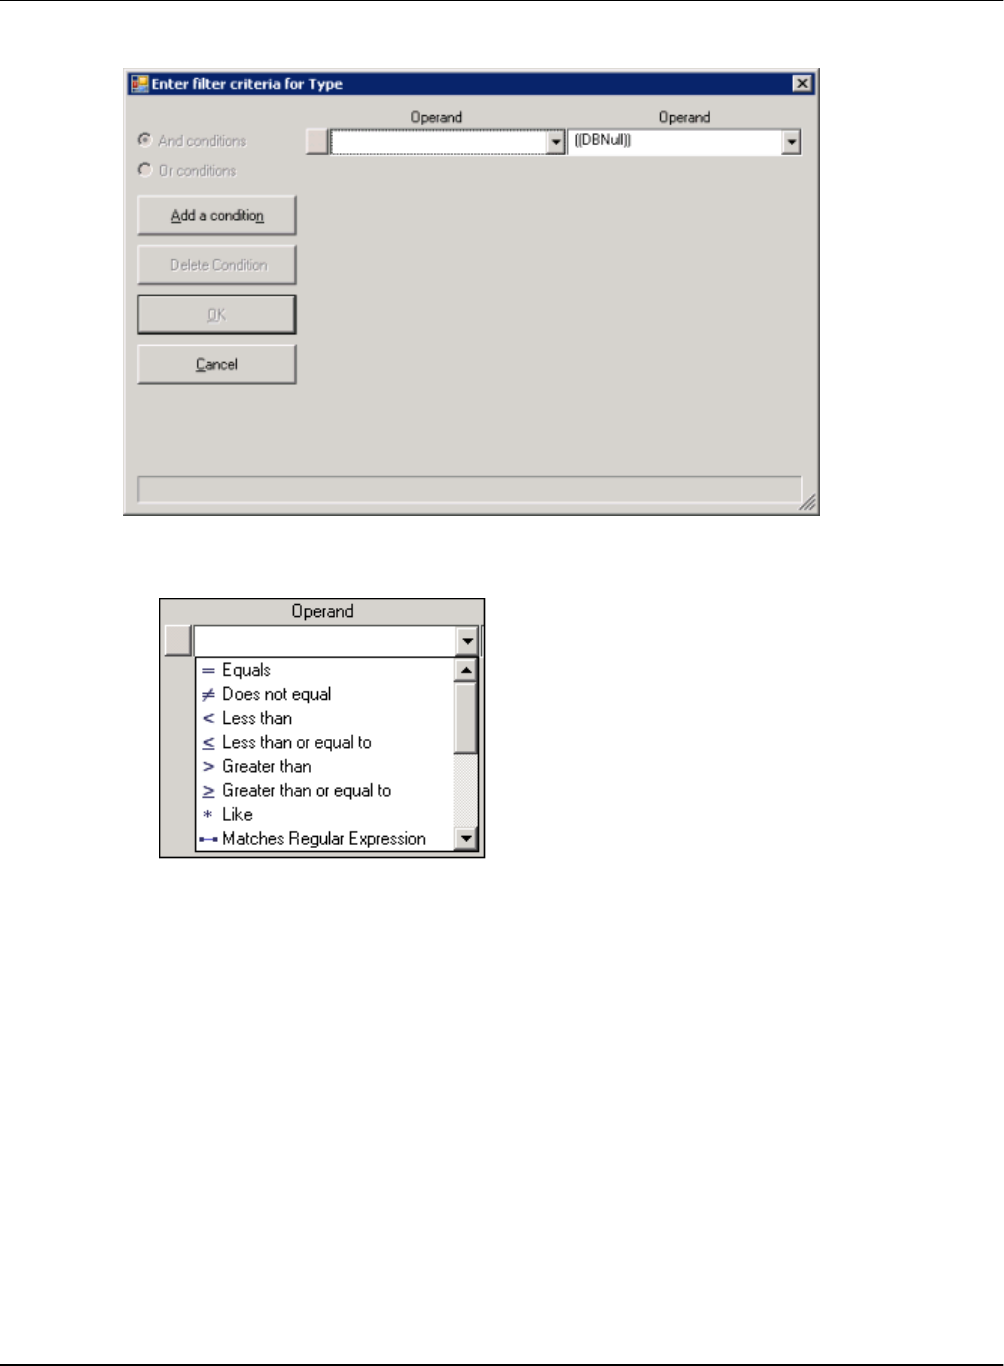
AVEVA™ ArchestrA Alarm Control Guide Use the Alarm Control at Run Time
68
If you selected (Custom), a dialog box appears.
3. Do one of the following:
o Select a different operator for the current condition
o Type or select a different operand for the current condition. The operand can be a value, or the
value of a different column in the same row
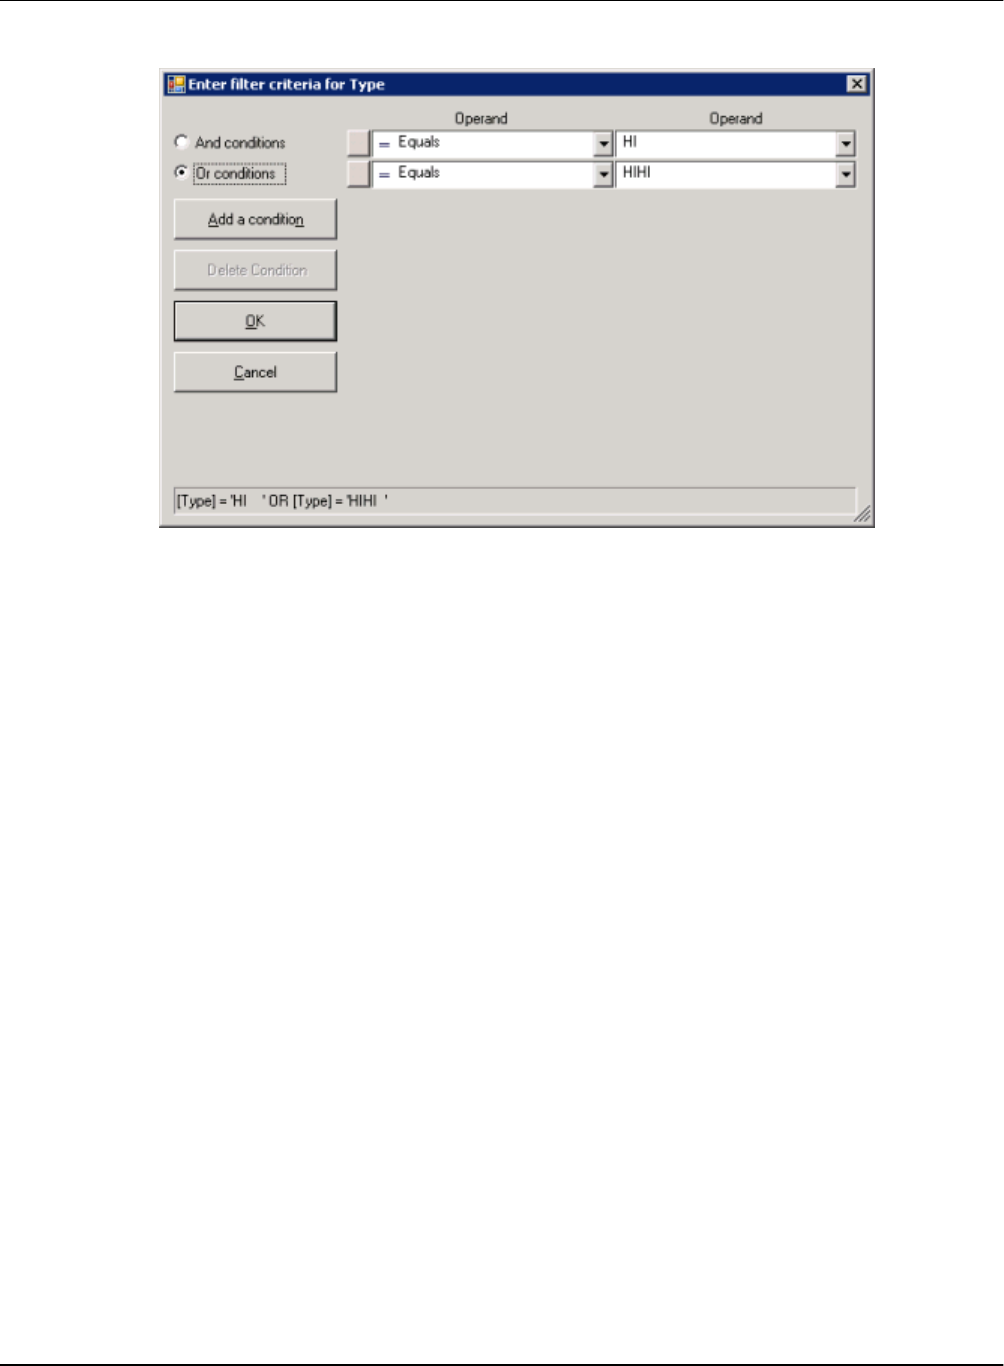
Use the Alarm Control at Run Time AVEVA™ ArchestrA Alarm Control Guide
69
o Click Add a condition to add more conditions to the filter
o Click Delete Condition to delete one or more selected conditions (You can mark the condition
by clicking on the button to the left of each condition.)
4. Click OK.
Reset the Grid
You can reset the Alarm Control's column widths, column order, and names to their last design-time
values. When you reset the grid, the query filter is also reset to its default. You can also reset the grid by
using the Reset() Method on page 126 in scripting.
To reset the grid
Right-click the Alarm Control grid and click Reset
Hide Alarms
The "hiding" and "unhiding" of alarm records is known in the corresponding InTouch alarm controls as
"suppressing" and "unsuppressing".
When the Alarm Control is hiding alarms, it ignores certain alarms. If an alarm matches the exclusion
criteria, it is not visible.
The actual alarm generation is completely unaffected by hiding. Alarm records are still logged into the
alarm history.
You can hide:
All alarms, including alarms not visible due to the limited space of the Alarm Control
All visible alarms
One or more selected alarms
All alarms with the same provider names and group names of one or more selected alarms
All alarms with the same provider names, group names, and within the priority ranges of one or more
selected alarms

AVEVA™ ArchestrA Alarm Control Guide Use the Alarm Control at Run Time
70
All alarms with the same provider names, group names, and tag names within the priority ranges of
one or more selected alarms
You can also view which alarms are hidden and unhide them.
To hide all alarms
Right-click the Alarm Control grid, point to Hide Others, and click Hide All
To hide all visible alarms
Right-click the Alarm Control grid, point to Hide Others, and click Hide Visible
To hide selected alarms
1. Select one or more alarms in alarm state.
2. Right-click the Alarm Control grid and click Hide Selected.
To hide alarms with common parameters
1. Select one or more alarms.
2. Right-click the Alarm Control grid, point to Hide Others, and click one of the following:
o Hide Selected Groups to hide alarms with the same provider names and group names of one or
more selected alarms
o Hide Selected Tags to hide alarms with the same provider names, group names, and tag
names within the priority ranges of one or more selected alarms
o Hide Selected Priorities to hide alarms with the same provider names, group names, and
within the priority ranges of one or more selected alarms
To unhide alarms
1. Right-click the Alarm Control grid and click Hidden. The Hidden Alarms dialog box appears.
2. Select the alarms you want to unhide and click Unhide.
3. Click Close.
Freeze and Unfreeze the Alarm Control Grid
You can freeze the Alarm Control to prevent the Alarm control tree from being updated with any further
changes.
For example, if new alarms occur while the Alarm Control is frozen, the new alarms are only shown after
you unfreeze the Alarm Control.
You can configure a time period after which the Alarm Control automatically unfreezes to avoid the Alarm
Control being unknowingly frozen. For example, the operator leaves the workstation and returns without
realizing that the Alarm Control is still frozen.
The Alarm Control unfreezes automatically if one of the following changes:
Alarm Mode
Alarm Query
Query Filter
After you unfreeze the Alarm Control, the grid updates with the new alarm records and any other updates
while the grid was frozen. You can also use scripting to freeze and unfreeze the Alarm Control grid at run
time. For more information, see FreezeDisplay() Method on page 121.

Use the Alarm Control at Run Time AVEVA™ ArchestrA Alarm Control Guide
71
To freeze or unfreeze the Alarm Control grid
1. Right-click the Alarm Control grid. The shortcut menu appears.
A check mark next to the Freeze option indicates if the grid is currently frozen.
2. Click Freeze. The Alarm Control grid is either frozen or unfrozen.
Show Alarm Statistics
You can view alarm statistics at run time to see which alarm providers are providing the alarm data. For
more information, see Show.Statistics() Method on page 137.
To show alarm statistics
1. Right-click the Alarm Control grid and click Statistics. The Alarm Statistics dialog box appears.
2. If you use an Alarm Hotbackup name as alarm query, you can expand the Hotbackup name in the
Alarm Statistics dialog box to show the individual percentages of retrieval for the configured
primary and backup alarm provider.
3. Click Update to update the statistics.
4. Click Close.

AVEVA™ ArchestrA Alarm Control Guide Use the Alarm Control at Run Time
72
Switching between Client Modes
You can switch between client modes at run time by changing the Alarm Control ClientMode property.
The easiest way to do this, is to configure an ArchestrA script to interact with the Alarm Control
ClientMode property at design time.
To switch between client modes
1. Place the Alarm Control on the Industrial graphic.
2. Paste a button on the canvas and change its caption to Current Alarms.
3. Double-click the button and configure it with the following action script:
AlarmControlGrid1.ClientMode = 1;
4. Click OK.
5. Repeat steps 2 to 4 for the following buttons:
Button Caption
Action script
Recent Alarms and Events
AlarmControlGrid1.ClientMode = 2;
Historical Alarms
AlarmControlGrid1.ClientMode = 3;
Historical Events
AlarmControlGrid1.ClientMode = 4;
Historical Alarms and Events
AlarmControlGrid1.ClientMode = 5;
6. Save and close the Industrial graphic.
7. Create a new managed InTouch application and open it in WindowMaker.
8. Place the Industrial graphic on a new InTouch window.
9. Switch to WindowViewer to test your application.
10. Click Historical Alarms to show historical alarms instead of current alarms.
By default, the Alarm Control tries to connect to the alarm database (either the InTouch Database called
WWALMDB or the ArchestrA Database called A2ALMDB) on the local computer using the currently
logged on user. If you are using a different configuration, you can use value input links or action script to
set the following properties:
Database.ServerName Property
Database.UserID Property
Database.Password Property
Domain Property
Database.Name Property
Database.Authentication Property

Use the Alarm Control at Run Time AVEVA™ ArchestrA Alarm Control Guide
73
Switching Run-Time Languages
You can switch the language of the Alarm Control in the same way as other parts of your InTouch
application. When you switch language, the alarm state, alarm class, alarm type, the various alarm
comment fields, and the column headers are switched to the selected language.
To switch the language
Do one of the following:
o In WindowViewer on the Special menu, point to Languages, and then click the language you
want to switch to
o In WindowMaker, use the InTouch QuickScript SwitchDisplayLanguage in a button action
script to switch the language. At run time, click the button to switch the language
o In WindowMaker, use the system tag $Language in a button action script and assign it to the
language code you want to switch to. At run time, click the button to switch the language
For more information about run-time language switching, see Chapter 11, Working with Languages, in
the Application Server User’s Guide.
Important: If you rename or reorder column headers, you must repeat the symbol text translation
procedures. If you do not, your changes will not be available for run-time language switching.

AVEVA™ ArchestrA Alarm Control Guide
75
This section describes the script properties, methods, and events of the Alarm Control.
Alarm Control Properties
This section describes the properties available for scripting in the Alarm Control.
AckComment.DefaultValue Property
The AckComment.DefaultValue property is a read-write string property that gets or sets the default
acknowledgement comment when the AckComment.UseDefault property is TRUE.
Syntax
result = AlarmClient.AckComment.DefaultValue;
AlarmClient.AckComment.DefaultValue = ackComment;
Example
AlarmClient1.AckComment.UseDefault = 1;
AlarmClient1.AckComment.DefaultValue = "This alarm is acknowledged by John
Smith";
Remarks
For more information, see Showing Current Alarms or Recent Alarms and Events on page 21.
AckComment.UseDefault Property
The AckComment.UseDefault property is a read-write Boolean property that gets or sets the usage of
the default acknowledgement comment.
Syntax
result = AlarmClient.AckComment.UseDefault;
AlarmClient.AckComment.UseDefault = useComment;
Example
AlarmClient1.AckComment.UseDefault = 1;
AlarmClient1.AckComment.DefaultValue = "This alarm is acknowledged by John
Smith";
Remarks
For more information, see Showing Current Alarms or Recent Alarms and Events on page 21.
AckSignature.MaxPriority Property
The AckSignature.MaxPriority property is a read-write integer property, which gets or sets the maximum
priority value for alarms that require a signature to be acknowledged. The value must range between 1
and 999, and must be greater than or equal to the AckSignature.MinPriority value. The default value of
AckSignature.MaxPriority is 999.
Syntax
To Set:
<EAC instance name>.<Property Name> = <integer value>;
CHAPTER 4
Scripting the Alarm Control

AVEVA™ ArchestrA Alarm Control Guide Scripting the Alarm Control
76
Example
AlarmClient1.AckSignature.MaxPriority = 500;
Syntax:
To Get:
integer <variable name> = <EAC instance name>.<Property Name>;
Example
dim iMax as integer;
iMax = AlarmClient1.AckSignature.MaxPriority;
Remarks
For more information, see Provide a Signature to Acknowledge Alarms on page 57.
AckSignature.MinPriority Property
The AckSignature.MinPriority property is a read-write integer property, which gets or sets the minimum
priority value for alarms that require a signature to be acknowledged. The value must range between 1
and 999, and must be less than or equal to the AckSignature.MaxPriority value. The default value of
AckSignature.MinPriority is 1.
Syntax
To Set:
<EAC instance name>.<Property Name> = <integer value>;
Example
AlarmClient1.AckSignature.MinPriority = 100;
Syntax
To Get:
To Get:
integer <variable name> = <EAC instance name>.<Property Name>;
Example
dim iMin as integer;
iMin = AlarmClient1.AckSignature.MinPriority;
Remarks
For more information, see Provide a Signature to Acknowledge Alarms on page 57.
AckSignature.Required Property
The AckSignature.Required property is a read-write Boolean property, indicating whether a signature is
required for acknowledging the alarms. The default value of AckSignature.MinPriority is True.
Syntax
To Set:
<EAC instance name>.<Property Name> = <boolean value>;
Example
AlarmClient1.AckSignature.Required = true;
Syntax
To Get:
boolean <variable name> = <EAC instance name>.<Property Name>;
Example
dim bIsACKSigned as boolean;
bIsACKSigned = AlarmClient1.AckSignature.Required;

Scripting the Alarm Control AVEVA™ ArchestrA Alarm Control Guide
77
Remarks
For more information, see Configuring the Alarm Control to Require a SHELVE Signature on page 52.
AlarmColor.Ack.BackGround Property
The AlarmColor.Ack.BackGround property is an array of read-write integer properties that get or set the
background colors of all acknowledged alarm records.
Index
Purpose
0
Sets the background color of all acknowledged alarm records in all priority ranges.
1
Gets or sets the background color of acknowledged alarm records in the priority
range 1 to AlarmColor.Range[1].
2
Gets or sets the background color of acknowledged alarm records in the priority
range AlarmColor.Range[1] to AlarmColor.Range[2].
3
Gets or sets the background color of acknowledged alarm records in the priority
range AlarmColor.Range[2] to AlarmColor.Range[3].
4
Gets or sets the background color of acknowledged alarm records in the priority
range AlarmColor.Range[3] to 999.
Syntax
Color = AlarmClient.AlarmColor.Ack.BackGround[n];
AlarmClient.AlarmColor.Ack.BackGround[n] = Color;
Parameters
n
Index from 0 to 4.
Color
Color of background.
Examples
AlarmClient1.AlarmColor.Ack.BackGround[0] = Color.Red;
AlarmClient1.AlarmColor.Ack.BackGround[1] = Color.FromARGB(0,128,0);
AlarmClient1.AlarmColor.Ack.BackGround[2] = Color.Grey;
AlarmClient1.AlarmColor.Ack.BackGround[3] = Color.Yellow;
AlarmClient1.AlarmColor.Ack.BackGround[4] = Color.Black;
Remarks
Color is a .NET Framework data type. You can use various Color methods to set the color, such as a
predefined color name, FromARGB(), FromKnownColor(), and FromName().
For a list of the .NET color names and the hexadecimal codes, see .NET Colors on page 145.
For more information on the color methods, see the online Microsoft documentation for .NET Framework
Development.
AlarmColor.Ack.ForeGround Property
The AlarmColor.Ack.ForeGround property is an array of read-write integer properties that get or set the
text colors of all acknowledged alarm records.

AVEVA™ ArchestrA Alarm Control Guide Scripting the Alarm Control
78
Index
Purpose
0
Sets the text color of all acknowledged alarm records in all priority ranges.
1
Gets or sets the text color of acknowledged alarm records in the priority
range 1 to AlarmColor.Range[1].
2
Gets or sets the text color of acknowledged alarm records in the priority
range AlarmColor.Range[1] to AlarmColor.Range[2].
3
Gets or sets the text color of acknowledged alarm records in the priority
range AlarmColor.Range[2] to AlarmColor.Range[3].
4
Gets or sets the text color of acknowledged alarm records in the priority
range AlarmColor.Range[3] to 999.
Syntax
Color = AlarmClient.AlarmColor.Ack.ForeGround[n];
AlarmClient.AlarmColor.Ack.ForeGround[n] = Color;
Parameters
n
Index from 0 to 4.
Color
Color of text.
Examples
AlarmClient1.AlarmColor.Ack.ForeGround[0] = Color.Black;
AlarmClient1.AlarmColor.Ack.ForeGround[1] = Color.Blue;
AlarmClient1.AlarmColor.Ack.ForeGround[2] = Color.Green;
AlarmClient1.AlarmColor.Ack.ForeGround[3] = Color.Yellow;
AlarmClient1.AlarmColor.Ack.ForeGround[4] = Color.FromARGB(0,128,0);
Remarks
Color is a .NET Framework data type. You can use various Color methods to set the color, such as a
predefined color name, FromARGB(), FromKnownColor(), and FromName().
For a list of the .NET color names and the hexadecimal codes, see .NET Colors on page 145.
For more information on the color methods, see the online Microsoft documentation for .NET Framework
Development.
AlarmColor.Ack.RTN.BackGround Property
The AlarmColor.Ack.RTN.BackGround property is a read-write color property that gets or sets the
background color of acknowledged alarm records that "return to normal" (ACK_RTN).
Syntax
Color = AlarmClient.AlarmColor.Ack.RTN.BackGround;
AlarmClient.AlarmColor.Ack.RTN.BackGround = Color;
Parameters
Color
Color of background.
Return Value
Returns the background color of acknowledged alarms that "return to normal".

Scripting the Alarm Control AVEVA™ ArchestrA Alarm Control Guide
79
Example
AlarmClient1.AlarmColor.Ack.RTN.BackGround = Color.Blue;
Remarks
Color is a .NET Framework data type. You can use various Color methods to set the color, such as a
predefined color name, FromARGB(), FromKnownColor(), and FromName().
For a list of the .NET color names and the hexadecimal codes, see .NET Colors on page 145.
For more information on the color methods, see the online Microsoft documentation for .NET Framework
Development.
AlarmColor.Ack.RTN.ForeGround Property
The AlarmColor.Ack.RTN.ForeGround property is a read-write color property that gets or sets the text
color of acknowledged alarm records that "return to normal" (ACK_RTN).
Syntax
Color = AlarmClient.AlarmColor.Ack.RTN.ForeGround;
AlarmClient.AlarmColor.Ack.RTN.ForeGround = Color;
Parameters
Color
Color of text.
Example
AlarmClient1.AlarmColor.Ack.RTN.ForeGround = Color.Black;
Remarks
Color is a .NET Framework data type. You can use various Color methods to set the color, such as a
predefined color name, FromARGB(), FromKnownColor(), and FromName().
For a list of the .NET color names and the hexadecimal codes, see .NET Colors on page 145.
For more information on the color methods, see the online Microsoft documentation for .NET Framework
Development.
AlarmColor.Range Property
The AlarmColor.Range property is an array of read-write integer properties that get or set the boundaries
of the priority ranges.
You can use priority ranges to classify, group, and emphasize alarms and events belonging to a certain
priority range.
The boundaries must fulfill the following condition:
1 < Range[1] < Range[2] < Range[3] < 999
By default, the boundaries are set as follows:
AlarmColor.Range[1]
250
AlarmColor.Range[2]
500
AlarmColor.Range[3]
750
Syntax
RangeN = AlarmClient.AlarmColor.Range[N];
AlarmClient.AlarmColor.Range[1] = RangeN;

AVEVA™ ArchestrA Alarm Control Guide Scripting the Alarm Control
80
Parameters
N
Range index 1, 2, or 3.
Example
The following example defines four priority ranges (1 to 50, 51 to 600, 601 to 800, and 801 to 999):
AlarmClient1.AlarmColor.Range[1] = 50;
AlarmClient1.AlarmColor.Range[2] = 600;
AlarmClient1.AlarmColor.Range[3] = 800;
Remarks
For more information, see Setting Priority Ranges for Alarm Records on page 29.
AlarmColor.RTN.BackGround Property
The AlarmColor.RTN.BackGround property is a read-write color property that gets or sets the
background color of alarm records that "return to normal" (ACK_RTN and UNACK_RTN).
Syntax
Color = AlarmClient.AlarmColor.RTN.BackGround;
AlarmClient.AlarmColor.RTN.BackGround = Color;
Parameters
Color
Color of background.
Example
AlarmClient1.AlarmColor.RTN.BackGround = Color.Blue;
Remarks
For more information, see Setting Return To Normal Record Colors on page 27.
Color is a .NET Framework data type. You can use various Color methods to set the color, such as a
predefined color name, FromARGB(), FromKnownColor(), and FromName().
For a list of the .NET color names and the hexadecimal codes, see .NET Colors on page 145.
For more information on the color methods, see the online Microsoft documentation for .NET Framework
Development.
AlarmColor.RTN.ForeGround Property
The AlarmColor.RTN.ForeGround property is a read-write color property that gets or sets the text color of
alarm records that "return to normal" (ACK_RTN and UNACK_RTN).
Syntax
Color = AlarmClient.AlarmColor.RTN.ForeGround;
AlarmClient.AlarmColor.RTN.ForeGround = Color;
Parameters
Color
Color of text.
Example
AlarmClient1.AlarmColor.RTN.ForeGround = Color.Yellow;
Remarks
For more information, see Setting Return To Normal Record Colors on page 27.

Scripting the Alarm Control AVEVA™ ArchestrA Alarm Control Guide
81
Color is a .NET Framework data type. You can use various Color methods to set the color, such as a
predefined color name, FromARGB(), FromKnownColor(), and FromName().
For a list of the .NET color names and the hexadecimal codes, see .NET Colors on page 145.
For more information on the color methods, see the online Microsoft documentation for .NET Framework
Development.
AlarmColor.UnAck.BackGround Property
The AlarmColor.UnAck.BackGround property is an array of read-write integer properties that get or set
the background colors of all unacknowledged alarm records.
Index
Purpose
0
Sets the background color of all unacknowledged alarm records in all priority
ranges.
1
Gets or sets the background color of unacknowledged alarm records in the priority
range 1 to AlarmColor.Range[1].
2
Gets or sets the background color of unacknowledged alarm records in the priority
range AlarmColor.Range[1] to AlarmColor.Range[2].
3
Gets or sets the background color of unacknowledged alarm records in the priority
range AlarmColor.Range[2] to AlarmColor.Range[3].
4
Gets or sets the background color of unacknowledged alarm records in the priority
range AlarmColor.Range[3] to 999.
Syntax
Color = AlarmClient.AlarmColor.UnAck.BackGround[n];
AlarmClient.AlarmColor.UnAck.BackGround[n] = Color;
Parameters
n
Index from 0 to 4.
Color
Color of background.
Example
AlarmClient1.AlarmColor.UnAck.BackGround[0] = Color.Blue;
AlarmClient1.AlarmColor.UnAck.BackGround[1] = Color.ARGB(223,113,76);
AlarmClient1.AlarmColor.UnAck.BackGround[2] = Color.Yellow;
AlarmClient1.AlarmColor.UnAck.BackGround[3] = Color.Green;
AlarmClient1.AlarmColor.UnAck.BackGround[4] = Color.White;
Remarks
Color is a .NET Framework data type. You can use various Color methods to set the color, such as a
predefined color name, FromARGB(), FromKnownColor(), and FromName().
For a list of the .NET color names and the hexadecimal codes, see .NET Colors on page 145.
For more information on the color methods, see the online Microsoft documentation for .NET Framework
Development.
AlarmColor.UnAck.Flash.BackGround Property
The AlarmColor.UnAck.Flash.BackGround property is an array of read-write color properties that get or
set the background colors of all flashing unacknowledged alarm records.

AVEVA™ ArchestrA Alarm Control Guide Scripting the Alarm Control
82
Index
Purpose
0
Sets the background color of all flashing unacknowledged alarm records in all
priority ranges.
1
Gets or sets the background color of flashing unacknowledged alarm records in
the priority range 1 to AlarmColor.Range[1].
2
Gets or sets the background color of flashing unacknowledged alarm records in
the priority range AlarmColor.Range[1] to AlarmColor.Range[2].
3
Gets or sets the background color of flashing unacknowledged alarm records in
the priority range AlarmColor.Range[2] to AlarmColor.Range[3].
4
Gets or sets the background color of flashing unacknowledged alarm records in
the priority range AlarmColor.Range[3] to 999.
Syntax
Color = AlarmClient.AlarmColor.UnAck.Flash.BackGround[n];
AlarmClient.AlarmColor.UnAck.Flash.BackGround[n] = Color;
Parameters
n
Index from 1 to 4.
Color
Color of background.
Example
AlarmClient1.AlarmColor.UnAck.Flash.BackGround[1] = Color.ARGB(223,113,76);
AlarmClient1.AlarmColor.UnAck.Flash.BackGround[2] = Color.Yellow;
AlarmClient1.AlarmColor.UnAck.Flash.BackGround[3] = Color.Green;
AlarmClient1.AlarmColor.UnAck.Flash.BackGround[4] = Color.White;
Remarks
Color is a .NET Framework data type. You can use various Color methods to set the color, such as a
predefined color name, FromARGB(), FromKnownColor(), and FromName().
For a list of the .NET color names and the hexadecimal codes, see .NET Colors on page 145.
For more information on the color methods, see the online Microsoft documentation for .NET Framework
Development.
AlarmColor.UnAck.Flash.ForeGround Property
The AlarmColor.UnAck.Flash.ForeGround property is an array of read-write color properties that get or
set the text colors of all flashing unacknowledged alarm records.
Index
Purpose
0
Sets the text color of all flashing unacknowledged alarm records in all priority
ranges.
1
Gets or sets the text color of flashing unacknowledged alarm records in the
priority range 1 to AlarmColor.Range[1].
2
Gets or sets the text color of flashing unacknowledged alarm records in the
priority range AlarmColor.Range[1] to AlarmColor.Range[2].

Scripting the Alarm Control AVEVA™ ArchestrA Alarm Control Guide
83
Index
Purpose
3
Gets or sets the text color of flashing unacknowledged alarm records in the
priority range AlarmColor.Range[2] to AlarmColor.Range[3].
4
Gets or sets the text color of flashing unacknowledged alarm records in the
priority range AlarmColor.Range[3] to 999.
Syntax
Color = AlarmClient.AlarmColor.UnAck.Flash.ForeGround[n];
AlarmClient.AlarmColor.UnAck.Flash.ForeGround[n] = Color;
Parameters
n
Index from 1 to 4.
Color
Color of text.
Examples
AlarmClient1.AlarmColor.UnAck.Flash.ForeGround[1] = Color.ARGB(223,113,76);
AlarmClient1.AlarmColor.UnAck.Flash.ForeGround[2] = Color.Yellow;
AlarmClient1.AlarmColor.UnAck.Flash.ForeGround[3] = Color.Green;
AlarmClient1.AlarmColor.UnAck.Flash.ForeGround[4] = Color.White;
Remarks
Color is a .NET Framework data type. You can use various Color methods to set the color, such as a
predefined color name, FromARGB(), FromKnownColor(), and FromName().
For a list of the .NET color names and the hexadecimal codes, see .NET Colors on page 145.
For more information on the color methods, see the online Microsoft documentation for .NET Framework
Development.
AlarmColor.UnAck.ForeGround Property
The AlarmColor.UnAck.ForeGround property is an array of read-write integer properties that get or set
the text colors of all unacknowledged alarm records.
Index
Purpose
0
Sets the text color of all unacknowledged alarm records in all priority ranges.
1
Gets or sets the text color of unacknowledged alarm records in the priority range 1
to AlarmColor.Range[1].
2
Gets or sets the text color of unacknowledged alarm records in the priority range
AlarmColor.Range[1] to AlarmColor.Range[2].
3
Gets or sets the text color of unacknowledged alarm records in the priority range
AlarmColor.Range[2] to AlarmColor.Range[3].
4
Gets or sets the text color of unacknowledged alarm records in the priority range
AlarmColor.Range[3] to 999.
Syntax
Color = AlarmClient.AlarmColor.UnAck.ForeGround[n];
AlarmClient.AlarmColor.UnAck.ForeGround[n] = Color;

AVEVA™ ArchestrA Alarm Control Guide Scripting the Alarm Control
84
Parameters
n
Index from 0 to 4.
Color
Color of text.
Example
AlarmClient1.AlarmColor.UnAck.ForeGround[0] = Color.Blue;
AlarmClient1.AlarmColor.UnAck.ForeGround[1] = Color.ARGB(223,113,76);
AlarmClient1.AlarmColor.UnAck.ForeGround[2] = Color.Yellow;
AlarmClient1.AlarmColor.UnAck.ForeGround[3] = Color.Green;
AlarmClient1.AlarmColor.UnAck.ForeGround[4] = Color.White;
Remarks
Color is a .NET Framework data type. You can use various Color methods to set the color, such as a
predefined color name, FromARGB(), FromKnownColor(), and FromName().
For a list of the .NET color names and the hexadecimal codes, see .NET Colors on page 145.
For more information on the color methods, see the online Microsoft documentation for .NET Framework
Development.
AlarmColor.UnAck.RTN.BackGround Property
The AlarmColor.UnAck.RTN.BackGround property is a read-write color property that gets or sets the
background color of unacknowledged alarm records that "return to normal" (UNACK_RTN).
Syntax
Color = AlarmClient.AlarmColor.UnAck.RTN.BackGround;
AlarmClient.AlarmColor.UnAck.RTN.BackGround = Color;
Parameters
Color
Color of background.
Example
AlarmClient1.AlarmColor.UnAck.RTN.BackGround = Color.Blue;
Remarks
Color is a .NET Framework data type. You can use various Color methods to set the color, such as a
predefined color name, FromARGB(), FromKnownColor(), and FromName().
For a list of the .NET color names and the hexadecimal codes, see .NET Colors on page 145.
For more information on the color methods, see the online Microsoft documentation for .NET Framework
Development.
AlarmColor.UnAck.RTN.ForeGround Property
The AlarmColor.UnAck.RTN.ForeGround property is a read-write color property that gets or sets the text
color of unacknowledged alarm records that "return to normal" (UNACK_RTN).
Syntax
Color = AlarmClient.AlarmColor.UnAck.RTN.ForeGround;
AlarmClient.AlarmColor.UnAck.RTN.ForeGround = Color;
Parameters
Color
Color of text.

Scripting the Alarm Control AVEVA™ ArchestrA Alarm Control Guide
85
Example
AlarmClient1.AlarmColor.UnAck.RTN.ForeGround = Color.FromARGB(0,0,0);
Remarks
Color is a .NET Framework data type. You can use various Color methods to set the color, such as a
predefined color name, FromARGB(), FromKnownColor(), and FromName().
For a list of the .NET color names and the hexadecimal codes, see .NET Colors on page 145.
For more information on the color methods, see the online Microsoft documentation for .NET Framework
Development.
AlarmQuery Property
The AlarmQuery property is a read-write string property that gets or sets the alarm query.
Syntax
result = AlarmClient.AlarmQuery;
AlarmClient.AlarmQuery = AlmQry;
Parameters
AlmQry
Alarm query string in format \\node\provider!group where node is optional.
Example
AlarmClient.AlarmQuery = "\intouch!GroupA";
Remarks
After you write a new value to the AlarmQuery property, the Alarm Control is updated. If you are using the
default query, the query is updated with the new node, provider, and group name.
AllowColumnResize Property
The AllowColumnResize property is a read-write Boolean property that gets or sets the ability to resize
the columns at run time.
Syntax
result = AlarmClient.AllowColumnResize;
AlarmClient.AllowColumnResize = allowColResizing;
AutoResumeDuration Property
The AutoResumeDuration property is a read-write integer property that gets or sets the time in seconds
after which the grid becomes unfrozen and resumes showing alarms.
Set this value to 0 to disable auto resume.
Syntax
result = AlarmClient.AutoResumeDuration;
AlarmClient.AllowColumnResize = timeout;
AutoScroll Property
The AutoScroll property is a read-write Boolean property that gets or sets automatic scrolling to new
alarms.
Syntax
result = AlarmClient.AutoScroll;
AlarmClient.AutoScroll = allowAutoscroll;

AVEVA™ ArchestrA Alarm Control Guide Scripting the Alarm Control
86
ClientMode Property
The ClientMode property is a read-write integer property that gets or sets the client mode for the Alarm
Control. Use one of the following values:
Value
Client Mode
1
Current Alarms
2
Recent Alarms and Events
3
Historical Alarms
4
Historical Events
5
Historical Alarms and Events
Syntax
result = AlarmClient.ClientMode;
AlarmClient.ClientMode = clientMode;
Example
AlarmClient1.ClientMode = 2;
LogMessage("Alarm client set to Recent Alarms and Events");
Remarks
For more information, see Showing Current Alarms or Recent Alarms and Events on page 21.
ConnectStatus Property
The ConnectStatus property is a read-only string property that gets the status of the connection to the
Alarm Database.
Syntax
result = AlarmClient.ConnectStatus;
Return Value
Returns the status of the connection to the alarm database. Can be "Connected," "Not connected," or "In
progress."
Example
alive = AlarmClient1.ConnectStatus;
if alive == "Connected" then
LogMessage("The Alarm Control is currently connected to the Alarm Database");
else
LogMessage("The Alarm Control is either currently connecting to the Alarm
Database or not connected.");
endif;
ContextMenu.AckAll Property
The ContextMenu.AckAll property is a read-write Boolean property that gets or sets the appearance of
the Ack All option on the shortcut menu.
Syntax
result = AlarmClient.ContextMenu.AckAll;
AlarmClient.ContextMenu.AckAll = AckAllVis;

Scripting the Alarm Control AVEVA™ ArchestrA Alarm Control Guide
87
Remarks
For more information, see Configuring the Run-Time Shortcut Menu on page 53.
ContextMenu.AckOthers Property
The ContextMenu.AckOthers property is a read-write Boolean property that gets or sets the appearance
of the Ack Others option on the shortcut menu.
Syntax
result = AlarmClient.ContextMenu.AckOthers;
AlarmClient.ContextMenu.AckOthers = AckOthersVis;
Remarks
For more information, see Configuring the Run-Time Shortcut Menu on page 53.
ContextMenu.AckSelected Property
The ContextMenu.AckSelected property is a read-write Boolean property that gets or sets the
appearance of the Ack Selected option on the shortcut menu.
Syntax
result = AlarmClient.ContextMenu.AckSelected;
AlarmClient.ContextMenu.AckSelected = AckSelectedVis;
Remarks
For more information, see Configuring the Run-Time Shortcut Menu on page 53.
ContextMenu.AckSelectedGroups Property
The ContextMenu.AckSelectedGroups property is a read-write Boolean property that gets or sets the
appearance of the Ack Selected Groups option on the shortcut menu.
Syntax
result = AlarmClient.ContextMenu.AckSelectedGroups;
AlarmClient.ContextMenu.AckSelectedGroups = AckSelGrpsVis;
Remarks
For more information, see Configuring the Run-Time Shortcut Menu on page 53.
ContextMenu.AckSelectedPriorities Property
The ContextMenu.AckSelectedPriorities property is a read-write Boolean property that gets or sets the
appearance of the Ack Selected Priorities option on the shortcut menu.
Syntax
result = AlarmClient.ContextMenu.AckSelectedPriorities;
AlarmClient.ContextMenu.AckSelectedPriorities = AckSelPriVis;
Remarks
For more information, see Configuring the Run-Time Shortcut Menu on page 53.
ContextMenu.AckSelectedTags Property
The ContextMenu.AckSelectedTags property is a read-write Boolean property that gets or sets the
appearance of the Ack Selected Tags option on the shortcut menu.
Syntax
result = AlarmClient.ContextMenu.AckSelectedTags;

AVEVA™ ArchestrA Alarm Control Guide Scripting the Alarm Control
88
AlarmClient.ContextMenu.AckSelectedTags = AckSelTagsVis;
Remarks
For more information, see Configuring the Run-Time Shortcut Menu on page 53.
ContextMenu.AckVisible Property
The ContextMenu.AckVisible property is a read-write Boolean property that gets or sets the appearance
of the Ack Visible option on the shortcut menu.
Syntax
result = AlarmClient.ContextMenu.AckVisible;
AlarmClient.ContextMenu.AckVisible = AckVisVis;
Remarks
For more information, see Configuring the Run-Time Shortcut Menu on page 53.
ContextMenu.Favorites Property
The ContextMenu.Favorites property is a read-write Boolean property that gets or sets the appearance
of the Query and Filter Favorites option on the shortcut menu.
Syntax
result = AlarmClient.ContextMenu.Favorites;
AlarmClient.ContextMenu.Favorites = FavsVis;
Remarks
For more information, see Configuring the Run-Time Shortcut Menu on page 53.
ContextMenu.Freeze Property
The ContextMenu.Freeze property is a read-write Boolean property that gets or sets the appearance of
the Freeze option on the shortcut menu.
Syntax
result = AlarmClient.ContextMenu.Freeze;
AlarmClient.ContextMenu.Freeze = FreezeVis;
Remarks
For more information, see Configuring the Run-Time Shortcut Menu on page 53.
ContextMenu.Hidden Property
The ContextMenu.Hidden property is a read-write Boolean property that gets or sets the appearance of
the Hidden option on the shortcut menu.
Syntax
result = AlarmClient.ContextMenu.Hidden;
AlarmClient.ContextMenu.Hidden = HiddenVis;
Remarks
For more information, see Configuring the Run-Time Shortcut Menu on page 53.
ContextMenu.HideAll Property
The ContextMenu.HideAll property is a read-write Boolean property that gets or sets the appearance of
the Hide All option on the shortcut menu.

Scripting the Alarm Control AVEVA™ ArchestrA Alarm Control Guide
89
Syntax
result = AlarmClient.ContextMenu.HideAll;
AlarmClient.ContextMenu.HideAll = HideAllVis;
Remarks
For more information, see Configuring the Run-Time Shortcut Menu on page 53.
ContextMenu.HideOthers Property
The ContextMenu.HideOthers property is a read-write Boolean property that gets or sets the appearance
of the Hide Others option on the shortcut menu.
Syntax
result = AlarmClient.ContextMenu.HideOthers;
AlarmClient.ContextMenu.HideOthers = HideOthersVis;
Remarks
For more information, see Configuring the Run-Time Shortcut Menu on page 53.
ContextMenu.HideSelected Property
The ContextMenu.HideSelected property is a read-write Boolean property that gets or sets the
appearance of the Hide Selected option on the shortcut menu.
Syntax
result = AlarmClient.ContextMenu.HideSelected;
AlarmClient.ContextMenu.HideSelected = HideSelVis;
Remarks
For more information, see Configuring the Run-Time Shortcut Menu on page 53.
ContextMenu.HideSelectedGroups Property
The ContextMenu.HideSelectedGroups property is a read-write Boolean property that gets or sets the
appearance of the Hide Selected Groups option on the shortcut menu.
Syntax
result = AlarmClient.ContextMenu.HideSelectedGroups;
AlarmClient.ContextMenu.HideSelectedGroups = HideSelGrpsVis;
Remarks
For more information, see Configuring the Run-Time Shortcut Menu on page 53.
ContextMenu.HideSelectedPriorities Property
The ContextMenu.HideSelectedPriorities property is a read-write Boolean property that gets or sets the
appearance of the Hide Selected Priorities option on the shortcut menu.
Syntax
result = AlarmClient.ContextMenu.HideSelectedPriorities;
AlarmClient.ContextMenu.HideSelectedPriorities = HideSelPrisVis;
Remarks
For more information, see Configuring the Run-Time Shortcut Menu on page 53.

AVEVA™ ArchestrA Alarm Control Guide Scripting the Alarm Control
90
ContextMenu.HideSelectedTags Property
The ContextMenu.HideSelectedTags property is a read-write Boolean property that gets or sets the
appearance of the Hide Selected Tags option on the shortcut menu.
Syntax
result = AlarmClient.ContextMenu.HideSelectedTags;
AlarmClient.ContextMenu.HideSelectedTags = HideSelTagsVis;
Remarks
For more information, see Configuring the Run-Time Shortcut Menu on page 53.
ContextMenu.HideVisible Property
The ContextMenu.HideVisible property is a read-write Boolean property that gets or sets the appearance
of the Hide Visible option on the shortcut menu.
Syntax
result = AlarmClient.ContextMenu.HideVisible;
AlarmClient.ContextMenu.HideVisible = HideVisVis;
Remarks
For more information, see Configuring the Run-Time Shortcut Menu on page 53.
ContextMenu.Requery Property
The ContextMenu.Requery property is a read-write Boolean property that gets or sets the appearance of
the Requery option on the shortcut menu.
Syntax
result = AlarmClient.ContextMenu.Requery;
AlarmClient.ContextMenu.Requery = RequeryVis;
Remarks
For more information, see Configuring the Run-Time Shortcut Menu on page 53.
ContextMenu.Reset Property
The ContextMenu.Reset property is a read-write Boolean property that gets or sets the appearance of
the Reset option on the shortcut menu.
Syntax
result = AlarmClient.ContextMenu.Reset;
AlarmClient.ContextMenu.Reset = ResetVis;
Remarks
For more information, see Configuring the Run-Time Shortcut Menu on page 53.
ContextMenu.ShelveAll Property
CntextMenu.ShelveAll is a read-write Boolean property that gets or sets the appearance of the Shelve
All option on the Alarm Control’s shortcut menu.
Syntax
To Set:
AlarmClient.ContextMenu.ShelveAll = boolean_value;
Example
AlarmClient1.ContextMenu.ShelveAll = true;

Scripting the Alarm Control AVEVA™ ArchestrA Alarm Control Guide
91
Syntax
To Get:
boolean_name = AlarmClient.ContextMenu.ShelveAll;
Example
dim ShlvAll as boolean;
ShlvAll = AlarmClient1.ContextMenu.ShelveAll;
Remarks
For more information, see Configuring the Run-Time Shortcut Menu on page 53.
ContextMenu.ShelveOthers Property
ContextMenu.ShelveOthers is a read-write Boolean property that gets or sets the appearance of the
Shelve Others option on the Alarm Control’s shortcut menu.
Syntax
To Set:
AlarmClient.ContextMenu.ShelveOthers = boolean_value;
Example
AlarmClient1.ContextMenu.ShelveOthers = true;
Syntax
To Get:
boolean_name = AlarmClient.ContextMenu.ShelveOthers;
Example
dim ShlvOthrs as boolean;
ShlvOthrs = AlarmClient1.ContextMenu.ShelveOthers;
Remarks
For more information, see Configuring the Run-Time Shortcut Menu on page 53.
ContextMenu.ShelveSelected Property
ContextMenu.ShelveSelected is a read-write Boolean property that gets or sets the appearance of the
Shelve Selected option on the Alarm Control’s shortcut menu.
Syntax
To Set:
AlarmClient.ContextMenu.ShelveSelected = boolean_value;
Example
AlarmClient1.ContextMenu.ShelveSelected = true;
Syntax
To Get:
boolean_name = AlarmClient.ContextMenu.ShelveSelected;
Example
dim ShlvSlctd as boolean;
ShlvSlctd = AlarmClient1.ContextMenu.ShelveSelected;
Remarks
For more information, see Configuring the Run-Time Shortcut Menu on page 53.

AVEVA™ ArchestrA Alarm Control Guide Scripting the Alarm Control
92
ContextMenu.ShelveSelectedGroups Property
ContextMenu.ShelveSelectedGroups is a read-write Boolean property that gets or sets the appearance
of the Shelve Selected Groups option on the Alarm Control’s shortcut menu.
Syntax
To Set:
AlarmClient.ContextMenu.ShelveSelectedGroups = boolean_value;
Example
AlarmClient1.ContextMenu.ShelveSelectedGroups = true;
Syntax
To Get:
boolean_name = AlarmClient.ContextMenu.ShelveSelectedGroups;
Example
dim ShlvSlctdGrp as boolean;
ShlvSlctdGrp = AlarmClient1.ContextMenu.ShelveSelectedGroups;
Remarks
For more information, see Configuring the Run-Time Shortcut Menu on page 53.
ContextMenu.ShelveSelectedPriorities Property
ContextMenu.ShelveSelectedPriorities is a read-write Boolean property that gets or sets the appearance
of the Shelve Selected Priorities option on the Alarm Control’s shortcut menu.
Syntax
To Set:
AlarmClient.ContextMenu.ShelveSelectedPriorities = boolean_value;
Example
AlarmClient1.ContextMenu.ShelveSelectedPriorities = true;
Syntax
To Get:
boolean_name = AlarmClient.ContextMenu.ShelveSelectedPriorities;
Example
dim ShlvSlctdPri as boolean;
ShlvSlctdPri = AlarmClient1.ContextMenu.ShelveSelectedPriorities;
Remarks
For more information, see Configuring the Run-Time Shortcut Menu on page 53.
ContextMenu.ShelveSelectedSeverities Property
ContextMenu.ShelveSelectedSeverities is a read-write Boolean property that gets or sets the
appearance of the Shelve Selected Severities option on the Alarm Control’s shortcut menu.
Syntax
To Set:
AlarmClient.ContextMenu.ShelveSelectedSeverities = boolean_value;
Example
AlarmClient1.ContextMenu.ShelveSelectedSeverities = true;
Syntax
To Get:
boolean_name = AlarmClient.ContextMenu.ShelveSelectedSeverities;

Scripting the Alarm Control AVEVA™ ArchestrA Alarm Control Guide
93
Example
dim ShlvSlctdSev as boolean;
ShlvSlctdSev = AlarmClient1.ContextMenu.ShelveSelectedSeverities;
Remarks
For more information, see Configuring the Run-Time Shortcut Menu on page 53.
ContextMenu.ShelveSelectedTags Property
ContextMenu.ShelveSelectedTags is a read-write Boolean property that gets or sets the appearance of
the Shelve Selected Tags option on the Alarm Control’s shortcut menu.
Syntax
To Set:
AlarmClient.ContextMenu.ShelveSelectedTags = boolean_value;
Example
AlarmClient1.ContextMenu.ShelveSelectedTags = true;
Syntax
To Get:
boolean_name = AlarmClient.ContextMenu.ShelveSelectedTags;
Example
dim ShlvSlctdTag as boolean;
ShlvSlctdTag = AlarmClient1.ContextMenu.ShelveSelectedTags;
Remarks
For more information, see Configuring the Run-Time Shortcut Menu on page 53.
ContextMenu.ShelveVisible Property
ContextMenu.ShelveVisible is a read-write Boolean property that gets or sets the appearance of the
Shelve Visible option appears in the Alarm Control’s shortcut menu.
Syntax
To Set:
AlarmClient.ContextMenu.ShelveSelectedVisible = boolean_value;
Example
AlarmClient1.ContextMenu.ShelveSelectedVisible = true;
Syntax
To Get:
boolean_name = AlarmClient.ContextMenu.ShelveSelectedVisible;
Example
dim ShlvSlctdVis as boolean;
ShlvSlctdVis = AlarmClient1.ContextMenu.ShelveSelectedVisible;
Remarks
For more information, see Configuring the Run-Time Shortcut Menu on page 53.
ContextMenu.Sort Property
The ContextMenu.Sort property is a read-write Boolean property that gets or sets the appearance of the
Sort option on the shortcut menu.
Syntax
result = AlarmClient.ContextMenu.Sort;

AVEVA™ ArchestrA Alarm Control Guide Scripting the Alarm Control
94
AlarmClient.ContextMenu.Sort = SortVis;
Remarks
For more information, see Configuring the Run-Time Shortcut Menu on page 53.
ContextMenu.Statistics Property
The ContextMenu.Statistics property is a read-write Boolean property that gets or sets the appearance of
the Statistics option on the shortcut menu.
Syntax
result = AlarmClient.ContextMenu.Statistics;
AlarmClient.ContextMenu.Statistics = StatsVis;
Remarks
For more information, see Configuring the Run-Time Shortcut Menu on page 53.
ContextMenu.UnhideAll Property
The ContextMenu.UnhideAll property is a read-write Boolean property that gets or sets the appearance
of the Unhide All option on the shortcut menu.
Syntax
result = AlarmClient.ContextMenu.UnhideAll;
AlarmClient.ContextMenu.UnhideAll = UnhideAllVis;
Remarks
For more information, see Configuring the Run-Time Shortcut Menu on page 53.
ContextMenu.UnshelveAll Property
ContextMenu.UnshelveAll is read-write Boolean property that gets or sets the appearance of the
Unshelve All option on the Alarm Control’s shortcut menu.
Syntax
To Set:
AlarmClient.ContextMenu.UnshelveAll = boolean_value;
Example
AlarmClient1.ContextMenu.UnshelveAll = true;
Syntax
To Get:
boolean_variable_name = AlarmClient.ContextMenu.UnshelveAll;
Example
dim ShlvAll as boolean;
ShlvAll = AlarmClient1.ContextMenu.UnshelveAll;
Remarks
For more information, see Configuring the Run-Time Shortcut Menu on page 53.
ContextMenu.UnshelveOthers Property
ContextMenu.UnshelveOthers is read-write Boolean property that gets or sets the appearance of the
Unshelve Others option on the Alarm Control’s shortcut menu.
Syntax
To Set:
AlarmClient.ContextMenu.UnshelveOthers = boolean_value;

Scripting the Alarm Control AVEVA™ ArchestrA Alarm Control Guide
95
Example
AlarmClient1.ContextMenu.UnshelveOthers = true;
Syntax
To Get:
boolean_variable_name = AlarmClient.ContextMenu.UnshelveOthers;
Example
dim ShlvOthrs as boolean;
ShlvOthrs = AlarmClient1.ContextMenu.UnshelveOthers;
Remarks
For more information, see Configuring the Run-Time Shortcut Menu on page 53.
ContextMenu.UnshelveSelected Property
ContextMenu.UnshelveSelected is read-write Boolean property that gets or sets the appearance of the
Unshelve Selected option on the Alarm Cont rol’s shortcut menu.
Syntax
To Set:
AlarmClient.ContextMenu.UnshelveSelected = boolean_value;
Example
AlarmClient1.ContextMenu.UnshelveSelected = true;
Syntax
To Get:
boolean_variable_name = AlarmClient.ContextMenu.UnshelveSelected;
Example
dim ShlvSlctd as boolean;
ShlvSlctd = AlarmClient1.ContextMenu.UnshelveSelected;
Remarks
For more information, see Configuring the Run-Time Shortcut Menu on page 53.
ContextMenu.UnshelveSelectedGroups Property
ContextMenu.UnshelveSelectedGroups is read-write Boolean property that gets or sets the appearance
of the Unshelve Selected Groups option on the Alarm Control’s shortcut menu.
Syntax
To Set:
AlarmClient.ContextMenu.UnshelveSelectedGroups = boolean_value;
Example
AlarmClient1.ContextMenu.UnshelveSelectedGroups = true;
Syntax
To Get:
boolean_name = AlarmClient.ContextMenu.UnshelveSelectedGroups;
Example
dim UnshlvSlctdGrp as boolean;
UnshlvSlctdGrp = AlarmClient1.ContextMenu.UnshelveSelectedGroups;
Remarks
For more information, see Configuring the Run-Time Shortcut Menu on page 53.

AVEVA™ ArchestrA Alarm Control Guide Scripting the Alarm Control
96
ContextMenu.UnshelveSelectedPriorities Property
ContextMenu.UnshelveSelectedPriorities is read-write Boolean property that gets or sets the
appearance of the Unshelve Selected Priorities option on the Alarm Control’s shortcut menu.
Syntax
To Set:
AlarmClient.ContextMenu.UnshelveSelectedPriorities = boolean_value;
Example
AlarmClient1.ContextMenu.UnshelveSelectedPriorities = true;
Syntax
To Get:
boolean_name = AlarmClient.ContextMenu.UnshelveSelectedPriorities;
Example
dim UnshlvSlctdPri as boolean;
UnshlvSlctdPri = AlarmClient1.ContextMenu.UnshelveSelectedPriorities;
Remarks
For more information, see Configuring the Run-Time Shortcut Menu on page 53.
ContextMenu.UnshelveSelectedSeverities Property
ContextMenu.UnshelveSelectedSeverities is read-write Boolean property that gets or sets the
appearance of the Unshelve Selected Severities option on the Alarm Cont rol’s shortcut menu.
Syntax
To Set:
AlarmClient.ContextMenu.UnshelveSelectedSeverities = boolean_value;
Example
AlarmClient1.ContextMenu.UnshelveSelectedSeverities = true;
Syntax
To Get:
boolean_name = AlarmClient.ContextMenu.UnshelveSelectedSeverities;
Example
dim UnshlvSlctdSev as boolean;
UnshlvSlctdSev = AlarmClient1.ContextMenu.UnshelveSelectedSeverities;
Remarks
For more information, see Configuring the Run-Time Shortcut Menu on page 53.
ContextMenu.UnshelveSelectedTags Property
ContextMenu.UnshelveSelectedTags is read-write Boolean property that gets or sets the appearance of
the Unshelve Selected Tags option on the Alarm Control’s shortcut menu.
Syntax
To Set:
AlarmClient.ContextMenu.UnshelveSelectedTags = boolean_value;
Example
AlarmClient1.ContextMenu.UnshelveSelectedTags = true;
Syntax
To Get:
boolean_name = AlarmClient.ContextMenu.UnshelveSelectedTags;

Scripting the Alarm Control AVEVA™ ArchestrA Alarm Control Guide
97
Example
dim UnshlvSlctdTag as boolean;
UnshlvSlctdTag = AlarmClient1.ContextMenu.UnshelveSelectedTags;
Remarks
For more information, see Configuring the Run-Time Shortcut Menu on page 53.
ContextMenu.UnshelveVisible Property
ContextMenu.UnshelveVisible is read-write Boolean property that gets or sets the appearance of the
Unshelve Visible option on the Alarm Control’s shortcut menu.
Syntax
To Set:
AlarmClient.ContextMenu.UnshelveSelectedVisible = boolean_value;
Example
AlarmClient1.ContextMenu.UnshelveSelectedVisible = true;
Syntax
To Get:
boolean_name = AlarmClient.ContextMenu.UnshelveSelectedVisible;
Example
dim UnshlvSlctdVis as boolean;
UnshlvSlctdVis = AlarmClient1.ContextMenu.UnshelveSelectedVisible;
Remarks
For more information, see Configuring the Run-Time Shortcut Menu on page 53.
Database.Authentication Property
The Database.Authentication property is a read-write string property that gets or sets the authentication
mode to connect to the Alarm Database. Possible values are:
Windows Integrated
Windows Account
SQL Server
The default value is "Windows Integrated".
Syntax
result = AlarmClient.Database.Authentication;
AlarmClient.Database.Authentication = AuthMode;
Remarks
For more information, see Showing Historical Alarms and/or Events on page 23.
Database.Name Property
The Database.Name property is a read-write string property that gets or sets the name of the Alarm
Database. The default value is "WWALMDB". WWALMDB is the name of the InTouch Database and
A2ALMDB is the name of the ArchestrA Database.
If you change the Database.Name property at run time, you need to call the Connect method to connect
to the new alarm database.
Syntax
result = AlarmClient.Database.Name;

AVEVA™ ArchestrA Alarm Control Guide Scripting the Alarm Control
98
AlarmClient.Database.Name = AlmDBName;
Remarks
For more information, see Showing Historical Alarms and/or Events on page 23.
Database.Password Property
The Database.Password property is a read-write string property that gets or sets the password
associated with the user name to connect to the Alarm Database.
Syntax
result = AlarmClient.Database.Password;
AlarmClient.Database.Password = Psswrd;
Remarks
For more information, see Showing Historical Alarms and/or Events on page 23.
Database.ServerName Property
The Database.ServerName property is a read-write string property that gets or sets the name of the
server that hosts the Alarm Database.
Syntax
result = AlarmClient.Database.ServerName;
AlarmClient.Database.ServerName = SrvName;
Remarks
For more information, see Showing Historical Alarms and/or Events on page 23.
Database.UserID Property
The Database.UserID property is a read-write string property that gets or sets the name of user
authorized to access the Alarm Database.
Syntax
result = AlarmClient.Database.UserID;
AlarmClient.Database.UserID = UserName;
Remarks
For more information, see Showing Historical Alarms and/or Events on page 23.
DisableFileBrowsing Property
Specify True to get/set the option to access the file browser when importing or exporting files.
Syntax
result = AlarmClient.DisableFileBrowsing;
AlarmClient.DisableFileBrowsing = boolean_value;
Example
AlarmClient.DisableFileBrowsing = true;
Remarks
Default is True.
Domain Property
The Domain property is a read-write string property that gets or sets the domain name of the user to
connect to the Alarm Database.

Scripting the Alarm Control AVEVA™ ArchestrA Alarm Control Guide
99
Syntax
result = AlarmClient.Domain;
AlarmClient.Domain = DomName;
Remarks
For more information, see Showing Historical Alarms and/or Events on page 23.
Enabled Property
The Enabled property is a read-write Boolean property that gets or sets the enablement of Alarm Control.
When the Alarm Control is disabled, alarm records are still updated, but the operator cannot interact with
the control.
The operator can still use scripting to interact with the control.
Syntax
result = AlarmClient.Enabled;
AlarmClient.Enabled = EnableFlag;
EventColor.BackGround Property
The EventColor.BackGround property is a read-write color property that gets or sets the background
color of event records.
Syntax
Color = AlarmClient.EventColor.BackGround;
AlarmClient.EventColor.BackGround = Color;
Parameters
Color
Color of background.
Example
AlarmClient1.EventColor.BackGround = Color.Blue;
Remarks
Color is a .NET Framework data type. You can use various Color methods to set the color, such as a
predefined color name, FromARGB(), FromKnownColor(), and FromName().
For a list of the .NET color names and the hexadecimal codes, see .NET Colors on page 145.
For more information on the color methods, see the online Microsoft documentation for .NET Framework
Development.
EventColor.ForeGround Property
The EventColor.ForeGround property is a read-write color property that gets or sets the text color of
event records.
Syntax
Color = AlarmClient.EventColor.ForeGround;
AlarmClient.EventColor.ForeGround = Color;
Parameters
Color
Color of text.
Example
AlarmClient1.EventColor.ForeGround = Color.Blue;

AVEVA™ ArchestrA Alarm Control Guide Scripting the Alarm Control
100
Remarks
Color is a .NET Framework data type. You can use various Color methods to set the color, such as a
predefined color name, FromARGB(), FromKnownColor(), and FromName().
For a list of the .NET color names and the hexadecimal codes, see .NET Colors on page 145.
For more information on the color methods, see the online Microsoft documentation for .NET Framework
Development.
Favorite Property
The Favorite property is a read-write string property that gets or sets the name of the current query filter
favorite.
Syntax
QueryFilterName = AlarmClient.Favorite;
AlarmClient.Favorite = QueryFilterName;
Parameters
QueryFilterName
The name of a query filter favorite.
Example
The following example sets the current Alarm Control grid to the Query Filter Favorite with the name "All
Hi Priority Alarms".
AlarmClient1.Favorite = "All Hi Priority Alarms";
Remarks
You can also use this property to reset the currently used query filter to its default with the following
script:
AlarmClient.Favorite = "Default";
The Favorite property executes as a query to retain previous release default behavior. If you want to
execute the query/filter as a filter only, then use the RunQuery() method.
FlashUnAckAlarms Property
The FlashUnAckAlarms property is a read-write Boolean property that gets or sets the flashing of
unacknowledged alarm records.
Syntax
result = AlarmClient.FlashUnAckAlarms;
AlarmClient.FlashUnAckAlarms = FlashUnAckRecs;
Remarks
For more information, see Setting Unacknowledged Alarms to Flash on page 31.
GridColor Property
The GridColor property is a read-write color property that gets or sets the color of the grid lines.
Syntax
Color = AlarmClient.GridColor;
AlarmClient.GridColor = Color;
Parameters
Color
Color of the grid lines.

Scripting the Alarm Control AVEVA™ ArchestrA Alarm Control Guide
101
Example
AlarmClient1.GridColor = Color.Black;
Remarks
For more information, see Setting Heading, Grid, and Window Color on page 28.
Color is a .NET Framework data type. You can use various Color methods to set the color, such as a
predefined color name, FromARGB(), FromKnownColor(), and FromName().
For a list of the .NET color names and the hexadecimal codes, see .NET Colors on page 145.
For more information on the color methods, see the online Microsoft documentation for .NET Framework
Development.
HeadingColor.BackGround Property
The HeadingColor.BackGround property is a read-write color property that gets or sets the background
color of the heading.
Syntax
Color = AlarmClient.HeadingColor.BackGround;
AlarmClient.HeadingColor.BackGround = Color;
Parameters
Color
Color of background.
Example
AlarmClient1.HeadingColor.BackGround = Color.Blue;
Remarks
For more information, see Setting Heading, Grid, and Window Color on page 28.
Color is a .NET Framework data type. You can use various Color methods to set the color, such as a
predefined color name, FromARGB(), FromKnownColor(), and FromName().
For a list of the .NET color names and the hexadecimal codes, see .NET Colors on page 145.
For more information on the color methods, see the online Microsoft documentation for .NET Framework
Development.
HeadingColor.ForeGround Property
The HeadingColor.ForeGround property is a read-write color property that gets or sets the text color of
the heading.
Syntax
Color = AlarmClient.HeadingColor.ForeGround;
AlarmClient.HeadingColor.ForeGround = Color;
Parameters
Color
Color of text.
Example
AlarmClient1.HeadingColor.ForeGround = Color.Blue;
Remarks
For more information, see Setting Heading, Grid, and Window Color on page 28.

AVEVA™ ArchestrA Alarm Control Guide Scripting the Alarm Control
102
Color is a .NET Framework data type. You can use various Color methods to set the color, such as a
predefined color name, FromARGB(), FromKnownColor(), and FromName().
For a list of the .NET color names and the hexadecimal codes, see .NET Colors on page 145.
For more information on the color methods, see the online Microsoft documentation for .NET Framework
Development.
Height Property
The Height property is a read-write integer property that gets or sets the height of the Alarm Control in
pixels.
Syntax
result = AlarmClient.Height;
AlarmClient.Height = Hght;
HiddenAlarms Property
The HiddenAlarms property is a read-only integer property that gets the number of hidden alarms.
Syntax
Result = AlarmClient.HiddenAlarms;
Example
LogMessage("There are " + Text(AlarmClient1.HiddenAlarms,"#")+" hidden
alarms.");
HideErrors Property
The HideErrors property is a read-write Boolean property that gets or sets the Hide Errors option.
TRUE - Run-time errors, warnings, and status messages are written to the ArchestrA Logger. No
pop-ups appear
FALSE - Run-time errors, warnings, and status messages pop-up and are also written to the
ArchestrA Logger
Syntax
result = AlarmClient.HideErrors;
AlarmClient.HideErrors = SilentMode;
Remarks
For more information, see Hiding Errors, Warnings, and Status Messages on page 48.
MaxDatabaseRecords Property
The MaxDatabaseRecords property is a read-write integer property that gets or sets the maximum
database records to retrieve. The valid range is 1 to 32766.
Syntax
result = AlarmClient.MaxDatabaseRecords;
AlarmClient.MaxDatabaseRecords = MaxRecs;
Remarks
For more information, see Showing Historical Alarms and/or Events on page 23.
NewAlarmEventMode Property
The NewAlarmEventMode property is an read-write integer property that gets or sets the trigger behavior
of the New Alarm event.

Scripting the Alarm Control AVEVA™ ArchestrA Alarm Control Guide
103
Syntax
EMode = AlarmClient.NewAlarmEventMode;
AlarmClient.NewAlarmEventMode = EMode;
Parameters
EMode
Event mode with following possible values:
Value
Description
0
The NewAlarm event cannot be triggered. (default).
1
The NewAlarm event is triggered only one time the first time a new alarm occurs.
2
The NewAlarm event is triggered every time a new alarm occurs.
NoRecordsMessage.Enabled Property
The NoRecordsMessage.Enabled property is a read-write Boolean property that gets or sets the visibility
of a custom message when no alarm records are available.
Syntax
result = AlarmClient.NoRecordsMessage.Enabled;
AlarmClient.NoRecordsMessage.Enabled = showMessage;
Example
AlarmClient1.NoRecordsMessage.Enabled = 1;
AlarmClient1.NoRecordsMessage.Message = "There are no alarm records available";
Remarks
Use this property in combination with the NoRecordsMessage.Message property.
NoRecordsMessage.Message Property
The NoRecordsMessage.Message property is a read-write string property that gets or sets the custom
message text when no alarm records are available and the NoRecordsMessage.Enabled property
value is TRUE.
Syntax
result = AlarmClient.NoRecordsMessage.Message;
AlarmClient.NoRecordsMessage.Message = myCustomMessage;
Example
AlarmClient1.NoRecordsMessage.Enabled = 1;
AlarmClient1.NoRecordsMessage.Message = "There are no alarm records available";
Remarks
Use this property in combination with the NoRecordsMessage.Enabled property.
SaveUserQueryFilter Property
Gets/Sets the option to save runtime user queries and filters. If false, then user modified queries or filters
will not be saved to file. If true, user modification will be saved to file.

AVEVA™ ArchestrA Alarm Control Guide Scripting the Alarm Control
104
Syntax
result = AlarmClient.SaveUserQueryFilter;
AlarmClient.SaveUserQueryFilter = boolean_true;
Example
AlarmClient.SaveUserQueryFilter = true;
Remarks
Default is True.
QueryStartup Property
The QueryStartup property is a read-write Boolean property that gets or sets or sets the automatic
update of the Alarm Control on startup.
Syntax
result = AlarmClient.QueryStartup;
AlarmClient.QueryStartup = AutoQry;
Remarks
For more information, see Automatically Querying for Alarms on Start Up on page 48.
RequiresShelveSignature Property
The RequiresShelveSignature property is a read-write Boolean property to specify if a user signature is
required to shelve an alarm.
Syntax
To Set:
AlarmClient.RequiresShelveSignature = boolean_value;
Example
AlarmClient1.RequiresShelveSignature = true;
Syntax
To Get:
boolean_variable_name> = AlarmClient.RequiresShelveSignature;
Example
dim bIsShlvSigned as boolean;
bIsShlvSigned = AlarmClient1.RequiresShelveSignature;
Remarks
For more information, see Configuring the Alarm Control to Require a SHELVE Signature on page 52.
RetainHidden Property
The RetainHidden property is a read-write Boolean property that gets or sets the retention of hidden
alarms or events when the alarm query or query filter to retrieve records changes at run time.
Syntax
result = AlarmClient.RetainHidden;
AlarmClient.RetainHidden = RetainHddn;
Remarks
For more information, see Retain Hiding when Changing Alarm Query Filter on page 49.

Scripting the Alarm Control AVEVA™ ArchestrA Alarm Control Guide
105
RowCount Property
The RowCount property is a read-only integer property that gets the number of records shown in the
Alarm Control grid.
For current alarms (and recent alarms and events), the RowCount property value is always the same as
the TotalRowCount property value.
For historical alarms, if the Alarm Control retrieves more alarm records than specified by the
MaxDatabaseRecords property value, it splits these into multiple pages.
The RowCount property shows how many alarm records are currently shown on the current page. The
RowCount property value is the same as the MaxDatabaseRecords property value, with exception of
the last page.
Syntax
Result = AlarmClient.RowCount;
Example
NRows = AlarmClient1.RowCount;
LogMessage("There are " + Text(NRows, "#") + " alarm records on the retrieved
page.");
RowSelection Property
The RowSelection property is a read-write string property that determines if row selection is allowed at
run time. The following values are possible:
Value
Description
No
Operator cannot select rows.
Single
Operator can only select one row at a time.
Multiple
Operator can select one or more rows.
The default value is "Multiple".
Syntax
Result = AlarmClient.RowSelection;
AlarmClient.RowSelection = RwSel;
Example
AlarmClient1.RowSelection = "Multiple";
Remarks
For more information, see Restricting User Access to Rows and Columns on page 49.
SelectedCount Property
The SelectedCount property is a read-only integer property that gets the total number of selected alarm
records.
Syntax
Result = AlarmClient.SelectedCount;
Return Value
Returns the number of selected alarm records.

AVEVA™ ArchestrA Alarm Control Guide Scripting the Alarm Control
106
Example
NSelRows = AlarmClient1.SelectedCount;
If NSelRows > 5 Then
LogMessage("There are more than 5 rows selected.");
Endif;
ShelveColor.BackGround Property
ShelveColor.BackGround is an integer property to set the background color of shelved alarm records in
the Alarm Control.
Syntax
Color= AlarmClient.ShelveColor.Background;
AlarmClient.ShelveColor.BackGround = Color
Parameters
Color
Background color of a shelved alarm record.
Example
AlarmClient1.ShelveColor.BackGround = Color.FromARGB(255,0,128);
Remarks
For more information, see Setting Heading, Grid, and Window Color on page 28.
Color is a .NET Framework data type. You can use various Color methods to set the color, such as a
predefined color name, FromARGB(), FromKnownColor(), and FromName().
For a list of the .NET color names and the hexadecimal codes, see .NET Colors on page 145.
For more information on the color methods, see the online Microsoft documentation for .NET Framework
Development.
ShelveColor.ForeGround Property
ShelveColor.ForeGround is an integer property to set the foreground or text color of shelved alarm
records in the Alarm Control.
Syntax
Color= AlarmClient.ShelveColor.Foreground;
AlarmClient.ShelveColor.Foreground = Color
Parameters
Color
Foreground color of a shelved alarm record.
Example
AlarmClient1.ShelveColor.Foreground = Color.FromARGB(255,255,255);
Remarks
For more information, see Setting Heading, Grid, and Window Color on page 28.
Color is a .NET Framework data type. You can use various Color methods to set the color, such as a
predefined color name, FromARGB(), FromKnownColor(), and FromName().
For a list of the .NET color names and the hexadecimal codes, see .NET Colors on page 145.
For more information on the color methods, see the online Microsoft documentation for .NET Framework
Development.

Scripting the Alarm Control AVEVA™ ArchestrA Alarm Control Guide
107
ShowContextMenu Property
The ShowContextMenu property is a read-write Boolean property that gets or sets the ability to open the
shortcut menu at run time.
Syntax
result = AlarmClient.ShowContextMenu;
AlarmClient.ShowContextMenu = ContxtMnuAvail;
ShowGrid Property
The ShowGrid property is a read-write Boolean property that gets or sets the appearance of grid lines.
Syntax
result = AlarmClient.ShowGrid;
AlarmClient.ShowGrid = showGrid;
ShowGroupByHeader Property
The ShowGroupByHeader property is a read-write Boolean property to show or hide the column
grouping label at the top of the run-time Alarm Control in the historical mode. Set the
ShowGroupByHeader property to true to show the label "Drag a column header here to group by that
column".
Syntax
result = AlarmClient.ShowGroupByHeader;
AlarmClient.ShowGroupByHeader = ShowGroupByHeader;
ShowHeading Property
The ShowHeading property is a read-write Boolean property that gets or sets the visibility of the grid
heading at run time.
Syntax
result = AlarmClient.ShowHeading;
AlarmClient.ShowHeading = showHeading;
ShowStatusBar Property
The ShowStatusBar property is a read-write Boolean property that gets or sets the visibility of the status
bar at run time.
Syntax
result = AlarmClient.ShowStatusBar;
AlarmClient.ShowStatusBar = showStatusBar;
SortColumn.First Property
The SortColumn.First property is a read-write string property that gets or sets the first sort column.
The default value is "Time (LCT)".
Syntax
result = AlarmClient.SortColumn.First;
AlarmClient.SortColumn.First = sortByFirst;
Example
AlarmClient1.SortColumn.First = "Class";

AVEVA™ ArchestrA Alarm Control Guide Scripting the Alarm Control
108
Remarks
Use this property in connection with the SortOrder.First to determine the sorting direction.
SortColumn.Second Property
The SortColumn.Second property is a read-write string property that gets or sets the second sort column.
The default value is blank.
Syntax
result = AlarmClient.SortColumn.Second;
AlarmClient.SortColumn.Second = sortBySecond;
Example
AlarmClient1.SortColumn.Second = "Type";
Remarks
Use this property in connection with the SortOrder.Second to determine the sorting direction.
SortColumn.Third Property
The SortColumn.Third property is a read-write string property that gets or sets the third sort column.
The default value is blank.
Syntax
result = AlarmClient.SortColumn.Third;
AlarmClient.SortColumn.Third = sortByThird;
Example
AlarmClient1.SortColumn.Third = "State";
Remarks
Use this property in connection with the SortOrder.Third to determine the sorting direction.
SortColumn.Fourth Property
The SortColumn.Fourth property is a read-write string property that gets or sets the fourth sort column.
The default value is blank.
Syntax
result = AlarmClient.SortColumn.Fourth;
AlarmClient.SortColumn.Fourth = sortByFourth;
Example
AlarmClient1.SortColumn.Fourth = "Priority";
Remarks
Use this property in connection with the SortOrder.Fourth to determine the sorting direction.
SortOrder.First Property
The SortOrder.First property is a read-write Boolean property that gets or sets the sorting direction of the
first sort column. The following values are possible:
Value
Description
FALSE
Ascending sorting direction

Scripting the Alarm Control AVEVA™ ArchestrA Alarm Control Guide
109
Value
Description
TRUE
Descending sorting direction
The default value is FALSE (Ascending).
Syntax
result = AlarmClient.SortOrder.First;
AlarmClient.SortOrder.First = sortDirFirst;
Remarks
Use this property in connection with the SortColumn.First to determine which column is sorted.
SortOrder.Second Property
The SortOrder.Second property is a read-write Boolean property that gets or sets the sorting direction of
the second sort column. The following values are possible:
Value
Description
FALSE
Ascending sorting direction
TRUE
Descending sorting direction
The default value is FALSE (Ascending).
Syntax
result = AlarmClient.SortOrder.Second;
AlarmClient.SortOrder.Second = sortDirSecond;
Remarks
Use this property in connection with the SortColumn.Second to determine which column is sorted.
SortOrder.Third Property
The SortOrder.Third property is a read-write Boolean property that gets or sets the sorting direction of the
third sort column. The following values are possible:
Value
Description
FALSE
Ascending sorting direction
TRUE
Descending sorting direction
The default value is FALSE (Ascending).
Syntax
result = AlarmClient.SortOrder.Third;
AlarmClient.SortOrder.Third = sortDirThird;
Remarks
Use this property in connection with the SortColumn.Third to determine which column is sorted.
SortOrder.Fourth Property
The SortOrder.Fourth property is a read-write Boolean property that gets or sets the sorting direction of
the fourth sort column. The following values are possible:

AVEVA™ ArchestrA Alarm Control Guide Scripting the Alarm Control
110
Value
Description
FALSE
Ascending sorting direction
TRUE
Descending sorting direction
The default value is FALSE (Ascending).
Syntax
result = AlarmClient.SortOrder.Fourth;
AlarmClient.SortOrder.Fourth = sortDirFourth;
Remarks
Use this property in connection with the SortColumn. Fourth to determine which column is sorted.
Time.Format Property
The Time.Format property is a read-write string property that gets or sets the date and time formats of the
alarm records in the Alarm Control.
You can either use the .NET time format or the default format. Set the Time.Type property to determine
which time format type to use.
Syntax
result = AlarmClient.Time.Format;
AlarmClient.Time.Format = TmFormat;
Example
This example shows the time format in French format (day/month/year) using the .NET datetime type.
AlarmClient1.Time.Type = 1;
AlarmClient1.Time.Format = "dd/MM/yyyy";
Remarks
For more information about the .NET time format, see Setting the .NET Datetime Format on page 45.
For more information about the default time format, see Setting the Time Format on page 44.
Time.Type Property
The Time.Type property is a read-write Boolean property that gets or sets the time format type of the
alarm records. The following values are possible:
Value
Description
FALSE
Default time format
TRUE
.NET time format (default)
Syntax
result = AlarmClient.Time.Type;
AlarmClient.Time.Type = TmType;
Example
This example shows the time format in German format (day.month.year) using the default datetime type.
AlarmClient1.Time.Type = 0;
AlarmClient1.Time.Format = "%d.%m.%Y %H:%M:%S";

Scripting the Alarm Control AVEVA™ ArchestrA Alarm Control Guide
111
Remarks
For more information about the .NET time format, see Setting the .NET Datetime Format on page 45.
For more information about the default time format, see Setting the Time Format on page 44.
TimeSelector Property
The TimeSelector property gets the Time Range Picker object used in the Alarm Control. You can use it
in scripting to shorten the code using its properties and methods.
For the individual properties and methods, see the following properties, or the methods starting at
TimeSelector.GetStartAndEndTimes() Method on page 137.
Example 1
dim TRP as object;
TRP = AlarmClient1.TimeSelector;
Timeselect = TRP;
StartDate = TRP.StartDate;
EndDate = TRP.EndDate;
duration = TRP.TimeDuration;
Example 2
dim TRP as object;
TRP = AlarmClient1.TimeSelector;
TRP.SetStartAndEndTimes(StartDate, EndDate, Duration);
TimeSelector.DurationMS Property
The TimeSelector.DurationMS property is a read-write integer property that gets the time duration
measured in milliseconds.
The start time of the Alarm control (TimeSelector.StartDate) is calculated as the end time
(TimeSelector.EndDate) minus the new time duration (TimeSelector.DurationMS).
When you set the value of the TimeSelector.DurationMS property, the TimeSelector.TimeDuration
property is set to 0.
The default value is 3600000.
Syntax
result = AlarmClient.TimeSelector.DurationMS;
AlarmClient.TimeSelector.DurationMS = Value;
Example
AlarmClient1.TimeSelector.DurationMS = 1800000;
// The Alarm Control now retrieves alarms from the last 30 minutes.
TimeSelector.EndDate Property
The TimeSelector.EndDate property is a read-only string property that gets the end date and time of the
Alarm Control.
The default value is the time the Alarm Control is placed on the canvas. If the Update to Current Time
option is enabled, the TimeSelector.EndDate property is updated with the current time.
Note: To set the end date and time of the Alarm Control, use the TimeSelector.GetStartAndEndTimes()
Method on page 137.
Syntax
result = AlarmClient.TimeSelector.EndDate;

AVEVA™ ArchestrA Alarm Control Guide Scripting the Alarm Control
112
Example
LogMessage(AlarmClient1.TimeSelector.EndDate);
TimeSelector.StartDate Property
The TimeSelector.StartDate property is a read-only string property that gets the start date and time of the
Alarm Control.
The default value is the time the Alarm Control is placed on the canvas. If the Update to Current Time
option is enabled, the TimeSelector.StartDate property is updated as current time minus duration.
Note: To set the start date and time of the Alarm Control, use the
TimeSelector.SetStartAndEndTimes() Method on page 137.
Syntax
result = AlarmClient.TimeSelector.StartDate;
Example
LogMessage(AlarmClient1.TimeSelector.StartDate);
TimeSelector.TimeDuration Property
The TimeSelector.TimeDuration property is a read-write integer property that gets or sets the time
duration. The start time of the Alarm control (TimeSelector.StartDate) is calculated as the end time
(TimeSelector.EndDate) minus the new time duration.
The TimeSelector.TimeDuration can have one of the following values:
Value
Description
0
Custom
1
The last minute.
2
The last five minutes.
3
The last ten minutes.
4
The last 15 minutes.
5
The last 30 minutes.
6
The last hour.
7
The last two hours.
8
The last four hours.
9
The last eight hours.
10
The last 12 hours.
11
The last 24 hours.
12
The last two days.
13
The last week.

Scripting the Alarm Control AVEVA™ ArchestrA Alarm Control Guide
113
Value
Description
14
The last two weeks.
15
The last month.
16
The last three months.
17
One minute.
18
Five minutes.
19
Ten minutes.
20
15 minutes.
21
30 minutes.
22
One hour.
23
Two hours.
24
Four hours.
25
Eight hours.
26
12 hours.
27
24 hours.
28
Two days.
29
One week.
30
Two weeks.
31
One month.
32
Three months.
33
Yesterday: 0:00:00 of the previous day to 0:00:00 of
the current day.
34
Current day: 0:00:00 of the current day to the current
time.
35
Previous hour: The start of the previous hour to the
start of the current hour.
36
Current hour: The start of the current hour to the
current time.
The default value is 6 (Last Hour).
Syntax
result = AlarmClient.TimeSelector.TimeDuration;

AVEVA™ ArchestrA Alarm Control Guide Scripting the Alarm Control
114
AlarmClient.TimeSelector.TimeDuration = Value;
Example
AlarmClient1.TimeSelector.TimeDuration = 5;
// The Alarm Control now retrieves alarms from the last 30 minutes.
Remarks
For more information, see Showing Historical Alarms and/or Events on page 23.
TimeZone.TimeZone Property
The TimeZone.TimeZone property is a read-write string property that gets or sets the time zone of the
Alarm Control.
The default value depends on the current setting of the operating system.
If you want to show time stamps using the local time of the computer, set the TimeZone.TimeZone
property to an empty string.
Syntax
result = AlarmClient.TimeZone.TimeZone;
AlarmClient.TimeZone.TimeZone = TimeZone;
Example
AlarmClient1.TimeZone.TimeZone = "(GMT-09:00) Alaska";
Remarks
For more information, see Setting Time Zone and Format on page 43.
TotalRowCount Property
The TotalRowCount property is a read-only integer property that gets the total number of alarm records
in the Alarm Control.
For current alarms (and recent alarms and events), the RowCount property value is always the same as
the TotalRowCount property value.
For historical alarms, if the Alarm Control retrieves more alarm records than specified by the
MaxDatabaseRecords property value, it splits these into multiple pages.
The RowCount property value shows how many alarm records are currently shown on the current page,
whereas the TotalRowCount property value shows how many alarm records are retrieved from the
alarm database.
Syntax
Result = AlarmClient.TotalRowCount;
Return Value
Returns the end date and time of the Alarm Control in historical mode.
Example
NTRows = AlarmClient1.TotalRowCount;
If (NTRows > 1000) then
LogMessage("More than 1000 records are currently in the Alarm Control");
Endif;
UnAckAlarms Property
The UnAckAlarms property is a read-only integer property that gets the number of unacknowledged
alarm records in the Alarm Control.

Scripting the Alarm Control AVEVA™ ArchestrA Alarm Control Guide
115
Syntax
Result = AlarmClient.UnackAlarms;
Return Value
Returns the number of unacknowledged alarm records in the Alarm Control.
Example
NUnack = AlarmClient1.UnAckAlarms;
If NUnack > 10 Then
LogMessage("There are more than 10 unacknowledged alarms in the grid!");
Endif;
UpdateToCurrentTime Property
The UpdateToCurrentTime property is a read-write Boolean property that gets or sets the Update to
Current Time option.
If you set this property to TRUE, the Alarm Control end time is set to the current time and the start time is
calculated as the difference of end time and duration. Whenever you refresh the Alarm Control, the end
time is set as current time.
If you set this property to FALSE, the Alarm Control uses the end time, duration, and start time as defined
by the Time Range Picker control.
The default value is TRUE.
Syntax
result = AlarmClient.UpdateToCurrentTime;
AlarmClient.UpdateToCurrentTime = UpdToCurrTime;
Example
AlarmClient1.UpdateToCurrentTime = 1;
AlarmClient1.Requery();
Remarks
For more information, see Showing Historical Alarms and/or Events on page 23.
UserQueryFilterFilePath Property
Gets/Sets the file path of the runtime user queries and filters. The file path excludes the file name.
Syntax
result = AlarmClient.UserQueryFilterFilePath;
AlarmClient.UserQueryFilterFilePath = myUserQueryFilterFilePath;
Example
AlarmClient1.UserQueryFilterFilePath = "C:\Users\Public\AppData\Wonderware";
Remarks
Default is %Userprofile%\Wonderware;
Visible Property
The Visible property is a read-write Boolean property that gets or sets the visibility of the Alarm Control.
Syntax
result = AlarmClient.Visible;
AlarmClient.Visible = Boolean;

AVEVA™ ArchestrA Alarm Control Guide Scripting the Alarm Control
116
Width Property
The Width property is a read-write integer property that gets or sets the width of the Alarm Control in
pixels.
Syntax
result = AlarmClient.Width;
AlarmClient.Width = Wdth;
WindowColor Property
The WindowColor property is a read-write color property that gets or sets the color of the Alarm Control
background.
Syntax
Color = AlarmClient.WindowColor;
AlarmClient.WindowColor = Color;
Parameters
Color
Color of background.
Example
AlarmClient1.WindowColor = Color.FromARGB(240,200,198);
Remarks
For more information, see Setting Heading, Grid, and Window Color on page 28.
Color is a .NET Framework data type. You can use various Color methods to set the color, such as a
predefined color name, FromARGB(), FromKnownColor(), and FromName().
For a list of the .NET color names and the hexadecimal codes, see .NET Colors on page 145.
For more information on the color methods, see the online Microsoft documentation for .NET Framework
Development.
X Property
The X property is a read-write integer property that gets or sets the horizontal position of the Alarm
Control in relation to the left edge of the InTouch window in which it appears.
Syntax
result = AlarmClient.X;
AlarmClient.X = LeftPos;
Y Property
The Y property is a read-write integer property that gets or sets the vertical position of the Alarm Control
in relation to the top edge of the InTouch window in which it appears.
Syntax
result = AlarmClient.Y;
AlarmClient.Y = TopPos;
Alarm Control Methods
This section describes the scripting methods available for the Alarm Control.

Scripting the Alarm Control AVEVA™ ArchestrA Alarm Control Guide
117
AboutBox() Method
The AboutBox method shows the About dialog box of the Alarm Control.
Syntax
AlarmClient.AboutBox();
Ack.All() Method
The Ack.All method acknowledges all alarms in the Alarm Control, including those not shown.
Syntax
AlarmClient.Ack.All(AckComment);
Parameters
AckComment
A string indicating the alarm acknowledgement comment.
Example
AlarmClient1.Ack.All("Alarm is acknowledged");
Ack.Group() Method
The Ack.Group method acknowledges all alarms for a given alarm source and group.
The alarm source and group names are case-insensitive.
Syntax
AlarmClient.Ack.Group(AlarmSource, Group, AckComment);
Parameters
AlarmSource
The name of the provider and optionally node providing alarms including backslash. For example:
\\node1\galaxy
\intouch
Group
The name of the alarm group. For example, $system.
AckComment
A string indicating the alarm acknowledgement comment.
Example
AlarmClient1.Ack.Group("\\machine1\galaxy", "Area_001", "All alarms in
Area_001 acknowledged");
Ack.Priority() Method
The Ack.Priority method acknowledges all alarms for a given alarm source, group, and priority range.
The alarm source and group names are case-insensitive.
Syntax
AlarmClient.Ack.Priority(AlarmSource, Group, FromPriority, ToPriority,
AckComment);
Parameters
AlarmSource
The name of the provider and optionally node providing alarms including backslash. For example:
\\node1\galaxy
\intouch

AVEVA™ ArchestrA Alarm Control Guide Scripting the Alarm Control
118
Group
The name of the alarm group. For example, $system.
FromPriority
Starting priority of alarms. For example, 100.
ToPriority
End priority of alarms. For example, 900.
AckComment
A string indicating the alarm acknowledgement comment.
Example
GrpName = "ValveGroup";
AlarmClient1.Ack.Priority("\intouch", GrpName, 250, 500, "All local InTouch
alarms in the ValveGroup alarm group with priorities from 250 to 500 are now
acknowledged.");
Ack.Selected() Method
The Ack.Selected method acknowledges all selected alarms.
Syntax
AlarmClient.Ack.Selected(AckComment);
Parameters
AckComment
A string indicating the alarm acknowledgement comment.
Example
AlarmClient1.Ack.Selected("This selected alarm is acknowledged");
Ack.SelectedGroup() Method
The Ack.SelectedGroup method acknowledges all alarms that have the same alarm sources and groups
as one or more selected alarms.
Syntax
AlarmClient.Ack.SelectedGroup(AckComment);
Parameters
AckComment
A string indicating the alarm acknowledgement comment.
Example
AlarmClient1.Ack.SelectedGroup("Alarm acknowledged");
Ack.SelectedPriority () Method
The Ack.SelectedPriority method acknowledges all alarms that have the same alarm sources, groups,
and within the priority ranges as one or more selected alarms.
Syntax
AlarmClient.Ack.SelectedPriority(AckComment);
Parameters
AckComment
A string indicating the alarm acknowledgement comment.
Example
AlarmClient1.Ack.SelectedPriority("Alarm acknowledged");

Scripting the Alarm Control AVEVA™ ArchestrA Alarm Control Guide
119
Ack.SelectedTag() Method
The Ack.SelectedTag method acknowledges all alarms that have the same alarm sources, groups, tags,
and within the priority ranges as one or more selected alarms.
Syntax
AlarmClient.Ack.SelectedTag(AckComment);
Parameters
AckComment
A string indicating the alarm acknowledgement comment.
Example
AlarmClient1.Ack.SelectedTag("Alarm acknowledged");
Ack.Tag() Method
The Ack.Tag method acknowledges all alarms for a given alarm source, group, tag name, and priority
range.
The alarm source, group names, and tag names are case-insensitive.
Syntax
AlarmClient.Ack.Tag(AlarmSource, Group, Tag, FromPriority, ToPriority,
AckComment);
Parameters
AlarmSource
The name of the provider and optionally node providing alarms including backslash. For example:
\\node1\galaxy
\intouch
Group
The name of the alarm group. For example, $system.
Tag
The name of the alarm tag. For example, ValveTag1.
FromPriority
Starting priority of alarms. For example, 100.
ToPriority
End priority of alarms. For example, 900.
AckComment
A string indicating the alarm acknowledgement comment.
Example
AckComment = "All ArchestrA alarm records of the attribute Valve17 in the group
(area) Vessel_25B of the galaxy on machine25 with prioriti es from 1 to 99 are
now acknowledged.";
AlarmClient1.Ack.Tag("\\machine25\galaxy", "Vessel_25B", "Valve17", 1, 99,
AckComment);
Ack.Visible() Method
The Ack.Visible method acknowledges all alarms currently visible in the Alarm Control.
Syntax
AlarmClient.Ack.Visible(AckComment);

AVEVA™ ArchestrA Alarm Control Guide Scripting the Alarm Control
120
Parameters
AckComment
A string indicating the alarm acknowledgement comment.
Example
AlarmClient1.Ack.Visible("Alarm acknowledged");
Connect() Method
The Connect method connects the Alarm Control to the Alarm Database.
Syntax
AlarmClient.Connect();
Disconnect() Method
The Disconnect method disconnects the Alarm Control from the Alarm Database.
Syntax
AlarmClient.Disconnect();
Favorites.Export() Method
The Favorites.Export method exports the list of query and filter favorites list to an XML file.
Syntax
AlarmClient.Favorites.Export(FilePath, FileName);
Parameters
FilePath
Name of the path to export the query and filter favorites file.
FileName
Name of the query and filter favorites file to export.
Example
AlarmClient1.Favorites.Export("c:\", "MyFavorites.xml");
Favorites.Import() Method
The Favorites.Import method imports the list of query and filter favorites list from an XML file. You can
either overwrite the existing query and filter favorites with the new favorites, or append them.
Syntax
AlarmClient.Favorites.Import(FilePath, FileName, OverwriteAppend);
Parameters
FilePath
Name of the path to the query and filter favorites file to import.
FileName
Name of the query and filter favorites file to import.
OverwriteAppend
String determining if the import of the query filter favorites overwrites existing favorites, or appends to
existing favorites. Set to one of the following:
o Overwrite to overwrite existing query filter favorites
o Append to append to existing query filter favorites. If a query filter with the same name already
exists, it is not overwritten by the query filter in the file

Scripting the Alarm Control AVEVA™ ArchestrA Alarm Control Guide
121
Example
AlarmClient1.Favorites.Import("c:\MyFavs\", "Favs.xml", "Overwrite");
FreezeDisplay() Method
The FreezeDisplay method freezes or unfreezes the Alarm Control. The following values are possible:
Value
Description
TRUE
Freezes the Alarm Control.
FALSE
Unfreezes the Alarm Control.
Syntax
AlarmClient.FreezeDisplay(FreezeFlag);
Parameters
FreezeFlag
Boolean value or expression (TRUE = freeze control, FALSE = unfreeze control)
Example
AlarmClient1.FreezeDisplay($hour > 17 OR $hour<9 );
LogMessage("The Alarm Control is frozen between 6 PM and 8 AM.");
GetItem() Method
The GetItem method returns the data at the given row and column. The row is given as a zero -based
index. You need to specify 0 to retrieve data from the 1st row. The column name can either be the original
column name, or the displayed column name.
Syntax
Result = AlarmClient.GetItem(RowNumber, ColumnName);
Parameters
RowNumber
An integer row number for the alarm record containing the value you want to fetch.
ColumnName
Name of the column.
Return Value
Returns the data at the given row and column as a string value.
Example
Data1 = AlarmClient1.GetItem(5, "Current Value");
LogMessage("The current value of the 6th alarm record is " + Data1);
Remarks
To get alarm record data from the currently selected row in a given column name, use the
GetSelectedItem method.
GetLastError() Method
The GetLastError method returns the last error message. This is useful if the Hide Errors option is
selected.
Syntax
ErrMsg = AlarmClient.GetLastError();

AVEVA™ ArchestrA Alarm Control Guide Scripting the Alarm Control
122
Return Value
Returns the last error message.
Example
ErrMsg = AlarmClient1.GetLastError();
ComboBox1.AddItem(ErrMsg);
GetSelectedItem() Method
The GetSelectedItem method returns the data at the currently selected row and specified column. The
column name can either be the original column name, or the displayed column name.
Syntax
Result = AlarmClient.GetSelectedItem(ColumnName);
Parameters
ColumnName
Name of the column.
Return Value
Returns the data in the currently selected row and specified column as a string value.
Example
Data2 = AlarmClient1.GetSelectedItem ("State");
LogMessage("The current state of the selected alarm record is " + Data2);
Remarks
To get alarm record data from a given column name and row index, use the GetItem method.
Hide.All() Method
The Hide.All method hides all current alarms in the Alarm Control, including future alarms.
Syntax
AlarmClient.Hide.All();
Hide.Group() Method
The Hide.Group method hides all alarms for a given alarm source and group.
The alarm source and group names are case-insensitive.
Syntax
AlarmClient.Hide.Group(AlarmSource, Group);
Parameters
AlarmSource
The name of the provider and optionally node providing alarms including backslash. For example:
\\node1\galaxy
\intouch
Group
The name of the alarm group. For example, $system.
Example
AlarmClient1.Hide.Group("\\machine1\galaxy", "Area_001");
LogMessage("All alarms in Area_001 hidden.");

Scripting the Alarm Control AVEVA™ ArchestrA Alarm Control Guide
123
Hide.Priority() Method
The Hide.Priority method hides all alarms for a given alarm source, group, and priority range.
The alarm source and group names are case-insensitive.
Syntax
AlarmClient.Hide.Priority(AlarmSource, Group, FromPriority, ToPriority);
Parameters
AlarmSource
The name of the provider and optionally node providing alarms including backslash. For example:
\\node1\galaxy
\intouch
Group
The name of the alarm group. For example, $system.
FromPriority
Starting priority of alarms. For example, 100.
ToPriority
End priority of alarms. For example, 900.
Example
GrpName = "ValveGroup";
AlarmClient1.Hide.Priority("\intouch", GrpName, 250, 500);
LogMessage("All local InTouch alarms in the ValveGroup alarm group with
priorities from 250 to 500 are now hidden.");
Hide.Selected() Method
The Hide.Selected method hides all selected alarms.
Syntax
AlarmClient.Hide.Selected();
Hide.SelectedGroup() Method
The Hide.SelectedGroup method hides all alarms that have the same alarm sources and groups as one
or more selected alarms.
Syntax
AlarmClient.Hide.SelectedGroup();
Hide.SelectedPriority() Method
The Hide.SelectedPriority method hides all alarms that have the same alarm sources, groups, and within
the priority ranges as one or more selected alarms.
Syntax
AlarmClient.Hide.SelectedPriority();
Hide.SelectedTag() Method
The Hide.SelectedTag method hides all alarms that have the same alarm sources, groups, tag names,
and within the priority ranges as one or more selected alarms.
Syntax
AlarmClient.Hide.SelectedTag();

AVEVA™ ArchestrA Alarm Control Guide Scripting the Alarm Control
124
Remarks
None
Hide.Tag() Method
The Hide.Tag method hides all alarms for a given alarm source, group, tag name, and priority range.
The alarm source, group name, and tag names are case-insensitive.
Syntax
AlarmClient.Hide.Tag(AlarmSource, Group, Tag, FromPriority, ToPriority);
Parameters
AlarmSource
The name of the provider and optionally node providing alarms including backslash. For example:
\\node1\galaxy
\intouch
Group
The name of the alarm group. For example, $system.
Tag
The name of the alarm tag. For example, ValveTag1.
FromPriority
Starting priority of alarms. For example, 100.
ToPriority
End priority of alarms. For example, 900.
Example
AlarmClient1.Hide.Tag("\\machine25\galaxy", "Vessel_25B", "Valve17", 1, 99);
LogMessage("All ArchestrA alarm records of the attribute Valve17 in the group
(area) Vessel_25B of the galaxy on machine25 with priorities from 1 to 99 are
now hidden.");
Hide.Visible() Method
The Hide.Visible method hides all alarms currently shown in the Alarm Control.
Syntax
AlarmClient.Hide.Visible();
LoadQueryFilterFile
Load from an xml file with query and filter favorites entries with different override options. Return false for
any error.
Syntax
AlarmClient.LoadQueryFilterFile(FilePath, OverrideOption);
Parameters
FilePath
Name of the path to the query filter favorites file to import.
OverrideOption
Append: Add to the query and filter favorites. If a duplicate entry is already present, it will not
append.
Overwrite: Delete all current query and filter favorite entries and add the new entries from the file.

Scripting the Alarm Control AVEVA™ ArchestrA Alarm Control Guide
125
Replace: Append and replace any duplicated entries with the contents from the file.
Example
AlarmClient. LoadQueryFilterFile("c:\users\public\file1.xml","Append")
MoveWindow() Method
The MoveWindow method scrolls the alarm records in the control in a given direction.
Syntax
AlarmClient.MoveWindow(ScrollDir, Repeat);
Parameters
ScrollDir
String indicating the direction to scroll. This parameter is case-insensitive. See the following table.
ScrollDir
Description
LineDn
Line down. The Repeat parameter controls the number of lines to be scrolled.
LineUp
Line up. The Repeat parameter controls the number of lines to be scrolled.
PageDn
Page down. The Repeat parameter controls the number of pages to be
scrolled.
PageUp
Page up. The Repeat parameter controls the number of pages to be scrolled.
Top
To the top of the control
Bottom
To the bottom of the control.
PageRt
Page to the right. The Repeat parameter controls the number of pages to be
scrolled.
PageLf
Page to the left. The Repeat parameter controls the number of pages to be
scrolled.
Right
Scrolls right. The Repeat parameter controls the number of columns to be
scrolled.
Left
Scrolls left. The Repeat parameter controls the number of columns to be
scrolled.
Home
Scrolls to the top row and left most column of the control.
Repeat
Number of times to repeat the scroll action.
Example
AlarmClient1.MoveWindow ("Bottom", 0);
Requery() Method
The Requery method refreshes the alarm records in the Alarm Control.
For current alarms and recent alarms and events, the control requeries the Alarm Manager. For historical
alarms or events, the control retrieves alarm records from the Alarm Database.

AVEVA™ ArchestrA Alarm Control Guide Scripting the Alarm Control
126
Syntax
AlarmClient.Requery();
Reset() Method
The Reset method resets column widths and the column order to their last known design-time settings.
The Reset method also resets the current query filter to the default query.
Syntax
AlarmClient.Reset();
ResetSortCriteria() Method
Reset the sorting criteria back to the design time settings and apply the sorting criteria.
Syntax
AlarmClient.ResetSortCriteria();
RunQuery() Method
Execute the query or filter available on the ArchestrA Alarm Control by name. If the ApplyAsFilter option
is true, then execute the query as a filter only. Note the following behaviors:
If ApplyAsFilter is true, the parameter QueryName needs to be a valid Filter.
If ApplyAsFilter is false, the parameter QueryName needs to be a valid Query.
In all other scenarios, the RunQuery() will not execute.
Syntax
AlarmClient.RunQuery(QueryName, ApplyAsFilter);
Parameters
QueryName
The name of the query or filter available on the ArchestrA Alarm Control.
ApplyAsFilter
Specify True to execute a query as a filter using the filter criteria and retain the existing alarm
subscription.
Example
AlarmClient.RunQuery ("High Alarms", true)
RunQueryFromFile() Method
Execute the query or filter by name defined in a file. This does not impact the current list of queries and
filters. If ApplyAsFilter option is true, then execute the query as filter only. Note the following beha viors:
If ApplyAsFilter is true, the parameter QueryName needs to be a valid Filter.
If ApplyAsFilter is false, the parameter QueryName needs to be a valid Query.
In all other scenarios, the RunQuery() will not execute.
Syntax
AlarmClient.RunQueryFromFile(FilePath, QueryName, ApplyAsFilter);
Parameters
FilePath
The file path to the query filter favorites file to execute.

Scripting the Alarm Control AVEVA™ ArchestrA Alarm Control Guide
127
QueryName
The name of the query or filter defined in the user provided file.
ApplyAsFilter
Specify True to execute a query as a filter using the filter criteria and retain the existing alarm
subscription.
Example
AlarmClient.RunQueryFromFile("c:\UserQueryFilter.xml", "User High Alarms",
true)
Select.All() Method
The Select.All method selects all alarms in the Alarm Control.
Syntax
AlarmClient.Select.All();
Select.Group() Method
The Select.Group method selects all alarms for a given provider and group.
Syntax
AlarmClient.Select.Group(AlarmSource, Group);
Parameters
AlarmSource
The name of the provider and optionally node providing alarms including backslash. For example:
\\node1\galaxy
\intouch
Group
The name of the alarm group. For example, $system.
Example
AlarmClient1.Select.Group("\\machine1\galaxy", "Area_001");
LogMessage("All galaxy alarms of group Area_001 from machine1 are now
selected.");
Select.Item() Method
The Select.Item method selects an alarm record at a given zero-based row number.
Syntax
AlarmClient.Select.Item(RowNumber);
Parameters
RowNumber
An integer row number for the alarm record to select. The first row in the control is 0.
Example
AlarmClient1.Select.Item(5);
LogMessage("The alarm record in the 6th row (index 5) is now selected.");
Select.Priority() Method
The Select.Priority method selects all alarms for a given alarm source, group, and priority range.
Syntax
AlarmClient.Select.Priority(AlarmSource, Group, FromPriority, ToPriority);

AVEVA™ ArchestrA Alarm Control Guide Scripting the Alarm Control
128
Parameters
AlarmSource
The name of the provider and optionally node providing alarms including backslash. For example:
\\node1\galaxy
\intouch
Group
The name of the alarm group. For example, $system.
FromPriority
Starting priority of alarms. For example, 100.
ToPriority
End priority of alarms. For example, 900.
Example
GrpName = "ValveGroup";
AlarmClient1.Select.Priority("\intouch", GrpName, 250, 500);
LogMessage("All local InTouch alarms in the ValveGroup alarm group with
priorities from 250 to 500 are now selected.");
Select.Tag() Method
The Select.Tag method selects all alarms for a given alarm source, group, tag name, and priority range.
Syntax
AlarmClient.Select.Tag(AlarmSource, Group, Tag, FromPriority, ToPriority);
Parameters
AlarmSource
The name of the provider and optionally node providing alarms including backslash. For example:
\\node1\galaxy
\intouch
Group
The name of the alarm group. For example, $system.
Tag
The name of the alarm tag. For example, ValveTag1.
FromPriority
Starting priority of alarms. For example, 100.
ToPriority
End priority of alarms. For example, 900.
Example
AlarmClient1.Select.Tag("\\machine25\galaxy", "Vessel_25B", "Valve17", 1, 99);
LogMessage("All ArchestrA alarm records of the attribute Valve17 in the group
(area) Vessel_25B of the galaxy on machine25 with priorities from 1 to 99 are
now selected.");
SetSort() Method
The SetSort method sets the level of sorting according to the defined sort columns and sort orders.
Syntax
AlarmClient.SetSort(Level);

Scripting the Alarm Control AVEVA™ ArchestrA Alarm Control Guide
129
Parameters
Level
The level of sorting:
Value
Description
1
Only use the first sort column.
2
Use first and second sort columns.
3
Use first, second, and third sort columns.
4
Use first, second, third, and fourth sort columns.
Example
AlarmClient1.SetSort(2);
Remarks
Use the Show.Sort method to open the Sort dialog box instead.
SetSortCriteria() Method
Set the sorting criteria by supplying a string of which columns to sort and their order. Then apply the sort
criteria. Return false if any error.
Syntax
AlarmClient.SetSortCriteria(SortCriteriaString);
Parameters
SortCriteriaString
The string containing the sorting criteria to be executed.
The syntax of the sort criteria string is: [CriteriaName]:[1|-1];
where:
CriteriaName is the name of the sorting criteria
Colon is separator for sort order integer
Use 1 for Ascending order
Use -1 for Descending order
Semicolon is separator for the next sorting criteria
If ordering integer is not supplied, then default to ascending order
Example
Example1: Sort by time ascending order and then by Priority ascending order
AlarmClient.SetSortCriteria("TimeLCT:1; Priority:1");
Example2: Sort by time ascending order using default value and then by Priority
descending order
AlarmClient.SetSortCriteria("TimeLCT; Priority:-1");
Example3: Sort by ascending order in sequence of InAlarm, AckState, Priority,
and Time.
AlarmClient.SetSortCriteria("InAlarm;AckState;Priority;TimeLCT");

AVEVA™ ArchestrA Alarm Control Guide Scripting the Alarm Control
130
Shelve.All() Method
The Shelve.All() method shelves all active alarms shown in the Alarm Control.
Syntax
AlarmClient.Shelve.All(Duration=Duration;Reason="Reason");
Parameters
Duration
Length of time in hours that selected alarms are shelved. Duration can be specified as an integer or
a floating point number greater than 0.
Example:
Duration=0.5
Reason
Explanation up to 200 characters for shelving all active alarms shown in the Alarm Control.
An explanation can be delimited by double or single quotation marks. Quotation marks and back
slashes (\) can appear within the text of an explanation. If an explanation is delimited by double
quotation marks, a single quotation mark is simply a character in the string. If an explanation is
delimited by single quotation marks, a double quotation mark is simply a character in the string.
Example
AlarmClient1.Shelve.All("Duration=0.1;Reason=’Shelve all alarms’;");
Remarks
For more information about shelving alarms, see Shelving Alarms on page 60.
Shelve.Group() Method
The Shelve.Group() method shelves all alarms belonging to a specified provider and alarm group.
Syntax
AlarmClient.Shelve.Group("ProviderName",
"GroupName",Duration=Duration;Reason="Reason");
Parameters
ProviderName
Node and provider name combination that specifies the origin of alarm monitoring.
GroupName
Alarm group or area name whose alarms are monitored by the Alarm Control.
Duration
Length of time in hours that selected alarms are shelved. Duration can be specified as an integer or
a floating point number greater than 0.
Example:
Duration=0.5
Reason
Explanation up to 200 characters for shelving alarms by groups shown in the Alarm Control.
An explanation can be delimited by double or single quotation marks. Quotation marks and back
slashes (\) can appear within the text of an explanation. If an explanation is delimited by double
quotation marks, a single quotation mark is simply a character in the string. If an explanation is
delimited by single quotation marks, a double quotation mark is simply a character in the string.
Examples
AlarmClient1.Shelve.Group("\\TankServer1\Galaxy","Area_001",
Duration=0.1;Reason=" + """" + "Shelved"+ """" + ";");

Scripting the Alarm Control AVEVA™ ArchestrA Alarm Control Guide
131
AlarmClient1.Shelve.Group("\Galaxy","Area_001",Duration=0.1; Reason=" + """" +
"Shelved"+ """" + ";");
Remarks
For more information about specifying provider and group names, see Alarm Queries on page 13.
Shelve.Priority() Method
The Shelve.Priority() method shelves all active alarms within a specified alarm priority range that belong
to the same specified provider and alarm group.
Syntax
AlarmClient.Shelve.Priority("ProviderName","GroupName",
FromPriority,ToPriority,Duration=Duration;Reason="Reason");
Parameters
ProviderName
Node and provider name combination that specifies the origin of alarm monitoring.
GroupName
Alarm group or area name whose alarms are monitored by the Alarm Control.
FromPriority
Starting point of the alarm priority range (1-999). The FromPriority value must be less than the
ToPriority value.
ToPriority
Three-digit end point of the alarm priority range (2-999). The ToPriority value must be greater
than the FromPriority value.
Duration
Length of time in hours that selected alarms are shelved. Duration can be specified as an integer or
a floating point number greater than 0.
Example:
Duration=0.5
Reason
Explanation up to 200 characters for shelving alarms by priority range that are shown in the Alarm
Control.
An explanation can be delimited by double or single quotation marks. Quotation marks and back
slashes (\) can appear within the text of an explanation. If an explanation is delimited by double
quotation marks, a single quotation mark is simply a character in the string. If an explanation is
delimited by single quotation marks, a double quotation mark is simply a character in the string.
Example
AlarmClient1.Shelve.Priority("\Galaxy","Area_001",100,600,
Duration=0.1;Reason=" + """" + "Shelved"+ """" + ";");
Remarks
For more information about setting an alarm priority range, see Setting Priority Ranges for Alarm
Records on page 29.
Shelve.Selected() Method
The Shelve.Selected() method shelves one or more active alarms selected by the user from the Alarm
Control.
Syntax
AlarmClient.Shelve.Selected(Duration=Duration;Reason="Reason");

AVEVA™ ArchestrA Alarm Control Guide Scripting the Alarm Control
132
Parameters
Duration
Length of time in hours that selected alarms are shelved. Duration can be specified as an integer or
a floating point number greater than 0.
Example:
Duration=0.5
Reason
Explanation up to 200 characters for shelving active alarms selected by the user from the Alarm
Control.
An explanation can be delimited by double or single quotation marks. Quotation marks and back
slashes (\) can appear within the text of an explanation. If an explanation is delimited by double
quotation marks, a single quotation mark is simply a character in the string. If an explanation is
delimited by single quotation marks, a double quotation mark is simply a character in the string.
Example
AlarmClient.Shelve.Selected(Duration=1.0;Reason="Nuisance alarms");
Remarks
For more information about selecting alarms to shelve.see Shelving Alarms on page 60.
Shelve.SelectedGroup() Method
The Shelve.Selected.Group method shelves all active alarms that belong to the same alarm groups as
the alarms selected by the user from the Alarm Control.
Syntax
AlarmClient.Shelve.SelectedGroup(Duration=Duration;
Reason="Reason");
Parameters
Duration
Length of time in hours that selected alarms are shelved. Duration can be specified as an integer or
a floating point number greater than 0.
Example:
Duration=0.5
Reason
Explanation up to 200 characters for shelving alarms in the same group as the alarms selected by
the user from the Alarm Control.
An explanation can be delimited by double or single quotation marks. Quotation marks and back
slashes (\) can appear within the text of an explanation. If an explanation is delimited by double
quotation marks, a single quotation mark is simply a character in the string. If an explanation is
delimited by single quotation marks, a double quotation mark is simply a character in the string.
Example
AlarmClient.Shelve.SelectedGroup(Duration=1.0;Reason="Low severity nuisance
alarms");
Remarks
For more information about selecting alarms to shelve.see Shelving Alarms on page 60.
Shelve.SelectedPriority() Method
The Shelve.SelectedPriority method shelves all active alarms that belong to the same alarm priority as
the alarms selected by the user from the Alarm Control.

Scripting the Alarm Control AVEVA™ ArchestrA Alarm Control Guide
133
Syntax
AlarmClient.Shelve.SelectedPriority(Duration=Duration;
Reason="Reason");
Parameters
Duration
Length of time in hours that selected alarms are shelved. Duration can be specified as an integer or
a floating point number greater than 0.
Example:
Duration=0.5
Reason
Explanation up to 200 characters for shelving alarms in the same priority range as the alarms
selected by the user from the Alarm Control.
An explanation can be delimited by double or single quotation marks. Quotation marks and back
slashes (\) can appear within the text of an explanation. If an explanation is delimited by double
quotation marks, a single quotation mark is simply a character in the string. If an explanation is
delimited by single quotation marks, a double quotation mark is simply a character in the string.
Example
AlarmClient.Shelve.SelectedPriority(Duration=1.0;Reason="Low priority nuisance alarms");
Remarks
For more information about selecting alarms to shelve.see Shelving Alarms on page 60.
Shelve.SelectedSeverity() Method
The Shelve.Selected.Severity method shelves all active alarms for a given alarm group, tag name, and
severity as the alarms selected by the user from the Alarm Control.
Syntax
AlarmClient.Shelve.SelectedSeverity(Duration=Duration;
Reason="Reason");
Parameters
Duration
Length of time in hours that selected alarms are shelved. Duration can be specified as an integer or
a floating point number greater than 0.
Example:
Duration=0.5
Reason
Explanation up to 200 characters for shelving alarms at the same severity as the alarms selected by
the user from the Alarm Control.
An explanation can be delimited by double or single quotation marks. Quotation marks and back
slashes (\) can appear within the text of an explanation. If an explanation is delimited by double
quotation marks, a single quotation mark is simply a character in the string. If an explanation is
delimited by single quotation marks, a double quotation mark is simply a character in the string.
Example
AlarmClient.Shelve.SelectedSeverity(Duration=1.0;Reason="Low severity
nuisance alarms");
Remarks
For more information about selecting alarms to shelve.see Shelving Alarms on page 60.

AVEVA™ ArchestrA Alarm Control Guide Scripting the Alarm Control
134
Shelve.SelectedTag() Method
The Shelve.SelectedTag method shelves all active alarms all active alarms for a given provider, alarm
group, and tag name as the alarms selected by the user from the Alarm Control.
Syntax
AlarmClient.Shelve.SelectedTag(Duration=Duration;
Reason="Reason");
Parameters
Duration
Length of time in hours that selected alarms are shelved. Duration can be specified as an integer or
a floating point number greater than 0.
Example:
Duration=0.5
Reason
Explanation up to 200 characters for shelving alarms from the same tags as the alarms selected by
the user from the Alarm Control.
An explanation can be delimited by double or single quotation marks. Quotation marks and back
slashes (\) can appear within the text of an explanation. If an explanation is delimited by double
quotation marks, a single quotation mark is simply a character in the string. If an explanation is
delimited by single quotation marks, a double quotation mark is simply a character in the string.
Example
AlarmClient.Shelve.SelectedTag(Duration=1.0;Reason="Nuisance alarms");
Remarks
For more information about selecting alarms to shelve.see Shelving Alarms on page 60.
Shelve.Severity() Method
The Shelve.Severity() method shelves all active alarms of a specified alarm severity that belong to the
same specified provider and alarm group.
Syntax
AlarmClient.Shelve.Severity("ProviderName","GroupName",
Severity,Duration=Duration;Reason="Reason");
Parameters
ProviderName
Node and provider name combination that specifies the origin of alarm monitoring.
GroupName
Alarm group or area name whose alarms are monitored by the Alarm Control.
Severity
Single-digit (1-4) alarm severity.
Duration
Length of time in hours that selected alarms are shelved. Duration can be specified as an integer or
a floating point number greater than 0.
Example:
Duration=0.5
Reason
Explanation up to 200 characters for shelving alarms at a specified severity from the Alarm Control.

Scripting the Alarm Control AVEVA™ ArchestrA Alarm Control Guide
135
An explanation can be delimited by double or single quotation marks. Quotation marks and back
slashes (\) can appear within the text of an explanation. If an explanation is delimited by double
quotation marks, a single quotation mark is simply a character in the string. If an explanation is
delimited by single quotation marks, a double quotation mark is simply a character in the string.
Example
AlarmClient1.Shelve.Severity("\Galaxy","Area_001",3,
Duration=0.1;Reason=" + """" + "Shelved"+ """" + ";");
Remarks
For more information about selecting alarms to shelve.see Shelving Alarms on page 60.
Shelve.Tag() Method
The Shelve.tag() method shelves all active alarms that originate from the same tag and belong to the
same provider and alarm group within the same alarm priority range.
Syntax
AlarmClient.Shelve.Tag("ProviderName","GroupName","Tag"
FromPriority,ToPriority,Duration=Duration;Reason="Reason");
Parameters
ProviderName
Node and provider name combination that specifies the origin of alarm monitoring.
GroupName
Alarm group or area name whose alarms are monitored by the Alarm Control.
Tag
Name of the tag whose active alarms have been selected to be shelved.
FromPriority
Starting point of the alarm priority range (1-998). The FromPriority value must be less than the
ToPriority value.
ToPriority
End point of the alarm priority range (2-999). The ToPriority value must be greater than the
FromPriority value.
Duration
Length of time in hours that selected alarms are shelved. Duration can be specified as an integer or
a floating point number greater than 0.
Example:
Duration=0.5
Reason
Explanation up to 200 characters for shelving alarms from the same tags.
An explanation can be delimited by double or single quotation marks. Quotation marks and back
slashes (\) can appear within the text of an explanation. If an explanation is delimited by double
quotation marks, a single quotation mark is simply a character in the string. If an explanation is
delimited by single quotation marks, a double quotation mark is simply a character in the string.
Example
AlarmClient1.Shelve.Tag("\Galaxy","Area_002",
"UserDefined_002.Analog_003",1,999,"Duration=1.5;Reason=" + """" + "Shelved"+
"""" + ";");
Remarks
For more information about selecting alarms to shelve.see Shelving Alarms on page 60.

AVEVA™ ArchestrA Alarm Control Guide Scripting the Alarm Control
136
Shelve.Visible() Method
The Shelve.Visible() method shelves only those alarms that are currently visible from the Alarm Control.
Syntax
AlarmClient.Shelve.Visible("Duration=<Duration
Hrs>;Reason="+"<Reason>"+"Shelved"+"<Description>"+";");
Parameters
Duration
Length of time in hours that selected alarms are shelved. Duration can be specified as an integer or
a floating point number greater than 0.
Example:
Duration=0.5
Reason
Explanation up to 200 characters for shelving all alarms that are visible from the Alarm Control.
An explanation can be delimited by double or single quotation marks. Quotation marks and back
slashes (\) can appear within the text of an explanation. If an explanation is delimited by double
quotation marks, a single quotation mark is simply a character in the string. If an explanation is
delimited by single quotation marks, a double quotation mark is simply a character in the string.
Examples
AlarmClient1.Shelve.Visible("Duration=1.0;
Reason="+""""+"Shelved"+""""+";");
Remarks
For more information about selecting alarms to shelve.see "Shelving Alarms" on page 74 on page 60.
Show.Context() Method
The Show.Context method opens the shortcut menu at run time. This method ignores the
ShowContextMenu property setting and always shows the context menu.
Syntax
AlarmClient.Show.Context();
Show.Favorite() Method
The Show.Favorite method opens the Query Filters dialog box.
Syntax
AlarmClient.Show.Favorite();
Show.Hidden() Method
The Show.Hidden method opens the Hidden Alarms dialog box.
Syntax
AlarmClient.Show.Hidden();
Show.Sort() Method
The Show.Sort method opens the Sort dialog box.
Syntax
AlarmClient.Show.Sort();

Scripting the Alarm Control AVEVA™ ArchestrA Alarm Control Guide
137
Show.Statistics() Method
The Show.Statistics method opens the Alarm Statistics dialog box.
Syntax
AlarmClient.Show.Statistics();
TimeSelector.GetStartAndEndTimes() Method
The TimeSelector.GetStartAndEndTimes method gets the start and end times for the query.
Syntax
AlarmClient.GetStartAndEndTimes(StartTime, EndTime);
Parameters
StartTime
String attribute, custom property, or element property to retrieve the start time.
EndTime
String attribute, custom property, or element property to retrieve the end time.
Example
dim SDate as string;
dim EDate as string;
AlarmClient1.TimeSelector.GetStartAndEndTimes(SDate, EDate);
StartDate = SDate;
EndDate = EDate;
TimeSelector.RefreshTimes() Method
The TimeSelector.RefreshTimes method sets the time period for the query by updating the end time to
current time and recalculates the start time based on the new end time and duration.
If you set the Boolean parameter to TRUE, the OnChange event is triggered if the time is updated.
Only use this method, if the Update to Current Time option is cleared or the UpdateToCurrentTime
property is FALSE.
Note: This method does not work if the UpdatetoCurrentTime property value is TRUE.
Syntax
AlarmClient.TimeSelector.RefreshTimes(TriggerEvent);
Example
dtag = 1;
AlarmClient.TimeSelector.RefreshTimes(dtag);
TimeSelector.SetStartAndEndTimes() Method
The TimeSelector.SetStartAndEndTimes method sets the start and end times for a query.
To customize start time, duration, and end time you must set the UpdateToCurrentTime property to
FALSE and specify one of the following parameter combinations:
Start time and end time. Set the Duration parameter to 0.
Start time and duration. Set the EndTime parameter to "".
End time and duration. Set the StartTime parameter to "".
Start time, duration, and end time. The Alarm Control shows an error message if start time plus
duration is not equal to end time.

AVEVA™ ArchestrA Alarm Control Guide Scripting the Alarm Control
138
Syntax
AlarmClient.SetStartAndEndTimes(StartTime, EndTime, Duration);
Parameters
StartTime
String value or expression indicating the start time.
EndTime
String value or expression indicating the end time.
Duration
Duration enum. For more information on possible values, see TimeSelector.TimeDuration Property
page 112.
Example
AlarmClient1.TimeSelector.SetStartAndEndTimes("08/31/2008
15:33:43","09/01/2009 15:33:43",0);
Toggle.All() Method
The Toggle.All method reverses the selection of all alarm records. Selected alarms are cleared, and
unselected alarms are selected.
Syntax
AlarmClient.Toggle.All();
Toggle.Item() Method
The Toggle.Item method reverses the selection of a given alarm record. If the given alarm record is
selected, the selection is cleared; otherwise, it is selected.
Syntax
AlarmClient.Toggle.Item(RowNumber);
Parameters
RowNumber
An integer row number for the alarm record to reverse the selection. The first row in the control is 0.
Example
AlarmClient1.Toggle.Item(5);
LogMessage("The selection of the alarm record in the 6th row (index 5) is now
reversed.");
UnhideAll() Method
The UnhideAll method unhides all hidden alarms.
Syntax
AlarmClient.UnhideAll();
UnSelectAll() Method
The UnSelectAll method unselects all alarm records.
Syntax
AlarmClient.UnSelectAll();
Unshelve.All() Method
The Unshelve.All() method unshelves all alarms that are currently shelved.

Scripting the Alarm Control AVEVA™ ArchestrA Alarm Control Guide
139
Syntax
AlarmClient.Unshelve.All(Duration=0;Reason="Reason");
Parameters
Duration
Duration must be set to 0 to unshelve alarms.
Reason
Explanation up to 200 characters for unshelving all alarms.
An explanation is optional to unshelve alarms and the Reason parameter can be specified as
Reason="" to indicate a null explanation.
Example
AlarmClient1.Unshelve.All(Duration=0;Reason="");
Remarks
For more information about unshelving alarms, see Unshelving Alarms on page 62.
Unshelve.Group() Method
The Unshelve.Group() method unshelves all currently shelved alarms belonging to a specified provider
and alarm group.
Syntax
AlarmClient.Unshelve.Group("ProviderName","GroupName",
Duration=0;Reason="Reason");
Parameters
ProviderName
Node and or provider name combination that specifies the origin of alarm monitoring.
GroupName
Alarm group or area name whose alarms are monitored by the Alarm Control.
Duration
Duration must be set to 0 to unshelve alarms.
Reason
Explanation up to 200 characters for unshelving all alarms belonging to a specified group and
provider.
An explanation is optional to unshelve alarms and the Reason parameter can be specified as
Reason="" to indicate a null explanation.
Examples
AlarmClient1.Unshelve.Group("\\TankServer1\Galaxy","Area_001",
Reason=" + """" + "Shelved"+ """" + ";");
AlarmClient1.Unshelve.Group("\Galaxy","Area_001",Reason=" + """" + "Shelved"+
"""" + ";");
Remarks
For more information about specifying provider and group names, see Alarm Queries on page 13.
Unshelve.Priority() Method
The Unshelve.Priority() method unshelves currently shelved alarms within a specified alarm priority
range that belong to the same specified provider and alarm group.

AVEVA™ ArchestrA Alarm Control Guide Scripting the Alarm Control
140
Syntax
AlarmClient.Unshelve.Priority("ProviderName","GroupName",FromPriority,ToPrio
rity,"Duration=<Duration>;Reason="+"<Reason>"+"UnShelved"+"<Description>"+";
");
Parameters
ProviderName
Node and provider name combination that specifies the origin of alarm monitoring.
GroupName
Alarm group or area name whose alarms are monitored by the Alarm Control.
FromPriority
Three-digit starting point of the alarm priority range. The FromPriority value must be less than
the ToPriority value.
ToPriority
Three-digit end point of the alarm priority range. The ToPriority value must be greater than the
FromPriority value.
Duration
Duration must be set to 0 to unshelve alarms.
Reason
Explanation up to 200 characters for unshelving all alarms belonging to a specified alarm priority
range.
An explanation is optional to unshelve alarms and the Reason parameter can be specified as
Reason="" to indicate a null explanation.
Example
AlarmClient1.Unshelve.Priority("\Galaxy","Area_001",100,600,"Duration=0;Reas
on="+""""+"UnShelved"+""""+";");
Remarks
For more information about unshelving alarms, see "Unshelving Alarms" on page 75 on page 62.
Unshelve.Selected() Method
The Unshelve.Selected() method unshelves currently shelved alarms selected by the user from the
Alarm Control.
Syntax
AlarmClient.Unshelve.Selected(Duration=0;Reason="Reason");
Parameters
Duration
Duration must be set to 0 to unshelve alarms.
Reason
Explanation up to 200 characters for unshelving alarms selected by the user.
An explanation is optional to unshelve alarms and the Reason parameter can be specified as
Reason="" to indicate a null explanation.
Example
AlarmClient.Unshelve.Selected(Duration=0;Reason="Maintenance finished");
Remarks
For more information about unshelving alarms, see Unshelving Alarms on page 62.

Scripting the Alarm Control AVEVA™ ArchestrA Alarm Control Guide
141
Unshelve.SelectedGroup() Method
The Unshelve.SelectedGroup() method unshelves all alarms that belong to the same provider and alarm
groups as the alarms selected by the user from the Alarm Control.
Syntax
AlarmClient.Unshelve.SelectedGroup(Duration=0;Reason="Reason");
Parameters
Duration
Duration must be set to 0 to unshelve alarms.
Reason
Explanation up to 200 characters for unshelving alarms that belong to the same alarm groups as the
alarms selected by the user.
An explanation is optional to unshelve alarms and the Reason parameter can be specified as
Reason="" to indicate a null explanation.
Example
AlarmClient.Unshelve.SelectedGroup(Duration=0;Reason="");
Remarks
For more information about unshelving alarms, see Unshelving Alarms on page 62.
Unshelve.SelectedPriority() Method
The Unshelve.SelectedPriority method unshelves all alarms within the same alarm priority range as the
alarms selected by the user from the Alarm Control.
Syntax
AlarmClient.Unshelve.SelectedPriority(Duration=0;Reason="Reason");
Parameters
Duration
Duration must be set to 0 to unshelve alarms.
Reason
Explanation up to 200 characters for unshelving the alarms within the same alarm priority range as
the alarms selected by the user.
An explanation is optional to unshelve alarms and the Reason parameter can be specified as
Reason="" to indicate a null explanation.
Example
AlarmClient.Unshelve.SelectedPriority(Duration=0;
Reason="Maintenance finished");
Remarks
For more information about unshelving alarms, see Unshelving Alarms on page 62.
Unshelve.SelectedSeverity() Method
The Unshelve.SelectedSeverity method unshelves all shelved alarms within the same alarm severities
as the alarms selected by the user from the Alarm Control.
Syntax
AlarmClient.Unshelve.SelectedSeverity(Duration=0;Reason="Reason");

AVEVA™ ArchestrA Alarm Control Guide Scripting the Alarm Control
142
Parameters
Duration
Duration must be set to 0 to unshelve alarms.
Reason
Explanation up to 200 characters for unshelving the shelved alarms that belong to the same alarm
severities as the alarms selected by the user.
An explanation is optional to unshelve alarms and the Reason parameter can be specified as
Reason="" to indicate a null explanation.
Example
AlarmClient.Unshelve.SelectedSeverity(Duration=0;Reason="Low severity
alarms");
Remarks
For more information about unshelving alarms, see Unshelving Alarms on page 62.
Unshelve.SelectedTag() Method
The Unshelve.SelectedTag method unshelves all shelved alarms that originate from the same tags as
the alarms selected by the user from the Alarm Control.
Syntax
AlarmClient.Unshelve.SelectedTag(Duration=0;Reason="Reason");
Parameters
Duration
Duration must be set to 0 to unshelve alarms.
Reason
Explanation up to 200 characters for unshelving the active alarms from the same tags as the alarms
selected by the user.
An explanation is optional to unshelve alarms and the Reason parameter can be specified as
Reason="" to indicate a null explanation.
Example
AlarmClient.Unshelve.SelectedTag(Duration=0;Reason="");
Remarks
For more information about unshelving alarms, see Unshelving Alarms on page 62.
Unshelve.Severity() Method
The Unshelve.Severity() method unshelves all shelved alarms of a specified alarm severity that belong
to the same specified provider and alarm group.
Syntax
AlarmClient.Unshelve.Severity("ProviderName","GroupName",Severity,"Duration=
<Duration>;Reason="+"<Reason>"+"UnShelved"+"<Description>"+";");
Parameters
ProviderName
Node and provider name combination that specifies the origin of alarm monitoring.
GroupName
Alarm group or area name whose alarms are monitored by the Alarm Control.

Scripting the Alarm Control AVEVA™ ArchestrA Alarm Control Guide
143
Severity
Single-digit (1-4) alarm severity.
Duration
Duration must be set to 0 to unshelve alarms.
Reason
Explanation up to 200 characters for unshelving the active alarms of the specified severity.
An explanation is optional to unshelve alarms and the Reason parameter can be specified as
Reason="" to indicate a null explanation.
Example
AlarmClient1.Unshelve.Severity("\Galaxy","Area_001",3,"Duration=0;Reason="+"
"""+"UnShelved"+""""+";");
Remarks
For more information about unshelving alarms, see "Unshelving Alarms" on page 75 on page 62.
Unshelve.Tag() Method
The Unshelve.Tag() method unshelves all shelved alarms that have the same tag names from the same
provider and alarm groups and are within the same priority range.
Syntax
AlarmClient.UnShelve.Tag("ProviderName","GroupName","Tag",FromPriority,ToPri
ority,"Duration=<Duration>;Reason="+"<Reason>"+"UnShelved"+"<Description>"+"
;");
Parameters
ProviderName
Node and provider name combination that specifies the origin of alarm monitoring.
GroupName
Alarm group or area name whose alarms are monitored by the Alarm Control.
Tag
Name of the tag whose active alarms have been selected to be unshelved.
FromPriority
Three-digit starting point of the alarm priority range. The FromPriority value must be less than
the ToPriority value.
ToPriority
Three-digit end point of the alarm priority range. The ToPriority value must be greater than the
FromPriority value.
Duration
Duration must be set to 0 to unshelve alarms.
Reason
Explanation up to 200 characters for shelving the active alarms that belong to the same alarm
severities as the alarms selected by the user.
An explanation is optional to unshelve alarms and the Reason parameter can be specified as
Reason="" to indicate a null explanation.
Example
AlarmClient1.UnShelve.Tag("\Galaxy","Area_001","User_Defined_001.Attribute00
4.LoLo",1,999,"Duration=0;Reason="+""""+"UnShelved"+""""+";");

AVEVA™ ArchestrA Alarm Control Guide Scripting the Alarm Control
144
Remarks
For more information about unshelving alarms, see "Unshelving Alarms" on page 75 on page 62.
Unshelve.Visible() Method
Th Unshelve.Visible() method unshelves only those alarms that are currently visible from the Alarm
Control.
Syntax
AlarmClient.Unshelve.Visible("Duration=<Duration>;Reason="+"<Reason>"+"UnShe
lved"+"<Description>"+";");
Parameters
Duration
Duration must be set to 0 to unshelve alarms.
Reason
Explanation up to 200 characters for unshelving the alarms currently shown from the Alarm Control.
An explanation is optional to unshelve alarms and the Reason parameter can be specified as
Reason="" to indicate a null explanation.
Example
AlarmClient1.Unshelve.Visible("Duration=0;Reason="+""""+"UnShelved"+""""+";"
);
Remarks
For more information about unshelving alarms, see "Unshelving Alarms" on page 75 on page 62.
Configuring Events
You can execute an action script when the Alarm Control triggers an event. Examples of basic events
are:
Click: The user clicks the Alarm Control
DoubleClick: The user double-clicks the Alarm Control
Startup: The Alarm Control opens at run time
Shutdown: The Alarm Control closes at run time
The Click, Double Click, Start up, and Shutdown events are standard for all .NET client controls. For
more information, see the Creating and Managing Industrial Graphics Users Guide.
The Alarm Control has one event of its own that is triggered when a new alarm occurs, the NewAlarm
event.
Configuring the NewAlarm Event
You can configure the NewAlarm event to execute an Industrial graphic script whenever a new alarm
occurs.
You can control the trigger behavior with the NewAlarmEventMode property. For more information, see
NewAlarmEventMode Property on page 102.
To configure the NewAlarm event
1. Double-click the Alarm Control. The Edit Animations dialog box appears.
2. Click Event. The Event page appears.

Scripting the Alarm Control AVEVA™ ArchestrA Alarm Control Guide
145
3. In the Event list, click NewAlarm.
4. In the script area, type the script you want to execute when a new alarm occurs, for example:
AlertIcon.Visible = true;
5. You must also set the NewAlarmEventMode property to 1 or 2 to enable the NewAlarm event trigger.
Do the following:
a. On the Special menu, click Scripts. The Edit Scripts dialog box appears.
b. Make sure Trigger type is set to On Show.
c. In the script area, type the following:
AlarmClient1.NewAlarmEventMode = 1;
d. If you want the script to be executed every time a new alarm occurs, set the
NewAlarmEventMode property to 2 instead.
e. Click OK.
.NET Colors
The following table is an overview of the color .NET color names with hexadecimal code.
Color with Hex Code
Color with Hex Code
Color with Hex Code
AliceBlue #F0F8FF
AntiqueWhite #FAEBD7
Aqua #00FFFF
Aquamarine #7FFFD4
Azure #F0FFFF
Beige #F5F5DC
Bisque #FFE4C4
Black #000000
BlanchedAlmond #FFEBCD
Blue #0000FF
BlueViolet #8A2BE2
Brown #A52A2A
BurlyWood #DEB887
CadetBlue #5F9EA0
Chartreuse #7FFF00
Chocolate #D2691E
Coral #FF7F50
CornflowerBlue #6495ED

AVEVA™ ArchestrA Alarm Control Guide Scripting the Alarm Control
146
Color with Hex Code
Color with Hex Code
Color with Hex Code
Cornsilk #FFF8DC
Crimson #DC143C
Cyan #00FFFF
DarkBlue #00008B
DarkCyan #008B8B
DarkGoldenrod #B8860B
DarkGray #A9A9A9
DarkGreen #006400
DarkKhaki #BDB76B
DarkMagenta #8B008B
DarkOliveGreen #556B2F
DarkOrange #FF8C00
DarkOrchid #9932CC
DarkRed #8B0000
DarkSalmon #E9967A
DarkSeaGreen #8FBC8B
DarkSlateBlue #483D8B
DarkSlateGray #2F4F4F
DarkTurquoise #00CED1
DarkViolet #9400D3
DeepPink #FF1493
DeepSkyBlue #00BFFF
DimGray #696969
DodgerBlue #1E90FF
Firebrick #B22222
FloralWhite #FFFAF0
ForestGreen #228B22
Fuchsia #FF00FF
Gainsboro #DCDCDC
GhostWhite #F8F8FF
Gold #FFD700
Goldenrod #DAA520
Gray #808080
Green #008000
GreenYellow #ADFF2F
Honeydew #F0FFF0
HotPink #FF69B4
IndianRed #CD5C5C
Indigo #4B0082
Ivory #FFFFF0
Khaki #F0E68C
Lavender #E6E6FA
LavenderBlush #FFF0F5
LawnGreen #7CFC00
LemonChiffon #FFFACD
LightBlue #ADD8E6
LightCoral #F08080
LightCyan #E0FFFF
LightGoldenrodYellow
#FAFAD2
LightGray #D3D3D3
LightGreen #90EE90
LightPink #FFB6C1
LightSalmon #FFA07A
LightSeaGreen #20B2AA
LightSkyBlue #87CEFA
LightSlateGray #778899
LightSteelBlue #B0C4DE
LightYellow #FFFFE0
Lime #00FF00
LimeGreen #32CD32
Linen #FAF0E6
Magenta #FF00FF
Maroon #800000
MediumAquamarine
#66CDAA
MediumBlue #0000CD
MediumOrchid #BA55D3
MediumPurple #9370DB
MediumSeaGreen #3CB371
MediumSlateBlue #7B68EE
MediumSpringGreen
#00FA9A
MediumTurquoise #48D1CC
MediumVioletRed #C71585
MidnightBlue #191970
MintCream #F5FFFA
MistyRose #FFE4E1

Scripting the Alarm Control AVEVA™ ArchestrA Alarm Control Guide
147
Color with Hex Code
Color with Hex Code
Color with Hex Code
Moccasin #FFE4B5
NavajoWhite #FFDEAD
Navy #000080
OldLace #FDF5E6
Olive #808000
OliveDrab #6B8E23
Orange #FFA500
OrangeRed #FF4500
Orchid #DA70D6
PaleGoldenrod #EEE8AA
PaleGreen #98FB98
PaleTurquoise #AFEEEE
PaleVioletRed #DB7093
PapayaWhip #FFEFD5
PeachPuff #FFDAB9
Peru #CD853F
Pink #FFC0CB
Plum #DDA0DD
PowderBlue #B0E0E6
Purple #800080
Red #FF0000
RosyBrown #BC8F8F
RoyalBlue #4169E1
SaddleBrown #8B4513
Salmon #FA8072
SandyBrown #F4A460
SeaGreen #2E8B57
SeaShell #FFF5EE
Sienna #A0522D
Silver #C0C0C0
SkyBlue #87CEEB
SlateBlue #6A5ACD
SlateGray #708090
Snow #FFFAFA
SpringGreen #00FF7F
SteelBlue #4682B4
Tan #D2B48C
Teal #008080
Thistle #D8BFD8
Tomato #FF6347
Transparent #FFFFFF
Turquoise #40E0D0
Violet #EE82EE
Wheat #F5DEB3
White #FFFFFF
WhiteSmoke #F5F5F5
Yellow #FFFF00
YellowGreen #9ACD32
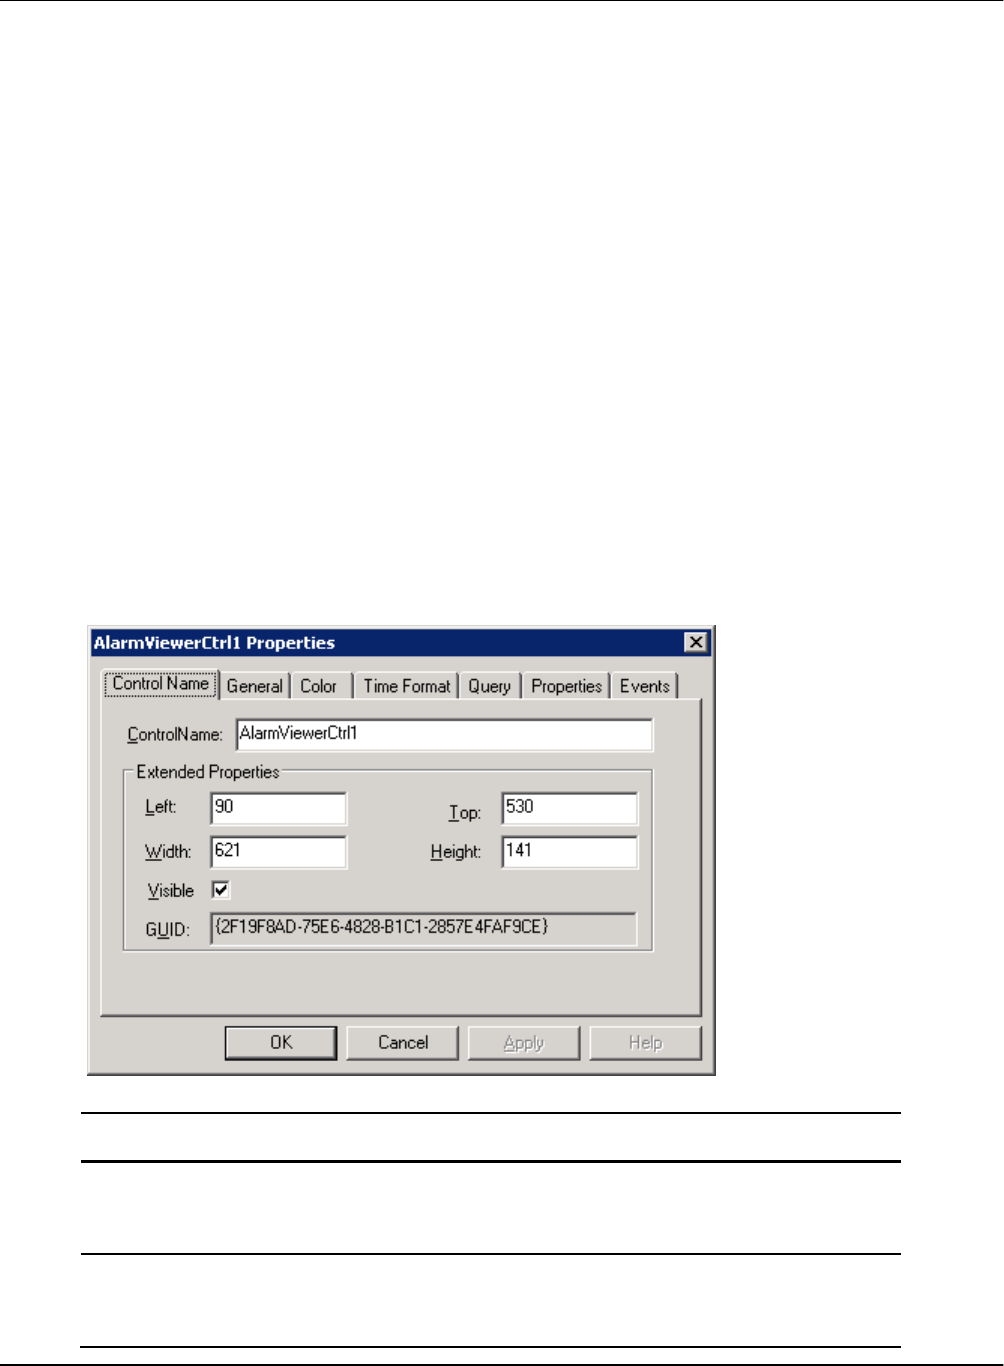
AVEVA™ ArchestrA Alarm Control Guide
149
You can transfer the configuration of the InTouch Alarm Viewer control and the InTouch Alarm DB View
control to the configuration of the ArchestrA Alarm Control.
You can also map the InTouch alarm control properties and methods to the properties and methods of
the ArchestrA Alarm Control.
Transferring the InTouch Alarm Viewer Control Configuration
You can transfer the configuration of the InTouch Alarm Viewer control tabs options to the ArchestrA
Alarm Control.
Transferring Configuration of the Control Name Tab
You can transfer the configuration of the Control Name tab options of the InTouch Alarm Viewer control
to the ArchestrA Alarm Control.
InTouch option
Alarm Control option
ControlName
You can rename the ArchestrA Alarm Control the same way as any
other elements on the canvas. For more information, see the Creating
and Managing Industrial Graphics User’s Guide.
Left, Top, Width,
and Height
You can directly edit the positioning options in the same way as any
other element on the canvas. Edit the following properties in the
Properties Editor: X, Y, Width, and Height.
CHAPTER 5
Transferring Alarm Configuration from
InTouch

AVEVA™ ArchestrA Alarm Control Guide Transferring Alarm Configuration from InTouch
150
InTouch option
Alarm Control option
Visible
You can directly edit the visibility option in the same way as any other
element on the canvas. In the Properties Editor, edit the Visible
property.
GUID
This option has no meaning in the ArchestrA Alarm Control.
Transferring Configuration of the General Tab
You can transfer the configuration of the General tab options of the InTouch Alarm Viewer control to the
ArchestrA Alarm Control.
InTouch option
Alarm Control option
Perform Query on
Startup
In the ArchestrA Alarm Control, this option is called Query on
Startup. You can configure this option on the Run-Time Behavior
page.
Show Context
Sensitive Menu
In the ArchestrA Alarm Control, this option is called Show Context
Menu. You can configure this option on the Run-Time Behavior
page.
Configure Context
Menus
In the ArchestrA Alarm Control, you can configure the availability of
individual shortcut menu options at run-time directly on the Run-Time
Behavior page.
Use Default Ack
Comment
In the ArchestrA Alarm Control, you can configure the availability of
the Query Filters shortcut menu option on the Run-Time Behavior
page.
Retain Suppression
In the ArchestrA Alarm Control, this option is called Retain Hidden.
You can configure it on the Run-Time Behavior page.

Transferring Alarm Configuration from InTouch AVEVA™ ArchestrA Alarm Control Guide
151
InTouch option
Alarm Control option
Show Status Bar
In the ArchestrA Alarm Control, you can configure the Show Grid
option on the Run-Time Behavior page.
Show Heading
In the ArchestrA Alarm Control, you can configure the Show Status
Bar option on the Run-Time Behavior page.
Row Selection
In the ArchestrA Alarm Control, this option is called Row Selection.
You can configure it on the Run-Time Behavior page.
Use Extended
Selection
In the ArchestrA Alarm Control, this option is called Row Selection.
You can configure it on the Run-Time Behavior page.
Show Grid
In the ArchestrA Alarm Control, you can configure the Show Grid
option on the Run-Time Behavior page.
Retrieve Buttons
In the ArchestrA Alarm Control, the retrieve buttons are not available.
The underlying grid technology handles the alarm retrieval from the
alarm database.
Silent Mode
In the ArchestrA Alarm Control, this option is called Hide Errors and
Warnings. You can configure it on the Run-Time Behavior page.
Flash Unack Alarms
In the ArchestrA Alarm Control, you can configure the Flash Unack
Alarms option on the Colors page.
Show Message
In the ArchestrA Alarm Control, this option is called Show Custom
‘No Records’ Me ssage. You can configure it on the Run-Time
Behavior page.
Font
You can configure this option from the Industrial Graphic Editor page.
Select the ArchestrA Alarm Control on the canvas and select an
appropriate font type, size, and style on the menu bars.
Column Details
In ArchestrA Alarm control, you can configure the column details
directly on the Column Details page.

AVEVA™ ArchestrA Alarm Control Guide Transferring Alarm Configuration from InTouch
152
Transferring Configuration of the Color Tab
You can transfer the configuration of the Color tab options of the InTouch Alarm Viewer control to the
ArchestrA Alarm Control.
All the options of the Color tab in the InTouch Alarm Viewer control can be set on the Colors page of the
ArchestrA Alarm Control.
The following table shows you some minor differences in wording:
InTouch Alarm View control
ArchestrA Alarm Control
Title Bar Text
Heading Text
Title Bar Back
Heading Background
Alarm Return
Alarm RTN
you can also set he background color in addition to the text color for most of the alarm records.
You can set the alarm priority range breakpoints directly in the table in the From Pri column.

Transferring Alarm Configuration from InTouch AVEVA™ ArchestrA Alarm Control Guide
153
Transferring Configuration of the Time Format Tab
You can transfer the configuration of the Time Format tab options of the InTouch Alarm Viewer control to
the ArchestrA Alarm Control.
InTouch option
Alarm Control option
Time Format
In the ArchestrA Alarm Control, you can configure the Time Format
option on the Time Settings page.
Displayed Time
This option has no meaning in the ArchestrA Alarm Control. All
alarm records are shown with the following time stamps in the Alarm
Control grid:
Time (OAT): Original Alarm Time
Time (LCT): Last Changed Time
Time (LCT, OAT): Last Changed Time, but Original Alarm Time
if the alarm record is unacknowledged
Displayed Time
Zone
In the ArchestrA Alarm Control, this option is called Time Zone. You
can configure it on the Time Settings page.
You need to explicitly configure the time zone for the correct time
stamp.
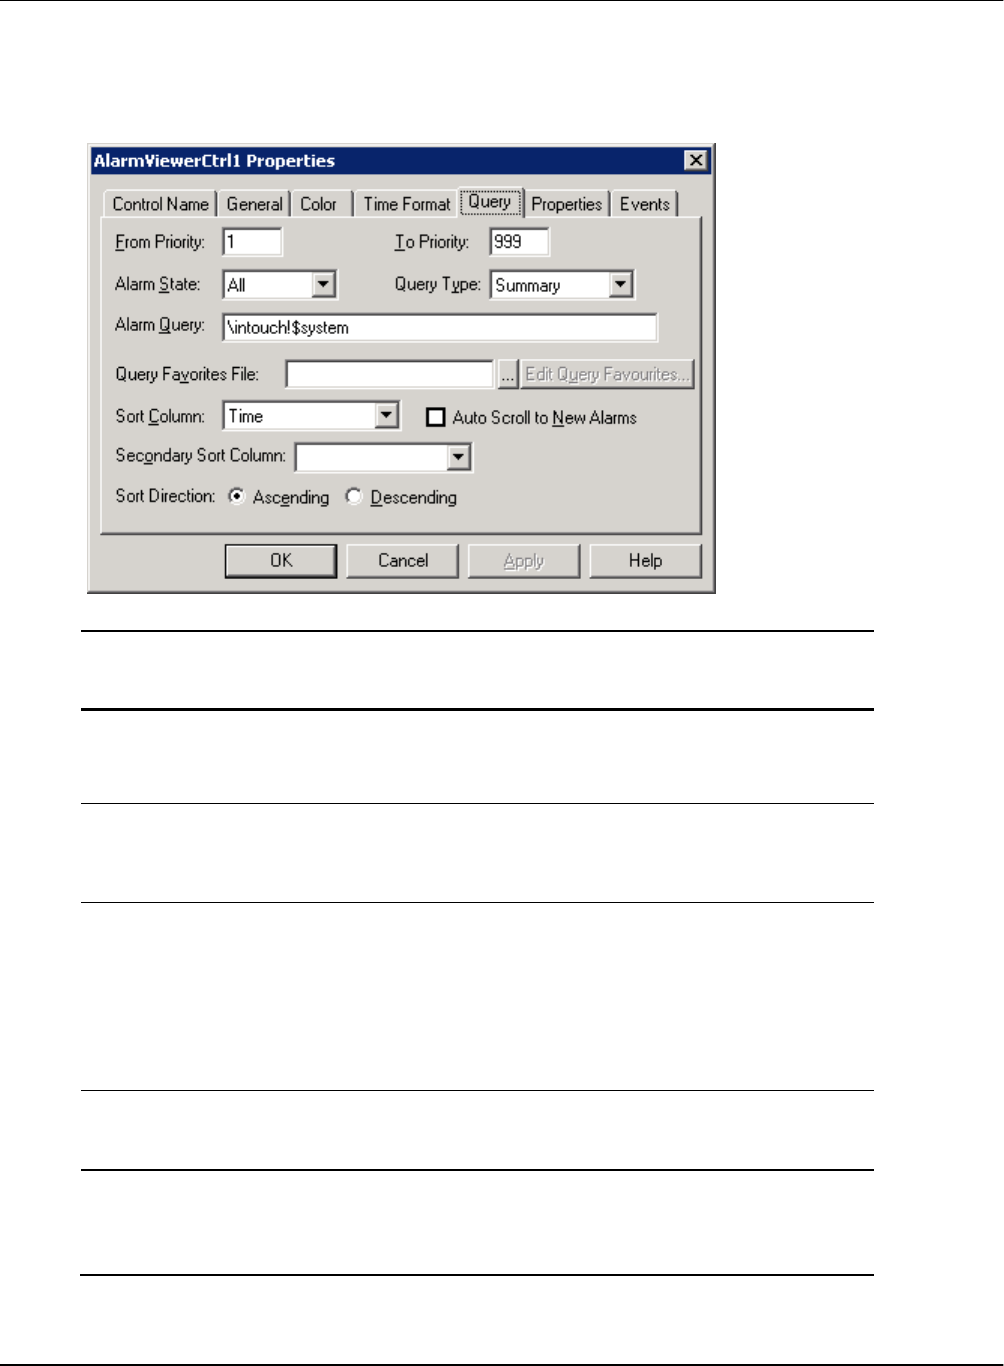
AVEVA™ ArchestrA Alarm Control Guide Transferring Alarm Configuration from InTouch
154
Transferring Configuration of the Query Tab
You can transfer the configuration of the Query tab options of the InTouch Alarm Viewer control to the
ArchestrA Alarm Control.
InTouch option
Alarm Control option
From Priority, To
Priority
In the ArchestrA Alarm Control, you can only set the priority limits
as part of a query filter on the Query Filters page. For more
information, see "Filtering Alarms" on page 46.
Alarm State
In the ArchestrA Alarm Control, you can only set the alarm state
limitation as part of a query filter on the Query Filters page. for
more information, see "Filtering Alarms" on page 37.
Query Type
In the ArchestrA Alarm Control, you can set the Client Mode option
on the Alarm Mode page as follow:
For query type "Summery", set the client mode to Current
Alarms
For query type "Historical", set the client mode to Recent
Alarms and Events
Alarm Query
In the ArchestrA Alarm Control, you can configure the Alarm Query
option on the Alarm Mode page.
Query Favorites
File, Edit Query
Favorites
In the ArchestrA Alarm Control, all query favorites and filter
favorites are managed on one page and are interchangeable
between different client modes. To access the Query Filter
Favorites, open the Query Filters page.
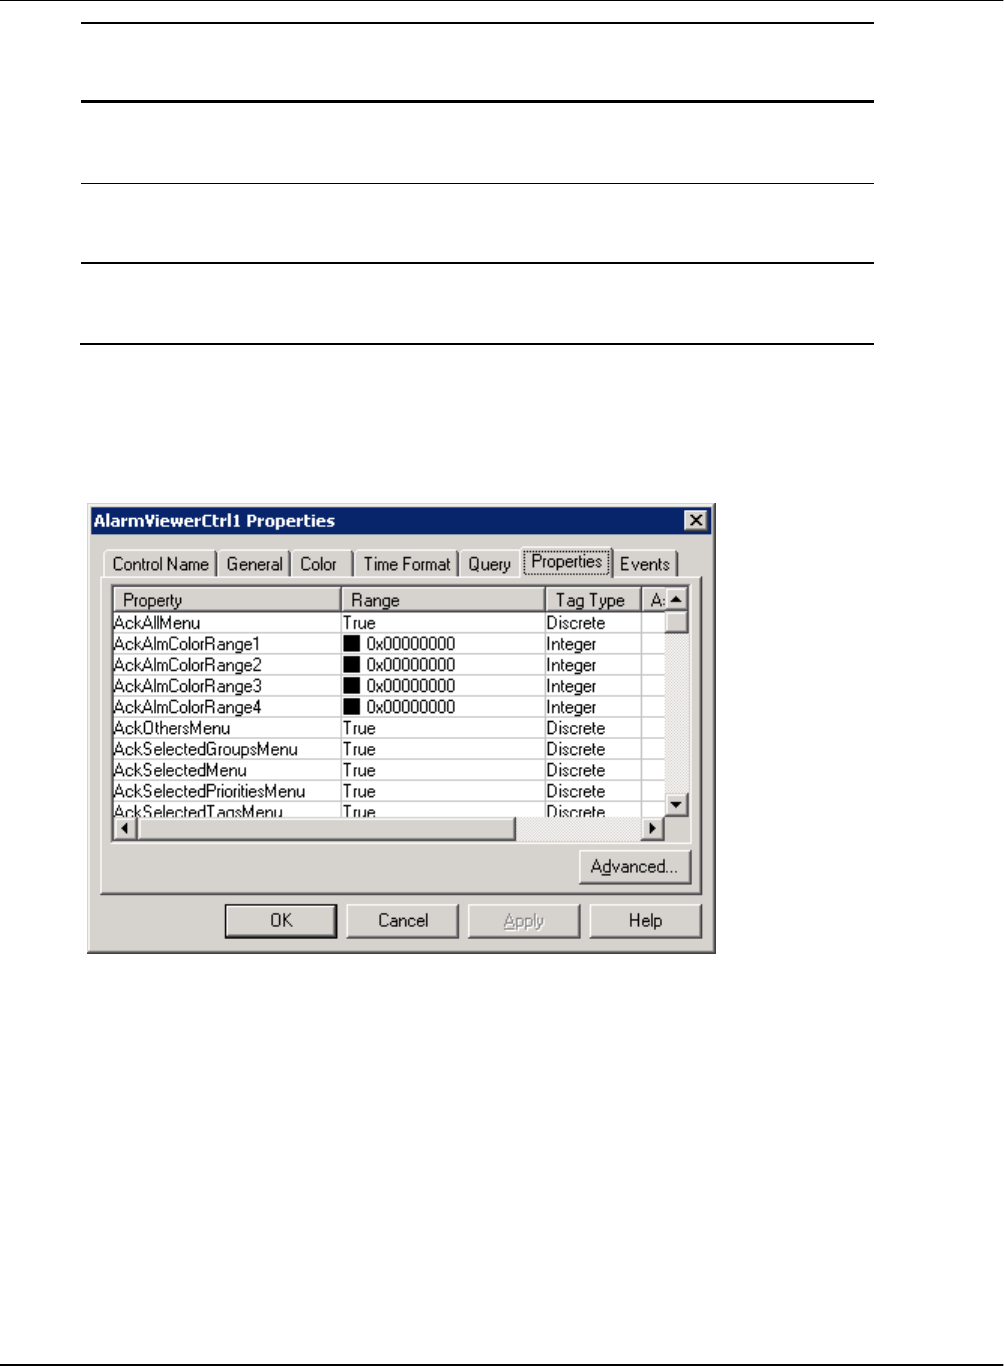
Transferring Alarm Configuration from InTouch AVEVA™ ArchestrA Alarm Control Guide
155
InTouch option
Alarm Control option
Sort Column
In the ArchestrA Alarm Control, you can configure the sorting of
alarm records on the Column Details page.
Auto Scroll to New
Alarms
In the ArchestrA Alarm Control, you can configure the Auto Scroll
to New Alarms on the Run-Time Behavior page.
Secondary Sort
Column, Sort
Direction
In the ArchestrA Alarm Control, you can configure the sorting of
alarm records on the Column Details page.
Transferring Configuration of the Properties Tab
You can set the properties of the ArchestrA Alarm Control in the Properties Editor when the Alarm
Control is selected on the canvas.
For more information on the exact mapping between the InTouch Alarm Viewer control properties and
ArchestrA Alarm Control properties, see Mapping Properties and Methods on page 164.
The advanced property filtering feature does not exist in the ArchestrA Alarm Control. However, when
you browse for properties of the ArchestrA Alarm Control from other elements with the Galaxy Browser,
you can filter the properties. Also, the properties of the ArchestrA Alarm Control are logically grouped in
the Properties Editor.
Transferring Script Configuration on the Events Tab
You can configure scripts for events of the ArchestrA Alarm Control on the Event animation page. The
events are the same as the events for the InTouch Alarm Viewer Control:
Click
Shutdown
DoubleClick
StartUp
New Alarm

AVEVA™ ArchestrA Alarm Control Guide Transferring Alarm Configuration from InTouch
156
Transferring the InTouch Alarm DB View Control
Configuration
You can transfer the configuration of the InTouch Alarm DB View control tabs options to the ArchestrA
Alarm Control.
Transferring Configuration of the Alarm DB View Control Name Tab
You can transfer the configuration of the Control Name tab options of the InTouch Alarm DB View
control to the ArchestrA Alarm Control.
InTouch option
Alarm Control option
ControlName
You can rename the ArchestrA Alarm Control the same way as any other
elements on the canvas. For more information, see the Creating and
Managing Industrial Graphics User’s Guide.
Left, Top, Width,
and Height
You can directly edit the positioning options in the same way as any other
element on the canvas. Edit the following properties in the Properties
Editor: X, Y, Width, and Height.
Visible
You can directly edit the visibility option in the same way as any other
element on the canvas. In the Properties Editor, edit the Visible property.
GUID
This option has no meaning in the ArchestrA Alarm Control.

Transferring Alarm Configuration from InTouch AVEVA™ ArchestrA Alarm Control Guide
157
Transferring Configuration of the InTouch Alarm DB View General Tab
You can transfer the configuration of the General tab options of the InTouch Alarm DB View control to
the ArchestrA Alarm Control.
InTouch option
Alarm Control option
Enable Refresh
Menu
In the ArchestrA Alarm Control, you can configure the availability of the
Requery shortcut menu option on the Run-Time Behavior page.
Enable Sort Menu
In the ArchestrA Alarm Control, you can configure the availability of the
Sort shortcut menu option on the Run-Time Behavior page.
Enabled Reset
Menu
In the ArchestrA Alarm Control, you can configure the availability of the
Reset shortcut menu option on the Run-Time Behavior page.
Enabled Filter Menu
In the ArchestrA Alarm Control, you can configure the availability of the
Query Filters shortcut menu option on the Run-Time Behavior page.
Display Mode
In the ArchestrA Alarm Control, set the Client Mode on the Alarm Mode
page to the same setting as the Display Mode setting in the InTouch
Alarm DB View control.
Column Details
In the ArchestrA Alarm Control, you can configure the column details
directly on the Column Details page.
Show Grid
In the ArchestrA Alarm Control, you can configure the Show Grid option
on the Run-Time Behavior page.
Show Heading
In the ArchestrA Alarm Control, you can configure the Show Heading
option on the Run-Time Behavior page.

AVEVA™ ArchestrA Alarm Control Guide Transferring Alarm Configuration from InTouch
158
InTouch option
Alarm Control option
Row Selection
In the ArchestrA Alarm Control, this option is called Row Selection. You
can configure it on the Run-Time Behavior page.
Resize Column
In the ArchestrA Alarm Control, this option is called Allow Column
Resizing. You can configure it on the Run-Time Behavior page.
Show Status Bar
In the ArchestrA Alarm Control, you can configure the Show Status Bar
option on the Run-Time Behavior page.
Retrieve Buttons
In the ArchestrA Alarm Control, the retrieve buttons are not available.
The underlying grid technology handles the alarm retrieval from the
alarm database.
Silent Mode
In the ArchestrA Alarm Control, this option is called Hide Errors and
Warnings. You can configure it on the Run-Time Behavior page.
Font
You can configure this option from the Industrial Graphic Editor page.
Select the ArchestrA Alarm Control on the canvas and select an
appropriate font type, size, and style on the menu bars.
Show Message
In the ArchestrA Alarm Control, this option is called Show Custom ‘No
Records’ Me ssage. You can configure it on the Run-Time Behavior
page.
Transferring Configuration of the InTouch Alarm DB View Color Tab
You can transfer the configuration of the Color tab options of the InTouch Alarm DB View control to the
ArchestrA Alarm Control.
All the options of the Color tab in the InTouch Alarm DB View control can be set on the Colors page of
the ArchestrA Alarm Control.
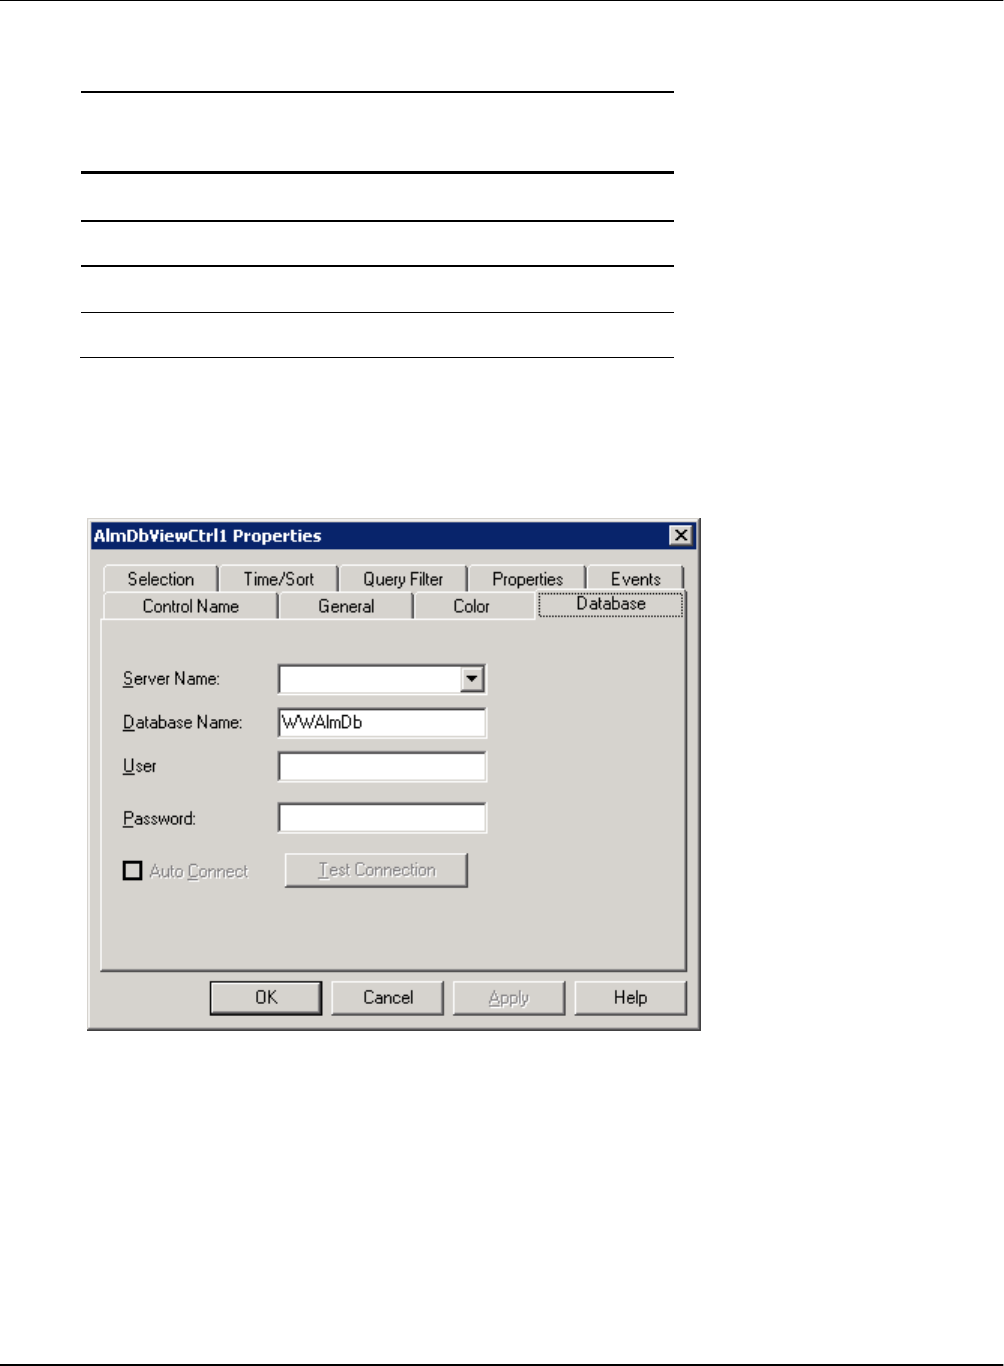
Transferring Alarm Configuration from InTouch AVEVA™ ArchestrA Alarm Control Guide
159
The following table shows you some minor differences in wording:
InTouch Alarm DB View
control
ArchestrA Alarm Control
Forecolor
Text
Backcolor
Background
Alm
n/a
Return
RTN
You can set the alarm priority range breakpoints directly in the table in the From Pri column.
Transferring Configuration of the Database Tab
You can transfer the configuration of the Database tab options of the InTouch Alarm DB View control to
the ArchestrA Alarm Control.
In the ArchestrA Alarm Control, you can configure the following options on the Alarm Mode page:
Server Name
Database Name
User
Password
Test Connection
In the ArchestrA Alarm Control, the Auto Connect option is called Query on Startup. You can configure
it on the Run-Time Behavior page.
The configuration for the Alarm Database only appears if the Client Mode is set to Historical Alarms,
Historical Events, or Historical Alarms and Events.

AVEVA™ ArchestrA Alarm Control Guide Transferring Alarm Configuration from InTouch
160
Transferring Configuration of the Selection Tab
You can transfer the configuration of the Selection tab options of the InTouch Alarm DB View control to
the ArchestrA Alarm Control.
InTouch option
Alarm Control option
Use Specific Time, Start
Time, End Time
In the ArchestrA Alarm Control, you can set these options directly
in the Time Range Picker control on the Alarm Mode page.
When you select a time from either the start time or end time part
of the Time Range Picker control, the Alarm Control is
automatically set to use a specific time.
To keep the specific start and end time, you must also clear
Update to Current Time. When you refresh the Alarm Control
grid at run time, the time range stays fixed to the given start and
end time.
Duration
In the ArchestrA Alarm Control, you can set this option directly in
the Time Range Picker control on the Alarm Mode page.
When you select a duration from the center part of the Time Range
Picker control, the Alarm Control is automatically set to use a time
offset.
To keep the duration, you must also select the Update to Current
Time check box.
When you refresh the Alarm Control grid at run time, the end time
is set to the current time and the Alarm Control shows the alarms
within the set duration.
UnAck Duration, Alarm
Duration
In the ArchestrA Alarm Control, you cannot configure the Unack
Duration and Alarm Duration settings. The Alarm Control grid
shows both UnAck Duration and Alarm Duration in separate

Transferring Alarm Configuration from InTouch AVEVA™ ArchestrA Alarm Control Guide
161
InTouch option
Alarm Control option
columns.
Query Time Zone
In the ArchestrA Alarm Control, you can configure the Time Zone
setting on the Time Settings page.
Maximum Records
In the ArchestrA Alarm Control, you can configure the Maximum
Records setting on the Alarm Mode page.
Transferring Configuration of the Time/Sort Tab
You can transfer the configuration of the Time/Sort tab options of the InTouch Alarm DB View control to
the ArchestrA Alarm Control.
InTouch option
Alarm Control option
Time Format
In the ArchestrA Alarm Control, you can configure the Time Format
setting on the Time Settings page.
Displayed Time
Zone
In the ArchestrA Alarm Control, you can configure the Time Zone setting
on the Time Settings page.
Primary Sort
Column, Secondary
Sort Column, Sort
Order
In the ArchestrA Alarm Control, you can configure the sorting options on
the Column Details page.

AVEVA™ ArchestrA Alarm Control Guide Transferring Alarm Configuration from InTouch
162
Transferring Configuration of the Query Filter Tab
You can transfer the configuration of the Query Filter tab options of the InTouch Alarm DB View control
to the ArchestrA Alarm Control.
In the ArchestrA Alarm Control, all query favorites and filter favorites are managed on one page and are
interchangeable between different client modes. To access the Query Filter Favorites, open the Query
Filters page.

Transferring Alarm Configuration from InTouch AVEVA™ ArchestrA Alarm Control Guide
163
Transferring Configuration of the InTouch Alarm DB View Properties
Tab
You can set the properties of the ArchestrA Alarm Control in the Properties Editor when the Alarm
Control is selected on the canvas.
For more information on the exact mapping between the InTouch Alarm DB View control properties and
ArchestrA Alarm Control properties, see Mapping Properties and Methods on page 164.
The advanced property filtering feature does not exist in the ArchestrA Alarm Control. However, when
you browse for properties of the ArchestrA Alarm Control from other elements with the Galaxy Browser,
you can filter the properties. Also, the properties of the ArchestrA Alarm Control are logically grouped in
the Properties Editor.
Transferring Scripts Configuration on the Events Tab
You can configure scripts for events of the ArchestrA Alarm Control on the Event animation page. The
events are the same as the events for the InTouch Alarm DB View control:
Click
Shutdown
DoubleClick
StartUp
NewAlarm
For more information, see Configuring Events on page 144.
Transferring Query Favorites Configuration
You can only transfer query favorites configuration from InTouch to the ArchestrA Alarm Control by
recreating the filters on the Query Filters page.
If you intend to use a the query filter in one of the current client modes, make sure you also include
Provider and Group as filter criteria.

AVEVA™ ArchestrA Alarm Control Guide Transferring Alarm Configuration from InTouch
164
Mapping Properties and Methods
The following table shows all properties and methods of the InTouch Alarm Viewer control and InTouch
Alarm DB View controls and their corresponding properties and methods of the ArchestrA Alarm Control.
InTouch alarm control property
or method
ArchestrA Alarm Control property or method
AboutBox()
AboutBox() Method on page 117
AckAll()
Ack.All() Method on page 117
AckAllMenu
ContextMenu.AckAll Property on page 86
AckAlmBackColor
AlarmColor.Ack.BackGround Property on page 77
AckAlmBackColorRange1
AlarmColor.Ack.BackGround Propert on page 77
AckAlmBackColorRange2
AlarmColor.Ack.BackGround Property on page 77
AckAlmBackColorRange3
AlarmColor.Ack.BackGround Property on page 77
AckAlmBackColorRange4
AlarmColor.Ack.BackGround Property on page 77
AckAlmColorRange1
AlarmColor.Ack.ForeGround Property on page 77
AckAlmColorRange2
AlarmColor.Ack.ForeGround Property on page 77
AckAlmColorRange3
AlarmColor.Ack.ForeGround Property on page 77
AckAlmColorRange4
AlarmColor.Ack.ForeGround Property on page 77
AckAlmForeColor
AlarmColor.Ack.ForeGround Property on page 77
AckAlmForeColorRange1
AlarmColor.Ack.ForeGround Property on page 77
AckAlmForeColorRange2
AlarmColor.Ack.ForeGround Property on page 77
AckAlmForeColorRange3
AlarmColor.Ack.ForeGround Property on page 77
AckAlmForeColorRange4
AlarmColor.Ack.ForeGround Property on page 77
AckGroup()
Ack.Group() Method on page 117
AckOthersMenu
ContextMenu.AckOthers Property on page 87
AckPriority()
Ack.Priority() Method on page 117
AckRtnBackColor
AlarmColor.RTN.BackGround Property on page 80
AckRtnForeColor
AlarmColor.RTN.ForeGround Property on page 80
AckSelected()
Ack.Selected() Method on page 118
AckSelectedGroup()
Ack.SelectedGroup() Method on page 118
AckSelectedGroupsMenu
ContextMenu.AckSelectedGroups Property on page 87
AckSelectedMenu
ContextMenu.AckSelected Property on page 87
AckSelectedPrioritiesMenu
ContextMenu.AckSelectedPriorities Property on page 87
AckSelectedPriority()
Ack.SelectedPriority () Method on page 118

Transferring Alarm Configuration from InTouch AVEVA™ ArchestrA Alarm Control Guide
165
InTouch alarm control property
or method
ArchestrA Alarm Control property or method
AckSelectedTag()
Ack.SelectedTag() Method on page 119
AckSelectedTagsMenu
ContextMenu.AckSelectedTags Property on page 87
AckTag()
Ack.Tag() Method on page 119
AckVisible()
Ack.Visible() Method on page 119
AckVisibleMenu
ContextMenu.AckVisible Property on page 88
AlarmQuery
AlarmQuery Property on page 85
AlarmState
No corresponding property. Configure a Query Filter
favorite at design time instead and use the Favorite
property. For more information, see Favorite Property on
page 100
AlmRtnBackColor
AlarmColor.RTN.BackGround Property on page 80
AlmRtnColor
AlarmColor.RTN.ForeGround Property on page 80
AlmRtnForeColor
AlarmColor.RTN.ForeGround Property on page 80
ApplyDefaultQuery()
Favorite Property on page 100
ApplyQuery()
No corresponding property. Configure a Query Filter
favorite at design time instead and use the Favorite
property. For more information, see Favorite Property on
page 100.
AutoConnect
QueryStartup Property on page 104
AutoScroll
AutoScroll Property on page 85
ColorPriorityRange1
AlarmColor.Range Property on page 79
ColorPriorityRange2
AlarmColor.Range Property on page 79
ColorPriorityRange3
AlarmColor.Range Property on page 79
ColumnResize
AllowColumnResize Property on page 85
Connect()
Connect() Method on page 120
ConnectStatus
ConnectStatus Property on page 86
CustomMessage
NoRecordsMessage.Message Property on page 103
DefaultAckComment
AckComment.DefaultValue Property on page 75
DisplayedTime
This option has no meaning in the ArchestrA Alarm
Control. All three times are shown in the Alarm Control:
Original Alarm Time
Last Changed Time
Last Changed Time, but Original Alarm Time for
unacknowledged alarms
DisplayedTimeZone
TimeZone.TimeZone Property on page 114

AVEVA™ ArchestrA Alarm Control Guide Transferring Alarm Configuration from InTouch
166
InTouch alarm control property
or method
ArchestrA Alarm Control property or method
DisplayMode
ClientMode Property on page 86
Duration
TimeSelector.TimeDuration Property page 112
EndTime
TimeSelector.EndDate Property on page 111
EventBackColor
EventColor.BackGround Property on page 99
EventColor
EventColor.ForeGround Property on page 99
EventForeColor
EventColor.ForeGround Property on page 99
ExtendedSelection
RowSelection Property on page 105
FilterFavoritesFile
No corresponding property. The file name is used as a
parameter for the Favorites.Export() Method on page 120
and Favorites.Import() Method on page 120 methods.
FilterMenu
ContextMenu.Favorites Property on page 88
FilterName
Favorite Property on page 100
FlashUnackAlarms
FlashUnAckAlarms Property on page 100
FlashUnAckAlmColorRange1
AlarmColor.UnAck.Flash.ForeGround Property on page
82
FlashUnAckAlmColorRange2
AlarmColor.UnAck.Flash.ForeGround Property on page
82
FlashUnAckAlmColorRange3
AlarmColor.UnAck.Flash.ForeGround Property on page
82
FlashUnAckAlmColorRange4
AlarmColor.UnAck.Flash.ForeGround Property on page
82
Font
You can only set the font at design time, not at run time.
FreezeDisplay()
FreezeDisplay() Method on page 121
FreezeMenu
ContextMenu.Freeze Property on page 88
FromPriority
No corresponding property. Configure a Query Filter
favorite at design time instead and use the Favorite
property. For more information, see Favorite Property on
page 100.
GetItem()
GetItem() Method on page 121
GetLastError()
GetLastError() Method on page 121
GetNext()
No corresponding property. Alarm records are retrieved
one by one from the Alarm Database after the initial set of
alarm records is retrieved. The initial set is defined by the
Maximum Records setting.
GetPrevious()
No corresponding property. Alarm records are retrieved
one by one from the Alarm Database after the initial set of
alarm records is retrieved. The initial set is defined by the

Transferring Alarm Configuration from InTouch AVEVA™ ArchestrA Alarm Control Guide
167
InTouch alarm control property
or method
ArchestrA Alarm Control property or method
Maximum Records setting.
GetSelectedItem()
GetSelectedItem() Method on page 122
GridColor
GridColor Property on page 100
GroupExactMatch
No corresponding property. Configure a Query Filter
favorite at design time instead and use the Favorite
property. For more information, see Favorite Property on
page 100.
GroupName
No corresponding property. Configure a Query Filter
favorite at design time instead and use the Favorite
property. For more information, see Favorite Property on
page 100.
MaxRecords
MaxDatabaseRecords Property
MoveWindow()
MoveWindow() Method on page 125
NewAlarmEventMode
NewAlarmEventMode Property on page 102
Password
Database.Authentication Property on page 97
PrimarySort
SortOrder.First Property on page 108
ProviderExactMatch
No corresponding property. Configure a Query Filter
favorite at design time instead and use the Favorite
property. For more information, see Favorite Property on
page 100.
ProviderName
No corresponding property. Configure a Query Filter
favorite at design time instead and use the Favorite
property. For more information, see Favorite Property on
page 100.
QueryFavoritesFile
No corresponding property. The file name is used as a
parameter for the Favorites.Export() Method on page 120
and Favorites.Import() Method on page 120 methods.
QueryFavoritesMenu
ContextMenu.Favorites Property on page 88
QueryName
Favorite Property on page 100
QueryStartup
QueryStartup Property on page 104
QueryTimeZone
TimeZone.TimeZone Property on page 114
QueryType
ClientMode Property on page 86
Refresh()
Requery() Method on page 125
RefreshMenu
ContextMenu.Requery Property on page 90
Requery()
Requery() Method on page 125
RequeryMenu
ContextMenu.Requery Property on page 90

AVEVA™ ArchestrA Alarm Control Guide Transferring Alarm Configuration from InTouch
168
InTouch alarm control property
or method
ArchestrA Alarm Control property or method
Reset()
Reset() Method on page 126
ResetMenu
ContextMenu.Reset Property on page 90
RetainSuppression
RetainHidden Property on page 104
RowCount
RowCount Property on page 105
RowSelection
RowSelection Property on page 105
SecondarySort
SortColumn.Second Property on page 108
SecondarySortColumn
SortColumn.Second Property on page 108
SelectAll()
To select all records, see Select.All() Method on page
127.
To reverse the selection of all records, see Toggle.All()
Method on page 138.
SelectedCount
SelectedCount Property on page 105
SelectGroup()
Select.Group() Method on page 127
SelectItem()
To select a given alarm record, see Select.Item() Method
on page 127.
To reverse the selection of a given alarm record, see
Toggle.Item() Method on page 138.
SelectPriority()
Select.Priority() Method on page 127
SelectQuery()
Favorite Property on page 100
SelectTag()
Select.Tag() Method on page 128
ServerName
Database.ServerName Property on page 98
SetQueryByName
Favorite Property on page 100
SetSort()
SetSort() Method on page 128
ShowContext()
Show.Context() Method on page 136
ShowContextMenu
ShowContextMenu Property on page 107
ShowDate
There is no equivalent functionality in the ArchestrA
Alarm Control.
ShowFetch
No corresponding property. The buttons for retrieving
sets of alarm records from the Alarm Database do not
exist in the ArchestrA Alarm Control.
ShowFilter()
Show.Favorite() Method on page 136
ShowGrid
ShowGrid Property on page 107
ShowHeading
ShowHeading Property on page 107

Transferring Alarm Configuration from InTouch AVEVA™ ArchestrA Alarm Control Guide
169
InTouch alarm control property
or method
ArchestrA Alarm Control property or method
ShowMessage
NoRecordsMessage.Enabled Property on page 103
ShowQueryFavorites()
Show.Favorite() Method on page 136
ShowSort()
Show.Sort() Method on page 136
ShowStatistics()
Show.Statistics() Method on page 137
ShowStatusBar
ShowStatusBar Property on page 107
ShowSuppression()
Show.Hidden() Method on page 136
SilentMode
HideErrors Property on page 102
SortColumn
You can set three sort columns in the ArchestrA Alarm
Control. To set the first column, see SortColumn.First
Property on page 107.
SortMenu
ContextMenu.Sort Property on page 93
SortOnCol()
To set the first sort column, see SortColumn.First
Property on page 107. To set the sort order of the first
sort column, see SortOrder.First Property on page 108.
SortOrder
SortOrder.First Property on page 108
SpecificTime
UpdateToCurrentTime Property on page 115
StartTime
TimeSelector.EndDate Property on page 111
StatsMenu
ContextMenu.Statistics Property on page 94
SuppressAll()
Hide.All() Method on page 122
SuppressAllMenu
ContextMenu.HideAll Property on page 88
SuppressedAlarms
HiddenAlarms Property on page 102
SuppressGroup()
Hide.Group() Method on page 122
SuppressionMenu
ContextMenu.Hidden Property on page 88
SuppressOthersMenu
ContextMenu.HideOthers Property on page 89
SuppressPriority()
Hide.Priority() Method on page 123
SuppressSelected()
Hide.Selected() Method on page 123
SuppressSelectedGroup()
Hide.SelectedGroup() Method on page 123
SuppressSelectedGroupsMenu
ContextMenu.HideSelectedGroups Property on page 89
SuppressSelectedMenu
ContextMenu.HideSelected Property on page 89
SuppressSelectedPrioritiesMenu
ContextMenu.HideSelectedPriorities Property on page
89
SuppressSelectedPriority()
Hide.SelectedPriority() Method on page 123

AVEVA™ ArchestrA Alarm Control Guide Transferring Alarm Configuration from InTouch
170
InTouch alarm control property
or method
ArchestrA Alarm Control property or method
SuppressSelectedTagsMenu
ContextMenu.HideSelectedTags Property on page 90
SuppressSelectedTag()
Hide.SelectedTag() Method on page 123
SuppressTag()
Hide.Tag() Method on page 124
SuppressVisible()
Hide.Visible() Method on page 124
SuppressVisibleMenu
ContextMenu.HideVisible Property on page 90
Time
Time.Type Property on page 110 and Time.Format
Property on page 110
TimeFormat
Time.Format Property on page 110 and Time.Type
Property on page 110
TitleBackColor
HeadingColor.BackGround Property on page 101
TitleForeColor
HeadingColor.ForeGround Property on page 101
ToPriority
No corresponding property. Configure a Query Filter
favorite at design time instead and use the Favorite
Property. For more information, see Favorite Property on
page 100.
TotalAlarms
TotalRowCount Property on page 114
TotalRowCount
TotalRowCount Property on page 114
UnAckAlarms
UnAckAlarms Property on page 114
UnAckAlmBackColor
AlarmColor.UnAck.BackGround Property on page 81
UnAckAlmBackColorRange1
AlarmColor.UnAck.BackGround Property on page 81
UnAckAlmBackColorRange2
AlarmColor.UnAck.BackGround Property on page 81
UnAckAlmBackColorRange3
AlarmColor.UnAck.BackGround Property on page 81
UnAckAlmBackColorRange4
AlarmColor.UnAck.BackGround Property on page 81
UnAckAlmColorRange1
AlarmColor.UnAck.ForeGround Property on page 83
UnAckAlmColorRange2
AlarmColor.UnAck.ForeGround Property on page 83
UnAckAlmColorRange3
AlarmColor.UnAck.ForeGround Property on page 83
UnAckAlmColorRange4
AlarmColor.UnAck.ForeGround Property on page 83
UnAckAlmForeColor
AlarmColor.UnAck.ForeGround Property on page 83
UnAckAlmForeColorRange1
AlarmColor.UnAck.ForeGround Property on page 83
UnAckAlmForeColorRange2
AlarmColor.UnAck.ForeGround Property on page 83
UnAckAlmForeColorRange3
AlarmColor.UnAck.ForeGround Property on page 83
UnAckAlmForeColorRange4
AlarmColor.UnAck.ForeGround Property on page 83
UnAckOrAlarmDuration
No corresponding property. UnAck Duration and Alarm
Duration are shown in the Alarm Control grid.
UnSelectAll()
UnSelectAll() Method on page 138

Transferring Alarm Configuration from InTouch AVEVA™ ArchestrA Alarm Control Guide
171
InTouch alarm control property
or method
ArchestrA Alarm Control property or method
UnSuppressAll()
UnhideAll() Method on page 138
UnsuppressAllMenu
ContextMenu.UnhideAll Property on page 94
UseDefaultAckComment
AckComment.UseDefault Property on page 75
UserID
Database.UserID Property on page 98
Visible
Visible Property on page 115
WindowColor
WindowColor Property on page 116

AVEVA™ ArchestrA Alarm Control Guide
173
A
alarm manager • 11
Alarms at run-time, Sorting • 58
alarms, historical • 11
C
ContextMenu.ShelveAll • 90
ContextMenu.ShelveOthers • 90
ContextMenu.ShelveSelected • 91
ContextMenu.ShelveSelectedGroups • 92
ContextMenu.ShelveSelectedPriorities • 92
ContextMenu.ShelveSelectedSeverities • 92
ContextMenu.ShelveSelectedTags • 93
ContextMenu.ShelveVisible • 93
ContextMenu.UnshelveAll • 94
ContextMenu.UnshelveOthers • 94
ContextMenu.UnshelveSelected • 95
ContextMenu.UnshelveSelectedGroups • 95
ContextMenu.UnshelveSelectedPriorities • 96
ContextMenu.UnshelveSelectedSeverities • 96
ContextMenu.UnshelveSelectedTags • 96
ContextMenu.UnshelveVisible • 97
E
events
historical • 11
H
historical alarms • 11
historical events • 11
R
RequiresShelveSignature • 104
run-time
sorting alarms • 58
S
Shelve.SelectedS everity • 133
Shelve.SelectedTag • 134
Shelve.Severity • 134
Shelve.Tag • 135
Shelve.Visible • 136
ShelveColor.Backgroun • 106
ShelveColor.Foreground • 106
shelving
description • 15
during run time • 15, 60
setting colors • 28
U
Unshelve.All • 138
Unshelve.Group • 139
Unshelve.Priority • 139
Unshelve.Selected • 140
Unshelve.SelectedGroup • 141
Unshelve.SelectedPriority • 141
Unshelve.SelectedSeverity • 141
Unshelve.SelectedTag • 142
Unshelve.Severity • 142
Unshelve.Tag • 143
Unshelve.Visible. • 144
unshelving
during run time • 16
Index
