
Resume Builder

Create New Resume
• Click on + symbol to
Create New Resume
2

Resume Name and Availability
• Enter a title for your resume
• Availability section: Select “Allow
employers to view my resume
online.” System default is set to
“Hide my resume from employers”
3

Resume Creation Method
• Choose your Resume Creation
Method
• Comprehensive: Build your
resume using a step by step
process (create your resume from
scratch)
• Upload: Attach an existing Word
or .PDF resume
4

Completing sections in Comprehensive Resume
• Click on each section to open modal pop-up display to
enter or edit data for that section
• Empty sections include a Pencil symbol, to indicate the
need for entering data
• Click on Objective section and type in Employment
Objective or utilize “Insert General Sample Text”
• Click on checkbox to “Update background information
with this objective”
Objective section
5

Ability Summary
• Click on next section, Ability Summary
• Enter summary of your abilities and include any key
skills
• Click on checkbox to “Update background information
with these abilities” and click on “SAVE”
6

Employment History
• Click on Add Employment History to enter employment
• Fill out Employment History, red (*) are required
fields
• Click on SAVE when completed
• Click on next section, Employment History
7

Employment History
• After clicking on SAVE in employment history, a
pop-up box will appear stating “You may add the
skills associated with this new history to your
existing list”
• Click OK button to add skills, otherwise click Cancel
• If OK is selected, another pop-up box will appear to
give you the option to add “technical skills and
tools associated with this employment history” OR
click CANCEL to not include technical skills.
• If OK is selected, another pop-up box will appear to
give you the option to add “technical skills and tools
associated with this employment history”
• Click CANCEL to not include these technical skills
• Skills/Tools and Technology will appear in Additional
Employer Searchable Items area
• Skills/Tools and Technology can be edited or updated by
clicking on “Job Skills” and/or “Tools and Technology”
8

Education History
• Click on “Add a new Education History”
• Complete education history fields, red (*) are required
fields. Click on SAVE when completed
• Click on next section, Education History
9

Occupational Licenses, Certificates and
Training
• Click on Add a new Occupation License(s)- Certificate(s)
• Enter Occupational License fields, red (*) information are
required fields. Click on SAVE when completed
• Click on next section, Occupational License(s),
Certificates and Training
10

Honors and Activities
• Click on next section, Honors and Activities
• Enter honors and activities. Click SAVE when complete
11

Additional Information
• Click on next section, Additional Information if you would
like to add any additional information to your resume
• Enter any Additional Information. Click SAVE when complete
12

Detailed References
• Click on next section, Detailed References if you would like to
add your specific references on your resume
• Click on “Add New Reference” to list your specific references
on your resume OR
• Click on the box: “Display References Available on Request on
this resume”
13

Additional Employer Searchable Items –
Desired Occupation
• Next complete Additional Employer Searchable Items fields
• Click on Desired Occupation
• Click on drop down box that will display previous occupations
you have selected while in the HireNet Hawaii system OR
• Search for an occupation by clicking on the “Search for an
Occupation link”
• Click on SAVE when completed
14

Desired Salary
15
• Click on next section, Desired Salary
• Click on drop down box to select “Desired Salary:
• Check box will be defaulted to “Update background
information with desired salary”
• Click on SAVE when completed

Desired Job Location
16
• Click on “Add a Location” link
• Make a selection of Desired Location by choosing either: State of
Hawaii, County or Zip code
• Check box will be defaulted to “Update background information
with the selected information” Click SAVE when completed
• Click on next section, Desired Job Type

Desired Job Type
17
• Click on “Add New Profile”
• Complete Desired Employment Category, Desired Work Hours,
Desired Travel and Relocation/Telecommuting
• Red (*) are required fields. Click on SAVE when completed
• Click on next section, Desired Job Type

Drivers License
18
• Click on next section, Drivers License
• Red (*) fields are required
• Additional fields will appear if YES is selected for valid driver’s
license. Click SAVE when completed

Security Clearance
19
• Click on next section, Security Clearance. If NO Security
Clearance bypass section.
• Click on drop down box for type of Security Clearance
• Select Security Clearance level and click on SAVE

Job Skills
20
• Skills will be prefilled if you selected YES to associate skills related to
your occupation when completing Employment History.
• Click on MODIFY SKILLS to make changes
• Click on ADD SKILLS if skills are not pre-populated from occupation.
Choose related skills and click on SAVE when completed
• Click on next section, Job Skills

Tools and Technology
21
• Tools and Technology will be prefilled if you selected YES to associate
Tools and Technology related to your occupation when completing
Employment History. Click on MODIFY SKILLS to make changes.
• Click on Add tools and technology by keyword or Add tools and
technology by occupation if skills are not pre-populated from
Employment History. Click on SAVE when completed
• Click on next section, Tools and Technology
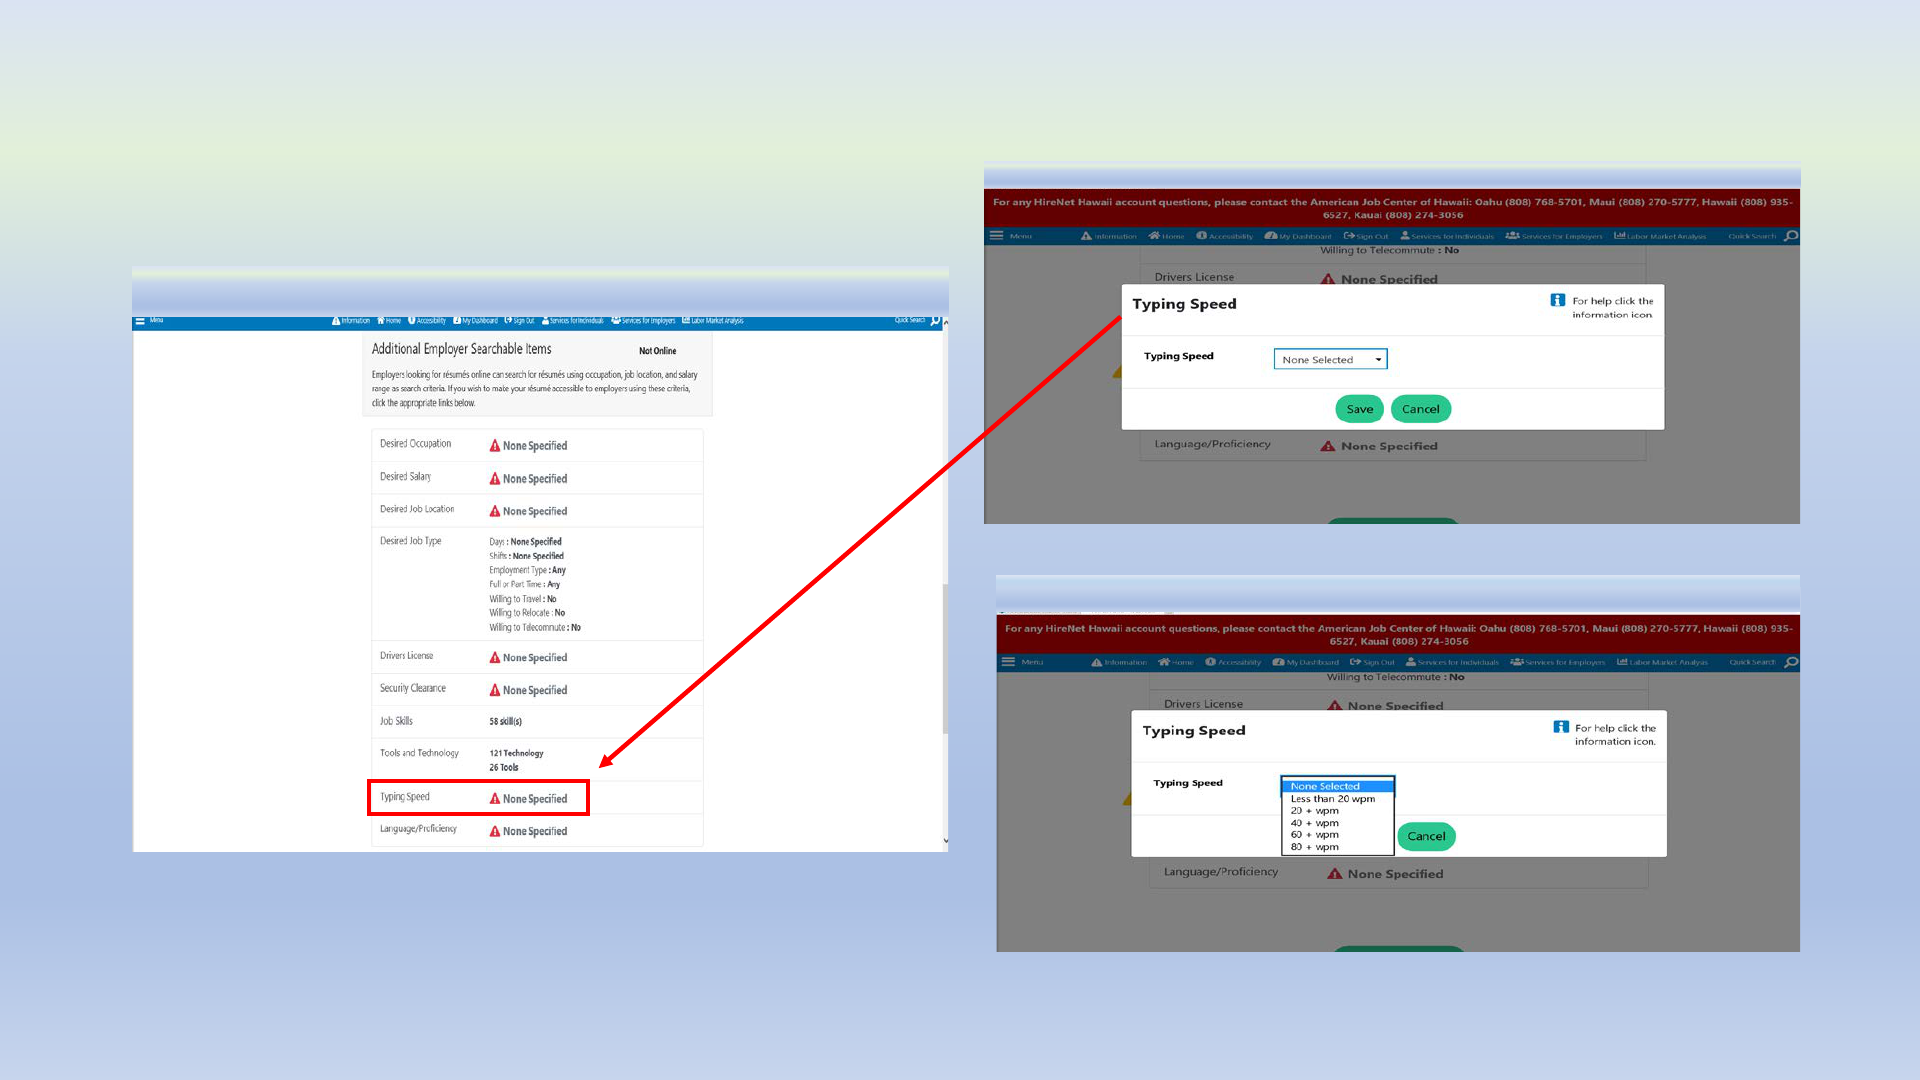
Typing Speed
22
• Click on next section, Typing Speed. If not applicable, bypass
section.
• Click on drop down list
• Select Typing Speed from drop down list and click on SAVE

Languages and Proficiency
23
• Click on Add a new Language
• Make a selection from drop down for Language and Proficiency
• Click on SAVE when completed
• Click on next section, Language/Proficiency. If not applicable,
bypass section.

Set Resume to Online
24
• Once fields in resume have been completed, click on “Not
Online” status to “Online”
• If you are filing or filed an Unemployment Insurance Claim your
resume must be ONLINE for employers to view
• Pop box will appear, click OK to set your
resume online
• Pop box will appear, click OK to make your resume
available to registered employers online
• You are also agreeing to share the information
displayed on your resume to employers

Online Resume
25
Resume Features:
1) Copy Existing Resume
2) Print Resume
3) Email Resume
4) Download Resume:
* Adobe Acrobat File (PDF)
* Microsoft Word File (.doc)
* HyperText Markup Language
(HTML)
* Rich Text Format (RTF)
5) Template Options
• Resume is now ONLINE and COMPLETE
1 2 3 4 5

Upload Resume Option
26
• Select UPLOAD creation
method to attach an existing
Word or.PDF resume
• Enter a title for your resume

Upload Resume - Resume Availability
27
• Select: YES, my resume will be available online for employers to
view
• If you have filed an Unemployment Insurance claim, your resume
is required to be ONLINE and available for employers to view
• If, for any reason you elect to take your resume offline while
collecting UI benefits, please notify your local UI claims office
• Pop up box will appear. Click OK to confirm “you are agreeing to
share the information displayed on your resume”
• Select OK to proceed

Content Extraction – for uploaded resume
28
Content Extraction:
• Make selection of selecting PDF or
Word resume to upload OR
• Copy and paste resume content
Content Display:
• Make selection of displaying existing
resume content OR display extracted
resume content formatted in the
HireNet Hawaii system
Extraction Method:
• Make selection to review extracted
employment and education history
before adding to the HireNet Hawaii
system OR choose to review
employment and education history
later
• Click on NEXT when completed

Select your resume file
29
• To upload resume, click on Browse to select your resume file
• Once resume is uploaded, click on NEXT and continue through
additional fields (e.g. Employer Search Items, Education, etc)
• For Copy & Paste resume, paste resume in body of page and
select NEXT when completed

Resume Upload Builder
30
• Once your resume has been extracted from
upload or copy and paste it will pre-fill
information in each resume section
• Click on “Next” to move forward and the
system will walk you through the remainder of
the Resume Builder to format your resume
and add it to the HireNet Hawaii system
• Once all fields have been completed, resume
will display ONLINE and complete
Leave as checked to
update background
information

Complete and Online Uploaded Resume
31
• Resume will display online and complete
• Below the displayed resume, you have the options to:
* View your uploaded resume
* Replace your uploaded resume
• Click on the link for the options
