
Progressive
Web Apps
with Angular
Create Responsive, Fast and Reliable
PWAs Using Angular
—
Majid Hajian
www.EBooksWorld.ir

Progressive Web Apps
with Angular
Create Responsive, Fast and Reliable
PWAs Using Angular
MajidHajian
www.EBooksWorld.ir
Progressive Web Apps with Angular
ISBN-13 (pbk): 978-1-4842-4447-0 ISBN-13 (electronic): 978-1-4842-4448-7
https://doi.org/10.1007/978-1-4842-4448-7
Copyright © 2019 by Majid Hajian
is work is subject to copyright. All rights are reserved by the Publisher, whether the whole or part of the
material is concerned, specically the rights of translation, reprinting, reuse of illustrations, recitation,
broadcasting, reproduction on microlms or in any other physical way, and transmission or information
storage and retrieval, electronic adaptation, computer software, or by similar or dissimilar methodology now
known or hereafter developed.
Trademarked names, logos, and images may appear in this book. Rather than use a trademark symbol with
every occurrence of a trademarked name, logo, or image we use the names, logos, and images only in an
editorial fashion and to the benet of the trademark owner, with no intention of infringement of the
trademark.
e use in this publication of trade names, trademarks, service marks, and similar terms, even if they are not
identied as such, is not to be taken as an expression of opinion as to whether or not they are subject to
proprietary rights.
While the advice and information in this book are believed to be true and accurate at the date of publication,
neither the authors nor the editors nor the publisher can accept any legal responsibility for any errors or
omissions that may be made. e publisher makes no warranty, express or implied, with respect to the
material contained herein.
Managing Director, Apress LLC: Welmoed Spahr
Acquisitions Editor: Louise Corrigan
Development Editor: James Markham
Coordinating Editor: Nancy Chen
Cover designed by eStudioCalamar
Cover image designed by Freepik (www.freepik.com)
Distributed to the book trade worldwide by Springer Science+Business Media NewYork, 233 Spring Street,
6th Floor, NewYork, NY 10013. Phone 1-800-SPRINGER, fax (201) 348-4505, e-mail orders-ny@springer-
sbm.com, or visit www.springeronline.com. Apress Media, LLC is a California LLC and the sole member
(owner) is Springer Science + Business Media Finance Inc (SSBM Finance Inc). SSBM Finance Inc is a
Delaware corporation.
For information on translations, please e-mail righ[email protected], or visit http://www.apress.com/
rights-permissions.
Apress titles may be purchased in bulk for academic, corporate, or promotional use. eBook versions and
licenses are also available for most titles. For more information, reference our Print and eBook Bulk Sales
web page at http://www.apress.com/bulk-sales.
Any source code or other supplementary material referenced by the author in this book is available to
readers on GitHub via the book’s product page, located at www.apress.com/9781484244470. For more
detailed information, please visit http://www.apress.com/source-code.
Printed on acid-free paper
MajidHajian
Oslo, Norway
www.EBooksWorld.ir
To my lovely wife and daughter, who give me a reason to write,
accept me for me, support my drive and ambitions.
www.EBooksWorld.ir
v
Table of Contents
Chapter 1: Setup Requirements �������������������������������������������������������������������������������� 1
Progressive Web App Fundamentals ��������������������������������������������������������������������������������������������� 1
Why Angular? �������������������������������������������������������������������������������������������������������������������������� 2
Installing Node and NPM ��������������������������������������������������������������������������������������������������������������� 3
Installing Chrome �������������������������������������������������������������������������������������������������������������������������� 4
Scaffolding Our Project ����������������������������������������������������������������������������������������������������������������� 4
Generating New Angular App with CLI ������������������������������������������������������������������������������������� 4
Adding Angular Material Design ���������������������������������������������������������������������������������������������� 5
Setting Up a Mobile Device ����������������������������������������������������������������������������������������������������������� 8
Setting Up a Mobile Emulator ������������������������������������������������������������������������������������������������������� 8
Connecting Android Simulator to Chrome Dev Tools ��������������������������������������������������������������������� 8
Summary��������������������������������������������������������������������������������������������������������������������������������������� 8
Chapter 2: Deploying to Firebase as the Back End ��������������������������������������������������� 9
Setting Up Your Account ���������������������������������������������������������������������������������������������������������������� 9
Creating a Project ����������������������������������������������������������������������������������������������������������������������� 10
Deploying to Firebase ����������������������������������������������������������������������������������������������������������������� 12
Generating a New Angular App ���������������������������������������������������������������������������������������������� 12
Initializing the App ����������������������������������������������������������������������������������������������������������������� 16
About the Author ����������������������������������������������������������������������������������������������������� xi
About the Technical Reviewer ������������������������������������������������������������������������������� xiii
Acknowledgments ���������������������������������������������������������������������������������������������������xv
Introduction �����������������������������������������������������������������������������������������������������������xvii
www.EBooksWorld.ir
vi
Deploying Our App ����������������������������������������������������������������������������������������������������������������� 21
Setting Up AngularFire ����������������������������������������������������������������������������������������������������������� 22
Summary������������������������������������������������������������������������������������������������������������������������������������� 27
Chapter 3: Completing an Angular App ������������������������������������������������������������������ 29
Implementing Our UI ������������������������������������������������������������������������������������������������������������������� 29
Installing and Setting Up Angular Material, CDK, and Animations ����������������������������������������� 30
Creating a Core Module / Shared Module ����������������������������������������������������������������������������������� 33
Header, Footer, and Body Components ���������������������������������������������������������������������������������� 35
Login / Prole Page ��������������������������������������������������������������������������������������������������������������� 41
Adding Login, Signup, and Prole UI and Functionalities ������������������������������������������������������ 43
Firebase CRUD Operations for Note Module �������������������������������������������������������������������������� 51
Summary������������������������������������������������������������������������������������������������������������������������������������� 70
Chapter 4: Angular Service Worker ������������������������������������������������������������������������ 71
Service Workers: The Brain of PWAs ������������������������������������������������������������������������������������������� 71
Understanding Service Worker ���������������������������������������������������������������������������������������������� 72
The Service Worker Life Cycle ����������������������������������������������������������������������������������������������� 73
Service Worker Functional Events ����������������������������������������������������������������������������������������� 76
Chrome DevTools ������������������������������������������������������������������������������������������������������������������� 76
Service Worker Example Code ����������������������������������������������������������������������������������������������� 79
Cache API ������������������������������������������������������������������������������������������������������������������������������������ 83
Precache Static Assets ���������������������������������������������������������������������������������������������������������� 85
Angular Service Worker Module �������������������������������������������������������������������������������������������� 88
Support for Service Worker in Angular ���������������������������������������������������������������������������������� 90
ngsw-cong�json Anatomy ���������������������������������������������������������������������������������������������������� 97
Build Project with Angular Service Worker �������������������������������������������������������������������������� 101
Summary����������������������������������������������������������������������������������������������������������������������������������� 104
Chapter 5: Advanced Angular Service Worker and Runtime Caching ������������������ 107
Cache Strategies ����������������������������������������������������������������������������������������������������������������������� 107
Cache Only ��������������������������������������������������������������������������������������������������������������������������� 107
Network Only ����������������������������������������������������������������������������������������������������������������������� 108
Table of ConTenTs
www.EBooksWorld.ir
vii
Cache Falling Back to Network or Cache-First �������������������������������������������������������������������� 109
Network Falling Back to Cache or Network-First ���������������������������������������������������������������� 110
Cache and Network ������������������������������������������������������������������������������������������������������������� 112
Generic Fallback ������������������������������������������������������������������������������������������������������������������ 114
Runtime Cache in Angular Service Worker ������������������������������������������������������������������������������� 116
External Resources �������������������������������������������������������������������������������������������������������������� 116
Revalidate Strategy for Resources with No Hash ���������������������������������������������������������������� 121
Data Groups Settings ����������������������������������������������������������������������������������������������������������� 122
Navigation Cache ����������������������������������������������������������������������������������������������������������������� 131
AppData Cong �������������������������������������������������������������������������������������������������������������������� 134
Dealing with Updates ���������������������������������������������������������������������������������������������������������� 134
Deploy to Firebase �������������������������������������������������������������������������������������������������������������������� 138
Summary����������������������������������������������������������������������������������������������������������������������������������� 139
Chapter 6: An App Manifest and Installable Angular App ������������������������������������ 141
The Web App Manifest �������������������������������������������������������������������������������������������������������������� 141
Debugging Web App Manifest ���������������������������������������������������������������������������������������������� 148
Adding to Home Screen ������������������������������������������������������������������������������������������������������������ 150
Handling Installation Event (Deferring the Prompt) ������������������������������������������������������������� 152
The Mini-Info Bar ����������������������������������������������������������������������������������������������������������������� 153
Implementing Functionality into Angular App ���������������������������������������������������������������������� 154
Adding to Home Screen on Mobile and Desktop ����������������������������������������������������������������� 157
Microsoft Windows �������������������������������������������������������������������������������������������������������������� 159
Android and Chrome ������������������������������������������������������������������������������������������������������������ 161
Manually Adding to Home Screen ��������������������������������������������������������������������������������������� 164
Further Enhancement ���������������������������������������������������������������������������������������������������������� 165
Summary����������������������������������������������������������������������������������������������������������������������������������� 168
Chapter 7: App Shell and Angular Performance ��������������������������������������������������� 169
The App Shell Model ����������������������������������������������������������������������������������������������������������������� 169
Angular App Shell ���������������������������������������������������������������������������������������������������������������������� 171
Angular App Shell and Angular Universal ���������������������������������������������������������������������������� 174
Generating the App Shell in Production ������������������������������������������������������������������������������� 179
Table of ConTenTs
www.EBooksWorld.ir
viii
Measuring App Shell Performance via webpagetest�org����������������������������������������������������� 182
Measuring App Shell Performance via Audit tab in Chrome DevTools ��������������������������������� 184
Beyond the App Shell, Further Optimizations ���������������������������������������������������������������������������� 187
Analyze Bundle Sizes and Lazy Load Module ���������������������������������������������������������������������� 187
Waterfall View from Web Page Test ������������������������������������������������������������������������������������� 189
Reduce Render Blocking CSS ���������������������������������������������������������������������������������������������� 190
Optimize Fonts ��������������������������������������������������������������������������������������������������������������������� 192
Browser Resource Hinting ��������������������������������������������������������������������������������������������������� 195
Preload Angular Lazy Loaded Modules �������������������������������������������������������������������������������� 197
HTTP/2 Server Push ������������������������������������������������������������������������������������������������������������� 198
Summary����������������������������������������������������������������������������������������������������������������������������������� 199
Chapter 8: Push Notications ������������������������������������������������������������������������������� 201
Introduction to Push Notications ��������������������������������������������������������������������������������������������� 201
Web Notications ���������������������������������������������������������������������������������������������������������������� 202
Push Notications���������������������������������������������������������������������������������������������������������������� 203
Browser Supports ���������������������������������������������������������������������������������������������������������������� 206
Push Notication in Angular ������������������������������������������������������������������������������������������������������ 206
Showing Again the Allow/Block Notications Popup ����������������������������������������������������������� 214
Sending Push Notications ������������������������������������������������������������������������������������������������� 215
Firebase Cloud Function ������������������������������������������������������������������������������������������������������ 216
lPush Message Body ����������������������������������������������������������������������������������������������������������� 221
Listen to Messages in Angular �������������������������������������������������������������������������������������������� 225
Notication Actions and Handling Notication Click Events ������������������������������������������������ 225
Deploy to Firebase ��������������������������������������������������������������������������������������������������������������� 227
Summary����������������������������������������������������������������������������������������������������������������������������������� 227
Chapter 9: Resilient Angular App and Ofine Browsing ��������������������������������������� 229
Ofine Storage �������������������������������������������������������������������������������������������������������������������������� 230
Ofine First Approach ���������������������������������������������������������������������������������������������������������� 232
Summary����������������������������������������������������������������������������������������������������������������������������������� 253
Table of ConTenTs
www.EBooksWorld.ir
ix
Chapter 10: Debugging and Measurement Tools �������������������������������������������������� 255
Debugging ��������������������������������������������������������������������������������������������������������������������������������� 255
NGSW Debug ����������������������������������������������������������������������������������������������������������������������� 255
Web App Manifest ���������������������������������������������������������������������������������������������������������������� 256
Service Workers ������������������������������������������������������������������������������������������������������������������ 258
Storage �������������������������������������������������������������������������������������������������������������������������������� 264
Cache ����������������������������������������������������������������������������������������������������������������������������������� 267
Simulate Ofine Behavior ���������������������������������������������������������������������������������������������������� 269
Simulate Different Network Conditions ������������������������������������������������������������������������������� 271
Simulate Mobile Devices ����������������������������������������������������������������������������������������������������� 272
Measurement ���������������������������������������������������������������������������������������������������������������������������� 273
Audit ������������������������������������������������������������������������������������������������������������������������������������ 273
Analytics ������������������������������������������������������������������������������������������������������������������������������ 279
Online Tools ������������������������������������������������������������������������������������������������������������������������� 282
Real Device �������������������������������������������������������������������������������������������������������������������������� 282
Summary����������������������������������������������������������������������������������������������������������������������������������� 282
Chapter 11: Safety Service Worker ����������������������������������������������������������������������� 283
Fail-safe ������������������������������������������������������������������������������������������������������������������������������������ 283
Safety Worker ���������������������������������������������������������������������������������������������������������������������������� 285
Extended Safety Worker ������������������������������������������������������������������������������������������������������������ 286
Summary����������������������������������������������������������������������������������������������������������������������������������� 288
Chapter 12: Modern Web APIs ������������������������������������������������������������������������������ 289
Credential Management ������������������������������������������������������������������������������������������������������������ 290
Browsers Support ���������������������������������������������������������������������������������������������������������������� 298
Payment Request ���������������������������������������������������������������������������������������������������������������������� 299
Browsers Support ���������������������������������������������������������������������������������������������������������������� 308
Video and Audio Capturing �������������������������������������������������������������������������������������������������������� 308
Browsers Support ���������������������������������������������������������������������������������������������������������������� 315
Table of ConTenTs
www.EBooksWorld.ir
x
Geolocation ������������������������������������������������������������������������������������������������������������������������������� 316
Browsers Support ���������������������������������������������������������������������������������������������������������������� 320
Web Bluetooth ��������������������������������������������������������������������������������������������������������������������� 320
Browsers Support ���������������������������������������������������������������������������������������������������������������� 324
Web USB ������������������������������������������������������������������������������������������������������������������������������ 324
Browsers Support ���������������������������������������������������������������������������������������������������������������� 330
Summary����������������������������������������������������������������������������������������������������������������������������������� 330
Chapter 13: PWA with Angular and Workbox ������������������������������������������������������� 331
Angular and Workbox Setup ������������������������������������������������������������������������������������������������������ 332
Workbox Wizard Mode ��������������������������������������������������������������������������������������������������������� 334
Workbox injectManifest ������������������������������������������������������������������������������������������������������� 338
Summary����������������������������������������������������������������������������������������������������������������������������������� 345
Chapter 14: Advanced Workbox ��������������������������������������������������������������������������� 347
Dealing with Updates ���������������������������������������������������������������������������������������������������������������� 347
Background Sync ���������������������������������������������������������������������������������������������������������������������� 351
Push Notication ����������������������������������������������������������������������������������������������������������������������� 359
Ofine Analytics ������������������������������������������������������������������������������������������������������������������������ 364
Summary����������������������������������������������������������������������������������������������������������������������������������� 365
Chapter 15: Next Steps ����������������������������������������������������������������������������������������� 367
Learning Resources ������������������������������������������������������������������������������������������������������������������ 367
Case Studies ����������������������������������������������������������������������������������������������������������������������������� 368
Example Applications ���������������������������������������������������������������������������������������������������������������� 369
Tools and Technologies ������������������������������������������������������������������������������������������������������������� 369
Last Words �������������������������������������������������������������������������������������������������������������������������������� 373
Index ��������������������������������������������������������������������������������������������������������������������� 375
Table of ConTenTs
www.EBooksWorld.ir

xi
About the Author
MajidHajianis a software developer that has developed and
architected complex web applications since 2007– after he
graduated as a software engineer.
Majid is passionate about web platforms, especially
hardware connectivity and performance; and, in particular,
Progressive Web Apps.
He loves sharing his knowledge with the community
by writing on his blog majidhajian.com and tweeting
@mhadaily, speaking at conferences, visiting developers
to help them, contributing to open source, and organizing
meetups and events.
He is a co-organizer of a few meetups in Norway dedicated to front end and mobile
in Oslo, including Mobile Meetup, Vue.js Oslo, and Angular Oslo. Majid is also orginizer
and an active contributor to Mobile Era and ngVikings, which are the main Nordic
conferences for mobile and Angular.
www.EBooksWorld.ir

xiii
About the Technical Reviewer
MaximSalnikov(@webmaxru) is an Oslo-based Web
Full- Stack Engineer, a Google Developer Expert in Web
Technologies and IoT, and a Microsoft MVP in Development
Technologies. He’s been architecting complex web
applications since the end of the last century and has
extensive experience with all aspects of web platforms
focusing on apps managing real-time data from IoT devices
and Progressive Web Apps.
Maxim is a founder and active contributor to two
conferences: Mobile Era and ngVikings– Nordic’s main
conferences for mobile and Angular developers, respectively.
He also leads Norway’s largest meetups dedicated to web
front end and mobile: Angular Oslo, Mobile Meetup, and
Oslo PWA.
Maxim is passionate about sharing his web platform experience and knowledge with
the community. He travels extensively for developer events and speaking/training at
conferences and meetups around the world.
www.EBooksWorld.ir
xv
Acknowledgments
Writing this book was a truly enjoyable and great experience and believe or not, it was
way more difficult than it looks. There is a lot of work to be done and lots of people that
need to help.
First, I want to start by thanking my wonderful wife, Shirin, for all of her support,
encouragement, and patience while I was writing this book. I always run to you with my
crazy ideas, but you are always patient enough to listen and motivate me!
I’d like to thank my lovely daughter, Hournaz, who was supportive and so patient
because I didn’t have time for her when I was writing this book.
Many of the technical aspects of this book would not have been possible without the
help of Maxim Salnikov. In other words, I believe and always say, this is a book by me
and my true friend Maxim. Thanks for all of your efforts and encouragement.
A special thanks to the Apress team: Jade Scard; Nancy Chen for being so calm and
insightful; and James Markham for the editing process, which made it a breeze– and I
guess it was fun, too!
Thanks to all Angular and PWA community leaders and members, and thank you to
Addy Osmani, Jake Archibald, Alex Rickabaugh, and many other PWA devs that I have
never met– you don’t even know how much I learned from you.
Finally, I am extremely grateful to you, the Reader. Despite the fact that there are tons
of videos, tutorials, and blogs available on the internet, you have chosen this book, which
might not have been an easy purchase. Thanks for your faith. I hope you enjoy reading it
as much as I enjoyed writing it.
www.EBooksWorld.ir
xvii
Introduction
Progressive Web Apps by Angular are amazing ways to build web applications that utilize
PWAs’ great features: they are fast, engaging, and resilient. In this book, I will start by
exploring the basics of PWAs and soon will dive into Angular Service Worker and its
capabilities in different chapters– not only to improve your own PWAs– but also to
explore tips and tricks and best practices to build an outstanding web application. My
approach in this book is to create an Angular application and slowly improve it and turn
it to a PWA; thus, you will see gradually how we will progressively build and deploy
a real-world application.
Web development, especially in the front end, was different 12 years ago. The web is
evolving very fast. PWAs, Hardware connectivity APIs on the web, and new modern APIs
help to create not only much faster and more reliable applications but also ones that are
much more native like and pleasant for our customers. So, in this book, I am going to
review some of the newest modern APIs that are exciting and will open a new era on the
web, in particular, for mobile web development in the feature.
Last but not least, different applications have different needs. Therefore, in this book,
I am going to cover building Progressive Web Apps using Angular by implementing
Workbox. You will see in this book how different features are being used in Angular
Service Worker and Workbox, respectively, and you can make a decision to use either
one of them based on your particular application requirements.
www.EBooksWorld.ir
1
© Majid Hajian 2019
M. Hajian, Progressive Web Apps with Angular, https://doi.org/10.1007/978-1-4842-4448-7_1
CHAPTER 1
Setup Requirements
In this book, I strive to take you on a journey where you can create the most
comprehensive Progressive Web Apps (PWAs) with Angular. But before I start,
we’ll review some PWA fundamentals and set up the environment that will be used
throughout the book.
Progressive Web App Fundamentals
PWAs are applied to those web applications that are fast, engaging, reliable, and will
try to progressively enhance user experience regardless of their browsers, platforms, or
devices. In other words, a PWA is not only one framework, tool, or fancy buzzword, but
it is a mindset for constant enhancement by leveraging browsers’ modern APIs, which
leads to satisfaction for every single user.
No matter which framework you choose to work with, no matter which language you
choose to write your code with, PWAs must have special characteristics:
1. Instant loading: Application should load fast and must be
interactive very quickly.
2. Connectivity independent: With either no network or a slow and
unstable connection, the application must continue working.
3. Responsive, mobile-rst, oine-rst design: Let’s focus and
optimize for mobile rst, which has lower hardware capacity, and
the application should be completely usable on mobile.
4. Re-engaging: A push notication is one way to send a reminder to
a user.
www.EBooksWorld.ir

2
5. Native-like features: Having UI architecture like App Shell and
using hardware APIs like Web Bluetooth can make our web app
more like a native app.
6. Secure: Security is the highest priority, and every PWA must serve
via HTTPs.
7. Installable: Being installable means it’ll be added to the device’s
home screen and launched like a native app.
8. Progressive: Regardless of browsers or devices, our app should
evolve and embrace new features and give every single one of
them the best user experience.
Why Angular?
A couple of years ago, the front-end world was dominated by Angular 1.x even
before React came to the market. By establishing and finalizing ES6 and TypeScript
appearances as well as new browser features and standards that have been adapted
widely, the Angular team, which has been backed by Google, decided to rewrite
AngularJS, formerly known as Angular 1.x, leading toward Angular 2, called Angular
nowadays. Angular is backed by Observable APIs with Rxjs and TypeScript and has
unique features such as robust change detection and routing, animation, lazy loading,
a headache-free bundle process, CLI, and tons of other APIs. These make it an
exceptional, capable, and full-fledged front-end framework that is trusted by many
companies worldwide to build and distribute complex web applications.
Additionally, the Angular Service Worker module has been introduced in version
5, improved in version 6,
1
and is now getting updates regularly in order to add more
features and become stable. Although Angular Service Worker along with Angular CLI
is not the only option to create a PWA, it is very well maintained, which allows us to
effortlessly create or convert an Angular app to a PWA.
All in all, it’s not that far off to say you have an all-in-one framework to create a web
and mobile application, and this makes Angular unique.
1
At the time I am writing this book, Angular is in version 6, but when you read this book, it may
have a higher version.
Chapter 1 Setup requirementS
www.EBooksWorld.ir

3
Installing Node andNPM
You need to make sure that you have Node and NPM installed on your machine. Simply
run the following commands to check your Node and NPM version or to see if you have
already installed them:
$ node -v
$ npm -v
Node 8 or higher and NPM 5 or higher are needed. You can visit the Node website at
https://nodejs.org and download the latest version based on your operating system
(Figure1-1).
Figure 1-1. Node official website where you can download the latest version of
NodeJS
Chapter 1 Setup requirementS
www.EBooksWorld.ir
4
YARN is an alternative to NPM and has been around for a while. If you prefer to use
it, you should visit https://yarnpkg.com/en/docs/install and then install the latest
version based on your operating system. To check if you have YARN installed, simply run
the following command:
$ yarn -v
Installing Chrome
Although we create a PWA that will work regardless of browsers of your choice, I will
stick to Chrome and its dev tools to develop and debug Service Worker as well as other
PWA features. At the time of writing the book, Chrome has a PWA auditing tool called
Lighthouse that is built in under the Audit tab. If you would like to download Chrome,
you can visit https://www.google.com/chrome/.
I will evaluable our application with Lighthouse and boost our PWA score later
in this book. We continuously use the applications tab to debug our Service Worker,
IndexedDB, Web App manifest, etc.
Scaffolding Our Project
It is time to scaffold our project using Angular CLI. So, before we proceed, first install
Angular CLI globally by running the following:
$ npm install -g @angular/cli
Or
$ yarn global add @angular/cli
Now that CLI is installed globally, we can generate a new Angular application.
Generating New Angular App withCLI
As soon as Angular CLI version 6 is installed (you may have a higher version when
you read this book), you have the ng command available globally in your terminal.
Let’s scaffold our project simply by running the following:
$ ng new lovely-offline –-routing –-style=scss
Chapter 1 Setup requirementS
www.EBooksWorld.ir
5
Lovely-offline is our application name, routing will generate the route module, and
style=scss indicates the scss prefix for our styling files.
Adding Angular Material Design
The Angular Material module is, perhaps, one of the best UI libraries for a web app.
It will let us develop our application rapidly and flawlessly. You are not limited to this
library only, but I recommend it for this project. To install:
$ npm install --save @angular/material @angular/cdk @angular/animations
Now open the project in your editor or Idea, and then under /src/app, find the
app.module.ts, and import BrowserAnimationsModule into your application to enable
animations support.
import { BrowserModule } from '@angular/platform-browser';
import { NgModule } from '@angular/core';
import { BrowserAnimationsModule } from '@angular/platform-browser/
animations';
import { AppRoutingModule } from './app-routing.module';
import { AppComponent } from './app.component';
@NgModule({
declarations: [
AppComponent
],
imports: [
BrowserModule,
BrowserAnimationsModule,
AppRoutingModule
],
providers: [],
bootstrap: [AppComponent]
})
export class AppModule { }
Chapter 1 Setup requirementS
www.EBooksWorld.ir
6
To use each component, we should import their relevant module into ngModule,
for instance:
import { BrowserModule } from '@angular/platform-browser';
import { NgModule } from '@angular/core';
import { BrowserAnimationsModule } from '@angular/platform-browser/
animations';
import { MatToolbarModule } from '@angular/material/toolbar';
import { MatIconModule } from '@angular/material/icon';
import { AppRoutingModule } from './app-routing.module';
import { AppComponent } from './app.component';
@NgModule({
declarations: [
AppComponent
],
imports: [
BrowserModule,
BrowserAnimationsModule,
MatToolbarModule,
MatIconModule,
AppRoutingModule
],
providers: [],
bootstrap: [AppComponent]
})
export class AppModule { }
A theme is required; therefore, I will add one of the available themes to style.scs in
our project:
@import "~@angular/material/prebuilt-themes/indigo-pink.css";
It is recommended that you install and include hammer.js as Gestures in Material
design are relied on in this library.
$ npm install hammerjs
Chapter 1 Setup requirementS
www.EBooksWorld.ir
7
After installing, import it in src/main.ts
import { enableProdMode } from '@angular/core';
import { platformBrowserDynamic } from '@angular/platform-browser-dynamic';
import { AppModule } from './app/app.module';
import { environment } from './environments/environment';
import 'hammerjs';
if (environment.production) {
enableProdMode();
}
platformBrowserDynamic().bootstrapModule(AppModule)
.catch(err => console.log(err));
Icons requires the Google Material Icons font; thus, we will add the font CDN link to
our index.html file:
<!doctype html>
<html lang="en">
<head>
<meta charset="utf-8">
<title>LovelyOffline</title>
<base href="/">
<meta name="viewport" content="width=device-width, initial-scale=1">
<link href="https://fonts.googleapis.com/icon?family=Material+Icons"
rel="stylesheet">
<link rel="icon" type="image/x-icon" href="favicon.ico">
</head>
<body>
<app-root></app-root>
</body>
</html>
Now our project is ready to use. Simply run ng serve or npm start. You can access the
project in your browser by entering localhost:4200.
Chapter 1 Setup requirementS
www.EBooksWorld.ir
8
Setting UpaMobile Device
There is nothing better than testing our application in a real device to see how it
looks. Android, along with Chrome, is supporting most of the PWA features including
Service Worker, Push notification, and background sync as well as even more
modern browser APIs.
Please read the article below on the Google developer website, https://
developers.google.com/web/tools/chrome-devtools/remote-debugging, if you have
a real device and want to conveniently connect it to Chrome dev tools. Keep in mind
that the real device is not necessary; you can always test your app via Android and iOS
emulators.
Setting UpaMobile Emulator
To run an Android Emulator, I recommend you install Android Studio and follow the
instructions placed on the Android developer website: https://developer.android.
com/studio/run/emulator.
Mac Users are also able to install xCode and run an iPhone simulator on their Mac.
After installing xCode from https://developer.apple.com/xcode/, you should be able
to find Open Developer Tool under the xCode menu, and then you can open Simulator to
open your selected iPhone / iPad.
Connecting Android Simulator toChrome Dev Tools
You now should be able to connect your Android simulator to Chrome dev tools. Please
refer to the “Set Up Mobile Device” section.
Summary
In this chapter, we have looked at PWA fundamentals, and then we scaffolded our projects
using CLI.Angular Material has been added to our project in order to style our app.
Moreover, we have reviewed other tools that we will need throughout this course
such as Node, NPM, YARN, and Chrome; and we learned how to set up our real device as
well as our simulators in order to properly test our app.
Chapter 1 Setup requirementS
www.EBooksWorld.ir
9
© Majid Hajian 2019
M. Hajian, Progressive Web Apps with Angular, https://doi.org/10.1007/978-1-4842-4448-7_2
CHAPTER 2
Deploying toFirebase as
theBack End
Firebase is considered a Backend as a Service, which is now part of the Google Cloud
Platform while it’s still serving as an independent entity. It offers different services such
as hosting, real-time databases, and cloud functions.
In this chapter, I am going to show you how we can deploy our app to Firebase.
It’s important to mention that Firebase is not the only option. However, since it’s
easy to set up and deploy, I encourage you to use Firebase as our host server.
Additionally, we may need to write a bit of back-end logic for our application;
therefore, Firebase Function is one of the best choices, in order to leverage serverless
architecture and reduce our concerns regarding a back-end system, while the front end
will remain our main focus.
Last but not least, to persist our data, we will use Firebase Firestore, which gives
us the best passivity to store and retrieve our data as quickly and possible with built-in
JSON access to each collection and document where needed.
Setting UpYour Account
Let’s get started by opening firebase.google.com. Sign in with your Gmail credentials, but
if you don’t have any, please continue by first registering a Google account.
After you have signed in, continue and hit “GO TO CONSOLE.” You will be redirected
to your console where you can see your projects.
www.EBooksWorld.ir

10
You should see a new view where it is going to ask you about your project details
such as your project name. Awesome-Apress-PWA is what I have chosen to name my
project.
You may need to change your organization or Cloud Firestore location; however,
the default setting should be enough to get started. Keep in mind that if you change the
Cloud Firestore location, you will not be able to alter it until your project is created.
I will leave “Use the default settings for sharing Google Analytics for Firebase
data” and “Terms and Condition” checked. Now, it’s time to hit Create project button,
as shown in Figure2-2.
Creating aProject
Now it’s time to add your project; simply click Add project, as shown in Figure2-1.
Figure 2-1. Firebase console, where you should hit Add Project to create a new
project
Chapter 2 Deploying toFirebase as thebaCk enD
www.EBooksWorld.ir


12
Deploying toFirebase
We have chosen Firebase as it’s easy to work with for our project, and you’ll see in a
minute how painless deployment is with Firebase CLI (Command-Line Interface).
Generating aNew Angular App
Before we start, we need to generate a new Angular app using Angular CLI (Command-
Line Interface). If you don’t have @angular/cli installed globally on your machine, you
should run the following command first:
$ npm install -g @angular/cli
To generate a new Angular app with routing and scss set up, we can run:
$ ng new lovely-offline --routing --style=scss
Name of project enable routing styling with scss
Figure 2-3. After several seconds, the project is ready, so simply click on the
“Continue” button to be redirected to the dashboard
Chapter 2 Deploying toFirebase as thebaCk enD
www.EBooksWorld.ir
13
After installing all NPM dependencies, you will have your app ready for building and
then deploying.
├── README.md
├── angular.json
├── e2e
├── node_modules
├── package-lock.json
├── package.json
├── src
│ ├── app
│ ├── assets
│ ├── browserslist
│ ├── environments
│ ├── favicon.ico
│ ├── index.html
│ ├── karma.conf.js
│ ├── main.ts
│ ├── polyfills.ts
│ ├── styles.scss
│ ├── test.ts
│ ├── tsconfig.app.json
│ ├── tsconfig.spec.json
│ └── tslint.json
├── tsconfig.json
└── tslint.json
Let’s now build our app for production.
$ ng build --prod
> ng build
Date: 2018-08-26T17:20:35.649Z
Hash: e6da8aa80ad79bc41363
Time: 6332ms
chunk {main} main.js, main.js.map (main) 11.6 kB [initial] [rendered]
chunk {polyfills} polyfills.js, polyfills.js.map (polyfills) 227 kB
[initial] [rendered]
Chapter 2 Deploying toFirebase as thebaCk enD
www.EBooksWorld.ir
14
chunk {runtime} runtime.js, runtime.js.map (runtime) 5.22 kB [entry] [rendered]
chunk {styles} styles.js, styles.js.map (styles) 16 kB [initial] [rendered]
chunk {vendor} vendor.js, vendor.js.map (vendor) 3.18 MB [initial] [rendered]
The build is a success, and now it’s time to deploy our app to Firebase. Let’s install
Firebase CLI.
$ npm install -g firebase-tools
Now the firebase command is available globally in our command line. Before we can
deploy, we need to make sure we have enough privileges; thus, we should now log in to
Firebase to set our credentials, so simply run:
$ firebase login
A questionnaire appears like that below:
Allow Firebase to collect anonymous CLI usage and error
reporting information? (Y/n) Y
Visit this URL on any device to log in:
https://accounts.google.com/o/oauth2/........
Waiting for authentication...
As soon as you see Authentication URL, you will be redirected to a browser in order
to sign in to your Google account. Then, you should grant enough permission to Firebase
CLI by clicking Allow access, as shown in Figure2-4.
Chapter 2 Deploying toFirebase as thebaCk enD
www.EBooksWorld.ir


16
You will also see a success message as seen below in your terminal, which means
that Firebase CLI now has enough access to your Firebase projects.
✓ Success! Logged in as [email protected]
Initializing theApp
The next step is to initialize your Firebase project. This will link your local Angular app to
the Firebase application that we just created. To do this, make sure you are in the root of
the project and run:
$ firebase init
Once you hit the command above, Firebase CLI asks you a few questions, appearing
in your terminal, in order to scaffold your Firebase project and create necessary
requirements that are essential to deploy our application to Firebase. Let’s review each
question step by step.
Features Selection
The first question, as shown below, is about which Firebase features we would like to
use:
Which Firebase CLI features do you want to set up for this folder? Press
Space to select features, then Enter to confirm your choices.
◯ Database: Deploy Firebase Realtime Database Rules
> ◉ Firestore: Deploy rules and create indexes for Firestore
Figure 2-5. Success message in your browser after giving permission to
Firebase CLI
Chapter 2 Deploying toFirebase as thebaCk enD
www.EBooksWorld.ir

17
◉ Functions: Configure and deploy Cloud Functions
◉ Hosting: Configure and deploy Firebase Hosting sites
◯ Storage: Deploy Cloud Storage security rules
Firebase Realtime Database
1
and Firestore
2
are two NoSQL databases services
to store and sync data for client- and server-side development. Cloud functions for
Firebase lets you automatically run back-end code in response to events triggered by
Firebase features and HTTPS requests. Your code is stored in Google’s cloud and runs
in a managed environment. Firebase Hosting provides fast and secure hosting for your
web app, static and dynamic content, and microservices. Cloud storage is built for app
developers who need to store and serve user-generated content, such as photos or
videos.
I will select Firestore, Functions, and Hosting features for this project as I am going
to use them throughout this book. Once you have selected what is needed, press enter to
go to the next step.
Project Selection
The second question, as shown below, shows your projects in Firebase, and since
we have created one project, I will select that one and continue by pressing enter.
Note that you can also create a project in this step, too.
Select a default Firebase project for this directory: (Use arrow keys)
[don't set up a default project]
> awesome-apress-pwa (awesome-apress-pwa)
[create a new project]
Database Setup
Firebase Firestore is a scalable and flexible NoSQL
3
real-time database to store and
sync data for a client- or server-side app development. This database keeps our data
in sync across multiple client apps and offers offline capabilities. Data in Firestore
saves documents that contain fields mapping to values. Collections are containers of
documents that allow us to not only organize our data but also to build queries.
1
https://firebase.google.com/docs/database/
2
https://firebase.google.com/docs/firestore/
3
Read more at https://en.wikipedia.org/wiki/NoSQL.
Chapter 2 Deploying toFirebase as thebaCk enD
www.EBooksWorld.ir

18
Since we have selected Firestore service already in the step features selection step,
the third question, as shown below, is about a database rules file to write all rules
regarding our project database. I continue with the default name, which is database.
rules.json:
What file should be used for Database Rules? (database.rules.json)
Functions Setup
Cloud functions in Firebase let us run back-end code over HTTPS requests without
having an actual server to maintain and manage and store our code in Google’s cloud-
managed environment. In order to achieve serverless
4
architecture in our app, we are
going to use Functions to write and run our essential back-end code.
Since we have selected to use the Firebase Functions feature already in the feature
selection step, the fourth question, as shown below, asks to choose our desired language
to write Functions.
What language would you like to use to write Cloud Functions? (Use arrow
keys)
> JavaScript
TypeScript
JavaScript is my choice now as we are not going to have a lot of functions in this
book; therefore, I kept it simple. Feel free to continue with TypeScript if this is what
you like.
Followed by the language of choice, Firebase CLI offers to set up a linting tool to help
us find possible bugs and styling issues in the next question, as shown below. If you like
to enforce styling and catch possible bugs in your cloud functions, continue with Y.
Do you want to use ESLint to catch probable bugs and enforce style? (Y/N) y
Final Setup
I will continue for the last three questions in order to complete my project initialization.
If you like to install dependencies now, enter Y in the next question.
Do you want to install dependencies with npm now? (Y/n)
4
Read more at https://en.wikipedia.org/wiki/Serverless_computing.
Chapter 2 Deploying toFirebase as thebaCk enD
www.EBooksWorld.ir
19
In the next step, we need to define where our ready-to-deploy app is located. By
default, in Angular it’s dist directory; thus, I also enter dist to set my public directory.
So, I will continue to answer the question as shown below:
What do you want to use as your public directory? (public) dist
Finally, our application is going to have a routing system in the front end, which
means we are going to create a single-page application. Therefore, when Firebase CLI is
questioned about rewriting all URLs to index.html, we should answer Y to make sure our
front end is handling routes individually, regardless of our server routing.
Although we are moving forward with a single-page application, it’s definitely not
required for creating a PWA.Notice that in this book, we will make a single-page PWA by
Angular. Let’s continue the final question with Y as shown below:
Configure as a single-page app (rewrite all urls to /index.html)? (y/N) y
Initializing our app with Firebase CLI has been completed! Our app structure will
look like the following tree after initialization.
.
├── README.md
├── angular.json
├── database.rules.json -> firebase databse rules
├── dist
├── e2e
├── firebase.json -> firebase configs
├── functions-> firebase cloud funtions directory
│ ├── index.js
│ ├── node_modules
│ ├── package-lock.json
│ └── package.json
├── node_modules
├── package-lock.json
├── package.json
├── src
│ ├── app
│ ├── assets
│ ├── browserslist
│ ├── environments
Chapter 2 Deploying toFirebase as thebaCk enD
www.EBooksWorld.ir
20
│ ├── favicon.ico
│ ├── index.html
│ ├── karma.conf.js
│ ├── main.ts
│ ├── polyfills.ts
│ ├── styles.scss
│ ├── test.ts
│ ├── tsconfig.app.json
│ ├── tsconfig.spec.json
│ └── tslint.json
├── tsconfig.json
└── tslint.json
Adjustment inAngular Project Settings
Before we can deploy our app, we need to apply a minor change to our Angular setting
located in Angular.json. Angular CLI is capable of building multiple apps, and each
app could simply be placed in a dist folder. However, we want to deal with only one app
at the moment, and we need to build it in the dist folder where Firebase will find and
deploy it. Therefore, we should change from
"architect": {
"build": {
"builder": "@angular-devkit/build-angular:browser",
"options": {
"outputPath": "dist/lovely-offline", // outputPath showes
where to build
to
"architect": {
"build": {
"builder": "@angular-devkit/build-angular:browser",
"options": {
"outputPath": "dist ", // build app just in dist
By removing our app name from outputPath, we enforce Angular CLI to build and
place all files in the dist folder instead. Now it’s time to finally deploy our app to Firebase.
Chapter 2 Deploying toFirebase as thebaCk enD
www.EBooksWorld.ir
21
Deploying Our App
While we are in the root of the project directory, we can simply run the following
command:
$ firebase deploy
Deployment starts…
> firebase deploy
=== Deploying to 'awesome-apress-pwa'...
i deploying database, functions, hosting
Running command: npm --prefix "$RESOURCE_DIR" run lint
> functions@ lint ~/awesome-apress-pwa/functions
> eslint .
✓ functions: Finished running predeploy script.
i database: checking rules syntax...
✓ database: rules syntax for database awesome-apress-pwa is valid
i functions: ensuring necessary APIs are enabled...
✓ functions: all necessary APIs are enabled
i functions: preparing functions directory for uploading...
i hosting[awesome-apress-pwa]: beginning deploy...
i hosting[awesome-apress-pwa]: found 14 files in dist
✓ hosting[awesome-apress-pwa]: file upload complete
i database: releasing rules...
✓ database: rules for database awesome-apress-pwa released successfully
i hosting[awesome-apress-pwa]: finalizing version...
✓ hosting[awesome-apress-pwa]: version finalized
i hosting[awesome-apress-pwa]: releasing new version...
✓ hosting[awesome-apress-pwa]: release complete
✓ Deploy complete!
Chapter 2 Deploying toFirebase as thebaCk enD
www.EBooksWorld.ir

22
Project Console: https://console.firebase.google.com/project/awesome-
apress- pwa/overview
Hosting URL: https://awesome-apress-pwa.firebaseapp.com
Congratulations– deployment is successfully completed, and now the website is
available at https://awesome-apress-pwa.firebaseapp.com.
Setting UpAngularFire
5
AngularFire2 is an official library for Angular to support Firebase functionalities. It is
powered by observable, real-time bindings, authentication, and offline data support.
I strongly recommend implementing this library in order to make it way easier for our
development process to deal with Firebase.
To install, run the following command:
$ npm install firebase @angular/fire –-save
To add a Firebase configuration, open the /src/environment/environment.ts
file, and add the following setup:
export const environment = {
production: false,
firebase: {
apiKey: '<your-key>',
authDomain: '<your-project-authdomain>',
databaseURL: '<your-database-URL>',
projectId: '<your-project-id>',
storageBucket: '<your-storage-bucket>',
messagingSenderId: '<your-messaging-sender-id>'
}
};
To find your app configuration, open the Firebase console and from the project
overview page, click gear icon and click project settings, as shown in Figure2-6.
5
https://github.com/angular/angularfire2
Chapter 2 Deploying toFirebase as thebaCk enD
www.EBooksWorld.ir


24
Replace the project setting in environment.ts. (see Figure2-8).
Figure 2-8. Copy your project setting to replace in environment.ts
Navigate to /src/app/app.module.ts and inject the Firebase provider. Injector
makes sure that your Firebase configuration is specified correctly in the app.
import { BrowserModule } from '@angular/platform-browser';
import { NgModule } from '@angular/core';
import { AngularFireModule } from 'angularfire2';
import { AppRoutingModule } from './app-routing.module';
import { AppComponent } from './app.component';
import { environment } from '../environments/environment';
@NgModule({
declarations: [
AppComponent
],
Chapter 2 Deploying toFirebase as thebaCk enD
www.EBooksWorld.ir
25
imports: [
BrowserModule,
AppRoutingModule,
AngularFireModule.initializeApp(environment.firebase)
],
providers: [],
bootstrap: [AppComponent]
})
export class AppModule { }
AngularFire is a modular package to support different Firebase features.
AngularFirestoreModule, AngularFireAuthModule, AngularFireDatabaseModule,
and AngularFireStorageModule are available individually to be added to
@NgModules. For instance, in this app, we would add AngularFireStoreModule
and AngularFireAuthModule, respectively, to get support for database and
authentication features.
import { BrowserModule } from '@angular/platform-browser';
import { NgModule } from '@angular/core';
import { AngularFireModule } from 'angularfire2';
import { AngularFirestoreModule } from 'angularfire2/firestore';
import { AngularFireAuthModule } from 'angularfire2/auth';
import { AppRoutingModule } from './app-routing.module';
import { AppComponent } from './app.component';
import { environment } from '../environments/environment';
@NgModule({
declarations: [
AppComponent
],
imports: [
BrowserModule,
AppRoutingModule,
AngularFireModule.initializeApp(environment.firebase),
AngularFirestoreModule, // needed for database features
AngularFireAuthModule, // needed for auth features,
],
Chapter 2 Deploying toFirebase as thebaCk enD
www.EBooksWorld.ir
26
providers: [],
bootstrap: [AppComponent]
})
export class AppModule { }
Great, AngularFirestore provider is now available in order to get access to Firebase
database collections to modify/delete or perform more actions. For example, open /src/
app/app.component.ts and inject AngularFirestore.
import { Component } from '@angular/core';
import { AngularFirestore } from 'angularfire2/firestore';
@Component({
selector: 'app-root',
templateUrl: './app.component.html',
styleUrls: ['./app.component.scss']
})
export class AppComponent {
title = 'lovely-offline';
constructor(db: AngularFirestore) {
}
}
The nest step is to bind a particular Firestore collection. As an example, in the future,
we will create a collection named notes. The following code demonstrates how we can
get access to all data and show it in our view while it’s an observable.
import { Component } from '@angular/core';
import { AngularFirestore } from 'angularfire2/firestore';
import { Observable } from 'rxjs';
@Component({
selector: 'app-root',
Chapter 2 Deploying toFirebase as thebaCk enD
www.EBooksWorld.ir
27
template: `
<h1>Bind Firestore collection example</h1>
<ul>
<li class="text" *ngFor="let note of notes$ | async">
{{note.title}}
</li>
</ul>
<router-outlet></router-outlet>
`,
styleUrls: ['./app.component.scss']
})
export class AppComponent {
notes$: Observable<any[]>;
constructor(db: AngularFirestore) {
this.notes$ = db.collection('notes').valueChanges();
}
}
Summary
This chapter unfolds an easy way to deploy our Angular app to Firebase and
introduced services such as Firestore Cloud functions to manage and run our back-
end code. Even though we didn’t deep dive into each feature, it was enough to start
and make the app live.
AngularFire2 is the official Angular library for Firebase, which has been set up in
our app, and it was explained how to inject it in our component in order to get access to
Firestore and other Firebase features later in the next chapters.
Now that we have prepared deployment requirements, we are ready to move on to
the next chapter and create our app skeleton and make it ready to start building a PWA.
Chapter 2 Deploying toFirebase as thebaCk enD
www.EBooksWorld.ir

29
© Majid Hajian 2019
M. Hajian, Progressive Web Apps with Angular, https://doi.org/10.1007/978-1-4842-4448-7_3
CHAPTER 3
Completing an
Angular App
Up to this point, we have reviewed fundamentals and requirements and set up
prerequisites in order to host, store data, and run functions in the cloud. It may sound a
bit boring to you, but as we continue to each chapter, it gets more exciting because we
will gradually build a real PWA together by adding more features.
Now, it’s time to step into the real world and create an app that works. In this chapter,
we are going to implement logics to yield an app that saves personal notes in Firebase.
This app will have user authentication functionalities and let a user save, edit, and delete
notes in their personal account. We will create UIs and routes, respectively, for each of
these functionalities.
Furthermore, there are two goals behind this chapter. First, you will see how we can
start an app from scratch and understand how we proceed to convert it to a PWA as we
continue to the next chapters. Secondly, you will see how we are going to convert an
existing app to a PWA.So, what are we waiting for? Let’s get started.
Implementing Our UI
First, we need to create an app that looks good. What we select for our UI must at least
contain the following characteristics: modern, fast, consistent, versatile, flexible,
mobile first, responsive, and user friendly. Angular Material
1
is one of the best, which
perfectly fits in Angular and helps us to rapidly develop our app while it looks nice and
fulfills our needs.
1
https://material.angular.io/
www.EBooksWorld.ir
30
Installing andSetting UpAngular Material, CDK,
andAnimations
Angular CLI 6+ provides a new command ng add in order to update an Angular project
with correct dependencies, perform configuration changes, and execute initialization
code, if any.
Installing @angular/material Automatically withAngular CLI
We can now use this command to install @angular/material:
ng add @angular/material
You should see the following messages:
> ng add @angular/material
Installing packages for tooling via npm.
npm WARN @angular/[email protected] requires a peer of @angular/[email protected] but
none is installed. You must install peer depen
dencies yourself.
+ @angular/[email protected]
added 2 packages from 1 contributor and audited 24256 packages in 7.228s
found 12 vulnerabilities (9 low, 3 high)
run `npm audit fix` to fix them, or `npm audit` for details
Installed packages for tooling via npm.
UPDATE package.json (1445 bytes)
UPDATE angular.json (3942 bytes)
UPDATE src/app/app.module.ts (907 bytes)
UPDATE src/index.html (477 bytes)
UPDATE src/styles.scss (165 bytes)
added 1 package and audited 24258 packages in 7.297s
Awesome– Angular cli has taken care of all configurations for us. However, for
a better understanding of how it works in detail, I will also continue to add Angular
material to my project manually, as described below.
CHAPTER 3 COMPLETING AN ANGULAR APP
www.EBooksWorld.ir
31
Installing @angular/material Manually
You can use either NPM or YARN to install packages, so use whichever is most
appropriate for your project. I will continue with npm.
npm install --save @angular/material @angular/cdk @angular/animations
To enable animation support once packages are installed, BrowserAnimationsModule
should be this:
imported into our application.
import { BrowserModule } from '@angular/platform-browser';
import { NgModule } from '@angular/core';
import { AngularFireModule } from 'angularfire2';
import { AngularFirestoreModule } from 'angularfire2/firestore';
import { AngularFireAuthModule } from 'angularfire2/auth';
import { AppRoutingModule } from './app-routing.module';
import { AppComponent } from './app.component';
import { environment } from '../environments/environment';
import { BrowserAnimationsModule } from '@angular/platform-browser/
animations';
@NgModule({
declarations: [
AppComponent
],
imports: [
BrowserModule,
AppRoutingModule,
AngularFireModule.initializeApp(environment.firebase),
AngularFirestoreModule, // needed for database features
AngularFireAuthModule, // needed for auth features,
BrowserAnimationsModule,
],
providers: [],
bootstrap: [AppComponent]
})
export class AppModule { }
CHAPTER 3 COMPLETING AN ANGULAR APP
www.EBooksWorld.ir
32
To enable animation support once packages are installed, BrowserAnimationsModule
should be imported.
Fonts and icons help our app look nicer and feel better. Therefore, we will add
Roboto and Material Icons fonts into our application. To include them, modify index.
html, and add the following links between <head></head>:
<link href="https://fonts.googleapis.com/icon?family=Material+Icons"
rel="stylesheet">
<link href="https://fonts.googleapis.com/css?family=Roboto:300,400,500"
rel="stylesheet">
Finally, we need to include a theme. There are prebuilt themes in the @angular/
material library, which at the time I am writing this book, are the following:
• deeppurple-amber.css
• indigo-pink.css
• pink-bluegrey.css
• purple-green.css
Open angular.json, and add one of the theme CSS files to architect ➤ build ➤ styles,
so it looks like the following configuration:
"architect": {
"build": {
"builder": "@angular-devkit/build-angular:browser",
"options": {
"outputPath": "dist",
"index": "src/index.html",
"main": "src/main.ts",
"polyfills": "src/polyfills.ts",
"tsConfig": "src/tsconfig.app.json",
"assets": [
"src/favicon.ico",
"src/assets"
],
CHAPTER 3 COMPLETING AN ANGULAR APP
www.EBooksWorld.ir
33
"styles": [
{
"input": "node_modules/@angular/material/prebuilt-themes/
indigo-pink.css"
},
"src/styles.scss"
],
"scripts": []
},
Great– we have added what we need for our UI; now let’s create a basic skeleton for
our app.
Creating aCore Module / Shared Module
One of the common ways in Angular to benefit from lazy loading and code splitting is
to modularize an application while it still keeps its components-based approach.
It means that we will encapsulate as many components as make sense into one module
and will reuse this module by importing into other modules. To start, we will generate
SharedModule to import into all other modules and expose all common components
and modules that will be reused across our app and CoreModule, which will only be
imported once in our root module, AppModule, and contains all providers that are
singletons and will initialize as soon as the application starts.
Run the following commands to generate a core module.
ng generate module modules/core
> ng g m modules/core
CREATE src/app/modules/core/core.module.spec.ts (259 bytes)
CREATE src/app/modules/core/core.module.ts (188 bytes)
Angular CLI generates CoreModule located in the modules folder. Let’s do this
command one more time to generate SharedModule located in the modules folder:
ng generate module modules/shared
> ng g m modules/shared
CREATE src/app/modules/shared/shared.module.spec.ts (275 bytes)
CREATE src/app/modules/shared/shared.module.ts (190 bytes)
CHAPTER 3 COMPLETING AN ANGULAR APP
www.EBooksWorld.ir
34
To make sure that CoreModule will not be imported multiple times, we can create a
guard for this module. Simply add the following code to your module:
export class CoreModule {
constructor(@Optional() @SkipSelf() parentModule: CoreModule) {
if (parentModule) {
throw new Error(`CoreModule has already been loaded. Import Core
modules in the AppModule only.`);
}
}
}
So, our core module looks like the following:
import { NgModule, Optional, SkipSelf } from '@angular/core';
import { CommonModule } from '@angular/common';
@NgModule({
imports: [
CommonModule,
],
providers: []
})
export class CoreModule {
constructor(@Optional() @SkipSelf() parentModule: CoreModule) {
if (parentModule) {
throw new Error(`CoreModule has already been loaded. Import Core
modules in the AppModule only.`);
}
}
}
Let’s import CoreModule into AppModule. Now we are ready to start creating our first
shared components.
CHAPTER 3 COMPLETING AN ANGULAR APP
www.EBooksWorld.ir

35
Header, Footer, andBody Components
In this section, we are going to create our first application– a main application layout–
based on the simple sketch that is shown in Figure3-1.
We will continue developing while we have this sketch in mind. To begin, let’s create
a module named LayoutModule that contains a footer, header, and menu components
and then import this module into AppModule to reuse header/footer in the app.
component.ts file.
ng g m modules/layout
import LayoutModule into AppModule:
Header / MENU
Footer / copyright
NOTE CARD
NOTE CARD
NOTE CARD
Header / MENU
Footer / copyright
BODY
Figure 3-1. Initial app sketch
CHAPTER 3 COMPLETING AN ANGULAR APP
www.EBooksWorld.ir
36
...imports: [
CoreModule,
LayoutModule,...
By running the following command, footer and header components are generated,
respectively.
ng generate component modules/layout/header
ng generate component modules/layout/footer
We have already created SharedModule; however, we need some changes in this
module. First, what we imported as share modules or share components should be
exported, too. Angular Material is a modular package; with that said, we should import
modules that are needed for our UI.Then, I will add as many modules from Angular
Material as we need in this application. It will be possible to add or remove modules and
components later.
Lastly, our SharedModule looks like the code below:
const SHARED_MODULES = [
CommonModule,
MatToolbarModule,
MatCardModule,
MatIconModule,
MatButtonModule,
MatDividerModule,
MatBadgeModule,
MatFormFieldModule,
MatInputModule,
MatSnackBarModule,
MatProgressBarModule,
MatProgressSpinnerModule,
MatMenuModule,
ReactiveFormsModule,
FormsModule,
RouterModule
];
CHAPTER 3 COMPLETING AN ANGULAR APP
www.EBooksWorld.ir

37
const SHARED_COMPONENTS = [];
@NgModule({
imports: [ ...SHARED_MODULES
2
],
declarations: [ ...SHARED_COMPONENTS ],
exports: [ ...SHARED_MODULES, ...SHARED_COMPONENTS ],
})
export class SharedModule { }
After importing SharedModule into LayoutModule, we are able to design our header/
footer based on material components that are required.
Following is the Header component:
// header.component.html
<mat-toolbar color="primary">
<span>ApressNote-PWA</span>
<span class="space-between"></span>
<button mat-icon-button [mat-menu-trigger-for]="menu">
<mat-icon>more_vert</mat-icon>
</button>
</mat-toolbar>
<mat-menu x-position="before" #menu="matMenu">
<button mat-menu-item>Home</button>
<button mat-menu-item>Profile</button>
<button mat-menu-item>Add Note</button>
</mat-menu>
// header.component.scss
.space-between {
flex:1;
}
// header.component.ts
import { Component, OnInit } from '@angular/core';
@Component({
selector: 'app-header',
2
The pread operator (three dots …) helps to concatenate arrays.
CHAPTER 3 COMPLETING AN ANGULAR APP
www.EBooksWorld.ir
38
templateUrl: './header.component.html',
styleUrls: ['./header.component.scss']
})
export class HeaderComponent { }
Following is the Footer component:
// footer.component.html
<footer>
<div class="copyright">Copyright Apress - Majid Hajian</div>
</footer>
<div class="addNote">
<button mat-fab>
<mat-icon>add circle</mat-icon>
</button>
</div>
// footer.component.scss
footer{
background: #3f51b5;
color: #fff;
display: flex;
box-sizing: border-box;
padding: 1rem;
flex-direction: column;
align-items: center;
white-space: nowrap;
}
.copyright {
text-align: center;
}
.addNote {
position: fixed;
bottom: 2rem;
right: 1rem;
color: #fff;
}
CHAPTER 3 COMPLETING AN ANGULAR APP
www.EBooksWorld.ir
39
// footer.component.ts
import { Component, OnInit } from '@angular/core';
@Component({
selector: 'app-footer',
templateUrl: './footer.component.html',
styleUrls: ['./footer.component.scss']
})
export class FooterComponent { }
Now add a few custom CSS lines in style.scss file to adjust our layout:
html, body { height: 100%; }
body { margin: 0; font-family: 'Roboto', sans-serif; }
.appress-pwa-note {
display: flex;
flex-direction: column;
align-content: space-between;
height: 100%;
}
.main{
display: flex;
flex:1;
}
mat-card {
max-width: 80%;
margin: 2em auto;
text-align: center;
}
mat-toolbar-row {
justify-content: space-between;
}
CHAPTER 3 COMPLETING AN ANGULAR APP
www.EBooksWorld.ir

40
Lastly, add the footer, header, and necessary changes to app.component.ts:
import { Component } from '@angular/core';
@Component({
selector: 'app-root',
template: `
<div class="appress-pwa-note">
<app-header></app-header>
<div class="main">
<router-outlet></router-outlet>
</div>
<app-footer></app-footer>
</div>
`,
})
export class AppComponent { }
So far, so good– the initial skeleton based on the sketch is now ready as shown in
Figure3-2.
Let move on and create different pages and routes.
Note You’ll find all the codes in the www.github.com/mhadaily/awesome-
apress-pwa/chapter03/01-material-design-and-core-shared-
modules-setup.
CHAPTER 3 COMPLETING AN ANGULAR APP
www.EBooksWorld.ir

41
Login / Profile Page
We need to create pages so that my users can register, log in, and see their profiles.
To begin, we create UserModule, including routing:
ng generate module modules/user --routing
As we are going to lazy load this module, we need at least one path and one
component. To generate a component, continue running the following command:
ng generate component modules/user/userContainer --flat
flag --flat ignores creating a new folder for this component.
Figure 3-2. Initial application shell
CHAPTER 3 COMPLETING AN ANGULAR APP
www.EBooksWorld.ir
42
Once the component is generated, we should add it to UserModule declarations
and then define our path in UserModuleRouting– path /user could be lazy loaded in
AppRoutingModule accordingly.
// UserModuleRouting
import { NgModule } from '@angular/core';
import { Routes, RouterModule } from '@angular/router';
import { UserContainerComponent } from './user-container.component';
const routes: Routes = [
{
path: '',
component: UserContainerComponent
}
];
@NgModule({
imports: [RouterModule.forChild(routes)],
exports: [RouterModule]
})
export class UserRoutingModule { }
//AppModuleRouting
import { NgModule } from '@angular/core';
import { Routes, RouterModule } from '@angular/router';
const routes: Routes = [
{
path: 'user',
loadChildren: './modules/user/user.module#UserModule',
}
];
@NgModule({
imports: [RouterModule.forRoot(routes)],
exports: [RouterModule]
})
export class AppRoutingModule { }
CHAPTER 3 COMPLETING AN ANGULAR APP
www.EBooksWorld.ir

43
Adding Login, Signup, andProfile UI andFunctionalities
Before we continue to add login/signup functionalities, we must activate Sign-in
providers in Firebase. Hence, go to your project Firebase console, find Authentication
under the develop group on the left menu list, and then move the current tab to Sign-in
methods. To keep it simple, we will use Email/Password providers; however, you should
be able to add more providers as you wish (see Figure3-3).
Let’s move on and create an Angular service that handles all Firebase authentication
methods. Continue by running the following command:
ng generate service modules/core/firebaseAuthService
We need to write several methods, checking the user login state and doing log in,
sign up, and log out.
Take your time and look at Listing 3-1 where we implement FirebaseAuthService
in order to invoke necessary methods from AngularFireAuth service and share the state
across the app. The service methods are self-explanatory.
Figure 3-3. Enable Email/Password authentication
CHAPTER 3 COMPLETING AN ANGULAR APP
www.EBooksWorld.ir
44
Listing 3-1. App/modules/core/auth.service.ts
export class AuthService {
// expose all data
public authErrorMessages$ = new Subject<string>();
public isLoading$ = new BehaviorSubject<boolean>(true);
public user$ = new Subject<User>();
constructor(private afAuth: AngularFireAuth) {
this.isLoggedIn().subscribe();
}
private isLoggedIn() {
return this.afAuth.authState.pipe(
first(),
tap(user => {
this.isLoading$.next(false);
if (user) {
const { email, uid } = user;
this.user$.next({ email, uid });
}
})
);
}
public signUpFirebase({ email, password }) {
this.isLoading$.next(true);
this.handleErrorOrSuccess(() => {
return this.afAuth.auth.createUserWithEmailAndPassword(email, password);
});
}
public loginFirebase({ email, password }) {
this.isLoading$.next(true);
this.handleErrorOrSuccess(() => {
return this.afAuth.auth.signInWithEmailAndPassword(email, password);
});
}
CHAPTER 3 COMPLETING AN ANGULAR APP
www.EBooksWorld.ir
45
public logOutFirebase() {
this.isLoading$.next(true);
this.afAuth.auth
.signOut()
.then(() => {
this.isLoading$.next(false);
this.user$.next(null);
})
.catch(e => {
console.error(e);
this.isLoading$.next(false);
this.authErrorMessages$.next("Something is wrong when signing out!");
});
}
private handleErrorOrSuccess(
cb: () => Promise<firebase.auth.UserCredential>
) {
cb()
.then(data => this.authenticateUser(data))
.catch(e => this.handleSignUpLoginError(e));
}
private authenticateUser(UserCredential) {
const {
user: { email, uid }
} = UserCredential;
this.isLoading$.next(false);
this.user$.next({ email, uid });
}
private handleSignUpLoginError(error: { code: string; message: string })
{
this.isLoading$.next(false);
const errorMessage = error.message;
CHAPTER 3 COMPLETING AN ANGULAR APP
www.EBooksWorld.ir
46
this.authErrorMessages$.next(errorMessage);
}
}
Lastly, the application should provide a UI to log in and sign up as well as user
information. Going back to our userContainerComponent, we will implement UI and
methods respectively. Listings 3-2 through 3-4 show our TypeScript, HTML, and CSS.
Listing 3-2. User-container.component.ts
export class UserContainerComponent implements OnInit {
public errorMessages$ = this.afAuthService.authErrorMessages$;
public user$ = this.afAuthService.user$;
public isLoading$ = this.afAuthService.isLoading$;
public loginForm: FormGroup;
public hide = true;
constructor(
private fb: FormBuilder,
private afAuthService: FirebaseAuthService
) {}
ngOnInit() {
this.createLoginForm();
}
private createLoginForm() {
this.loginForm = this.fb.group({
email: ["", [Validators.required, Validators.email]],
password: ["", [Validators.required]]
});
}
public signUp() {
this.checkFormValidity(() => {
this.afAuthService.signUpFirebase(this.loginForm.value);
});
}
CHAPTER 3 COMPLETING AN ANGULAR APP
www.EBooksWorld.ir
47
public login() {
this.checkFormValidity(() => {
this.afAuthService.loginFirebase(this.loginForm.value);
});
}
private checkFormValidity(cb) {
if (this.loginForm.valid) {
cb();
} else {
this.errorMessages$.next("Please enter correct Email and Password value");
}
}
public logOut() {
this.afAuthService.logOutFirebase();
}
public getErrorMessage(controlName: string, errorName: string): string {
const control = this.loginForm.get(controlName);
return control.hasError("required")
? "You must enter a value"
: control.hasError(errorName)
? `Not a valid ${errorName}`
: "";
}
}
Listing 3-3. User-container.component.html
<mat-card *ngIf="user$ | async as user">
<mat-card-title>
Hello {{user.email}}
</mat-card-title>
<mat-card-subtitle>
ID: {{user.uid}}
</mat-card-subtitle>
CHAPTER 3 COMPLETING AN ANGULAR APP
www.EBooksWorld.ir
48
<mat-card-content>
<button mat-raised-button color="secondary" (click)="logOut()">Logout
</button>
</mat-card-content>
</mat-card>
<mat-card *ngIf="!(user$ | async)">
<mat-card-title>
Access to your notes
</mat-card-title>
<mat-card-subtitle class="error" *ngIf="errorMessages$ | async as
errorMessage">
{{ errorMessage }}
</mat-card-subtitle>
<mat-card-content>
<div class="login-container" [formGroup]="loginForm">
<mat-form-field>
<input matInput placeholder="Enter your email" formControl
Name="email" required>
<mat-error *ngIf="loginForm.get('email').invalid">{{getErrorMessage
('email', 'email')}}</mat-error>
</mat-form-field>
<br>
<mat-form-field>
<input matInput placeholder="Enter your password" [type]="hide ?
'password' : 'text'" formControlName="password">
<mat-icon matSuffix (click)="hide = !hide">{{hide ? 'visibility' :
'visibility_off'}}</mat-icon>
<mat-error *ngIf="loginForm.get('password').invalid">{{getErrorMess
age('password')}}</mat-error>
</mat-form-field>
</div>
<button mat-raised-button color="primary" (click)="login()">Login
</button>
</mat-card-content>
CHAPTER 3 COMPLETING AN ANGULAR APP
www.EBooksWorld.ir
49
<mat-card-content><br>----- OR -----<br><br></mat-card-content>
<mat-card-content>
<button mat-raised-button color="accent" (click)="signUp()">Sign Up
</button>
</mat-card-content>
<mat-card-footer>
<mat-progress-bar *ngIf="isLoading$ | async" mode="indeterminate">
</mat-progress-bar>
</mat-card-footer>
</mat-card>
Listing 3-4. User-container.component.scss
.login-container {
display: flex;
flex-direction: column;
> * {
width: 100%;
}
}
Figure 3-4 shows the result of what we have done up to this point.
CHAPTER 3 COMPLETING AN ANGULAR APP
www.EBooksWorld.ir

50
Note You’ll find all the codes in the www.github.com/mhadaily/awesome-
apress-pwa/chapter03/02-login-signup-profile.
Although what we need to proceed has been achieved, you are not limited and
can continue adding more and more Firebase features such as forgot password link,
password-less login, and other providers for log in.
Figure 3-4. Login, Signup, and Profile UI in the app
CHAPTER 3 COMPLETING AN ANGULAR APP
www.EBooksWorld.ir
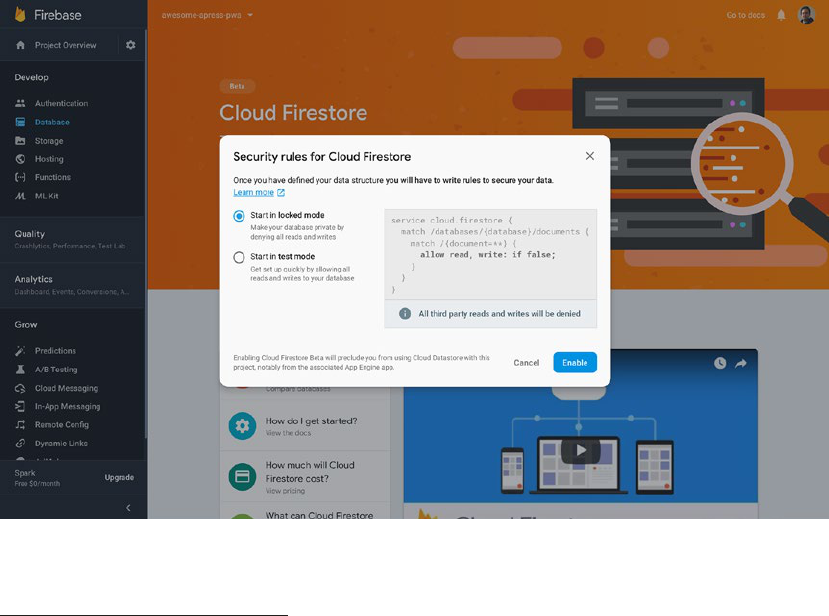
51
Firebase CRUD
3
Operations forNote Module
In the following section, we are going to work on different views and methods in order to
list, add, delete, and update notes in our application; let’s do it step by step.
Set UpFirestore Database
First things first: a quick start to show how to set up our Firestore database.
1. Open your browser and go to Firebase project console.
2. In the Database section, click the Get Started or Create database
button for Cloud Firestore.
3. Select Locked mode for your Cloud Firestore Security Rules.
4
4. Click Enable as shown in Figure3-5.
3
https://en.wikipedia.org/wiki/Create,_read,_update_and_delete
4
https://firebase.google.com/docs/firestore/quickstart
Figure 3-5. Select locked mode when creating a new database in Firebase
CHAPTER 3 COMPLETING AN ANGULAR APP
www.EBooksWorld.ir

52
Below is the Database schema
5
that we aim to create in order to store our users and
their notes.
----- users // this is a collection
------- [USER IDs] // this is a document
------ notes // this is a collection
----- [NOTE DOCUMENT]
----- [NOTE DOCUMENT]
----- [NOTE DOCUMENT]
------- [USER IDs] // this is a document
------ notes // this is a collection
----- [NOTE DOCUMENT]
----- [NOTE DOCUMENT]
----- [NOTE DOCUMENT]
It is possible to create collections and documents in Firestore manually; but we will do it
programmatically later by implementing proper logics in our application (see Figure3-6).
5
https://en.wikipedia.org/wiki/Database_schema
Figure 3-6. Firestore view once it is enabled
CHAPTER 3 COMPLETING AN ANGULAR APP
www.EBooksWorld.ir
53
The last step is to set Firestore rules to require a user unique id (uid) in request in
order to give sufficient permission to do create/read/update/delete actions. Click on the
Rules tab and copy and paste the following rules (see Figure3-7).
service cloud.firestore {
match /databases/{database}/documents {
// Make sure the uid of the requesting user matches name of the user
// document. The wildcard expression {userId} makes the userId variable
// available in rules.
match /users/{userId} {
allow read, update, delete: if request.auth.uid == userId;
allow create: if request.auth.uid != null;
// make sure user can do all action for notes collection if userID is
matched
match /notes/{document=**} {
allow create, read, update, delete: if request.auth.uid == userId;
}
}
}
}
CHAPTER 3 COMPLETING AN ANGULAR APP
www.EBooksWorld.ir
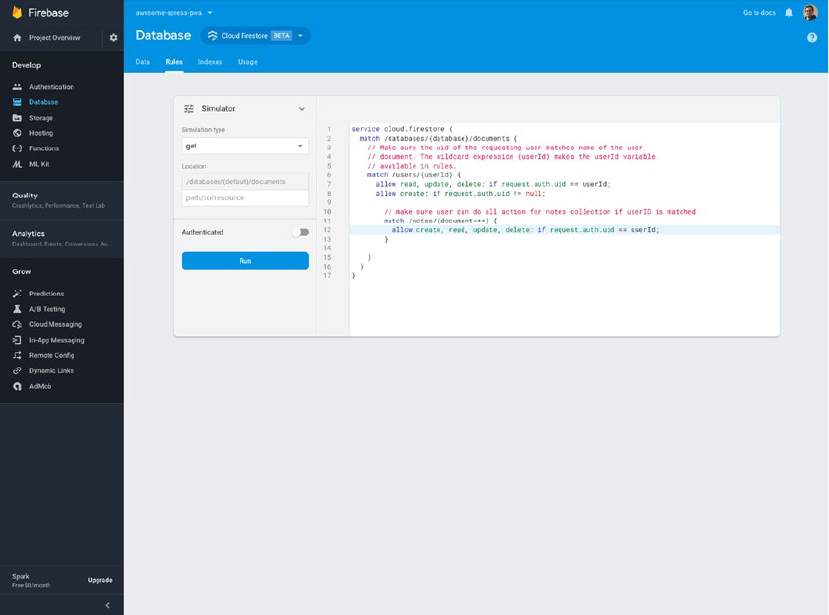
54
List, Add, andDetail Note Views
The next step, once the Firestore setup is done, is to create our components in order
to show a list of notes, add a note, and detail the note view along with their relevant
functionalities.
To begin, generate a notes module, including routing, by running the following
command:
ng generate module modules/notes --routing
Let’s take a look at NotesRoutingModule:
const routes: Routes = [
Figure 3-7. Firestore rules
CHAPTER 3 COMPLETING AN ANGULAR APP
www.EBooksWorld.ir
55
{
path: "",
component: NotesListComponent
},
{
path: "add",
component: NotesAddComponent
},
{
path: ":id",
component: NoteDetailsComponent
}
];
@NgModule({
imports: [RouterModule.forChild(routes)],
exports: [RouterModule]
})
export class NotesRoutingModule {}
As you see, three paths have been defined; therefore we should generate related
components by running each command separately:
ng generate component modules/notes/notesList
ng generate component modules/notes/notesAdd
ng generate component modules/notes/noteDetails
Finally, lazy load NotesModule by adding NotesRoutingModule into the
AppRoutingModule:
const routes: Routes = [
{
path: "",
redirectTo: "/notes",
pathMatch: "full"
},
CHAPTER 3 COMPLETING AN ANGULAR APP
www.EBooksWorld.ir

56
{
path: "user",
loadChildren: "./modules/user/user.module#UserModule",
},
{
path: "notes",
loadChildren: "./modules/notes/notes.module#NotesModule"
}
];
@NgModule({
imports: [RouterModule.forRoot(routes)],
exports: [RouterModule]
})
export class AppRoutingModule {}
Authentication Service
The authentication service is used to log in, log out, and sign up and check if the user
has already been authenticated for the application. The credentials were sent to Firebase
by calling proper methods on the AngularFire Auth service to perform each function
accordingly.
AuthService is required to be injected
6
in order to handle the authentication layer in
our app:
ng generate service modules/core/auth
The following code shows the logic for AuthService:
// auth.service.ts
interface User {
uid: string;
email: string;
}
6
https://angular.io/guide/dependency-injection
CHAPTER 3 COMPLETING AN ANGULAR APP
www.EBooksWorld.ir
57
@Injectable({
providedIn: "root"
})
export class AuthService {
public authErrorMessages$ = new BehaviorSubject<string>(null);
public isLoading$ = new BehaviorSubject<boolean>(true);
public user$ = new BehaviorSubject<User>(null);
private authState = null;
constructor(private afAuth: AngularFireAuth) {
this.isLoggedIn().subscribe(user => (this.authState = user));
}
get authenticated(): boolean {
return this.authState !== null;
}
get id(): string {
return this.authenticated ? this.authState.uid : "";
}
private isLoggedIn(): Observable<User | null> {
return this.afAuth.authState.pipe(
map(user => {
if (user) {
const { email, uid } = user;
this.user$.next({ email, uid });
return { email, uid };
}
return null;
}),
tap(() => this.isLoading$.next(false))
);
}
public getCurrentUserUid(): string {
return this.afAuth.auth.currentUser.uid;
}
CHAPTER 3 COMPLETING AN ANGULAR APP
www.EBooksWorld.ir
58
public signUpFirebase({ email, password }) {
this.isLoading$.next(true);
this.handleErrorOrSuccess(() => {
return this.afAuth.auth.createUserWithEmailAndPassword(email, password);
});
}
public loginFirebase({ email, password }) {
this.isLoading$.next(true);
this.handleErrorOrSuccess(() => {
return this.afAuth.auth.signInWithEmailAndPassword(email, password);
});
}
public logOutFirebase() {
this.isLoading$.next(true);
return this.afAuth.auth.signOut();
}
private handleErrorOrSuccess(
cb: () => Promise<firebase.auth.UserCredential>
) {
cb()
.then(data => this.authenticateUser(data))
.catch(e => this.handleSignUpLoginError(e));
}
private authenticateUser(UserCredential) {
const {
user: { email, uid }
} = UserCredential;
this.isLoading$.next(false);
}
CHAPTER 3 COMPLETING AN ANGULAR APP
www.EBooksWorld.ir
59
private handleSignUpLoginError(error: { code: string; message: string })
{
this.isLoading$.next(false);
const errorMessage = error.message;
this.authErrorMessages$.next(errorMessage);
}
}
Data Service
This service contains a standard set of CRUD methods (Create, read, update and delete).
Functionalities such as fetching all notes; add, update and delete; and fetch detail note
by calling proper methods or requesting from proper APIs. In fact, it acts as an interface
between the Angular application and the back-end APIs.
To generate DataService, run the command below:
ng generate service modules/core/data
The following code shows the logic for DataService:
// data.service.ts
interface Note {
id: string;
title: string;
content: string;
}
@Injectable({
providedIn: "root"
})
export class DataService {
protected readonly USERS_COLLECTION = "users";
protected readonly NOTES_COLLECTION = "notes";
public isLoading$ = new BehaviorSubject<boolean>(true);
get timestamp() {
return new Date().getTime();
}
CHAPTER 3 COMPLETING AN ANGULAR APP
www.EBooksWorld.ir
60
constructor(private afDb: AngularFirestore, private auth: AuthService) {}
getUserNotesCollection() {
return this.afDb.collection(
this.USERS_COLLECTION + "/" + this.auth.id + "/" + this.NOTES_COLLECTION,
ref => ref.orderBy("updated_at", "desc")
);
}
addNote(data): Promise<DocumentReference> {
return this.getUserNotesCollection().add({
...data,
created_at: this.timestamp,
updated_at: this.timestamp
});
}
editNote(id, data): Promise<void> {
return this.getUserNotesCollection()
.doc(id)
.update({
...data,
updated_at: this.timestamp
});
}
deleteNote(id): Promise<void> {
return this.getUserNotesCollection()
.doc(id)
.delete();
}
getNote(id): Observable<any> {
return this.getUserNotesCollection()
.doc(id)
.snapshotChanges()
.pipe(
map(snapshot => {
CHAPTER 3 COMPLETING AN ANGULAR APP
www.EBooksWorld.ir
61
const data = snapshot.payload.data() as Note;
const id = snapshot.payload.id;
return { id, ...data };
}),
catchError(e => throwError(e))
);
}
getNotes(): Observable<any> {
return this.getUserNotesCollection()
.snapshotChanges()
.pipe(
map(snapshot =>
snapshot.map(a => {
//Get document data
const data = a.payload.doc.data() as Note;
//Get document id
const id = a.payload.doc.id;
//Use spread operator to add the id to the document data
return { id, ...data };
})
),
tap(notes => {
this.isLoading$.next(false);
}),
catchError(e => throwError(e))
);
}
}
Authentication Guard
Since this application requires a user to be authenticated before performing any action,
we should make sure that all routes are protected by a guard.
CHAPTER 3 COMPLETING AN ANGULAR APP
www.EBooksWorld.ir
62
AuthGuard helps to protect access to authentication routes. Since we need to put this
guard on a lazy load module, CanLoad should be implemented.
Ng generate guard modules/notes/auth
The following code shows the logic for AuthGuard:
// auth.guard.ts
@Injectable()
export class AuthGuard implements CanLoad {
constructor(private auth: AuthService, private router: Router) {}
canLoad(): Observable<boolean> {
if (!this.auth.authenticated) {
this.router.navigate(["/user"]);
return of(false);
}
return of(true);
}
}
We should provide AuthGuard in our AppRoutingModule. It’s important to remember
to add this guard into providers.
{
path: "notes",
loadChildren: "./modules/notes/notes.module#NotesModule",
canLoad: [AuthGuard]
}
@NgModule({
imports: [RouterModule.forRoot(routes)],
providers: [AuthGuard],
exports: [RouterModule]
})
CHAPTER 3 COMPLETING AN ANGULAR APP
www.EBooksWorld.ir
63
NoteList, NoteAdd, andNoteDetail Components
We have prepared all the service layers and routing that are needed in the application.
The rest of the application is to just implement proper UI and components logics for
NotesList, NoteAdd, and NoteDetail components (Listings 3-5 through 3-13). Since it’s
easy, I would like you to just take a look at the components, and at the end, Figure3-8
will demonstrate the result.
Listing 3-5. // Notes-list.component.ts
export class NotesListComponent implements OnInit {
notes$: Observable<Note[]>;
isDbLoading$;
constructor(private db: DataService) {}
ngOnInit() {
this.notes$ = this.db.getNotes();
this.isDbLoading$ = this.db.isLoading$;
}
}
Listing 3-6. // Notes-list.component.html
<div *ngIf="notes$ | async as notes; else notFound">
<app-note-card *ngFor="let note of notes" [note]="note" [loading]="isDb
Loading$ | async" [routerLink]="['/notes', note.id]">
</app-note-card>
</div>
<ng-template #notFound>
<mat-card>
<mat-card-title>
Either you have no notes
</mat-card-title>
</mat-card>
</ng-template>
CHAPTER 3 COMPLETING AN ANGULAR APP
www.EBooksWorld.ir
64
Listing 3-7. // Notes-card.component.ts
@Component({
selector: "app-note-card",
templateUrl: "./note-card.component.html",
styleUrls: ["./note-card.component.scss"]
})
export class NoteCardComponent {
@Input()
note;
@Input()
loading;
@Input()
edit = true;
}
Listing 3-8. // Notes-card.component.html
<mat-card>
<mat-card-title>{{ note.title }}</mat-card-title>
<mat-card-subtitle>{{ note.created_at | date:"short" }}</mat-card-
subtitle>
<mat-card-content>{{ note.content }}</mat-card-content>
<mat-card-footer class="text-right">
<button color="primary" *ngIf="edit"><mat-icon>edit</mat-icon></button>
<mat-progress-bar *ngIf="loading" mode="indeterminate"></mat-progress-
bar>
</mat-card-footer>
</mat-card>
Listing 3-9. // Notes-add.component.ts
export class NotesAddComponent {
public userID;
public errorMessages$ = new Subject();
CHAPTER 3 COMPLETING AN ANGULAR APP
www.EBooksWorld.ir
65
constructor(
private router: Router,
private data: DataService,
private snackBar: SnackBarService
) {}
onSaveNote(values) {
this.data
.addNote(values)
.then(doc => {
this.router.navigate(["/notes"]);
this.snackBar.open(`Note ${doc.id} has been succeffully saved`);
})
.catch(e => {
this.errorMessages$.next("something is wrong when adding to DB");
});
}
onSendError(message) {
this.errorMessages$.next(message);
}
}
Listing 3-10. // Notes-add.component.html
<mat-card>
<mat-card-title>New Note</mat-card-title>
<mat-card-subtitle class="error" *ngIf="errorMessages$ | async as
errorMessage">
{{ errorMessage }}
</mat-card-subtitle>
<mat-card-content>
<app-note-form (saveNote)="onSaveNote($event)" (sendError)="onSendError
($event)"></app-note-form>
</mat-card-content>
</mat-card>
CHAPTER 3 COMPLETING AN ANGULAR APP
www.EBooksWorld.ir
66
Listing 3-11. // Notes-form.component.ts
export class NoteFormComponent implements OnInit {
noteForm: FormGroup;
@Input()
note;
@Output()
saveNote = new EventEmitter();
@Output()
sendError = new EventEmitter();
constructor(private fb: FormBuilder) {}
ngOnInit() {
this.createForm();
if (this.note) {
this.noteForm.patchValue(this.note);
}
}
createForm() {
this.noteForm = this.fb.group({
title: ["", Validators.required],
content: ["", Validators.required]
});
}
addNote() {
if (this.noteForm.valid) {
this.saveNote.emit(this.noteForm.value);
} else {
this.sendError.emit("please fill all fields");
}
}
}
CHAPTER 3 COMPLETING AN ANGULAR APP
www.EBooksWorld.ir
67
Listing 3-12. // Notes-form.component.html
<div class="note-container" [formGroup]="noteForm">
<mat-form-field>
<input matInput placeholder="Enter your title" formControlName="title"
required>
</mat-form-field>
<br>
<mat-form-field>
<textarea matInput placeholder="Leave a comment"
formControlName="content" required cdkTextareaAutosize></textarea>
</mat-form-field>
</div>
<br>
<br>
<div class="text-right">
<button mat-raised-button color="primary" (click)="addNote()">Save</
button>
</div>
Listing 3-13. // Notes-details.component.ts
export class NoteDetailsComponent implements OnInit {
public errorMessages$ = new Subject();
public note$;
public isEdit;
private id;
constructor(
private data: DataService,
private route: ActivatedRoute,
private snackBar: SnackBarService,
private router: Router
) {}
CHAPTER 3 COMPLETING AN ANGULAR APP
www.EBooksWorld.ir
68
ngOnInit() {
const id = this.route.snapshot.paramMap.get("id");
this.id = id;
this.note$ = this.data.getNote(id);
}
delete() {
if (confirm("Are you sure?")) {
this.data
.deleteNote(this.id)
.then(() => {
this.router.navigate(["/notes"]);
this.snackBar.open(`${this.id} successfully was deleted`);
})
.catch(e => {
this.snackBar.open("Unable to delete this note");
});
}
}
edit() {
this.isEdit = !this.isEdit;
}
saveNote(values) {
this.data
.editNote(this.id, values)
.then(() => {
this.snackBar.open("Successfully done");
this.edit();
})
.catch(e => {
this.snackBar.open("Unable to edit this note");
this.edit();
});
}
CHAPTER 3 COMPLETING AN ANGULAR APP
www.EBooksWorld.ir
69
sendError(message) {
this.errorMessages$.next(message);
}
}
Listing 3-14. // Notes-details.component.html
<div *ngIf="note$ | async as note; else spinner">
<mat-card *ngIf="isEdit">
<mat-card-subtitle class="error" *ngIf="errorMessages$ | async as
errorMessage">
{{ errorMessage }}
</mat-card-subtitle>
<mat-card-content>
<app-note-form [note]="note" (saveNote)="saveNote($event)"
(sendError)="sendError($event)"></app-note-form>
</mat-card-content>
</mat-card>
<app-note-card *ngIf="!isEdit" [note]="note" [loading]="isDbLoading$ |
async"></app-note-card>
<button mat-raised-button color="accent" (click)="delete()"><mat-
icon>delete</mat-icon></button>
<button mat-raised-button color="primary" (click)="edit()"><mat-
icon>edit</mat-icon></button>
</div>
<ng-template #spinner>
<mat-spinner></mat-spinner>
</ng-template>
CHAPTER 3 COMPLETING AN ANGULAR APP
www.EBooksWorld.ir

70
Note If you are comfortable, check out the final code. You will find it in github.
com/mhadaily/chapter03/03-note-list-add-edit-update-delete/. Clone the project
and navigate to the folder. Then run the following commands:
npm install // to install dependencies
npm start // to run development server
npm run deploy // to deploy to firebase
Summary
The first three chapters’ goal was to reveal PWA fundamentals; tools; and creating an
app, step by step, together. It may sound unrelated to PWA; however, as we continue
in this book, chapter by chapter, section by section, we will try to make our app
progressively better to finally have a great PWA with Angular.
Beginning with the next chapter, we will dive into implementing offline capabilities,
caches, push notifications, new modern browsers’ APIs, and more just to create a native-
like app for better user experiences on the mobile and web. While this was not possible
just a few years ago, these days it’s widely supported in major browsers.
Figure 3-8. Add note, details, and notes list view
CHAPTER 3 COMPLETING AN ANGULAR APP
www.EBooksWorld.ir

71
© Majid Hajian 2019
M. Hajian, Progressive Web Apps with Angular, https://doi.org/10.1007/978-1-4842-4448-7_4
CHAPTER 4
Angular Service Worker
Up to this point, the application that we built has no PWA characteristics. From this
chapter on, we are going to gradually add PWA features and dive into them in depth.
Angular provides a module called service-worker to handle caching strategies and
push notifications out of the box. Angular Service Worker is highly configurable and can
satisfy Angular app requirements. However, before we start implementing this module,
we should have a basic understanding of Service Worker.
This chapter begins with Service Worker fundamentals and cache APIs as it’s crucial
to know what’s going on behind the scenes when we code with Angular Service Worker.
Then, Angular CLI will help us to scaffold and turn our project to PWA by using
@angular/pwa schematics.
Although, the focus is on CLI v6, each modification will be broken down in order
to give us a better picture of what needs to be done if it is implemented manually, for
instance, in Angular version 5 or even lower.
Service Workers: TheBrain ofPWAs
Your brain is the center of decision making and has full control of your body. Server
workers resemble our brain. At their core, they are worker scripts written in JavaScript,
enabled with a few lines of code in modern browsers and runs in the background. Once
activated, developers are able to intercept network requests, handle push notifications,
manage caches, and perform many different tasks.
You may ask, what if it’s not supported?
1
1
All major browsers, support Service Worker. Check https://caniuse.com/
#feat=serviceworkers
www.EBooksWorld.ir
72
If it is not implemented in a user’s browser, it simply falls back, and the website will
function normally. The beautify of PWA is, by its definition, that anyone– regardless of
browser and operating system of choice– should be able to surf the website and get the
best user experience. This description refers to a phrase known as “perfect progressive
enhancement.”
Understanding Service Worker
In order to understand Service Worker, think of yourself sitting in the center of your
brain. You are provided with different tools to gain control of your body. You see
everything, and you can make any decision. It’s up to you either let your body do what
it does normally or redirect the decision to a different direction. You may even stop the
brain from functioning completely. This is what you can do with network requests in
Service Worker; it acts similar to a proxy between a website and server. The ability to
totally take over a network request makes Service Worker extremely powerful and allows
you to react and respond!
It’s crucial to mention that although Service Worker is written in JavaScript, it has
slightly different behavior such as the following:
• Runs in different threads from the main JavaScript that empowers
your app. Figure4-1 illustrates how Service Worker sits on a different
thread and intercepts a network request.
• Runs in its own global context.
• Designed to be fully asynchronous; therefore, it doesn’t have access
to things such as synchronous XHR and LocalStorage.
• Runs in worker context– thus, it doesn’t have access to DOM.
• Runs HTTPS-Only in production, in addition to Localhost for
development.
• Runs in 1:1 scope, meaning there can be only one Service Worker per
scope.
• Can be terminated any time.
CHAPTER 4 ANGULAR SERVICE WORKER
www.EBooksWorld.ir

73
Service Workers are event driven. As a consequence, it is easier than you think to get
started with them once the basics of the events are understood. Simply pick and choose
which event you want to tap into, and you are good to go. Let’s take a look at primary
events in Service Workers.
The Service Worker Life Cycle
Service Worker in its life cycle has different stages. Take your time and look at Figure4-2,
which demonstrates how the Service Worker life cycle takes place in four steps. Imagine
that your website is going to be served by a Service Worker:
Step 1, when the user navigates to the website, by calling the register() function,
the browser detects the Service Worker JavaScript file; therefore, it downloads, parses,
and the execution phase begins. The Register function retunes a Promise
2
in which in
case of error, the registration gets rejected and the Service Worker registration process
stops.
Step 2, however, if registration goes well and gets resolved, the Service Worker
state turns into installed. Therefore, an install event fires where it is the best place to
precache all of the static assets. Keep in mind that an install event happens only the first
time after registration.
Step 3, as soon as install has completed successfully, Service Worker is then
activated, and has total control under its own scope. Similar to the install event, activate
only happens for the first time after registration and once install has completed.
Figure 4-1. Service Worker can run in different threads and intercept requests
2
https://developer.mozilla.org/en/docs/Web/JavaScript/Reference/Global_Objects/
Promise
CHAPTER 4 ANGULAR SERVICE WORKER
www.EBooksWorld.ir

74
Note Scope is used to specify the subset of your content that you want the
server worker to control and can be defined either by the optional parameter
scope in second argument in register() function or by default where the
server worker JavaScript file is located. For instance, if the server worker file is in
the root of the application, it has control over all pages. However, /sw-test/
specifies only access to all pages under this origin. Figure4-3 demonstrates how
the scope works.
Figure 4-2. Server worker life cycle
CHAPTER 4 ANGULAR SERVICE WORKER
www.EBooksWorld.ir

75
Step 4, once install and activate events are completed with no errors, Service Worker
will be effective. However, if it fails during installation, activation, or is replaced by a new
one, it remains redundant and does not affect the app.
As mentioned, a website without Service Worker won’t handle any requests;
however, as soon as it’s installed and activated, it can control every single request under
its own scope. Hence, to kick the logic off in Service Worker after the first installation and
activation, the website needs to be refreshed, or we should navigate to another page.
Last but not least, it may happen that we want to alter a registered and activated
Service Worker. If there is byte-size change in the registered file, the browser considers it,
and all the steps, as mentioned above, will happen again. However, since we already had
a Service Worker activated, the process is slightly different. This time, Service Worker will
not get activated immediately; therefore, the logic in Service Worker does not execute.
Figure 4-3. Service worker scope demonstration
CHAPTER 4 ANGULAR SERVICE WORKER
www.EBooksWorld.ir

76
It remains waiting until all tabs and clients that have old Service Worker running are
terminated. In other words, all the tabs that have the website open must be closed and
reopened again. As we are developers and know ninja tricks, we can simply skip waiting
from DevTools, or if we want, we can do it programmatically in Service Worker logic, too.
We will review this in detail, shortly, in this chapter.
Service Worker Functional Events
Along with Install and Activate events, Fetch, Push, and Sync events are also available
in Service Worker and are known as functional events. In short:
• Fetch: happens every time the browser requests static assets or
dynamic content; for instance, request for an image, video, CSS, JS,
HTML, and even an ajax request.
• Push: happens when web app receives a push notication.
• Sync: Lets you defer actions until the user has stable connectivity.
is is useful to ensure that whatever the user wants to send is
actually sent. is API also allows servers to push periodic updates to
the app so the app can update when it’s next online.
Chrome DevTools
No developer feels comfortable without an appropriate debugging tool. Among all
browsers, at the time of writing this book, Chrome DevTools is the best choice to debug
Service Workers. Let’s catch a glimpse Chrome DevTools and see what options it
provides to assist us in making debugging easier and enhancing PWAs even better.
Console, Application, and Audits are main panels for debugging Service Worker
in Chrome DevTools. Audits panel leverages Lighthouse,
3
which is an open source,
automated tool for improving the quality of websites and can be used to run
accessibility, performance, SEO, best practices, and a PWA audit test. We use the Audits
panels to qualify web pages, especially Progressive Web App, which is in our target (see
Figure4-4).
3
https://developers.google.com/web/tools/lighthouse/
CHAPTER 4 ANGULAR SERVICE WORKER
www.EBooksWorld.ir

77
Having looked at Application panel, we see the following:
• Manifest: where we can debug Web App Manifest.
4
• Service Workers: where we debug Service Worker and have many
options such as update Service Worker, remove, skip waiting, and
dierent options to work with the network (Figure4-5).
• Offline: simulate a no-internet-access in browser.
• Update on reload: where it downloads Service Worker every time
a page is reloaded, and therefore all life-cycle events, including
install and activate, happen on reload. This is incredibly useful for
debugging.
• Bypass for network: Will force the browser to ignore any active
Service Worker and fetch resources from the network. This is
extremely useful for situations where you want to work on CSS
Figure 4-4. Audits panel in Chrome where we run auditing tests on web pages
4
Chapter 6 is dedicated to Web App Manifest.
CHAPTER 4 ANGULAR SERVICE WORKER
www.EBooksWorld.ir

78
or JavaScript and not have to worry about the Service Worker
accidentally caching and returning old files.
• Clear storage: where we can delete all caches.
• LocalStorage, Session Storage, Indexed DB, Web SQL, and cookies
are all dierent type of storages you may be familiar with. Indexed
DB will be in our main focus in this book since it’s asynchronous and
Service Worker has access to it.
• Cache Storage: it’s a new cache API in browsers, key-value base, and
capable of storing requests and responding. We open this cache to
store most of our assets and dynamic content. is cache is extremely
powerful and is available in both application and Service Worker.
If you are interested in learning more about Chrome DevTools, you can check the
detailed documents at the Google developer website found in https://developers.
google.com/web/tools/chrome-devtools/. I strongly recommend that you take your
time and explore, in depth, the information about DevTools, which I believe makes you
much more productive.
Figure 4-5. Service Workers option under Application panel in Chrome DevTools
CHAPTER 4 ANGULAR SERVICE WORKER
www.EBooksWorld.ir
79
I know that you are impatient to start coding and see sample codes, so let’s
get started.
Service Worker Example Code
It is time to write a few lines of code to see how we can register a Service Worker and
explore its own life cycle. To begin, I’ll create a simple html file, and right before
</body> I’ll open a <script> tag and will register service-worker.js file where it is
located in the root next to index.html.
<!DOCTYPE html>
<html lang="en">
<head>
<meta charset="UTF-8">
<meta name="viewport" content="width=device-width, initial-scale=1.0">
<meta http-equiv="X-UA-Compatible" content="ie=edge">
<title>Apress Simple Service Worker Registartion</title>
</head>
<body>
<div style="text-align: center; padding: 3rem">
<h1>Apress Simple Service Worker Registartion</h1>
</div>
<script>
if ('serviceWorker' in navigator) {
navigator.serviceWorker
.register('/service-worker.js')
.then(registration => { // registeration object
console.log('Service worker is registered', registration);
})
.catch(e => {
console.error('Something went wrong while registaring
service worker.')
});
}
</script>
</body>
</html>
CHAPTER 4 ANGULAR SERVICE WORKER
www.EBooksWorld.ir

80
Progressive enhancement is meant to allow all users to load our web pages whether
they are using the oldest or latest versions of browsers. Consequently, we should always
check for features that may not be available in different browsers. Code above has
started by a feature-checking statement if ('serviceWorker' in navigator) {}.
Once availability is ensured, the register method has been called register('/service-
worker.js') by passing the Service Worker path. This method has a second argument
that is optional to pass extra options to the method: for instance, defining scope. Since,
there is no second argument in the register method, scope is supposed to be the default;
and in this case it is the root where the Service Worker file is located. then and catch
return the registration or error object when the register promised is resolved or rejected
respectively.
Logic in server-worker.js is listeners for activate and install events where we
log two messages in the console in the callback function. Self in this context refers to
ServiceWorkerGlobalScope.
//service-worker.js
self.addEventListener("install", (event) => {
console.log("[SW.JS] Step 2, Service worker has been installed");
});
self.addEventListener("activate", (event) => {
console.log("[SW.JS] Step 2, Service worker has been activated");
});
You will be able to see logs when you open devTools in console panel
(see Figure4-6).
Note You can pull down www.github.com/mhadaily/awesome-apress-
pwa/chapter04/01-simple-service-worker. Run npm install and
then run npm start. It runs a web server on port 8080. You can navigate to
localhost:8080. If you copy and paste code from the book to your project, you
need a web server to run your code.
CHAPTER 4 ANGULAR SERVICE WORKER
www.EBooksWorld.ir
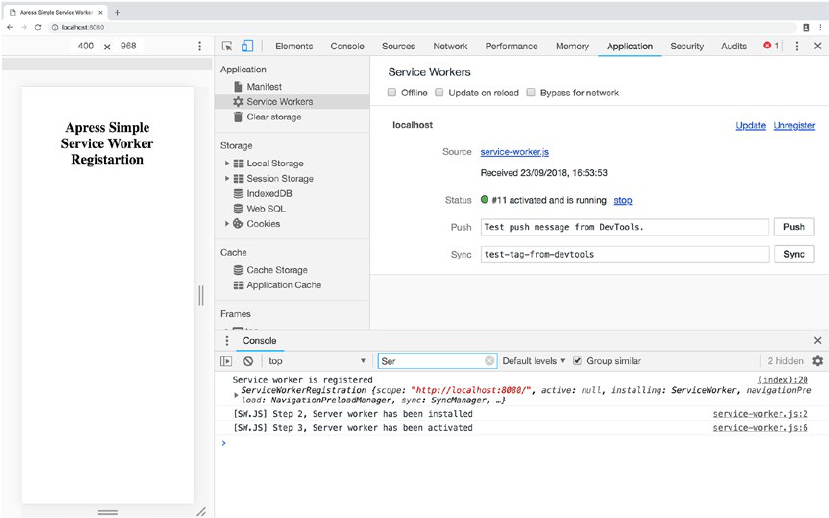
81
Reload the web page; from now on until the new change in service-wokrer.js,
you’ll only see the registration object logged in the console, and install and activate does
not get fired anymore (see Figure4-7).
Figure 4-6. Service worker life cycle when it’s registered for the first time. As you
see, install and activate events happen.
CHAPTER 4 ANGULAR SERVICE WORKER
www.EBooksWorld.ir

82
Add just a few lines to the Service Worker file and then reload the application while
watching Service Workers in the application panel.
// modified service-worker.js
// this is equivalent to following addEventistener
// self.oninstall = (event) => { };
self.addEventListener("install", event => {
console.log("[SW.JS] Step 2, Service worker has been installed");
console.log("Just added something;");
});
// this is equivalent to following addEventistener
// self.onactivate = (event) => { };
self.addEventListener("activate", event => {
console.log("[SW.JS] Step 3, Service worker has been activated");
});
Figure 4-7. Once Service Worker is activated, second reload doesn’t fire install and
activate event anymore
CHAPTER 4 ANGULAR SERVICE WORKER
www.EBooksWorld.ir

83
After reloading, you’ll see that a new Service Worker is waiting until all clients are
terminated. Once the browser detects a new change in Service Worker, then, this file gets
installed; however, it does not activate until all clients get claimed– in other words, all
tabs need to be closed and reopened again, programmatically performing skipWaiting
in Service Worker, or you can manually click on SkipWaiting in Chrome DevTools as
shown in Figure4-8.
Figure 4-8. In DevTools, you can click SkipWaiting to activate new Service
Worker
So far, we have discovered how Service Worker and its life cycle work. Now it’s time
to unfold Cache API capability and see it in action in the next section.
Cache API
Connectivity independence is a top-notch PWAs trait that makes them phenomenal.
Cache API is a new caching storage in browsers where we can store a request as key and
a response as value. In this section, we are going to have a quick glimpse of Cache API in
order to understand how offline features work under the hood.
CHAPTER 4 ANGULAR SERVICE WORKER
www.EBooksWorld.ir
84
I change the app structure to include app.js file where it manipulates DOM to
display title and style.css where it contains a title to make the headline center.
.
├── app.js
├── index.html
├── service-worker.js
└── style.css
// app.js
const title = document.querySelector(".title");
title.innerHTML = "<h1>Apress Simple Service Worker Registartion</h1>";
// style.css
.title {
text-align: center;
padding: 3rem;
}
// index.html
<!DOCTYPE html>
<html lang="en">
<head>
<meta charset="UTF-8">
<meta name="viewport" content="width=device-width, initial-scale=1.0">
<meta http-equiv="X-UA-Compatible" content="ie=edge">
<title>Apress Simple Service Worker Registartion</title>
<link href="/style.css" rel="stylesheet">
</head>
<body>
<div class="title"></div>
CHAPTER 4 ANGULAR SERVICE WORKER
www.EBooksWorld.ir
85
<script src="/app.js"></script>
<script>
if ('serviceWorker' in navigator) {
navigator.serviceWorker.register('/service-worker.js')
}
</script>
</body>
</html>
Precache Static Assets
Every web application contains many static assets including styles, JavaScript, and
images. As mentioned earlier in this chapter, once an install event fires, it’s possible
to tap into the event and write desired logics. It fires once per installation right before
Service Worker takes control over all content; thus, here is one of the best places to
open cache and add data to cache storage in which it is essential to load application
fundamentals.
server-worker.js
// always add version to your cache
const CACHE_VERSION = "v1";
const PRECACHE_ASSETS = ["/", "/style.css", "/index.html", "/app.js"];
self.oninstall = event => {
console.log("Install event, start precaching...");
event.waitUntil(
caches.open(CACHE_VERSION).then(cache => {
return cache.addAll(PRECACHE_ASSETS);
})
);
};
Let’s break down the code. First, we have defined a cache storage name, which is
specified as a version name. Secondly, this app requires that some of its static assets, in
order to run without having an internet connection, must be listed in an array.
CHAPTER 4 ANGULAR SERVICE WORKER
www.EBooksWorld.ir
86
As soon as the install event in Service Worker fires, regardless of what the result of
logic in callback is, it is closed. So, we need a mechanism to tell Service Worker to stand
still until actions are resolved. Hence, waitUntil() is a method that tells browsers to
remain in the same event until the promise or promises that are going to be passed into
the method are resolved.
Lastly, caches.open() accepts a name and open cache to store data into it. Other
Caches methods are:
• delete(cacheName): delete whole cache name and returns Boolean.
• has(cacheName): nd cache name and returns Boolean.
• keys(): retrieve all caches name and returns array of strings.
• match(request): matches a request, if any.
• open(cacheName): it opens a cache storage to add request/
response.
All cache APIs are Promised Based.
Once a cache opens, we can add all of our assets either one by one or as an array.
Other available methods on cache are the following:
• add(request): add a request, and you can add a name as string.
• addAll(requests): add array of requests or arrays of strings.
• delete(request): deletes request or name string and returns a
Boolean.
• keys(): retrieve all caches names and returns array of strings.
• match(request): matches a request, if any.
• matchAll(requests): matches array of requests, if any.
• put(request, response): modifies an existing request with new
response.
You may ask, where should I dump my cache? Great question– it’s right before
Service Worker controls all pages under its scope, which means to activate an event.
Imagine we already bumped up our cache version to v2 and we want to delete all
outdated caches, which helps to clean up outdated caches and free up space (see
Figure4-9).
CHAPTER 4 ANGULAR SERVICE WORKER
www.EBooksWorld.ir

87
We need to filter out all other caches expect the current one and delete all of them.
// service-worker.js
self.onactivate = event => {
console.log("activate event, clean up all of our caches...");
event.waitUntil(
caches.keys().then(cacheNames => {
return Promise.all(
cacheNames
.filter(cacheName => cacheName !== CACHE_VERSION) .
map(cacheName => caches.delete(cacheName));
})
);
};
We call waitUntil() method to tell browser to stay in the activate event until all
Promises passed into this method have been resolved. As you see in the code above, all
keys are retrieved and then are being filtered where it’s not equal to current version, and
then deletes all previous caches (see Figure4-10).
Figure 4-9. Two versions of caches are available in install event since new Service
Worker is not activated yet
CHAPTER 4 ANGULAR SERVICE WORKER
www.EBooksWorld.ir
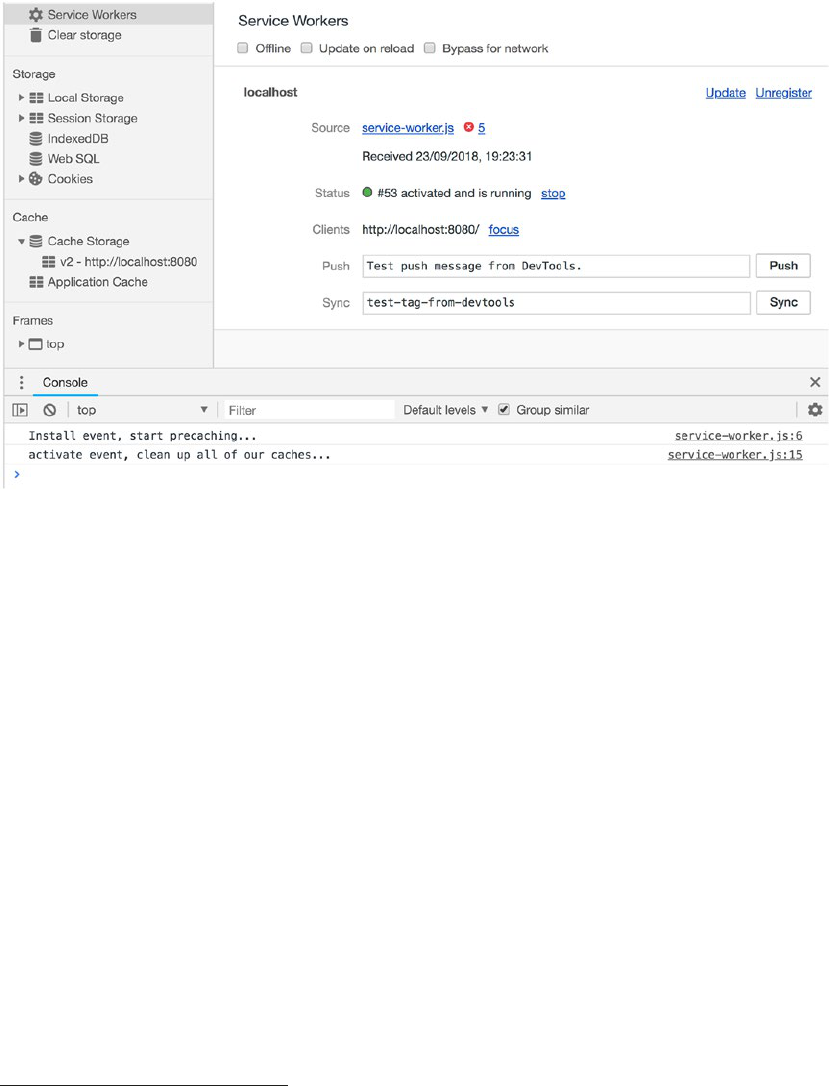
88
Having reviewed the Service Worker and cache API, I am impatiently looking
forward to starting off the Angular Service Worker module.
Angular Service Worker Module
Conceptually, Angular Service Worker is similar to a forward cache or a CDN edge
installed in the end user’s web browsers, which satisfies requests made by an Angular
app for resources or data from a local cache without needing to wait for the network.
Like any cache, it has rules for how content is expired and updated.
Before adding anything to the project, let’s analyze our application using Lighthouse
in the Audit panel.
Navigate to awesome-apress-pwa.firebaseapp.com
5
or your Firebase URL where you
have already deployed the application.
Figure 4-10. Once new Service Worker is activated, all previous oudated caches
are deleted
5
Alternatively, you can run ng serve --prod to run production ready app served a locally
runned server, then nagivate to localhost:4200.
CHAPTER 4 ANGULAR SERVICE WORKER
www.EBooksWorld.ir

89
Note You can pull down www.github.com/mhadaily/awesome-apress-
pwa/chapter04/03-analyze-using-lighthouse. Run npm install and
then run npm run serve:prod. It runs a production app on a web server. You
can navigate to localhost:4200. You may need to also deploy this code to
Firebase in order to evaluate your app before adding a Service Worker.
Next, open developer tools
6
in Chrome and click on the Audit panel. Our main
target group is mobile users. So, preferably select emulation on Mobile and uncheck all
check boxes expect Progress Web App
7
and select Simulated Fast 3G, 4x CPU slowdown
in throttling
8
option to make sure our test environment is similar to average real mobile
user devices. Ensure clear storage is also selected as focused visitors are those who load
the web for the first time.
Press run audits and wait until Lighthouse generates a report. Result indicates a
54/100
9
score; that’s because we have some audits passed. Six failures are mainly related
to Service Workers, Progressive Enhancement, and Web App Manifest as shown in
Figure4-11.
Note If you run auditing on localhost, keep in mind that since you are not running
your app with HTTPS, you may see a lower score.
6
Press Ctrl + Shift + I in Windows or Cmd + Shift + I in Mac.
7
We do run all other options in this book as we go and optimize to hit a 100/100 score.
8
Read more about network throttling in Lighthouse: https://github.com/GoogleChrome/
lighthouse/blob/master/docs/throttling.md.
9
Lighthouse validates many aspects of PWA which is specifically based on https://developers.
google.com/web/progressive-web-apps/checklist.
CHAPTER 4 ANGULAR SERVICE WORKER
www.EBooksWorld.ir

90
Support forService Worker inAngular
Angular schematics
10
has been introduced to Angular CLI 6 and has had a notable
impact on how quickly we can scaffold our Angular app. Due to this, Adding PWA
features, including Service Worker, is a straightforward process and incredibly easy.
Since @angular/cli has been installed globally, simply run the following command in
your terminal.
ng add @angular/pwa
This command
11
will automatically modify some of the existing files by extending
boilerplate codes and adding new files into the Angular app structure. Let’s take a close
look at the modifications.
Figure 4-11. Initial result before adding any new optimization to the project
10
Learn more about schematics at https://blog.angular.io/schematics-an-introduction-
dc1dfbc2a2b2.
11
Version 6.1.3 of Angular cli and PWA schematics is buggy. So please upgrade or downgrade to a
lower version, possibly 6.1.0 or 6.2+.
CHAPTER 4 ANGULAR SERVICE WORKER
www.EBooksWorld.ir

91
CREATE ngsw-config.json (441 bytes)
CREATE src/manifest.json (1085 bytes)
CREATE src/assets/icons/icon-128x128.png (1253 bytes)
CREATE src/assets/icons/icon-144x144.png (1394 bytes)
CREATE src/assets/icons/icon-152x152.png (1427 bytes)
CREATE src/assets/icons/icon-192x192.png (1790 bytes)
CREATE src/assets/icons/icon-384x384.png (3557 bytes)
CREATE src/assets/icons/icon-512x512.png (5008 bytes)
CREATE src/assets/icons/icon-72x72.png (792 bytes)
CREATE src/assets/icons/icon-96x96.png (958 bytes)
UPDATE angular.json (4049 bytes)
UPDATE package.json (1646 bytes)
UPDATE src/app/app.module.ts (1238 bytes)
UPDATE src/index.html (652 bytes)
As you have seen, different icons sizes, ngsw-config.json, manifest.json, and
ngsw-worker.js
12
have been added to the project while angular.json, app.module.ts,
index.html, and package.json have been modified.
Let’s break down the changes and see what and where it has changed:
1. package.json: Angular Service Worker "@angular/service-
worker" has been added to list of dependencies, and by the
time of writing this book, version 6.1.0 has been installed. It may
upgrade or add a new version by the time you read this book.
2. ngsw-config.json: added to root of project, and it contains a Service
Worker configuration. In this chapter we will take a look at it and
walk through the basics, and in the next chapter we will dive into it
and add more advanced configurations along with tips and tricks.
{
"index": "/index.html",
"assetGroups": [
12
You need to build for production to find this file under /dist folder.
CHAPTER 4 ANGULAR SERVICE WORKER
www.EBooksWorld.ir
92
{
"name": "app",
"installMode": "prefetch",
"resources": {
"files": [
"/favicon.ico",
"/index.html",
"/*.css",
"/*.js"
]
}
}, {
"name": "assets",
"installMode": "lazy",
"updateMode": "prefetch",
"resources": {
"files": [
"/assets/**"
]
}
}
]
}
3. manifest.json: added to /src/ folder in the project. it contains a
conguration to make the app installable. In Chapter 6, manifest.
json will be reviewed in depth.
{
"name": "lovely-offline",
"short_name": "lovely-offline",
"theme_color": "#1976d2",
"background_color": "#fafafa",
"display": "standalone",
"scope": "/",
"start_url": "/",
CHAPTER 4 ANGULAR SERVICE WORKER
www.EBooksWorld.ir
93
"icons": [
{
"src": "assets/icons/icon-72x72.png",
"sizes": "72x72",
"type": "image/png"
},
{
"src": "assets/icons/icon-96x96.png",
"sizes": "96x96",
"type": "image/png"
},
{
"src": "assets/icons/icon-128x128.png",
"sizes": "128x128",
"type": "image/png"
},
{
"src": "assets/icons/icon-144x144.png",
"sizes": "144x144",
"type": "image/png"
},
{
"src": "assets/icons/icon-152x152.png",
"sizes": "152x152",
"type": "image/png"
},
{
"src": "assets/icons/icon-192x192.png",
"sizes": "192x192",
"type": "image/png"
},
{
"src": "assets/icons/icon-384x384.png",
"sizes": "384x384",
"type": "image/png"
},
CHAPTER 4 ANGULAR SERVICE WORKER
www.EBooksWorld.ir
94
{
"src": "assets/icons/icon-512x512.png",
"sizes": "512x512",
"type": "image/png"
}
]
}
4. Different icons: added in src/assets/icons/ and have been reused
in manifest.json. We will come back to these icons in Chapter 6.
5. Angular.json: as you know, this file contains all Angular CLI
configurations. Since manifest.json needs to be exposed in a
public/build folder, it must be added to an assets array in in the
architect configurations where it’s applicable. See the following
snippet, for example:
"architect": {
"build": {
"builder": "@angular-devkit/build-angular:browser",
"options": {
...
"assets": [
"src/favicon.ico",
"src/assets",
"src/manifest.json"
],
"styles": [
...
"src/styles.scss"
],
"scripts": []
},
...
CHAPTER 4 ANGULAR SERVICE WORKER
www.EBooksWorld.ir
95
There will be one more change here. serviceWorker has been
added to the production configuration to inform Angular CLI that
this feature is enabled. Let take a look at the configuration’s snippet:
"configurations": {
"production": {
"fileReplacements": [
{
"replace": "src/environments/environment.ts",
"with": "src/environments/environment.prod.ts"
}
],
"optimization": true,
"outputHashing": "all",
"sourceMap": false,
"extractCss": true,
"namedChunks": false,
"aot": true,
"extractLicenses": true,
"vendorChunk": false,
"buildOptimizer": true,
"serviceWorker": true
}
}
6. Index.html: after adding manifest.json to the project, it needs to
be exposed by rel=manifest in the head of index.html to let the
browser know that this le is the project’s manifest conguration
le. eme color meta tells the browser what color to tint UI
elements such as the address bar.
<link rel="manifest" href="manifest.json">
<meta name="theme-color" content="#1976d2">
7. app.module.ts: is our main app module that has been modied
to import ServiceWorkerModule in order to add Service Worker
capabilities and features to the project. is module registers
CHAPTER 4 ANGULAR SERVICE WORKER
www.EBooksWorld.ir

96
ngsw-worker.js Service Worker JavaScript le, which has been
written and maintained by the Angular team and will be added
after a prod build to the root of project. It has a second argument
to ensure that this registration is enabled only when the app
is ready to be built for production and doesn’t interrupt the
development environment.
ServiceWorkerModule.register("ngsw-worker.js", {
enabled: environment.production
})
Service Worker in Angular can also be registered in two other options:
• Adding registration script in index.html, please refer to the previous
section where we register a simple Service Worker. Remember to
register ngsw-worker.js. I don’t recommend this option; rather, use
the next option if necessary.
• Using the same registration code in main.ts after bootstrapModule()
is resolved,
// main.ts
platformBrowserDynamic().bootstrapModule(AppModule)
.then(() => {
if ('serviceWorker' in navigator && environment.production) {
window.addEventListener('load', () => {
navigator.serviceWorker.register('/ngsw-worker.js') ;
});
}
})
.catch(err => console.log(err));
Note ServiceWorkerModule.register() has scope option in addition to
enable.
CHAPTER 4 ANGULAR SERVICE WORKER
www.EBooksWorld.ir
97
Although @angular/pwa schematic helps to set up an Angular PWA project quickly,
there may be use cases that we need to do all of the above steps manually. For instance:
1. If you are running Angular 5in production, there is still a chance
to add Angular Service Worker module to your application. Simply
go back to each step and try to add or modify all the changes one
by one. Run npm install to make sure @angular/service-worker
is successfully installed and that you are good to go!
2. You may need only ServiceWorker module alone and not the rest
of features: for instance, manifest.json.
It seems every piece is in place and ready to build for production. In the next section,
we are going to check out the dist folder and explore new additions.
ngsw-config.json Anatomy
Angular Server Worker has been designed and programmed for large applications in
mind; thus, it’s highly configurable.
Rules are written in ngsw-config json file. A Top-Level Angular Service Worker
configuration object interface indicates that there are five main properties that can be
used.
interface Config {
appData?: {};
index: string;
assetGroups?: AssetGroup[];
dataGroups?: DataGroup[];
navigationUrls?: string[];
}
By default, index.html has been added as the main entry point. Having looked
at assetGroups interface, it’s an array that set rules for static assets such as JavaScript,
images, icons, CSS, and HTML files.
type Glob = string;
CHAPTER 4 ANGULAR SERVICE WORKER
www.EBooksWorld.ir

98
interface AssetGroup {
name: string;
installMode?: 'prefetch' | 'lazy';
updateMode?: 'prefetch' | 'lazy';
resources: {
files?: Glob[];
versionedFiles?: Glob[];
urls?: Glob[];
};
}
Note VersionedFiles is depreciated and as of v6, `versionedFiles` and `files`
options have the same behaviors. Use `files` instead.
We have seen that Angular CLI has added default rules to the ngsw-config.json:
"assetGroups": [
{
"name": "app",
"installMode": "prefetch",
"resources": {
"files": ["/favicon.ico", "/index.html", "/*.css", "/*.js"]
}
},
{
"name": "assets",
"installMode": "lazy",
"updateMode": "prefetch",
"resources": {
"files": ["/assets/**"]
}
}
]
CHAPTER 4 ANGULAR SERVICE WORKER
www.EBooksWorld.ir
99
As it’s shown, there are two objects in this array. Let’s explore the first object.
{
"name": "app",
"installMode": "prefetch",
"resources": {
"files": ["/favicon.ico", "/index.html", "/*.css", "/*.js"]
}
},
1. name: defines group name and will be part of Cache API storage
name.
2. installMode: determines how cache strategies should behave for
group’s resources when they are cached or fetched. It has two options:
a. prefetch: means all the resources are downloaded and should immediately
be cached on install event; this is similar to precache assets that we have
seen earlier in this chapter. This mode is being used for caching assets
that applications require for bootstrapping like app-shell to make the
application be fully capable offline.
b. lazy: means each resource is cached individually in runtime when it’s
requested.
3. resouces: the explicit list of resources to cache. ere are two
ways to set up them: les or urls. VersionedFiles as mentioned are
depreciated and have the same behavior as les.
a. files: contains a list of globs matched against files in the root (in this case).
* stands for file names which have been defined with appropriate file name
extensions. For example, *.js means all JavaScript files and / means they are
located in the root. In short, /*.js indicates all JavaScript files located in the
root of the project.
b. urls: contains a list of external URLs (either relative, absolute paths, or on
dierent origins) that should be cached: for example, Google Fonts. URLs
cannot be hashed, so by changes in conguration, they will be updated.
In default congurations, there are no URLs, but we will need it to add our
external resources in the next chapter.
CHAPTER 4 ANGULAR SERVICE WORKER
www.EBooksWorld.ir

100
Note Files will have content hashed included in ngsw.json file’s hashTable
13
node. It helps to have an accurate version. Keep in mind that file paths are mapped
into the URL space of the application, starting with the base href.
Clearly, it tries to precache essential files that are required to run the Angular
application even when there is no network.
Moving forward to the second object, it has similar configurations except that it
targets all files regardless of their file extension under /assets folder, which will get
cached as soon as they are fetched in runtime. If there is a new change in each of those
assets, it’ll be fetched and updated immediately.
{
"name": "assets",
"installMode": "lazy",
"updateMode": "prefetch",
"resources": {
"files": ["/assets/**"]
}
}
1. installMode: please refer to object one description.
2. updateMode: determines how each cached asset should behave
when application has a new version and is downloaded; similar to
installMode, it has two options:
a. prefetch: means each asset should be refreshed on every new app version
(if needed). Angular creates hashTable to compare hashes, and if there is a
new change, the asset will be downloaded. URLS in caches, in this manner,
will always be refreshed (with an If-Modified-Since
14
request).
b. lazy: performs similar to above ow however, when resource is requested.
is mode works only if installMode is also lazy.
13
https://en.wikipedia.org/wiki/Hash_table
14
https://developer.mozilla.org/en-US/docs/Web/HTTP/Headers/If-Modified-Since
CHAPTER 4 ANGULAR SERVICE WORKER
www.EBooksWorld.ir

101
3. resources: please refer to object one description.
a. files: ** stands for everything. In this case, /assets/** means all files under
assets files including images, icons, etc.
Note Default value for installMode and updateMode is prefetch in ngsw.js
I believe in the saying that says “understand, don’t imitate.” Evaluating each object
should help us to be more capable of writing our own rule based on what we need in our
application. The fundamentals are the same; however, you may need more advanced
setups such as writing rules for external resources and navigation URLs, which will,
be discussed in the next chapter.
Build Project withAngular Service Worker
ServiceWorker module is only enabled when we run a production build. Run the
following command to start building an app in prod-environment:
npm run build:prod // or ng build --prod
ngsw-worker.js is our servicer worker file and ngsw.json our configurations which
will be fetched by service worker and will be implemented accordingly.
.
├── 0.c570a2562d2874d34dc4.js
├── 1.71eb2445db7dfda9e415.js
├── 2.df6bb6a6fde654fe8392.js
├── 3rdpartylicenses.txt
├── assets
├── favicon.ico
├── index.html
├── main.873527a6348e9dfb2cc1.js
CHAPTER 4 ANGULAR SERVICE WORKER
www.EBooksWorld.ir
102
├── manifest.json
├── ngsw-worker.js
├── ngsw.json
├── polyfills.8883ab5d81bf34ae13b1.js
├── runtime.e14ed3e6d31ff77728e9.js
├── safety-worker.js
├── styles.7a3dc1d11e8502df3926.css
└── worker-basic.min.js
ngsw-worker is registered as the Service Worker logic file, and ngsw.json is being
created based on ngsw-config.json. All the configurations and resources are generated
in ngsw.json manifest, which is automatically fetched by written logic in ngsw-worker
and an add, update, or delete cache based on URLs, files, and strategies that have been
defined in this file. It contains a hashTable according to build-hash and Angular Service
Worker. Check this hash to update resources that are in dist folder if there are any
changes.
If you open ngsw manifest file, static assets and JavaScript files after the build have
been added magically. Eventually, Angular CLI will match all of our files and add them
to ngsw, as we need a full path of each file. ngsw.json also informs Angular to fetch these
resources into the cache and keep them updated accordingly. It’s worth mentioning that
even though this file has been designed for Angular Service Worker, it’s a pretty readable
file for us as developers.
Let’s run following the command to fire up the local server:
npm run prod
Navigate to localhost:4200 and open your Chrome DevTools. Open the application
panel and check for Service Workers. Figure4-12 clearly shows that ngsw-worker.js has
been successfully installed and how different caches in Cache Storage were created.
In the next chapter, ngsw manifest and ngsw-worker will be reviewed in depth.
CHAPTER 4 ANGULAR SERVICE WORKER
www.EBooksWorld.ir

103
We need to run the following command as always to deploy a new build to Firebase
and see how all of our efforts in the setup work in action:
npm run deploy
Once deployment is done, open audit panel in Chrome DevTools and press run
audits (see Figure4-13). Remember, we should keep all the same settings as we did
earlier in this chapter.
Yes, this is true: score 100/100 as shown in Figure4-13 has been achieved for PWA
auditing by just adding a few steps in Angular, which was mainly done by the CLI.This is
great, but we still have a lot to do.
Figure 4-12. ngsw-worker.js has been installed and resouces have been added to
Cache storage
CHAPTER 4 ANGULAR SERVICE WORKER
www.EBooksWorld.ir

104
Note Chapters 13 and 14 are dedicated to building a PWA with Workbox, which
is a tool to create our service worker and cache strategies. The goal is to have
100% PWA coverage for all Angular apps regardless of their version. So, do not
worry if your Angular version does not have an Angular Service Worker module or
the Angular Service Worker does not meet your essential requirements. You’ll be
covered soon.
Summary
The Angular team aims to make PWA features as easy as possible. As you have seen, it
was a trivial process to set up those features in the Angular project. In this chapter, we
have seen how we turned our Angular application into a PWA using Angular CLI not
only with pwa schematic but also with defined steps to reproduce manually while default
configurations have been explained.
Figure 4-13. Score 100 after setting up Angular for PWA schematics by ng CLI
CHAPTER 4 ANGULAR SERVICE WORKER
www.EBooksWorld.ir
105
Although the app got a score of 100, it does not mean we have accomplished all of
what we need to run our application for any circumstances. So, bear with me while we
dive deeply into more configurations, settings, and advanced techniques in order to
meet all production-ready app requirements.
With that said, I encourage you to proceed to the next chapter.
CHAPTER 4 ANGULAR SERVICE WORKER
www.EBooksWorld.ir
107
© Majid Hajian 2019
M. Hajian, Progressive Web Apps with Angular, https://doi.org/10.1007/978-1-4842-4448-7_5
CHAPTER 5
Advanced Angular Service
Worker andRuntime
Caching
In the previous chapter, we implemented Angular Service Worker and saw that Angular
CLI helped us to run PWA out of the box with minimal effort. Basic configuration is the
beginning of our journey to create a PWA with Angular. It is obvious that an application
will require advanced techniques and strategies as it grows. Hence, Angular Service
Worker is providing more features to handle variant situations.
In this chapter, I will expand configurations to an advanced level in order to make a fully
offline application. However, we start off by learning complex cache strategies in Service
Worker that enable us to understand what underlies Angular Service Worker implementation.
Cache Strategies
There are a few patterns for handling requests and responds in Service Worker. It differs
from application to application. Depending on requirements, you may use one or more
of the strategies discussed in the following sections.
Cache Only
In this strategy, requests always look for a match in the cache and respond accordingly.
This is ideal for “versioned” files when they are supposed to be there for your application
and considered static and unchanged until the next deployment. Usually all statics assets
that application needs to run, we cache them on install event. Figure5-1 is a simple
illustration to show how it works.
www.EBooksWorld.ir

108
Following snippet shows how we can use this strategy.
self.addEventListener("fetch", event => {
event.respondWith(caches.match(event.request));
});
Notice where a request match is not found in the cache, respond will look like a
connection error.
Network Only
There are use cases that don’t have an offline equivalent. Imagine that you have a stock
exchange website and always need to show the latest and most up-to-date rates to your
user. Figure5-2 shows a simple illustration of how this works.
Figure 5-1. Cache only strategy illustration
Figure 5-2. Network Only
CHAPTER 5 ADVANCED ANGULAR SERVICE WORKER ANDRUNTIME CACHING
www.EBooksWorld.ir

109
self.addEventListener("fetch", event => {
event.respondWith(fetch(event.request));
});
It is possible that you don’t call event.respondWith, which ends up in default
browser behavior.
Cache Falling Back toNetwork or Cache-First
This gives you a combination of cache only and network only where it tries to match the
request from a cache, and if it doesn’t exist, then it falls back to fetch a request from the
network. See Figure5-3 to see how it works.
Figure 5-3. Cache falling back to network or Cache-First
self.addEventListener('fetch', function(event) {
const request = event.request;
event.respondWith(
caches.match(event.request).then(function(response) {
return response || fetch(event.request);
})
);
});
CHAPTER 5 ADVANCED ANGULAR SERVICE WORKER ANDRUNTIME CACHING
www.EBooksWorld.ir
110
We can leverage this strategy to cache content dynamically.
self.addEventListener("fetch", event => {
const request = event.request;
event.respondWith(
caches.match(request).then(res => {
// Fallback
return (
res || fetch(request).then(newRes => {
// Cache fetched response
caches
.open(DYNAMIC_CACHE_VERSION)
.then(cache => cache.put(request, newRes));
// Response can be used once, we need to clone to use it more in the
context
return newRes.clone();
})
);
})
);
});
Keep in mind that updated-cached content will be available in the next visit of the
same request.
Network Falling Back toCache or Network-First
This strategy is suitable for those resources that should update regardless of what is the
app version or what the versioned files are: for instance, showing the latest articles or
timeline in social media (see Figure5-4). Eventually, the most up-to-date content is
shown to our online users whereas in offline mode, a user will receive an older cached
version of the content. Similar to the previous strategy, it’s most likely that we want to
update a cache entry when a network request succeeds.
CHAPTER 5 ADVANCED ANGULAR SERVICE WORKER ANDRUNTIME CACHING
www.EBooksWorld.ir

111
self.addEventListener("fetch", event => {
const request = event.request;
event.respondWith(
fetch(request)
.then(res => {
// Cache latest version
caches
.open(DYNAMIC_CACHE_VERSION)
.then(cache => cache.put(request, res));
return res.clone();
}) // Fallback to cache
.catch(err => caches.match(request))
);
});
However, in case of a slow or intermittent connection, a user faces an unacceptable
and unpleasant experience since fetch takes an extremely long time; so it’s going to be
frustrating from the user’s perspective. See the next pattern if you are looking for a better
alternative.
Figure 5-4. Network falling back to cache or Network-First
CHAPTER 5 ADVANCED ANGULAR SERVICE WORKER ANDRUNTIME CACHING
www.EBooksWorld.ir
112
Cache andNetwork
The idea is to first show your user old cached content if it exists and then update the UI
when the network request succeeds. In other words, you have to make two fetch requests
in the page, and in Service Worker you should always update the cache with the latest
fetch response. Figure5-5 demonstrates how it works.
You have seen this pattern in many social media platforms such as Twitter where
they usually show old cached content and then add newer content on top of the timeline
and adjust the scroll position so that a user is uninterrupted. All in all, this is ideal for
content that needs to be updated frequently such as articles or activity timelines.
Although this strategy gives our user a better experience, it can be disruptive, too:
for instance, when a user is reading content on the website. All of sudden, a large piece
of that content disappears in order to update the UI and show them fresh data. So, it is
important that we ensure users’ interactions with the app and never interrupt so it is as
smooth as possible. Remember, one of the most important goals of PWA is to give our
user a much better experience.
Code in the app looks like this:
const hasFetchData = false;
// fetch fresh data
const freshDataFromNetwork = fetch(YOUR_API)
.then((response) => response.json())
.then((data) => {
hasFetchData = true;
showDataInPage();
});
// fetch cached data
caches.match(YOUR_API)
.then((response) => response.json())
.then(function(data) {
if (!hasFetchData) {
showDataInPage(data);
}
})
.catch((e)=>{
CHAPTER 5 ADVANCED ANGULAR SERVICE WORKER ANDRUNTIME CACHING
www.EBooksWorld.ir

113
// in case if cache is not availble, we hope data is received by network
fetch
return freshDataFromNetwork;
})
Note Cache API is available in Window Object and other Workers in addition to
Service Worker.
Code in Service Worker is similar to a network falling back to cache while updating
the cache.
self.addEventListener("fetch", event => {
const request = event.request;
event.respondWith(
caches.open(DYNAMIC_CACHE_VERSION).then(cache => {
return fetch(request).then(res => {
Figure 5-5. Cache and network
CHAPTER 5 ADVANCED ANGULAR SERVICE WORKER ANDRUNTIME CACHING
www.EBooksWorld.ir

114
cache.put(request, res.clone());
return res;
});
})
);
});
You may ask, what if both network and cache fail? See the next pattern to find out
more.
Generic Fallback
This pattern is ideal to show a replacement for those requests that are not available in
both cache and network: for example, when a user has an avatar and fetch from both the
network and cache fails. So, we can simply replace this request with a photo placeholder.
Another example is to show our user an offline page when a request fails. You can
simply precache offline.html page and match from the cache when necessary. Figure5-6
illustrates how it works.
Figure 5-6. Generic fallback
CHAPTER 5 ADVANCED ANGULAR SERVICE WORKER ANDRUNTIME CACHING
www.EBooksWorld.ir

115
self.addEventListener("fetch", event => {
const request = event.request;
event.respondWith(
// check with cache first
caches
.match(request)
.then(res => {
// Fall back to network and if both failes catch error
return res || fetch(request);
})
.catch(() => {
// If both fail, show a generic fallback:
return caches.match("/offline.html");
})
);
});
In a real application, even though you can show an offline replacement to a user,
you may want to store data to the indexedDB and let your user know that the request
is successfully retained and will be synced. We will review offline storage together in
Chapter 9.
Note It is likely that using all or many of the cache strategies in an application
depends on what we need to implement. Evaluate your particular use case and
then choose one pattern that suits it.
It is important to understand most of the common cache patterns in Service Worker
before we review Angular runtime caching. I am confident that you will get a better
understanding of Angular cache strategies since you know how they work. Let’s procced
to Angular Service Worker advanced configurations.
CHAPTER 5 ADVANCED ANGULAR SERVICE WORKER ANDRUNTIME CACHING
www.EBooksWorld.ir

116
Runtime Cache inAngular Service Worker
Angular Service Worker is configured using ngsw-config.json. Having been helped by
Angular CLI, the default setting has been in place to run for a barebones Angular app.
But as the application develops, we see the need to cache external files, CDN resources,
as well as populate data from a remote API call. It gets more complex and we would like
the caching all data or at least partially caching to have an enhanced performance, faster
app, and smooth experience. I aim to cover what an application needs regarding data
and external file caches in this section. Let’s carry on.
Note Runtime cache may be called dynamic content cache, too. The idea is to
cache data when fetched or requested while the application is running, and data
has not been stored to cache already on the install event, which is referred to as
precache.
External Resources
Font, JavaScript, style, Images, and other type of files that are hosted on a different origin
or CDN are considered external resources. Whether we want to precache or lazily add
them to cache on runtime, we need to define them in an ngsw-config.json. They must
be added to assetGroup using urls key where the value will be an array of Glob,
meaning we can also use glob pattern to specify urls. URLs are not hashed;
thus, whenever a configuration changes, they will update. As mentioned in previous
chapters, we had added two fonts in our application.
<head>
<link href="https://fonts.googleapis.com/icon?family=Material+Icons"
rel="stylesheet">
<link href="https://fonts.googleapis.com/css?family=Roboto:300,400,500"
rel="stylesheet">
<base href="/">
<meta name="viewport" content="width=device-width, initial-scale=1">
<link rel="manifest" href="manifest.json">
<meta name="theme-color" content="#1976d2">
</head>
CHAPTER 5 ADVANCED ANGULAR SERVICE WORKER ANDRUNTIME CACHING
www.EBooksWorld.ir
117
Now we want to cache these fonts. Code is similar to the following:
// this is our application ngsw-config.json file
{
"name": "app",
"installMode": "prefetch",
"resources": {
"files": ["/favicon.ico", "/index.html", "/*.css", "/*.js"],
"urls": [
https://fonts.googleapis.com/icon?family=Material+Icons,
https://fonts.googleapis.com/css?family=Roboto:300,400,500,
https://fonts.gstatic.com/s/roboto/v18/
KFOlCnqEu92Fr1MmSU5fCRc4AMP6lbBP.woff2,
https://fonts.gstatic.com/s/materialicons/v41/flUhRq6tzZclQEJ-Vdg-
IuiaDsNcIhQ8tQ.woff2
]
}
},
{
"name": "assets",
"installMode": "lazy",
"updateMode": "prefetch",
"resources": {
"files": ["/assets/**"],
}
}
Here is an example where we could add precise URLs since we already knew those
URLs. However, it is not always clear what will be the exact URLs. Thus, we can add a
glob pattern to cache all URLs that are hosted in googleapis.com and gstatic.com in order
to host woff fonts dynamically.
{
"name": "app",
"installMode": "prefetch",
CHAPTER 5 ADVANCED ANGULAR SERVICE WORKER ANDRUNTIME CACHING
www.EBooksWorld.ir
118
"resources": {
"files": ["/favicon.ico", "/index.html", "/*.css", "/*.js"],
}
},
{
"name": "assets",
"installMode": "lazy",
"updateMode": "prefetch",
"resources": {
"files": ["/assets/**"],
"urls": [
https://fonts.googleapis.com/**,
https://fonts.gstatic.com/**
]
}
}
Patterns use a limited glob format in configuration unless otherwise it is explicitly
noted.
1. ** matches 0 or more path segments
a. /**/*.html specifies all HTML files
b. /**/*.js species all JS les
c. example.com/** species all request which hostname is matched
2. * matches 0 or more characters excluding /
a. /*.html specifies only HTML files in the root
b. /a/folder/*.png specied only png les in the /a/folder/
3. ? matches exactly one character excluding /
a. /what?ver.js specifies all JS files in the root where its 5
th
character
could be anything
CHAPTER 5 ADVANCED ANGULAR SERVICE WORKER ANDRUNTIME CACHING
www.EBooksWorld.ir

119
4. e ! prex acts negative, meaning that only les that don’t match
the pattern will be included.
a. !/**/*.map excludes all source-maps
b. !/*.pdf excludes all pdf les in the root
Note urls doesn’t have support for negative glob patterns and ? will be
matched literally; that means ? will not match any character other than ? itself.
Run the build command. Once it’s done, navigate to /dist folder and open ngsw.
json generated based on an ngsw-config.json by Angular CLI.
"assetGroups": [
{
"name": "app",
"installMode": "prefetch",
"updateMode": "prefetch",
"urls": [
"/0.c570a2562d2874d34dc4.js",
"/1.71eb2445db7dfda9e415.js",
"/2.df6bb6a6fde654fe8392.js",
"/favicon.ico",
"/index.html",
"/main.f224c8a2c47bceb8bef0.js",
"/polyfills.8883ab5d81bf34ae13b1.js",
"/runtime.e14ed3e6d31ff77728e9.js",
"/styles.7a3dc1d11e8502df3926.css"
],
"patterns": []
},
{
"name": "assets",
"installMode": "lazy",
"updateMode": "prefetch",
CHAPTER 5 ADVANCED ANGULAR SERVICE WORKER ANDRUNTIME CACHING
www.EBooksWorld.ir
120
"urls": [
"/assets/icons/icon-128x128.png",
"/assets/icons/icon-144x144.png",
"/assets/icons/icon-152x152.png",
"/assets/icons/icon-192x192.png",
"/assets/icons/icon-384x384.png",
"/assets/icons/icon-512x512.png",
"/assets/icons/icon-72x72.png",
"/assets/icons/icon-96x96.png"
],
"patterns": [
"https:\\/\\/fonts\\.googleapis\\.com\\/.*",
"https:\\/\\/fonts\\.gstatic\\.com\\/.*"
]
}
],
By looking into the generated ngsw-worker.js and ngsw.json, we notice that the
glob turned into a pattern to be consumed as regex. Here is the piece of code that maps
pattern to regex, in class AssetGroup extracted from ngsw-worker.js:
// Patterns in the config are regular expressions disguised as
strings. Breathe life into them.
this.patterns = this.config.patterns.map(pattern => new
RegExp(pattern));
And in the future, down in code, it is being used as:
// Either the request matches one of the known resource URLs, one of the
patterns for
// dynamically matched URLs, or neither. Determine which is the case for
this request // in order to decide how to handle it.
if (this.config.urls.indexOf(url) !== -1 || this.patterns.some(pattern =>
pattern.test(url))) {
These have been added in order to match requests while intercepting and storing
them in cache storage.
CHAPTER 5 ADVANCED ANGULAR SERVICE WORKER ANDRUNTIME CACHING
www.EBooksWorld.ir
121
Revalidate Strategy forResources withNo Hash
Some resources may not have hash while it existed in the cache. Angular Service Worker
will check how old is this request and ensure it still can be usable. There are three
different strategies applied in Angular Service Worker regarding resource revalidation:
1. The request has a Cache-Control header, and thus expiration
needs to be based on its age.
• This specifies directives for caching mechanisms in both requests
and responses. Standard Cache-Control directives can be used by
the client in an HTTP request.
Cache-Control: max-age=<seconds>
Cache-Control: max-stale[=<seconds>]
Cache-Control: min-fresh=<seconds>
Cache-Control: no-cache
Cache-Control: no-store
Cache-Control: no-transform
Cache-Control: only-if-cached
• Depends on the condition Angular looks for: max-age or Date
header.
2. e request has an Expires header, and expiration is based on the
current timestamp.
• The Expires header contains the date/time while Invalid
dates, like the value 0, is an indication that a resource is already
expired. If there is a Cache-Control header with the "max-age"
or "s-maxage" directive in the response, the Expires header is
ignored.
• e.g.: Expires: Wed, 21 Oct 2019 07:28:00 GMT.
3. e request has no applicable caching headers and must be
revalidated.
• If there is no way to evaluate staleness, assume the response is
already stale.
CHAPTER 5 ADVANCED ANGULAR SERVICE WORKER ANDRUNTIME CACHING
www.EBooksWorld.ir
122
So, it’s good practice to add the cache control to your resources; it not only helps
browsers to revalidate a response, but also Angular Service Worker helps to stay up to
date efficiently.
Data Groups Settings
Beside assetGroups, there are also dataGroups. Unlike asset resources, data requests
defined in this section are independent of the app version while the assetGroups cache
update strategy is different: if the single resource was updated, we recycle the whole
version cache. They follow their own manually configured policies, which are most useful
for situations such as handling API requests and other data dependencies. We can use
them to cache the responses from the external services in case that application goes offline.
Having looked at DataGroup Typescript interface, the following properties reveal:
export interface DataGroup {
name: string;
urls: string[];
version?: number;
cacheConfig: {
maxSize: number;
maxAge: string;
timeout?: string;
strategy?: 'freshness' | 'performance';
};
}
1) name:
(required) name of group that will be included in Cache API
storage name. It should be string, descriptive to our knowledge,
and uniquely identified.
2) urls:
(required) a list of glob patterns that are used to match these
URLs for caching accordingly to this data policy. Similar to
assetGroups, negative glob patterns are not supported and ? will
be matched literally, which means ? will remain the ? character
and doesn’t match anything.
CHAPTER 5 ADVANCED ANGULAR SERVICE WORKER ANDRUNTIME CACHING
www.EBooksWorld.ir

123
3) version:
(optional) versioning in APIs is quite common. In a way that
sometimes a new version format will not be backward compatible
with the old API; thus, the existing cache contains an older format
and is likely to break the app since it does not match the newer
API structure. Although version is optional and an integer field
defaults to 0, it provides a mechanism to indicate whether an API
response that is being cached has been changed in a backward-
incompatible way. Hence all old cache entries stored responses
for this API must be discarded, eradicated, and replaced with new
responses.
4) cacheConfig:
(required) settings that define the policies and strategies by which
matching requests will be cached:
• maxSize:
(required) when cache is open to accept unlimited number
of responses, depends on your app size, it can grow rapidly
and eventually exceed the storage quota,
1
calling for eviction.
Thus, we can define a maximum number of entries or
responses here.
• maxAge:
(required) indicates how long responses are allowed to
remain in cache until they flag as invalid and are evicted. It is
a string that specifies time duration, which can be set by d:
days, h: hours, m: minutes, s: seconds and u: milliseconds.
10d12h4m, for instance, will cache content for up to 10 and a
half days and 4 minutes.
1
All browsers impose a limit for storage that your web app’s origin is allowed to use and that
differs from device to device, browser to browser. If the origin eviction couldn’t free enough
space, the browser will throw a QuotaExceededError.
CHAPTER 5 ADVANCED ANGULAR SERVICE WORKER ANDRUNTIME CACHING
www.EBooksWorld.ir
124
• timeout:
(optional) Although this is optional parameter, it tells Angular
Service Worker how long it should wait for the network
response before it falls back to content that is cached. This is
valid when strategy is freshness, which means network first
(see next property). Duration specifies time duration similar
to maxAge unit. 1d considers 1 day.
• strategy
(optional) it can have two options for all data resources:
• performance:
it refers to Cache-First strategy. Content that doesn’t
change often can fall into this strategy since it has been
optimized for faster response.
It checks cache first and if the resource exists there and it
not expired depending on maxAge, the cached version will
instantly be served depending on the maxAge, in exchange
for better performance. If content expires, it tries to
update the cache.
As an example, we have an endpoint to retrieve a user’s
wish list. Based on our app, we really do not need to
call this API; thus we can set a maxAge of 1 hour and
performance strategy to show a faster response to our
user.
• freshness:
This strategy considers as Network-First for which
it always tries to fetch data from the network only.
Depending on timeout, if the network doesn’t respond
accordingly, the request fall backs to the cache. It fits all
data that needs to be updated frequently.
For example: a user dashboard that shows user points
balance.
CHAPTER 5 ADVANCED ANGULAR SERVICE WORKER ANDRUNTIME CACHING
www.EBooksWorld.ir

125
Note By default. Angular Service Worker does not cache any data or files that
fetch at runtime. They have to be explicitly defined and configured.
Now it’s time to configure our Note application. I will use a Network-First strategy
for retrieving notes from a Firebase endpoint using ** glob. I’d like to set size to 100,
maximum cache age to 10 days and 5 seconds for timeout after which the request falls
backs to cache if it exists.
To have a better understanding, I will create two new methods in data.service.ts
to make a GET request to Firestore API directly as well as another method to get a
random dad joke. New methods look like the following code:
// data.service.ts
// DataService
protected readonly FIRESTORE_ENDPOINT =
'https://firestore.googleapis.com/v1beta1/projects/awesome-apress-pwa/
databases/(default)/documents/';
protected readonly DAD_JOKE = 'https://icanhazdadjoke.com';
// Get a random joke
getRandomDadJoke(): Observable<string> {
return this.http
.get<Joke>(this.DAD_JOKE, {
headers: {
Accept: 'application/json'
}
})
.pipe(map(data => data.joke));
}
// Get note Details
getNoteFromDirectApi(id): Observable<any> {
return this.auth.getToken().pipe(
switchMap(idToken => {
CHAPTER 5 ADVANCED ANGULAR SERVICE WORKER ANDRUNTIME CACHING
www.EBooksWorld.ir
126
return this.http.get(
`${this.FIRESTORE_ENDPOINT}users/${this.auth.id}/notes/${id}`,
{
headers: {
Authorization: `Bearer ${idToken}`
}
}
);
}),
map(notes => this.transfromNote(notes))
);
}
// List all notes for current user
initializeNotes(): Observable<any> {
return this.auth.getToken().pipe(
switchMap(idToken => {
return this.http.get(
`${this.FIRESTORE_ENDPOINT}users/${this.auth.id}/notes`,
{
headers: {
Authorization: `Bearer ${idToken}`
}
}
);
}),
map((data: { documents: { fields: {} }[] }) => data.documents),
map(notes => this.transfromNotes(notes)),
tap(notes => {
this.isLoading$.next(false);
})
);
}
CHAPTER 5 ADVANCED ANGULAR SERVICE WORKER ANDRUNTIME CACHING
www.EBooksWorld.ir
127
private transfromNotes(notes) {
return notes.map(note => this.transfromNote(note));
}
// since I am calling google API directly, a simple transfromationm make it
easy to use data in our application
private transfromNote(note) {
const _note = {};
_note['id'] = note.name.split('/').reverse()[0];
for (const prop in note.fields) {
if (note.fields[prop]) {
_note[prop] =
note.fields[prop]['stringValue'] || note.fields[prop]['integerValue'];
}
}
return _note;
}
Then I’ll replace getNotes() with initializeNotes() and getNote() with
getNoteFromDirectApi() in notes-list.component.ts and note-details.component.ts,
respectively. Last but not least, I will add a joke to my app.component.ts.
@Component({
selector: 'app-root',
template: `
<div class="appress-pwa-note">
<app-header></app-header>
<div class="main">
<div *ngIf="joke$ | async as joke" class="joke">
{{ joke }}
</div>
<router-outlet></router-outlet>
</div>
<app-footer></app-footer>
</div>
`,
CHAPTER 5 ADVANCED ANGULAR SERVICE WORKER ANDRUNTIME CACHING
www.EBooksWorld.ir
128
styles: [
`
.joke {
margin-top: 0.5rem;
padding: 1rem;
border: 1px solid #ccc;
}
`
]
})
export class AppComponent implements OnInit {
joke$: Observable<string>;
constructor(private db: DataService) {}
ngOnInit() {
this.joke$ = this.db.getRandomDadJoke();
}
}
Based on my strategy in the app, I decided to use freshness for Firestore Google API
endpoints and performance for the random joke endpoint since this is unnecessary to
be called many times; once after every 15 minutes should be enough. The corresponding
configuration will look like this:
"dataGroups": [
{
"name": "api-network-first",
"version": 1,
"urls": ["https://firestore.googleapis.com/v1beta1/**"],
"cacheConfig": {
"strategy": "freshness",
"maxSize": 100,
"maxAge": "10d",
"timeout": "5s"
}
},
CHAPTER 5 ADVANCED ANGULAR SERVICE WORKER ANDRUNTIME CACHING
www.EBooksWorld.ir

129
{
"name": "api-cache-first",
"version": 1,
"urls": ["https://icanhazdadjoke.com"],
"cacheConfig": {
"strategy": "performance",
"maxSize": 20,
"maxAge": "15m"
}
}
]
Now I will build my production-ready app and will serve it locally.
npm run prod
Navigate to localhost:4200 and check out cache storage and the Service Worker
tab. You’ll notice that now we have cache names to store our both strategies as shown in
Figure5-7.
Figure 5-7. Runtime cache
CHAPTER 5 ADVANCED ANGULAR SERVICE WORKER ANDRUNTIME CACHING
www.EBooksWorld.ir

130
Now spend a bit of time with the app and after a few minutes, turn the network off as
shown in Figure5-8 and reload the application.
Surprise! All the data that you have seen including notes, static assets, and jokes are
now available even though you don’t have a network connection whatsoever. Let’s take
a look at all requests in the network tab. You may notice in Figure5-9 that there is no
request for a joke endpoint.
Figure 5-8. Check offline to disconnect network
Figure 5-9. Offline mode network request
CHAPTER 5 ADVANCED ANGULAR SERVICE WORKER ANDRUNTIME CACHING
www.EBooksWorld.ir

131
Yes, this is correct, since we have set performance (Cache-First) strategy for this
endpoint, and it has not been expired due to maxAge, which is 15 minutes, Angular
Service Worker will drop this request until it expires and then will revalidate this request
and update the cache with an appropriate response.
Navigation Cache
In a single page application, routing is being handled in the front end. All routes in the
front end are eventually pointed to index.html where the framework, in particular
Angular Router Module, will match a navigation request to a specific view.
What makes a request considered to be a navigation request falls into three main
bullets:
1. Its mode is navigation.
The mode read-only property of the Request interface, is used to
determine if cross-origin requests lead to valid responses, and
which properties of the response are readable –values of which
are cors, no-cors, same-origin, or navigate. navigate is a mode for
supporting navigation and is intended to be used only by HTML
navigation. A navigate request is created only while navigating
between documents.
2
2. It accepts a text/html response (as determined by the value of the
Accept header).
3. Its URL matches certain criteria, defaults to:
a. The URL must not contain a file extension (i.e., a .) in the last path segment.
b. The URL must not contain __.
Having looked at Config interface, you will notice that there is a specific property
for Angular or custom navigations navigationUrls. As you can see, this is optional and
enables us to customize a list of URLs.
export interface Config {
appData?: {};
2
https://developer.mozilla.org/en-US/docs/Web/API/Request/mode
CHAPTER 5 ADVANCED ANGULAR SERVICE WORKER ANDRUNTIME CACHING
www.EBooksWorld.ir
132
index: string;
assetGroups?: AssetGroup[];
dataGroups?: DataGroup[];
navigationUrls?: string[];
}
The URLs can be either an array of URLs and glob-like URL pattern that can be
matched at runtime. Negative and nonnegative patterns are both supported.
While the default value is sufficient in most cases, it is sometimes necessary to
configure different rules. Let’s imagine we have some particular URLs in our application
that need to be served in the back end, and we need to pass them through to the server
to be handled since they are not Angular routes.
If nagivationUrls is omitted, default values are replaced:
"navigationUrls": [
"/**", // Include all URLs.
"!/**/*.*", // Exclude URLs to files.
"!/**/*__*", // Exclude URLs containing `__` in the last
segment.
"!/**/*__*/**" // Exclude URLs containing `__` in any other
segment.
]
And the result will look like this:
"navigationUrls": [
{
"positive": true,
"regex": "^\\/.*$"
},
{
"positive": false,
"regex": "^\\/(?:.+\\/)?[^/]*\\.[^/]*$"
},
{
"positive": false,
"regex": "^\\/(?:.+\\/)?[^/]*__[^/]*$"
CHAPTER 5 ADVANCED ANGULAR SERVICE WORKER ANDRUNTIME CACHING
www.EBooksWorld.ir
133
},
{
"positive": false,
"regex": "^\\/(?:.+\\/)?[^/]*__[^/]*\\/.*$"
}
]
As an example, I will implement a route that doesn’t need to be cached.
I will generate a component called NoCacheRouteComponent.
@Component({
selector: 'app-no-cache-route',
template: `
<div class="appress-pwa-note">No-cache</div>
`
})
export class NoCacheRouteComponent {}
Then I will add a route to app-routing.module.ts.
{
path: 'no-cache-route',
component: NoCacheRouteComponent
}
And finally, I will exclude this URL in ngsw-config.json.
"navigationUrls": [
"/**",
"!/**/*.*",
"!/**/*__*",
"!/**/*__*/**",
"!/**/no-cache-route"
]
CHAPTER 5 ADVANCED ANGULAR SERVICE WORKER ANDRUNTIME CACHING
www.EBooksWorld.ir

134
Note You can pull down www.github.com/mhadaily/awesome-apress-
pwa/chapter05/03-no-cache-route. Run npm install and then run npm
run serve:prod. It runs production app on a web server. You can navigate to
localhost:4200.
AppData Config
This property is also optional and may contain application metadata for this specific
version. The appData is not used by Service Worker but may be determined in Server
Worker update where it can be used to show additional information in UI notifications to
inform the user or make an intelligent decision on the app.
For example, information such as release date, build hash, a flag to indicate a sever
security bugs which can be applied on the next reload without interrupting users.
I will use this object in the next section and will look at this config in other chapters
later.
Dealing withUpdates
By implementing Service Worker in our application, sooner or later dealing with a stale
version of an app compared to what has been cached and used will become a problem
because new versions of Service Worker will only be activated on page reload. Angular
Service Worker resolves this issue by providing an SwUpdate class that makes it easy to
check for available updates. Let’s take a look at the class:
class SwUpdate {
available: Observable<UpdateAvailableEvent>
activated: Observable<UpdateActivatedEvent>
isEnabled: boolean
checkForUpdate(): Promise<void>
activateUpdate(): Promise<void>
}
CHAPTER 5 ADVANCED ANGULAR SERVICE WORKER ANDRUNTIME CACHING
www.EBooksWorld.ir
135
Let’s break this class down:
1. available: an observable that emits UpdateAvailableEvent
whenever a new app version is available.
interface Version {
hash: string;
appData?: Object;
}
interface UpdateAvailableEvent {
type: 'UPDATE_AVAILABLE';
current: Version
available: Version;
}
UpdateAvailableEvent interface is pretty self-explanatory. As you
see, in both current and available properties, appData is an option
that will be available if we define it in ngsw-config.json.
For example:
{
"index": "/index.html",
"appData": {
"version": "1.0.1"
},
"assetGroups": []
}
2. activated: an observable that emits UpdateActivateEvent
whenever the app has been updated to a new version.
interface UpdateActivatedEvent {
type: 'UPDATE_ACTIVATED';
previous?: Version;
current: Version;
}
CHAPTER 5 ADVANCED ANGULAR SERVICE WORKER ANDRUNTIME CACHING
www.EBooksWorld.ir
136
3. isEnabled: is a Boolean in order to check if Service Worker is
supported by the browser and enabled via ServiceWorkerModule.
4. checkFoUpdate(): a Promise that will be resolved when an update
is available, and it allows us to check for updates periodically.
5. activateUpdate(): a Promise that will be resolved by forcing a
Service Worker update. We may need to take other actions after
getting resolved on this function. For instance, we need to reload the
application because the currently loaded resources become invalid.
Now it’s time to implement in our application and see the result in action.
export class AppComponent implements OnInit {
joke$: Observable<string>;
constructor(private db: DataService, private swUpdates: SwUpdate, private
snackbar: SnackBarService) {}
ngOnInit() {
this.joke$ = this.db.getRandomDadJoke();
this.swUpdateFlow();
}
swUpdateFlow() {
// check if service worker is enabled and only check if it's production
if (this.swUpdates.isEnabled && environment.production) {
// subscribe to recieve update when it's available
this.swUpdates.available.subscribe((event: UpdateAvailableEvent) => {
// console log version on appData Object defined in ngsw-config.js
console.log(`Version: ${event.current.appData['version']}`);
// an update is available, inform user and take an action
this.snackbar
.action(
`${event.type}: current is ${event.current.hash} but available
is ${event.available.hash}`,
'Activate'
)
.subscribe(() => {
CHAPTER 5 ADVANCED ANGULAR SERVICE WORKER ANDRUNTIME CACHING
www.EBooksWorld.ir
137
// force to activate update
this.swUpdates
.activateUpdate()
.then(() => {
this.snackbar.open('Update has been applied', 1000);
// force to reload to ensure new update is in place
// (<any>window).location.reload();
})
.catch(e => {
this.snackbar.open('Something is wrong, please reload
manually');
});
});
});
// subscribe to receive an notification when new version is activated
this.swUpdates.activated.subscribe((event: UpdateActivatedEvent) => {
// console log version on appData Object defined in ngsw-config.js
console.log(`Version: ${event.current.appData['version']}`);
this.snackbar
.action(`${event.type}, current is ${event.current.hash} but
previously was ${event.previous.hash}`, 'Reload')
.subscribe(() => {
// force to reload to ensure new update is in place
(<any>window).location.reload();
});
});
}
}
}
In the app.component.ts, I will inject SwUpdate first. Then, I will ensure that we
run the code on production and Service Worker is enabled. I will subscribe to available
observables and once an update is available, I will show snackbar notification and
inform the user that there is a newer version of app available and ask them to reload the
page in order to see the latest and most up-to-date version of the app.
CHAPTER 5 ADVANCED ANGULAR SERVICE WORKER ANDRUNTIME CACHING
www.EBooksWorld.ir

138
Note You can pull down www.github.com/mhadaily/awesome-apress-
pwa/chapter05/04-notification-updates. Run npm install and then
run npm run serve:prod. It runs a production app on a web server. You can
navigate to localhost:4200.
Deploy toFirebase
Now we are ready to build our application and deploy to Firebase. As always, simply run:
npm run deploy
✓ hosting[awesome-apress-pwa]: file upload complete
i database: releasing rules...
✓ database: rules for database awesome-apress-pwa released successfully
i hosting[awesome-apress-pwa]: finalizing version...
✓ hosting[awesome-apress-pwa]: version finalized
i hosting[awesome-apress-pwa]: releasing new version...
✓ hosting[awesome-apress-pwa]: release complete
✓ Deploy complete!
Project Console: https://console.firebase.google.com/project/awesome-
apress- pwa/overview
Hosting URL: https://awesome-apress-pwa.firebaseapp.com
Let’s navigate to the website and check Service Worker. As seen in Figure5-10, new
Service Worker has been installed and activated and new caches have been created.
CHAPTER 5 ADVANCED ANGULAR SERVICE WORKER ANDRUNTIME CACHING
www.EBooksWorld.ir

139
Note You can pull down www.github.com/mhadaily/awesome-apress-
pwa/chapter05/02-runtime-cache. Run npm install and then run npm
run serve:prod. It runs a production app on a web server. You can navigate to
localhost:4200. You may need to also deploy this code to Firebase in order to
evaluate your app before adding Service Worker.
Summary
in the last two chapters, I deep dived into Angular Service Worker configurations and
settings, implemented the best strategies for our applications, and deployed an offline-
ready app. Although our application works connection independently, there many
possibilities to enhance the user experience.
In the next chapter, we will take a detailed look at app manifest, which makes our
app installable where our user can run our application from the home screen.
Figure 5-10. Success deployment to Firebase
CHAPTER 5 ADVANCED ANGULAR SERVICE WORKER ANDRUNTIME CACHING
www.EBooksWorld.ir
141
© Majid Hajian 2019
M. Hajian, Progressive Web Apps with Angular, https://doi.org/10.1007/978-1-4842-4448-7_6
CHAPTER 6
An App Manifest and
Installable Angular App
Up until this point in the book, we have focused on the core feature of Progressive Web
App (PWA), Service Worker. It enables us to cache our static assets as well as dynamic
content. The app will continue to work offline, which is especially important on mobile
devices. However, an app’s “look and feel” is another important factor that enhances the
user experience to truly delight users.
In this chapter, we focus on visual appeal and a few different ways that can help
boost engagement on the app. We explore features such as Add to Home Screen and
customization, which prompts a user to add the web to their device home screen.
The Web App Manifest
The Web App Manifest is a JSON text file following Web App Manifest specification
that provides information about an application such as its name, author, icons, and
description. But more importantly, this file enables an application to be installed by a
user on their device and allows us to modify the theme, URL that should be opened,
splash screen, icons on home page, and more.
Let’s take a look at manifest.json located in /src/, which Angular CLI has created
by default.
{
"name": "lovely-offline",
"short_name": "ApressPWA",
"theme_color": "#1976d2",
"background_color": "#fafafa",
"display": "standalone",
www.EBooksWorld.ir
142
"scope": "/",
"start_url": "/",
"icons": [
{
"src": "assets/icons/icon-72x72.png",
"sizes": "72x72",
"type": "image/png"
},
{
"src": "assets/icons/icon-96x96.png",
"sizes": "96x96",
"type": "image/png"
},
{
"src": "assets/icons/icon-128x128.png",
"sizes": "128x128",
"type": "image/png"
},
{
"src": "assets/icons/icon-144x144.png",
"sizes": "144x144",
"type": "image/png"
},
{
"src": "assets/icons/icon-152x152.png",
"sizes": "152x152",
"type": "image/png"
},
{
"src": "assets/icons/icon-192x192.png",
"sizes": "192x192",
"type": "image/png"
},
{
"src": "assets/icons/icon-384x384.png",
CHAPTER 6 AN APP MANIFEST AND INSTALLABLE ANGULAR APP
www.EBooksWorld.ir
143
"sizes": "384x384",
"type": "image/png"
},
{
"src": "assets/icons/icon-512x512.png",
"sizes": "512x512",
"type": "image/png"
}
]
}
Most of the properties are self-explanatory, but I will try to provide descriptive
definitions. Each property in a manifest file has a role and tells the browser information
regarding our app’s look and feel. Although default manifest.json added by Angular
CLI should be fine for most use cases, there are more properties that we can add to better
enhance the user experience depending our needs and requirements.
Let’s break them down:
• name:
a readable name for the app displayed to user or as a label for
an icon.
• short_name:
short name that replaces name if that doesn’t fit due to insufficient
space.
• theme_color:
defines the default theme color for the application to tint OS or
browser-related UIs: for example, browser’s toolbar or Android’s
task switcher. HEX code or color’s name can be used.
• background_color:
defines the expected background color for the app even before
user agent loads website style sheets. Usually, there is a short gap
between launching the web application and loading the site’s
content. This creates a smooth transition to fill the delay.
CHAPTER 6 AN APP MANIFEST AND INSTALLABLE ANGULAR APP
www.EBooksWorld.ir
144
You can use color HEX code or standard color’s name. Note that
this background will not be used by the user agent after the style
sheet is available.
• display:
preferred display mode for the website. Four options are available
as per spec, but it may not be available in all browsers:
fullscreen: All of the available display is used. if not supported,
falls back to standalone mode.
standalone: most browser elements are hidden. Feels like a
standalone application. In this mode, the user agent will exclude
UI elements for controlling navigation but can include other
UI elements such as a status bar. If not supported, falls backs to
minimal-ui mode.
minimal-ui: this application looks like a standalone app; however,
essential UIs of the browser are still visible such as navigation
buttons. It not supported, fall backs to browser mode.
browser: just conventional browser tab or new window.
It’s interesting to know what there is a feature in CSS where you
can detect display-mode. See code below:
@media all and (display-mode: minimal-ui) {
/* ... */
}
@media all and (display-mode: standalone) {
/* ... */
}
• scope:
more or less similar to service worker scope that defines the
navigation scope of this website’s context. If a page is outside of
this scope, it retunes to a normal web page inside a browser tab/
window. In case of relative URL, the base URL will be the URL of
the manifest. If omitted, default is everything under the manifest
directory and all subdirectories.
CHAPTER 6 AN APP MANIFEST AND INSTALLABLE ANGULAR APP
www.EBooksWorld.ir

145
• start_url:
the URL that loads when a user launches the application. It can
be different from the main page, for example, if you want your
PWA users to go directly to login page or signup page instead of
home page. For analytical purposes, start_url can be crafted to
indicate that the application was launched from the outside of the
browser, which can be translated to PWA.That is: "start_url":
"/?launcher=homescreen"
• icons:
an array of image files that specifics the app icons depending on
the context. Each image has three properties:
src: path to the image file; in case of relative URL, the base URL
will be the URL of the manifest.
sizes: specifies an icon size (even multiple sizes that are
containing space-separate image dimensions). There are a
variety of different screen sizes that we should support; the more
dimensions we include, the better result we will get regarding the
quality of icons.
type: the media type
1
of image; if the user agent doesn’t support
this type, they can quickly ignore it.
• prefer_related_applications:
this asks the browser to indicate to the user a specified native
application in which are recommended in the next property, over
the PWA.Although it may sound silly, sometimes it happens that
we have a very specific native feature that doesn’t exist on the web,
so we want our user to use a native app instead. If omitted, the
default value is false.
1
https://www.iana.org/assignments/media-types/media-types.xhtml#image
CHAPTER 6 AN APP MANIFEST AND INSTALLABLE ANGULAR APP
www.EBooksWorld.ir

146
• related_applications:
recommended native applications that are installable or
accessible from underlying platform store. For example, link to
an Android app from Google Play Store. The objects may contain
platform, url, and id.
{
"platform": "play",
"url": "https://play.google.com/store/apps/details?id=com.
example.app1",
"id": "com.example.app1"
}, {
"platform": "itunes",
"url": "https://itunes.apple.com/app/example-app1/id123456789"
}
• orientation:
sets the app work on default orientation. Orientation may be one
of the following values:
any, natural, landscape, landscape-primary, landscape-secondary
portrait, portrait-primary, portrait-secondary
• dir:
specifies the primary text direction for the name, short_name, and
description. There are two values: ltr, auto, and rtl. When
the value is omitted, default is auto.
• lang:
together with dir, it specifies correct display language. Default is
en- US.
2
• description:
a general description of what the website does.
2
https://developer.mozilla.org/en-US/docs/Web/HTML/Global_attributes/lang
CHAPTER 6 AN APP MANIFEST AND INSTALLABLE ANGULAR APP
www.EBooksWorld.ir

147
• serviceWorker:
this member represents an intended service worker registration in
form of a registration object.
"serviceworker": {
"src": "sw.js",
"scope": "/foo",
"update_via_cache": "none"
}
This feature may not work in any browsers.
• categories:
specifies an array of strings of the expected application categories
to which the web application belongs, written in lowercase.
• screenshots:
array of image resources that represent the web application in
common usage scenarios. This might not work yet in any browser
or platform.
• iarc_rating_id:
represents the International Age Rating Coalition (IARC)
3
certification code of the web application.
To reference a manifest file, we need to add a link tag between head to all the pages
in our web app. However, we have a single page application with Angular, and ng-cli
has added the link to index.html and angular.json to copy this file to the root folder
after build.
3
https://www.globalratings.com/
CHAPTER 6 AN APP MANIFEST AND INSTALLABLE ANGULAR APP
www.EBooksWorld.ir
148
// index.html where we added manifest.json link.
<head>
.
.
<base href="/">
<link rel="manifest" href="manifest.json">
.
.
</head>
Debugging Web App Manifest
Now that I have covered the Web App Manifest and referenced the index HTML page,
we should be able to run an application and then navigate to the app in the Chrome. In
DevTools, go to Application tab and click on manifest option on the left side, right
above Service Workers (see Figure6-1).
The details appear there, including errors if any. There is an option to test the prompt
to add the app to the home screen also.
CHAPTER 6 AN APP MANIFEST AND INSTALLABLE ANGULAR APP
www.EBooksWorld.ir

149
Although Chrome DevTools is fine to debug your manifest file, there are tools that
you can check to validate your manifest file against W3C spec. One example is manifest-
validator.appspot.com where you can simply audit your manifest file. Figure6-2 shows a
screenshot of Web Manifest Validator.
Figure 6-1. App manifest details in DevTools
CHAPTER 6 AN APP MANIFEST AND INSTALLABLE ANGULAR APP
www.EBooksWorld.ir

150
Adding toHome Screen
By default, a native app installs on your home screen. You will see an icon and short
name, and when you need to run this application, it’s easy to come back to the home
screen and tap on the icon to open up the app. As web developers, it is important to
engage our users and keep them coming back to our app. So, functionality as a native
app is one piece of the puzzle to tackle engagement. A great way to seamlessly allow our
users to add our web’s app to their home screen is Add to Home Screen (you may see
A2HS) capability, also known as a web app install banner.
This feature makes it easy to install a PWA on the mobile or desktop device. It displays
a prompt and after the user accepts it, your PWA will added to their launcher or home
screen. It will run like any other installed app and looks similar to native apps.
However, the web app install banner prompt will not be shown unless otherwise it
meets the following criteria:
1. Serve over HTTPS (this was one of the PWA core concepts and
required for Service Worker).
Figure 6-2. Web Manifest Validator is a tool where you can debug your manifest
file
CHAPTER 6 AN APP MANIFEST AND INSTALLABLE ANGULAR APP
www.EBooksWorld.ir

151
2. Web App Manifest has to include:
a. short_name or name
b. icons must include a 192px and a 512px sizes icons
c. start_url must have a proper value
d. display must be one of the: fullscreen, standalone, or minimal-ui
3. e web app is not already installed.
4. An appropriate user engagement heuristic.
This item may change over time, so you should always keep
yourself updated with the latest news and check different
browsers’ criteria lists time to time. At the time of writing this
book, a user must interact with the domain for at least 30 seconds.
5. App has a registered Service Worker with a fetch event handler.
While this list is in a bit of flux and is updated frequently, if these criteria are met,
Google Chrome will fire an event called beforeinstallprompt that we should use it to
show the prompt to our user. Keep an eye on different browsers and check the latest
news to see if they support this event or similar events.
Although Safari does not support the automatic Add to Home Screen prompt or
beforeinstsallprompt event, the manually add to home screen is shown by tapping
the share button, even though it behaves a bit differently compared with other browsers.
I hope that by the time you read this book, an automatic version of this feature will be
supported by Safari and all other browsers.
Note Chrome 67 and earlier showed an “Add to Home Screen” banner.
It was removed in Chrome 68 and a dialog will be shown if it is listened to
beforeinstallprompt and the user taps on an element that has a proper
gesture event.
CHAPTER 6 AN APP MANIFEST AND INSTALLABLE ANGULAR APP
www.EBooksWorld.ir
152
Handling Installation Event (Deferring thePrompt)
As we have seen, when all the criteria are met, beforeinstallprompt event fires on the
window object. It is crucial to listen to this event to indicate when the app is installable,
and we need to act accordingly on the web app to show an appropriate UI to notify our
user that they are able to install this app on their home screen.
While add to home screen is our main goal, this event can be used for other purposes
also, such as the following:
1. Sending user choice to our analytics system.
2. Defer displaying the notification until we ensure that’s the best
time to show in which user will tap or click.
In order to save the event that has been fired, we need to write the code as the following:
let deferredPrompt;
window.addEventListener('beforeinstallprompt', event => {
// Prevent automatically showing the prompt if browser still supports it
event.preventDefault();
// Stash the event so it can be triggered later.
deferredPrompt = event;
// This is time to update UI, notify the user they can install app to
home screen
const button = document.getElementById('add-to-home-screen-button');
button.style.display = 'block';
button.addEventListner('click', () => {
if (deferredPrompt) {
// will show prompt
deferredPrompt.prompt();
// Wait for the user to respond to the prompt
deferredPrompt.userChoice.then(choiceResult => {
// outcome is either "accepted" or "dismissed"
if (choiceResult.outcome === 'accepted') {
// User accepted the A2HS prompt
// send data to analytics
CHAPTER 6 AN APP MANIFEST AND INSTALLABLE ANGULAR APP
www.EBooksWorld.ir

153
// do whatever you want
} else {
// User dismissed the A2HS prompt
// send data to analytics
// do whatever you want
}
// we don't need this event anymore
deferredPrompt = null;
// delete or hide this button as it's not needed anymore
button.style.display = 'none';
});
}
});
});
It’s only possible to call prompt() on the deferred event once. If the user dismisses it,
we need to wait until the browsers trigger beforeinstallprompt event on the next page
navigation.
The Mini-Info Bar
The mini-info bar is an interim experience for Chrome on Android at the time of
writing this book; it is moving toward creating a consistent experience across all
platforms that includes an install button into the omnibox as shown in Figure6-3.
Figure 6-3. The mini-info bar in Google Chrome on Android
4
4
https://developers.google.com/web/updates/2018/06/a2hs-updates
CHAPTER 6 AN APP MANIFEST AND INSTALLABLE ANGULAR APP
www.EBooksWorld.ir
154
This is Chrome UI component and we are not able to control it. Once it has been
dismissed by user, it will not appear again until a sufficient amount of time. Regardless
of preventDefault() on the beforeinstallprompt event, if the website meets all the
criteria above, this mini-bar will appear.
This experimental functionality may be controllable or completely eradicated in the
future.
Implementing Functionality into Angular App
Let’s now implement the code above in our Angular sample project. Start off by creating
a service called AddToHomeScreenService and import it to CoreModule.
This service will hold the prompt event and will share this event according to the
modules.
@Injectable({
providedIn: 'root'
})
export class AddToHomeScreenService {
public deferredPromptFired$ = new BehaviorSubject<boolean>(false);
public deferredPrompt;
get deferredPromptFired() {
this.deferredPromptFired$.next(!!this.deferredPrompt);
return this.deferredPromptFired$;
}
public showPrompt() {
if (this.deferredPrompt) {
// will show prompt
this.deferredPrompt.prompt();
// Wait for the user to respond to the prompt
this.deferredPrompt.userChoice.then(choiceResult => {
// outcome is either "accepted" or "dismissed"
if (choiceResult.outcome === 'accepted') {
// User accepted the A2HS prompt
// send data to analytics
CHAPTER 6 AN APP MANIFEST AND INSTALLABLE ANGULAR APP
www.EBooksWorld.ir
155
// do whatever you want
this.sendToAnalytics(choiceResult.userChoice);
} else {
// User dismissed the A2HS prompt
// send data to analytics
// do whatever you want
this.sendToAnalytics(choiceResult.userChoice);
}
// we don't need this event anymore
this.deferredPrompt = null;
this.deferredPromptFired$.next(false);
});
}
}
public sendToAnalytics(userChoice) {
// for example, send data to Google Analytics
console.log(userChoice);
}
}
In the app.component.ts file, by adding @HostListener, we will listen to for a
beforeinstallprompt event and by injecting AddToHomeScreenService, we have access
to the deferredPrompt, which helps to keep our event object.
export class AppComponent implements OnInit {
joke$: Observable<string>;
@HostListener('window:beforeinstallprompt', ['$event'])
onEventFire(e) {
this.a2hs.deferredPrompt = e;
}
constructor(
private db: DataService,
private a2hs: AddToHomeScreenService
) {}
CHAPTER 6 AN APP MANIFEST AND INSTALLABLE ANGULAR APP
www.EBooksWorld.ir
156
ngOnInit() {
this.joke$ = this.db.getRandomDadJoke();
}
}
Next, I decided to show a notification box to my user on the notes list page. I think
this is the best place to ask if the user would like to install the app since they have already
benefited from the app, and it’s likely that they will accept the prompt. So, it’s good
practice not to bother a user with an unwanted prompt or notification and ask them,
instead, when it makes sense.
AddToHomeScreenService was injected to NotesListComponent and UI has been
created accordingly.
export class NotesListComponent implements OnInit {
isAddToHomeScreenEnabled$;
constructor(private db: DataService,
private a2hs: AddToHomeScreenService) {}
ngOnInit() {
// this.notes$ = this.db.getNotes();
this.notes$ = this.db.initializeNotes();
this.isDbLoading$ = this.db.isLoading$;
this.isAddToHomeScreenEnabled$ = this.a2hs.deferredPromptFired;
}
}
And in the notes-list.component.html file, at the top of the page, I will add a simple
card to ask the user if they like to interact with prompt as soon as it it’s ready.
<mat-card *ngIf="isAddToHomeScreenEnabled$ | async">
<mat-card-subtitle>Add To Home Screen</mat-card-subtitle>
<mat-card-content>
Do you know you can install this app on your homescreen?
<button mat-raised-button color="primary" (click)="showPrompt()">Show
me</button>
</mat-card-content>
</mat-card>
CHAPTER 6 AN APP MANIFEST AND INSTALLABLE ANGULAR APP
www.EBooksWorld.ir

157
<div *ngIf="notes$ | async as notes; else notFound">
<app-note-card *ngFor="let note of notes" [note]="note"
[loading]="isDbLoading$ | async" [routerLink]="['/notes', note.id]">
</app-note-card>
</div>
<ng-template #notFound>
<mat-card>
<mat-card-title>
Either you have no notes
</mat-card-title>
</mat-card>
</ng-template>
Put all of it together and build an application for production and then deploy to Firebase.
Adding toHome Screen onMobile andDesktop
Now that we have implemented all the criteria, it’s time to test it on the mobile and
desktop. Since Google Chrome has the best support for installing an app, you may ask
what actually Google Chrome does when a user accepts the prompt?
Chrome handles most of the heavy lifting for us:
1. Mobile:
Chrome will generate a WebAPK,
5
which results in better
integrated experiences for the users.
2. Desktop:
Your app is installed and will run in an app window
6
on both Mac
and Windows machines.
Note To test install flow for Desktop PWA on Mac, you’ll need to enable the
#enable-desktop-pwas flag in Google Chrome. It may be the default in the future or
when you are reading this book.
5
https://developers.google.com/web/fundamentals/integration/webapks
6
https://developers.google.com/web/progressive-web-apps/desktop#app-window
CHAPTER 6 AN APP MANIFEST AND INSTALLABLE ANGULAR APP
www.EBooksWorld.ir

158
When you click on the button to show the prompt, a browser dialog prompt will
appear (see Figure6-5).
Once you click on Install, the app will have installed in Chrome Apps folder and will
be ready to be served as a standalone app (see Figure6-6). This feature is also available
on Windows 10.
Figure 6-5. Prompt Dialog in Chrome on Mac
Figure 6-4. Notification is shown once beforeinstallprompt in Chrome on Android
and Mac was fired
Let’s see this in action on a Mac and Android phone, as shown in Figure6-4.
CHAPTER 6 AN APP MANIFEST AND INSTALLABLE ANGULAR APP
www.EBooksWorld.ir

159
Microsoft Windows
7
PWA in Edge is a first-class citizen. Once PWA was distributed through the Microsoft
Store, the entire Windows 10 install base of 600+ million active monthly users are your
potential app audience!
Interestingly, when PWAs are in Windows 10, they run as Universal Windows
Platforms apps and will gain the following technical advantages:
• Standalone window
• Independent process from browser (isolated cache, less overhead)
• No storage quota (for IndexedDB, local storage, etc.)
• Oine and background processes Access to native Windows
Runtime (WinRT) APIs via JavaScript
• Appearance in “app” contexts such as the Windows Start menu and
Cortana search results
One of the greatest features is the ability to access WinRT APIs. It’s just a matter of
identifying what you need to use, obtaining the requisite permissions, and employing
feature detection to call that API on supported environments (see Figure6-7). Let’s look
at one example:
if (window.Windows && Windows.UI.Popups) {
document.addEventListener('contextmenu', function (e) {
Figure 6-6. PWA was installed in Chrome apps on Mac
7
https://docs.microsoft.com/en-us/microsoft-edge/progressive-web-apps
CHAPTER 6 AN APP MANIFEST AND INSTALLABLE ANGULAR APP
www.EBooksWorld.ir
160
// Build the context menu
var menu = new Windows.UI.Popups.PopupMenu();
menu.commands.append(new Windows.UI.Popups.UICommand("Option 1",
null, 1));
menu.commands.append(new Windows.UI.Popups.UICommandSeparator);
menu.commands.append(new Windows.UI.Popups.UICommand("Option 2",
null, 2));
// Convert from webpage to WinRT coordinates
function pageToWinRT(pageX, pageY) {
var zoomFactor = document.documentElement.msContentZoomFactor;
return {
x: (pageX - window.pageXOffset) * zoomFactor,
y: (pageY - window.pageYOffset) * zoomFactor
};
}
// When the menu is invoked, execute the requested command
menu.showAsync(pageToWinRT(e.pageX, e.pageY)).done(function
(invokedCommand) {
if (invokedCommand !== null) {
switch (invokedCommand.id) {
case 1:
console.log('Option 1 selected');
// Invoke code for option 1
break;
case 2:
console.log('Option 2 selected');
// Invoke code for option 2
break;
default:
break;
}
CHAPTER 6 AN APP MANIFEST AND INSTALLABLE ANGULAR APP
www.EBooksWorld.ir

161
} else {
// The command is null if no command was invoked.
console.log("Context menu dismissed");
}
});
}, false);
}
Android andChrome
Flow is similar for Chrome in Android. beforeinstallprompt event is triggered. Once we
tap on the button that we implemented, the dialog will be shown (see Figure6-8).
Figure 6-7. Context menu on Microsoft Edge and Windows App
CHAPTER 6 AN APP MANIFEST AND INSTALLABLE ANGULAR APP
www.EBooksWorld.ir

162
As soon as the user accepts it to install, App icon and short_name will have been
placed just next to other native apps icons in the home screen as shown in Figure6-9.
Note Samsung internet browser behavior is similar to Chrome but reacts slightly
differently.
Figure 6-8. Install app notification to user and add to home screen dialog
CHAPTER 6 AN APP MANIFEST AND INSTALLABLE ANGULAR APP
www.EBooksWorld.ir

163
When you tap to open the app, no browser chrome (navigation buttons, address
bar, menu options, etc.) are visible with the fullscreen option, and you’ll notice that the
status bar on the top adopts the theme_color, which we have configured in our app (see
Figure6-10).
Figure 6-9. App installed on home screen and once tapped to open, splash screen
with configured background and icons is shown
CHAPTER 6 AN APP MANIFEST AND INSTALLABLE ANGULAR APP
www.EBooksWorld.ir

164
Manually Adding toHome Screen
Dialog prompt is not guaranteed to always be triggered. So, there are possibilities to
manually add a PWA to the home screen. This feature is also available on Safari iOS.
In Chrome, if you click on menu context menu on the top-right side of the browser,
you’ll see the menu options where you can find add to home screen, tap on it, and a
prompt dialog UI appears.
In Safari, the add to home screen feature is hidden under the share button. You
should explicitly hit share and then you’ll find add to home screen as shown in
Figure6- 11. However, Safari doesn’t exactly follow the Web App Manifest spec and
may be changed in the future– hopefully by the time you are reading the book.
Figure 6-10. PWA looks similar to native app once it opens
CHAPTER 6 AN APP MANIFEST AND INSTALLABLE ANGULAR APP
www.EBooksWorld.ir

165
Further Enhancement
There are a few tags available to refine UI in for Apple and Microsoft where web manifest
is not supported. I add them to index.html between head tag. Even though it’s a minor
improvement, we still progressively enhance our user experience, which is our goal in PWA.
<!-- Enhancement for Safari-->
<meta name="apple-mobile-web-app-capable" content="yes">
<meta name="apple-mobile-web-app-status-bar-style" content="default">
<meta name="apple-mobile-web-app-title" content="ApressNote">
Figure 6-11. Add to Home Screen buttons are available on Safari and Chrome
CHAPTER 6 AN APP MANIFEST AND INSTALLABLE ANGULAR APP
www.EBooksWorld.ir
166
<link rel="apple-touch-startup-image" href="/assets/icons/icon-512x512.
png">
<link rel="apple-touch-icon" sizes="57x57" href="/assets/icons/icon-
96x96.png">
<link rel="apple-touch-icon" sizes="76x76" href="/assets/icons/icon-
72x72.png">
<link rel="apple-touch-icon" sizes="114x114" href="/assets/icons/icon-
114x114.png">
<link rel="apple-touch-icon" sizes="167x167" href="/assets/icons/apple-
icon- 384x384.png">
<link rel="apple-touch-icon" sizes="152x152" href="/assets/icons/apple-
icon- 152x152.png">
<link rel="apple-touch-icon" sizes="180x180" href="/assets/icons/apple-
icon- 384x384.png">
<link rel="apple-touch-icon" sizes="192x192" href="/assets/icons/icon-
192x192.png">
<!-- Tile icon for Win8 (144x144 + tile color) -->
<meta name="msapplication-TileImage" content="/assets/images/icons/icon-
144x144.png">
<meta name="msapplication-TileColor" content="#3372DF">
<meta name="msapplication-starturl" content="/">
<meta name="application-name" content="ApressPWA">
<!-- Mobile specific browser color -->
<meta name="theme-color" content="#3f51b5">
apple-mobile-web-app-capable: behaves similarly to display fullscreen mode if
set to yes. We determine whether a web page is displayed in fullscreen mode using the
window.navigator.standalone in Safari.
apple-mobile-web-app-status-bar-style: this meta tag has no effect unless you
first specify fullscreen mode as described in apple-apple-mobile-web-app-capable.
If content is set to default, the status bar appears normal. If set to black, the status
bar has a black background. If set to black-translucent, the status bar is black and
translucent. If set to default or black, the web content is displayed below the status bar.
If set to black- translucent, the web content is displayed on the entire screen, partially
obscured by the status bar. The default value is default.
CHAPTER 6 AN APP MANIFEST AND INSTALLABLE ANGULAR APP
www.EBooksWorld.ir

167
apple-touch-startup-image: specifies a launch screen image that is displayed while
your web application launches. By default, a screenshot of the web application the last
time it was launched is used.
apple-mobile-web-app-title: specifies a web application title for the launch icon.
By default, the <title> tag is used.
apple-touch-icon:
8
specifies an icon to represent your web application or web page
that user may want to add to the home screen. These links, represented by an icon, are
called Web Clips.
application-name:
9
the default name displayed with the pinned sites tile (or icon).
msapplication-starturl: the root URL of the pinned site similar to start_url in web
manifest.
msapplication-TileColor: sets the background color for a live tile.
msapplication-TileImage: specifies a URI for the desired image in the background
image for live tile.
While you can add all of the enhancements manually yourself, there is a library from
Google Chrome Team that can help you mitigate this issue automatically.
PWACompat Library
10
PWAcompat is a library that brings the Web App Manifest to noncompliant browsers for
better PWAs; you can use the PWACompat library where we will fill the gap for wider
support in most browsers through legacy HTML tags for icons and theming. Basically,
you just need to include the library script in your page and you are done!
<link rel="manifest" href="manifest.json" />
<script async src="https://cdn.jsdelivr.net/npm/[email protected]/pwacompat.
min.js"></script>
What actually this library does is to update your page and also the following:
• Create meta icon tags for all icons in the manifest (e.g., for a favicon,
older browsers)
8
https://developer.apple.com/library/archive/documentation/AppleApplications/
Reference/SafariWebContent/ConfiguringWebApplications/ConfiguringWebApplications.
html
9
https://technet.microsoft.com/en-us/windows/dn255024(v=vs.60), to find out more
about window site metadata.
10
https://github.com/GoogleChromeLabs/pwacompat
CHAPTER 6 AN APP MANIFEST AND INSTALLABLE ANGULAR APP
www.EBooksWorld.ir
168
• Create fallback meta tags for various browsers (e.g., iOS, WebKit/
Chromium forks etc.) describing how a PWA should open
• Sets the theme color based on the manifest
For Safari, PWACompat also:
• Sets apple-mobile-web-app-capable (opening without a browser
chrome) for display modes standalone, fullscreen, or minimal-ui
• Creates apple-touch-icon images, adding the manifest background to
transparent icons: otherwise, iOS renders transparency as black
• Creates dynamic splash images, closely matching the splash images
generated for Chromium-based browsers
For PWAs on Windows with access to UWP APIs:
• Sets the title bar color
Keep an eye on the library to see the latest version and features.
Summary
Advanced caching and the add to home screen have been implemented. We are one step
closer to the native app counterparts. In the next chapter, we are going to boost Angular
performance and work on App Shell to take our application to the next level.
CHAPTER 6 AN APP MANIFEST AND INSTALLABLE ANGULAR APP
www.EBooksWorld.ir
169
© Majid Hajian 2019
M. Hajian, Progressive Web Apps with Angular, https://doi.org/10.1007/978-1-4842-4448-7_7
CHAPTER 7
App Shell andAngular
Performance
No one likes to wait for long to see that an application is loading. In fact, statistics show
that if the initial rendering takes more than three seconds, it’s very likely that a user
leaves our app. One of the main fundamentals of PWAs is to be fast. In native apps, the
user usually is presented a splash screen and after a reasonable amount of time will
see the main content and skeleton. On the other hand, there will be white screen until
bootstrapping is finished, especially a single page app.
In this chapter, we will review the app shell model to understand what it is and how
it works. Then, we will set up Angular CLI to help us generate our Angular App Shell.
Finally, we are going to step beyond the app shell and optimize our Angular app to
achieve better performance.
The App Shell Model
This model has been introduced in order to build a PWA that, reliably, instantly loads
and boosts perceived startup performance for the user similar to what they see in native
applications.
The app “shell” is the minimal HTML, CSS, and JavaScript that are required for the
user interface in order to see something meaningful when they load the application. We
can think of what they should see above the fold content or the main skeleton as quickly
as possible. It can be cached offline and should be instantly loaded and must have
reliable performance to the user on repeat visits. In other words, an application shell is
not loaded from the network every time a user visits the app.
www.EBooksWorld.ir

170
You may ask, what about the content? Content, in this case, is requested from the
network if necessary. This architecture may not work for all scenarios and applications;
however, it’s has been the go-to-approach for Angular app, which is mostly considered a
single-page application.
As seen in Figures7-1 and 7-2, an application shell is similar to the native app
skeleton that is necessary to boot up the app and show the initial UI to user; however, it
doesn’t contain the data. So, we can simply bundle it up and publish it to the app store.
This architecture not only help to simulate a native-like app and load it fast, but also,
from an economical perspective, will save data as we have cached them and will reload
caches on repeated visits.
Figure 7-1. Application shell
Chapter 7 app Shell andangular performanCe
www.EBooksWorld.ir

171
In Chapter 4, we technically cached our application shell and managed to even
cache part of our dynamic content in Chapter 5, which also boosted our user experience.
Angular App Shell
An app shell concept in Angular consists of two meanings: “pre-caching app’s UI” and
“pre-rendering of the UI during build-time.” In general, using both cache and pre-
rendering UIs together can create an Angular App Shell.
Although we have cached our static assets, which include application shell
requirements, it is not shown to the user until Angular is bootstrapped. The time that we
have shown meaningful content to our user is when JavaScript files have been parsed
and executed; thus the Angular App has been bootstrapped. As we know, we reference
our JavaScript files in index.html; therefore, the user hits this file first before even the
files are downloaded.
Figure 7-2. Dynamic content
Chapter 7 app Shell andangular performanCe
www.EBooksWorld.ir
172
In low-performance apps and especially on the first-time visit, there is a time
between seeing app content and a blank screen, which is basically our index.html and
does not have any elements.
Angular CLI has a built-in functionality that helps us to generate our app shell at
build time automatically. Before we go further, let’s see what index.html contains after
building for prod in /dist folder. Open your project and build for prod or if you have
cloned the repository for this book, simply change your directory to chapter07 and then
to 02-app-shell; finally, run the following command:
npm run build:prod
If we compare index.html from src folder and dist folder, we notice that we only
see JS files and CSS files injected into this file.
<!doctype html>
<html lang="en">
<head>
...
<link rel="stylesheet" href="styles.c418d0a7774195ac83e5.css">
</head>
<body>
<app-root></app-root>
<noscript>Please enable JavaScript to continue using this application.
</noscript>
<script type="text/javascript" src="runtime.3d4490af672566f1a0de.js">
</script>
<script type="text/javascript" src="polyfills.c53b1132b0de9f2601bd.js">
</script>
<script type="text/javascript" src="main.a136972022b8598085fb.js">
</script>
</body>
</html>
Chapter 7 app Shell andangular performanCe
www.EBooksWorld.ir

173
I would like to measure the app startup performance after build. You can either run
ng serve --prod or after build run a local server to run the app. If you are still in project
repository for this book, simply run npm run prod then follow these steps:
1. Open a new browser, possibly incognito where we ensure there is
no cache.
2. Open DevTools in Chrome and select tab performance.
3. Open capture setting and select Fast 3G for Network and 4x
Slowdown for CPU; this is typically when we want to simulate
throttling for a mobile (Figure7-3).
4. Click on record and hit enter to load the website or simply reload
the page by hitting the reload icon in performance tab.
As you can see in Figure7-4, the browser is rendering the page at about 2000 ms
while the first paint attempt has started around 500 ms, but since there is no content and
nothing to show, it remains blank.
Figure 7-3. Open capture setting and select Fast 3G and 4x slowdown
Chapter 7 app Shell andangular performanCe
www.EBooksWorld.ir

174
Angular App Shell andAngular Universal
Angular Universal generates static application pages on the server through a process
called server-side rendering (SSR). When Universal is integrated with your app, it can
pre-generate pages as HTML files that can be served later.
Having looked at the application structure, app.component.ts has the main skeleton,
which includes a header and footer.
template: `
<div class="appress-pwa-note">
<app-header></app-header>
<div class="main">
<div *ngIf="joke$ | async as joke" class="joke">
{{ joke }}
</div>
Figure 7-4. Initial rendering for app shell after Angular is bootstrapped around
2 seconds
Chapter 7 app Shell andangular performanCe
www.EBooksWorld.ir
175
<router-outlet></router-outlet>
</div>
<app-footer></app-footer>
</div>
`,
It seems that if we can pre-render this component, we can have an app shell before
bootstrapping Angular. As you see in the component template, it has <router-outlet>
that is going to be replaced with content; thus, we need to specify what we want to put in
place of the router outlet.
This is where we are using Angular Universal by running simple commands via
Angular CLI to generate an app-shell at build time and output in index.html. We define
the route we would like to pre-render and then we are good to go. Hence, we are going
to scaffold for an Angular Universal to gain pre-rendering capabilities. Angular CLI will
be a built-in command that will help us to achieve our goal painlessly. Simply run the
following command:
ng generate app-shell --client-project <my-app> --universal-project
<server-app>
• Angular CLI generates App Shell.
• --universal-project species which Angular Universal application
we want to use for pre-rendering.
• --client-project species the client project that we would like to
use for pre-rendering.
• Optionally, you can use --route to specify what route name should
be used for generating App Shell. The default value is shell.
Since Angular CLI 6+ can handle multiple client projects, it’s important to find the
correct app. If you don’t know your client project name, look inside the angular.json
CLI configuration file.
Here is the command output:
CREATE src/main.server.ts (220 bytes)
CREATE src/app/app.server.module.ts (590 bytes)
CREATE src/tsconfig.server.json (219 bytes)
CREATE src/app/app-shell/app-shell.component.css (0 bytes)
Chapter 7 app Shell andangular performanCe
www.EBooksWorld.ir
176
CREATE src/app/app-shell/app-shell.component.html (28 bytes)
CREATE src/app/app-shell/app-shell.component.spec.ts (643 bytes)
CREATE src/app/app-shell/app-shell.component.ts (280 bytes)
UPDATE package.json (1822 bytes)
UPDATE angular.json (5045 bytes)
UPDATE src/main.ts (656 bytes)
UPDATE src/app/app.module.ts (1504 bytes)
If you want to do the process manually or if you wonder how it works under the
hood. I will break the code down.
Main.server.ts has been created to bootstrap the app-server-module:
import { enableProdMode } from '@angular/core';
import { environment } from './environments/environment';
if (environment.production) {
enableProdMode();
}
export { AppServerModule } from './app/app.server.module';
app-server.module.ts with only one route shell where it’s being replaced with
router-outlet
import { NgModule } from '@angular/core';
import { ServerModule } from '@angular/platform-server';
import { AppModule } from './app.module';
import { AppComponent } from './app.component';
import { Routes, RouterModule } from '@angular/router';
import { AppShellComponent } from './app-shell/app-shell.component';
const routes: Routes = [ { path: 'shell', component: AppShellComponent }];
@NgModule({
imports: [
AppModule,
ServerModule,
RouterModule.forRoot(routes),
],
Chapter 7 app Shell andangular performanCe
www.EBooksWorld.ir
177
bootstrap: [AppComponent],
declarations: [AppShellComponent],
})
export class AppServerModule {}
app-shell.component where we can add what we need to show for pre-rendering; in
this case, I will add a simple loading message.
// app-shell.component.html
<div class="loading" style="text-align:center; padding:3rem">
loading... will be sevring you very very soon
</div>`
// app-shell.component.ts
@Component({
selector: 'app-app-shell',
templateUrl: './app-shell.component.html',
styleUrls: ['./app-shell.component.css']
})
export class AppShellComponent implements OnInit {
constructor() { }
ngOnInit() {
}
}
tsconfig-server.json will have all requirements for server-side rendering an
Angular app.
{
"extends": "./tsconfig.app.json",
"compilerOptions": {
"outDir": "../out-tsc/app-server",
"baseUrl": "."
},
"angularCompilerOptions": {
"entryModule": "app/app.server.module#AppServerModule"
}
}
Chapter 7 app Shell andangular performanCe
www.EBooksWorld.ir
178
And platform-server module has been added to package.json:
"@angular/platform-server": "^7.0.1",
In app.module.ts, BrowserModule has configured in order to transition from a
server-rendered app, if one is present on the page.
BrowserModule.withServerTransition({ appId: 'serverApp' }),
Besides all the other changes, there are new configurations in angular.json file
where we have two new targets:
"server": {
"builder": "@angular-devkit/build-angular:server",
"options": {
"outputPath": "dist/lovely-offline-server",
"main": "src/main.server.ts",
"tsConfig": "src/tsconfig.server.json"
},
"configurations": {
"production": {
"fileReplacements": [
{
"replace": "src/environments/environment.ts",
"with": "src/environments/environment.prod.ts"
}
]
}
}
},
"app-shell": {
"builder": "@angular-devkit/build-angular:app-shell",
"options": {
"browserTarget": "lovely-offline:build",
"serverTarget": "lovely-offline:server",
"route": "shell" // where we define our route
},
Chapter 7 app Shell andangular performanCe
www.EBooksWorld.ir
179
"configurations": {
"production": {
"browserTarget": "lovely-offline:build:production"
}
}
}
As you have seen, app-shell component was linked to /shell route but only in
the Angular Universal application. This special route is an internal Angular CLI
mechanism in order to generate App Shell. It will replace router-outlet tag and the
user will not able to navigate to it.
Generating theApp Shell inProduction
So, everything seems ready and has been set up properly. Let’s now build with the app
shell target.
To trigger a production build, all you need to do is run one of the below commands:
ng run <project-name>:app-shell:production
ng run <project-name>:app-shell --configuration production
Therefore, in the project, run the following command:
ng run lovely-offline:app-shell:production
This command will target the client app named lovely-offline and the target
build, which is app-shell. Angular CLI starts building and bundling and once it’s done,
output is ready in dist folder. Let’s take a look at index.html now.
<app-root _nghost-sc0="" ng-version="7.0.1">
<div _ngcontent-sc0="" class="appress-pwa-note">
<app-header _ngcontent-sc0="" _nghost-sc1="">
<mat-toolbar _ngcontent-sc1="" class="mat-toolbar mat-primary mat-
toolbar- single-row" color="primary"
ng-reflect-color="primary"><span _ngcontent-sc1="" tabindex="0"
ng-reflect-router-link="/">ApressNote-PWA</span><span
_ngcontent-sc1="" class="space-between"></span><button _
ngcontent- sc1="" aria-haspopup="true"
Chapter 7 app Shell andangular performanCe
www.EBooksWorld.ir
180
mat-icon-button="" class="mat-icon-button _mat-animation-
noopable"
ng-reflect-_deprecated-mat-menu-trigger-for="[object
Object]"><span class="mat-button-wrapper">
<mat-icon _ngcontent-sc1="" class="mat-icon material-icons"
role="img" aria-hidden="true">more_vert</mat-icon>
</span>
<div class="mat-button-ripple mat-ripple mat-button-ripple-
round" matripple="" ng-reflect-centered="true"
ng-reflect-disabled="false" ng-reflect-trigger="[object
Object]"></div>
<div class="mat-button-focus-overlay"></div>
</button></mat-toolbar>
<mat-menu _ngcontent-sc1="" x-position="before" class="ng- tns- c6-0">
<!---->
</mat-menu>
</app-header>
<div _ngcontent-sc0="" class="main">
<!--bindings={
"ng-reflect-ng-if": "How many kids with ADD does it"
}-->
<div _ngcontent-sc0="" class="joke ng-star-inserted"> How many kids
with ADD does it take to change a
lightbulb? Let's go ride bikes! </div>
<router-outlet _ngcontent-sc0=""></router-outlet>
<app-app-shell _nghost-sc7="" class="ng-star-inserted">
<div _ngcontent-sc7="" class="loading" style="text-align:center;
padding:3rem"> loading... will be sevring
you very very soon
</div>`
</app-app-shell>
</div>
<app-footer _ngcontent-sc0="" _nghost-sc2="">
<footer _ngcontent-sc2="">
<div _ngcontent-sc2="" class="copyright">Copyright Apress - Majid
Hajian</div>
Chapter 7 app Shell andangular performanCe
www.EBooksWorld.ir
181
</footer>
<div _ngcontent-sc2="" class="addNote"><button _ngcontent-sc2=""
mat-fab="" class="mat-fab mat-accent _mat-animation-noopable"
tabindex="0" ng-reflect-router-link="/notes/add"><span
class="mat-button-wrapper">
<mat-icon _ngcontent-sc2="" class="mat-icon material-icons"
role="img" aria-hidden="true">add circle</mat-icon>
</span>
<div class="mat-button-ripple mat-ripple mat-button-ripple-
round" matripple="" ng-reflect-centered="false"
ng-reflect-disabled="false" ng-reflect-trigger="[object
Object]"></div>
<div class="mat-button-focus-overlay"></div>
</button></div>
</app-footer>
</div>
</app-root>
It looks very different from what we had before. Angular CLI has generated a shell
based on /shell route, which has a footer and header, including a joke section.
In addition to HTML, you see that all CSS based on these components have also
been generated and added to <head> </head>.
I will add a npm script to build App Shell and measure the performance again.
"build:prod:shell": "ng run lovely-offline:app-shell:production",
And
"prod": "npm run build:prod:shell && cd dist && http-server -p 4200 -c- 1",
Run the local server by hitting
npm run prod
If you are running your own project, make sure you have http-server installed and
you change the directory to /dist and run http-server -p 4200 c-1.
After the server is ready, navigate to localhost:4200 in Chrome and do the same
performance profiling as we did before App Shell implementation.
Chapter 7 app Shell andangular performanCe
www.EBooksWorld.ir

182
The result may differ from app to app and where you run the test, but the main point
is that Angular App Shell could potentially enhance start up load time. As you see in
Figure7-5, we managed to render our application shell to the user at around 100 ms and
as soon as Angular is bootstrapped dynamic content, it will be loaded.
Measuring App Shell Performance via webpagetest.org
Although we have run a local test with our local server via the Chrome Performance tab
in DevTools, it’s not very precise. Webpagetest.org is a tool that we can use to measure a
website’s performance and generate details about the test, including many features that
are useful when it comes to web app optimization.
Let’s run a test for our app on Firebase before we deploy new App Shell
implementation.
Figure 7-5. First paint starts at around 100 ms after we implement Angular App
Shell
Chapter 7 app Shell andangular performanCe
www.EBooksWorld.ir

183
Open webpagetest website and go to simple testing tab. Enter your website name
and select “Mobile regular 3G” (see Figure7-6). Select both “Include repeat view”
and “run lighthouse audit.” You can run more tests with different settings. Finally,
start the test.
Once a result is ready, we see that before App Shell optimization, the time to interact
is around 7.8 seconds and the browser starts rendering around 6.9 seconds, which is
somehow expected due to bootstrapping Angular (see Figure7-7). To see more details,
check out this link:
https://www.webpagetest.org/result/181030_ZA_ff4f3780bea8eb430be1171a5297ae35/
I will deploy the app to Firebase with App Shell implementation. Once deployment
is done, navigate to the website and see the source via Chrome. You’ll see that the App
Shell and inline styles are already in the source. Open webpagetest.org and run the exact
same test again.
Figure 7-6. Simple testing setting on webpagetest.org
Figure 7-7. Webpagetest result before App Shell and more optimizations, run on
Mobile Regular 3G network
Chapter 7 app Shell andangular performanCe
www.EBooksWorld.ir

184
As soon as the result is ready, a significant improvement is seen. The time to
interact has reduced to 5.9 seconds and the start render time dropped at least 2 seconds
compared to the previous test. You see that a simple model in the app could have a
notable impact on user experience (see Figure7-8).
To see more details, check out this link:
https://www.webpagetest.org/result/181031_KE_538b7df1cabf6cbe4a3565a3f6c42fc6/
Measuring App Shell Performance viaAudit tab
inChrome DevTools
While webpagetest.org is able to run a test application via Lighthouse, I would like to
run the measure with my web app running on Chrome DevTools on my machine. Keep
in mind, the more tests you do, the better. So, don’t give up, and run more tests on
different tools.
Simply open your Chrome DevTools while the web app on Firebase is loading. Go
to Audit tab as you are familiar with, and select the Performance check box as well as
Progressive Web App. Make sure Simulated Fast 3G, 4x CPU Slowdown is chosen for
throttling and then hit the “Run Audit” button. I will do this test before and after I deploy
the app with App Shell implementation. You can see the result in Figures7-9 through 7-12.
Figure 7-8. Webpagetest result after App Shell, run on Mobile Regular 3G
network
Chapter 7 app Shell andangular performanCe
www.EBooksWorld.ir

185
Figure 7-9. Audit website in Chrome audit tab to check performance score before
deploying App Shell implementation on simulated mobile fast 3G
Figure 7-10. Performance tab before deploying App Shell implementation, tested
on good internet connection, and initial rendering is around 700 ms
Chapter 7 app Shell andangular performanCe
www.EBooksWorld.ir

186
Figure 7-12. performance tab after deploying App Shell implementation, tested on
good internet connection, initial rendering is around 150 ms
Figure 7-11. Audit website in Chrome audit tab to check performance score after
deploying App Shell implementation on simulated mobile fast 3G
Chapter 7 app Shell andangular performanCe
www.EBooksWorld.ir
187
As we have seen, in this particular app, the App Shell has represented a huge
improvement to the typical time to the first paint of a full SPA, which could sometimes
keep a user waiting for a few noticeable seconds.
Although, App Shell model is one way to improve a startup load, it’s not the only
thing that we can do in our applications. There are even more optimizations that we can
do in a web app, especially in an Angular application, in order to boost the performance.
Beyond theApp Shell, Further Optimizations
As we know, web apps are still fighting with native apps in terms of performance
perception; thus, each blink of an eye is going to be important. There are an infinite
number of tips and tricks that we can try to do in the app to eke out another few
milliseconds.
In general, performance in Angular is mostly divided into two sections:
1. Runtime performance, which targets best practices to improve
mostly change detection, rendering related optimizations.
2. Network performance, which targets best practices to enhance
the load time of our application, including latency and bandwidth
reduction.
There are common best practices that are known in web development and overlap
both sections. However, in this section, my focus point is network performance and
faster load time. I will review some of the most important tips that we can do in order to
improve loading speed.
Analyze Bundle Sizes andLazy Load Module
No doubt that the less JavaScript code in the bundle size, the better for downloading and
parsing. Angular CLI uses Webpack to bundle the app. By passing --stats-json in build
command, Angular CLI will generate a JSON file that contains all bundle information
and we simply can analyze it.
Chapter 7 app Shell andangular performanCe
www.EBooksWorld.ir

188
Just follow the steps below:
1. Install the tool with npm install webpack-bundle-analyzer -D
2. Add --stats-json to build script in packge.json
"build:prod": "ng build --prod --stats-json",
3. Add new script to package.json le
"analyzer": "webpack-bundle-analyzer dist/stats.json"
4. Build and then run npm run analyzer
Once build is done, there will be a stats.json file in the /dist folder that contains
all information about the project bundles. You’ll be redirected to the browser as soon
as you run the npm command, and you’ll see how the app stats look like as shown in
Figure7-13.
Figure 7-13. Analysis of the project app; lazy loaded modules are shown to the
right of the picture
Chapter 7 app Shell andangular performanCe
www.EBooksWorld.ir
189
One way of splitting code to decease the bundle size is to use lazy loading in Angular.
Lazy loading gives you an ability to optimize your application load time by splitting the
application to feature modules and loading them on demand.
{
path: 'user',
loadChildren: './modules/user/user.module#UserModule'
},
{
path: 'notes',
loadChildren: './modules/notes/notes.module#NotesModule',
canLoad: [AuthGuard]
}
We can even prevent whole modules from being loaded based on some condition.
For example, in the project application, we have prevented loading the whole module by
adding canLoad guard, if it’s necessary based on the rule in the guard.
The analysis may differ from app to app and it’s based on how you architect your app.
Waterfall View fromWeb Page Test
Waterfall view reveals many helpful loading details that can be used for tracking down
bottlenecks: for instance, things that block rendering, or requests that can be eliminated
or deferred. An overview of how long that takes from initial a request until is done. Useful
information about http handshaking and etc. For example, Figure7-14 shows that the
project app renders blocks by loading Google fonts, or it delays painting around 450 ms
because the browser is parsing CSS.
Chapter 7 app Shell andangular performanCe
www.EBooksWorld.ir

190
Reduce Render Blocking CSS
It is a common mistake that is seen in many applications in which they will load a
lot of CSS while it’s not necessary for the content that are can be seen in the screen or so-
called above-the-fold-content.
Generally speaking, we should determine what is crucial for the app skeleton, app
shell, and for the initial load and add them to style.css. We should try to minimize the
footprint of our initial style file.
Additionally, we should import shared styles in lazy loaded modules. Sometimes
we even need to import styles to only those lazy loaded modules that need a particular
style. For example, imagine that we have a chart module that has been loaded lazily.
If this module needs a specific styling, we should only import that to this where it will
be loaded on demand.
In a real example, think of our app, since we are pre-rendering and app shell and
Angular CLI will inject all essential styling to index.html. It may make sense to remove
Angular Material theme CSS file and our main style.scss file into AppComponent,
Figure 7-14. The app waterfall view from webpagetest.org
Chapter 7 app Shell andangular performanCe
www.EBooksWorld.ir
191
because basically the whole application needs those styles and we can simply pre-render
and inject that styling into index.html head, which will result removing the style.css
bundle file that blocks the render.
// Angular.json
"styles": [
{
"input": "node_modules/@angular/material/prebuilt-themes/
indigo-pink.css"
},
"src/styles.scss"
],
// remove these files and it looks like
"styles": [],
And then import them to AppComponent:
//app.component.ts
@Component({
selector: 'app-root',
template: `
<div class="appress-pwa-note">
<app-header></app-header>
<div class="main">
<div *ngIf="joke$ | async as joke" class="joke">
{{ joke }}
</div>
<router-outlet></router-outlet>
</div>
<app-footer></app-footer>
</div>
`,
styleUrls: [
'../../node_modules/@angular/material/prebuilt-themes/indigo-pink.css',
'../../styles.scss'
]
})
Chapter 7 app Shell andangular performanCe
www.EBooksWorld.ir

192
Now, if you build the application and then check /dist/index.html, you’ll see that
all stylings have been added to the head and there is no more css file as before.
Once more, this is just an example that I want to show how you can think of
optimizing your app; and it may make sense for our Note app but doesn’t seem a good
option for your next project. Keep in mind, you should evaluate the app performance
after each change and see if there is an improvement.
Optimize Fonts
It’s very likely that you are using fonts in web applications these days, especially external
fonts such as Google fonts. While we add the style link to the head of the page, it should
be taken into consideration that these fonts will block rendering. That means rendering
will hold off until these styles are downloaded and rendered. It is important to slim down
the initial need for fonts and load the reset of them on demand.
Self-Hosting Fonts
Using a web font face block means that the browser decides what to do if it takes a long
time for that web font to fetch. Some browsers will wait anywhere up to three seconds for
this before falling back to a system font, and they'll eventually swap it out to the font once
it's downloaded.
We are trying to avoid invisible text, so thanks to new feature called font-display,
this helps to decide how web fonts will render or fall back based on how long it takes for
them to swap.
Swap gives the font face a zero-second block period and an infinite swap period.
In other words, the browser will render text pretty quickly with a fallback font if
downloading takes time. Once the web font is ready, it is going to swap. This feature has
a good browser support.
1
@font-face {
font-family: YouFont;
font-style: normal;
font-display: swap;
font-weight: 400;
1
https://caniuse.com/#search=font-display
Chapter 7 app Shell andangular performanCe
www.EBooksWorld.ir

193
src: local(yo-font Regular'), local(YouFont -Regular'),
/* Chrome 26+, Opera 23+, Firefox 39+ */
url(you-font -v12-latin-regular.woff2') format('woff2'),
/* Chrome 6+, Firefox 3.6+, IE 9+, Safari 5.1+ */
url(you-font -v12-latin-regular.woff') format('woff');
}
In case of Note app, it makes sense to show our user their notes as quickly as possible
and then move on, and transition over to the web font once it is ready. Keep in mind that
we still get a FOUT
2
(flash of unstyled text).
CDN-Based Fonts
Clearly, we are using Google web fonts in the Note app. There are many different
approaches to optimize these types of fonts. On way is to asynchronously add them to
UI, which helps to avoid block rendering. There are tools and libraries that we can use to
lazy load fonts, but perhaps one of the most well-known libraries is Web Font loader.
3
However, I have decided to load my fonts differently in my Angular project in
order to unveil two attributes that help loading JavaScript files while they don’t block
rendering. I have created a JavaScript file named lazy-fonts.js and added it to /src
and will add the following code, which basically adds a script tag to the head.
(function(d) {
var x = d.createElement('link');
var y = d.getElementsByTagName('script')[0];
x.rel = 'stylesheet';
x.href = 'https://fonts.googleapis.com/icon?family=Material+Icons';
y.parentNode.insertBefore(x, y);
})(document);
(function(d) {
var x = d.createElement('link');
var y = d.getElementsByTagName('script')[0];
2
https://en.wikipedia.org/wiki/Flash_of_unstyled_content
3
https://github.com/typekit/webfontloader
Chapter 7 app Shell andangular performanCe
www.EBooksWorld.ir
194
x.rel = 'stylesheet';
x.href = 'https://fonts.googleapis.com/css?family=Roboto:300,400,500';
y.parentNode.insertBefore(x, y);
})(document);
I will also delete the fonts tags between <head> in the index.html file in the
Application and will reference this file right before </body>. Last but not least, I will add
this file into my assets array in Angular configuration file, which tells Angular CLI to copy
this file from the src to dist folder root.
// angular.json
"assets": [
"src/favicon.ico",
"src/assets",
"src/manifest.json",
"src/lazy-fonts.js"
],
and
// index.html
<script type="text/javascript" src="lazy-fonts.js"></script>
</body>
Modern browsers have a couple of additional options to keep the scripts from
blocking the page-rendering process. The two main features are the following:
• defer attribute: tells browser to continue rendering while the
resource is being downloaded but to not execute this JS resource
until it’s finished rendering HTML.In other words, the browser will
wait for the script to execute until rendering is completely done. For
angular-cli app, currently there is no way to add this automatically
during the build, so you have to do it manually after the build.
• async attribute: tells browsers that continuing rendering while the
script resource is also being downloaded will only pause parsing from
HTML to execute the script. This is useful when you need the script
to be executed as soon as possible but not block rendering from your
application shell. The best example is to use it with Google analytics
scripts, which are usually independent of any other scripts.
Chapter 7 app Shell andangular performanCe
www.EBooksWorld.ir

195
So, based on the definition I would like to add async to my script file.
// index.html
<script type="text/javascript" src="lazy-fonts.js" async></script>
</body>
This will help to render HTML without being blocked by the script, which will also
add the fonts to the app.
Browser Resource Hinting
You might have heard of preload, prefetch, and preconnect. Eventually, these enable
web developers to optimize delivery of the resources, reduce round-trips, and fetch
resources faster than it’s requested.
• Preload: is a new standard to of how to gain more control on how
resources should be fetched for current navigation. This directive
is defined within a <link> element, <link rel="preload">. This
allows the browser to set priority to prefetch even before the resource
is reached. See Figure7-15 for browser support.
<link rel="preload" href="https://example.com/fonts/font.
woff" as="font" crossorigin>
Figure 7-15. Preload browser support as of writing this book
Chapter 7 app Shell andangular performanCe
www.EBooksWorld.ir

196
• Prefetch: is set as a low priority resource hint that informs the
browser to fetch that particular resource in the background when
the browser is idle. We use prefetch for those resources that may
be needed later: for example, prefetch pictures that will need to be
shown on the second navigation on the website. Element is dened
similar to preload. See Figure7-16 for browser support.
<link rel="prefetch" href="/uploads/images/pic.png">
• Preconnect: this allows the browser to set up early connection
before an HTTP request is actually sent to the server, including DNS
lookups, TLS negotiations, and TCP handshakes. One of the benets
of having this resource hint is to eliminate roundtrip latency and save
time for users. In some cases, it could improve up to 400 ms for the
initial load. e tag is similar to preload, which is added to the head
in HTML.Using preconnect for external resources such as fonts that
are being served via a CDN can potentially boost loading time. See
Figure7-17 for browser support.
<link rel="preconnect" href="https://fonts.googleapis.
com"crossorigin="anonymous">
Figure 7-16. Prefetch brower support as of writing this book
Chapter 7 app Shell andangular performanCe
www.EBooksWorld.ir

197
Since we are using Google fonts in PWA Note project, adding resources hits preconnect
and preload and may help loading performance. Open src/index.html and add the
following codes:
<head>
<link rel="preconnect" href="https://fonts.googleapis.com"
crossorigin="anonymous">
<link rel="preconnect" href="https://fonts.gstatic.com"
crossorigin="anonymous">
<link rel="preload" href="https://fonts.googleapis.com/
icon?family=Material+Icons" as="style">
<link rel="preload" href="https://fonts.googleapis.com/
css?family=Roboto:300,400,500" as="style">
<link rel="preload" href="lazy-fonts.js" as="script">
Once we build and deploy to Firebase, we can run another test to measure
performance after adding these tags. You may not see a huge improvement, but even 100
ms counts. Remember, we strive to reduce milliseconds.
Preload Angular Lazy Loaded Modules
Angular enables us to preload all lazy loaded modules. This feature is inherited from
Angular Router module where we are able to change the preloading strategy.
While you are able to write a custom provider to define a preloading strategy, I use
PreloadAllModules, which is in Angular Router module already. Open app-routing.
module.ts and add a second argument to forRoot on RouterModule.
Figure 7-17. Preconnect browser support as of writing this book
Chapter 7 app Shell andangular performanCe
www.EBooksWorld.ir

198
@NgModule({
imports: [
RouterModule.forRoot(routes, { preloadingStrategy: PreloadAllModules })
],
providers: [AuthGuard],
exports: [RouterModule]
})
export class AppRoutingModule {}
This allows the browser to prefetch and cache these modules even before they are
on demand; thus, subsequent navigations are instant while the initial load is as small as
possible. This might be especially useful when our lazy load modules are pretty big in
size. Keep in mind that preloading will not affect the initial load performance.
HTTP/2 Server Push
4
HTTP/2 (h2) Server Push is one of the performance features included in version 2 of the
HTTP protocol.
As long as all the URLs are delivered over the same hostname and protocol, the web
server is allowed to “push” contents to the client ahead of time even if the client has not
requested them.
Having push resources compete with the delivery of the HTML can impact page load
times. This can be avoided by limiting the amount and size of what is pushed.
Firebase allows us to push content to the client by configurating firebase.json
located in the root of our project. The rule looks like the code below:
"hosting": {
"headers": [
{
"source": "/",
"headers": [
{
"key": "Link",
4
https://en.wikipedia.org/wiki/HTTP/2_Server_Push
Chapter 7 app Shell andangular performanCe
www.EBooksWorld.ir
199
"value": "</lazy-fonts.js>;rel=preload;as=script,</css/any-
file.css>;rel=preload;as=style"
}
]
}
],
}
Although this feature sounds promising, do not try to overuse it.
Summary
App Shell pattern is a great way to boost initial load speed, and we have seen that
Angular CLI by utilizing Angular Universal will generate a proper app shell for any
Angular project as long as it is well architected.
We optimize our application for enhancing performance in a network level to
build a blazing fast application. Although I have covered the main important topics
in performance and optimizations, you are not limited and should take things a step
further and refine even more. Things like Google Closure Compiler, Tree-shaking, Build-
optimizer flag, Ivy Render Engine, Cache-control header, Gzip compression, Header
compression in HTTP/2, Compressing images, Change Detection optimization, Pure
pipes and memorization, are just examples of how far you can get and how fast the
application can be.
As I mentioned, progressive enhancement is one of the most important keys in
building PWAs. So, implement features with feature-detecting in browsers, always keep
all of your users in mind, iteratively enhance your app performance, and give your users
the best integration and interaction experience regardless of what browser they are
using.
In the next chapter, we shift our attention to engaging part of a PWA and will see how
we can send push notifications to our users.
Chapter 7 app Shell andangular performanCe
www.EBooksWorld.ir

201
© Majid Hajian 2019
M. Hajian, Progressive Web Apps with Angular, https://doi.org/10.1007/978-1-4842-4448-7_8
CHAPTER 8
Push Notifications
There are different ways to keep your user engaged and up to date such as by email, in-
app notifications, and push notifications! Native mobile apps have been engaging their
users by push notifications for a long time. This feature was not supported on the web
until PWAs were born. Thanks to new standard APIs such as Notification API and Push
API, which are built on top of Service Worker, it’s possible to send push notifications to
web users.
In this chapter, you’ll discover the basics of push notifications and will build a
working example for the existing application, PWA Note. You’ll see how we write a
Firebase Cloud Function in order to send push notifications from a server. All in all, after
this chapter, you should be able to run your own server for sending push notifications
and implement this feature in Angular in no time.
Introduction toPush Notifications
Most modern web applications will keep their users updated and communicate through
different channels such as their social medias, emails, and in-app notifications. While all
of these channels are great, they don’t always grab their users’ attention, especially when
the user navigates away from the app.
Traditionally, native applications had this amazing ability, push notification, until
PWAs were born. That’s why PWAs are a game changer. A notification is a message that
can be shown on the user’s device and is triggered either locally by Web Notifications
API
1
or can be pushed from the server to the user when the app is not even running,
thanks to Service Worker.
1
https://www.w3.org/TR/notifications/
www.EBooksWorld.ir

202
Web Notifications
The notification API allows a web page to control the display of system notifications to
the user. Since this message is shown outside of the top-level browsing context viewport,
it can be displayed to the user even if the user switches tabs. The best part is that this
API is designed to be compatible with existing notification systems across different
platforms. On supported platforms, the user needs to grant the current origin permission
to display system notifications. Generally, it can be done by calling the Notification.
requestPermission() method (Figure8-1).
Once permission is granted, on the web page, we just need to instantiate
Notification constructor with an appropriate title and options (see Figure8-2).
new Notification("New Email Received", { icon: "mail.png" })
Figure 8-1. Permission popup for web notifications in different browsers
Figure 8-2. Simple notification received in Chrome browser
CHAPTER 8 PUSH NOTIFICATIONS
www.EBooksWorld.ir
203
This is pretty great. It would be nice if we can involve Service Worker, too. When
showing a notification is handled by Service Worker, it’s called “Persistent notifications,”
since Service Worker remains persistent in the background of the app whether it’s
running or not.
Almost all of the code is going to be the same as before; the only difference is that we
just need to call showNotification method on sw object.
nagivator.serviceWorker.ready.then(sw =>{
sw.showNotification('title', { icon: "main.png"})
})
You’ll find out more about possible options for the notifications in this chapter.
Push Notifications
Undoubtedly, one of the most powerful and incredible ways to engage with our user is
push notifications, where they extend the app beyond the browser. There are several
pieces that come together to make push notifications work. One of the main pieces is
Push API that enables web developers to do this similarly to native apps technology,
which is called Push Messaging.
In a few steps, I’ll try to simplify the push notification architecture:
1. After the user grants permission, the app asks a web push service
for a PushSubscription object. Keep in mind that each browser
has its own implementation of a push service.
2. e web push service returns the PushSubscription object. Here
is when you can save this object in your database in order to reuse
it for pushing notications.
3. In our app, we dene which action requires a push notication.
erefore, the app back end will handle sending push
notications based on the subscription details.
4. Finally, once the web push service sends the notification, Service
Worker will receive the notification and show it.
There are different events for push notification in Service Worker such as push and
notificationclick events.
CHAPTER 8 PUSH NOTIFICATIONS
www.EBooksWorld.ir

204
Note In Service Worker, you can listen to push and other events related to push
notifications such as notificationclick
Looking at Figure8-3, you’ll see how it works visually.
Requesting for a subscription object without identifying the app itself in the web
push server, potentially, will expose a lot of risks and vulnerabilities. The solution is to
use Voluntary Application Server Identification (VAPID) keys, also known as application
server keys. This ensures that the server will know who is requesting the push and
who will receive it. This is considered a security precaution to make sure nothing goes
maliciously wrong between the application and the server.
Figure 8-3. Push notification process
CHAPTER 8 PUSH NOTIFICATIONS
www.EBooksWorld.ir
205
The process is pretty simple:
1. Your application server creates a public/private key pair. Public
key is used as a unique server identifier for subscribing the user to
notifications sent by that server, and the private key is used by the
application server to sign messages, before sending them to the
Push Service for delivery.
ere are dierent ways to generate public/private keys. For
instance,
a. You can use web-push-codelab.glitch.me and generate keys. Then
store the keys safely, especially private key (it should be hidden to
public) and use it when it’s needed.
b. There is npm package called web-push that we can use to both
generate private/public keys. Also, it can be used to push a
notification in the app back-end server.
To generate with web push library:
npm install web-push -g
Once package is installed, run the following command to generate
key pair:
web-push generate-vapid-keys --json
Using this command, here is what a VAPID key pair looks like:
{
"publicKey":"ByP9KTS5K7ZLBx- _x3qf5F4_hf2WrL2qEa0qKb-
aCJbcxEvyn62GDTy0K7TfmOKSPqp8vQF0DaG8hpSBknz iEFo",
"privateKey":"fGcS9j-KgY29NM7myQXXoGcO-fGcSsA_fG0DaG8h"
}
2. The public key is given to your web app. When the user elects
to receive pushes, add the public key to the subscribe() call’s
options object. Later in this chapter, we need the public key to
pass into the requestSubscription method and Angular Service
Worker will handle the permission request.
CHAPTER 8 PUSH NOTIFICATIONS
www.EBooksWorld.ir

206
The subscribe method on PushManager needs
ApplicationSeverKey as UInt8Array,
2
which is handled by
Angular Service Worker under the hood.
3. When your app back end sends a push message, include a signed
JSON web token along with the public key.
Note If you have cloned the project source, go to https://github.com/mhadaily/
awesome-apress-pwa/tree/master/chapter08/01-push-notification. To generate
vapid pair keys, run npm install first and then npm run vapid.
Browser Supports
At the time of writing this book, the Push API is supported by the major browsers Firefox,
Chrome, Opera, and Microsoft Edge. Safari doesn’t support Push API.However, if you
would like to target Safari, too, there is a recommendation on the Apple Developer’s
website on how to send push notifications for websites. You can find this document on
developer.apple.com/notifications/safari-push-notifications for more information. Keep
in mind that this solution is not related to Safari on iOS.
Now that you know how push notifications work, it’s time to start implementing
Angular Service Worker to handle push notifications in our application.
Push Notification inAngular
Angular Service Worker provides SwPush service, which has different methods and
properties to facilitate push notification implementation. While we can use the Angular
way, it’s not obligatory to use it in order to subscribe and unsubscribe because those
methods are basically just syntax sugar on top of native pushManager object methods.
However, in this section, I will keep using the Angular way.
Since we have already installed Angular Service Worker, we now are able to
inject SwPush service. First, we should allow our user to subscribe for receiving push
2
If you like to know more, check urlB64ToUint8Array() function here: https://github.com/
GoogleChromeLabs/web-push-codelab/blob/master/app/scripts/main.js
CHAPTER 8 PUSH NOTIFICATIONS
www.EBooksWorld.ir
207
notification. In order to do that, the user should grant a permission to subscribe to
notifications. Let’s change the app UI to let the user enable notification.
I will add a button in the menu that when the user clicks, it triggers request
permission. Since we do care about our user experience, I’ll add another button for
when the user likes to unsubscribe from a push notification.
<button mat-menu-item (click)="requestPermission()"
*ngIf="!(subscription$ | async) && (user$ | async) && isEnabled">
<mat-icon>notifications_on</mat-icon>
<span>Enable alerts</span>
</button>
<button mat-menu-item (click)="requestUnsubscribe()"
*ngIf="subscription$ | async">
<mat-icon>notifications_off</mat-icon>
<span>Disabled alerts</span>
</button>
We are progressively building our application; therefore, we should make sure that
this feature is available for those who have Service Worker registered and pushManager
object is available in the Service Worker registration. As you see, we hide the Enable
Alerts button when there is already a subscription enabled and Service Worker is
enabled.
requestPermission and requestUnsubscribe methods are defined in the
HeaderComponent class.
export class HeaderComponent {
private readonly VAPID_PUBLIC_KEY = 'YOUR VAPID PUBLIC KEY';
public user$ = this.auth.user$;
public subscription$ = this.swPush.subscription;
public isEnabled = this.swPush.isEnabled;
constructor(
private auth: AuthService, private swPush: SwPush,
private snackBar: SnackBarService, private dataService: DataService,
private router: Router
) { }
CHAPTER 8 PUSH NOTIFICATIONS
www.EBooksWorld.ir
208
requestPermission() {
this.swPush
.requestSubscription({
serverPublicKey: this.VAPID_PUBLIC_KEY
})
.then(async (sub: PushSubscription) => {
const subJSON = sub.toJSON();
await this.dataService.addPushSubscription(subJSON);
return this.snackBar.open('You are subscribed now!');
})
.catch(e => {
console.error(e);
this.snackBar.open('Subscription failed');
});
}
requestUnsubscribe() {
this.swPush
.unsubscribe()
.then(() => {
this.snackBar.open('You are unsubscribed');
})
.catch(e => {
console.error(e);
this.snackBar.open('unsubscribe failed');
});
}
}
Let’s break down the code.
SwPush subscription property is an observable that is associated to the Service
Worker get subscription method or if there is not, the subscription is null.
In requestPermission method, the user is asked for permission by calling
requestSubscription on swPush service. We should pass our VAPID public key as
serverPublicKey to this method.
CHAPTER 8 PUSH NOTIFICATIONS
www.EBooksWorld.ir

209
this.swPush
.requestSubscription({
serverPublicKey: this.VAPID_PUBLIC_KEY
})
This method returns a Promise that contains PushSubscription. The push
notification object has the following methods and properties:
interface PushSubscription {
readonly endpoint: string;
readonly expirationTime: number | null;
readonly options: PushSubscriptionOptions;
getKey(name: PushEncryptionKeyName): ArrayBuffer | null;
toJSON(): PushSubscriptionJSON;
unsubscribe(): Promise<boolean>;
}
As a result, we are going to call toJSON()
3
function to receive the
PushSubscriptionJSON object, which includes essential properties for sending
notifications where we send it to the back end and store it our database.
interface PushSubscriptionJSON {
endpoint?: string;
expirationTime?: number | null;
keys?: Record<string, string>;
}
I have created a simple method in the data service to store push subscription data in
the database.
const subJSON = sub.toJSON();
await this.dataService.addPushSubscription(subJSON);
By passing subscription JSON object to the addPushSUbscription method, I
will store this object to another collection called subscription for the active user
in Firestore. Our user may have more than one subscription based on different
3
Standard serializer– returns a JSON representation of the subscription properties.
CHAPTER 8 PUSH NOTIFICATIONS
www.EBooksWorld.ir
210
browsers and devices. So, it’s important to store all subscription for this user and send
notifications to all of the devices that are registered to receive notifications.
addPushSubscription(sub: PushSubscriptionJSON):
Promise<DocumentReference> {
const { keys, endpoint, expirationTime } = sub;
return this.afDb
.collection(this.USERS_COLLECTION)
.doc(this.auth.id)
.collection(this.SUBSCRIPTION_COLLECTION)
.add({ keys, endpoint, expirationTime });
}
We have implemented another button to allow our user to opt out from receiving
notifications if they are willing to. Therefore, the requestUnsubscribe method will call
unsubscribe() method on swPush that returns a Promise and once resolved, the user
will be unsubscribed.
requestUnsubscribe() {
this.swPush
.unsubscribe()
.then(() => {
this.snackBar.open('You are unsubscribed');
})
.catch(e => {
console.error(e);
this.snackBar.open('unsubscribe failed');
});
}
Now we have implemented the basics of our needs, let’s build an application for a
production and run server. Navigate to Chrome browser and under the menu, click on
enable alerts (see Figure8-4).
CHAPTER 8 PUSH NOTIFICATIONS
www.EBooksWorld.ir

211
Once clicked, you should be able to see a permission popup (see Figures8-5 and 8-6).
What you’ll see is a native browser UI, and it may differ from browser to browser on different
platforms. However, you’ll have two options– “allow” and “block”– where you can grant
sufficient permission for receiving notifications. Once either of these options is chosen, this
modal will not get triggered anymore.
Figure 8-4. Enable alerts buttons when Service Worker is enabled and there is no
notification subscription
Figure 8-5. Notification request popup in Chrome
CHAPTER 8 PUSH NOTIFICATIONS
www.EBooksWorld.ir

212
If the user chooses Block, the app goes to the block list, and there will not be any
subscription granted. However, if the user accepts the request, the browser will generate
a push notification subscription for this user on the device, and therefore the request
permission will successfully be evaluated, and then the push subscription will be passed
to then(). To covert the result to JSON format, we call toJSON() and then we send it over
to the back end in order to store it to the database (see Figure8-7).
Figure 8-6. Notification request modal on Chrome, Android
Figure 8-7. Snack bar message when user accepts the request and it’s stored in
database
CHAPTER 8 PUSH NOTIFICATIONS
www.EBooksWorld.ir
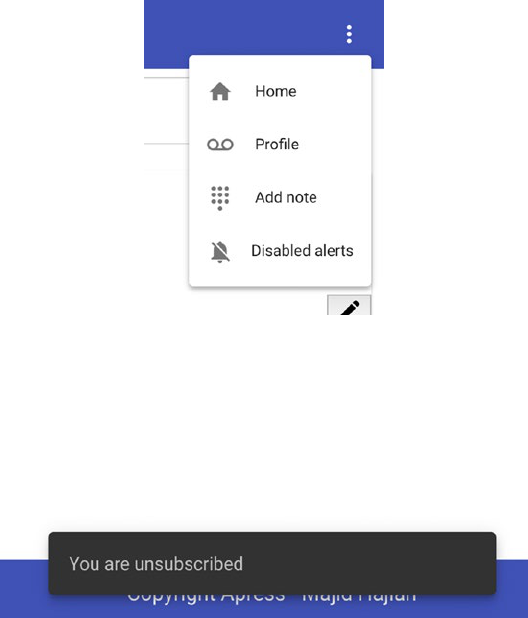
213
You may now notice that enable alerts under the menu has become disable alerts as
soon as permission is granted, and the subscription object returns from the push server
(see Figures8-8 and 8-9).
This is a good practice to give our user the ability to opt out from receiving
notifications.
Having looked at the database, the user subscription has been added to the
subscriptions collection for the current user. We are now ready to push notifications to
our users based on their subscription information in our database.
Let’s have a look at the subscription object in JSON format (see Figure8-10).
{
"endpoint": "UNIQUE URL",
"expirationTime": null,
"keys": { "p256dh": "KEY", "auth": "KEY }
}
Figure 8-8. If there is an active subscription, disable alerts is displayed and lets the
user unsubscribe from the subscription
Figure 8-9. Snack bar message when user unsubscription is successful
CHAPTER 8 PUSH NOTIFICATIONS
www.EBooksWorld.ir

214
To understand better how Push Notifications works in general, I will uncover push
notification object properties:
• endpoint: This contains a unique URL from Browser Push Service
used by the application back end to send push notifications to this
subscription.
• expirationTime: Some messages are time sensitive and don't need to
be sent if a certain time interval has passed: for instance, if message
has an authentication code that expires at a certain time.
• p256dh: is is an encryption key that our back end will use to
encrypt the message, before sending it to the Push Service.
• auth: This is an authentication secret, which is one of the inputs of
the message content encryption process.
All of the information is essential to be able to send push notifications to this user.
Figure 8-10. JSON format of subscription object stored for the active user in the
app. For instance, this user has more than one subscription, and we may want to
send push notifications to all of them
Showing Again theAllow/Block Notifications Popup
While testing locally, you may hit the Block button accidentally or deliberately, and the
permission popup will never display anymore. Instead, if you click on the subscription
button, the Promise is going to be rejected and the catch block in our code will be
triggered (see Figure8-11).
CHAPTER 8 PUSH NOTIFICATIONS
www.EBooksWorld.ir

215
To fix this issue, we should remove the app from the block list in the browser. For
instance, in Chrome:
1. Go to chrome://settings/content/notifications.
2. Scroll down to the Block list where all the websites that are
blocked from emitting push notications are located.
3. Delete localhost or your app URL from the Block list.
The popup should now appear again, and if we click on the Allow option, a Push
Subscription object will be generated.
Sending Push Notifications
A user’s subscriptions object has been stored in the database. It means we are able to
push a notification to the user even if there is more than one subscription.
In order to send a push notification, we are going to write a simple Firebase Cloud
Function to save the note into the database and once it’s saved, send a notification to the
user with a note ID that says the note has been synced with an appropriate ID retrieved
from the database. This is just an example; you may want to send notifications for
different purposes, and after this section, you should be able to do that in no time.
Note Although sending push notifications is one of the best ways to engage with
the user, sending too many unwanted and unnecessary notifications may have
the opposite impact and makes the user frustrated and annoyed. Thus, it is our
responsibility to respect a user’s privacy and experiences.
Figure 8-11. Permission denied in console and snack bar message to show
subscription fail where it is triggered in Catch block in the Request Permission Block
CHAPTER 8 PUSH NOTIFICATIONS
www.EBooksWorld.ir
216
In the app, we are going to define a new method in DataService that will accept a
note object and post it to the endpoint that is created by Firebase Cloud Function. It will
then replace the addNote() method.
// DataService
protected readonly SAVE_NOTE_ENDPOINT =
'https://us-central1-awesome-apress-pwa.cloudfunctions.net/saveNote';
saveNoteFromCloudFunction(
note: Note
): Observable<{ success: boolean; data: Note }> {
return this.http.post<{ success: boolean; data: Note }>(
this.SAVE_NOTE_ENDPOINT,
{
user: this.auth.id,
data: {
...note,
created_at: this.timestamp,
updated_at: this.timestamp
}
}
);
}
Now we will write the function and as soon as we deploy, the saveNote endpoint
will be provided by Firebase.
Firebase Cloud Function
In Chapter 2 we prepared a project that was ready for defining functions. Node.js engine
had been set to 8, which is the latest and most up-to-date version of Node in Firebase as
of writing this book.
We are going to use Firebase SDK for the Cloud Function setup with Firestore.
const admin = require('firebase-admin');
const functions = require('firebase-functions');
const webpush = require('web-push');
CHAPTER 8 PUSH NOTIFICATIONS
www.EBooksWorld.ir
217
const cors = require('cors')({
origin: true
});
const serviceAccount = require('./awesome-apress-pwa-firebase-adminsdk-
l9fnh-6b35c787b9.json');
admin.initializeApp({
credential: admin.credential.cert(serviceAccount),
databaseURL: 'https://awesome-apress-pwa.firebaseio.com'
});
const sendNotification = (noteId, subscriptions) => {
webpush.setVapidDetails(
'mailto:[email protected]',
'VAPID PUBLIC KEY',
'VAPID PRIVATE KEY
);
const pushPayload = {
notification: {
title: 'WebPush: New Note',
body: `Note ${noteId} has been synced!`,
icon: 'https://placekitten.com/200/139',
badge: 'https://placekitten.com/50/50',
dir: 'ltr',
lang: 'en',
renotify: false,
requireInteraction: false,
timestamp: new Date().getTime(),
silent: false,
tag: 'saveNote',
vibrate: [100, 50, 100],
data: {
noteID: noteId,
dateOfArrival: Date.now(),
primaryKey: 1
},
CHAPTER 8 PUSH NOTIFICATIONS
www.EBooksWorld.ir
218
actions: [
{
action: 'open',
title: 'Open Note', icon: 'images/checkmark.png'
},
{
action: 'cancel',
title: 'Close', icon: 'images/checkmark.png'
}
]
}
};
if (subscriptions) {
setTimeout(() => {
subscriptions.forEach(pushConfig => {
webpush
.sendNotification(pushConfig.data(), JSON.stringify(pushPayload))
.then(_ => console.log('message has been sent'))
.catch(err => {
console.log(`PushError ${err}`);
// Check for "410 - Gone" status and delete it
if (err.statusCode === 410) {
pushConfig.ref.delete();
}
});
});
}, 3000);
}
};
exports.saveNote = functions.https.onRequest((request, response) => {
const { user, data } = request.body;
cors(request, response, async () => {
return admin
.firestore()
CHAPTER 8 PUSH NOTIFICATIONS
www.EBooksWorld.ir

219
.collection(`users/${user}/notes`)
.add(data)
.then(async noteDoc => {
const note = await noteDoc.get();
const data = note.data();
data.id = note.id;
const subscriptions = await admin
.firestore()
.collection(`users/${user}/subscriptions`)
.get();
sendNotification(note.id, subscriptions);
return response.status(201).json({
succcess: true,
data
});
})
.catch(err => {
console.log(err);
response.status(500).json({
error: err,
succcess: false
});
});
});
});
Note We have used Node.js for this example, but you are able to use other
languages such as Python, Java, and Go. Feel free to choose what you like. To find
out more, you can check the Firebase documentation website.
CHAPTER 8 PUSH NOTIFICATIONS
www.EBooksWorld.ir
220
Let’s break down the code.
1. We have imported libraries required for the functions. As you see,
I am using web- push library for sending notifications.
const admin = require('firebase-admin');
const functions = require('firebase-functions');
const webpush = require('web-push'); // to send Push Notification
const cors = require('cors')({ // to solve CORS issue we use this
library
origin: true
});
The webpush library will then do the following steps:
• the payload of the message is going to be encrypted using the
p256dh public key and the auth authentication secret
• the encrypted payload is then going to be signed using the VAPID
private key
• the message is then going to be sent to the Firebase Cloud
Messaging endpoint specied in the endpoint property of the
subscription object
2. To Initialize the app, you need to pass the essential credential
and database URL.When you get this credential, you should go
to Firebase console, settings and then Service accounts tab. Select
Admin SDK language, in this case Node.js, then click on Generate
new private key. A JSON le is downloaded that contains all
necessary credentials. It’s important to keep this information safe
and never reveal publicly. For example, my JSON le has been
added to .gitignore
const serviceAccount = require('./awesome-apress-pwa-firebase-
adminsdk-l9fnh-6b35c787b9.json');
admin.initializeApp({
credential: admin.credential.cert(serviceAccount),
databaseURL: 'https://awesome-apress-pwa.firebaseio.com'
});
CHAPTER 8 PUSH NOTIFICATIONS
www.EBooksWorld.ir
221
3. saveNote function will save a note to the database and then we
retrieve a user’s subscriptions from the database and will send
push notications to the user. You may want to implement a
dierent logic to send push notications in your application.
However, sending a notication itself is the same as it’s described
in the following. As mentioned, this endpoint will be used in
DataService.
4. sendNotification: this function is pretty self-explanatory.
a. Set VAPID details by calling webpush.setValidDetails(), and you need
to pass an email, public and private VAPID keys.
b. Send a notification by calling webpush.sendNotification(). This function
accepts two arguments: subscription config, which we have stored in the
database for the user, followed by the push payload. It returns a Promise.
If the notification is sent successfully, Promise will resolve. Basically, this
means the subscription configs are still valid. However, if is an error in
subscription config like when a user unsubscribes, sending a notification
to that particular endpoint rejects and the status code will be 410, meaning
this endpoint is gone. Therefore, Promise rejects. Catch block is where we
clean up our database by removing dead subscription configs.
// Check for "410 - Gone" status and delete it
if (err.statusCode === 410) {
pushConfig.ref.delete();
}
lPush Message Body
Angular Service Worker needs specific formats to show the push notification correctly.
As seen, in the example code above, it’s a root object that has only one property, which is
notification. In this property, we are going to define our push message configurations.
Let’s break them down:
CHAPTER 8 PUSH NOTIFICATIONS
www.EBooksWorld.ir
222
Remember ServiceWorkerRegistration.showNotification(title, [options]),
here are the properties for options, passing to showNotification() in Service Worker:
• title: The title that must be shown within the notification. This tag
is used in Angular Service Worker to pass as a first argument in the
showNotification function. The rest of properties are passed as one
object called options in the second argument of show Notification
functions.
• body: A string representing extra content to display within the
notication
• icon: e URL of an image to be used as an icon by the notication
• badge: e URL of an image to represent the notication when there
is not enough space to display the notication itself. For example, the
Android Notication Bar, on Android devices.
• dir: e direction of the notication; it can be auto, ltr, or rtl
• lang: Specify the language used within the notication
• image: e URL of an image to be displayed in the notication.
• renotify: A Boolean that indicates whether to suppress vibrations
and audible alerts when reusing a tag value. e default is false. If
you set renotify: true on a notication without a tag, you'll get the
following error:
TypeError: Failed to execute 'showNotification' on
'ServiceWorkerRegistration':
Notifications which set the renotify flag must specify a
non-empty tag
• requireInteraction: Indicates that on devices with suciently large
screens, a notication should remain active until the user clicks or
dismisses it. If this value is absent or false, the desktop version of
Chrome will auto-minimize notications after approximately
20 seconds. e default value is false.
CHAPTER 8 PUSH NOTIFICATIONS
www.EBooksWorld.ir

223
• silent: is option allows you to show a new notication but prevents
the default behavior of vibration, sound, and turning on the device's
display. If you dene both silent and renotify, silent will take precedence.
• tag: A string ID that “groups” notications together, providing an easy
way to determine how multiple notications are displayed to the user.
• vibrate: A vibration pattern to run with the display of the
notication. A vibration pattern can be an array with as few as one
member. Android devices respect this option.
• timestamp: Show the timestamp of the notication.
• data: Any data type that we want to be associated with the
notication.
• actions: An array of actions to display in the notication. e
members of the array should be an object literal. It may contain the
following values:
• action: a user action to be displayed on the notification.
• title: text to be shown to the user.
• icon: the URL of an icon to display with the action.
Appropriate responses are built using event.action within the notificationclick
event.
Note Silent push notifications are now encompassed in the Budget API,
4
which
is a new API designed to allow developers to perform limited background work
without notifying the user, such as a silent push or performing a background fetch.
These comprehensive options perform differently in each platform. As of writing this
book, Chrome, in particular on Android, has implemented all of these options. It’s likely
that if browsers don’t support one or more of these options, they will be ignored.
After sending push notifications, all users’ browsers that have a subscription will
show the notification in the notification center (see Figure8-12 and 8-13).
4
https://developers.google.com/web/updates/2017/06/budget-api
CHAPTER 8 PUSH NOTIFICATIONS
www.EBooksWorld.ir

224
Figure 8-12. Notification shown on Mac, both Chrome and Firefox
Figure 8-13. Notifications in Android
CHAPTER 8 PUSH NOTIFICATIONS
www.EBooksWorld.ir
225
Listen toMessages inAngular
SwPush service provides an Observable that allows us to listen to each message. We may
need to perform a different action based on what we receive.
// header.componetnt.ts
constructor(
private auth: AuthService,
private swPush: SwPush,
private snackBar: SnackBarService,
private dataService: DataService,
private router: Router
) {
this.swPush.messages.subscribe((msg: { notification: object }) =>
this.handlePushMessage(msg)
);
}
We listen and do what we want. For instance, in this case, we just need to show the
notification body to a user in the snack bar.
handlePushMessage({ notification }) {
this.snackBar.open(`Push Notification: ${notification.body}`);
}
This is already existing, but what if the user clicks on notification? Let’s explore this
in the next section.
Notification Actions andHandling Notification Click Events
In Service Worker, like when we listen to install or push event, we can also listen to a
notificationclick event. And because we have implemented actions on notification
options, we will know what the user clicked on, an action or anywhere else. This makes
the app very flexible on what we want to do based on the user choice. This feature was
not available in Angular Service Worker until version 7.1, which has introduced a new
Observable on SwPush Service called notificationClicks. There are limitations for the
CHAPTER 8 PUSH NOTIFICATIONS
www.EBooksWorld.ir
226
current implementation, which is, as these events processed in the app, so it should be
opened in the browser.
// header.componetnt.ts
constructor(
private auth: AuthService,
private swPush: SwPush,
private snackBar: SnackBarService,
private dataService: DataService,
private router: Router
) {
this.swPush.messages.subscribe((msg: { notification: object }) =>
this.handlePushMessage(msg)
);
this.swPush.notificationClicks.subscribe(options =>
this.handlePushNotificationClick(options)
);
}
The options that are passed have two properties: action, which is selected by the
choice of the user when he or she clicked on the notification action; and notification,
which are all of the notification properties that been pushed to the user.
handlePushNotificationClick({ action, notification }) {
switch (action) {
case 'open': {
this.router.navigate(['notes', notification.data.noteID, {
queryParams: { pushNotification: true } }]);
break;
}
case 'cancel': {
this.snackBar.dismiss();
}
// or anything else
}
}
CHAPTER 8 PUSH NOTIFICATIONS
www.EBooksWorld.ir

227
As an example, in data property, we have defined nodeID; and we have
implemented that when a user clicks on open action, we redirect our application to the
detailed note view.
It might be a good idea to add some indicator that you can measure how many
users click on the notification. For instance, you can send some analytics or add a
queryParams.
Note Remember, though, actions are not supported in all browsers. So, have
a backup for your app in case you face an undefined due to lack of browser
support.
Deploy toFirebase
It seems we have implemented our needs for the application PWA Note. I will deploy the
application to Firebase as always by running the following command:
npm run deploy
Summary
In this chapter, we explored another native-like feature and are now one step closer
toward building a PWA that resembles a native app.
In the next chapter, I am going to shift your focus back to persistent data. Although
we have cached dynamic data on runtime, there are different solutions and architectures
that you can use in your application to help persist data in the user browsers and
synchronize it back to the server when necessary. This gives our user a powerful
capability to work fully offline with our application and helps us to build a much faster,
reliable, and performant application.
CHAPTER 8 PUSH NOTIFICATIONS
www.EBooksWorld.ir
229
© Majid Hajian 2019
M. Hajian, Progressive Web Apps with Angular, https://doi.org/10.1007/978-1-4842-4448-7_9
CHAPTER 9
Resilient Angular App
andOffline Browsing
One important aspect of PWAs is the concept of building an app that can be served
offline. Up until this point of the book, we have made an application and enabled offline
capabilities. We have seen the power of Service Worker, which has done most of the
heavy lifting when it comes to storing static assets and dynamic content by leveraging
Cache API. All in all, the achievement is significant compared to a traditional web
application.
However, there is still room for improvement. Let’s imagine that you are building
an application that communicates through REST API.Although Service Worker is
facilitating to cache content and serve faster, it doesn’t help with a poor internet
connection as soon as the network first strategy must be applied, and the respond and
request have a long latency. Or what should we do with the application state or the app
data set?
In PWA Note app, users’ experience is most likely disrupted because we keep them
waiting until sending a message to the server is successfully completed if they have a
poor internet connection. in fact, a delay of more than 10 seconds will often make users
leave a site instantly. Slowness and lack of acceptable user experience could abruptly
affect your business if it relies on the app.
In this chapter, I am going to explorer an approach that provides a consistent
user experience whether the users’ devices have no connectively, limited
connectivity, or great connectively. This model reduces latency down to zero as it
provides access to content stored directly on the device and synchronizes data in all
users’ devices over HTTP.
www.EBooksWorld.ir
230
Offline Storage
Before HTML5, application data had to be stored in cookies, included in every server
request while it was limited up to 4KB.Web Storage is not only more secure but also
capable of storing large amounts of data locally without affecting website performance.
It is per origin and all pages, from the same origin, can store and access the same data.
The two mechanisms within web storages are as follows:
• sessionStorage maintains a separate storage area for each given
origin that’s available for the duration of the page session (as long as
the browser is open, including page reloads and restores).
• localStorage does the same thing but persists even when the
browser is closed and reopened.
There are two downsides to this API:
1. You need to serialize and deserialize data when you want to store
(only strings).
2. API is synchronous, which means it blocks the application and
has no Web Worker support.
Due to these issues, we shift our focus to other options in order to achieve better
performance and support in Web Worker.
• WebSQL is asynchronous (callback-based); however, it also has no
Web Worker support and was rejected by Firefox and Edge but is in
Chrome and Safari. It’s also depreciated.
• File System API is asynchronous too (callback-based) and does
work in Web Workers and Windows (albeit with a synchronous API).
Unfortunately, it doesn’t have much interest outside of Chrome and
is sandboxed (meaning you don’t get native le access).
• File API is being improved over in the File and Directory Entries
API and File API specs. A File API library exists and for le saving,
I’ve been using FileSaver.js as a stopgap. e writable-les proposal
may eventually give us a better standards-track solution for seamless,
local le interaction.
CHAPTER 9 RESILIENT ANGULAR APP ANDOFFLINE BROWSING
www.EBooksWorld.ir

231
• IndexedDB is a key-value pair NoSQL database and supports large
scale storage (up to 20%–50% of hard drive capacity) and supports
many data types like number, string, JSON, blob, and so on. As it is
asynchronous, it can be used everywhere including Web Workers and
is widely supported in the browsers.
• Cache API provides a storage mechanism for Request / Response
object pairs that are cached, for example, as part of the Service
Worker life cycle. Note that the Cache interface is exposed to window
scopes as well as workers.
As we have seen, it seems the best options are IndexedDB
1
and Cache API.
A combination of both APIs makes it much more reliable and provides a better user
experience. We have used Cache API to store URL addressable resources such as static
files and request and respond from REST APIs. There are no hard rules how to use and
architect your application to leverage these APIs. Some applications might be sufficiently
simple that they can just use the Cache API alone, while others may find it valuable
to partially cache their JSON payloads in IDB so that in browsers without Cache API
support, you still get the benefit of some local caching during the session.
Note IndexedDB API is powerful but may seem too complicated for simple
cases. I recommend trying libraries such as LocalForage, Dexie.js,
zangoDB, PouchDB, LoxiJs, JsStore, IDB, LokiJs that help to wrap
IndexedDB APIs, which make it more programmer friendly. Also, this API was
buggy and slow in Safari 10; therefore some of these libraries implemented a fall
back to WebSQL in Safari as opposed to indexedDB to gain a better performance.
Although this issue was resolved and IndexedDB is stable in all major browsers,
if your apps target older browsers for some certain reasons, you may need to use
suggested libraries: for example, Localforage
1
https://developer.mozilla.org/en/docs/Web/API/IndexedDB_API
CHAPTER 9 RESILIENT ANGULAR APP ANDOFFLINE BROWSING
www.EBooksWorld.ir
232
Even though there is no specific architecture, it’s recommended that
• For the network resources necessary to load your app while offline,
use the Cache.
• For all other data, use IndexedDB, for instance, application state and
data set are the best candidates to be stored in IndexedDB.
Offline First Approach
A common way to build a web application is to be a consumer of a back-end server to
store and retrieve data for persistency (Figure9-1).
One issue with this approach is that a flaky or nonexistent internet connection may
interrupt the user experience and lead to unreliable performance. To fix that, we have
used Service Worker and will leverage other storage techniques to substantially improve
the user experience in all situations, including a perfect wireless environment.
In this approach (shown in Figure9-2), the user interacts with the cache constantly
where it’s stored in the client device; therefore, there will be zero latency.
View ServerModel
Figure 9-1. Data-binding ways in traditional web applications
View Server Model
Cache
JS
Figure 9-2. Offline first approach, 4-way data binding
CHAPTER 9 RESILIENT ANGULAR APP ANDOFFLINE BROWSING
www.EBooksWorld.ir

233
Service Worker can intercept request between the client and server if needed.
We can even think of how to synchronize our data with the server.
Note Thanks to Background Sync event in Service Worker, it’s easily possible
to resolve synchronization. I will explore the sync event in Chapter 14 when we
are implementing Workbox because this feature is not available in Angular Service
Worker as of now (Angular 7.1).
I am going to step forward and tweak this model a bit more. What if we can implement
a logic that can sync data from and to a server whether the user is online or offline; and
therefore, that server can manipulate data and do necessary adjustments afterward (see
Figures9-3 and 9-4). Think how much this approach can improve a user’s experience.
JS
View Model Sync Server
Cache
Figure 9-3. Offline first approach with syncing in mind
CHAPTER 9 RESILIENT ANGULAR APP ANDOFFLINE BROWSING
www.EBooksWorld.ir
234
JS
View Model
Cache
JS
View Model
Cache
JS
View Model
Cache
Sync Server
Figure 9-4. Data can be distributed and synchronized through all user’s devices
from/to sync server
Let’s experiment with the offline first database approach in PWA Note application
and see how it works in action.
Implement Offline First Approach withSync Server
We have figured out that IndexedDB is what we need to use in a client app. The next hurdle
is figuring out how to store and sync the app’s data and state. Offline syncing is a bit more
challenging than it looks. I believe one of the best solutions to overcome this obstacle is to
CHAPTER 9 RESILIENT ANGULAR APP ANDOFFLINE BROWSING
www.EBooksWorld.ir

235
2
https://pouchdb.com
3
Hoodie is another example; you can find more about it on https://hood.ie.
4
http://couchdb.apache.org
5
PouchDB can sync back data to any services that speak to the CouchDB replication protocol. For
examples, CouchDB, IBM Cloudant, Couchbase.
use PouchDB.
2
Keep in mind, you are not limited to this solution, and you may need to either
implement your own logic for your application or use another third party.
3
All in all, the goal
is to implement offline first cache for storing data and sync back to the server accordingly.
Note PouchDB is an open source JavaScript database inspired by Apache
CouchDB
4
that is designed to run well within the browser. PouchDB was created to
help web developers build applications that work as well offline as they do online.
It enables applications to store data locally while offline, then synchronize it with
CouchDB and compatible servers when the application is back online, keeping the
user’s data in sync no matter where they next log in.
You can use PouchDB without the sync feature too, but for the sake of offline
capability, I enable the sync and offline features in PouchDB.
First, we need to install pouchdb:
npm install pouchdb
The pouchdb-browser preset contains the version of PouchDB that is designed for
the browser. In particular, it ships with the IndexedDB and WebSQL adapters as its default
adapters. It also contains the replication, HTTP, and map/reduce plugins. Use this
preset if you only want to use PouchDB in the browser, and don’t want to use it in Node.
js. (e.g., to avoid installing LevelDB.)
Therefore, instead of pouchdb, I install pouchdb-browser alternately:
npm install pouchdb-browser
Carry on and create a new service in Angular by running:
ng g s modules/core/offline-db
To create a remote sync database server, for simplicity, I install pouchdb-server.
5
npm install -g pouchdb-server
CHAPTER 9 RESILIENT ANGULAR APP ANDOFFLINE BROWSING
www.EBooksWorld.ir

236
Run the PouchDB server:
pouchdb-server --port 5984
If you clone the project repository and want to see the example codes, first install
npm packages and then npm run pouchdb-server
In OfflineDbService, we need to instantiate PouchDB. To sync, the simplest case
is unidirectional replication, meaning you just want one database to mirror its changes
to a second one. Writes to the second database, however, will not propagate back to the
master database; however, we need bidirectional replication to make things easier for
your poor, tired fingers; PouchDB has a shortcut API.
import PouchDB from 'pouchdb-browser';
constructor() {
// create new local database
this._DB = new PouchDB(this.DB_NAME);
// shortcut API for bidirectional replication
this._DB.sync(this.REMOTE_DB, {
live: true,
retry: true
});
}
Note If you see an error due to undefined global object in console, please
add (window as any).global = window; at the bottom of Polyfills.ts.
6
Database has been instantiated successfully; therefore, CRUD operations need to be
implemented.
public get(id: string) {
return this._DB.get(id);
}
6
This is a known issue with pouchdb 7 and Angular 6 and 7 as of the writing of this book.
CHAPTER 9 RESILIENT ANGULAR APP ANDOFFLINE BROWSING
www.EBooksWorld.ir
237
public async delete(id) {
const doc = await this.get(id);
const deleteResult = this._DB.remove(doc);
return deleteResult;
}
public add(note: any) {
return this._DB.post({
...note,
created_at: this.timestamp,
updated_at: this.timestamp
});
}
public async edit(document: any) {
const result = await this.get(document._id);
document._rev = result._rev;
return this._DB.put({
...document,
updated_at: this.timestamp
});
}
To retrieve all notes from the database, I define another function getAll where I will
call this method on loading application to show notes to my user.
public async getAll(page?: number) {
const doc = await this._DB.allDocs({
include_docs: true,
limit: 40,
skip: page || 0
});
this._allDocs = doc.rows.map(row => row.doc);
// Handle database change on documents
this.listenToDBChange();
return this._allDocs;
}
CHAPTER 9 RESILIENT ANGULAR APP ANDOFFLINE BROWSING
www.EBooksWorld.ir
238
PouchDB provides a changes() method that is an event emitter and will emit a
'change' event on each document change, a 'complete' event when all the changes
have been processed, and an 'error' event when an error occurs. Calling cancel() will
automatically unsubscribe all event listeners.
listenToDBChange() {
if (this.listener) {
return;
}
this.listener = this._DB
.changes({ live: true, since: 'now', include_docs: true })
.on('change', change => {
this.onDBChange(change);
});
}
From now on, we have a listener that can detect each document change and
manipulate the data accordingly. For instance, in onDBChange method in the
OfflineDbService, I have implemented a very simple logic to detect what types of
change have happened to the document and run a logic based on that.
private onDBChange(change) {
this.ngZone.run(() => {
const index = this._allDocs.findIndex(row => row._id === change.id);
if (change.deleted) {
this._allDocs.splice(index, 1);
return;
}
if (index > -1) {
// doc is updated
this._allDocs[index] = change.doc;
} else {
// new doc
CHAPTER 9 RESILIENT ANGULAR APP ANDOFFLINE BROWSING
www.EBooksWorld.ir
239
this._allDocs.unshift(change.doc);
}
});
}
Altogether, the OfflineDBServer looks like the following:
export class OfflineDbService {
private readonly LOCAL_DB_NAME = 'apress_pwa_note';
private readonly DB_NAME = `${this.LOCAL_DB_NAME}__${this.auth.id}`;
private readonly REMOTE_DB = `http://localhost:5984/${this.DB_NAME}`;
private _DB: PouchDB.Database;
private listener = null;
private _allDocs: any[];
get timestamp() {
return;
}
constructor(private auth: AuthService, private ngZone: NgZone) {
this._DB = new PouchDB(this.DB_NAME);
this._DB.sync(this.REMOTE_DB, {
live: true,
retry: true
});
}
listenToDBChange() {
if (this.listener) {
return;
}
this.listener = this._DB
.changes({ live: true, since: 'now', include_docs: true })
.on('change', change => {
this.onDBChange(change);
});
}
CHAPTER 9 RESILIENT ANGULAR APP ANDOFFLINE BROWSING
www.EBooksWorld.ir
240
private onDBChange(change) {
console.log('>>>>>> DBChange', change);
this.ngZone.run(() => {
const index = this._allDocs.findIndex(row => row._id === change.id);
if (change.deleted) {
this._allDocs.splice(index, 1);
return;
}
if (index > -1) {
// doc is updated
this._allDocs[index] = change.doc;
} else {
// new doc
this._allDocs.unshift(change.doc);
}
});
}
public async getAll(page?: number) {
const doc = await this._DB.allDocs({
include_docs: true,
limit: 40,
skip: page || 0
});
this._allDocs = doc.rows.map(row => row.doc);
// Handle database change on documents
this.listenToDBChange();
return this._allDocs;
}
public get(id: string) {
return this._DB.get(id);
}
CHAPTER 9 RESILIENT ANGULAR APP ANDOFFLINE BROWSING
www.EBooksWorld.ir
241
public async delete(id) {
const doc = await this.get(id);
const deleteResult = this._DB.remove(doc);
return deleteResult;
}
public add(note: any) {
return this._DB.post({
...note,
created_at: this.timestamp,
updated_at: this.timestamp
});
}
public async edit(document: any) {
const result = await this.get(document._id);
document._rev = result._rev;
return this._DB.put({
...document,
updated_at: this.timestamp
});
}
}
Now I need to change all components and replace DataService with
OfflineDbService. To begin, NotesListComponent:
constructor(
private offlineDB: OfflineDbService,
) {}
ngOnInit() {
// here is we call getAll() and consequesntly subscribe to change listerner
this.offlineDB.getAll().then(allDoc => {
this.notes = allDoc;
});
}
CHAPTER 9 RESILIENT ANGULAR APP ANDOFFLINE BROWSING
www.EBooksWorld.ir
242
onSaveNote() on NotesAddComponent is updated to
constructor(
private router: Router,
private offlineDB: OfflineDbService,
private snackBar: SnackBarService
) {}
onSaveNote(values) {
this.loading$.next(true);
// Notice we add everything to local DB
this.offlineDB.add(values).then(
doc => {
this.router.navigate(['/notes']);
this.snackBar.open(`LOCAL: ${doc.id} has been succeffully saved`);
this.loading$.next(false);
},
e => {
this.loading$.next(false);
this.errorMessages$.next('something is wrong when adding to DB');
}
);
}
And here is the same change to NoteDetailsComponent where we have Edit, Get,
Delete operations.
constructor(
private offlineDB: OfflineDbService,
private route: ActivatedRoute,
private snackBar: SnackBarService,
private router: Router
) {}
ngOnInit() {
const id = this.route.snapshot.paramMap.get('id');
this.id = id;
this.getNote(id);
}
CHAPTER 9 RESILIENT ANGULAR APP ANDOFFLINE BROWSING
www.EBooksWorld.ir
243
getNote(id) {
// get note from offline DB
this.offlineDB.get(id).then(note => {
this.note = note;
});
}
delete() {
if (confirm('Are you sure?')) {
// delete note from offline DB
this.offlineDB
.delete(this.id)
.then(() => {
this.router.navigate(['/notes']);
this.snackBar.open(`${this.id} successfully was deleted`);
})
.catch(e => {
this.snackBar.open('Unable to delete this note');
});
}
}
edit() {
this.isEdit = !this.isEdit;
}
saveNote(values) {
// edit in offline DB
this.offlineDB
.edit(values)
.then(() => {
this.getNote(values._id);
this.snackBar.open('Successfully done');
this.edit();
})
CHAPTER 9 RESILIENT ANGULAR APP ANDOFFLINE BROWSING
www.EBooksWorld.ir

244
.catch(e => {
this.snackBar.open('Unable to edit this note');
this.edit();
});
}
It’s time to test the application, and we don’t necessarily need Service Worker;
therefore, we can simply run my application in development mode locally. So, run npm
start and then navigate to localhost:4200 to see the application. Try to add a new note
and observe the console messages (see Figure9-5).
As you have been shown in Figure9-5, each document has an _id and _rev property
that is being added automatically. The change object contains all the necessary
information that we can use in our app logic to manipulate the data.
Figure 9-5. Change object is emitted for each change on database
CHAPTER 9 RESILIENT ANGULAR APP ANDOFFLINE BROWSING
www.EBooksWorld.ir

245
Note The rev field in the response indicates a revision of the document. Each
document has a field by the name _rev. Every time a document is updated, the _
rev field of the document is changed. Each revision points to its previous revision.
PouchDB maintains a history of each document (much like git). _rev allows
PouchDB and CouchDB to elegantly handle conflicts, among its other benefits.
Open two different browsers on your computer, for instance, Chrome and Firefox
and open the app on each. First, you’ll notice that you will have the exact same notes
on both browsers. Now add a new note in one browser, and check the other one (see
Figure9-6); you’ll notice the new note will appear quickly in another browser where the
app is open.
Figure 9-6. The App is running in two different browsers (devices), and by adding
a note from one, as soon as it’s added to sync server, a change will get emitted and
immediately the note will appear in another browser (device)
So far so good; you’ll notice that there will be zero latency to show or add a note,
since the content is going to be added to the cache first and then will be synced back
with the server. Therefore, our user will not notice the latency between the cache and
server.
CHAPTER 9 RESILIENT ANGULAR APP ANDOFFLINE BROWSING
www.EBooksWorld.ir

246
What if our user goes offline? Let’s test it out. We’ll disconnect the network by
checking offline in Chrome and then will try to delete a note from Safari where it’s online
still and add a note from Chrome browser, which is offline (see Figures9-7 and 9-8).
Note PouchDB has two types of data: documents and attachments.
Documents As in CouchDB, the documents you store must be serializable as
JSON.
Attachments PouchDB also supports attachments, which are the most efficient
way to store binary data. Attachments may either be supplied as base64-encoded
strings or as Blob objects.
Figure 9-7. Deleting one note from another browser that is online will reflect on
the remote database, but since another browser is offline, it will not receive the
update
CHAPTER 9 RESILIENT ANGULAR APP ANDOFFLINE BROWSING
www.EBooksWorld.ir

247
Once I am done, I will make the Chrome network online again and will wait a bit.
You’ll see after a few seconds that the app in both browsers will be synced successfully
(see Figure9-9).
Figure 9-8. Add a note in a browser (device) even when the user is offline. App
allows the user to add this note; however, it does not reflect on the remote database
until the user comes back online.
CHAPTER 9 RESILIENT ANGULAR APP ANDOFFLINE BROWSING
www.EBooksWorld.ir

248
There has been no interruption in the user experience, and there has been fast
performance and reliable data and synchronization– isn't it amazing?
As said, PouchDB is one way to the implement offline first approach. Depending on
your application and requirements, you may use different libraries or even your own
implementation where you use IndexedDB APIs directly.
Implement Persistent Data withAngular Firebase
Cloud Firestore supports offline data persistence. This feature caches a copy of the Cloud
Firestore data that your app is actively using, so your app can access the data when the
device is offline. You can write, read, listen to, and query the cached data. When the
device comes back online, Cloud Firestore synchronizes any local changes made by your
app to the data stored remotely in Cloud Firestore.
Offline persistence is an experimental feature that is supported only by
the Chrome, Safari, and Firefox web browsers.
Figure 9-9. App in both browsers (devices) is synced when user comes back online
CHAPTER 9 RESILIENT ANGULAR APP ANDOFFLINE BROWSING
www.EBooksWorld.ir
249
To enable offline persistence, enablePersistence() must be called while importing
AngularFirestoreModule into your @NgModule:
@NgModule({
declarations: [AppComponent, LoadingComponent],
imports: [
CoreModule,
LayoutModule,
BrowserModule.withServerTransition({ appId: 'serverApp' }),
HttpClientModule,
AppRoutingModule,
AngularFireModule.initializeApp(environment.firebase),
AngularFirestoreModule.enablePersistence(),
// AngularFirestoreModule, // needed for database features
AngularFireAuthModule, // needed for auth features,
BrowserAnimationsModule, // needed for animation
ServiceWorkerModule.register('ngsw-worker.js', {
enabled: environment.production
}),
RouterModule
],
providers: [],
bootstrap: [AppComponent]
})
export class AppModule {}
If a user opens multiple browser tabs that point to the same Cloud
Firestore database, and offline persistence is enabled, Cloud Firestore
will work correctly only in the first tab. However, As of September 2018,
experimental multi-tab is available for you to play with. You just need to
pass {experimentalTabSynchronization: true} to enbalePersistence() function
such as:
AngularFirestoreModule.enablePersistence({experimentalTabSynchronization: true})
Next, we need to make sure we are using Angular Firestore APIs.
CHAPTER 9 RESILIENT ANGULAR APP ANDOFFLINE BROWSING
www.EBooksWorld.ir
250
For instance, in NotesListComponent, use getNotes() method instead of
initializedNotes()
ngOnInit() {
this.notes$ = this.db.getNotes();
// this.notes$ = this.db.initializeNotes();
}
In NoteDetailsComponent, use getNote() method instead of
getNoteFromDirectApi():
ngOnInit() {
const id = this.route.snapshot.paramMap.get('id');
this.id = id;
this.note$ = this.data.getNote(id);
// this.note$ = this.data.getNoteFromDirectApi(id);
}
And in NotesAddComponent, call the addNote() method on DataService.
onSaveNote(values) {
this.data.addNote(values).then(
doc => {
this.snackBar.open(`LOCAL: ${doc.id} has been succeffully saved`);
},
e => {
this.errorMessages$.next('something is wrong when adding to DB');
}
);
this.router.navigate(['/notes']);
}
Run the application and disconnect from the network. You can add a note even
though you are offline; and as soon as you come back online, the data will sync back to
Firestore.
We can go ahead and deploy the app to Firebase by running:
npm run deploy
CHAPTER 9 RESILIENT ANGULAR APP ANDOFFLINE BROWSING
www.EBooksWorld.ir
251
User Interface Considerations
Imagine that our application works even when users are offline. Users will continue
adding content and modify more and more. Users usually do not notice that the data
is not synced due to slowness or no internet connection. In this case, there are several
UI considerations that can be done in the app to show some signals to the users as to
whether they are offline or online:
1. Change the header and footer color to some other colors that
indicate they are offline; for instance, in the Note app, we can gray
out the blue header when the user is offline.
2. Show a notication or a popup when the user is oine; for
instance, when the user is adding a note in Note PWA app, we can
show a message that you are oine, but we will sync back data to
server as soon as you are online.
3. Display an icon or other indication that clearly shows even though
a note has been added, it’s not synced with the server yet and only
exists on the user local device.
4. Resolve conflicts based on user decision; for instance, a user
may edit a note in different devices at once when all devices are
offline, and when all devices come online again, there might be
conflicts between each revision. In this case, it’s a good practice to
show our user a notification and tell them that there are different
revisions based on their edit; therefore, they can select which
update is the one that needs to be applied.
These are just a few ideas. You may have better ideas based on your app. It is
important to enhance the UIs along with adding more functionalities and features to
boost the user experience.
Last but not least, by listening for a change event on navigator.connection, we can
react to proper logic based on the change accordingly. As an example, take a look at the
function below where we can find out more about the network information:
constructor(
private auth: AuthService,
private swPush: SwPush,
CHAPTER 9 RESILIENT ANGULAR APP ANDOFFLINE BROWSING
www.EBooksWorld.ir

252
private snackBar: SnackBarService,
private dataService: DataService,
private router: Router
) {
(<any>navigator).connection.addEventListener('change', this.
onConnectionChange);
}
onConnectionChange() {
const { downlink, effectiveType, type } = (<any>navigator).connection;
console.log(`Effective network connection type: ${effectiveType}`);
console.log(`Downlink Speed/bandwidth estimate: ${downlink}Mb/s`);
console.log(
`type of connection is ${type} but could be of bluetooth, cellular,
ethernet, none, wifi, wimax, other, unknown`
);
if (/\slow-2g|2g|3g/.test((<any>navigator).connection.effectiveType)) {
this.snackBar.open(`You connection is slow!`);
} else {
this.snackBar.open(`Connection is fast!`);
}
}
As you see, you can write your own logic based on how the network information
changes.
Note If you want to see and run all the examples and codes on your machine,
simply clone https://github.com/mhadaily/awesome-apress-pwa.git,
then go to chapter09. For pouchdb implementation, you’ll find 01-pouchdb; go
to folder and install all packages first by running npm install and then run both
app and pouchdb-server by running npm start and npm run pouchdb-
server respectively. For Firestore implementation, go to 02-firebase-
presistent-db, run npm install and npm start respectively.
CHAPTER 9 RESILIENT ANGULAR APP ANDOFFLINE BROWSING
www.EBooksWorld.ir
253
Summary
One main aspect of PWAs is to enhance the user experience. Providing an offline
experience– whether with a flaky connection in transport or being offline in the
airplane– is invaluable to boost user satisfaction and improve the app’s performance.
To support a meaningful experience in an offline case, not only we should cache
our static assets and requests and responses, but also storing data on the client side
seems essential. By rethinking how to architect an application in the front end and make
it offline– first by leveraging browser offline storage, like IndexedDB, with one of the
libraries available (PouchDB), the app has been moved to the next level.
CHAPTER 9 RESILIENT ANGULAR APP ANDOFFLINE BROWSING
www.EBooksWorld.ir
255
© Majid Hajian 2019
M. Hajian, Progressive Web Apps with Angular, https://doi.org/10.1007/978-1-4842-4448-7_10
CHAPTER 10
Debugging and
Measurement Tools
As developers, we work with debugging tools on a daily basis, and we cannot think of
coding without them. For developing a PWA, we may need more tools to help us inspect
our code, find bugs, run, simulate offline mode, and test Service Worker. To progressively
enhance our application, measuring different aspects such as performance and PWA
criteria, and engagement by tracking, seem crucial, too.
In this chapter, I will explorer a lot of tools that will help us to inspect, debug and
develop, and measure a PWA more easily and pleasantly. Although you may find many
of these tools familiar, I still would like to have all of them in one chapter where you can
refer to it anytime you like.
Debugging
First things first, let’s start by looking into debugging possibilities.
NGSW Debug
Angular Service Worker has a specific URL in order to check the state of ngsw. To get
access to it, you should navigate to /ngsw/state to your website base URL.
www.EBooksWorld.ir
256
For instance, if you are running your production app on your local machine, you
should be able to navigate to https://localhost:3000/ngsw/state and see the
information, which looks like the following:
NGSW Debug Info:
Driver state: NORMAL ((nominal))
Latest manifest hash: b15d32a87eae976c0909801e2b8962df20a7deec
Last update check: 13s304u
=== Version b15d32a87eae976c0909801e2b8962df20a7deec ===
Clients: 9d63b22a-f76b-f642-aab4-e6c8e627f66a, 20e02d5b-746e-8e48-b04e-
232d3a43e760, 40ccc813-b89f-5643-8e67-a6e93b688ee9
=== Idle Task Queue ===
Last update tick: 13s647u
Last update run: 8s646u
Task queue:
Debug log:
[13s638u] Error(Response not Ok (fetchAndCacheOnce): request for https://
fonts.googleapis.com/icon?family=Material+Icons returned response 0 ,
fetchAndCacheOnce/<@https://awesome-apress-pwa.firebaseapp.com/ngsw-worker.
js:589:31
fulfilled@https://awesome-apress-pwa.firebaseapp.com/ngsw-worker.js:312:52
) while running idle task revalidate(ngsw:b15d32a87eae976c0909801
e2b8962df20a7deec:assets, assets): https://fonts.googleapis.com/
icon?family=Material+Icons
This state may help you to find useful information that makes debugging easier.
Web App Manifest
A web manifest allows you to control how your app behaves when launched and
displayed to the user. Along with Service Worker, it offers users the Add to Homescreen
option. In Chapter 6, we looked into the web app manifest in depth.
CHAPTER 10 DEBUGGING AND MEASUREMENT TOOLS
www.EBooksWorld.ir
257
Chrome DevTools
Once Chrome DevTools are Opened, go to the Application panel and click on Manifest
to inspect it (see Figure10-1).
• To look at the manifest source, click the link below the App Manifest
label.
• Press the Add to homescreen button to simulate an Add to
Homescreen event. On the Chrome Desktop, it triggers the browser
to add the app to the shelf. On mobile, it prompts the user to install
the app (add the icon to the home screen).
• e Identity and Presentation sections just display elds from the
manifest source in a more user-friendly display.
• e Icons section displays every icon that you’ve specied.
Figure 10-1. Manifest inspector in Chrome
CHAPTER 10 DEBUGGING AND MEASUREMENT TOOLS
www.EBooksWorld.ir
258
Online Validators
It is easy to find many websites and online tools that can also validate a web app
manifest, for instance, manifest-validator.appspot.com.
Online Generators
Sometimes generating web app manifests might be time consuming or monotonous.
Hence, online generators come in handy, for example, tomitm.github.io/appmanifest.
Service Workers
Service Workers give developers the amazing ability to intercept network requests and
create a truly offline-first web app. In Chapters 4 and 5, we introduced the Service Worker
via Angular Service Worker.
Chrome DevTools
Open DevTools and go to Application Panel (see Figure10-2). Click on Service Workers.
• The Offline puts the website in the corresponding tab offline.
• e Update on reload forces the Service Worker to update on every
page load.
• e Bypass for network bypasses the Service Worker and forces the
browser to go to the network for requested resources.
• e Update performs a one-time update of the specied Service
Worker.
• e Push emulates a push notication with a specic message.
• e Sync emulates a background sync event with a specic tag.
• e Unregister unregisters the specied Service Worker.
• e Source tells you when the currently running Service Worker was
installed. If you click on the click, it will redirect you to the Service
Worker source under the Sources panel.
CHAPTER 10 DEBUGGING AND MEASUREMENT TOOLS
www.EBooksWorld.ir

259
• e Status tells you the status of the Service Worker. Since Service
Workers are designed to be stopped and started by the browser at any
time, we can explicitly stop the Service Worker using the stop button,
which will simulate it to reveal bugs due to faulty assumptions about
persistent global states.
• e Clients tells you the origin that the Service Worker is scoped to.
Firefox DevTools
The about:debugging page provides an interface for interacting with Service Workers.
There are several different ways to open about:debugging; however, I will encourage you
to open debugger by simply entering the command in the Firefox address bar.
You’ll see a few options such as push, debug, and unregister, which are similar to a
Chrome expect push emulate push event without a payload (see Figure10-3).
Figure 10-2. Service Worker debugger in Chrome DevTools
CHAPTER 10 DEBUGGING AND MEASUREMENT TOOLS
www.EBooksWorld.ir

260
Figure 10-3. Service Worker debugger in Firefox DevTools
CHAPTER 10 DEBUGGING AND MEASUREMENT TOOLS
www.EBooksWorld.ir
261
Service Worker Mock
Pinterest engineers have developed a set of tools to work with Service Worker. Service
Worker Mock is a library that creates an environment with the following properties that
make it easy to turn a Node.js environment into a faux Service Worker environment and
will be helpful when you need to write integration tests.
const env = {
// Environment polyfills
skipWaiting: Function,
caches: CacheStorage,
clients: Clients,
registration: ServiceWorkerRegistration,
addEventListener: Function,
Request: constructor Function,
Response: constructor Function,
URL: constructor Function,
// Test helpers
listeners: Object,
trigger: Function,
snapshot: Function,
};
The Service Worker mock is best used by applying its result to the global scope, then
calling require(‘./service-worker.js’) with the path to your Service Worker file. The file
will use the global mocks for things like adding event listeners. Let’s write a simple test:
// service-worker.js
const TESTCACHE = 'TESTCACHE';
const TESTCACHE_URLS = [
'index.html',
'./' // Alias for index.html
];
self.addEventListener('install', event => {
console.log('[SW.JS] Server worker has been installed');
event.waitUntil(
CHAPTER 10 DEBUGGING AND MEASUREMENT TOOLS
www.EBooksWorld.ir
262
caches
.open(TESTCACHE)
.then(cache => cache.addAll(TESTCACHE_URLS))
.then(self.skipWaiting())
);
});
// The activate handler takes care of cleaning up old caches.
self.addEventListener('activate', event => {
console.log('[SW.JS] Server worker has been activated');
const currentCaches = [TESTCACHE];
event.waitUntil(
caches
.keys()
.then(cacheNames => cacheNames.filter(cacheName => !currentCaches.
includes(cacheName)))
.then(cachesToDelete => {
return Promise.all(cachesToDelete.map(cacheToDelete => caches.
delete(cacheToDelete)));
})
.then(() => self.clients.claim())
);
});
self.addEventListener('push', event => {
console.log(
'[SWJ.S] Debug Push',
event.data ? event.data.text() : 'no payload'
);
});
self.addEventListener('sync', event => {
console.log('[SWJ.S] Debug Sync', event.tag);
});
CHAPTER 10 DEBUGGING AND MEASUREMENT TOOLS
www.EBooksWorld.ir
263
I will write my test using the Jest framework and service-worker-mock library.
// service-worker.test.js
const makeServiceWorkerEnv = require('service-worker-mock');
const makeFetchMock = require('service-worker-mock/fetch');
describe('Service worker', () => {
beforeEach(() => {
Object.assign(
global,
makeServiceWorkerEnv(),
makeFetchMock()
// If you're using sinon ur similar you'd probably use below instead
of makeFetchMock
// fetch: sinon.stub().returns(Promise.resolve())
);
jest.resetModules();
});
it('should add listeners', () => {
require('./service-worker.js');
expect(self.listeners['install']).toBeDefined();
expect(self.listeners['activate']).toBeDefined();
expect(self.listeners['push']).toBeDefined();
expect(self.listeners['sync']).toBeDefined();
expect(self.listeners['fetch']).toBeUndefined();
});
it('should delete old caches on activate', async () => {
require('./service-worker.js');
// Create old cache
await self.caches.open('OLD_CACHE');
expect(self.snapshot().caches.OLD_CACHE).toBeDefined();
// Activate and verify old cache is removed
await self.trigger('activate');
expect(self.snapshot().caches.OLD_CACHE).toBeUndefined();
});
});
CHAPTER 10 DEBUGGING AND MEASUREMENT TOOLS
www.EBooksWorld.ir

264
Run Jest or npm test.
PASS ./service-worker.test.js
Service worker
✓ should add listeners (7ms)
✓ should delete old caches on activate (15ms)
console.log service-worker.js:19
[SW.JS] Server worker has been activated
Test Suites: 1 passed, 1 total
Tests: 2 passed, 2 total
Snapshots: 0 total
Time: 0.77s, estimated 1s
Ran all test suites.
Note Clone https://github.com/mhadaily/awesome-apress-pwa.git
and go to the Chapter10 directory and see samples. npm test will run the test.
Storage
You might already be familiar with many types of web storage. A web storage’s standard
such as Local Storage, Session Storage, IndexedDB (have extensively used it), Web SQL,
and Cookies are found in all major browsers. I am especially interested in IndexedDB,
which can generally be used in Service Worker.
Chrome DevTools
In DevTools, navigate to the Application tab (see Figure10-4). Select IndexedDB.
CHAPTER 10 DEBUGGING AND MEASUREMENT TOOLS
www.EBooksWorld.ir

265
By right-clicking on the object store, you can find a clear action and by clicking on
the database name, you will find delete and refresh database buttons where you can
delete or refresh the database respectively (see Figure10-5).
You can clear and refresh the object store by the little action buttons on top of the
object store’s list UI.You are also able to delete selected data. You may find the refresh
and delete action by right-clicking on each piece of data (see Figure10-6).
Figure 10-4. IndexedDB in Chrome DevTools
Figure 10-5. Clear, refresh, delete IndexedDB in Chrome DevTools/
CHAPTER 10 DEBUGGING AND MEASUREMENT TOOLS
www.EBooksWorld.ir

266
Firefox DevTools
When you open Firefox DevTools, you may not see the storage panel by default. You
should enable it from the setting as seen in Figure10-7.
Once enabled, Click on Storage panel and you’ll find IndexedDB as seen in Figure10-8.
Figure 10-6. Clear, refresh, delete IndexedDB on Object store
Figure 10-7. Enable storage from DevTools Setting in Firefox
Figure 10-8. Storage panel in Firefox DevTools
CHAPTER 10 DEBUGGING AND MEASUREMENT TOOLS
www.EBooksWorld.ir

267
Cache
The Cache Storage pane provides a read-only list of resources that have been cached
using the Cache API.
Chrome DevTools
Note that the first time you open a cache and add a resource to it, DevTools might not
detect the change. Reload the page and you should see the cache. If you’ve got two or
more caches open, you’ll see them listed below the Cache Storage Cache Storage drop-
down (see Figure10-9).
When loading resources cached by Service Workers Cache Storage using the Cache
API, the Network panel of the DevTools shows it as coming from Service Worker (see
Figure10-10).
Figure 10-9. Cache Storage in Chrome DevTools
CHAPTER 10 DEBUGGING AND MEASUREMENT TOOLS
www.EBooksWorld.ir
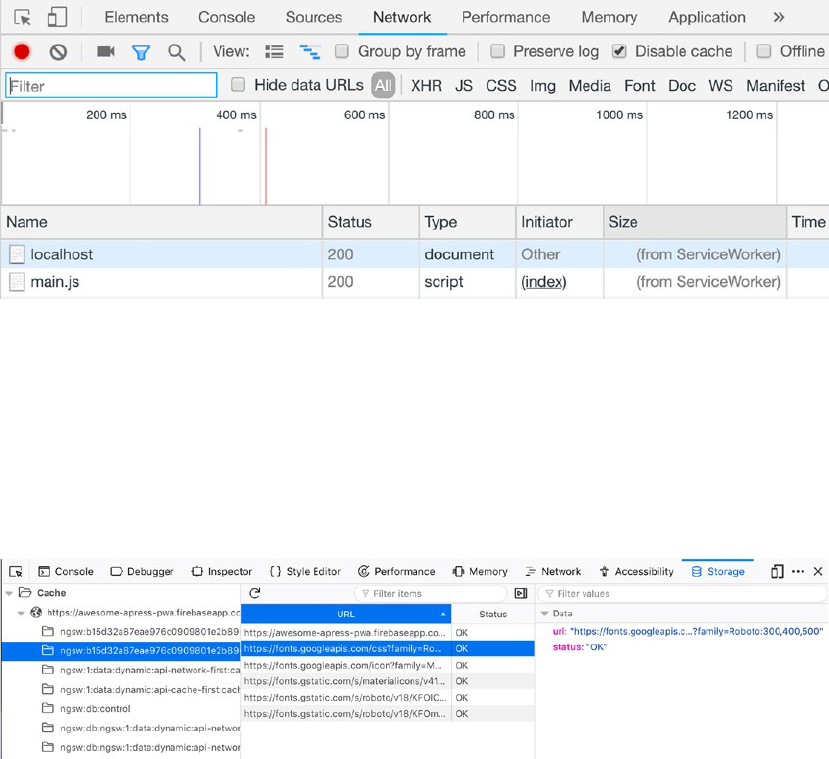
268
Firefox DevTools
Caches name are available under storage Cache as you can see in Figure10-11.
When loading resources cached by Service Workers Cache Storage using the Cache
API, Firefox shows it is cached in the Network panel (see Figure10-12).
Figure 10-10. Network request in Chrome DevTools Cache Storage from Service
Worker
Figure 10-11. Cache Storage in Firefox DevTools
CHAPTER 10 DEBUGGING AND MEASUREMENT TOOLS
www.EBooksWorld.ir

269
Simulate Offline Behavior
To verify everything works as planned while our application is offline, we need to make
sure we are able to simulate no connectivity.
Chrome and Firefox provide a handy feature that we can leverage to mock the
offline mode.
Chrome
In addition to the Offline check box in Service Worker under the Application panel, we
are able to use the offline check box under the Network panel (see Figure10-13).
Figure 10-12. Network request in Firefox DevTools Cache Storage from Service
Worker
Figure 10-13. Offline mode under Network panel in Chrome DevTools
CHAPTER 10 DEBUGGING AND MEASUREMENT TOOLS
www.EBooksWorld.ir


271
Figure 10-15. Throttling option in Chrome under Network Tab; you are able to
add custom profile as you wish
Sometimes the offline simulator doesn’t do the proper job, and you may need to
actually turn off your internet and reconnect again. For example, at the time I am writing
this book, when you work with background sync in Service Worker, you may need to
really turn off your internet connection.
Simulate Different Network Conditions
There are also many parts of the world where 3G and 2G speeds are the norm. Also, we
are constantly moving between various states of connectivity. To verify that our app
works well for these consumers, we need to test our application in different network
connections and devices.
In both Chrome and Firefox, we have a throttling option that you can find in
Figures10-15 and 10-16.
CHAPTER 10 DEBUGGING AND MEASUREMENT TOOLS
www.EBooksWorld.ir

272
Note Ultimately, Service Worker is a plain JavaScript file, where you can use all
JavaScript debugging features such as Debugger or break point to inspect code
inside Service Worker.
Simulate Mobile Devices
You can run your PWA on a real device while it’s connected to your browser via USB, or
you can run an emulator and perform your test and inspect what you are looking for.
Remote Debugging andMeasuring
To connect your Android device to Chrome, you can follow the instructions on this link:
https://goo.gl/syNfSR; and to connect to Firefox, you can find instructions on this
link: https://goo.gl/P7gFNE.
Figure 10-16. Throttling option in Firefox
CHAPTER 10 DEBUGGING AND MEASUREMENT TOOLS
www.EBooksWorld.ir
273
Emulators
To set up and run the iOS simulator, follow this link: https://goo.gl/ymihLs. And for
Android, follow the instructions on this link: https://goo.gl/EGPpxx.
Online Tools
BrowserStack is a cross-browser testing tool. With it you can test your website across
browsers on multiple operating systems and mobile devices without individual virtual
machines, devices, or emulators. BrowserStack also offers remote testing on physical
devices, so if you find yourself needing to test your website performance on many
devices, it can be a helpful time-saver.
Measurement
It is always important to measure our application for different aspects such as speed,
performance, or user experience in order to deliver a quality application progressively.
In this section, I will explorer possibilities that help us to get better insight about out
application, which allows us to continuously refine our application.
Audit
As seen in previous chapters, the Audit panel in Chrome DevTools, which is
powered by Lighthouse, is one of the best tools that we can use to perform auditing
on our application. It has different options including performance and PWA (see
Figure10-17).
CHAPTER 10 DEBUGGING AND MEASUREMENT TOOLS
www.EBooksWorld.ir

274
Figure 10-17. Lighthouse in Chrome DevTools Audit tab where different audits
can be selected and performed
It is likely that we will automate our audit test or add that to the CD/CI
1
pipeline.
Lighthouse
2
is also available as the Node command-line tool and can also be used as a
Node module programmatically.
1
Continuous Delivery, Continuous Integration.
2
https://developers.google.com/web/tools/lighthouse
CHAPTER 10 DEBUGGING AND MEASUREMENT TOOLS
www.EBooksWorld.ir
275
To run Lighthouse in the command line, do the following:
1. Make sure Chrome for Desktop and Node is installed.
2. Install Lighthouse.
npm install -g lighthouse
to run an audit
lighthouse <url>
for example
lighthouse https://awesome-apress-pwa.firebaseapp.com --view
You can see more options by running
lighthouse --help
Let’s take a look at how we can add Lighthouse programmatically.
Lighthouse withChrome Launcher
We will write an example that will run chrome-launcher and perform Lighthouse audits.
This test is helpful when you run a test for your application, especially if you want to run
multiple automated tests.
// lighthouse-chrome-launcher.js
const lighthouse = require('lighthouse');
const chromeLauncher = require('chrome-launcher');
function launchChromeAndRunLighthouse(url, opts, config = null) {
return chromeLauncher
.launch({ chromeFlags: opts.chromeFlags })
.then(chrome => {
opts.port = chrome.port;
return lighthouse(url, opts, config).then(results => {
// use results.lhr for the JS-consumeable output
// https://github.com/GoogleChrome/lighthouse/blob/master/types/
lhr.d.ts
// use results.report for the HTML/JSON/CSV output as a string
CHAPTER 10 DEBUGGING AND MEASUREMENT TOOLS
www.EBooksWorld.ir
276
// use results.artifacts for the trace/screenshots/other specific
case you need (rarer)
return chrome.kill().then(() => results.lhr);
});
});
}
const opts = {
chromeFlags: ['--show-paint-rects'],
onlyCategories: ['performance', 'pwa'] // you can leave it empty for all
audits
};
// Usage:
launchChromeAndRunLighthouse(
'https://awesome-apress-pwa.firebaseapp.com',
opts
).then(results => {
// Use results!
console.log({
pwa: results.categories.pwa.score,
performance: results.categories.performance.score
});
});
When you run this file, you’ll get the result, and you can add your logic based on the
scores.
node lighthouse-chrome-launcher.js
You’ll see
{ pwa: 1, performance: 0. 95 }
For instance, if a particular page has lower score than 0.5in PWA, you can exit build
and ask to improve that page.
CHAPTER 10 DEBUGGING AND MEASUREMENT TOOLS
www.EBooksWorld.ir

277
Lighthouse withPuppeteer
3
Puppeteer is a Node library that provides a high-level API to control Chrome or
Chromium over a DevTools Protocol. Puppeteer runs headless by default but can be
configured to run full (non-headless) Chrome or Chromium. Lighthouse and Puppeteer
is an excellent combination to run audits in our CD/CI where we cannot use the Chrome
launcher.
// lighthouse-puppeteer.js
const puppeteer = require('puppeteer');
const lighthouse = require('lighthouse');
const { URL } = require('url');
const run = async url => {
// Use Puppeteer to launch headful Chrome and don't use its default
800x600 viewport.
const browser = await puppeteer.launch({
headless: true,
defaultViewport: null
});
browser.on('targetchanged', async target => {
const page = await target.page();
function addStyleContent(content) {
const style = document.createElement('style');
style.type = 'text/css';
style.appendChild(document.createTextNode(content));
document.head.appendChild(style);
}
const css = '* {color: red}';
if (page && page.url() === url) {
const client = await page.target().createCDPSession();
await client.send('Runtime.evaluate', {
expression: `(${addStyleContent.toString()})('${css}')`
});
}
3
Headless Chrome Node API https://pptr.dev.
CHAPTER 10 DEBUGGING AND MEASUREMENT TOOLS
www.EBooksWorld.ir
278
});
const { lhr } = await lighthouse(
url,
{
port: new URL(browser.wsEndpoint()).port,
output: 'json',
logLevel: 'error',
chromeFlags: ['--show-paint-rects'],
onlyCategories: ['performance', 'pwa']
},
{
extends: 'lighthouse:default'
}
);
await browser.close();
return {
pwa: lhr.categories.pwa.score,
performance: lhr.categories.performance.score
};
};
run('https://awesome-apress-pwa.firebaseapp.com').then(res => console.
log(res));
Then you can run this file:
node lighthouse-puppeteer.js
And you’ll see
{ pwa: 1, performance: 0.96 }
CHAPTER 10 DEBUGGING AND MEASUREMENT TOOLS
www.EBooksWorld.ir
279
Analytics
PWAs allows applications to offer functionality that weren’t possible before: for instance,
adding offline behavior to a page or allowing users to launch a website from the home
screen.
Generally, there are three events that we are interested in:
• Add to home screen: This will allow us to understand how users are
reacting to the browser prompt and based on users’ choices, we can
know how valuable the service is being to the users.
• Run from home screen: Adding an icon to the home screen is just
the rst step. It would be benecial to understand how adding our
service to the home screen aects user engagement.
• Oine pageviews frequency: is allows us to track how many users
are accessing the service while oine.
Tracking Home Screen Prompts
We are going to use beforeinstallprompt event to track how many users are being
asked to add a website to their home screen and what will be their decision and based on
that, we will send information to our tracking system: for instance, Google Analytics.
Open AddToHomeScreenService
public showPrompt() {
if (this.deferredPrompt) {
// will show prompt
this.deferredPrompt.prompt();
// Wait for the user to respond to the prompt
this.deferredPrompt.userChoice.then(choiceResult => {
// outcome is either "accepted" or "dismissed"
if (choiceResult.outcome === 'accepted') {
// User accepted the A2HS prompt
// send data to analytics
// do whatever you want
this.sendToAnalytics(choiceResult.userChoice);
} else {
CHAPTER 10 DEBUGGING AND MEASUREMENT TOOLS
www.EBooksWorld.ir

280
// User dismissed the A2HS prompt
// send data to analytics
// do whatever you want
this.sendToAnalytics(choiceResult.userChoice);
}
// we don't need this event anymore
this.deferredPrompt = null;
this.deferredPromptFired$.next(false);
});
}
}
public sendToAnalytics (userChoice) {
// for example, send data to Google Analytics, you can create another
service
// or you may use a library to send this event to Google Analytics
// ga('send', 'event', 'A2H', userChoice);
console.log(userChoice);
this.deferredPromptFired$.next(false);
}
Tracking Sessions fromtheHome Screen
One of the most reliable ways to track sessions being started from the home screen is to
add a custom query param to start_url on our application manifest. For instance, if you
are using Google Analytics, you can add custom campaigns parameters.
4
Generally, there are five parameters that you can add to your URLs:
utm_source: Identify the advertiser, site, publication, etc., that is
sending traffic to your property: for example, google, newsletter4,
billboard.
utm_medium: e advertising or marketing medium: for example,
cpc, banner, email newsletter.
4
https://support.google.com/analytics/answer/1033863?hl=en
CHAPTER 10 DEBUGGING AND MEASUREMENT TOOLS
www.EBooksWorld.ir
281
utm_campaign: e individual campaign name, slogan, promo
code, etc., for a product.
utm_term: Identify paid search keywords. If you’re manually
tagging paid keyword campaigns, you should also use utm_term to
specify the keyword.
utm_content: Used to differentiate similar content or links within
the same ad. For example, if you have two call-to-action links
within the same email message, you can use utm_content and
set different values for each so you can tell which version is more
effective.
As an example:
// manifest.json
{ ...
"background_color": "#fafafa",
"display": "standalone",
"scope": "/",
"//": "Append tracking parameters to start_url",
"start_url": "/?utm_source=homescreen",
"icons": [
{
"src": "assets/icons/icon-72x72.png",
"sizes": "72x72",
"type": "image/png"
},
...
}
To see the Campaigns reports:
1. Sign in to Google Analytics.
2. Navigate to your view.
3. Open Reports.
4. Select Acquisition ➤ Campaigns.
CHAPTER 10 DEBUGGING AND MEASUREMENT TOOLS
www.EBooksWorld.ir
282
You may user other tracking systems as needed to create your desirables using the
same mechanism.
Track Offline Pageviews
At the time of writing this book, there is no implemented solution in Angular Service
Worker.
Workbox is providing support for offline pageview tracking. In Chapters 13 and 14, we
will implement this module and see how it works.
Online Tools
webpagetest.org is a go-to tool when it comes to measuring performance. You will find
in-depth documentation here: sites.google.com/a/webpagetest.org/docs.
web.dev/measure is a new tool from Google that helps developers like you learn
and apply the web’s modern capabilities to your own sites and apps.
Real Device
Last but not least, never forget real-device testing and measure your application
performance and behavior on an average device or on your top-visited devices based on
your analytics system. It’s imperative to have an overview on a real device to see that app
in the real world.
Summary
In this chapter, we talked about the handiest tools to debug and measure a PWA.
However, things will not always go so well. In the next chapter, I will reveal
possibilities to show that id your application and Service Worker go wrong, you will
still be able to survive.
CHAPTER 10 DEBUGGING AND MEASUREMENT TOOLS
www.EBooksWorld.ir
283
© Majid Hajian 2019
M. Hajian, Progressive Web Apps with Angular, https://doi.org/10.1007/978-1-4842-4448-7_11
CHAPTER 11
Safety Service Worker
Service Workers are indeed powerful, and the Angular Service Worker is no exception.
They do complex and advanced jobs for building a web application. However, based on
my experience building PWAs over the years, things are not always going in a way that we
like. It may happen that the Service Worker acts in unforeseen ways, and it may interrupt
the user experience or even make our app completely useless and unreachable.
Getting rid of a Service Worker is not as easy as it looks when you have registered
a Service Worker in the browser. Knowing how to unregister a service worker from a
client can leave your site in a suspended state of failure, which may lead to a frustrating
experience for your users.
A simple example is when you have registered a Service Worker and want to remove
a registered Service Worker file; therefore, a browser will not find the Service Worker file
any more, and the old Service Worker will stay on the browser until a new Service Worker
file gets registered. You will see that this mistake can have a disruptive impact on your
clients.
Luckily, Angular Service Worker contains several solutions such as Fail-safe, which
is a self-destructing way to unregister itself from the browser. In this chapter, I am going
to show you different mechanisms– a so-called “kill switch”– in addition to Angular
solutions where you can kill off or unregister your Service Worker, clean the cache, and
more, in order to avoid serving disruptive web applications to the user. You can use these
methods while you are debugging or even when you feel you need to get rid of the PWA
feature for your application.
Fail-safe
Angular provides a simple solution to deactivate the Service Worker. As we have seen
in previous chapters, ngsw-config.json (ngsw.json after build in dist folder) is the
manifest where we define our Service Worker rules and logic.
www.EBooksWorld.ir
284
Angular Service Worker tries to fetch the ngsw manifest on app initialization
and when it checks for new updates on navigation requests, by executing the
fetchLatestManifest method. Let’s take a look at the method closely:
fetchLatestManifest(ignoreOfflineError = false) {
return __awaiter$5(this, void 0, void 0, function* () {
const res = yield this.safeFetch(this.adapter.
newRequest('ngsw.json?ngsw-cache-bust=' + Math.random()));
if (!res.ok) {
if (res.status === 404) {
yield this.deleteAllCaches();
yield this.scope.registration.unregister();
}
else if (res.status === 504 && ignoreOfflineError) {
return null;
}
throw new Error(`Manifest fetch failed! (status: ${res.
status})`);
}
this.lastUpdateCheck = this.adapter.time;
return res.json();
});
}
As seen in the snippet, Angular tries to fetch with a random cache-bust query param
where it makes sure that the file was not cached and is fresh.
If this file doesn’t exist or basically the response status code is 404, Angular Service
Worker will first delete all caches and then unregister the current SW registration.
Thus, if in your application something went wrong, you can simply rename or
remove ngsw.json file, which essentially removes all caches; de-registers itself; or, in
other words, self-destructs itself.
rm dist/ngsw.json
Chapter 11 Safety ServiCe Worker
www.EBooksWorld.ir

285
Here is a function where it handles deleting all caches:
deleteAllCaches() {
return __awaiter$5(this, void 0, void 0, function* () {
yield (yield this.scope.caches.keys())
.filter(key => key.startsWith('ngsw:'))
.reduce((previous, key) => __awaiter$5(this, void 0,
void 0, function* () {
yield Promise.all([
previous,
this.scope.caches.delete(key),
]);
}), Promise.resolve());
});
}
Note that if you turn “serviceWorker” to false in angular.json, ngsw.json will not
be generated; therefore, this mechanism will work too.
Safety Worker
The Angular Service Worker package contains a simple no-op
1
Service Worker script that
can replace ngsw-worker.js:
self.addEventListener('install', event => { self.skipWaiting(); });
self.addEventListener('activate', event => {
event.waitUntil(self.clients.claim());
self.registration.unregister().then(
() => { console.log('NGSW Safety Worker - unregistered old service
worker'); });
});
1
A no op (or no-op), for no operation, is a computer instruction that takes up a small amount
of space but specifies no operation. Here it refers to a simple Service Worker that doesn’t do
anything expect that it just registers itself, or we may delete just caches in an active event or
unregister if necessary.
Chapter 11 Safety ServiCe Worker
www.EBooksWorld.ir
286
Let’s break down this script:
1. It listens to install even and forces to skip waiting in order to
immediately install.
2. It listens to activate event:
a. Make sure all clients (tabs, for instances) are claimed in order to use
the latest installed Service Worker. The claim() method of the clients
allows an active service worker to set itself as the controller for all clients
within its scope. This triggers a “controllerchange” event on navigator.
serviceWorker in any clients that become controlled by this Service
Worker.
b. It will unregister itself immediately.
In order to unregister your current Service Worker, copy the file content into
ngsw-worker.js or any Service Worker name that was registered and is in use.
cp dist/satefy-worker.js dist/ngsw-worker.js
This script can be used both to deactivate Angular Service Worker as well as any
other Service Worker that might have been served on the website.
Extended Safety Worker
However, in most cases a simple no-op Service Worker will work. In some cases, we may
need to delete all caches or force a user’s tab (each client of the website) to be refreshed
in order to receive the latest update. For instance, when you redirect your website to a
new origin (domain), your Service Worker may abruptly misbehave.
So, how to solve this?
1. To remove all caches:
caches.keys().then(cacheNames => {
return Promise.all(
cacheNames.map(cacheName => caches.delete(cacheName))
);
})
Chapter 11 Safety ServiCe Worker
www.EBooksWorld.ir
287
If you want to just filter the Angular cache name and delete them:
caches.keys().then(cacheNames => {
return Promise.all(
cacheNames
.filter(key => key.startsWith('ngsw:'))
.map(cacheName => caches.delete(cacheName))
);
})
2. To Refresh all Windows type clients (tabs):
a. Get a list of all window clients (tabs).
b. Each client exposes a method called navigatem which allow us to redirect
the client to another page.
c. We navigate each client to itself in order to force it to reload the page!
self.clients.matchAll({ type: 'window' })
.then(clients => {
for (const client of clients) {
client.navigate(client.url);
}
});
Put them all together:
self.addEventListener('install', event => {
self.skipWaiting();
});
self.addEventListener('activate', event => {
event.waitUntil(self.clients.claim());
self.registration.unregister().then(async () => {
console.log('NGSW Safety Worker - unregistered old service
worker');
Chapter 11 Safety ServiCe Worker
www.EBooksWorld.ir
288
// Get all cache keys
const cacheNames = await caches.keys();
// If you want to delete Only Angular Caches
const AngularCaches = cacheNames.filter(key => key.
startsWith('ngsw:'));
// Delete all caches
await Promise.all(AngularCaches.map(cacheName => caches.
delete(cacheName)));
// Grab a list of all tabs
const clients = await self.clients.matchAll({ type: 'window'
});
// Reload pages
for (const client of clients) {
client.navigate(client.url);
}
});
});
Summary
Although our goal is to develop, build, and deploy an application that works, bugs are
unavoidable. In this chapter, we made a backup plan– a so-called “kill switch”– ready
for cases in which we need to get rid of a buggy Service Worker until we can debug and
fix the problem. Angular, in particular, provides several methods that makes sure our
application works flawlessly as much as possible: such as fail-safe and safety-worker
script mechanisms.
We have also extended the no-op Service Worker script and learned how to
unregister Service Worker, claims for all clients, clean up caches, and reload pages if
necessary. I hope you never get to use these methods and that everything goes well;
however, you now know what to do if something unexpectedly goes wrong.
Chapter 11 Safety ServiCe Worker
www.EBooksWorld.ir
289
© Majid Hajian 2019
M. Hajian, Progressive Web Apps with Angular, https://doi.org/10.1007/978-1-4842-4448-7_12
CHAPTER 12
Modern Web APIs
What if I tell you that you can build a web app, connect to a device that supports
Bluetooth Low Energy, and have control over it from your web application? What if
a user’s login credentials are kept in the browsers safely, and when users access the
website, they are automatically signed in? What if a login to a web application needs a
device connected via USB to authenticate a user? What if I can access share options on
a native platform via a JavaScript API within our browser? I know what you might be
thinking now; but even though these all sounded like dreams 10 years ago, today most of
them are achievable or at least close to becoming realities.
For the past decade, much of the web has evolved significantly. New web APIs allow
developers to connect web applications to hardware via Bluetooth and USB.Online
payment has never been easier than it is today. Single sign-on and password-less
solutions have brought a much better user experience with minimal effort. Developing
a cross-platform via the same API across all devices and operating systems was very
difficult whereas, today, it’s such a pleasant way to develop and build a web application–
especially Progressive Web Apps (PWAs) since a lot of new APIs have been standardized
that provide a high-level JavaScript API in our browsers to gain access to underlying low-
level APIs of the platform.
In this chapter, I have chosen a few new technologies and APIs to explore and
integrate with PWA note apps such as Credential Management, Payment Request,
Geolocation, Media Streams, Web Bluetooth, and Web USB.I will ensure that the
fundamentals of these APIs will be covered. However, you may need to develop
additional ones for your applications based on your needs and requirements.
Additionally, I would suggest keeping an eye on Web Share, Web VR/AR, Background
fetch, Accessibility improvement, Web Assembly, and many more new standards that are
either under development or under consideration and will empower the web, especially
by building a PWA.
www.EBooksWorld.ir
290
Credential Management
The Credential management API is a Promised-based standard browser API that
facilitates seamless sign-ins across devices by providing an interface between
the website and the browser. This API allows the user to sign in with one tab via
an account chooser and helps to store credentials in the browsers by which can
be synced across devices. This helps that user who has signed in to one browser
already– he or she can then stay logged in to all other devices as well if they use the
same browser.
This API not only works with native-browser password management, but it can also
provide information about credentials from a federated identity provider. What it means
is this: any entity that a website trusts to correctly authenticate a user and provide an
API for that purpose can be a provider in this API to store the credential and retrieve it if
necessary. For example, Google Account, GitHub, Twitter, Facebook, or OpenID Connect
are examples of a federated identity provider framework.
Keep in mind that this API will only work when the origin is secure; in other words,
similar to PWA, your website must run on HTTPS.
Let’s start implementing in an Angular project and see how it works.
First, we will create a service called CredentialManagementService, and we import
to my CoreModule.
declare const PasswordCredential: any;
declare const FederatedCredential: any;
declare const navigator: any;
declare const window: any;
@Injectable({
providedIn: 'root'
})
export class CredentialManagementService {
isCredentialManagementSupported: boolean;
constructor(private snackBar: SnackBarService) {
if (window.PasswordCredential || window.FederatedCredential) {
this.isCredentialManagementSupported = true;
} else {
CHAPTER 12 MODERN WEB APIS
www.EBooksWorld.ir
291
this.isCredentialManagementSupported = false;
console.log('Credential Management API is not supported in this
browser');
}
}
async store({ username, password }) {
if (this.isCredentialManagementSupported) {
// You can either pass the passwordCredentialData as below
// or simply pass down your HTMLFormElement. A reference to an
HTMLFormElement with appropriate input fields.
// The form should, at the very least, contain an id and password.
// It could also require a CSRF token.
/*
<form id="form" method="post">
<input type="text" name="id" autocomplete="username" />
<input type="password" name="password" autocomplete="current-
password" />
<input type="hidden" name="csrf_token" value="*****" />
</form>
<script>
const form = document.querySelector('#form');
const credential = new PasswordCredential(form);
// if you have a federated provider
const cred = new FederatedCredential({
id: id,
name: name,
provider: 'https://account.google.com',
iconURL: iconUrl
});
<script>
*/
CHAPTER 12 MODERN WEB APIS
www.EBooksWorld.ir
292
// Create credential object synchronously.
const credential = new PasswordCredential({
id: username,
password: password
// name: name,
// iconURL: iconUrl
});
const isStored = await navigator.credentials.store(credential);
if (isStored) {
this.snackBar.open('You password and username saved in your browser');
}
}
}
async get() {
if (this.isCredentialManagementSupported) {
return navigator.credentials.get({
password: true,
mediation: 'silent'
// federated: {
// providers: ['https://accounts.google.com']
// },
});
}
}
preventSilentAccess() {
if (this.isCredentialManagementSupported) {
navigator.credentials.preventSilentAccess();
}
}
}
CHAPTER 12 MODERN WEB APIS
www.EBooksWorld.ir
293
This service has three methods that are basically wrappers around the main
credential API methods to check if the API is available in the browser or not. Let’s break
the service down:
1. A feature detection when service is initialized to ensure this API
is available.
if (window.PasswordCredential || window.FederatedCredential) {}
2. store method:
A) Accepts username and password, and therefore we can create a password
credential where it’ll be ready to store in credentials. PasswordCredential
constructor accepts both HTMLFormElement and an object of essential fields.
If you want to pass in the HTMLFormElement, make sure your form contains
at least an ID and Password as well as CSRF token. In the method, the call
constructor with ID, which is a username and password. name and iconURL,
are names of the user that is signing in and the user’s avatar image,
respectively and optionally. Keep in mind that we run this code if the feature
is available; otherwise we let the user work with the application normally.
Since we are building a PWA, it is always important to provide
an alternative for those users whose browser of choice doesn’t
support features that are being used.
B) If you are going to use third-party login, you must call
FederatedCredential constructor with an id as well as provider
endpoint.
C) Credentials API is available on navigator, the store function is Promised-
based and by calling that, we can save user credentials in the browser.
D) Finally, we show a message to the user in order to inform them that we
store their password in the browser.
3. get method:
After feature detection is checked, we call get on navigation.
credentials by passing in the configuration such as password,
mediation. Mediation defines how we want to tell the browser
to show the account chooser to user, which has three values:
CHAPTER 12 MODERN WEB APIS
www.EBooksWorld.ir
294
optional, required, and silent. When mediation is optional,
the user is explicitly shown an account chooser to sign in after a
navigator.credentials.preventSilentAccess() was called.
This is normally to ensure automatic sign-in doesn’t happen after
the user chooses to sign out or unregister.
Once navigator.credentials.get() resolves, it returns either
an undefined or a credential object. To determine whether it
is a PasswordCredential or a FederatedCredential, simply look
at the type property of the object, which will be either password
or federated. If the type is federated, the provider property is a
string that represents the identity provider.
4. preventSilentAccess method:
We call preventSilentAccess() on navigator.credentials.
This will ensure the auto sign-in will not happen until next time
the user enables auto sign-in. To resume auto sign-in, a user can
choose to intentionally sign in by choosing the account they wish
to sign in with, from the account chooser. Then the user is always
signed back in until they explicitly sign out.
To continue with UserContainerComponent, we will first inject this service, then will
define my autoSignIn method and will call that on ngOnInit. On both the signup and
login methods, we will call the store method from the credential service to save and
update the user credential.
Finally, when a user logs out, we need to call preventSilentAccess(). This is what it
looks like:
constructor(
private credentialManagement: CredentialManagementService,
private fb: FormBuilder,
private auth: AuthService,
private snackBar: SnackBarService
) {}
ngOnInit() {
this.createLoginForm();
if (!this.auth.authenticated) {
CHAPTER 12 MODERN WEB APIS
www.EBooksWorld.ir
295
this.autoSignIn();
}
}
private async autoSignIn() {
const credential = await this.credentialManagement.get();
if (credential && credential.type === 'password') {
const { password, id, type } = credential;
const isLogin = await this._loginFirebase({ password, email: id });
if (isLogin) {
// make sure to show a proper message to the user
this.snackBar.open(`Signed in by ${id} automatically!`);
}
}
}
public signUp() {
this.checkFormValidity(async () => {
const signup = await this.auth.signUpFirebase(this.loginForm.value);
const isLogin = await this.auth.authenticateUser(signup);
if (isLogin) {
const { email, password } = this.loginForm.value;
this.credentialManagement.store({ username: email, password });
}
});
}
public login() {
this.checkFormValidity(async () => {
const { email, password } = this.loginForm.value;
const isLogin = this._loginFirebase({ email, password });
if (isLogin) {
this.credentialManagement.store({ username: email, password });
}
});
}
CHAPTER 12 MODERN WEB APIS
www.EBooksWorld.ir

296
public logOut() {
this.auth
.logOutFirebase()
.then(() => {
this.auth.authErrorMessages$.next(null);
this.auth.isLoading$.next(false);
this.auth.user$.next(null);
// prevent auto signin until next time user login explicity
// or allow us for auto sign in
this.credentialManagement.preventSilentAccess();
})
.catch(e => {
console.error(e);
this.auth.isLoading$.next(false);
this.auth.authErrorMessages$.next(
'Something is wrong when signing out!'
);
});
}
Note Clone https://github.com/mhadaily/awesome-apress-pwa.git
and go to Chapter 12, 01-credential-management-api folder to find all sample
codes.
It is also a good practice to use the autocomplete attribute on the login form to help
the browser to appropriately identify the fields (Figure12-1).
<input
matInput
placeholder="Enter your email"
autocomplete="username"
formControlName="email"
required
/>
CHAPTER 12 MODERN WEB APIS
www.EBooksWorld.ir

297
<input
matInput
autocomplete="current-password"
placeholder="Enter your password"
[type]="hide ? 'password' : 'text'"
formControlName="password"
/>
We run the application in a new browser, then we will go to the login page and by
entering my credential will log in to the website. You’ll see a prompt message that asks
the user to save the credential in the browser (see Figure12-2).
Figure 12-1. Autocomplete attribute allows browser to show appropriate
username and password for the website
Figure 12-2. Credential prompt when web app wants to save credential in the
browser
CHAPTER 12 MODERN WEB APIS
www.EBooksWorld.ir

298
To test my auto sign-in, we will open a new clean browser and will go to the login
page, then we will notice that we get redirected to the note list, and a snackbar message
appears that shows we am automatically signed in (see Figure12-3).
Finally, the mediation optional or required will display an account chooser prompt
that allows users to select their account of choice, especially if they have more than one
account saved (See Figure12-4).
Browsers Support
By the time of writing this book, Chrome on Desktop and for Android, Android browser,
Opera for desktop and mobile, and Samsung internet browser support this API; and it
currently under consideration for Firefox. MS Edge is moving to a Chromium platform
and this API should be covered soon.
Figure 12-3. The website snackbar message and a message from browser itself
after automatic sign-in occurs
Figure 12-4. The account chooser if mediation is optional or required
CHAPTER 12 MODERN WEB APIS
www.EBooksWorld.ir
299
Payment Request
There is a high probability that all of us reading this book have made a payment on the
web– at least once. So we all know that how time consuming, and boring it is to fill out
the checkout forms, especially if it has more than one step.
The payment request standard API is developed by W3C to ensure the online
payment system for both consumers and merchants remains consistent and smooth
with minimal effort. This is not a new way of payment; rather, it’s a way that aims to
make the checkout process easier.
With this API, consumers always see a native platform UI when they want to select
payment details such as shipping address, credit card, contact details, etc. Imagine that
once you save all of the information in your browsers, you can simply just reuse them in
every single checkout page where this API is supported. How pleasant an experience it
will be: ignore the filling out of lots of fields in a checkout form, credit card information,
and more. Instead we will be seeing saved information consistently with a familiar
native UI. Just a few clicks or tabs to select, and it’s done!
Another advantage of this API is to accept different payment methods from a variety
of handlers to the web with relatively easy integration: for example, Apple Pay, Samsung
Pay, Google Pay.
Long story short, I am going to add a donation button in the PWA note app.
First, we will create a service in Angular called WebPaymentService and import it in
CoreModule.
export class WebPaymentService {
public isWebPaymentSupported: boolean;
private requestPayment = null;
private canMakePaymentPromise: Promise<boolean> = null;
private supportedPaymentMethods = [
{
// support credit card payment
supportedMethods: 'basic-card',
data: {
supportedNetworks: ['visa', 'mastercard', 'amex'],
supportedTypes: ['credit', 'debit']
}
}
CHAPTER 12 MODERN WEB APIS
www.EBooksWorld.ir
300
// Apple pay, Google Pay, Samasung pay, Stripe and others can be added here too.
];
// just an example of a simple product details
private paymentDetails: any = {
total: {
label: 'Total Donation',
amount: { currency: 'USD', value: 4.99 }
},
displayItems: [
{
label: 'What I recieve',
amount: { currency: 'USD', value: 4.49 }
},
{
label: 'Tax',
amount: { currency: 'USD', value: 0.5 }
}
]
};
private requestPaymentOptions = {
requestPayerName: true,
requestPayerPhone: false,
requestPayerEmail: true,
requestShipping: false
shippingType: 'shipping'
};
constructor() {
if (window.PaymentRequest) {
// Use Payment Request API which is supported
this.isWebPaymentSupported = true;
} else {
this.isWebPaymentSupported = false;
}
}
CHAPTER 12 MODERN WEB APIS
www.EBooksWorld.ir
301
constructPaymentRequest() {
if (this.isWebPaymentSupported) {
this.requestPayment = new PaymentRequest(
this.supportedPaymentMethods,
this.paymentDetails,
this.requestPaymentOptions
);
// ensure that user have a supported payment method if not you can do other
things
if (this.requestPayment.canMakePaymentPromise) {
this.canMakePaymentPromise = this.requestPayment.canMakePayment();
} else {
this.canMakePaymentPromise = Promise.resolve(true);
}
} else {
// do something else for instance redirect user to normal checkout
}
return this;
}
async show(): Promise<any> {
/* you can make sure client has a supported method already if not do
somethig else. For instance, fallback to normal checkout, or let them to
add one active card */
const canMakePayment = await this.canMakePaymentPromise;
if (canMakePayment) {
try {
const response = await this.requestPayment.show();
// here where you can process response payment with your backend
// there must be a backend implementation too.
const status = await this.processResponseWithBackend(response);
// after backend responsed successfully, you can do any other logic
here
// complete transaction and close the payment UI
CHAPTER 12 MODERN WEB APIS
www.EBooksWorld.ir
302
response.complete(status.success);
return status.response;
} catch (e) {
// API Error or user closed the UI
console.log('API Error or user closed the UI');
return false;
}
} else {
// Fallback to traditional checkout for example
// this.router.navigateByUrl('/donate/traditional');
}
}
async abort(): Promise<boolean> {
return this.requestPayment.abort();
}
// mock backend response
async processResponseWithBackend(response): Promise<any> {
// check with backend and respond accordingly
return new Promise(resolve => {
setTimeout(() => {
resolve({ success: 'success', response });
}, 1500);
});
}
}
Let’s break it down.
1. As always, a feature detection for progressive enhancement.
if (window.PaymentRequest) {
this.isWebPaymentSupported = true;
} else {
this.isWebPaymentSupported = false;
}
CHAPTER 12 MODERN WEB APIS
www.EBooksWorld.ir
303
2. For each payment, you need to construct a PaymentRequest that
accepts three arguments.
new PaymentRequest(
this.supportedPaymentMethods,
this.paymentDetails,
this.requestPaymentOptions
);
3. Dene supportedPaymentMethods, which is an array of all
supported payment methods. In the code example, I have just
dened a basic card; however, in this chapter’s sample codes,
you will nd more methods such as Apple Pay, Google Pay,
and Samsung Pay. You are not also limited to them; you can
implement any favorite methods such as PayPal, Stripe, and more
that support this API.
private supportedPaymentMethods = [
{
// support credit card payment
supportedMethods: 'basic-card',
data: {
// you can add more such as discover, JCB and etc.
supportedNetworks: ['visa', 'mastercard', 'amex'],
supportedTypes: ['credit', 'debit']
}
},
]
Each object in this array has supportedMethods and data
property that is specific for the method itself. To have a better
understanding, I’ll provide an Apple Pay object as an example, too:
{
supportedMethods: 'https://apple.com/apple-pay',
data: {
version: 3,
merchantIdentifier: 'merchant.com.example',
CHAPTER 12 MODERN WEB APIS
www.EBooksWorld.ir
304
merchantCapabilities: ['supports3DS', 'supportsCredit',
'supportsDebit'],
supportedNetworks: ['amex', 'discover', 'masterCard', 'visa'],
countryCode: 'US'
}
},
4. In Dene paymentDetails, for instance, in my example, I have a
xed donation number; however, you may have a cart page with
dierent products and other details that need to be added to
payment details accordingly.
private paymentDetails: any = {
total: {
label: 'Total Donation',
amount: { currency: 'USD', value: 4.99 }
},
displayItems: [
{
label: 'What I recieve',
amount: { currency: 'USD', value: 4.49 }
},
{
label: 'Tax',
amount: { currency: 'USD', value: 0.5 }
}
]
};
There are two main properties: total indicates total amount; and
displayItems, which is an array that shows cart items.
5. Dene requestPaymentOptions is optional; however, you may
nd it very useful for dierent purposes– for instance, if a
shipping address is required or email must be provided.
CHAPTER 12 MODERN WEB APIS
www.EBooksWorld.ir
305
private requestPaymentOptions = {
requestPayerName: true,
requestPayerPhone: false,
requestPayerEmail: true,
requestShipping: false,
shippingType: 'shipping'
};
In this example, we ask the payer to provide an email and name
only.
6. Last but not least, we show call show method on requestPayment
in order to display the payment native prompt page.
async show(): Promise<any> {
const canMakePayment = await this.canMakePaymentPromise;
if (canMakePayment) {
try {
const response = await this.requestPayment.show();
const status = await this.processResponseWithBackend
(response);
response.complete(status.success);
return status.response;
} catch (e) {
return false;
}
}
}
There is another Promised-based method on requestPayment called
canMakePayment(), which is essentially a helper to determine if the user has a supported
payment method to make this payment before show() gets called. It may not be in all
user agents; therefore, we need to feature detect.
Then we call show(), once the user is done, and Promise will get resolved with the
user’s selection details including contact information, credit card, shipping, and more.
Now it’s time to validate and process the payment with the back end.
CHAPTER 12 MODERN WEB APIS
www.EBooksWorld.ir

306
Open header.component.html() and add the following button (see Figure12-5):
<button mat-menu-item (click)="donateMe()" *ngIf="isWebPaymentSupported">
<mat-icon>attach_money</mat-icon>
<span>Donate</span>
</button>
Lastly, inject WebPaymentService into header.component.ts. donateMe() method
should be defined, and it will call requestPayment and display the appropriate message
to the user once it’s resolved.
public isWebPaymentSupported: boolean;
constructor(
private webPayment: WebPaymentService,
) {
this.isWebPaymentSupported = this.webPayment.isWebPaymentSupported;
}
Figure 12-5. Donate button where it triggers payment native UI
CHAPTER 12 MODERN WEB APIS
www.EBooksWorld.ir

307
async donateMe() {
const paymentResponse = await this.webPayment
.constructPaymentRequest()
.show();
if (paymentResponse) {
this.snackBar.open(
`Successfully paid, Thank you for Donation ${paymentResponse.
payerName}`
);
} else {
// this.snackBar.open('Ops, sorry something went wrong with
payment');
}
}
We will build application and run and test it in the browser and mobile (See
Figures12- 6 and 12-7).
Figure 12-6. Payment native UI, Chrome, Mac
CHAPTER 12 MODERN WEB APIS
www.EBooksWorld.ir

308
Note Clone https://github.com/mhadaily/awesome-apress-pwa.git
and go to Chapter 13, 02-request-payment-api folder to find all sample codes.
Browsers Support
By the time of writing this book, almost all major browsers support this API either in
production or a nightly build for both desktop and mobile, although they may also
support them partially.
Video andAudio Capturing
The Media Streams is an API related to WebRTC, which provides support for streaming
audio and video data. This API has been around for a while. New Promised-based
getUserMedia() is a method that ask for user permission for microphone and camera;
and, thus, you will get access to the live stream.
Figure 12-7. Apple pay in Safari, Chrome, and Samsung internet browser display
native payment UI
CHAPTER 12 MODERN WEB APIS
www.EBooksWorld.ir
309
In this section, we will add a new feature to “add note” page, where users can save an
interactive video with audio to their notes.
Note, we will not send this video to a server in this example, but the implementation will
be ready to communicate to the back end in order to save the video and audio if needed.
In notes-add.component.html, we will add following html snippet:
<div class="media-container" *ngIf="isMediaRecorderSupported">
<h1>Add video with audio Note</h1>
<div class="videos">
<div class="video">
<h2>LIVE STREAM</h2>
<video #videoOutput autoplay muted></video>
</div>
<div class="video">
<h2>RECORDED STREAM</h2>
<video #recorded autoplay loop></video>
</div>
</div>
<div class="buttons">
<button mat-raised-button color="primary" (click)="record()"
*ngIf="disabled.record" > Start Recording</button>
<button mat-raised-button color="primary" (click)="stop()"
*ngIf="disabled.stop"> Stop Recording </button>
<button mat-raised-button color="secondary" (click)="play()"
*ngIf="disabled.play"> Play Recording</button>
<button mat-raised-button color="primary" (click)="download()"
*ngIf="disabled.download"> Download Recording </button>
<a #downloadLink href="">Download Link</a>
</div>
</div>
This code is pretty self-explanatory. We add the logic to notes-add.component.ts:
export class NotesAddComponent {
@ViewChild('videoOutput') videoOutput: ElementRef;
@ViewChild('recorded') recordedVideo: ElementRef;
@ViewChild('downloadLink') downloadLink: ElementRef;
CHAPTER 12 MODERN WEB APIS
www.EBooksWorld.ir
310
public disabled = { record: true, stop: false, play: false, download:
false };
public userID;
public errorMessages$ = new Subject();
public loading$ = new Subject();
public isMediaRecorderSupported: boolean;
private recordedBlobs;
private liveStream: any;
private mediaRecorder: any;
constructor(
private router: Router,
private data: DataService,
private snackBar: SnackBarService
) {
if (window.MediaRecorder) {
this.isMediaRecorderSupported = true;
this.getStream();
} else {
this.isMediaRecorderSupported = false;
}
}
async getStream() {
try {
const stream = await navigator.mediaDevices.getUserMedia({
audio: true,
video: true
});
this.handleLiveStream(stream);
} catch (e) {
this.isMediaRecorderSupported = false;
this.onSendError('No permission or something is wrong');
return 'No permission or something is wrong';
}
}
CHAPTER 12 MODERN WEB APIS
www.EBooksWorld.ir
311
handleLiveStream(stream) {
this.liveStream = stream;
this.videoOutput.nativeElement.srcObject = stream;
}
getMediaRecorderOptions() {
let options = {
mimeType: 'video/webm;codecs=vp9',
audioBitsPerSecond: 1000000, // 1 Mbps
bitsPerSecond: 1000000, // 2 Mbps
videoBitsPerSecond: 1000000 // 2 Mbps
};
if (!MediaRecorder.isTypeSupported(options.mimeType)) {
console.log(`${options.mimeType} is not Supported`);
options = { ...options, mimeType: 'video/webm;codecs=vp8' };
if (!MediaRecorder.isTypeSupported(options.mimeType)) {
console.log(`${options.mimeType} is not Supported`);
options = { ...options, mimeType: 'video/webm' };
if (!MediaRecorder.isTypeSupported(options.mimeType)) {
console.log(`${options.mimeType} is not Supported`);
options = { ...options, mimeType: " };
}
}
}
return options;
}
record() {
this.recordedBlobs = [];
this.disabled = { play: false, download: false, record: false, stop: true };
this.mediaRecorder = new MediaRecorder(
this.liveStream,
this.getMediaRecorderOptions
);
this.mediaRecorder.ondataavailable = e => {
CHAPTER 12 MODERN WEB APIS
www.EBooksWorld.ir
312
{
if (e.data) {
this.recordedBlobs.push(e.data);
}
}
};
this.mediaRecorder.start();
console.log('MediaRecorder started', this.mediaRecorder);
}
stop() {
this.disabled = { play: true, download: true, record: true, stop: false };
this.mediaRecorder.onstop = e => {
this.recordedVideo.nativeElement.controls = true;
};
this.mediaRecorder.stop();
}
play() {
this.disabled = { play: true, download: true, record: true, stop: false };
const buffer = new Blob(this.recordedBlobs, { type: 'video/webm' });
this.recordedVideo.nativeElement.src = window.URL.createObjectURL(buffer);
}
download() {
const blob = new Blob(this.recordedBlobs, { type: 'video/webm' });
const url = window.URL.createObjectURL(blob);
this.downloadLink.nativeElement.url = url;
this.downloadLink.nativeElement.download = `recording_${new Date().
getTime()}.webm`;
this.downloadLink.nativeElement.click();
setTimeout(() => {
window.URL.revokeObjectURL(url);
}, 100);
}
onSaveNote(values) {
CHAPTER 12 MODERN WEB APIS
www.EBooksWorld.ir

313
this.data.addNote(values).then(
doc => {
this.snackBar.open(`LOCAL: ${doc.id} has been succeffully saved`);
},
e => {
this.errorMessages$.next('something is wrong when adding to DB');
}
);
this.router.navigate(['/notes']);
}
onSendError(message) {
this.errorMessages$.next(message);
}
}
This code is straightforward. As always, it is a feature detection for MediaRecorder,
and if it is supported by a browser, we will continue and show this feature to our user
and will initialize getUserMedia(); therefore, we ask for audio and video permission as
shown in Figure12-8.
Once permission is granted, Promise gets resolved and the stream will be accessible
(see Figure12-9). When user clicks on tab “start recording” button, MediaRecorder
constructor gets called with the live stream data and the options that gave already been
defined.
Figure 12-8. Browser asks for permission for camera and microphone
CHAPTER 12 MODERN WEB APIS
www.EBooksWorld.ir

314
We store each blob in an array until stop() method gets called. Once recording
stops, media is ready to be played. By hitting “play” button, we will simply create a
stream buffer of the stream array and by creating a Blob URL, we will assign it to an
src of <video> tag.
Ta-da, now the video is playing directly in the browser. We are also able to work on
the downloadable version of this video (see Figure12-10).
Figure 12-9. Ask for permission for getting access to video and audio on Android
mobile
CHAPTER 12 MODERN WEB APIS
www.EBooksWorld.ir

315
By the tab or click on “Download“ button, we will create a Blob from an array of
recordedBlob and then will create a URL and assign to <a> tag thatI have defined in the
template with display: none and then call click() to force browser opening download
modal for user in order to ask them where this file must be saved on their system.
Note Clone https://github.com/mhadaily/awesome-apress-pwa.git
and go to Chapter 12, 03-camera-and-microphone-api folder to find all sample
codes.
Browsers Support
At the time of writing this book, Opera, Chrome, and Firefox on desktop; and Chrome
and Samsung internet on Android support most of the standard specs. Microsoft Edge
also has this API under consideration. It also works on Safari 12 / iOS 12. I believe the
API’s future is bright.
Figure 12-10. Live stream and recorded playback
CHAPTER 12 MODERN WEB APIS
www.EBooksWorld.ir
316
Geolocation
The Geolocation API provides the user’s location coordination and exposes it to the web
application. The browser will ask for permission for privacy reasons. This Promised-
based API has been around for a long time. You might even work with it already.
We will explore this API by creating a service called GeolocationService where you
can find it under modules/core/geolocation.service.ts.
export interface Position {
coords: {
accuracy: number;
altitude: number;
altitudeAccuracy: number;
heading: any;
latitude: number;
longitude: number;
speed: number;
};
timestamp: number;
}
@Injectable()
export class GeolocationService {
public isGeoLocationSupported: boolean;
private geoOptions = {
enableHighAccuracy: true, maximumAge: 30000, timeout: 27000
};
constructor() {
if (navigator.geolocation) {
this.isGeoLocationSupported = true;
} else {
// geolocation is not supported, fall back to other options
this.isGeoLocationSupported = false;
}
}
CHAPTER 12 MODERN WEB APIS
www.EBooksWorld.ir
317
getCurrentPosition(): Observable<Position> {
return Observable.create(obs => {
if (navigator.geolocation) {
navigator.geolocation.getCurrentPosition(
position => {
obs.next(position);
obs.complete();
},
error => {
obs.error(error);
}
);
}
});
}
watchPosition(): Observable<Position> {
return Observable.create(obs => {
if (navigator.geolocation) {
navigator.geolocation.watchPosition(
position => {
obs.next(position);
},
error => {
obs.error(error);
},
this.geoOptions
);
}
});
}
}
CHAPTER 12 MODERN WEB APIS
www.EBooksWorld.ir
318
Let’s break it down.
1. As usual, a feature detection to ensure geolocation is available.
2. Dene getCurrentPosition(), I am going to convert
geolocation.getCurrentPosition() callbacks into an
observable.
3. Dene watchPosition(), we do the same with geolocation.
watchPosition() and turn its callbacks into an observable.
4. We have already defined my Position interface by which
geolocation methods provide.
What I’d like to do is to add user coordination to each note to keep the location as
it saves. Thus, we can later show the user’s note’s coordination or exact address using a
third-party map provider like Google Map. Since we are saving all coordination data, we
will be able to convert this coordination to a meaningful address using third-party map
providers in the back end or even in the front end based on application needs.
At the moment, to keep in simple and short, let’s just display the current latitude and
longitude to the user.
First, we inject geolocation service into NotesAddComponent, then we will call
getCurrentPosition() and assign it to my local location$ variable where we transform
a position object into a simple string.
public isGeoLocationSupported = this.geoLocation.isGeoLocationSupported;
public location$: Observable<string> = this.geoLocation
.getCurrentPosition()
.pipe(map(p =>
`Latitude:${p.coords.latitude}
Longitude:${p.coords.longitude}`
));
constructor(
private router: Router,
private data: DataService,
private snackBar: SnackBarService,
private geoLocation: GeolocationService
) {}
CHAPTER 12 MODERN WEB APIS
www.EBooksWorld.ir
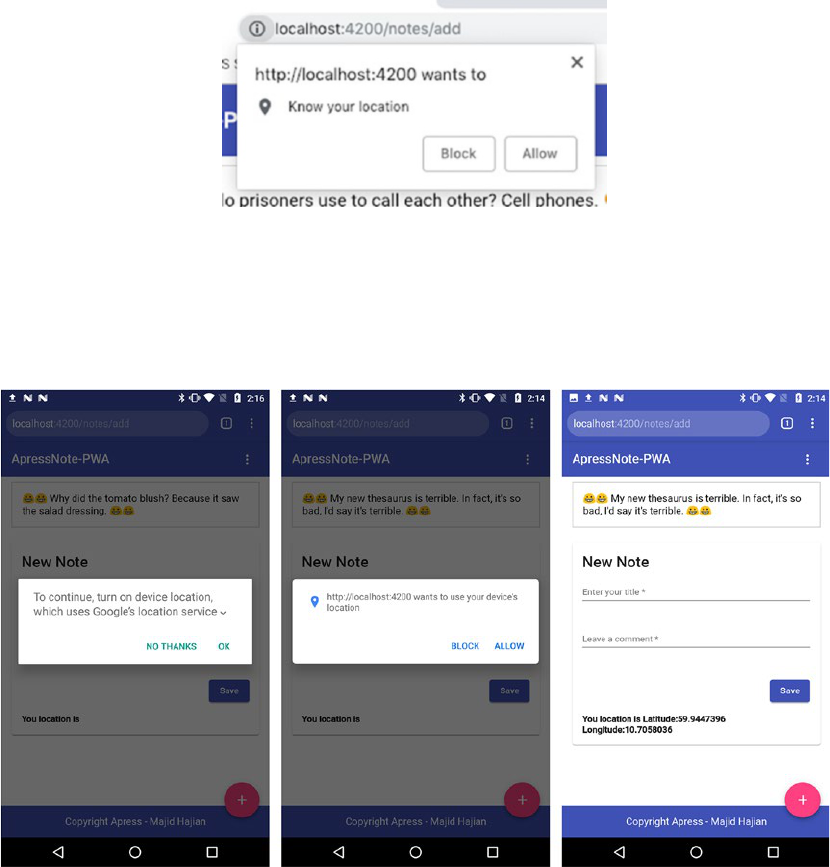
319
Finally, add the following html snippet where we use location$ observable with async
pipe; however, we first check if geolocation is available by using *ngIf (see permission
dialog in Figure12-11).
<h4 *ngIf="isGeoLocationSupported">You location is {{ location$ |
async }}</h4>
Once permission is allowed by the user, the browser will provide coordination data
on each method call (see Figure12-12).
Figure 12-11. Browser asks for location permission
Figure 12-12. Geolocation permission dialog on Android; once it’s resolved,
coordination is displayed
CHAPTER 12 MODERN WEB APIS
www.EBooksWorld.ir

320
Note Clone https://github.com/mhadaily/awesome-apress-pwa.git
and go to Chapter 12, 04-geolocation-api folder to find all sample codes.
Browsers Support
All major browsers support this API, which globally covers over 93 percent of the market
according to the caniuse.com website.
1
Web Bluetooth
This Promised-based API is a new technology that opens a new era for Internet of Things
through the web. It allows a web application to get connected to Bluetooth Low Energy
(BLE) devices.
Imagine developing a PWA where we are able to get access to Bluetooth and get
control over devices such as smart home appliances, health accessories, ONLY with web
API consistency across all browsers in different platforms.
Keep in mind that this API is still being developed and API may slightly change
in the future. I recommend the following implementation status documentation on
GitHub.
2
Before we continue, I would suggest studying the basic knowledge of how Bluetooth
Low Energy (BLE) and the Generic Attribute Profile (GATT)
3
work.
In this section, we simulate a BLE device using BLE Peripheral Simulator
4
app on
Android and will pair my PWA note app to that device in order to receive a battery level
number. What we have done is this:
1. Installed BLE Peripheral Simulator app
2. Select Battery Service to advertise
3. Keep the screen on and put the battery level to 73
1
https://caniuse.com/#search=geolocation
2
https://github.com/WebBluetoothCG/web-bluetooth/blob/master/implementation-status.md
3
https://www.bluetooth.com/specifications/gatt/generic-attributes-overview
4
Search “BLE Peripheral Simulator” on the Google Play store.
CHAPTER 12 MODERN WEB APIS
www.EBooksWorld.ir
321
Let’s get started.
First, we will create my WebBluetoothService and import it in CoreModule.
@Injectable()
export class WebBluetoothService {
public isWebBluetoothSupported: boolean;
private GATT_SERVICE_NAME = 'battery_service';
private GATT_SERVICE_CHARACTERISTIC = 'battery_level';
constructor() {
if (navigator.bluetooth) {
this.isWebBluetoothSupported = true;
}
}
async getBatteryLevel(): Promise<any> {
try {
// step 1, scan for devices and pair
const device = await navigator.bluetooth.requestDevice({
// acceptAllDevices: true
filters: [{ services: [this.GATT_SERVICE_NAME] }]
});
// step 2: connect to device
const connectedDevice = await this.connectDevice(device);
// step 3 : Getting Battery Service
const service = await this.getPrimaryService(connectedDevice, this.
GATT_SERVICE_NAME);
// step 4: Read Battery level characterestic
const characteristic = await this.getCharacteristic(service, this.
GATT_SERVICE_CHARACTERISTIC);
// step 5: ready battery level
const value = await characteristic.readValue();
// step 6: return value
return `Battery Level is ${value.getUint8(0)}%`;
} catch (e) {
console.error(e);
CHAPTER 12 MODERN WEB APIS
www.EBooksWorld.ir
322
return `something is wrong: ${e}`;
}
}
private connectDevice(device): Promise<any> {
return device.gatt.connect();
}
private getPrimaryService(connectedDevice, serviceName): Promise<any> {
return connectedDevice.getPrimaryService(serviceName);
}
private getCharacteristic(service, characterestic): Promise<any> {
return service.getCharacteristic(characterestic);
}
}
This service is simple. We followed these steps:
1. Detect if bluetooth is available.
2. Call requestDevice() with proper conguration where we ask
browser to lter and show us what we are interested in. ere is
potentially an option to ask for checking all devices; however, it’s
not recommended regarding battery health.
To make the service simple, we have statically defined GATT
service name and characteristic.
3. Try to connect to device once prompt modal appears.
4. Call getPrimaryService() to retrieve battery service.
5. By calling getCharacteristic(), we will ask for battery_level.
6. Once characteristic was resolved, we will read the value.
It seems a bit complex and confusing even though this a very simple device and the
documentation is clear. The more you work with these types of devices and technologies,
the better you will become at figuring it all out.
CHAPTER 12 MODERN WEB APIS
www.EBooksWorld.ir

323
You can only ask a browser to discover devices by click or tab on a button; thus, we’ll
add a button under the menu in header.component.html and ensure with ngIf that the
button appears when it’s supported.
<button mat-menu-item (click)="getBatteryLevel()" *ngIf="isWebBluetooth
Supported">
<mat-icon>battery_unknown</mat-icon>
<span>Battery Level</span>
</button>
Finally, I will define my getBatteryLevel method in header.component.ts,
which only shows a message with the battery level once all promises are resolved (see
Figure12-13).
async getBatteryLevel() {
const level = await this.bluetooth.getBatteryLevel();
this.snackBar.open(level);
}
Note Clone https://github.com/mhadaily/awesome-apress-pwa.git
and go to Chapter 12, 05-web-bluetooth-api folder to find all sample codes.
Figure 12-13. Web Bluetooth API: pair a device and read a characteristic and
display a message once all Promises are resolved
CHAPTER 12 MODERN WEB APIS
www.EBooksWorld.ir

324
The example above unfolds read possibilities from a BLE device; however, writing
5
to Bluetooth characteristics and subscribing
6
to receive GATT notifications are also
another case.
We have reviewed the basics of Web Bluetooth and hope that it excites you enough to
get started with this awesome web technology.
There is a great Angular library for Web Bluetooth with Observable API by my
community friend Wassim Chegham– and you can install by running the following
command:
npm i -S @manekinekko/angular-web-bluetooth @types/web-bluetooth
Find the documentation on GitHub https://github.com/manekinekko/angular-
web- bluetooth.
Browsers Support
Browsers that support this API, at the time of writing this book, are Chrome Desktop
for both Windows and Mac as well as Android, Samsung internet, and Opera. I hope
in the future, especially when you are reading this section, there will be more browsers
supporting Web Bluetooth API.
Web USB
This Promised-based API provides a safe way to expose USB devices to the web via
browsers using JavaScript high-level APIs. This is still a relatively new API and may
change over time, implementation is limited, and bugs are reported.
Web USB API by default needs HTTPS, and similar to Web Bluetooth it must be
called via a user gesture such as a touch or mouse click. Devices similar to a keyboard
and mouse are not accessible to this API.
5
https://www.bluetooth.com/specifications/gatt/viewer?attributeXmlFile=org.
bluetooth.characteristic.heart_rate_control_point.xml
6
https://www.bluetooth.com/specifications/gatt/viewer?attributeXmlFile=org.
bluetooth.characteristic.heart_rate_measurement.xml&u=org.bluetooth.
characteristic.heart_rate_measurement.xml
CHAPTER 12 MODERN WEB APIS
www.EBooksWorld.ir
325
I believe Web USB opens a new window where it brings a lot of opportunities for
academic purposes, students, manufacturers, and developers. Imagine this instead
of an online developer tool that can access to a USB board directly or manufacturers
who need to write native drivers; instead they will be able to develop a cross-
platform JavaScript SDK.Think of a hardware support center who can access directly
through their website to my device and diagnose or debug. We can count more and
more case studies; however, I should mention that this technology is still growing
and, if not right now, will be a mind- blowing feature for the web in the coming
future. Truly, the web is amazing; isn’t it?
Enough talking, let’s get started and explorer the API.To keep it simple and give
you an idea how Web USB works, we going to connect my “Transcend Pen drive,” and
once it’s connected, I will just show a message where it displays hardware information
including “serial number.”
First, I write a service called WebUSBService and import to CoreModule.
@Injectable()
export class WebUSBService {
public isWebUSBSupported: boolean;
constructor(private snackBar: SnackBarService) {
if (navigator.usb) {
this.isWebUSBSupported = true;
}
}
async requestDevice() {
try {
const usbDeviceProperties = { name: 'Transcend Information, Inc.',
vendorId: 0x8564 };
const device = await navigator.usb.requestDevice({ filters:
[usbDeviceProperties] });
// await device.open();
console.log(device);
return `
USB device name: ${device.productName}, Manifacture is ${device.
manufacturerName}
CHAPTER 12 MODERN WEB APIS
www.EBooksWorld.ir
326
USB Version is: ${device.usbVersionMajor}.${device.
usbVersionMinor}.${device.usbVersionSubminor}
Product Serial Number is ${device.serialNumber}
`;
} catch (error) {
return 'Error: ' + error.message;
}
}
async getDevices() {
const devices = await navigator.usb.getDevices();
devices.map(device => {
console.log(device.productName); // "Mass Storage Device"
console.log(device.manufacturerName); // "JetFlash"
this.snackBar.open(
`this. USB device name: ${device.productName}, Manifacture is
${device.manufacturerName} is connected.`
);
});
}
}
Let’s break it down:
1. Feature detection to ensure “usb” is available.
2. Dene requestDevice method, it calls navigator.usb.
requestDevice(). I needed to explicitly lter my USB device by
vendorID. I didn’t magically come up with vendor hexadecimal
number; what I did was to search and nd my device name
‘Transcend’ in this list http://www.linux-usb.org/usb.ids.
3. Define getDevices method, and it calls navigator.usb.
getDevices(); once resolved, it will return a list of devices that are
connected to the origin.
We add two buttons in header.component.html, which on click call getDevices()
and requestDevice() methods respectively.
CHAPTER 12 MODERN WEB APIS
www.EBooksWorld.ir
327
<button mat-menu-item (click)="getUSBDevices()"
*ngIf="isWebUSBSupported">
<mat-icon>usb</mat-icon>
<span>USB Devices List</span>
</button>
<button mat-menu-item (click)="pairUSBDevice()"
*ngIf="isWebUSBSupported">
<mat-icon>usb</mat-icon>
<span>USB Devices Pair</span>
</button>
Inject WebUSBService to header.component.ts. Make sure buttons are visible if
isWebUSBSupported is true.
constructor(private webUsb: WebUSBService) {
this.isWebUSBSupported = this.webUsb.isWebUSBSupported;
}
getUSBDevices() {
this.webUsb.getDevices();
}
async pairUSBDevice() {
const message = await this.webUsb.requestDevice();
this.snackBar.open(message);
}
By clicking on “USB Devices Pair,” a list appears where it shows my device and I can
pair it (see Figure12-14).
CHAPTER 12 MODERN WEB APIS
www.EBooksWorld.ir

328
Once the pair is completed successfully, the device is ready to be opened and data
can be transferred in and out.
For example, here is an example for a device to communicate with:
await device.open();
await device.selectConfiguration(1) // Select configuration #1
await device.claimInterface(0) // Request exclusive control
over interface #0
await device.controlTransferOut({
"recipient": "interface",
"requestType": "class",
"request": 9,
"value": 0x0300,
"index": 0 })
const result = await device.transferIn(8, 64); // Ready to
receive data
7
// and you need to read the result...
7
https://beyondlogic.org/usbnutshell/usb4.shtml
Figure 12-14. A device in the list based on the filter options when
requestDevice() gets called. Once paired, based on logic, a message appears that
shows device information such as serial number, device name, manufacturer, USB
version, etc. Once device is connected, it’s ready to transfer data in and out.
CHAPTER 12 MODERN WEB APIS
www.EBooksWorld.ir
329
This information is specific to each device. However, the methods are an API in the
browser.
In general, the Web USB API provides all endpoint types of USB devices:
• Interrupt transfers:
Used for typically nonperiodic, small device “initiated”
communication by calling transferIn(endpointNumber,
length) and transferOut(endpointNumber, data)
• Control transfers:
Used for command and status operations by
calling controlTransferIn(setup, length) and
controlTransferOut(setup, data)
• Bulk transfers:
Used for large data such as print-job sent to a printer
by calling transferIn(endpointNumber, length) and
transferOut(endpointNumber, data)
• Isochronous transfers:
Used for continuous and periodic data, such as an audio or video
stream by calling isochronousTransferIn(endpointNumber,
packetLengths) and isochronousTransferOut(endpointNumber,
data, packetLengths)
Last but not least, it may happen that users connect or disconnect the device from
their system. There are two events that can be listened to and acted on accordingly.
navigator.usb.onconnect = event => {
// event.device will bring the connected device
// do something here
console.log('this device connected again: ' + event.device);
};
navigator.usb.ondisconnect = event => {
// event.device will bring the disconnected device
CHAPTER 12 MODERN WEB APIS
www.EBooksWorld.ir

330
// do something here
console.log('this device disconnected: ', event.device);
};
Debugging USB in Chrome is easier with the internal page chrome://device-log
where you can see all USB device-related events in one single place.
Note Clone https://github.com/mhadaily/awesome-apress-pwa.git
and go to Chapter 12, 06-web-usb-api folder to find all sample codes.
Browsers Support
Browsers that support this API, at the time of writing this book, are Chrome For desktop
and Android as well as Opera. While the API is evolving and being developed rapidly,
I hope we soon see better support in the browsers.
Summary
In this chapter, we have just explored six web APIs. Although they are not an essential
part of a PWA, they help to build an app that is even closer to native apps.
As I wrote in the chapter’s introduction, these are not the only new APIs that
are coming to web. There are many others that are either under development or
consideration to be developed soon.
I am very excited about the future of web development as I can see how it will open
endless opportunities in front of us to build and ship a much better web application.
CHAPTER 12 MODERN WEB APIS
www.EBooksWorld.ir
331
© Majid Hajian 2019
M. Hajian, Progressive Web Apps with Angular, https://doi.org/10.1007/978-1-4842-4448-7_13
CHAPTER 13
PWA withAngular
andWorkbox
Up until this point in the book, I bet on the Angular Service Worker module and built on
top of that. It has many advantages, including less code; tested in high scale, reliability,
and stability; Angular way of communicating with Service Worker; automatic build with
CLI; and great support from the Angular team. It truly gives us peace of mind.
However, like every other tool, there are also disadvantages too. One of the
downsides is that Angular Service Worker is not extendable in a proper way (at least at
the time of writing this book), which means that you are not able to add your own logic
to Service Worker if you want; or you may need some of the new Service Worker APIs
or features that Angular Service Worker doesn’t support yet, and it may take some time
until the team provides a public API to Angular developers.
Luckily there are a few tools out there which support generating Service Workers
with ease, although they might be more complex than an Angular Service Worker. One
of the best is Workbox, a library from Google Chrome team. Workbox is a modular
library that provides an extremely easy way to write our Service Worker. Workbox CLI
(command-line interface) consists of a Node.js program and can be run from a Mac,
Window, and Unix-compatible command-line environment. It wraps the Workbox build
module under the hook, which generates an entire Service Worker or just generates a list
of assets to precache that could be used within an existing Service Worker.
In this chapter, we strive to explore Workbox capabilities and will build the Note PWA
once more with Workbox. You will see what the differences are between Workbox setup
and Angular Service Worker. Thus, you will be able to decide, based on your project,
which one you have to choose in order to build your next, fantastic PWA.
www.EBooksWorld.ir
332
Angular andWorkbox Setup
Before we go further, we will explorer Workbox and explain how it works.
Workbox is a modular library that helps to generate an entire Service Worker with
minimal effort. It can generate an SW automatically or will allow us to write a custom
Service Worker, and it will inject scripts based on the configuration (aka manifest) and
generate an entire Service Worker.
Workbox-cli provides an easy way of integrating Workbox into a command-line build
process with a flexible configuration. To install the CLI:
npm install workbox-cli --global
Or if you would like to install locally (which I prefer to):
npm install workbox-cli --save-dev // to run `npx workbox [mode]`
Workbox CLI has four different modes, which are the following:
• wizard: a step-by-step guide to set up Workbox for your project.
• generateSW: generates a complete Service Worker for you.
• injectManifest: injects the assets to precache into your project.
• copyLibraries: copy the Workbox libraries into a directory.
Workbox consists of different modules that a developer can decide to use. These
modules are the following:
• Core: common code that each module relies on, for instance, log level.
• Precaching: simplies precaching app-shell on install event.
• Routing: perhaps the most important module, where you can
intercept a network request and respond accordingly.
• Strategies: provides the most common caching strategies so it’s easy
to apply them in your Service Worker.
• Expiration: allows you to limit the number of entries in a cache and /
or remove entries that have been cached for a long period of time.
CHAPTER 13 PWA WITHANGULAR ANDWORKBOX
www.EBooksWorld.ir

333
• BackgroundSync: detects a network request’s failing due to
connectivity issue and queue them in IndexedDB and will retry
on a ‘sync’ event, which the browser res when a user reconnects.
is module also provides a fallback for those browsers that still
don’t support Background sync APIs. is feature is not available in
Angular Service Worker as of the time of writing this book.
• GoogleAnalytics: helps to detect failed requests to Measurement
Protocol, store in IndexedDB, and retry once connectivity is back.
• CacheableResponse: provides a standard way of determining
whether a response should be cached based on its numeric status
code, the presence of a header with a specic value, or a combination
of the two.
• BroadcastUpdate: provides a standard way of notifying Window
Clients that a cached response has been updated. is module uses
Broadcast Channel AI to announce the update. In Workbox 4, it will
automatically fall back to postMessage() API for those browsers that
don’t support Broadcast Channel API.
• NavigationPreload:
1
will handle checking at runtime to see if the
current browser supports navigation preload; and if it does, it will
automatically create an activate event handler to enable it.
• RangeRequests: when making a request, a range header can be set
that tells the server to return only a portion of the full request. This
is useful for certain files like a video file, where a user might change
where to play the video.
We know the basics now. Let’s continue and add Workbox to our Angular project.
Note Clone https://github.com/mhadaily/awesome-apress-pwa.git
and go to Chapter 13, folder 01-starter does not have Service Worker
implementation and is ready to start adding Workbox.
1
https://developers.google.com/web/updates/2017/02/navigation-preload
CHAPTER 13 PWA WITHANGULAR ANDWORKBOX
www.EBooksWorld.ir

334
Workbox Wizard Mode
The first and easiest way to work with Workbox is to use the Wizard mode. Workbox
CLI asks you a few questions. Then workbox-config.js is created, and you can add or
generate a Service Worker to your build process. It is possible, indeed, to do all these
steps manually by creating workbox-config file.
Run wizard mode with Workbox CLI:
2
npx workbox wizard
And then questions appear, which are listed below:
1. What is the root of your web app (i.e., which directory do you
deploy)? (dist or could be dist/project-name)
2. Which le types would you like to precache? (Press
<space> to select, <a> to toggle all, <i> to inverse selection)
(css,js,txt,png,ico.html.json)
3. Where would you like your Service Worker le to be saved?
(dist/sw.js)
4. Where would you like to save these configuration options?
(workbox-config.js)
Config file will be generated with minimal setup in a file called workbox-config.js
as you have chosen in the wizard:
module.exports = {
globDirectory: 'dist/', // this could be dist/project-name in an Angular
project
globPatterns: ['**/*.{js,txt,png,ico,html,css}' ],
globIgnores: ['stats.json'],
swDest: 'dist/sw.js', // this could be dist/project-name in an Angular
project
importWorkboxFrom: 'local',
maximumFileSizeToCacheInBytes: 4 * 1024 * 1024 // not more than 4MB
};
2
https://developers.google.com/web/tools/workbox/modules/workbox-cli
CHAPTER 13 PWA WITHANGULAR ANDWORKBOX
www.EBooksWorld.ir
335
1. globDirectory: the folder that Workbox needs to scan for the
patterns or ignore files provided in the next property.
2. globPatterns: an array of globs in order to add them to precache,
essentially to generate our app-shell.
3. globIgnores: an array of glob type that will be ignored for
app-shell.
4. swDest: folder where sw.js will be placed after generating.
5. imporWorkboxFrom: denes how Workbox library should be
imported into Service Worker le.
a. cdn: script will be imported from Google Cloud storage. For example:
https://storage.googleapis.com/workbox-cdn/releases/3.6.3/
workbox-sw.js
b. local: Workbox libraries must be copied to dist folder and be imported
into Service Worker. In order to copy Workbox libraries, run npx workbox
copyLibraries dist
c. none: will import nothing.
6. maximumFileSizeToCacheInBytes: a guard if discovered file is
oversized.
This configuration is enough for generating a Service Worker to precache the static
assets and app-shell. Once the Angular build is done, by running the command below,
Workbox will be generating a Service Worker automatically:
npx workbox generateSW workbox-config.js
Tada! The auto-generated sw.js is in dist folder, so let’s glance at it:
importScripts(`workbox-v3.6.3/workbox-sw.js`);
workbox.precaching.precacheAndRoute([
{
"url": "favicon.ico",
"revision": "b9aa7c338693424aae99599bec875b5f"
},
CHAPTER 13 PWA WITHANGULAR ANDWORKBOX
www.EBooksWorld.ir
336
{
"url": "index.html",
"revision": "ba3375f16e2a5c7fdf36600745e88e98"
},
{
"url": "styles.356e924fea446d033420.css",
"revision": "b7a968bbc1b49cd4f6478cae97fed4f6"
},
{
"url": "1.ee064b5075b0e24f691c.js",
"revision": "1a0cf93d36be20c46550e5a85a91aeae"
},
{
"url": "5.902dda00d476d615f591.js",
"revision": "28265e0a43435a8acebad181a6f02056"
},
{
"url": "6.58566fec934a1864fc29.js",
"revision": "33af875f4f0454106aa0e23f66ee13d0"
},
{
"url": "lazy-fonts.js",
"revision": "62693c91e34c656d59025a6fb3e22f99"
},
{
"url": "main.e1f6fe9ffe4709effd6b.js",
"revision": "6debac0612cf6f10ab6140e18f310899"
},
{
"url": "polyfills.c1da48c5c45ccdef1eb4.js",
"revision": "7c508c4c2a0d8521e03909fb9e015ebe"
},
CHAPTER 13 PWA WITHANGULAR ANDWORKBOX
www.EBooksWorld.ir

337
{
"url": "runtime.0c53ce34d2b71056f3b2.js",
"revision": "ad44f617b496d7cf73f3e6338864abe1"
}
]);
First the Workbox library is imported, then an array of app-shell assets in the precaching
module is used in order to put them into a cache on the ‘install’ event in Service Worker.
Note Workbox uses a revision hash similar to Angular Service Worker to detect
file changes.
Now it is time to register sw.js. We will add my Service Worker registration in the
main.ts file where Angular bootstraps AppModule.
document.addEventListener('DOMContentLoaded', async () => {
try {
const module = await platformBrowserDynamic().bootstrapModule(AppModule);
const app = module.injector.get(ApplicationRef);
const whenStable = await app.isStable
.pipe(filter((stable: boolean) => !!stable), take(1)).toPromise();
window.onload = async () => {
if (whenStable && navigator.serviceWorker && environment.production) {
const registration = await navigator
.serviceWorker.register('/sw.js', { scope:
'/' });
console.log(`sw.js has been registered, scope is: ${registration.
scope}`);
}
};
} catch (err) {
console.error(err);
}
});
CHAPTER 13 PWA WITHANGULAR ANDWORKBOX
www.EBooksWorld.ir
338
To break down:
1. Once Angular AppModule is bootstrapped and promised to
be resolved, we’ll get access to ApplicationRef through a
dependency injection to find out if the application is stable.
2. To ensure registration is as performant as possible, we keep the
logic in `window load` event.
3. Once the Angular bootstrap is resolved and AppModule is stable,
which means there is not any kind of recurrent asynchronous task
when the application starts: for example, a polling process started
with setInterval or Rxjs Interval.
We will do feature detection for Service Worker as part of
progressive enhancement as well as production environment in
order to prevent conflicts in development.
Finally, we will add a Workbox command to my build pipeline for generating a
Service Worker right after the Angular build for production is done:
"build:prod": "ng build --prod && workbox copyLibraries dist && workbox
generateSW workbox-config.js",
Workbox injectManifest
Workbox generateSW is simple, fully configuration based, and makes it easy to generate
an entire Service Worker. It works perfectly for many web apps. However, what if we want
to add our custom code for any reason to Service Worker? Every time Workbox generates
SW file, our custom code will be overwritten. There must be a solution.
Luckily, Workbox provides injectManifest mode in which you can stay in control
of your Service Worker file and let Workbox generate part of it. All your configuration is
written as code in a custom Service Worker instead of a configuration file.
To use injectManifest, you need to specify where the source of the custom Service
Worker is by swSrc property. I have created a sw-srouce.js in the src folder and add it
to the config file.
module.exports = {
globDirectory: 'dist/',
globPatterns: ['**/*.{js,txt,png,ico,html,css}'],
CHAPTER 13 PWA WITHANGULAR ANDWORKBOX
www.EBooksWorld.ir
339
globIgnores: ['stats.json'],
swDest: 'dist/sw.js',
swSrc: 'src/sw-source.js',
maximumFileSizeToCacheInBytes: 4 * 1024 * 1024 // not more than 4MB
};
Now we need to create “Source Service Worker.” Let’s get started. First things first,
though; we need to import Workbox.
// current workbox version
const MODULE_PATH_PREFIX = 'workbox-v3.6.3';
// to copy workbox files run npm run copyWorkboxModules or 'npx workbox
copyLibraries dist'
// this synchronously load workbox locally, if you prefer CDN use the linke
// mentioned earlier
importScripts(`${MODULE_PATH_PREFIX}/workbox-sw.js`);
if (!workbox) {
// if workbox for any resson didn't happen simply ignore the rest of file
console.error(`Something went wrong while loading ${modulePathPrefix}/
workbox-sw.js`);
} else {
// OUR CODE
}
We can modify the Workbox config and SW update cycle based on requirements.
// set module path prefix
workbox.setConfig({ modulePathPrefix: MODULE_PATH_PREFIX });
// overwrite cache name details if you like, if you don’t write this line,
// Workbox uses default settings.
workbox.core.setCacheNameDetails({
prefix: 'angular-aprees-note-pwa',
suffix: 'v1',
precache: 'install-time',
runtime: 'run-time',
googleAnalytics: 'ga'
});
CHAPTER 13 PWA WITHANGULAR ANDWORKBOX
www.EBooksWorld.ir
340
// Modify SW update cycle
// forces the waiting service worker to become the active service worker.
workbox.skipWaiting();
// ensure that updates to the underlying service worker take effect
immediately // for both the current client and all other active clients.
workbox.clientsClaim();
Workbox still will generate precaches assets; however, we need to tell Workbox
explicitly where assets (manifestEntrys) should be concatenated in the source file.
We can configure this in two ways:
• By adding a different RegExp containing two capture groups.
The manifest array will be injected in between the capture groups.
For example: injectionPointRegexp: new RegExp('(const
myManifest =)(;)'),
default is: /(\.precacheAndRoute\()\s*\[\s*\]\s*(\))/
• Or, we can add a placeholder in the source Service Worker file by
using a precaching module that calls precacheAndRoute([]) by
passing an empty array.
/* PRE-CACHE STERATEGY */
// this is a placeholder. All assets that must be precached
will be injected here
// automatically
workbox.precaching.precacheAndRoute([]);
In Chapter 4, we defined assetGroups in ngsw-config.json. If you forgot, please
quickly review Chapter 4 where ngsw-config.json assetGroups was explained.
For prefetch installMode, I had a list of globs that can be written in the Workbox
config file, too.
globPatterns: [
'**/favicon.ico', '**/index.html', '**/*.css', '**/*.js'
],
CHAPTER 13 PWA WITHANGULAR ANDWORKBOX
www.EBooksWorld.ir
341
We have done precaching so far by instructing Workbox to add app-shell resources
to cache where it actually happens during the ‘install event’ in Service Worker. Now we
need to write our logic for a runtime cache with different cache strategies. The Workbox
routing module allows us to register routes by defining a regular expression that matches
a specific request and then assigns a cache strategy to it.
Before we continue, let me remind you that we had explored advanced cache
strategies in Chapter 4, and basically the Workbox strategy module provides them to you
effortlessly.
• Stale-While-Revalidate: workbox.strategies.staleWhileRevalidate()
• Cache First (Cache Falling Back to Network): workbox.strategies.
cacheFirst()
• Network First (Network Falling Back to Cache): workbox.
strategies.networkFirst()
• Network Only: workbox.strategies.networkOnly()
• Cache Only: workbox.strategies.cacheOnly()
All of these methods are configurable by passing an object argument containing the
following:
• cacheName: the name of the cache to use in the strategy.
• plugins: an array of plugins that will have their life-cycle methods
called when fetching and caching a request. We can use all
Workbox plugins such as expiration, cacheableResponse,
broadcastUpdate, and backgroundSync as well as a custom plugin
by passing in instances.
Let’s register two routes for caching images and Google fonts requested dynamically
in sw-source.js.
workbox.routing.registerRoute(
new RegExp('/(.*)assets(.*).(?:png|gif|jpg)/'),
// cacheFirst for images
workbox.strategies.cacheFirst({
cacheName: 'images-cache',
CHAPTER 13 PWA WITHANGULAR ANDWORKBOX
www.EBooksWorld.ir
342
plugins: [
// set cache expiration restrictions to use in the
strategy
new workbox.expiration.Plugin({
// only cache 50 requests
maxEntries: 50,
// only cache requests for 30 days
maxAgeSeconds: 30 * 24 * 60 * 60
})
]
})
);
// we need to handle Google fonts
workbox.routing.registerRoute(
new RegExp('https://fonts.(?:googleapis|gstatic).com/(.*)'),
// stale-while-revalidate for fonts
workbox.strategies.staleWhileRevalidate({
cacheName: 'google-apis-cache',
plugins: [
// set cache expiration restrictions to use in the
strategy
new workbox.expiration.Plugin({
// only cache 50 requests
maxEntries: 10,
// only cache requests for 10 days
maxAgeSeconds: 10 * 24 * 60 * 60
})
]
})
);
Having looked at ngsw-config from Chapter 4, in dataGroups, we defined
api- network- first and api-cache-first. Let’s register those routes with Workbox.
CHAPTER 13 PWA WITHANGULAR ANDWORKBOX
www.EBooksWorld.ir
343
// API with network-first strategy
workbox.routing.registerRoute(
new RegExp('https://firestore.googleapis.com/v1beta1/(.*)'),
workbox.strategies.networkFirst({
cacheName: 'api-network-first',
plugins: [
new workbox.expiration.Plugin({
maxEntries: 100
})
]
})
);
// API with cache-first strategy
workbox.routing.registerRoute(
new RegExp('https://icanhazdadjoke.com/(.*)'),
workbox.strategies.cacheFirst({
cacheName: 'api-cache-first',
plugins: [
new workbox.expiration.Plugin({
maxEntries: 20,
maxAgeSeconds: 15 * 60 * 60 // 15 min
})
]
})
);
A routing module allows us to add a whitelist or blacklist for a particular navigation
route. We will use the same Regex from the Angular manifest file.
// Register whitelist and black list
workbox.routing.registerNavigationRoute('/index.html', {
whitelist: [new RegExp('^\\/.*$')],
blacklist: [
new RegExp('/restricted/(.*)'),
new RegExp('^\\/(?:.+\\/)?[^/]*\\.[^/]*$'),
CHAPTER 13 PWA WITHANGULAR ANDWORKBOX
www.EBooksWorld.ir

344
new RegExp('^\\/(?:.+\\/)?[^/]*__[^/]*$'),
new RegExp('^\\/(?:.+\\/)?[^/]*__[^/]*\\/.*$')
]
});
Time to build the application. To simplify the build process, we will add two npm
scripts to packge.json and add injectManifest to the production build script.
"injectManifest": "workbox copyLibraries dist && workbox injectManifest",
"copyWorkboxModules": "workbox copyLibraries dist"
"build:prod:shell": "ng run lovely-offline:app-shell:production && npm run
injectManifest",
Let’s build and run the app. After the first visit, test the application in offline mode
(see Figure13-1).
Figure 13-1. Cache storage after writing our logic for Workbox
CHAPTER 13 PWA WITHANGULAR ANDWORKBOX
www.EBooksWorld.ir

345
Note Clone https://github.com/mhadaily/awesome-apress-pwa.git
and go to Chapter 12, 02-workbox-setup folder to find all sample codes. You can
build the application and test in your browser by running npm run prod.
Summary
In this chapter, we managed to set up an Angular project with Workbox and generate
our custom Service Worker where it caches app-shell resources and intercepts network
requests based on the pattern that we have defined, along with an appropriate strategy.
You may read this chapter while Workbox 4 is being released. There are a few
breaking changes in Workbox 4, and many of the techniques that have been revealed in
this chapter can be used for version 4, too, although there might be additional features.
In the next chapter, we will explore advanced features such as background sync,
which helps to retry failed requests due to no connectivity; push notifications for
engaging; update flow notifications that inform users to refresh an application in order to
receive the latest update; and offline analytics.
CHAPTER 13 PWA WITHANGULAR ANDWORKBOX
www.EBooksWorld.ir
347
© Majid Hajian 2019
M. Hajian, Progressive Web Apps with Angular, https://doi.org/10.1007/978-1-4842-4448-7_14
CHAPTER 14
Advanced Workbox
In the previous chapter, I taught you how to use Workbox in an Angular project whether
you have used Angular Service Worker and you want to replace it with Workbox, or you
simply want to start a new project from scratch.
In this chapter, I will show you how to implement Background sync, push
notification, offline analytics, and how to notify a user if there is a new update available.
Dealing withUpdates
When responding to a request with cached entries, while being fast, it comes with
a trade-off that uses my end up seeing stable data. Workbox provides broadcast
update module, which helps to notify Window clients in a standard way when there
is an available update for a cached responded. While Workbox, by default, compares
Conent- Length, ETag, and Last-Modified headers for detecting updates, we can still
define our custom headers to be checked.
We start implementing a channel for broadcasting a message if there will
be an update available for precached assets. In sw-source.js, we will add the
broadcastUpdate plugin to the precaching module in order to open a new channel to
receive an update notification message:
workbox.precaching.addPlugins([new
workbox.broadcastUpdate.Plugin('app-shell-update')]);
Or we can use this plugin along with staleWhileRevalidate caching strategy since
that strategy involves returning a cached response immediately, but also provides a
mechanism for updating the cache asynchronously. While the first argument of the
plugin is channel name, the second one is an object that provides options to the function.
www.EBooksWorld.ir
348
For instance, we can pass headersToCheck, which is an array to define all the custom
headers that must be checked for detecting changes and notifying throughout the
channel.
workbox.routing.registerRoute(
new RegExp('https://fonts.(?:googleapis|gstatic).com/(.*)'),
workbox.strategies.staleWhileRevalidate({
cacheName: 'google-apis-cache',
plugins: [
new workbox.expiration.Plugin({
maxEntries: 10,
maxAgeSeconds: 10 * 24 * 60 * 60 // 10 Days
})
// new workbox.broadcastUpdate.Plugin('apis-updates', {
// headersToCheck: ['X-Custom-Header']
// })
]
})
);
In the Angular app-component, we need to listen to the channels that we have
opened in Service Worker in order to receive the message and perform an action
accordingly. For instance, a snack bar that has update action button will be shown
when a message is received. Once clicked or tabbed on the “update me” action button,
we will force the window to be reloaded, which helps that a new update gets in place
automatically.
ngOnInit() {
this.joke$ = this.db.getRandomDadJoke();
this.checkForUpdates();
}
checkForUpdates() {
const updateChannel = new this.window.native.BroadcastChannel
('app- shell- update');
updateChannel.addEventListener('message', event => {
console.log(event);
Chapter 14 advanCed Workbox
www.EBooksWorld.ir
349
this.snackBar
.open('Newer version of the app is available', 'Update me!')
.onAction()
.subscribe(() => {
this.window.native.location.reload();
});
});
}
The window object may not be available everywhere that Angular is running such
as mobile or web workers; therefore, you notice that we are using WindowRef service
injected in app-component instead of getting a reference to window object directly to
change the concrete runtime instance of a given object based on the environment. It
may look overworked for this project, but let’s do it in the Angular way.
// app-component.ts
constructor(private window: WindowRef){}
And wrap window by creating WindowRefService as below:
// window.service.ts
function _window(): any {
// return the native window obj
return window;
}
@Injectable()
export class WindowRef {
get native(): any {
return _window();
}
}
It is good to mention that there is an alternative way to listen to an update
during the install event in Service Worker. The onupdatefound property of the
ServiceWorkerRegistration interface is an EventListener property called whenever an
event of type statechange is fired; it is fired any time the ServiceWorkerRegistration.
installing property acquires a new Service Worker.
Chapter 14 advanCed Workbox
www.EBooksWorld.ir

350
if ("serviceWorker" in navigator) {
// register service worker file
navigator.serviceWorker
.register("service-worker.js")
.then(reg => {
reg.onupdatefound = () => {
const installingWorker = reg.installing;
installingWorker.onstatechange = () => {
switch (installingWorker.state) {
case "installed":
if (navigator.serviceWorker.controller) {
// new update available
} else {
// no update available
}
break;
}
};
};
})
.catch(err => console.error("[SW ERROR]", err));
}
The code above is an example that we can listen to for purposes of an update.
Let’s build and run the application. To see the notification, first make sure you are
running the app in supported browsers such as Firefox, Chrome, and Opera on both
Android and Desktop.
1
When an update is available, snackBar will show a message with
an action button (Figure14-1).
1
As of writing this book, Broadcast Channel API is only supported in these browsers, but it may
change later. However, in Workbox 4, there will be a fallback to another method if this API is not
supported. At the moment, we are using Workbox 3.6.3.
Chapter 14 advanCed Workbox
www.EBooksWorld.ir

351
Background Sync
The BackgroundSync API is an ideal solution to those requests that fail due to no
connectivity or when server is down. When a Service Worker detects that a network
request has failed, it can register a sync event that gets delivered when the browser
thinks connectivity has returned. Thus, we can save the requests and when the sync
event happens, retry to send the requests. This is more effective than a traditional
strategy to resolve this issue because even if the user has left the application, we still can
deliver the requests to the server from Service Worker.
Workbox provides a background sync module that helps to intercept network
requests that fail and save it in IndexedDB to retry them when a sync event happens.
It also implements a fallback strategy for browsers that don't yet implement
BackgroundSync.
Figure 14-1. The “Update me” button will trigger reloading page
Chapter 14 advanCed Workbox
www.EBooksWorld.ir
352
The best candidate for implementing a background sync is the POST and DELETE
method in Note PWA. To demonstrate back-end APIs, we will create a simple express
app that provides POST and DELETE APIs:
const express = require('express');
const bodyParser = require('body-parser');
const axios = require('axios').default;
const app = express();
app.use(express.static(__dirname + '/dist'));
app.use(bodyParser.urlencoded({ extended: false }));
app.use(bodyParser.json());
app.post('/api/saveNote', async (req, res) => {
try {
const result = await axios.post('https://us-central1-awesome-apress-
pwa.cloudfunctions.net/saveNote', req.body);
return res.status(201).json(result.data);
} catch (error) {
return res.status(500).json({ success: false, error: { message:
'something went wrong with the endpoint' } });
}
});
app.delete(`/api/deleteNote/users/:user_id/notes/:note_id`, async (req,
res) => {
try {
const { user_id, note_id } = req.params;
const { authorization } = req.headers;
const result = await axios.delete(
`https://firestore.googleapis.com/v1beta1/projects/awesome-apress-
pwa/databases/(default)/documents/users/${user_id}/notes/${note_id}`,
{
headers: {
Authorization: authorization
}
}
);
Chapter 14 advanCed Workbox
www.EBooksWorld.ir
353
return res.json(result.data);
} catch (error) {
console.log(error);
return res.status(500).json({ success: false, error: { message:
'something went wrong with the endpoint' } });
}
});
// redirect all routes to index.html since we are running single page
application
app.get('*', (req, res) => {
res.sendfile('./dist/index.html');
});
app.listen(4200);
console.log('SEVER IS R'EADY -> PORT 4200');
You can run this server as simple as "node simple-express-server.js" in the
terminal. As you remember, DataService was in charge of making http requests;
therefore, we are going to slightly modify the two methods and endpoint in this service
to point them to new back-end APIs.
We will data SaveNote endpoint to be pointed to our back end.
protected readonly SAVE_NOTE_ENDPOINT = '/api/saveNote';
saveNoteFromCloudFunction(note: Note): Observable<{ success: boolean;
data: Note }> {
return this.http.post<{ success: boolean; data: Note }>(this.SAVE_NOTE_
ENDPOINT, {
user: this.auth.id,
data: {
...note,
created_at: this.timestamp,
updated_at: this.timestamp
}
});
}
Chapter 14 advanCed Workbox
www.EBooksWorld.ir
354
I will also define a new method for deleting a note pointing to my back-end API.
deleteNoteDirectly(id): Promise<any> {
return this.auth
.getToken()
.pipe(
switchMap(idToken => {
return this.http.delete(`/api/deleteNote/users/${this.auth.id}/
notes/${id}`, {
headers: {
Authorization: `Bearer ${idToken}`
}
});
})
)
.toPromise();
}
Finally, we will use these methods while saving and deleting a single note. Once you
cloned https://github.com/mhadaily/awesome-apress-pwa, go to Chapter 14, then
02-background-sync. You will find all the sample codes including all the new changes in
NoteModule, DataService and sw-source.js.
We will register two routes in order to intercept network requests that fail and use the
backgroundSync plugin to retry those requests.
workbox.routing.registerRoute(
new RegExp('/api/saveNote'),
workbox.strategies.networkOnly({
plugins: [
new workbox.backgroundSync.Plugin('firebaseSaveNoteQueue',
{
callbacks: {
queueDidReplay: StorableRequest => {
// Invoked after all requests in the queue have successfully replayed.
console.log('queueDidReplay', StorableRequest);
Chapter 14 advanCed Workbox
www.EBooksWorld.ir
355
// show notification
self.registration.showNotification('Background Sync
Successful', {
body: 'You notes has been saved in cloud! '});
},
requestWillEnqueue: StorableRequest => {
// Invoked immediately before the request is stored to IndexedDB.
// Use this callback to modify request data at store time.
console.log('requestWillEnqueue', StorableRequest);
},
requestWillReplay: StorableRequest => {
// Invoked immediately before the request is re-fetched.
// Use this callback to modify request data at fetch time.
console.log('requestWillEnqueue', StorableRequest);
}
},
maxRetentionTime: 60 * 24 * 7 // 7 days in minutes
})
]
}),
'POST'
);
Let’s break it down now that the argument has been passed into the
registerRoute() function:
1. First argument is regular expression to match network request,
which is /api/saveNote in this example.
2. Background sync has been added to plugins. e rst argument
is the queue name, and the second one is options, which is
optional. In the options, there are a few properties such as
maxRetentionTime that indicate how long this request should
be retried and callbacks where you have access to life-cycle
methods.
a. queueDidReplay: Invoked after all requests in the queue have
successfully replayed.
Chapter 14 advanCed Workbox
www.EBooksWorld.ir
356
b. requestWillEnqueue: Invoked immediately before the request is
stored to IndexedDB.
c. requestWillReplay: Invoked immediately before the request is
re-fetched.
3. Third argument is the HTTP methods.
We will register a new route for intercepting failed DeleteNote network requests.
workbox.routing.registerRoute(
new RegExp('/api/deleteNote/(.*)'),
workbox.strategies.networkOnly({
plugins: [
new workbox.backgroundSync.Plugin('firebaseDeleteNoteQueue', {
callbacks: {
queueDidReplay: _ => {
self.registration.showNotification('Background Sync
Successful', {
body: 'DELETE is done!'
});
}
},
maxRetentionTime: 24 * 60 // Retry for max of 24 Hours
})
]
}),
'DELETE'
);
Sadly, testing BackgroundSync is somewhat unintuitive and difficult for a number of
reasons. One of the best ways to test is by using the following steps:
1. Build and run application in production as Service Worker is
registered.
2. Turn o your computer’s network or turn o back-end server,
which is simple- express- server.js. Please note that you cannot
use oine in Chrome DevTools as it will only aect requests from
the page. Service Worker requests will continue to go through.
Chapter 14 advanCed Workbox
www.EBooksWorld.ir

357
3. Make network requests that should be queued with Workbox
Background Sync. For example, add a note or delete a note.
4. You can check the requests have been queued by looking in
Chrome DevTools > Application > IndexedDB > workbox-
background-sync > requests.
5. Now turn on your network or run the web server (node simple-
express-server.js).
6. Force an early sync event by going to Chrome DevTools >
Application > Service Workers, enter the tag name of workbox-
background-sync:<your queue name> for example workbox-
background-sync:firebaseSaveNoteQueue, where “ ” should be
the name of the queue you set and then clicking the ‘Sync’ button.
7. You should see network requests go through for the failed
requests, and the IndexedDB data should now be empty since the
requests have been successfully replayed (Figures14-2, 14-3, 14-4,
and 14-5).
Figure 14-2. Queue databse in indexedDB
Chapter 14 advanCed Workbox
www.EBooksWorld.ir

358
Figure 14-3. Successful notification when network requests succesfully synced
Figure 14-4. Simluate background sycn in Chrome dev tools
Chapter 14 advanCed Workbox
www.EBooksWorld.ir

359
If you check console when you are in localhost, you will be able to see logs, too.
You should see a notification when sync is done since we have used
showNotification() in queueDidReplay callback.
Push Notification
In Chapter 8, I explained the basics of a web push notification and taught you how to use
Angular Service Worker SwPush service. Since we have taken out this module, we will
first create a service called SwPushService that provides the same methods that Angular
provides and use it in our components.
@Injectable()
export class SwPushService {
constructor() {}
public async checkSW(): Promise<{ isEnabled: boolean; subscription: any
}> {
if (navigator.serviceWorker) {
const registration = await navigator.serviceWorker.getRegistration();
let subscription;
if ('PushManager' in window && registration) {
subscription = await registration.pushManager.getSubscription();
}
return { isEnabled: true, subscription };
} else {
return { isEnabled: false, subscription: null };
}
} else {
return { isEnabled: false, subscription: null };
}
Figure 14-5. Workbox logs in callback functions for background sync
Chapter 14 advanCed Workbox
www.EBooksWorld.ir
360
urlBase64ToUint8Array(base64String) {
const padding = '='.repeat((4 - (base64String.length % 4)) % 4);
const base64 = (base64String + padding).replace(/\-/g, '+').
replace(/_/g, '/');
const rawData = window.atob(base64);
const outputArray = new Uint8Array(rawData.length);
for (let i = 0; i < rawData.length; ++i) {
outputArray[i] = rawData.charCodeAt(i);
}
return outputArray;
}
async requestSubscription({ serverPublicKey }) {
const registration = await navigator.serviceWorker.getRegistration();
return registration.pushManager.subscribe({
userVisibleOnly: true,
applicationServerKey: this.urlBase64ToUint8Array(serverPublicKey)
});
}
async unsubscribe(): Promise<boolean> {
const registration = await navigator.serviceWorker.getRegistration();
const subscription = await registration.pushManager.getSubscription();
return subscription.unsubscribe();
}
}
Let’s break it down:
1. We need to first check if Service Worker is ready and PushManager
is available. We use this to ensure that the “subscribe” button in UI
is shown when the browser supports web push notification.
2. requestSubscription() method accepts serverPublicKey. We
use it when subscripting to pushManager. Server public key must
be converted to Uint8Array by calling urlBase64ToUint8Array().
3. Unsubscribe() to unsubscribe from push manager.
Chapter 14 advanCed Workbox
www.EBooksWorld.ir
361
Now we just replace this service with Angular Service Worker. Since we have
provided the same methods, we don’t need to change too many things, only run
checkSW() on component initialization.
constructor(
private auth: AuthService,
private swPush: SwPushService,
private snackBar: SnackBarService,
private router: Router,
private dataService: DataService
) {}
ngOnInit() {
this.checkSW();
}
async checkSW() {
const { isEnabled, subscription } = await this.swPush.checkSW();
this.isEnabled = isEnabled;
this.subscription$.next(subscription);
}
The rest of the header will be as same as what we have created in Chapter 8. Let’s
continue to add our push notification event in sw-source.js. As we discussed earlier in
this book, push event fires when a push notification is received. Thus, we need to listen
to this event in Service Worker.
self.onpush = event => {
const { notification } = event.data.json();
const promiseChain = self.registration.showNotification(notification.
title, notification);
event.waitUntil(promiseChain);
};
We also need to handle click event on notification actions. In Chapter 8, we
implemented a logic in Firebase function method that a notification will be sent while
saving a note is successful. The sent notification will have two custom actions: open and
cancel.
Chapter 14 advanCed Workbox
www.EBooksWorld.ir
362
// Custom notification actions
self.onnotificationclick = event => {
event.notification.close();
switch (event.action) {
case 'cancel': {
// do something if you want, e.g sending analytics to track these actions
break;
}
case 'open': {
// we can track these actions in Analytics
const URL = `${self.registration.scope}notes/${event.notification.
data.noteID}`;
event.waitUntil(clients.openWindow(URL));
break;
}
default: {
event.waitUntil(
clients
.matchAll({
includeUncontrolled: true,
type: 'window'
})
.then(clientList => {
clientList.forEach(client => {
if (client.url == '/' && 'focus' in client) {
return client.focus();
}
});
if (clients.openWindow) {
return clients.openWindow('/');
}
})
);
}
}
};
Chapter 14 advanCed Workbox
www.EBooksWorld.ir

363
// Closing notification action
self.onnotificationclose = event => {
console.log('Notification Close Event', event);
// do something if you want!
};
Once you build and run the application again, add a note. A notification will be sent
to the browser and shown to the user if you have a valid subscription (see Figure14-6).
Please note that you can clone https://github.com/mhadaily/awesome-apress- pwa,
and all the sample codes can be found in Chapter 14 ➤ 03-push-notification folder.
Figure 14-6. Web push notification after saving note in both mobile and desktop
Chapter 14 advanCed Workbox
www.EBooksWorld.ir
364
Offline Analytics
Offline analytics is a module that will use background sync to ensure that requests to
Google Analytics are made regardless of the current network condition; this is especially
useful while a user is offline.
Whether you use Google tracking tag directly in index.html or using a module such
as angulartics2, you should set a custom dimension to determine when the app was
offline or when it was online. Let’s add the script in index.html.
<script>
/*
(function(i, s, o, g, r, a, m) { i['GoogleAnalyticsObject'] = r;
(i[r] = i[r] || function() { (i[r].q = i[r].q || []).
push(arguments);}),
(i[r].l = 1 * new Date()); (a = s.createElement(o)), (m =
s.getElementsByTagName(o)[0]);
a.async = 1; a.src = g; m.parentNode.insertBefore(a, m);
})(window, document, 'script', 'https://www.google-analytics.com/
analytics.js', 'ga');
ga('create', 'UA-XXXXX-Y', 'auto');
// Set default value of custom dimension 1 to 'online'
ga('set', 'networkstatus', 'online');
ga('send', 'pageview');
*/
</script>
Enabling offline analytics can be as simple as in sw-source.js:
workbox.googleAnalytics.initialize({
parameterOverrides: {
networkstatus: 'offline'
}
});
On googleAnalytics initialization, we will pass in parameterOverrides that we
define to overwrite the dimension that we have defined already to determine the
tracking has received when the app was offline.
Chapter 14 advanCed Workbox
www.EBooksWorld.ir
365
Summary
In this chapter, advanced topics have been implemented in both Angular and Service
Worker with Workbox. We walked through how to send a message to a window client in
order to inform the client that there is an update in the cache. Background sync helped
us to retry sending a failed request to the server once the connection or endpoint
is back online. Engaging is one of the main characteristics of the PWA that we have
achieved by implementing push notifications. Finally, Workbox Google Analytics
module provides a mechanism that we can track our application while it is being used
offline. With that said, let’s move on to the next chapter and see what the next steps for
building PWA will be.
Chapter 14 advanCed Workbox
www.EBooksWorld.ir
367
© Majid Hajian 2019
M. Hajian, Progressive Web Apps with Angular, https://doi.org/10.1007/978-1-4842-4448-7_15
CHAPTER 15
Next Steps
Congratulations! You have completed Angular PWA education, which enables you to
build a Progressive Web App with Angular and have a good understanding of how PWA
works. But, wait! This is just the beginning! From now on, you have to keep learning
and trying to do things better and better. You don’t have to stop at this point but should
continue your path, which you have come with me until this point in the book. There
are a lot more things to learn. Some of the concepts that we have explored together in
this book were just the surface for an ocean of knowledge and information. You should
continue diving deeper and deeper.
As a developer, we all know that what we write today might be obsolete in the next
five years. You have probably also noticed that I mentioned a few times in different
chapters that many of these APIs are still evolving and changing over time, which means
we need to embrace these changes and keep ourselves updated.
In this chapter, I will write a few pages about learning resources, case studies, and
PWA examples in the real world as well as introducing a few new technologies and tools
that you should keep an eye on.
Learning Resources
There are tons of articles, videos, tutorials, blogs, and podcast about PWA. In the list
below, I introduce you to a few resources that you can help you learn more about PWA
and Angular and dive deeper if you want:
1. https://developers.google.com/web/progressive-web-apps/
I believe you have seen this website before. Google Developer has
a dedicated section for PWA under Web. Just check it out!
www.EBooksWorld.ir
368
2. https://web.dev
In Chrome Dev Summit 2018, Googlers announced a new website
dedicated to web and, in particular, PWA. is website not only
helps you to learn more but also provides tools to measure and
audit your web application.
3. https://serviceworke.rs
is website is powered by Mozilla and provides a collection of
working, practical examples of using Service Worker in modern
websites.
4. https://blog.angular.io/
Ensure you are getting the latest update from the Angular blog.
Also, it’s good have an eye on Angular documents, especially the
PWA guide.
5. https://developer.mozilla.org/en-US/docs/Web/Apps/
Progressive
Mozilla MDN website is familiar to all developers. Keep your eye
on PWA sections.
Case Studies
In my opinion, it’s always great to read about other developers’ and teams’ experiences
and follow their journey. I always find many tips and tricks that help sometimes to avoid
bugs and errors, or many times speed up my development process. I will write no case
studies here, but I will encourage you to read up from the following resources:
1. https://developers.google.com/web/showcase/2018/nikkei
Nikkei achieves a new level of quality and performance with their
multipage PWA.
2. https://developers.google.com/web/showcase/2018/asda-
george
George.com enhances the mobile customer experience with a
new PWA.
Chapter 15 Next StepS
www.EBooksWorld.ir
369
3. https://developers.google.com/web/showcase/2017/eleme
Ele.me improves performance load times with a multipage PWA.
4. https://developers.google.com/web/showcase/2017/
bookmyshow
BookMyShow’s new PWA drives an 80 percent increase in
conversions.
5. https://developers.google.com/web/showcase/2016/
aliexpress
AliExpress increases the conversion rate for new users by 104
percent with a new PWA.
You can find a lot more on the Google website if you just simply search PWA case
studies or check out www.pwastats.com to see more use cases in the context of business
advantages.
Example Applications
If you are interested to see who is using PWA in production now, you can find a list of
PWA websites on this website: https://outweb.io/ or https://pwa.rocks/.
I encourage you to check out Hacker news as PWAs: https://hnpwa.com/
website where you will find a lot of different implementations of PWAs with different
technologies and tools. It’s a good resource to learn and study more, especially about
techniques that are being used to boost initial load and application performance.
Tools andTechnologies
Although throughout this book I have mentioned a lot of tools and technologies and
reviewed them, there are still tools and technologies that I’d like to write a few lines
about here.
Chapter 15 Next StepS
www.EBooksWorld.ir
370
1. Desktop Progressive Web App
As we already talked about, one of the main advantages of PWA
is that we create only for browsers and we can ship it to dierent
platforms. Mobile users are the most important target for our
Angular PWA; that’s why we have focused on mobile renement
and mentioned that many times. However, we don’t have to forget
that our desktop users will benet from our optimization, too.
In fact, Desktop PWAs are supported on many platforms already
such as Chrome 67+ on Chrome OS, Linux, Windows, and Mac.
Even better, we are able to submit our PWA app to the Microsoft
Store; and once published, our customers can install to Windows
10 as an app. at’s huge. Imagine your PWA will be discovered by
millions of active Windows users.
So, when you build your PWA with Angular, you should think of
a wide variety of customers from mobile to desktop. I think we
may see Google Play or Apple Store! Also we might be able to
submit our PWA to their store in the future– who knows! Just even
thinking of that makes me so excited.
In order to learn more about the Windows store and PWA, follow
this link: https://developer.microsoft.com/en-us/windows/pwa.
Also, Google has a dedicated page regarding this topic, which
is accessible here: https://developers.google.com/web/
progressive-web-apps/desktop.
2. Trusted Web Activities
Trusted Web Activities are a new way to integrate your web-app
content such as your PWA with your Android app using a protocol
based on Custom Tabs. Read more about it on https://developers.
google.com/web/updates/2019/02/using-twa.
3. Web Share APIs
is is one of my favorite API that I hope will see better support
soon, especially on iOS.is method provides a simple high-level
JavaScript API that invokes the native sharing capabilities of the
host platform. e API is Promised-based and has only a single
Chapter 15 Next StepS
www.EBooksWorld.ir
371
method. It accepts conguration objects that at least need to have
text or url properties.
Here is an example:
// a method which gets invoke by user mouse click or tab (touch)
async openShare(){
if (navigator.share) {
try {
const result = await navigator.share({
title: 'Apress NG-PWANote',
text: 'Check out Apress Angular PWA Note!',
url: 'https://awesome-apress-pwa.firebaseapp.com',
})
console.log('Successful share')
} catch(error) {
console.log('Error sharing', error)
}
}
}
Chrome for Android supports this API. ere is no more support
as of writing this book, but I hope that by the time you read this
book, this API is supported widely across dierent platforms and
browsers.
4. Oine Webpack Plugin
You may, for some reasons, use webpack or are using webpack
for your Angular application. If so, there is plugin in the webpack
ecosystem that brings oine capabilities.
Find it here https://github.com/NekR/offline-plugin
5. www.pwabuilder.com
is website is founded by Microsoft and helps you to take data
from your website and use that to generate a cross-platform PWA.
If you like automation and have no conguration for your website,
you may nd this website useful!
Chapter 15 Next StepS
www.EBooksWorld.ir
372
6. www.webhint.io
Another great website from Microsoft developers.
Webhint is a linting tool that will help you with your site's
accessibility, speed, security, and more by checking your code for
best practices and common errors. Use the online scanner or the
CLI to start checking your site for errors.
7. Background Fetch
is is a web standard API that handles large uploads/downloads
in the background with user visibility. e problem is when you
fetch something, Service Worker must be alive and the process
should be short; otherwise, the browser will kill Service Worker
due to a risk for a user’s privacy and battery.
is is extremely useful for tasks that may take a long time to be
nished, like downloading a movie or podcasts. At the time of
writing this chapter, this API was introduced as an experimental
web platform feature ag to Chrome 71.
Keep your eye on this API and nd more information on it here:
https://developers.google.com/web/updates/2018/12/
background-fetch
8. Web Performance
We build PWA because we want users to have native-like
experiences that are fast, reliable, and engaging. us, web
performance is always a topic that we never have to stop learning
about it. e more you learn, the faster the app you build. A lot of
resources, including those that I have mentioned earlier in this
chapter, provide performance-related topics, too; however, in
addition, you can nd the following link helpful:
https://developers.google.com/web/fundamentals/
performance/why-performance-matters/
Chapter 15 Next StepS
www.EBooksWorld.ir

373
9. Web Components
Web Components is a suite of dierent technologies allowing you
to create reusable custom elements while their functionality is
encapsulated away from the rest of your code and lets you utilize
them in your web apps.
is is a great technology that Angular supports by Angular
Element. You can nd more about it here: https://angular.
io/guide/elements. After Angular Ivy
1
(pretty soon), Angular
Element will be even better. Don’t forget to keep your eye on it.
10. Web Assembly
Web assembly (abbreviated WASM) is designed to help with the
compilation of high-level languages like C/C++/ Rust along with
JavaScript, which means with Web Assembly JavaScript APIs,
you can load WASM modules into a JavaScript app and share the
functionality between the two. is is amazing technology that
has, of now, been shipped to all major browsers.
e developer documentation is available here o nth Mozilla
MDN web docs website:
https://developer.mozilla.org/en-US/docs/WebAssembly
Last Words
Web is evolving rapidly. PWA, in particular, is growing quickly. We hear about new
technologies literally every day. Even during the time that I was writing this book, there
was a lot of new news regarding PWA and Angular, and I probably should have revised
what I have written. I personally love it. I love to see new APIs that make me excited and
thrilled as a web developer. What I want to point out is that, even though the it takes
great speed to catch up sometimes, the concepts and principles of Progressive Web Apps
with or without Angular that have been taught to you throughout the book will remain
the same. An Angular PWA must be fast to load, reliable to work with, and engaging as
1
https://github.com/angular/angular/blob/master/packages/core/src/render3/STATUS.md
Chapter 15 Next StepS
www.EBooksWorld.ir
374
native apps were in the past and now. It must run on all browsers and platforms and
must be developed and deployed progressively.
Thank you for reading! We had a long journey together. I hope you enjoy building
amazing Progressive Web Apps with Angular (or maybe without!) as much as I enjoyed
writing this book.
All the best.
Chapter 15 Next StepS
www.EBooksWorld.ir
375
© Majid Hajian 2019
M. Hajian, Progressive Web Apps with Angular, https://doi.org/10.1007/978-1-4842-4448-7
Index
A
addPushSUbscription() method, 209
AddToHomeScreenService, 154
Android and Chrome, 161–164
Android Studio, 8
Angular App Shell
Angular Universal, 174
bootstrapped, 171
built-in functionality, 172
JS and CSS les, 172
performance
audit tab, Chrome
DevTools, 184–187
bundle sizes analyze, 187–189
optimizations, 187
webpagetest.org, 182–184
in production, 179–182
project repository, 173–174
Angular CLI, 143, 169
app generation, 4
installation, 4
material design, 5–7
AngularFire, 22–27
Angular rebase, 248–250
Angular Router module, 197
Angular schematics
@angular/cli, 90
@angular/pwa schematic, 97
app structure, 90
modications, 90–95
Angular service worker, 285–288
appData conguration, 134
build project, 101–104
chrome DevTools, 258–259
clear storage, 89
data groups, 122
external resources, 116–120
rebase URL, 88
refox DevTools, 259–260
forward cache/CDN edge, 88
Network-First strategy, 125–129
network request, 131
resource revalidation, no hash, 121–122
runtime cache, 116, 130
SwUpdate class, 134–137
Web App Manifest, 89–90
Angular universal
angular CLI, 175
angular.json le conguration, 178–179
app-server-module, 176
CLI conguration le, 175
route shell, 176
server-side application, 177
SSR, 174
app-server-module, 176
app-shell.component, 177
App Shell model, 169–171
Audit panel
lighthouse, Chrome launcher, 275–276
lighthouse, Puppeteer, 277
www.EBooksWorld.ir
376
B
Background fetch, 372
BackgroundSync API
backgroundSync plugin, 354–355
callback functions, 359
Chrome dev tools, 358
DataService, 353
DeleteNote network, 356
indexedDB, 357
network request, 358
POST and DELETE method, 352
registerRoute() function, 355–356
showNotication(), 359
testing, 356–357
beforeinstsallprompt event, 151
Bluetooth low energy (BLE), 320, 324
Broadcast update module, 347, 350
BrowserAnimationsModule, 5
Browser resource hinting, 195–197
BrowserStack, 273
Bulk transfers, 329
C
Cache and network strategy, 112–114
Cache API, 83–85
Cache falling back to network/
cache-rst, 109–110
Cache only strategy, 107–108
changes() method, 238
Chrome DevTools, 257–259
application panel, 78
cache storage, 78
progressive web app, 76
service workers, debug, 76
Web App Manifest, 77
Chrome installation, 4
Cloud Firestore security rules, 51
Command-Line Interface (CLI), 12
Components-based approach, 33
Control transfers, 329
Core/shared module, 33–34
email/password authentication, 43–45
Firestore setup, 51–54
footer and header components, 36–40
login/prole page, 41–42
note view
authentication guard, 61–62
authentication service, 56–58
data service, 59–61
Notes-add, 64–65
Notes-card, 64
Notes-details, 67–70
Notes-form, 66–67
Notes-list, 63
paths, 54–55
sketch, 35, 40–41
user-container.component, 46–49
Credential management
account chooser, 298
autocomplete attribute, 296–297
CredentialManagementService, 290–292
dened, 290
methods, 293–294
preventSilentAccess(), 294, 296
prompt message, 297
snackbar message, 298
CSS blocking, render, 190–192
D
Database schema, 52
DataGroup Typescript interface, 122
Debugging tools
cache storage, 267–269
NGSW debug, 255–256
INDEX
www.EBooksWorld.ir
377
oine behavior, 269–271
service workers, 258
Web App Manifest, 256
web storage, 264
Deploy to Firebase, 138–139
Desktop Progressive Web App
(Desktop PWAs), 370
Dynamic content, 171
E
Emulators, 273
EventListener property, 349
F
Fail-safe, 283–285
Feature detection, 293
File system API, 230
Firebase Cloud
Function, 216–220
Firebase CRUD
authentication guard, 62
authentication service, 56–58
database schema, 52
data service, 59–61
Firestore database, 51–54
notes view, 54–55
Notes-add, 64–65
Notes-card, 64
Notes-details, 67–70
Notes-form, 66–67
Notes-list, 63
Firebase function
account access, 15
Angular app generation, 12–14
app deploy, 21
app initialization
Angular project adjustment, 20
database setup, 17–18
feature selection, 16–17
nal setup, 18–20
functions setup, 18
project selection, 17
dashboard, 12
project, 10–11
success message, 16
Functionality into angular app, 154–157
G
Generic attribute prole (GATT), 320
Generic fallback, 114–115
Geolocation API
coordination data, 319
GeolocationService, 316–317
location permission, 319
NotesAddComponent, 318
getCurrentPosition(), 318
getDevices method, 326
get method, 293–294
getNote() method, 250
getUserMedia() method, 308
Glob pattern, 117
H
Home screen
on desktop, 157–158
on mobile, 157–158
PWA, 164–165
HTTP/2 server push, 198–199
I
IndexedDB, 231
Installation event, 152–153
Index
www.EBooksWorld.ir
378
Interrupt transfers, 329
Isochronous transfers, 329
J, K
Jest framework, 263
L
Lazy loaded modules, 197–198
localStorage, 230
M
Measurement
analytics
home screen prompts, 279–280
tracking sessions, 280–282
track oine pageviews, 282
audit panel, 273
online tools, 282
real-device testing, 282
MediaRecorder constructor, 313
Media streams, API, 308
getUserMedia(), 313
live stream and recorded playback, 315
Microsoft Windows, 159–161
Mini-info bar, 153–154
Mobile devices, 272–273
set up, 8
Mobile Emulator, 8
Mobile regular 3G network, 183, 184
N
navigatem method, 287
Navigation cache, 131–133
Network connections, 271–272
Network falling back to cache, 110–111
Network rst strategy, 229
Network information, 251–252
Network only, cache strategy, 108–109
Network panel, 269
ng add command, 30
NGSW debug, 255–256
NoCacheRouteComponent, 133
Node and NPM, 3
NoteDetailsComponent, 242
NotesListComponent, 241
Notication.requestPermission()
method, 202
O
Oine analytics, 364
Oine rst approach
data manipulation, 233
sync server implementation (see Sync
server implementation)
user’s devices from/to sync server, 234
4-way data binding, 232–233
web applications, 232
Oine mode Firefox, 270–271
Oine storage, 230–232
Online validators, 258
Optimize fonts
CDN, 193–195
self-hosting, 192–193
P, Q
Page-rendering, 194–195
Payment request
arguments, 303
data property, 303
feature detection, 302
INDEX
www.EBooksWorld.ir
379
paymentDetails, 304
payment native UI, 307–308
show() method, 305
W3C, 299
WebPaymentService, 299, 306
Persistent notications, 203
preventSilentAccess method, 294
Progressive Web Apps (PWAs), 141, 289,
367–369
Angular service worker module, 2
characteristics of, 1–2
Push notications, 203–206
addNote() method, 216
allow/block popup, 214–215
browsers, 206
checkSW() method, 361
click event, 361–362
deploy to Firebase, 227
enable alerts buttons, 210–211
Firebase cloud function, 216–221
HeaderComponent class, 207–208
IPush message body, 221–224
listen to message, 225
note, 363
noticationClicks, 225–227
object properties, 214
request popup, 211–212
requestSubscription() method, 360
subscription, 212–213
SwPush service, 206, 359–360
toJSON() function, 209–210
unsubscribe() method, 210
PWACompat library, 167–168
R
Real-device testing, 282
register() function, 73
requestDevice method, 322, 326
requestPaymentOptions, 304
Router-outlet, 176
S
Server-side rendering (SSR), 174
Server workers
behavior, 72
callback function, 80
Chrome DevTools, SkipWaiting, 83
functional events, 76
install/activate events, 81
life cycle, 73–76
network request, 72
perfect progressive enhancement, 72
PWA, 72
registration object, 82
thread and intercepts request, 73
Service worker mock library, 261–264
sessionStorage, 230
showNotication() method, 203, 222
Static assets
caches methods, 86
cache storage, 85
outdated caches, 86–88
waitUntil() method, 87
stop() method, 314
store method, 293
supportedPaymentMethods, 303
SwUpdate class, 134
Sync server implementation
CRUD operations, 236–237
data manipulation, 244–245
error event, 238
IndexedDB, 234
OineDBServer, 239–241
onDBChange method, 238
Index
www.EBooksWorld.ir
380
PouchDB, 235–236
reliable data, 248
remote database, 246–247
zero latency, 245
T
Trusted web activities, 370
U
User interface (UI), 251–252
implementation, 30–33
V
Voluntary application server identication
(VAPID) keys, 204
W, X
watchPosition() method, 318
Waterfall view, 189–190
Web app install banner, 150–151
Web App Manifest, 141, 165–167
chrome DevTools, 257
debug, 148–150
online generators, 258
online validators, 258
Web assembly (WASM), 373
Web components, 373
Web Font Loader, 193
Webhint, 372
Web notications, 202–203
Webpack, 371
Web performance, 372
Web-push, 205
Web Share APIs, 370–371
Web storage
Chrome DevTools, 264–266
Firefox DevTools, 266
Web USB
device, communication, 328
endpoint types, 329
navigator.usb.requestDevice(), 326
user gesture, 324
WebUSBService, 325–326
WindowRef service, 349
Workbox
CLI installation, 332
injectManifest
conguration, 340
object argument, 341
oine mode, 344
routing module, 341–343
source Service Worker, 339
strategy module, 341
swSrc property, 338
SW update, 339
modes, 332
modules, 332–333
wizard mode, 334–338
Y, Z
YARN, 4
Sync server implementation (cont.)
INDEX
www.EBooksWorld.ir
