
December 15, 2020
V
V
o
o
r
r
e
e
x
x
™
™
User Guide
Version 4.0.39

Copyright Agreement
The purchase and use of all Software and Services is subject to the Agreement as defined in Kaseya’s
“Click-Accept” EULATOS as updated from time to time by Kaseya at
http://www.kaseya.com/legal.aspx. If Customer does not agree with the Agreement, please do not
install, use or purchase any Software and Services from Kaseya as continued use of the Software or
Services indicates Customer’s acceptance of the Agreement.”
©2019 Kaseya. All rights reserved. | www.kaseya.com
i
Contents
Getting Started ............................................................................................................................................. 9
Admin .......................................................................................................................................................... 15
Human Resources ..................................................................................................................................... 93
Finance ..................................................................................................................................................... 107
CRM Module ............................................................................................................................................. 143
Service Desk ............................................................................................................................................ 173
Projects..................................................................................................................................................... 193
Inventory................................................................................................................................................... 213
Home ......................................................................................................................................................... 223
Client Portal ............................................................................................................................................. 237
Vorex SOAP API ...................................................................................................................................... 243
Vorex REST API ....................................................................................................................................... 275
Reports ..................................................................................................................................................... 275
Index ......................................................................................................................................................... 277
Getting Started
1
C h a p t e r 1
Getting Started
i
Contents
Getting Started ............................................................................................................................................. 9
About the Guide ................................................................................................................................... 9
System Requirements ....................................................................................................................... 10
How to Login ...................................................................................................................................... 11
How to Navigate the Software .......................................................................................................... 12
My Profile ............................................................................................................................................ 13
Edit Access by URL ........................................................................................................................... 14
Caveats ............................................................................................................................................... 14
Admin .......................................................................................................................................................... 15
Dashboard (Home) ............................................................................................................................. 15
My Company ...................................................................................................................................... 17
Locations .................................................................................................................................... 17
Moving Users ...................................................................................................................... 18
Location Hours ................................................................................................................... 19
Company Settings ..................................................................................................................... 19
General ................................................................................................................................ 20
Time Sheet .......................................................................................................................... 20
Project ................................................................................................................................. 21
Service Desk ....................................................................................................................... 22
Invoice ................................................................................................................................. 23
Contract .............................................................................................................................. 24
CRM ..................................................................................................................................... 24
Inventory ............................................................................................................................. 25
User Account ...................................................................................................................... 25
Outbound Email ......................................................................................................................... 25
Custom Fields ............................................................................................................................ 25
Lists ............................................................................................................................................. 26
Company News .......................................................................................................................... 27
Holidays ...................................................................................................................................... 28
Administrative Work .................................................................................................................. 29
Single Sign On ........................................................................................................................... 30
Business Process .............................................................................................................................. 30
Email Templates ......................................................................................................................... 30
Approval Routes ........................................................................................................................ 31
Workflow ..................................................................................................................................... 33
HR (in Admin) ..................................................................................................................................... 38
CRM (in Admin) .................................................................................................................................. 38
Accounts ..................................................................................................................................... 38
Opportunity Statuses ................................................................................................................ 38
Getting Started
ii
CRM Account Types .................................................................................................................. 39
Service Types ............................................................................................................................. 39
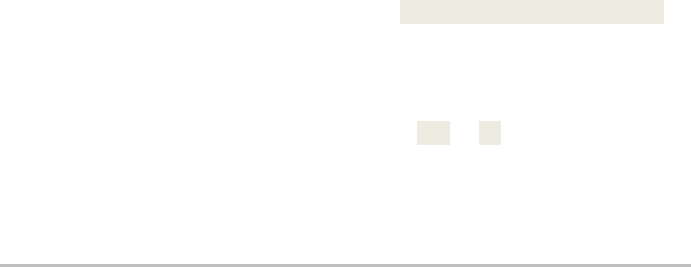
Security ............................................................................................................................................... 39
Roles ........................................................................................................................................... 39
Scopes ........................................................................................................................................ 42
Finance (in Admin) ............................................................................................................................ 42
Roles ........................................................................................................................................... 43
Work Type ................................................................................................................................... 44
Services ...................................................................................................................................... 45
Expense Type ............................................................................................................................. 46
Milestone Type ........................................................................................................................... 47
Account Type ............................................................................................................................. 48
Account Code ............................................................................................................................. 48
Discount Type ............................................................................................................................ 49
Charge Type ............................................................................................................................... 49
Billing Configuration ................................................................................................................. 50
Sales Tax Items .......................................................................................................................... 50
Exchange Rates ......................................................................................................................... 51
Class List .................................................................................................................................... 52
Service Desk (in Admin).................................................................................................................... 52
Issue Types ................................................................................................................................ 52
Ticket Types ............................................................................................................................... 53
Queues ........................................................................................................................................ 54
Priorities ..................................................................................................................................... 54
SLAs ............................................................................................................................................ 55
Ticket Statuses ........................................................................................................................... 57
Email Parser ............................................................................................................................... 58
Survey Integration Settings ...................................................................................................... 59
Internal Survey Scores .............................................................................................................. 60
RMM Integration Settings - Kaseya v1 ..................................................................................... 63
Integrating Servers ............................................................................................................ 63
Integrating Ticket Settings ................................................................................................ 64
Integrating Customer Accounts and Locations .............................................................. 65
Assets Synchronization .................................................................................................... 66
Testing Ticket Integration ................................................................................................. 69
RMM Integration Settings - Kaseya v2 - New .......................................................................... 72
Integrating Servers v2 ....................................................................................................... 72
Synchronizing Accounts v2 .............................................................................................. 74
Assets Synchronization v2 ............................................................................................... 75
Integrating Live Connect v2 .............................................................................................. 76
Activating VSA Integration v2 ........................................................................................... 77
Review Ticket Integration v2 ............................................................................................. 78
RMM Integration Settings - Kaseya v2 - Upgrade ................................................................... 80
RMM Integration Settings - Continuum ................................................................................... 85
Step 1 - Recommended Settings ...................................................................................... 85
Getting Started
iii
Step 2 - RMM Integration Settings .................................................................................... 85
Step 3 - Ticket Status Mapping ......................................................................................... 87
Step 4 - Account Mapping ................................................................................................. 87
Step 5 - PSA Integration and Activation .......................................................................... 88
Inventory (in Admin) .......................................................................................................................... 89
Warehouses ................................................................................................................................ 89
Product Categories .................................................................................................................... 90
Email Logs .......................................................................................................................................... 90
Import Data ......................................................................................................................................... 91
Human Resources ..................................................................................................................................... 93
Dashboard .......................................................................................................................................... 93
Departments ....................................................................................................................................... 93
Job Titles ............................................................................................................................................ 94
Skill Categories .................................................................................................................................. 94
Employees .......................................................................................................................................... 95
Contact Information ................................................................................................................... 97
Wages ......................................................................................................................................... 98
Shifts ........................................................................................................................................... 99
Associated Clients ..................................................................................................................... 99
Associated Queues .................................................................................................................. 100
Custom Fields (for Employees) .............................................................................................. 101
Employee Roles ....................................................................................................................... 101
Security Roles .......................................................................................................................... 102
Attachments (for Employees) ................................................................................................. 102
Education .................................................................................................................................. 103
Skills .......................................................................................................................................... 103
Organizational Chart ....................................................................................................................... 104
Finance ..................................................................................................................................................... 107
Dashboard (Finance) ....................................................................................................................... 107
Contracts .......................................................................................................................................... 108
Time and Materials ................................................................................................................... 109
Recurring Services .................................................................................................................. 110
Fixed Price ................................................................................................................................ 113
Retainer By Amount ................................................................................................................ 115
Retainer By Hours .................................................................................................................... 117
Billing Automation ........................................................................................................................... 118
Billing Review .................................................................................................................................. 122
Labor Hours .............................................................................................................................. 123
Expenses .................................................................................................................................. 124
Recurring Services .................................................................................................................. 125
Fixed Price Milestone .............................................................................................................. 126
Retainer Amount ...................................................................................................................... 127
Retainer Hours ......................................................................................................................... 128
Billing ................................................................................................................................................ 129
Invoices ............................................................................................................................................ 130
Getting Started
iv
Invoice Details .......................................................................................................................... 132
Invoice Discounts .................................................................................................................... 133
Invoice Receipts ....................................................................................................................... 134
Invoice Attachments ................................................................................................................ 134
Generate and Preview ............................................................................................................. 134
Resetting a Posted Invoice ..................................................................................................... 136
Sending an Invoice .................................................................................................................. 136
Voiding an Invoice ................................................................................................................... 137
Payments .......................................................................................................................................... 137
Vendor Bills ...................................................................................................................................... 138
Reimbursements .............................................................................................................................. 139
QuickBooks Integration .................................................................................................................. 141
CRM Module ............................................................................................................................................. 143
Dashboard ........................................................................................................................................ 143
Accounts .......................................................................................................................................... 144
Locations .................................................................................................................................. 147
Contacts .................................................................................................................................... 148
Assigned Resources ............................................................................................................... 150
Email Domains ......................................................................................................................... 151
Tax Settings .............................................................................................................................. 151
Opportunities ........................................................................................................................... 151
Activities ................................................................................................................................... 152
Linked Accounts ...................................................................................................................... 153
Notes ......................................................................................................................................... 154
Custom Fields (for Accounts) ................................................................................................ 155
Attachments (for Accounts) ................................................................................................... 155
RMM Integration ....................................................................................................................... 155
Contacts ........................................................................................................................................... 155
Activities ........................................................................................................................................... 158
Opportunities ................................................................................................................................... 159
Quotations ........................................................................................................................................ 161
Service Quotations .................................................................................................................. 162
Product Quotations ................................................................................................................. 164
Processing Service Quotations .............................................................................................. 165
Processing Product Quotations ............................................................................................. 167
Sales Orders ..................................................................................................................................... 168
Processing Sales Orders ........................................................................................................ 170
Sites .................................................................................................................................................. 171
Service Desk ............................................................................................................................................ 173
Service Desk Dashboard................................................................................................................. 173
My Tickets ........................................................................................................................................ 174
Tickets............................................................................................................................................... 174
Creating/Editing Tickets .......................................................................................................... 175
Processing Tickets .................................................................................................................. 177
Adding Notes to Tickets .......................................................................................................... 178
Getting Started
v
Adding Time to Tickets ........................................................................................................... 179
Adding Expenses to Tickets ................................................................................................... 181
Adding Charges to Tickets ..................................................................................................... 182
Adding Service Calls to Tickets ............................................................................................. 183
Adding To-Dos to Tickets ....................................................................................................... 183
Adding Related Tickets ........................................................................................................... 184
Custom Fields, Attachments for Tickets ............................................................................... 184
Batch Actions for Tickets ....................................................................................................... 184
Unknown Tickets ..................................................................................................................... 185
Hardware Assets .............................................................................................................................. 186
Software Assets ............................................................................................................................... 187
Knowledgebase ............................................................................................................................... 188
Recurring Master Tickets ................................................................................................................ 189
Service Calls .................................................................................................................................... 191
Projects..................................................................................................................................................... 193
Projects Dashboard ......................................................................................................................... 193
Projects ............................................................................................................................................. 194
Creating a New Project ............................................................................................................ 195
Adding/Viewing Project Financials ........................................................................................ 196
Adding Related Opportunities to Projects ............................................................................ 197
Adding Expenses to Projects ................................................................................................. 197
Adding Charges to Projects ................................................................................................... 199
Receipts, Custom Fields, Attachments for Projects ............................................................ 200
Copy Projects ........................................................................................................................... 200
Tasks ................................................................................................................................................. 201
Using the Tasks Tab ................................................................................................................ 201
Adding Task Basics ................................................................................................................. 202
Scheduling Projects and Tasks .............................................................................................. 203
Adding Members to Tasks ...................................................................................................... 203
Adding Time to Tasks .............................................................................................................. 204
Adding Service Calls to Tasks ............................................................................................... 206
Adding Notes to Tasks ............................................................................................................ 207
Custom Fields, Attachments for Projects ............................................................................. 207
Adding Task Dependencies .................................................................................................... 207
Updating Tasks by Batch ........................................................................................................ 208
All Tasks ................................................................................................................................... 209
Resource Utilization ........................................................................................................................ 209
Multiple Projects Gantt .................................................................................................................... 210
Archived Projects ............................................................................................................................ 210
Template Projects ............................................................................................................................ 210
Inventory................................................................................................................................................... 213
Inventory Dashboard ....................................................................................................................... 213
Manage Products ............................................................................................................................. 214
Product Availability ......................................................................................................................... 216
Purchase Orders .............................................................................................................................. 217
Getting Started
vi
Processing Purchase Orders ......................................................................................................... 218
Receiving Purchase Orders ............................................................................................................ 219
Deliver Product Charges ................................................................................................................. 220
Stock Adjustments .......................................................................................................................... 221
Home ......................................................................................................................................................... 223
Dashboard (Home) ........................................................................................................................... 223
Views ................................................................................................................................................. 224
My Queues ........................................................................................................................................ 225
My Tickets ........................................................................................................................................ 225
My Tasks ........................................................................................................................................... 225
My Grouped Tasks ........................................................................................................................... 226
My Service Calls .............................................................................................................................. 226
My Calendar ..................................................................................................................................... 227
Outlook Extension ................................................................................................................... 227
My Projects ....................................................................................................................................... 229
My Expense Reports ....................................................................................................................... 229
My Approvals ................................................................................................................................... 231
My Templates ................................................................................................................................... 231
Collaborations .................................................................................................................................. 232
My Timesheet ................................................................................................................................... 232
Dispatch Calendar ........................................................................................................................... 234
Adjust Timesheets ........................................................................................................................... 235
Adjust Expenses .............................................................................................................................. 235
Downloads ........................................................................................................................................ 235
Client Portal ............................................................................................................................................. 237
Enabling Client Portal Access ........................................................................................................ 237
Client Portal Dashboard .................................................................................................................. 237
My Tickets (in Client Portal) ........................................................................................................... 238
My Profile (in Client Profile) ............................................................................................................ 238
My Messages (in Client Profile) ...................................................................................................... 239
Tickets (in Client Portal).................................................................................................................. 239
Contracts (in Client Portal) ............................................................................................................. 240
Invoices (in Client Portal)................................................................................................................ 240
Vorex SOAP API ...................................................................................................................................... 243
Introduction ...................................................................................................................................... 243
Authenticate ..................................................................................................................................... 244
Create Ticket .................................................................................................................................... 244
Create Ticket Note ........................................................................................................................... 247
Export Accounts And Contacts ..................................................................................................... 248
Get Accounts Locations ................................................................................................................. 250
Get Client Accounts ........................................................................................................................ 252
Get Employees List ......................................................................................................................... 253
Get Expense Sheets ........................................................................................................................ 256
Get Projects ...................................................................................................................................... 258
Get Tasks .......................................................................................................................................... 260
Getting Started
vii
Get Ticket Note Types ..................................................................................................................... 262
Get Ticket Priorities ......................................................................................................................... 263
Get Ticket Queues ........................................................................................................................... 265
Get Ticket Sources .......................................................................................................................... 266
Get Ticket Statuses ......................................................................................................................... 267
Get Ticket Types .............................................................................................................................. 269
Get Tickets ....................................................................................................................................... 270
Get Time Sheets ............................................................................................................................... 273
Vorex REST API ....................................................................................................................................... 275
Reports ..................................................................................................................................................... 275
Index ......................................................................................................................................................... 277

Getting Started
9
Getting Started
In This Chapter
About the Guide 9
System Requirements 10
How to Login 11
How to Navigate the Software 12
My Profile 13
Edit Access by URL 14
Caveats 14
About the Guide
This guide is designed for the administrators responsible for setting up and managing the Vorex™
software solution. Depending on the size of your organization, you may want to limit the number of
Global Administrators (the highest level of permissions) in your system.
How the User Guide Is Organized
The user guide is designed by module, with the premise that some administrative work and system configuration needs
to be completed first.
Adding Basic Company Data
Before creating tickets and projects, assigning to-dos, generating invoices, and running reports, you'll want to add some
basic data specific for your company in the Admin Module (page 17).
In this module . . .
You will find this kind of information . . .
Admin
Setting up Your Company
Creating departments, roles and rates for billing
Custom fields to add to existing forms.
Setting up account types and codes to integrate with your accounting
software.
Preconfiguring drop down lists – faster and easier to complete forms
Creating work-flow rules to automate daily task and communicate with
external and internal customers.
Human Resources - HR
Adding/Managing the Employees
Selecting job titles and placing in the right department.
Tracking personal contacts, wage history, time off balances.
Applying the proper access level to Vorex™.
Quickly producing organization charts to visually see your company structure.
Finance
Set up the Contracts/Billing
Use roles and rates and services in the already entered into system to create
T&M,
Recurring, fixed price, prepaid hours and prepaid dollar contracts.
Review time and expense entries
Generate invoices or transfer to QuickBooks.

Getting Started
10
Projects
Create Projects and Assign Tasks
Manage and monitor progress on a projects dashboard.
Real time updates on estimate hours and used hours and budgets.
Service Desk
Create and manage Support Tickets
Access the dashboard by priority, by issue, by client, etc.
Set up queues to manage tickets with common themes.
Store and track all the assets your customers have
Automatic alerts displayed and sent when a contract or warranty is set to
expire.
CRM
Store and Manage all the Accounts
Clients, prospects, vendors, etc.
Access contacts with phone numbers, emails, notes and future activities.
Create and track opportunities and see all this information in pipeline reports.
Reports
Create Reports
Organized by modules, you will find it easy to run the reports you need for
Service Desk – Projects – CRM – Finance – Time-sheet and Expenses.
With easy to use filters, you can generate and export in a multitude of
formats.
New Ad Hoc Report Writer
System Requirements
The PulsewayPSA cloud-based solution runs on our servers, which means that the only requirements
to run our application are:
Computer with a web browser (Internet Explorer, Chrome, Firefox, Safari.)
iPad or tablet
Internet Connection
So, if you are reading this now, you have everything you need to use the software. You do not need to
purchase any special hardware, download anything, or apply any add-on's to run Vorex™.

Getting Started
11
How to Login
Typically a new user receives a welcome email similar to the sample below.
To access Vorex™:
1. Use a browser to log into https://vorexlogin.com
2. Enter your credentials:
Username
Password
Company Name
Forget Your Password
If you forgot your password, click the Forgot Password link.
and the following screen appears.
Enter your email address and Company Name
When you hit Reset Password it will send you an email with a new password

Getting Started
12
How to Navigate the Software
Global Navigation Bar
When you login to your database, a horizontal navigation bar runs along the TOP with words such as Service Desk, CRM,
Finance and Projects. This bar is called the global navigation bar and each of these words is the heading of a Vorex™
module.
When you click on a module, such as the Service Desk module, notice the letters Service Desk turn white and a red line
appears under the words.
Local Navigation Bar
On the left side of the screen, a vertical navigation bar shows a list of options you can select.
This is called the local navigation bar. Selecting one of these options takes you further into the module.
Continuing in the Service Desk module, you can view a ticket screen by clicking the word Tickets located in the local
navigation bar.

Getting Started
13
My Profile
Settings > My Profile
The My Profile section enables you to personalize your Vorex™ user experience.
Sets your Vorex™ photo.
Displays your personal ticket counts.
Stores your personal information and contact information.
Changes your password.
Sets your default landing page when you login.
Reviewing My Profile
1. Select the Settings > My Profile page.
2. Review the Personal Information tab.
Reset (Photo)
Select Photo - jpg, jpeg, png, gif
Your Ticket Statistics
Opened
Handled
Resolved
User Name
E-mail
First Name
Middle Name
Last Name
Birth Date
Marital Status
Gender
3. Review the Contact Information > Main Address tab and Secondary Contact tab.
Address 1
Address 2
City

Getting Started
14
State
Zip Code
Country
Phone
Ext
Fax
Mobile
Email
4. Optionally change your password using the Change Password tab.
Old Password
New Password
Confirm New Password
5. Optionally set options on the Preferences tab.
Default Landing Page - The page displayed when you logon.
Default Tickets Listing Click Behavior - Selects how a ticket opens from a list page.
in the same page
in a new tab
in a new window
Edit Access by URL
PulsewayPSA supports edit access by URL for the following types of records:
Tickets by Ticket ID
https://vorexlogin.com/MSP/TicketEdit.aspx?ID=15551
Projects by Project ID
https://vorexlogin.com/Projects/ProjectEdit.aspx?ID=2560
Tasks by Task ID
https://vorexlogin.com/Projects/TasksEdit.aspx?ID=22182
To identify the number of a ticket, project or task, create an Ad Hoc report that includes the Ticket ID, or
Project ID or Task ID columns, along with additional columns to help identify the corresponding ID.
Note: Navigate to the Reports > Ad-Hoc Reports page and click the icon in the upper right hand corner
for instructions on how to create Ad Hoc reports.
Caveats
Text enclosed in angle brackets < and > is not generally supported for security reasons. Try to use ( or
) instead as this is a security consideration.

Admin
15
Admin
In This Chapter
Dashboard (Home) 15
My Company 17
Business Process 30
HR (in Admin) 38
CRM (in Admin) 38
Security 39
Finance (in Admin) 42
Service Desk (in Admin) 52
Inventory (in Admin) 89
Email Logs 90
Import Data 91
Dashboard (Home)
Home > Dashboard
Admin > Dashboard
HR > Dashboard
All modules have a dashboard to display important data. The Administrator Dashboard tracks important
events and activities, not necessarily identified as a ticket or project or CRM activity.
1. Click the Admin module on the far right of the global navigation bar.
2. Click Admin Dashboard, the first selection on the local navigator bar on the left.
My To Do List - A place to set reminders. For example: stop by HR and get benefit change form.
Enter text, then click the calendar and set the date, or simply enter the word tomorrow. Press the
Enter key on your keyboard to add the entry. To Dos created for a ticket display the name of the
ticket along with a link. You can click the link to access the ticket immediately.
C h a p t e r 2

Admin
16
My Notes - A quick summary of thoughts or ideas that you don’t want to forget during the day.
News - Company news (page 27) generated from the Admin module.
Sharing
If user has the rights, he or she can use the system to share information such as events,
announcements, and news.
Removing My To-Do List Items
The user can remove items in the My To-Do List by clicking the red X in the Already Done tab and clicking
on the red X. The user can reset the My To-Do List by clicking the yellow arrow, if an item was completed
by mistake.
Deleting
The user can simply erase My Notes by highlighting the words and selecting delete on the keyboard.

Admin
17
My Company
Admin > My Company
The My Company menu specifies settings about your own company.
1. On the global navigation bar, click Admin.
2. On the local navigation bar, click My Company
In This Section
Locations 17
Company Settings 19
Outbound Email 25
Custom Fields 25
Lists 26
Company News 27
Holidays 28
Administrative Work 29
Single Sign On 30
Locations
Admin > My Company > Locations
The Manage Locations page specifies your company locations. These fields are used throughout the
system to track information about your various offices.
Address information will appear on your invoices.
You will be able to quickly see which employees are located at which location, etc.
The Main Branch is the default. If you have other locations—like a remote sales office or a store in a
different city—you will create them here as well.
Add Locations
1. Click New on the Manage Locations page.
2. Enter the following on the Location Data tab.
Location Name
Website
Time Zone
Date Format
American Format (MM/dd/yyyy)

Admin
18
European Format (dd/MM/yyyy)
Time Format
12 Hours Format (Ex: 8:00 A.M , 8:00 P.M)
24 Hours Format (Ex: 8:00 , 20:00)
Main - Yes or No.
Click Save.
3. Enter the following on the Address > Shipping Contact tab. Optionally click Copy From Billing to
populate these fields from the Billing Contact tab.
First Name
Last Name
Address Line 1
Address Line 2
City
State
Zip Code
Country
Phone
Ext
Fax
Mobile
Email
4. Enter the following on the Address > Billing Contact tab. Optionally click Copy From Shipping to
populate these fields from the Billing Contact tab.
First Name
Last Name
Address Line 1
Address Line 2
City
State
Zip Code
Country
Phone
Ext
Fax
Mobile
Email
5. Click Save.
Moving Users
Admin > My Company > Locations > Edit > Users
The Users tab associates users with a single location. Users initially are members of the Main Branch
location.

Admin
19
To Move Users Between Locations
1. Click Move.
2. A Search and Select screen appears.
3. Select the employees you want to move.
4. Click OK.
5. Click Save.
Location Hours
Admin > My Company > Locations > Edit > Working Hours
The Working Hours section specifies the working hours for your location.
1. Use the check box and select the WeekDay days your location is open.
2. Enter your hours per day by clicking on the next to Starttime and Endtime.
3. Click Save.
Note: If you have multiple locations, you will need to set the working hours for each location.
Company Settings
Admin > My Company > Company Settings
In the section, you set global settings and defaults for modules and the entire system.
In This Section
General 20
Time Sheet 20
Project 21
Service Desk 22
Invoice 23
Contract 24
CRM 24
Inventory 25

Admin
20
User Account 25
General
Admin > My Company > Company Settings > General
The General tab specifies how your company name and logo is displayed in the user interface and in
communications with your customers. It also specifies currency and dashboard settings.
Business Name - The business name displayed in invoices.
Business Email - The FROM address of emails sent to recipients.
Note: If you create email templates in the Business Process section, the email you enter in the FROM
field on the template will override the Business Email address created above.
Business Email Display Name - The display name included with the FROM email address. Optional.
Business Logo - The business logo shown on this page displays throughout the user interface, for
both users and clients accessing client portal. To change the business logo:
Click Select.
Upload your business logo. Uploaded business logos are re-sized to 20px in height.
Click Save.
Report Logo - The report logo is shown on all reports and forms. To change the report logo:
Click Select.
Upload your report logo. Uploaded report logos are re-sized to 20px in height.
Click Save.
Listing Auto Refresh in - Set how frequently, in minutes, you want your dashboards to refresh their
data.
Currency - Select which currency you want to display in your system.
1. Delete the existing text and a list of available currencies display.
2. Select the currency from the data list.
3. Click Save.
4. Log out and then login for the change to apply.
Time Sheet
Admin > My Company > Company Settings > Time Sheet
The Time Sheet tab sets defaults and global settings for your company’s timesheets. A timesheet period

Admin
21
is one week.
TimeSheet Week Day Starts On - Select a day of the week to start each timesheet.
Allow Future View of Timesheets - The number of weeks into the future employees can view their
timesheets. Maximum 2 years.
Allow Past View of Timesheets - The number of weeks into the past employees can view their
timesheets. Maximum 2 years.
Preload Timesheets - If Yes, tickets and project tasks preload future timesheets. If No, tickets and
project tasks do not preload future timesheets. Many project focused organizations are
accustomed to seeing all of their assigned tasks displayed immediately on timesheets at the
beginning of the week as well as on future timesheets.
Note:
Current
employee time entered on tickets and project tasks are automatically added to
current
timesheets. In effect, timesheets are built as work is entered and completed during the
week.
Limit of items to preload in Timesheets - Limits the number of items preloaded in timesheets.
Round Time Logs - Rounds time entries in logs to the nearest specified interval, in minutes. Enter 0
to 60.
Up/Down - Select to round time entries up or down.
Project
Admin > My Company > Company Settings > Project
The Project tab sets defaults for new projects.
Project Number Prefix - Specifies the default prefix for new projects.
Project Starting Number - Specifies the default starting number for new projects.
Note: When you save a project you can type over the project number and override the system
generated number.
Whenever a new project is created, the default time sheetsheet approval route and expense sheet
approval route are automatically assigned to the new project. A project manager can override these
default approval routes or select None. If None is selected, submitted timesheets and expenses are
auto-approved. Approval routes are created in the Admin > Business Process > Approval Routes
(page 31) folder.
Default Timesheet Approval Route
Default Expensesheet Approval Route

Admin
22
Service Desk
Admin > My Company > Company Settings > Service Desk
The Service Desk tab sets defaults for new tickets. For example, when a customer calls in and user
clicks New Ticket... the priority, ticket type and source will already be populated with the values you
specify here.
Default Ticket Priority - Select the default ticket priority. Priorities are maintained using the Admin >
Service Desk > Priorities (page 54) page.
You can set up approval routes for timesheets and expense sheets in the system. If you are using the
Service Desk module and you want all timesheets with entries from tickets to route to a specific person
or manager, select default approval routes here.
Default Timesheet Approval Route: Select approval routes that are create in the Business Process >
Approval Routes (page 31) section in Admin Module.
Default Expense sheet Approval Route: Select approval routes that are created in the Business
Process > Approval Routes section in Admin Module.
Default Ticket Source - The default method of communication used by the customer to initiate the
creation of ticket.
Default SLA - The default service level agreement. Applies to customers that do not have a
contract. SLAs are maintained using the Admin > Service Desk > SLA (page 55) page.
Sort Status By - Sorts ticket pages by ticket status (page 57), either alphabetically or by ticket status
order.
Ticket Number Prefix - Adds a prefix to ticket identifiers. Defaults to blank.
Ticket Number Format - Specifies the date and count format of the ticket identifier. Defaults to
COUNT-MMDDYYYY. Changing the format affects new tickets only.
Default Ticket Type - Select the default ticket type. Ticket types are maintained using the Admin >
Service Desk > Ticket Types page.
Merge Status - When a ticket is merged, this field will determine which status to be merged to.
Merge Activity Type - This option allows you to define the type of note to be added (Internal vs
External) when a ticket is merged.
Enable Stopwatch Autostart - If enabled, when working on a ticket, the time starts automatically as
soon as the ticket is opened.
Load Parent Account Contracts - When this is enabled and a ticket is created for a "Child Account"
the contract drop-down will show the child & parent contracts associated with that account.
Load Assignees by Account Service Type - If checked, when assigning a technician for a ticket, this
will check all the technicians with the corresponding scope and only those associated can be
assigned.

Admin
23
Suppress Assignee list when Account is blank - When creating a new ticket, if the account is not filled,
the assignee list will not show the names of the technicians.
Invoice
Admin > My Company > Company Settings > Invoice
The Invoice tab sets defaults and global settings for your invoices.
Invoice Number Prefix - Specifies the default prefix for new invoices.
Invoice Starting Number - Specifies the default starting number for new invoices.
Issue Invoice on - When an invoice is issued. You can override this default setting in the header of
a contract.
Beginning of Billing Cycle - Invoices are created in advance and will appear in the
Billing review folder on the first day of the month or quarter.
End of Billing Cycle - Invoices are created in advance and will appear in the Billing
review folder on the last day of the month or quarter.
Post T&M Entries
Only Approved - Only approved timesheet entries and expense entries are posted to billing.
All - All timesheet entries and expense entries are posted to billing.
Post Zero Entries - If Yes, zero value hours are posted for fixed price and recurring services on the
Finance > Billing Review > Labor Hours (page 123) and Recurring Services (page 125) pages.
Bill Zero Value Items - If Yes, show zero value items in billing pages. If No, hide them.
Use Classes - In QuickBooks Desktop version, you can create classes that you assign to
transactions. These classes enable you to track account balances by department, business office
or location, separate properties, or by any other meaningful breakdown of your business. Use
classes are maintained using the Admin > Finance > Class List page.
Show VAT Number - If Yes, a VAT identifier displays on printable documents.
VAT Number Text - Specifies the string portion of the VAT identifier shown on printable documents.
VAT Number - Specifies the numerical portion of the VAT identifier shown on printable documents.
Billing End Date - Sets the default number of days or months into the future future date shown by
the Default End Date search field on the Finance > Billing Review (page 122) page. This same
change also applies to the To Date search field on the Finance > Billing (page 129) page.
Invoice Title - Customizes the title at the top of the invoice. The default is 'Invoice'.
Notes to clients - Any notes entered here will display on all invoices generated from the Finance
module.

Admin
24
Contract
Admin > My Company > Company Settings > Contract
The Contract tab sets defaults for contracts. Contracts are maintained in the Finance module.
1. Contract Number Prefix - Enter a string prefix for the names of new contracts. Optional.
2. Contract Starting Number - Enter a starting number for new contracts.
CRM
Admin > My Company > Company Settings > CRM
The CRM tab sets defaults for the CRM module
Quotation Number Prefix - A prefix added to the names of new quotations.
Quotation Starting Number - The starting number for new quotations.
Pipeline Factor - The default probability that sales opportunities in the sales pipeline will be
converted into sales. Used by the CRM dashboard and the Pipeline Value portion of the Pipeline
Report CRM Dashboard.
Quotations Terms and Conditions - New CRM > Service Quotations and Product Quotations use the
value in this field by default.

Admin
25
Inventory
Admin > My Company > Company Settings > Inventory
The Inventory tab sets defaults for records that affect inventory management. Types of records include:
PO - purchase order
RO - received order
UPC - universal product code
DO - dispatch order
SO - sales order
AD - inventory stock adjustment
These are the default settings for each field:
PO Number Prefix - PO_
PO Starting Number - 1
RO Number Prefix - RO_
RO Starting Number - 1
UPC Prefix - 111111
UPC Length - 5
Adjustment Number Prefix - AD_
Adjustment Starting Number - 1
SO Number Prefix - SO_
SO Starting Number - 1000
User Account
Admin > My Company > Company Settings > User Account
The User Account tab sets defaults for new employees and clients.
New Employee Email Template - Select an email template for new employees to use.
New Client Portal User Email Template - Select an email template for new portal user clients to use.
Password Reset Email Template -
Outbound Email
The Outbound Email page enables you to configure a custom outgoing mail server. This forces your
instance of Vorex to send all outgoing email and notifications through your company's mail server
instead of the default SMTP server.
Use Custom SMTP Settings - If Yes, enables the other fields.
Outgoing Mail Server (SMTP) - The name of your outbound mail server.
Username - The account username for outbound mail.
Password - The account password for outbound mail.
Server Port Number - 465 (default)
Encryption Type - SSL (default), TLS, Non-Encrypted
Custom Fields
Admin > My Company > Custom Fields
The Custom Fields page maintains custom fields you can use in forms in many different modules. For
example, you can add custom fields to forms in:

Admin
26
CRM - Accounts, Contacts, CRM Activities, CRM Opportunities, CRM Quotes and Sites, Sales
Order.
Projects - Projects and Project Tasks
Service Desk - Tickets, Pending Tickets and Assets (Physical and Software).
Inventory - Dispatch Orders, Products, Product Quotations, Receiving Purchase Orders.
HR - Employee Records
Custom fields can also be included in Ad Hoc Report Writer reports.
Editable Fields
Field Name - The name of the custom field.
Field Type - Free Text, Date, Data List, Numeric, or Money
Module Name - The module using the custom field.
Order - The order custom fields display in a form.
Status - Active or Inactive
Required Custom Field - If Yes, entering a value in a custom fields is required to save a form.
Lists
Admin > My Company > Lists
The Manage Lists page maintains the list of values displayed by list fields used in standard forms. Each list is predefined.
You cannot add a new list. Click any row in the Manage Lists page to edit that list.
Manage Lists
If you want to populate a drop-down field with list items, you should have the Admin permissions and
do the following steps:
1. Navigate to Admin > My Company > Lists.
2. Choose the List Name(or name of a drop-down field).
3. Select the Add button.
4. Enter the Name for a list item you would like to see in the drop-down of the selected field.
5. Select Save button.
You can add more than one drop-down list items.
Note: If you do NOT want the item to be visible immediately, make sure you select No in the Active
option, when adding a List item.
Editable Fields
List Name - A value in the drop-down list.
Is Default - Sets a single item to be the default.
Is Active - If checked, the value displays in the drop-down list.
Types of Lists and Where They are Used
CRM
Accounts - Business Types
Contacts - Phone Type
Contacts - Email Type
Activities - CRM Activity Type ( like Call, Email)
Activities - CRM Activity Status ( New, In progress, Complete)
Opportunities - CRM Opportunity Type
Opportunities - CRM Opportunity Status
Admin
27
Opportunities - CRM Opportunity Rating
Opportunities - CRM Opportunity Lead Source
Sites - Site Market Type\
Projects
Projects - Project Type
Projects - Project Assessment
Projects - Collaboration Type
Service Desk
Tickets - Ticket Note Type
Software Assets - Asset Software Category
Hardware Assets - Asset Hardware Category
Hardware Assets - Asset Vendors
Hardware Assets - Asset Brands
Hardware Assets - Asset Business Impact
Knowledgebase - Knowledge Category
Inventory
Purchase Orders - Ship Method
Purchase Orders - Payment Term
Purchase Orders - Purchase Order Charge Type
Products - Product Composition Materials
Products - Product Brand
Products - Product Manufacture
Products - Product Cost Codes
Products - Product Pricing Levels
Stock Adjustment - Warehouse Adjust Reason
HR
Employees - Education Institute Name
Employees - Education Field of Study
Employees - Education Degree
Company News
Admin > My Company > Company News
The Company News page manages communications published in module dashboards and the client
portal dashboard. Types of communications include:
Announcement
Event
Information
Message

Admin
28
News
Editable Fields
Title - The title of the communication.
Type - The type of communication.
Display On - Select the module dashboards this communication will be published to.
Admin
Client Portal
CRM
Finance
Home
HR
Inventory
Projects
Reports
Service Desk
Publish Date - The date the communication start being displayed on dashboards.
Expires On - The date the communication stop being displayed on dashboards.
Content - The body text of the communication.
Holidays
Admin > My Company > Holidays
The Manage Holidays page specifies the holidays recognized by your company. Holidays are shown on
company calendars, so customers will know with your team is unavailable.
Editable Fields
Holiday Name - The name of the holiday.
From - The date the holiday begins.
To - The date the holiday ends.
Is Recurring - If Recurring, the holiday recurs each year.
Status - If Active, the holiday displays on company calendars.

Admin
29
Holiday Locations - The locations this holiday applies to.
Administrative Work
Admin > My Company > Administrative Work
The Administrative Work page creates tasks used to track time against company activities not associated
with projects or tickets. Typically Administrative Work tasks are non-billable. Once created, tasks are
available on employee timesheets to classify time entries. Examples include paperwork, meetings,
training, holidays, sick days, vacation, jury duty, etc.
Editable Header Fields
The following header fields apply to all Administration Work tasks.
Name - The display name for Administration Work category tasks.
Status - The default status.
Manager - The manager.
Timesheet Route - The timesheet approval route.
Expensesheet Route - The expense sheet approval route
Editable Task Fields
Task Name - The name of the task
Status - The status of the task
Admin
30
Assign Work Type to the Administrative Task - The work type associated with this task. In most cases
Administrative Work tasks are set to Non Billable Labor Hours.
Single Sign On
The Single Sign On page enables/disables integration with a single sign on (SSO) server.
Enable Single Sign On to AuthAnvil™ - Yes or No
Reply to URL - The URL of the single sign on SSO server.
Upload Certificate / Delete Certificate - Uploads/deletes the certificate provided by the SSO service
provider.
Business Process
Admin > Business Process
The Admin > Business Process menu provides access to templates and records used by the Business Process module.
In This Section
Email Templates 30
Approval Routes 31
Workflow 33
Email Templates
Admin > Business Process > Email Templates
The emails you create and send to customers or employees are based on standard templates you
maintain using the Email Templates page. Email templates are classified by the module they apply to.
Many default email templates used by the system are not shown on the Email Templates page. You must
create your own custom email template and select it elsewhere in the system to override the default
email template being used by the system.
Email template examples include:
Service Desk - Sending communications based on ticket creation, assignment, status changes,
requests for information and closure
CRM - Sending quotations to prospects or customers
HR - Welcoming new employees to logon the first time.
Inventory - Sending a purchase orders to suppliers
Finance - Sending invoice to your customers
Client Portal - Sending new client portal user and reset client portal user password emails to your
customers.
Field Placeholders
Field placeholders inserted into the body text of email templates enable you to quickly send out
customer-specific or employee-specific emails.
Editable Header Fields
Email Template Name - The name of the email template.
Description - A longer description of the email template.
Module - The module using this email template.

Admin
31
Status - If Active, this email template can be used.
Editable Email Template Details
From - Defaults from the Admin > My Company > Company Settings > General > Business Email
field.
CC - Additional recipients to copy.
BCC - Additional recipients to blind copy.
Subject - The subject of the message.
Content - The body text of the message.
Note: If you want to support replies to emails sent out for tickets, include the Ticket Number field
in the body text.
Fields - Insert your cursor anywhere in the body text area of your message, then click any field
listed in the Fields list. A field placeholder will be inserted into the body text. When a message is
sent these field placeholders are resolved to specific values. The list of fields available to select is
based on the module you select in the Module field in the header.
Approval Routes
Admin > Business Process > Approval Routes
The Approval Routes page defines approval processes in your company. An approval route refers to a
specific sequence of approval steps. Each step requires one or more approvers to approve that step.
You can define an unlimited number of routes. Each route can have any number of approval
steps.
Modified routes only impact new employee actions, not those already in-route.
Designated approvers get notified by email and the internal messaging system.
Recursive approvals can be forwarded from one supervisor to the next, ascending the levels of
the organizational chart, for the number of levels you specify.

Admin
32
Approving Timesheets and Expense Reports
Submitted time-sheets and expense-sheets can be managed using approval routes. Each
employee's My Approvals page in the Home module displays the timesheets and expense sheets
waiting for their approval. If an expense report is submitted and the approval route split, the report
is split into sub reports, one for each project manager approver.
For projects, approval routes are assigned at the project-level. Each project may have its own
unique approval route to follow. If no route is assigned to a project, it defaults to auto-approval.
Default approval routes for timesheets and expense reports are assigned to Projects using the
Admin > My Company > Company Settings > Project (page 21) tab.
Default approval routes for timesheets and expense reports are assigned to tickets using the
Admin > My Company > Company Settings > Service Desk (page 22) tab.
Default approval routes for timesheets and expense reports are assigned to administrative work
using the Admin > My Company > Administrative Work (page 29) tab.
Creating New Approval Routes
1. Select the Admin > Business Process > Approval Routes page.
2. Click New.
3. Enter the following header fields:
Route Name - The name of the approval route.
Route Description - A one line description of the approval route.
Active - Yes
Click Save. A new Steps section displays below the header fields.
4. Click Add Step.
5. Enter the following step fields:
Step Name - The name of the step.
Pick Step Type - The person approving this step.
Specific Person(s) - A specific employee. Select one or more people from a drop-down

Admin
33
list.
Manager of Submitter - The manager of the employee. Managers of employees are
specified in the HR module.
Project Manager - The manager of a project. Project managers are specified in the
Projects module.
Recursive Approval - Approvals are forwarded from one supervisor to the next,
ascending the levels of the organizational chart (page 104), for the number of levels
you specify.
6. Repeat steps 4 and 5 to add as many additional approval steps as your approval process
requires.
Workflow
Admin > Business Process > Workflow
The Workflows page defines workflows that automate the processing of tickets when triggers and
conditions are met. For example you can use a Workflow:
When Tickets are Assigned - Based on the source, priority, issue or client, or any combination of
these conditions, automatically assign the ticket to the best person in your company.
When Tickets are Reassigned or Escalated - If a ticket sits idle for too many days or hours,
automatically send a reminder or re-assign the ticket to another technician and bump the priority
to a higher level.
When Tickets are Edited - We can send a notification if a note or time is entered on a ticket.
When Tickets are Resolved - Send an email with a summary of what was done with a 'thank you'
message included.
Creating Workflows
1. Select the Admin > Business Process > Workflow page.
2. Click New.
Note: You can also Clone an existing workflow and modify it.
3. Ensure the Workflow Rule tab is selected.
4. Enter the following header fields:
Workflow Name – The name of the workflow.

Admin
34
Description - A one line description of the workflow.
Active - If Yes, the workflow is being used.
5. Define Triggers for ticket workflows in the Triggers section.
Created By - Anyone, Employees, Clients
Updated By - Anyone, Employees, Clients
Note: An update is a change of status, change of primary assignee or queue, change of priority,
change of ticket type.
Activity Added By - Anyone, Employees, Clients
Note: An activity is a time entered, note added, or expense entered.
Activity Type - Time, Expense, Activity
Idle For - The tickets sit idle—with no activities or no time entries—for hours or minutes.
Due In - The ticket has a due date on it and that date is approaching, in hours or minutes
Overdue By - The due date has passed, in hours or minutes.
SLA First Response Due In - Specifies when an SLA first response is due and sends an alert, in
hours or minutes.
SLA First Response Overdue By
SLA Resolution Due In - Specifies when an SLA resolution is due and sends an alert, in hours
or minutes.
SLA Resolution Overdue By - Specifies when an SLA resolution is past due and sends an alert,
in hours or minutes.
6. Select the Conditions tab.
Each condition provides a set of comparison operators. Comparison operators can include:
In, Not In, Changed, Changed From, Changed To, Is Empty, Is Not Empty, Like, Not
Like, Greater Than, Less Than, Greater or equal, Less or equal, Between
The following fields are set in the Tickets section of the Conditions tab. These conditions test for
values in the ticket.
7. Use the Tickets section to set conditions for values in the ticket.
Status - Changes the status of a ticket.
Priority - Sets the item's priority
SLA
Issue Type - Updates the issue type.
Sub-issue Type - Updates the sub-issue type.
Source
Ticket Type - Updates the ticket type.
Queue - Assigns a ticket to a queue.
Primary Assignee - Assigns a primary technician
Title
Details
Satisfaction Score
Ticket Sender Email
Service Contract
Admin
35
Work Type
Open Data
Due Date
Account Type
Account
Service Type
8. Use the Accounts section to set conditions for values in the CRM account associated with the
ticket.
Account Type
Account Name
Location
Description
Service Type
Account Code
Business Type
Account Manager
Status
Acquired Date
9. Use the Contacts section to set conditions for values in the CRM account contact record
associated with the ticket.
First Name
Middle Name
Last Name
Job Title
Status
Point of Contact
Receive Invoices
Has Client Portal Access
10. Use the Assets section to set conditions for assets associated with the ticket.
Name
Description
Category
Business Impact
State
Brand
Manufacturer
Machine Group ID
Product Name
Serial
Model Number
Asset Tag
Acquisition Date
Expiration Date
Warranty Expiration Date
Barcode

Admin
36
Vendor
11. Use the Custom Fields section to set conditions for custom fields added to the ticket.
12. Define the actions taken using the Updates tab.
Account - Assigns the ticket to an account.
Updates the ticket with the default contract for the account.
Updates the SLA with the SLA specified by the default contract.
Status - Changes the status of a ticket.
Priority - Sets the item's priority
SLA
Updates the SLA with this SLA, overriding the SLA specified by any contract.
Issue Type - Updates the issue type.
Sub-issue Type - Updates the sub-issue type.
Ticket Type - Updates the ticket type.
Queue - Assigns a ticket to a queue.
Primary Assignee - Assigns a primary technician
Contract - Enter an account to enable this drop-down list.
Updates the ticket with this contract, overriding the default contract for the account.
Updates the SLA with the SLA specified by the specified contract.
13. Select the Notification tab.
14. Specify who will be notified when a workflow is triggered.
Assigned Queues - Yes or No. Notifies all users who are members of the listed queue (page 54)
assigned to the ticket.
Assigned Resources - Yes or No. Notifies the primary assignee or secondary assignees
assigned to the ticket.
Account Associate Resources - Yes or No. Notifies all resources added to the CRM > Account >
Associated Resources (page 150) tab for this client.
You can also add specific employees by name.

Admin
37
15. Select the customers to be notified in the Client section. Contacts only display in this section if
clients were selected in the Workflow Rule > Conditions > Client drop-down list.
Ticket Contact - If Yes, clients are notified if they submitted a ticket.
Point of Contacts - If Yes, clients are notified if they are designated the point of contact for a
customer account.
16. Select the email template used to create notifications for this workflow.
17. Click Save.

Admin
38
HR (in Admin)
Admin > HR
Note: See Human Resources (page 93) for a description of these support tables. The same support tables
can be accessed in the user interface using either the Admin module or the Human Resources module.
CRM (in Admin)
Admin > CRM
CRM stands for customer relationship management. A CRM solution allows you to manage the
business relationship and interactions you have with customers, prospects, vendors, etc., and store all
the data about these relationships. These interactions can be sales related—calls, emails, meetings
and demonstrations—as well as support related—service tickets and projects. The benefit of a CRM is
having all your business data stored and accessible from one central location. The CRM module
provides:
Immediate employee access to the data they need.
Sharing of important data between departments.
Management insight into activity across the organization and helps them understand where they
can improve processes.
Customers are first added as accounts in CRM. After that you can create projects, open tickets, and set
up contracts on their behalf.
In This Section
Accounts 38
Opportunity Statuses 38
CRM Account Types 39
Service Types 39
Accounts
Admin > CRM > Accounts
Note: See Accounts (page 144) in the CRM module for a description of these support tables. The same
support tables can be accessed in the user interface using either the Admin > CRM menu or the CRM
module.
Opportunity Statuses
Admin > CRM > Opportunity Statuses
The CRM Account Types page maintains a status list for opportunities.
Creating Opportunity Statuses
1. Select the Admin > CRM > Opportunity Statuses page.
2. Click New.
3. Enter the following fields.

Admin
39
Name
Base Status
Probability
Is Active - Yes or No
Include in Pipeline - Yes or No
Description
CRM Account Types
Admin > CRM > CRM Account Types
The CRM Account Types page maintains a list used to identify primary business relationships with
accounts. By default, this list includes Client, Competitor, Former Client, Miscellaneous,
Partner, Unknown, Vendor. In addition you can flag an account as either a client or vendor or both.
Creating Account Types
1. Select the Admin > CRM > CRM Account Types page.
2. Click New.
3. Enter the following fields in the Account Types header section.
Account Type Name
Status - Active or InActive
Client - Yes or No
Vendor - Yes or No
Service Types
Admin > CRM > Service Type
The Service Type page defines basic records used to classify CRM accounts. Service types are
subsequently assigned to scopes. A scope determines which users have access to which tickets,
based on security types assigned the scope and the CRM account assigned the ticket.
You define the following for a service type:
Name
Description
Active
Default
Security
In This Section
Roles 39
Scopes 42
Roles
Admin > Security > Roles
The Roles page determine the access an employee has to different modules, menus and selected
settings. The system provides several predefined security roles for both internal and external users.
You can also add custom security roles. A person assigned multiple security roles has access to the

Admin
40
combined privileges of all assigned roles. Certain permission categories include special features.
Pre-Defined Security Roles
Six (6) pre-defined internal roles - Administrator, Project Manager, CRM Manager, Finance
Manager, Service Desk Manager, and User.
Two (2) pre-defined external roles - External User and External Manager. These are used by
clients using Client Portal.
Pre-Defined
Internal Roles
Description
Administrator
The highest level of permissions. Complete access to add/edit/delete, and configure
any record across the system.
Project Manager
Access to Project Management modules and related reports. Add/edit/delete projects,
clients, approval routes, and employees. Also, adjust/approve time and
expense-sheets.
CRM Manager
Access to CRM modules and related reports. Add/edit/delete customer contacts,
opportunities, activities, and customer quotes.
Finance Manager
Access to Finance modules and related reports. View/update/process billing,
invoicing, receivables, account setups, and payments.
Service Desk Manager
Access to Service Desk module and related reports. Add/edit/delete service desk
settings in Admin module. Create workflow rules, etc.
User
Access restricted to personal information, time and expense sheet entries, and
time-off requests.
Special Features
You can enable special features for certain categories of permissions.
Home
Access to All Employees Timesheet Data ORG Chart
Access to All Employees Expense Data (Bypasee ORG Chart)
Service Desk
Quick Add Ticket - If checked, a blue New Ticket button displays in the header. Users can click
the button to add a new ticket immediately from anywhere in the user interface.
Kaseya Live Connect - If checked, enables Live Connect (page 76) access from a ticket to a
corresponding hardware asset.
Customer Survey Scores - If checked, enables visibility of survey score (page 59) data.
CRM
Access to All Employees CRM Data (Bypass ORG Chart)
Projects
Access to All Employees Project Data (Bypass ORG Chart)
Hide Financials Tab on Projects
HR
Bypass Timesheet and Expense Sheet Approvals
Quick Tickets
Security roles have a Client Portal option called Quick Tickets. When checked in a security role,
customers are presented with a simplified page layout when adding new tickets. If unchecked,
customers are presented with the same page layout that employees see.
Adding Security Roles
1. Select the Admin > Security Roles page.

Admin
41
2. Click New.
3. Enter the following fields in the Security Role Information header section.
Name
Description
Client
Internal - This security role can only be assigned to employees and not to CRM
customer account Contacts (page 148) given client portal access.
External - This security role can be assigned to both employees and to CRM
customer account Contacts given client portal access.
Status - Active or InActive
4. Expand each permission category displayed on the Permissions tab.
5. Optionally toggle the Allow View All or Allow Modify All buttons to check or uncheck all checkboxes in
a permission category.
View - Allows users assigned this security role to view data.
Modify - Allows users assigned this security role to change data.
6. Optionally check or uncheck each item in an expanded category separately.
7. Optionally enable special features at the bottom of each category. Not all categories have them.

Admin
42
example of special features:
8. Click the Role Users tab.
9. Click Add.
10. Select one or more users to assign them to this security role.
11. Click OK.
12. Click Save the save the security role.
Scopes
Admin > Security > Scopes
The Scopes page determines employee access to user-defined data in the system. Currently scopes
only control employee access to user-defined data in Service Desk tickets, and only if the CRM
account has been assigned a service type.
Note: By default Service Desk users continue to have read/write access to all tickets created for all CRM
accounts that have not been assigned a service type controlled by a scope.
Configuration
1. Create Service Types (page 39).
2. Assign service types to accounts using the CRM > Accounts (page 144) > Account tab > Service
Type field.
3. Create a new scope using the Admin > Security > Scopes page.
4. Add service types to the scope record you just created.
Each scope can include multiple service types.
Select the Service Desk Permission Type.
Read/Write
Read Only
No Access
5. Add users to the scope record you just created.
Finance (in Admin)
Admin > Finance Roles
The Finance menu in the Admin module defines support tables used by all your financial transactions.
This includes:

Admin
43
Roles and rates for your employees
Work types
Services and their unit price
Expense categories for employee billing
In This Section
Roles 43
Work Type 44
Services 45
Expense Type 46
Milestone Type 47
Account Type 48
Account Code 48
Discount Type 49
Charge Type 49
Billing Configuration 50
Sales Tax Items 50
Exchange Rates 51
Class List 52
Roles
Admin > Finance > Roles
The Manage Roles page defines roles used by employees to classify the work bill billed to customers.
Each role has a defined default billing rate.
Roles are applied when entering labor time on tickets or project tasks.
Roles are assigned to by employee or by job title.
Employees assigned multiple roles can usually select any of their roles when working a task or
ticket.
In Projects, the project manager can lock down the role when assigning a task to an employee.
You can override role rates by creating a 'New Time and Material Contract' for a specific
customer.
Creating Roles and Rates
1. Select the Admin > Finance > Roles page.
2. Click New.
3. Enter the following fields.
Role Name
Description
Billing Rate - The per hour billing rate.
Status - Active or InActive

Admin
44
4. Click Save.
Work Type
Admin > Finance > Work Type
The Work Type page maintains a list used to classify the work performed on tickets and tasks. You can
optionally specify a custom billing rate by work type that overrides the billing rate specified by a user's
selected role on a ticket or task.
Work types are used for tracking and reporting purposes
Work types are match them to your general ledger codes on the Billing Configuration (page 50)
page.
You can create additional work types to apply a custom rate to labor time entries on a ticket.
Creating Work Types
1. Select the Admin > Finance > Work Types page.
2. Click New.
3. Enter the following fields.
Work Type Name
Description
Status - Active or InActive
Invoice
Non-Billable do not show on Invoice
Non-Billable show on Invoice
Billable
Overtime Multiplier Rate - Multiplies the hourly billing rate for overtime. Defaults to 1.
Billing
Use Role Rate - Billings use the hourly rate specified for the role the user selects in a
ticket or task.
Use Custom Rate - If selected, the Custom Rate field displays. Enter a custom hourly
billing rate for this work type.

Admin
45
4. Click Save.
Services
Admin > Finance > Services
The Services page maintains a list of standard services. A service is work performed for a customer that
is billed on a weekly, monthly, quarterly, or annual basis and is typically part of a recurring service
contract. A flat fee is specified for each type of device or service that is supported in your client’s
environment. These services are available in a drop-down list when building recurring contracts using
the Finance Module > Contracts page.
Creating Services
1. Select the Admin > Finance > Services page.
2. Click New.
3. Enter the following fields.
Service Name
Description
Unit Price
Unit Cost
Status - Active or InActive
GL Account - Select general ledger account to record postings.
Taxable - Taxable or Non Taxable
4. Click Save.

Admin
46
Expense Type
Admin > Finance > Expense Type
The Expense Type page maintains a list of standard expenses types—meals, travel, lodging., etc.—that
employees may incur during work related activities. Expenses can be:
Entered costs on a ticket, project task, or regular expense sheet
Marked as billable
Marked as reimbursable
Defined on a per unit basis. For example, mileage.
Expense rules can:
Limit the expense amount entered per category
Allow a specific user to enter an amount over the standard limit
Require a receipt be attached to expense.
Be applied by individual employee
Be applied by department
Creating Expense Types
1. Select the Admin > Finance > Expense Type page.
2. Click New.
3. Enter the following fields in the Details section.
Name
Description
Per Unit - If Yes, a Unit Amount field displays. For example, mileage.
Billable - Yes or No
Allow Billable Modification - Yes or No
Is Attachment Required - If Yes, an attachment, typically a receipt, is required to record an
expense.
GL Account - Select general ledger account to record postings.
Taxable - Taxable or Non Taxable
Available for
Employees
Vendors - For example, you may wish to specify rent or utilities to as a vendor expense
type those expenses appear in the Finance module to pay vendors.
Employees and Vendors
Active - Yes or No
4. Specify rules by clicking Add in the Rules section.

Admin
47
Name - The name of the expense type rule.
Department - The department this expense type is applied to.
Resources - The employee this expense type is applied to.
Limit Amount - The amount this expense type is limited to.
Overage - If yes, the use or department, can override the Limit Amount.
5. Repeat step 4 for as many rules as appropriate for this expense type.
6. Click Save.
Milestone Type
Admin > Finance > Milestone Type
The Milestone page maintains a list of standard milestone types. A milestone type specifies the % total
fee a client pays over the course of a project. Instead of paying everything upfront, payments are
divided into milestones. For example a client could pay you 40% upfront, then 30% mid-project, then
pay the last 30% on project completion. In the Contracts module, when creating a fixed price contract,
these milestones are available in a drop-down list to quickly create phased billing.
Creating Milestone Types
1. Select the Admin > Finance > Milestone Types page.
2. Click New.
3. Enter the following fields.
Milestone Type Name
Description
Status - Active or InActive
GL Account - Select general ledger account to record postings.
Taxable - Taxable or Non Taxable
4. Click Save.

Admin
48
Account Type
Admin > Finance > Account Type
The Account Type page maintains a list of standard account types. Account types are used to group
general ledger account codes (page 48). For example, Accounts Receivable (A/R), Accounts Payable
(A/R), and Expenses.
Creating Account Types
1. Select the Admin > Finance > Account Types page.
2. Click New.
3. Enter the following fields.
Account Type Name
Description
Status - Active or InActive
GL Account - Select general ledger account to record postings.
Taxable - Taxable or Non Taxable
4. Click Save.
Account Code
Admin > Finance > Account Code
The Account Type page maintains a list of account codes. Sub-accounts are supported by specifying the
parent account of an account code. Account codes are used to integrate Vorex™with matching
accounts codes in an integrated accounting software package such as QuickBooks.
Creating Account Types
1. Select the Admin > Finance > Account Code page.
2. Click New.
3. Enter the following fields.
Account Code
Description
Status - Active or InActive
Account Type
Parent Account

Admin
49
4. Click Save.
Discount Type
Admin > Finance > Discount Type
The Discount Type page maintains a list of standard discounts types. A discount type specifies a
percentage or amount to optionally discount an invoice. The default value can be overridden.
Creating Account Types
1. Select the Admin > Finance > Discount Types page.
2. Click New.
3. Enter the following fields.
Name
Value
Discount Type - Amount or Percentage
Description
GL Account
Taxable - Taxable or Not Taxable
4. Click Save.
Charge Type
Admin > Finance > Charge Type
The Charge Type page maintains a list of standard charge types. Charge types specify additional
charges entered when maintaining an invoice. For example, you may wish to add a one time handling
fee to an invoice.
Creating Account Types
1. Select the Admin > Finance > Charge Type page.
2. Click New.

Admin
50
3. Enter the following fields.
Charge Type Name
Description
Status - Active or InActive
GL Account
Taxable - Taxable or Not Taxable
4. Click Save.
Billing Configuration
Admin > Finance > Billing Configuration
The Billing Configuration page assigns accounts codes to values defined in other Finance setup tables.
Accounts codes can be specified separately for each value in each Finance setup table. Account
codes are used to integrate Vorex™ with matching accounts codes in an integrated accounting
software package such as QuickBooks.
Creating Billing Configuration
1. Select the Admin > Finance > Billing Configuration page.
2. Enter accounts for fields in the Work Types tab.
Income Account
Expense Account
Taxable
3. Repeat step 2 for each of the following tabs.
Expense Types
Services
Milestone Types
Discount Types
Products
Charge Types
Taxable
4. Click Save.
Sales Tax Items
Admin > Finance > Sales Tax Items
The Sales Tax Items page maintains a list of standard sales tax items. You can also group tax rates

Admin
51
together using group tax items.
Creating Sales Tax Items
1. Select the Admin > Finance > Sales Tax Items page.
2. Click New.
3. Enter the following fields.
Name
Tax Rate - Enter a percentage.
Tax Agency - A CRM account classified as a vendor.
Tax Group - Accept default No.
Description
4. Click Save.
Creating Group Tax Items
1. Select the Admin > Finance > Sales Tax Items page.
2. Click New.
3. Enter the following in the Sales Tax Item Info tab.
Name
Tax Group - Yes.
Description
4. Enter the following in the Group Tax Items tab.
Click Add.
Select one or more sales tax items.
Click OK.
5. Click Save.
Exchange Rates
Admin > Finance > Exchange Rates
The Exchange Rates page maintains a list of exchange rate records, one for each pair of currencies in
the system. After saving an exchange record for the first time, you can add additional records
specifying exchange rate values and the dates these exchange rates take effect.
Creating Exchange Rate
1. Select the Admin > Finance > Exchange Rates page.
2. Click New.
3. Enter the following fields.
Currency From - Select a currency.
Currency To - Select a currency.
4. Click Save. An Exchange Rate Values tab displays.
5. Click Add and enter values for the following fields.
Exchange Rate Date - The date the exchange rate takes effect.
Exchange Rate Value - The multiplier used to convert FROM currency amounts to TO currency
amounts.
6. Repeat step 5 each time you want define a new exchange rate and the date when it takes effect.
7. Click Save again.

Admin
52
Class List
Admin > Finance > Class List
The Class List page maintains a multi-level list of class names. Classes provide an alternate way of
classifying income and expenses from the chart of accounts. For example you could classify income
and expenses by department, location, property, project or event. Once created and assigned to
transactions, you can filter reports by class.
Creating Class Lists
1. Select the Admin > Finance > Class Lists page.
2. Click New.
3. Enter the following fields.
Class Name
Status - Active or InActive
Add Parent Class - If Yes, select a Parent Class from the drop-down list.
4. Click Save again.
Service Desk (in Admin)
Admin > Service Desk
The Service Desk menu in the Admin module defines support tables used by all your service desk
operations. This includes values required to create, classify, assign, track and report on tickets in the
system.
In This Section
Issue Types 52
Ticket Types 53
Queues 54
Priorities 54
SLAs 55
Ticket Statuses 57
Email Parser 58
Survey Integration Settings 59
Internal Survey Scores 60
RMM Integration Settings - Kaseya v1 63
RMM Integration Settings - Kaseya v2 - New 72
RMM Integration Settings - Kaseya v2 - Upgrade 80
RMM Integration Settings - Continuum 85
Issue Types
Admin > Service Desk > Issue Types
The Issue Types pages maintains the list of issues and sub-issues that customers typically request
support for in your system. This list is useful for tracking and reporting purposes. You can use
workflows to automate responses to customer support requests, based on the issue type assigned to
the request. Issue types and issue sub types can be included in an SLA (page 55) objective.
Creating Issue Types
1. Select the Admin > Service Desk > Issues Types page.
2. Click New.

Admin
53
3. Enter the following fields in the Issue Type Info section.
Issue Type Name
Description
Status - Active or InActive
4. Click Add to add a new record in the Issues Sub Types section.
Name
Description
Status - Active or InActive
5. Repeat step 4 to add more issue sub types.
6. Click Save.
Ticket Types
Admin > Service Desk > Ticket Types
The Ticket Types pages maintains a list of ticket types used to classify tickets. You can create a
workflow, run reports and create views based on ticket type.Types of tickets could include:
Service Request: A request from a user for information, or advice. A service request can be for a
move, add or change, which relocates, changes or installs some equipment or service. This could
be an installation of an application, purchasing hardware or providing additional access.
Incident Ticket: An unplanned interruption to an IT service. An Incident is when something the
customer currently has is broken and needs to be fixed as soon as possible. These are commonly
referred to as "break/fix tickets."
Problem Ticket: A cause of one or more Incidents. A problem is a condition often identified as a
result of multiple incidents that exhibit common symptoms. A problem can also be identified from
a single incident, but this incident is significant any can affect many users. For example, a server
is down, this problem would create multiple incident request and affects many.
Change Request: A ticket requesting a significant change that may require approval from someone
within the clients’ organization.
Creating Issue Types
1. Select the Admin > Service Desk > Ticket Types page.
2. Click New.
3. Enter the following fields.
Ticket Type Name
Description
Status - Active or InActive

Admin
54
4. Click Save.
Queues
Admin > Service Desk > Queues
The Queues page maintains the ticket queues used by your Service Desk module. Tickets are assigned
to queues. Technicians assigned to a queue are responsible for working the tickets in that queue. A
workflow can automatically assign a ticket to a queue, based on the settings of the ticket. You can
search for all tickets assigned to the queues you are a member of using the Queue search parameter on
the My Tickets (page 174) page.
You create a queue first.
Then you add employees to the queue.
Creating Queues
1. Select the Admin > Service Desk > Queues page.
2. Click New.
3. Enter the following fields in the Queue Information section.
Name
Description
Status - Active or InActive
4. Click Add to add one or more employees in the Queue Users section.
Select one or more rows in the employee list.
Click OK.
5. Click Save.
Priorities
Admin > Service Desk > Priorities
The Priorities pages maintains a list of priorities used to rank the urgency or importance of tickets in the
Service Desk module. Each priority is assigned a color to help you quickly identify high priority tickets in
your dashboard. Priorities can be included in an SLA (page 55) objective.
Creating Priorities
1. Select the Admin > Service Desk > Priorities page.
2. Click New.
3. Enter the following fields.
Priority Name
Description
Color - Select a background color from the color picker.

Admin
55
4. Click Save.
SLAs
Admin > Service Desk > SLAs
The SLAs page maintains a list of service level agreements. A service level agreement (SLA) is an
agreement between a service provider and the customer that defines the level of service expected
from the service provider. It defines the response time, escalations and potentially, resolution times per
incident in a contract format between you and your customer. The SLA specifies, in measurable terms,
how your company responds to the client’s needs and service requests. SLAs are critical towards
formalizing expectations around services with end users and customers. Without these, customer
expectations will assume that everything will be delivered and available at a 100% level all the time.
These SLAs can be individualized for each client based upon your contract agreement with them.
Tickets
A Default SLA is set for all tickets using the Admin > My Company > Company Settings > Service
Desk (page 22) tab.
Email parsers (page 58) calculate the SLA Time to Resolution when a new ticket is added.
The SLA Time to Resolution is paused whenever a ticket is in the waiting for customer status
(page 57).
For tickets assigned an SLA, when editing a ticket you will see a link next to an SLA Status field on
the Ticket View tab. Click this link to see the estimated and actual times specified for resolving the
ticket by the SLA.
Workflows
Workflows (page 33) contain several SLA options that affect how tickets are processed.
Triggers
SLA First Response Due In - Specifies when a SLA first response is due and sends an alert, in hours
or minutes.
SLA Resolution Due In - Specifies when a SLA resolution is due and sends an alert, in hours or
minutes.
SLA Resolution Overdue By - Specifies when a SLA resolution is past due and sends an alert, in
hours or minutes.
Conditions
SLA - A ticket is assigned/not assigned to one or more selected SLAs.
Update
SLA - Assigns a ticket to a specified SLA.
Contracts
Contracts can also be assigned to SLAs. A contract associated with an SLA overrides the Default
SLA when the ticket is linked to the contract.

Admin
56
Creating SLAs
1. Select the Admin > Service Desk > SLAs page.
2. Click New.
3. Enter the following fields in the Service Level Agreement Information section.
SLA Name
Description
Business Hours Of: - Select one of your company's locations. Each location specifies the
hours it is available to be contacted by customers.
Status - Active or InActive
4. Click Save.
5. Click the new SLA row you just created to open it again.
6. Click Add and enter the following fields in the SLA Objectives section.
Priority
Issue Type
Issue Sub Type
Timeframe - The timeframe specifies how SLA response times are calculated:
All (24x7) - Using all 24 hours, seven days a week.
Business Hours - Using the business hours defined for this location. For example, a
location defines business hours as 8:00 a.m to 5:00 p.m., Monday through Friday. You
have a 4 hour SLA for an incident and the ticket comes in at 3:00 p.m. on Monday.
Based on these hours of operation, you have until 10:00 a.m. on Tuesday to respond.
Extended - Using business hours and the hours beyond the normal end of the same
workday for this location. Excludes weekends and holidays. For example, a location
defines business hours as 8:00 a.m to 5:00 p.m., Monday through Friday. You have an
8 hour SLA for an incident and the ticket comes in at 3:00 p.m. on Monday. Based on
these hours of operation, you have until 11:00 p.m. of the same day, Monday, to
respond.
Resolve Time (in hours)
Click Save.
7. Repeat step 6 to add as many SLA Objectives as you require.

Admin
57
8. Click Save.
Ticket Statuses
Admin > Service Desk > Ticket Statuses
The Ticket Statuses page maintains a list of ticket status records. A ticket's status identifies where it is in
the process of being resolved. The system comes with several pre-defined statuses. You can create
additional statuses to meet your business requirements. Each status is assigned a color to help you
quickly identify the status of tickets in your dashboard. Typically statuses include:
New - The ticket has not yet been worked on.
In Progress - The ticket is being worked on.
Waiting for customer - The ticket is waiting for the customer to respond to a query from your
company.
Complete - The ticket has been resolved.
New, Waiting for Customer and Completed statuses cannot be made inactive.
Creating Ticket Statuses
1. Select the Admin > Service Desk > Ticket Statuses page.
2. Click New.
3. Enter the following fields:
Status Name
SLA Event - The selected SLA event is calculated based on setting a ticket to this status.
Display Order - Tickets can be sorted in drop-down lists based on this ranking. The sort order
of ticket pages can also be optionally affected by the Sort Status By (page 22) option.
Description
Color - Displays the status of a ticket using this background color.
Font Color - Displays the status of a ticket using this font color.
Status - Active or InActive

Admin
58
4. Click Save.
Email Parser
Admin > Service Desk > Email Parser
The Manage Mailboxes page maintains configuration settings for email parsers. Each active email parser
converts incoming email into support tickets. Email messages are parsed into separate elements, then
each element is mapped to the appropriate field of a new service desk ticket. With the email parser you
can:
Create new tickets from emails sent to [email protected]
Add attachments from emails to the ticket
Auto notify the sender of the success or failure of ticket creation
Auto assign the ticket to a queue
Take email responses from customers and add it as note to an existing ticket
Review "unknown" submissions and convert them to tickets or discard them using the Service
Desk > Unknown Tickets (page 185) page.
Email Submitted by Employees
Email parsers create tickets using the internal client account when the email is submitted by an
employee that has no contact record. When a new ticket is created using the email address of both an
employee and a contact, the new ticket is associated with the client account of the contact. Subsequent
replies to tickets using an email address shared by a contact and employee are added as employee
notes and not as client notes.
Logs and Notifications
Use the Logs tab to help troubleshoot issues with processing inbound emails using an email parser.
The Notifications tab specifies who to notify for different types of email parser events.
Creating Email Parsers
1. Select the Admin > Service Desk > Email Parser page.
2. Click New.
3. Enter the following fields in the Basics section.
Mailbox Name
Email
Note: Aliases for inbound email addresses are not supported.
Password
User Name

Admin
59
Status - Active or InActive
Add Attachments to Tickets - Yes or No
4. Enter the following fields in the Defaults tab. These are the default values for the ticket created
from email.
Priority
Queue
Primary Assignee
Ticket Type
Ticket Note Type
5. Enter the following fields in the IMAPs tab.
Incoming Mail Server - Must be an IMAP server. POP is not supported.
Server Port Number - Defaults to a value based on the encryption type selected.
Encryption Type - SSL, TLS or Non-Encrypted
Search Folder - Optionally specify a different email folder to check for new inbound email.
Defaults to Inbox.
6. Enter the following fields in the Notifications tab > Notify Sender section.
On Success Template
On Failure Template
Reply to
Sender - Sends reply email only to the sender of the original inbound email.
All (CC) - Sends reply email to all email recipients, including recipients copied (CC) on
the original inbound email.
Note: Email templates are maintained using the Admin > Business Process > Email Templates (page 30)
page.
7. Enter the following fields in the Notifications tab > Notify Internal Resources section.
On Success Template
Notified Internal Resources - Select one or more employees.
Notified Others - Email recipients.
On Failure Template
Notified Internal Resources - Select one or more employees.
Notified Others - Email recipients.
8. Enter the following fields in the Black List tab. Ignores email sent from these addresses.
Email Address
9. Click Save.
10. Click Save.
Survey Integration Settings
Admin > Service Desk > Survey Integration Settings
The Survey Integration Settings page maintains records that create customer survey links in email
notifications. Settings include:
The customer survey provider.
The HTML layout presented to a user when he or she clicks a link in a notification email to take a
survey.
The mapping of customer survey responses to 'satisfaction scores' maintained internally within
Vorex.

Admin
60
Configuration
In Vorex
1. Create a set of internal 'satisfaction scores' using the Admin > Service Desk > Internal Survey
Scores (page 60) page.
2. Create a Survey Integration Settings record.
Currently only Customer Thermometer survey integration records are supported.
Leave the Template Layout tab blank.
Click Save.
3. After the first save, a Survey Score Mappings tab displays.
The External Score column of values on this tab is fixed, and based on the customer survey
provider selected for the integration record.
Map your Internal Survey Scores to the External Score values.
Click Save.
In Customer Thermometer
1. Watch a video that explains how to 'Embed 1-click icons inside your ticket notifications' provided
by Customer Thermometer.
2. Generate Customer Thermometer feedback buttons and tracking links.
3. Copy the code in the 'HTML code for pasting' text box provided by Customer Thermometer.
In Vorex
1. Paste code from the 'HTML code for pasting' text box into the Template Content tab of your new
integration record on this page.
2. Add the %CUSTOMER_SURVEY_Customer_Thermometer%] field placeholder to any email
template (page 30) you wish to use to display a survey link when an email notification based on that
template is sent out.
3. Optionally configure a workflow notification to use the email template with the survey link.
Otherwise you must remember to select the email template when sending email notifications
manually.
Processing
Once a survey score is submitted:
Workflows can use the mapped results to evaluate the Satisfaction Score submitted and trigger a
subsequent update to the ticket. For example, if a ticket was closed and a customer was
dissatisfied, the ticket could be re-opened.
Opening a ticket shows the latest survey score submitted for the ticket on the Ticket View tab.
A Survey History tab in the opened ticket shows the complete history of all survey scores submitted
for the ticket.
The results of survey scores can also be shown in reports.
Visibility of survey score results can be controlled by a Customer Survey Scores permission in the
Service Desk section of security roles (page 39).
Internal Survey Scores
Admin > Service Desk > Internal Survey Scores
The Internal Survey Scores page maintains the internal records used to classify survey scores provided
by survey score providers. A numerical value is associated with each survey score record.
Admin
61

Admin
62
Copyright Agreement
The purchase and use of all Software and Services is subject to the Agreement as defined in Kaseya’s
“Click-Accept” EULATOS as updated from time to time by Kaseya at
http://www.kaseya.com/legal.aspx. If Customer does not agree with the Agreement, please do not
install, use or purchase any Software and Services from Kaseya as continued use of the Software or
Services indicates Customer’s acceptance of the Agreement.”
©2019 Kaseya. All rights reserved. | www.kaseya.com

Admin
63
RMM Integration Settings - Kaseya v1
Admin > Service Desk > RMM Integration Settings
Note: RMM Integration - Kaseya v2 (page 72) is strongly recommended for both new and existing users of Vorex™ and VSA.
Existing users of
RMM Integration - Kaseya v1
should upgrade by following the instructions in the RMM
Integration - Kaseya v2 - Upgrade (page 80) topic.
The RMM Integration Settings page maintains configuration settings for integrating Vorex™ with a remote
monitoring and management (RMM) systems. Once integration is complete you can monitor machines
and devices using an integrated RMM and manage their corresponding tickets in Vorex™.
Kaseya v.1 Integration Summary
Integrating Servers (page 63)
Integrating Ticket Settings (page 64)
Integrating Customer Accounts and Locations (page 65)
Assets Synchronization (page 66)
Testing Ticket Integration (page 69)
Integrating Servers
Admin > Service Desk > RMM Integration Settings
In this first procedure you integrate your Vorex™ instance with a Kaseya VSA server.
VSA Prerequisites
Identify the VSA address.
Create a dedicated VSA user account used by Vorex to access the VSA. Example:
Vorex_service
Ensure ticket creation events in the VSA create tickets in the Ticketing module of the VSA.
Procedure
1. Select the Admin > Service Desk > RMM Integration Settings page.
2. Click New.
3. Enter the following fields in the General Settings tab, Configuration Options section.
Enable RMM Integration - Enable or Disable
Integration Name - Enter a unique name for this integration.

Admin
64
Integration Type - Kaseya
Integrator Username - Enter the VSA username Vorex uses to access the VSA. This should be
a dedicated service account, such as Vorex_service.
Integrator Password - Enter the password for the Vorex service account.
Server Address (IP-Port) - Enter the IP address for the VSA.
Callback URL - Enter the URL used by the VSA to update the Vorex, using the following
format:
https://vorexlogin.com/KaseyaCallback.aspx?Client=<yourcompanyname+secondword
>
For example:
https://vorexlogin.com/KaseyaCallback.aspx?Client=kaseya+demo
4. Click Save to save the integration.
Integrating Ticket Settings
Admin > Service Desk > RMM Integration Settings
In this procedure you review default ticket settings and map ticket statuses between Vorex™ and the
VSA.
1. Select the Admin > Service Desk > RMM Integration Settings page.
2. Select the integration record you just created.
3. Optionally change the default values in the General Settings tab, Ticket Defaults section. All Vorex™
ticket values created from an RMM ticket are initially set to these values. They can be
automatically changed—based on the ticket's content—using a Vorex™ workflow (page 33).
Priority
Queue
Ticket Type
Ticket Note Type
Ticket Source
4. Select the Ticket Status Mapping tab.
5. Select values for mapping ticket statuses between Vorex™ and the VSA.
Ticket Status Mapping From Vorex
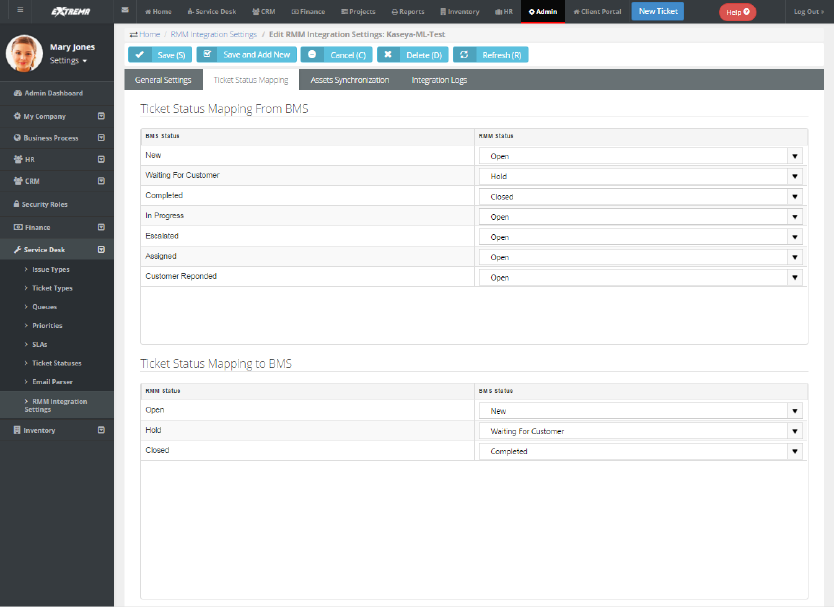
Admin
65
Ticket Status Mapping To Vorex
6. Click Save to save the ticket defaults and ticket mapping.
Integrating Customer Accounts and Locations
Admin > Service Desk > RMM Integration Settings
In each Vorex™ customer account you choose to integrate, you must map Vorex™ customer
accounts to VSA organizations. You must also map machine groups in each integrated VSA
organization to locations in each Vorex™ customer account.
1. Select the CRM > Accounts page.
2. Select an account.
3. Click the RMM Integration tab.
4. Select the Kaseya Organization ID that corresponds to this Vorex™ customer account.
5. Add or edit a location on the Location tab.
6. Click the RMM Integration tab in the dialog.
7. Select the VSA machine group that corresponds to this Vorex™ location.
8. Repeat steps 5 through 7 for each machine group and location you want to integrate.
9. Click Save to save the customer account.
10. Repeat this procedure for each customer account you want to integrate.

Admin
66
Assets Synchronization
Admin > Service Desk > RMM Integration Settings
This procedure provides bulk synchronization. Even if this bulk procedure is not run, asset
synchronization occurs automatically for integrated customer accounts and locations when:
A ticket is created for an existing agent.
A new agent is installed.
Synchronizing Assets
1. Select the Admin > Service Desk > RMM Integration Settings page.
2. Click the integration record you created earlier.
3. Select the Assets Synchronization tab.
4. Optionally filter the loading of asset data from the VSA into Vorex™ using the Load Assets tab.
Machine Group ID
Group Name
MAC Address
IP Address

Admin
67
First Check In
5. Click the Load Assets button to load asset data from the VSA into Vorex™.

Admin
68
6. Check the assets you want to import. You can also select the 'select all' checkbox in the upper left
hand corner of the table to select all listed assets.
7. Review the Import Results.
If the customer account and location is mapped and the asset exists or is added, the import
shows success.

Admin
69
If the customer account or location is not mapped, the import shows failure.
8. Review synchronized asset properties using the Vorex > Service Desk > Asset Management >
Hardware Assets (page 186) page.
Testing Ticket Integration
Admin > Service Desk > RMM Integration Settings
Once integration is configured, you can test it by triggering a system-generated ticket in the VSA, then
view the corresponding ticket in the Vorex™.
1. In the VSA, use a monitoring event to create a Ticketing ticket for an agent in an integrated
organization and machine group.
2. In Vorex™ select the Service Desk > Tickets (page 174) page.
3. Select the Vorex™ ticket created for the VSA monitoring event.

Admin
70
The Ticket View > Assets section identifies the machine, group and organization of the agent
account in the VSA.
4. Select the RMM Integration tab.
The Ticket Reference identifies the ticket in the VSA.

Admin
71
Copyright Agreement
The purchase and use of all Software and Services is subject to the Agreement as defined in Kaseya’s
“Click-Accept” EULATOS as updated from time to time by Kaseya at
http://www.kaseya.com/legal.aspx. If Customer does not agree with the Agreement, please do not
install, use or purchase any Software and Services from Kaseya as continued use of the Software or
Services indicates Customer’s acceptance of the Agreement.”
©2019 Kaseya. All rights reserved. | www.kaseya.com

Admin
72
RMM Integration Settings - Kaseya v2 - New
Admin > Service Desk > RMM Integration Settings
The RMM Integration Settings page maintains configuration settings for integrating Vorex™ with multiple
remote monitoring and management (RMM) systems. Once integration is complete you can monitor
machines and devices using an integrated RMM and manage their corresponding tickets in Vorex™.
RMM Integration - Kaseya v2 (pdf)
(http://help.kaseya.com/WebHelp/EN/Vorex/EN_Vorex_Kaseya_v2.pdf#zoom=70&navpanes=0)
Version Requirements
VSA must be running 9.3.0.11 or later. Vorex™ must be running 3.9 or later.
RMM Integration - Kaseya v2 - New
These five topics contain all instructions required for a new integration and should be performed in
sequence.
1. Integrating Servers v2 (page 72)
2. Synchronizing Accounts v2 (page 74)
3. Assets Synchronization v2 (page 75)
4. Integrating Live Connect v2 (page 76)
5. Activating VSA Integration v2 (page 77)
6. Review Ticket Integration v2 (page 78)
RMM Integration - Kaseya v2 - Upgrade from Kaseya v1
Upgrading to RMM Integration - Kaseya v2 (page 80) - This single topic contains all instructions
required for upgrading.
Integrating Servers v2
Admin > Service Desk > RMM Integration Settings > General Settings
In this first procedure you integrate your Vorex™ instance with a Kaseya VSA server. You also select
default ticket settings for tickets sourced from the VSA.
Note: Do not attempt to configure integration inside the VSA before configuring integration in Vorex.
Configuring the VSA is the last step of
new
Vorex / Kaseya v2 integration. To
upgrade
see RMM
Integration - Kaseya v2 - Upgrade (page 80).
Integration Prerequisites
VSA must be running 9.3.0.11 or later. Vorex™ must be running 3.9.
Identify the VSA address you will integrating with Vorex™.
Create a dedicated VSA user account used by Vorex™ to access the VSA. Example:
Vorex_service. The VSA user account should have access to all organizations.
Identify the "root" user in Vorex™. The root user is the top most employee tile in the HR >
Organizational Chart (page 104) page. Using this user for RMM Integration is recommended to
ensure all Vorex > CRM customer accounts and Vorex > Service Desk tickets can be accessed.
Disable the VSA > Ticketing email server by checking the Disable email reader checkbox on the VSA
> Ticketing > Email Reader page.
If the Service Desk module is installed in the VSA:
Click the Disable button on the VSA > Service Desk > Incoming Email and Alarm Settings
page.
Uncheck the Activate Service Desk checkbox on the VSA > Service Desk > Global Settings
page.

Admin
73
Procedure
1. Select the Admin > Service Desk > RMM Integration Settings page.
2. Click New.
3. Enter the following fields in the General Settings tab, Configuration Options section.
Enable RMM Integration - Enable or Disable
Integration Name - Enter a unique name for this integration.
Integration Type - Kaseya Ver.2
Integrator Username - Enter the VSA username Vorex uses to access the VSA. This should be
a dedicated service account, such as Vorex_service.
Note: In the VSA, each username is unique across all tenant partitions, so you do not have to
specify a company name in the VSA as you do in Vorex.
Integrator Password - Enter the password for the Vorex service account.
Server Address - Enter the URL or IP address for the VSA. Optionally include a port.
Push CRM Accounts automatically to VSA - Enable or Disable - If enabled, new CRM customer
accounts create corresponding organizations in the VSA, as soon as the CRM customer
account is created. The CRM customer account and VSA organization remains mapped to
each other from then on. This option does not apply to existing CRM accounts.
4. Select default values in the Ticket Defaults section. All Vorex™ ticket values created from an RMM
ticket are initially set to these values. They can be automatically changed—based on the ticket's
content—using a Vorex™ workflow (page 33).
Priority
Queue
Ticket Type
Ticket Note Type
Ticket Source
5. Click Save to save your settings.

Admin
74
6. Click Test Connection to ensure Vorex™ can connect with the VSA instance you have specified.
Synchronizing Accounts v2
Admin > Service Desk > RMM Integration Settings > Accounts Synchronization
Once a Kaseya version 2 RMM Integration Settings record has been saved, you can bulk import VSA
organizations into Vorex™ to create corresponding CRM customer accounts. Minor spelling
differences are ignored to intelligently match accounts. TheVorex™ remembers the mapping so you
can reimport as often as you like. This would typically occur at least once during your initial
configuration. You can also export existing CRM customer accounts to create corresponding
organizations in the VSA.
Additional Guidelines
Running Accounts Synchronization initially is recommended. Whether or not Accounts
Synchronization is run. Once Vorex integration is activated in the VSA, Vorex™ will create a new
CRM customer account for any new VSA organization referenced by a new ticket or new asset.
Changing the name of the organization or asset in the VSA does not update Vorex™ unless you
run Accounts Synchronization and Assets Synchronization again.
You can also manually associate an existing CRM customer account with an existing VSA
organization, using the CRM > Accounts > (selected account) > RMM Integration (page 155) tab.
Import Accounts Procedure
1. Click Load Accounts.
2. Optionally filter the loading of data from the VSA into Vorex™ using the Filter by Name... field. Click
Load Accounts again to re-display the filtered list.
3. Select the organizations you want to import into Vorex™.
4. Optionally click:
to edit the mapping
to delete the mapping
(Vorex account name) to display its account record in Vorex
5. Click Import Results.
Note: If you get a 'There are no logs yet!' message you may have forgotten to select any
organizations to import.
Export Accounts Procedure
Use this procedure to export existing CRM customer accounts in Vorex™ to the VSA. Any new CRM

Admin
75
account you create is automatically added to the VSA without having to use this feature.
1. Click Load Accounts.
2. Optionally filter the loading of data from the VSA into Vorex™ using the Filter field.
3. Select the CRM customer accounts you want to export to the VSA.
4. Click Export Results.
Note: If you get a 'There are no logs yet!' message you may have forgotten to select any CRM
customer accounts to export.
Assets Synchronization v2
Admin > Service Desk > RMM Integration Settings
This procedure provides bulk synchronization of assets. Even if this bulk procedure is not run, asset
synchronization occurs automatically for integrated organizations/customer accounts when:
An asset is detected using VSA > Discovery.
A new agent is installed in the VSA.
Additional Guidelines
Changing the name of the organization or asset in the VSA does not update Vorex™ unless you
run Assets Synchronization.
Once assets are imported, you can also manually create a ticket in Vorex™ and select the
imported asset, without having to initiate a ticket creation event in the VSA.
Procedure
1. Select the Admin > Service Desk > RMM Integration Settings page.
2. Click the integration record you created earlier.
3. Select the Assets Synchronization tab.
4. Click Load Assets.
5. Optionally filter the loading of data from the VSA into Vorex™ using filter fields.
Asset Name
Machine Group
Is Computer Agent - No or Yes - If Yes, the computer has a Kaseya agent installed.
6. Select the assets you want to import into Vorex™.
7. Click Import Results.

Admin
76
Note: If you get a 'There are no logs yet!' message you may have forgotten to select any assets to
import.
8. Review synchronized asset properties using the Vorex > Service Desk > Asset Management >
Hardware Assets (page 186) page.
Integrating Live Connect v2
From within a Vorex™ ticket you can launch a VSA Live Connect session to a machine by clicking the
associated hardware asset.
Prerequisites
VSA v9.4
SSL enabled on VSA with valid certificate
The latest version of the Kaseya Live Connect app from VSA v9.4.
Allow popups for all sites on the browser you are using during configuration.
Configuration
1. Register your Vorex™ instance in the target VSA.
See the VSA > System > OAuth Clients
(http://help.kaseya.com/webhelp/en/VSA-Online-Help.asp?Topic=37667.htm) help topic for instructions.
Provide a Redirect URL. The format should be:
https://<Vorex-domain-name>/OAuth/KaseyaVSACallback.aspx
Provide an email address that will send you a Client ID and Client Secret.
2. Enter the Client ID and Client Secret from the mail into the Live Connect tab in Vorex™.
3. Save the RMM Integration Settings record with the new Client ID and Client Secret values entered.
4. Click the Connect via OAuth button.
5. Save your changes to this RMM Integration Settings record.
6. Navigate to the Vorex™ > Admin > Security Roles page.
7. Edit the security roles used by your Service Desk technicians. For example: Service Desk
Manager.
8. For each security role that applies, ensure the Kaseya Live Connect special feature is checked in the
Service Desk section of the Permissions tab.
9. For each user that will be using the Vorex™ Live Connect feature, download and install the VSA
Live Connect app on his or her local computer.
10. Verify the Live Connect integration when you get to step 4 of Review Ticket Integration v2 (page
78). Live Connect can be launched from:
The Service Desk > Asset Management > Hardware Assets page
The View Ticket tab of an open ticket.
The Search Hardware Assets dialog used to select a hardware asset and link it to a ticket.

Admin
77
Activating VSA Integration v2
VSA > System > BMS Integration > Sync Configuration
In the VSA the Sync Configuration page configures VSA access to data in Vorex™. Once the
configuration is activated, Vorex™ creates tickets for the VSA, based on ticket creation events
detected in the VSA.
Prerequisites
The RMM Integration - Kaseya v2 record for the corresponding Vorex™ company you wish to
integrate must already be configured and enabled for your VSA.
The Activate Service Desk checkbox in the VSA > Service Desk module—if installed—must be
deactivated.
Actions
Edit - Configures the Vorex™ company account that creates tickets for this VSA.
Test - Tests the connection with the Vorex™ server and company account.
Resume / Enable Sync Processing
Resumes creating tickets in Vorex™.
Any ticket creation events in the VSA that have occurred since sync processing was paused
are forwarded to Vorex™.
Pause Sync Processing
Halts ticket creation in Vorex™.
Ticket creation events continue to be queued, ready to create tickets when you resume sync
processing.
Activate Integration Module
The VSA > Service Desk and Ticketing modules will no longer create tickets for any ticket
creation events in the VSA. This includes tickets created for alerts and for inbound emails.
The email readers for Service Desk and Ticketing will no longer be polled.
Note: Existing tickets are not processed in this initial release of
RMM Integration - Kaseya v2
.
Deactivate Integration Module
Ticket creation events in the VSA begin creating tickets in the Ticketing module.
Procedure
1. In the VSA, select the System > BMS Integration > Sync Configuration page.
2. Click Edit.
3. Enter the following in the Edit Settings dialog.
URL of BMS Server - Enter the URL of your Vorex™ server.
Company - Enter your Vorex™ company name.
Username - Enter a Vorex™ login username. The Vorex™ "root" user account is
recommended. See the prerequisites in Integrating Servers v2 (page 72).
Password - Enter the password for your Vorex™ login username.
Select Asset Push Rule
Agent Assets Only - Only computers with agents installed on them are pushed to
Vorex.
All Assets - Devices without agents can be promoted to assets. Both computers and
devices promoted to assets are pushed to Vorex.
None - No assets are pushed to Vorex.
Ticket Processing Rules

Admin
78
Deduplicate matching tickets updated within <N> hours – Matching tickets can
be sent to Vorex as a single ticket with a duplicate count of X within the designated
time frame.
Reopen closed duplicate tickets – Closed duplicate tickets can be reopened after
synchronization to Vorex.
4. Click Test to verify your VSA can access the Vorex™ server.
5. Click the Activate Integration Module.
6. Click the Resume/Enable Sync Processing button.
Both buttons must have a green checkmark to trigger the creation of tickets in Vorex™.
7. Configure ticket creation events in the VSA.
8. Optionally review log entries created by the VSA for ticket requests sent to Vorex™
System > BMS Integration > Sync Transaction Log - Displays a log of sync transactions
between the VSA and Vorex™.
System > BMS Integration > BMS API Log - Displays a log of REST API requests related to
the integration between the VSA and Vorex™.
Review Ticket Integration v2
Service Desk > Tickets > (selected ticket) > Edit > RMM Integration
Once integration is configured, you can test it by triggering a system-generated ticket in the VSA, then
view the corresponding ticket in the Vorex™.
Note: Closing the Vorex ticket also closes the alarm in the VSA that was created by the same alert. This
feature requires the System > Configure > Enable auto close of alarms and tickets checkbox be checked in the
VSA.
Procedure
1. In the VSA, use a monitoring event to create a Ticketing ticket for an agent in an integrated
organization and machine group.
2. In Vorex™ select the Service Desk > Tickets (page 174) page.
3. Select the Vorex™ ticket created for the VSA monitoring event.

Admin
79
The Ticket View > Affected Assets section identifies the machine, group and organization of
the agent account in the VSA.
4. Click Live Connect to start a session to this machine.
A separate Live Connect window opens. If this is the first time during your session you have
used Live Connect, you will be required to enter a VSA username and password. Your
credentials determines the Live Connect assets you are authorized to access.
If no Live Connect asset is shown, you can add one manually. Click Edit, then click the plus
icon next to the Affected Hardware Asset field. In the Search dialog you can start a Live Connect
session on any of the assets listed, without having to link it to the ticket.
5. Select the RMM Integration tab.
The Ticket Reference identifies the value shown in the Record Reference column in the Sync
Transaction Log page in the VSA.
The Status column in the Sync Transaction Log displays the Vorex ticket number created.
6. Select the Service Desk > Assets Management > Hardware Assets page.
Click any row that displays a Live Connect icon. A separate Live Connect window opens.
If a icon displays, this is the first time during your session you have used Live Connect.
Click the icon to enter a VSA username and password. Your credentials determines the Live
Connect assets you are authorized to access.

Admin
80
RMM Integration Settings - Kaseya v2 - Upgrade
Customers who have already integrated their VSA with Vorex™ using RMM Integration - Kaseya v1
may wish to upgrade to RMM Integration - Kaseya v2. Upgrading to RMM Integration - Kaseya v2:
Provides better performance and efficiency.
Enables users to take advantage of future integration enhancements.
Provides enhanced logging and tracking of integration transactions.
Enables temporary pausing of ticket creation events without loss of data.
Eliminates duplicate creation of tickets in both the VSA and Vorex.
Supports cutover from either the VSA Service Desk module or the VSA Ticketing module.
Supports both on premises and SaaS VSA implementations.
Closing the Vorex ticket also closes the alarm in the VSA that was created by the same alert. This
feature requires the System > Configure > Enable auto close of alarms and tickets checkbox be
checked in the VSA.
Upgrade Prerequisites
VSA must be running 9.3.0.11 or later. Vorex™ must be running 3.9.
The following two files are required to complete the uninstall of your existing RMM integration -
Kaseya v1 configuration. You can download them from the Kaseya Community
(http://community.kaseya.com/resources/m/tpipinfo/86618.aspx). Copy these two files to the
//Kaseya/BMSSync folder of your VSA. Do not run these files until instructed to do so in the procedure
below.
RemoveBMSSync.bat - You will run this from a command line on the system hosting your
VSA.
RemoveBMSSync.sql - You will execute this SQL query on the system hosting the SQL
Server used by your VSA.
Identify or create a new dedicated VSA user account used by Vorex™ to access the VSA.
Example: Vorex_service. The VSA user account should have access to all organizations. You
can re-use the same one you're already using for your existing RMM Integration - Kaseya v1.
Identify the "root" user in Vorex™. The root user is the top most employee tile in the HR >
Organizational Chart (page 104) page. Using this user for RMM Integration is recommended to
ensure all Vorex > CRM customer accounts and Vorex > Service Desk tickets can be accessed.
Disable the VSA > Ticketing email server by checking the Disable email reader checkbox on the VSA
> Ticketing > Email Reader page.
If the Service Desk module is installed in the VSA:
Click the Disable button on the VSA > Service Desk > Incoming Email and Alarm Settings
page.
Uncheck the Activate Service Desk checkbox on the VSA > Service Desk > Global Settings
page.
In VSA
1. In the VSA, select the System > BMS Integration > Sync Configuration page.
2. Click the Activate Integration Module button.
This disables the creation of tickets in Vorex using your existing RMM Integration - Kaseya v1 record.
Ticket creation events in the VSA will continue to be collected with no loss of data. Tickets
will resume being created when the new integration has been configured and activated.

Admin
81
In Vorex
1. Select the Admin > Service Desk > RMM Integration Settings page.
2. Select the existing RMM Integration - version 1 record you have been using.
Set Enable RMM Integration option to Disable.
Save, then close this record.
3. Click New to create a new integration record.
4. Enter the following fields in the General Settings tab, Configuration Options section.
Enable RMM Integration - Enable or Disable
Integration Name - Enter a unique name for this integration.
Integration Type - Kaseya Ver.2
Integrator Username - Enter the VSA username Vorex uses to access the VSA. This should be
a dedicated service account, such as Vorex_service.
Note: In the VSA, each username is unique across all tenant partitions, so you do not have to
specify a company name in the VSA as you do in Vorex.
Integrator Password - Enter the password for the Vorex service account.
Server Address - Enter the URL or IP address for the VSA. Optionally include a port.
Push CRM Accounts automatically to VSA - Enable or Disable - If enabled, new CRM customer
accounts create corresponding organizations in the VSA, as soon as the CRM customer
account is created. The CRM customer account and VSA organization remains mapped to
each other from then on. This option does not apply to existing CRM accounts.
5. Optionally change the default values in the Ticket Defaults section. All Vorex™ ticket values
created from an RMM ticket are initially set to these values. They can be automatically
changed—based on the ticket's content—using a Vorex™ workflow (page 33).
Priority
Queue
Ticket Type
Ticket Note Type
Ticket Source
6. Click Save to save your settings.
Do not run the Account Synchronization and Asset Synchronization tabs yet. These are run later.

Admin
82
7. Click Test Connection to ensure Vorex™ can connect with the VSA instance you have specified.
In VSA
The following two steps assume you downloaded these files as described in the pre-requisites above.
1. In a command line with administrator-level privileges, run the
//Kaseya/BMSSync/RemoveBMSSync.bat.
2. Login into SQL Server used by your VSA and execute the BMSSync.sql script.
In Vorex
1. Select the Admin > Service Desk > RMM Integration Settings page.
2. Select your new RMM Integration - Kaseya v2 record you just configured and enabled.
3. Click the Accounts Synchronization tab.
4. Click Load Accounts.
5. Optionally filter the loading of data from the VSA into Vorex™ using Filter headers.
6. Select the organizations you want to import into Vorex™.
7. Click Import Results.
8. Select the Assets Synchronization tab.
9. Click Load Assets.
10. Optionally filter the loading of data from the VSA into Vorex™ using Filter headers.
11. Select the assets you want to import into Vorex™.
12. Click Import Results.
Admin
83
In VSA
1. Select the System > BMS Integration > Sync Configuration page.
2. Click Edit.
3. Enter the following in the Edit Settings dialog.
URL of BMS Server - Enter the URL of your Vorex™ server.
Company - Enter your Vorex™ company name.
Username - Enter a Vorex™ login username. The Vorex™ "root" user account is
recommended. See the prerequisites in Integrating Servers v2 (page 72).
Password - Enter the password for your Vorex™ login username.
4. Click Test to verify your VSA can access the Vorex™ server.
5. Click the Activate Integration Module.
6. Click the Resume/Enable Sync Processing button.
Both buttons must have a green checkmark to trigger the creation of tickets in Vorex™.

Admin
84
Copyright Agreement
The purchase and use of all Software and Services is subject to the Agreement as defined in Kaseya’s
“Click-Accept” EULATOS as updated from time to time by Kaseya at
http://www.kaseya.com/legal.aspx. If Customer does not agree with the Agreement, please do not
install, use or purchase any Software and Services from Kaseya as continued use of the Software or
Services indicates Customer’s acceptance of the Agreement.”
©2019 Kaseya. All rights reserved. | www.kaseya.com

Admin
85
RMM Integration Settings - Continuum
The RMM Integration Settings page maintains configuration settings for integrating Vorex™ with a remote
monitoring and management (RMM) systems. Once integration is complete you can monitor machines
and devices using an integrated RMM and manage their corresponding tickets in Vorex™. Linked
Continuum assets are created in Vorex™ as the tickets are created.
RMM Integration - Continuum integrates Vorex™ with Continuum, a remote monitoring and
management (RMM) system. Perform the following procedures to configure and activate integration.
Warning: Do not perform Step 5 - PSA Integration and Activation (page 88) until all other steps are
completed. Once you enter the Callback URL and click Update, Continuum will start to send alerts into
Vorex™ and the ticket creation process will start.
Continuum Integration Summary
Step 1 - Recommended Settings (page 85)
Step 2 - RMM Integration Settings (page 85)
Step 3 - Ticket Status Mapping (page 87)
Step 4 - Account Mapping (page 87)
Step 5 - PSA Integration and Activation (page 88)
Step 1 - Recommended Settings
Add the following records in Vorex™ to support data provided by Continuum.
Ticket Statuses
Admin > Service Desk Folder > Ticket Statuses
Add the following two statuses.
Pending
NOC Completed
Priorities
Admin > Service Desk Folder > Priorities
Add the following priorities.
Low
Emergency
Queue
Admin > Service Desk Folder > Queues
Add the following queue.
Monitoring Alert Tickets
Step 2 - RMM Integration Settings
Add a Continuum integration record in Vorex™.
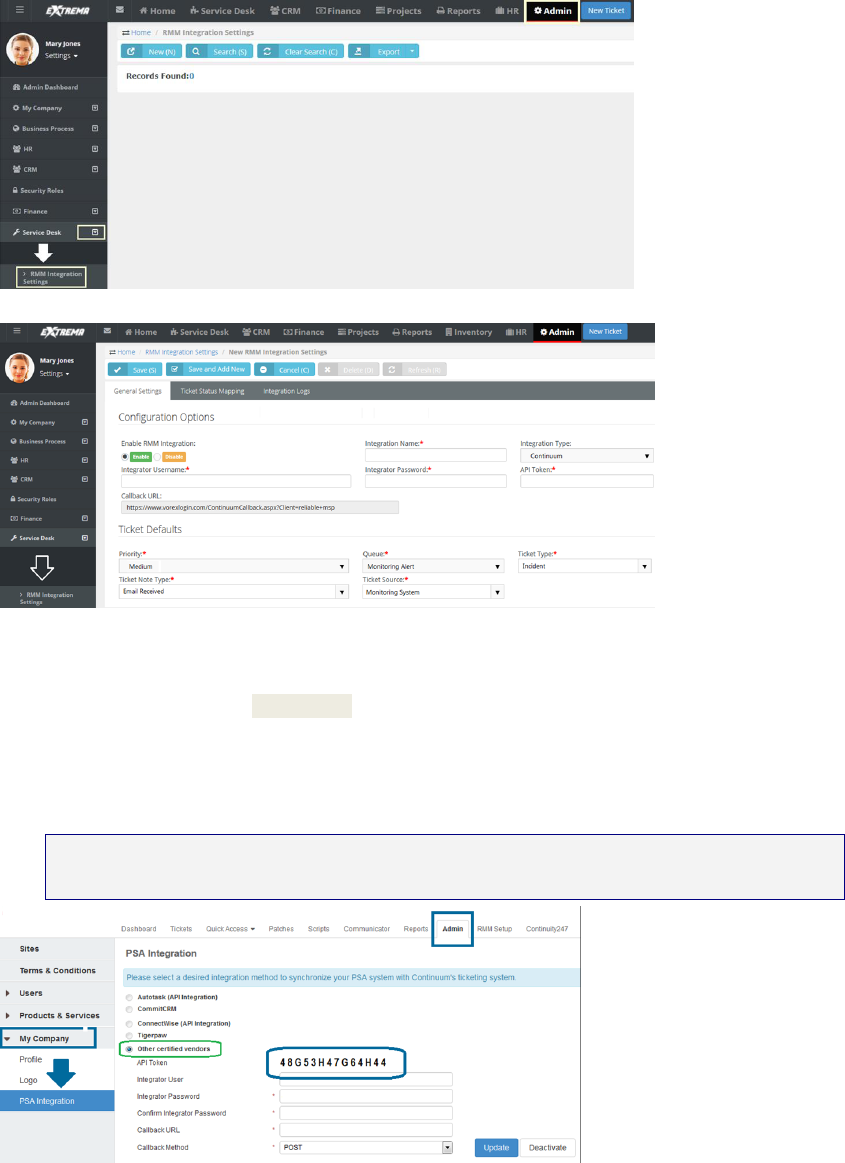
Admin
86
1. Select Admin > Service Desk > RMM Integration Settings.
2. Click New to create your integration.
3. Enter the following in the General Settings > Configuration Options section.
Integration Name - Enter a name that is easy to understand. You may want to add other
integrations later.
Integration Type - Select Continuum from the drop-down list.
Integrator Username - Create an "integrator username" you will use later to integrate with
Continuum.
Integrator Password - Create an "integrator password".
API Token - Enter the API token provided by Continuum.
Note: You can identify the
API Token
in Continuum by navigating to the
Admin > My Company >
PSA Integration
page.
4. In Vorex™, enter the following in the General Settings > Ticket Defaults section.
Priority - Select a default priority.

Admin
87
Queue - Select the queue you want tickets created from Continuum monitoring alerts to be
assigned to. For example, Monitoring Alert Tickets, if you created that in step 1.
Ticket Type - Select a default ticket type.
Ticket Note Type - Select a default note type. General Notes is fine.
Ticket Source - Select a default ticket source. Monitoring System is recommended.
5. Click Save.
Step 3 - Ticket Status Mapping
Admin > Service Desk > RMM Integration > Continuum Integration > Ticket Status
Mapping
In Vorex™:
Map Continuum ticket statuses to Vorex™ ticket statuses.
Map Vorex™ ticket statuses to Continuum ticket statuses.
Step 4 - Account Mapping
1. In Continuum, select the Admin > Sites page.
2. Copy the <site_code> value.
In Continuum, a site code equals an account in Vorex™.
3. In Vorex™, select the CRM > Accounts page.

Admin
88
4. Open an account that matches the <site_code> information.
5. Double-click a Location record to edit.
The location record should correspond to the <site_code> for this account. You may have
several locations defined for this account.
6. Click the RMM Integration tab.
7. Paste the <site_code> into the Continuum Location Code field.
8. Click Save.
Step 5 - PSA Integration and Activation
Configure Continuum to use Vorex™ as its PSA Integration solution.
Warning: Do not perform this step until all other steps are completed. Once you enter the Callback URL
and click Update, Continuum will start to send the alerts into Vorex™ and the ticket creation process will
start.

Admin
89
1. In Continuum, select the Admin > My Company > PSA Integration page.
2. Select the Other certified vendors option.
Integrator User - Enter the Integrator Username you specified in Step 2 - RMM Integration
Setup (page 85).
Integrator Password - Enter the Integrator Password you specified in Step 2 - RMM Integration
Setup (page 85).
Confirm Integrator Password - Re-enter the Integrator Password.
Callback URL - Enter a URL similar to the following:
https://vorexlogin.com/ContinuumCallback.aspx?Client=Company_Name
Note: You can identify the
Callback URL
in Vorex™ by navigating to the
Admin
>
Service Desk >
RMM Integration Settings
page. Open the RMM Integration Settings record you created in Step 2
(page 85) and copy the value in the Callback URL field.
Callback Method - Select POST from the drop-down list.
3. Click on the Update button.
A ticket originates in Continuum and gets created in Vorex™.
Linked Continuum assets are created in Vorex™ as the tickets are created.
Updates to the status and notes of a Vorex™ ticket are posted back to its corresponding
ticket in Continuum.
If a ticket is manually created new in Vorex™ Continuum is not updated.
Inventory (in Admin)
Admin > Inventory
The Inventory menu in the Admin module defines support tables used by your inventory operations.
In This Section
Warehouses 89
Product Categories 90
Warehouses
Admin > Inventory > Warehouses
The Warehouses page specifies the physical dimensions and maximum weight allowed for each
warehouse. Warehouses are required to store inventory quantities.
Inventory quantities are stored in a default "virtual" location. Received quantities are also stored

Admin
90
temporarily in the default virtual location. The location is identified by the Warehouse Prefix and word
Default. For example, W0987_:Default.
Creating Warehouses
1. Select the Admin > Inventory > Warehouses page.
2. Click New.
3. Enter the following fields in the Warehouse section.
Warehouse Name
Description
Width / (unit of length)
Height / (unit of length)
Depth / (unit of length)
Max Weight / (unit of weight)
Warehouse Prefix
4. Click Save.
Product Categories
Admin > Inventory > Product Categories
The Product Categories page specifies categories and sub categories products. These are used to
classify inventory.
Creating Product Categories
1. Select the Admin > Inventory > Product Categories page.
2. Click New.
3. Enter the following fields in the Category Info section.
Category Name
Description
Status - Active or InActive
4. Click Add to add a sub categories in the Sub Categories section.
Name
Description
Is Active
5. Repeat step 4 to add additional sub categories as required.
6. Click Save.
Email Logs
Admin > Logs > Email Logs
The Email Logs page provides an audit of all outbound email used to notify customers.
Note: A similar log is provided for each email parser used to process
inbound
email from customers.
On the list page you can:
Search for emails using the From, To, Display Name, Subject and Body fields, or by date range.
Export the email log.
Click any single row to see the details of that email:

Admin
91
The Email Log Info tab shows the content of the email.
The Email Log History tab shows a history of email sending events.
You can Delete, Resend or Forward the email.
Clicking Forward displays dialog that enables you to edit the email before you forward it.
Import Data
Admin > Imports & Exports > Import Data
The Import Data page imports customer accounts and contacts from other PSA vendor systems.
Currently only ConnectWise systems can be imported.
Importing Data from ConnectWise
In ConnectWise
Create public and private keys.
1. Login into ConnectWise.
2. Navigate to My Account.
3. Click the API Keys tab.
4. Click the + icon.
5. Enter Vorex Integration as the Description, then save the record. The page should refresh.
6. Make note of the displayed Public Key and Private Key.
In Vorex
Start a data import job.
1. Login into Vorex.
2. Select the Admin > Imports & Exports > Import Data page.
3. Click the ConnectWise logo.
4. Enter the following ConnectWise authentication details:
Public Key
Private Key
Server
Admin
92
If your customer login URL looks like this...
na.myconnectwise.net
... the API URL for Data Import needs to be entered as this:
api-na.myconnectwise.net/v4_6_release/apis/3.0/
In this example, na changes to api-na.
Append /v4_6_release/apis/3.0/ to the end of the URL.
Company
Job Processing and Notification
Vorex™ will queue your job and process it. When processing completes you will be notified by email.
The following is a sample email:
<your_Vorex_account_name>,
Your ConnectWise data import has been completed.
8 Client Accounts and 13 Contacts were imported from your
ConnectWise account to Vorex™.
For questions and assistance, contact Support.
Thank you,
Vorex™

Human Resources
93
Human Resources
The following support tables are configured for human resource tracking and reporting purposes.
When completed you will be able to:
Run reports based on your company's job titles and departments.
Send messages to your company's departments.
Classify projects worked on by your company's departments.
Generate an organization chart in the Human Resources module based on your company's
departments and job titles.
In This Chapter
Dashboard 93
Departments 93
Job Titles 94
Skill Categories 94
Employees 95
Organizational Chart 104
Dashboard
Note: See the Home > Dashboard (page 15) for a description of this topic. The same Dashboard displays in
the Home, Admin and HR modules.
Departments
HR > Departments
Admin > HR > Departments
Creating Departments
1. Select the Admin > HR > Departments page.
2. Click New.
3. Enter the following fields:
Department Name
Description
Manager
Annual Budget - The annual budget of this department.
C h a p t e r 3

Human Resources
94
Cost Center - The account cost center associated with this department.
Job Titles
HR > Job Titles
Admin > HR > Job Titles
Creating Job Titles
1. Select the Admin > HR > Job Titles page.
2. Click New.
3. Enter the following fields:
Job Title
Description
Status - If Yes, this job title is used.
Skill Categories
HR > Skill Categories
Admin > HR > Skill Categories
The Skill Categories page defines job skills referenced by other modules. For example:
Admin > HR > Employees
Projects > (any project) > (any task)
Creating Skill Categories
1. Select the Admin > HR > Skill Categories page.
2. Click New.
3. In the Skill Category section add the following:
Skill Category Name

Human Resources
95
Description
4. In the Skill section enter the following:
Name
Description
5. Click Add to add addition skills as necessary.
Employees
HR > Employees
Admin > HR > Employees
The Employees page maintains your company's employee profiles. This same page displays in the HR
module if you have permission. Initially you create a basic profile. After you save an employee profile
the first time, multiple tabs display for you to enter additional details.
Creating Employee Profiles
1. Select the Admin > HR > Employees page.
2. Click New.
3. Enter the following basic fields in the New Employee page.
User Name
First Name
Last Name
Emp ID
Email Address
Job Title
Department
Manager
Employment Type
Employee Roles
Security Roles

Human Resources
96
Location
4. Click Save.
A new user can start using the system with just this basic information.
The new user is automatically sent an email with login credentials, similar to the image
below.
5. Click the row of the employee profile you just created to add additional information.
The Edit Employee page displays.
Use the additional fields and tabs to maintain more details about an employee.
6. The first tab, the Personal Details tab, provides the following additional fields.
Hire Date
Termination Date
Birthday
SSN - Social security number
Marital Status
Status - If Yes, this is a current employee.
Note: You cannot delete employee profiles. Set an employee's Status to No so you can see
continue to see historical data associated with this employee.
Gender
Photo - Upload a photograph of your employee. Employee photos display on their dashboard
when they login
Password Management
Reset and Email Password - Resets the user password when the user has forgotten the
password. A randomly generated password is sent by email to the user.
Unlock User's Account - Unlocks a user account if the account has become locked after
several invalid login attempts.
Note: The user can also optionally change his or her password in the My Profile page.

Human Resources
97
Contact Information
HR > Employees > Contact Info
Admin > HR > Employees > Contact Info
The Contact Info page records contact information for an employee.
Use the Main Address for the employees work place address.
Use the Secondary Contact tab for an emergency contact record.

Human Resources
98
Wages
HR > Employees > Wages
Admin > HR > Employees > Wages
The Wages page records the wages paid an employee.
Note: The employee is already identified as hourly or salaried or a contractor on the Personal Details
(page 95) tab.
Hourly Pay
Hourly Pay Rate - The hourly pay rate for the employee.
Burden Rate - The allocation rate at which indirect costs are applied to the direct costs of either
labor or inventory. These costs can include but are not limited to payroll taxes, pension costs,
health insurance, dental insurance, and any other benefits that a company provides an employee.
Over Time Pay Rate - The hourly overtime pay rate for an employee.
Pay Period - Weekly, Monthly, Quarterly, Yearly, Contract Length.
Currency
Rate Calculation Guide
This is just a guide to help quickly calculate the hourly wage for an employee. It's a basic calculation of
annual salary divided by working hours.
Working Hours Per Year - There are 52 weeks x 40 hours a week = 2080 hours. Adjust for part time
employees
Annual Salary - Put the annual salary in this field and then click Calc to display an hourly wage.
Does not include the Burden Rate.
External Employee
Vendor - Links this employee to a vendor. Required to add expense entries and time entries
associated with projects and tickets to Vendor Bills (page 138). Vendor bills can be processed in
Quickbooks.

Human Resources
99
Employee Financials
Equivalent Vendor Record - Creates a vendor alias for an employee. The vendor alias is required to
process reimbursements (page 139) in Quickbooks. For example, use the employee's name with
a _v suffix in this field.
Shifts
HR > Employees > Shifts
Admin > HR > Employees > Shifts
The Shifts page records the weekly work schedule for an employee.
Creating Work Schedules
1. Select the Admin > HR > Employees > Shifts tab.
2. Set Allow Overtime - Yes or No. The pay rate for overtime is set on the Wages tab.
3. Click Add to add a new shift.
4. Enter the following:
Week day
Start Time
End Time
5. Repeat steps 3 and 4 to add as many shifts for this employee as required.
Associated Clients
HR > Employees > Associated Clients
Admin > HR > Employees > Associated Clients
The Associated Clients tab links your employee, typically a technician, to one or more clients. When a
client opens Client Portal, linked employees are listed as primary contacts for messaging.
Adding Clients
1. Select the Admin > HR > Employees > Associate Clients tab.

Human Resources
100
2. Click Add.
3. Select one or more clients.
4. Click OK.
Associated Queues
HR > Employees > Associated Queues
Admin > HR > Employees > Associated Queues
The Associated Queues tab assigns an employee to one or more ticket queues. Queues group tickets by
the state they are in. Employees work tickets in the queues they are assigned to. Queues are
maintained using the Admin > Service Desk > Queues (page 54) page.
Adding Queues
1. Select the Admin > HR > Employees > Associate Queues tab.
2. Click Add.
3. Select one or more queues.
4. Click OK.

Human Resources
101
Custom Fields (for Employees)
HR > Employees > Custom Fields
Admin > HR > Employees > Custom Fields
The Custom Fields tab maintains data entered in custom fields for employee profiles. Data types for
custom fields can be Free Text, Date or Data List. Custom fields can be set to required. Custom
fields are created using the Admin module > My Company > Custom Fields (page 25) page.
Employee Roles
HR > Employees > Employee Roles
Admin > HR > Employees > Employee Roles
The Employee Roles tab assigns roles to an employee. Each role determines the work billed to
customers on tickets and tasks. Roles and rates are maintained using the Admin > Finance > Roles
and Rates (page 43) page. Employees assigned multiple roles can usually select any of their roles when
working a task or ticket. In Projects, the project manager can lock down the role when assigning a task
to an employee.
Adding Roles
1. Select the Admin > HR > Employees > Employee Roles tab.
2. Check the Has Role checkbox for any role that applies to this employee.
3. Select the Default role for this employee. This role automatically populate the Role field when the
user enters time on a task or ticket.

Human Resources
102
Security Roles
HR > Employees > Security Roles
Admin > HR > Employees > Security Roles
The Security Roles tab assigns security roles to an employee. Security roles determine the access an
employee has to different modules, menus and selected settings. The system provides several
predefined security roles for both internal and external users. You can also add custom security roles.
Security roles are configured using the Admin > Security Roles (page 39) page.
Adding Security Roles
1. Select the Admin > HR > Employees > Security Roles tab.
2. Check the Has Role checkbox for any security role that applies to this employee.
Attachments (for Employees)
HR > Employees > Attachments
Admin > HR > Employees > Attachments
Use the Attachments tab to upload files to an employee profile.
Adding Attachments
1. Select the Admin > HR > Employees > Attachments tab.
2. Click Upload a new file.
3. Browse, then Select a file to upload.
4. Optionally enter an Alias name.
5. Click Save.

Human Resources
103
Education
HR > Employees > HR > Education
Admin > HR > Employees > HR > Education
The Education tab documents the education of an employee. The Institute Name, Degree and Field of Study
drop-down lists are maintained using the Admin > My Company > Lists page.
Adding Education Records
1. Select the Admin > HR > Employees > HR > Education option.
2. Click Add.
3. Enter the following:
Institute Name
Date Attended
Degree
Field of Study
Grade
Description
4. Click Save.
Skills
HR > Employees > HR > Skills
Admin > HR > Employees > HR > Skills
The Skills tab identifies the job skills an employee has. This helps users determines the types of tickets
and tasks a user should be assigned to. Job skills are maintained using the Admin > HR > Skill
Categories page.
Adding Education Records
1. Select the Admin > HR > Employees > HR > Skills option.
2. Click Add.
3. Enter the following fields:

Human Resources
104
Category
Skill
Year(s) Of Experience
Experience Level
4. Click Save.
Organizational Chart
HR > Organization Chart
An Organizational Chart page displays a hierarchical chart of all employees in your company, based on
supervisor and subordinate relationships. Org charts:
Helps clarify the working relationships between executives and managers.
Establishes the hierarchical structure for decision-making and authority.
Serves as an information portal, by clicking an employee's name in the chart to open up that
employee's record.
Helps visualize changes to the company's structure.
Helps executive officers establish clear management procedures within a company.
Helps guide employees about who to contact in other parts of the organization.
You can generate an organization chart in two ways:
By Manager

Human Resources
105
By Department

Finance
107
Finance
In This Chapter
Dashboard (Finance) 107
Contracts 108
Billing Automation 118
Billing Review 122
Billing 129
Invoices 130
Payments 137
Vendor Bills 138
Reimbursements 139
QuickBooks Integration 141
Dashboard (Finance)
Finance > Dashboard
The Dashboard displayed in the Finance module includes specialized dashlets highlighting important
financial concerns.
Revenue by Client
Revenue Still To Invoice Current Month
Contracts Expiring Next 90 Days
C h a p t e r 4

Finance
108
See Dashboard (Home) (page 15) for a description of general purpose dashlets that also display on this
page.
Contracts
Finance > Contracts
The Contracts page registers billing agreements between you and your clients. The selected contract
type determines how billing is processed. There are five contract types.
Time and Material - The customer is charged for all of hours of work performed, any direct expenses
incurred, and all materials purchased to support the resolution of tickets and the completion of
projects. Time entered on tickets and tasks generates billable amounts for labor on invoices. The
role assigned a labor time entry determines the rate charged for that labor. Default rates for roles
can be adjusted on a per contract basis.
Recurring Services - Services are billed on a contract length, weekly, monthly, quarterly, or yearly
basis.
Fixed Price - A fixed priced contract is not subject to any adjustment on the basis of the provider’s
cost experience in performing the contract. A fixed price contract is typically tied to a single
project, but some users use them for support contracts. In many contracts the fixed price is
divided into smaller milestone payments.
Retainer by Amount - The total price of the contract is prepaid. Clients schedule services when
needed. Billings decrement the contract amount purchased.

Finance
109
Retainer by Hours - Hours of service are prepaid. Clients schedule services when needed. Labor
time entries decrement the retainer hours purchased. The total price of contract is calculated by
multiplying the number of contract hours purchased by an average rate.
Additional guidelines:
A customer can have multiple contracts.
You can pick a default contract for service tickets for a client, thus eliminating the guess work if
something is covered or not.
You can link a service level agreements (SLA) to a contract
Time and Materials
Finance > Contracts > New > Time and Materials
The customer is charged for all of hours of work performed, any direct expenses incurred, and all
materials purchased to support the resolution of tickets and the completion of projects. Time entered
on tickets and tasks generates billable amounts for labor on invoices. The role assigned a labor time
entry determines the rate charged for that labor. Default rates for roles can be adjusted on a per
contract basis.
Creating Time and Materials Contracts
1. Select the Finance > Contracts page.
2. Click New > Time and Materials.
3. Enter the following in the Contract Information section.
Contract Number - Only displays when editing a contract.
Contract Name
Contract Description
Client
Start Date
End Date
SLA - A contract associated with an SLA (page 55) overrides the Default SLA when the ticket is
linked to the contract.
Setup Fees
Issue Invoice on - Overrides the default value set for the 'Issue Invoice on' field, either Start
of Billing Cycle or End of Billing Cycle. The default is set using the Admin >
Company Settings > Invoice (page 23) tab.
Reference Number
Default Contract - Yes or No
4. Enter additional information in the Custom Fields section.
5. Click Save.
6. Adjust rates for roles for this contract in the Billing Information tab.

Finance
110
Maximum Hours - Limits the hours billable for this role.
Contract Billing Rate - Adjusts the default billing rate for this role.
7. Optionally exclude roles and work types that can report hours to this contract using the Exclusions
tab.
If hours are reported using an excluded role or work type, the hours are reported against the
Default Fallback Contract you specify.
8. Upload files to the contract using the Attachments tab.
9. Click Save.
10. Optionally reopen the contract and click Activate to begin using this contract to create billing
entries.
Recurring Services
Finance > Contracts > New > Recurring Services
Services are billed on a contract length, weekly, monthly, quarterly, or yearly basis.
Creating Recurring Services Contracts
1. Select the Finance > Contracts page.
2. Click New > Recurring Services.
3. Enter the following in the Contract Information section.
Contract Number - Only displays when editing a contract.
Contract Name
Contract Description
Client
Start Date
End Date

Finance
111
SLA - A contract associated with an SLA (page 55) overrides the Default SLA when the ticket is
linked to the contract.
Setup Fees
Reference Number
Billing Cycle - Contract Length, Weekly, Monthly, Quarterly, Yearly
Issue Invoice on -
Default Contract - Yes or No
Billing Periods based on Calendar Year - Yes or No
Note:
Billing entries are not generated for hours reported on tickets and tasks linked to a
recurring service contract.
To prevent generating billing lines for labor hours independently
of a contract, set the Default Contract option to Yes for that contract. When a new ticket or
task is created, the default contract is linked to the ticket or task automatically.
Examples:

Finance
112
Recurring Service Contract billing periods can be established based on the Contract Start Date or
based on the Calendar Year. For example, a monthly contract based on Start Date beginning on
January 17 would have billing periods that begin on the 17th and end on the 18th of each month. A
monthly contract based on Calendar year would have the first period beginning on January 17th and
ending January 31st (prorated first month), and each subsequent period would begin on the 1st of the
month and end on the last day of the month.
4. Enter additional information in the Custom Fields section.
5. Click Save.
6. Click Add to add services in the Billing Information tab. You can adjust the calculated extended cost
and price for each service add to this contract.
Service
Effective Date
Unit Price
Extended Unit Price
Unit Cost

Finance
113
Extended Unit Cost
Units
Total Price
Total Cost
7. Click Save.
8. Review the Contract Billing Price. This is the total price for all the services added.
9. Optionally exclude roles and work types that can report hours to this contract using the Exclusions
tab.
If hours are reported using an excluded role or work type, the hours are reported against the
Default Fallback Contract you specify.
10. Upload files to the contract using the Attachments tab.
11. Click Save.
12. Optionally reopen the contract and click Activate to begin using this contract to create billing
entries.
13. When the contract changes, you can review those changes using the Contract History tab.
Fixed Price
Finance > Contracts > New > Fixed Price
A fixed priced contract is not subject to any adjustment on the basis of the provider’s cost experience in
performing the contract. A fixed price contract is typically tied to a single project, but some users also
use them for support contracts. In many contracts the fixed price is divided into smaller milestone
payments.
Creating Fixed Priced Contracts
1. Select the Finance > Contracts page.
2. Click New > Fixed Price.
3. Enter the following in the Contract Information section.
Contract Number - Only displays when editing a contract.
Finance
114
Contract Name
Contract Description
Client
Start Date
End Date - Milestones due dates default to this date.
SLA - A contract associated with an SLA (page 55) overrides the Default SLA when the ticket is
linked to the contract.
Setup Fees
Reference Number
Default Contract - Yes or No
Accumulating Contract - If Yes, the total contract amount starts at zero (0) and increases each
time you add a new milestone. If No, the total contract amount is set to that fixed amount.
You can add milestones whenever you like, so long as the total contract amount does not
exceed the fixed amount.
Alter From Project - If Yes, a project phase milestone is added to the project linked to this
contract each time you add a new milestone to the contract.
4. Enter additional information in the Custom Fields section.
5. Click Save.
6. Click Add to add milestone payments in the Billing Information tab.
Name
Type
Amount
Due Date - Defaults to the end date of the contract. For milestone payments Billing Review
(page 122) lists billable amounts using this date. You may wish to adjust this date for earlier
milestone payments to ensure they display sooner in Billing Review.
Description
Note: The Billing Information tab displays Billed and Posted checkbox columns. Billing Review (page 122)
posts
a line item. Generating an invoice using Billing (page 129)
bills
that line item.
7. Click Save.
8. Review the following in the Billing Information tab
Contract Billing Price - The total of all milestone amounts.
Billed Amount
Remaining Amount
9. Optionally exclude roles and work types that can report hours to this contract using the Exclusions
tab.
If hours are reported using an excluded role or work type, the hours are reported against the
Default Fallback Contract you specify.
10. Upload files to the contract using the Attachments tab.
11. Click Save.

Finance
115
12. Optionally reopen the contract and click Activate to begin using this contract to create billing
entries.
Retainer By Amount
Finance > Contracts > New > Retainer by Amount
The total price of the contract is prepaid. Clients schedule services when needed. Billings decrement
the contract amount purchased. Billable labor time on tickets and tasks consume the amount. Charges
and expenses do not consume the amount.
Creating Retainer by Amount Contracts
1. Select the Finance > Contracts page.
2. Click New > Retainer by Amount.
3. Enter the following in the Contract Information section.
Contract Number - Only displays when editing a contract.
Contract Name

Finance
116
Contract Description
Client
Start Date
End Date
SLA - A contract associated with an SLA (page 55) overrides the Default SLA when the ticket is
linked to the contract.
Setup Fees
Reference Number
Default Contract - Yes or No
Note:
To prevent generating billing lines for labor hours independently of a contract, set the
Default Contract option to Yes for that contract. When a new ticket or task is created, the
default contract is linked to the ticket or task automatically.
4. Enter additional information in the Custom Fields section.
5. Click Save.
6. Adjust rates for roles for this contract in the Billing Information tab.
Contract Billing Rate - Adjusts the default billing rate for this role.
7. Review the following in the Billing Information tab
Contract Billing Price - Enter the total amount that can billed to this contract.
Consumed Amount - The total amount of billings applied to this contract.
8. Optionally exclude roles and work types that can report hours to this contract using the Exclusions
tab.
If hours are reported using an excluded role or work type, the hours are reported against the
Default Fallback Contract you specify.
9. Upload files to the contract using the Attachments tab.
10. Click Save.
11. Optionally reopen the contract and click Activate to begin using this contract to create billing
entries.

Finance
117
Retainer By Hours
Finance > Contracts > New > Retainer by Hour
Hours of service are prepaid. Clients schedule services when needed. Labor time entries decrement
the retainer hours purchased. The total price of contract is calculated by multiplying the number of
contract hours purchased by an average rate. Retainer by Hour contracts are billed by billing periods.
The total hours specified by the contract are distributed evenly across all the billing periods contained
by the contract's date range. When a billing period within the contract is closed, unconsumed retainer
hours can be optionally carried forward to the next billing period.
Creating Retainer by Hours Contracts
1. Select the Finance > Contracts page.
2. Click New > Retainer by Hours.
3. Enter the following in the Contract Information section.
Contract Number - Only displays when editing a contract.
Contract Name
Contract Description
Client
Start Date
End Date
SLA - A contract associated with an SLA (page 55) overrides the Default SLA when the ticket is
linked to the contract.
Setup Fees
Reference Number
Billing Cycle - Contract Length, Weekly, Monthly, Quarterly, Yearly
Default Contract - Yes or No
Note:
To prevent generating billing lines for labor hours independently of a contract, set the
Default Contract option to Yes for that contract. When a new ticket or task is created, the
default contract is linked to the ticket or task automatically.
4. Enter additional information in the Custom Fields section.
5. Click Save.
6. Click Add to add milestone payments in the Billing Information tab.
Average Rate
Contract Hours
Bill For - Actual Hours or Actual Hours + Overage

Finance
118
Carry Over Extra Hours to the Next Billing Cycle - If Yes, unconsumed retainer hours are carried
forward to the next billing period when a billing period is closed using Billing Review >
Retainer Hours (page 128) page.
7. Click Save.
8. Review the following in the Billing Information tab
Contract Billing Price - The Average Rate times the Contracts Hours.
9. Optionally exclude roles and work types that can report hours to this contract using the Exclusions
tab.
If hours are reported using an excluded role or work type, the hours are reported against the
Default Fallback Contract you specify.
10. Upload files to the contract using the Attachments tab.
11. Click Save.
12. Optionally reopen the contract and click Activate to begin using this contract to create billing
entries.
13. When labor time entries are applied to this contract, you can review the hours consumed using
the PrePaid Hours Summary tab.
Billing Automation
Finance > Billing Automation
Job setting
1. Login to Vorex.
2. Navigate to Finance > Billing Automation.
3. Click “New”.
4. In the “Job Settings” tab, add a name for the job.
5. Select an Action Type:
a. Post: Items will be posted and ready to be billed at anytime.
Finance
119
b. Post & Bill: Items will be posted and billed and the corresponding Invoice(s) will be
created.
c. Generate Invoice: This is the same as Post & Bill where the items will be posted and billed
and the invoice will be created. The Invoice PDF will be generated and attached to the
invoice.
6. Select Billing Type:
a. Time Entries
b. Expense Entries
c. Charges
d. Recurring Services
e. Fixed price milestones
7. Select Invoice Template: In case the Action Type is “Generate Invoice”, the invoice template will
be required so that the generated invoice follows the format of the chosen template.
8. Select Email template: In case “Send Invoice to Customer” is set to “Yes”, the “Email Template”
field becomes required.
9. Status:
a. Active
b. Inactive
10. Send Invoice to Customer: If set to “Yes”, the generated invoice(s) will be sent as an email to the
account contacts who have “Receive Invoice” Flag set to true.
11. Generate Invoice by Project: If set to “Yes”, the generated invoice(s) will be separated by the
project.
Automation Filter
These filters specify which items are the targets of the billing automation job.
1. Get Past Items and Get Future Items: These two fields represent a time interval. All items added
within this time interval will be subjected to the automated job.
a. Example: If “Get Past Items” is set to “One Week Ago” and “Get Future Items” is set to “One
Week After”, this automated job will execute the selected action type on all items that are
within this date range.
2. Bill Zero Value Items.
3. Department.
4. Time/Expense Sheet Status.
5. Work type.
6. Role.
7. Expense type.
8. Tickets/Projects.
9. Ticket/Project/Task Status.

Finance
120
10. Reimbursable: Yes/No.
Job Settings & Filters
Contracts & Job Schedule
Upon saving, the following tabs appear: Contracts & Job Schedule.
1. Contracts: This automation job can run on all contracts or specified contracts chosen.
All Contracts or Contacts listed Below
2. Job Schedule: In this section, the recurrence interval is defined. The repetition rate could be one
of the following:
a.Daily

Finance
121
Daily Repetition
b. Weekly
Weekly Repetition
c.Monthly
Monthly Repetition
Note:If “Enable Scheduler” is set to “Yes”, the job will work based on the schedule and recurrence
defined. If not, the scheduled process will work, only, when “Run Now”,at the top right of the page, is
clicked.

Finance
122
Notifications
The user can add the user emails to be notified on success or failure of the job automation.
Notified Emails on Success & Failure
Logs
Everytime the job executes, all the execution steps will be added to the log grid along with the Creation
Date of the step and whether or not the job was executed successfully.
Job Logs
Billing Review
Finance > Billing Review
The Billing Review menu enables you to review billing entries and create invoices. Invoices can be sent out before or after
the customer receives services. A separate billing review page is provided to review each type of billing entry.

Finance
123
In This Section
Labor Hours 123
Expenses 124
Recurring Services 125
Fixed Price Milestone 126
Retainer Amount 127
Retainer Hours 128
Labor Hours
Finance > Billing Review > Labor Hours
The Labor Hours page lists billing entries for labor hours entered on tickets and tasks. Review one or
more entries, make adjustments if necessary, then post them. Posting moves billing entries to Billing
(page 129). For a billing entry to display on this page:
Hours must be reported in a ticket or task. The ticket or task may be optionally optionally linked to
a time and materials contract (page 109). The contract must be active.
The billing entry must match search filter parameters.
Zero value hours can be posted or ignored using the Admin > Company Settings > Invoice (page
23) > Post Zero Entries option.
Reviewing Labor Hour Billing Entries
1. Select the Finance > Billing Review > Labor Hours page.
2. Optionally change Search filter settings. The default date range is from today's date to 3 months
into the future. This can be customized using the Admin > Company Settings > Invoice (page 23)
tab > Billing End Date setting.
3. Click Search. A list of entries displays in the Results tab.
4. Optionally review the ticket or task for a billing entry by clicking the link in the Ticket/Project column.
The icon indicates a ticket billing entry.
The icon indicates a project/task billing entry.
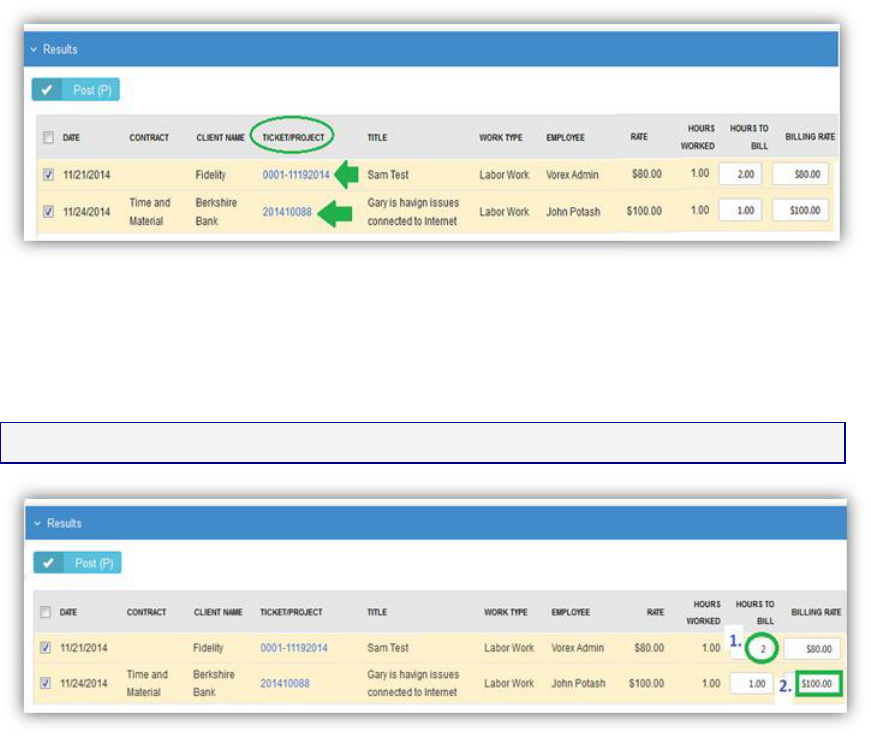
Finance
124
5. Optionally review the contract for a billing entry by clicking the link in the Contract column.
6. Optionally adjust billing entries.
Overtime Hours to Bill
Overtime Billing Rate
Hours to Bill
Billing
Note: Adjustments do not change time entries on employee time sheets.
7. Check one or more rows you want to post.
8. Click Post to post checked rows.
Expenses
Finance > Billing Review > Expenses
The Expenses page lists billing entries for expenses entered on tickets and tasks. Review one or more
entries, make adjustments if necessary, then post them. Posting moves billing entries to Billing (page
129). For a billing entry to display on this page:
An expense must be added to a ticket or task or expense report.
The billing entry must match search filter parameters.
Reviewing Expense Billing Entries
1. Select the Finance > Billing Review > Expenses page.
2. Optionally change Search filter settings. The default date range is from today's date to 3 months
into the future. This can be customized using the Admin > Company Settings > Invoice (page 23)
tab > Billing End Date setting.

Finance
125
3. Click Search. A list of entries displays in the Results tab.
4. Optionally review the ticket or task for a billing entry by clicking the link in the Ticket/Project column.
The icon indicates a ticket billing entry.
The icon indicates a project/task billing entry.
5. Optionally review the contract for a billing entry by clicking the link in the Contract column.
6. Optionally adjust billing entires.
Billing Price
Note: Adjustments do not change expenses on employee expense sheets.
7. Check any row you want to post.
8. Click Post to post checked rows.
Recurring Services
Finance > Billing Review > Recurring Services
The Recurring Services page lists billing entries for recurring services. For a billing entry to display on this
page:
A recurring service must be added to a recurring services contract (page 110).
The contract must be active.
The billing entry must match search filter parameters.
Billing is by contract billing period. Once a recurring services contract is active, any of the time periods
can be billed at any time. Review one or more entries, make adjustments if necessary, then post them.
Posting moves billing entries to Billing (page 129).
Billing entries are not generated for hours reported on tickets and tasks linked to a recurring
service contract. To prevent generating billing lines for labor hours independently of a contract,

Finance
126
set the Default Contract option to Yes for that contract. When a new ticket or task is created, the
default contract is linked to the ticket or task automatically.
Zero value hours can be posted or ignored using the Admin > Company Settings > Invoice (page
23) > Post Zero Entries option.
Reviewing Recurring Services
1. Select the Finance > Billing Review > Recurring Services page.
2. Optionally change Search filter settings. The default date range is from today's date to 3 months
into the future. This can be customized using the Admin > Company Settings > Invoice (page 23)
tab > Billing End Date setting.
3. Click Search. A list of entries displays in the Results tab.
4. Optionally adjust billing entries.
Quantity
Unit Price
5. Check any row you want to post.
6. Click Post to post checked rows.
Fixed Price Milestone
Finance > Billing Review > Fixed Price Milestones
The Fixed Price Milestone page lists billing entries for fixed price milestones. Milestones are created
using fixed price contracts (page 113). Review one or more entries, make adjustments if necessary,
then post them. Posting moves billing entries to Billing (page 129). For a billing entry to display on this
page:
A fixed priced milestone must be added to a fixed priced contract (page 110).

Finance
127
The contract must be active.
The billing entry must match search filter parameters.
A fixed priced contract is typically linked to a project. Once a fixed price contract is active, you can bill
any of its fixed price milestones at any time.
Reviewing Recurring Services
1. Select the Finance > Billing Review > Fixed Priced Milestones page.
2. Optionally change Search filter settings. The default date range is from today's date to 3 months
into the future. This can be customized using the Admin > Company Settings > Invoice (page 23)
tab > Billing End Date setting.
3. Click Search. A list of entries displays in the Results tab.
4. Optionally adjust billing entries.
Amount
5. Check any row you want to post.
6. Click Post to post checked rows.
Retainer Amount
Finance > Billing Review > Retainer Amount
The Retainer Amount page lists billing entries for retainer by amount contracts. Review one or more
entries, make adjustments if necessary, then post them. Posting moves billing entries to Billing (page
129). For a billing entry to display on this page:
A retainer by amount contract must be active.

Finance
128
The billing entry must match search filter parameters.
Once a retainer by amount contract is active, the total price of the contract can be billed at any time.
Reviewing Recurring Services
1. Select the Finance > Billing Review > Retainer Amount page.
2. Optionally change Search filter settings. The default date range is from today's date to 3 months
into the future. This can be customized using the Admin > Company Settings > Invoice (page 23)
tab > Billing End Date setting.
3. Click Search. A list of entries displays in the Results tab.
4. Check any row you want to post.
5. Click Post to post checked rows.
Retainer Hours
Finance > Billing Review > Retainer Hours
The Retainer Hours page lists billing entries for retainer hours. Retainers hours are consumed when
hours are reported on tickets or tasks linked to a retainer by hours contract (page 117). Billing is by
contract billing period. Review one or more entries, make adjustments if necessary, then post them.
Posting moves billing entries to Billing (page 129). For a billing entry to display on this page:
Hours must be reported in a ticket or task.
The ticket or task must be linked to a retainer by hours contract (page 117).
The contract must be active.
The billing entry must match search filter parameters.
Once a retainer hours contract is active, any of the time periods can be billed at any time, unless the
billing period has been closed.

Finance
129
Note:
To prevent generating billing lines for labor hours independently of a contract, set the Default
Contract option to Yes for that contract. When a new ticket or task is created, the default contract is
linked to the ticket or task automatically.
Reviewing Recurring Services
1. Select the Finance > Billing Review > Retainer Hours page.
2. Optionally change Search filter settings. The default date range is from today's date to 3 months
into the future. This can be customized using the Admin > Company Settings > Invoice (page 23)
tab > Billing End Date setting.
3. Click Search. A list of entries displays in the Results tab.
4. Check any row you want to post.
5. Click Post to post checked rows.
6. Optionally close billing periods using the Billing Periods tab.
Close Billing Periods - If checked, clicking this button closes checked billing periods. If the
Carry Over Extra Hours to the Next Billing Cycle option is set to Yes in the retainer by hours
contract (page 117), unconsumed retainer hours are carried forward to the next billing period
when a billing period is closed.
Billing
Finance > Billing
The Billing page creates invoices from posted billing lines.

Finance
130
Creating Invoices
1. Select the Finance > Billing page.
2. Optionally change Search filter settings. The default date range is from today's date to 3 months
into the future. This can be customized using the Admin > Company Settings > Invoice (page 23)
tab > Billing End Date setting.
3. Click Search. A list of entries displays in the Results tab. Review the rows displayed.
4. Select one or more rows to invoice.
By default, a single invoice is generated for each customer, for all selected items.
To generate additional invoices, one for each project for each customer, set the Generate
Invoices by Project option to Yes.
5. Click Generate Invoice.
Unposting Billing Lines
Instead of creating an invoice, you can unpost billing lines and send them back to Billing Review (page
122).
1. Select the Finance > Billing page.
2. Optionally change search filter settings. The default date range is today's date.
3. Click Search. A list of entries displays in the Results tab. Review the rows displayed.
4. Select one or more rows to unpost.
5. Click Unpost.
Invoices
Finance > Invoices
The lnvoices page manages and generates invoices. Batch generation of invoices is supported.

Finance
131
To manage a single invoice, click any row to display the following:
Invoice information
Billing address
Tax calculations
Invoice details
Attached receipts
Attached files
You can also perform the following actions:
Generate the invoice
Preview the invoice
Edit the invoice and regenerate it
Send the invoice
Void the invoice
Discount the invoice
Add hidden notes
In This Section
Invoice Details 132
Invoice Discounts 133
Invoice Receipts 134
Invoice Attachments 134
Generate and Preview 134
Resetting a Posted Invoice 136
Sending an Invoice 136
Voiding an Invoice 137

Finance
132
Invoice Details
Finance > Invoices > (selected invoice) > Invoice Details
The Invoice Details tab lists each line item in the invoice. For each line item, you can edit the following
fields:
Item Name
Description
Class
Quantity
Unit Price
Reviewing Invoice Details
1. Select the Finance > Invoices page.
2. Select a row with a Status of Ready to Send.
3. Review and optionally edit rows listed in the Invoice Details tab.
Item Name - The labor, entry, recurring services, milestone payment type, etc.
Item Description - Depends on the type of line item:
Labor - the note entered for the labor entry on the ticket or task
Milestone Payment - the milestone name
Expense - the expense note field
Recurring Services - the description entered for the service name. This supports
multiple lines, including line breaks as entered in the service page, as opposed to all
the lines merged into a single line
Retainer By Hours - the Contract Description field in the contract. This supports multiple
lines, including line breaks as entered in the service page, as opposed to all the lines
merged into a single line
Retainer By Amount - the Contract Description field in the contract
Quantity - The number of each item.
Unit Price - The price per item.
Total Price - Unit price times the quantity.
Value Date - The date the time entry was made or the date the expense was entered.

Finance
133
Invoice Discounts
Finance > Invoices > (selected invoice) > Invoice Discount
The Invoice Discount tab enables you to apply a discount to the invoice. A discount can be a percentage
or dollar amount.
To Apply a Discount
1. Select the Finance > Billing page.
2. Click an invoice row with a Status of Ready to Send.
3. Click the Invoice Discount tab.
4. Click Add.
Discount Type - Assigns a default discount type (page 49) percentage or amount.
Class - The finance class (page 52) of this discount. Optional.
Default Value - Accept or override.
Notes - Entered notes display on the invoice.
Click Save. The Grand Total reflects the discount immediately.
5. Click Save.

Finance
134
Invoice Receipts
Finance > Invoices > (selected invoice) > Receipts
The Receipts tab displays receipts for line items included in the invoice. For example, if expenses
require a receipt be attached, you would see receipts for expense line items here. When you send the
invoice to the customer, the receipts will be included in the email.
Invoice Attachments
Finance > Invoices > (selected invoice) > Attachments
The Attachments tab enables you to upload attachments to an invoice. When you send the invoice to a
customer, the attachment will be included in the email.
Generate and Preview
Finance > Invoices > (selected invoice) > Regenerate
Invoices are generated by clicking the Regenerate button.

Finance
135
You can generate either a detailed or summary invoice.
A message indicates the successful creation of your invoice.
Click Preview to review this invoice before sending it.

Finance
136
Resetting a Posted Invoice
Finance > Invoices > (selected invoice) > Reset Posted to Accounting
If you want to adjust an Invoice that has already been posted to Quickbooks Accounting, click "Reset
Posted to Accounting" button so that you can edit the Invoice data in the Finance > Billing. Once you
are done with editing the bill, you have to post the invoice to Quickbooks Accounting once again.
You can also click the "Reset Posted to Accounting" button, if you have posted an Invoice to
Quickbooks, but for some reason the invoice has not been successfully synchronized by Quickbooks
app. In this case, you will cancel the previously posted invoice and will be able to submit it to
Quickbooks Accounting once again.
Sending an Invoice
Finance > Invoices > (selected invoice) > Send to Customer
Send an invoice by clicking the Send to Customer button.

Finance
137
Select the contacts you wish to send the invoice to, then click Send.
A message indicates the invoice was sent.
Voiding an Invoice
Finance > Invoices > (selected invoice) > Void Invoice
Voice an invoice by clicking the Void Invoice button. Voiding unposts all the billing lines in the invoice
and sends them back to Billing Review (page 122).
A message indicates the invoice was voided.
Payments
Finance > Payments
The Payments page matches payments received from customers to invoices. For each invoice linked to
a payment you can optionally edit the payment Amount received and enter an additional Discount
amount. To set an invoice line to Fully Paid, the Amount and Discount must equal the Total. You can
also upload attachments to a payment record.
Header Fields
Client
Payment Date
Reference
Created By

Finance
138
Payment Type
Amount
Memo
Invoice Fields
Status
Invoice Number
Client
Date
Due Date
Total
Paid
Due
Amount
Discount
Vendor Bills
Finance > Vendor Bills
The Vendor Bills page records time and expenses incurred by vendors and contractors. This includes:
Labor entries linked to a ticket or task.
Expenses linked to a ticket or task.
New expenses not necessarily linked to a ticket or task.
Entries added to vendor bills can be marked up in price, posted and billed to your customers. Billing
can occur at any time, regardless of the status of the entry on the Vendor Bills page.
Note: Entries added to this page are assumed to be subsequently processed by an integrated accounting
package, such as Quickbooks.
Prerequisites
On the Vorex > Admin > Finance > Expense Type (page 46) page:
An expense type must be set to Available For: Vendor or Employees or Vendors.
For Quickbooks integration, expense items must be linked to both an income account and an
expense account.
To add items to the Vorex > Finance > Vendor Bills > (vendor bill) > Item tab:
Adhoc items do not have to be approved.
To add items to the Vorex > Finance > Vendor Bills > (vendor bill) > Expense Entries tab and Time Entries
tab:
The employee must be linked to a vendor using the HR > Employees > (employee) > Wages (page
98) > Vendor field.
For timesheet entries, on the same employee Wages page, specify a Burden Rate > 0.
The roles specified for billable entries require an Admin > Finance > Roles (page 43) > Billing Rate.
Vendor-linked employee expense entries or timesheet entries must be approved.
Processing Vendor Bills
1. Create and save a new vendor bill.
The vendor bill status will be New.
2. Add entries for Items, Expense Entries and Time Entries.

Finance
139
Ensure entries are checked as billable if you intend on billing the customer for the work
outsourced to the vendor.
3. Click Save
The vendor bill status will be Processed the first time you save the vendor bill with an entry.
Saved vendor bill entries cannot be edited. You can still add new entries.
4. Use the Finance > Billing Review > Expenses (page 124) page to post billable vendor bill expense
entries.
5. Use the Finance > Billing Review > Labor Hours (page 123) page to post billable vendor bill labor
entries.
6. Use the Finance > Billing (page 129) page to create an invoice that includes posted vendor bill
entries.
Header Fields
Vendor
Created On
Created By
Due Date
Reference #
Amount
Items tab
Expense Type
Date
Amount Spent
Mark up / down
Total Amount
Notes
Expense Associated With - Project, Ticket, Internal Expense - Internal expenses are added to
the Administration Project for your company.
Expense Entries tab
Click Add to select expense entries.
Time Entries tab
Click Add to select labor time entries.
Attachments
Click Upload a new file to upload files to a Vendor Bill record.
Reimbursements
Finance > Reimbursements
The Reimbursements page records payments to employees who have incurred expenses on behalf of
your company.
Note: Entries added to this page are assumed to be subsequently processed by an integrated accounting
package, such as Quickbooks.

Finance
140
Prerequisites
On the Vorex > Admin > Finance > Expense Type (page 46) page:
An expense type must be set to Available For: Employees or Employees or Vendors.
For Quickbooks integration:
Expense items must be linked to both an income account and an expense account.
The employee must have a vendor alias defined using the Vorex > HR > Employees > (employee)
> Wages (page 98) > Equivalent Vendor Record field.
To add items to the Vorex > Finance > Reimbursements page:
The employee's expense entries must be approved.
Creating Reimbursements
1. Select the Finance > Reimbursements page.
2. Click New.
3. Enter the following fields.
Employee
Created On
Created By
Payment Type
Reference #
Amount
Memo
4. Click Save.

Finance
141
QuickBooks Integration
Finance > QuickBooks
The QuickBooks Integration allows you to exchange financial data between your system and an instance
of Quickbooks. For more information download the Quickbooks Online Integration or Quickbooks
Desktop Integration guides (http://help.kaseya.com/webhelp/EN/Vorex/index.asp#home.asp).
Vorex™ QuickBooks Sync is supported in the following countries:
Australia
Canada
India
United Kingdom
United States
The following versions of QuickBooks Desktop are supported:
2018
2017
2016
2015
2014
2013
2012
2011
QuickBooks Integration does not support Apple Online QuickBooks.
C h a p t e r

CRM Module
143
CRM Module
CRM stands for customer relationship management. A CRM solution allows you to manage the
business relationship and interactions you have with customers, prospects, vendors, etc., and store all
the data about these relationships. These interactions can be sales related—calls, emails, meetings
and demonstrations—as well as support related—service tickets and projects. The benefit of a CRM is
having all your business data stored and accessible from one central location. The CRM module
provides:
Immediate employee access to the data they need.
Sharing of important data between departments.
Management insight into activity across the organization and helps them understand where they
can improve processes.
Customers are first added as accounts in CRM. After that you can create projects, open tickets, and set
up contracts on their behalf.
In This Chapter
Dashboard 143
Accounts 144
Contacts 155
Activities 158
Opportunities 159
Quotations 161
Sales Orders 168
Sites 171
Dashboard
Finance > Dashboard
The Dashboard displayed in the CRM module includes additional dashlets that highlight important sales
cycle concerns.
Note: If you are a Manager and have employees reporting to you, the CRM Dashboard rolls up all the
values for you and your employees. If you do not have anyone reporting to you, the CRM Dashboard only
displays your values.
Specialized dashlets provided by the CRM > Dashboard include:
Pipeline - The dollar value of opportunities in the system:
Pipeline value - The value of all opportunities equal to or greater than the Pipeline Factor set in
Admin > My Company > CRM > Opportunities (page 151). Click View Details.
Total Value - All opportunities in the system regardless of the Pipeline Factor, meaning any
opportunity with a percent between 0% and 99%. Click View Details.
Opportunity Amount Value by Lead Source - A chart of the opportunities grouped by lead source.
Hover the cursor over any color to display its dollar value. Filter the chart by This Month, This
Quarter, This Year.
C h a p t e r 5

CRM Module
144
Opportunity Pipeline Value - A chart of of the pipeline value. Filter the chart by This Month, This
Quarter, This Year.
Opportunities Converted to Projects - A chart of the number of opportunities converted to projects.
Opportunity Performance - An opportunity performance table by sales representative. The Probability
is the average for all opportunities for the selected period: This Month, This Quarter, This Year.
Provides the value of opportunities Won, Lost and Open.
See Dashboard (Home) (page 15) for a description of general purpose dashlets that also display on this
page.
Accounts
Admin > CRM > Accounts
The Accounts Management page maintains your account profiles for every organization you do business
with. This includes clients, prospects, vendors, competitors, former clients, business partners, and
miscellaneous organizations.This same page displays in the CRM module if you have permission.
Initially you create a basic account. After you save an account the first time, multiple tabs display for
you to enter additional details.
Creating Accounts
1. Select the Admin > CRM > Accounts page.
2. Click New.
You can select two types of accounts.
Account Code - An account code associated with this customer organization.
Account Name - The main account name for a customer organization.
Child Account - An subordinate account for a larger customer organization. If Route Invoice to
Parent is set to Yes for this child account, billables are routed to the parent organization for
payment. If set to No, parent-child accounts are used for reporting purposes only.

CRM Module
145
3. Select Account.
4. Enter the following fields in the Account header section.
Account Name
Account Type - Client, Competitor, Former Client, Miscellaneous, Partner, Unknown,
Vendor
Note: One of your accounts is an internal account. The internal CRM customer account is
created for you and matches your company name by default. Your internal CRM customer
account is used when you ship inventory between warehouses. You can filter accounts to
identify your internal account.
Business Type - This list is maintained using Admin > My Company > Lists page.
Website
Acquired Date
Credit Limit
Default Currency
Net Days
Account Manager - The employee in your company assigned to manage this account.
Description
5. Enter the main business address in the Main Address Info tab. Optionally click Copy From Billing to
populate these fields from the Billing Address Info tab.
Address Line 1
Address Line 2
City
State
Post Code
Country
Phone Number
Fax Number
Longitude

CRM Module
146
Latitude
6. Enter the billing account address in the Billing Address Info tab. Optionally click Copy From Main to
populate these fields from the Main Address Info tab.
Email Address
Address Line 1
Address Line 2
City
Post Code
State
Country
Phone Number
Fax Number
Longitude
Latitude
7. Click Save.
8. Click the row of the new account you just created to add additional information.

CRM Module
147
The Status option in the header is now available to maintain. If Yes, the account is being
used.
9. Use the tabs at the bottom of the page to maintain more details about each account.
Locations
CRM > Accounts > Locations
Admin > CRM > Accounts > Locations
Use the Locations tab to maintain physical address locations for each account.
Adding New Account Locations
1. Select the Admin > CRM > Accounts > Locations tab.
2. Click Add.
3. Enter the following fields in the Address Info tab.
Location Name
Status
Address Line 1
Address Line 2
City

CRM Module
148
Post Code
State
Country
Phone Number
Fax Number
Longitude
Latitude
4. Optionally click Convert to Main (M) set a location as the 'main address' for an account.
5. Click Save.
6. Click the Custom Fields tab.
Enter values in the custom fields, as appropriate for this record.
Custom fields are maintained using the Admin > My Company > Custom Fields page.
Contacts
CRM > Accounts > Account Contacts
Admin > CRM > Accounts > Account Contacts
Similar to CRM > Contacts

CRM Module
149
Use the Account Contacts tab to maintain contacts for each account. These are the individuals that the
sales team work with to sell products and services. These are the people that your project team is
delivering a completed project to. These are the people that are calling you for support and who you
are opening tickets for.
Adding New Account Contacts
1. Select the Admin > CRM > Accounts > Account Contacts tab.
2. Click Add.
3. Enter the following fields in the Account Contact tab.
First Name
Middle Name
Last Name
Location Name
Job Title
Phone Type
Phone
Status
Email Type
Email
Point of Contact - If Yes, this person will be notified if a workflow rule is configured to send
notifications to Point of Contact.
Has Client Portal Access - If Yes, the client has portal access. Two extra fields Username and
Security Role display.The first time this setting is saved, the contact is sent an email with a
user name, password and instructions on how to login to the portal.

CRM Module
150
Receive Invoices
4. Click the Custom Fields tab.
Enter values in the custom fields, as appropriate for this record.
Custom fields are maintained using the Admin > My Company > Custom Fields page.
Assigned Resources
CRM > Accounts > Assigned Resources
Admin > CRM > Accounts > Assigned Resources
Use the Assigned Resources tab to link employees—typically a technician—to an account.
When a client composes a message in Client Portal, Assigned Resources display in the client's
recipient search list.
Assigned Resources can be notified when a ticket workflow (page 33) is triggered.
Adding Assigned Resources
1. Select the Admin > CRM > Accounts > Assigned Resources tab.
2. Click Add.

CRM Module
151
3. Check one or more employee rows.
4. Click OK.
Email Domains
CRM > Accounts > Email Domains
Admin > CRM > Accounts > Email Domains
Associate one or more Email Domains with a CRM customer account. This enables the Vorex™ email
parser to determine the related account to create tickets for in Service Desk. If used, creates a new
contact (page 148) record for the sender of the email and associates that new contact with the new
ticket.
Only applies if the sender's email address is not recognized as an existing contact record. In this
case, a ticket is created and associated with the existing contact.
If an email cannot be associated with any existing contact or email domain record, the email
parser creates the ticket and identifies its sender as Unknown.
Specified email domain names should not be public domains such as yahoo.com, google.com or
hotmail.com, and should be unique for each account.
Adding Email Domains
1. Select the Admin > CRM > Accounts > Email Domains tab.
2. Click Add.
3. Check one or more email domains rows.
4. Click OK.
Tax Settings
CRM > Accounts > Tax Settings
Admin > CRM > Accounts > Tax Settings
The Tax Settings tab specifies tax related information for an account.
Tax ID - The tax identifier for this account.
Tax Rate - Applies to the labor entered on tickets and tasks. Displays on invoices.
Is Taxable - Yes or No.
Opportunities
CRM > Accounts > Opportunities
Admin > CRM > Accounts > Opportunities
Similar to CRM > Opportunities
The Opportunities tab maintains opportunities for each account.
Adding Opportunities
1. Select the Admin > CRM > Accounts > Opportunities tab.
2. Click Add.
3. Enter the following fields.
Subject
Next Step
Account
Type
Status

CRM Module
152
Location
Probability
Rating
Contact
Sales Representative
Customer PO#
Phone
Close Date
Lead Source
Amount
Probability Adjusted Revenue
Description
4. Click Save.
Activities
CRM > Accounts > Activities
Admin > CRM > Accounts > Activities
The Activities tab maintains a history of the interactions between your company and the contacts for an
account. Many activities may need to be tracked to support converting an opportunity into a sale.
Adding Activities
1. Select the Admin > CRM > Accounts > Activities tab.
2. Click Add.
3. Enter the following fields.
Subject - Summary of this activity.
Status - Status of this activity.
Type - Appointment, Ask for Sale, Call, Demo, Email, Follow up, Inquiry, Marketing,
Memo, Proactive Call, Quote, Renew Agreement, Task
Due Date - Due date for this activity.
Reminder - Reminder date for this activity.
Contact - Contact for this activity.
Start Time - Start time for this activity.
Assigned To - Employee assigned this activity.
Phone - Contact's phone.
End Time - End time for this activity.
Assigned By - Employee who assigned this activity.
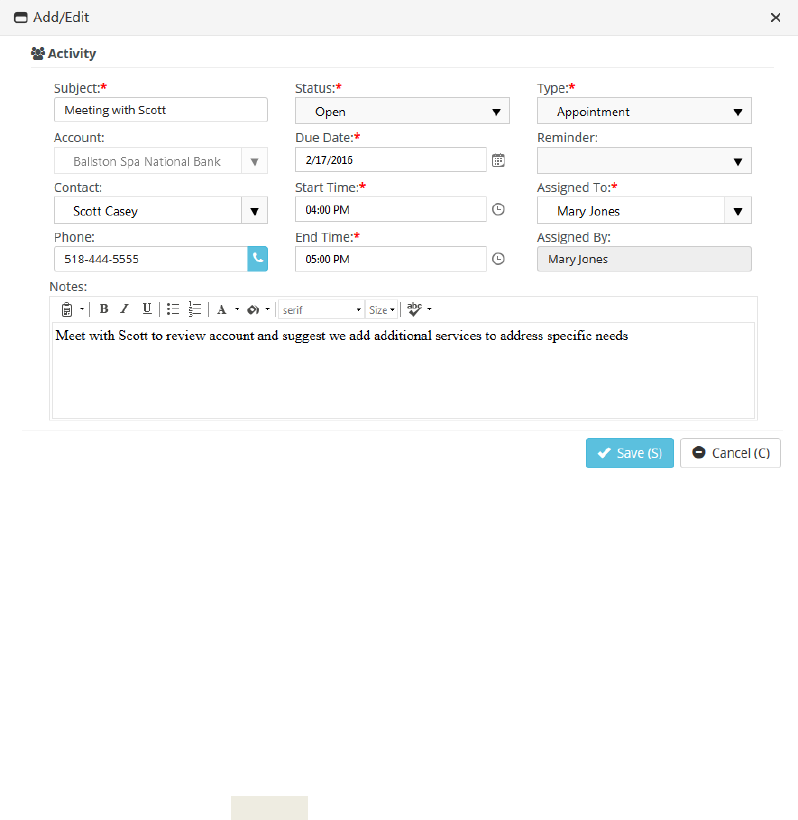
CRM Module
153
Notes - Additional notes about this activity.
4. Click Save.
Linked Accounts
CRM > Accounts > Linked Accounts
Admin > CRM > Accounts > Linked Accounts
The Linked Activities tab associates an accounts with other accounts in your system.
Adding Linked Accounts
1. Select the Admin > CRM > Accounts > Linked Accounts tab.
2. Click Add.
3. Enter the following fields in the Linked Account tab.
Account - Select another account to link with this account.
Link Type - General
Notes
4. Click Save.
5. Click the Custom Fields tab.
Enter values in the custom fields, as appropriate for this record.
Custom fields are maintained using the Admin > My Company > Custom Fields page.

CRM Module
154
Notes
CRM > Accounts > Notes
Admin > CRM > Accounts > Notes
The Notes tab stores notes for an account. Copy text from proposals, signed contracts, statements of
work, network diagrams, user guides, etc.—anything important about this client you want to reference
quickly.
Adding Notes
1. Select the Admin > CRM > Accounts > Notes tab.
2. Click Add.
3. Type or paste text into the Note Text edit box.,
4. Click Save.

CRM Module
155
Custom Fields (for Accounts)
CRM > Accounts > Custom Fields
Admin > CRM > Accounts > Custom Fields
The Custom Fields tab maintains data entered in custom fields for account profiles. Data types for
custom fields can be Free Text, Date or Data List. Custom fields can be set to required. Custom
fields are created using the Admin module > My Company > Custom Fields (page 25) page.
Attachments (for Accounts)
CRM > Accounts > Attachments
Admin > CRM > Accounts > Attachments
Use the Attachments tab to upload files to an account profile.
Adding Attachments
1. Select the Admin > CRM > Accounts > Attachments tab.
2. Click Upload a new file.
3. Browse, then Select a file to upload.
4. Optionally enter an Alias name.
5. Click Save.
RMM Integration
CRM > Accounts > RMM Integration
Admin > CRM > Accounts > RMM Integration
The RMM Integration page manually maps an individual Vorex™ account with an an individual account
in an RMM. This can be done by batch using the Admin > Service Desk > RMM Integration Settings
page.
Organization ID - Select a RMM account. This list only displays RMM accounts that are not already
linked to a CRM customer account in Vorex™.
Contacts
CRM > Contacts
Similar to CRM > Accounts > Account Contacts and Admin > CRM > Accounts > Account Contacts
Use the Contacts tab to maintain contacts for each account. These are the individuals that the sales
team work with to sell products and services. These are the people that your project team is delivering
a completed project to. These are the people that are calling you for support and who you are opening

CRM Module
156
tickets for.
Adding New Account Contacts
1. Select the Admin > CRM > Accounts > Account Contacts tab.
2. Click Add.
3. Enter the following fields in the Account Contact tab.
First Name
Middle Name
Last Name
Job Title
Account
Location Name
Status - Active or Inactive
Point of Contact - If Yes, this person will be notified if a workflow rule is configured to send
notifications to Point of Contact.
Receive Invoices - Yes or No
Photo - Reset or Select Photo
4. Click the Phones tab and enter the following. Click Add to add additional rows.
Phone Type
Phone Number
Is Default - The default phone number displays when you create an activity.
5. Click the Emails tab and enter the following. Click Add to add additional rows.

CRM Module
157
Email Type
Email
Is Default
6. Click the Client Portal Access tab.
If you are using the Service Desk module, you can turn on Client Portal for all contacts in your
accounts that are clients. The client portal is a secure place for your customers to submit and
track help tickets. There is also a Message center that allows the user to send messages directly
to their service provider, making it easier to follow up with any tickets and questions that may not
be support related. Security roles are provided that makes it easy to turn on the portal and give
the right permission levels to your clients.
Has Client Portal Access - If Yes, the client has portal access and two extra fields Username and
Security Role display. The first time this setting is saved, the contact is sent an email with a
user name, password and instructions on how to login to the portal.
Username - The username the client will use to logon to the client portal.
Reset and Email Password - Enabled if the user requests a new password.
Security Role
Client Access
External User - Allow the client to view/edit their own profile and messages, as well
as tickets assigned to them.
External Manager - Allow the client to view/edit their own profile and messages.
However, unlike 'External User' this option will allow the client to view all tickets.
7. Click the Notes tab. Click Add to add notes.
8. Click the Activities tab. Click Add to add additional activities.
Activities are a history of the interactions between your company and the contacts for an account.
Many activities may need to be tracked to support converting an opportunity into a sale.
Subject - Summary of this activity.
Status - Status of this activity.
Type - Appointment, Ask for Sale, Call, Demo, Email, Follow up, Inquiry, Marketing,
Memo, Proactive Call, Quote, Renew Agreement, Task
Account - The customer account.
Due Date - Due date for this activity.
Reminder - Reminder date for this activity.
Contact - Contact for this activity.
Start Time - Start time for this activity.
Assigned To - Employee assigned this activity.Phone - Contact's phone.
End Time - End time for this activity.
Assigned By - Employee who assigned this activity.
Notes - Additional notes about this activity.
9. Click the Custom Fields tab.
Enter values in the custom fields, as appropriate for this record.
Custom fields are maintained using the Admin > My Company > Custom Fields (page 25)
page.

CRM Module
158
Activities
CRM > Activities
Similar to CRM > Accounts > Activities and Admin > CRM > Accounts > Activities
The Activities tab maintains a history of the interactions between your company and an account. Many
activities may need to be tracked to support converting an opportunity into a sale. The page:
Does not require you to enter an account or contact with an activity.
Enables you to link an activity to a project, opportunity or ticket.
Adding Activities
1. Select the Admin > CRM > Activities tab.
2. Click New.
3. Enter the following fields.
Subject - Summary of this activity.
Status - Status of this activity.
Type - Appointment, Ask for Sale, Call, Demo, Email, Follow up, Inquiry, Marketing,
Memo, Proactive Call, Quote, Renew Agreement, Task
Account - The customer account.
Due Date - Due date for this activity.
Reminder - Reminder date for this activity.
Contact - Contact for this activity.
Start Time - Start time for this activity.
Assigned To - Employee assigned this activity.
Phone - Contact's phone.
End Time - End time for this activity.
Assigned By - Employee who assigned this activity.
Project - Requires an account be selected. An associated project.
Opportunity - Requires an account be selected. An associated opportunity.
Ticket - Requires an account be selected. An associated ticket.
Notes - Additional notes about this activity.

CRM Module
159
4. Click Save.
Opportunities
CRM > Opportunities
The Opportunities tab maintains opportunities across all accounts. Creating opportunities helps the
sales team track and manage the sale pipeline.
Leads vs Opportunities
Lead
A qualified prospect that proactively wants to learn more about your products and services.
A type of prospect who has a problem we can solve and we can sell to.
The prospect is proactively looking: requested a white paper, a demonstration. They have
questions.
A list of names to cold call is not a lead. It's a prospect list.
Opportunity
When the conversation turns into near-term purchase possibility.
They have a defined time-line to make a purchase.
You are talking with the decision maker(s) and they are actively seeking to solve problem /
issue.
Budget has been discussed and is available.
The buyer has agreed upon next steps, which may or may not be to purchase from you.
If you've converted a lead into an opportunity, you have an expected close date.
Adding Opportunities
1. Select the CRM > Opportunities tab.
2. Click New.

CRM Module
160
3. Enter the following fields.
Subject
Next Step
Account
Type
Status
Location
Probability
Rating
Contact
Sales Representative
Customer PO#
Phone
Close Date
Lead Source
Amount
Probability Adjusted Revenue
Description
4. Select the Activities tab and enter the following. Click Add to add additional rows.
Subject - Summary of this activity.
Status - Status of this activity.
Type - Appointment, Ask for Sale, Call, Demo, Email, Follow up, Inquiry, Marketing,
Memo, Proactive Call, Quote, Renew Agreement, Task
Account - The customer account.
Due Date - Due date for this activity.
Reminder - Reminder date for this activity.
Contact - Contact for this activity.
Start Time - Start time for this activity.

CRM Module
161
Assigned To - Employee assigned this activity.
Phone - Contact's phone.
End Time - End time for this activity.
Assigned By - Employee who assigned this activity.
Notes - Additional notes about this activity.
5. Select the Quotations tab and enter the following. Click Add to add additional rows.
A quote (page 161) is a form that you send to your prospect or client that lists the prices for the
items and services you are selling.
Quotation Number
Status
Name
Expiry Date
Created By
Creation Date
Summary
Click Save.
After you save a quotation, a new Line Items tab displays. You can use it to Add line
items to the quotation.
You can subsequently Generate, Preview, and Send to Customer all from within this tab.
You can then set the Status of the quotation to Approved from within this tab. Once
approved, you can Convert the quotation into one or more contracts and a single
project.
For more information see Quotations (page 161).
6. Click the Notes tab. Click Add to add notes.
7. Click the Custom Fields tab.
Enter values in the custom fields, as appropriate for this record.
Custom fields are maintained using the Admin > My Company > Custom Fields (page 25)
page.
8. Click Attachments tab.
Click Upload a new file to upload files to this record. For example, a request for proposal
(RFP).
9. Click Save.
Quotations
CRM > Quotations
Part of the sales process is sending your prospects or customers a quote for your products and
services. A sales quote allows the prospective buyer to see the cost for the products and services and
make a decision. Vorex™ allows you to generate Quotations that are linked to your opportunities.
In This Section
Service Quotations 162
Product Quotations 164
Processing Service Quotations 165
Processing Product Quotations 167

CRM Module
162
Service Quotations
CRM > Quotations > Service Quotations
The Service Quotations page manages quotes for service items. You can also include product items in
service quotations. Each service line item can override the default prices specified for labor and
services. A service quotation supports the following types of line items:
Service Items
Labor Items
Fixed Labor Item
Fixed Price Item
Product Item
Retainer by Hour Item
Retainer by Amount Item
Note: For a description of service quotation actions see Processing Service Quotations (page 165).
Create New Service Quotations
1. Select the CRM > Quotations > Service Quotations tab.
2. Click New.
3. Enter the following in the Customer Info panel.
One of the following:
By Opportunity
By CRM Account
By Project
Contact
4. Enter the following fields in the Quotation Info tab.
Quotation Number
Status
Name
Expiry Date
Created By
Creation Date
Summary
5. Click the Custom Fields tab.
Enter values in the custom fields, as appropriate for this record.
Custom fields are maintained using the Admin > My Company > Custom Fields (page 25)
page.
6. Click Save. Two additional tabs display: Line Items and Attachments.
7. Click the Line Items tab.
8. Click Add. Select one of the following service items.
Service Item
T&M Labor Item
Fixed Labor Item
Fixed Price Item
Product Item
Retainer by Hour Item
Retainer by Amount Item

CRM Module
163
9. When adding a Service Item enter the following:
Service - Select a service.
Unit Price - Accept the default or override.
Quantity - Accept the default or override.
Period - Recurring or One Time
Description - Enter a description.
10. When adding a T&M Labor Item entering the following:
Role - Select a role.
Unit Price - Accept the default or override.
Quantity - Accept the default or override.
Period - Per Hour or Per Day
Description - Enter a description.
11. When adding a Fixed Labor Item entering the following:
Name - Enter a name.
Unit Price - Accept the default or override.
Quantity - Accept the default or override.
Period - Per Hour or Per Day
Description - Enter a description.
12. When adding a Fixed Price Item entering the following:
Name - Enter a name.
Milestone Type - Select a milestone type.
Unit Price - Accept the default or override.
Quantity - Accept the default or override.
Period - Per Hour or Per Day
Description - Enter a description.
13. When adding a Product Item enter the following:
Product
Price Level
Discount
QTY
Price
Description
14. When adding a Retainer by Hour Item entering the following:
Name - Enter a name.
Unit Price - Accept the default or override.
Quantity - Accept the default or override.
Period - Contract Length, Weekly, Monthly, Quarterly, Yearly
Description - Enter a description.
15. When adding a Retainer by Amount Item entering the following:
Name - Enter a name.
Retainer Amount - Enter an amount.
Description - Enter a description.
16. Click Attachments tab.
Click Upload a new file to upload files to this record. For example, a request for proposal
(RFP).

CRM Module
164
17. Click Save.
Product Quotations
CRM > Quotations > Product Quotations
The Product Quotations page manages quotes for products. Products are typically defined in inventory
first. But product quotations also supports specifying "free form" products not in your inventory. Each
quotation can override the default prices specified for products.
Note: For a description of product quotation actions see Processing Product Quotations (page 167).
Create New Product Quotations
1. Select the CRM > Quotations > Product Quotations tab.
2. Click New.
3. Enter the following in the Customer Info panel.
Destination Type - Location, Site, Warehouse
Destination
Contact
4. Enter the following fields in the Quotation Info tab.
Quotation Number
Quotation Date
PO
PO Date
Ship by Method
Ship by Date
Project
Payment Term
Sales Rep
Pricing Level
Shipment Type
Status
Notes
5. Click Save. Tabs display at the bottom of the page.
6. Click the Inventory Items tab.
Click Add.
Select one or more products.
Click OK.
7. Update the following default values for each inventory item added. Changes are reflected in the
Grand Total at the bottom of this tab after you save.
Pricing Level
Quantity
Unit Price
Discount
8. Click the Items tab and click Add. These are "free form" items that are not defined in your inventory.
After you save a row, click the row to edit it. Changes are reflected in the Grand Total at the bottom
of this tab after you save. Repeat this step to add as many rows as you require.

CRM Module
165
Item
Item Description
QTY
Unit Price
Discount
Taxable - Yes or No
Total
Click Save.
9. Click the Charges tab click Add. After you save a row, click the row to edit it. Repeat this step to add
as many rows as you require.
Charge
Currency
Amount
Date
Notes
Click Save.
10. Click Notes tab.
Click Add to add a note.
11. Click the Custom Fields tab.
Enter values in the custom fields, as appropriate for this record.
Custom fields are maintained using the Admin > My Company > Custom Fields (page 25)
page.
12. Click Attachments tab.
Click Upload a new file to upload files to this record. For example, a request for quote (RFQ).
13. Click Save.
Processing Service Quotations
CRM > Quotations > Service Quotations
Note: To create a service quotation see Service Quotations (page 162).
Statuses
Typically each service quotation progresses through one or more of the following statuses:
New
Ready to Send
Sent
Approved
Rejected
Convert to Projects/Contracts
Note that a Rejected quotation can be subsequently Approved.
Actions
Clicking the Action button sets the appropriate status for the service quotation and usually displays a
dialog or window for you to complete the action or review the results.
Copy Quotation - Copies this quotation to a new quotation
Generate Quotation - Creates a printable quotation.

CRM Module
166
Print Quotation - Displays a printable PDF of the quotation
Send Quotation - Sends the PDF to email recipients.
A quotation is changed to Approved or Rejected by selecting either status from the Status field in
the header.
Convert to Projects/Contracts - Converts a quotation to contracts, projects, or both. A quotation must
be Approved before it can be converted.
Messages confirm an action has completed successfully.
Processing Service Quotations
1. Select the CRM > Quotations > Service Quotations tab.
2. Click a quotation with a Status of New.
3. Click Actions > Generate Quotation.
The Status is set to Ready to Send.
4. Click Actions > Print Quotation.
Review the PDF to ensure it is correct.
If necessary, make changes to the quotation, regenerate and review the PDF again.
5. Click Actions > Send Quotation.
Email Template
Attach Quotation - Yes or No.
Send Email - Separate Recipients or Combined Recipients
Contacts - Optionally uncheck to exclude.
Other Email - Enter email addresses manually.
Attachments - Optionally check to include.
Click Send.
The Status is set to Sent.
6. When a client approves or rejects the quotation, set the Status field to:
Approved
Rejected
7. Click Save. If the quotation is Approved, you can convert the quotation.
If converting to a project, only one project will be created. You can optionally copy the
structure of an existing project during conversion.
If converting to contracts, one contract will be created for each contract type included in your
quotation—Service Items, Labor Items, Fixed Labor Item, Fixed Price Item. You must
activate contracts before you can bill for them.
If both a contract and project are converted, you must activate the contract before the
corresponding project shows itself linked to the contract. If multiple contracts and a project
were created, ensure the correct contract is linked to the project.
8. Click Actions > Convert to Projects/Contracts.
A three-step wizard dialog displays.
9. Convert to Project - Set to Yes to enable the other fields in this wizard page.
Name
Start Date
End Date
Project Manager
Department
Copy Project From - Project Templates or All Projects

CRM Module
167
Project - Select the specific project template or project to copy from.
Description
10. Convert to Contract - Set to Yes to enable the other fields in this wizard page.
Select one or more service quotation line items to convert to contracts.
If the quotation is also being converted to a project, any contracts you create will be linked to
the project.
11. Convert to Sales Order - Set to Yes to enable the other fields in this wizard page.
PO #
PO Date
Ship By
Price Level
Delivery Method
Payment Term
Delivery Type
Link To Project:- Existing Project or Converted Project
Project - Select if Existing Project was selected.
Sales Rep
Notes
12. After conversion, click the Project/Contract button.
Click the project created for this service quotation, if created. A new window or tab displays
the project.
Click any of the contracts created for this service quotation, if created. A new window or tab
displays the contract. You must activate created contracts to begin billing for their delivery.
Processing Product Quotations
CRM > Quotations > Product Quotations
Note: To create a product quotation see Product Quotations (page 164).
Statuses
Typically each product quotation progresses through one or more of the following statuses:
New
Ready to Send
Send
Approved
Rejected
Convert to Sales Order
Note that a Rejected quotation can be subsequently Approved.
Actions
Clicking the Action button sets the appropriate status for the quotation and usually displays a dialog or
window for you to complete the action or review the results.
Generate Quotation - Creates a printable quotation.
Print Quotation - Displays a printable PDF of the quotation
Email Quotation - Sends the PDF to email recipients.
Accept - Marks the quotation as accepted by the customer.

CRM Module
168
Reject - Marks the quotation as rejected by the customer.
Convert to Sales Order - Converts the quotation to a sales order. A quotation must be Approved
before it can be converted.
Messages confirm an action has completed successfully.
Processing Product Quotations
1. Select the CRM > Quotations > Product Quotations tab.
2. Click a quotation with a Status of New.
3. Click Actions > Generate Quotation.
The Status is set to Ready to Send.
4. Click Actions > Print Quotation.
Review the PDF to ensure it is correct.
If necessary, make changes to the quotation, regenerate and review the PDF again.
5. Click Actions > Email Quotation.
Email Template
Send Email - Separate Recipients or Combined Recipients
Contacts - Optionally uncheck to exclude.
Other Email - Enter email addresses manually.
Attachments - Optionally check to include.
Click Send.
The Status is set to Sent.
6. Do one of the following:
Click Actions > Approve to set the Status of the quotation to Approved.
Click Actions > Reject to set the Status of the quotation to Rejected.
7. If the quotation is Approved, click Actions > Convert to Sales Order.
Sales Orders
CRM > Sales Orders
The Sales Orders page manages sales orders for products. Products are typically defined in inventory
first. But sales orders also support specifying "free form" products not in your inventory. Each sales
order can override the default prices specified for products.
Note: For a description of sales order
actions
see Processing Sales Orders (page 170)
Create New Sales Orders
1. Select the CRM > Sales Orders tab.
2. Click New.
3. Enter the following in the Customer Info panel.
Destination Type - Location, Site, Warehouse
Destination
Contact
4. Enter the following fields in the Sales Order tab.
Sales order Number
Sales order Date

CRM Module
169
PO
PO Date
Ship by Method
Ship by Date
Project - If a project is entered, items listed in the sales order display in the project as a
charge when the sales order is posted.
Payment Term
Sales Rep
Pricing Level
Shipment Type
Status
Notes
5. Click Save. Tabs display at the bottom of the page.
6. Click the Inventory Items tab.
Click Add.
Select one or more products.
Click OK.
7. Update the following default values for each inventory item added. Changes are reflected in the
Grand Total at the bottom of this tab after you save.
Pricing Level
Quantity
Unit Price
Discount
8. Click the Items tab and click Add. These are "free form" items that are not defined in your inventory.
After you save a row, click the row to edit it. Changes are reflected in the Grand Total at the bottom
of this tab after you save. Repeat this step to add as many rows as you require.
Item
Item Description
QTY
Unit Price
Discount
Taxable - Yes or No
Total
Click Save.
9. Click the Charges tab click Add. After you save a row, click the row to edit it. Repeat this step to add
as many rows as you require.
Charge
Currency
Amount
Date
Notes
Click Save.
10. Click Notes tab.
Click Add to add a note.
11. Click the Custom Fields tab.
Enter values in the custom fields, as appropriate for this record.
CRM Module
170
Custom fields are maintained using the Admin > My Company > Custom Fields (page 25)
page.
12. Click Attachments tab.
Click Upload a new file to upload files to this record.
13. Click Save.
Processing Sales Orders
CRM > Sales Orders
Note: To create a sales order see Sales Orders (page 168).
Statuses
Typically each sales order progresses through one or more of the following statuses:
New
Ready to Post
Posted
Voided
Actions
Clicking the Action button sets the appropriate status for the sales order and usually displays a dialog or
window for you to complete the action or review the results.
Post Order - Posts the sales order.
Generate Order - Creates a printable sales order.
Print Order - Displays a printable PDF of the sales order
Email Order - Sends the PDF to email recipients.
Void Order - Voids the orders.
Messages confirm an action has completed successfully.
Inventory
Inventory Product quantity will be decremented upon Delivering the Products. Posting will allow you to
Bill the Customer.
Note: Updating customer hardware assets (page 186) and software assets (page 187) from completed sales
orders is not currently supported.
Processing Sales Orders
1. Select the CRM > Sales Orders tab.
2. Click a sales order with a Status of New.
3. Click Actions > Generate Order.
The Status is set to Ready to Post.
4. Click Actions > Print Order.
Review the PDF to ensure it is correct.
If necessary, make changes to the sales order, regenerate and review the PDF again.
5. Click Actions > Email Order.
Email Template
Send Email - Separate Recipients or Combined Recipients
Contacts - Optionally uncheck to exclude.

CRM Module
171
Other Email - Enter email addresses manually.
Attachments - Optionally check to include.
Click Send.
6. Click Actions > Post Order.
The Status is set to Posted.
Sites
CRM > Sites
The Sites page defines field locations where work is performed for a customer. Sites are not considered
standard business addresses for your customer. There may be no permanent personnel at the site. A
site could be a:
a temporary construction site
a cell tower
You can ship inventory for a sales order or project to a site address, rather than ship it to your
customer's standard business locations. You can quickly create a series of projects, one for each
selected site, using a Site Project.
Adding Sites
1. Select the CRM > Sites page.
2. Click New.
3. Enter the following fields in the Site Info tab.
Site ID
Site Name
Owner
Site Number
Market Type
Gate Combination
Door Combination
Notes
Direction
4. Select the Address tab and enter the following.
Address 1
Address 2
City
State
Zip Code
Country
Latitude
Longitude
5. Click the Custom Fields tab.
Enter values in the custom fields, as appropriate for this record.
Custom fields are maintained using the Admin > My Company > Custom Fields (page 25)
page.
6. Click Attachments tab.
CRM Module
172
Click Upload a new file to upload files to this record. For example, a site map.
7. Click Save.

Service Desk
173
Service Desk
The Service Desk module is the central place to manage all the support tickets between you and your
clients.
The Service Desk Dashboard provides real time information on the progress and status of the
tickets as they move through your company’s support process.
Workflow rules ensure tickets move through your support process in a timely manner and
reminders sent along the way until final resolution.
The Asset Management folder is a centralized place to store all your clients hardware and
software assets.
Knowledgebase helps share information with employees and reduces the time to find
resolutions.
In This Chapter
Service Desk Dashboard 173
My Tickets 174
Tickets 174
Hardware Assets 186
Software Assets 187
Knowledgebase 188
Recurring Master Tickets 189
Service Calls 191
Service Desk Dashboard
Service Desk > Service Desk Dashboard
The Service Desk Dashboard provides help desk managers with real time information about the status
and progress of tickets as they move through your company's support process. Workflow rules ensure
tickets move through your support process in a timely manner and generate reminders that display on
this page.
Specialized dashlets provided by the Service Desk Dashboard include:
Today's Tickets - A place to set reminders.
Tickets By Issue Types - A place to set reminders.
Tickets By Status - A place to set reminders.
Tickets By Assignee - A place to set reminders.
Tickets By Priority - place to set reminders.
Tickets By Queue - A place to set reminders.
C h a p t e r 6

Service Desk
174
See Dashboard (Home) (page 15) for a description of general purpose dashlets that also display on this
page.
My Tickets
Home > My Tickets
Service Desk > My Tickets
The My Tickets page manages tickets assigned to yourself as the primary assignee. If you assign the
ticket to another employee, the ticket no longer displays on this page. Ticket assignments to queues
are ignored by this page. You can search for all tickets assigned to the queues you are a member of
using the Queue search parameter.
Note: See Service Desk > Tickets (page 174) for a detailed description of how to work with tickets on this
page.
Tickets
Service Desk > Tickets
The Tickets page manages tickets created for customer support issues. A support issue may be a
question, a problem, a request for service, or a suggestion for a future enhancement.
Tickets are assigned to employees (technicians) and queues (groups of employees) to work on the
support issue. The ticket helps track the progress of issue towards resolution. Based on billing
agreements with each client, labor time entries can generate billable hours or deduct a pre-paid
amount, or deduct retainer hours.
Tickets creation is initiated by:
Phone - The client calls and a technician creates the ticket manually.
Email - An email to support is converted into a ticket automatically.

Service Desk
175
Client Portal - The customer creates the ticket manually.
In This Section
Creating/Editing Tickets 175
Processing Tickets 177
Adding Notes to Tickets 178
Adding Time to Tickets 179
Adding Expenses to Tickets 181
Adding Charges to Tickets 182
Adding Service Calls to Tickets 183
Adding To-Dos to Tickets 183
Adding Related Tickets 184
Custom Fields, Attachments for Tickets 184
Batch Actions for Tickets 184
Unknown Tickets 185
Creating/Editing Tickets
Service Desk > Tickets
You can set any of the header fields of a new ticket when it is New or when you Edit the ticket.
Creating New Tickets Within Vorex™
1. Select the Service Desk > Tickets page.
2. Click New.

Service Desk
176
3. You can pre-populate field values in the header of the ticket by selecting a ticket template (page
231) using the From Template drop-down list.
4. Enter the following in the Ticket Details > Customer Info panel.
Client
Site
Contact
Contact Phone - Defaults to the selected contact's phone number.
Contact Email - Defaults to the selected contact's email.
Source - The default source is maintained using the Admin > My Company > Service Desk
Settings (page 22) tab.
5. Enter the following fields in the Ticket Details > Ticket Properties panel.
Ticket Type
Issue Type
Sub-Issue Type
Service Contract - The contract selected will determine how the labor is tracked on this ticket.
If there is a default contract for tickets, it will automatically appear in this field. The default
service contract are created using the Finance > Contracts page.
SLA - Displays the default service level agreement, if one is set, and allows you to assign
one.
Work Type
6. Enter the following fields in the Ticket Details tab.
Ticket Title - A one line summary. Used to search tickets by title.
Ticket Priority
Status - New, Waiting for Customer, In Progress, Escalated, Assigned, Completed,
Customer Responded. Defaults to New. Customize using the Admin > Service Desk Settings
> Ticket Statuses (page 57) page.
TTR - Estimated time to tesolution, in hours or minutes.
Details - Enter expanded description of the support issue.
Primary Assignee - The primary employee assigned to work this ticket.
Open Date - The date/time this ticket was created.
Queue - Assigns a ticket to queue. Employees assigned to a queue will see tickets assigned
to the same queue displayed on their Home > My Queues (page 225) page.
Due Date - The date/time the ticket is scheduled to be resolved.
Secondary Assignees - One or more employees also assigned to work this ticket. Secondary
assignees can enter time and notes.
Affected Hardware Asset - Identifies a hardware asset affected by this issue. Records of a
client's hardware assets are maintained using the Service Desk > Asset Management >
Hardware Assets page.
Affected Software Asset - Identifies a software asset affected by this issue. Records of a client's
software assets are maintained using the Service Desk > Asset Management > Software
Assets page.
Select or Drag and Drop Files - Select files to attach to the ticket.
7. Click Save. See the following topics to maintain existing tickets:
Adding Notes to Tickets (page 178)
Processing Tickets (page 177)
Adding Time to Tickets (page 179)
Adding Expenses to Tickets (page 181)

Service Desk
177
Adding Charges to Tickets (page 182)
Adding Service Calls to Tickets (page 183)
Adding To-Dos to Tickets (page 183)
Adding Related Tickets (page 184)
Custom Fields, Attachments for Tickets (page 184)
Batch Actions for Tickets (page 184)
Unknown Tickets (page 185)
Processing Tickets
Service Desk > Tickets
Note: To create a ticket see Creating/Editing Tickets (page 175).
Statuses
Each ticket typically progresses through one or more statuses.
A new install of Vorex™ provides the following statuses: New, Waiting for Customer, In
Progress, Escalated, Assigned, Completed, Customer Responded.
You can customize the list using the Admin > Service Desk Settings > Ticket Statuses (page 57)
page.
Three "system" statuses cannot be made inactive:
New, Waiting for Customer, and Completed.
Tickets default to New.
The Tickets and My Tickets list pages do not display Completed tickets by default. Clicking the
Search button without specifying any parameters includes Completed tickets.
Actions
Tickets support the following types of actions. Each action displays a dialog of additional settings.
Audits
Ticket Logs tab - Displays a log of all changes to a ticket, by both users and workflows.
Workflow Log tab - Shows actions performed on a ticket by a workflow.
Assign Ticket
Status - Changes the status of the ticket.
Queue - Assigns the ticket to a group of employees responsible for the ticket.
Primary Technician - Assigns an employee to the ticket.
Comments
Resolve Ticket
Status
Comments
Publish to Knowledge Base - Yes or No - See Knowledgebase (page 188).
Print Ticket - Displays a printable PDF of the ticket.
With Notes
With Time Entries
With Expenses
Business Processes
Use the Admin > Business Process:
Email Templates (page 30) page to customize ticket email notifications.

Service Desk
178
Approval Routes (page 31) page to create approval items used in workflows.
Workflow (page 33) page to automate the processing of tickets.
Customer Info
When you first open a ticket, the Ticket View tab displays. Below the ticket title is the customer's name
with a link. Click this link to show the Customer Info window with the following information:
Name
Location
Account Type
Address
Locate on Google Maps - Click this link to show the address on Google Maps.
Phone
Fax Number
Contact Person
Name
Phone
Email
SLA Status
On the Ticket View tab you will see both an SLA field and an SLA Status field. For tickets assigned an SLA
(page 55), the SLA Status field shows a link. Click this link to see the estimated and actual times specified
for resolving the ticket by the SLA. The workflow assigned to a ticket can be used to specify when
employees or customers should be notified, based on SLA benchmarks. The Waiting SLA State is
time spent waiting for the customer to respond. SLA timers are paused while waiting for the customer
to respond.
Adding Notes to Tickets
Service Desk > Tickets > (selected ticket)
When you add notes to a ticket you can:
Change the status of a ticket.
Notify others of the note you're adding.
Include an attachment with the note.
Adding Notes to Tickets
1. Select the Service Desk > Tickets page.
2. Click an existing ticket.
3. Click the Activities tab.
This same tab can be used to Add Time (page 179) to a ticket.
4. Click Add.
From Template - Pre-populate field values in the note by selecting a ticket note template
(page 231).
Note Date
Type - The ticket note type (page 26).
Status - Optionally change the status of the ticket when this note is saved.
Internal Note - If Yes, this note is hidden from clients.
Details
Service Desk
179
General Notes - Optionally enter a note for this labor time entry that will display on the invoice.
Internal Notes - Optionally enter a hidden not that will not display the invoice.
Click Save.
Adding Time to Tickets
Service Desk > Tickets > (selected ticket) > Time Logs
The Time Logs tab adds time to a ticket.
Time log entries can be created with or without using a timer.
Time entered on tickets automatically updates the user's timesheet.
If linked to an active contract, time entered on a ticket can:
Create billable events for Time & Materials (page 109) contracts
Deduct prepaid hours for Retainer by Hours (page 117) contracts
Deduct prepaid amounts for Retainer by Amount (page 115) contracts.
Track but not bill time for Recurring Services (page 110) contracts.
Adding Ticket Time Without Using a Timer
1. Select the Service Desk > Tickets page.
2. Click an existing ticket.
3. Click the Time Logs tab.
4. Click Add.
From Template - Field values can be pre-populated by selecting a ticket time entry template
(page 231).
Date Started - The date this labor time started.
Start Time - The time this labor time started.
Time Spent (hrs) - The duration of hours worked.
Role - The role (page 43) best describing the person performing this work. The role, and
optionally the work time, determine the rate charged for billable hours.
Work Type - The work type (page 44) best describing the work itself.
Status - Optionally change the status (page 57) of the ticket when this time entry is saved. .
General Notes - Optionally enter a note for this labor time entry that will display on the invoice.
Internal Notes - Optionally enter a hidden not that will not display the invoice.

Service Desk
180
Click Save.
Adding Ticket Time Using a Timer
You can start, stop and reset a timer when you open or edit a ticket. You can see the elapsed
incrementing while you work the ticket. The elapsed time of a running timer populates the time log entry
window when you open it and continues to update it while it runs.
You can configure the timer to start automatically whenever a ticket is opened by setting a Enable
Stopwatch Autostart option to Yes. This option is located on the Admin > My Company > Company
Settings > Service (page 22)Desk tab.
1. Select the Service Desk > Tickets page.
2. Click an existing ticket.
3. Optional start, stop, reset the timer in the upper right corner.
4. Click the Time Logs tab.
5. Enter the following:
From Template - Field values can be pre-populated by selecting a ticket time entry template
(page 231).
Date Started - The date this labor time started.
Start Time - The time this labor time started.
End Time - The time this labor time ended.
Time Spent (hrs) - The duration of hours worked.
Role - The role best describing the person performing this work. The role, and optionally the
work time, determine the rate charged for billable hours.
Work Type - The work type best describing the work itself.
Status - Optionally change the status of the ticket when this time entry is saved.
General Notes - Optionally enter a note for this labor time entry that will display on the invoice.
Internal Notes - Optionally enter a hidden not that will not display the invoice.
Click Save.

Service Desk
181
Adding Expenses to Tickets
Service Desk > Tickets > (selected ticket) > Expenses
Service Desk > Tickets > (selected ticket) > Expenses & Charges
Expenses entered on tickets automatically update the user's expense sheets. Alternatively, users can
enter an expense on a expensesheet and link it to a ticket. These can include:
Expenses billed to customers.
Expenses reimbursed by your company to the employee.
You can use pre-configured expense types to save time. You can also adjust the default amount for
each expense.
Adding Expenses to a Ticket
1. Select the Service Desk > Tickets page.
2. Click an existing ticket.
3. Click the Expenses tab.
You can also add expenses using the Expenses & Charges tab. The same dialog displays
either way.
4. Click Add.
5. Enter the following in the Expense Info tab.
Expense Type
Date - The date the expense was incurred
Amount Spent
Mark Up / Down - Adjust up or down by amount ($) or percent (%).
Payment Types - Cash, Check, Debit Card, Credit Card, Other, Company Credit Card.
Classification - Reimbursable or Non-Reimbursable
Billable - Yes or No
Available Expense Sheets - Select an existing expense sheet or add a new one.
Add New Expense Sheet - If checked, the following display:
New Expense Sheet Name
New Expense Sheet Date
General Notes - Optionally enter a note for this labor time entry that will display on the invoice.
Internal Notes - Optionally enter a hidden not that will not display the invoice.
6. Enter the following in the Receipts tab.
Upload a new file
Have Receipt - Yes or No
Notes
7. Enter the following in the Notifications tab.
Contact
Resources
Email template to use
Other Emails
8. Click Save to save the expense.

Service Desk
182
9. Click Save to save the ticket.
Adding Charges to Tickets
Service Desk > Tickets > (selected ticket) > Expenses & Charges
You can add charges to tickets that optionally:
Are billable or not billable.
Sells—or provides at no charge—products to your client, decrementing them from your inventory.
Transfers the products to the client's hardware assets (page 186) or software assets (page 187).
Adding Charges to Tickets
1. Select the Service Desk > Tickets page.
2. Click an existing ticket.
3. Click the Expenses & Charges tab.
4. Click Add.
5. Enter the following in the Charge Info tab.
Product
Charge Name
Status - Pending, Need to Order / Fulfill, Ready to Deliver / Ship, Cancelled. For
reporting purposes only.
Price Level
Purchase Date
Purchase Order
QTY
Price
Billable Amount
Description

Service Desk
183
Unit Cost
Total Cost
Billable - Yes or No
Create Multiple Items - Yes or No - Selecting Yes for this option splits the total quantity into
individual lines, each with a quantity of 1.
Optional review the Stock Info tab.
6. Enter the following in the Receipts tab.
Upload a new file
7. Click Save to save the charge.
8. Click Save to save the ticket.
Adding Service Calls to Tickets
Service Desk > Tickets > (selected ticket) > Service Calls & To-Dos
The Service Calls & To-Dos tab adds service calls to a ticket.
Each service call is added to the timesheet of the employee assigned that service call, for tracking
purposes.
Service calls are always non-billable.
Service calls are first scheduled, then marked as complete after the service call has occurred.
You can also manage service calls using the Service Desk > Service Calls (page 191) page and
within project tasks.
You can see any unassigned service calls you create on your My Service Calls (page 226) page.
Adding Service Calls to Tickets
1. Select the Service Desk > Tickets page.
2. Click an existing ticket.
3. Click the Service Calls & To-Dos tab and click Add.
4. On the Service Call tab:
Resource
Start Date
End Date
Description - The description is populated with some basic info.
Client
Location
Ticket Number
Ticket Title
5. On the Notification tab optionally enter:
Resources - Employees to be notified.
Email template to use
Other Emails - Other email recipients to be notified.
6. Click Save.
Adding To-Dos to Tickets
Service Desk > Tickets > (selected ticket) > Service Calls & To-Dos
The Service Calls & To-Dos tab adds to-dos to a ticket. To-dos can be assigned to yourself or any other
employee. To-dos provide each user with his or her own system-wide checklist of reminder tasks to

Service Desk
184
perform, with due dates and completion states. Each user's entire to-do list displays on module
dashboard pages.
Adding To-Dos to Tickets
1. Select the Service Desk > Tickets page.
2. Click an existing ticket.
3. Click the Service Calls & To-Dos tab click Add.
Client
Location
Complete - Yes or No
Start Date
End Date
Description
Click Save.
Adding Related Tickets
Service Desk > Tickets > (selected ticket) > Related Tickets
The Related Tickets tab links other tickets with the current ticket. Clicking a related ticket opens the
related ticket in a new window or tab, enabling you to work on both tickets in tandem. When you add a
related link, links are created in both tickets.
Custom Fields, Attachments for Tickets
Service Desk > Tickets > (selected ticket) > Custom Fields
Service Desk > Tickets > (selected ticket) > Attachments
Additional ticket tabs include:
Custom Fields
Enter values in the custom fields, as appropriate for this record.
Custom fields are maintained using the Admin > My Company > Custom Fields (page 25)
page.
Attachments
Lists all attachments for the ticket.
Click Upload a new file to upload files to this record. For example.
Batch Actions for Tickets
Service Desk > Tickets
Service Desk > My Tickets
Home > My Tickets
The Batch Actions button on ticket search pages enables you to perform actions on multiple tickets at
the same time. When you click the button, two options display:
Current Page - Performs batch actions on tickets in the current page only.
All Pages (max 500) - Performs batch actions on tickets in the current search context, up to 500
tickets at a time.
Batch Tickets Wizard
Clicking either of the options above displays a Batch Tickets wizard that steps you through the following
choices:
Service Desk
185
Choose Tickets
Choose Operation
Operation Details
Confirmation
Step 1 - Choose Tickets
1. Select one or more tickets in the list to batch process.
2. Click Next Step.
Step 2 - Choose Operation
1. Select one of the following options.
Update Tickets - Updates selected fields in the tickets.
Assign Tickets - Assigns the tickets to an assignee and/or queue.
Delete Tickets - Deletes the tickets.
2. Click Next Step.
Step 3 - Operation Details
1. Complete the following, depending on the choice you made in step 2.
If Update Tickets was selected, you can update the following ticket fields.
Status
Priority
Source
Issue Type
Sub Issue Type
Ticket Type
If Assign Tickets was selected, you can change who the ticket is assigned to:
Change Primary Assignee
Change Queue
If Delete Tickets was selected, no detail choices are required.
2. Click Next Step.
Step 4 - Confirmation
1. Review the list of tickets that are about to be batch processed.
For Update Tickets and Assign Tickets, a list of the fields selected for updating shows the new
values that will be assigned.
For Delete Tickets, a warning message displays before final confirmation.
2. Click Confirm.
Unknown Tickets
Service Desk > Unknown Tickets
An Unknown Tickets page displays in the Service Desk module when an Admin > Service Desk > Email
Parser (page 58) receives email from an email address that is not recognized as belonging to any
employee or company contact. Use the Unknown Tickets page to manually assign tickets to the
appropriate customer account or delete them.

Service Desk
186
Hardware Assets
Service Desk > Asset Management > Hardware Assets
The Hardware Assets page registers hardware owned by the client and located at client location.
Hardware assets can be added using this page, or by adding a charge to a ticket (page 182).
Adding Hardware Assets
1. Select the Service Desk > Asset Management > Hardware Assets page.
2. Click New.
3. Enter the following in the Asset Info tab.
Name
Category
Physical Location Info
Client
Client Location
Contact
Business Impact
State
Brand
Description
4. Click to maintain/review the Additional Info tab.
Acquisition Date
Expiration Date
Warranty Expiration Date
Purchase Cost
BarCode
Vendor
5. Click to maintain/review the Asset Details tab.
Manufacturer
Serial
Model Number
Machine Group ID
Product Name
Machine Version
OS Type
OS Info
Version (Major | Minor)
Login Name
Last Login Name
Current User
First Check In
Last Check In
Last Reboot
Asset Tag
Max Memory Size

Service Desk
187
Max Memory Slots
6. Click to maintain/review the Network Details tab.
IP Address
Subnet Mask
Default Gateway
Mac Address
DNS Server(s)
Connection Gateway IP
Wins Enabled: Yes or No
DHCP Enabled: Yes or No
Primary Wins Server
Secondary Wins Server
DHCP
7. Click to maintain/review the Motherboard Info tab.
Motherboard Manufacturer
Motherboard Product Code
Motherboard Version
Motherboard Serial Number
Bus Speed
8. Click to maintain/review the Chassis Info tab.
Chassis Manufacturer
Chassis Type
Chassis Version
Chassis Serial Number
Chassis Asset Tag
9. Click the Custom Fields tab.
Enter values in the custom fields, as appropriate for this record.
Custom fields are maintained using the Admin > My Company > Custom Fields (page 25)
page.
10. Click Save.
Software Assets
Service Desk > Asset Management > Software Assets
The Software Assets page registers software owned by the client and located at a client location.
Software assets can be added using this page, or by adding a charge to a ticket (page 182).
Adding Software Assets
1. Select the Service Desk > Asset Management > Software Assets page.
2. Click New.
3. Enter the following in the Software Asset tab.
Client
Client Location
Contact
Name

Service Desk
188
Software Category
Version
Brand
Additional Location Info
Model Number
Description
4. Click the following in the Software License tab.
License Name
License Type
No. Of Licenses
Purchase Cost
Acquisition Date
Expiration Date
License Key
Description
5. Click the Custom Fields tab.
Enter values in the custom fields, as appropriate for this record.
Custom fields are maintained using the Admin > My Company > Custom Fields (page 25)
page.
6. Click Save.
Importing Software Assets
Select the Service Desk > Asset Management > Software Assets page.
Click Import(I).
Click Download Template(T).
Enter values in the fields and save the template.
Click Select and select import file from your directory.
Click Import(I).
Note:If there are two or more identical Asset names of the same type of software, PulsewayPSA creates
a master record and then enters each license under the ‘Software License’ tab.
Knowledgebase
Service Desk > Knowledgebase
The Knowledgebase page manages knowledge base articles related to customer support issues.
Typically knowledge base articles are started by copying them from an actual customer ticket when
the ticket is resolved (page 177), then updating the article to serve as a general reference. You can
also create a knowledge base article using this page.
Each knowledge base article can be linked to one or more tickets.
Each article can include attachments.
You cannot browse for a knowledge base
Creating New Knowledge Base Articles
1. Select the Service Desk > Knowledgebase page.
2. Click New.

Service Desk
189
3. Enter the following in the Articles tab.
Title
Category
Keywords
Publish Date
Details
4. Select the Related Tickets tab.
Select one or more tickets.
Click OK.
5. Click Attachments tab.
Click Upload a new file to upload files to this record.
6. Click Save.
Recurring Master Tickets
Service Desk > Recurring Master Tickets
The Recurring Master Tickets page creates a series of "child" tickets for a recurring support issue. For
example, a maintenance service call might be required on a recurring basis for a hardware asset.
You can create a series of service calls, with each service call linked to its own child ticket.
You can link a recurring master ticket to a contract. When you do, each child ticket will be linked to
that contract.
Once the recurring master ticket is saved the first time, defaults on the Defaults tab cannot be
changed.
You can select any created child ticket from the Tickets tab of the recurring master ticket.
You can create additional child tickets by extending the recurring time period on the Recurrence
tab. This is the only recurrence setting you can change.
Creating New Recurring Master Tickets
1. Select the Service Desk > Recurring Master Tickets page.
2. Click New.
3. Enter the following in the Defaults tab.
Title
Client
Location
Main Branch
Contact
Primary Assignee
Queue
Issue Type
Sub-Issue Type
Ticket Type
Status
Priority
Medium
Work Type

Service Desk
190
Contract
Due Time
Estimated Hours
Affected Hardware Asset
Affected Software Asset
Ticket Details
4. Select the Recurrence tab. Specify how many tickets to create in the series and the interval
between them.
Duration
Start Date
End After <N> occurrences
End On
Recurrence - A recurrence can only be modified if it's incremental.
Repeats - Daily, Weekly, Monthly, Yearly
Repeats <periods>
Repeats every <N> <periods>
for weekly Repeat on
Sun, Mon, Tue, Wed, Thu, Fri, Sat
for monthly Repeat on
Day <N> of the month
The <N> <weekday> of the month
for yearly Repeat on
Every <calendar_month> <day_of_month>
The <N> <weekday> of <calendar_month>
5. Select the Service Calls tab. Optionally create service calls, one for each ticket in the series.
Create service calls - Yes or No
Start Time
End Time
Description
6. Click the Custom Fields tab.
Enter values in the custom fields, as appropriate for this record.
Custom fields for the TicketRecurringMaster module are maintained using the Admin > My
Company > Custom Fields (page 25) page.
7. Click Save.
8. Click the new Tickets tab added to the recurring master ticket.
A series of child tickets are listed.
Click each ticket to view or work that individual ticket.
If service calls were created for each ticket, click the Service Calls & To-Dos tab inside the
individual ticket to see it listed.
If a service contract was added to the recurring master ticket, each individual ticket is linked
to this same contract.

Service Desk
191
Service Calls
Service Desk > Service Calls
The Service Calls page creates and manages all service calls created throughout the system.
Each service call is added to the timesheet of the employee assigned that service call, for tracking
purposes.
Service calls are always non-billable.
Service calls are first scheduled, then marked as complete after the service call has occurred.
Using a recurring master ticket you can create a series of child tickets and service calls, with each
service call linked to its own child ticket.
You can see any unassigned service calls you create on your My Service Calls (page 226) page.
Adding Service Calls
You can add a Service Call:
In a Task: see Service Calls topic.
In a Ticket: see Adding Service Calls to Tickets (page 183) topic.
In a Dispatch Calendar: see Dispatch Calendar (page 234) topic.
Editing a Service Call
1. Select the Service Desk > Service Calls page.
2. Select the Service call you would like to add. If the list is long, you narrow the search results by
adding the following parameters:
Account
Start Date
End date
Complete (status)
Created By
Created On
3. Edit the following in the Service Call tab.
Resource - Select an employee.
Complete - Yes or No
Start Date
End Date
Description
4. On the Notification tab optionally enter:
Resources - Employees to be notified.
Email template to use
Other Emails - Other email recipients to be notified.
5. Click Save.

Projects
193
Projects
In This Chapter
Projects Dashboard 193
Projects 194
Tasks 201
Resource Utilization 209
Multiple Projects Gantt 210
Archived Projects 210
Template Projects 210
Projects Dashboard
Projects > Projects Dashboard
The Projects Dashboard displayed in the Projects module provides instant access to projects and tasks
requiring your attention. Drill into dashlet indicators to view lists of corresponding projects and tasks.
Specialized dashlets provided by the Projects Dashboard include:
My Open Projects - Lists each project assigned to you as the project manager.
Project Vitals - Projects Over Budget, Projects Over Hours, Unstaffed Projects - Click any
count to display a list of projects in the All Projects (page 194) page using this filter criteria.
Projects by Status - Today, This Month, This Year, All - Displays a bar chart by project status.
Tasks Statistics - Due Today, Due This Week, Due This Month - Click any count to display a list
of tasks in the All Tasks (page 209) page using this filter criteria.
Timesheets Statistics - Opened, Submitted, Approved, Rejected
See Dashboard (Home) (page 15) for a description of general purpose dashlets that also display on this
page.
C h a p t e r 7

Projects
194
Projects
Projects > All Projects
Projects and tasks are often better suited than a ticket to track and manage more complex work efforts.
The All Projects page lists all projects currently being used. Projects are removed from the page
when archived (page 210). By default, the search filter does not include template projects (page
210).
You can quickly create new projects by copying an existing project or template project.
A Vorex™ project supports dependencies between tasks, unique deadlines for each task, and
can coordinate the allocation of resources and service calls across multiple projects and tasks.
Each project provides a complete financial summary of the costs and pricing associated with that
project. All labor time entries, expenses and charges applied to a project are tracked by the
Finance module for both billing and reporting purposes.
Projects can be created from a service quotation and linked to a corresponding contract. The
method used to bill a project depends on the contract linked to the project. If no contract is linked,
the project is billed on a time and materials basis.
Expenses can be entered for a project. Alternatively, users can enter an expense on a
expensesheet and link it to a project.
Products required to complete the project are entered using a charge. Charged products can be
added to the customer hardware assets or software assets.
Once you create or select an existing project you add, maintain and view project details using the
following tabs:
Projects
Financials
Related Opportunities
Expenses
Charges
Receipts
Custom Fields
Attachments
Tasks
Basics
Members
Time Logs
Service Calls
Notes
Custom Fields
Attachments
Some tabs are not available until the first time you save the project.
In This Section
Creating a New Project 195
Adding/Viewing Project Financials 196
Adding Related Opportunities to Projects 197
Adding Expenses to Projects 197
Adding Charges to Projects 199
Receipts, Custom Fields, Attachments for Projects 200
Copy Projects 200

Projects
195
Creating a New Project
Projects > All Projects > New > Project
You start a new project by entering general information in the Project tab.
Project Actions
Copy Project - Copies the open project to new project (page 200).
Archive Project - Archives the open project (page 210).
Creating a New Project
This procedure describes just the main Projects tab within a project. Child tabs are described in other
topics.
1. Select the Projects > All Projects page.
2. Click New.
3. Enter the following in the Project tab.
Project Number
Project Name
Client
Percent Done
PO# (Project Code)
Project Type
Status - Defaults to Open. Users assigned to tasks are not allowed to enter time entries when
the project status is set to Hold or Completed or Closed. Project managers can always add
time regardless of the status.
Priority
Project Assessment - Classifies the risk level of this project.
Project Manager
Department - Department leading this project. You can run a projects by department report.
Project Management
Contract - If blank, this project is billed on a time and materials basis.
Contracts must be activated before they display in this drop-down list.
If both a contract and project were converted from a quotation, activating the contract
automatically populates this field with the converted contract.
If multiple contracts and a project were converted from a quotation and the contracts
activated, ensure the correct contract is linked to the project.
Start Date - The start date of the entire project. Once tasks are entered, this field is
determined by the earliest start date of any task in the project. See Scheduling Projects
and Tasks (page 203)
Planned End Date - The planned end date of the entire project. Once tasks are entered, this
field is determined by the latest end date of any task in the project.
Actual End Date - The actual end date of the entire project. You can manually maintain this
date without being constrained by any tasks.
Timesheet Route - The timesheet approval route. If None, then timesheets are auto-approved.
Expensesheet Route - The expenseheet approval route. If None, then expensesheets are
auto-approved.
Site

Projects
196
Template - Yes or No
Allow Tasks on Weekends - Yes or No
Project Description
4. Click Save. Additional tabs display after the first save.
Adding/Viewing Project Financials
Projects > All Projects > (selected project) > Financials
The Financials tab summarizes the costs and pricing associated with a project. All labor time entries,
expenses and charges applied to a project are totaled in this tab and tracked by the Finance module for
both billing and reporting purposes.
You can edit the following fields:
Planned Budgets
Planned Hours
PO Amount
Cost Type
Cost Center
Note: A user's view of Financial tab data can be hidden, by checking the Hide Financials Tab on Projects
checkbox for the security role (page 39) being used.
Adding/Viewing Project Financials
1. Select the Projects > All Projects page.
2. Click an existing project.
3. Select the Project > Financials tab.
Planned Budget - Estimated cost to complete the project.
Used Budget Labor (Dollars) - Auto-calculated. The number of hours of labor entered
multiplied by the wages of those employees.
Used Budget Expenses (Dollars) - Auto-calculated. The total of all expenses submitted for the
project. Expenses are added to tasks by employees or added to the project by the project
manager using the Expenses tab.

Projects
197
Remaining Budget - The total of Planned Budget minus the Used Budget.
Percent Used (Budget) - Auto-calculated.
Planned Hours - Estimated hours to complete the project.
Used Hours - Auto-calculated. Hours entered for the project's by employees.
Remaining Hours - The total of Planned Hours minus Used Hours.
Percent Used (Hours) - Auto-calculated.
PO Amount - Enter the monetary amount of this project as it appears on the purchase order
provided by the client.
Total Billing - Estimated total billings for the project.
Actual Billing - Auto calculated.
Remained Unbilled
Cost Type - Define if project is CAPEX, OPEX, None or Client Billable.
Cost Center
Adding Related Opportunities to Projects
Projects > All Projects > (selected project) > Related Opportunities
The Related Opportunities tab shows the links between a project and quotation and one or more
opportunities. If a project was created by converting an opportunity into a service quotation, and then
converting the service quotation into a project, these display as Converted From links.
Adding Related Opportunities
1. Select the Projects > All Projects page.
2. Click an existing project.
3. Select the Project > Related Opportunities tab.
4. Click Add.
Select one or more opportunities created for this same customer.
Click OK.
5. Click Save.
Adding Expenses to Projects
Projects > All Projects > (selected project) > Expenses
Expenses entered on projects automatically update the user's expense sheets. Alternatively, users

Projects
198
can enter an expense on a expensesheet and link it to a project. These can include:
Expenses billed to customers.
Expenses reimbursed by your company to the employee.
You can use pre-configured expense types to save time. You can also adjust the default amount for
each expense.
Adding Expenses to a Project
1. Select the Projects > All Projects page.
2. Click an existing project.
3. Click the Project > Expenses tab.
4. Click Add.
5. Enter the following in the Expense Info tab.
Expense Type
Date - The date the expense was incurred
Amount Spent
Mark Up / Down - Adjust up or down by amount ($) or percent (%).
Payment Types - Cash, Check, Debit Card, Credit Card, Other, Company Credit Card.
Classification - Reimbursable or Non-Reimbursable
Billable - Yes or No
Available Expense Sheets - Select an existing expense sheet or add a new one.
Add New Expense Sheet - If checked, the following display:
New Expense Sheet Name
New Expense Sheet Date
General Notes - Optionally enter a note for this labor time entry that will display on the invoice.
Internal Notes - Optionally enter a hidden not that will not display the invoice.
6. Enter the following in the Receipts tab.
Upload a new file
Have Receipt - Yes or No
Notes
7. Click Save to save the expense.
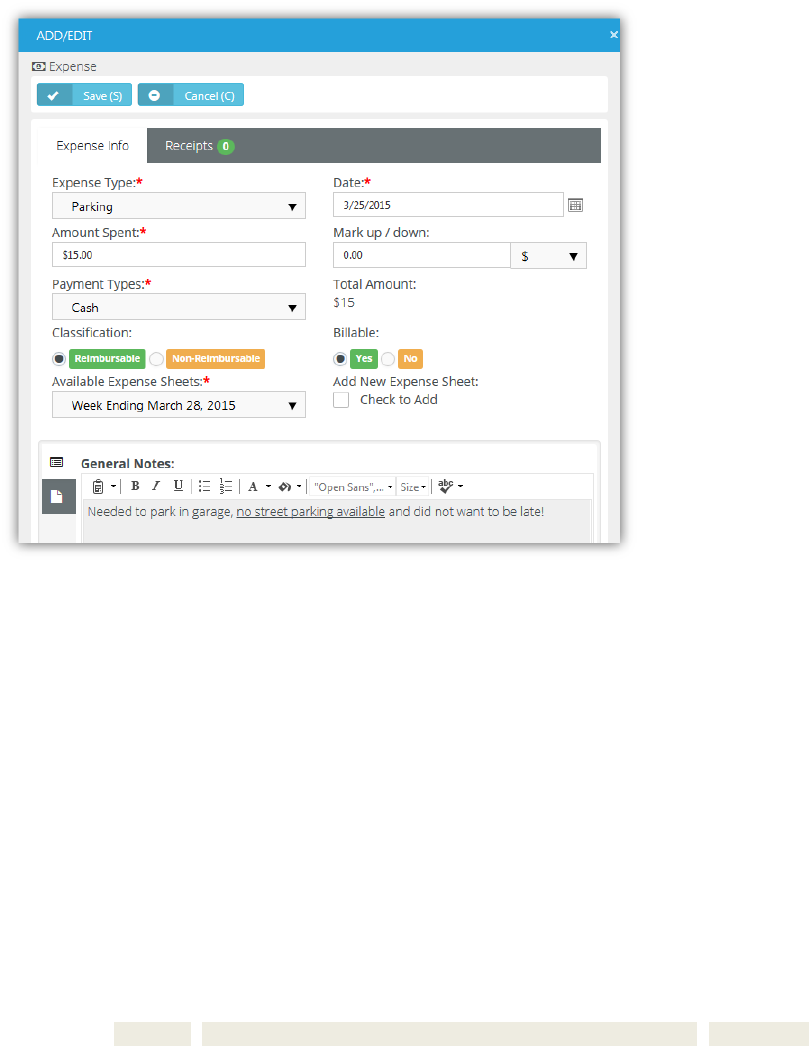
Projects
199
8. Click Save to save the project.
Adding Charges to Projects
Projects > All Project > (selected project) > Charges
You can add charges to projects that optionally:
Are billable or not billable.
Sells—or provides at no charge—products to your client, decrementing them from your inventory.
Transfers the products to the client's hardware assets (page 186) or software assets (page 187).
Adding Charges to Tickets
1. Select the Projects > Project page.
2. Click an existing ticket.
3. Click the Project > Charges tab.
4. Click Add.
5. Enter the following in the Charge Info tab.
Product
Charge Name
Status - Pending, Need to Order / Fulfill, Ready to Deliver / Ship, Cancelled. For
reporting purposes only.
Price Level
Purchase Date
Purchase Order
QTY
Price
Billable Amount
Description

Projects
200
Unit Cost
Total Cost
Billable - Yes or No
Create Multiple Items - Yes or No - Selecting Yes for this option splits the total quantity into
individual lines, each with a quantity of 1.
6. Optionally review the Stock Info tab.
7. Enter the following in the Receipts tab.
Upload a new file
8. Click Save to save the charge.
9. Click Save to save the project.
Receipts, Custom Fields, Attachments for Projects
Projects > All Projects > (selected project) > Receipts, Custom Fields, Attachments
Additional child tabs on the Projects tab include:
Receipts
Lists all expense receipts for the project.
Custom Fields
Enter values in the custom fields, as appropriate for this record.
Custom fields are maintained using the Admin > My Company > Custom Fields (page 25)
page.
Attachments
Lists all attachments, for both the project and for specific tasks.
Click Upload a new file to upload files to this record. For example, a project proposal or
statement of work.
Copy Projects
Projects > All Projects > (selected project) > Copy Project
Use the Action > Copy Project button to quickly create new projects by copying an existing project or
template project.
Copying Projects
1. Select the Projects > All Projects page.
2. Click an existing project.
3. Click Actions > Copy Project.
Original Project Name
New Project Name
Start Date
Planned End Date
Additional Options
Copy Tasks - Includes tasks, but not members.
Copy Tasks and Resources - Includes tasks and members.
None - Excludes tasks and members.
Copy Tasks Status - Yes or No
Enforce Project End Date on Tasks - If Yes, all tasks are scheduled within the Start Date and
Planned End Date you specify in the dialog. If No, the Planned End Date is reset, if necessary.

Projects
201
4. Click Finish. The newly copied project displays.
Tasks
Projects > All Projects > (selected project) > Tasks
Within a selected project the Tasks tab maintains all the tasks for that project.
A project usually comprises a series of shorter-duration tasks.
You can define an unlimited number of tasks for each project.
Tasks can be multi-level.
Each task's start and end date must be within the start and end date of its parent task or project.
Employees enter labor time for a task, not a project, so at least one task is required to log time.
Time entered for a task is also entered in that employee's timesheet.
Employees can be assigned to tasks and are called Members of the task. Tasks assigned to an
employee display on the employee's My Task page and on the employee's timesheet, if the task
and timesheet date ranges overlap.
Four Types of Tasks
There are four types of tasks you can include in a project:
Task - A standard task.
Summary Tasks - A container task. You cannot assign members and enter time for summary
tasks. This supports the project convention of reporting actual work using the lowest level tasks in
a project.
Clock Task - Reserved for future use.
Milestones - A zero duration task with only an end date. Milestone tasks mark the completion of
a phase in a project. Milestone tasks are typically used with a fixed priced (page 113) contract to
trigger milestone payments. Enabling the Alter From Project option in a fixed price contract adds a
milestone task to a linked project each time you add a new milestone payment to the contract.
Note: Unless otherwise noted in the documentation, assume a standard Task is being described.
In This Section
Using the Tasks Tab 201
Adding Task Basics 202
Scheduling Projects and Tasks 203
Adding Members to Tasks 203
Adding Time to Tasks 204
Adding Service Calls to Tasks 206
Adding Notes to Tasks 207
Custom Fields, Attachments for Projects 207
Adding Task Dependencies 207
Updating Tasks by Batch 208
All Tasks 209
Using the Tasks Tab
Projects > All Projects > (selected project) > Tasks
The Tasks tab displays and manages all the tasks in your project.

Projects
202
Project Actions
Add Task - Adds a new task (page 202). When you open a standard (page 201) task the following
tabs display:
Basics - Sets general properties for a task. (page 202)
Members - Assigns employees to a task. (page 203)
Time Logs - Enters labor time. (page 204)
Service Calls - Schedules a service call. (page 206)
Notes - Add notes to a task. (page 207)
Custom Fields - Updates custom fields. (page 207)
Attachments - Adds attachments. (page 207)
Import Tasks - Imports tasks from an Excel spreadsheet into a project. You can download a
template to guide you on how to format your data for import.
Gantt Chart - Displays all tasks as a Gantt chart. See Adding Task Dependencies (page 207). See
Multiple Projects Gantt (page 210).
Batch Actions - Updates task by batch (page 208) within the project.
Task Actions
Edit Task - Click the task icon— —to edit an existing task (page 202).
In-Line Edit Click to enable in-line editing of cells in a selected row. Click to save your inline
edits.
Task name
Duration
Start Date
End Date
Plan Hrs
Status
% Done
Add Dependency Click enter a dependency (page 207) between the selected row any other row.
Add Sub-Task - Click add sub-task to the currently selected task.
Delete - Click to delete the task.
Expand/Collapse - Click and to toggle the expansion/collapse of a selected row's child tasks.
Move - Drag and drop a to move a task.
Adding Task Basics
Projects > All Projects > (selected project) > Tasks > Add Task > Basics
The Basics tab provides general information about a task.
Adding Task Basics
This procedure is based on a standard Task .
1. Select the Projects > All Projects page.
2. Select an existing project.
3. Select the Tasks tab.
4. Click Add Task.
5. Select Task. This is a standard task type (page 201).
Task Name

Projects
203
Status - New, Open, In Progress, Completed, Closed. Set to Open to allow employees to
enter time. A program manager can always enter time, regardless of the status.
Used Hours
Percent Used
Cost Type
(blank) - None.
Capex - Capital expense.
Opex - Operating expense.
Client Billable
Planned Hours
Percent Done
Work Type
Duration (Days) - The number of days between the Start Date and End Date.
Start Date - The planned start date of this task. See Scheduling Projects and Tasks (page
203)
End Date - The planned end date of this task.
Task Description
6. Click Save to save the task.
7. Click Save to save the project.
Scheduling Projects and Tasks
Projects are scheduled from the project start date. Initially you set the project start date and project
planned end date manually. Once you start adding tasks:
The earliest start date for any task in the project determines the entire project's start date.
The latest end date for any task in the project determines the entire project's planned end date.
You can manually maintain an actual end date for the entire project without being constrained by
any tasks.
When working with task date ranges, you'll notice that:
The start date and end date of a new task defaults to either its parent task, if it has one, or to the
start date and planned end date for the entire project.
Manually changing the start date of a task causes the task end date to shift, preserving the same
duration for the task.
Manually changing the end date of a task causes the task duration to change, preserving the start
date of the task.
Making tasks dependent enables you to shift the dates for an entire series of tasks at one time.
See Adding Task Dependencies (page 207). Dependencies also enable you to schedule
backwards if you like, from the last task in a series of tasks to the first task in that series.
When working with the date ranges of parent tasks and child tasks:
Parent task date ranges cannot be adjusted manually. The date range for a parent task is
determined by the date ranges of its child tasks. The same is true for multiple levels of parent
tasks.
Adding Members to Tasks
Projects > All Projects > (selected project) > Tasks > (selected task) > Members
The Members tab assigns one or more employees to a task. Tasks assigned to an employee:
Display on the employee's My Task page.

Projects
204
Display on the employee's timesheet, if the task and timesheet date ranges overlap and Admin >
Time Sheet (page 20) > Preload Timesheets is enabled.
Display on the Resource Utilization (page 209) page.
Note: The Members tab is hidden when a task is opened using the All Tasks (page 209) page.
Constraining Employee Hours for a Task
For each task you can constrain:
The number of Hours a specific employee is allowed to enter for a task. If Hours is set to zero, any
number of hours can be entered.
The Role a specific employee must use when entering time for a task. If set to ALL, the employee
can select any role enabled for his or her employee record.
Adding Task Members
This procedure is based on a standard Task .
1. Select the Projects > All Projects page.
2. Select an existing project.
3. Select the Tasks tab.
4. Select an existing task.
5. Click the Members tab.
6. Click Add.
Select an employee.
Click OK.
7. Change the role from ALL, if more than one role can be selected.
8. Click the clock icon in the Hours cell.
The From Date and To Date default to the start and end date of the task. These date ranges are
for forecasting and employee calendars only. They do not constrain when an employee can
enter time.
Enter the number of Hours this employee is allowed to enter for this task.
Clicking the Populate Periods button enables you to quickly add a series of time periods:
Daily Recurring Periods
Weekly Periods
Monthly Periods
Monthly Periods
9. Click Save to save the Members tab.
10. Click Save to save the project.
Adding Time to Tasks
Projects > All Projects > (selected project) > Tasks > (selected task) > Time Log
The Time Logs tab adds time to a task.
Time log entries can be created with or without using a timer.
Time entered on a task automatically updates the user's timesheet.
If linked to an active contract, time entered on a task can:
Create billable events for Time & Materials (page 109) contracts
Deduct prepaid hours for Retainer by Hours (page 117) contracts
Deduct prepaid amounts for Retainer by Amount (page 115) contracts.
Track but not bill time for Recurring Services (page 110) contracts.

Projects
205
These procedures are based on a standard Task .
Adding Time to a Task Without Using a Timer
1. Select the Projects > All Projects page.
2. Click an existing project.
3. Select the Tasks tab.
4. Click an existing task.
5. Click Add.
6. Click the Time Logs tab.
Date Started - The date this labor time started.
Start Time - The time this labor time started.
End Time - The time this labor time started.
Time Spent (hrs) - The duration of hours worked.
Role - The employee's role (page 43) when performing the work. The role, and optionally the
work time, determine the rate charged for billable hours.
Work Type - The type of work (page 44) performed.
General Notes - Optionally enter a note for this labor time entry that will display on the invoice.
Internal Notes - Optionally enter a hidden not that will not display the invoice.
7. Click the Notifications tab.
Resourses
Email templates to use
Other emails
Click Save to save the time entry.
8. Click Save to save the Time Logs tab.
9. Click Save to save the task.
10. Click Save to save the project.
Adding Time to a Task Using a Timer
1. Select the Projects > All Projects page.
2. Click an existing project.
3. Select the Tasks tab.
4. Click an existing task.
5. Click the Time Logs tab.
6. Click Start Timer.
A new green row displays.
The Start Timer is replaced by a Stop Timer button.
You may close the ticket and return later.
7. Click Stop Timer. The Time Details tab displays. Enter the following:
Date Started - The date this labor time started.
Start Time - The time this labor time started.
End Time - The time this labor time started.
Time Spent (hrs) - The duration of hours worked.
Role - The role (page 43) best describing the work performed. The role, and optionally the
work time, determine the rate charged for billable hours.
Work Type - Another way of classifying the work (page 44) performed.
General Notes - Optionally enter a note for this labor time entry that will display on the invoice.

Projects
206
Internal Notes - Optionally enter a hidden not that will not display the invoice.
8. Click the Notifications tab.
Resourses
Email templates to use
Other emails
Click Save to save the time entry. The green row no longer displays.
9. Click Save to save the Time Logs tab.
10. Click Save to save the task.
11. Click Save to save the project.
Adding Service Calls to Tasks
Projects > All Projects > (selected project) > Tasks > (selected task) > Service Calls
The Service Calls tab adds service calls to a task.
Each service call is added to the timesheet of the employee assigned that service call, for tracking
purposes.
Service calls are always non-billable.
Service calls are first scheduled, then marked as complete after the service call has occurred.
You can also manage service calls using the Service Desk > Service Calls (page 191) page and
within tickets.
You can see any unassigned service calls you create on your My Service Calls (page 226) page.
Adding Service Calls to Tasks
This procedure is based on a standard Task .
1. Select the Projects > All Projects page.
2. Click an existing project.
3. Select the Tasks tab.
4. Click an existing task.
5. On the Service Calls tab click Add.
6. On the Service Call tab enter the following:
Resource
Start Date
End Date
Description - The description is populated with some basic info.
Client
Project Number
Project Name
Task Name
7. On the Notification tab optionally enter:
Resources - Employees to be notified.
Email template to use
Other Emails - Other email recipients to be notified.
8. Click Save.
9. Click Save to save the task.
10. Click Save to save the project.

Projects
207
Adding Notes to Tasks
Projects > All Projects > (selected project) > Tasks > (selected task) > Notes
The Notes tab adds notes to a task.
Adding Notes to Tasks
This procedure is based on a standard Task .
1. Select the Projects > All Projects page.
2. Click an existing project.
3. Select the Tasks tab.
4. Click an existing task.
5. Click Add Note.
Note Date
Details - Enter a note for this task.
Click Save to save the note.
6. Click Save to save the task.
7. Click Save to save the project.
Custom Fields, Attachments for Projects
Projects > All Projects > (selected project) > Tasks > (selected task) > Custom Fields,
Attachments
Additional tabs for each task include:
Custom Fields
Enter values in the custom fields, as appropriate for this record.
Custom fields are maintained using the Admin > My Company > Custom Fields (page 25)
page.
Attachments
Lists all attachments for task.
The Project > Attachments tab displays all attachments, for both the project and for all tasks.
Click Upload a new file to upload files to this record. For example, a statement of work.
Adding Task Dependencies
Projects > All Projects > (selected project) > Tasks >
The Dependency dialog enables you to define a dependency between a selected task and one or
more other tasks.
Dependencies
Adding a dependency to a task makes its scheduling dependent on the "other" task.
If you change the date range of the other task, the dependent task will change automatically to
accommodate the change.
If you change the date range of the dependent task, the dependency is removed.
A task can be dependent on multiple other tasks.
Dependencies in the Gantt Chart
Click the Gantt Chart button after setting a dependency. Dependencies are identified by an arrow
running between the tasks. The arrowhead points to the dependent task.

Projects
208
Four Types of Dependency
Dependencies are classified from the point of view of the dependent task looking towards the "other"
task.
Finish-to-Start (FS) - The other task's finish determines the dependent task's start. This is
the most common way to set a dependency between two tasks.
Start-to-Start (SS) - The other task's start determines the dependent task's start.
Finish-to-Finish (FF) - The other task's finish determines the dependent task's finish.
Start-to-Finish (SF) - The other task's start determines the dependent task's finish. This is
the least common way to set a dependency between two tasks.
Lag Days
Lag days shift the dependent task forward in time (positive) or backward in time (negative) from the
other task. The result either causes a scheduling gap between the two tasks, or an scheduling overlap.
Lag days do not change the scheduling of the other task.
Setting a Task Dependency
1. Select the Projects > All Projects page.
2. Click an existing project.
3. Select the Tasks tab.
4. Click the icon for a task and enter the following:
Row
Task
Type - Defaults to Finish-to-Start (FS).
Lag Days
Click OK.
5. Click Gantt Chart to view the dependency.
6. Click Save to save the project.
Updating Tasks by Batch
Projects > All Projects > (selected project) > Tasks > Batch Actions
Batch Actions enables you to update several tasks at once. A two step wizard prompts you to:
Select tasks.
Select an action.
Running Batch Actions
1. Select the Projects > All Projects page.
2. Click an existing project.
3. Select the Tasks tab.
4. Click Batch Actions.
5. Select tasks on the Choose Tasks tab.
6. Select one of the following actions to perform on the Choose Action tab.
Slide Tasks - Slide dates forward or backward by a specific number of days or months for
selected tasks.
Slide - Forward or Backward
Slide Dates - Start Dates, End Dates, Start & End Dates
Duration - <N> <periods>
Assign Members - Assign selected users to selected tasks.

Projects
209
Remove Members - Remove selected users from selected tasks.
Delete Tasks - Delete selected tasks and their related data.
Update Status - Update the status of selected tasks.
New Status - Select as status.
Update Percentage - Update percentage of selected tasks.
New Percentage - Select as status.
7. Click Finish.
8. Click Save to save the project.
All Tasks
Projects > All Tasks
The All Tasks page lists all tasks in all projects currently being used. Click a task to display only the
details of that task. This enables you to rapidly update a series of tasks in multiple projects, without
having to open each project separately.
When you open a standard (page 201) task the following tabs display:
Basics - Sets general properties for a task. (page 202)
Time Logs - Enters labor time. (page 204)
Service Calls - Schedules a service call. (page 206)
Notes - Add notes to a task. (page 207)
Custom Fields - Updates custom fields. (page 207)
Attachments - Adds attachments. (page 207)
Additional Guidelines
All project managers can view all tasks in all projects using the All Tasks page
The Members tab is hidden when a task is opened using the All Tasks page.
Tasks are removed from the All Tasks page when their corresponding projects are archived (page
210).
Resource Utilization
Projects > Resource Utilization
The Resource Utilization page shows a timeline of each employee's scheduled task assignments. Click
any task to to edit that task.
Note: You must add an employee to the Members (page 203) tab of a task and schedule the
date range
and
hours
that employee will work, for that employee's utilization to display on this page.
The resource allocation bar for each employee displays line segments in three colors.
- Indicates this employee has available hours to allocate to a task.
- Indicates this employee has been assigned too many hours. Over-utilization occurs
when:
The same employee is scheduled concurrently for multiple tasks.
The employee is assigned too many hours, even for a single task.
- Indicates this employee is assigned hours, but not yet fully allocated.
The page displays resource utilization by Week, Month or Year. Use the search bar to filter the page by
specific users, department, start date or end date.

Projects
210
Multiple Projects Gantt
Projects > Multiple Projects Gantt
The Multiple Projects Gantt page shows a timeline of all projects and tasks. Click any task to to edit the
Title, Start, End and Completion percentage for that task. You can also use this page to check for gaps
and overlaps between projects. The page displays by Week, Month or Year. Use the search bar to filter
the page by project, start date or end date.
Archived Projects
Projects > Archive Projects
The Archived Projects page maintains archived projects. All project data remains intact. You can unarchive a project at
any time. Archiving a project removes it from the following pages:
Projects Dashboard
All Projects
Multiple Projects Gantt
Archiving a Project
1. Open a project on the Projects > All Projects page.
2. Click Actions > Archive Project.
Unarchiving a Project
1. Open a project on the Projects > Archived Projects page.
2. Click Actions > Unarchive Project.
Template Projects
Projects > Template Projects
The Template Projects page maintains template projects. By default, the search filter only displays
template projects. Billables cannot be entered for project templates. Project templates do not display
the Time Log (page 204) and Expenses (page 197) tabs. Changes to template projects to not update
projects after they are copied.
If billables are already entered for a project and the project is converted to a template, then the data is
preserved. If the template project is converted back to a project, the billable data redisplays.
Converting a Project to a Project Template
1. Select the Projects > All Projects page.
2. Click the Project tab.
3. Set the Template option to Yes.

Projects
211
Set this option to No to convert a project template to a project.
4. Click Save.
Copying Projects from Template Projects
1. Select the Projects > Template Projects page.
2. Click an existing template project.
3. Click Actions > Copy Project.
Original Project Name
New Project Name
Start Date
Planned End Date
Additional Options
Copy Tasks - Includes tasks, but not members.
Copy Tasks and Resources - Includes tasks and members.
None - Excludes tasks and members.
Copy Tasks Status - Yes or No
Enforce Project End Date on Tasks - If Yes, all tasks are scheduled within the Start Date and
Planned End Date you specify in the dialog. If No, the Planned End Date is reset, if necessary.
4. Click Finish. The newly copied project displays.

Inventory
213
Inventory
In This Chapter
Inventory Dashboard 213
Manage Products 214
Product Availability 216
Purchase Orders 217
Processing Purchase Orders 218
Receiving Purchase Orders 219
Deliver Product Charges 220
Stock Adjustments 221
Inventory Dashboard
Inventory > Inventory Dashboard
The Inventory Dashboard provides instant access to inventory activities requiring your attention. Drill into
dashlet indicators to view lists of corresponding inventory activities.
Specialized dashlets provided by the Inventory Dashboard include:
Purchase Order Amount By Status - Today, This Month, This Year, All - Displays a bar chart of
purchase order amounts by status.
Purchase Orders By Status - Today, This Month, This Year, All - Displays a list of purchase order
counts by status.
See Dashboard (Home) (page 15) for a description of general purpose dashlets that also display on this
page.
C h a p t e r 8

Inventory
214
Manage Products
Inventory > Products > Manage Products
The Manage Products page lists all the inventory-managed products in your company. Once a product
record is created you can:
Assign and adjust quantities of products in inventory storage locations.
Procure products using purchase orders.
Add products to tickets as charges.
Add products to tickets as charges.
Add products to sales orders.
Products and UPC Codes
Each product can have multiple UPC codes created for it. Each Product and UPC Code record is
maintained separately, using the following set of tabs.
UPC
Suppliers - You must add a supplier to a product record before you can create a purchase order for
that supplier to deliver that product. The cross-reference includes the default unit cost for the
product from that supplier.
Locations
Pricing Levels
Composition
Options
Stock By Location
Stock By Project
Notes
Custom Fields
Attachments
The parent Product Info tab is shared by all combinations of products and UPS codes.
Creating Product Records
1. Select the Inventory > Products > Manage Products page.
2. Click New.
3. Enter the following on the Product Info tab.
Product Name
Product Number
Product Type
Product Category
Product Sub Category
Brand
Manufacturer
Product Description
4. Enter the following on the UPC tab.
UPC - Click the gear icon to generate a new universal product code.
You can also click the Add New UPC to add an additional UPC code.
Maximum Level - Informational only, indicates the maximum level of the product.
Warranty
SKU/Unique ID

Inventory
215
Optimal Level
Expense Account
Width
Low Level
Income Account
Height
Reorder Level - Not yet implemented. When Autogen PO is set to Yes on the Options tab and the
stock level for this product drops to equal or below the Reorder Level, a purchase order is
automatically created to replenish inventory to the Maximum Level.
Cost Code
Length
Stacking
Pack
Weight
Color
UOM - Units of measure.
5. Click Save to save this product record.
Additional product tabs display.
6. Click the Suppliers tab. Click Add. For each supplier enter:
Supplier - You must add a supplier to a product record before you can create a purchase
order for that supplier to deliver that product. The cross-reference includes the default unit
cost for the product from that supplier.
Primary Contact
Product Id/Part No
Unit Cost
Reorder Qty
Tax Rate
7. Click the Pricing Levels tab. Click Add. For each pricing level enter:
Pricing Level
Price
8. Click the Composition tab. Click Add. For each composition enter:
Material
Qty
UOM - Unit of measure.
Notes
9. Click the Composition tab. Click Add. For each composition enter:
Material
Qty
UOM - Unit of measure.
Notes
10. Click the Options tab.
Autogen PO - Not yet implemented. When Yes and the stock level for this product drops to
equal or below the Reorder Level, a purchase order is automatically created to replenish
inventory to the Maximum Level.
Prelabeled - Yes or No

Inventory
216
Requires Procurement - If No, you do not need a purchase order to add quantities to storage
locations for this product. Intended for temporary items.
Use Levels - Yes or No
Serialized - Yes or No
Assembly Req'd - Yes or No
Discontinued - Yes or No
Hazardous - Yes or No
Taxable - Yes or No
11. Click the Stock By Location tab.
Review the current quantity stored in each warehouse location list.
12. Click the Stock By Project tab.
Review the current quantity stored in each warehouse location list, allocated to a project.
13. Click the Notes tab. Click Add to add a note.
14. Click the Custom Fields tab.
Enter values in the custom fields, as appropriate for this record.
Custom fields are maintained using the Admin > My Company > Custom Fields (page 25)
page.
15. Click Attachments tab.
Click Upload a new file to upload files to this record.
16. Click Save to save this product and UPC code record.
Product Availability
Inventory > Products > Manage Products
Use the Product Availability page to check the quantities available for each product and UPC code
combination. Selecting a row shows two tabs.
Product by Location - Shows the quantity available at each location for the selected product.
Product by Project - Shows the quantity available at each location, grouped by project, for the
selected product.
The parent Product Information tab displays the following:
Product Number
Product Name
UPC
Product Description
Product Type
Category
Sub Category
Brand
Manufacturer
QTY In Stock
QTY Available
QTY Committed - The quantity committed to pick orders.
QTY On Order
Low Level
Re-Order Level

Inventory
217
Max Level
Optimal Level
Purchase Orders
Inventory > Procurement > Purchase Orders
The Purchase Orders page creates an order to purchase products from a supplier. The purchase order
includes product quantities, an expected delivery date, the delivery location, and prices for each
product in the purchase order. On delivery the inventory storage quantities are incremented. Payment
terms usually specify an agreed to number of days after delivery for payment. The supplier sends an
invoice, which is matched against the delivery record, then processed by your company to pay the
supplier.
Product/Supplier Cross-Reference
A supplier must be added to the Manage Products (page 214) > Supplier tab, before you can create a
purchase order for that supplier to deliver that product. The cross-reference includes the default unit
cost for the product from that supplier.
Note: For a description of purchase order actions see Processing Purchase Orders (page 218).
Creating New Purchase Orders
1. Select the Inventory > Procurement > Purchase Orders page.
2. Click New.
3. Enter the following on the New Purchase Order tab. Notice this tab does does not yet identify the
supplier.
(PO) Date
Ship Method
Payment Term
(PO) Expected Date
Location
Default Discount
Reference #
Project
Notes
4. Click Add on the on the Purchase Order Item tab.
Select one or more Products.
Click OK.
QTY - Enter the quantity to order for each time. You can also specify this later.
5. Click Continue in the upper right corner of the page.
Suppliers who are eligible to deliver the products you added to your purchase order are listed
in the upper panel of the page.
If no suppliers are eligible to deliver the products you added in the previous page, that
product cannot be included in the creation of purchase orders.
Click the Select Lowest Cost button in the lower panel to list each item and the suppliers who
can deliver them. The lower cost supplier for each product is selected by default.
Optionally change the selected supplier for each item. For example, you may wish to
consolidate the creation of POs by selecting the fewest number of suppliers possible.
6. Click Create POs.

Inventory
218
The message box lists the newly created purchase order numbers.
The status of the newly created purchase orders is New.
7. Open a purchase order you just created.
A Supplier Info panel displays in the header of the purchase order.
A PO # field has been added to the header. It cannot be edited.
8. Optionally adjust the editable fields for each item in the Purchase Orders Items tab. A Grand Total
displays at the bottom of this tab.
Qty
Unit Cost
Discount
Tax
9. Click the Purchase Order Charges tab click Add.
Charge
Currency
Amount
Date
Notes
Click Save.
10. Click the Custom Fields tab.
Enter values in the custom fields, as appropriate for this record.
Custom fields are maintained using the Admin > My Company > Custom Fields (page 25)
page.
11. Click Attachments tab.
Click Upload a new file to upload files to this record.
12. Click Save.
Processing Purchase Orders
Inventory > Procurement > Purchase Orders
Note: To create a purchase order see Purchase Orders (page 217).
Statuses
Typically each purchase order progresses through one or more of the following statuses:
New
Ready to Send
Sent
Partially Received
Received
Fully Received
Voided
Actions
Clicking the Action button sets the appropriate status for the purchase order and usually displays a
dialog or window for you to complete the action or review the results.
Generate Order - Creates a printable purchase order. Sets purchase order to Ready to Send.

Inventory
219
Print Order - Displays a printable PDF of the purchase order.
Email Order - Sends the PDF to email recipients. Sets purchase order status to Sent.
Void Order - Cancels the order. Partially Received and Received orders cannot be voided nor
regenerated.
Messages confirm an action has completed successfully.
Processing Purchase Orders
1. Select the Inventory > Procurement > Purchase Order tab.
2. Click a purchase order with a Status of New.
3. Click Actions > Generate Order.
The Status is set to Ready to Send.
4. Click Actions > Print Order.
Review the PDF to ensure it is correct.
If necessary, make changes to the purchase order, regenerate and review the PDF again.
5. Click Actions > Email Order.
Email Template
Send Email - Separate Recipients or Combined Recipients
Contacts - Check to include.
Other Email - Enter email addresses manually.
Attachments - Optionally check to include.
Click Send.
The Status is set to Sent.
6. Click Save.
See Receiving Purchase Orders (page 219).
Receiving Purchase Orders
Inventory > Fulfillment > Receiving Purchase Orders
The Receiving Purchase Orders page processes receipt of inventory quantities requested by a purchase
order. Each receiving order is assigned a unique order number. There may be multiple receiving orders
created for a single purchase order, one for each separate delivery by the supplier. A purchase order
must be Sent to the supplier to display on this page.
Receiving Location
Received inventory is received into a warehouse's default "virtual location". The location is identified by
the warehouse prefix (page 89) and word Default. For example, W105_:Default.
Statuses
Typically each receiving order progresses through one or more of the following statuses:
Open - No item quantities have been received.
Partially Received - Some item quantities have been received.
Fully Received - All item quantities have been received.
Received - Receiving is finished for this receiving order, regardless of whether it is currently
Partially Received or Fully Received. Typically used to prevent further receiving quantities
on a partially received order.

Inventory
220
Actions
Clicking the Action button sets the appropriate status for the receiving order.
Finish Receiving - The receiving order status is set to Received.
Creating Receiving Orders
1. Select the Inventory > Fulfillment > Receiving Purchase Orders page.
2. Select an existing purchase order with an RO Status of Open.
3. Note the following on the Receiving Order tab.
Supplier
Contact
Contact Phone
Contact Email
Currency
RO #
(PO) Order #
Order Date
(PO) Order Expected Date
Notes
4. On the Receiving Order Items tab click a row to record receipt of the item quantity.
For a non-serial controlled quantity enter the following:
Qty Received - Enter the quantity received for this item. You can compare the quantity
entered with the quantity ordered and quantity already received in the header of this
dialog.
Lot # - The lot number, if item quantities are lot tracked.
Reference #
Expiry Date - Enter if the inventory has a shelf life expiration date.
Notes
Click OK.
For a serial controlled quantity enter the following for each item.
Serial #
Lot #
Expiry Date
Reference
Notes
Click OK.
5. Click Save to save the receiving order.
Deliver Product Charges
Inventory > Fulfillment > Deliver Product Charges
The Deliver Product Charges page processes the delivery of product quantities demanded by associated
tickets or projects. By default product deliveries consume inventory. You can optionally populate the
list of hardware assets or software assets with the product quantities delivered.
Listing Product Charge Deliveries
You must first create product charges in tickets or projects. Then on this page:

Inventory
221
1. Click Search Product Charges.
2. Click Search.
3. Optionally filter the list by entering a string in the Result field.
4. Optionally review the history of previous deliveries for any one row by clicking the history
icon.
Delivering Product Charges
1. For a selected delivery, click the truck icon.
2. Enter the following:
Delivery Method
Delivered By
Delivery Date
QTY In Stock - The stock available in inventory to deliver.
QTY Delivered - The quantity already delivered.
QTY To Deliver - Accept or modify the quantity to be delivered.
Remove From Inventory - Yes, No
Create Asset - None, Hardware, Software
Stock Adjustments
Inventory > Stock Adjustments
The Stock Adjustments page adjusts the quantity of inventory shown by the system to be available in
warehouse locations. It's a quick way:
Initialize inventory quantities.
Correct inventory inaccuracies discovered during cycle job counts.
Each stock adjustment references a single warehouse.
Statuses
Stock adjustments progress through the following statuses:
Open - The stock adjustment is new and unposted.
Posted - The stock adjustment has been posted.
Actions
Clicking the Action button sets the appropriate status for the stock adjustment.
Post Adjustments - Sets the stock adjustment record to Posted.
Adjusting Inventory Stock Levels
1. Select the Inventory > Stock Adjustments page.
2. Click New.
3. Enter the following in the Adjustment tab.
Adjustment #
Warehouse
Created Date
Posted Date
Notes
4. Click Save to save the stock adjustment record.

Inventory
222
5. Click Add on the Inventory Items tab.
Select one or more products.
Click OK.
6. Enter the following for each item:
New Qty
Reason
7. Click Save to save your stock adjustment record.
8. Click the Action > Post Adjustments.
The stock adjustment is Posted.
Item quantities are adjusted in the warehouse you specified.

Home
223
Home
Every user in the system has access to the Home. It’s the starting point for day to day use. Your security
role determines what Home options you have.
In This Chapter
Dashboard (Home) 223
Views 224
My Queues 225
My Tickets 225
My Tasks 225
My Grouped Tasks 226
My Service Calls 226
My Calendar 227
My Projects 229
My Expense Reports 229
My Approvals 231
My Templates 231
Collaborations 232
My Timesheet 232
Dispatch Calendar 234
Adjust Timesheets 235
Adjust Expenses 235
Downloads 235
Dashboard (Home)
Home > Dashboard
Admin > Dashboard
HR > Dashboard
All modules have a dashboard to display important data. The Administrator Dashboard tracks important
events and activities, not necessarily identified as a ticket or project or CRM activity.
1. Click the Admin module on the far right of the global navigation bar.
C h a p t e r 9
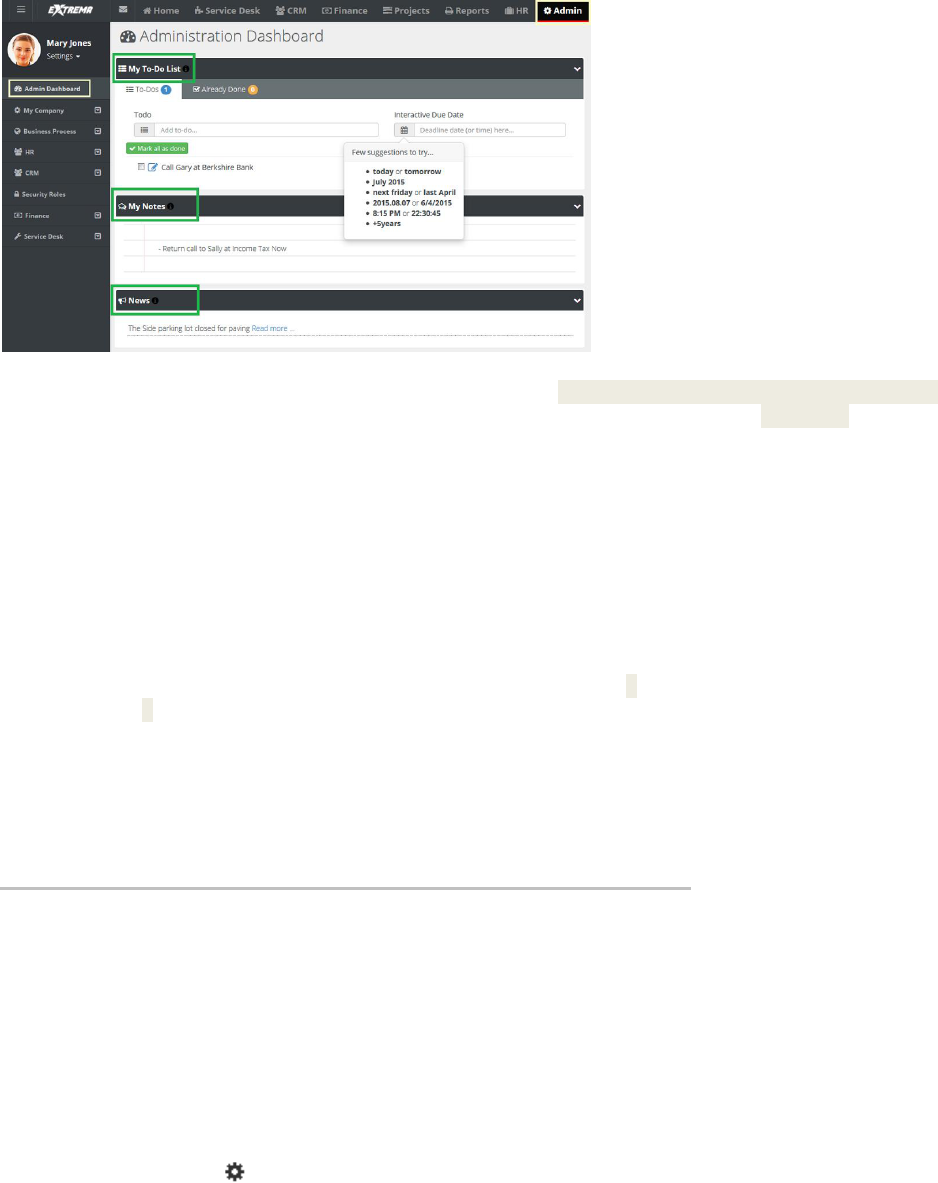
Home
224
2. Click Admin Dashboard, the first selection on the local navigator bar on the left.
My To Do List - A place to set reminders. For example: stop by HR and get benefit change form.
Enter text, then click the calendar and set the date, or simply enter the word tomorrow. Press the
Enter key on your keyboard to add the entry. To Dos created for a ticket display the name of the
ticket along with a link. You can click the link to access the ticket immediately.
My Notes - A quick summary of thoughts or ideas that you don’t want to forget during the day.
News - Company news (page 27) generated from the Admin module.
Sharing
If user has the rights, he or she can use the system to share information such as events,
announcements, and news.
Removing My To-Do List Items
The user can remove items in the My To-Do List by clicking the red X in the Already Done tab and clicking
on the red X. The user can reset the My To-Do List by clicking the yellow arrow, if an item was completed
by mistake.
Deleting
The user can simply erase My Notes by highlighting the words and selecting delete on the keyboard.
Views
Home > Views
A view is a user-defined filtered search of a specific list page. The Views page shows all views created
by yourself or shared with you by others. Selecting a view selects both the specific list page and the
search filter parameters saved with that view.
Creating a View
To create and save a new view by name on any list page:
1. From the Views combo box, select an existing view, or enter new search parameters from scratch.
2. Click the gear icon, then click the Save As option, then enter a name.
3. Optionally make your view Public or set it be your Default for the page you're working with.

Home
225
Working with Views
You can Save, SaveAs, Edit, Delete, or Share your own view.
You can SaveAs a view shared by someone else.
When you Share your own view, you can select both individual employees (page 95) or queues
(page 54) of service desk employees to share it with.
Column Chooser
All list pages display a Column Chooser icon. Click the icon to select and order your column choices
for a list page. You can then optionally save it as a view or export the data.
Export
All list pages support the ability to Export the Current Page or All Pages to an .xls format file. Only
currently displayed columns are exported in the order they are displayed. Use the Column Chooser to
add, remove or reorder columns before exporting.
My Queues
Home > My Queues
The My Queues folder displays one or more queues if you are a member of any ticket queues. A ticket is
assigned to a queue using the Service > Tickets > Ticket Details (page 175) tab. You can search for all
tickets assigned to the queues you are a member of using the Queue search parameter on the My
Tickets (page 174) page.
Employees are added to ticket queues using the:
Admin > Service Desk > Queues (page 54) page.
HR > Employee > Associated Queues (page 100) tab.
If you are not assigned to any queues, the My Queues folder does not display in your Home module.
My Tickets
Home > My Tickets
Service Desk > My Tickets
The My Tickets page manages tickets assigned to yourself as the primary assignee. If you assign the
ticket to another employee, the ticket no longer displays on this page. Ticket assignments to queues
are ignored by this page. You can search for all tickets assigned to the queues you are a member of
using the Queue search parameter.
Note: See Service Desk > Tickets (page 174) for a detailed description of how to work with tickets on this
page.
My Tasks
Home > My Tasks
The My Tasks page enables you to update tasks assigned to you by project managers of projects. You
can enter time and update other properties of tasks. A task may have child tasks you can update as
well. Time entered on tasks updates your timesheet as well. This page does not display tasks of
archived projects.

Home
226
Note: See Projects > Tasks (page 201) for a detailed description of how to work with tasks on this page.
My Grouped Tasks
Home > My Grouped Tasks
The My Grouped Tasks page lists all tasks you are assigned to by project first, then by task.
The My Grouped Tasks page enables you to update tasks assigned to you by project managers of
projects. You can enter time and update other properties of tasks. A task may have child tasks you can
update as well. Time entered on tasks updates your timesheet as well. This page does not display
tasks of archived projects.
Note: See Projects > Tasks (page 201) for a detailed description of how to work with tasks on this page.
My Service Calls
Home > My Service Calls
The My Service Calls page enables you to update service calls created to assist customers. Service calls
are usually associated with one or more tickets or tasks, but can also be scheduled independently. You
can see any unassigned service calls you create on your My Service Calls page.
Note: See Service Desk > Service Calls (page 191) for a detailed description of how to work with service
calls on this page.

Home
227
My Calendar
Home > My Calendar
The My Calendar page provides a calendar view of all your scheduled Vorex™ events.
Appointments
Activities
Tasks
To-Dos
Service Calls
Options
You can hide all events for a category by clicking its button off.
Calendar views include: Day, Work Week, Month, Timeline.
You can add a new appointment by clicking anywhere in the calendar. Enter the following:
Subject
Start Time
End Time
Reminder
Description
Recurrence - Click to enter recurring appointment options.
Click the Export Calendar button to download an "icalendar" file for importing into other calender
software packages.
Click the Download Outlook Extension to download an Outlook Extension (page 227) that
synchronizes your Vorex™ calendar with your Outlook calendar.
Outlook Extension
Home > My Calendar
The Outlook Extension synchronizes your Vorex™ calendar with your Outlook calendar. This includes:
Appointments
Activities
Tasks
To-Dos

Home
228
Service Calls
Note: The Outlook extension only supports Outlook 2010 and later.
Installing the Extension
1. In Vorex™, select the Home > My Calendar page.
2. Click Download Outlook Extension.
3. Run the installer on the computer containing your Outlook application.
4. Start Outlook.
A new tab displays in your Outlook application.
5. Enter the following in the Settings > Login tab.
User Name
Password
Company Name
Click Save.
6. Set your preferences on the Calendar tab.
Enable Calendar Integration
Get Past Calendard Items
Get Future Calendar Items
When Opening Outlook
Calendar Options
Tasks
CRM Activities
To-Dos
Enable Automatic Update Every <N> Minutes
Click Save.

Home
229
A 'data saved' confirmation message displays.
My Projects
Home > My Projects
The My Projects page enables you to update the projects you are assigned to as project manager.
Note: See Projects > Projects (page 194) for a detailed description of how to work with projects on this
page.
My Expense Reports
Home > My Expense Reports
The My Expenses page enables you to maintain all your expenses, no matter where they are entered in
the system. This includes expenses for tickets and tasks. You can also enter expenses without linking
them to tickets or tasks, such as for your own company's expenses.
You can enter expense entries for any date on any expense report. You are required to enter a date in
the header of the expense report but the date does not restrict you.
Approving Expense Reports
Submitted expense reports can be manually approved or auto approved.
If your company uses approval routes (page 31), submitted expense reports display in the My
Approval folder of the appropriate persons for review. The submitted expense report is then
approved or rejected.
If your company does not use approval routes, the submitted expense report is auto approved.
The Approval History tab shows the history of submitted expense reports.
Statuses
An expense report can have the following statuses.

Home
230
Open
Submitted
Approved
Rejected
A Submitted or Approved expense report cannot be edited. A Rejected expense report can be
subsequently Submitted and Approved.
Notification
You are notified about approvals and rejections in several ways.
A message displays in the Settings > My Messages inbox.
You may also receive an email message.
The status of the expense report will show Approval or Rejected.
Actions
Print Expense Sheet
Submit for Approval
Adding Expenses
1. Select the Home > My Expense Reports page.
2. Click New.
3. Enter the following in the Expense Sheet Info tab.
Name
Date
Notes
4. Enter the following in the Expense Info tab.
Expense Type
Date - The date the expense was incurred
Amount Spent
Mark Up / Down - Adjust up or down by amount ($) or percent (%).
Payment Types - Cash, Check, Debit Card, Credit Card, Other, Company Credit Card.
Classification - Reimbursable or Non-Reimbursable
Notes
Billable - Yes or No
Expense Associated with
Project - Select a project.
Ticket - Select a ticket.
Internal Expense - Expenses are added internally.
5. Enter the following in the Expense Entries > Receipts tab.
Upload a new file
Have Receipt - Yes or No
Notes
6. Click Save to save the expense report.

Home
231
My Approvals
Home > My Approvals
The My Approvals page approves or rejects timesheets and expense reports submitted by employees
on two separate tabs. If you are not an approver, or submitted timesheets and expense reports are
auto approved, the My Approvals page does not display in your Home module.
Your designation as an direct approver or secondary approver is defined using the Admin > Business
Process > Approval Routes (page 31) page. There are separate approval routes for Expenses and
Timesheets.
Notification
You are notified about submitted timesheets and expense reports in several ways.
A message displays in the Settings > My Messages inbox.
You may also receive an email message.
The My Approval page lists timesheets and expense reports waiting to be approved or rejected.
Approving or Rejecting Timesheets and Expense Reports
1. Select the Home > My Approvals page.
2. Click Timesheet Approvals tab.
3. Select submitted timesheets in the Direct Approvals or Secondary Approvals sections.
4. Click Approve Selected or Reject Selected.
If you reject the selected rows, you can include an explanatory note. Rejected timesheets
can be subsequently submitted for approval.
5. Select the Expense Reports tab.
6. Repeat steps 3 and 4 for expense reports.
My Templates
Home > My Templates
The My Templates page enables you to maintain your own set of ticket templates. To make ticket
creation easier, when you create a ticket, you can select one of your ticket templates to pre-populate
selected fields for you.
Ticket templates can include adding questions in the description field of the ticket. These questions
can then prompt ticket editors to ask these standard questions when contacting customers.
Your ticket templates can be shared with other team members. If you don't share a ticket template, it
can only be viewed by yourself and Vorex™ administrators.
Creating Tickets Templates
1. Select the Home > Ticket Templates page.
2. Click New.
3. Select one of three types of ticket template.
Ticket Templates - Defines custom templates for tickets. You select this type of template using
the From Template field when adding a new ticket.
Ticket Note Templates - Defines custom templates for notes in tickets. You select this type of
template using the From Template field when adding a note to a ticket.
Ticket Time Entry Templates - Defines custom templates for time log entries in tickets. You
select this type of template using the From Template field when adding a time log entry to a
ticket.

Home
232
4. Enter values in each of the fields provided.
These will serve as default field values when you create a new ticket, note, or time entry,
based on this template.
5. Click Save.
Collaborations
Home > Collaborations
The Collaborations page maintains discussion threads about a project, shared with all project team
members. Project team members include the project manager and any employees assigned to be
members of a task. You can create new thread topic at any time.
Creating Project Discussions Threads
1. Select the Home > Collaboration page.
2. Select a project.
3. Select New Thread to create the first comment in the thread.
Subject
Type - Question, Reply, Information, News
Content
Click Save.
4. Once you create a comment, you can optionally select the following Actions:
Edit - Changes a comment you created.
Comment - Replies to this specific comment.
Delete - Deletes the comment.
5. As another user reading this thread, you can click Reply to create a new comment for the entire
thread.
My Timesheet
Home > My Timesheets
The My Timesheets page maintains your timesheets. Timesheets are saved automatically after you add
or change time entries.
Timesheets include all the time entries you enter anywhere in the system. This includes time
entries for tickets and tasks.
You can also enter timesheet entries without linking them to tickets or tasks, such as for
administrative tasks. Work types for classifying administrative tasks are defined using the Admin
> My Company > Administrative Work (page 29) page.
A timesheet specifies a weekly date range when it is created, always starting on the same day of
the week. Each user can only have one timesheet for each weekly date range.
Timesheets are automatically created the first time a time entry is created within that timesheet's
weekly date range. Or you can manually create a timesheet for a new weekly date range, before
any entries have been created.
The scheduling pattern for creating timesheets is specified using the Admin > Company Settings
> Time Sheet (page 20) tab. This same page sets whether future and past timesheets can be
viewed.

Home
233
If Preload Timesheets is Yes on the Time Sheet tab then scheduled events on ticket and tasks will
preload any future timesheets you create. If No, then only actual time entries display on
timesheets.
If your administrative task timesheet entries are similar from one week to the next, you can save
time by copying a timesheet to a new weekly date range. Ticket and task timesheet entries will not
be include.
If you attempt to add a task that is closed or on hold, then 0 time is shown allotted. You cannot
change this.
Approving Timesheets
Submitted timesheets can be manually approved or auto approved.
If your company uses approval routes (page 31), submitted timesheets display in the My Approval
folder of the appropriate persons for review. The submitted timesheet is then approved or
rejected.
If your company does not use approval routes, the submitted timesheet is auto approved.
The Approval History tab shows the history of submitted timesheets.
Statuses
An timesheet can have the following statuses.
Open
Submitted
Approved
Rejected
A Submitted or Approved timesheet cannot be edited. A Rejected timesheet can be subsequently
Submitted and Approved.
Notification
You are notified about approvals and rejections in several ways.
A message displays in the Settings > My Messages inbox.
You will also receive an email notification.
The status of the timesheet will show Approval or Rejected.
Actions
Add Tasks - Adds time entries to tasks in projects.
Add Admin Tasks - Adds administrative work tasks.
Submit for Approval - Submits the timesheet for approval.
Print Timesheet - Creates a PDF of the timesheet.
Copy Timesheet - Copies administrative task timesheet entries to a new timesheet with a different
weekly date range. Ticket and task time entries are not copied.
Adding Timesheets
1. Select the Home > My Timesheet page.
2. Click New. A Create Timesheet dialog displays.
Select Week Range - You can only select a weekly date range that does not yet exist for your
user account.
Click Create.
A blank timesheet display, since this is a new timesheet.
3. Click Add Admin Tasks.
Select the Training task. The administrative work task is added to the timesheet.
Enter hours for at least one day of the week.

Home
234
Note: You must enter hours to prevent an added task from being removed from the timesheet
when you leave this page.
4. Click Add Tasks.
Note: You must be a member of a active project sharing the same date range as this timesheet
to see tasks listed in this dialog.
Select a project task.
Enter hours for at least one day in the project task. See Adding Time to Tasks (page 204).
The timesheet is saved automatically.
Dispatch Calendar
Home > Dispatch Calendar
The Dispatch Calendar page provides a calendar view of all employee scheduled Vorex™ events. Event
types can include:
Appointments
Activities
Tasks
To-Dos
Service Calls
Actions
Employee calendar filtering - By default you see your own calendar and the calendars of all
subordinate employees that report to you. You filter the list of employee calendars displayed by:
Resource
Queue
Event Type
Employee calendar time selection - Change the scale of calendar time displayed using the Day, Work
Week, Month, Timeline options. You can also jump to a date by using the date picker.
Add appointments - Click a date for a single employee to add a new appointment.
Subject
Start Time
End Time
Reminder
Description
Recurrence - Click to enter recurring appointment options.
Dispatch Actions - Click this link to display:
Dispatch Only - Displays only employee dispatch calendars.
View Tickets - Displays a ticket search list. Select a view to filter the ticket list.
Adding Service Calls to Tickets - When View Tickets is selected, you can drag and drop a specific
ticket on to an employee's calendar date. Doing so opens the service call (page 191) dialog. Enter
additional details for the service call, then click Save. The new service call now displays in the
Dispatch Calendar, employee's My Service Calls (page 226) page, and in the corresponding ticket.

Home
235
Adjust Timesheets
Home > Adjust Timesheets
Use the Adjust Timesheets page to adjust the timesheets of any employee. Access to this page is
determined by your assigned security role.
By default the page lists all timesheets for all users. Enter search parameters to filter the list.
Week Start, From, To
Week End, From, To
Status
Employee Name
Click any timesheet row to adjust timesheet entries. See My Timesheet (page 232) for details about
editing timesheet entries.
Adjust Expenses
Home > Adjust Expenses
Use the Adjust Expenses page to adjust the expenses of any employee. Access to this page is
determined by your assigned security role.
By default the page lists all expense reports for all users. Enter search parameters to filter the list.
Name
Status
Date, From, To
Last Update, From, To
Employee Name
Click any expense report row to adjust expense report entries. See My Expense Reports (page 229) for
details about editing expense report entries.
Downloads
Home > Downloads
The Downloads page provides connector tools you can use to integrate and synchronize data between
Vorex and external applications.
Click any of the Download buttons to download these tools to your local machine.
QuoteWerks Connector - For more information see the QuoteWerks Integration Guide
http://help.kaseya.com/webhelp/EN/BMS/EN_BMS_QuoteWerks_Integration_Guide.pdf#z
oom=70&navpanes=0.
QuickBooks Sync - For more information see Quickbooks Sync (page 141).
Outlook Sync - For more information see Outlook Extension (page 227).
Home
236

Client Portal
237
Client Portal
The Client Portal module enables customers to log into the Vorex™ system and track their own
Vorex™ issues.
In This Chapter
Enabling Client Portal Access 237
Client Portal Dashboard 237
My Tickets (in Client Portal) 238
My Profile (in Client Profile) 238
My Messages (in Client Profile) 239
Tickets (in Client Portal) 239
Contracts (in Client Portal) 240
Invoices (in Client Portal) 240
Enabling Client Portal Access
Client Portal access is enabled using a Contacts (page 148) record of a CRM account.
Configuring Client Portal Access
1. Select the CRM > Contacts page.
2. Select a contact record to edit.
3. Click the Client Portal Access tab.
4. Set the Has Client Portal Access to Yes.
Note: You can filter the Contacts page using the Has Client Portal Access option.
5. Enter a User Name the contact will use to logon to Client Portal.
6. Select a Security Role. There are two built-in security roles you can use immediately that have
access to the Client Portal module enabled.
External User - Allows the client to view/edit their own profile and messages, as well as
tickets assigned to them.
External Manager - Allows the client to view/edit their own profile and messages. Also
allows the client to view all of their account's tickets, contracts and invoices.
7. Click Save.
Client Portal Dashboard
Client Portal > Client Portal Dashboard
The Client Portal Dashboard help customers manage their activities in the Vorex™ system. Dashlets
include:
My To Do List - A place to set reminders. For example: check on certification for site
install. Enter text, then click the calendar and set the date, or simply enter the word tomorrow.
C h a p t e r 10

Client Portal
238
My Notes - A quick summary of thoughts or ideas that you don’t want to forget during the day.
News - Company news.
Removing My To-Do List Items
The user can remove items in the My To-Do List by clicking the red X in the Already Done tab and clicking
on the red X. The user can reset the My To-Do List by clicking the yellow arrow, if an item was completed
by mistake.
Deleting
The user can simply erase My Notes by highlighting the words and selecting delete on the keyboard.
My Tickets (in Client Portal)
Client Portal > My Tickets
The My Tickets page manages tickets assigned to you as the Contact Person of your customer
organization. If you create a new ticket using this page, the ticket is assigned to you as the customer
Contact Person by default.
When you open an existing ticket:
The Ticket View displays general properties of the ticket.
You can also click Add Note to add a note for support to read.
You may also see notes about this ticket for you, as the customer contact, to review and possibly
act on.
Quick Tickets
Security roles (page 39) have a Client Portal option called Quick Tickets. When checked in a security role,
customers are presented with a simplified page layout when adding new tickets. If unchecked,
customers are presented with the same page layout that employees see.
Creating a New Ticket
1. Select the Client Portal > My Tickets page.
2. Click New.
3. Enter the following in the Quick Add Ticket page.
Site
Ticket Type
Priority
Issue Type
Sub-Issue Type
Affected Hardware Asset
Affected Software Asset
Attach File
Title - A one line summary of the issue.
Details - A longer description of the issue.
My Profile (in Client Profile)
Client Portal > My Profile
The My Profile section enables you to personalize your Vorex™ client portal experience.

Client Portal
239
Sets your Vorex™ photo.
Displays your personal ticket counts.
Stores your personal information and contact information.
Changes your password.
Sets your default landing page when you login.
Reviewing My Profile
1. Select the Settings > My Profile page.
2. Review the Personal Information tab.
Reset (Photo)
Select Photo - jpg, jpeg, png, gif
Your Ticket Statistics
Opened
Resolved
User Name
E-mail
First Name
Last Name
3. Optionally change your password using the Change Password tab.
Old Password
New Password
Confirm New Password
4. Optionally change the default landing page using the Preferences tab.
My Messages (in Client Profile)
Client Portal > My Messages
Customer contacts can use the My Messages page to send and receive messages with Vorex™ support
personnel and other customer accounts contacts. These messages are not linked to tickets.
When you receive new messages from support personnel, you will see an envelope icon with a
count of unopened tickets in the upper left hand corner, indicating messages are waiting for you.
Actions
Compose Message - Creates a new message.
Reply - Replies to receives message.
Archive/Archived - Move selected messages to the Archived folder.
Delete - Deletes selected messages.
Inbox - Moves selected messages to the Inbox folder.
Starred - This folder lists messages that have the star toggled on.
Save/Draft - Saved unsent messages are stored in the Draft folder.
Tickets (in Client Portal)
Client Portal > Tickets
The Tickets page manages all tickets in your customer organization, regardless of the customer contact

Client Portal
240
person assigned to the ticket. See My Tickets (in Client Portal) (page 238) for details on how to work
with tickets in the Client Portal module.
Contracts (in Client Portal)
Client Portal > Contracts
The Contracts page enables you to view all active contracts in your customer organization. See
Contracts (page 108) for a discussion of the different types of contracts and field information.
Contract Information
Contract Name
Contract Type - Time & Materials, Recurring, Fixed Price, Retainer by Amount, Retainer
by Hours.
Reference Number
Start Date
End Date
SLA
Setup Fees
Contract Status
Default Contract
Billing Cycle - Applies to recurring and retainer by hours contracts.
Contract Billing Price - Applies to recurring, fixed price, and retainer by amount contracts.
Bill Amount - Applies to fixed priced contracts.
Remaining Amount - Applies to fixed price contracts.
Consumed Amount - Applies to retainer by amount contracts.
Description
Additional Tabs
Billing Information
Contract History - Applies to recurring contracts.
PrePaid Hours Summary - Applies to retainer by hours contracts.
Invoices (in Client Portal)
Client Portal > Invoices
The Contracts page enables you to view all invoices sent by Vorex™ to your customer organization.
Contract Information
Invoice Number
Invoice Status
P.O. Number
From
To
Invoice Date
Due Date
Sales Representative
Project
Client Portal
241
Payment Due
Paid Amount
Total Tax
Total Price
Grand Total
Sent On
Notes
Additional Tabs
Invoice Details
Invoice Discount
Payments

Vorex SOAP API
243
Vorex SOAP API
In This Chapter
Introduction 243
Authenticate 244
Create Ticket 244
Create Ticket Note 247
Export Accounts And Contacts 248
Get Accounts Locations 250
Get Client Accounts 252
Get Employees List 253
Get Expense Sheets 256
Get Projects 258
Get Tasks 260
Get Ticket Note Types 262
Get Ticket Priorities 263
Get Ticket Queues 265
Get Ticket Sources 266
Get Ticket Statuses 267
Get Ticket Types 269
Get Tickets 270
Get Time Sheets 273
Introduction
Open API provides a way for customers to make authenticated calls to Vorex™—using either
https://vorexlogin/ or https://www.vorexlogin.com/—from their existing applications or
third-party tools. This API offers the functionalities for various operations dealing with projects, tasks
and more.
Assumptions
The partner is using Vorex services and is registered for an account with Vorex.
API Authentication
As a security mechanism, every call of the Vorex Open API is authenticated. Each API Call has to be
accompanied by a custom SOAP header holding the authorized user Vorex credentials consisting of:
UserName
Password
CompanyName
Supported Operations
The OpenAPI itself provides self-documentation for all supported operations. Add /WS/OpenAPI.asmx
to any Vorex™ website URL. For example:
https://vorexlogin.com/WS/OpenAPI.asmx
C h a p t e r 11

Vorex SOAP API
244
Authenticate
Authenticates the connecting user within Vorex. Returns a boolean representing whether he is
authenticated or not.
Request
URL
https://vorexlogin.com/Authenticate
Type
Params
Values
Body
companyName
string
Body
userName
string
Body
password
string
Example Request
POST /WS/OpenAPI.asmx HTTP/1.1
Host: vorexlogin.com
Content-Type: text/xml; charset=utf-8
Content-Length: length
SOAPAction: "https://vorexlogin.com/Authenticate"
<?xml version="1.0" encoding="utf-8"?>
<soap:Envelope xmlns:xsi="http://www.w3.org/2001/XMLSchema-instance"
xmlns:xsd="http://www.w3.org/2001/XMLSchema" xmlns:soap="http://schemas.xmlsoap.org/soap/envelope/">
<soap:Body>
<Authenticate xmlns="https://vorexlogin.com/">
<companyName>string</companyName>
<userName>string</userName>
<password>string</password>
</Authenticate>
</soap:Body>
</soap:Envelope>
Response
Type
Response
Boolean
AuthenticateResult
Example Response
HTTP/1.1 200 OK
Content-Type: text/xml; charset=utf-8
Content-Length: length
<?xml version="1.0" encoding="utf-8"?>
<soap:Envelope xmlns:xsi="http://www.w3.org/2001/XMLSchema-instance"
xmlns:xsd="http://www.w3.org/2001/XMLSchema" xmlns:soap="http://schemas.xmlsoap.org/soap/envelope/">
<soap:Body>
<AuthenticateResponse xmlns="https://vorexlogin.com/">
<AuthenticateResult>boolean</AuthenticateResult>
</AuthenticateResponse>
</soap:Body>
</soap:Envelope>
Create Ticket
Creates a service desk ticket in your Vorex account using a ticketObj.

Vorex SOAP API
245
Request
URL
https://vorexlogin.com/CreateTicket
Type
Params
Values
HEAD
WSUserCredentials
Object
PARAM
ticketObj
Object
PARAM
outputMessage
OUTPUT String
WSUserCredentials - A custom authentication SOAP header object consisting of:
UserName
Password
CompanyName
ticketObj (Ticket Object) - The ticket information will be specified in this Ticket Object consisting
of the following parameters:
ClientId (Int)
Required
ClientName (string) - Links the ticket to a specific client. Soap Action
https://vorexlogin.com/GetClientAccounts can be used to get the Accounts and their IDs
ClientSiteId (Int) - Optional. If not specified the Main Location will be automatically specified.
Soap Action https://vorexlogin.com/GetAccountLocations can be used to get the locations and
their IDs.
ClientContactId (Int) - Optional. Soap Action
https://vorexlogin.com/ExportAccountsAndContacts can be used to get contacts information
TicketTitle (string) - Required.
TicketDetails (string) - Required.
TicketTypeId (Int) - Required. Soap Action https://vorexlogin.com/GetTicketTypes can be used
to get ticket types.
TicketStatusId (Int) - Required. Soap Action https://vorexlogin.com/GetTicketStatuses can be
used to get ticket statuses.
TicketPriorityId (Int) - Required. Soap Action https://vorexlogin.com/GetTicketPriorities can
be used to get ticket priorities.
TicketQueueId (Int) - Optional if Primary Assignee is specified. Soap Action
https://vorexlogin.com/GetTicketQueues can be used to get ticket Queues.
TicketPrimaryAssigneeId (Int) - Optional if Queue is specified. Soap Action
https://vorexlogin.com/GetEmployeesList can be used to Employees User IDs
TicketSourceId (Int) - Required. Soap Action https://vorexlogin.com/GetTicketSources can be
used to get Ticket Sources.
TicketOpenDate (datetime) - Required.
Example Request
POST /WS/OpenAPI.asmx HTTP/1.1
Host: vorexlogin.com
Content-Type: text/xml; charset=utf-8
Content-Length: length
SOAPAction: "https://vorexlogin.com/CreateTicket"
<?xml version="1.0" encoding="utf-8"?>
<soap:Envelope xmlns:xsi="http://www.w3.org/2001/XMLSchema-instance"

Vorex SOAP API
246
xmlns:xsd="http://www.w3.org/2001/XMLSchema" xmlns:soap="http://schemas.xmlsoap.org/soap/envelope/">
<soap:Header>
<WSUserCredentials xmlns="https://vorexlogin.com/">
<UserName>string</UserName>
<Password>string</Password>
<CompanyName>string</CompanyName>
</WSUserCredentials>
</soap:Header>
<soap:Body>
<CreateTicket xmlns="https://vorexlogin.com/">
<ticketObj>
<ClientId>int</ClientId>
<ClientSiteId>int</ClientSiteId>
<ClientContactId>int</ClientContactId>
<TicketTitle>string</TicketTitle>
<TicketDetails>string</TicketDetails>
<TicketTypeId>int</TicketTypeId>
<TicketStatusId>int</TicketStatusId>
<TicketPriorityId>int</TicketPriorityId>
<TicketQueueId>int</TicketQueueId>
<TicketPrimaryAssigneeId>int</TicketPrimaryAssigneeId>
<TicketSourceId>int</TicketSourceId>
<TicketOpenDate>dateTime</TicketOpenDate>
</ticketObj>
</CreateTicket>
</soap:Body>
</soap:Envelope>
Response
Status
Response
Success
CreateTicketResult:
Integer representing the new Ticket ID
outputMessage:
"Ticket #ticket_number# created successfully."
Failure
CreateTicketResult:
Returns Null
outputMessage:
"A valid ticket object is required."
"Ticket Title is required!"
"Ticket Details is required!"
"Ticket Assignee or/and Queue must be specified!"
"Failed to Create new Ticket."
Example Response
HTTP/1.1 200 OK
Content-Type: text/xml; charset=utf-8
Content-Length: length
<?xml version="1.0" encoding="utf-8"?>
<soap:Envelope xmlns:xsi="http://www.w3.org/2001/XMLSchema-instance"
xmlns:xsd="http://www.w3.org/2001/XMLSchema" xmlns:soap="http://schemas.xmlsoap.org/soap/envelope/">
<soap:Body>
<CreateTicketResponse xmlns="https://vorexlogin.com/">
<CreateTicketResult>int</CreateTicketResult>
<outputMessage>string</outputMessage>
</CreateTicketResponse>
</soap:Body>
</soap:Envelope>

Vorex SOAP API
247
Create Ticket Note
Creates a ticket note for a specific TicketId in your Vorex account using a ticketNote object.
Request
URL
https://vorexlogin.com/CreateTicketNote
Type
Params
Values
HEAD
WSUserCredentials
Object
PARAM
ticketNote
Object
PARAM
outputMessage
OUTPUT String
WSUserCredentials - A custom authentication SOAP header object consisting of:
UserName
Password
CompanyName
ticketNote (Ticket Note Object) - The ticket note information will be specified in this Ticket Note
Object consisting of the following parameters:
TicketId (Int) - Required. Links the note to a specific ticket.
UserId (Int) - Optional. If not specified the note will appear to be created by the system. Soap
Action https://vorexlogin.com/GetEmployeesList can be used to Employees User IDs
NoteDetails (string) - Required.
NoteTypeId (Int) - Required. Soap Action https://vorexlogin.com/GetTicketNoteTypes can be
used to get ticket types.
IsInternalNote (boolean) - Required. Specifies if this note is internal or public to the client to
see.
NoteDate (datetime) - Required.
Example Request
POST /WS/OpenAPI.asmx HTTP/1.1
Host: vorexlogin.com
Content-Type: text/xml; charset=utf-8
Content-Length: length
SOAPAction: "https://vorexlogin.com/CreateTicketNote"
<?xml version="1.0" encoding="utf-8"?>
<soap:Envelope xmlns:xsi="http://www.w3.org/2001/XMLSchema-instance"
xmlns:xsd="http://www.w3.org/2001/XMLSchema" xmlns:soap="http://schemas.xmlsoap.org/soap/envelope/">
<soap:Header>
<WSUserCredentials xmlns="https://vorexlogin.com/">
<UserName>string</UserName>
<Password>string</Password>
<CompanyName>string</CompanyName>
</WSUserCredentials>
</soap:Header>
<soap:Body>
<CreateTicketNote xmlns="https://vorexlogin.com/">
<ticketNote>
<TicketId>int</TicketId>
<UserId>int</UserId>
<NoteDetails>string</NoteDetails>
<NoteTypeId>int</NoteTypeId>
<IsInternalNote>boolean</IsInternalNote>
<NoteDate>dateTime</NoteDate>

Vorex SOAP API
248
</ticketNote>
</CreateTicketNote>
</soap:Body>
</soap:Envelope>
Response
Status
Response
Success
CreateTicketNoteResult:
Integer representing the new Ticket Note ID
outputMessage:
Empty String
Failure
CreateTicketNoteResult:
Returns Null
outputMessage:
"Failed to create new note."
"A valid ticket note object is required."
"Note Details is required!"
"Invalid Ticket Number."
"Referenced Ticket could not be found!"
Example Response
HTTP/1.1 200 OK
Content-Type: text/xml; charset=utf-8
Content-Length: length
<?xml version="1.0" encoding="utf-8"?>
<soap:Envelope xmlns:xsi="http://www.w3.org/2001/XMLSchema-instance"
xmlns:xsd="http://www.w3.org/2001/XMLSchema" xmlns:soap="http://schemas.xmlsoap.org/soap/envelope/">
<soap:Body>
<CreateTicketNoteResponse xmlns="https://vorexlogin.com/">
<CreateTicketNoteResult>int</CreateTicketNoteResult>
<outputMessage>string</outputMessage>
</CreateTicketNoteResponse>
</soap:Body>
</soap:Envelope>
Export Accounts And Contacts
Returns an array of accounts and, if requested, related data such as account locations, contacts,
contacts phones and emails. The result set is returned in a data set format having various data tables
filled in case the data is requested.
Request
URL
https://vorexlogin.com/ExportAccountsAndContacts
Type
Params
Values
HEAD
WSUserCredentials
Object
PARAM
dateFrom
dateTime

Vorex SOAP API
249
PARAM
dateTo
dateTime
PARAM
clientNames
string
PARAM
businessTypes
string
PARAM
accountTypes
string
PARAM
withLocations
boolean
PARAM
withContacts
boolean
PARAM
outputMessage
OUTPUT String
WSUserCredentials - A custom authentication SOAP header object consisting of:
UserName
Password
CompanyName
clientNames - Specify the clients(s) value(s) by which to filter accounts based on. For multiple
clients you have to separate by Comma (,). If Null or Empty ("") this will be ignored.
dateFrom - Specify the earliest account acquired date. If Null this will be ignored.
dateTo - Specify the latest account acquired date. If Null this will be ignored.
businessTypes - Specify the business type(s) value(s) by which to filter accounts based on. For
multiple business types you have to separate by Comma (,). If Null or Empty ("") this will be
ignored.
accountTypes - Specify the account type(s) value(s) by which to filter accounts based on. For
multiple account types you have to separate by Comma (,). If Null or Empty ("") this will be
ignored.
withLocations - Boolean value to specify if the accounts locations should be loaded as well.
withContacts - Boolean value to specify if the accounts Contacts should be loaded as well.
Example Request
POST /WS/OpenAPI.asmx HTTP/1.1
Host: vorexlogin.com
Content-Type: text/xml; charset=utf-8
Content-Length: length
SOAPAction: "https://vorexlogin.com/ExportAccountsAndContacts"
<?xml version="1.0" encoding="utf-8"?>
<soap:Envelope xmlns:xsi="http://www.w3.org/2001/XMLSchema-instance"
xmlns:xsd="http://www.w3.org/2001/XMLSchema" xmlns:soap="http://schemas.xmlsoap.org/soap/envelope/">
<soap:Header>
<WSUserCredentials xmlns="https://vorexlogin.com/">
<UserName>string</UserName>
<Password>string</Password>
<CompanyName>string</CompanyName>
</WSUserCredentials>
</soap:Header>
<soap:Body>
<ExportAccountsAndContacts xmlns="https://vorexlogin.com/">
<dateFrom>dateTime</dateFrom>
<dateTo>dateTime</dateTo>
<clientNames>string</clientNames>

Vorex SOAP API
250
<businessTypes>string</businessTypes>
<accountTypes>string</accountTypes>
<withLocations>boolean</withLocations>
<withContacts>boolean</withContacts>
</ExportAccountsAndContacts>
</soap:Body>
</soap:Envelope>
Response
Status
Response
Success
ExportAccountsAndContactsResult:
DataSet
outputMessage:
Empty String
Failure
ExportAccountsAndContactsResult:
Returns Null
outputMessage:
"An Error has Occurred while processing the request."
Example Response
HTTP/1.1 200 OK
Content-Type: text/xml; charset=utf-8
Content-Length: length
<?xml version="1.0" encoding="utf-8"?>
<soap:Envelope xmlns:xsi="http://www.w3.org/2001/XMLSchema-instance"
xmlns:xsd="http://www.w3.org/2001/XMLSchema" xmlns:soap="http://schemas.xmlsoap.org/soap/envelope/">
<soap:Body>
<ExportAccountsAndContactsResponse xmlns="https://vorexlogin.com/">
<ExportAccountsAndContactsResult>
<xsd:schema>schema</xsd:schema>xml</ExportAccountsAndContactsResult>
<outputMessage>string</outputMessage>
</ExportAccountsAndContactsResponse>
</soap:Body>
</soap:Envelope>
Get Accounts Locations
Returns an AccountLocation array of possible locations defined in your Vorex account for a specified
client accountId.
Request
URL
https://vorexlogin.com/GetAccountLocations
Type
Params
Values
HEAD
WSUserCredentials
Object
PARAM
accountId
Int
PARAM
outputMessage
OUTPUT String
WSUserCredentials - A custom authentication SOAP header object consisting of:
UserName

Vorex SOAP API
251
Password
CompanyName
accountId - This represents the identification number of the account (client) for which you would
like to retrieve the list of locations for.
Example Request
POST /WS/OpenAPI.asmx HTTP/1.1
Host: vorexlogin.com
Content-Type: text/xml; charset=utf-8
Content-Length: length
SOAPAction: "https://vorexlogin.com/GetAccountLocations"
<?xml version="1.0" encoding="utf-8"?>
<soap:Envelope xmlns:xsi="http://www.w3.org/2001/XMLSchema-instance"
xmlns:xsd="http://www.w3.org/2001/XMLSchema" xmlns:soap="http://schemas.xmlsoap.org/soap/envelope/">
<soap:Header>
<WSUserCredentials xmlns="https://vorexlogin.com/">
<UserName>string</UserName>
<Password>string</Password>
<CompanyName>string</CompanyName>
</WSUserCredentials>
</soap:Header>
<soap:Body>
<GetAccountLocations xmlns="https://vorexlogin.com/">
<accountId>int</accountId>
</GetAccountLocations>
</soap:Body>
</soap:Envelope>
Response
Status
Response
Success
GetAccountLocationsResult:
Array of AccountLocation:
o LocationId (int)
o LocationName (string)
o IsMain (boolean)
o IsActive (boolean)
outputMessage:
o Empty String
Failure
GetAccountLocationsResult:
Returns Null
outputMessage:
"Failed to get Account Locations list."
Example Response
HTTP/1.1 200 OK
Content-Type: text/xml; charset=utf-8
Content-Length: length
<?xml version="1.0" encoding="utf-8"?>
<soap:Envelope xmlns:xsi="http://www.w3.org/2001/XMLSchema-instance"
xmlns:xsd="http://www.w3.org/2001/XMLSchema" xmlns:soap="http://schemas.xmlsoap.org/soap/envelope/">
<soap:Body>
<GetAccountLocationsResponse xmlns="https://vorexlogin.com/">
<GetAccountLocationsResult>
<AccountLocation>
<LocationId>int</LocationId>
<LocationName>string</LocationName>
<IsMain>boolean</IsMain>

Vorex SOAP API
252
<IsActive>boolean</IsActive>
</AccountLocation>
<AccountLocation>
<LocationId>int</LocationId>
<LocationName>string</LocationName>
<IsMain>boolean</IsMain>
<IsActive>boolean</IsActive>
</AccountLocation>
</GetAccountLocationsResult>
<outputMessage>string</outputMessage>
</GetAccountLocationsResponse>
</soap:Body>
</soap:Envelope>
Get Client Accounts
Returns an Account array of type "Client" defined in your Vorex account.
Request
URL
https://vorexlogin.com/GetClientAccounts
Type
Params
Values
HEAD
WSUserCredentials
Object
PARAM
outputMessage
OUTPUT String
WSUserCredentials - A custom authentication SOAP header object consisting of:
UserName
Password
CompanyName
Example Request
POST /WS/OpenAPI.asmx HTTP/1.1
Host: vorexlogin.com
Content-Type: text/xml; charset=utf-8
Content-Length: length
SOAPAction: "https://vorexlogin.com/GetClientAccounts"
<?xml version="1.0" encoding="utf-8"?>
<soap:Envelope xmlns:xsi="http://www.w3.org/2001/XMLSchema-instance"
xmlns:xsd="http://www.w3.org/2001/XMLSchema" xmlns:soap="http://schemas.xmlsoap.org/soap/envelope/">
<soap:Header>
<WSUserCredentials xmlns="https://vorexlogin.com/">
<UserName>string</UserName>
<Password>string</Password>
<CompanyName>string</CompanyName>
</WSUserCredentials>
</soap:Header>
<soap:Body>
<GetClientAccounts xmlns="https://vorexlogin.com/" />
</soap:Body>
</soap:Envelope>

Vorex SOAP API
253
Response
Status
Response
Success
GetClientAccountsResult:
Array of Account:
o AccountId (int)
o AccountName (string)
o IsActive (boolean)
o IsInternal (boolean)
outputMessage:
Empty String
Failure
GetClientAccountsResult:
Returns Null
outputMessage:
"Failed to get clients list."
Example Response
HTTP/1.1 200 OK
Content-Type: text/xml; charset=utf-8
Content-Length: length
<?xml version="1.0" encoding="utf-8"?>
<soap:Envelope xmlns:xsi="http://www.w3.org/2001/XMLSchema-instance"
xmlns:xsd="http://www.w3.org/2001/XMLSchema" xmlns:soap="http://schemas.xmlsoap.org/soap/envelope/">
<soap:Body>
<GetClientAccountsResponse xmlns="https://vorexlogin.com/">
<GetClientAccountsResult>
<Account>
<AccountId>int</AccountId>
<AccountName>string</AccountName>
<IsActive>boolean</IsActive>
<IsInternal>boolean</IsInternal>
</Account>
<Account>
<AccountId>int</AccountId>
<AccountName>string</AccountName>
<IsActive>boolean</IsActive>
<IsInternal>boolean</IsInternal>
</Account>
</GetClientAccountsResult>
<outputMessage>string</outputMessage>
</GetClientAccountsResponse>
</soap:Body>
</soap:Envelope>
Get Employees List
Returns an api_EmployeesListingResult array of your Vorex Account employees, with the ability to
filter by employee name, department, job title, location and username.
Request
URL
https://vorexlogin.com/GetEmployeesList
Type
Params
Values
HEAD
WSUserCredentials
Object

Vorex SOAP API
254
PARAM
name
string
PARAM
departmentName
string
PARAM
jobTitle
string
PARAM
location
string
PARAM
userNames
string
PARAM
outputMessage
OUTPUT String
WSUserCredentials - A custom authentication SOAP header object consisting of:
UserName
Password
CompanyName
name - Specify the name value by which to filter employees based on their first name or last name.
If Null or Empty ("") this will be ignored.
departmentName - Specify the department(s) value(s) by which to filter employees based on. For
multiple departments you have to separate by Comma (,). If Null or Empty ("") this will be ignored.
jobTitle - Specify the Job Titles(s) value(s) by which to filter employees based on. For multiple
Job Titles you have to separate by Comma (,). If Null or Empty ("") this will be ignored.
location - Specify the branches(s) value(s) by which to filter employees based on. For multiple
branches (locations) you have to separate by Comma (,). If Null or Empty ("") this will be ignored.
userNames - Specify the username(s) value(s) by which to filter employees based on. For multiple
usernames you have to separate by Comma (,). If Null or Empty ("") this will be ignored.
Example Request
POST /WS/OpenAPI.asmx HTTP/1.1
Host: vorexlogin.com
Content-Type: text/xml; charset=utf-8
Content-Length: length
SOAPAction: "https://vorexlogin.com/GetEmployeesList"
<?xml version="1.0" encoding="utf-8"?>
<soap:Envelope xmlns:xsi="http://www.w3.org/2001/XMLSchema-instance"
xmlns:xsd="http://www.w3.org/2001/XMLSchema" xmlns:soap="http://schemas.xmlsoap.org/soap/envelope/">
<soap:Header>
<WSUserCredentials xmlns="https://vorexlogin.com/">
<UserName>string</UserName>
<Password>string</Password>
<CompanyName>string</CompanyName>
</WSUserCredentials>
</soap:Header>
<soap:Body>
<GetEmployeesList xmlns="https://vorexlogin.com/">
<name>string</name>
<departmentName>string</departmentName>
<jobTitle>string</jobTitle>
<location>string</location>
<userNames>string</userNames>
</GetEmployeesList>
</soap:Body>
</soap:Envelope>
Response
Status
Response
Success
GetEmployeesListResult:
Array of api_EmployeesListingResult:

Vorex SOAP API
255
o UserId (int)
o UserName (string)
o EmployeeName (string)
o MiddleName (string)
o Manager (string)
o EmployementType (string)
o Gender (string)
o MaritalStatus (string)
o IsActive (boolean)
o Description (string)
o CreatedOn (dateTime)
o ModifiedOn (dateTime)
o EmailAddress (string)
o EmployeeId (string)
o JobTitle (string)
o Department (string)
o HireDate (dateTime)
o TerminationDate (dateTime)
o BranchName (dateTime)
outputMessage:
Empty String
Failure
GetEmployeesListResult:
Returns Null
outputMessage:
"An Error has Occurred while processing the request."
Example Response
HTTP/1.1 200 OK
Content-Type: text/xml; charset=utf-8
Content-Length: length
<?xml version="1.0" encoding="utf-8"?>
<soap:Envelope xmlns:xsi="http://www.w3.org/2001/XMLSchema-instance"
xmlns:xsd="http://www.w3.org/2001/XMLSchema" xmlns:soap="http://schemas.xmlsoap.org/soap/envelope/">
<soap:Body>
<GetEmployeesListResponse xmlns="https://vorexlogin.com/">
<GetEmployeesListResult>
<api_EmployeesListingResult>
<UserId>int</UserId>
<UserName>string</UserName>
<EmployeName>string</EmployeName>
<MiddleName>string</MiddleName>
<Manager>string</Manager>
<EmploymentType>string</EmploymentType>
<Gender>string</Gender>
<MaritalStatus>string</MaritalStatus>
<IsActive>boolean</IsActive>
<Description>string</Description>
<CreatedOn>dateTime</CreatedOn>
<ModifiedOn>dateTime</ModifiedOn>
<EmailAddress>string</EmailAddress>
<EmployeeId>string</EmployeeId>
<JobTitle>string</JobTitle>
<Department>string</Department>
<HireDate>dateTime</HireDate>
<TerminationDate>dateTime</TerminationDate>
<BranchName>string</BranchName>
</api_EmployeesListingResult>
<outputMessage>string</outputMessage>
</GetEmployeesListResponse>
</soap:Body>
</soap:Envelope>

Vorex SOAP API
256
Get Expense Sheets
Returns an api_GetExpenseSheetsResult array of expenses and related information based on a
date range, clients and or usernames of employees.
Request
URL
https://vorexlogin.com/GetExpenseSheets
Type
Params
Values
HEAD
WSUserCredentials
Object
PARAM
dateFrom
dateTime
PARAM
dateTo
dateTime
PARAM
clientNames
string
PARAM
userNames
string
PARAM
outputMessage
OUTPUT String
WSUserCredentials - A custom authentication SOAP header object consisting of:
UserName
Password
CompanyName
clientNames - Specify the clients(s) value(s) by which to filter expenses based on. For multiple
clients you have to separate by Comma (,). If Null or Empty ("") this will be ignored.
dateFrom - Specify the earliest expense sheet date. If Null this will be ignored.
dateTo - Specify the latest expense sheet date. If Null this will be ignored.
userNames - Specify the employee username(s) value(s) by which to filter expenses based on.
For multiple usernames you have to separate by Comma (,). If Null or Empty ("") this will be
ignored.
Example Request
POST /WS/OpenAPI.asmx HTTP/1.1
Host: vorexlogin.com
Content-Type: text/xml; charset=utf-8
Content-Length: length
SOAPAction: "https://vorexlogin.com/GetExpenseSheets"
<?xml version="1.0" encoding="utf-8"?>
<soap:Envelope xmlns:xsi="http://www.w3.org/2001/XMLSchema-instance"
xmlns:xsd="http://www.w3.org/2001/XMLSchema" xmlns:soap="http://schemas.xmlsoap.org/soap/envelope/">
<soap:Header>
<WSUserCredentials xmlns="https://vorexlogin.com/">
<UserName>string</UserName>
<Password>string</Password>
<CompanyName>string</CompanyName>
</WSUserCredentials>
</soap:Header>
<soap:Body>
<GetExpenseSheets xmlns="https://vorexlogin.com/">
<dateFrom>dateTime</dateFrom>
<dateTo>dateTime</dateTo>
<clientNames>string</clientNames>
<userNames>string</userNames>
</GetExpenseSheets>
</soap:Body>

Vorex SOAP API
257
</soap:Envelope>
Response
Status
Response
Success
GetExpenseSheetsResult:
Array of api_GetExpensesheetResult:
o pkExpenseEntryId (int)
o ExpenseSheetId (int)
o EmployeeName (string)
o ExpenseName (string)
o Client (string)
o Project_Ticket (string)
o ExpenseDate (dateTime)
o ExpenseType(string)
o Billable (boolean)
o Notes (string)
o Amount (decimal)
outputMessage:
Empty String
Failure
GetExpenseSheetsResult:
Returns Null
outputMessage:
"An Error has Occurred while processing the request."
Example Response
HTTP/1.1 200 OK
Content-Type: text/xml; charset=utf-8
Content-Length: length
<?xml version="1.0" encoding="utf-8"?>
<soap:Envelope xmlns:xsi="http://www.w3.org/2001/XMLSchema-instance"
xmlns:xsd="http://www.w3.org/2001/XMLSchema" xmlns:soap="http://schemas.xmlsoap.org/soap/envelope/">
<soap:Body>
<GetExpenseSheetsResponse xmlns="https://vorexlogin.com/">
<GetExpenseSheetsResult>
<api_GetExpensesheetResult>
<pkExpenseEntryId>int</pkExpenseEntryId>
<ExpenseSheetId>int</ExpenseSheetId>
<EmployeeName>string</EmployeeName>
<ExpenseName>string</ExpenseName>
<Client>string</Client>
<Project_Ticket>string</Project_Ticket>
<ExpenseDate>dateTime</ExpenseDate>
<ExpenseType>string</ExpenseType>
<Billable>boolean</Billable>
<Reimbursable>boolean</Reimbursable>
<Notes>string</Notes>
<Amount>decimal</Amount>
</api_GetExpensesheetResult>
</GetExpenseSheetsResult>
<outputMessage>string</outputMessage>
</GetExpenseSheetsResponse>
</soap:Body>
</soap:Envelope>

Vorex SOAP API
258
Get Projects
Returns an api_ProjectListingResult array of your projects defined in your Vorex account, with
the ability to filter by clients, dates, departments, and status.
Request
URL
https://vorexlogin.com/GetProjects
Type
Params
Values
HEAD
WSUserCredentials
Object
PARAM
clients
string
PARAM
startDateFrom
dateTime
PARAM
startDateTo
dateTime
PARAM
dueDateFrom
dateTime
PARAM
dueDateTo
dateTime
PARAM
departments
string
PARAM
statuses
string
PARAM
outputMessage
OUTPUT String
WSUserCredentials - A custom authentication SOAP header object consisting of:
UserName
Password
CompanyName
clients - Specify the clients(s) value(s) by which to filter projects based on. For multiple clients
you have to separate by Comma (,). If Null or Empty ("") this will be ignored.
startDateFrom - Specify the earliest project start date. If Null this will be ignored.
startDateTo - Specify the latest project start date. If Null this will be ignored.
dueDateFrom - Specify the earliest project due date. If Null this will be ignored.
dueDateTo - Specify the latest project due date. If Null this will be ignored.
departments - Specify the department(s) value(s) by which to filter projects based on. For
multiple departments you have to separate by Comma (,). If Null or Empty ("") this will be ignored.
statuses - Specify the project status(s) value(s) by which to filter projects based on. For multiple
statuses you have to separate by Comma (,). If Null or Empty ("") this will be ignored.
Example Request
POST /WS/OpenAPI.asmx HTTP/1.1
Host: vorexlogin.com
Content-Type: text/xml; charset=utf-8
Content-Length: length
SOAPAction: "https://vorexlogin.com/GetProjects"
<?xml version="1.0" encoding="utf-8"?>
<soap:Envelope xmlns:xsi="http://www.w3.org/2001/XMLSchema-instance"
xmlns:xsd="http://www.w3.org/2001/XMLSchema" xmlns:soap="http://schemas.xmlsoap.org/soap/envelope/">
<soap:Header>
<WSUserCredentials xmlns="https://vorexlogin.com/">
<UserName>string</UserName>
<Password>string</Password>
<CompanyName>string</CompanyName>
</WSUserCredentials>

Vorex SOAP API
259
</soap:Header>
<soap:Body>
<GetProjects xmlns="https://vorexlogin.com/">
<clients>string</clients>
<startDateFrom>dateTime</startDateFrom>
<startDateTo>dateTime</startDateTo>
<dueDateFrom>dateTime</dueDateFrom>
<dueDateTo>dateTime</dueDateTo>
<departments>string</departments>
<statuses>string</statuses>
</GetProjects>
</soap:Body>
</soap:Envelope>
Response
Status
Response
Success
GetProjectsResult:
Array of api_ProjectListingResult:
o pkProjectId (int)
o ClientName (string)
o ProjectNumber (string)
o ProjectName (string)
o ProjectCode (string)
o ContractName (string)
o Manager (string)
o ProjectStatus(string)
o StartDate (dateTime)
o DueDate (dateTime)
o Completion (dateTime)
o PlannedHours (decimal)
o UsedHours (decimal)
o PlannedBudget (decimal)
o ActualBudget (decimal)
outputMessage:
Empty String
Failure
GetProjectsResult:
Returns Null
outputMessage:
"An Error has Occurred while processing the request."
Example Response
HTTP/1.1 200 OK
Content-Type: text/xml; charset=utf-8
Content-Length: length
<?xml version="1.0" encoding="utf-8"?>
<soap:Envelope xmlns:xsi="http://www.w3.org/2001/XMLSchema-instance"
xmlns:xsd="http://www.w3.org/2001/XMLSchema" xmlns:soap="http://schemas.xmlsoap.org/soap/envelope/">
<soap:Body>
<GetProjectsResponse xmlns="https://vorexlogin.com/">
<GetProjectsResult>
<api_ProjectListingResult>
<ClientName>string</ClientName>
<ProjectNumber>string</ProjectNumber>
<ProjectName>string</ProjectName>
<ProjectCode>string</ProjectCode>
<ContractName>string</ContractName>
<Manager>string</Manager>
<ProjectStatus>string</ProjectStatus>

Vorex SOAP API
260
<StartDate>dateTime</StartDate>
<DueDate>dateTime</DueDate>
<Completion>dateTime</Completion>
<PlannedHours>decimal</PlannedHours>
<UsedHours>decimal</UsedHours>
<PlannedBudget>decimal</PlannedBudget>
<ActualBudget>decimal</ActualBudget>
<pkProjectId>int</pkProjectId>
</api_ProjectListingResult>
</GetProjectsResult>
<outputMessage>string</outputMessage>
</GetProjectsResponse>
</soap:Body>
</soap:Envelope>
Get Tasks
Returns an api_TaskListingResult array of your project tasks defined in your Vorex account, with
the ability to filter by clients, dates, projects, and status.
Request
URL
https://vorexlogin.com/GetTasks
Type
Params
Values
HEAD
WSUserCredentials
Object
PARAM
clients
string
PARAM
startDateFrom
dateTime
PARAM
startDateTo
dateTime
PARAM
endDateFrom
dateTime
PARAM
endDateTo
dateTime
PARAM
projects
string
PARAM
statuses
string
PARAM
outputMessage
OUTPUT String
WSUserCredentials - A custom authentication SOAP header object consisting of:
UserName
Password
CompanyName
clients - Specify the clients(s) value(s) by which to filter tasks based on. For multiple clients you
have to separate by Comma (,). If Null or Empty ("") this will be ignored.
startDateFrom - Specify the earliest task start date. If Null this will be ignored.
startDateTo - Specify the latest task start date. If Null this will be ignored.
endDateFrom - Specify the earliest task end date. If Null this will be ignored.
endDateTo - Specify the latest task end date. If Null this will be ignored.
projects - Specify the project(s) value(s) by which to filter tasks based on. For multiple projects
you have to separate by Comma (,). If Null or Empty ("") this will be ignored.
statuses - Specify the project status(s) value(s) by which to filter tasks based on. For multiple
statuses you have to separate by Comma (,). If Null or Empty ("") this will be ignored.

Vorex SOAP API
261
Example Request
POST /WS/OpenAPI.asmx HTTP/1.1
Host: vorexlogin.com
Content-Type: text/xml; charset=utf-8
Content-Length: length
SOAPAction: "https://vorexlogin.com/GetTasks"
<?xml version="1.0" encoding="utf-8"?>
<soap:Envelope xmlns:xsi="http://www.w3.org/2001/XMLSchema-instance"
xmlns:xsd="http://www.w3.org/2001/XMLSchema" xmlns:soap="http://schemas.xmlsoap.org/soap/envelope/">
<soap:Header>
<WSUserCredentials xmlns="https://vorexlogin.com/">
<UserName>string</UserName>
<Password>string</Password>
<CompanyName>string</CompanyName>
</WSUserCredentials>
</soap:Header>
<soap:Body>
<GetTasks xmlns="https://vorexlogin.com/">
<clients>string</clients>
<startDateFrom>dateTime</startDateFrom>
<startDateTo>dateTime</startDateTo>
<endDateFrom>dateTime</endDateFrom>
<endDateTo>dateTime</endDateTo>
<projects>string</projects>
<statuses>string</statuses>
</GetTasks>
</soap:Body>
</soap:Envelope>
Response
Status
Response
Success
GetTasksResult:
Array of api_TaskListingResult:
o pkTaskId (int)
o ParentTaskId (int)
o ClientName (string)
o ProjectName (string)
o TaskStatus (string)
o StartDate (dateTime)
o EndDate (dateTime)
o UsedHours (decimal)
o PercentageUsed (decimal)
o EstimatedHours (decimal)
o TaskType (string)
outputMessage:
Empty String
Failure
GetTasksResult:
Returns Null
outputMessage:
"An Error has Occurred while processing the request."
Example Response
HTTP/1.1 200 OK
Content-Type: text/xml; charset=utf-8
Content-Length: length
<?xml version="1.0" encoding="utf-8"?>
<soap:Envelope xmlns:xsi="http://www.w3.org/2001/XMLSchema-instance"

Vorex SOAP API
262
xmlns:xsd="http://www.w3.org/2001/XMLSchema" xmlns:soap="http://schemas.xmlsoap.org/soap/envelope/">
<soap:Body>
<GetTasksResponse xmlns="https://vorexlogin.com/">
<GetTasksResult>
<api_TaskListingResult>
<TaskName>string</TaskName>
<ProjectName>string</ProjectName>
<ClientName>string</ClientName>
<TaskStatus>string</TaskStatus>
<StartDate>dateTime</StartDate>
<EndDate>dateTime</EndDate>
<UsedHours>decimal</UsedHours>
<PercentUsed>decimal</PercentUsed>
<EstimatedHours>decimal</EstimatedHours>
<TaskType>string</TaskType>
<pkTaskId>int</pkTaskId>
<ParentTaskId>int</ParentTaskId>
</api_TaskListingResult>
</GetTasksResult>
<outputMessage>string</outputMessage>
</GetTasksResponse>
</soap:Body>
</soap:Envelope>
Get Ticket Note Types
Returns a TicketNoteType array of possible ticket note types defined in your Vorex account.
Request
URL
https://vorexlogin.com/GetTicketNoteTypes
Type
Params
Values
HEAD
WSUserCredentials
Object
PARAM
outputMessage
OUTPUT String
WSUserCredentials - A custom authentication SOAP header object consisting of:
UserName
Password
CompanyName
Example Request
POST /WS/OpenAPI.asmx HTTP/1.1
Host: vorexlogin.com
Content-Type: text/xml; charset=utf-8
Content-Length: length
SOAPAction: "https://vorexlogin.com/GetTicketNoteTypes"
<?xml version="1.0" encoding="utf-8"?>
<soap:Envelope xmlns:xsi="http://www.w3.org/2001/XMLSchema-instance"
xmlns:xsd="http://www.w3.org/2001/XMLSchema" xmlns:soap="http://schemas.xmlsoap.org/soap/envelope/">
<soap:Header>
<WSUserCredentials xmlns="https://vorexlogin.com/">
<UserName>string</UserName>
<Password>string</Password>
<CompanyName>string</CompanyName>
</WSUserCredentials>
</soap:Header>
<soap:Body>

Vorex SOAP API
263
<GetTicketNoteTypes xmlns="https://vorexlogin.com/" />
</soap:Body>
</soap:Envelope>
Response
Status
Response
Success
GetTicketNoteTypesResult:
Array of TicketNoteType:
o TypeId (int)
o TypeName (string)
outputMessage:
Empty String
Failure
GetTicketNoteTypesResult:
Returns Null
outputMessage:
"Failed to get note types list."
Example Response
HTTP/1.1 200 OK
Content-Type: text/xml; charset=utf-8
Content-Length: length
<?xml version="1.0" encoding="utf-8"?>
<soap:Envelope xmlns:xsi="http://www.w3.org/2001/XMLSchema-instance"
xmlns:xsd="http://www.w3.org/2001/XMLSchema" xmlns:soap="http://schemas.xmlsoap.org/soap/envelope/">
<soap:Body>
<GetTicketNoteTypesResponse xmlns="https://vorexlogin.com/">
<GetTicketNoteTypesResult>
<TicketNoteType>
<TypeId>int</TypeId>
<TypeName>string</TypeName>
</TicketNoteType>
<TicketNoteType>
<TypeId>int</TypeId>
<TypeName>string</TypeName>
</TicketNoteType>
</GetTicketNoteTypesResult>
<outputMessage>string</outputMessage>
</GetTicketNoteTypesResponse>
</soap:Body>
</soap:Envelope>
Get Ticket Priorities
Returns a TicketPriority array of possible ticket priorities defined in your Vorex account.
Request
URL
https://vorexlogin.com/GetTicketPriorities
Type
Params
Values
HEAD
WSUserCredentials
Object
PARAM
outputMessage
OUTPUT String

Vorex SOAP API
264
WSUserCredentials - A custom authentication SOAP header object consisting of:
UserName
Password
CompanyName
Example Request
POST /WS/OpenAPI.asmx HTTP/1.1
Host: vorexlogin.com
Content-Type: text/xml; charset=utf-8
Content-Length: length
SOAPAction: "https://vorexlogin.com/GetTicketPriorities"
<?xml version="1.0" encoding="utf-8"?>
<soap:Envelope xmlns:xsi="http://www.w3.org/2001/XMLSchema-instance"
xmlns:xsd="http://www.w3.org/2001/XMLSchema" xmlns:soap="http://schemas.xmlsoap.org/soap/envelope/">
<soap:Header>
<WSUserCredentials xmlns="https://vorexlogin.com/">
<UserName>string</UserName>
<Password>string</Password>
<CompanyName>string</CompanyName>
</WSUserCredentials>
</soap:Header>
<soap:Body>
<GetTicketPriorities xmlns="https://vorexlogin.com/" />
</soap:Body>
</soap:Envelope>
Response
Status
Response
Success
GetTicketPrioritiesResult:
Array of TicketPriority:
o PriorityId (int)
o PriorityName (string)
o PriorityColor (string)
outputMessage:
Empty String
Failure
GetTicketPrioritiesResult:
Returns Null
outputMessage:
"Failed to get Priorities list."
Example Response
HTTP/1.1 200 OK
Content-Type: text/xml; charset=utf-8
Content-Length: length
<?xml version="1.0" encoding="utf-8"?>
<soap:Envelope xmlns:xsi="http://www.w3.org/2001/XMLSchema-instance"
xmlns:xsd="http://www.w3.org/2001/XMLSchema" xmlns:soap="http://schemas.xmlsoap.org/soap/envelope/">
<soap:Body>
<GetTicketPrioritiesResponse xmlns="https://vorexlogin.com/">
<GetTicketPrioritiesResult>
<TicketPriority>
<PriorityId>int</PriorityId>
<PriorityName>string</PriorityName>
<PriorityColor>string</PriorityColor>
</TicketPriority>
<TicketPriority>
<PriorityId>int</PriorityId>

Vorex SOAP API
265
<PriorityName>string</PriorityName>
<PriorityColor>string</PriorityColor>
</TicketPriority>
</GetTicketPrioritiesResult>
<outputMessage>string</outputMessage>
</GetTicketPrioritiesResponse>
</soap:Body>
</soap:Envelope>
Get Ticket Queues
Returns a TicketQueue array of possible ticket queues defined in your Vorex account.
Request
URL
https://vorexlogin.com/GetTicketQueues
Type
Params
Values
HEAD
WSUserCredentials
Object
PARAM
outputMessage
OUTPUT String
WSUserCredentials - A custom authentication SOAP header object consisting of:
UserName
Password
CompanyName
Example Request
POST /WS/OpenAPI.asmx HTTP/1.1
Host: vorexlogin.com
Content-Type: text/xml; charset=utf-8
Content-Length: length
SOAPAction: "https://vorexlogin.com/GetTicketQueues"
<?xml version="1.0" encoding="utf-8"?>
<soap:Envelope xmlns:xsi="http://www.w3.org/2001/XMLSchema-instance"
xmlns:xsd="http://www.w3.org/2001/XMLSchema" xmlns:soap="http://schemas.xmlsoap.org/soap/envelope/">
<soap:Header>
<WSUserCredentials xmlns="https://vorexlogin.com/">
<UserName>string</UserName>
<Password>string</Password>
<CompanyName>string</CompanyName>
</WSUserCredentials>
</soap:Header>
<soap:Body>
<GetTicketQueues xmlns="https://vorexlogin.com/" />
</soap:Body>
</soap:Envelope>
Response
Status
Response
Success
GetTicketQueuesResult:
Array of TicketQueue:
o QueueId (int)
o QueueName (string)

Vorex SOAP API
266
outputMessage:
Empty String
Failure
GetTicketQueuesResult:
Returns Null
outputMessage:
"Failed to get Queues list."
Example Response
HTTP/1.1 200 OK
Content-Type: text/xml; charset=utf-8
Content-Length: length
<?xml version="1.0" encoding="utf-8"?>
<soap:Envelope xmlns:xsi="http://www.w3.org/2001/XMLSchema-instance"
xmlns:xsd="http://www.w3.org/2001/XMLSchema" xmlns:soap="http://schemas.xmlsoap.org/soap/envelope/">
<soap:Body>
<GetTicketQueuesResponse xmlns="https://vorexlogin.com/">
<GetTicketQueuesResult>
<TicketQueue>
<QueueId>int</QueueId>
<QueueName>string</QueueName>
</TicketQueue>
<TicketQueue>
<QueueId>int</QueueId>
<QueueName>string</QueueName>
</TicketQueue>
</GetTicketQueuesResult>
<outputMessage>string</outputMessage>
</GetTicketQueuesResponse>
</soap:Body>
</soap:Envelope>
Get Ticket Sources
Returns a TicketSource array of possible ticket sources defined in your Vorex account.
Request
URL
https://vorexlogin.com/GetTicketSources
Type
Params
Values
HEAD
WSUserCredentials
Object
PARAM
outputMessage
OUTPUT String
WSUserCredentials - A custom authentication SOAP header object consisting of:
UserName
Password
CompanyName
Example Request
POST /WS/OpenAPI.asmx HTTP/1.1
Host: vorexlogin.com
Content-Type: text/xml; charset=utf-8
Content-Length: length
SOAPAction: "https://vorexlogin.com/GetTicketSources"

Vorex SOAP API
267
<?xml version="1.0" encoding="utf-8"?>
<soap:Envelope xmlns:xsi="http://www.w3.org/2001/XMLSchema-instance"
xmlns:xsd="http://www.w3.org/2001/XMLSchema" xmlns:soap="http://schemas.xmlsoap.org/soap/envelope/">
<soap:Header>
<WSUserCredentials xmlns="https://vorexlogin.com/">
<UserName>string</UserName>
<Password>string</Password>
<CompanyName>string</CompanyName>
</WSUserCredentials>
</soap:Header>
<soap:Body>
<GetTicketSources xmlns="https://vorexlogin.com/" />
</soap:Body>
</soap:Envelope>
Response
Status
Response
Success
GetTicketSourcesResult:
Array of TicketSource:
o SourceId (int)
o SourceName (string)
outputMessage:
Empty String
Failure
GetTicketSourcesResult:
Returns Null
outputMessage:
"Failed to get ticket sources list."
Example Response
HTTP/1.1 200 OK
Content-Type: text/xml; charset=utf-8
Content-Length: length
<?xml version="1.0" encoding="utf-8"?>
<soap:Envelope xmlns:xsi="http://www.w3.org/2001/XMLSchema-instance"
xmlns:xsd="http://www.w3.org/2001/XMLSchema" xmlns:soap="http://schemas.xmlsoap.org/soap/envelope/">
<soap:Body>
<GetTicketSourcesResponse xmlns="https://vorexlogin.com/">
<GetTicketSourcesResult>
<TicketSource>
<SourceId>int</SourceId>
<SourceName>string</SourceName>
</TicketSource>
<TicketSource>
<SourceId>int</SourceId>
<SourceName>string</SourceName>
</TicketSource>
</GetTicketSourcesResult>
<outputMessage>string</outputMessage>
</GetTicketSourcesResponse>
</soap:Body>
</soap:Envelope>
Get Ticket Statuses
Returns a TicketStatus array of possible ticket statuses defined in your Vorex account.

Vorex SOAP API
268
Request
URL
https://vorexlogin.com/GetTicketStatuses
Type
Params
Values
HEAD
WSUserCredentials
Object
PARAM
outputMessage
OUTPUT String
WSUserCredentials - A custom authentication SOAP header object consisting of:
UserName
Password
CompanyName
Example Request
POST /WS/OpenAPI.asmx HTTP/1.1
Host: vorexlogin.com
Content-Type: text/xml; charset=utf-8
Content-Length: length
SOAPAction: "https://vorexlogin.com/GetTicketStatuses"
<?xml version="1.0" encoding="utf-8"?>
<soap:Envelope xmlns:xsi="http://www.w3.org/2001/XMLSchema-instance"
xmlns:xsd="http://www.w3.org/2001/XMLSchema" xmlns:soap="http://schemas.xmlsoap.org/soap/envelope/">
<soap:Header>
<WSUserCredentials xmlns="https://vorexlogin.com/">
<UserName>string</UserName>
<Password>string</Password>
<CompanyName>string</CompanyName>
</WSUserCredentials>
</soap:Header>
<soap:Body>
<GetTicketStatuses xmlns="https://vorexlogin.com/" />
</soap:Body>
</soap:Envelope>
Response
Status
Response
Success
GetTicketStatusesResult:
Array of TicketStatus:
o StatusId (int)
o StatusName (string)
StatusOrder (int)
outputMessage:
o Empty String
Failure
GetTicketStatusesResult:
o Returns Null
outputMessage:
o "Failed to get statuses list."
Example Response
HTTP/1.1 200 OK
Content-Type: text/xml; charset=utf-8
Content-Length: length

Vorex SOAP API
269
<?xml version="1.0" encoding="utf-8"?>
<soap:Envelope xmlns:xsi="http://www.w3.org/2001/XMLSchema-instance"
xmlns:xsd="http://www.w3.org/2001/XMLSchema" xmlns:soap="http://schemas.xmlsoap.org/soap/envelope/">
<soap:Body>
<GetTicketStatusesResponse xmlns="https://vorexlogin.com/">
<GetTicketStatusesResult>
<TicketStatus>
<StatusId>int</StatusId>
<StatusName>string</StatusName>
<StatusOrder>int</StatusOrder>
</TicketStatus>
<TicketStatus>
<StatusId>int</StatusId>
<StatusName>string</StatusName>
<StatusOrder>int</StatusOrder>
</TicketStatus>
</GetTicketStatusesResult>
<outputMessage>string</outputMessage>
</GetTicketStatusesResponse>
</soap:Body>
</soap:Envelope>
Get Ticket Types
Returns a TicketType array of possible ticket types defined in your Vorex account.
Request
URL
https://vorexlogin.com/GetTicketTypes
Type
Params
Values
HEAD
WSUserCredentials
Object
PARAM
outputMessage
OUTPUT String
WSUserCredentials - A custom authentication SOAP header object consisting of:
UserName
Password
CompanyName
Example Request
POST /WS/OpenAPI.asmx HTTP/1.1
Host: vorexlogin.com
Content-Type: text/xml; charset=utf-8
Content-Length: length
SOAPAction: "https://vorexlogin.com/GetTicketTypes"
<?xml version="1.0" encoding="utf-8"?>
<soap:Envelope xmlns:xsi="http://www.w3.org/2001/XMLSchema-instance"
xmlns:xsd="http://www.w3.org/2001/XMLSchema" xmlns:soap="http://schemas.xmlsoap.org/soap/envelope/">
<soap:Header>
<WSUserCredentials xmlns="https://vorexlogin.com/">
<UserName>string</UserName>
<Password>string</Password>
<CompanyName>string</CompanyName>
</WSUserCredentials>
</soap:Header>
<soap:Body>
<GetTicketTypes xmlns="https://vorexlogin.com/" />
</soap:Body>

Vorex SOAP API
270
</soap:Envelope>
Response
Status
Response
Success
GetTicketTypesResult:
Array of TicketType:
o TypeId (int)
o TypeName (string)
outputMessage:
Empty String
Failure
GetTicketTypesResult:
Returns Null
outputMessage:
"Failed to get ticket types list."
Example Response
HTTP/1.1 200 OK
Content-Type: text/xml; charset=utf-8
Content-Length: length
<?xml version="1.0" encoding="utf-8"?>
<soap:Envelope xmlns:xsi="http://www.w3.org/2001/XMLSchema-instance"
xmlns:xsd="http://www.w3.org/2001/XMLSchema" xmlns:soap="http://schemas.xmlsoap.org/soap/envelope/">
<soap:Body>
<GetTicketTypesResponse xmlns="https://vorexlogin.com/">
<GetTicketTypesResult>
<TicketType>
<TypeId>int</TypeId>
<TypeName>string</TypeName>
</TicketType>
<TicketType>
<TypeId>int</TypeId>
<TypeName>string</TypeName>
</TicketType>
</GetTicketTypesResult>
<outputMessage>string</outputMessage>
</GetTicketTypesResponse>
</soap:Body>
</soap:Envelope>
Get Tickets
Note:The Get Tickets SOAP API no longer returns ticket results. Going forward, please use the 'GET
All Tickets' and 'GET Ticket' REST APIs.
Returns an array of objects of type Ticket in your Vorex account. The list can be filtered by any text
value in the searchStr parameter. The result set can be retrieved in a paged manner by supplying a
startIndex and endIndex.
Request
URL
https://vorexlogin.com/GetTickets

Vorex SOAP API
271
Type
Params
Values
HEAD
WSUserCredentials
Object
PARAM
outputMessage
OUTPUT String
WSUserCredentials - A custom authentication SOAP header object consisting of:
UserName
Password
CompanyName
searchStr - Remains empty to retrieve all tickets. If a value is supplied the system tries to
match all text and date fields to get the matching tickets.
startIndex (required) - Allows you to retrieve tickets based on their row index. This will give the
ability to implement paging.
endIndex (required) - The following example retrieves the first 50 records matching "Ticket xyz".
searchStr - Ticket xyz
startIndex - 0
endIndex - 50
Example Request
POST /ws/OpenAPI.asmx HTTP/1.1
Host: staging.vorexlogin.com
Content-Type: text/xml; charset=utf-8
Content-Length: length
SOAPAction: "https://vorexlogin.com/GetTickets"
<?xml version="1.0" encoding="utf-8"?>
<soap:Envelope xmlns:xsi="http://www.w3.org/2001/XMLSchema-instance"
xmlns:xsd="http://www.w3.org/2001/XMLSchema" xmlns:soap="http://schemas.xmlsoap.org/soap/envelope/">
<soap:Header>
<WSUserCredentials xmlns="https://vorexlogin.com/">
<UserName>string</UserName>
<Password>string</Password>
<CompanyName>string</CompanyName>
</WSUserCredentials>
</soap:Header>
<soap:Body>
<GetTickets xmlns="https://vorexlogin.com/">
<searchStr>string</searchStr>
<startIndex>int</startIndex>
<endIndex>int</endIndex>
</GetTickets>
</soap:Body>
</soap:Envelope>
Response
Status
Response
Success
GetTicketsResult:
Array of Ticket:
o TicketId (int)
o TicketNumber (string)
o ClientId (int)
o ClientName (string)
o ClientSiteId (int)
o ClientSiteName (string)
o ClientContactId (int)

Vorex SOAP API
272
o ClientContactName (string)
o TicketTitle (string)
o TicketDetails (string)
o TicketTypeId (int)
o TicketType (string)
o TicketStatusId (int)
o TicketStatus (string)
o TicketPriorityId (int)
o TicketPriority (string)
o TicketQueueId (int)
o TicketQueue (string)
o TicketPrimaryAssigneeId (int)
o TicketPrimaryAssignee (string)
o TicketSourceId (int)
o TicketSource (string)
o TicketOpenDate (DateTime)
o TicketDueDate (DateTime)
o TicketCompletedDate (DateTime)
o TicketWorkType (string)
o TicketContractName (string)
o TicketLastUpdate (DateTime)
o TicketSLAName (string)
outputMessage:
Empty String
Failure
GetTicketsResult:
Returns Null
outputMessage:
"Failed to get tickets list."
Example Response
HTTP/1.1 200 OK
Content-Type: text/xml; charset=utf-8
Content-Length: length
<?xml version="1.0" encoding="utf-8"?>
<soap:Envelope xmlns:xsi="http://www.w3.org/2001/XMLSchema-instance"
xmlns:xsd="http://www.w3.org/2001/XMLSchema" xmlns:soap="http://schemas.xmlsoap.org/soap/envelope/">
<soap:Body>
<GetTicketsResult>
<Ticket>
<TicketId>int</TicketId>
<TicketNumber>string</TicketNumber>
<ClientId>int</ClientId>
<ClientName>string</ClientName>
<ClientSiteId>int</ClientSiteId>
<ClientSiteName>string</ClientSiteName>
<ClientContactId>int</ClientContactId>
<ClientContactName>string</ClientContactName>
<TicketTitle>string</TicketTitle>
<TicketDetails>string</TicketDetails>
<TicketTypeId>int</TicketTypeId>
<TicketType>string</TicketType>
<TicketStatusId>int</TicketStatusId>
<TicketStatus>string</TicketStatus>
<TicketPriorityId>int</TicketPriorityId>
<TicketPriority>string</TicketPriority>
<TicketQueueId>int</TicketQueueId>
<TicketQueue>string</TicketQueue>
<TicketPrimaryAssigneeId>int</TicketPrimaryAssigneeId>
<TicketPrimaryAssignee>string</TicketPrimaryAssignee>
<TicketSourceId>int</TicketSourceId>

Vorex SOAP API
273
<TicketSource>string</TicketSource>
<TicketOpenDate>dateTime</TicketOpenDate>
<TicketDueDate>dateTime</TicketDueDate>
<TicketCompletedDate>dateTime</TicketCompletedDate>
<TicketWorkType>string</TicketWorkType>
<TicketContractName>string</TicketContractName>
<TicketLastUpdate>dateTime</TicketLastUpdate>
<TicketSLAName>string</TicketSLAName>
</Ticket>
</GetTicketsResult>
<outputMessage>string</outputMessage>
</GetTicketsResponse>
</soap:Body>
</soap:Envelope>
Get Time Sheets
Returns an api_GetTimeSheetsResult array of time entries and related information based on a date
range, projects, clients and or usernames of employees.
Request
URL
https://vorexlogin.com/GetTimeSheets
Type
Params
Values
HEAD
WSUserCredentials
Object
PARAM
dateFrom
dateTime
PARAM
dateTo
dateTime
PARAM
clientNames
string
PARAM
userNames
string
PARAM
projectNames
string
PARAM
outputMessage
OUTPUT String
WSUserCredentials - A custom authentication SOAP header object consisting of:
UserName
Password
CompanyName
clientNames - Specify the clients(s) value(s) by which to filter time logs based on. For multiple
clients you have to separate by Comma (,). If Null or Empty ("") this will be ignored.
dateFrom - Specify the earliest time entry date. If Null this will be ignored.
dateTo - Specify the latest time entry date. If Null this will be ignored.
userNames - Specify the employee username(s) value(s) by which to filter time logs based on. For
multiple usernames you have to separate by Comma (,). If Null or Empty ("") this will be ignored.
projectNames - Specify the project(s) value(s) by which to filter time logs based on. For multiple
usernames you have to separate by Comma (,). If Null or Empty ("") this will be ignored.
Example Request
POST /WS/OpenAPI.asmx HTTP/1.1
Host: vorexlogin.com
Content-Type: text/xml; charset=utf-8
Content-Length: length
SOAPAction: "https://vorexlogin.com/GetTimeSheets"

Vorex SOAP API
274
<?xml version="1.0" encoding="utf-8"?>
<soap:Envelope xmlns:xsi="http://www.w3.org/2001/XMLSchema-instance"
xmlns:xsd="http://www.w3.org/2001/XMLSchema" xmlns:soap="http://schemas.xmlsoap.org/soap/envelope/">
<soap:Header>
<WSUserCredentials xmlns="https://vorexlogin.com/">
<UserName>string</UserName>
<Password>string</Password>
<CompanyName>string</CompanyName>
</WSUserCredentials>
</soap:Header>
<soap:Body>
<GetTimeSheets xmlns="https://vorexlogin.com/">
<dateFrom>dateTime</dateFrom>
<dateTo>dateTime</dateTo>
<clientNames>string</clientNames>
<userNames>string</userNames>
<projectNames>string</projectNames>
</GetTimeSheets>
</soap:Body>
</soap:Envelope>
Response
Status
Response
Success
GetTimeSheetsResult:
Array of api_GetTimeSheetsResult:
o pkTimeEntryId (int)
o TimesheetId (int)
o UserName(string)
o Client (string)
o Source(string)
o Title (string)
o StartDate(dateTime)
o TimeSpent (decimal)
o Billable (int)
o RoleName (string)
o RoleRate (decimal)
o WorkTypName (string)
o Notes (string)
o Billed (boolean)
o IsPosted (boolean)
outputMessage:
Empty String
Failure
GetTimeSheetsResult:
Returns Null
outputMessage:
"An Error has Occurred while processing the request."
Example Response
HTTP/1.1 200 OK
Content-Type: text/xml; charset=utf-8
Content-Length: length
<?xml version="1.0" encoding="utf-8"?>
<soap:Envelope xmlns:xsi="http://www.w3.org/2001/XMLSchema-instance"
xmlns:xsd="http://www.w3.org/2001/XMLSchema" xmlns:soap="http://schemas.xmlsoap.org/soap/envelope/">
<soap:Body>
<GetTimeSheetsResponse xmlns="https://vorexlogin.com/">
<GetTimeSheetsResult>

Vorex REST API
275
<api_GetTimeSheetsResult>
<pkTimeEntryId>int</pkTimeEntryId>
<TimesheetId>int</TimesheetId>
<UserName>string</UserName>
<Client>string</Client>
<Source>string</Source>
<title>string</title>
<StartDate>dateTime</StartDate>
<TimeSpent>decimal</TimeSpent>
<Billable>int</Billable>
<RoleName>string</RoleName>
<RoleRate>decimal</RoleRate>
<WorkTypName>string</WorkTypName>
<Notes>string</Notes>
<Billed>boolean</Billed>
<IsPosted>boolean</IsPosted>
</api_GetTimeSheetsResult>
</GetTimeSheetsResult>
<outputMessage>string</outputMessage>
</GetTimeSheetsResponse>
</soap:Body>
</soap:Envelope>
Vorex REST API
Click https://vorexlogin.com/api (https://vorexlogin.com/api) to access the Vorex REST API
documentation.
Reports
The Reports module provides two kinds of reports:
Predefined Reports - You can run predefined reports immediately for each module.
Ad Hoc Reports - Customize your own reports.
Express View - Explore data and get quick answers using drag & drop in a highly-interactive
designer.
Express Report - Quickly create tabular reports with essential operations like sorting, filtering
and calculations. Easily format and summarize data.
Standard Report - Create advanced reports containing charts, maps, gauges, and images.
Add group sections to provide more flexibility in how data is displayed.
Crosstab Report - Create reports that pivot data. The number of columns and rows in the
crosstab expands based on the data itself.
Dashboard - Create an interactive canvas containing reports, visualizations, images, charts,
maps, gauges, text and web pages.
Chained Report - Combine multiple related or disparate reports into a single export.
Note: Navigate to the Reports > Ad-Hoc Reports page and click the icon in the upper right hand
corner for instructions on how to create Ad Hoc Reports.

Index
277
Index
A
About the Guide • 9
Account Code • 48
Account Type • 48
Accounts • 38, 144
Activating VSA Integration v2 • 77
Activities • 152, 158
Adding Charges to Projects • 199
Adding Charges to Tickets • 182
Adding Expenses to Projects • 197
Adding Expenses to Tickets • 181
Adding Members to Tasks • 203
Adding Notes to Tasks • 207
Adding Notes to Tickets • 178
Adding Related Opportunities to Projects • 197
Adding Related Tickets • 184
Adding Service Calls to Tasks • 206
Adding Service Calls to Tickets • 183
Adding Task Basics • 202
Adding Task Dependencies • 207
Adding Time to Tasks • 204
Adding Time to Tickets • 179
Adding To-Dos to Tickets • 183
Adding/Viewing Project Financials • 196
Adjust Expenses • 235
Adjust Timesheets • 235
Admin • 15
Administrative Work • 29
All Tasks • 209
Approval Routes • 31
Archived Projects • 210
Assets Synchronization • 66
Assets Synchronization v2 • 75
Assigned Resources • 150
Associated Clients • 99
Associated Queues • 100
Attachments (for Accounts) • 155
Attachments (for Employees) • 102
Authenticate • 244
B
Batch Actions for Tickets • 184
Billing • 129
Billing Automation • 118
Billing Configuration • 50
Billing Review • 122
Business Process • 30
C
Caveats • 14
Charge Type • 49
Class List • 52
Client Portal • 237
Client Portal Dashboard • 237
Collaborations • 232
Company News • 27
Company Settings • 19
Contact Information • 97
Contacts • 148, 155
Contract • 24
Contracts • 108
Contracts (in Client Portal) • 240
Copy Projects • 200
Create Ticket • 244
Create Ticket Note • 247
Creating a New Project • 195
Creating/Editing Tickets • 175
CRM • 24
CRM (in Admin) • 38
CRM Account Types • 39
CRM Module • 143
Custom Fields • 25
Custom Fields (for Accounts) • 155
Custom Fields (for Employees) • 101
Custom Fields, Attachments for Projects • 207
Custom Fields, Attachments for Tickets • 184
D
Dashboard • 93, 143
Dashboard (Finance) • 107
Dashboard (Home) • 15, 223
Deliver Product Charges • 220
Departments • 93
Discount Type • 49
Dispatch Calendar • 234
Downloads • 235
E
Edit Access by URL • 14
Education • 103
Email Domains • 151
Email Logs • 90
Email Parser • 58
Email Templates • 30
Employee Roles • 101
Employees • 95
Enabling Client Portal Access • 237
Exchange Rates • 51
Expense Type • 46
Expenses • 124
Export Accounts And Contacts • 248
F
Finance • 107
Finance (in Admin) • 42
Fixed Price • 113
Fixed Price Milestone • 126
G
General • 20
Generate and Preview • 134
Get Accounts Locations • 250
Get Client Accounts • 252
Get Employees List • 253
Get Expense Sheets • 256
Index
278
Get Projects • 258
Get Tasks • 260
Get Ticket Note Types • 262
Get Ticket Priorities • 263
Get Ticket Queues • 265
Get Ticket Sources • 266
Get Ticket Statuses • 267
Get Ticket Types • 269
Get Tickets • 270
Get Time Sheets • 273
Getting Started • 9
H
Hardware Assets • 186
Holidays • 28
Home • 223
How to Login • 11
How to Navigate the Software • 12
HR (in Admin) • 38
Human Resources • 93
I
Import Data • 91
Integrating Customer Accounts and Locations • 65
Integrating Live Connect v2 • 76
Integrating Servers • 63
Integrating Servers v2 • 72
Integrating Ticket Settings • 64
Internal Survey Scores • 60
Introduction • 243
Inventory • 25, 213
Inventory (in Admin) • 89
Inventory Dashboard • 213
Invoice • 23
Invoice Attachments • 134
Invoice Details • 132
Invoice Discounts • 133
Invoice Receipts • 134
Invoices • 130
Invoices (in Client Portal) • 240
Issue Types • 52
J
Job Titles • 94
K
Knowledgebase • 188
L
Labor Hours • 123
Linked Accounts • 153
Lists • 26
Location Hours • 19
Locations • 17, 147
M
Manage Products • 214
Milestone Type • 47
Moving Users • 18
Multiple Projects Gantt • 210
My Approvals • 231
My Calendar • 227
My Company • 17
My Expense Reports • 229
My Grouped Tasks • 226
My Messages (in Client Profile) • 239
My Profile • 13
My Profile (in Client Profile) • 238
My Projects • 229
My Queues • 225
My Service Calls • 226
My Tasks • 225
My Templates • 231
My Tickets • 174, 225
My Tickets (in Client Portal) • 238
My Timesheet • 232
N
Notes • 154
O
Opportunities • 151, 159
Opportunity Statuses • 38
Organizational Chart • 104
Outbound Email • 25
Outlook Extension • 227
P
Payments • 137
Priorities • 54
Processing Product Quotations • 167
Processing Purchase Orders • 218
Processing Sales Orders • 170
Processing Service Quotations • 165
Processing Tickets • 177
Product Availability • 216
Product Categories • 90
Product Quotations • 164
Project • 21
Projects • 193, 194
Projects Dashboard • 193
Purchase Orders • 217
Q
Queues • 54
QuickBooks Integration • 141
Quotations • 161
R
Receipts, Custom Fields, Attachments for Projects •
200
Receiving Purchase Orders • 219
Recurring Master Tickets • 189
Recurring Services • 110, 125
Reimbursements • 139
Reports • 275
Resetting a Posted Invoice • 136
Resource Utilization • 209
Retainer Amount • 127
Index
279
Retainer By Amount • 115
Retainer By Hours • 117
Retainer Hours • 128
Review Ticket Integration v2 • 78
RMM Integration • 155
RMM Integration Settings - Continuum • 85
RMM Integration Settings - Kaseya v1 • 63
RMM Integration Settings - Kaseya v2 - New • 72
RMM Integration Settings - Kaseya v2 - Upgrade • 80
Roles • 39, 43
S
Sales Orders • 168
Sales Tax Items • 50
Scheduling Projects and Tasks • 203
Scopes • 42
Security • 39
Security Roles • 102
Sending an Invoice • 136
Service Calls • 191
Service Desk • 22, 173
Service Desk (in Admin) • 52
Service Desk Dashboard • 173
Service Quotations • 162
Service Types • 39
Services • 45
Shifts • 99
Single Sign On • 30
Sites • 171
Skill Categories • 94
Skills • 103
SLAs • 55
Software Assets • 187
Step 1 - Recommended Settings • 85
Step 2 - RMM Integration Settings • 85
Step 3 - Ticket Status Mapping • 87
Step 4 - Account Mapping • 87
Step 5 - PSA Integration and Activation • 88
Stock Adjustments • 221
Survey Integration Settings • 59
Synchronizing Accounts v2 • 74
System Requirements • 10
T
Tasks • 201
Tax Settings • 151
Template Projects • 210
Testing Ticket Integration • 69
Ticket Statuses • 57
Ticket Types • 53
Tickets • 174
Tickets (in Client Portal) • 239
Time and Materials • 109
Time Sheet • 20
U
Unknown Tickets • 185
Updating Tasks by Batch • 208
User Account • 25
Using the Tasks Tab • 201
V
Vendor Bills • 138
Views • 224
Voiding an Invoice • 137
Vorex REST API • 275
Vorex SOAP API • 243
W
Wages • 98
Warehouses • 89
Work Type • 44
Workflow • 33
