
PUBLIC
2024-08-14
Set Up Guide for SAP Service Cloud Version2
© 2024 SAP SE or an SAP aliate company. All rights reserved.
THE BEST RUN
Content
1 Set Up Guide for SAP Service Cloud Version2...................................... 7
2 Org Structure...............................................................8
2.1 Create Your Org Structure.......................................................8
2.2 Create an Org Unit............................................................9
2.3 Add Employees and Managers to Org Units..........................................12
3 Employees................................................................ 13
3.1 Create Employees............................................................13
3.2 Edit Employees..............................................................13
3.3 Manage Attachments......................................................... 14
3.4 Working Hours..............................................................15
4 Users and Control...........................................................17
4.1 Users.....................................................................17
Business User Details.......................................................18
Create Business Users and Assign a Business Role..................................19
4.2 Business Roles..............................................................20
Business Role Details.......................................................20
Create Business Roles and Assign a Business User..................................21
List of Business Services.................................................... 24
4.3 Security Policies.............................................................27
Security Policy Features.....................................................28
Create Security Policies.....................................................28
Edit Security Policy........................................................ 29
4.4 Identity Provider Conguration.................................................. 30
Congure Identity Provider...................................................30
4.5 Settings...................................................................32
5 Data Import and Export...................................................... 33
5.1 Create Data Using Import......................................................34
Download Template........................................................35
Prepare Data.............................................................35
Create Data..............................................................37
5.2 Update Data Using Import......................................................38
Update Data.............................................................39
5.3 Export Data................................................................39
5.4 ID Mapping................................................................ 40
2
PUBLIC
Set Up Guide for SAP Service Cloud Version2
Content
5.5 Entity-Specic Information..................................................... 41
Account................................................................43
Account Hierarchy.........................................................51
Case Overview and Structure.................................................53
Contact Person...........................................................58
Employee...............................................................62
Organizational Unit........................................................66
Individual Customer........................................................73
Product.................................................................81
Product Group............................................................85
Service Categories Overview and Structure.......................................87
Service Catalogs..........................................................89
Registered Products....................................................... 92
Installed Base............................................................96
Functional Location........................................................99
Product Installation Point...................................................104
Warranty...............................................................107
Users.................................................................109
6 Congure Agent Desktop.....................................................111
7 Congure Timeline......................................................... 119
8 Congure Knowledge Base Provider............................................120
9 Integrate External SAP Systems into Agent Desktop with Mashups.................... 122
9.1 Congure SAP Event Mesh .................................................... 123
9.2 Congure SAP S/4HANA Cloud................................................. 125
9.3 Congure SAP S/4HANA......................................................126
9.4 Congure SAP Cloud Integration.................................................127
9.5 Congure SAP Service Cloud...................................................130
9.6 Congure Service Agent Desktop................................................ 131
9.7 Congure Mashup: Create Scenario...............................................131
9.8 Congure Mashup: Display Scenario..............................................133
9.9 Adapt Agent Desktop for Mashup................................................134
Service Order............................................................135
Service Quotation.........................................................137
10 Congure Cases...........................................................140
11 Congure Registered Products................................................152
12 Create Installation Points....................................................153
13 Congure Installed Bases....................................................154
Set Up Guide for SAP Service Cloud Version2
Content
PUBLIC 3
14 Output Management........................................................155
14.1 Main Templates ............................................................155
14.2 Form Templates.............................................................157
Create Form Template Rule..................................................161
15 Adaptation...............................................................162
15.1 Customize Your Solution...................................................... 162
15.2 Manage Fields..............................................................162
15.3 Create and Organize Filters.................................................... 163
15.4 Add Extension Fields.........................................................165
15.5 Add and Manage Sections.....................................................166
15.6 Create Custom Buttons.......................................................167
15.7 Create and Manage Custom Tabs................................................168
Add Mashups to Custom Sections and Tabs......................................168
16 Extensibility..............................................................170
16.1 Create Extension Fields.......................................................170
Extension Field Data Types...................................................171
Field Attributes...........................................................173
Delete Extension Fields.....................................................175
16.2 Create Validations...........................................................176
16.3 Create Determinations........................................................177
16.4 Functions in Custom Logic.....................................................180
16.5 Create External Hooks........................................................181
External Hook Request and Response Structure...................................184
16.6 Disable Custom Logic........................................................ 189
16.7 Create Page Layouts.........................................................190
16.8 Create and Assign Rules to Page Layouts...........................................191
16.9 Create Code List Restrictions...................................................192
16.10 Language Adaptation........................................................ 194
16.11 Extensibility Using SAP Build Apps...............................................195
16.12 Congure Inbound Authentication............................................... 196
17 Autoow.................................................................199
17.1 Congure Autoows.........................................................199
Congure Conditions......................................................199
Congure Actions........................................................ 201
17.2 Monitor Autoow Logs....................................................... 205
18 Approval.................................................................207
18.1 Congure Approvals.........................................................208
19 Mashups.................................................................211
4
PUBLIC
Set Up Guide for SAP Service Cloud Version2
Content
19.1 Create HTML Mashups....................................................... 212
19.2 Copy Existing Mashups.......................................................213
19.3 Delete or Deactivate Mashups.................................................. 213
19.4 Add Mashups as Tabs........................................................ 214
20 Library.................................................................. 215
20.1 Congure Library........................................................... 215
20.2 Organize Files and Folders..................................................... 217
20.3 Manage Access to Files and Folders..............................................222
20.4 Share Links to Files and Folders.................................................223
21 Microsoft Teams Integration..................................................225
21.1 Congure Microsoft Teams Integration............................................225
21.2 Use Microsoft Teams Integration................................................ 227
Permissions............................................................ 227
Create Appointments......................................................229
Share Workspaces........................................................230
Make Outbound Calls......................................................232
21.3 Microsoft Teams Integration FAQ................................................232
22 Intelligent Services.........................................................233
22.1 Case Categorization .........................................................233
22.2 Similar Case Recommendation................................................. 237
22.3 NLP Classication...........................................................239
22.4 Machine Translation.........................................................240
22.5 Case Summarization.........................................................244
22.6 Case Topic Analyzer.........................................................246
22.7 Case Type Determination..................................................... 248
22.8 Profanity Check............................................................250
22.9 Intelligent Services FAQ.......................................................251
23 Generative AI.............................................................252
23.1 Case Summary.............................................................252
23.2 Email Draft Recommender.....................................................254
23.3 Account Synopsis...........................................................255
23.4 Control Enablement of Generative AI features.......................................255
23.5 Remove Personally Identiable Information.........................................257
24 Minimum System and Software Requirements ....................................259
24.1 Web Applications...........................................................259
Minimum Hardware Requirements............................................ 259
Minimum Network Requirements.............................................260
Display Resolution........................................................260
Set Up Guide for SAP Service Cloud Version2
Content
PUBLIC 5
Additional Software.......................................................260
Browser Settings.........................................................260
Browser Versions.........................................................261
Domain Settings......................................................... 261
Desktops and Laptops.....................................................262
24.2 Language Settings..........................................................262
24.3 Integration and Add-Ins.......................................................263
25 Help and Support..........................................................264
6 PUBLIC
Set Up Guide for SAP Service Cloud Version2
Content
1 Set Up Guide for SAP Service Cloud
Version2
This guide provides a step-by-step checklist for implementers to congure a new solution tenant for SAP
Service Cloud Version2 customers.
Activate the tenant by following the steps in the Onboarding Guide, then use the procedures in this guide to
congure settings for your organization. Congure organizational structures, user accounts and roles to dene
access control, as well as on-screen branding and templates. The conguration procedures here are duplicated
from the Solution Guide, which includes more high-level context as well as detailed usage information for each
feature. This guide is intended only as a streamlined list of setup procedures for system implementers.
The conguration procedures are initially collapsed under their headings. Select the triangle at the left of the
heading to expand the list of steps.
Related Information
SAP Service Cloud Version2 Onboarding Guide
SAP Service Cloud Version2 Solution Guide
Set Up Guide for SAP Service Cloud Version2
Set Up Guide for SAP Service Cloud Version2
PUBLIC 7

2 Org Structure
An organization structure is a set of organizational units, and their hierarchical relationships, that together form
the company.
As an administrator, learn to set up your organizational structure including business organizations and sub-
units. The organizational structure establishes reporting lines and allows automatic work distribution.
2.1 Create Your Org Structure
Setting up an organizational structure enables automated routing of work. The organizational structure is
composed of units and provides a unied representation of your company’s organizational data.
To create your org structure, you must rst plan your org structure. Use your existing organizational
structure plan as a basis for creating the org structure in the system. When you start creating the
structure, we recommend that you build from the top down; that is, start with companies and then add
the sales organizations or departments, including your sales teams. Obtain all data relevant to organizational
management, including managerial and functional data.
Tip
When editing your org structure, always enter the valid-from date for your changes.
2.1.1Recommendations
Under Settings Company Org Structures , you establish your organizational structure as a prerequisite
to going live. This is also where you maintain and update your organizational structure. As you set up your org
structure, we recommend that you observe the following principles:
• The uppermost node of your org structure should be an org unit dened with the Company function.
Tip
You must create and then edit the org unit details to select the Company function.
• The node that you create directly below the Company node should be either a Sales Organization or a
Service Organization. If your company uses both the sales and service functions of the solution, then your
org structure will have both types of nodes below the company.
Tip
It’s possible to setup multiple sales/service organizations in parallel organizational structures but it
isn’t possible to stack sales/service organizations. Because a sales organization is required to process
8
PUBLIC
Set Up Guide for SAP Service Cloud Version2
Org Structure

all corresponding sales documents (for example, leads, opportunities), and a service organization is
required to process service requests. We recommend that you dene only one sales organization and
one service organization per org structure.
• The nodes that you create below the Sales Organization node can be for example, Sales Units, and the
nodes that you create below the Service Organization node can be for example, be Service Units. It’s
also possible to create an organization, in which all units underneath a sales/service organization are not
agged as a sales/service unit.
However, it is not recommended to interrupt the setup of the sales or service function along the
organizational hierarchy as application logic may not consider functional units underneath a node that
is not agged as service or sales unit.
Tip
Within the org structure, multiple levels of sales or service units may be dened. Service units
represent the service organization and teams that process service requests. Sales units represent
the sales departments or oces where sales documents are initiated. Nodes for Sales Units or Service
Units can be dened below the Sales Organization, or Service Organization node, or below the nodes of
other sales or service units.
• When editing your org structure, always enter the valid-from date for your changes. There’s no need to
explicitly activate the organizational units. They are activated based on their validity period.
Caution
During maintenance of the org structure, always set the validity of org units within the validity period of
the parent org unit.
2.2 Create an Org Unit
Learn how to create an Org Unit.
1. Navigate to User Menu Settings All Settings Company Org Structure .
2. Create a new org unit by selecting Create ().
3. Enter the Valid From date (today's date, or a future date, xed date) and the Valid To date.
You can edit the Valid From and Valid To elds in the detailed view of the org unit.
4. Enter the Address details for the unit.
You can edit the Address eld in the detailed view of the org unit under the General tab.
5. Select the appropriate functions for the unit.
Set Up Guide for SAP Service Cloud Version2
Org Structure
PUBLIC 9

Function Description
Sales The Sales function indicates that the org unit is responsi-
ble for the processing of documents, such as opportuni-
ties or sales quotes.
In sales reporting, sales data is aggregated at the sales
unit level. The sales organization is a specic type of
sales unit, which is used to head complete areas or coun-
tries/regions.
Relevance
Select this function if employees assigned to this org unit
will perform tasks in the areas described above or if sales
data is to be aggregated at the level of this org unit.
Sales Organization
The Sales Organization function indicates that the org unit
represents the top level of a sales hierarchy.
Note
Example
For your domestic sales, you create a sales hierarchy
and dene the top-level org unit as a sales organiza-
tion. Then below that org unit, you add additional
units, dened as sales units, that represent regional
sales groups and sales departments.
The sales organization is also used for dening sales
data in master data.
• Sales data in the product and account master can be
dened in relation to the sales organization in combi-
nation with the distribution channel and division.
• Internal price lists can be dened based on the sales
organization and distribution channels.
• The combination of the sales organization, distribu-
tion channel, and division is also included in sales
documents, such as sales orders or service orders.
Relevance
Select this function if the org unit represents the top unit
of a sales hierarchy. All sales-relevant master data and
pricing must include a sales organization.
10
PUBLIC
Set Up Guide for SAP Service Cloud Version2
Org Structure

Function Description
Service The Service function indicates that the org unit is respon-
sible for the managing, monitoring, and execution of serv-
ices, such as the handling of product inquiries, providing
recommendations, and pre- and post- sales support. Cus-
tomer service can be provided by a service desk or by eld
or in-house service teams.
Relevance
Select this function if employees assigned to this org unit
will perform tasks in the areas described above.
Service Organization
The Service Organization function indicates that the org
unit represents the overall organization responsible for
customer service. Below the service organization, you can
dene individual service units to represent the various
service and support teams and departments within the
service organization.
Tip
If the services provided are sold to your customers,
you will also need to dene a sales organization.
Relevance
Select this function if the org unit represents a xed entity
for service reporting that can be referenced by all service
documents.
Company
In the context of organizational management, a Company
represents an org unit that is nancially and legally inde-
pendent, that is not tied to a geographical location, and
could be registered under business law.
Each org structure must contain at least one org unit that
is dened as a company. Saving the org unit as a com-
pany automatically creates an associated business part-
ner which is used in the context of seller party or output
form determinations.
You set the default currency for the organization within the
company org unit.
6. Save your entries.
7. To select the Company function for the org unit, open the unit details and make your selection in the
header section.
Set Up Guide for SAP Service Cloud Version2
Org Structure
PUBLIC 11

2.3 Add Employees and Managers to Org Units
As an administrator, you can identify an employee as a manager by dening that employee as the manager
of an org unit. The manager of an org unit enjoys unique access privileges and can access the data of their
subordinates.
Note
Employees and managers need the Primary Indicator. An employee can be marked as main by using the
primary indicator for only one org unit. An employee who is marked as main in an org unit may only be
added as a secondary employee in another org unit.
Prerequisties:
• The employees you want to assign to the org unit have been created in the system.
• Alternatively, you can assign employees to org units when you create the employee data in the system.
Procedure
1. From the Org Structure screen, select the relevant org unit from the list.
2. On the Employees tab, click Add () to assign employees on the Employees view or a manager on the
Managers view to the org unit.
3. Select the employee or manager you want to assign to the org unit and select the icon ().
4. Save your entries.
12
PUBLIC
Set Up Guide for SAP Service Cloud Version2
Org Structure

3 Employees
Learn how to create employees in your system.
Note
All accounts, individual customers, employees, contacts, are considered as business partners in the
system. Therefore, all functions that are common to business partners are applicable to them.
Additionally, detailed information on External IDs is displayed under the Mapping for Integration section,
and you can view all changes made to employees under the Change History () section.
3.1 Create Employees
You can create employee records manually or upload employee data via migration tool in the implementation
project activity.
Procedure
1. Navigate to your User Menuand select Settings All Settings Company Employees .
2. In the worklist of the employees view, choose Create ().
3. Enter as much personal, organizational, and contact information as you require.
4. Choose Save.
3.2 Edit Employees
Edit an employee record.
Procedure
1. In the worklist of the employees view, click the employee record.
2. In the quick view, click open details.
3. If you want to delimit the validity of an employee record, enter the appropriate date in the Valid To eld.
From this date onward, this employee record cannot be used for new business processes.
Set Up Guide for SAP Service Cloud Version2
Employees
PUBLIC 13

4. System automatically saves the changes you made.
3.3 Manage Attachments
As an administrator, you can upload, view, delete, and download attachments.
3.3.1Upload Attachments From Your Computer
Here is a step-by-step guide on how to import attachments from a front-end system, such as a computer, into
the system.
Procedure
1. Navigate to User Menu and select
Settings All Settings Company Employees .
2. In the quick view, click Open in Detailed View ( ).
3. From the Attachment () tab, select Drop or Browse Files.
4. Select the le from your computer you want to upload and click Open.
5. From the dropdown, select the Attachment Type.
6. Click Upload.
Note
You can upload multiple les at the same time.
To download attachments, select an attachments and click Download ().
Select an attachment and click Delete () to delete an attachment.
3.3.2Add Attachments From SAP System
Find out how to add attachments from your SAP system.
Procedure
1. Navigate to User Menu and select Settings All Settings Company Employees .
14
PUBLIC
Set Up Guide for SAP Service Cloud Version2
Employees

2. In the quick view, click Open in Detailed View ( ).
3. From the Attachment () tab, select the Add button.
4. Choose Add From Library.
Note
To add a link, select Add Link () and provide the link in the link eld. Click Save. You also can provide a
title for this link.
5. Choose the documents you want to add and click Add.
3.3.3Download or Delete Attachments
Here you can learn how to download and delete attachments.
To download attachments, select an attachments and click Download ().
Note
Links cannot be downloaded.
Select an attachment and click Delete () to delete an attachment.
3.4 Working Hours
An employee's scheduled working hours.
3.4.1Add Working Day Calendar
The working days of an organizational unit within a particular company or region.
Context
Find out how you can assign the working days of an organization to an employee.
Set Up Guide for SAP Service Cloud Version2
Employees
PUBLIC 15

Procedure
1. Navigate to User Menu and select Settings All Settings Company Employees .
2. Select an employee and in the quick view, click Open in Detailed View ( ).
3. Select the Working Hours () tab.
4. Under the Working Day Calendar section, ll the Time Zone and Working Day Calendar elds from the
dropdowns.
5. System automatically saves this information.
3.4.2Add Working Hours
The amount of time an employee is scheduled to spend working.
Procedure
1. Navigate to User Menu and select
Settings All Settings Company Employees .
2. Select an employee and in the quick view, click Open in Detailed View (
).
3. Select the Working Hours () tab.
4. In the Working Hours section, select Create ().
5. Select the Days and set the Time ().
6. Click the icon .
7. Employees' working hours are saved.
16
PUBLIC
Set Up Guide for SAP Service Cloud Version2
Employees
4 Users and Control
Users and control allow you, as an administrator, to manage employees, users, business roles, and security
policies in the system.
• Employees: A group of people who contribute to creating goods or services in a company, based on a work
contract or a contract for services. Unlike externals, internal employees are bound by instructions and
obliged to adhere to the company's policies and regulations.
• Users: Refer to employees, business users, and other users such as partner contacts. Users are assigned
to business roles and technically, access controls in your system are implemented on the business roles.
• Business Roles: Represents a set of authorizations to access your solution within your organization and
system landscape. In the system, a business role denes a hierarchy of access controls that you can assign
to application users in your organization. You can use roles to assign access to a large number of users at
a time. As roles change, you need to update only the access rights within a role and the rights apply for all
assigned users.
• Security Policies: A set of rules that denes password complexity, such as including numerical digits and
password validity, like requiring a password change after a certain period of time.
4.1 Users
Users are created for employees to access the system.
The dierent types of users in the system include:
• Business User: Users who have at least one business role assigned to them that governs the access to the
system. These users can access the user interface of the application.
• Technical User: The dierent types of technical users include:
• Communication User – Users created and used for integration purposes only. A communication user
is used only for accessing a specic communication scenario for which they have been created. They
have API access, but no access to UI is provided.
• Support Users – Users used by support teams to log on to customer tenants.
• Initial Users – Users created initially when a tenant is provisioned, and are later locked.
• Active Users: It is a metric, and is dened as the number of unique users who are logging in a 30-day
period.
• Licensed Users: It is a metric, and is dened as the total number of valid Business Users in the system.
Business User List View
You can view all the business users in your system in a list format.
The following header elds are available on this page:
Set Up Guide for SAP Service Cloud Version2
Users and Control
PUBLIC 17

• User Name: the user name of your business user.
• Full Name: the full name of your business user.
• Created On: the date on which your business user was created.
• Valid Until: the date until which your business user is valid in the system.
4.1.1Business User Details
View more details of a business user on this page.
The Details tab provides the following information of a business user.
• Employee Data: Shows the basic employee information such as Employee Name, Employee ID, Company,
Email ID, and so on.
• User Details: Displays the following user information.
• User Name: A unique name to identify a business user. Only an administrator has the privileges to edit
it.
• Global User ID: A unique identier for a user for content records.
• Created On: The date on which the business user was created in the system.
• Valid Until: The date until which the user is active in the system. An administrator can edit this date.
• Password Locked: A switch that indicates if the password is locked or not. The following are the
features of the Password Locked switch.
• The switch is auto-enabled after too many failed login attempts.
• If the switch is enabled, an employee can't log on to the system from the login screen but can only
log in using a certicate.
• An administrator can disable this switch to unlock the password, however, an administrator can't
lock the password.
• Security Policy: Displays the security policy assigned to the user. An administrator can change the assigned
security policy.
• Reset Password: Provides an option to reset the current password of the user. As an administrator, you can
reset a user's password by clicking the Reset Password button, which triggers a password reset email to
your user. The user can then reset the password using the Password Reset link in the email.
Note
• The Password Reset link is valid for 60 minutes and is for single password reset only.
• You can view user created and password reset email details in Outbound Monitoring setting.
• Manage Certicates: Enables an administrator to add or remove certicates for a user to enable certicate-
based login for a user.
To add a new certicate for a user:
1. Choose Manage Certicates.
2. Upload a certicate for a user using the Drop or Browse Files option. Once the certicate is uploaded, it
enables an user with seamless login to the system.
3. To remove a certicate, select the certicate and click the delete icon under the Actions column.
The Assigned Business Roles tab lists all the business roles assigned to a particular business user. An
administrator can search and add a business role. The administrator can also delete an assigned role.
18
PUBLIC
Set Up Guide for SAP Service Cloud Version2
Users and Control

Related Information
Users [page 17]
Users are created for employees to access the system.
Create Business Users and Assign a Business Role [page 19]
Administrators can create business users and provide appropriate authorizations by assigning business
roles.
4.1.2Create Business Users and Assign a Business Role
Administrators can create business users and provide appropriate authorizations by assigning business roles.
Context
Business users in the system are linked to employees. Business users have business roles assigned, and the
access controls in the system are implemented on business roles.
Procedure
1. Log in to the system as an administrator.
2. Navigate to user prole on the top-right corner, and access the Settings page.
3. Go to
All Settings Users and Control Users .
4. Choose Business Users from the dropdown on the page.
5. Click the add icon () on the Business Users page.
6. Search and select an employee for whom you wish to create the business user.
Note
• The employee linked to a user must have an unique Email ID.
• If business user already exists for the employee, a message stating The business user already exists
for this employee is displayed.
7. Once you select an employee, the User Data section is auto-populated. By default, the user name is
created with the last name followed by the rst name of the employee. If you wish to modify the user name,
you can modify them.
8. Once you've veried all the details, click Create. The business user is now created and linked to the
employee. Refresh the business users' list to view your newly created business user.
9. Choose your business user, and then navigate to the Assigned Business Roles tab.
10. Add business roles to your user by using the Search and Add functionality on the screen. All the business
roles that you assigned to your business user now appear in the list format on the Assigned Business Roles
tab.
Set Up Guide for SAP Service Cloud Version2
Users and Control
PUBLIC 19

You've now created a business user and assigned the user to a business role.
4.2 Business Roles
A business role denes the specic areas of the system the users can access when they're assigned to that
role. Administrators can implement authorizations to business users by assigning business roles.
A business role represents a set of authorizations to access your solution within your organization and system
landscape. A business role denes a hierarchy of access controls that you can assign to business users in your
organization. As roles change, you need to update only the access rights within a role and the rights will apply
for all assigned users.
Business Roles List View
Lists all the business roles in a list view. As an administrator, you can edit the following elds on this page:
• Business Role ID
• Business Role Name
• Description
• Status: You can set the status to In Preparation, Active, or Obsolete.
• Admin: You can activate this switch to indicate that the role is for an administrator.
4.2.1Business Role Details
View more details of a business role on this page.
The Details tab provides the following information of a business role.
• Business Services:
• All business services that are assigned to a business role are displayed in the Business Services list. As
an administrator, you can add or delete business services to the business role.
• All business services have unrestricted read and write access by default.
• Some business services allow creation of restrictions. Such services have Read/Write dropdown
enabled. On setting any one of them to Restricted, the Restriction Rule link in enabled.
Note
If one role blocks write access and another role allows it, the more permissive role wins.
• An administrator can select from the available restrictions for a given service to create a restriction
rule.
• You can delete invalid business services that get agged with the following message "Some of the
business services assigned to the business role is no longer valid. Please
delete all the services with a warning sign to proceed further."
20
PUBLIC
Set Up Guide for SAP Service Cloud Version2
Users and Control

• App List:
• Each business service can have one or more apps associated with it. These apps dene the left
navigation for the users having this particular business role assigned.
• On adding the business service to a role, the corresponding apps are added to the app list.
• Administrators can enable or disable these apps using the switch against them.
• You can also search for apps from the search bar. You can also lter the app list by All Apps, Generic
Apps, and Admin Apps.
• As an administrator, you can also enable all apps at once using the Enable All Apps switch and enable
all admin apps at once using the Enable All Admin Apps switch.
The Assigned Business Users tab lists all the users that have this business role assigned. An administrator can
search and add users to this role. The administrator can also delete users from this role.
The Change History tab lists all the changes made to your business role. You can use the dierent lters
available on the interface to lter and view the changes.
Related Information
Changes
4.2.2Create Business Roles and Assign a Business User
Administrators can create business roles with appropriate authorizations and assign them to business users.
Context
Use business roles to assign access rights to multiple business users who carry out similar activities. You can
also dene access restrictions for a business role.
Procedure
1. Log in to the system as an administrator.
2. Navigate to user prole on the top-right corner, and access the Settings page.
3. Go to
All Settings Users and Control Business Roles .
4. Click the add icon () on the Business Roles page, and enter the business role name and description. The
Business Role ID is auto-generated. By default, a list of default services applicable for a role is added and
displayed. You can also set this role as an admin role by enabling the Admin switch.
Set Up Guide for SAP Service Cloud Version2
Users and Control
PUBLIC 21

Note
If you set a role as an Admin role using the switch, a default list of business services necessary for an
administrator role gets added from the backend by default.
5. Click the add icon () in the Business Services section to open the Add Business Services popup, select
all the services that are required for this role from the list of services, and then click Add. You can now Save
and Activate your business role.
6. You can add additional business services required for your role from the Add Business Services popup.
7. Set restrictions for the newly added business services by editing either or both of the Read Access and
Write Access columns for a corresponding business service. By default, both these columns are set to
unrestricted for a service, and the Restriction Rule is set to unassigned. Once you set Read Access and
Write Access for a business service, the corresponding Restriction Rule is enabled. Click the enabled
Unassigned button to set access restriction rules for your business role, based on the options listed.
Note
Access Restriction Rules: Based on the restriction types dened by each service, the following
restriction rules are supported. When a business role is maintained for a user, based on supported
restriction types for a service, corresponding rules are displayed. You can select one or more rules.
Access Restriction Rules
Restriction Type
Restriction Rule Description
EMPLOYEE Myself Access based on direct Employee
assignment
Employees Reporting to Me For a manager: Access based on em-
ployee and involvement of employ-
ees reporting to a user in an org. unit
(including subunits). For a non-man-
ager: Same as Myself
ORGANIZATIONAL UNIT
My Service Organization Access based on service organiza-
tion of the employee in your organi-
zational hierarchy
My Sales Organization Access based on sales organization
of the employee in your organiza-
tional hierarchy
My Organizational Unit Access based on organizational unit
of the employee in your organiza-
tional hierarchy
TERRITORY My Territory Hierarchy Access based on the employee’s
territory assignment only (including
subterritories)
SALES AREA My Sales Data Access based on employee's sales
data (sales org. + division + distribu-
tion channel)
Sales Areas of My Sales Orgs Access based on all sales areas of
sales organizations of employee
22 PUBLIC
Set Up Guide for SAP Service Cloud Version2
Users and Control

Restriction Type Restriction Rule Description
DISTRIBUTION CHAIN My Sales Data Refers to a distribution chain main-
tained at an employee level.
A distribution chain is a combination
of Sales Org. and Distribution Chan-
nel code
• A sales organization (for exam-
ple, Sales Organization France
• A distribution channel code (for
example, 1 = direct sales and 2
= indirect sales)
Therefore, the distribution chain at
the employee level has the sales
data of:
• Sales Organization France 1
• Sales Organization France 2
Distribution Chains of My Sales Orgs
If a user with employee assignment
under Sales Organization France and
if you select this restriction, then you
get access for any distribution chain
with Sales Organization France that
is Sales Organization France *Refers
to the Org. with any distriibution
channel. The restriction rule checks
to which Sales Org. the user is as-
signed. Accordingly, any distribution
chain with this Sales Org. is allowed
(combination of the user's Sales Org.
with any Dist Channel)
Note
If one rule blocks the write access and another role allows it, the more permissive role takes
precedence.
8. The App List section, following the Business Services section, displays all the available apps for the
selected business services. Select the switch against an app to make it available for the business role.
Note
The App List section denes the left navigation on the UI for users that have this business role
assigned.
9. Navigate to the Assigned Users tab. A list of users who have been this role assigned is displayed. If there are
no business users assigned yet, the Search and Add Users button is visible.
10. Click the Search and Add Users button to add business users from the quick view. Search and select users
from the quick view to add them to the role.
Set Up Guide for SAP Service Cloud Version2
Users and Control
PUBLIC 23

Results
You've now created a business role and assigned the business role to the selected list of business users.
Related Information
List of Business Services [page 24]
This document provides a list of the business services available in SAP Sales Cloud V2 and SAP Services
Cloud V2
4.2.3List of Business Services
This document provides a list of the business services available in SAP Sales Cloud V2 and SAP Services Cloud
V2
Business Service
Name
Technical Name Description
Accounts
sap.crm.md.accountservice.uiapp.acc
ountApp
Monitor, store, and track business information
about customers, prospects, and partners.
Agent Desktop
sap.crm.agentdeskservice.uiapp.agen
tDesk
Review customer information, create and proc-
ess cases, manage interactions, and review
knowledge base articles.
Agent Desktop Settings
sap.crm.agentdeskservice.uiapp.agen
tDeskAdmin
Congure agent desktop settings.
Analytics
sap.crm.analyticsbusinessuserstorie
sservice.uiapp.anaStoryBusinessUser
Create stories and models.
Attachments
sap.crm.documentservice.uiapp.docum
ent
Choose the les that you want to upload or
download.
Attachments Admin
sap.crm.documentservice.uiapp.docum
entAdmin
Congure your attachment settings.
Autoow
sap.crm.workflowservice.uiapp.workf
lowAdmin
Automate your business processes by creating
rules that can trigger various events.
Case
sap.crm.caseservice.uiapp.case
Create cases and manage case phases and
steps.
Case Management
sap.crm.caseservice.uiapp.caseAdmin
Create case types and congure case settings.
Change History
sap.crm.service.changehistoryservic
e.uiapp.changeHistoryApp
Check when and by whom an entity was modi-
ed.
Chat
sap.crm.chatservice.uiapp.chatInter
action
Chat with customers to resolve their service is-
sues.
24 PUBLIC
Set Up Guide for SAP Service Cloud Version2
Users and Control
Business Service
Name Technical Name Description
Computer Telephony In-
tegration (CTI)
sap.crm.ctiservice.uiapp.cti
Speak with customers using partner-supplied
computer telephony service.
Contacts
sap.crm.md.contactpersonservice.uia
pp.contactApp
Maintain the details for contacts by creating a
contact or using the relation between a contact
and an account.
Data Depersonalization
sap.crm.dppservice.uiapp.depersonal
ize
Remove personal data of employees, individual
customers, and contacts on their request.
Data Disclosure
sap.crm.dppservice.uiapp.disclosure
Disclose personal data of employees, individual
customers, and contacts.
Data Import and Export
sap.crm.dataimpexservice.uiapp.data
impex
Import and export data.
Data Workbench
sap.crm.dataworkbenchservice.uiapp.
dataworkbench
Import data from a third-party system or a csv
le.
Email
sap.crm.emailservice.uiapp.email
Create and send email messages to customers.
Email
sap.crm.emailservice.uiapp.emailInt
eraction
Track email interactions.
Employees
sap.crm.md.employeeservice.uiapp.em
ployeeApp
Create employees as business users in the sys-
tem.
Extensibility Admin
sap.crm.extensibilityservice.uiapp.
extensibilityAdmin
Create extension elds and dene the eld at-
tributes. You can also create custom validations
and determinations.
Favorites
sap.crm.favoriteservice.uiapp.favor
ite
Mark frequently used objects to enable quick ac-
cess in the future.
Favorites Workspace
sap.crm.favoriteservice.uiapp.favor
iteWorkspace
View all your favourites in one place.
Flexibility
sap.crm.extensibilityservice.uiapp.
flex
Change the look and feel of the solution for all
users by changing layout settings, adding mash-
ups and elds, as well as adding extension elds.
Home Page
sap.crm.homepageservice.uiapp.homep
age
Default start page, typically the rst page that
you see after logging in.
Home Page Admin
sap.crm.homepageservice.uiapp.homep
ageadmin
Arrange the start page with information and ac-
tivities based on business roles.
Individual Customers
sap.crm.md.individualcustomerservic
e.uiapp.individualCustomerApp
Manage, monitor, store, and track business infor-
mation about individual customers.
Set Up Guide for SAP Service Cloud Version2
Users and Control
PUBLIC 25

Business Service
Name Technical Name Description
Installation Points
sap.crm.installationpointservice.ui
app.installationPoint
Maintain physical location of objects that require
servicing or maintenance based on the service
or maintenance plan for that object.
Installed Bases
sap.crm.installedbaseservice.uiapp.
installedBase
Arrange installed items hierarchically at your
customer’s location.
Knowledge Base
sap.crm.knowledgebaseservice.uiapp.
knowledgebase
Search for, review, and share knowledge base ar-
ticles.
Knowledge Base Set-
tings
sap.crm.knowledgebaseservice.uiapp.
knowledgebaseAdmin
Congure knowledeg base settings.
Language & Region
sap.crm.i18nservice.uiapp.i18napp
Choose language and region settings
Language & Region Ad-
min
sap.crm.i18nservice.uiapp.i18nAdmin
Congure language and region settings
Mashups
sap.crm.mashupservice.uiapp.mashupA
pp
Integrate data from SAP's cloud solution with
data provided by online Web services or applica-
tions.
Mashup Authoring
sap.crm.mashupservice.uiapp.mashupA
uthoring
Activate precongured mashups and create new
mashups.
Mashup Conguration
sap.crm.extensibilityservice.uiapp.
flexMashupConfigAdmin
Congure, access, and use mashups.
Mashup Demo
sap.crm.mashupservice.uiapp.mashupD
emo
Display mashup service consumption.
Messaging
sap.crm.chatservice.uiapp.messageIn
teraction
Exchange text messages with customers to re-
solve their service issues.
Organizational Units
sap.crm.md.organizationalunitservic
e.uiapp.organizationalUnitApp
Create an element of an organizational model.
Organizational Unit Ad-
min
sap.crm.md.organizationalunitservic
e.uiapp.organizationalUnitAdminApp
Maintain organizational units.
Output Management
sap.crm.outputmanagementservice.uia
pp.outputManagementApp
Manage activities related to the output of docu-
ments.
Phone
sap.crm.phoneservice.uiapp.phone
Track and review phone call activities.
Products
sap.crm.md.productservice.uiapp.pro
ductApp
Create, view, and update products in an organi-
zational master data.
Registered Products
sap.crm.registeredproductservice.ui
app.registeredProduct
Use products that are associated with a specic
customer and generally has a serial number.
Roles
sap.crm.roleservice.uiapp.roleAdmin
Congure dierent user roles in the system to
access specic apps.
26 PUBLIC
Set Up Guide for SAP Service Cloud Version2
Users and Control

Business Service
Name Technical Name Description
Search
sap.crm.searchservice.uiapp.searchA
pp
Search for entity details across the solution.
Search Admin
sap.crm.searchservice.uiapp.searchA
dmin
Manage global search settings.
Security Policies
sap.crm.securitypolicyservice.uiapp
.securityPolicyAdmin
Create security policies for your organization
Service Category Cata-
log
sap.crm.servicecategoryservice.uiap
p.serviceCatalogClassification
Create and manage service category catalogs.
Service Category Cata-
log Settings
sap.crm.servicecategoryservice.uiap
p.serviceCatalogAdmin
Create and manage service category catalogs.
Service Orders
sap.crm.s4hcserviceorderservice.uia
pp.externalReplica
Replicate service orders to external systems.
Settings
sap.crm.adminservice.uiapp.admin
Congure dashboard settings for your system.
Settings
sap.crm.adminservice.uiapp.admincon
sole
Congure administration settings for your sys-
tem.
Templates
sap.crm.templateservice.uiapp.templ
ate
Create and edit templates
Template Settings
sap.crm.templateservice.uiapp.templ
ateAdmin
Congure template settings
Timeline
sap.crm.timelineservice.uiapp.timel
ine
View timeline events for your apps.
Timeline Settings
sap.crm.timelineservice.uiapp.timel
ineAdmin
Congure timeline for your apps.
User Settings
sap.crm.userservice.uiapp.userAdmin
Congure user settings.
Warranty
sap.crm.warrantyservice.uiapp.warra
nty
Assign a warranty to a registered product or in-
stallation point, and determine its coverage in a
ticket.
4.3 Security Policies
A security policy is a set of rules that denes password complexity, such as including numerical digits and
password validity, like requiring a password change after a certain period of time.
You can dene multiple security policies because work areas or departments of a company may have dierent
password security requirements.
As an administrator, you can manage the security level, if desired, by editing and enhancing the security policy,
for example, by changing the complexity and validity for all passwords, in accordance with your company´s
security requirements.
Set Up Guide for SAP Service Cloud Version2
Users and Control
PUBLIC 27
4.3.1Security Policy Features
Lists and describes the features of a security policy.
The security policy features are classied as:
• System password-related features
• Enable Password Login - if enabled, allows users to log in to the system with a password.
• Set Default - if enabled is set as the default security policy for all the users.
• System password complexity-related features
• Minimum Number of Characters - denes the minimum number of characters in a valid password.
• Minimum Number of Lowercase Alphabets - denes the minimum number of lowercase alphabets in a
valid password.
• Minimum Number of Uppercase Alphabets - denes the minimum number of uppercase alphabets in a
valid password.
• Minimum Number of Digits - denes the number of numerals in a password.
• Minimum Number of Special Characters - denes the minimum number of special characters in a valid
password.
• System password validity-related features
• Allowed Number of Incorrect Password Attempts - denes the number of successive login failures
before a password is locked. A message is displayed on the login screen once the password is locked.
• Password History - denes the number of passwords to store in the memory to compare with the new
productive password set by the user.
• Maximum Password Validity (in Days) - denes the maximum number of days a password is valid for.
• Minimum Waiting Time Before Changing Password (in Days) - denes the minimum number of days a
user must wait before changing the existing password to a new password.
• Unused Productive Password Validity (in Days) - denes the validity of the productive password after
changing from the initial password.
4.3.2Create Security Policies
You can dene multiple security policies as dierent work areas or departments in a company can have
dierent password security requirements.
Context
As an administrator, you can increase the security level by editing and enhancing a security policy. For example,
by changing the complexity and validity for all passwords, in accordance with your company´s security
requirements.
28
PUBLIC
Set Up Guide for SAP Service Cloud Version2
Users and Control

Procedure
1. Log in to the system as an administrator.
2. Navigate to user prole on the right-top corner, and access the Settings page.
3. Go to All Settings Users and Control Security Policies .
4. Click the add icon () on the Security Policies page.
5. Enter a Policy ID, Policy Name, and Description for the security policy. You can further choose to set this
policy as the default using the Set Default switch.
6. Enhance security complexity for your policy by setting inputs for: Minimum Number of Characters,
Minimum Number of Lowercase Alphabets, Minimum Number of Uppercase Alphabets, Minimum Number
of Digits, Minimum Number of Special Characters, Allowed Number of Incorrect Password Attempts,
Password History, Maximum Password Validity (in Days), Minimum Password Change Waiting Time (in
Days), Initial Password Validity (in Days), Unused Productive Password Validity (in Days), and then click
Save.
7. Refresh the Security Policies page to view your newly created security policy. All the security policies that
you've created appear in the list format on the All Policies page.
You've now created a security policy.
4.3.3Edit Security Policy
Administrators can edit security policies.
Procedure
1. Log in to the system as an administrator.
2. Navigate to user prole on the right-top corner, and access the Settings page.
3. Go to
All Settings Users and Control Security Policies .
4. Click an existing policy ID to view the details. The Security Policy quick view opens.
5. Hover the mouse over the elds that you want to edit. Click on pencil icon next to the eld to edit the eld.
Results
Once edited, the changes are saved automatically.
Set Up Guide for SAP Service Cloud Version2
Users and Control
PUBLIC 29

4.4 Identity Provider Conguration
Identity provider refers to an entity that manages identity information and provides authentication services to
trusted service providers.
Every user type must authenticate to the system for regular browser-based front-end access, as well as
for electronic data exchange, such as business-to-business communication. The system doesn’t support
anonymous access. We recommend using Single Sign-On (SSO) for basic security. To protect accounts further,
congure the identity provider (IdP) of the SSO solution to provide enhanced security.
4.4.1Congure Identity Provider
Administrators can congure identity provider to enable Single-Sign On (SSO) for the system.
Enable Single Sign-On for the System
To enable SSO for a tenant, you've to connect the identity provider to the tenant. To do so, download the
metadata of your system, upload the tenant metadata XML le to your identity provider (IdP), and then
download the congured metadata from your identity provider. Afterwards on your system, choose the identity
provider, and create the identity provider to start using the system.
Download the System Metadata
Download the tenant metadata XML to further upload to IdP and congure it.
1. Log in to the system as an administrator.
2. Navigate to user prole on the top-right corner, and access the Settings page.
3. Go to All Settings Users and Control IdP Conguration page.
4. Click Download Metadata. The tenant metadata XML le is downloaded to your local drive.
Note
If your IdP certicate is due for renewal in the next 20 days, the message "Click the Renew and
Download Metadata button before the certicate validate expiration date to avoid disruptions to your
SSO users" appears. In addition to the message, the certicate validity period is dispalyed as well.
If you intend to renew and recongure your identity provider, click the Renew and Download Metadata
option to download and further recongure the identity provider. The Renew and Download Metadata
option extends the validity of your certicate and stops your SSO users from logging into the system
until you have recongured your IdP with the renewed metadata le. Use the downloaded service
provider metadata le to congure your IdP.
Congure System Metadata in Your Identity Provider (IdP)
System metadata XML le is uploaded to the IdP, congured, and then the congured IdP metadata le is
downloaded.
30
PUBLIC
Set Up Guide for SAP Service Cloud Version2
Users and Control

Note
Use this procedure to congure authentication services provided by SAP IAS. You can follow similar steps
to congure other IdPs as well.
1. Log on to the SAP Cloud Identity Services - Identity Authentication (IAS) as an administrator. You can also
use an external identity provider.
2. On the IAS screen, navigate to Applications & Resources Applications , and click Add to create a new
application for your system.
3. In the Add Application pop-up window, enter a name, and click Save. A new application page opens.
4. Under
Trust Single Sign-On , congure the following settings:
• Click Type, and select SAML 2.0
• Click SAML 2.0 Conguration, and upload the downloaded tenant metadata XML from your local drive.
• Click Subject Name Identier, and congure the attribute, which the application uses to identify the
users.
5. Navigate to Tenant Settings, and click SAML 2.0 Conguration to open a new screen.
6. Click Download Metadata File to download the IdP metadata le.
Create a Trusted Identity Provider and Upload IdP Metadata to Your System
Navigate to your tenant to create a trusted IdP and choose a default IdP.
1. Log in to your system as an administrator.
2. Navigate to user prole on the top-right corner, and access the Settings page.
3. Go to
All Settings Users and Control Congure IdP .
4. Click the add () icon under the Trusted Identity Provider section.
5. Under the Upload IdP Metadata quick view, enter an Alias, and upload the congured metadata XML le
(downloaded from your IdP) by either dropping or browsing to upload from the system.
6. Click Save to save your conguration.
7. Activate your conguration by enabling the Set Active switch. To make it a default option, turn on the Set
Default switch.
You've now congured Single Sign-On for your system.
Related Information
Access Admin Console
Set Up Guide for SAP Service Cloud Version2
Users and Control
PUBLIC 31

4.5 Settings
This page lists all the identity and access management settings.
Cross-Site Request Forgery Settings
Cross-Site Request Forgery (CSRF) is a web-security vulnerability that allows an attacker to induce users to
perform actions that they do not intend to perform. CSRF attacks exploit the trust a Web application has in an
authenticated user. To prevent such attacks, CSRF settings are provided.
Congure Cross-Site Request Forgery Settings
1. Log in to the system as an administrator.
2. Navigate to user prole on the right-top corner, and access the Settings page.
3. Go to All Settings Users and Control Settings Cross-Site Request Forgery Settings .
4. Select one of the modes: Strict, None, or Lax from the dropdown for third-party integration.
Note
• Lax: This mode allows cookies to be sent for top-level navigation only.
• None: This mode disables SameSite based protection. The website can use its own CSRF
protection mechanisms.
• Strict: This mode disables cookies being sent to all third-party websites. Cookies will be sent only if
the domain is the same as the path for which the cookie is been set.
Note
By default, the Strict mode is enabled for third-party integrations. However, for existing customers, this
change will not aect the existing integrations in the current release. In a future release, the existing
integrations can be aected.
32
PUBLIC
Set Up Guide for SAP Service Cloud Version2
Users and Control

5 Data Import and Export
This document describes how you can use Data Import and Export to import data into your solution and export
data from your solution.
You can use Data Import and Export to import the following:
• Data from a legacy system into SAP Service Cloud Version2. For example, you can transfer all the existing
data from any Cloud CRM system to SAP Service Cloud Version2.
• Operational data from third-party systems into SAP Service Cloud Version2.
• Data that is manually maintained in a CSV le (data le) into SAP Service Cloud Version2. For example,
customer and product information collected from a campaign and maintained in a data le.
As an administrator, you are expected to understand the following:
• Your business requirement and knowledge of data imported to SAP Service Cloud Version2.
• Sequence in which the entities must be imported. For information on each of the entities, see entity
documentation.
Navigate to your user prole and select
Settings All Settings Data Import and Export Import and
Export Data
.
You can use the lters to view all tasks, your tasks, and application tasks. Application tasks are import and
export tasks triggered from the respective entity workspaces.
Once a task is triggered, it goes through the following stages:
• New indicates that a new task is triggered.
• In Process indicates that the task is being processed.
• Completed indicates that the task is processed without any errors.
• Completed With Errors indicates that the task is completed but with errors.
Error les are generated and the task moves to Completer With Errors. Errors generated, if any, are
available for download. The error le species the error message along with the specic root causes for the
error. For example, if data validation failed due to an invalid character and incorrect ID, an error message
Data Validation Failed: Account name contains an invalid character, Account ID is incorrect is displayed. If
there are multiple errors the errors are displayed as comma separated values. Verify the le and import it
again.
• Failed indicates that the task failed because of technical errors.
Technical errors could be due to incorrect le format or invalid data type for any of the elds in the import
le. The error count for tasks in failed status will be zero.
Note
Tasks older than 30 days are automatically removed from Monitor, irrespective of task status.
In cases where you want to retain information beyond one month (such as external keys used for an entity
during import), we recommend you to maintain local copies of such information.
You can view all tasks triggered in your tenant.
Set Up Guide for SAP Service Cloud Version2
Data Import and Export
PUBLIC 33

Prerequisites
Type Task
Technical Template les can downloaded from the system. To check if
the le is in an acceptable format, do the following:
1. Open the CSV le in Notepad.
2. Click File Save As
3. In the Save As dialog, choose Encoding as UTF-8. Keep
the le extension as .CSV.
4. Once the le is saved, check if the content is displayed
correctly.
Functional You understand the business requirement of the data to be
imported.
For each entity you want to import data into, you understand
the dependency within the entity section of the respective
entity document.
5.1 Create Data Using Import
You can create new data and import it to the system.
Templates are available by default for each entity type for administrators who have a business understanding of
the elds that needs to be mapped between systems. This ensures consistency in mapping across all users.
Typical tasks of an administrator include:
• Downloading templates for various entities and nodes
• Preparing data to an accepted format
• Importing data
Tip
It is recommended to download the template from the system for every import create instead of using a
locally saved template version.
34
PUBLIC
Set Up Guide for SAP Service Cloud Version2
Data Import and Export

5.1.1Download Template
You can download templates to prepare data for importing.
Procedure
1. Navigate to your user prole and select
Settings All Settings Data Import and Export Import and
Export Data
.
2. Select Download Template.
3. Select the entity for which you want to import the data.
4. Select the File Type between Comma Separated Values (.csv) and Excel Workbook (.xlsx).
5. Turn on the Complete Entity switch to import the root entity and all its subentities. Disable it if only the root
entity or root entity with selected subentities is to be imported.
When Complete Entity is selected, the system downloads a zip le with multiple csv and xlsx template les
(one le each for the root entity and individual subentities).
When Complete Entity is deselected, you can optionally select subentities based on your import
requirement along with root entity template le. considering only root entity is to be imported or root
entity only with select child entities is to be imported.
• If no subentity is selected, a single csv/excel template le of the root entity is made available for
download.
• If certain subentities are selected, a zip le with multiple csv/xlsx template les (one le each for root
entity and every selected subentity) is available for download.
6. Select Download Template.
Note
The template is downloaded in the same language as that of the user's login language.
7. Update the downloaded template with data to be imported.
Note
Only comma and semicolon are supported as value separators.
5.1.2Prepare Data
Data that is either downloaded from a legacy system, a third-party system, or manually maintained in a data
le, it must be cleansed to ensure that it is in as per the Data Import and Export template.
For example, you must ensure that all the technical IDs are maintained based on the dependency, and also
check if data is as per the Data Import and Export template.
Set Up Guide for SAP Service Cloud Version2
Data Import and Export
PUBLIC 35

Instructions
• The login language while importing data and the template language used while creating data using import
should be the same.
• For date elds, follow these instructions:
• Use format yyyy-mm-dd. For example, 2015-11-25.
• To import a timestamp eld, use format yyyy-mm-ddThh:mm:ssZ. For example,
2021-12-31T23:59:59Z. Enter the UTC time.
Note
Date and currency elds get auto converted in excel when entering the data, ensure that the
format is in the expected format after data entry by changing the data type of the cell to Text/
General.
• If you have a Boolean entry, ensure that the value is entered either as true or false in small case.
Accepted Values
• true
• True
• TRUE
• false
• False
• FALSE
Note
Any blank boolean eld is treated as undened.
• Columns with numbers that are treated as text.
Data of a few columns that display numbers will be treated as text. Refer to the code list in the templates
for elds that have a specic list of values.
Remember
Use a notepad application to modify the CSV data le before importing. This would avoid any format
changes to the CSV data le.
When using any excel application to modify the CSV data le, make sure to import the .csv le using
UTF-8 character encoding.
Only comma and semicolon are supported as value separators.
• In addition to the import data elds, you must also provide the following:
• An external_key in the root entity le
• A parent_external_key in the root entity le in case of hierarchical entity structure
• A parent_external_key in the subentity les
36
PUBLIC
Set Up Guide for SAP Service Cloud Version2
Data Import and Export

Add the parent record's external_key as parent_external_key for child records to dene parent-child
relationship between records.
• external_key must be unique for each record in the import le.
• The external_key and parent_external_key elds are string type elds used by data impex for processing
the respective import tasks. It does not reect in the entity records created in the system via import. Data
impex does not store these eld values as they are used only for a particular import task.
catalogId parentId displayId imageUrl name
descrip-
tion
language-
Code
exter-
nal_key
parent_ex-
ternal_key
In this example, external_key is a unique non-null value.
• Even if subentities are not being used, you must include the template les for those subentities during
import.
The primary key (ID/Display ID/Technical ID) of the respective entity is dierent from the external_key and
parent_external_key elds. The primary key (ID/Display ID/Technical ID) of the entity is generated when the
entity records imported are created in the tenant. Hence, when new records are created during import, this
eld will have to be left blank in the template.
Note
To import only the root entity, use a single csv/excel le.
To import a complete entity or a root entity along with select subentities, use a .zip le that includes
multiple csv/excel les
Do not create a zip le by zipping a folder that contains the entity les. To prepare a zip le, select all of the
csv/excel les (except codelist les) to include in the .zip le, right-click, and create a zipped folder. Do not
create a zipped folder directly from the parent folder that was downloaded.
Attachments present in the template cannot be imported via Data Import and Export. However, include the
csv/excel blank template in the zip le to import the complete entity.
Tip
It is recommended to import only a maximum of 25,000 records in a single le.
5.1.3Create Data
You can create new data and import it to the system.
Procedure
1. Navigate to your user prole and select
Settings All Settings Data Import and Export Import and
Export Data
.
Set Up Guide for SAP Service Cloud Version2
Data Import and Export
PUBLIC 37

2. Select Import Create .
3. Select Complete Entity if you want to create the root entity and all its subentities or select Individual
Entities if you want to import only the root entity or root entity with selected subentities.
4. Turn on the Initial Load switch to relax checks and reduce errors during initial migration.
5. Turn on the Simulation Mode switch to simulate and view errors.
6. elect the File Type between Comma Separated Values (.csv) and Excel Workbook (.xlsx).
Remember
Use that latest template le for create.
7. Select the File Type between Comma Separated Values (.csv) and Excel Workbook (.xlsx).
8. Browse for the *.zip prepared data le you want to upload.
Note
Maintaining external key is mandatory for import of the complete entity.
9. Click Import Data.
Results
The system validates the rst 10 entries in the import le for data type and le type errors. Errors, if any, are
displayed in the Import and Export Data screen. You cannot import the le without resolving the errors. The
system displays a message on the status of the import.
5.2 Update Data Using Import
You can update existing data records and import them to the system.
To update existing data records, you must rst export the data from the system.
1. Navigate to your user prole and select
Settings All Settings Data Import and Export Import and
Export Data
.
2. Select Export.
3. Select the entity for which you want to update the data.
4. Select the subentities and elds from Entity and eld selection.
5. Select the File Type between Comma Separated Values (.csv) and Excel Workbook (.xlsx).
6. Select Apply Filter to lter based on the values available for the respective entities.
Select Dene Conditions to add specifc lter conditions and Add Condition Group to add more conditions.
7. Select entities that need to be downloaded as part of the export le.
8. Select Export Data.
The system displays the status of the export in the Import and Export Data screen.
38
PUBLIC
Set Up Guide for SAP Service Cloud Version2
Data Import and Export

Remember
Use that latest export le for update. If an old export le is used, existing data will be overwritten
considering update le data as the latest data. Data which is not to be updated can be left unchanged
in the complete entity le. Update is only supported for the complete entity or root entity. If only certain
subentities need an update, modify only those entities and upload the complete entity le without
altering the other data. It is recommended to export only a maximum of 50,000 records in a single le.
5.2.1Update Data
Once the exported le is updated with necessary information, you can import it back to the system.
1. Navigate to your user prole and select Settings All Settings Data Import and Export Import and
Export Data
.
2. Select Import Update .
3. Select the entity for which you want to update the data.
4. Select Complete Entity if you want to import the root entity and all its subentities or select Root Entity if you
want to import only the root entity.
Note
Updating root entity is currently available only for Opportunities.
5. Select Ignore or Update to ignore or overwrite blank values, respectively.
6. Turn on the Initial Load switch to relax checks and reduce errors during initial migration.
7. Turn on the Simulation Mode switch to simulate and view errors.
8. Select the File Type between Comma Separated Values (.csv) and Excel Workbook (.xlsx).
9. Browse for the *.zip prepared data le you want to upload.
10. Click Import Data.
The system validates the rst 10 entries in the import le for data type and le type errors. Errors, if any,
are displayed in the Import and Export Data screen. You cannot import the le without resolving the errors.
The system displays a message on the status of the import.
5.3 Export Data
You can export data from your solution.
Procedure
1. Navigate to your user prole and select Settings All Settings Data Import and Export Import and
Export Data .
Set Up Guide for SAP Service Cloud Version2
Data Import and Export
PUBLIC 39

2. Select Export.
3. Select the entity for which you want to export the data.
4. Select the subentities and elds from Entity and eld selection.
5. Select the File Type between Comma Separated Values (.csv) and Excel Workbook (.xlsx).
6. Select Apply Filter to lter based on the values available for the respective entities.
a. Select Dene Conditions to add specifc lter conditions.
b. Select Add Condition Group to add more conditions.
7. Select entities that need to be downloaded as part of the export le.
8. Select Export Data.
The system displays the status of the export in the Import and Export Data screen.
Note
You can export only a maximum of 50,000 records per export task in a single le.
5.4 ID Mapping
If an external key is not maintained or retained previously, you can maintain external keys against the Technical
IDs or UUIDs of existing records using the template le that contains a common Technical ID and external
key columns for all entities. For example, records imported via Data Import and Export before ID mapping
activation or via other sources.
ID Mapping is currently available for the following entities:
• Accounts
• Contacts
• Employees
• Individual Customers
• Organizational Unit
Note
To enable ID mapping on your tenant, please raise a ticket in the CEC-CRM-IMX component.
40
PUBLIC
Set Up Guide for SAP Service Cloud Version2
Data Import and Export

5.4.1Congure ID Mapping
As an administrator, once you activate ID mapping for an entity, the external keys used in the Import Create
mode le for that entity will be retained and can be reused instead of Technical IDs to make subsequent
updates and cross references in other entities via Import Update mode.
Procedure
1. Navigate to your user prole and select Settings All Settings Data Import and Export ID Mapping
Conguration .
2. Turn on the Enable ID Mapping switch to enable ID mapping for the respective entities.
After activating ID mapping for an entity, the external keys used in the Import Create mode le for that
entity will be retained and can be reused instead of Technical IDs and for cross references in other entities.
For example, if ID mapping is activated for the Accounts entity, external key of Accounts can be used while
importing opportunities instead of Account Technical UUIDs.
5.5 Entity-Specic Information
This section describes the entity-specic information available in Data Import and Export.
Data Import and Export supports the following entities:
Supported Entities
Entity
Import Create
Import Update
- Complete En-
tity
Import Update
- Root Entity Initial Load
Simulation
Mode Export
Accounts Yes Yes Yes No No Yes
Cases Yes Yes No No Yes Yes
Chat Yes Yes No Yes Yes Yes
Contacts Yes Yes Yes No No Yes
Email Yes No No No No Yes
Employees Yes Yes Yes No No Yes
Exchange Rate Yes No No No No Yes
Functional Lo-
cation
Yes Yes No No No Yes
Individual Cus-
tomers
Yes Yes Yes No No Yes
Installed Base Yes Yes No No No Yes
Set Up Guide for SAP Service Cloud Version2
Data Import and Export
PUBLIC 41

Entity Import Create
Import Update
- Complete En-
tity
Import Update
- Root Entity Initial Load
Simulation
Mode Export
Organizational
Unit
Yes Yes No No No Yes
Phone Call Yes Yes No Yes Yes Yes
Products Yes No No No No Yes
Product Groups Yes No No No No Yes
Product Instal-
lation Point
Yes Yes No No No Yes
Registered
Products
Yes Yes No No No Yes
Service Catalog Yes Yes No No Yes Yes
Service Cate-
gory
Yes Yes No No Yes Yes
Task Yes No No No No Yes
User Yes Yes No No No Yes
Warranty Yes Yes No No No Yes
Account [page 43]
Account management capabilities oer a holistic view of the customer, and allow you to capture,
monitor, store and track all critical business information about customers, prospects and partners.
Account Hierarchy [page 51]
Account hierarchy is a collection of accounts linked to each other through a parent-child relationship.
Case Overview and Structure [page 53]
Overview of the Case entity and the structure in the solution.
Contact Person [page 58]
Use contacts to represent the relationship between contacts and accounts. Contacts can be
maintained only for corporate accounts.
Employee [page 62]
Employee Master Data capabilities oer a holistic view of internal employees (a business partner
person with valid employee type "INTERNAL").
Organizational Unit [page 66]
Organizational unit containing a hierarchy that represents the hierarchical structure of the organization.
Individual Customer [page 73]
Individual Customers represent persons with whom business is done.
Product [page 81]
A product is the item oered for sale and it can be a service or a physical item. A product can be of real
or virtual form. Each product is made at a cost and sold at a price and the price depends on the quality,
market, the marketing, and the targeted segment.
Product Group [page 84]
42
PUBLIC
Set Up Guide for SAP Service Cloud Version2
Data Import and Export
A product group is a group of products categorized based on the shared attributes like usage, features,
production processes and so on. A product group can also be the market or customer segment in
which the products are sold or the prices at which they're oered.
Service Categories Overview and Structure [page 87]
Overview of the Service Category entity and the structure in the solution.
Service Catalogs [page 89]
Overview of the Service Catalog entity and the structure in the solution.
Registered Products [page 92]
A registered product is an instance of a product that is associated with a specic customer and
generally has a unique serial number. The registered product information allows the service agent to
identify the customer product and any associated warranties or service entitlements
Installed Base [page 96]
Installed base is a hierarchical arrangement of items installed at your customer’s location.
Functional Location [page 99]
Product Installation Point [page 104]
An installation point is the physical location of the object that requires servicing or maintenance based
on the service or maintenance plan for that object.
Warranty [page 107]
Warranty is assigned to a registered product or installation point, and you can determine its coverage in
a ticket.
Users [page 109]
Users in the system refers to employees, business users and other users such as partner contacts.
Users are assigned to business roles and access controls in the system are implemented on business
roles.
5.5.1Account
Account management capabilities oer a holistic view of the customer, and allow you to capture, monitor, store
and track all critical business information about customers, prospects and partners.
Use this information to focus on your most protable customers, maintain satisfaction and loyalty and
consistent interaction across all channels.
Set Up Guide for SAP Service Cloud Version2
Data Import and Export
PUBLIC 43

5.5.1.1 Account Dependencies
Dependencies on Other Entities
Entity
Description
Contact Person
Used in Account Contact Persons to assign a Contact to
Corporate account(s)
Employee
Used in Account Team Members to assign internal and exter-
nal employees to the account
Organizational Unit
Used in Account Team to assign the employees fo a specic
Sales Organization to Corporate account(s)
Used in Account Sales Data to assign a Sales Organization to
the account
Account Relationships
The related Business Partner, and in case it is provided, the
related Sales Organization must exist before creating a rela-
tionship to the account
44 PUBLIC
Set Up Guide for SAP Service Cloud Version2
Data Import and Export

Dependencies within the Entity
Entity Description
Account Addresses
The default address can either be maintained in Account or
Account Addresses but not in both places simultaneously
Account Contact Persons
Default address maintained at Account or Account Ad-
dresses must exist to ll workplace address elds
5.5.1.2 Account Fields
Download the template from Data Import and Export for the eld level information.
5.5.1.2.1 Account
The Account header entity contains all central information of a corporate account.
It contains information about the account name, main address with communication data like email, ABC
classication and blocking information. Use the address elds in the Account header entity in case only the
default account address is to be maintained. It is highly recommended to ll the Country eld even if you do not
provide full address details.
Template Header
Data Type Notes
external_key STRING
Technical ID STRING
Account ID STRING If this is not provided a number from
a number range is drawn. Display ID of
Account
Prospect BOOLEAN A prospect is someone who may be-
come a customer.
Role STRING
This eld is mandatory
Use CRM000 for customer
Or BUP002 for prospect
Or any specic Z-code
ABC Classication
STRING ABC classication of a customer
Nielsen ID STRING
Status STRING ACTIVE will be determined by the sys-
tem if not explicitly specied.
Set Up Guide for SAP Service Cloud Version2
Data Import and Export
PUBLIC 45

Template Header Data Type Notes
Natural Person BOOLEAN
Source Lead Technical ID STRING
Blocking Reasons_Billing Block STRING
Blocking Reasons_Delivery Block STRING
Blocking Reasons_Order Block STRING
Blocking Reasons_Sales Support Block BOOLEAN
Name STRING
This eld is mandatory
Name of the account holder
Additional Name STRING
Additional Name 2 STRING
Additional Name 3 STRING
Industry STRING Primary business activity of the com-
pany
Legal Form STRING
Contact Permission STRING
D-U-N-S STRING
Owner Technical ID STRING Technical ID of the Account Owner (Em-
ployee) part of the Account Team
Main Address_Country/Region STRING The country of the account main ad-
dress
Main Address_State_State STRING The region (federal state, county) of the
address
Main Address_Postal Code STRING Postal code for the street address
Main Address_City STRING City of the address
Main Address_Street STRING Street
Main Address_House Number STRING
Main Address_County STRING
Main Address_District STRING District of the address
Main Address_Address Line 1 STRING
Main Address_Address Line 2 STRING
Main Address_Address Line 4 STRING
Main Address_Address Line 5 STRING
Main Address_P.O. Box STRING
Main Address_P.O. Box Address BOOLEAN
Main Address_Latitude NUMBER
Main Address_Longitude NUMBER
46 PUBLIC
Set Up Guide for SAP Service Cloud Version2
Data Import and Export

Template Header Data Type Notes
Main Address_Internal Geo Location BOOLEAN
Main Address_Language STRING
Main Address_Best Reached By STRING
Main Communication Data_Email STRING Email address
Main Communication Data_Website STRING
Main Communication Data_Fax STRING
Main Communication Data_Phone STRING
Main Communication Data_Mobile STRING
5.5.1.2.2 Account Team Members
The Account Team entity allows access to the account team. Here you can assign employees with a specic
role to the corporate account.
Template Header
Data Type Notes
parent_external_key STRING
Employee Technical ID STRING
This eld is mandatory
Technical ID of Employee
Employee ID STRING Employee display ID can be used to
reference an employee alternatively to
Employee Technical ID. (Either of the
two can be used.)
Role
STRING
This eld is mandatory
The type of responsibility the employee
has for the account.
Sales Organization Technical ID STRING Technical ID of the Sales Organization.
It is required for Sales Area dependent
Account Team.
Distribution Channel STRING
division STRING
Main BOOLEAN
Main indicator for given party role, sales
area and validity period
Valid From DATETIME Start date of the validity of the account
Valid To DATETIME End date of the validity of the account
Set Up Guide for SAP Service Cloud Version2
Data Import and Export
PUBLIC 47

5.5.1.2.3 Account Addresses
The Account Addresses entity oers access and maintenance of the corporate accounts addresses.
The address includes postal address details as well as communication data details like email or phone number.
You can specify for an individual address whether it should be the main address. Use the Account Addresses
entity only in case of multiple addresses. If you want to maintain only the main address, then use the Account
entity.
Template Header
Data Type Notes
parent_external_key STRING
Main BOOLEAN Specication of main address
Country/Region STRING The country/region of the address
State_State STRING The region (federal state, county) of the
address
City STRING City or district of the address
Street STRING Street of the address
House Number STRING
Postal Code STRING Postal code for the street address
County STRING
District STRING District of the address
Address Line 1 STRING
Address Line 2 STRING
Address Line 4 STRING
Address Line 5 STRING
P.O. Box STRING
P.O. Box Address BOOLEAN
Latitude NUMBER
Longitude NUMBER
Internal Geo Location BOOLEAN
Language STRING
Best Reached By STRING
Email STRING Email address
Website STRING
Fax STRING
Phone STRING
Mobile STRING
48 PUBLIC
Set Up Guide for SAP Service Cloud Version2
Data Import and Export

5.5.1.2.4 Account Contacts Persons
The Account Contact Persons entity oers access to the corporate accounts contact data.
With this entity you can assign contacts to an account and add business address details like communication
data email, phone or mobile number. The relationship to the account will always be established based on the
main address of the account.
Template Header
Data Type Notes
parent_external_key STRING
Technical ID STRING
Contact Technical ID STRING This eld is mandatory
Contact ID STRING The Contact display ID can be used
to reference an contact person alterna-
tively to Contact Technical ID. (Either of
the two can be used.)
Main
STRING Species that the assigned Contact
person is the main contact for this Ac-
count.
5.5.1.2.5 Account Identication
The Account Identication entity oers access to the corporate accounts identication data.
Template Header
Data Type Notes
parent_external_key STRING
ID Type STRING
This eld is mandatory
A code representation of the type of an
identication number
ID Number STRING
This eld is mandatory
The identication number itself
Valid From DATETIME
Valid To DATETIME
Institution Responsible STRING
Name of the institution (government
agency, registry oce), company (Dun
& Bradstreet), an organization (UN)
that issued the identication number
Entry Date
DATETIME
Country/Region STRING
State_State STRING
Set Up Guide for SAP Service Cloud Version2
Data Import and Export
PUBLIC 49

5.5.1.2.6 Account Relationships
The Account Relationships entity oers access to the corporate accounts relationship data.
Relationships from the account can be established to other business partners by providing the Business
Partner Technical ID and the Relationship Role, which classies the relationship.
Template Header
Data Type Notes
parent_external_key STRING
Technical ID STRING
Business Partner Relationship Role STRING
This eld is mandatory
A coded representation of the type of
Relationship.
Business Partner Technical ID STRING
This eld is mandatory
Business Partner ID STRING The Business Partner ID can be used to
reference an Business Partner alterna-
tively to Business Partner Technical ID.
(Either of the two can be used.)
Sales Organization Technical ID
STRING For Sales Area dependent relationships
the Sales Organization Technical ID
must be provided.
Distribution Channel STRING
Division STRING
Main Relationship BOOLEAN Indicates whether the relationship for
the provided Business Partner Relation-
ship Role and the Sales Area is the main
relationship.
5.5.1.2.7 Account Sales Arrangements
The Account Sales Data entity allows access to the corporate accounts sales data.
Template Header
Data Type Notes
parent_external_key STRING
Sales Organization Technical ID STRING
This eld is mandatory
Technical ID of the Sales Organization.
Sales Organization ID STRING
Distribution Channel STRING If you provide a distribution channel you
need to provide Sales Organization ID
50 PUBLIC
Set Up Guide for SAP Service Cloud Version2
Data Import and Export

Template Header Data Type Notes
Division STRING If you provide a division you need to
provide distribution channel and Sales
Organization ID
Marked for Deletion BOOLEAN Use this to mark a Sales Area for de-
letion. Required in integrated environ-
ments where physical deletion of sales
arrangements is not allowed
Sales Oce Technical ID
STRING
Sales Oce ID STRING
Sales Group Technical ID STRING
Sales Group ID STRING
Delivery Priority STRING
Complete Delivery BOOLEAN
Currency STRING
Customer Group STRING
Price List STRING
Price Group STRING
Cash Discount Terms STRING
Incoterms_Incoterms STRING
Incoterms_Incoterms Location STRING
Blocking Reasons_Billing Block STRING
Blocking Reasons_Delivery Block STRING
Blocking Reasons_Order Block STRING
Blocking Reasons_Sales Support Block BOOLEAN
5.5.2Account Hierarchy
Account hierarchy is a collection of accounts linked to each other through a parent-child relationship.
Use account hierarchy to:
• Map complex organizational structures of a business partner (for example, buying group, co-operative or
chain of retail outlets).
• Map the complex organizational structure of a large customer with multiple levels of subsidiaries.
5.5.2.1 Account Hierarchy Fields
Download the template from Data Import and Export for the eld level information.
Set Up Guide for SAP Service Cloud Version2
Data Import and Export
PUBLIC 51

5.5.2.1.1 Account Hierarchy
This is the main entity le that contains all the account hierarchies, sub hierarchies, and their linkage.
Account Hierarchy
Template Header
Data Type Notes
external_key STRING
Technical ID STRING This is a mandatory eld.
Sales Organization Technical ID STRING
Distribution Channel Code STRING
Division Code STRING
Parent Account Technical ID STRING This eld can be left blabk for the top
account.
Parent Account Sales Organization ID STRING This eld is not mandatory but is used
in combination with Distribution Chan-
nel and Division. Hence, all three elds
must be maintained.
Parent Account Distribution Channel
Code
STRING This eld is not mandatory but is used
in combination with Sales Organization
ID and Division. Hence, all three elds
must be maintained.
Parent Account Division Code
STRING This eld is not mandatory but is used
in combination with Sales organization
ID and Distribution Channel. Hence, all
three elds must be maintained.
Is Rebate Relevant
BOOLEAN
Is Pricing Determination Relevant BOOLEAN
Usage Type Code STRING This is a mandatory eld. The usage
type should be same for the entire hier-
archy.
5.5.2.1.2 Account Hierarchy External IDs
The sub entity le contains the Externa IDs of the account hierarchies and the source system information.
External IDs
Template Header
Data Type Notes
external_key STRING
External ID STRING This is the ID in the source system.
Business System Technical ID STRING This is the UUID of the business sys-
tem.
Business System ID STRING This is the ID of the business system.
52 PUBLIC
Set Up Guide for SAP Service Cloud Version2
Data Import and Export

Template Header Data Type Notes
ID Type STRING ID Type is constant for account hierar-
chy. The eld value is sap.oitc.985
Main BOOLEAN If there are multiple External IDs, you
can use this eld to mark an external ID
as main or default.
5.5.3Case Overview and Structure
Overview of the Case entity and the structure in the solution.
Cases are a record of a request for some type of service or support from an account, customer, or employee.
This record allows you to track interactions with the service requester. Cases also record details like how much
time has passed since the case was created, what actions were taken to resolve the issue, priority, associated
products, or warranties, and much more. Cases are sometimes referred to as service requests.
Set Up Guide for SAP Service Cloud Version2
Data Import and Export
PUBLIC 53

54 PUBLIC
Set Up Guide for SAP Service Cloud Version2
Data Import and Export

5.5.3.1 Case Dependencies
Case has dependencies on the following entities.
Entity
Notes
Hypernotes Hypernotes are used for the case description and notes con-
tent.
Attachments
5.5.3.2 Supported Operations for Case
Data import and export supports the following operations for the case entity.
Complete Entity Import
Insert Update Delete
Yes Yes Yes No
5.5.3.3 Case Fields
Download the template from Data Import and Export for the eld level information.
5.5.3.3.1 Case
Template Header
Data Type Notes
external_key STRING
Subject STRING
Priority Code STRING
Source STRING
Case Type STRING
Status Code STRING
Escalation Status STRING
Language STRING
Account_Account ID STRING
Contact_Contact ID STRING
Set Up Guide for SAP Service Cloud Version2
Data Import and Export
PUBLIC 55

Template Header Data Type Notes
Individual Customer_Individual Customer ID STRING
Processor_Processor ID STRING
Service Team_Service Team ID STRING
Supplier_Supplier ID STRING
Employee_Employee ID STRING
Supplier Contact_Supplier Contact ID STRING
Bill-To Account_Bill-To Account ID STRING
Bill-To Individual Customer_Bill-To Individual Customer ID STRING
Bill-To Supplier_Bill-To Supplier ID STRING
Ship-To Account_Ship-To Account ID STRING
Ship-to Individual Customer_Ship-To Individual Customer
ID
STRING
Ship-To Supplier_Ship-To Supplier ID STRING
Payer Account_Payer Account ID STRING
Payer Individual Customer_Payer Individual Customer ID STRING
Payer Supplier_Payer Supplier ID STRING
Description_Note ID_HTML_CONTENT STRING
Description_Note ID STRING
TimePoints_Reported on DATETIME
Incident Category Level 1_Category Level 1 ID STRING
Incident Category Level 1_Category Level 1 Display ID STRING
Category Level 2_Category Level 2 ID STRING
Category Level 2_Category Level 2 Display ID STRING
Category Level 3_Category Level 3 ID STRING
Category Level 3_Category Level 3 Display ID STRING
Category Level 4_Category Level 4 ID STRING
Category Level 4_Category Level 4 Display ID STRING
Company_Company ID STRING
Irrelevant Indicator BOOLEAN
56 PUBLIC
Set Up Guide for SAP Service Cloud Version2
Data Import and Export

5.5.3.3.2 Case Approvers
Template Header Data Type Notes
parent_external_key STRING
Approver ID STRING
5.5.3.3.3 Case Functional Locations
Template Header
Data Type Notes
parent_external_key STRING
Functional Location ID STRING
5.5.3.3.4 Case Installed Bases
Template Header
Data Type Notes
parent_external_key STRING
Installed Base ID STRING
5.5.3.3.5 Case Notes
Template Header
Data Type Notes
parent_external_key STRING
Note ID_HTML_CONTENT STRING
Note ID_NOTE_TYPE STRING
Note ID STRING
Set Up Guide for SAP Service Cloud Version2
Data Import and Export
PUBLIC 57

5.5.3.3.6 Case Product Install Points
Template Header Data Type Notes
parent_external_key STRING
Product Install Point ID STRING
5.5.3.3.7 Case Registered Products
Template Header
Data Type Notes
parent_external_key STRING
Registered Product ID STRING
5.5.4Contact Person
Use contacts to represent the relationship between contacts and accounts. Contacts can be maintained only
for corporate accounts.
Contact Persons are individuals you are having direct interactions with for your business to be successful.
Contacts mostly have a relationship with a corporate account and they may be involved in business processes
like activities, orders, opportunities, and so on. Contact Person Relationships can only be maintained for
corporate accounts whereas in general a contact can also exist without any account assignment yet. With the
contact entity and its dedicated sub-entities you can access and modify all central and related information of a
contact (master data).
58
PUBLIC
Set Up Guide for SAP Service Cloud Version2
Data Import and Export

5.5.4.1 Contact Person Dependencies
Dependencies on Other Entities
Entity
Description
Account
Used in Contact Person (Root) and (Is) Contact Person For
entity to assign a Contact to existing Corporate Account(s)
Account Address
Used as basis and prerequisite for the contacts business
address based communication and workplace data
Dependencies within the Entity
Entity
Description
(Is) Contact Person For
The contacts main account relationship data can either be
maintained in Contact Person (Root) or (Is) Contact Person
For entity not in both places simultaneously.
Recommendation is to maintain this Business Address
based details like communication data email, phone or mo-
bile number for the main account at the Contact Person
(Root) entity whereas non-main-account information needs
to be handled via the specic sub-entity.
5.5.4.2 Contact Person Fields
Download the template from Data Import and Export for the eld level information.
5.5.4.2.1 Contact Person
The Contact Person entity allows you access to all central information for a contact person such as Contact
Name and assignment of the contact to the main account (including the business address details of that
relationship). The assignment to an account is mandatory in case you want to maintain any workplace details
like “Email”, “Phone”, “Mobile”, “Fax”, “Building”, “Floor”, “Room”, etc. based on the business address. Use the
address elds in the Contact Person header entity in case only the workplace address to the main account is to
be maintained.
Set Up Guide for SAP Service Cloud Version2
Data Import and Export
PUBLIC 59
Template Header Data Type Notes
external_key STRING
Technical ID STRING
Contact ID STRING Human-readable identier of a contact
person. The Contact ID is internally de-
termined by the system via number
range if not explicitly specied.
Last Name
STRING This eld is mandatory.
Family name of a contact person
First Name STRING Given name of a contact person
Middle Name STRING
Date of Birth DATETIME
Gender STRING
Title STRING
Academic Title STRING
Language STRING
Status STRING ACTIVE will be determined by the sys-
tem if not explicitly specied.
Account Technical ID STRING UUID of the main account to which the
contact is assigned to
Account ID STRING Display ID of the main account to which
the contact is assigned to (Read Only)
Department STRING
Department From Business Card STRING
Job Title STRING Description of the function of the Con-
tact Person within the main accounts
company
Function STRING
VIP Contact STRING
Building STRING Building maintained for the assignment
to the main account
Floor STRING
Room STRING
Phone STRING Conventional phone number for the
contact person's workplace with main
account
Mobile STRING Mobile phone number for the contact
person's workplace with main account
Email STRING Email address for the contact person's
workplace with main account
60 PUBLIC
Set Up Guide for SAP Service Cloud Version2
Data Import and Export

Template Header Data Type Notes
Best Reached By STRING
Contact Permission STRING
5.5.4.2.2 Contact Person for
The 'Contact Person Is Contact Person For' sub-entity oers access to the contact account relationship data.
With this entity you can assign contacts to accounts and add business address details like communication
data email, phone or mobile number. The relationship to the account will always be established based on the
main address of the account. This specic entity has to be used in case a contact person serves as contact for
multiple accounts and the referred account is not the main one. The related information for the contacts' main
account can also me maintained at the Contact Person (root) entity.
Template Header
Data Type Notes
parent_external_key STRING
Technical ID STRING
Account Technical ID STRING
This eld is mandatory for the sub-en-
tity
UUID of the account to which the con-
tact is assigned to
Account ID
STRING
Main Contact BOOLEAN Indicates whether the account is the
contact person's main account (in case
of multiple account assignments for the
contact)
Function
STRING
Department STRING
VIP Contact STRING
Department From Business Card STRING
Job Title STRING Description of the function of the con-
tact person within the assigned ac-
counts company
Building STRING Building maintained for the assignment
to the assigned account
Floor STRING
Room STRING
Phone STRING Conventional phone number for the
contact person's workplace with as-
signed account
Set Up Guide for SAP Service Cloud Version2
Data Import and Export
PUBLIC 61

Template Header Data Type Notes
Mobile STRING Mobile phone number for the contact
person's workplace with main account
Email STRING Email address for the contact person's
workplace with main account
Best Reached By STRING
5.5.5Employee
Employee Master Data capabilities oer a holistic view of internal employees (a business partner person with
valid employee type "INTERNAL").
It allows you to maintain all relevant data for your internal employees such as basic data (name, workplace
address, communication data), organizational data (manager assignment, department), sales responsibility
data, working hours information, and so on.
62
PUBLIC
Set Up Guide for SAP Service Cloud Version2
Data Import and Export

5.5.5.1 Employee Dependencies
Dependencies on Other Entities
Entity
Description
Organizational Unit
Used in Employee Sales Responsibility to assign the employ-
ees to a specic Sales Organization and OrgUnit
Dependencies within the Entity
Entity
Description
Employee Type The employee type address can be maintained in Employee
Employee Working Hours Weekday Operating Period The Employee Working Hours Weekday Operating Period can
be maintained in Employee
5.5.5.2 Employee Fields
Download the template from Data Import and Export for the eld level information.
5.5.5.2.1 Employee
The Employee header entity contains all central information of a employee. It contains information about the
account name and workplace address with communication data like email.
Template Header
Data Type Notes
external_key STRING
Technical ID STRING
Business Partner ID STRING A proprietary identier for a business
partner; alternative identier for the
employee
Employee ID STRING
This eld is mandatory
An identier for an Employee
Set Up Guide for SAP Service Cloud Version2
Data Import and Export
PUBLIC 63

Template Header Data Type Notes
Title STRING
Academic Title STRING
First Name STRING Given name of a person
Middle Name STRING
Last Name STRING
This eld is mandatory
Family name of a person
Additional Last Name STRING
Date of Birth DATETIME The date on which the employee was
born.
Nationality STRING
Marital Status STRING
Gender STRING
Language STRING
Workplace Address_Street STRING Street of the address
Workplace Address_House Number STRING House number of the address
Workplace Address_City STRING City of the address
Workplace Address_Postal Code STRING Postal code for the street address
Workplace Address_Country/Region STRING The country/region of the address
Workplace Address_State_State STRING The state of the address
Workplace Address_District STRING The district of the address
Workplace Address_Latitude NUMBER
Workplace Address_Longitude NUMBER
Workplace Address_Building STRING
Workplace Address_Floor STRING
Workplace Address_Room STRING
Workplace Address_Phone STRING
Workplace Address_Mobile STRING
Workplace Address_Email STRING Email address
Workplace Address_Address Line 1 STRING
Workplace Address_Address Line 2 STRING
Workplace Address_Address Line 4 STRING
Workplace Address_Address Line 5 STRING
64 PUBLIC
Set Up Guide for SAP Service Cloud Version2
Data Import and Export

5.5.5.2.2 Employee Sales Responsibility
The Employee Sales Responsibility entity allows the employee to maintain the sales data.
Template Header
Data Type Notes
parent_external_key STRING
Sales Organization Technical ID STRING
Distribution Channel STRING A coded representation of a distribution
channel
Division STRING A coded representation of a division
Default Sales Responsibility BOOLEAN An indicator to mark one Employee
Sales Responsibility-record as default
for the employee
5.5.5.2.3 Employee Types
The Employee Types entity oers the possibility to maintain the type of the employee (internal or external) and
the validity.
Template Header
Data Type Notes
parent_external_key STRING
Internal Employee BOOLEAN
This eld is mandatory
Valid From DATETIME
This eld is mandatory
Valid To DATETIME
This eld is mandatory
5.5.5.2.4 Employee External IDs
The Employee External IDs entity displays the external ids for employee records.
Template Header
Data Type Notes
parent_external_key STRING
External ID STRING
Business System Technical ID STRING
Business System ID STRING
ID Type STRING
Main BOOLEAN
Set Up Guide for SAP Service Cloud Version2
Data Import and Export
PUBLIC 65

5.5.5.2.5 Employee Working Hours
The Employee Working Hours entity oers access to the working hours data.
Template Header
Data Type Notes
parent_external_key STRING
Type STRING A coded representation of a working
hours type
Valid From DATETIME The period from which the operating
hours are valid
Valid To DATETIME The period till which the operating
hours are valid
Time Zone STRING Time zone in which the operating hours
are specied
Working Day Calendar STRING Calendar with general working days in a
week and public holidays
5.5.5.2.6 Employee Working Hours Operating Periods
The Employee Working Hours Operating Periods entity oers access to the operating period data. With this
entity you can assign working hours operating period to working hours.
Template Header
Data Type Notes
parent_external_key STRING
Weekday STRING
Start Time DATETIME An active time period of a day in a day
program
End Time DATETIME An active time period of a day in a day
program
5.5.6Organizational Unit
Organizational unit containing a hierarchy that represents the hierarchical structure of the organization.
66
PUBLIC
Set Up Guide for SAP Service Cloud Version2
Data Import and Export

5.5.6.1 Organizational Unit Dependencies
Dependencies on Other Entities
Entity
Description
Organizational Unit Assign a parent org unit
Employee Assignments You can assign an employee to the org unit
5.5.6.2 Organizational Unit Fields
Download the template from Data Import and Export for the eld level information.
5.5.6.2.1 Organizational Unit
Note
Do not upload the root eld information simultaneously with the sub node elds as it will lead to
inconsistencies. Please use only root elds or subnode elds.
Template Header
Data Type Notes
external_key STRING
Technical ID STRING
Valid From DATETIME If not provided, defaulted to current
date
Valid To DATETIME If not provided, defaulted to the maxi-
mum end date, 31-December-9999
Organizational Unit ID STRING This eld is mandatory
Name STRING
Status STRING
Current Functions_Company BOOLEAN Do not upload the root eld information
simultaneously with the sub node elds
as it will lead to inconsistencies. Please
use only root elds or subnode elds.
Set Up Guide for SAP Service Cloud Version2
Data Import and Export
PUBLIC 67
Template Header Data Type Notes
Current Functions_Sales Organization BOOLEAN Do not upload the root eld information
simultaneously with the sub node elds
as it will lead to inconsistencies. Please
use only root elds or subnode elds.
Current Functions_Service Organiza-
tion
BOOLEAN Do not upload the root eld information
simultaneously with the sub node elds
as it will lead to inconsistencies. Please
use only root elds or subnode elds.
Current Functions_Sales Oce
BOOLEAN Do not upload the root eld information
simultaneously with the sub node elds
as it will lead to inconsistencies. Please
use only root elds or subnode elds.
Current Functions_Sales Group
BOOLEAN Do not upload the root eld information
simultaneously with the sub node elds
as it will lead to inconsistencies. Please
use only root elds or subnode elds.
Current Functions_Sales
BOOLEAN Do not upload the root eld information
simultaneously with the sub node elds
as it will lead to inconsistencies. Please
use only root elds or subnode elds.
Current Functions_Service
BOOLEAN Do not upload the root eld information
simultaneously with the sub node elds
as it will lead to inconsistencies. Please
use only root elds or subnode elds.
Current Functions_Currency
STRING Do not upload the root eld information
simultaneously with the sub node elds
as it will lead to inconsistencies. Please
use only root elds or subnode elds.
Manager_Manager Technical ID
STRING Do not upload the root eld information
simultaneously with the sub node elds
as it will lead to inconsistencies. Please
use only root elds or subnode elds.
Parent Unit_Parent Unit Technical ID
STRING Do not upload the root eld information
simultaneously with the sub node elds
as it will lead to inconsistencies. Please
use only root elds or subnode elds.
Address_Country/Region
STRING Do not upload the root eld information
simultaneously with the sub node elds
as it will lead to inconsistencies. Please
use only root elds or subnode elds.
Address__State
STRING Do not upload the root eld information
simultaneously with the sub node elds
as it will lead to inconsistencies. Please
use only root elds or subnode elds.
Address__State
STRING Do not upload the root eld information
simultaneously with the sub node elds
as it will lead to inconsistencies. Please
use only root elds or subnode elds.
68 PUBLIC
Set Up Guide for SAP Service Cloud Version2
Data Import and Export

Template Header Data Type Notes
Address_Postal Code STRING Do not upload the root eld information
simultaneously with the sub node elds
as it will lead to inconsistencies. Please
use only root elds or subnode elds.
Address_City
STRING Do not upload the root eld information
simultaneously with the sub node elds
as it will lead to inconsistencies. Please
use only root elds or subnode elds.
Address_Street
STRING Do not upload the root eld information
simultaneously with the sub node elds
as it will lead to inconsistencies. Please
use only root elds or subnode elds.
Address_House Number
STRING Do not upload the root eld information
simultaneously with the sub node elds
as it will lead to inconsistencies. Please
use only root elds or subnode elds.
Address_County
STRING Do not upload the root eld information
simultaneously with the sub node elds
as it will lead to inconsistencies. Please
use only root elds or subnode elds.
Address_District
STRING Do not upload the root eld information
simultaneously with the sub node elds
as it will lead to inconsistencies. Please
use only root elds or subnode elds.
Address_Address Line 1
STRING Do not upload the root eld information
simultaneously with the sub node elds
as it will lead to inconsistencies. Please
use only root elds or subnode elds.
Address_Address Line 2
STRING Do not upload the root eld information
simultaneously with the sub node elds
as it will lead to inconsistencies. Please
use only root elds or subnode elds.
Address_Address Line 4
STRING Do not upload the root eld information
simultaneously with the sub node elds
as it will lead to inconsistencies. Please
use only root elds or subnode elds.
Address_Address Line 5
STRING Do not upload the root eld information
simultaneously with the sub node elds
as it will lead to inconsistencies. Please
use only root elds or subnode elds.
Address_Latitude
NUMBER Do not upload the root eld information
simultaneously with the sub node elds
as it will lead to inconsistencies. Please
use only root elds or subnode elds.
Address_Longitude
NUMBER Do not upload the root eld information
simultaneously with the sub node elds
as it will lead to inconsistencies. Please
use only root elds or subnode elds.
Set Up Guide for SAP Service Cloud Version2
Data Import and Export
PUBLIC 69
Template Header Data Type Notes
Communication Data_Email STRING Do not upload the root eld information
simultaneously with the sub node elds
as it will lead to inconsistencies. Please
use only root elds or subnode elds.
Communication Data_Website
STRING Do not upload the root eld information
simultaneously with the sub node elds
as it will lead to inconsistencies. Please
use only root elds or subnode elds.
Communication Data_Fax
STRING Do not upload the root eld information
simultaneously with the sub node elds
as it will lead to inconsistencies. Please
use only root elds or subnode elds.
Communication Data_Phone
STRING Do not upload the root eld information
simultaneously with the sub node elds
as it will lead to inconsistencies. Please
use only root elds or subnode elds.
Communication Data_Mobile
STRING Do not upload the root eld information
simultaneously with the sub node elds
as it will lead to inconsistencies. Please
use only root elds or subnode elds.
5.5.6.2.2 Organizational Unit Employee Assignments
Note
Do not upload the root eld information simultaneously with the sub node elds as it will lead to
inconsistencies. Please use only root elds or subnode elds.
Template Header
Data Type Notes
parent_external_key STRING
Technical ID STRING
Valid From DATETIME
Valid To DATETIME
Employee Technical ID STRING The employee should be present in the
system.
This eld or the employee display ID is
mandatory.
The employee must be valid during the
period given in the Valid From and Valid
To.
Role
STRING
70 PUBLIC
Set Up Guide for SAP Service Cloud Version2
Data Import and Export

5.5.6.2.3 Organizational Unit External IDs
Template Header Data Type Notes
parent_external_key STRING
Technical ID STRING
External ID STRING
Business System Technical ID STRING
Business System ID STRING
ID Type STRING
Main BOOLEAN
5.5.6.2.4 Organizational Unit Functions
Note
Do not upload the root eld information simultaneously with the sub node elds as it will lead to
inconsistencies. Please use only root elds or subnode elds.
Template Header
Data Type Notes
parent_external_key STRING
Technical ID STRING
Valid From DATETIME
Valid To DATETIME
Company BOOLEAN
Sales Organization BOOLEAN
Service Organization BOOLEAN
Sales Oce BOOLEAN
Sales Group BOOLEAN
Sales BOOLEAN
Service BOOLEAN
Currency STRING Recommended to maintain a currency
either for the company or for the Sales
Organization
Set Up Guide for SAP Service Cloud Version2
Data Import and Export
PUBLIC 71

5.5.6.2.5 Organizational Unit Name and Address
Note
Do not upload the root eld information simultaneously with the sub node elds as it will lead to
inconsistencies. Please use only root elds or subnode elds.
Template Header
Data Type Notes
parent_external_key STRING
Technical ID STRING
Valid From DATETIME
Valid To DATETIME
Name STRING Recommended to maintain this eld
Address Technical ID STRING
Country/Region STRING
_Country/Region STRING
_State STRING
City STRING
Street STRING
House Number STRING
Postal Code STRING
County STRING
District STRING
Address Line 1 STRING
Address Line 2 STRING
Address Line 4 STRING
Address Line 5 STRING
Latitude NUMBER
Longitude NUMBER
Email STRING
Website STRING
Fax STRING
Phone STRING
Mobile STRING
72 PUBLIC
Set Up Guide for SAP Service Cloud Version2
Data Import and Export

5.5.6.2.6 Organizational Unit Parent Units
Note
Do not upload the root eld information simultaneously with the sub node elds as it will lead to
inconsistencies. Please use only root elds or subnode elds.
Template Header
Data Types Notes
parent_external_key STRING
Technical ID STRING
Valid From DATETIME
Valid To DATETIME
Parent Unit Technical ID STRING Recommended to maintain a valid Pa-
rent Unit Technical ID or a Parent Unit
Display ID
Reporting Line BOOLEAN There can be only one reporting line pa-
rent org unit at the same point in time.
5.5.6.2.7 Organizational Unit Allowed Sales Areas
Template Header
Data Types Notes
parent_external_key STRING
Technical ID STRING
Distribution Channel STRING
Division STRING
5.5.7Individual Customer
Individual Customers represent persons with whom business is done.
Similar to account management capabilities for accounts with this entity a holistic view of the Individual
Customer is oered, that allows you to capture, monitor, store and track all critical business information
about customers and prospects. The Individual Customer thereby directly represents a person with whom
your business is done, whereas an account is always an organization. Use this information to focus on your
most protable individual customers, maintain satisfaction and loyalty and consistent interaction across all
channels.
Set Up Guide for SAP Service Cloud Version2
Data Import and Export
PUBLIC 73

5.5.7.1 Individual Customer Dependencies
Dependencies on Other Entities
Entity
Description
Contact Person
Used in Individual Customer Contact Persons entity to as-
sign a Contact to individual customers
Employee
Used in Individual Customer (Root) and Individual Customer
Account Team Members to assign internal and external em-
ployees e.g. as owner to the Individual Customer
Organizational Unit Used in Individual Customer Account Team Members and
Individual Customer Sales Data to assign data relevant for a
specic Sales Organization to the Individual Customer
74 PUBLIC
Set Up Guide for SAP Service Cloud Version2
Data Import and Export

Dependencies within the Entity
Entity Description
Individual Customer Addresses
The default address can either be maintained in the Individ-
ual Customer (Root) or Individual Customer Addresses en-
tity but not in both places simultaneously.
Individual Customer Account Team Members The owner for the individual customer can either be main-
tained in the Individual Customer (Root) or Individual Cus-
tomer Account Team Members entity but not in both places
simultaneously.
5.5.7.2 Individual Customer Fields
Download the template from Data Import and Export for the eld level information.
5.5.7.2.1 Individual Customer
The Individual Customer header entity contains all central information of an individual customer. It contains
information about the customers name, main address with communication data like email, ABC classication
and blocking information. Use the address elds in the individual customer header entity in case only the
default address is to be maintained. It is recommended to ll the Country eld even if you do not provide full
address details.
Template Header
Data Type Notes
external_key STRING
Technical ID STRING
Customer ID STRING Human-readable identier of an Individ-
ual Customer. The Customer ID is in-
ternally determined by the system via
number range if not explicitly specied
Prospect
BOOLEAN A prospect is someone who may be-
come a customer.
Role STRING This eld is mandatory
Use CRM000 for customer
Or BUP002 for prospect
Or any specic Z-code
ABC Classication
STRING ABC classication of a customer
Set Up Guide for SAP Service Cloud Version2
Data Import and Export
PUBLIC 75

Template Header Data Type Notes
Status STRING ACTIVE will be determined by the sys-
tem if not explicitly specied.
Blocking Reasons_Billing Block STRING
Blocking Reasons_Delivery Block STRING
Blocking Reasons_Order Block STRING
Blocking Reasons_Sales Support Block BOOLEAN
Date of Birth DATETIME The date of birth
Language STRING
Nationality STRING Identies the nation to which the cuto-
mer belongs
Gender STRING
Title STRING A form of address, for example, Mr. or
Ms.
Academic Title STRING Identies the academic degree
First Name STRING Given name of an individual customer
Middle Name STRING
Last Name STRING
This eld is mandatory
Family name of an individual customer
Contact Permission STRING An indicator that denes whether it is
allowed to contact the customer
Owner Technical ID STRING Technical ID of the Account Owner (Em-
ployee) as part of the Individual Cus-
tomer (Account) Team
Main Address_Country/Region STRING The country of the customer's address
Main Address_State_State STRING The region (federal state, county) of the
customer's address
Main Address_Postal Code STRING The postal code for the customer's
street address
Main Address_City STRING The city of the customer's address
Main Address_Street STRING The street of the customer's address
Main Address_House Number STRING The house number of the customer's
address
Main Address_County STRING
Main Address_District STRING District of the address
Main Address_Address Line 1 STRING
Main Address_Address Line 2 STRING
Main Address_Address Line 4 STRING
Main Address_Address Line 5 STRING
76 PUBLIC
Set Up Guide for SAP Service Cloud Version2
Data Import and Export

Template Header Data Type Notes
Main Address_Latitude NUMBER
Main Address_Longitude NUMBER
Main Address_Best Reached By STRING
Main Communication Data_Email STRING
Main Communication Data_Website STRING
Main Communication Data_Fax STRING
Main Communication Data_Phone STRING Phone number of the customer
Main Communication Data_Mobile STRING
5.5.7.2.2 Individual Customer Account Team Members
The Individual Customer (Account) Team Members entity allows access to the Individual Customer Team. Here
you can assign employees with a specic party role to the individual customer. These assignments can even be
done sales organization dependent.
Template Header
Data Type Notes
parent_external_key STRING
Employee Technical ID STRING This eld is mandatory
Technical ID of the assigned Employee
Employee ID STRING
Role STRING
This eld is mandatory
The type of responsibility the employee
has for the business partner.
Sales Organization Technical ID STRING Technical ID of the Sales Organization.
It is required for Sales Area dependent
Individual Customer Team.
Distribution Channel STRING
Division STRING
Main BOOLEAN Main indicator for given party role, sales
area and validity period
Valid From DATETIME Start date of the validity of the cus-
tomer team assignment of the em-
ployee
Valid To DATETIME End date of the validity of the customer
team assignment of the employee
Set Up Guide for SAP Service Cloud Version2
Data Import and Export
PUBLIC 77

5.5.7.2.3 Individual Customer Addresses
The Individual Customer Addresses entity oers access and maintenance of the individual customer
addresses. The address includes postal address details as well as communication data details like email
or phone number. You can specify for a dedicated address whether it should be the main address for the
individual customer. Use the Individual Customer Addresses entity in case of multiple addresses. If you want to
maintain/change only the main address, then use the Individual Customer header entity.
Template Header
Data Type Notes
parent_external_key STRING
Main BOOLEAN Specication of main address
Country/Region STRING Country/region of the customer's ad-
dress
State_State STRING The region (federal state, county) of the
customer's address
City STRING City of customer's address
Street STRING Street of customer's address
House Number STRING House number of customer's address
Postal Code STRING Postal code of the customer's street ad-
dress
County STRING
District STRING District of customer's address
Address Line 1 STRING
Address Line 2 STRING
Address Line 4 STRING
Address Line 5 STRING
Latitude NUMBER
Longitude NUMBER
Best Reached By STRING
E-mail STRING Email address
Website STRING
Fax STRING
Phone STRING
Mobile STRING
78 PUBLIC
Set Up Guide for SAP Service Cloud Version2
Data Import and Export

5.5.7.2.4 Individual Customer Identications
The Individual Customer Identication entity oers access to the individual customers identication data.
Template Header
Data Type Notes
parent_external_key STRING
ID Type STRING
This eld is mandatory
A code representation of the type of an
identication number
ID Number STRING
This eld is mandatory
The identication number itself
Valid From DATETIME
Valid To DATETIME
Institution Responsible STRING Name of the institution (government
agency, registry oce), company (Dun
& Bradstreet), an organization (UN)
that issued the identication number
Entry Date
DATETIME
Country/Region STRING
State_State STRING
5.5.7.2.5 Individual Customer Sales Arrangements
The Individual Customer Sales Data entity allows access to the individual customers sales data.
Template Header
Data Type Notes
parent_external_key STRING
Sales Organization Technical ID STRING
This eld is mandatory
Technical ID of the Sales Organization.
Sales Organization ID STRING
Distribution Channel STRING
Division STRING
Marked for Deletion BOOLEAN Use this to mark a Sales Area for de-
letion. Required in integrated environ-
ments where physical deletion of sales
arrangements is not allowed
Sales Oce Technical ID
STRING
Sales Oce ID STRING
Set Up Guide for SAP Service Cloud Version2
Data Import and Export
PUBLIC 79

Template Header Data Type Notes
Sales Group Technical ID STRING
Sales Group ID STRING
Delivery Priority STRING
Complete Delivery BOOLEAN
Currency STRING
Customer Group STRING
Price List STRING
Price Group STRING
Cash Discount Terms STRING
Incoterms_Incoterms STRING
Incoterms_Incoterms Location STRING
Blocking Reasons_Billing Block STRING
Blocking Reasons_Delivery Block STRING
Blocking Reasons_Order Block STRING
Blocking Reasons_Sales Support Block BOOLEAN
5.5.7.2.6 Individual Customer Relationships
The Individual Customer Relationships allows establish relationships between business partners.
Template Header
Data Type Notes
parent_external_key STRING
Technical ID STRING
This eld is mandatory
Business Partner Relationship Role STRING
Business Partner Technical ID STRING
Business Partner ID STRING
Sales Organization Technical ID STRING
Sales Organization ID STRING
Sales Group Technical ID STRING
Distribution Channel STRING
Division STRING
Main Relationship STRING
80 PUBLIC
Set Up Guide for SAP Service Cloud Version2
Data Import and Export

5.5.8Product
A product is the item oered for sale and it can be a service or a physical item. A product can be of real or
virtual form. Each product is made at a cost and sold at a price and the price depends on the quality, market,
the marketing, and the targeted segment.
5.5.8.1 Product Dependencies
Dependencies on Other Entities
Entity
Description
Product Group Used in product root to assign a product group to product(s)
Organizational Unit Used in product sales distribution chains to assign sales data to product(s)
5.5.8.2 Product Fields
Download the template from Data Import and Export for the eld level information.
5.5.8.2.1 Product
Template Header
Data Type Notes
external_key STRING
Technical ID STRING
Product ID STRING Mandatory eld
Status Code STRING Mandatory eld. If no value is provided, then the default will be
In_PREPARATION
Unit of Measure Code STRING Mandatory eld
Name STRING Mandatory eld
Description STRING
Product Group Technical ID STRING
Technical ID of the product group created in the system.
Set Up Guide for SAP Service Cloud Version2
Data Import and Export
PUBLIC 81

Template Header Data Type Notes
Product Group ID STRING Display ID of the product group created in the system.
5.5.8.2.2 Product Descriptions
Template Header
Data Type Notes
parent_external_key STRING
Technical ID STRING
Description STRING A user-dened language-dependent text that provides more
information about the product.
Maximum length: 5000
Language Code STRING
5.5.8.2.3 Product External IDs
Template Header
Data Type Notes
parent_external_key STRING
Technical ID STRING
External ID STRING
Business System Technical ID STRING Technical GUID of the Communication System.
Business System ID STRING Display ID of the Communication System.
ID Type STRING
Main BOOLEAN
5.5.8.2.4 Product Names
Template Header
Data Type Notes
parent_external_key STRING
Technical ID STRING
82 PUBLIC
Set Up Guide for SAP Service Cloud Version2
Data Import and Export

Template Header Data Type Notes
Name STRING Denition of product names in multiple languages.
Maximum length: 255
Language Code STRING
5.5.8.2.5 Product Sales Distribution Chains
Template Header
Data Type Notes
parent_external_key STRING
Technical ID STRING
Sales Organization Technical ID STRING
Organizational Unit Technical ID which is created in the system.
This is a mandatory eld.
Distribution Channel Code STRING This is a mandatory eld.
Sales Unit Of Measure Code STRING
Minimum Order Quantity_Quantity NUMBER
Minimum Order Quantity_Unit of Meas-
ure Code
STRING Minimum Order Quantity Unit of Measure Code must be equal
to the eld Unit of Measure Code of the entity Product. If it is
not maintained during the creation of the corresponding Product
Sales Distribution Chains entry, then it defaults to the Unit of
Measure Code of the Product.
Sales Status Code
STRING Sales status code that is dened in administrator settings > sales
status schema
5.5.8.2.6 Product Unit of Measure Conversion
Template Header
Data Type Notes
parent_external_key STRING
Technical ID STRING
Quantity NUMBER
Unit of Measure Code STRING
Corresponding Quantity NUMBER
Corresponding Unit of Measure Code STRING
Set Up Guide for SAP Service Cloud Version2
Data Import and Export
PUBLIC 83

5.5.8.2.7 Product Unit of Measure
Template Header Data Type Notes
parent_external_key STRING
Technical ID STRING
Unit of Measure Code STRING
5.5.8.3 Product Group
A product group is a group of products categorized based on the shared attributes like usage, features,
production processes and so on. A product group can also be the market or customer segment in which the
products are sold or the prices at which they're oered.
For the eld level information of product group, download the product group template from User Prole
Settings Monitoring Data Import and Export .
Template Header
Data Type Notes
parent_external_key STRING
external_key STRING
Technical ID STRING
Product Group ID STRING Mandatory eld
Parent Product Group Technical ID Technical ID of the parent product group created in the system.
Name STRING Mandatory eld
Parent Product Group ID STRING Display ID of the parent product group created in the system.
5.5.8.3.1 Product Group External IDs
Template Header
Data Type Notes
parent_external_key STRING
Technical ID STRING
External ID STRING
Business System Technical ID STRING
Business System ID STRING
ID Type STRING
84 PUBLIC
Set Up Guide for SAP Service Cloud Version2
Data Import and Export

Template Header Data Type Notes
Main BOOLEAN
5.5.8.3.2 Product Group Names
Template Header
Data Type Notes
parent_external_key STRING
Technical ID STRING
Name STRING Denition of product group names in multiple languages.
Maximum length: 255
Language Code STRING
5.5.9Product Group
A product group is a group of products categorized based on the shared attributes like usage, features,
production processes and so on. A product group can also be the market or customer segment in which the
products are sold or the prices at which they're oered.
For the eld level information of product group, download the product group template from
User Prole
Settings Monitoring Data Import and Export .
Template Header
Data Type Notes
parent_external_key STRING
external_key STRING
Technical ID STRING
Product Group ID STRING Mandatory eld
Parent Product Group Technical ID Technical ID of the parent product group created in the system.
Name STRING Mandatory eld
Parent Product Group ID STRING Display ID of the parent product group created in the system.
Set Up Guide for SAP Service Cloud Version2
Data Import and Export
PUBLIC 85

5.5.9.1 Product Group External IDs
Template Header Data Type Notes
parent_external_key STRING
Technical ID STRING
External ID STRING
Business System Technical ID STRING
Business System ID STRING
ID Type STRING
Main BOOLEAN
5.5.9.2 Product Group Names
Template Header
Data Type Notes
parent_external_key STRING
Technical ID STRING
Name STRING Denition of product group names in multiple languages.
Maximum length: 255
Language Code STRING
86 PUBLIC
Set Up Guide for SAP Service Cloud Version2
Data Import and Export

5.5.10Service Categories Overview and Structure
Overview of the Service Category entity and the structure in the solution.
5.5.10.1Service Categories Dependencies
Dependencies on Other Entities
Entity
Description
Service Catalog Each service category must be associated with a service catalog
Set Up Guide for SAP Service Cloud Version2
Data Import and Export
PUBLIC 87

Dependencies within the Entity
Entity Description
Category Names
Provide name values in dierent languages
Category Descriptions
Provide descriptions in dierent languages
5.5.10.2Service Category Fields
Download the template from Data Import and Export for the eld level information.
5.5.10.2.1Service Category
Enter each category in a separate row. The Name and Description values entered in this root le are stored
for English. Use the Category Names and Category Descriptions les to enter translations for these values in
additional languages.
Template Header
Data Type Notes
parent_external_key STRING Enter the external key of the parent cat-
egory. Leave blank for top-level catego-
ries.
external_key STRING
Catalog Display ID STRING required
Category Display ID STRING required
Image URL STRING
Category Name STRING required
Category Description STRING
Category Status STRING Enter status codes as provided in cate-
gory status le
Parent Category Display ID STRING Enter the display ID of the parent cat-
egory. Leave blank for top-level catego-
ries.
88 PUBLIC
Set Up Guide for SAP Service Cloud Version2
Data Import and Export

5.5.10.2.2Category Names
Use Category Names to enter name values for dierent languages. Prepare a le for all category names to be
translated into dierent languages and enter each language translation in a separate row.
Template Header
Data Type Notes
parent_external_key STRING Enter the external key of the category
to be translated
content STRING Enter the translated name here
languageCode STRING Use language codes provided in the
Langauge-Code le
5.5.10.2.3Category Descriptions
Use Category Descriptions to enter description values for dierent languages. Prepare a le for all category
descriptions to be translated in dierent languages and enter each language translation in a separate row.
Template Header
Data Type Notes
parent_external_key STRING Enter the external key of the category
to be translated
content STRING Enter the translated description here
languageCode STRING Use language codes provided in the
Langauge-Code le
5.5.11Service Catalogs
Overview of the Service Catalog entity and the structure in the solution.
Service catalogs are collections of service categories. Each service category must be assigned to a service
catalog.
Set Up Guide for SAP Service Cloud Version2
Data Import and Export
PUBLIC 89

5.5.11.1Service Catalog Dependencies
Dependencies within the Entity
Entity
Description
Catalog Names
Provide name values in dierent languages
Catalog Descriptions
Provide descriptions in dierent languages
5.5.11.2Service Catalog Fields
Download the template from Data Import and Export for the eld level information.
90
PUBLIC
Set Up Guide for SAP Service Cloud Version2
Data Import and Export

5.5.11.2.1Service Catalog
Enter each Catalog to be imported in a separate row. The Name and Description values entered in this root le
are stored for English. Use the Catalog Names and Catalog Descriptions les to enter translations for these
values in additional languages.
Template Header
Data Type Notes
external_key STRING
Catalog ID required - unique technical ID for the
catalog
Catalog Display ID STRING required
Catalog Name STRING required
Catalog Description STRING
Use Images BOOLEAN
Catalog Status STRING Enter status codes provided in the cata-
log status le
Object Types Supported ARRAY
• Case: 2886
• Phone: 86
• Chat: 1976
• Email: 39
If the catalog is used for all object
types, enter "2886";"86";"1976";"39" in
the eld
Catalog Administration Data_Created By
STRING
Catalog Administration Data_Created On DATETIME
Catalog Administration Data_Updated By STRING
Catalog Administration Data_Updated On DATETIME
5.5.11.2.2Catalog Names
Use Catalog Names to enter name values for dierent languages. Prepare a le for all catalog names to be
translated into dierent languages and enter each language translation in a separate row.
Template Header
Data Type Notes
parent_external_key STRING Enter the external key of the catalog to
be translated
content STRING Enter the translated name here
languageCode STRING Use language codes provided in the
Langauge-Code le
Set Up Guide for SAP Service Cloud Version2
Data Import and Export
PUBLIC 91

5.5.11.2.3Catalog Descriptions
Use Catalog Descriptions to enter description values for dierent languages. Prepare a le for all catalog
descriptions to be translated in dierent languages and enter each language translation in a separate row.
Template Header
Data Type Notes
parent_external_key STRING Enter the external key of the catalog to
be translated
content STRING Enter the translated description here
languageCode STRING Use language codes provided in the
Langauge-Code le
5.5.12Registered Products
A registered product is an instance of a product that is associated with a specic customer and generally has
a unique serial number. The registered product information allows the service agent to identify the customer
product and any associated warranties or service entitlements
5.5.12.1Registered Product Dependencies
Dependencies on Other Entities
Entity
Description
Account Used as Customer, Ship To, Bill To, Owner and Payer
Individual Customer Used as Customer, Ship To, Bill To, Owner and Payer
Contact Used as Main contact of Customer, Ship To, Bill To, Owner and Payer Accounts
Employee Used as Service Technician and Employee Responsible
Organizational Unit Used as Responsible Planner, Service Technician Team, Sales Org
Product
Warranty
92 PUBLIC
Set Up Guide for SAP Service Cloud Version2
Data Import and Export

5.5.12.2Registered Product Fields
Download the template from Data Import and Export for the eld level information.
5.5.12.2.1Registered Product
Template Header
Data Type Notes
external_key STRING
ID STRING
Status STRING
Account_Contact UUID STRING
Account_Account UUID STRING
Individual Customer_Individual Customer UUID STRING
Ship-to Account_Ship-To Contact UUID STRING
Ship-to Account_Ship-To Account UUID STRING
Ship-to Individual Customer_Ship-To Individual Cus-
tomer UUID
STRING
Bill-to Account_Bill-To Contact UUID STRING
Bill-to Account_Bill-To Account UUID STRING
Bill-to Individual Customer_Bill-To Individual Cus-
tomer UUID
STRING
Payer Account_Payer Contact UUID STRING
Payer Account_Payer Account UUID STRING
Payer Individual Customer_Payer Individual Customer
UUID
STRING
Owner Account_Owner Contact UUID STRING
Owner Account_Owner Account UUID STRING
Owner Individual Customer_Owner Individual Cus-
tomer UUID
STRING
Service Technician Team_Service Technician Team
UUID
STRING
Responsible Planner_Responsible Planner UUID STRING
Service Technician_Service Technician UUID STRING
Employee Responsible_Employee Responsible UUID STRING
Address_Postal Address_Building STRING
Address_Postal Address_City STRING
Set Up Guide for SAP Service Cloud Version2
Data Import and Export
PUBLIC 93

Template Header Data Type Notes
Address_Postal Address_Country/Region Code STRING
Address_Postal Address_State Code STRING
Address_Postal Address_County STRING
Address_Postal Address_District STRING
Address_Postal Address_Floor STRING
Address_Postal Address_House Number STRING
Address_Postal Address_Additional House Number STRING
Address_Postal Address_Room STRING
Address_Postal Address_Street STRING
Address_Postal Address_Street Postal Code STRING
Address_Postal Address_Time Zone STRING
Address_Postal Address_Street Prex STRING
Address_Postal Address_Street Sux STRING
Address_Postal Address_Additional Street Prex STRING
Address_Postal Address_Additional Street Sux STRING
Address_Postal Address_C/O STRING
Address_Postal Address_P.O. Box City STRING
Address_Postal Address_P.O. Box Country/Region STRING
Address_Postal Address_P.O. Box STRING
Address_Postal Address_P.O. Box Postal Code STRING
Address_Postal Address_P.O. Box State STRING
Address_Geographical Location_Latitude STRING
Address_Geographical Location_Longitude STRING
Registered Product category_Registered Product Cat-
egory Code
STRING
Reference Product_Product UUID STRING
Parent Registered Product_Parent Registered Product
UUID
STRING
Parent Installation Point_Parent Installation Point
UUID
STRING
Parent Installed Base_Parent Installed Base UUID STRING
Reference Date DATETIME
Serial ID STRING
Warranty_Warranty UUID STRING
Warranty_Warranty End Date DATETIME
Warranty_Warranty Start Date DATETIME
94 PUBLIC
Set Up Guide for SAP Service Cloud Version2
Data Import and Export

Template Header Data Type Notes
Sales Oce_Sales Oce UUID STRING
Sales Group_Sales Group UUID STRING
Sales Organization_Sales Organization UUID STRING
Division Code STRING
Distribution Channel Code STRING
5.5.12.2.2Registered Product External IDs
Template Header
Data Type Notes
parent_external_key STRING
id STRING
External ID STRING
Communication System ID STRING
Communication System UUID STRING
Type STRING
Default BOOLEAN
5.5.12.2.3Registered Product Descriptions
Template Header
Data Type Notes
parent_external_key STRING
content STRING
languageCode STRING
5.5.12.2.4Registered Product Notes
Template Header
Data Type Notes
parent_external_key STRING
content STRING
Set Up Guide for SAP Service Cloud Version2
Data Import and Export
PUBLIC 95

Template Header Data Type Notes
languageCode STRING
5.5.12.2.5Registered Product Customer Information
Template Header
Data Type Notes
parent_external_key STRING
content STRING
languageCode STRING
5.5.13Installed Base
Installed base is a hierarchical arrangement of items installed at your customer’s location.
5.5.13.1Installed Base Dependencies
Dependencies on Other Entities
Entity
Description
Account Used as Customer, Ship To, Bill To, Owner and Payer
Individual Customer Used as Customer, Ship To, Bill To, Owner and Payer
Contact Used as Main contact of Customer, Ship To, Bill To, Owner and Payer Accounts
Employee Used as Service Technician and Employee Responsible
Organizational Unit Used as Responsible Planner, Service Technician Team, Sales Org
5.5.13.2Installed Base Fields
Download the template from Data Import and Export for the eld level information.
96
PUBLIC
Set Up Guide for SAP Service Cloud Version2
Data Import and Export

5.5.13.2.1Installed Base
Template Header String Type Notes
external_key STRING
Account_Contact UUID STRING
Account_Account UUID STRING
Bill-to Account_Bill-To Contact UUID STRING
Bill-to Account_Bill-To Account UUID STRING
Ship-to Account_Ship-To Contact UUID STRING
Ship-to Account_Ship-To Account UUID STRING
Individual Customer_Individual Customer UUID STRING
Bill-To Individual Customer_Bill-To Individual Cus-
tomer UUID
STRING
Ship-to Individual Customer_Ship-To Individual Cus-
tomer UUID
STRING
Status STRING
ID STRING
Address_Postal Address_Building STRING
Address_Postal Address_City STRING
Address_Postal Address_Country/Region Code STRING
Address_Postal Address_State Code STRING
Address_Postal Address_County STRING
Address_Postal Address_District STRING
Address_Postal Address_Floor STRING
Address_Postal Address_House Number STRING
Address_Postal Address_Additional House Number STRING
Address_Postal Address_Room STRING
Address_Postal Address_Street STRING
Address_Postal Address_Street Postal Code STRING
Address_Postal Address_Time Zone STRING
Address_Postal Address_Street Prex STRING
Address_Postal Address_Street Sux STRING
Address_Postal Address_Additional Street Prex STRING
Address_Postal Address_Additional Street Sux STRING
Address_Postal Address_C/O STRING
Address_Postal Address_P.O. Box City STRING
Set Up Guide for SAP Service Cloud Version2
Data Import and Export
PUBLIC 97

Template Header String Type Notes
Address_Postal Address_P.O. Box Country/Region STRING
Address_Postal Address_P.O. Box STRING
Address_Postal Address_P.O. Box Postal Code STRING
Address_Postal Address_P.O. Box State STRING
Address_Geographical Location_Latitude STRING
Address_Geographical Location_Longitude STRING
Payer Account_Payer Contact UUID STRING
Payer Account_Payer Account UUID STRING
Payer Individual Customer_Payer Individual Cus-
tomer UUID
STRING
Owner Account_Owner Contact UUID STRING
Owner Account_Owner Account UUID STRING
Owner Individual Customer_Owner Individual Cus-
tomer UUID
STRING
Service Technician Team_Service Technician Team
UUID
STRING
Responsible Planner_Responsible Planner UUID STRING
Service Technician_Service Technician UUID STRING
Employee Responsible_Employee Responsible UUID STRING
5.5.13.2.2Installed Base Descriptions
Template Header
Data Type Notes
parent_external_key STRING
content STRING
languageCode STRING
5.5.13.2.3Installed Base Notes
Template Header
Data Type Notes
parent_external_key STRING
content STRING
98 PUBLIC
Set Up Guide for SAP Service Cloud Version2
Data Import and Export

Template Header Data Type Notes
languageCode STRING
5.5.14Functional Location
5.5.14.1Functional Location Dependencies
Dependencies on Other Entities
Entity
Description
Account Used as Customer, Ship To, Bill To, Owner and Payer
Individual Customer Used as Customer, Ship To, Bill To, Owner and Payer
Contact Used as Main contact of Customer, Ship To, Bill To, Owner and Payer Accounts
Employee Used as Service Technician and Employee Responsible
Organizational Unit Used as Responsible Planner, Service Technician Team, Sales Org
Warranty
5.5.14.2Functional Location Fields
Download the template from Data Import and Export for the eld level information.
5.5.14.2.1Functional Location
Template Header
String Type Notes
external_key STRING
Valid From DATETIME
Valid To DATETIME
Set Up Guide for SAP Service Cloud Version2
Data Import and Export
PUBLIC 99

Template Header String Type Notes
Account_Contact UUID STRING
Account_Account UUID STRING
Bill-to Account_Bill-To Contact UUID STRING
Bill-to Account_Bill-To Account UUID STRING
Ship-to Account_Ship-To Contact UUID STRING
Ship-to Account_Ship-To Account UUID STRING
Payer Account_Payer Contact UUID STRING
Payer Account_Payer Account UUID STRING
Owner Account_Owner Contact UUID STRING
Owner Account_Owner Account UUID STRING
Individual Customer_Individual Customer UUID STRING
Bill-To Individual Customer_Bill-To Individual Customer
UUID
STRING
Ship-to Individual Customer_Ship-To Individual Cus-
tomer UUID
STRING
Payer Individual Customer_Payer Individual Customer
UUID
STRING
Owner Individual Customer_Owner Individual Customer
UUID
STRING
Service Technician Team_Service Technician Team UUID STRING
Responsible Planner_Responsible Planner UUID STRING
Service Technician_Service Technician UUID STRING
Employee Responsible_Employee Responsible UUID STRING
Warranty_Warranty UUID STRING
Warranty_Warranty End Date DATETIME
Warranty_Warranty Start Date DATETIME
Status STRING
ID STRING
Address_Postal Address_Building STRING
Address_Postal Address_City STRING
Address_Postal Address_Country/Region Code STRING
Address_Postal Address_State Code STRING
Address_Postal Address_County STRING
Address_Postal Address_District STRING
Address_Postal Address_Floor STRING
Address_Postal Address_House Number STRING
100 PUBLIC
Set Up Guide for SAP Service Cloud Version2
Data Import and Export

Template Header String Type Notes
Address_Postal Address_Additional House Number STRING
Address_Postal Address_Room STRING
Address_Postal Address_Street STRING
Address_Postal Address_Street Postal Code STRING
Address_Postal Address_Time Zone STRING
Address_Postal Address_Street Prex STRING
Address_Postal Address_Street Sux STRING
Address_Postal Address_Additional Street Prex STRING
Address_Postal Address_Additional Street Sux STRING
Address_Postal Address_C/O STRING
Address_Postal Address_P.O. Box City STRING
Address_Postal Address_P.O. Box Country/Region STRING
Address_Postal Address_P.O. Box STRING
Address_Postal Address_P.O. Box Postal Code STRING
Address_Postal Address_P.O. Box State STRING
Address_Geographical Location_Latitude STRING
Address_Geographical Location_Longitude STRING
Sales Oce_Sales Oce UUID STRING
Sales Group_Sales Group UUID STRING
Sales Organization_Sales Organization UUID STRING
Division Code STRING
Distribution Channel Code STRING
Type STRING
Parent Registered Product_Parent Registered Product
UUID
STRING
Parent Installation Point_Parent Installation Point UUID STRING
Parent Installed Base_Parent Installed Base UUID STRING
Extensions_asdD STRING
Extensions_z_bool_search_ref BOOLEAN
Set Up Guide for SAP Service Cloud Version2
Data Import and Export
PUBLIC 101

5.5.14.2.2Functional Location Customer Information
Template Header String Type Notes
parent_external_key STRING
content STRING
languageCode STRING
5.5.14.2.3Functional Location Descriptions
Template Header
String Type Notes
parent_external_key STRING
content STRING
languageCode STRING
5.5.14.2.4Functional Location External IDs
Template Header
String Type Notes
parent_external_key STRING
id STRING
External ID STRING
Communication System ID STRING
Communication System UUID STRING
Type STRING
Default BOOLEAN
5.5.14.2.5Functional Location Notes
Template Header
String Type Notes
parent_external_key STRING
content STRING
102 PUBLIC
Set Up Guide for SAP Service Cloud Version2
Data Import and Export

Template Header String Type Notes
languageCode STRING
5.5.14.2.6Functional Location Account Custom Parties
Template Header
String Type Notes
parent_external_key STRING
Role Code STRING
Contact UUID STRING
Account UUID STRING
5.5.14.2.7Functional Location Employee Custom Parties
Template Header
String Type Notes
parent_external_key STRING
Role Code STRING
Employee UUID STRING
5.5.14.2.8Functional Location_Individual Customer Custom
Parties
Template Header
String Type Notes
parent_external_key STRING
Role Code STRING
Individual Customer UUID STRING
Set Up Guide for SAP Service Cloud Version2
Data Import and Export
PUBLIC 103

5.5.14.2.9Functional Location Organization Custom Parties
Template Header String Type Notes
parent_external_key STRING
Role Code STRING
Organization UUID STRING
5.5.15Product Installation Point
An installation point is the physical location of the object that requires servicing or maintenance based on the
service or maintenance plan for that object.
5.5.15.1Product Installation Point Dependencies
Dependencies on Other Entities
Entity
Description
Account Used as Customer, Ship To, Bill To, Owner and Payer
Individual Customer Used as Customer, Ship To, Bill To, Owner and Payer
Contact Used as Main contact of Customer, Ship To, Bill To, Owner and Payer Accounts
Employee Used as Service Technician and Employee Responsible
Organizational Unit Used as Responsible Planner, Service Technician Team, Sales Org
Product
5.5.15.2Product Installation Point Fields
Download the template from Data Import and Export for the eld level information.
104
PUBLIC
Set Up Guide for SAP Service Cloud Version2
Data Import and Export

5.5.15.2.1Product Installation Point
Template Header Data Type Notes
external_key STRING
Reference Product_Product UUID STRING
Type STRING
Quantity_Quantity NUMBER
Quantity_Unit of Measure STRING
Account_Contact UUID STRING
Account_Account UUID STRING
Bill-to Account_Bill-To Contact UUID STRING
Bill-to Account_Bill-To Account UUID STRING
Ship-to Account_Ship-To Contact UUID STRING
Ship-to Account_Ship-To Account UUID STRING
Payer Account_Payer Contact UUID STRING
Payer Account_Payer Account UUID STRING
Owner Account_Owner Contact UUID STRING
Owner Account_Owner Account UUID STRING
Individual Customer_Individual Customer UUID STRING
Bill-To Individual Customer_Bill-To Individual Customer
UUID
STRING
Ship-to Individual Customer_Ship-To Individual Customer
UUID
STRING
Payer Individual Customer_Payer Individual Customer
UUID
STRING
Owner Individual Customer_Owner Individual Customer
UUID
STRING
Service Technician Team_Service Technician Team UUID STRING
Responsible Planner_Responsible Planner UUID STRING
Service Technician_Service Technician UUID STRING
Employee Responsible_Employee Responsible UUID STRING
Status STRING
ID STRING
Address_Postal Address_Building STRING
Address_Postal Address_City STRING
Address_Postal Address_Country/Region Code STRING
Address_Postal Address_State Code STRING
Set Up Guide for SAP Service Cloud Version2
Data Import and Export
PUBLIC 105

Template Header Data Type Notes
Address_Postal Address_County STRING
Address_Postal Address_District STRING
Address_Postal Address_Floor STRING
Address_Postal Address_House Number STRING
Address_Postal Address_Additional House Number STRING
Address_Postal Address_Room STRING
Address_Postal Address_Street STRING
Address_Postal Address_Street Postal Code STRING
Address_Postal Address_Time Zone STRING
Address_Postal Address_Street Prex STRING
Address_Postal Address_Street Sux STRING
Address_Postal Address_Additional Street Prex STRING
Address_Postal Address_Additional Street Sux STRING
Address_Postal Address_C/O STRING
Address_Postal Address_P.O. Box City STRING
Address_Postal Address_P.O. Box Country/Region STRING
Address_Postal Address_P.O. Box STRING
Address_Postal Address_P.O. Box Postal Code STRING
Address_Postal Address_P.O. Box State STRING
Address_Geographical Location_Latitude STRING
Address_Geographical Location_Longitude STRING
Parent Registered Product_Parent Registered Product
UUID
STRING
Parent Installation Point_Parent Installation Point UUID STRING
Parent Installed Base_Parent Installed Base UUID STRING
5.5.15.2.2Product Installation Point External IDs
Template Header
Data Type Notes
parent_external_key STRING
id STRING
External ID STRING
Communication System ID STRING
106 PUBLIC
Set Up Guide for SAP Service Cloud Version2
Data Import and Export

Template Header Data Type Notes
Communication System UUID STRING
Type STRING
Default BOOLEAN
5.5.15.2.3Product Installation Point Customer Information
Template Header
Data Type Notes
parent_external_key STRING
content STRING
languageCode STRING
5.5.15.2.4Product Installation Point Notes
Template Header
Data Type Notes
parent_external_key STRING
content STRING
languageCode STRING
5.5.15.2.5Product Installation Point Descriptions
Template Header
Data Type Notes
parent_external_key STRING
content STRING
languageCode STRING
5.5.16Warranty
Warranty is assigned to a registered product or installation point, and you can determine its coverage in a
ticket.
Set Up Guide for SAP Service Cloud Version2
Data Import and Export
PUBLIC 107

5.5.16.1Warranty Fields
Download the template from Data Import and Export for the eld level information.
5.5.16.1.1Warranty
Template Header
Data Type Notes
external_key STRING
Status STRING
Duration DATETIME
5.5.16.1.2Warranty External IDs
Template Header
Data Type Notes
parent_external_key STRING
id STRING
External ID STRING
Communication System ID STRING
Communication System UUID STRING
Type STRING
Default BOOLEAN
5.5.16.1.3Warranty Descriptions
Template Header
Data Type Notes
parent_external_key STRING
content STRING
languageCode STRING
108 PUBLIC
Set Up Guide for SAP Service Cloud Version2
Data Import and Export

5.5.17Users
Users in the system refers to employees, business users and other users such as partner contacts. Users are
assigned to business roles and access controls in the system are implemented on business roles.
Each business user must have at least one business role assigned that governs the access of the user to the
system.
5.5.17.1User Fields
Download the template from Data Import and Export for eld level information.
5.5.17.1.1Users
The Users header entity contains all central information of a user.
Template Header
Data Type Notes
external_key STRING Unique eld used by data import and
export for processing the respective im-
port tasks
Technical ID STRING Technical reference ID for user based
on integration scenarios
System Specic ID STRING
User Name STRING Name of the user
Status STRING Status of the user
Given Name STRING First name of the user
Family Name STRING Last name of the user
User Type STRING
Employee ID STRING
Security Policy_Technical ID STRING
Valid From DATETIME
Valid Until DATETIME
Admin Data_Created By STRING
Admin Data_Created On DATETIME
Admin Data_Changed By STRING
Admin Data_Changed On DATETIME
Set Up Guide for SAP Service Cloud Version2
Data Import and Export
PUBLIC 109

5.5.17.1.2User Roles
The User Roles entity contains all the information of a user role.
Template Header
Data Type Notes
parent_external_key STRING
Technical ID STRING
Role ID STRING
110 PUBLIC
Set Up Guide for SAP Service Cloud Version2
Data Import and Export

6 Congure Agent Desktop
Administrators can congure agent desktop in Settings.
Find Settings in the user prole menu at the top of the screen.
Tip
Expand a collapsible section heading to view the conguration steps.
6.1 Congure General Settings
Enable automatic activity creation and open agent desktop automatically when a service agent accepts an
incoming interaction.
Context
You can congure the solution to automatically create activity entities for either incoming or outbound
interactions, or for both. This screen is also where you enable agent desktop to open automatically upon
accepting an incoming interaction.
Procedure
1. Go to your user prole and select Settings Agent Desktop General Settings .
2. Select the checkbox to enable one or more of these options:
• Create Activity from Interaction - Inbound Create an activity record for each incoming interaction
automatically.
• Create Activity from Interaction - Outbound Create an activity record for each outgoing interaction
automatically.
• Open Agent Desktop Open the agent desktop when an agent accepts an incoming interaction.
3. Save your changes.
Set Up Guide for SAP Service Cloud Version2
Congure Agent Desktop
PUBLIC 111

6.2 Congure Communication Provider
Congure communication system provider and widget size.
Prerequisites
A third-party communication system integrated with your solution. The communication system must be
available as a widget or embedded frame inside the agent desktop interface. For more details, see the
integration information in the related links that follow the steps.
Note
A third-party communication system provider is required for communication channels. Contracting a
communication system provider, including all costs incurred by using the provider services, is your
responsibility. These contracts and charges aren't part of SAP Service Cloud Version2. The availability
of the inbound and outbound call functionality depends on the services that your provider supports.
Procedure
1. Go to your user prole and select Settings Agent Desktop Live Interaction Widget Settings .
2. Under Congure Widget and Provider, enter the required provider details:
• Provider Name
• Provider ID
• Provider URL - URL for the communication system widget
3. Add channels. Select the add icon () at the top of the table to add a new channel.
Set the parameters depending on the channel type:
Channel Parameters
Type
ID Identify Customer By
Phone (unique channel ID) Email
Chat (unique channel ID) Phone
SMS (unique channel ID) Phone
(Social Media Service) (unique channel ID) Email
4. Activate channel. Set the Active switch for the channel entry to on.
Interactions on a channel are only possible if the channel is active.
You can congure multiple channels of each type for your solution. For example: dierent phone numbers
or SMS short codes with your communication provider for each support team can be congured as
separate channels with unique IDs.
112
PUBLIC
Set Up Guide for SAP Service Cloud Version2
Congure Agent Desktop

5. Save your changes.
6.3 Congure Timeline
Congure the events that create a timeline update for dierent entities and conditions.
Context
Dierent entities can subscribe to timeline events so that the event generates a timeline entry for that entity.
Procedure
1. Go to your user prole and select Settings Timeline Timeline Conguration .
2. Select Event View to list all events. Expand an event to view the event status.
Check the Timeline Event Title column to see how the event appears in the timeline with placeholders for
entities and parties.
3. Select Subscriber View to see events grouped by subscribing entity. Expand the subscriber to view the
subscribed events.
4. Add an event to the subscriber or remove an event (). You can also toggle the timeline visibility.
5. Save your changes.
6.4 Congure Knowledge Base Provider
Congure your knowledge base provider to integrate with the native widget. Widget functions include:
recommended articles based on linked case or registered product, article search, a top trending article list,
copy article URL, and send article as email.
Prerequisites
Create a communication system for your knowledge base provider.
For knowledge base providers, the outbound protocol is HTTPS.
Find a link to complete details for setting up a communication system in the Related Information section.
Set Up Guide for SAP Service Cloud Version2
Congure Agent Desktop
PUBLIC 113

Procedure
1. Go to your user prole and select Settings Integration Communication Conguration .
2. Search for and select one of the following :
• Knowledge Base Provider: NICE CXone Expert (Mindtouch)
• Knowledge Base Provider: Generic - all other knowledge base providers
3. Select the Copy () button in the provider details screen you opened.
4. Edit the name of your new communication conguration as desired.
5. Set the two API paths under HTTP Data:
• Retrieve articles based on ...
• Get Top Trending Articles from ...
6. Set the Active switch to on and save the conguration.
Next Steps
Additional conguration is required if your knowledge base provider is NICE CXone Expert (Mindtouch).
1. Go to your user prole and select Settings Knowledge Base Provider Settings .
2. Select NICE CXone Expert (Mindtouch) under Knowledgebase Providers and enter these required
parameters:
• User - user name for account
• Key
• Secret
Related Information
Create Communication Systems
Create Communication Congurations
114
PUBLIC
Set Up Guide for SAP Service Cloud Version2
Congure Agent Desktop

6.5 Congure Inbound Email Channels to Create Cases
Email messages routed to your solution can automatically generate cases that are sent to service agents for
processing. You, as an administrator can add the inbound email addresses to use for case creation.
Prerequisites
• Decide which email addresses to use for customer support. There is currently a limit of 20 channels per
tenant.
• In your organization’s mail server, congure email forwarding from each support address to the technical
address of your SAP Service Cloud Version2 tenant. Find the tenant technical address on the email
channel settings page.
Context
When an email message is routed to the solution, the system creates a case for the corresponding email
channel according to the settings you congure for the channel. In addition, the solution can then route cases
to a team or agent using routing rules you specify.
Procedure
1. Go to your user prole and select Settings Email Channel Settings .
2. Add a channel for each inbound support address you wish to use. Select the create icon () at the top of
the All Email Channels list to create a new channel.
3. Enter the support email address for this channel and enter a display name for the channel.
You can also enter an address to send a blind carbon copy (BCC) of outbound messages you send as
replies to this channel. Some organizations use this secondary address as another way to track support
responses.
4. Choose Case for Object.
When you choose Case, the Type and Default Account elds appear.
5. Choose the case type, and the default account for this channel.
All cases created from this channel use the case type you select here. The default account is assigned to
the case if the solution is unable to determine a unique account or customer based on the from address on
the email message.
6. Select Save to save the new email channel.
The technical email address for your tenant appears on this screen once you save the channel.
7. Select Activate to set the channel to Active status.
Set Up Guide for SAP Service Cloud Version2
Congure Agent Desktop
PUBLIC 115
A two-step verication process is required before the channel is activated. A message is sent to the
channel email address with a verication code. A second message is sent from the verication service with
a link you use to activate the channel.
Email channels only create cases from incoming messages when the channel status is set to Active and the
forwarding rules are in place on your organization's mail server.
Once a channel is in Active status, you can edit all attributes of the channel, except the channel email
address. For example, you can edit the channel name, display name, object, case type, or default account.
Related Information
Congure Case Routing to Employee [page 149]
You, as an administrator, can set up rules that route cases to employees automatically.
Congure Case Routing to Team [page 150]
You, as an administrator, can set up rules that route cases to service teams automatically.
6.6 Create Email Templates
Email templates streamline email messaging with preset text, graphics, signatures, and attachments. Create
templates for service responses, signatures, branding, and campaigns by uploading an HTML-based layout le.
Prerequisites
Prepare an HTML template layout. You can include technical placeholders to ll in data from the object record
when the template is applied in the context of an associated object. See the steps following for how to nd a list
of placeholders.
Context
You can create email templates based on HTML layouts you create in your preferred HTML editor. Upload the
HTML layout le and include any standard attachments for the template. You can also use placeholders to
automatically pull data from associated objects in the system. For example: you can automatically ll in the
customer name and ticket ID for a service response.
116
PUBLIC
Set Up Guide for SAP Service Cloud Version2
Congure Agent Desktop

Procedure
1. Go to your user prole and select Settings Email Templates .
2. Add a new template. Select the create icon () at the top of the Templates list to create a new template.
3. Enter a name for your new template.
4. Select a Template Type:
• Response: use for service responses from your support teams.
• Signature: can include placeholders for employee information.
• Branding: create a custom brand-themed email template.
• Campaign: for newsletters and surveys.
• Approval Response Template: create a response template for approvals.
• Approval Template: create an approval request template.
The required elds for the template information vary depending on the type of template you select.
Some types are only available for email channels. You can enter a description for response templates and
campaign templates.
5. Select an Object Type.
• Account
• Contact
• Individual Customer
• Case
Object type selection is limited based on the template type. Not all objects are available for every template
type.
6. Select a Channel Type if necessary.
The channel type defaults to Email for most template types.
7. Set up the formatting for your template.
Depending on the type of template and object you selected in the previous steps, some or all of the
following tabs are available for working with template formatting:
• Viewer: Shows a preview of the template as it appears in the email editor. Placeholders are shown
where relevant data is lled in once the template is applied.
• Documents: Upload or change the HTML le dening the template layout here. Use any HTML editor
you prefer to create your template layout.
• Attachments: Upload any documents you want to include as standard attachments with email
messages created from this template.
• Placeholder: Displays a list of available data elds associated with the object type you selected for
your template. Consult this list when creating your HTML layout le to insert placeholders for object
data. Placeholders are formatted as the technical eld name surrounded by double curly braces. For
example: {{familyName}}, {{givenName}}.
Note
While creating or editing the HTML approval template, to add the source document link, use
Insert link and enter {{uiLink}} in the URL eld, and enter a name for the source document in the
Text eld. When approval email notication is received by the intended approvers, the approver
Set Up Guide for SAP Service Cloud Version2
Congure Agent Desktop
PUBLIC 117

can access the source document by clicking on the link in the email with manual login and then
navigate to the source document approval step.
8. Save your changes when nished.
118 PUBLIC
Set Up Guide for SAP Service Cloud Version2
Congure Agent Desktop

7 Congure Timeline
Congure the events that create a timeline update for dierent entities and conditions.
Context
Dierent entities can subscribe to timeline events so that the event generates a timeline entry for that entity.
Procedure
1. Go to your user prole and select
Settings Timeline Timeline Conguration .
2. Select Event View to list all events. Expand an event to view the event status.
Check the Timeline Event Title column to see how the event appears in the timeline with placeholders for
entities and parties.
3. Select Subscriber View to see events grouped by subscribing entity. Expand the subscriber to view the
subscribed events.
4. Add an event to the subscriber or remove an event (). You can also toggle the timeline visibility.
5. Save your changes.
Set Up Guide for SAP Service Cloud Version2
Congure Timeline
PUBLIC 119

8 Congure Knowledge Base Provider
Congure your knowledge base provider to integrate with the native widget. Widget functions include:
recommended articles based on linked case or registered product, article search, a top trending article list,
copy article URL, and send article as email.
Prerequisites
Create a communication system for your knowledge base provider.
For knowledge base providers, the outbound protocol is HTTPS.
Find a link to complete details for setting up a communication system in the Related Information section.
Procedure
1. Go to your user prole and select Settings Integration Communication Conguration .
2. Search for and select one of the following :
• Knowledge Base Provider: NICE CXone Expert (Mindtouch)
• Knowledge Base Provider: Generic - all other knowledge base providers
3. Select the Copy () button in the provider details screen you opened.
4. Edit the name of your new communication conguration as desired.
5. Set the two API paths under HTTP Data:
• Retrieve articles based on ...
• Get Top Trending Articles from ...
6. Set the Active switch to on and save the conguration.
Next Steps
Additional conguration is required if your knowledge base provider is NICE CXone Expert (Mindtouch).
1. Go to your user prole and select Settings Knowledge Base Provider Settings .
2. Select NICE CXone Expert (Mindtouch) under Knowledgebase Providers and enter these required
parameters:
• User - user name for account
• Key
120
PUBLIC
Set Up Guide for SAP Service Cloud Version2
Congure Knowledge Base Provider
9 Integrate External SAP Systems into
Agent Desktop with Mashups
Use the screen adaptation function of Agent Desktop and the mashup capabilities built into SAP Service Cloud
Version2 to integrate external system functions into Agent Desktop. The example that follows integrates SAP
S/4HANA or SAP S/4HANA Cloud Service Management to create service orders and service quotation. As
part of the standard integration, only service order and service quotation is supported.
Overview
Incorporate a back-oce application, such as SAP S/4HANA Cloud Service Management or SAP S/4HANA,
into the front-oce interface of SAP Service Cloud Version2 Agent Desktop using a mashup..
Prerequisites
You require the following software components for this example integration:
• SAP Service Cloud Version 2
• SAP Agent Desktop
• SAP S/4HANA or SAP S/4HANA Cloud Service Management
• SAP Event Mesh
• SAP Cloud Integration
122
PUBLIC
Set Up Guide for SAP Service Cloud Version2
Integrate External SAP Systems into Agent Desktop with Mashups

Architecture and Design
The following diagram illustrates this integration architecture:
Related Information
SAP Event Mesh documentation
SAP Cloud Integration documentation
9.1 Congure SAP Event Mesh
Congure SAP Event Mesh for integration between SAP S/4HANA or SAP S/4HANA Cloud and SAP Service
Cloud Version2, Agent Desktop.
Context
Log on as an administrator to congure this integration.
Set Up Guide for SAP Service Cloud Version2
Integrate External SAP Systems into Agent Desktop with Mashups
PUBLIC 123

Procedure
1. Go to the Cloud Cockpit of your BTP sub-account.
2. Navigate to the Instance and Subscriptions option.
3. Under Instances, create a new Service Instance of the Event Mesh service, with a Default plan.
Provide the JSON parameters for the instance following this example:
Sample Code
{
"options": {
"management": true,
"messagingrest": true,
"messaging": true
},
"rules": {
"topicRules": {
"publishFilter": [
"${namespace}/*"
],
"subscribeFilter": [
"${namespace}/*"
]
},
"queueRules": {
"publishFilter": [
"${namespace}/*"
],
"subscribeFilter": [
"${namespace}/*"
]
}
},
"version": "1.1.0",
"emname": "<Unique Instance name>",
"namespace": "<Unique namespace value>"
}
Make a note of the Namespace for this service instance. You need it later for conguring the Enterprise
Event Enablement in SAP S/4HANA Cloud.
4. Create a Service Key for this newly created event mesh instance.
Make a note of the Client ID and Secret of this key under the amqp10ws protocol. You need it later for
conguring the Communication System in SAP S/4HANA Cloud.
5. Launch the Event Mesh Administrator user interface to create a subscription to the Event Mesh
application.
6. Choose the service instance you created previously.
Find the service instance listed under Message Clients.
7. Go to the Queues tab, and create a new queue. Prex the queue name with the namespace you created and
noted previously.
Once the queue is created, you can create subscriptions to the SAP S/4HANA Cloud outbound topics
corresponding to service order events in the SAP S/4HANA Cloud solution.
8. Add subscriptions to your queue: select the queue you created in the previous step, and go to
Actions
Create Subscriptions .
124
PUBLIC
Set Up Guide for SAP Service Cloud Version2
Integrate External SAP Systems into Agent Desktop with Mashups

For events you want to relay to the agent desktop timeline, create subscriptions using the following pattern:
<Message Client Namespace>ce<S4 Hana outbound topic name>
For example: s4toc4/v2/srvo/ce/sap/s4/beh/serviceorder/v1/ServiceOrder/Completed/v1
Other events supported currently are:
• /sap/s4/beh/serviceorder/v1/ServiceOrder/Created/v1
• /sap/s4/beh/serviceorder/v1/ServiceOrder/Released/v1
9. Create a webhook in the event mesh instance. Go to the instance WebHooks tab. Create a new webhook
and point it to the integration ow endpoint by providing the required authentication.
Related Information
SAP Event Mesh documentation
9.2 Congure SAP S/4HANA Cloud
Congure SAP S/4HANA Cloud for integration with SAP Service Cloud Version2, Agent Desktop.
Procedure
1. Log on to your SAP S/4HANA Cloud solution and to go Communication Management.
2. Create a new communication arrangement for the communication scenario: SAP_COM_0092 (Enterprise
Eventing Integration).
Note
You also need to create two more communication arrangements once you nish this one.
3. Enter the value you noted for the event mesh instance namespace under Additional Properties.
4. Enter a unique value for the property: Channel.
Make a note of the channel property value. You need it later to congure the channel binding.
5. Create a Communication System with the host name set to your event mesh instance.
For example: enterprise-messaging-messaging-
gateway.cfapps.sap.hana.ondemand.com:443
6. Enter the authentication and token endpoint in the OAuth 2.0 settings. Use the Service Key token
endpoint value that you created previously.
7. Enter the OAuth 2.0 client ID and client secret corresponding to the service key amqp protocol under
Outbound communication.
Set Up Guide for SAP Service Cloud Version2
Integrate External SAP Systems into Agent Desktop with Mashups
PUBLIC 125

8. Enter your mesh instance with the amqp protocol under Outbound services.
For example: https://enterprise-messaging-messaging-
gateway.cfapps.sap.hana.ondemand.com:443/protocols/amqp10ws
9. Activate the communication arrangement.
If you can't activate the communication arrangement, check and correct your entries made in the previous
steps. Continue this procedure when the communication arrangement status is active.
10. Go to Enterprise Event EnablementCongure Channel Binding and search for the communication
arrangement, using the value you entered for the Channel property.
Verify that the communication arrangement status is Active. If the status is anything other than Active, try
reactivating the communication arrangement.
11. Go to the channel details and create Outbound Topics corresponding to the service order events that need
to be relayed to the Agent Desktop timeline.
The topics congured in this channel must be the same as the subscriptions you created in the event mesh
instance.
Events supported currently are:
• /sap/s4/beh/serviceorder/v1/ServiceOrder/Created/v1
• /sap/s4/beh/serviceorder/v1/ServiceOrder/Released/v1
• /sap/s4/beh/serviceorder/v1/ServiceOrder/Completed/v1
12. Go to
Administration Security Maintain Protection Allowlists . In the Clickjacking Protection tab,
click on the + icon and add the Trusted Host Name, Schema, and Port for your SAP Service Cloud tenant.
This step allows trusted access for SAP Service Cloud and Agent Desktop to your S/4 HANA Cloud tenant.
13. Create a new communication arrangement for the communication scenario: SAP_COM_0350 (Service
Order OData Integration).
This communication arrangement invokes the Service Order OData API from the integration ow. The log
in credentials for the inbound user congured in this communication arrangement must be maintained in
the integration ow.
14. Create a Communication Arrangement for the Communication Scenario: SAP_COM_0008 (Business
Partner, Customer, and Supplier Integration).
This communication arrangement invokes the Business Partner OData API from the integration ow.
9.3 Congure SAP S/4HANA
Congure SAP S/4HANA for integration with SAP Service Cloud Version2, Agent Desktop.
Using the enterprise event enablement feature of SAP S/4HANA, events can be exchanged between SAP
S/4HANA and event mesh. In order to enable SAP S/4HANA systems for enterprise messaging you need
to create channels and maintain outbound event topic bindings for the channel. For more information, see
Creating, Conguring and Managing Channels
126
PUBLIC
Set Up Guide for SAP Service Cloud Version2
Integrate External SAP Systems into Agent Desktop with Mashups

9.4 Congure SAP Cloud Integration
Congure and deploy the SAP Cloud Integration ow (iFlow) between SAP Service Cloud Version2, Agent
Desktop, and SAP S/4HANA or SAP S/4HANA Cloud.
9.4.1Congure iFlow Parameters for SAP S/4HANA Cloud to
SAP Service Cloud Service Order Integration
Prerequisites
As a prerequisite, go to
Operations View Security Material Add User Credentials and deploy the
following:
• User credentials to connect to SAP S/4HANA Cloud system
• User credentials to connect to SAP Service Cloud Version2.
Congure the iFlow Parameters
Congure the iFlow parameters for the SAP S/4HANA Cloud to SAP Service Cloud integration.
• Congure Sender
Parameter
Description
Sender Select S4_HANA_Cloud
Adapter Type HTTPS
Address <Webhook configured in event mesh>
Authorization User Role
User Role ESBMessaging.send
• Congure Receiver
• S4_HANA_Cloud
Parameter
Description
Adapter Type HTTP
S4 host URL <SAP S/4HANA Cloud host URL>
Set Up Guide for SAP Service Cloud Version2
Integrate External SAP Systems into Agent Desktop with Mashups
PUBLIC 127

Parameter Description
Proxy Type Internet
Credential Name <User credential created for connecting to SAP S/
4HANA Cloud>
User Role ESBMessaging.send
Timeout (in ms) 60000
• Service_Cloud_V2
Parameter
Description
Adapter Type HTTP
C4C host URL <SAP Service Cloud V2 host URL>
Credential Name <User credential created for connecting to SAP Service
Cloud V2>
Timeout (in ms) 60000
• More congurations
Parameter
Description
Type All Parameters
Agent Deskptop Add-on
•
False: For standalone scenario
• True: For side by side scenario
Receiver Communication Default communication system of Service Cloud version 2
Sender Communication Communication system of Service Cloud version 2 which
is congured for the communication conguration Inte-
grate Service Entities with SAP S/4HANA Cloud
9.4.2Congure iFlow Parameters for SAP S/4HANA to SAP
Service Cloud Service Order Integration
Prerequisites
As a prerequisite, go to Operations View Security Material Add User Credentials and deploy the
following:
• User credentials to connect to SAP S/4HANA system
• User credentials to connect to SAP Service Cloud Version2.
128
PUBLIC
Set Up Guide for SAP Service Cloud Version2
Integrate External SAP Systems into Agent Desktop with Mashups

Congure the iFlow Parameters
Congure the iFlow parameters for the SAP S/4HANA to SAP Service Cloud integration.
• Congure Sender
Parameter
Description
Sender Select S4
Adapter Type HTTPS
Address <Webhook configured in event mesh>
Authorization User Role
User Role ESBMessaging.send
• Congure Receiver
• S4_HANA
Parameter
Description
Adapter Type HTTP
S4 host URL <SAP S/4HANA host URL>
Proxy Type On-premise
Credential Name <User credential created for connecting to SAP S/
4HANA>
User Role ESBMessaging.send
Timeout (in ms) 60000
• Service_Cloud_V2
Parameter
Description
Adapter Type HTTP
C4C host URL <SAP Service Cloud V2 host URL>
Credential Name <User credential created for connecting to SAP Service
Cloud V2>
Timeout (in ms) 60000
• More congurations
Parameter
Description
Type All Parameters
Agent Deskptop Add-on
•
False: For standalone scenario
• True: For side by side scenario
Receiver Communication Default communication system of Service Cloud version 2
Set Up Guide for SAP Service Cloud Version2
Integrate External SAP Systems into Agent Desktop with Mashups
PUBLIC 129

Parameter Description
Sender Communication Communication system of Service Cloud version 2 which
is congured for the communication conguration Inte-
grate Service Entities with SAP S/4HANA Cloud
9.5 Congure SAP Service Cloud
Congure SAP Service Cloud, Service Agent Desktop for integration with SAP S/4HANA Cloud.
Prerequisites
Master data replication of Business Partner (BP) in SAP S/4HANA or SAP S/4HANA Cloud to Customer in
SAP Service Cloud.
For this integration, every customer record in SAP Service Cloud requires a corresponding remote business
partner in S/4HANA Cloud Service Management.
Context
Restriction
Individual customers aren't supported currently.
Procedure
1. Review Section 4 of the guide: Setting Up Opportunity-to-Order with SAP Cloud for Customer.
Find a link to this guide in the Related Links section.
2. Follow the procedure in section 4 to set up master data integration for business partners (BP).
Related Information
Setting Up Opportunity-to-Order with SAP Cloud for Customer
130
PUBLIC
Set Up Guide for SAP Service Cloud Version2
Integrate External SAP Systems into Agent Desktop with Mashups

9.6 Congure Service Agent Desktop
Congure SAP Service Cloud, Agent Desktop for integration with SAP S/4HANA or SAP S/4HANA Cloud
Service Management.
Context
An inbound communication conguration linking the Event Bridge service to the Inbound entity is delivered
with the connector-service. Create the following artifacts for this inbound communication conguration:
• Communication System
• Communication Conguration
Procedure
1. Go to
User Settings Integration Communication Conguration .
2. Choose Integrate Service Entities with SAP S/4HANA Cloud.
3. Select Copy icon.
4. Create a new communication conguration for the communication system you created .
5. Activate the communication conguration you created.
You don't need an outbound conguration for this integration.
9.7 Congure Mashup: Create Scenario
Congure a create scenario mashup in SAP Service Cloud Version2 for integration with SAP S/4HANA or SAP
S/4HANA Cloud.
Prerequisites
• The S/4HANA or S/4HANA Cloud URLs that are included in the mashup need to be added to a list
of allowed URLs in SAP Service Cloud Version2. You can do this by navigating to your user prole on
the top-right corner of your screen and click
Settings All Settings General Content Security Policy
Setting and scroll to the section Frame Source and add the S/4HANA Cloud hostname URLs.
Set Up Guide for SAP Service Cloud Version2
Integrate External SAP Systems into Agent Desktop with Mashups
PUBLIC 131

Example
If the Service Order Create URL is https://my123456.s4hana.ondemand.com/
ui?sap-ushell-config=headerless#ServiceOrder-create then, add https://
my123456.s4hana.ondemand.com/ in the Frame Source.
Similarly, add the login URL of S/4HANA Cloud system in the Frame Source.
• Assign the customer service manager role SAP_BR_CUSTOMER_SERVICE_MGR to the user in S/4HANA.
• Assign the business catalog SAP_CRM_BC_SERV_PROCORDER_PC to the user in S/4HANA Cloud Service
Management.
For further details on assigning business catalogs to S/4HANA Cloud users, see the related links section
following the steps.
Context
Procedure
1. Go to
User Settings Foundation Mashup Authoring .
2. Create a new mashup by clicking the Create button.
3. Under the General Information section, enter a mashup name and description. Use a meaningful title. For
example: Create Service Order.
4. Under the Input Parameters section, enter the service order create URL of your SAP S/4HANA or SAP
S/4HANA Cloud tenant in the URL eld.
• Example URL for SAP
S/4HANA: https://my12345.org/sap/bc/ui5_ui5/ui2/ushell/shells/abap/
FioriLaunchpad.html?sap-client=210&sap-ushell-config=headerless#ServiceOrder-
create?sap-processtype=SRVO&sap-soldtoparty=171000030
• Example URL for SAP S/4HANA Cloud: https://my123456.s4hana.ondemand.com/ui?
sap-ushell-config=headerless#ServiceOrder-create?sap-processtype=SVO1&sap-
soldtoparty=17100004
5. Click Extract Parameters.
6. Under the Parameter, Constant and API Key section, ensure that the sap-processtype is set to SV01
and sap-soldtoparty is blank. You congure the parameter binding of the sap-soldtoparty by using the
extensibility feature in Agent Desktop.
132
PUBLIC
Set Up Guide for SAP Service Cloud Version2
Integrate External SAP Systems into Agent Desktop with Mashups

Post extraction of the parameters from the URL, the section should appear as:
7. Save and activate your mashup.
• Ensure to create a new mashup to use with agent desktop integration.
• Set the screen binding parameters in Agent Desktop via Extensibility and not in Mashup authoring.
Related Information
Add Business Catalogs to Business Users in SAP S/4HANA Cloud
9.8 Congure Mashup: Display Scenario
Congure a display scenario mashup in SAP Service Cloud Version2 for integration with SAP S/4HANA Cloud.
Prerequisites
• Assign the customer service manager role SAP_BR_CUSTOMER_SERVICE_MGR to the user in S/4HANA.
• Assign the business catalog SAP_S4CRM_BC_SRVC_DSP_PC to the user in S/4HANA Cloud Service
Management.
For further details on assigning business catalogs to S/4HANA Cloud users, see the related links section
following the steps.
Procedure
1. Go to User Settings Foundation Mashup Authoring .
2. Create a new mashup by clicking the Create button.
Set Up Guide for SAP Service Cloud Version2
Integrate External SAP Systems into Agent Desktop with Mashups
PUBLIC 133

3. Under the General Information section, enter a mashup name and description. Use a meaningful title. For
example: Display Service Order.
4. Under the Input Parameters section, enter the service order display URL of your SAP S/4HANA or SAP
S/4HANA Cloud tenant in the URL eld.
• Example URL for SAP
S/4HANA: https://my12345.org/sap/bc/ui5_ui5/ui2/ushell/shells/abap/
FioriLaunchpad.html?sap-client=210&sap-ushell-config=headerless#ServiceOrder-
display?ServiceOrder=ID
• Example URL for SAP S/
4HANA Cloud: https://my123456.s4hana.ondemand.com/ui?sap-ushell-
config=headerless#ServiceOrder-display&/C_SrvcOrdDocListRptAndObjPg’{ID1}’/?
FCLLayout=MidColumnFullScreen
5. Click Extract Parameters.
6. Under the Parameter, Constant and API Key section, ensure that the FCLLayout is set to
MidColumnFullScreen and {ID} is blank. You congure the parameter binding of the {ID} by using the
extensibility feature in Agent Desktop.
Post extraction of the parameters from the URL, the section should appear as:
7. Save and activate your mashup.
• Ensure to create a new mashup to use with agent desktop integration.
• Set the screen binding parameters in Agent Desktop via Extensibility and not in Mashup authoring.
Related Information
Add Business Catalogs to Business Users in SAP S/4HANA Cloud
9.9 Adapt Agent Desktop for Mashup
134
PUBLIC
Set Up Guide for SAP Service Cloud Version2
Integrate External SAP Systems into Agent Desktop with Mashups

9.9.1Service Order
9.9.1.1 Create Service Order
Adapt the agent desktop screen to include the create scenario mashup in SAP Service Cloud Version2 for
integration with SAP S/4HANA Cloud.
Procedure
1. Go to Agent Desktop.
2. Under the Search tab, Conrm an account and navigate to the Customer Hub tab.
3. Go to User Start Adaptation
4. Select the What would you like to do? section and select the Edit Section icon () to open the Section
Items pop-up box.
5. Select Createand click the Create Button icon ().
6. In the Add Buttons dialog box, enter the Button Text as Service Order and enter an Event Name.
7. In the Parameters section, ensure the parameter binding of sap-soldtoparty is set to Fields/External
Business Partner - Default ID and click Apply.
This links the service order to a customer account.
8. Select the tabs section and click the icon () to open the Edit Tabs pop-up box.
9. Click the Create Tab icon () and provide a new tab name, for example: Create Service Order and press
Enter.
10. Click the icon () to launch Edit Tabs pop-up dialog again. Select the event you provided for service order
create and click Apply.
11. Click the icon () under the Create Service Order screen area.
12. Click Add Mashup and select the mashup that you created for create service order.
13. In the Edit Properties window, set the value of Height(%)to 100 and ensure that sap-soldtoparty is set
to accountInfo/externalReferenceBusinessPartnerId and click Apply.
14. Click End Session to exit the adaptation mode and to view your adaptations on the screen.
Set Up Guide for SAP Service Cloud Version2
Integrate External SAP Systems into Agent Desktop with Mashups
PUBLIC 135

9.9.1.2 View Service Order
Adapt the agent desktop screen to include the View Service Order Details mashup in SAP Service Cloud
Version2 for integration with SAP S/4HANA Cloud.
Procedure
1. Go to Agent Desktop.
2. Under the Search tab, Conrm an account and navigate to the Customer Hub tab.
3. Go to User Start Adaptation
4. Select the tabs section and click the icon () to open the Edit Tabs pop-up box.
5. Click the Create Tab icon () and provide a new tab name, for example: Display Service Order and press
Enter.
6. Click the icon () to launch Edit Tabs pop-up dialog again. Select the event you provided for service order
display and click Apply.
7. Click the icon () under the Display Service Order screen area.
8. Click Add Mashup and select the mashup that you created for display service order.
9. In the Edit Properties window, set the value of Height(%)to 100 and ensure that {ID} is set to
s4ServiceOrderInfo/serviceOrderId and click Apply.
10. Click End Session to exit the adaptation mode and to view your adaptations on the screen.
9.9.1.3 Create an SAP S/4HANA Service Order from Agent
Desktop Mashup
Create an SAP S/4HANA Service Order from Agent Desktop mashup by connecting to SAP Service Cloud
Version2.
Context
Now that the mashup is congured, and the Agent Desktop screen is adapted to show the mashup, service
agents can create a service order directly in the back-oce SAP S/4HANA Cloud Service Management
application from Agent Desktop screen:
Procedure
1. Log in to your SAP Service Cloud Version2 solution.
136
PUBLIC
Set Up Guide for SAP Service Cloud Version2
Integrate External SAP Systems into Agent Desktop with Mashups

2. Choose Service Agent Desktop .
3. Search for an account and click Conrm.
4. Under the Customer Hub tab, choose Create Service Order .
The Service Order tab loads the SAP S/4HANA Cloud system's Create Service Order screen using the
mashup.
5. Enter a description and ll-in other details in the service order and click Save.
The Timeline tab opens with a new Service Order created event on the timeline.
6. To see a quick view of service order, click on the Service Order ID in the timeline event.
To see a detailed view of the service order in new tab in the Customer Hub, click the icon.
Note
Only users with a role that has access to the service sap.crm.service.s4hcServiceOrderService can
view the Service Order quick view. You can assign business roles under User Settings Users
and Control
9.9.2Service Quotation
9.9.2.1 Create Service Quotation
Adapt the agent desktop screen to include the create scenario mashup in SAP Service Cloud Version2 for
integration with SAP S/4HANA Cloud.
Procedure
1. Go to Agent Desktop.
2. Under the Search tab, Conrm an account and navigate to the Customer Hub tab.
3. Go to User Start Adaptation
4. Select the What would you like to do? section and select the Edit Section icon () to open the Section
Items pop-up box.
5. Select Createand click the Create Button icon ().
6. In the Add Buttons dialog box, enter the Button Text as Service Quotation and enter an Event Name.
7. In the Parameters section, ensure the parameter binding of sap-soldtoparty is set to Fields/External
Business Partner - Default ID and click Apply.
This links the service order to a customer account.
Set Up Guide for SAP Service Cloud Version2
Integrate External SAP Systems into Agent Desktop with Mashups
PUBLIC 137

8. Select the tabs section and click the icon () to open the Edit Tabs pop-up box.
9. Click the Create Tab icon () and provide a new tab name, for example: Create Service Quotation and
press Enter.
10. Click the icon () to launch Edit Tabs pop-up dialog again. Select the event you provided for service
quotation create and click Apply.
11. Click the icon () under the Create Service Quotation screen area.
12. Click Add Mashup and select the mashup that you created for create service quotation.
13. In the Edit Properties window, set the value of Height(%)to 100 and ensure that sap-soldtoparty is set
to accountInfo/externalReferenceBusinessPartnerId and click Apply.
14. Click End Session to exit the adaptation mode and to view your adaptations on the screen.
9.9.2.2 View Service Quotation
Adapt the agent desktop screen to include the View Service Quotation Details mashup in SAP Service Cloud
Version2 for integration with SAP S/4HANA Cloud.
Context
Procedure
1. Go to Agent Desktop.
2. Under the Search tab, Conrm an account and navigate to the Customer Hub tab.
3. Go to
User Start Adaptation
4. Select the tabs section and click the icon () to open the Edit Tabs pop-up box.
5. Click the Create Tab icon () and provide a new tab name, for example: Display Service Quotation and
press Enter.
6. Click the icon () to launch Edit Tabs pop-up dialog again. Select the event you provided for service
quotation display and click Apply.
7. Click the icon () under the Display Service Quotation screen area.
8. Click Add Mashup and select the mashup that you created for display service quotation.
9. In the Edit Properties window, set the value of Height(%)to 100 and ensure that {ID} is set to
s4ServiceOrderInfo/serviceOrderId and click Apply.
10. Click End Session to exit the adaptation mode and to view your adaptations on the screen.
138
PUBLIC
Set Up Guide for SAP Service Cloud Version2
Integrate External SAP Systems into Agent Desktop with Mashups

9.9.2.3 Create an SAP S/4HANA Service Quotation from
Agent Desktop Mashup
Create an SAP S/4HANA Service Quotation from Agent Desktop mashup by connecting to SAP Service Cloud
Version2.
Context
Now that the mashup is congured, and the Agent Desktop screen is adapted to show the mashup, service
agents can create a service quotation directly in the back-oce SAP S/4HANA Cloud Service Management
application from Agent Desktop screen:
Procedure
1. Log in to your SAP Service Cloud Version2 solution.
2. Choose Service Agent Desktop .
3. Search for an account and click Conrm.
4. Under the Customer Hub tab, choose Create Service Quotation .
The Service Quotation tab loads the SAP S/4HANA Cloud system's Create Service Quotation screen using
the mashup.
5. Enter a description and ll-in other details in the service quotation and click Save.
The Timeline tab opens with a new Service Quotation created event on the timeline.
6. To see a quick view of service quotation, click on the Service Quotation ID in the timeline event.
To see a detailed view of the service quotation in new tab in the Customer Hub, click the icon.
Note
Only users with a role that has access to the service sap.crm.service.s4hcServiceOrderService can
view the Service Quotation quick view. You can assign business roles under
User Settings
Users and Control
Set Up Guide for SAP Service Cloud Version2
Integrate External SAP Systems into Agent Desktop with Mashups
PUBLIC 139

10 Congure Cases
Administrators can congure cases in Settings.
Find Settings in the user prole menu at the top of the screen.
Tip
Expand a collapsible section heading to view the conguration steps.
10.1 Congure Status Dictionary Entries
You, as an administrator, can use your own case statuses in your processes and schemas. Create the Status
Dictionary Entries and then assign them a lifecycle and assignment status.
Context
The lifecycle statuses are used for service level agreement (SLA) calculations. Assignment statuses are used to
identify the assignee of the case (the processor and requestor) to help case duration determination.
The following table lists the predelivered status values that you can select in the case and the next status you
can reach from there. When you create your statuses, keep these possibilities in mind.
Current Status Reachable Statuses Non-Reachable Statuses Description
Open
•
In Process
•
Customer Action
•
Completed
•
Closed
This status isn't reachable
from any other value.
In Process
•
Customer Action
•
Completed
•
Open
•
Closed
If the status changes from
In Process to Closed the sys-
tem completes and closes
the case.
Customer Action
•
In Process
•
Completed
•
Open
•
Closed
Completed
•
In Process
•
Customer Action
•
Closed
•
Open
140 PUBLIC
Set Up Guide for SAP Service Cloud Version2
Congure Cases

Current Status Reachable Statuses Non-Reachable Statuses Description
Closed None
•
Open
•
In Process
•
Customer Action
•
Completed
If a case is closed, it isn't pos-
sible to open it again. This
status can only be used for
cases still in the system. New
cases aren't allowed to use
Closed.
Note
Once a case is set to
closed, you can't change
the case status.
Procedure
1. Go to your user prole and select
Settings Case Management Status Dictionary Entries .
2. Select the add icon () at the top of the table to add a new status code.
3. Enter a code and a description for your new status.
Custom status codes have to start with Z or Y.
4. Select the Lifecycle Status and Assignment Status for your new code.
Allowed Combinations
Lifecycle Status
Assignment Status
Open Processor Action
In Process Processor Action
In Process Requestor Action
Completed Requestor Action
Closed Not Assigned
5. Select the conrm icon () to save changes.
You can delete a status code by selecting the delete icon () in the Action column.
Note
You can change the description of the predelivered statuses, but you can't delete them.
Related Information
Congure Status Schemas [page 142]
Set Up Guide for SAP Service Cloud Version2
Congure Cases
PUBLIC 141

You, as an administrator, can edit the standard status schemas, and create new schemas for cases.
10.2 Congure Status Schemas
You, as an administrator, can edit the standard status schemas, and create new schemas for cases.
Context
Change the visibility, and sequence of the standard statuses. Use status schemas to realize dierent processes
in your company. For example: Create a status schema for use with your internal employee support, and a
dierent status schema valid for interactions with partners.
Procedure
1. Go to your user prole and select
Settings Case Management Status Schemas .
2. Select the add icon () at the top of the table to add a new status schema.
3. Enter an ID for your new schema in the Status Schema eld. The ID consists of two characters and starts
with either Z or Y.
4. Enter a description for your new schema.
5. Select the add icon () at the top of the table to Add Status to Schema.
This step adds a row to the table where you can select from the status dictionary entries you've previously
dened. Select the option if this is the Initial Status for the schema, and if you want the Status Visible for
the case.
• Only the Open Life Cycle Status can be selected as initial status.
• You can select the Closed Life Cycle Status but you can't set it to visible.
6. Save your changes.
You can Hide a status, or Set as Visible from the Actions menu ().
Note
Only statuses not currently in use can be deleted.
Related Information
Congure Status Dictionary Entries [page 140]
You, as an administrator, can use your own case statuses in your processes and schemas. Create the Status
Dictionary Entries and then assign them a lifecycle and assignment status.
142
PUBLIC
Set Up Guide for SAP Service Cloud Version2
Congure Cases

10.3 Congure Priority Color
Assign a new color to any of the four priority codes.
Procedure
1. Go to your user prole and select Settings Case Management Priority Settings .
2. Select the edit () icon to change the color assigned to a priority code.
3. Select a new color from the menu.
Your changes are saved automatically.
10.4 Congure Service Levels
You, as an administrator, can create new service levels in your solution.
Context
Set up service level based on target milestones with response times, and specifying working hours and
timezone.
Procedure
1. Go to your user prole and select
Settings Case Management Service Levels .
2. Enter a name for the new service level.
3. Add target milestones.
4. Select a milestone type.
• Due Date for Completion
• Due Date for Initial Review
• Due Date for Resolution
• Due Date for Response
Tip
If you enter the duration in hours, the system only considers operating hours. If you enter the duration
in days, the system uses the Working Conguration, but not the time ranges. You enter this information
under Operating Hours in the next step.
Set Up Guide for SAP Service Cloud Version2
Congure Cases
PUBLIC 143

Example
Suppose that your working days are from Monday to Friday, from 8:00 to 18:00 and the reporting
date is Wednesday 06 April 2022, 15:00.
• If you enter a duration of 2 days the system calculates a due date on Friday, 08 April 2022,
15:00.
• If you enter a duration of 48 hours the system calculates a due date on Wednesday, 13 April
2022, 13:00.
Note
Attribute specic service level denition is not supported. You need to create multiple service level
denitions for dierent attributes with dierent durations for milestones. For example, Priority.
5. Set the Working Day Calendar, Time Zone, and Working Conguration daily time ranges.
Working Conguration allows you to set the hours when your service sta is available. If you don't enter
operating hours, the solution assumes that service is available 24x7.
Tip
If you want to intentionally set up 24x7 availability, create a calendar with all 7 days as working days and
12 AM to 12 AM as working hours.
You can use customer working hours for milestone calculations by maintaining a working day calendar,
time zone, and working conguration consistent with the customer location.
6. Save the new service level. The service level now appears in the Service Levels list.
7. Activate the new service level.
Related Information
Congure Service Level Agreements [page 145]
You, as an administrator, can set up rules that assign service levels to cases automatically.
144
PUBLIC
Set Up Guide for SAP Service Cloud Version2
Congure Cases
10.5 Congure Service Level Agreements
You, as an administrator, can set up rules that assign service levels to cases automatically.
Context
When you create or edit a case, the system uses rules to evaluate which service level to apply. When a rule is
found that matches the case, the system applies the appropriate service level. The service level pushes details
about reaction times and due date calculations to the case.
Procedure
1. Go to your user prole and select Settings Case Management Service Level Agreements .
2. Set up the rules table with Adapt Columns.
The rst time you set up business rules you must congure the rules table. You can have up to 15 columns
in the table, including the results column.
Tip
Use only the columns required for assigning objects. Extra columns can impact performance. You can
add additional columns and rules at any time.
3. Select the add icon () at the top of the table to add a new rule. A new row with an asterisk in each eld of
the row is added to the table.
4. Click the asterisk symbol (*) in a cell to enter a value for that eld. The rules table oers a variety of logical
operators to dene your values.
You can add values to more than one eld in a row. The elds in one row evaluate with a logical AND
relationship. The eld values must all evaluate to true in order for the rule to evaluate to true.
5. Continue to add rows for each desired result.
The system compares rows using the logical OR operator. The system compares each rule, top to bottom,
until ONE evaluates to true.
Rearrange rows by selecting the row and selecting the sort icon ().
6. Select the conrm icon () to save changes to the row when nished.
7. Click Activate.
Enable your changes by activating the new rules.
Tip
Once you've set up your columns and you're familiar with the operators and table properties, you can
export the table to a Microsoft Excel le. If you have a large number of service level rules, you can edit
the le o line and then import the rules le back into your solution.
Set Up Guide for SAP Service Cloud Version2
Congure Cases
PUBLIC 145

Related Information
Congure Service Levels [page 143]
You, as an administrator, can create new service levels in your solution.
10.6 Congure Case Types
Customize case types to match the workow used by your organization.
Context
Create case types to model any type of service workow based on your business processes. You can add
phases, steps, approvals, automated ows, mashups, and feedback to your case type. Phases and steps guide
your agents visually through processing the case.
Standard Case Statuses
Status Code
Status
01 Open
02 In Process
04 Customer Action
05 Completed
06 Closed
Procedure
1. Go to your user prole and select Settings Case Management Case Types .
Tip
Select the pin icon () to add Case Types to the Dashboard for quick access.
146
PUBLIC
Set Up Guide for SAP Service Cloud Version2
Congure Cases

2. Select a case type in status Active that you want to use as a starting point to customize and create your
own case type. You can use the Sample Case Type provided by SAP to get started.
3. Select Duplicate Case Type From Version from the Action menu () for an active version of the case type
template.
4. Enter a case type code starting with the letter Z. The type code can be up to four characters in length, with
no spaces or special characters.
5. Enter a description for your new case type and select Create.
The Case Template screen opens where you can edit and add phases and steps. Phases are represented by
a screen within the case detail view, containing one or more specic steps. Steps are discrete actions that
can be:
• To do items: Tasks or actions that can include explanatory text. If a step is mandatory, the agent must
complete the task or action before the case can proceed to the next step. The agent must conrm
manually once they complete the step.
• Automated ows (autoows): Triggers an autoow action. For example: update a eld in an object,
create a time line event, or send an email message. You can use autoow steps in addition to autoows
triggered at the case level.
• Approvals: Use approval steps to require that the agent request approval before continuing to process
the case. Agents can include notes before submitting the approval request. You can use approval steps
in addition to approvals triggered at the case level.
• Mashup: A step consisting of a mashup screen from an external system. Integrate external systems
directly into your case workow.
• Feedback: Set up a feedback step with channel, template, customer response survey, and optional
preconditions. Once the agent reaches this step and conditions are met, the solution sends an email
message containing a link to the survey and collects survey feedback.
6. Add, edit, reorder, or remove phases and steps to set up the case template to reect your desired business
process.
Drag the move icon () to reorder phases and steps.
7. (Optional) Add step preconditions. Edit the desired step to include conditions that evaluate if the step is
ready to be processed.
Preconditions determine if a particular step can be processed or not. Agents can only set the step as done
when the preconditions are met.
When preconditions are not met:
• Mandatory step: agents can proceed with other steps, but can't complete the current phase and
continue to the next phase.
• Optional step: agents can proceed with next steps as well as continue to next phase.
• First step of the rst phase: the solution takes agents to the next step that can be processed.
8. (Optional) Select View/edit number range table to select an existing number range for the case type, or
create a new number range.
9. (Optional) Select a service catalog for the case type.
Note
You can only select catalogs set up for use with cases. If you want to associate a service catalog to your
case type, you must select a catalog when the case type is in draft status. You cannot add a catalog
later.
Set Up Guide for SAP Service Cloud Version2
Congure Cases
PUBLIC 147

10. Save your changes.
• Activate sets your case type to active status.
• Close saves your case type as a draft. You can activate it later.
Related Information
Autoow [page 199]
Autoow involves creation of rules that can trigger actions such as send event notications to integrated
solutions, in-app notications to users, and trigger automatic emails for business entities.
Approval [page 207]
Approval is a systematic process of reviewing and authorizing changes or actions before they are integrated
into the system. Approvals are routed to your reporting line manager, though there may be multiple levels of
approval required for certain objects or conditions.
10.7 Congure Involved Party Settings
You, as an administrator can congure Involved Parties for cases.
Context
You can determine automatically all involved parties for business transactions and their related documents
using party roles and determination rules. These rules allow you to streamline account team assignments,
and ensure that business partners are correctly assigned to business objects in a way that matches your
company processes. You can decide which party roles to use in your organization, however some party roles
are mandatory by default, and can't be deactivated.
Procedure
1. Go to your user prole and select
Case Management Involved Party Settings .
2. Add or edit party roles and under Party Role Assignments. Select the add icon () at the top of the table to
add a new party role assignment.
You can also select the edit () icon to edit the existing party role assignments.
3. Select a Party Role from the menu.
4. Select the appropriate toggles to set the role to: active, mandatory, or unique.
5. To add or edit determination rules, select the review determination steps icon () in the Actions column.
6. Enter a step number. For example: 100, 150, 200.
148
PUBLIC
Set Up Guide for SAP Service Cloud Version2
Congure Cases

7. Select a determination method from the menu.
8. Select a source party role and whether to bring over one or all parties from the source.
9. Save your changes.
10.8 Congure Case Routing to Employee
You, as an administrator, can set up rules that route cases to employees automatically.
Procedure
1. Go to your user prole and select Settings Case Management Case Routing to Employee .
2. Set up the rules table with Adapt Columns.
The rst time you set up business rules you must congure the rules table. You can have up to 15 columns
in the table, including the results column.
Tip
Use only the columns required for assigning objects. Extra columns can impact performance. You can
add additional columns and rules at any time.
3. Select the add icon () at the top of the table to add a new rule. A new row with an asterisk in each eld of
the row is added to the table.
4. Click the asterisk symbol (*) in a cell to enter a value for that eld. The rules table oers a variety of logical
operators to dene your values.
You can add values to more than one eld in a row. The elds in one row evaluate with a logical AND
relationship. The eld values must all evaluate to true in order for the rule to evaluate to true.
5. Continue to add rows for each desired result.
The system compares rows using the logical OR operator. The system compares each rule, top to bottom,
until ONE evaluates to true.
Rearrange rows by selecting the row and selecting the sort icon ().
6. Select the conrm icon () to save changes to the row when nished.
7. Click Activate.
Enable your changes by activating the new rules.
Tip
Once you've set up your columns and you're familiar with the operators and table properties, you can
export the table to a Microsoft Excel le. If you have a large number of service level rules, you can edit
the le o line and then import the rules le back into your solution.
Set Up Guide for SAP Service Cloud Version2
Congure Cases
PUBLIC 149

Related Information
Congure Case Routing to Team [page 150]
You, as an administrator, can set up rules that route cases to service teams automatically.
10.9 Congure Case Routing to Team
You, as an administrator, can set up rules that route cases to service teams automatically.
Procedure
1. Go to your user prole and select Settings Case Management Case Routing to Team .
2. Set up the rules table with Adapt Columns.
The rst time you set up business rules you must congure the rules table. You can have up to 15 columns
in the table, including the results column.
Tip
Use only the columns required for assigning objects. Extra columns can impact performance. You can
add additional columns and rules at any time.
3. Select the add icon () at the top of the table to add a new rule. A new row with an asterisk in each eld of
the row is added to the table.
4. Click the asterisk symbol (*) in a cell to enter a value for that eld. The rules table oers a variety of logical
operators to dene your values.
You can add values to more than one eld in a row. The elds in one row evaluate with a logical AND
relationship. The eld values must all evaluate to true in order for the rule to evaluate to true.
5. Continue to add rows for each desired result.
The system compares rows using the logical OR operator. The system compares each rule, top to bottom,
until ONE evaluates to true.
Rearrange rows by selecting the row and selecting the sort icon ().
6. Select the conrm icon () to save changes to the row when nished.
7. Click Activate.
Enable your changes by activating the new rules.
Tip
Once you've set up your columns and you're familiar with the operators and table properties, you can
export the table to a Microsoft Excel le. If you have a large number of service level rules, you can edit
the le o line and then import the rules le back into your solution.
150
PUBLIC
Set Up Guide for SAP Service Cloud Version2
Congure Cases

11 Congure Registered Products
As an administrator, you can add new categories and custom party types in addition to the default values.
Procedure
1. Navigate to
User Menu Settings All Settings Registered Products Fields .
2. Select (Create).
3. Enter the Code and Description.
4. Save your changes.
Select (Delete) to delete an existing value.
152
PUBLIC
Set Up Guide for SAP Service Cloud Version2
Congure Registered Products

12 Create Installation Points
From the Installation Point tab, you can create a new installation point only with the category of functional
location.
In addition to the common features, this category of installation point supports warranty, sales and distribution
data, and replication from SAP S/4 HANA. The customer information and installed base sections are
prepopulated when you create an installation point from an installed base.
Installation points that are categorized as registered products are only displayed in the Registered Product tab.
You can assign a registered product to an installation point. You can also assign an existing registered product
to a current installation point.
To assign an installation point, with product or text category, to an installed base, create the installation point
from the Installed Base.
Note
You can add a functional location to an installed base using a migration template.
Set Up Guide for SAP Service Cloud Version2
Create Installation Points
PUBLIC 153

13 Congure Installed Bases
As an administrator, you can add new custom part types in addition to the default values.
Procedure
1. Navigate to
User Menu Settings All Settings Installed Base Custom Party Type .
2. Select (Create).
3. Enter the Code and Description.
4. Save your changes.
Select (Delete) to delete an existing value.
154
PUBLIC
Set Up Guide for SAP Service Cloud Version2
Congure Installed Bases

14 Output Management
Output management comprises all activities related to the output of documents. Form-based documents can
be output on an ad hoc basis or as an integrated part of a business process.
14.1 Main Templates
As an administrator, you can create company-specic main templates for use in form templates.
Form main templates are used to dene the logo, header, sender address, and language-dependent footer that
are used in form-based business documents.
SAP provides one default form main template for your solution. If you require a dierent logo or sender address
for dierent companies or org units in your organization, you can create additional form main templates. These
can then be assigned to the relevant company/org unit.
If you do not want to use any form main template for a business document, you can deactivate the use of main
templates in the form template. If you specify that a main template must not be used for a form template, then
you can alternatively create a unique header, logo, and footer for the form template using Adobe® LiveCycle
Designer.
When a business document is output, the system uses the following logic to determine which form main
template to use:
• The system searches for a form main template assigned to the company/org unit in which the business
document was created. For example, if an invoice is created in the invoicing unit Sales US West Coast and is
to be sent by email, the system tries to nd a main template assigned to the org unit Sales US West Coast.
• If no match is found, the system searches upwards in the organizational structure for a main template
assigned to a higher-level org unit.
• If no match is found, the system uses the default main template.
14.1.1Create Main Templates
If you use templates, creating company-specic main templates makes all templates consistent, saving you
time. You can dene company-specic main templates to use as a basis for other forms.
Procedure
1. Go to your user prole and select Settings All Settings Output Management Maintain Main
Template .
Set Up Guide for SAP Service Cloud Version2
Output Management
PUBLIC 155

2. Click (Create)..
3. Enter a name and assign org unit (if any) for your new main template.
Use the Is Default toggle button to mark the template as the default template.
4. In the Design Main Template tab, enter the header and footer information.
a. In the Header tab, upload a logo.
Adjust the size and alignment of the logo, as required. The le formats .gif, .bmp, .jpg, .png, and .tif are
supported. The logo must be lesser than 40 mm in width and 20 mm in height. If you upload a graphic
that is larger than 40 mm x 20 mm, it is resized automatically.
b. Use the Header Divider toggle button to add a graphical divider on your form.
c. Enter your company’s address as the sender address. The sender address is shown above the
recipient's address in a letter.
d. In the Footer tab, choose the number of footer columns you want to display.
Enter the footer text exactly as you would like it to appear on the form. You can maintain up to four
footer blocks with a maximum of 10 lines per footer.
Note that the width of each footer block is equally divided over the available space. If a line of text
in the footer is too long for the current font size, the system automatically enters a line break. If
this automatic line break does not meet your needs, you can enter the text after the line break as a
separate line.
5. Preview your changes by refreshing the screen.
6. Save your changes.
You can now assign the main template to one or more companies, org units, or output channels.
14.1.2Edit Form Main Templates
As an administrator, you can update the main template design or assign organizational units to the template.
Procedure
1. Go to your user prole and navigate to Settings All Settings Output Management Maintain Main
Template
.
2. Select any main template that you want to edit and click .
3. Update the name and org unit details in the Create Main Template View tab or the header and footer details
in the Design Main Template tab.
4. Save your changes.
156
PUBLIC
Set Up Guide for SAP Service Cloud Version2
Output Management

14.2 Form Templates
Use form templates to dene the content and layout of documents that can be output from the system.
Form templates are in the form of print forms that are read-only portable document format (PDF) documents
that are generated from data stored in the system. Print forms can be printed, sent as an email attachment, or
faxed to business partners.
Variants
Variants of a form template are copies of the content displayed in other languages, or with information
specic to that country/region. Language variants are used to provide translations of form templates into other
languages.
When a document is output from the system, the system automatically determines which language version
to use. Most form templates are intended for internal review. Therefore the system uses the form template
matching the language selected by the user on the log on screen. Certain objects are intended for review by a
business partner or customer, and the system selects a template based on the recipient language.
Language variants are determined by the user log-on language, or in certain cases, by the preferred language
of the receiving business partner. For example, if a customer in a German company sends product information
to a business partner in France, the system searches for a French language variant of the form template and
uses this to generate the document. If a language variant is not available in the recipient’s language, then the
form template in the fallback language English is used.
You can use the appropriate buttons to delete form templates or variants.
Restriction
It is not possible to delete a form template that has already been used to output a document because that
template is referenced in a document's output history.
14.2.1Create Form Templates
You can create custom form templates, but we recommend editing templates provided by SAP, which saves
you setup time.
Context
Recommendation
While it’s possible to create new form templates using this procedure, we recommend that you edit form
templates provided by SAP or partners instead. Editing provided templates means that you don’t have
Set Up Guide for SAP Service Cloud Version2
Output Management
PUBLIC 157

to adapt any output settings. It is not possible to copy or edit print forms that contain legally-sensitive
content.
Procedure
1. Go to your user prole and navigate to Settings All Settings Output Management Maintain Form
Template .
2. Choose a predelivered template, click and select Copy Template.
3. Enter a name and description and select a language.
4. If you are creating a form template specic to a language, select the language. If the template is not
specic to language, leave this eld blank.
5. Turn on the Form Main Template switch button to use master templates to determine the layout of the
template.
6. Save and publish your changes.
When a new version of a predelivered template is released, the new version of the predelivered template is
automatically set to active. To avoid any changes to the existing version, create a copy of the predelivered
template and use the custom template while selecting the form template. If you want to make changes in
the newer predelivered templates, create a copy of the same and start using it. Else, continue using the
existing custom template.
14.2.2Edit Form Templates
As an administrator, you can update the name and description of a form template, upload a form template
variant, or download a template and make changes using Adobe LiveCycle Designer.
Prerequisites
You have installed Adobe LiveCycle Designer.
Context
Recommendation
We recommend that you edit form templates provided by SAP or partners instead of creating new form
templates. Editing provided templates means that you do not have to adapt any output settings and
you can also manage all versions of the template. Form template versions that you customize are not
overwritten by SAP or partner upgrades.
158
PUBLIC
Set Up Guide for SAP Service Cloud Version2
Output Management

Procedure
1. Go to your user prole and select Settings All Settings Output Management Maintain Form
Template .
2. Click and select Edit.
3. Update the name and description of a form template, upload a form template variant, or download a
template and make changes using Adobe LiveCycle Designer.
By default, the Form Main Template switch is on. If you do not want to use company-specic main
templates, turn o the switch. Note that only .xdp les can be uploaded.
4. Save and publish your changes.
In the Adobe LiveCycle Designer, you can make changes such as the following:
• Change position of title, logo, and elds
• Change alignment of title and logo (unless you dene these with main templates)
• Change title and template texts
• Change sender address, number, and content of footers (unless you dene these with main templates)
• Change style and size of font
• Change line style and add borders
• Adjust visibility of elds, change eld labels, and the sequence of elds
• Adjust visibility of columns, change column order, and column headers
• Add standard elds available in the form data structure
If you want to add new elds that are not available in the form data structure, you can add extension
elds. Other elds require support from the SAP Cloud Service Center.
• Add placeholders to free text blocks
• Add new texts or captions
• Show and hide page numbers or folder marks
Note
If you require complex changes to a print form, you can also contact the SAP Cloud Service Center.
They can assist you with complex scripting such as dynamically displaying or hiding elds, sorting
table rows, adding new or extension elds to a form, or creating a completely new form. For more
information, see the Business Center for Cloud Solutions from SAP .
For more information about using Adobe LiveCycle Designer, see the Adobe product documentation.
Set Up Guide for SAP Service Cloud Version2
Output Management
PUBLIC 159

14.2.3Create Language Variants
Variants are copies of an existing form template that are dened in other languages. You can use variants to
create translations of forms in other languages.
Procedure
1. Go to your user prole and select
Settings All Settings Output Management Maintain Form
Template
.
2. Click and select Copy Variant.
3. In the dialog box that appears, select a language.
4. By default, the Form Main Template switch is on. If you do not want to use company-specic main
templates, turn o the switch.
• If you use a main template, some of the elements are predened by the main template, which creates
consistency among documents.
• If you do not use a main template, then you can dene the template's header, footers, logo, and sender
address individually for this template.
5. Save and publish your changes.
14.2.4Download Template Variants
Download a template variant either to edit it oine or to use it as sample data to preview a form template.
Procedure
1. Go to your user prole and select
Settings All Settings Output Management Maintain Form
Template
.
2. Select the template you want and choose Download.
3. Save the archive le using .zip as the le extension.
The ZIP le contains the following les:
• An XML data package (XDP) le containing the selected form template variant.
• An XML schema denition (XSD) le that denes the structure of the XML document. This is required
for oine editing.
• If available, XML les containing sample data for previewing your changes.
Note
If no sample data les are available, you can also create your own sample data les using the View
XML Data button on a document's output history.
160
PUBLIC
Set Up Guide for SAP Service Cloud Version2
Output Management

14.2.5Create Form Template Rule
Administrators can create rules to determine which form template is used for the output of a business
document. If you create new templates, you must create a form template rule to dene when the templates are
used.
Context
You can either dene a form template rule that applies to all instances of the selected business document, or
you can use the parameters provided to create more complex rules. If you have created more than one rule for
a document, you also need to dene the sequence of the rules. The system processes the rules in the order
in which they appear in the table until a rule is found for which the conditions are met. Therefore, enter more
specic rules at the top of the list and generic rules at the bottom. If you create a rule and leave a parameter
blank, then this is handled as a wildcard, and any value is considered as having fullled the condition.
Note
In some cases, a business document represents a group of related document types. For example, the
business document Customer Invoice includes invoices, credit memos, correction invoices, and down
payments.
Procedure
1. Go to your user prole and select Settings All Settings Output Management Select Form
Template
.
2. Select the Entity and Type.
3. Click Add.
4. From the Form Template drop-down list, select a form template.
5. Under Parameter Settings, enter the parameters for which you want this rule to apply.
6. Use the Rearrange icon to adjust the sequence in which the form template rules are applied in order to
ensure that the required rule is applied by the system.
7. Save your changes.
Set Up Guide for SAP Service Cloud Version2
Output Management
PUBLIC 161
15 Adaptation
As an administrator, you can change the look and feel of the solution for all users by changing layout settings,
adding mashups and elds, as well as dening extension elds.
This document describes all functions that you can access as an administrator using the Start Adaptation
button that you can nd under the user prole dropdown list.
15.1 Customize Your Solution
As an administrator, you can customize the UI look and feel for all users.
Procedure
1. Navigate to your user prole on the top-right corner of your screen, and from the dropdown list click Start
Adaptation.
The system displays an orange line in the header to indicate that you are in adaptation mode.
2. Make your changes. Note that any change you make applies to only the main layout.
3. When your changes are complete, click End Session in the header area.
15.2 Manage Fields
Add, hide, and reorder elds.
Procedure
1. Navigate to your user prole on the top-right corner of your screen, and from the dropdown list click Start
Adaptation. The system opens in the adaptation mode and the section where the changes can be made is
marked with a thin orange outline.
2. Hover over the desired section to view the editing icons.
3. Select the Edit Section icon () to open the Section Items pop-up box.
162
PUBLIC
Set Up Guide for SAP Service Cloud Version2
Adaptation

a. To change the sequence of elds, drag the Move icon ( ) next to a eld and move the elds around.
b. To hide elds, click the Hide Field icon ().
c. To add elds, select the Add from list icon ( ) to bring up the elds available in the entity. You can
select one or multiple elds at a time.
4. Click Apply.
15.3 Create and Organize Filters
As an administrator, you can dene lters that end users often use. This makes it easy for them to nd the
information they need quickly.
Context
Customers use our platform to manage tickets or sales modules such as leads, but currently have to manually
enter their most common queries each time. This feature allows them to save their own queries saving their
time making the user experience better.
There are two types of custom lters:
• End User or Personalized Filters: Personalized lters applicable only for that end user.
• Key User Filters: Filters created by the administrator and propagated to all end users or certain group of
end users using page layouts and assignment rules.
Example
A customer service manager wants their team regularly to monitor high priority tickets or platinum
customer incidents. With this feature, they can create a predened query that lters for high priority
tickets, saving them from having to manually enter this query each time.
Procedure
1. Navigate to your user prole on the top-right corner of your screen, and from the dropdown list select Start
Adaptation and select either the main layout or a page layout.
The system highlights the screen with a thin colored line in the header to indicate that you are in adaptation
mode.
2. Navigate to the list view for which you want to create a lter.
3. Select (Advanced Filter)
4. Select an existing lter from the drop down.
5. In the advanced search elds, ll the values as per your requirements and select Search. The system shows
you all the items related to the lters.
Set Up Guide for SAP Service Cloud Version2
Adaptation
PUBLIC 163

6. Depending on whether you have selected a standard or custom lter, the system oers the following
options:
• The Save and Save As buttons are enabled if you have chosen a custom lter. Select Save to override
the values and edit the existing lter. Select Save As to create a copy of the selected lter.
• Only the Save As button is enabled if you have chosen a standard lter. Select Save As to create a
copy of the selected lter. The system stores the references of standard lter and builds additional
parameters. This means that in in future if the application changes the conditions for the standard
lter, it will reect in the custom lter. The Save button is grayed out because you are not allowed to
edit a standard lter.
7. In the Save Filters pop-up box, enter a name for your lter and save your changes.
Note
• The system considers only Advanced Filter elds for custom lter. Quick Filter eld values are not
considered. However, if Quick Filter values are connected to the Advanced Filter, the system uses
the values from the Advanced Filter section.
• You can switch between saved lters in the dropdown. The system resets the values saved as part
that specic saved lter.
• If you try to remove or hide a eld that's being used as a parameter in any saved lter, the system
displays an error message indicating that the eld is currently in use. It will request that you
eliminate its usage before proceeding with removal.
The system displays the list of all saved lters in the Saved Filters pop-up window. You can perform the
following actions:
• Delete: Select(Delete)next to the lter you wish to remove, and then select Save. Note that you
cannot delete standard lters.
• Rearrange: To change the sequence of lters, drag (Move) next to the lters and move them around.
• Show and Hide: Use the switch next to the lters.
• Set as default: Under the Default Filter header, select a lter from the available list.
• Rename custom lters: Hover over the lter name and select (Edit) to edit the name.
8. Save your changes.
9. End the adaptation session.
15.3.1Customize Quick Filters
As an administrator, you can customize quick lters according to your specic preferences or needs. This
customization allows you to adjust which lters are readily available and how they are displayed or accessed
within the application.
Context
It helps in improving eciency and usability by ensuring that the most relevant lters are easily accessible for
quick navigation or sorting of information.
164
PUBLIC
Set Up Guide for SAP Service Cloud Version2
Adaptation
Procedure
1. Navigate to your user prole on the top-right corner of your screen, and from the dropdown list choose
Start Adaptation and select the main layout.
The system highlights the screen with a thin colored line in the header to indicate that you are in adaptation
mode.
2. Select an entity from the left navigation menu.
3. Select a saved lter.
The system displays the quick lter list associated with the saved lter.
4. Hover over the quick lter bar to view the edit option.
Choose (Edit) to view the list of available elds. You can perform the following actions:
• Add From List: To add lters, select
(Add from list) to bring up the elds available in the entity.
Note
You cannot add more than six lters.
• Delete: To delete lters from the list, select(Delete)
• Hide: To hide the lter from the screen, choose (Mark as Hidden)
• Rearrange: To change the sequence of lters, drag (Move) next to the lters and move them around.
5. Apply your changes.
The system reects the new lters immediately. It also displays the lters in the order in which you placed
them during editing.
15.4 Add Extension Fields
Add extension elds for your objects.
Procedure
1. Navigate to your user prole on the top-right corner of your screen, and from the dropdown list click Start
Adaptation. The system opens in the adaptation mode and the section where the changes can be made is
marked with a thin orange border.
2. Hover over the desired section to view the editing icons.
3. Select (Edit Section) to open the Section Items pop-up box.
4. To add elds, select
(Add from list) to bring up the elds available in the entity.
5. Find the Extensions node in the list and drill down inside the structure to view the list of available extension
elds.
Set Up Guide for SAP Service Cloud Version2
Adaptation
PUBLIC 165
6. Select (Add Field) to add the desired eld.
Note: You can add only part of structure elds, for example, you can add only the amount value and not the
currency.
7. Click Apply.
Related Information
Field Attributes [page 173]
Field attributes, also known as column attributes or eld properties, are characteristics or settings
associated with a database eld (column) that dene various aspects of how data is stored, displayed,
and processed within a database. These attributes help ensure data integrity, enforce constraints, and
control how the data is used.
15.5 Add and Manage Sections
Add, hide, show, and reorder sections.
Procedure
1. Navigate to your user prole on the top-right corner of your screen, and from the dropdown list click Start
Adaptation. The system opens in the adaptation mode and the section where the changes can be made is
marked with a thin orange border.
2. Hover over the desired section to view the editing icons.
a. To move the section up or down, click the Sort icons ().
b. To hide the section from the screen, click the Hide Section icon ().
c. To add sections, follow these steps:
1. Click the Add Section icon ( ) on the orange/yellow outline.
2. Select Create Section. The system creates an empty section above the selected spot and a Create
Section pop-up box opens up.
3. Enter the section name.
4. Optional: Select the Show Section Header checkbox to make the section name visible as header.
5. Click Apply.
d. To manage multiple sections together, follow these steps:
1. Click the orange icon ( ).
2. Select Manage Sections. The system displays the list of visible sections in the All Sections pop-up
box.
3. You can perform the following actions:
166
PUBLIC
Set Up Guide for SAP Service Cloud Version2
Adaptation

• To change the sequence of sections, drag the Move Section icon ( ) next to sections and
move them around.
• To hide sections from the screen, click ().
• To make hidden sections visible, select the Add from list icon (
) to bring up the Add Section
pop-up box. Search and select the desired sections and click Apply to make those sections
visible again in the UI.
• To delete custom sections from the screen, select the Delete Section icon ().
Note
You can’t delete standard sections; you can only hide them from the screen.
4. Click Apply to make changes to all these explicit actions at one go.
15.6 Create Custom Buttons
As an administrator, you can create custom buttons to trigger end user action such as release sales orders,
print invoices, and so on. You can create them at designated sections on the screen, for example, near an
action group.
Procedure
1. Navigate to your user prole on the top-right corner of your screen, and from the dropdown list click Start
Adaptation. The system opens in the adaptation mode and the section where the changes can be made is
marked with a thin orange outline.
2. Hover over the desired section to view the editing icons.
3. Select the Edit icon () to open the Section Items pop-up box.
4. Select the Add icon () to open the Add Buttons pop-up box.
Note
You can create a custom button under a standard button group or create a stand-alone button. To
create a custom button under a standard button group, drill down inside the group.
5. Add a button name.
6. Add an event name. We recommend that you add a name that explains what the button is used for. For
example, Create a Sales Order.
User actions, such as click of a button, or clicking a link triggers certain events. These events are
associated to a button.
7. Optional: Add parameters.
Parameters are data that is passed when an event is triggered. You can use these data points as input for
mashups.
Set Up Guide for SAP Service Cloud Version2
Adaptation
PUBLIC 167
For example, when you capture the current address and send it to third-party system during a button click,
the system will pick up the address that you mention in the parameter section during a button creation.
8. Click Apply.
15.7 Create and Manage Custom Tabs
As an administrator, you can create custom tabs and embed mashups.
Procedure
1. Navigate to your user prole on the top-right corner of your screen, and from the dropdown list select Start
Adaptation. The system opens in the adaptation mode and the section where the changes can be made is
marked with a thin orange border.
2. Hover over the tab header section to view the editing icons.
3. Select (Edit) to open the Edit Tabs pop-up box.
4. Select(Add) to create a custom tab.
5. Add a name for your tab and press the Return key.
6. Select Apply.
A custom tab is now created with the same title.
7. Optional: To hide the tab and launch it based on a button click, select (Drill Down) next to the tab and
select the Show on Event Trigger checkbox. The system now hides the tab by default and makes it visible
only after you click the button you associate with an event. Ensure that the desired parameters of the event
are associated to the mashup present in custom tab.
8. Optional: To hide a custom tab, select (Hide).
9. Optional: To delete a custom tab, select (Delete).
10. Optional: To change the sequence of tabs, drag(Move) next to the tabs and move them around.
Select Apply after performing all the optional steps for the changes to reect.
15.7.1Add Mashups to Custom Sections and Tabs
After creating a custom section or tab, you can add mashups to that section or tab.
Procedure
1. Open a custom section, or a custom tab.
168
PUBLIC
Set Up Guide for SAP Service Cloud Version2
Adaptation
2. Click (Drill Down)next to Add Mashup to drill down to the list of available mashups.
3. Search for the desired mashup and click(Drill Down) to view the mashup properties.
4. If necessary, you can adjust the appearance of the mashup by editing the following options in the Edit
Properties pop-up box.
Note: The options available to you’ll vary depending on the mashup.
• Select the Show Header checkbox if you want to see the mashup title on the screen.
• Dene the height of HTML Mashups to be displayed in the available screen. For example, if you set the
value of Height(%) to 100, the newly added mashup occupies the full height of the screen.
• Congure the parameters to dene which screens can be used in the mashup.
5. Click Apply.
Set Up Guide for SAP Service Cloud Version2
Adaptation
PUBLIC 169

16 Extensibility
Extensibility allows you and your partners to extend the software platform without having to modify the original
codebase. So, you can add to the base functionality, thereby oering new capabilities and outputs.
Extensions range from customizing through to the development of add-ons or composites. Extensions can
either be made by customers, partners, or SAP. Extensibility allows customers and partners to support specic
use cases and requirements that are not covered by standard software.
16.1 Create Extension Fields
Extension elds are additional elds that you, as an administrator, can add to a cloud solution from SAP.
Context
Extension elds provide the means to store additional data for specic use cases beyond what is natively
present in the solution. You can create these elds for a screen that has been enabled for extension elds.
Procedure
1. Navigate to your user prole on the top-right corner of your screen, and from the dropdown list select
Settings All Settings Extensibility and click Extensibility Administration.
The system opens a new screen and displays a list of all business entities in the left panel. These entities
are grouped by services.
2. Click the Extendable checkbox to view the entities that can be extended.
3. Drill down to the entity you want to add an extension eld to, and select it. The system opens the
corresponding worklist.
4. In the Custom Fields tab, click (Add) to open the Create Fields quick create screen.
5. Enter the Label. The system autopopulates the name.
6. Select the Data Type and the corresponding Data Format.
7. Save your changes.
The extension eld is now created and is listed under the Custom Fields tab.
Note
You can create up to 50 extension elds per entity.
170
PUBLIC
Set Up Guide for SAP Service Cloud Version2
Extensibility
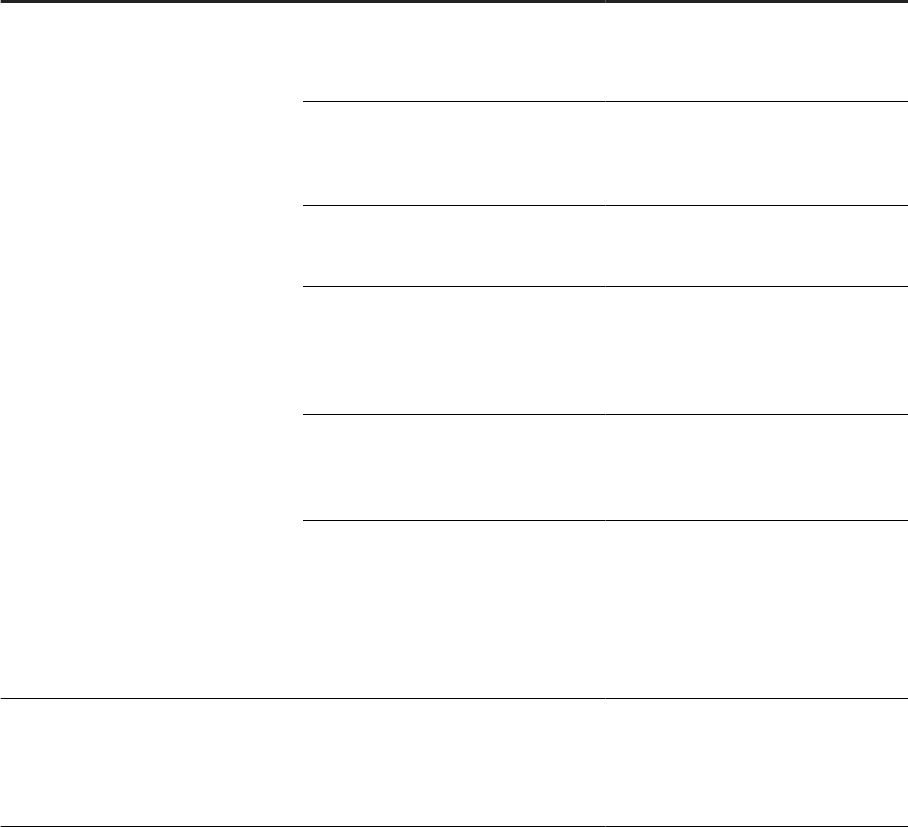
Related Information
Extension Field Data Types [page 171]
Field Attributes [page 173]
Field attributes, also known as column attributes or eld properties, are characteristics or settings
associated with a database eld (column) that dene various aspects of how data is stored, displayed,
and processed within a database. These attributes help ensure data integrity, enforce constraints, and
control how the data is used.
16.1.1Extension Field Data Types
Extension Field Data Types
Data Type
Data Format Description
STRING STRING (Default)
This data type is used for storing alpha-
numeric characters. It can be a single
line or a multiline text eld.
UUID
A UUID (Universally Unique Identier)
is a 128-bit identier used for unique
resource identication, typically repre-
sented as a 36-character string.
EMAIL
Email data types are designed for stor-
ing email addresses and often include
validation checks.
CODE CODE data type is used for code list.
Fixed code lists are dened via Enum
options. Dynamic code lists are dened
via reference to the corresponding en-
tity.
TOKEN A TOKEN represents a small piece of
data, often a single word, number, or
symbol used as a fundamental unit in
programming or language processing.
URI
A URI (Uniform Resource Identier) is a
text string used to identify a resource,
typically consisting of a scheme, au-
thority, path, query, and fragment
components. Example: https://
www.example.com/resource?
param=value#section.
NUMBER FLOAT (Default)
Number data types can include inte-
gers, decimals, or oats. They are used
for storing numeric values. Use FLOAT
when memory conservation is critical,
and you can tolerate lower precision
Set Up Guide for SAP Service Cloud Version2
Extensibility
PUBLIC 171

Data Type Data Format Description
DOUBLE The DOUBLE data type is used to rep-
resent real numbers with a high level
of precision. Double provides a higher
level of precision compared to the
FLOAT data type. It can represent ap-
proximately 15-16 decimal digits accu-
rately.
BOOLEAN
Boolean elds can have only two values
- true or false. They are used for binary
data or simple yes/no choices.
OBJECT OBJECT is a versatile and often generic
data type that can represent a wide
range of values, data structures, or enti-
ties.
AMOUNT AMOUNT stores numerical values that
represent quantities, prices, costs, or
any other kind of monetary or non-
monetary amounts.
QUANTITY QUANTITY typically refers to a numeri-
cal value that represents a count, meas-
urement, or amount. Such values are
generally represented using standard
numeric data types, which can be either
integer or oating-point types, depend-
ing on the nature of the quantities being
measured.
TEXT The TEXT data type represents textual
data, such as characters, strings, or
plain text. They are designed to store
human-readable information and are
typically used for storing words, senten-
ces, paragraphs, and other forms of
text.
INTEGER INT32 (Default) The INT32 data type can store a range
of integer values, both positive and
negative, within the constraints of a
32-bit binary representation. Int-32 is
more memory-ecient than larger inte-
ger types like int-64, making it a good
choice for applications where memory
optimization is a concern.
172 PUBLIC
Set Up Guide for SAP Service Cloud Version2
Extensibility

Data Type Data Format Description
INT64 The INT64 data type is capable of
storing a wide range of integer values,
both positive and negative, within the
constraints of a 64-bit binary represen-
tation. The range of values for a 64-bit
integer is extensive, making it suitable
for applications where very large or very
small integer values need to be han-
dled.
DATETIME DATETIME (Default) DATETIME data types store informa-
tion about both the date (day, month,
and year) and time (hours, minutes,
seconds, and sometimes fractions of a
second).
DATE
Date elds store date values, including
options for time and time zone settings.
TIME
Time elds store time values without
date information.
DURATION
Duration elds are used to represent a
specic length of time, typically meas-
ured in terms of hours, minutes, sec-
onds, and sometimes milliseconds. It
allows you to work with time intervals or
durations, as opposed to specic points
in time, which are handled by date and
time data types.
16.1.2Field Attributes
Field attributes, also known as column attributes or eld properties, are characteristics or settings associated
with a database eld (column) that dene various aspects of how data is stored, displayed, and processed
within a database. These attributes help ensure data integrity, enforce constraints, and control how the data is
used.
Available Field Attributes
Field Attribute
Description
creatable
Createable elds indicate whether a eld can be populated
with data when inserting a new record (i.e., during the crea-
tion of a new record in a database table).
If a eld is createable, you can provide a value for it when
adding a new record to the database. If it's not createable,
the eld must remain empty or be set to a default value
during insertion.
Set Up Guide for SAP Service Cloud Version2
Extensibility
PUBLIC 173

Field Attribute Description
updatable
Updateable elds determine whether a eld's value can be
modied after the record has been created.
If a eld is updateable, you can change its value when up-
dating existing records. Fields marked as non-updateable
typically remain unchanged after the record's creation, but
this behavior can be controlled using eld attributes.
nullable
A eld is nullable if it can contain null values, meaning that
it's not required to have a value in every record.
If a eld is nullable, you can leave it empty (null) when cre-
ating or updating a record. If a eld is not nullable, it must
always have a valid value, and it can't be null. Non-nullable
elds are typically used for data that's required and must
always have a value.
required
Required elds are those that must have a value in every
record, and null values are not allowed.
When dening a eld as required, you must ensure that it
is populated with a valid value whenever a new record is
created or an existing record is updated. These elds are
essential for data integrity and accuracy.
sortable
Sortable elds allow data to be arranged in a particular or-
der, typically in ascending or descending fashion. Sorting is
based on the values within these elds.
You can click the column headers in a table or a list to sort
the data by that column. Sorting helps with data organiza-
tion and simplies data analysis.
lterable
Filterable elds permit data to be ltered based on specic
criteria or conditions. Users can apply lters to display only
the records that meet their chosen criteria.
Filtering is employed to reduce a dataset's size, making it
easier to focus on specic information or patterns within the
data.
searchable
Searchable elds enable data to be searched or queried us-
ing keywords, phrases, or search terms. Searching allows
users to nd specic records or information within a larger
dataset.
You can enter search queries to locate records that contain
the desired information, which is crucial for ecient infor-
mation retrieval.
174 PUBLIC
Set Up Guide for SAP Service Cloud Version2
Extensibility

Field Attribute Description
hidden
Hidden elds are not visible to the user by default, but they
may contain data that is used for various purposes, such as
calculations or internal processing.
Hidden elds are often used in forms or data structures
where the data is needed for processing but doesn't need to
be displayed to the user.
Note
• You cannot change the searchable property for the OBJECT, ARRAY, INTEGER, NUMBER, and
DATETIME datatypes.
• You cannot change the filterable and sortable properties for the OBJECT, ARRAY, INTEGER, and
NUMBER datatypes.
• The required and nullable properties are not applicable for the BOOLEAN datatype.
• OBJECT dataType can not have dataFormat as DEFAULT or not dened. dataFormat AMOUNT or
QUANTITY or TEXT are only supported for custom/extension attributes.
• You cannot update dataType and dataFormat.
16.1.3Delete Extension Fields
As an administrator, you might delete an extension eld to eliminate redundancy, improve system
performance, and maintain data accuracy..
To delete an extension eld, navigate to Extensibility Administration Custom Fields where all the elds
are listed and select Delete.
Note that deleted elds cannot be recovered, and all data will be lost.
You are not allowed to delete an extension eld if it is already in use in other business processes such as
Validations, Determinations, Autoows, and so on. We recommend that you use the where-used function to
identify and detect all usages. Make sure to delete these usages before deleting the extension eld.
Select
(View Usage) to check the services where the eld has been used. If the usage list is blank or shows
an error, ensure that the where- used service sap.crm.service.whereUsedService is assigned to your
corresponding user role.
Set Up Guide for SAP Service Cloud Version2
Extensibility
PUBLIC 175

16.2 Create Validations
Validations help you, as an administrator, to implement a custom logic where you can prevent a save or issue a
warning message to users during save based on certain conditions.
Procedure
1. Navigate to your user prole on the top-right corner of your screen, and from the dropdown list select
Settings All Settings Extensibility and choose Extensibility Administration.
The system opens a new screen and displays a list of all business entities in the left panel. These entities
are grouped by services.
2. Select a service and choose (Drill Down) to open and select an entity.
3. Navigate to the Validations tab and choose
Create Using Forms to launch the New Validation editor
tab.
The editor has three main blocks:
• Header: Specify the validation name and description here.
• Condition: Set the desired conditions using a ow-based visual condition editor.
• Action: Specify an error or warning message based on the conditions dened in the condition block.
4. In the header block, specify the validation name and description.
5. In the Condition Block set the desired conditions using a ow-based visual condition editor.
a. Select a function from the dropdown.
b. Select the standard or extension eld from the dropdown.
To create a condition based on the previous value of the eld, slide the Previous Value switch.
c. Select the comparison operator.
d. Select the target comparison. You can compare either by a xed value or with another eld.
e. If you choose Value, enter a corresponding target value. If you choose Field, select a target eld.
Add multiple conditions by choosing (Add Condition). To remove a condition, choose (Remove
Condition). To clear all conditions in a block, choose (Delete Condition Block).
Note that when you create multiple conditions, the condition group is considered fullled only if all the
conditions within a group are met.
6. Optional: Create an OR condition by choosing the + Or button. The system displays additional condition
blocks. Follow the same steps as earlier to ll one or more OR condition blocks.
Note
When you create multiple OR conditions, the condition group is considered fullled if any one of the
block conditions are met.
7. In the third block, under Action choose to show either an error or a warning message.
8. Add the message text.
176
PUBLIC
Set Up Guide for SAP Service Cloud Version2
Extensibility

9. Save and activate your changes.
Note
You can create a maximum of 20 validations per entity.
In the Validations tab, the system lists all validations for a specied entity. Select or to edit or delete
the corresponding validation.
If you need to temporarily turn o certain rules for testing or troubleshooting, you can do so by using the
switch under Actions to disable the validation.
Note
To create a validation using block-based editor, watch the following video:
Related Information
Disable Custom Logic [page 189]
As an administrator you can disable custom logic that you have previously congured or added to meet
specic requirements. This includes validation and determination rules.
Functions in Custom Logic [page 180]
This document lists all the functions available for creating validation and determination rules in Extensibility
Administration.
16.3 Create Determinations
Use determinations to calculate specic eld value based on certain conditions. You can either default or
propose the value or mandate a certain value using determinations.
Procedure
1. Navigate to your user prole on the top-right corner of your screen, and from the dropdown list select
Settings All Settings Extensibility and choose Extensibility Administration.
The system opens a new screen and displays a list of all business entities in the left panel. These entities
are grouped by services.
2. Select a service and choose (Drill Down) to open and select an entity.
3. Navigate to the Determinations tab, choose Create Using Forms to launch the New Determination
editor tab.
Set Up Guide for SAP Service Cloud Version2
Extensibility
PUBLIC 177

The editor has three main blocks:
• Header: Specify the determination name, event, and description here.
• Condition: Set the desired conditions using a ow-based visual condition editor.
• Assignment: Assign a value to specic elds. You can use each row to assign a single eld value. For
example, total_amount = item_count * item_price.
4. In the header block, perform the following actions:
a. Enter a name.
b. Choose one of the following events:
• Pre Hook: You can use it to default or suggest standard and custom eld values. The user can
change the eld values.
• Post Hook: You can use it to mandate custom eld values. The user cannot change the standard
eld values.
c. Add a description.
5. In the Condition Block set the desired conditions using a ow-based visual condition editor.
a. Select a function from the dropdown.
b. Select the standard or extension eld from the dropdown.
To create a condition based on the previous value of the eld, slide the Previous Value switch.
c. Select the target comparison. You can compare either by a xed value or with another eld.
d. If you choose Value, enter a corresponding target value. If you choose Field, select a target eld.
Add multiple conditions by choosing (Add Condition). To remove a condition, choose (Remove
Condition). To clear all conditions in a block, choose (Delete Condition Block).
Note that when you create multiple conditions, the condition group is considered fullled only if all the
conditions within a group are met.
6. Optional: You can also create an OR condition by choosing the + Or button. The system displays additional
condition blocks. Follow the same steps as earlier to ll one or more OR condition blocks.
Note
When you create multiple OR conditions, the condition group is considered fullled if any one of the
block conditions are met.
Under the Summary header, the system shows you a summary of all the conditions that you’ve entered.
7. In the Assignment Block perform the following actions:
• Use a row to assign or calculate value to a specic eld.
• Write the expressions and calculations in free-style format.
• Mention the target eld rst, followed by “=” and then specify the expression. For example, {status} =
('Open')
• Enclose all entity elds in curly braces: For example, {status}, {ID}, and so on.
• Ensure that you add the extension/custom elds under the extensions structure. For example,
{extensions/customeld}
• Get the technical name of the elds using the dropdown in the Condition Block.
• Use expressions consisting of operators and certain pre-dened functions specied in the Assignment
Block.
178
PUBLIC
Set Up Guide for SAP Service Cloud Version2
Extensibility

• Ensure that you check the feedback provided by the system in case of invalid expressions. The error
messages are congured to give exact feedback so that you can correct the expression.
• Create additional assignment rows by choosing (Add Assignment). To remove a row, choose
(Remove Assignment). Choose Clear All to remove all assignment rows.
8. Optional: Select Else or Else If to create one more set of condition blocks that are triggered if the initial sets
of conditions are not satised. Follow the same steps to create Else If/Else conditions and assignments
inside the respective blocks.
Note
• You can create an Else If/Else block only when you have at least one condition in the initial IF
block.
• You can create up to 20 Else If conditions.
• If you select an Else condition, the system does not allow you to create additional blocks indicating
that your entire logic is complete.
9. Save and activate your changes.
Note
You can create a maximum of 10 determinations per entity.
In the Determinations tab, the system lists all determinations for a specied entity. Choose or to edit
or delete the corresponding determination.
To control the sequence in which the determination rules should be implemented, drag and drop the rules
in order of precedence by choosing (Move).
If you need to temporarily turn o certain rules for testing or troubleshooting, you can do so by using the
switch under Actions to disable the determination.
Note
To create a determination using block-based editor, watch the following video:
Related Information
Disable Custom Logic [page 189]
As an administrator you can disable custom logic that you have previously congured or added to meet
specic requirements. This includes validation and determination rules.
Functions in Custom Logic [page 180]
This document lists all the functions available for creating validation and determination rules in Extensibility
Administration.
Set Up Guide for SAP Service Cloud Version2
Extensibility
PUBLIC 179

16.4 Functions in Custom Logic
This document lists all the functions available for creating validation and determination rules in Extensibility
Administration.
The list of functions available are as follows:
• IS NULL
The function supports null check for both array and non-array attributes. The result data type is Boolean.
• Non-Array Fields
This function accepts an expression or an attribute as an input. This function is supported for all data
types.
Example
• $IS NULL ( {closeDate} ) returns true if closeDate is null otherwise false.
• $IS NULL ( {description} == 'desc' ) returns true if description is null otherwise false.
• ( $IS NULL ( {account/name} ) == false ) && ( {account/name} == 'acc' )
• Array Root Fields
This function only operates on the top-level array attribute, and does not support nested arrays.
The expression returns true only if the array is either not present in the input JSON or is explicitly set to
null.
In case of empty arrays or arrays with values in it, the result of the expression would be false.
Example
$IS NULL ( {salesData} ) returns true if salesData array is null or not part of the input json.
• MATCH_ALL
Returns true if every occurence of an attribute in the array matches with a value. Otherwise returns false.
• MATCH_ANY
Returns true if there is at least one occurence of an attribute in the array that matches a value. Otherwise
returns false.
• SUM
Returns the sum of attributes in the array. This is applicable only for Integer and Number array operands.
• IS_EMPTY
Returns true if array is empty, else returns false.
Example
salesData is an array, \"salesData\" : [] will return true. But \"salesData\" : [{}] would return false.
When salesData is missing or \"salesData\": null the result is UNKNOWN
• $CURRENTDATETIME()
Returns current date time value, supported as Date Time data type. Usage ( $CURRENT_DATETIME() >
'2019-08-27T00:00:00Z').
When used alone, for example ( $CURRENT_DATETIME() ), it returns current date time value in EPOC
format on evaluation.
The consuming application can then convert it in the format that is required.
• $CONCATENATE ( list of comma separated string arguments )
180
PUBLIC
Set Up Guide for SAP Service Cloud Version2
Extensibility

Returns concatenated string value. It accepts arguments of data type String.
Usage $CONCATENATE ( 'String1' , {account/name} , 'String2' )
Note
Condition conguration UI supports the following functions: IS Null, Is Empty, Match All, Match Any
and Sum based on the source eld datatype. The assignment editor (in determination) supports
Current date time, Concatenate and Sum functions.
16.5 Create External Hooks
As an administrator, you can create and use external hooks to activate external functions when you save an
application. This means you can customize or add extra functionalities to the saving process according to your
needs using side-by-side tools such as Kyma, BTP, and so on.
Prerequisites
You have already congured the communication arrangement between the solution and a communication
partner.
Context
External hooks refer to mechanisms or points in a system or software where external processes or custom
code can be integrated or triggered to extend or modify the behavior of the system. These hooks provide
a way for external components to interact with the main system at specic events or actions, allowing for
customization and exibility in the overall functionality.
Note
When you send data to external systems, you are responsible for managing or deleting personal data from
those systems. SAP or its aliated companies shall not be liable for errors or omissions with respect to the
data that is transmitted outside of the SAP solution.
Procedure
1. Navigate to your user prole on the top-right corner of your screen, and from the dropdown list select
Settings All Settings Extensibility and click Extensibility Administration.
The system opens a new screen and displays a list of all business entities in the left panel. These entities
are grouped by services.
Set Up Guide for SAP Service Cloud Version2
Extensibility
PUBLIC 181

2. Select a service and click (Drill Down) to open and select an entity.
3. Navigate to the External Hooks tab and click (Create External Hook) to launch the Create External Hook
quick create window.
4. Enter a name and description.
5. Choose one of the following events:
• Pre Hook: You can use it to default or suggest standard and custom eld values. The user can change
the eld values.
• Post Hook: You can use it to mandate custom eld values. The user cannot overwrite the eld values.
The system displays the Service Full Name based on your selection in Extensibility Administration. It's a
read-only eld.
6. Enter the API Path sux that need to be applied. In the Communication system, you will
dene the system URL but this API path can be dierent for dierent logics. For example, your
system URL my123131.ondemand.com is dened in the communication system but you must call
my123131.ondemand.com/case_validation for each case save. This is achieved by mentioning the
API path which is added to the system instance URL.
The HTTP Method eld is already auto-populated with POST, since this is the only method allowed
currently. All the data exchange happens via POST message.
7. Select the Communication System from the dropdown. Note that you have already created the
communication system.
8. Save your changes.
Note
• In the pre hook, you have the exibility to update both standard and custom elds.
However, in the post hook, you can only update custom elds. Updating standard elds is not
permitted.
• You cannot add or delete entries from arrays of objects in either pre hook or post hook.
For instance, in the opportunity entity (sap.ssc.opportunityservice.entity.opportunity),
you have ‘items’ which is an array of objects referring to the
sap.ssc.opportunityservice.entity.opportunityItems entity. Here, you cannot add another object
in the items array, nor can you remove the object ( with “id”= “6cc451bc-2969-4cf4-
a303-92607abc7b5c” ).
Sample Code
{
"items": [
{
"id": "6cc451bc-2969-4cf4-a303-92607abc7b5c",
"productId": "c14c84f8-2f86-4890-b0a4-b6a956c3d622",
"productDisplayId": "0000000000,020,255",
"netAmount": {
"content": 0,
"currencyCode": "USD"
},
"revenueStartDate": "2024-03-01",
"revenueEndDate": "2024-03-01"
}
]
}
182
PUBLIC
Set Up Guide for SAP Service Cloud Version2
Extensibility

However, you can add or remove items from arrays of primitive types ( String, Number etc. )
For example, case entity (sap.ssc.caseservice.entity.case) has an attribute called ‘toRecipients’
which is an array of strings. You can add or remove entries here.
Sample Code
{
"emailInteraction": {
"id": "fd63de17-e971-11ed-a33e-a7a619a69637",
"senderEmailAddress": [email protected],
"toRecipients": [
]
}
}
• In the post hook, you can perform validations and respond with error/warning/info messages.
Responding with an error message results in a transaction save failure.
• Metadata validations are conducted on modied data, and errors from these checks are returned
to the application service.
These validation errors should be visible in the user interface, and the save operation will fail
accordingly.
• If there's an error in connecting to an external system implementation (due to incorrect
conguration or unavailability of the service), appropriate errors are returned to the application
service.
These errors should be visible in the user interface, and the save operation will fail.
• The response returned in hooks should adhere to the published and supported response structure.
Schema validations are performed on the response data, and any validation errors will be returned
to the application service.
These errors should be visible in the user interface, and the save operation will fail.
• Only one external pre hook and one external post hook per root entity are allowed.
Creating hooks on sub-entities is not permitted.
• The external hook implementation should be very lean, ecient, and performant as these
are called synchronously within the transaction. Sub-optimal implementations hamper the
performance of your application..
• In unforeseen cases, to protect the system's stability and performance, requests taking more than
10 seconds are terminated. An error message indicating this appears in the application.
Related Information
External Hook Request and Response Structure [page 184]
Create Communication Systems
Set Up Guide for SAP Service Cloud Version2
Extensibility
PUBLIC 183

16.5.1External Hook Request and Response Structure
ExternalHook PreHook
Request format for preHook to external system:
Sample Code
{
"entity": "",
"currentImage": { }
}
Element
Mandatory Type Description
entity Yes String Full name of the aggregated
entity
currentImage Yes Object Current image of the aggre-
gate entity data
Example
Incoming Externalhook PreHook request for case entity
Sample Code
{
"entity": "sap.ssc.caseservice.entity.case",
"currentImage": {
"subject": "Very Important Case",
"priority": "03",
"priorityDescription": "Normal",
"origin": "MANUAL_DATA_ENTRY",
"caseType": "ZSRK",
"caseTypeDescription": "SRK Case Type",
"timePoints": {
"reportedOn": "2023-10-30T05:28:00Z"
},
"categoryLevel1": {},
"extensions": {
"Price": 12345
}
}}
Response format for preHook
Sample Code
{
"data": { },
“noChanges”: true/false
}
184
PUBLIC
Set Up Guide for SAP Service Cloud Version2
Extensibility

Element Mandatory Type Description
data Yes (if noChanges = false or
if noChanges not sent in re-
sponse)
Object Modied entity aggregate
current image data returned
by the external system.
Standard and extension
elds can be modied.
noChanges
No Boolean Indicates that the external
system has not modied the
data. If set to ‘true’, you do
not need to return the 'da-
ta' attribute in the response.
This helps reduce unneces-
sary data transfer over the
wire.
Example
Externalhook PreHook response for case entity where subject and extensions/price are changed.
Sample Code
{
"data": {
"subject": "Not important",
"priority": "03",
"priorityDescription": "Normal",
"origin": "MANUAL_DATA_ENTRY",
"caseType": "ZSRK",
"caseTypeDescription": "SRK Case Type",
"timePoints": {
"reportedOn": "2023-10-30T05:28:00Z"
},
"categoryLevel1": {},
"extensions": {
"Price": 999
}
}
Example
Externalhook PreHook response for case entity where no modicationsare made on the data.
Sample Code
{
“noChanges”: true
}
Set Up Guide for SAP Service Cloud Version2
Extensibility
PUBLIC 185

ExternalHook PostHook
Request format for postHook to external system
Sample Code
{
"entity": "",
"currentImage": { }
}
Element
Mandatory Type Description
entity Yes String Full name of the aggregated
entity
currentImage Yes Object Current image of the aggre-
gate entity data
Example
Incoming Externalhook PostHook request for case entity
Sample Code
{
"entity": "sap.ssc.caseservice.entity.case",
"currentImage": {
"subject": "Very Important Case",
"priority": "03",
"priorityDescription": "Normal",
"origin": "MANUAL_DATA_ENTRY",
"caseType": "ZSRK",
"caseTypeDescription": "SRK Case Type",
"timePoints": {
"reportedOn": "2023-10-30T05:28:00Z"
},
"categoryLevel1": {},
"extensions": {
"Price": 12345
}
}
}
Example
Response format for postHook
Sample Code
{
"data": { },
"error": [
{
"code": "",
"message": "",
"target": ""
}
186
PUBLIC
Set Up Guide for SAP Service Cloud Version2
Extensibility

],
"info": [
{
"code": "",
"message": "",
"target": "",
"severity": "WARNING/INFO"
},
]
}
Element
Element Of Mandatory Type Description
data
Yes ( if noChanges
= false or if no-
Changes not sent in
response)
Object
Modied entity aggregate current image
data returned by the external system.
Only extension elds are editable.
noChanges No Boolean Indicates no modications to data by ex-
ternal system. If passed as ‘true’, data
need not be provided in the response.
error
No Array of objects
List of validation error messages
code
Error Yes
Combination of the external service name
and error code of integer (5 digits), with a
dot (.) as the delimiter
message
Error Yes String
Description of the error message
Messages can be up to 200 characters
long. Anything longer will be truncated.
target
Error No String
Object that is used to provide reference
to the target element that caused the
error. The target may either identify the
resource directly using the URL notation
(or) may identify an element in the pay-
load using the binding "{ … }" notation
info
No Array of objects
List of validation info/warning messages.
code
Info No String
Combination of the external service name
and code integer (5 digits), with a dot (.)
as the delimiter
message
Info Yes String
Description of the info/warning message
Messages can be up to 200 characters
long. Anything longer will be truncated.
Set Up Guide for SAP Service Cloud Version2
Extensibility
PUBLIC 187

Element Element Of Mandatory Type Description
target
Info No String
Object that is used to provide reference
to the target element that caused the
error. The target may either identify the
resource directly using the URL notation
(or) may identify an element in the pay-
load using the binding "{ … }" notation
severity
Info Yes Enum
Indicates the type of the information. Per-
mitted values INFO, WARNING
Example
Outgoing Externalhook PostHook response for case entity with error, info, and warning messages
Sample Code
{
"data": {
"subject": "Very Important Case",
"priority": "03",
"priorityDescription": "Normal",
"origin": "MANUAL_DATA_ENTRY",
"caseType": "ZSRK",
"caseTypeDescription": "SRK Case Type",
"timePoints": {
"reportedOn": "2023-10-30T05:28:00Z"
},
"categoryLevel1": {},
"extensions": {
"Price": 12345
}
},
"error": [ {
"code": "external_CaseService.10000",
"message": "Case type is not allowed.”,
"target": "{caseType}"
}
],
"info": [ {
"code": " external_CaseService.10001",
"message": "Try to keep subject within 2 words.",
"target": "{subject}",
"severity": "WARNING"
},
{
"code": " external_CaseService.10002",
"message": "Case processed by external system.",
"target": "",
"severity": "INFO"
}
]
}
188
PUBLIC
Set Up Guide for SAP Service Cloud Version2
Extensibility

16.6 Disable Custom Logic
As an administrator you can disable custom logic that you have previously congured or added to meet
specic requirements. This includes validation and determination rules.
Context
For debugging purposes, if you wish to disable the implementation of custom logic for specic users in a test
landscape, you can use the Custom Logic Administration workspace.
Here, you have the option to temporarily disable the custom logic that you created for debugging purposes. By
doing so, you can dierentiate between SAP-generated messages and those from your own logic, aiding in your
analysis and resolution process. This feature is particularly useful during debugging, enabling you to mimic
the behavior of a fresh SAP solution by turning o custom logic implementation for specic users or in a test
landscape.
In the Custom Logic Administration workspace, you can specify the users for whom you want to disable
these custom processes. This feature is helpful when you need to temporarily suspend all custom logic
implementation for selected users during debugging or testing phases.
Procedure
1. Navigate to your user prole on the top-right corner of your screen, and from the dropdown list select
Settings All Settings Extensibility and click Custom Logic Administration.
The system opens the Disable Custom Logic screen and displays the list of all the users who created the
custom logic.
2. Select the check box next to the user that you want to delete.
3. Click (Delete).
All the validation and determination rules connected to that user is disabled.
Note
This feature is available only in the test landscape and you cannot add more than ve users.
Set Up Guide for SAP Service Cloud Version2
Extensibility
PUBLIC 189

16.7 Create Page Layouts
As an administrator, you can create customized page layouts to cater to the diverse needs of dierent user
groups. This allows you to provide an optimized and user-centric experience for each segment of users.
Context
While the main layout is the default layout that impacts all users and establishes consistency across the
entire project, there are situations where specic user groups may require a dierent look and feel or user
interface (UI) design. In such cases, page layouts play a crucial role in customizing the user experience for
dierent groups of users. For example, users in Bangalore may have distinct preferences, cultural inuences,
or language requirements compared to users in New York. By using dierent page layouts for each user group,
administrators can create a more personalized and relevant experience, enhancing user engagement and
satisfaction.
By default, when you create a new page layout, the changes you make to that layout are not automatically
applied to any of the existing users. You must explicitly assign the new page layout by using the assignment
rules.
This approach allows administrators to have full control over which users or user groups will be using the
customized page layout. You can selectively assign the new layout based on countries, languages, business
roles, individual users, territories and their heirarchies, and so on, using the assigment rules. Once the
assignment is made, the users who have been assigned the new page layout starts experiencing the changes
and enjoy the optimized user experience tailored to their requirements.
Procedure
1. Navigate to your user prole on the top-right corner of your screen, and from the dropdown list select
Settings All Settings Extensibility and click Page Layouts.
2. Click (Add) to open the New Layout quick create screen.
3. Add a name.
4. Save your changes.
The page layout is now created and is listed under the Page Layouts screen.
You can make changes for the specic page layout by using the adapatation mode and selecting the new
page layout.
Click (Edit) or (Delete) to edit or delete the corresponding page layout.
Note
Conicts can occur when changes are made to the same control in both the main layout and the page
layout. In such cases, the behavior dened in the page layout takes precedence over the main layout.
For example, if a eld is made visible in themain layout and then explicitly hidden in the page layout, the
190
PUBLIC
Set Up Guide for SAP Service Cloud Version2
Extensibility

page layout will take precedence, and the eld will be eventually hidden when the page is displayed to
the user.
In case of non-conicting changes, both the main layout and the page layout changes will get applied.
In this scenario, any visibility congurations set at themain layout level will be applied universally
across all pages where that eld appears unless explicitly overridden in individual page layouts.
16.8 Create and Assign Rules to Page Layouts
As an administrator, you can create and assign rules to page layouts.
Context
Assignment rules allow users to implement diverse logic, customize the user interface, and create distinct
appearances for various user groups based on territories, departments, and users.
Procedure
1. Navigate to your user prole on the top-right corner of your screen, and from the dropdown list select
Settings All Settings Extensibility and click Assignment Rules.
2. Click (Add) to open the New Rule screen.
3. Enter the rule name and description.
4. Add a condition following these steps:
a. Select a property from the dropdown.
b. Select the comparison operator.
c. Enter a value.
Add multiple conditions by clicking (Add Condition). To remove a condition, click (Remove
Condition). To clear all conditions in a block, click (Delete Condition Block)
Note that when you create multiple conditions, the condition group is considered fullled only if all the
conditions within a group are met.
5. Optional: You can create a new condition by clicking the + New Condition Group button. The system
displays additional condition blocks. Follow the same steps as earlier to ll one or more OR condition
blocks.
Note
When you create multiple OR conditions, the condition group is considered fullled if any one of the
block conditions are met.
Set Up Guide for SAP Service Cloud Version2
Extensibility
PUBLIC 191

6. Save your changes.
The rule is now created and is listed under the Assignment Rules screen.
7. Navigate to the Page Layouts screen.
8. Click (Assign Rules) next to the page layout. The system opens the Assign Rules quick create screen.
9. Select the rules you want to assign to the page layout and click Save.
The rule is now assigned to the page layout.
Note
You can assign multiple rules to a single page layout. The system applies the ‘OR’ condition in case of
multiple assignment rules per page layout. Even if one assignment rule is satised, the page layout is
assigned to the user.
If there are multiple rules assigned, the page layout that appears on top of the list on the UI takes
precedence and is applied for that particular user. One user can have only one page layout applied at
a time and this is decided based on precedence. To change the sequence, you can drag and drop the
page layout.
Example
You have created two dierent Page Layouts Sales Manager and Sales Rep. They appear on the UI
as follows:
1. Sales Manager
2. Sales Rep
If you fall under both the conditions, i.e., a sales manager who can act like a sales rep as well, the
Sales Manager layout is given more precedence since the Sales Manager Page Layout prcedes the
Sales Rep page layout on the UI.
16.9 Create Code List Restrictions
Code list restriction refers to the process of limiting the available code values based on other code elds
or context. As an administrator, you can restrict the values available from a drop-down list by creating and
maintaining code list restrictions for dierent business entities.
Prerequisites
You have assigned the Code List Restrictions service to the respective business roles.
192
PUBLIC
Set Up Guide for SAP Service Cloud Version2
Extensibility

Context
By default, the system allows all the code values for a business entity to be visible. You can restrict those
values based on an instance eld through a combination of the following values: Business entity, code eld, and
control eld.
Procedure
1. Navigate to your user prole on the top-right corner of your screen, and from the dropdown list select
Settings All Settings Extensibility and select Code List Restrictions.
2. Click (Create) to open the Create Code List Restrictions screen.
3. Enter a name and description.
4. From the dropdown list, select a business entity for which you want to restrict certain code types.
5. From the Code to Restrict dropdown list, select a code that you want to restrict for the business entity.
6. Optional: From the Control Field dropdown list, select a eld.
7. Select Next to view all the allowed code values for that business entity
8. To restrict all or some of the values, deselect the check boxes under the Values Allowed header. Select
Show More to view more than 20 values.
9. Save your changes.
Result: You have restricted specic code values from appearing in certain drop-down menus in the
applications. This restriction is based on a combination of business entity, code eld, and control eld.
To view the code list restrictions that you have created, select the business entitity fom the drop-down
menu on your screen.
Example
In the application UI, you have made the following selections:
● Business Entity: Sales Orders
● Code to Restrict: Cash Discount Term Code
● Control Field: Distribution Channel
The system displays all the available code list values for the code Cash Discount Term Code, for the
Sales Orders business entity. You will have an option to restrict or allow the code values for the control
eld values Direct Sales and Indirect Sales individually.
Set Up Guide for SAP Service Cloud Version2
Extensibility
PUBLIC 193

16.10Language Adaptation
Language adaptation customizes communication for dierent users, considering business and linguistic
preferences. It ensures content resonates eectively, improving comprehension and engagement.
This practice is vital for global communication, making information accessible and enhancing the user
experience across diverse linguistic and cultural backgrounds.
16.10.1Change User Interface Texts for Applications
As an administrator, you can translate or change eld labels and UI texts for applications.
Context
You can use this feature to override the standard SAP texts and customize eld label terminology to t your
business needs.
Procedure
1. Navigate to
Settings All Settings Extensibility Language Adaptation . The system opens the
Language Adaptation tool in a new window.
2. Select an application, source language, and target language for maintaining custom translations. Keep the
source language and target language same if you just want to change the eld labels or texts.
3. Choose Next.
4. Do the following:
• Navigate to the Field Labels tab if you want to change the eld labels. The system displays the current
target language text.
• Navigate to the Code Lists tab if you want to change the code lists descriptions. If no code lists are
selected, select one or multiple code lists from the drop down and click outside the box. The system
displays the list of selected code lists and the current target language text.
5. Modify the text in one of the following ways:
• For simple texts, use the Target Language Text column. To undo the changes, choose (Reset).
You can also change the source text by selecting Edit Source Text. To go back to the SAP delivered
target language text, select (Revert)
• To change texts enmasse, use the following steps:
1. Choose (Export).
2. In the Export screen, select the le type as either Excel or CSV and select Export. The system
generates a zip le.
194
PUBLIC
Set Up Guide for SAP Service Cloud Version2
Extensibility
3. Select the zip le.
It gets download it to your local system. The le contains two excels with the following column
headers:
• File 1: ID, Service, Source Language, Target Language
• File 2: ID, Label ID, Default Target Language Text, Source Language Text, Target Language Text,
Text Parent_Technical_Key and a new column header called New Target Language Text
4. Add a new text or update the existing text in the New Target Language Text column.
5. Save your changes and re-compress the Excel les into a ZIP le.
6. Navigate to the original tab and select (Import).
7. In the Import screen, select the le type as either Excel or CSV.
8. Browse for the *.zip prepared data le you want to upload.
Remember
Use that latest le for import. If an old le is used, existing data is overwritten considering
update le data as the latest data. Data which is not to be updated can be left unchanged in the
exported le. We recommend that you import only a maximum of 50,000 records in a single
le.
9. Select Import and save your changes.
Related Information
Data Import and Export [page 33]
This document describes how you can use Data Import and Export to import data into your solution and
export data from your solution.
16.11Extensibility Using SAP Build Apps
SAP Build Apps enables you to build apps for all form factors including mobile, desktop, browser, TV, and
others without writing code.
You can extend your system using SAP Build Apps by designing, developing, and embedding these extensions
on your system. You can access Build Apps by clicking the Switch Application icon ( ) in the Shell Bar.
Note
If you've 100 or more users, SAP Build Apps base package is included as a default with SAP Service
Cloud Version2 . If you've fewer than 100 users, you need additional licensing for SAP Build Apps to build
extensions. You must contact your account executive to purchase licenses.
Set Up Guide for SAP Service Cloud Version2
Extensibility
PUBLIC 195

Related Information
Design and Develop Extensions on SAP Service and Sales Cloud Version 2 Using SAP Build Apps
Setup SAP Build Apps with SAP Sales Cloud and SAP Service Cloud Version 2
16.12Congure Inbound Authentication
Propogate user identity from BTP service to SAP Sales Cloud Version2 and SAP Service Cloud Version2 using
OAuth2 SAML Bearer Assertion Flow BTP destinations.
Context
The following steps describe how to connect a SAP Sales Cloud Version2 and SAP Service Cloud Version2
system using the OAuth2 SAML Bearer Assertion Authentication ow. In this ow, the user identity of the
logged-in user from source system can be propagated to SAP Sales and Service Cloud Version 2 system.
Procedure
1. Login to your SAP BTP cockpit, and navigate to
BTP Subaccount Destinations Subaccount
Destinations Download Trust .
2. Copy contents of the certicate between the header and the footer.
3. Create an inbound conguration in your tenant.
a. Verify if your tenant is already congured.
Code Syntax
Method: GET
URL: <Your tenant host url>/sap/c4c/api/v1/iam-service/
oauth2InboundConfiguration/34f8b9d2-78c2-4617-bcf2-6eb36403c667
b. If there exists a conguration, verify if it is the same certicate or dierent. If the certicate is same,
you can use the existing conguration. Otherwise, override it.
Code Syntax
Method: PUT
URL: <Your tenant host url>/sap/c4c/api/v1/iam-service/
oauth2InboundConfiguration/34f8b9d2-78c2-4617-bcf2-6eb36403c667
Body:
{
"id": "34f8b9d2-78c2-4617-bcf2-6eb36403c667",
"clientAppName" : "<give your own name>",
"certificate" : "<certificate extracted in above step>"
196
PUBLIC
Set Up Guide for SAP Service Cloud Version2
Extensibility

}
c. If there is no inbound conguration, create a new inbound conguration.
Code Syntax
Method: POST
URL: <Your tenant host url>/sap/c4c/api/v1/iam-service/
oauth2InboundConfiguration
Body:
{
"id": "34f8b9d2-78c2-4617-bcf2-6eb36403c667",
"clientAppName" : "<give your own name>",
"certificate" : "<certificate extracted in above step"
}
Once you create or update the conguration, you get the following response.
Output Code
{
"value": {
"id": " ... ",
"adminData": {
"createdBy": " ... ",
"createdOn": " ... ",
"updatedBy": " ... ",
"updatedOn": " ... ",
"deletedBy": null,
"deletedOn": null,
"deleted": false
},
"description": " ... ",
"grantType": "SAML2_BEARER",
"scopes": [
"<SCOPE_ID>"
],
"nameIdType": "EMAIL",
"spEntityId": " ... ",
"audience": "<AUDIENCE>",
"tokenServiceUrl": "<TOKEN_URL>",
"clientId": "<CLIENT_ID>",
"clientAppName": " ... ",
"certificate": " ... "
}
}
Restriction
Only one OAuth2 SAML Assertion Bearer Flow Inbound Conguration can be congured for a
tenant.
4. Now, go to your BTP Subaccount BTP Subaccount - Create New Destination and a create a new
destination entering the following information:
Option
Description
Name <As per your choice>
Set Up Guide for SAP Service Cloud Version2
Extensibility
PUBLIC 197

Option Description
Type HTTP
URL <Your tenant host URL>
Authentication Oauth2SAMLBearerAssertion
Audience <AUDIENCE> from the inbound congured JSON re-
sponse
AuthContextClassRed urn: none
Client Key <CLIENT KEY> from the inbound congured JSON re-
sponse
Token Service URL <TOKEN_URL> from the inbound congured JSON re-
sponse
Scope <SCOPE_ID> from the inbound congured JSON re-
sponse
nameIdFormat urn:oasis:names:tc:SAML:1.1:nameid-format:emailAd-
dress
Note
If this destination is also used for SAP Build Apps, select additional properties and enter the
information.
AppGyverEnabled
true
HTML5.DynamicDestination true
IsSAPSalesAndServiceCloudAPI true
5. Congure trusted domains for SAP authorization and trust management service: Congure Trusted
Domains for SAP Authorization and Trust Management Service [Feature Set B].
Related Information
Security Considerations for the SAP Authorization and Trust Management Service
OAuth SAML Bearer Assertion Authentication
198
PUBLIC
Set Up Guide for SAP Service Cloud Version2
Extensibility

17 Autoow
Autoow involves creation of rules that can trigger actions such as send event notications to integrated
solutions, in-app notications to users, and trigger automatic emails for business entities.
Note
Maximum number of rules allowed per entity is 50.
Related Information
Congure Autoow
Notications
17.1 Congure Autoows
As an administrator, you can congure autoows in Settings.
You dene the entity, event, and conditions based on which the autoow triggers actions.
Note
Maximum number of rules allowed per entity is 50.
17.1.1Congure Conditions
As an administrator, you dene the conditions based on which the actions are triggered for an autoow.
Context
Conditions are structured in groups and include criteria that must be fullled if a workow action must be
triggered. More than one condition can be dened using logical operators AND/OR. The AND operator can be
dened using condition within the same group. To add more than one condition, use the OR operator. Add a
new group to dene the OR operator amongst the workow conditions such that if conditions in at least one
group are met, then the overall condition is considered fullled and the workow rule has been triggered.
Set Up Guide for SAP Service Cloud Version2
Autoow
PUBLIC 199

Note
• The maximum number of OR conditions allowed per rule is 10.
• The maximum number of AND conditions allowed per rule is 10.
• Custom autoows are not supported in Sales Orders.
Procedure
1. Go to your user prole and select
Settings All Settings Business Flow Autoow .
2. Select Create Rule.
3. From the Entities dropdown, select Cases.
4. Select the Event Type.
This determines when an autoow rule must be evaluated and triggered. Timing is relative to an event that
occurs to an entity. For example,
•
On create - The rule is applied at every create of an entity instance.
• On update - The rule is applied at every update of an entity instance.
• Explicit Trigger -The rule is applied when you click Submit in the Autoow case step. You must select
Autoow for step type in case type conguration.
Recommendation
• Autoow rules that are set to on create and on update are run synchronously while the transaction
object is being created or saved in user session. Too many rules aect system performance.
Therefore, it is recommended that you consolidate these rules. Based on the entity you have
selected, there are various event types for managing autoows.
• Autoow rules aect all users using the entity within a process. Plan and dene rules accordingly.
• While conguring conditions, It is recommended to not use language dependent attributes(and are
not available in conditions lists). Also, do not congure the attribute createdByName, if you are not
a technical user.
5. Optional: Dene conditions to specify criteria that must be fullled to trigger an autoow.
The following operators are available for dening conditions, based on the data type of the eld:
• Equal to
• Not Equal to
• Greater than
• Greater than or equal to
• Less than
• Less than or equal to
• Contains
• Does not contain
• Is Null
• Is not Null
Conditions can be based on standard elds or extension elds.
200
PUBLIC
Set Up Guide for SAP Service Cloud Version2
Autoow

You can dene more than one conditions using logical operators AND/OR. Use the AND operator to dene
conditions within the same group. To add more than one condition, use the OR operator. Add a new group
to dene the OR operator amongst the autoow conditions such that if conditions in at least one group are
met, then the overall condition is considered fullled and the autoow process is triggered.
If u want to consider the previous value before the event occurred as a part of a condition, select the
Previous Value checkbox. The value - Before Entity Change, can be used to dene conditions based on
eld value changes. For example, an email is sent when the eld - Escalation Status is changed from Not
Escalated to Escalated. The Previous Value checkbox is not available for scheduled autoow rules.
a. Choose +OR Condition. By default, the trigger is set to Conditions are met. While using operands, the
rst condition can only be dened using the AND operand.
b. Select the eld, comparator and the value or eld. When previous value and current value inuence the
action, choose Previous value to consider the value before the event occurred.
c. Specify an appropriate operator, and a value.
Note
You can also create conditions using custom elds. Set up custom elds before you create
autoow rules.
d. If desired, specify conditions with the following options:
• To add an AND expression, click the Add icon ().
Conditions within a group are logical AND expressions. If all the conditions within a group are met, the
condition group is considered fullled.
• Click + OR Condition to add an OR expression,.
If all conditions in at least one group are met, then the overall condition for the rule is considered
fullled.
• Click the delete icon () to delete a condition group.
• Click the dismiss icon () to remove a condition.
After you dene conditions, you must dene actions for the autoow.
Related Information
Congure Case Types [page 146]
Customize case types to match the workow used by your organization.
17.1.2Congure Actions
After you have dened conditions for an autoow, you must congure actions.
Note
The maximum number of action cards allowed per action type is 5.
Set Up Guide for SAP Service Cloud Version2
Autoow
PUBLIC 201

Related Information
Congure Conditions [page 199]
As an administrator, you dene the conditions based on which the actions are triggered for an autoow.
17.1.2.1Send Emails
You congure an autoow to send email messages when the conditions are met for business entities. Currently
the email action is supported only for the entities such as Cases, Leads and Tasks.
Procedure
1. Select Send Email from the Action dropdown, to send an email.
a. Enter the following details:
Field Name
Description
Subject Enter the subject of your email.
Template Choose a template.
Sender Name and
Email
Select the name and email ID of the sender. This depends on the email channels dened for the
entity selected.
Role Based Recipi-
ents
Select the recipients of this email based on their role. These roles vary based on the entity you
have selected.
Note
If there are no roles associated with the entity, you cannot see any recipients.
Recipients
Select the recipients of this email irrespective of their roles. You can select from a list of ac-
counts, individual customers and contacts that are maintained in the master data.
2. Select the Add icon, to add more actions.().
The Action dropdown displays.
• Select Send Emails to send email.
• Select Send Event Notications to send event notication to a third-party communication system.
• Select Send Info Notications to send in-app notications to selected users.
3. You can disable or delete actions from the Action menu:
a. Select the Delete icon () to delete an action.
b. Select the Disable icon to disable an action.
4. Select Save.
5. Select Activate.
You can select the autoows that you dene here in the Autoow step type of Case designer.
202
PUBLIC
Set Up Guide for SAP Service Cloud Version2
Autoow

Related Information
Congure Conditions [page 199]
As an administrator, you dene the conditions based on which the actions are triggered for an autoow.
Send Event Notications [page 203]
You congure an autoow to send event notications to third-party systems, when the conditions are met
for business objects.
Send Info Notications [page 204]
You congure an autoow to send in-app notications to selected users, when the conditions are met for
business entities.
17.1.2.2Send Event Notications
You congure an autoow to send event notications to third-party systems, when the conditions are met for
business objects.
Procedure
1. Select Send Event Notication from the Action dropdown.
a. In the panel that appears, enter the following details:
Field Name
Description
Event Name Enter a name.
Communication System Choose a communication system. For more information, see Create Communication Sys-
tems.
Subscribe Path Enter the URL of the third-party system.
2. Select the Add icon ()to add more actions.
The Action dropdown displays.
• Select Send Emails to send email.
• Select Send Event Notications to send event notication to a third-party communication system.
• Select Send Info Notications to send in-app notications to selected users.
3. You can disable or delete actions from the Action menu:
a. Select the Delete icon () to delete an action.
b. Select the Disable to disable an action.
4. Select Save.
5. Select Activate.
You can select the autoows that you dene here in the Autoow step type of Case designer.
Set Up Guide for SAP Service Cloud Version2
Autoow
PUBLIC 203

Related Information
Congure Conditions [page 199]
As an administrator, you dene the conditions based on which the actions are triggered for an autoow.
Send Info Notications [page 204]
You congure an autoow to send in-app notications to selected users, when the conditions are met for
business entities.
Send Emails [page 202]
You congure an autoow to send email messages when the conditions are met for business entities.
Currently the email action is supported only for the entities such as Cases, Leads and Tasks.
17.1.2.3Send Info Notications
You congure an autoow to send in-app notications to selected users, when the conditions are met for
business entities.
Context
The info notications appear in the Notications area.
After you congure conditions, dene sending info notication as the action of the autoow.
Procedure
1. Select Send Info Notication from the Action dropdown.
a. In the panel that appears, enter the following details:
Field Name
Description
Language Select a language from the dropdown.
Subject Enter a subject.
Description Enter a description for the notication.
Note
Placeholders are supported for info notication action (subject and description). You can use a
placeholder by typing a { symbol to see the list of placeholder attributes.
Role based
Select roles from the dropdown, to send notications to users with specic roles.
Employee Select employees from the list, to send notiaction to specic users.
2. Select the Add icon ()to add more actions.
204
PUBLIC
Set Up Guide for SAP Service Cloud Version2
Autoow

The Action dropdown displays.
• Select Send Emails to send email.
• Select Send Event Notications to send event notication to a third-party communication system.
• Select Send Info Notications to send in-app notications to selected users.
3. You can disable or delete actions from the Action menu:
a. Select the Delete icon () to delete an action.
b. Select the Disable icon to disable an action.
4. Select Save.
5. Select Activate.
You can select the autoows that you dene here in the Autoow step type of Case designer.
Related Information
Congure Conditions [page 199]
As an administrator, you dene the conditions based on which the actions are triggered for an autoow.
Send Event Notications [page 203]
You congure an autoow to send event notications to third-party systems, when the conditions are met
for business objects.
Send Emails [page 202]
You congure an autoow to send email messages when the conditions are met for business entities.
Currently the email action is supported only for the entities such as Cases, Leads and Tasks.
17.2 Monitor Autoow Logs
As an administrator, you can monitor logs for autoow rules.
When the system triggers an autoow rule, an entry gets added in Rule Logs. You can use the rule logs to
troubleshoot autoow errors. The Rule Logs screen displays logs for the last two weeks.
To view the Autoow logs, go to User Menu and select
Settings All Settings Business Flow Autoow .
Select (More) and then select Rule Logs.
By default, the Log All Rules switch is turned o and this mode logs only the rules for which the condition
evaluation result were successful. You can turn on the Log All Rules switch to log all rules irrespective of the
conditions were met or not and actions triggered.
Note
The Log All Rules switch turns o after 5 minutes.
You can use the following lters to lter logs:
• Date - based on the time intervals
Set Up Guide for SAP Service Cloud Version2
Autoow
PUBLIC 205
• Business Entity - based on entities used while creating the rule
• Rule Name - name dened for the rule
• Action Type - action type dened for the rule
• Action Status - status of the action
The Rule Logs tab displays logs for custom rules. You can search a rule by entering Source Document ID in the
search eld. You can view and sort the logs using the following elds:
• Business Entity - Business entity for which the rule triggered
• Source Document ID - Display ID of the business object
• Event Name - Event for which the rule gets triggered
• Run Time - Time at which the rule was run
• Run Status - Overall status for the rule.
One of the following status displays:
• Not Executed - for rules triggered, however, not executed due to condition evaluation being false
• Completed - for rules triggered and executed successfully
• Completed with Errors - for rules triggered and executed with errors
When you select a rule from the Rule Name column, Log Messages displays the status and more details for the
actions that were triggered for the rule. You can view the action type, action status, reference ID, and success or
error message, for the actions triggered.
For event notications, the reference ID provides a link to view the event name, event ID, payload, and error
message. This can be further checked and retriggered in Event Monitoring.
For every action of either same or dierent types, there will be an entry in Log Messages. For example, if
there were two emails and an event notication sent for an autoow rule, there will be three entries in the log
messages for the rule.
206
PUBLIC
Set Up Guide for SAP Service Cloud Version2
Autoow

18 Approval
Approval is a systematic process of reviewing and authorizing changes or actions before they are integrated
into the system. Approvals are routed to your reporting line manager, though there may be multiple levels of
approval required for certain objects or conditions.
As an administrator, you can create approvals for streamlining your business processes. By default, once the
approval workow is triggered, the assigned approvers receive in-app notications.
Important Facts About Approvals
• One business transaction can have multiple active approval processes.
• The approval request notication appears in the notication area of the system for the involved employees
and managers.
• If the approver nds an unsatisfactory transaction, the approver can add a comment and return it to the
employee for revision. The employee then revises the transaction and submits it again for approval. Once
the business transaction is correct, it can be further processed.
• You can only delete approval processes that are in the Draft or Active state.
Note
As an administrator, you can create and modify approval processes only if you are assigned approval
services.
Business users must have access to the business entity for which they are added as approvers. For
example, if a business user has been added as an approver for case, case service must be assigned to this
business user.
Related Information
Notications
Set Up Guide for SAP Service Cloud Version2
Approval
PUBLIC 207
18.1 Congure Approvals
As an administrator, you can congure approvals. You dene the entity, event, and condition based on which a
notication is sent to the approvers.
Procedure
1. Go to your user menu and select Settings All Settings Business Flow Approval .
You can see a list of approvals that are available.
2. Select + and select Create Approval Process.
3. Enter a name in the Process Name eld.
4. From the Entities dropdown, select Cases
Note
Approvals are available only for Case.
5. Select your language and enter subject and description in the Task subject and Task Description elds.
6. Select Enable Email Notications.
Note
Your administrator must dene email templates for Approval Request and Approval Response template
types for Case object type. For more details on dening templates, see Related information.
7. Optional: Dene conditions to specify criteria that must be fullled to trigger approvals.
Note
• You can add multiple approval steps using the Add button and congure conditions and approval
for each step.
• You can dene more than one conditions using logical operators AND/OR. Use the AND operator to
dene conditions within the same group.
• When one of the conditions is not met, the approval process ends and the requestor is notied
about the same.
• To add more than one condition, use the OR operator. Add a new group to dene the OR operator
amongst the approval conditions such that if conditions in at least one group are met, then the
overall condition is considered fullled and the approval process is triggered.
• The maximum number of steps in an approval process is 10.
• Conditions can be based on standard elds or extension elds.
a. Choose +OR Condition. By default, the trigger is set to Conditions are met. While using operands, the
rst condition can only be dened using the AND operand.
b. Select the eld, comparator and the value or eld. When previous value and current value inuence the
action, choose Previous value to consider the value before the event occurred.
208
PUBLIC
Set Up Guide for SAP Service Cloud Version2
Approval

c. Specify an appropriate operator, and a value.
d. If desired, specify conditions with the following options:
• Click the Add icon () to add an AND expression.
Conditions within a group are logical AND expressions. If all the conditions within a group are met, the
condition group is considered fullled.
• Click + OR Condition to add an OR expression.
If all conditions in at least one group are met, then the overall condition for the rule is considered
fullled.
• Click the Delete icon () to delete a condition group.
• Click the Dismiss icon () to remove a condition.
Note
• The maximum number of OR conditions per approval rule is 10.
• The maximum number of AND conditions per approval rule is 10.
• The maximum number of steps in an approval process is 10
8. Set up the approval.
a. Select the Approval Request and Approval Response templates.
b. In the Dene Work Distribution section, dene the approvers. You can choose from the following
options:
• Direct Approvers: You can select specic employees responsible as direct approvers, provided that they
possess the corresponding access rights to the task type and business transaction. Such approvers
also require read access to the relevant business transaction data and write access to the notes of the
business transaction.
Note
You can enable approvers to trigger actions directly from the details of the item to be approved.
To do so, from the Approval tab of any related item, make the Actions column visible on the user
interface
The maximum number of direct approvers per approval rule is 10.
• Responsibles: You can select any responsible employees associated with the Approval. It can include
Processor of case, Manager of processor for case, Suggested recipients and so on.
Note
• To include multiple approvers, enable the All Approvals Required switch. However, sequential
approval is not supported.
• To enable automatic approval of your business process (only when there are no approvers
determined for a step), turn on the Automatic Approval switch.
9. Choose Save and Activate.
You can select the approvals that you dene here in the Approval step type of Case designer.
Set Up Guide for SAP Service Cloud Version2
Approval
PUBLIC 209

Note
When the entire approval process is completed, the system sends an in-app notication of type Info
Notication to the approval requester with either Approved or Rejected state so that requestor can
proceed with subsequent actions.
Related Information
Create Email Templates [page 116]
Email templates streamline email messaging with preset text, graphics, signatures, and attachments.
Create templates for service responses, signatures, branding, and campaigns by uploading an HTML-based
layout le.
Notications
210
PUBLIC
Set Up Guide for SAP Service Cloud Version2
Approval

19 Mashups
Learn how to congure, use, and access mashups.
Mashups are used to integrate data from SAP's cloud solution with data provided by an online Web service
or application. Users can access the content provided by these Web services and applications, and use it in
their daily work. Mashups can include Web searches, company or industry business information, or online map
searches.
Prerequisites
As an administrator, you must congure the following settings:
• Enable the mashup service for business roles
1. Go to
User Menu Settings All Settings and under Users and Control, select Business Roles.
2. From the Business Roles window, click any of the Business Role ID to open the details.
3. Under Business Services, click the icon to open the Add Business Services window.
4. Select the check box for mashupService and click Add.
Note
You can create new HTML mashups based on a mashup category provided by SAP.
• Add the mashup URL in the Content Security Policy settings
1. Go to User Menu Settings All Settings and under General, select Content Security Policy.
2. Scroll down to the section Frame Source and click the icon.
3. Enter the hostname URL and click the icon.
Example
If you're creating a mashup with the URL https://my123456.s4hana.ondemand.com/
ui?sap-ushell-config=headerless#ServiceOrder-create then, add https://
my123456.s4hana.ondemand.com/ in the Frame Source.
How to Access Mashups
Once a mashup has been activated and made visible on screens, then the mashup can be displayed as an
embedded screen.
Set Up Guide for SAP Service Cloud Version2
Mashups
PUBLIC 211

Features
We support only HTML Mashup that embeds an HTML or JavaScript based Web page directly on a screen.
Conguring Mashups
You can congure mashups as follows:
• Centrally: Go to
User Menu Settings All Settings and under Foundation, select Mashup Authoring.
• On a particular screen: Use the adaptation function on any screen enabled for mashups.
You have the exibility to congure mashups in the following ways:
• Activate mashups for use by all users or deactivate unwanted mashups.
• Change the way in which mashups are displayed, and test and publish the changes to all users.
• Create new mashups by copying an existing mashup and adapting the settings in the copied mashup.
19.1 Create HTML Mashups
Create HTML mashups to embed an HTML or JavaScript based Web page into a screen of your SAP cloud
solution.
Note
Some Web services may pass your business data to a third-party organization, for example, account data
is passed to a search engine when performing a reverse lookup in an online address book. We recommend
that you check whether the mashup conforms to your company’s data privacy policies before activating the
mashup.
Prerequisites
You must know the URL of the Web site that you want to embed.
Procedure
1. Go to User Menu Settings All Settings and under Extensibility, select Mashup Authoring.
2. From the new tab, click (Create) to create a mashup.
3. Under General Information, enter a name and a description for the mashup.
212
PUBLIC
Set Up Guide for SAP Service Cloud Version2
Mashups

Note
By default, the status of the mashup is Active. You can also change the status to Inactive if necessary.
4. Adjust the display height, as required. The default height is 500 pixels.
5. Under Input Parameters, enter the URL in the URL eld and click Extract Parameters.
Note
• For URLs that don't use queries you can manually add curly brackets around terms that should act
as placeholders. For example, in the URL https://mail.google.com/mail/#search/SAP, you
can replace the word SAP with a search term in curly brackets, for example, {term}. If you then
enter https://mail.google.com/mail/#search/{term} in the URL eld and click Extract
Parameters, the word in brackets is extracted as a parameter.
• If you're using parameters, make sure that you don't add any sensitive information.
6. Once you nish, click Show Preview to check the details.
7. Save your changes.
19.2 Copy Existing Mashups
You can create a copy from the existing mashups.
1. Go to
User Menu Settings All Settings and under Extensibility, select Mashup Authoring.
2. From the new tab, select the mashup you want to copy by clicking on the mashup name.
3. From the Mashup Details screen, click Duplicate.
The system opens a copy of the mashup.
4. Enter a new name for the mashup and adapt the conguration settings, as required.
5. Save your changes.
19.3 Delete or Deactivate Mashups
Delete or deactivate mashups that you and other users have created.
1. Go to User Menu Settings All Settings and under Extensibility, select Mashup Authoring.
2. Select a mashup from the list.
3. Click the Delete icon, or turn the Active swtich o.
If you select deactivate, the mashup is no longer visible on screens. If you select delete, the mashup is
removed from the Mashup Authoring view and is also deleted from all screens for which it had been made
visible.
Set Up Guide for SAP Service Cloud Version2
Mashups
PUBLIC 213

19.4 Add Mashups as Tabs
As an administrator, you can add a mashup as a new tab.
Using page layouts and visibility property, you can control who is allowed to use the mashup.
To add a mashup as a tab, follow these steps:
1. Create a tab on a screen.
1. Navigate to a screen where you want to add the mashup.
2. Go to User Menu Start Adaptation . The system opens in the adaptation mode.
3. Hover over the area where you see a plus icon (+).
The system highlights the area with a red border along with a tool tab
4. From the tool tab, select the pencil icon to edit. A new tab opens.
5. Click the plus icon (+) and enter a tab name.
6. Click Apply.
The new tab is added to the header of the screen.
2. Add a mashup to the tab.
1. Open the new tab and hover over the empty space to enable the red highlight with the tool tab.
2. From the tool tab, select the pencil icon to edit. A new tab opens.
3. Select the arrow available next to Add Mashup to open a new window.
4. Click the arrow available next to the required mashup to display the properties.
5. If necessary, you can adjust the appearance of the mashup by selecting one of the following options
under Edit Properties.
Note
The options available to you may vary depending on the mashup.
• Show Header: Select the Show Header checkbox if you want to see the mashup title on the screen.
• Height (%): You can dene the height of HTML Mashups to be displayed in the available screen.
For example, if you set the value of Height (%) to 100, the newly added mashup occupies the full
height of the screen.
6. Click Apply.
7. To save your settings, click End Session on the top of the screen.
Related Information
Adaptation [page 162]
As an administrator, you can change the look and feel of the solution for all users by changing layout
settings, adding mashups and elds, as well as dening extension elds.
214
PUBLIC
Set Up Guide for SAP Service Cloud Version2
Mashups

20 Library
You can use Library to store, organize, and share les and folders.
Library oers you the following:
• Ecient management of les, such as documents and multimedia objects, for your daily business
activities
• Searching, viewing, uploading, and downloading les, creating folder structures to organize them, and
controlling access to them
• Provision of attaching les to sales processes such as sales quotes
• Quick and safe way to share and exchange les for collaboration among sales team members
• Public and private folders. You can set access control for private les and folders.
• Table view and tile view of all the les and folders in the right pane
• Collapsible tree view that shows folder structures in the left pane
20.1 Congure Library
Administrators can create le type lter categories and manage access restrictions for Library.
20.1.1Create File Type Filter Category
Administrators must create le type categories for users to lter les.
Procedure
1. Go to
User Menu Settings All Settings Library File Type Filter Conguration .
2. Click (Create).
Note
The standard SAP system delivers le type lter categories without le types added to them. You can
modify them with the required le types or delete them.
To add le types to a standard lter category, allow the le types at Settings Data Administration
MIME Types for Attachments if they are not allowed.
3. In the Create File Type Filter Category pane, enter Title.
Set Up Guide for SAP Service Cloud Version2
Library
PUBLIC 215

4. Click
(Search and Add) to add the supported le types.
5. Click Save.
The new le type lter category gets added in File Type Filter Categories.
Note
• To delete a le type conguration, click (Delete) in File Type Filter Categories.
• You can also modify le types added to an existing le type lter category.
• Switch o le type lter categories if you do not want them to appear in the File Type lter in
Library.
• Switch o the le type lter categories to disable them from the lter values in the File Type lter in
Library.
Related Information
Dene MIME Types for Attachments
20.1.2Manage Access Restrictions
Administrators can provide users with restricted access to the library.
Context
With this access context, read and write access to folders and les can be restricted based on sales area and
employee.
Sub folders inherit access restrictions of their parent folder. You can also set sub folders' access to Private and
set restrictions that apply to only sub folders.
This access restriction also applies to attachments added from the library. Files added to the library and
referenced in a business object, such as account, are visible to all under the Attachments section. However,
unauthorized users cannot navigate to further details. Restricted documents are not listed in Attachments.
Attachments from outside of the library are not subject to access restriction.
Procedure
1. Create a business role.
216
PUBLIC
Set Up Guide for SAP Service Cloud Version2
Library

2. Add the Library (sap.crm.service.libraryService) business service.
3. Enable the sap.crm.libraryservice.uiapp.libraryAdminApp and sap.crm.libraryservice.uiapp.libraryApp apps.
Related Information
Create Business Roles and Assign a Business User [page 21]
Administrators can create business roles with appropriate authorizations and assign them to business
users.
20.2 Organize Files and Folders
You can organize les and folders based on your organizational and business needs. This helps you nd the
right les quickly for your business processes.
Library oers you various operations to keep your les and folders organized.
Note
You can perform these operations only if you are authorized.
20.2.1Create Folders
You can create folders and folder structures to collect, group, and organize les and folders.
Context
Organizing les in folders helps you easily and quickly nd and share them.
A navigation path that appears above the contents of a folder allows you to keep track of your current location
and easily navigate back to an upper level folder in the hierarchy.
Note
• You can build only ve levels of folders.
• If you add a le within a folder, the le inherits the permissions of the parent folder.
Set Up Guide for SAP Service Cloud Version2
Library
PUBLIC 217

Procedure
1. From the home page, expand the Navigation Menu and go to Library.
2. Click (Create).
3. Select Create Folder.
4. In the Name eld, enter the name for the folder.
5. Do one of the following:
• To provide access to all users, go to step 6 [page 218].
• To provide access to the restricted sales area or employee or both, do the following:
1. Turn o the Public switch.
2. Do the following as required:
• To restrict access to the required sales area, click Sales Area and (Add) the required Sales
Org, Distribution Channel, and Division.
• To restrict access to the required employees, click Employees and
(Search and Add).
To provide administration rights to the employee, turn on the Owner switch.
6. Click Save.
The folder is created, and it appears in Library.
20.2.2Upload Files
You can upload les from your local drive to Library and organize them in folders. You can also select multiple
les for mass upload.
Procedure
1. From the home page, expand the Navigation Menu and go to Library.
2. Click (Create) at the required folder level.
3. Click Add Files.
4. In Upload Files panel, do one of the following:
• Drag and drop the les
• Browse the les and click Open.
Note
• You can edit the name of the le.
• The number of les in mass upload is restricted to six.
• You cannot upload a document if another document has the same name at the same level. We
recommend that you upload the document with a dierent name and edit the title later.
218
PUBLIC
Set Up Guide for SAP Service Cloud Version2
Library

• The size limit for les is as congured by your administrator. Contact your administrator to change
the limit.
5. Do one of the following:
• To provide access to all users, go to step 6 [page 219].
• To provide access to the restricted sales area or employee or both, do the following:
1. Turn o the Public switch.
2. Do the following as required:
• To restrict access to the required sales area, click Sales Area and (Add) the required Sales
Org, Distribution Channel, and Division.
• To restrict access to the required employees, click Employees and the Search and Add icon.
To provide administration rights to the employee, turn on the Owner switch.
6. Click Save
The les are uploaded, and they appear in Library.
Related Information
Congure Attachments
20.2.3Delete Files and Folders
You can delete les and folders that are no longer valid or those you uploaded by mistake.
20.2.3.1Delete Files
Procedure
1. From the home page, expand the Navigation Menu and go to Library.
2. Do one of the following:
• Click (Show More) on the le and then click (Delete).
Note
You can also select the le and then click (Show More).
• Select multiple les and click (Delete) on the top right.
The les are deleted from Library.
Set Up Guide for SAP Service Cloud Version2
Library
PUBLIC 219

20.2.3.2Delete Folders
Procedure
1. From the home page, expand the Navigation Menu and go to Library.
2. Click (Show More) on the folder.
3. Click (Delete).
Note
You cannot delete folders if they have contents.
The folder is deleted from Library.
20.2.4Download Files
You can download les on to your local drive from Library.
Procedure
1. From the home page, expand the Navigation Menu and go to Library.
2. Do one of the following:
• Click (Show More) on the le and then click (Download).
Note
You can also select the le and then click (Show More).
• Select the required les and then click (Download) on the top right.
The les are downloaded to your local drive.
Note
If you download multiple les simultaneously, the les are rst consolidated into a single zip folder and
then downloaded to your local drive.
220
PUBLIC
Set Up Guide for SAP Service Cloud Version2
Library

20.2.5Move Files
When you organize your les, you can move them to folders at any level.
Procedure
1. From the home page, expand the Navigation Menu and go to Library.
2. In the table view or the tile view, select the required les and click
(Move) on the right.
Note
• If you are moving a single le, you can also drag and drop the le to the required folder. You cannot
drag and drop multiple les.
• You cannot drag and drop les in the table view. You can drag and drop les only in the tile view.
• You can drag and drop les from tile view to tree view.
• You cannot drag and drop les within the tree view.
• You can move only les into a folder. You cannot move folders into a folder.
• You can only select multiple les that are on the same folder level.
• If you move a le into a folder, the access restrictions on the le change and it inherits the access
restrictions of the new parent folder.
3. In the Move Files panel, select the required folder.
4. Click Move.
The le is moved to the required folder.
20.2.6Search and Filter Files and Folders
You can look for specic les and folders using the search option. Filters help you narrow down the displayed
les and folders.
Procedure
1. From the home page, expand the Navigation Menu and go to Library.
2. Click (Search).
3. Enter the keyword.
Files and folders with your keyword in their names are displayed.
Set Up Guide for SAP Service Cloud Version2
Library
PUBLIC 221

Note
• The system searches both the parent folders and subfolders to display results.
• Search results are based on access control.
4. To lter the search results, select the required option from the standard SAP system views, File Types,
Upload Date, Uploaded By, or Access.
• Restriction
The standard SAP system views are only used to lter top-level documents and folders in the
library. For example, if you switch the view from Created by Me to Changed by Me within a folder,
you will be directed back to the top level in the library and a list of top-level documents and folders
that have been changed by you are displayed.
• You can lter les and folders without searching for a particular keyword too, but the scope is
restricted to the current folder.
20.2.7Rename Files and Folders
You can rename the les and folders that are already in Library.
Procedure
1. From the home page, expand the Navigation Menu and go to Library.
2. Click (Show More) on the folder or the le.
3. Click (Rename).
The le or the folder is renamed.
20.3 Manage Access to Files and Folders
If you have unrestricted edit authorization or if you are an owner, you can dene whether the le or folder is
public or private. Access to a private le or folder can be restricted to specic sales areas and employees.
Context
You can authorize other employees to access the le or the folder in Manage Access.
Users that have access to a parent folder can access all the subfolders and les within the folder. Users with
such Inherited Access cannot be edited or deleted.
222
PUBLIC
Set Up Guide for SAP Service Cloud Version2
Library

Note
• You cannot change the administration right (the Owner switch in Manage Access) for an employee with
inherited access. In a case like this, you must add the employee explicitly for editing.
• You can congure access to les and folders when you upload or create them respectively.
For more information, see Create Folders [page 217] and Upload Files [page 218].
Inherited access can also be granted due to access control that has been congured by your administrator.
Procedure
1. From the home page, expand the Navigation Menu and go to Library.
2. Click (More) on the required le or the folder.
3. Click Manage Access.
4. Do one of the following:
• To provide unrestricted access, switch on Public
• To provide access to the restricted sales area or employee or both, do the following:
1. Switch o Public.
2. Click (Edit).
3. Do the following as required:
• To restrict access to the required sales area, click Sales Area and (Add) the required Sales
Org, Distribution Channel, and Division.
• To restrict access to the required employees, click Employee and
(Search and Add).
To provide administration rights to the employee, switch on Owner.
4. Click Save.
20.4 Share Links to Files and Folders
You can share links to les or folders.
Procedure
1. From the home page, expand the Navigation Menu and go to Library.
2. Click (More) on the folder or the le.
3. Click (Link).
Set Up Guide for SAP Service Cloud Version2
Library
PUBLIC 223

Results
The URL is copied to the clipboard to be shared.
When you open a shared link to a private folder or document, you must have permission to access the folder or
the le to see the content.
Note
• When you open a shared link to a folder, you can view the content within the shared folder displayed
under your default view and the available actions on the right.
• When you open a shared link to a le, you can view the preview of the le along with the details of the
le and available actions above it.
224 PUBLIC
Set Up Guide for SAP Service Cloud Version2
Library

21 Microsoft Teams Integration
An embedded in-app integration of the solution with Microsoft Teams.
With this integration, you can share workspaces with Microsoft Teams. The real-time and automated data
updates ensure transparency, consistency, and collaboration of the cases for the service teams.
Remember
The solution is best displayed at a screen resolution of 1920 x 1080 and 100% scale.
21.1 Congure Microsoft Teams Integration
As an administrator, you can congure Microsoft Teams integration.
You must add the business service sap.crm.service.msteamsService to use it.
• You must have Microsoft Oce 365 exchange online license.
• In Cross-Site Request Forgery Settings, the Strict mode is enabled by default for third-party integrations.
You must change this to None. For details on how to change this setting, see Cross Site Request Forgery
Settings.
21.1.1Add SAP Sales and Service Cloud App in Teams
You can add SAP Sales and Service Cloud app in the Microsoft Teams app.
Procedure
1. Log in to Microsoft Teams admin center.
2. From the home page, expand the navigation menu and go to
Teams apps Manage apps .
3. Search and select the SAP Sales and Service Cloud app from the list.
4. Click Allow. A new window opens.
5. Click Allow again.
Set Up Guide for SAP Service Cloud Version2
Microsoft Teams Integration
PUBLIC 225

21.1.2Enable Microsoft Teams Integrated Features
You can enable Microsoft Teams integrated features by providing consent.
Procedure
1. Go to your user prole, navigate to Settings All Settings .
2. Under Communication & Information Exchange, select Microsoft Teams Integration.
A new window opens.
3. Enable the following features based on your requirements:
• Share Workspace and Deal Room
You can enable Deal Room and Share Workspace separately.
There are two permission types that you can choose from:
• Application Permission: Your administrator must consent on behalf of all the users.
• Delegated Permission: Your administrator must consent on behalf of your organization.
If you're using the features such as Share Workspace, and Deal Rooms with delegated permission,
the system shows a window where you must allow the permissions and login to your Microsoft
Teams account. The validity of this permission is 30 days. Hence, you must allow the permissions
and login to Microsoft Teams again when the permission expires.
In the case of delegation permission type, your administrator has to select the check box Consent
on behalf of your organization available at the end of all the permissions listed.
Note
The application and user delegation consent provided by the administrator must be renewed
once in three years.
Note
If you enable Create Teams, the system allows you to create a new team while using the Share
Workspace feature.
• Teams Meeting
• Outbound Calls
4. Click Start Consent for the feature that you want to use.
Note
• You can map multiple SAP Sales and Service Cloud V2 tenants to one Azure tenant.
• The domain of the logged in user (xxx@abc.com) and admin user (yyy@abc.com) providing
consent must be the same.
5. Sign in with your Microsoft 365 username and password.
A new window opens for consent.
6. Review the permissions and click Accept.
As an admin, you must grant consent to any feature before using it.
226
PUBLIC
Set Up Guide for SAP Service Cloud Version2
Microsoft Teams Integration

Note
There is no consent required for Outbound Calls.
You can see the details of the user who provided consent, and the time of consent on Microsoft Teams
Integration page.
21.2 Use Microsoft Teams Integration
Learn how you can use the features using MS Teams integration.
Note
• Ensure that your administrator enables Microsoft Teams integration by following the congurations in
Congure Microsoft Teams Integration [page 225].
• Ensure that the domain of the logged in user (xxx@abc.com) and the domain of the admin user
(yyy@abc.com) providing the consent are the same.
Permissions [page 227]
Various permissions must be provided by the administrator for you to use Microsoft Teams integrated
with the SAP Sales and Service Cloud Version 2. Currently, only application delegated permissions are
supported.
Create Appointments [page 229]
Create an appointment with Microsoft Teams collaboration.
Share Workspaces [page 230]
Share any list or detail view of your supported entities on Microsoft Teams.
Make Outbound Calls [page 232]
Use Microsoft Teams to make your outbound calls.
21.2.1Permissions
Various permissions must be provided by the administrator for you to use Microsoft Teams integrated with the
SAP Sales and Service Cloud Version 2. Currently, only application delegated permissions are supported.
Permissions for Creating Appointments
Following are the permissions that need to be provided for you to create appointments.
• Calendars.ReadWrite
• TeamsAppInstallation.ReadWriteForChat.All
• TeamsAppInstallation.ReadWriteForTeam.All
Set Up Guide for SAP Service Cloud Version2
Microsoft Teams Integration
PUBLIC 227

• TeamSettings.ReadWrite.All
• TeamsTab.Create
• TeamsTab.ReadWriteForChat.All
• TeamsTab.ReadWriteSelfForChat.All
• TeamsTab.ReadWriteSelfForTeam.All
Permissions for Shared Workspaces
Following are the required permissions:
• Channel.Create
• Channel.ReadBasic.All
• ChannelMember.ReadWrite.All
• ChannelSettings.Read.All
• Files.Read.All
• Group.ReadWrite.All
• GroupMember.ReadWrite.All
• Team.Create
• Team.ReadBasic.All
• TeamMember.ReadWrite.All
• TeamsAppInstallation.ReadWriteForTeam.All
• TeamSettings.Read.All
• TeamsTab.Create
• TeamsTab.Read.All
• TeamsTab.ReadWriteSelfForTeam.All
• User.Invite.All
• User.Read.All
Note
These permissions are also applicable to Deal Room in SAP Sales Cloud Version 2.
For details on each of these permissions, see Microsoft Permission Reference
Permissions for Specic Mailbox
Administrators who want to limit app access to specic mailboxes can create an application access policy by
using the New-ApplicationAccessPolicy PowerShell cmdlet. For more details, see Microsoft Docs .
228
PUBLIC
Set Up Guide for SAP Service Cloud Version2
Microsoft Teams Integration

21.2.2Create Appointments
Create an appointment with Microsoft Teams collaboration.
Procedure
1. Navigate to Appointments.
2. Click the plus (+) icon to create a new appointment.
3. Update the necessary elds such as Subject, Start Date/Time, and so on.
4. Check whether the Microsoft Teams collaboration is enabled or not. If not, turn the Teams Meeting switch
on.
5. Go to Attendees and click the add (+) icon to search and select the required attendees.
Note
• You must add at least one attendee to create a Microsoft Teams meeting.
• When creating an event using Microsoft Graph APIs, changes made to the attendee type do not
reect in the Outlook Application. This appears to be a known issue with Microsoft.
6. Click Save.
Note
• You can't remove Microsoft Teams collaboration from the appointment once it is saved.
• To view transcripts after your meeting has ended, you must enable the following settings in
Microsoft Teams:
• Enable the Transcript option in your Microsoft Teams admin center.
• Congure the application access policy and allow the application to access online meetings
with application permission.
21.2.2.1Join Microsoft Teams Meeting
You can join a Microsoft Teams meeting either from solution or from Microsoft Teams.
From Solution
Join a Teams meeting by clicking either the Microsoft Teams icon or the link provided on the following screens:
• Appointments worklist
• Appointment's quick view
Set Up Guide for SAP Service Cloud Version2
Microsoft Teams Integration
PUBLIC 229

• Appointment's object detail view
From Microsoft Teams
1. Go to Calendar, select an appointment and then click Join to enter a meeting before it's started, or one
that's in-progress.
2. Select Join now.
21.2.3Share Workspaces
Share any list or detail view of your supported entities on Microsoft Teams.
The supported entities are Cases, Leads, Guided Selling, and Sales Quotes.
Note
For Leads, we support only detail view from the solution. From Microsoft Teams, we support both list view
and detail view.
21.2.3.1Share Workspace from Solution
You can share any list or detail view of your supported entities on Microsoft Teams from your solution.
Procedure
1. Navigate to any of the supported entities that you want to share on Microsoft Teams.
2. Click the (Share Workspace) icon.
3. If the workspace is already shared, the system shows a window with a list of existing teams and channels
where you can join directly if you have not already joined, or you can click Create a Team and proceed.
4. If the workspace is not shared, a new window opens and click Next.
5. In the Team tab, you can either select an existing team from the dropdown or select Create a team and
enter a name. The system generates the Tab Name depending on the object that you select. You can edit it
if required.
6. Click Next.
7. In the Channel tab, you can either select an existing channel from the dropdown or select Create a channel
and edit the name if required.
You can't use the existing channels if you have created a new team.
8. Click Next to move to the next tab.
230
PUBLIC
Set Up Guide for SAP Service Cloud Version2
Microsoft Teams Integration

9. To add members to the team, enter their email ID and press Enter.
Note
If you are adding guest users, it may take up to 24 hours to reect on Microsoft Teams.
10. Click Next to review the updated information.
11. Once you nish, click Save.
The system generates a link.
12. Click the link to open the existing or new team on Microsoft Teams.
21.2.3.2Share Workspace from Microsoft Teams
You can share any list or detail view of your supported entities directly from Microsoft Teams.
Procedure
1. Sign in to Microsoft Teams.
2. Click Apps and select SAP Service Cloud Version2 application.
3. Choose one of the following options:
• Add to a team
• Add to a meeting
4. Search and select a team or meeting from the dropdown based on the previous selection.
5. Click Set up a tab.
6. Enter the Tenant URL, User ID, and Password.
If you have multiple SAP Sales and Service Cloud V2 tenants with one Azure tenant, ensure that each user
is a part of one tenant only. When you enter the URL, you can see the list of available tenant URLs in the
drop-down from which you can choose the one you require.
7. If required, you can edit the default Tab Name from SAP Service Cloud .
8. Click Save to move to the sign in page.
9. Click Sign in to view the entity from your solution.
Restriction
If you try to include users outside the team to a private channel of Microsoft Teams, they may not be
added.
Set Up Guide for SAP Service Cloud Version2
Microsoft Teams Integration
PUBLIC 231

21.2.4Make Outbound Calls
Use Microsoft Teams to make your outbound calls.
Note
Ensure that you've the required Microsoft Teams license for outbound calls.
To use this feature, you must disable the following options:
• Computer Telephony Integration (CTI) if it's congured in your solution.
• Pop-up blocker in your browser settings.
21.3 Microsoft Teams Integration FAQ
This section answers commonly asked questions about Microsoft Teams integration in your solution.
21.3.1What licenses are required for Teams integration?
You should have a Microsoft Oce 365 Exchange Online license for Teams integration.
21.3.2Do tabs work in the Teams mobile app?
No, any tab added in the desktop is not available on the mobile application.
232
PUBLIC
Set Up Guide for SAP Service Cloud Version2
Microsoft Teams Integration
22 Intelligent Services
Use case data to create and train machine learning models to recognize similar cases, predict case categories,
and sentiment.
Intelligent Services categorize your cases and improves accuracy. Intelligent Services predict the case category
and recommends similar cases that can provide you with potential answers for the customer issue. The
solution can scan the case text to identify sentiment, translate case text, and identify profane language. The
model constantly captures feedback to be retrained for improved accuracy over time.
22.1 Case Categorization
Use machine learning to automate the case categorization process.
Save agents' time by automatically categorizing cases for your most commonly used case categories. Machine
learning analyzes your past cases and category catalog to learn how cases are categorized in your organization.
Once you train and activate the model and if the condence thresholds are met, the system automatically
populates the proposals into the case category.
Case categorization increases agent productivity, provides better prioritization of incoming cases and
automatic classication based on model accuracy.
Case categorization is currently supported in the following languages:
• Chinese
• English
• French
• German
• Japanese
• Portuguese
• Russian
• Spanish
Prerequisites
• Data volume: Includes minimum 1000 categorized cases and an additional 500 instances of each category
or subcategory values
• Data quality: Includes subject, description, and proper category
Set Up Guide for SAP Service Cloud Version2
Intelligent Services
PUBLIC 233

22.1.1Case Intelligence Readiness Report
Use the readiness report to analyze your case data to determine if you can get useful predictions for case
categorization.
Before you start creating and training the Case Categorization model, you must run the readiness report.
Find the readiness report under Settings All Settings Machine Learning Intelligent Service Case
Categorization . Select Readiness Report at the top right.
When the check is complete, the readiness report displays one of the following status:
• Ready to use machine learning
• Data improvements required
• Requirements not fullled
Each readiness factor shows you the minimum required value, the recommended value, and the actual value
in your system. You can adjust the data in your system to meet the minimum and recommended thresholds
and run the readiness check again. Each check factor should meet the recommended value to ensure reliable
prediction results. If the check factor value falls between the minimum value and the recommended value, the
report shows a caution. If the value is less than the minimum value, the report shows an error message. You can
still proceed with the training, however the prediction result will be of lower accuracy.
Note
The data volume, or total number of objects (cases) shown is an approximate number of case records from
the previous 12 months that could potentially be used to train the machine learning model.
Example
Let's look at a simplied example for case categorization readiness.
Suppose you have 10 categories in your service category catalog. The readiness report shows that only 33%
(3) of these categories are assigned to the required number of cases to meet the qualication threshold.
The percentage is below the recommended minimum threshold. However, 80% of your qualifying cases are
assigned to these three categories. If you train a model based on this data you can potentially automate up to
80% of your incoming cases, despite using only 33% of your category catalog. In this case, machine learning
could still yield signicant agent productivity gains.
234
PUBLIC
Set Up Guide for SAP Service Cloud Version2
Intelligent Services

22.1.2Congure Case Categorization
As an administrator, you must add, train, test, and activate the Case Categorization model.
Procedure
1. Navigate to your user prole, and select Settings All Settings Machine Learning Intelligent Service
Case Categorization .
2. To create a model, click .
3. Enter a name for your model.
4. Use up to four levels of categories to categorize cases.
5. Click Save.
A new model is added with status Created.
6. Locate your model and click Train from Actionsto start training the model.
Note
If you update your service category catalog you must map new category IDs to existing categories and
retrain your model.
a. Select the model for which you want to update the category mapping.
b. Click Download Mapping to download the existing category mapping of the model.
Note
The model does not have a mapping document, click Prepare Mapping to create one and then
download it.
c. Edit the category listing as required and upload the updated mapping document.
d. Click Save.
e. Select Train to retrain the model.
The training takes time to complete depending on the volume of the historical data. The mode goes
through the following statuses during the training: Created Training in Preparation Data Extraction
is Pending
Data Extraction is in Progress Data Preprocessing is Pending Data Preprocessing is in
Progress Training Triggered Training is Pending Training in Progress Training Completed or Training
Failed
Active or Inactive .
The system stops the training if data extraction fails and updates the status as Data Extraction Failed.
You can refresh and update the training status of the model by selecting the (refresh) icon.
7. Click the (activate) icon to activate the model.
You can deactivate a model by selecting the (deactivate) icon.
Set Up Guide for SAP Service Cloud Version2
Intelligent Services
PUBLIC 235

Note
You can enable automated recommendations using the Enable switch in the Settings tab of your model.
Adjust the condence level for automated prediction. The default value of the condence level slider is
60 in the solution.
Restriction
You cannot add new categories from the settings dialog. You can only deselect, or select the categories
you included during model creation.
Note
You can use the test console to test if the model is functioning correctly. Select your model, enter a
description in the Input eld and click Test.
The test console invokes the prediction model API using the sample case data you provide.
• The model considers the content of both the case Subject and Description elds. To test, combine
text from both elds in the input box, or into one cell in the spreadsheet le. For testing purposes, a
single entry has a limit of 1000 characters. In actual use, the model analyzes all text in the subject
and description. Entries in the upload le don’t have a maximum character limit.
• You can test the model quality from the test console by activating the model, but set the
automation Enabled switch to No in the model settings. With automation disabled, the activated
model doesn’t start categorizing tickets in your productive system, but can be tested in the
console. Testing with automation disabled can be useful if you have data quality issues with your
test tenant, but good quality data in your production system.
Case Categorization Test File Example
Case ID
Description
12341 Are boxes allowed as checked luggage?
12342 Pump is making a loud noise when activated.
12343 Coee maker is making cold coee!
22.1.3View Case Categorization Prediction
Find category prediction results in cases.
Procedure
1. Go to Cases.
2. Create a new case and enter the subject and description elds.
3. Select Save.
236
PUBLIC
Set Up Guide for SAP Service Cloud Version2
Intelligent Services

Case categorization prediction works for all case creation channels such as manual, e-mail, social media,
chat, messaging, and so on. The main usage for case category prediction is for cases generated from
incoming e-mail messages. Cases are categorized during case creationg. You will only see predictions for
cases created after the model is set to active status.
22.2 Similar Case Recommendation
Find solutions from similar cases from the past that you can apply to the current case.
Note
To ensure accurate similar case recommendation with machine learning you require at least one year worth
of cases with change history data. It is recommended to have at least 22,000 completed cases.
The machine learning algorithm scans the subject and description of categorized cases over the last 12 months
and returns the top three most similar cases to the current case. The model learns the semantic relationship
of words in the description and subject text and uses this context to nd cases similar to the current case.
This semantic, sentence-level representation of case text yields more accurate results than a simple keyword
search. You can check similar cases for possible solutions to the current case.
Similar case recommendation is currently supported in the following languages:
• Dutch
• English
• Finnish
• French
• German
• Greek
• Italian
• Polish
• Slovak
• Spanish
22.2.1Congure Similar Case Recommendation
As an administrator, you must add, train, and activate the Similar Case Recommendation model.
Procedure
1. Navigate to your user prole, and select
Settings All Settings Machine Learning Intelligent Service
Similar Case Recommendation .
Set Up Guide for SAP Service Cloud Version2
Intelligent Services
PUBLIC 237

2. To add a mode, click .
3. Enter a name for your model.
4. Click Save and Train to save your model and start the training.
The training takes time to complete depending on the volume of the historical data. The mode goes
through the following statuses during the training: Created Training in Preparation Data Extraction
is Pending
Data Extraction is in Progress Data Preprocessing is Pending Data Preprocessing is in
Progress Training Triggered Training is Pending Training in Progress Training Completed or Training
Failed
Active or Inactive .
The system stops the training if data extraction fails and updates the status as Data Extraction Failed.
You can refresh and update the training status of the model by selecting the (refresh) icon.
Note
You can also save your model and train your model later.
Locate your model and click Train from the Actions to start training the model.
5. After the training is complete, click Activate from Actions to activate the model.
You can deactivate a model by selecting Deactivate.
Note
You can use the test console to test if the model is functioning correctly. Select your model, enter a
description in the Input eld and click Test.
You can enable similar case recommendation for incoming cases by turning on the Enable Similar Case
Recommendation switch. Testing via console is possible with an active model even when automation is
disabled.
22.2.2View Similar Case Recommendation
View similar case recommendations in cases.
Procedure
1. Go to the Case worklist.
2. Create a new case and enter the subject and description elds.
Similar case recommendation happens at case creation. Hence, you'll only see predictions for cases
created after the model is set to active status.
3. Select Save.
Find similar cases in the the side pane by clicking the Similar Cases () icon. A condence score of 0–100
shows the level of accuracy of the match.
238
PUBLIC
Set Up Guide for SAP Service Cloud Version2
Intelligent Services

Case summary displays on hover over the card view or list view of cases in the Similar Cases section, if
case summary is activated and a summary exists for the case.
22.2.2.1Similar Cases - Show More
View all similar cases to check for more solutions that apply to your current cases.
To view more similar cases, select Show More at the top right of the Recommendations side pane. The Solution
Center opens and displays up to ten similar cases in the top table.
22.3 NLP Classication
Use Natural language processing (NLP) to identify sentiment from email.
The NLP Classication scenario includes the Sentiment output eld that determines if the vocabulary used in
the email from which a case is created, is positive or negative and the degree of positivity or negativity.
Restriction
Sentiment analysis only identies sentiment for cases created from email channels.
NLP sentiment classication returns the following possible values:
• Not Available
• Strong Positive
• Weak Positive
• Neutral
• Weak Negative
• Strong Negative
The sentiment value from an email from which a case is created, indicates the overall emotion.
The magnitude of sentiment indicates how much emotional content is present within the email, and is often
proportional to the length of the text.
The natural language algorithm dierentiates between positive and negative emotion in a case, but doesn't
identify specic positive and negative emotions. For example, angry and sad are both negative emotions.
However, the sentiment classication only indicates that the text is negative, not sad, or angry.
An email with a neutral value can indicate a low-emotion, or email text expressing mixed emotions; containing
both high positive and high negative values that cancel out each other.
Set Up Guide for SAP Service Cloud Version2
Intelligent Services
PUBLIC 239

22.3.1Congure NLP Classication
As an administrator, you must add, train, and activate the NLP Classication model.
Procedure
1. Navigate to your user prole, and select Settings All Settings Machine Learning Intelligent Service
NLP Classication .
2. To create a new model , click l.
3. Enter a name for your model.
4. Turn on the Sentiment switch to enable sentiment detection.
5. Click Save and Train to save your model and start the training.
The model goes through the following statuses during the training:
Created Training in Preparation
Data Extraction is Pending Data Extraction is in Progress Data Preprocessing is Pending Data
Preprocessing is in Progress
Training Triggered Training is Pending Training in Progress Training
Completed or Training Failed Active or Inactive .
You can refresh and update the training status of the model by selecting the (refresh) icon.
Note
You can also save your model and train your model later.
6. Locate your model and click Train from Actions to start training the model.
7. After the training is completed, click the (activate) icon to activate the model.
You can deactivate a model by selecting the (deactivate) icon.
Note
You can adjust the threshold condence level. The default value of the condence level is 60.
Note
You can use the test console to test if the model is functioning correctly. Select your model, enter a
description in the Input eld and click Classify. The test console invokes the prediction model API using
the sample case data you provide.
22.4 Machine Translation
Use machine translation to translate emails.
Machine translation is available for the languages in the following table.
240
PUBLIC
Set Up Guide for SAP Service Cloud Version2
Intelligent Services

Machine Translation Supported Languages
Source Language Code Target Language Code
Arabic ar English (United States) en
Catalan ca English (United States) en
Chinese zh English (United States) en
Danish da English (United States) en
Dutch nl English (United States) en
English (US – applicable for
below rows)
en Arabic ar
English en Bulgarian bg
English en Catalan ca
English en Chinese (Simplied) zh
English en Chinese (Traditional) zf
English en Croatian hr
English en Czech cs
English en Danish da
English en Dutch nl
English en Estonian et
English en Finnish
English en French (France) fr
English en German de
English en Greek el
English en Hebrew he
English en Hindi hi
English en Hungarian hu
English en Italian it
English en Japanese ja
English en Kazakh kk
English en Korean ko
English en Latvian lv
English en Lithuanian lt
English en Malay ms
English en Norwegian no
English en Polish pl
English en Portuguese (Brazil) pt
English en Romanian ro
English en Russian ru
Set Up Guide for SAP Service Cloud Version2
Intelligent Services
PUBLIC 241

Source Language Code Target Language Code
English en Serbian (Latin) sh
English en Slovak sk
English en Slovenian sl
English en Spanish (Spain) es
English en Swedish sv
English en Thai th
English en Turkish tr
English en Ukrainian uk
English en Vietnamese vi
Finnish English en
French (France) fr English en
German de Bulgarian bg
German de Chinese (Simplied) zh
German de Croatian hr
German de Czech cs
German de English en
German de French (France) fr
German de Hungarian hu
German de Italian it
German de Polish pl
German de Romanian ro
German de Russian ru
German de Serbian (Latin) sh
German de Slovakian sk
German de Slovenian sl
German de Spanish (Spain) es
Hindi hi English en
Italian it English en
Japanese ja English en
Korean ko English en
Norwegian no English en
Portuguese (Brazil) pt English en
Romanian ro English en
Russian ru English en
242 PUBLIC
Set Up Guide for SAP Service Cloud Version2
Intelligent Services
Source Language Code Target Language Code
Spanish (Spain) es English en
Swedish sv English en
22.4.1Congure Machine Translation
As an administrator, you must add, train, test, and activate the Machine Translation model.
Procedure
1. Navigate to your user prole, and select Settings All Settings Machine Learning Intelligent Service
Machine Translation .
2. To create a new model, click .
3. Enter a name for your model.
4. Click Save and Train to save your model and start the training.
The model goes through the following statuses during the training: Created Training in Preparation
Training Completed or Training Failed .
You can refresh and update the training status of the model by selecting the (refresh) icon.
Note
You can also save your model and train your model later.
5. Locate your model and click Train from Actionsto start training the model.
6. After the training is complete, click Activate from Actions to activate the model.
You can deactivate a model by selecting Deactivate.
Note
You can use the test console to test if the model is functioning correctly. Select your model, enter a
description in the Input eld and click Translate. The test console invokes the prediction model API
using the sample case data you provide.
Set Up Guide for SAP Service Cloud Version2
Intelligent Services
PUBLIC 243

22.4.2View Machine Translated Text
View the translated description for the email in the user logon language.
Procedure
1. Navigate to the Emails worklist and select an email.
The same feature is available in Case timeline.
2. Select (Machine Translation) to view the Machine Translation popup.
The Machine Translation popup has two sections, Original Text and Translated Text. You can remove some
parts of the text in the Original Text before translation. This is helpful when you have a mix of languages
in an email. For example, when email footer signature or disclaimer text is in a language other than the
email content language and is much more in volume as compared to the email content which could be a
shorter one or two line which need to be translated. In this scenario, you can remove a part of text which is
in dierent language and translate.
3. To translate the required text, select Translate in the Translated Text section.
22.5 Case Summarization
Use Natural Language Processing (NLP) to summarize the text in the subject eld and email interactions.
Restriction
• Text summarization is tested only for English language texts.
• Text summarization is applicable only for email based interactions between a customer and a service
agent.
• Text summarization is available only for email interactions generated from Outlook and Gmail.
• For existing cases, a summary is generated only when a new interaction is added (after model
activation).
• There’s a delay between sending or receiving interaction and summary updates. Text summarization
takes place asynchronously from the email communication. The delay depends on the number of
interactions in the queue and the number and size of the interactions.
244
PUBLIC
Set Up Guide for SAP Service Cloud Version2
Intelligent Services

22.5.1Congure Case Summarization
As an administrator, you must add, train, test, and activate the Case Summarization model.
Procedure
1. Navigate to your user prole, and select Settings All Settings Machine Learning Intelligent Service
Case Summarization .
2. To create a new model, click .
3. Enter a name for your model.
4. Click Save and Train to save your model and start the training.
The model goes through the following statuses during the training:
Created Training in Preparation
Data Extraction is Pending Data Extraction is in Progress Data Preprocessing is Pending Data
Preprocessing is in Progress Training Triggered Training is Pending Training in Progress Training
Completed or Training Failed
Active or Inactive .
You can also save your model and train your model later.
Note
You can refresh and update the training status of the model by selecting the (refresh) icon.
5. After the training is complete, click Activate from Actions to activate the model.
You can deactivate a model by selecting the (deactivate) icon.
Note
You can use the test console to test if the model is functioning correctly. Select your model, enter a
Case ID in the Input eld and click Summarize. The test console invokes the prediction model API using
the sample case data you provide.
You can enable case summarizatrion for incoming cases by turning on the Enable text summarization
for case switch. When you enable the automation settings, then the system starts summarizing email
interactions at case level. Testing via console is possible with an active model even when automation is
disabled.
Restriction
There's an upper limit on the number of interactions summarized for test purposes. Hence, you may
not see all interactions in the summary.
Set Up Guide for SAP Service Cloud Version2
Intelligent Services
PUBLIC 245

22.5.2View Case Summarization
View the case summary results.
Procedure
1. Log into your solution and go to Cases.
2. Open a case in detailed view using the icon.
3. Go to the General tab to view the summary of each interaction.
You can see an overall summary, a summary of agent-generated interactions, and a summary of customer
interactions.
If the email interactions and the corresponding case summaries were created in English, and later when
you login in a dierent language, then you can translate the summary to the logged in language by
selecting Show Translation.
Note
You cannot keep both Generative AI based case summary and classical Machine Learning based case
summary (under Intelligent Services) in active state together. If you are activating Generative AI based
case summary, then you must deactivate the other one.
Also, while switching from classical machine learning to Generative AI based summary (or vice-
versa), case summary generated by the previous approach does not get updated until summary is
re-generated.
22.6 Case Topic Analyzer
Use the Case Topic Analyzer machine learning model to view trending topics from cases.
The Case Topic Analyzer machine learning model analyzes keywords from case descriptions and groups cases
based on labels assigned to a model. A label is a topic which acts as a heading for a list of similar keywords.
Prerequisites
To ensure accurate results from the model, your system must contain historical data (cases) in order to train
the model. Ideally around 3000 cases (minimum) with cases having meaningful text content in the case
description (multiple sentences which conveys the issue).
Note
When setting up a demo or test environment, you need to consider the following points:
246
PUBLIC
Set Up Guide for SAP Service Cloud Version2
Intelligent Services

• If most cases are talking about totally dierent distinct problems, topic detection will not happen
properly.
• Cases must have meaningful text which conveys the issue correctly.
22.6.1Congure Case Topic Analyzer
As an administrator, you must add, train, test, and activate the Case Topic Analyzer model.
Procedure
1. Navigate to your user prole, and select Settings All Settings Machine Learning Intelligent Service
Case Topic Analyzer .
2. Under Case Topic Analyzer, click the create icon () to add a model.
3. Enter a name for your model.
4. Click Save and Train to start training the model.
The model goes through the following statuses during the training:
Created Training in Progress
Training Completed or Training Failed Active or Inactive .
You can refresh and update the training status of the model by selecting the (refresh) icon.
5. After the training is completed, select your model to assign a label to the list of keywords.
Note
A label is a topic which acts as a heading for a list of similar keywords.
You must set appropriate topic label which matches your business.
6. Select Settings to see a number of topics with keywords associated with each one and three sample case
IDs for each topic.
7. Enter a topic label.
8. Click Save.
9. Click the (activate) icon to activate the model.
Note
• You can deactivate a model by selecting the (deactivate) icon.
• You can use the test console to test if the model is functioning correctly. Select your model, enter a
description in the Input eld, and click Test.
• You can enable the case topic analyzer for incoming cases by turning on the Enable topic analyzer
for case switch.
• Only English language is supported currently for the Case Topic Analyzer models.
Set Up Guide for SAP Service Cloud Version2
Intelligent Services
PUBLIC 247
22.6.2View Topic Analyzer
View trending topics from case descriptions.
After you train and activate the case topic analyzer model, you can view trending topics in Topic Analyzer.
New cases created in the system are grouped according to the topics they belong to. Existing cases upto a
maximum of 12 months are grouped into topics.
You can choose to view the trending topics in the form of cards or lists that display the topic name, the rank,
number of cases, and percentage trend. The topics are ranked according to the number of cases for the topics
for the calendar year. The percentage trends are calculated on monthly basis.
You can lter trending topics using a date lter with values such as This week, This Month, and This Year. By
default, the date lter is set to lter trending topics for the current week. For a selected lter, topics will appear
only if it has cases from that selected time period. However, the overall topic rank for the calendar year and
percentage trend (month to month) does not change.
The trending topics display information for all topics in the following forms:
• Bar charts - displays the number of cases for topics
• Graphs - displays topic trends across months.
• Keywords clusters - displays list of trending keywords as word clouds and as lists.
When you select a trending topic, the list, graph and keywords display information specic to the selected topic
only. You can view the list of associated cases and navigate to specic cases.
22.7 Case Type Determination
The Case Type Determination machine learning model determines the case type during the conversion of email
to case.
During the conversion of emails to cases, the case type determination model analyzes subject and description.
It then establishes the Case Type for the case creation.
The system inputs the determined case type into the case, initiating the case creation process.
Case type determination is currently supported in the following languages:
• Chinese
• English
• French
• German
• Japanese
• Portuguese
• Russian
• Spanish
248
PUBLIC
Set Up Guide for SAP Service Cloud Version2
Intelligent Services

Prerequisites
• Data volume: Includes minimum 1000 cases with case types assigned and an additional 500 instances of
each case type.
• Data quality: Includes subject, description, and case type.
22.7.1Congure Case Type Determination
As an administrator, you must add, train, test, and activate the Case Type Determination model.
1. Navigate to your user prole, and select Settings All Settings Machine Learning Intelligent Service
Case Type Determination .
2. To add a new model, click .
3. In the Create Model popup, enter a name for the model.
4. Go to Settings.
5. Turn on the Condence Level and select the condence value.
6. Save your changes.
7. Click Save and Train to save your model and start the training.
You can also save your model and train your model later.
The model goes through the following statuses during the training:
Created Training in Progress or
Training Failed.
You can refresh and update the training status of the model by selecting the (refresh) icon.
8. Click the (activate) icon to activate the model.
Note
• After you acivate the model, ensure that you have enabled the Case Type Determination From AI
switch from the Determination Rules section in the email channels. For more information, see the
Related information section.
• You can deactivate a model by selecting the (deactivate) icon.
• You can use the test console to test if the model is functioning correctly. Select your model, enter a
description in the Input eld, and click Test.
Related Information
Congure Case Types [page 146]
Customize case types to match the workow used by your organization.
Set Up Guide for SAP Service Cloud Version2
Intelligent Services
PUBLIC 249

22.8 Profanity Check
Use profanity check to dene a set of pejorative vocabulary.
Profanity check is currently available only in English.
22.8.1Congure Profanity Check
As an administrator, you must add, train, test, and activate the Profanity Check model.
Procedure
1. Navigate to your user prole, and select Settings All Settings Machine Learning Intelligent Service
Profanity Check .
2. To create a new model, click .
3. Enter a name for your model.
4. Click Save and Train to save your model and start the training.
The model goes through the following statuses during the training:
Created Training in Preparation
Data Extraction is Pending Data Extraction is in Progress Data Preprocessing is Pending Data
Preprocessing is in Progress Training Triggered Training is Pending Training in Progress Training
Completed or Training Failed
Active or Inactive .
You can refresh and update the training status of the model by selecting the (refresh) icon.
Note
You can also save your model and train your model later.
Locate your model and click Train from Actions to start training the model.
5. After the training is completed, click the (activate) icon to activate the model.
You can deactivate a model by selecting the (deactivate) icon.
Note
You can use the test console to test if the model is functioning correctly. Select your model, enter a
description in the Input eld and click Check Profanity. The test console invokes the prediction model
API using the sample case data you provide.
250
PUBLIC
Set Up Guide for SAP Service Cloud Version2
Intelligent Services
22.8.2View Profanity Check
View the results of profanity check.
Procedure
1. Navigate to the Email worklist.
2. Reply to an email.
3. Draft a reply with profane language.
The system opens a pop up with the profane text.
22.9 Intelligent Services FAQ
Here are some frequently asked questions (FAQ) and corresponding answers about Machine Learning.
What are Intelligent Services?
Intelligent Services is a collection of machine learning models and scenarios embedded in SAP Service Cloud
CNS. Intelligent Services is not a separate product. You don't require any additional licensing, deployment, or
upgrades. You can manage everything through the SAP Service Cloud CNS administrator interface.
Is there any impact on the system performance as the data is cached?
There’s no impact on day-to-day system performance as the data is cached and stored in the solution. All
compute-intensive operations, such as training the model, happen outside of your SAP Service Cloud CNS
tenant.
How many models are active at any time?
Only one model can be active in production. However, you can create multiple models.
Are there extension elds to the model?
Extension elds aren’t available right now.
How many category levels does Case Categorization support?
Case Categorization supports upto four levels.
Related Information
Service Ticket Intelligence Service Ticket Intelligence
Set Up Guide for SAP Service Cloud Version2
Intelligent Services
PUBLIC 251

23 Generative AI
Use Generative AI to generate account synopsis, case summary, and draft email response for cases.
Generative AI features are available only when you have a valid license for usage of SAP AI Units. To enable
Generative AI features, you must raise an incident with the CEC-CRM-ML component, mentioning that you
have a valid license for SAP AI Units. After you activate the Generative AI features, you must assign the
sap.crm.service.mlScenarioManagementGenAIService service and app to your role.
Note
• For details on how the metrics consume the credits, see the SAP AI Services List
for SAP Sales
Cloud V2 Generative AI transaction and SAP Service Cloud V2 Generative AI transaction.
• For SAP Service Cloud V2 , 1 transaction as per AI services list for each Generative AI capability
translates to the following:
• 1 account synopsis
• 1 email draft
• 1 case summary
Every regeneration for the these capabilities also counts as a transaction.
• Generative AI features are tested only for English, German, French, and Spanish language texts.
23.1 Case Summary
Use Generative AI to summarize text in email interactions for cases.
Case summary displays in the General tab of cases. Case summary also displays on hover over the card view or
list view of cases in the Similar Cases section, if case summary is activated and a summary exists for the case.
Case summarization is applicable only for email-based interactions between a customer and a service agent.
Case summary is generated only for new interactions that occur after activating Case Summary.
Note
You cannot keep both Generative AI based case summary and classical Machine Learning based case
summary (under Intelligent Services) in active state together. If you are activating Generative AI based case
summary, then you must deactivate the other one.
Also, while switching from classical machine learning to Generative AI based summary (or vice-versa), case
summary generated by the previous approach does not get updated until summary is re-generated.
252
PUBLIC
Set Up Guide for SAP Service Cloud Version2
Generative AI

Congure Case Summary
1. As an administrator, navigate to your user prole, and select Settings All Settings Machine Learning
Generative AI Case Summary .
2. To activate case summarization, enable Activate Case Summary, and accept Acknowledgment.
3. Use the Test Console to test case summary.
4. To update case summary for your business users, enable Update Case Summary.
Note
The administrator can use the test console even if this step is not performed, however, case
summarization is available to business users only if Update Case Summary is enabled.
5. Select one of the following:
1. Manual - to manually generate the summary and update the case summary by regenerating the
summary when required. Business users must click Generate Summary to view the case summary,
and use Regenerate to refresh case summary.
2. Automatic - to automatically update the case summary for every interaction between the agent and
customer.
Note
Summary generation is an asynchronous process and takes some time for summary update to be
visible in the UI.
6. Go to Congure and enable the Priority eld if you want to include it in case summary.
Note
The Email Interaction and Description elds are included in the case summary by default.
7. Save your changes.
View Case Summary
1. To view the case summary, open a case in detailed view using the icon.
2. Go to
General Summary .
3. Select Generate Summary to generate a summary manually and select Regenerate to refresh the summary
(This step is applicable if you select the Manual option for Update Case Summary.
Note
• Case summary is generated by Generative AI using case specic data. You must verify it while
making any decisions.
• If the email interactions and the corresponding case summaries were created in English, and
later when you login in a dierent language, then you can translate the summary to the logged in
language.
Set Up Guide for SAP Service Cloud Version2
Generative AI
PUBLIC 253

23.2 Email Draft Recommender
Use email draft recommender from Generative AI to draft email replies or interactions for cases (currently
tested in English, German, Spanish, and French).
Congure Email Draft Recommendation
1. Navigate to your user prole and select Settings All Settings Machine Learning Generative AI
Email Draft Recommender .
2. To activate email draft recommendation for business users, enable Activate Email Draft Recommendation,
and accept Acknowledgment.
3. Use Test Console to test email draft recommendation.
4. Go to Congure and enable the required entities (currently supported only for Cases).
5. To include prompts in the email draft recommendation, enable the required prompts from the following list
in Available Prompts:
• Case status update email
• Update the Service Level timelines
• Share relevant KB articles
6. Save your changes.
View Email Draft Recommendation
1. To view the email draft recommendation, open a case in detailed view using the icon and select Email.
2. Select the
Email Drafter . The Email Drafter popup opens.
3. Select a prompt from Available Prompts.
4. Select the style, tone, and length from Email Text Preferences.
5. Select Generate Draft. The recommended email draft appears in the Draft section.
6. Click Apply to copy the draft content to the email editor.
Note
Draft is generated by Generative AI using the application context data. You must verify thoroughly
before using it in response email. If you want to change the text, style, tone or purpose, then you must
make the changes and click Generate Draft and Apply.
.
254
PUBLIC
Set Up Guide for SAP Service Cloud Version2
Generative AI

23.3 Account Synopsis
Account Synopsis provides all the information related to an account that helps the sales representatives.
Congure Account Summary
1. As an administrator, navigate to your user prole, and select Settings All Settings Machine Learning
Generative AI Account Summary .
2. To activate account summary, enable Activate Account Summary, and accept Acknowledgement.
3. In the Congure section, you can enable the following aspects of accounts that you want to display in the AI
Synopsis tab within accounts:
• Overall Information
• Business Overview
• Typical Customers
• Competitive Landscape
• Culture and Background
• Business Strategies
4. Save the changes.
View Account Summary
1. From the Navigation Menu, Search for Accounts.
2. In the worklist of the accounts view, select the account name and then click
( Open in Detail View).
3. Select the AI Synopsis tab to view the AI generated summary.
23.4 Control Enablement of Generative AI features
You can make context data based Generative AI feature disablement or enablement decision using Generative
AI: Custom Processing Decision Maker.
As an administrator, you can introduce your own logic to enable or disable Generative AI scenarios, allowing
the use of Generative AI based on document type or business context. Use the pre-delivered Custom Code
Extensions for Generative AI Scenarios communication conguration template, along with the synchronous
outbound communication conguration Generative AI: Custom Processing Decision Maker to enable this
capability.
Set Up Guide for SAP Service Cloud Version2
Generative AI
PUBLIC 255

Congure Enablement of Generative AI features
1. Create a communication system with outbound authentication details for the application endpoint
which holds the custom logic to determine enablement of Generative AI scenario by following the
steps mentioned in the Create Communication Systems topic in this guide. You can ignore the inbound
conguration.
2. Create a communication conguration by copying the pre-delivered template conguration Custom Code
Extensions for Generative AI Scenarios by following the steps mentioned in the Create Communication
Congurations topic in this guide. You can ignore steps related to inbound and outbound conguration.
3. Change the status of the communication arrangement to Active by clicking the status and selecting the
Active radio button.
The endpoint congured in the outbound conguration gets called before the Generative AI scenario is
enabled for a specic document.
Request format
The request payload will be sent through a POST call in JSON in the following format.
Sample Code
{
“scenarioName”: <Name of Gen AI scenario(English and Caps) in Admin UI
with space replaced by underscore>
"id": "<entity uuid>",
"objectTypeCode": "<context object type code Example: 2886 for case, 72
for Opportunity >"
}
Response format
The application expects a response back in JSON in the following format:
Sample Code
{
"isAllowed":"true/false"
}
The Generative AI scenario is allowed for the document only if the isAllowed value is returned as true and
also if there is no exit congured or the exit endpoint is unavailable.
Related Information
Create Communication Systems
Create Communication Congurations
256
PUBLIC
Set Up Guide for SAP Service Cloud Version2
Generative AI

23.5 Remove Personally Identiable Information
You can check and remove Personally Identiable Information(PII) in Generative AI scenarios by using the
Generative AI: Custom Processing Personally Identiable Information template.
Use the pre-delivered Custom Code Extensions for Generative AI Scenarios communication conguration
template, along with the synchronous HTTP data outbound communication conguration Generative AI:
Custom Processing Personally Identiable Information to enable this capability.
The conguration is expected to produce response text with PII data replaced by unique tags and generate a
dictionary mapping unique identier tags to PII data values. This mapping can then be used to associate the
data back in the model response, providing users with responses containing PII contextual data.
Congure Custom Processing Exit
1. Create a communication system with outbound authentication details for the application endpoint
which holds the custom logic to determine enablement of Generative AI scenario by following the
steps mentioned in the Create Communication Systems topic in this guide. You can ignore the inbound
conguration.
2. Create a communication conguration by copying the pre-delivered template conguration Custom Code
Extensions for Generative AI Scenarios of category All HTTP Data by following the steps mentioned in the
Create Communication Congurations topic in this guide. You can ignore steps related to inbound and
outbound conguration.
3. Change the status of the communication arrangement to Active by clicking the status and selecting the
Active radio button.
The endpoint congured in the outbound conguration gets called before the Generative AI scenario is
enabled for a specic document.
Request format
The request payload will be sent through a POST call in JSON in the following format.
Sample Code
request payload
{
“text”: <contextual data with PII>,
“scenarioName”:”SCENARIO_NAME”
}
Response format
The application expects a response back in JSON in the following format:
Sample Code
{
“text”:<Anonymized contextual data>,
“piiDataValueMappingDictionary”: [
{
“identifier”: <unique tag used for anonymizing PII>,
“value”: <PII value>
}
Set Up Guide for SAP Service Cloud Version2
Generative AI
PUBLIC 257

]
}
258 PUBLIC
Set Up Guide for SAP Service Cloud Version2
Generative AI

24 Minimum System and Software
Requirements
This section provides an overview of minimum system and software requirements.
24.1 Web Applications
You will learn about the minimum hardware and network requirements, display resolution, additional software,
browser settings and versions and domain settings for web applications.
24.1.1Minimum Hardware Requirements
Minimum desktop and laptop hardware requirements.
• Processor: Intel Core 2 Duo (2.4 GHz with a 1066 megahertz {MHz} front-side bus) or equivalent
• Memory: 6 gigabytes (GB)
Set Up Guide for SAP Service Cloud Version2
Minimum System and Software Requirements
PUBLIC 259

24.1.2Minimum Network Requirements
Minimum bandwidth and latency requirements for
Number of Users 20 100 500 1000
Bandwidth Re-
quired (Mbps)
Sales 0.25 1.24 6.2 12.4
Service 0.6 3 15 30
Network latency should be 200ms.
Note
The calculations consider only bandwidth used by the solution and don’t include any other internet or
internal network trac.
SAP Support may request wired networking during investigation of incidents.
For detailed calculations and more information about bandwidth requirements, refer to the Network Sizing
blog.
24.1.3Display Resolution
The solution is best displayed at a screen resolution of 1920 x 1080 and 100% scale.
24.1.4Additional Software
You will require Adobe Reader 8.1.3 or higher as an additional software to work on certain functions.
24.1.5Browser Settings
Download settings and formats, pop-up settings and advanced settings.
Downloads
Downloading les should be enabled in your browser, since the solution can export les to your local device.
If your browser supports restricting downloads by le type, you should enable at least the XML and CSV le
types.
260
PUBLIC
Set Up Guide for SAP Service Cloud Version2
Minimum System and Software Requirements
If your browser supports trusted sites, we recommend maintaining the download settings only for the Trusted
Sites security zone and adding the following URLs to this zone:
• Your system URL, or alternatively the general pattern to which the URL adheres, such as http://
*.crm.cloud.sap
• Your system URL, or alternatively the general pattern to which the URL adheres, such as http://
*.crm.cloud.sap
• The pattern https://*crm.cloud.sap
• The pattern https://*.cxm-salescloud.com
Pop-ups
The pop-up blocker should either be disabled, or the system URL should be registered as an exceptional site for
the pop-up blocker. The Trusted Sites security zone settings listed in the Downloads section applies to pop-ups
as well.
24.1.6Browser Versions
Versions tested and handling browser updates.
SAP performs manual and automated testing on the supported and recommended browsers. Recommended
browsers provide better performance and usability. Later versions of the recommended browser should be
compatible, but have not yet been tested.
Use the latest, stable version of the recommended browsers. Please be aware that some browsers download
and apply updates automatically. SAP makes every eort to test and support the most recent, stable versions
of all recommended browsers.
24.1.7Domain Settings
Allow applications to access resources from the *.crm.cloud.sap domains.
If you use a URL lter to blocklist a category of websites, you must allow *.crm.cloud.sap domains as an
exception. Static resources based on the Content Delivery Network (CDN) should be in allow list for the domain
*.cxm-salescloud.com.
Set Up Guide for SAP Service Cloud Version2
Minimum System and Software Requirements
PUBLIC 261

24.1.8Desktops and Laptops
Browser support by operating system for desktops and laptops.
Platform OS Recommended Browser
Supported
Microsoft Windows
Windows 10 & above
Google Chrome Google Chrome
Microsoft Edge (Chromium)
Apple Mac OS X 10.10 “Yosemite” Google Chrome Google Chrome
Microsoft Edge (Chromium)
24.2 Language Settings
Browser settings for language support.
To ensure that texts appear consistently in the same login language, review the following three language
settings:
• Before you log on to the solution, choose the preferred language from the dropdown list.
• Make sure that the browser locale is correct, the locale is used to determine the dates, time zone, or
amount formats. For add-ons, dates and times are not updated based on your browser settings.
• In the operating system itself, ensure that the preferred language is dened as the display language.
24.2.1Languages Supported
Supported languages and restrictions for specic languages.
The user interface is available in the following languages.
• AR — Arabic (Functional limitations for this language are described in the note below)
• BG — Bulgarian
• CS — Czech
• DA — Danish
• DE — German
• EN — English
• ES — Spanish
• FI — Finnish
• FR — French
• HE — Hebrew (Functional limitations for this language are described in the note below)
• HU — Hungarian
262
PUBLIC
Set Up Guide for SAP Service Cloud Version2
Minimum System and Software Requirements

• IT — Italian
• JA — Japanese
• KO — Korean
• NL — Dutch
• NO — Norwegian
• PL — Polish
• PT — Portuguese
• RU — Russian
• SK — Slovak
• SV — Swedish
• TH — Thai
• TR — Turkish
• ZH — Simplied Chinese
• ZF — Traditional Chinese
Note
Right-to-left languages (Arabic script and the Hebrew alphabet are written from right to left) are NOT
SUPPORTED for email integration, analytics, or maps.
24.3 Integration and Add-Ins
Additional software requirements for integration scenarios and add-ins.
You can enable additional functionalities by integrating with external systems or software that can be installed,
via the Download screen, for specic business purposes and users.
24.3.1Requirements for Software Integration
To increase customer service, large enterprises can integrate existing SAP S/4 HANA systems with the
solution.
Set Up Guide for SAP Service Cloud Version2
Minimum System and Software Requirements
PUBLIC 263

25 Help and Support
Learn how to nd answers to your questions about the solution and how to report issues and problems.
As you're working, if you encounter unexpected behavior in the solution that interrupts your work or reduces
the quality of the service, you can search the Built-In Support () for more information or create an incident
that is sent to SAP Support. You can search the entire SAP knowledge database, as well as additional
resources, for information that can solve your problem.
If you want to review the product documentation that can help you solve the issue yourself, you can nd links to
the SAP Help Center and this solution guide in the Built-In Support panel.
Your administrator is the rst line of support but if they can't solve the issue for you, they can send the incident
to SAP for further investigation.
Prerequisite: One time registration is required to create an SAP Universal ID and use the real-time chat and
submit an incident. We recommend you register for your SAP Universal ID with your S-User ID. Once registered,
incident reporting and expert chat are available in the Built-In Support panel.
When creating an incident, be sure to create it from the screen where you're experiencing the issue. The
system identies the screen automatically and includes this information in the incident. To help support
process your incident more quickly, always include step-by-step instructions on how to re-create the behavior
you're reporting.
As an administrator, after you submit an incident, you can track it for updates.
264
PUBLIC
Set Up Guide for SAP Service Cloud Version2
Help and Support

You can chat with product support specialists as well as with our customer interaction teams for updates on
existing incidents. Each chat generates an incident that you can view and edit. The incident contains the chat
transcript and can be used to follow up on the reported issue.
Get help within the Built-In Support tool by selecting the () icon at the top of the panel.
Restriction
Built-in support is available only in English.
Related Information
Full documentation for Built-In Support
About SAP Universal ID
Set Up Guide for SAP Service Cloud Version2
Help and Support
PUBLIC 265

Important Disclaimers and Legal Information
Hyperlinks
Some links are classied by an icon and/or a mouseover text. These links provide additional information.
About the icons:
• Links with the icon
: You are entering a Web site that is not hosted by SAP. By using such links, you agree (unless expressly stated otherwise in your
agreements with SAP) to this:
• The content of the linked-to site is not SAP documentation. You may not infer any product claims against SAP based on this information.
• SAP does not agree or disagree with the content on the linked-to site, nor does SAP warrant the availability and correctness. SAP shall not be liable for any
damages caused by the use of such content unless damages have been caused by SAP's gross negligence or willful misconduct.
• Links with the icon : You are leaving the documentation for that particular SAP product or service and are entering an SAP-hosted Web site. By using
such links, you agree that (unless expressly stated otherwise in your agreements with SAP) you may not infer any product claims against SAP based on this
information.
Videos Hosted on External Platforms
Some videos may point to third-party video hosting platforms. SAP cannot guarantee the future availability of videos stored on these platforms. Furthermore, any
advertisements or other content hosted on these platforms (for example, suggested videos or by navigating to other videos hosted on the same site), are not within
the control or responsibility of SAP.
Beta and Other Experimental Features
Experimental features are not part of the ocially delivered scope that SAP guarantees for future releases. This means that experimental features may be changed by
SAP at any time for any reason without notice. Experimental features are not for productive use. You may not demonstrate, test, examine, evaluate or otherwise use
the experimental features in a live operating environment or with data that has not been suciently backed up.
The purpose of experimental features is to get feedback early on, allowing customers and partners to inuence the future product accordingly. By providing your
feedback (e.g. in the SAP Community), you accept that intellectual property rights of the contributions or derivative works shall remain the exclusive property of SAP.
Example Code
Any software coding and/or code snippets are examples. They are not for productive use. The example code is only intended to better explain and visualize the syntax
and phrasing rules. SAP does not warrant the correctness and completeness of the example code. SAP shall not be liable for errors or damages caused by the use of
example code unless damages have been caused by SAP's gross negligence or willful misconduct.
Bias-Free Language
SAP supports a culture of diversity and inclusion. Whenever possible, we use unbiased language in our documentation to refer to people of all cultures, ethnicities,
genders, and abilities.
266
PUBLIC
Set Up Guide for SAP Service Cloud Version2
Important Disclaimers and Legal Information
Set Up Guide for SAP Service Cloud Version2
Important Disclaimers and Legal Information
PUBLIC 267

www.sap.com/contactsap
© 2024 SAP SE or an SAP aliate company. All rights reserved.
No part of this publication may be reproduced or transmitted in any form
or for any purpose without the express permission of SAP SE or an SAP
aliate company. The information contained herein may be changed
without prior notice.
Some software products marketed by SAP SE and its distributors
contain proprietary software components of other software vendors.
National product specications may vary.
These materials are provided by SAP SE or an SAP aliate company for
informational purposes only, without representation or warranty of any
kind, and SAP or its aliated companies shall not be liable for errors or
omissions with respect to the materials. The only warranties for SAP or
SAP aliate company products and services are those that are set forth
in the express warranty statements accompanying such products and
services, if any. Nothing herein should be construed as constituting an
additional warranty.
SAP and other SAP products and services mentioned herein as well as
their respective logos are trademarks or registered trademarks of SAP
SE (or an SAP aliate company) in Germany and other countries. All
other product and service names mentioned are the trademarks of their
respective companies.
Please see https://www.sap.com/about/legal/trademark.html for
additional trademark information and notices.
THE BEST RUN
