
LiCO 5.4.0
Administrator Guide
Fifth Edition (November 2019)
© Copyright Lenovo 2018, 2019.
LIMITED AND RESTRICTED RIGHTS NOTICE: If data or software is delivered pursuant to a General Services
Administration (GSA) contract, use, reproduction, or disclosure is subject to restrictions set forth in Contract No. GS-35F-
05925.

Contents
Chapter 1. Overview. . . . . . . . . . . 1
Introduction to LiCO . . . . . . . . . . . . . . 1
Features of LiCO . . . . . . . . . . . . . . . 1
Terminology . . . . . . . . . . . . . . . . . 1
Prerequisite . . . . . . . . . . . . . . . . . 2
Operating environment . . . . . . . . . . . . . 2
Chapter 2. Administrator home
page . . . . . . . . . . . . . . . . . . . 3
Log in to the administrator home page . . . . . . . 4
Switch roles . . . . . . . . . . . . . . . . . 4
Get current version information . . . . . . . . . . 4
Change the account password . . . . . . . . . . 5
Cluster status view . . . . . . . . . . . . . . 6
Cluster alert messages . . . . . . . . . . . . . 7
Chapter 3. User management . . . . . . 9
User groups (using LDAP) . . . . . . . . . . . . 9
Create a user group . . . . . . . . . . . . 9
Delete a user group . . . . . . . . . . . 10
User groups (not using LDAP) . . . . . . . . . 10
Users (using LDAP) . . . . . . . . . . . . . 11
Create a user . . . . . . . . . . . . . . 11
Import users in batch . . . . . . . . . . . 12
Export users . . . . . . . . . . . . . . 12
Edit a user . . . . . . . . . . . . . . . 12
Change the user password . . . . . . . . 13
Delete a user . . . . . . . . . . . . . . 14
Suspend a user . . . . . . . . . . . . . 14
Resume a user . . . . . . . . . . . . . 15
Browse user details . . . . . . . . . . . 15
Users (not using LDAP) . . . . . . . . . . . . 16
Import a user . . . . . . . . . . . . . . 16
Import users in batch . . . . . . . . . . . 17
Export users . . . . . . . . . . . . . . 17
Edit a user . . . . . . . . . . . . . . . 17
Change the user password . . . . . . . . 18
Delete a user . . . . . . . . . . . . . . 19
Suspend a user . . . . . . . . . . . . . 19
Resume a user . . . . . . . . . . . . . 20
Browse user details . . . . . . . . . . . 20
Billing groups. . . . . . . . . . . . . . . . 21
Create a billing group . . . . . . . . . . . 21
Edit a billing group . . . . . . . . . . . . 22
Deposit/Withdraw an account . . . . . . . 23
Delete a billing group . . . . . . . . . . . 24
Solutions to some user action failures . . . . . . 25
Chapter 4. Monitor . . . . . . . . . . 27
List view. . . . . . . . . . . . . . . . . . 27
Physical view . . . . . . . . . . . . . . . . 28
Group view . . . . . . . . . . . . . . . . 28
GPU view . . . . . . . . . . . . . . . . . 29
Jobs . . . . . . . . . . . . . . . . . . . 29
Alerts . . . . . . . . . . . . . . . . . . . 30
Operations. . . . . . . . . . . . . . . . . 32
Chapter 5. Reports . . . . . . . . . . 35
Job reports . . . . . . . . . . . . . . . . 35
Alert reports . . . . . . . . . . . . . . . . 35
Utilization reports . . . . . . . . . . . . . . 36
Chapter 6. Admin . . . . . . . . . . . 39
Container images . . . . . . . . . . . . . . 39
Create an image . . . . . . . . . . . . . 39
Edit an image . . . . . . . . . . . . . . 40
View an image . . . . . . . . . . . . . 41
Delete an image . . . . . . . . . . . . . 41
Download an image . . . . . . . . . . . 42
Reupload an image . . . . . . . . . . . 42
VNC . . . . . . . . . . . . . . . . . . . 43
Manage VNC sessions on the Web . . . . . 44
Manage VNC sessions using command
lines . . . . . . . . . . . . . . . . . 44
Operation logs . . . . . . . . . . . . . . . 45
Web logs . . . . . . . . . . . . . . . . . 45
Chapter 7. Settings . . . . . . . . . . 47
Scheduler . . . . . . . . . . . . . . . . . 47
Create a queue . . . . . . . . . . . . . 47
Edit a queue . . . . . . . . . . . . . . 49
Delete a queue . . . . . . . . . . . . . 49
Set the state of a queue . . . . . . . . . . 50
Set the node state . . . . . . . . . . . . 50
Alert policy. . . . . . . . . . . . . . . . . 50
Create an alert policy . . . . . . . . . . . 51
Edit an alert policy . . . . . . . . . . . . 52
Delete an alert policy . . . . . . . . . . . 52
Notification group . . . . . . . . . . . . . . 53
Create a notification group. . . . . . . . . 53
Edit a notification group . . . . . . . . . . 54
Delete a notification group . . . . . . . . . 54
Notification . . . . . . . . . . . . . . . . 55
Scripts . . . . . . . . . . . . . . . . . . 55
License . . . . . . . . . . . . . . . . . . 55
© Copyright Lenovo 2018, 2019 i
Chapter 8. HPC cluster
management . . . . . . . . . . . . . . 57
View HPC cluster details . . . . . . . . . . . 57
Remote management of HPC cluster software . . . 57
Interface management . . . . . . . . . . 57
Command line management . . . . . . . . 58
xCAT management. . . . . . . . . . . . 58
Parallel commands . . . . . . . . . . . . . 59
Job scheduling commands . . . . . . . . . . 59
Queue commands . . . . . . . . . . . . . . 60
Job management . . . . . . . . . . . . . . 60
Appendix A. Important
information . . . . . . . . . . . . . . . 63
Restart LiCO . . . . . . . . . . . . . . . . 63
Ports used by LiCO . . . . . . . . . . . . . 63
Resolve a failed job submission . . . . . . . . 63
Manage user import using command lines . . . . 64
Batch deletion of jobs in the database . . . . . . 64
Failure to view or delete a VNC . . . . . . . . . 64
Data sources for GPU monitoring . . . . . . . . 65
Clean up jobs submitted through accounts not
managed by LiCO . . . . . . . . . . . . . . 65
MPI issues troubleshooting . . . . . . . . . . 65
Notices and trademarks . . . . . . . . . . . 65
ii LiCO 5.4.0 Administrator Guide

Chapter 1. Overview
Introduction to LiCO
Lenovo Intelligent Computing Orchestration (LiCO) is an infrastructure management software for high-
performance computing (HPC) and artificial intelligence (AI). It provides features like cluster management and
monitoring, job scheduling and management, cluster user management, account management, and file
system management.
With LiCO, administrators can manage and monitor user groups, users, and billing groups within a cluster in
a centralized manner. They can also schedule and monitor jobs, alerts, and reports, and perform various
settings.
Features of LiCO
• Cluster resource monitoring: LiCO provides a dashboard to monitor the usage of cluster resources,
including CPU, memory, storage, and network.
• Job template storage: LiCO provides multiple job templates, including HPC and AI job templates, which
help users submit jobs from Web pages with convenience.
• Customized templates: Users can create their own job templates to support other HPC and AI
applications.
• Job management and monitoring: Users can directly view and manage the status and results of jobs.
Various common schedulers and a wide range of job types are supported (including AI jobs such as
TensorFlow and Caffe).
• E2E training: Users can train image classification models without coding. LiCO also provides E2E support
for training, such as dataset management, topology management, and pre-trained model management.
• User management and billing: LiCO manages both local and domain users through the same interface.
It supports user top-ups and chargebacks, and offers the ability to set billing groups and fees.
• Customizations: A range of customizations are available, such as enterprise job template customization,
report customization, and 3D server visualization.
• Container image management: LiCO provides system container images for every supported AI
framework. Users can upload private images and run AI or HPC jobs on them.
• Expert Mode: LiCO provides command line tools to submit and manage jobs. Expert users can log in to
the login node via another shell and execute commands.
Terminology
• Computer cluster: a general reference to a collection of server resources including management nodes,
login nodes, and computing nodes
• Job: a series of commands in sequence intended to accomplish a particular task
• Job status: the status of a job in the scheduling system, such as waiting, in queue, on hold, running,
suspended, or completed
• Node status: the status of a node, such as idle, busy, or off
• Job scheduling system: the distributed program in control of receiving, distributing, executing and
registering jobs, also referred to as the operation scheduler or simply scheduler
• Management node: the server in a cluster running management programs such as job scheduling,
cluster management and user billing
© Copyright Lenovo 2018, 2019 1

• Login node: the server in a cluster to which users can log in via Linux and conduct operations
• Computing node: the server in a cluster for executing jobs
• User group: a set of users for which the system has defined an access control policy, so that all users in
the same user group have access to the same set of cluster resources
• Billing group: a group of cluster users that are to be billed under one account, also referred to as a billing
account. A billing account can be made up of a single user or multiple users.
• NGC Image: NVIDIA Container Runtime for Docker, also known as nvidia-docker. It supports GPU-based
applications that are portable across multiple machines. This is achieved through the use of Docker
containers.
Prerequisite
LiCO currently supports Slurm as the scheduler. The commands for Slurm in this Guide are not applicable to
other schedulers.
Operating environment
Cluster server:
Lenovo ThinkSystem servers
Operating system
• CentOS / Red Hat Enterprise Linux (RHEL) 7.6
• SUSE Linux Enterprise server (SLES) 12 SP4
Client requirements:
• Hardware: CPU of 2.0 GHz or above, memory of 8 GB or above
• Browser: Chrome (V 62.0 or higher) or Firefox (V 56.0 or higher) recommended
• Display resolution: 1280 x 800 or above
2
LiCO 5.4.0 Administrator Guide

Chapter 2. Administrator home page
A user can assume three kinds of roles: administrator, operator, and ordinary user. Administrators can view
the entire computer cluster and the information of all users. Operators can only view resources to which they
have access, as well as their own information. Ordinary users can execute jobs and run operations such as
job monitoring.
With the correct administrator username and password, you can open the administrator home page.
The left-hand side navigation pane shows the following elements:
• HPC.com: Cluster name. When the mouse hovers over it, the current scheduling and file service state is
shown. You can refer to the LiCO Installation Guide to edit the cluster name.
• Home: the current page that shows basic cluster information
• User Management: allows the administrator to perform basic operations on users, user groups, and
billing groups.
• Monitor: provides functions for monitoring the HPC cluster.
• Reports: allows the administrator to export reports in Excel, PDF, or HTML format based on the job, alert,
or action type
• Admin: allows the administrator to check the VNC, operation logs, and Web logs
• Settings: allows the administrator to perform actions on the queues, configure alerts for the HPC cluster,
and manage notification groups and notification settings
The upper-right corner shows the following icons:
•
: shows the number of unconfirmed alerts in the current cluster. You can click this icon to enter the
alert details page or to turn alert sounds on or off.
•
: You can click this icon to check current user information, edit current user password, log out, or
switch between user roles.
© Copyright Lenovo 2018, 2019 3

Log in to the administrator home page
Step 1. Open a browser.
Step 2. Type the IP address for the cluster’s login node, such as https://10.220.112.21.
Step 3. Type the correct administrator username and password.
Step 4. Click Log in.
The administrator home page is displayed.
Switch roles
With the highest permission level in the system, an administrator can switch to the role of an operator or user
and be redirected to the corresponding home page.
Step 1. Click
in the upper-right corner.
A list is displayed for you to choose the role to switch to.
Step 2. Click the role you want to switch to.
Click Operator to switch to the operator role.
Click User to switch to the user role.
The operator home page or user home page is displayed.
Get current version information
Step 1. Place your cursor over in the upper-right corner of the administrator home page.
A list is displayed for you to choose a user operation.
Step 2. Click
.
A page that shows the current version information is displayed.
4
LiCO 5.4.0 Administrator Guide

Step 3. Click a menu item to get required information.
Click User Agreement to get the user agreement.
Click Third party licenses to obtain the third party licenses.
Change the account password
Step 1. Place your cursor over in the upper-right corner of the administrator home page.
The user information dialog is displayed.
Step 2. Click
.
The Change Password dialog is displayed.
Chapter 2. Administrator home page 5

Step 3. Type the current password, and then type the new password twice.
Step 4. Click OK.
Your password is changed.
Cluster status view
The administrator home page shows the basic status of the entire cluster. You can click to maximize or
minimize the navigation pane.
The cluster overview page consists of the following elements:
Element Description
CPU Utilization rate of the CPUs in a server cluster, indicated by the percentage of CPU cores
in use among the total CPU cores in a cluster
GPU Utilization rate of the GPUs in a server cluster, indicated by the percentage of GPU cores
in use among the total GPU cores in a cluster
Memory Utilization of memory in the cluster, together with the amount of memory used and the
total size of the memory in the cluster
Shared Storage Utilization of storage in the cluster, together with the storage used and the total storage in
the cluster
Network Capacity of the network on a server cluster, including reading and writing speeds
Nodes Number of computers turned on or off in the computer cluster
Node Status Usage status of nodes on the computer cluster, including busy, idle, and off. The primary
basis for determining node usage is that there is one or more jobs running on that node.
Jobs Names and running times of jobs that are running or waiting.
6 LiCO 5.4.0 Administrator Guide

Element Description
Job Status Past information about the job, including the numbers of jobs running, waiting, and
finished. An administrator can choose to display the number of jobs in all queues or the
number of jobs in a certain queue. In terms of time, available display options include the
last hour, the last day, the last seven days, and the last thirty days. In terms of job type,
available display options include unfinished and finished jobs.
Messages
Show the most recent operations log for the web system. When you place the cursor over
the cluster name in the left navigation pane, the current scheduling and file service status
is displayed.
The health of the scheduler and parallel system is indicated by the following color-coded system:
Scheduler: Green means that the scheduler is working normally; red means that the scheduler is not working
normally.
Parallel File System: Green means that the parallel file system is working normally; red means that the
parallel file system is not working normally.
Cluster alert messages
If alerts are triggered, the symbol in the upper-right corner of the home page produces a red numerical
prompt, showing the current number of unconfirmed alerts.
To view all alert information, place the cursor over
, and then click View All in the displayed information
box. To access this alert information page, you can also select Monitor ➙ Alerts from the left navigation
pane.
In the information box, you can also choose to turn on or turn of the sound. When alert sound is turned on,
every new alert triggers a sound.
Chapter 2. Administrator home page 7
8 LiCO 5.4.0 Administrator Guide

Chapter 3. User management
There are three user constructs: user group, user, and billing group (or billing account), as explained in the
table below.
User Construct
Description Attributes
User group
A group of users on the HPC cluster with similar
queue access permissions.
-
User
List of users in the HPC cluster. Username, role, first name, last name, billing
group, user group, last login time, e-mail,
password
Billing group The billing account number, which can be used
by one or multiple users. When members of a
billing group run applications in a cluster, the
balance in the billing account will be debited
according to the number of CPU cores used
and the time taken in running the applications.
Name, billing rate, used time, spent amount,
balance, description
User groups (using LDAP)
Select User Management ➙ User Groups from the left navigation pane to enter the user group
management page.
Create a user group
During system initialization, a user group (with the default name default_os_group) is automatically created.
However, it is recommended that the administrator create a new user group.
Step 1. On the user group management page, click Create.
The Create User Group dialog is displayed.
© Copyright Lenovo 2018, 2019 9

Step 2. Type a unique name for the user group.
Step 3. Click OK.
A new user group is created.
Delete a user group
Administrators can delete existing user groups.
Step 1. On the user group management page, find the user group you want to delete, and then click
on the same row.
A dialog is displayed, asking you to confirm the deletion.
Step 2. Click OK.
The user group is deleted from the system.
Note: Before deleting the user group, you should move the users to a new group. Otherwise, the users
cannot submit jobs.
User groups (not using LDAP)
Select User Management ➙ User Groups from the left navigation pane to enter the user group
management page.
10
LiCO 5.4.0 Administrator Guide

Note: An administrator cannot create or delete a user group.
Users (using LDAP)
Select User Management ➙ Users from the left navigation pane to enter the user management page.
All actions in this section are performed on this page.
Create a user
During system initialization, an administrator account (with the default name “hpcadmin”) is automatically
created.
Step 1. On the user management page, click Create.
The Create User dialog is displayed.
Step 2. Fill in the information in the dialog box.
Chapter 3. User management 11

• Username must only contain lowercase letters, numbers, underscores, and minus signs. It must
start with a letter.
• Password should consist of at least 10 characters, including at least one uppercase letter, one
lowercase letter, one special symbol, and one number.
Step 3. Click OK.
A user account is created and can be used for login.
Import users in batch
Step 1. Click Batch Import on the user management page.
The User Batch Import dialog is displayed.
Step 2. Click Browse, and then select the file that contains the information about the users you want to
import.
You can click Sample File to help yourself prepare the user information file.
Step 3. Click Import.
Users in the file are imported into the system.
When the user accounts are successfully imported, the users can log in.
Export users
Step 1. Click Export on the user management page.
Your browser shows a dialog, asking your desired actions with the user information file in CSV
format.
Step 2. Specify a location and save the CSV file.
Information about all users on the page is exported and saved in the CSV file.
Edit a user
An administrator can change user information such as the role, user group, billing group, and e-mail address.
Step 1. Find the user you want to edit on the user management page, and then select Action ➙ Edit.
The Edit User dialog is displayed.
12
LiCO 5.4.0 Administrator Guide

Step 2. Change the information in the dialog box.
Step 3. Click OK.
Change the user password
An administrator can change passwords for operators or ordinary users, but not those of other
administrators.
Step 1. Find the user for which you want to change the password on the user management page, and then
select Action ➙ Change Password.
The Change User Password dialog is displayed.
Step 2. Type and confirm the new password.
Step 3. Click OK.
The user password is changed.
Chapter 3. User management 13
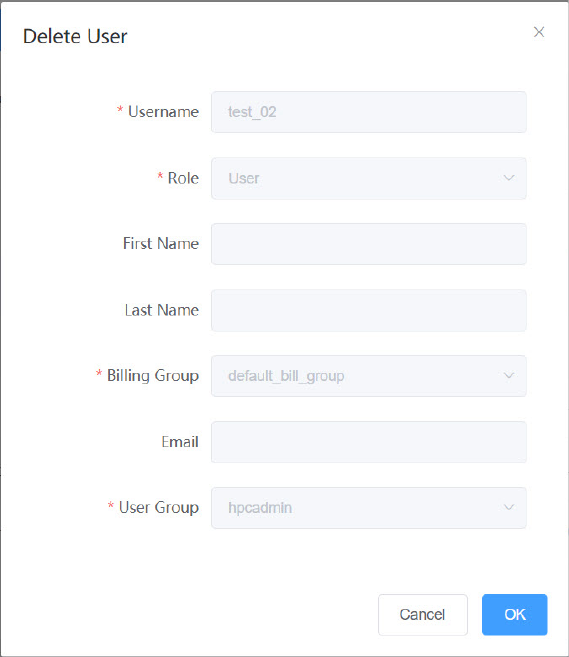
Delete a user
An administrator can delete existing users.
Step 1. Find the user you want to delete, and then select Action ➙ Delete.
The Delete User dialog is displayed.
Step 2. Click OK.
The user is deleted.
Suspend a user
An administrator can suspend the accounts of operators or ordinary users, but not those of other
administrators.
Step 1. Find the user account you want to suspend, and then select Action ➙ Suspend.
The Suspend User dialog is displayed.
14
LiCO 5.4.0 Administrator Guide

Step 2. Type the suspension time as needed.
Step 3. Click OK.
The user account is suspended for the time you specified.
Resume a user
An administrator can resume suspended operators or ordinary users.
Step 1. Find the suspended user you want to resume, and then select Action ➙ Resume.
The Resume User dialog is displayed.
Step 2. Click OK.
The suspended user is resumed.
Browse user details
Find the user whose details you want to browse, and then select Action ➙ Detail.
The user details page is displayed.
Chapter 3. User management 15

Users (not using LDAP)
You can select User Management ➙ Users from the left navigation pane to enter the user management
page.
All actions in this section are performed on this page.
Import a user
Step 1. Select User Management ➙ Users from the left navigation pane.
The Users page is displayed.
Step 2. Click Import.
The Import User dialog is displayed.
Step 3. Fill in the information as required.
Step 4. Click OK.
The system imports the user account.
16
LiCO 5.4.0 Administrator Guide

When the user account is successfully imported, the user can log in.
Import users in batch
Step 1. Click Batch Import on the user management page.
The User Batch Import dialog is displayed.
Step 2. Click Browse, and then select the file that contains the information about the users you want to
import.
You can click Sample File to help yourself prepare the user information file.
Step 3. Click Import.
Users in the file are imported into the system.
When the user accounts are successfully imported, the users can log in.
Export users
Step 1. Click Export on the user management page.
Your browser shows a dialog, asking your desired actions with the user information file in CSV
format.
Step 2. Specify a location and save the CSV file.
Information about all users on the page is exported and saved in the CSV file.
Edit a user
An administrator can change user information such as the role, user group, billing group, and e-mail address.
Step 1. Find the user you want to edit on the user management page, and then select Action ➙ Edit.
The Edit User dialog is displayed.
Chapter 3. User management 17

Step 2. Change the information in the dialog box.
Step 3. Click OK.
Change the user password
An administrator can change passwords for operators or ordinary users, but not those of other
administrators.
Step 1. Find the user for which you want to change the password on the user management page, and then
select Action ➙ Change Password.
The Change User Password dialog is displayed.
Step 2. Type and confirm the new password.
Step 3. Click OK.
The user password is changed.
18
LiCO 5.4.0 Administrator Guide

Delete a user
An administrator can delete existing users.
Step 1. Find the user you want to delete, and then select Action ➙ Delete.
The Delete User dialog is displayed.
Step 2. Click OK.
The user is deleted.
Suspend a user
An administrator can suspend the accounts of operators or ordinary users, but not those of other
administrators.
Step 1. Find the user account you want to suspend, and then select Action ➙ Suspend.
The Suspend User dialog is displayed.
Chapter 3. User management 19

Step 2. Type the suspension time as needed.
Step 3. Click OK.
The user account is suspended for the time you specified.
Resume a user
An administrator can resume suspended operators or ordinary users.
Step 1. Find the suspended user you want to resume, and then select Action ➙ Resume.
The Resume User dialog is displayed.
Step 2. Click OK.
The suspended user is resumed.
Browse user details
Find the user whose details you want to browse, and then select Action ➙ Detail.
The user details page is displayed.
20
LiCO 5.4.0 Administrator Guide

Billing groups
LiCO allows administrators to manage user billing groups in an easy and consolidated manner. You can
create, edit, credit, debit, and delete billing groups.
During system initialization, a default billing group named “default_bill_group” is created. It is recommended
that the administrator create a new billing group as needed.
Create a billing group
Step 1. Choose User Management ➙ Billing Groups from the left navigation pane.
The Billing Groups page is displayed.
Step 2. Click Create.
The Create Billing Group dialog is displayed.
Chapter 3. User management 21

Step 3. Fill in the required information.
• Name: name of the billing group, which must be unique
• Billing Rate: The fee-per-unit computing time. If the rate is 1, any member of the billing group
using 1 CPU core for 1 hour would be charged 1 US dollar.
• Initial Amount: the amount in the account when the billing group was created
• Description: a description of the billing group
Step 4. Click OK.
Edit a billing group
Step 1. Choose User Management ➙ Billing Groups from the left navigation pane.
The Billing Groups page is displayed.
Step 2. Find the billing group you want to edit, and then select Action ➙ Edit.
The Edit Billing Group dialog is displayed.
22
LiCO 5.4.0 Administrator Guide

Step 3. Edit the parameters in this dialog as required.
Step 4. Click OK.
Deposit/Withdraw an account
Step 1. Choose User Management ➙ Billing Groups from the left navigation pane.
The Billing Groups page is displayed.
Step 2. Find the billing group you want to take account actions, and then select Action ➙ Account
Actions.
The Billing Group Action dialog is displayed.
Chapter 3. User management 23
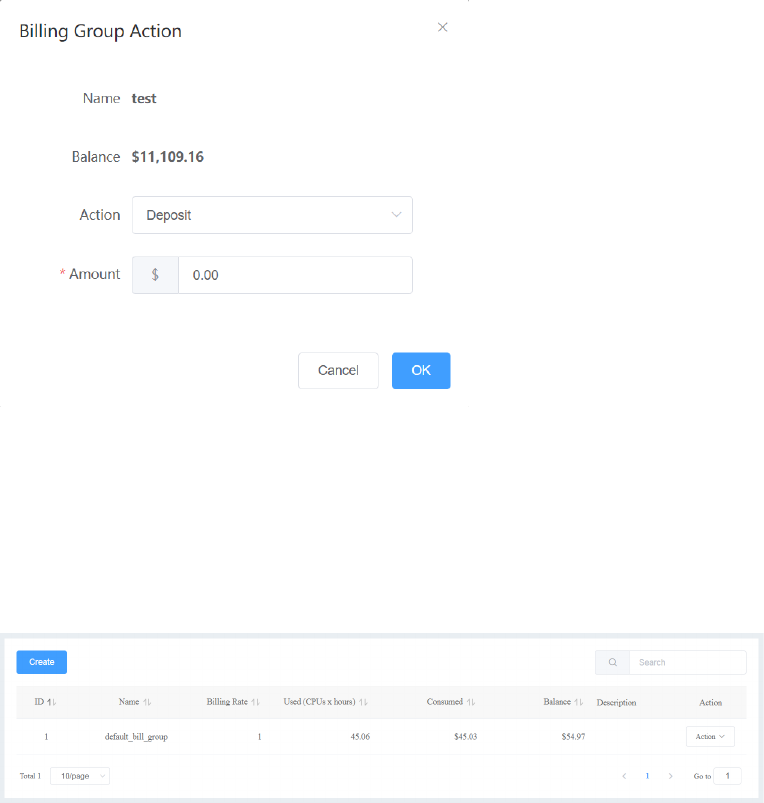
Step 3. Select the action from the Action drop-down list, and fill in the amount information.
Step 4. Click OK.
Delete a billing group
Step 1. Select User Management ➙ Billing Groups from the left navigation pane.
The Billing Groups page is displayed.
Step 2. Find the billing group you want to delete, and then select Action ➙ Delete.
The Delete Billing Group dialog is displayed.
24
LiCO 5.4.0 Administrator Guide

Step 3. Click OK.
Solutions to some user action failures
In the following circumstances, some user actions may fail:
• Network problems exist on the server nodes of a cluster.
• User groups or user accounts with identical names have been created in the operating system on the
server nodes of a cluster.
• There are inconsistencies in user group or user account information in the operating system on the server
nodes of a cluster.
• Slurm is not running properly.
Based on the failures above, use the following solutions:
1. Make sure the network connection is good, and root accounts can be accessed without a password
across all server nodes.
2. Delete all failed user groups, billing groups, and user accounts and re-create these accounts.
3. Contact Lenovo professional services for technical support.
Chapter 3. User management 25
26 LiCO 5.4.0 Administrator Guide

Chapter 4. Monitor
Select Monitor from the left navigation pane. The following sub-options are displayed:
• List View: shows detailed information about all nodes in a cluster, and allows the user to perform
corresponding actions on nodes in that cluster
• Physical View: shows detailed node information based on the physical locations of all machines in the
cluster
• Group View: shows detailed information about group nodes based on the functions of all nodes in the
cluster
• GPU View: shows the monitoring information about every GPU based on the functions of all group nodes
in the cluster
• Jobs: shows the running status of jobs currently on the cluster
• Alerts: shows the details of triggered alerts and manages the status of these alerts
• Operations: shows the logs of all action changes
List view
In the List View page, information for all nodes in a cluster is displayed in a list, as shown below:
The parameters on the List View page are described as follows:
• Host Name: host name for the node
• Status: status of the node, which can be Idle, Busy, or Off
• Power: indicates whether the power is on or off
• Type: indicate the type of the node, which can be compute, head, login, I/O, and other user-defined
nodes
• BMC IP: IP address of the head module BMC
• OS IP: IP address of the node
• Hardware: number of CPU cores on every node / the total memory on every node / the number of GPUs
on every node (if there is no GPU, then the GPU section will not appear)
• Custom Group: the group to which the node currently belongs
• Action: The actions include Remote Console, OS SSH, Boot, Boot to Setup, Boot to Network, and Boot to
Media.
© Copyright Lenovo 2018, 2019 27

Physical view
The Physical View page shows server room information, including room name and location, number of
nodes, and total power consumption, and presents a graphic view of the number of racks and the locations
of nodes, as shown below.
By clicking on a rack, the user can view detailed information about the rack, including:
• Rack name
• Rack location (related to the server room)
• Total number of nodes on a rack
• Total power consumption of a rack
By clicking on a node in a rack, the user can view detailed information on the selected node.
By clicking on the icons above a rack, the user can switch between displays of temperature, power
consumption, CPU/load, memory utilization ratios, hard drive utilization ratios, network throughput, and jobs.
Group view
In the Group View page, the information about all nodes in a cluster is sorted by logical grouping. Click on the
“Select Group” drop-down box in the top-left corner and select a group to be displayed, as shown below.
28
LiCO 5.4.0 Administrator Guide

The Group View page offers the following monitoring types:
• List: a list of all nodes in this group, which has similar functionality as “List view” on page 27
• Trend: shows the trend diagram for the group, including load, CPU, memory, hard drive, network, energy
consumption, temperature, and job use
• Heatmap: shows a heat diagram including load, CPU, memory, hard drive, network, energy consumption,
temperature, and job use for all nodes in the group
GPU view
The GPU View page shows GPU information about the nodes in a group based on the logical grouping of all
nodes in a cluster. Click the group option in the upper-left corner of GPU View, as shown below.
This interface presents real-time GPU data for the group in graphic form and allows the user to switch
between GPU usage rates, memory, and temperature. Every frame in the image represents a node, with the
name of the node written in the upper-right corner of the frame. A bar inside every frame represents a GPU,
and the blue portion of the bar represents the monitored values. An orange section at the top of the bar
means that the GPU is in use. Using the slide in the upper-right are, the user can adjust the colors of the
columns to filter and highlight GPUs in a given numerical range. Select the Color Inversion check box to the
right of the slide to switch the colors that denote values inside and outside the stated range.
Jobs
The Jobs page shows job information and status, as well as jobs running in the current cluster, as shown
below.
Chapter 4. Monitor 29

Jobs in the list can be filtered by the changing criteria at the top of the list, which include:
• Queue: You can filter the queues running in the system.
• Submit User: You can filter based on the user who submitted the job.
• Status: You can select Running, Waiting, or Completed. LiCO V5.3.0 and later versions allow you to
cancel jobs in the Running or Waiting state. To cancel a job, select Action ➙ Cancel.
• Submit Time: filters the jobs using their submission time. You can select Last 1 month, Last 3 months,
Last 6 months, or All.
Alerts
The Alerts page shows alert information for all triggered alert rules, as shown below.
30
LiCO 5.4.0 Administrator Guide

The displayed information includes:
• ID: the alert ID corresponding to the alert rule
• Name: the alert name corresponding to the alert rule
• Level: Critical, Serious, Alert, or Information
• Status: Unconfirmed, Confirmed, or Fixed
• Time: the time when the alert was triggered
• Select Date: Select the start time and end time to filter the alerts, or select 1 day, 7 days, or 30 days to
view the alerts in the specified period back from the current time.
• Node: the monitored node corresponding to the alert rule. When a GPU alert takes place, the GPU serial
number increases. For example, node1: gpu0.
• Comment: notes for the alert
• Action: Confirm, Fix, or Delete.
Alert events are classified into current events and all events. Current events include only unconfirmed events,
whereas all events include confirmed events.
Alert event information includes:
Chapter 4. Monitor 31

• Serial Number: unique ID for the alert event
• Alert Name: name corresponding to the alert strategy
• Alert Grade: grade of the corresponding alert strategy
• Status: current status of the alert: Unconfirmed, Confirmed, or Fixed
• Alert Time: the time when the alert occurred
• Alert Node: name of the node on which the alert occurred
• Notes: the administrator’s description of this alert
Alert information can be filtered by selecting criteria at the top of the page, and multiple choices can be made
for status and grade. Alert information can be filtered by time, such as last day, last three days, last week,
and last month, or by time criteria manually set with start and end dates.
The user can act on a selected node by clicking the appropriate button in the action list, or by selecting a
node and then clicking “Confirm,” “Resolve,” or “Delete.” The user can also select “Act on All” to perform the
same action on all alert messages. Actions are defined as follows:
• Confirm: applicable to unconfirmed alerts. After confirmation, a reminder for the alert will not be shown in
the upper right corner of the home page, and after action is taken, the status will be changed to
“Confirmed.”
• Fix: applicable to unconfirmed and confirmed alerts. After the administrator has handled the alert, this
action can be taken and the status will be changed to “Fixed”.
• Delete: applicable to unconfirmed, confirmed, and resolved alerts. After deletion, the alert will not be
shown on the list.
Operations
The Operations page records the actions by all users for all targets in the system, as shown below.
The operation monitoring page shows the following elements:
• Operator: operator account to which the action information belongs
• Module: the module of the action, such as user or job
• Action: specific commands for the action, such as creation or deletion
• Target: the target of the action, such as a user or node
• Time: the time when the target action occurred
32
LiCO 5.4.0 Administrator Guide
Information will be displayed at the top of the page according to the filtering criteria. Operator information
can be viewed by selecting “Operator” from the drop-down list. The “Target/Action” drop-down list allows
for the user to filter action information by targets and actions. Alert information can be filtered by time, such
as last day, last three days, last week, and last month, or by time criteria manually set with a start and end
date.
The following target/action information is recorded in action monitoring:
• User: create, update, delete
• Job: create, re-run, cancel, delete
• Node: turn on, turn off
• Alerts: confirm, fix, delete, comment
• Policy: create, update, delete
• Billing Group: create, update, delete
• Billing Account: top up, deduct
Chapter 4. Monitor 33
34 LiCO 5.4.0 Administrator Guide

Chapter 5. Reports
Reports consist of the following types:
• Job Reports: statistics and details of jobs, users, and billing groups
• Alert Reports: statistics and details of alerts
• Utilization Reports: running status, connected users, user login status, and user storage statistics for the
node
Job reports
The Job Reports page allows administrators to obtain reports on jobs.
The report filters include:
• Job Type: filters by job, user, or billing group
• Time: supports pre-defined and self-defined time periods of no longer than one year
• Filter User: filters the selected users
• Billing Group: filters the selected billing group
The preview function includes:
• Job Report Preview: supports bar graphs and tables
• User Report Preview: supports pie charts, bar graphs, and tables
• Details: Pie charts and bar graphs are the default, but users can also show data in table form. Click on the
right side of the pie chart to refresh current user/billing group job data.
• Billing group Report Preview: supports pie charts, bar graphs, and tables
The report exporting function includes:
• Content: supports the export of statistics and detailed data
• Report Format: supports Excel, PDF, and HTML
Alert reports
The Alert Reports page allows administrators to obtain reports on alerts. It supports pre-defined and self-
defined time periods of up to one year.
© Copyright Lenovo 2018, 2019 35

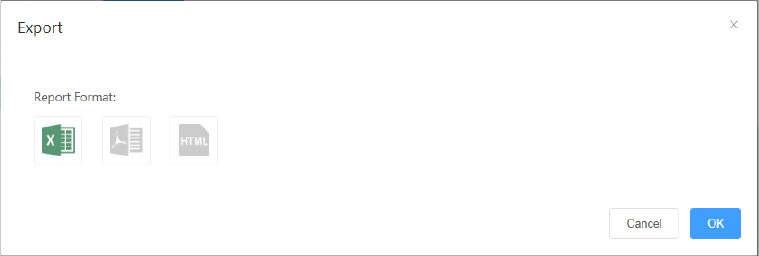
You can click Preview to directly preview alert data, which can be shown as a pie chart, bar graph, or table.
You can also click Export and set the filters in the displayed Export dialog to export alert reports, as shown
below.
The parameters in the Export dialog are described as follows:
• Content: supports the export of statistics or detailed data
• Alert level: All, Critical, Error, Warning, or Information
• Report Format: supports Excel, PDF, and HTML
Note: After setting the filters and the report format, click OK to export the report.
Utilization reports
The Utilization Reports page allows administrators to obtain reports on actions, as shown below.
The report filters include:
• Data: Data on CPU, memory, and networks.
• Filter Nodes: Filter the selected nodes.
You can click Preview to preview filtered data in a graph.
You can also click Export and set the report format in the displayed Export dialog to export action reports,
as shown below.
36
LiCO 5.4.0 Administrator Guide
38 LiCO 5.4.0 Administrator Guide

Chapter 6. Admin
After logging in, an administrator can click Admin in the left navigation pane to access Container Images,
Operation Logs, or Web Logs.
Container images
LiCO runs all AI jobs within a container. The system supports the Singularity container platform, with different
AI job templates running on different container images. Administrators can use this function to manage
system images.
Select Admin ➙ Container Images from the left navigation pane to enter the image management page.
The parameters on the Container Images page are described as follows:
• Name: self-defined image name
• Framework: frame to which the image belongs
• Type: type of the image. The value system means that the image is created by the system administrator.
• Version: self-defined image version
• Tag: self-defined image tag
• Action: action on the image, which can be Edit, View, Delete, Download, or Reupload.
Create an image
Step 1. Select Admin ➙ Container Images from the left navigation pane.
The Container Images page is displayed.
Step 2. Click Create.
The Create Image dialog is displayed.
© Copyright Lenovo 2018, 2019 39

Step 3. Filled in the required information.
• Name: self-defined image name
• Source File: image file selected, which must be a singularity image file. Otherwise, the image
will fail to be created.
• Save As: name of the image file. Ensure that there is no image file with the same name in the
storage path.
Step 4. Click OK.
Edit an image
Step 1. Select Admin ➙ Container Images from the left navigation pane.
The Container Images page is displayed.
Step 2. Find the image you want to edit, and then select Action ➙ Edit.
The Edit Image dialog is displayed.
40
LiCO 5.4.0 Administrator Guide
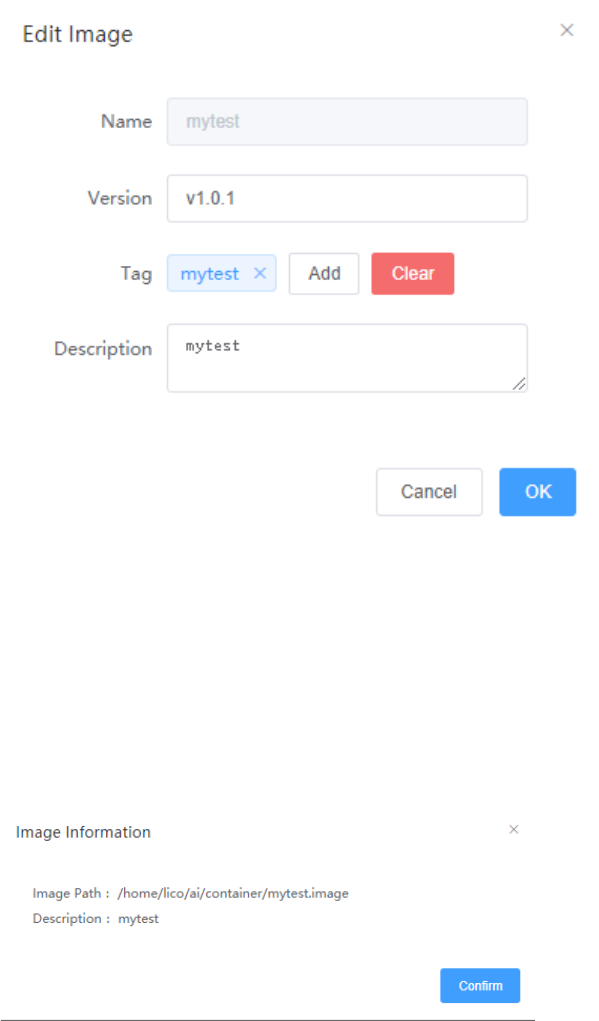
Step 3. Edit the image information as required.
Step 4. Click OK.
View an image
Step 1. Select Admin ➙ Container Images from the left navigation pane.
The Container Images page is displayed.
Step 2. Find the image for which you want to view its information, and then select Action ➙ View.
The Image Information window is displayed.
The information is described as follows:
• Image Path: absolute path of the container image. You can use this path in your job file.
• Description: description of the container image. If no description has been filled in, this
information is not displayed.
Delete an image
Step 1. Select Admin ➙ Container Images from the left navigation pane.
The Container Images page is displayed.
Step 2. Find the image you want to delete, and then select Action ➙ Delete.
Chapter 6. Admin 41

The Delete Image dialog is displayed.
Step 3. Click OK.
Download an image
Step 1. Select Admin ➙ Container Images from the left navigation pane.
The Container Images page is displayed.
Step 2. Find the image you want to download, and then select Action ➙ Download.
The Download Image dialog is displayed.
Step 3. Click Browse and then select a folder to save the container image.
Ensure that there is no image file with the same name in the storage path.
Step 4. Click OK.
Reupload an image
Step 1. Select Admin ➙ Container Images from the left navigation pane.
The Container Images page is displayed.
Step 2. Find the image you want to reupload, and then select Action ➙ Reupload.
The Reupload Image dialog is displayed.
42
LiCO 5.4.0 Administrator Guide
Step 3. Click Browse and then select a new image file you want to upload.
Step 4. Click OK.
VNC
The VNC page shows VNC session information for compute nodes in the cluster and allows users to open
the VNC.
The running of certain jobs requires VNC support. Before running the job, create a VNC session. Delete this
VNC session when the job is finished.
The following is an example of a VNC job file:
cat Job.pbs
#!/bin/bash
#PBS -N short
#PBS -q batch
#PBS -j oe
#PBS -l nodes=2:ppn=4
cd /share/users_root/user1
echo current job id is $PBS_JOBID >> /share/users_root/user1/$PBS_JOBID.log
echo job start time is `date` >> /share/users_root/user1/$PBS_JOBID.log
echo `hostname` >> /share/users_root/user1/$PBS_JOBID.log
session=`vncserver 2>&1`
sessionid=`echo "$session"| grep "^New"| awk -F ":" '{print $3}'`
echo "vncsession $sessionid is created" >> /share/users_root/user1/$PBS_JOBID.log
export DISPLAY=:$sessionid.0
./prog
vncserver -kill :$sessionid
echo job end time is `date` >> /share/users_root/user1/$PBS_JOBID.log
Note: VNC sessions can be managed using the LiCO interface and command lines.
Chapter 6. Admin 43

Manage VNC sessions on the Web
The VNC page shows all VNC sessions in real time, including the creator, node, port number, process ID, and
index of the VNC session.
To view a VNC session, select a VNC session and click Open in the Actions column.
Note: If the VNC session is locked, only the session creator can view this session.
A user should only have one VNC session per node. However, too many VNC sessions may accumulate if
VNC sessions are not deleted at the end of a job. Testing has shown that a user may have more than 20 VNC
sessions on one node, but the user may not be allowed to create a new VNC session, so unnecessary VNC
sessions should be deleted.
To delete a VNC session, click Delete in the corresponding Actions row and then click Confirm and Submit
in the dialog that pops up.
Manage VNC sessions using command lines
In a cluster node, the current user can create a session on the VNC server.
Step 1. Switch to a LiCO user through the command lines, and enter the directory /home/lico_5.x/cluster_
monitor_project.
Step 2. Start lico-vnc-slave using the following command lines below on the node that runs the VNC
server:
# service lico-vnc-slave start
Step 3. Change the IP address in /opt/lico/vnc-slave/etc/lico-vnc-slave.ini to the IP address of the
cluster head node. Based on the circumstances, this step may be necessary because otherwise
the page cannot obtain VNC information.
On a node within the cluster, the current user can only do the following:
• View VNC sessions he/she has created on VNC Server -List
• Use VNC Server -Kill to delete VNC sessions they have created
• View all VNC sessions on the node using the command ps -ef|grep Xvnc, and then delete VNC sessions
using the deletion process (use kill rather than kill-9)
The result of an action performed with the above command lines may be shown on the LiCO page. The jobs
deleted by the user via command lines will disappear from LiCO after about 30 seconds. Sessions the user
has newly created via command lines will show on the LiCO page after about 30 seconds.
44
LiCO 5.4.0 Administrator Guide

Operation logs
Log in as an administrator, and select Admin ➙ Operation Logs from the left navigation pane. The
Operation Logs page is displayed, as shown below.
To download operation logs, set the time range and click Download.
Web logs
Log in as an administrator, and select Admin ➙ Web Logs from the left navigation pane. The Web Logs
page is displayed, as shown below.
To download web logs, click Download.
Chapter 6. Admin 45
46 LiCO 5.4.0 Administrator Guide

Chapter 7. Settings
The Settings menu allows the user to manage alert rules, alert notification groups, notification adapters, and
alert triggering scripts.
After logging in as an administrator, select Settings from the left navigation pane, and then select the desired
sub-items.
Scheduler
Select Settings ➙ Scheduler from the left navigation pane.
The Scheduler page is displayed, which allows administrators to create, edit, delete queues, set queue state,
and set node state.
All actions in this section are performed on this page.
Create a queue
Step 1. Click Create on the Scheduler page.
The Create Queue dialog is displayed.
© Copyright Lenovo 2018, 2019 47

Step 2. Fill in the required information.
• Queue: self-defined queue name
• Nodes: identifies the node(s) to be associated with this queue. Multiple node names may be
specified using simple node range expressions such as "lx[10-20]". Note that a job can only be
associated with one queue at any time.
• Default: indicates whether a queue is to be used by jobs that do not have specified queues
• Priority: Jobs submitted to a higher priority queue will be dispatched before pending jobs in
lower priority queues and if possible they will preempt running jobs from lower priority queues.
Note that a queue's priority takes precedence over a job's priority. The highest priority is 65533,
while the lowest is 1.
• Max Time: The maximum running time for jobs. If the box is selected, the time is "UNLIMITED".
Otherwise, you need to input the time, the input format is "<days>-<hours>:<minutes>". For
example, "2-23:59".
• Over Subscribe: specifies whether compute resources (individual CPUs) in this queue can be
shared by multiple jobs. Possible values are "YES", "NO", "EXCLUSIVE" and "FORCE". An
optional job count specifies how many jobs can be allocated to use each resource.
• State: specifies whether jobs can be allocated nodes or queued in this queue. Possible values
are "UP" and "DOWN". The value can also be "DRAIN" or "INACTIVE" when you edit or set the
queue state.
– UP: indicates that new jobs can be added to the queue, and jobs can be allocated to nodes
and run from the queue.
– DOWN: indicates that new jobs can be added to the queue, but queued jobs cannot be
allocated to nodes and run from the queue. Jobs already running on the queue continue to
run. They must be explicitly cancelled to force their termination.
– DRAIN: indicates that no new jobs can be added to the queue (job submission requests will
be denied with an error message), but jobs already queued on the queue can be allocated to
nodes and run.
48
LiCO 5.4.0 Administrator Guide

– INACTIVE: indicates that no new job can be added to the queue, and jobs that are already in
the queue cannot be allocated to nodes or run.
Step 3. Click Submit.
Edit a queue
Step 1. Find the queue you want to edit, and then select Action ➙ Edit.
The Edit Queue dialog is displayed.
Step 2. Edit the queue information as required.
For the parameter description, see “Create a queue” on page 47.
Step 3. Click Submit.
Delete a queue
Step 1. Find the queue you want to delete, and then select Action ➙ Delete.
The Delete Queue dialog is displayed.
Chapter 7. Settings 49

Step 2. Click Submit.
Set the state of a queue
Step 1. Find the queue whose state you want to change, and then select Action ➙ Set Queue State.
The Set Queue State dialog is displayed.
Step 2. Set the state of the queue.
Step 3. Click Submit.
Set the node state
Step 1. Click Set Node State on the Scheduler page.
The Set Nodes State dialog is displayed.
Step 2. Fill in the required information.
• Nodes: one node, multiple nodes, or a node expression
• Current State: indicates the current state of the node or nodes above
• New State: the state you want to set.
Alert policy
Select Settings ➙ Alert Policy from the left navigation pane.
50
LiCO 5.4.0 Administrator Guide

The Alert Policy page allows administrators to view the alert policy for the current cluster, and add, update, or
delete alert rules, as shown below.
Create an alert policy
Step 1. Click Create in the upper-left corner of the page.
The Alert Policy dialog is displayed, as shown below.
Step 2. Fill in the alert rules.An alert policy must include the following information:
• Alert name: self-defined alert name
• Monitor: LiCO provides alert monitoring for the CPU usage rate, temperature, GPU usage rate,
GPU temperature, network status, storage usage rate, energy consumption, and hardware
problems.
Chapter 7. Settings 51

• Condition: Set an alert trigger that is larger than, smaller than, or equal to a threshold value.
• Duration: For some monitored items, set the duration of the triggering condition. The default is
60 seconds.
• Risk Level: self-defined risk level, including critical, serious, alert, and information
• Notification Group: Notify one or more groups of users after an alert policy is triggered.
• Monitoring Node: Fill in the name of the node or nodes to be monitored. If left blank, the default
is to monitor all nodes.
• Configure Script: Choose a script to run automatically after an alert is triggered.
• Notice: Turn on WeChat notifications and sound notifications.
• Status: Immediately start this alert strategy.
Step 3. Click OK.
Edit an alert policy
Step 1. Find the alert rule you want to edit, and then select Action ➙ Edit.
The Edit Policy dialog is displayed, as shown below.
Step 2. Edit the alert rules in the dialog.
Step 3. Click OK.
Delete an alert policy
Step 1. Find the alert policy you want to delete, and then select Action ➙ Delete.
The Delete Policy dialog is displayed.
52
LiCO 5.4.0 Administrator Guide

Step 2. Click OK.
Notification group
Notification groups are user groups that are notified when an alert is triggered.
Select Settings ➙ Notification Group from the left navigation pane.
The Notification Group page is displayed, which allows administrators to create, edit, and delete notification
groups.
Create a notification group
Step 1. In the upper-left corner of the Notification Group page, click Create.
The Create Notification Group dialog is displayed.
Step 2. Type the group name, e-mail addresses, and mobile numbers for the notification group.
Chapter 7. Settings 53

Step 3. Click OK.
The newly-created notification group is displayed in the list.
Edit a notification group
Step 1. Find the notification group you want to edit, and then select Action ➙ Edit.
The Edit Notification Group dialog is displayed.
Step 2. Edit the notification group information.
Step 3. Click OK.
Delete a notification group
Step 1. Find the notification group you want to delete, and then select Action ➙ Delete.
The Delete Notification Group dialog is displayed.
Step 2. Click OK.
54
LiCO 5.4.0 Administrator Guide

The notification group is deleted.
Notification
Select Settings ➙ Notification from the left navigation pane.
The Notification page is displayed, which allows administrators to manage the e-mail, SMS, and WeChat
settings for the external alert API, as shown below.
Notes:
• Turn the alert API on or off by clicking the ON or OFF buttons in the upper-right corner.
• All changes to these settings will only be saved after you click Confirm at the bottom.
• Test alert notification connections by clicking Test at the bottom of each area.
Scripts
Select Settings ➙ Scripts from the left navigation pane.
The Scripts page is displayed, which allows administrators to manage scripts for creating alerts. The scripts
displayed on the script management page have self-defined alert rules. The information displayed includes
the script name, file size, and upload time, as shown below.
Notes:
• The scripts are located in the /var/run/lico/core/scripts directory. You can change the directory in the
LiCO configuration file.
• For security reasons, this page does not support uploading, updating, or deleting scripts. These actions
should be performed using the background platform.
License
Select Settings ➙ License from the left navigation pane.
Chapter 7. Settings 55

The License page is displayed, which provides license details.
The License page provides the following information:
• License: the quantity of sockets or GPUs permitted for the licence
• Key: unique license key
• Active Time: time when the license is activated
• Service: valid service period for the license
• Customer: customer name
• Order: order number
• Region: region where the license is valid
Attention: When the cluster resources exceed the limitation of the license, do the following:
1. Contact Lenovo sales to purchase a new license.
2. Copy the license file to the /etc/lico directory and replace the existing lico.lic file.
3. Restart the LiCO service by running the following command:
systemctl restart lico
56 LiCO 5.4.0 Administrator Guide

Chapter 8. HPC cluster management
Most HPC functions may be completed using the interface. However, because HPC cluster management is
complicated, some more complex actions require command lines or other tools.
View HPC cluster details
Step 1. Select Monitor ➙ List View from the left navigation tree.
The List View page is displayed.
Step 2. View the HPC cluster information.The displayed information includes:
• Hostname: the cluster hostname
• Status: Idle, Busy, Off
• Power: On, Off
• Type: compute, management, login, I/O, and other user-defined nodes
• BMC IP: IP address of the management module XCC
• OS IP: IP address for the node
• Hardware: the number of CPU cores on every node/the total memory on every node /the total
storage on every node/the number of GPUs on every node
• Custom Group: the group to which the node currently belongs
Remote management of HPC cluster software
Interface management
On the List View page, click the “BMC IP” link in the node list to open a Lenovo XCC management module
interface and perform remote hardware management, including a remote on/off switch, a remote console,
and hardware configuration.
Type the username /password (Factory Default: USERID/PASSW0RD) to log in to the XCC management
interface.
See the XCC User Manual for details:
http://sysmgt.lenovofiles.com/help/index.jsp
© Copyright Lenovo 2018, 2019 57

Command line management
Select the required node, and click or Console to open the control panel for the selected node.
xCAT management
Log in to the management node and perform remote management using xCAT commands.
Remote on/off command rpower:
rpower <noderange> [on|onstandby|off|suspend|reset|stat|state|boot]
# rpower c[01-03],d08 reset, Restart nodes c01,c02,c03,d08
# rpower c[01-03],d08 state, View the on/off status of nodes c01,c02,c03,d08
Set Boot Order Command rsetboot:
rsetboot <noderange> [net|hd|cd|floppy|def|stat]
# rsetboot c[01-03],d08 net, Set nodes c01,c02,c03,d08 to boot from the network
Remote view of the node hardware device asset information command rinv:
Remote view of the node hardware device log information command reventlog:
58
LiCO 5.4.0 Administrator Guide

Find more command techniques using the link below:
http://sourceforge.net/p/xcat/wiki/XCAT_Commands/
Parallel commands
When using parallel commands on the SSH login head node, the following actions can be performed on
nodes in a cluster in batches:
Parallel Command PSH: PSH Use: PSH node name shell command
Node names can be represented regularly or separated by commas. For example, to run an LS command on
nodes c01,c02,c03,d08:
# psh c[01-03], d08 ls
Parallel File Copying PSCP: PSCP Use: PSCP source file node name:/target directory
Node names can be represented regularly or separated by commas. For example, to copy the data.txt file
from the computer to the c01,c02,c03,d08 directories:
# pscp data.txt c[01-03], d08:/opt
Job scheduling commands
LiCO supports lifecycle actions such as uploading files, or submitting, cancelling, re-running, and deleting
jobs. See the LiCO User Manual.
The administrator may use command lines to perform more complicated scheduling management jobs.
Chapter 8. HPC cluster management 59

Queue commands
Queue management includes viewing, creating, and modifying queues. In queue management, the current
user needs to log in to the head node and utilize Slurm scheduler command lines.
SSH Login for the Head Node:
• View the queue:
[root@mgt /]# sinfo
• Create a queue:
1. Modify the Slurm configuration file /etc/slurm/slurm.conf, and add the following content:
PartitionName=test Nodes=headnode, computenode1 Default=YES MaxTime=INFINITE State=UP
2. Restart Slurm-related services:
– On the management node:
[root@mgt /]# systemctl restart slurmctld
– On the compute node:
[root@mgt /]# systemctl restart slurmd
After completing the steps above, the newly-created queue can be viewed on the interface.
The queue may be modified by changing the configuration file /etc/slurm/slurm.conf. The steps are the same
as those for queue creation. View the queue parameters via scontrol show partition.
For more queue management commands, refer to
http://slurm.schedmd.com/.
Job management
Job management can be performed on the LiCO interface. An administrator can view and act on a job by
giving commands to the scheduler.
SSH Login to Head Node:
• View job status:
[root@mgt /]# squeue -a
JOBID PARTITION NAME USER ST TIME NODES NODELIST(REASON)
428 compute zhangtes testuser R 5:19 1 testcomputenode01
429 compute zhangtes testuser R 4:49 1 testcomputenode01
430 compute mnist-pa ls-test R 4:37 1 testcomputenode01
• View detailed job status:
[root@mgt /]# scontrol show jobs
• Use jobid to view the detailed status of a certain job:
[root@mgt /]# scontrol show jobs 428
• Use jobid to cancel a job running or in the queue:
[root@mgt /]# scancel 428
For more job management commands, refer to http://slurm.schedmd.com/.
60
LiCO 5.4.0 Administrator Guide
62 LiCO 5.4.0 Administrator Guide

Appendix A. Important information
Restart LiCO
If LiCO do not work normally, restart it.
• Stop Service:
[root@mgt lico_5.x]# systemctl stop lico
• Start Service:
[root@mgt lico_5.x]# systemctl start lico
• View LiCO Status:
[root@mgt lico_5.x]# systemctl status lico
When LiCO starts normally, the screen shows the following information:
[root@mgt lico_5.x]# systemctl status lico
lico.service - lenovo hpc project
Loaded: loaded (/usr/lib/systemd/system/lico.service; disabled; vendor preset: disabled)
Active: active (running) since Thu 2017-11-02 16:48:05 CST; 3h 59min ago
Main PID: 381046 (lico)
Ports used by LiCO
LiCO needs to allocate ports of compute nodes to some AI jobs, and the port range is defined in the job-
manager.ini file in the /etc/lico/ directory. You can change the port range by editing the value of port_range
in the job-manager.ini file mentioned above, and this change will take effect by restarting the lico-job-
manager service.
Resolve a failed job submission
The failure to submit a job on the LiCO interface may be caused by a poorly-configured Slurm scheduler. To
check the cause of the failure, try the following suggestions:
• Use SSH to log in to the management node and re-submit the job using command lines: "cd" to the
current user directory, find the job file, submit the job through sbatch jobfile.slurm, and then check to see
which error message is returned. Resource limits may have been exceeded. For example, the job needs
100 cores, but there are only 80 in the cluster.
• Run the Slurm command sinfo on the head node and view the compute node status and resource status
for the cluster.
If sinfo returns no results, no nodes have been added to the scheduling node. Open /etc/slurm/slurm.conf
and add a compute node using the following format:
NodeName=nodename CPUs=cores State=node status
Following the addition, restarting the Slurm service at the head node may be required for the addition to take
effect.
[root@mgt lico_5.x]# sysemctl restart slurmctld
© Copyright Lenovo 2018, 2019
63

If sinfo shows that some nodes are down, check whether Slurm services have been started on the down
nodes.
[root@mgt lico_5.x]# systemctl status slurmd
Run Slurm command ssccoonnttrrooll sshhooww ppaarrttiittiioonn on the management node to view the queue settings.
Manage user import using command lines
Parameters for creating a user
Required parameters:
• -u username: requires the username
• -r {user,operator,admin}: specifies the user role
Optional parameters:
• -b billgroup: specifies the billing group for the user. This group name must already exist.
LiCO user management actions
LiCO user management actions include the following:
• user_import
• user_export
• user_changerole
• user_resume
Batch deletion of jobs in the database
After LiCO has been running for a long period, jobs accumulate. Jobs can be deleted through the Manage
interface, but if you want to delete jobs in batches, they can be deleted from the database directly. LiCO uses
postgresql as a database. The database is on the management node and the database name is postgres.
The corresponding job table is webconsole_job. You can use a visualization tool, and use command lines
similar to those below to delete unnecessary jobs from the database.
>psql –h 127.0.0.1 –U postgres –d lico
lico=#select * from scheduler_job
lico-#\g
lico=#delete from scheduler_job where id < 3
lico-# \g
lico-# \q
Failure to view or delete a VNC
You can restart LiCO if you fail to view a VNC session on the LiCO page.
If you fail to delete a VNC session on the LiCO page, log in to the VNC session node, view the process
number of the VNC session to be deleted with the command ps -ef|grep Xvnc, and delete the VNC session
using the deletion process. Use kkiillll rather than kkiillll--99 when deleting a session. Information on the LiCO page
will update after about 30 seconds.
64
LiCO 5.4.0 Administrator Guide

Data sources for GPU monitoring
LiCO can only monitor GPUs produced by NVIDIA. Monitoring data (including GPU usage rates, memory,
temperature, and usage status) is obtained through the official NVIDIA API.
To check GPU monitoring data on the node’s operating system, run nnvviiddiiaa--ssmmii on the command line to
check.
Clean up jobs submitted through accounts not managed by LiCO
In some special cases, some customers use accounts that are not managed by LiCO to submit jobs. Under
such circumstances, there are many empty job records in the system, which are in queuing state and cannot
be deleted through the web interface. If this occurs, log in to your system service node as the root user and
restart LiCO. After LiCO restarts, the state of these empty jobs is automatically set to completed, and there is
no impact on system running.
MPI issues troubleshooting
When running an Open MPI program, the following error might be displayed:
WARNING: Open MPI accepted a TCP connection from what appears to be a another Open MPI process
but cannot find a corresponding process entry for that peer.
If the TCP connection is ignored, the Open MPI program might not be executed properly.
When the Open MPI program uses the unroutable USB NICs, whose name might be “enp0s20f0u1u6” or
similar under RedHat/CentOS 7, this warning might be displayed. Select one of the following workarounds to
resolve this issue:
• Disable the USB NICs on all nodes by running the following command:
psh all ifconfig enp0s20f0u1u6 down
Note: This step might interrupt the running Lenovo management tools, such as OneCLI. When you want
to use OneCLI, enable the NICs for a while.
• Instruct Open MPI to ignore the NICs by running the following command:
mpirun --mca btl_tcp_if_exclude enp0s20f0u1u6
Note: It is recommended to create the custom system-wide MPI templates.
• Permanently disable USB NICs by running the following command:
rmmod cdc_ether
Note: This step might permanently disable OneCLI and other Lenovo management tools.
Notices and trademarks
Notices
Lenovo may not offer the products, services, or features discussed in this document in all countries. Consult
your local Lenovo representative for information on the products and services currently available in your
area. Any reference to a Lenovo product, program, or service is not intended to state or imply that only that
Lenovo product, program, or service may be used. Any functionally equivalent product, program, or service
Appendix A. Important information 65
that does not infringe any Lenovo intellectual property right may be used instead. However, it is the user's
responsibility to evaluate and verify the operation of any other product, program, or service.
Lenovo may have patents or pending patent programs covering subject matter described in this document.
The furnishing of this document does not give you any license to these patents. You can send license
inquiries, in writing, to:
Lenovo (United States), Inc.
1009 Think Place - Building One
Morrisville, NC 27560
U.S.A.
Attention: Lenovo Director of Licensing
LENOVO PROVIDES THIS PUBLICATION "AS IS" WITHOUT WARRANTY OF ANY KIND, EITHER EXPRESS
OR IMPLIED, INCLUDING, BUT NOT LIMITED TO, THE IMPLIED WARRANTIES OF NON-INFRINGEMENT,
MERCHANTABILITY OR FITNESS FOR A PARTICULAR PURPOSE. Some jurisdictions do not allow
disclaimer of express or implied warranties in certain transactions, therefore, this statement may not apply to
you.
Changes are made periodically to the information herein; these changes will be incorporated in new editions
of the publication. To provide better service, Lenovo reserves the right to improve and/or modify the
products and software programs described in the manuals included with your computer, and the content of
the manual, at any time without additional notice.
The software interface and function and hardware configuration described in the manuals included with your
computer might not match exactly the actual configuration of the computer that you purchase. For the
configuration of the product, refer to the related contract (if any) or product packing list, or consult the
distributor for the product sales. Lenovo may use or distribute any of the information you supply in any way it
believes appropriate without incurring any obligation to you.
The products described in this document are not intended for use in implantation or other life support
applications where malfunction may result in injury or death to persons. The information contained in this
document does not affect or change Lenovo product specifications or warranties. Nothing in this document
shall operate as an express or implied license or indemnity under the intellectual property rights of Lenovo or
third parties. All information contained in this document was obtained in specific environments and is
presented as an illustration. The result obtained in other operating environments may vary.
Lenovo may use or distribute any of the information you supply in any way it believes appropriate without
incurring any obligation to you.
Any references in this publication to non-Lenovo Web sites are provided for convenience only and do not in
any manner serve as an endorsement of those Web sites. The materials at those Web sites are not part of the
materials for this Lenovo product, and use of those Web sites is at your own risk.
Any performance data contained herein was determined in a controlled environment. Therefore, the result
obtained in other operating environments may vary significantly. Some measurements may have been made
on development-level systems and there is no guarantee that these measurements will be the same on
generally available systems. Furthermore, some measurements may have been estimated through
extrapolation. Actual results may vary. Users of this document should verify the applicable data for their
specific environment.
This document is copyrighted by Lenovo and is not covered by any open source license, including any Linux
agreement(s) which may accompany software included with this product. Lenovo may update this document
at any time without notice.
66
LiCO 5.4.0 Administrator Guide

For the latest information or any questions or comments, contact or visit the Lenovo Web site:
https://support.lenovo.com
Trademarks
LENOVO, LENOVO logo, THINKPAD, THINKPAD logo, TRACKPOINT, ULTRACONNECT, and Yoga are
trademarks of Lenovo. Microsoft, Windows, Direct3D, BitLocker, and Cortana are trademarks of the
Microsoft group of companies. Ubuntu is a registered trademark of Canonical Ltd. The terms HDMI and
HDMI High-Definition Multimedia Interface are trademarks or registered trademarks of HDMI Licensing LLC
in the United States and other countries. Wi-Fi, Wi-Fi Alliance, and Miracast are registered trademarks of Wi-
Fi Alliance. USB-C is a trademark of USB Implementers Forum. All other trademarks are the property of their
respective owners. © 2018 Lenovo.
Appendix A. Important information 67
