
This document contains proprietary information that is protected by copyright and other intellectual
property laws. No part of this document may be reproduced, translated, or modified without the
prior written consent of QAD Inc. The information contained in this document is subject to change
without notice.
QAD Inc. provides this material as is and makes no warranty of any kind, expressed or implied,
including, but not limited to, the implied warranties of merchantability and fitness for a particular
purpose. QAD Inc. shall not be liable for errors contained herein or for incidental or consequential
damages (including lost profits) in connection with the furnishing, performance, or use of this
material whether based on warranty, contract, or other legal theory.
This document contains trademarks owned by QAD Inc. and other companies.
Copyright © 2021 by QAD Inc.
UI_Admin_AG_v2021EE.pdf/sti/sti
QAD Inc.
100 Innovation Place
Santa Barbara, California 93108
Phone (805) 566-6000
https://www.qad.com
Contents
QAD .NET UI Administration
Change Summary . . . . . . . . . . . . . . . . . . . . . . . . . . . . . . . . . . . . . . . . . .vii
Chapter 1 Introduction to QAD .NET UI Administration . . . . . . . . . .1
QAD .NET UI Administration . . . . . . . . . . . . . . . . . . . . . . . . . . . . . . . . . . . . . . . 2
Configuration Environments . . . . . . . . . . . . . . . . . . . . . . . . . . . . . . . . . . . . . . . . . 2
Configurable Screens . . . . . . . . . . . . . . . . . . . . . . . . . . . . . . . . . . . . . . . . . . . . . . 2
Chapter 2 Administration Features and Functions . . . . . . . . . . . . . .3
Configuring User Features . . . . . . . . . . . . . . . . . . . . . . . . . . . . . . . . . . . . . . . . . . 4
Monitoring User Sessions . . . . . . . . . . . . . . . . . . . . . . . . . . . . . . . . . . . . 4
Active Directory Authentication . . . . . . . . . . . . . . . . . . . . . . . . . . . . . . . 4
Configuring Default Client Folder Name . . . . . . . . . . . . . . . . . . . . . . . . 4
Shortcut Options . . . . . . . . . . . . . . . . . . . . . . . . . . . . . . . . . . . . . . . . . . . 5
E-mail Action Options . . . . . . . . . . . . . . . . . . . . . . . . . . . . . . . . . . . . . . . 6
Configuring Menus, Programs, and Workspaces . . . . . . . . . . . . . . . . . . . . . . . . . 6
Using Menu System Maintenance . . . . . . . . . . . . . . . . . . . . . . . . . . . . . . 6
Defining Program Information . . . . . . . . . . . . . . . . . . . . . . . . . . . . . . . . 8
Domain/Workspaces Configuration . . . . . . . . . . . . . . . . . . . . . . . . . . . . . 9
Configuring Lookups for Multiple Return Values . . . . . . . . . . . . . . . . . 10
Program Message Color and Font Options . . . . . . . . . . . . . . . . . . . . . . 11
Configuring Toolbar Colors . . . . . . . . . . . . . . . . . . . . . . . . . . . . . . . . . . 11
Configuring Menu Images . . . . . . . . . . . . . . . . . . . . . . . . . . . . . . . . . . . 11
Browse Performance Controls . . . . . . . . . . . . . . . . . . . . . . . . . . . . . . . . . . . . . . 13
Disabling Browse Total Count Thread . . . . . . . . . . . . . . . . . . . . . . . . . 14
Browse Timeout . . . . . . . . . . . . . . . . . . . . . . . . . . . . . . . . . . . . . . . . . . . 14
Browse Initial Database Query Suppression . . . . . . . . . . . . . . . . . . . . . 14
Browse Performance Controls in AIA Environments . . . . . . . . . . . . . . 15
Request Timeouts in AIA Environments . . . . . . . . . . . . . . . . . . . . . . . . 16
Defining Menu Collections . . . . . . . . . . . . . . . . . . . . . . . . . . . . . . . . . . . . . . . . . 16
Defining Browse Collections . . . . . . . . . . . . . . . . . . . . . . . . . . . . . . . . . . . . . . . 17
Configuring Dashboards . . . . . . . . . . . . . . . . . . . . . . . . . . . . . . . . . . . . . . . . . . . 21
Changing the Number of Panels Allowed in a Dashboard . . . . . . . . . . 21
Copying Dashboards Between Systems . . . . . . . . . . . . . . . . . . . . . . . . . 21
Identifying Files Associated with Specific Dashboards . . . . . . . . . . . . 22

iv QAD .NET User Interface Administration Guide
Questions? Visit community.qad.com
Dashboard Settings in client-session.xml File . . . . . . . . . . . . . . . . . . . . 22
Configuring Business Intelligence (BI) Portal for Dashboards . . . . . . . 23
Attachment Maintenance . . . . . . . . . . . . . . . . . . . . . . . . . . . . . . . . . . . . . . . . . . 23
Using Attachment Maintenance . . . . . . . . . . . . . . . . . . . . . . . . . . . . . . . 24
Enabling Attachments . . . . . . . . . . . . . . . . . . . . . . . . . . . . . . . . . . . . . . 26
Adding Attachments . . . . . . . . . . . . . . . . . . . . . . . . . . . . . . . . . . . . . . . 26
Automatic Attachment Areas . . . . . . . . . . . . . . . . . . . . . . . . . . . . . . . . . 28
Attachment Storage . . . . . . . . . . . . . . . . . . . . . . . . . . . . . . . . . . . . . . . . 29
Adding Links to Application Help . . . . . . . . . . . . . . . . . . . . . . . . . . . . . . . . . . . 29
Enabling QAD Guide Me . . . . . . . . . . . . . . . . . . . . . . . . . . . . . . . . . . . . . . . . . . 29
Connection Manager Access . . . . . . . . . . . . . . . . . . . . . . . . . . . . . . . . . . . . . . . . 31
Using the Connection Manager . . . . . . . . . . . . . . . . . . . . . . . . . . . . . . . 32
Functions Menu . . . . . . . . . . . . . . . . . . . . . . . . . . . . . . . . . . . . . . . . . . . 33
Connections Menu . . . . . . . . . . . . . . . . . . . . . . . . . . . . . . . . . . . . . . . . . 34
Users Menu . . . . . . . . . . . . . . . . . . . . . . . . . . . . . . . . . . . . . . . . . . . . . . 35
Using QAD Shell URL (qadsh:// protocol) . . . . . . . . . . . . . . . . . . . . . . . . . . . . . 35
Heartbeat URLs for Load Balancing . . . . . . . . . . . . . . . . . . . . . . . . . . . . . . . . . 38
Enhancing Reports . . . . . . . . . . . . . . . . . . . . . . . . . . . . . . . . . . . . . . . . . . . . . . . 38
Configuring Multiple Language Support for Terminal Client . . . . . . . . . . . . . . 41
Configuring Terminal Script Parameters . . . . . . . . . . . . . . . . . . . . . . . . . . . . . . 42
Configuring Terminal Encoding By Domain . . . . . . . . . . . . . . . . . . . . . . . . . . . 43
Defining Custom Key Mappings . . . . . . . . . . . . . . . . . . . . . . . . . . . . . . . . . . . . 43
Process Map Configuration . . . . . . . . . . . . . . . . . . . . . . . . . . . . . . . . . . . . . . . . . 45
Process Map Configuration Settings . . . . . . . . . . . . . . . . . . . . . . . . . . . 45
Process Map Storage and Multiple Language Support . . . . . . . . . . . . . 45
Viewing Process Maps with QAD Shell URL . . . . . . . . . . . . . . . . . . . . 46
Regional Display Setting Control . . . . . . . . . . . . . . . . . . . . . . . . . . . . . . . . . . . . 47
Chapter 3 Configuring System Environments . . . . . . . . . . . . . . . . .49
Multiple Instance and Environment Recommendations . . . . . . . . . . . . . . . . . . . 50
Configuration Storage Directories . . . . . . . . . . . . . . . . . . . . . . . . . . . . . . . . . . . 50
Browse Collection Storage . . . . . . . . . . . . . . . . . . . . . . . . . . . . . . . . . . 50
Menu Collection Storage . . . . . . . . . . . . . . . . . . . . . . . . . . . . . . . . . . . . 50
Favorites Storage . . . . . . . . . . . . . . . . . . . . . . . . . . . . . . . . . . . . . . . . . . 50
Attachments Storage . . . . . . . . . . . . . . . . . . . . . . . . . . . . . . . . . . . . . . . 50
Document Attachment Applications Maintenance and QAD Web UI . 53
Configuration Files . . . . . . . . . . . . . . . . . . . . . . . . . . . . . . . . . . . . . . . . . . . . . . . 53
Client Bootstrap Configuration File . . . . . . . . . . . . . . . . . . . . . . . . . . . . . . . . . . 55
File Usage . . . . . . . . . . . . . . . . . . . . . . . . . . . . . . . . . . . . . . . . . . . . . . . 55
File Format . . . . . . . . . . . . . . . . . . . . . . . . . . . . . . . . . . . . . . . . . . . . . . . 55
File Elements . . . . . . . . . . . . . . . . . . . . . . . . . . . . . . . . . . . . . . . . . . . . . 55
Client Session Configuration File . . . . . . . . . . . . . . . . . . . . . . . . . . . . . . . . . . . . 57
File Usage . . . . . . . . . . . . . . . . . . . . . . . . . . . . . . . . . . . . . . . . . . . . . . . 57

Contents v
Comments? Go to goo.gl/MfwKHm
File Format . . . . . . . . . . . . . . . . . . . . . . . . . . . . . . . . . . . . . . . . . . . . . . . 57
File Elements . . . . . . . . . . . . . . . . . . . . . . . . . . . . . . . . . . . . . . . . . . . . . 57
Menu Extension Configuration File . . . . . . . . . . . . . . . . . . . . . . . . . . . . . . . . . . 64
File Usage . . . . . . . . . . . . . . . . . . . . . . . . . . . . . . . . . . . . . . . . . . . . . . . 64
File Format . . . . . . . . . . . . . . . . . . . . . . . . . . . . . . . . . . . . . . . . . . . . . . . 64
File Elements . . . . . . . . . . . . . . . . . . . . . . . . . . . . . . . . . . . . . . . . . . . . . 64
Setting Menu Extension Security . . . . . . . . . . . . . . . . . . . . . . . . . . . . . . 77
Defining Labels . . . . . . . . . . . . . . . . . . . . . . . . . . . . . . . . . . . . . . . . . . . 78
Adding URIs as Shell Menu Items . . . . . . . . . . . . . . . . . . . . . . . . . . . . 78
Adding Process Maps . . . . . . . . . . . . . . . . . . . . . . . . . . . . . . . . . . . . . . 79
Chapter 4 Configurable Screens . . . . . . . . . . . . . . . . . . . . . . . . . . . .81
Using Configurable Screens . . . . . . . . . . . . . . . . . . . . . . . . . . . . . . . . . . . . . . . . 82
Assigning Configurable Screen Templates . . . . . . . . . . . . . . . . . . . . . . . . . . . . . 83
Impact of System Changes to Configurable Screens . . . . . . . . . . . . . . . . . . . . . 83
Configurable Screen Error Handling . . . . . . . . . . . . . . . . . . . . . . . . . . . . . . . . . 84
Resolving Configurable Screen UI Template Conflicts . . . . . . . . . . . . . . . . . . . 84
Setting up Configurable Screens . . . . . . . . . . . . . . . . . . . . . . . . . . . . . . . . . . . . . 84
Setting Up Configurable Screens in Enterprise Edition . . . . . . . . . . . . 85
Designing a Template . . . . . . . . . . . . . . . . . . . . . . . . . . . . . . . . . . . . . . . . . . . . . 85
Creating a Template . . . . . . . . . . . . . . . . . . . . . . . . . . . . . . . . . . . . . . . . . . . . . . 86
Configuring Program Screens . . . . . . . . . . . . . . . . . . . . . . . . . . . . . . . . . . . . . . . 87
Adding Fields and Frames . . . . . . . . . . . . . . . . . . . . . . . . . . . . . . . . . . . . . . . . . 90
Adding New Fields and Tables to Programs . . . . . . . . . . . . . . . . . . . . . 90
Adding Available Fields to Screens . . . . . . . . . . . . . . . . . . . . . . . . . . . . 91
Editing Field Properties . . . . . . . . . . . . . . . . . . . . . . . . . . . . . . . . . . . . . 91
Adding New Frames to Screens . . . . . . . . . . . . . . . . . . . . . . . . . . . . . . . 92
Adding Lookups to a User-Defined Field . . . . . . . . . . . . . . . . . . . . . . . 94
Using New Fields in Character Code . . . . . . . . . . . . . . . . . . . . . . . . . . . 94
Restricting Configurable Screens by Domain . . . . . . . . . . . . . . . . . . . . . . . . . . . 96
Configurable Screens Report . . . . . . . . . . . . . . . . . . . . . . . . . . . . . . . . . . . . . . . 96
Product Information Resources . . . . . . . . . . . . . . . . . . . . . . . . . . . . . .99
Index. . . . . . . . . . . . . . . . . . . . . . . . . . . . . . . . . . . . . . . . . . . . . . . . . . . .101


QAD .NET UI Administration
Change Summary
Product Name Changes
Starting in September 2019, the new name for QAD’s complete portfolio of products is QAD
Adaptive Applications. Additionally, QAD Adaptive ERP is the new name for QAD’s flagship
ERP solution. QAD Adaptive ERP includes the functionality previously associated with QAD
Cloud ERP and QAD Enterprise Applications - Enterprise Edition, plus the QAD Enterprise
Platform and Adaptive UX which resulted from the Channel Islands program. Going forward, the
terms QAD Enterprise Applications, QAD Cloud ERP, and Channel Islands will be deprecated but
will remain in previous documentation and training materials. QAD’s intention is to—as soon as
possible—eliminate the use of the deprecated terms going forward.
Change Summary
The following table summarizes changes to this document.
Date/Version Description Reference
September 2021EE Rebranded for 2021 EE --
September 2020EE Rebranded for 2020 EE --
September 2019EE Rebranded for 2019 EE --
June 2019/2018EE Revised to remove obsolete chapter from table of contents --
September 2018EE Rebranded for 2018 EE --
Updated Active Directory Authentication section to indicate only
server-side is supported.
page 4
Removed Security chapter. This information is covered in more detail
in the Security Administration Guide.
--
September 2017EE Rebranded for 2017 EE --
March 2016EE Added new topic on using Document Attachment Applications
Maintenance in the Channel Islands UI
page 53
March 2015EE Moved Security Configuration to Security and Controls User Guide
March 2014EE Added Security Configuration chapter page 99
Other updates and corrections Throughout
September 2013/2013.1EE Added Browse Initial Database Query Suppression topic page 14
Added Configuring Dashboards topic page 21
Added Configuring Terminal Script Parameters topic page 42
Updated Process Map Configuration topic page 45
Other updates and corrections Throughout

viii QAD .NET User Interface Administration Guide
Questions? Visit community.qad.com
March 2013 EE Updates and corrections
September 2012/2012.1EE Updates and corrections
June 2012/2012SE Updates and corrections
March 2012/2012 EE Updates and corrections
Added topic on e-mail action options page 6
Provided samples of menu images page 11
September 2011/2011.1 EE Rebranded for QAD 2011.1 EE
Date/Version Description Reference
Chapter 1
Introduction to QAD .NET UI
Administration
The QAD .NET User Interface (UI) provides a common framework for multiple QAD
applications. This framework is based on Microsoft .NET technology, and incorporates familiar UI
standards, reducing the need for users to learn how to navigate QAD applications.
The QAD .NET UI is the common interface for both Standard Edition, the core QAD solutions
suite, and Enterprise Edition, which offers all of the core Standard Edition capabilities as well as
enhancements and new features in a number of other areas. This guide describes how to use the
many QAD
.NET UI maintenance functions to administer the QAD .NET UI, how to customize
the interface for your own business requirements, and how to maintain the most commonly used
configuration files. This chapter contains the following sections:
QAD .NET UI Administration 2
Discusses the maintenance features and utilities for the QAD .NET UI interface and programs.
Configuration Environments 2
Lists the configuration files used to customize interface features and functions.
Configurable Screens 2
Discusses the Configurable Screens customization function for non-component based programs.

2 QAD .NET User Interface Administration Guide
Questions? Visit community.qad.com
QAD .NET UI Administration
The QAD .NET UI contains a range of maintenance programs and utilities that let you customize
programs and the interface itself for specific requirements. These include programs to:
• Monitor user sessions
• Configure menus, programs, and workspaces
• Define menu and browse collections
• Add links to program help and enable the Guide Me feature
• Use the QAD Shell Interface
See “Administration Features and Functions” on page 3.
Configuration Environments
Many of the interface features are controlled using the system configuration files:
• client-session.xml
• client-bootstrap.xml
• plugin-menus.xml
These files also control program parameters and timings, and enable and disable application
menus as required.
See “Configuration Files” on page 53.
Configurable Screens
The programs within the QAD .NET UI are fully customizable, and the Configurable Screens
function lets you add or remove fields and frames from the application screen using user-defined
templates. Once you have designed your template, you apply the template to enable your changes.
The template system ensures that individual customizations can be applied without impacting the
core application code.
See “Configurable Screens” on page 81.
Chapter 2
Administration Features and
Functions
This section provides information for system administrators on how to use the administration
features and functions to configure and customize the QAD
.NET User Interface.
This section covers the following topics:
Configuring User Features 4
Configuring Menus, Programs, and Workspaces 6
Browse Performance Controls 13
Defining Menu Collections 16
Defining Browse Collections 17
Configuring Dashboards 21
Attachment Maintenance 23
Adding Links to Application Help 29
Enabling QAD Guide Me 29
Connection Manager Access 31
Using QAD Shell URL (qadsh:// protocol) 35
Heartbeat URLs for Load Balancing 38
Enhancing Reports 38
Configuring Multiple Language Support for Terminal Client 41
Configuring Terminal Script Parameters 42
Configuring Terminal Encoding By Domain 43
Defining Custom Key Mappings 43
Process Map Configuration 45
Regional Display Setting Control 47

4 QAD .NET User Interface Administration Guide
Questions? Visit community.qad.com
Configuring User Features
The following sections describe user configuration features.
Monitoring User Sessions
Use Session Master Maintenance (36.4.22) to view information about users who are currently
logged in to the system through the QAD
.NET UI. This information displays in the form of
session records, each identified by a unique session ID that is generated by the system. (You can
identify your current session ID by selecting Help|View Configuration and viewing the Session
ID.) A session record is automatically created when a user successfully logs in to the system from
the QAD
.NET UI and is deleted when the user logs out.
Only some of the settings displayed on this screen apply to the QAD .NET UI sessions. You can
ignore the following: Active Web, Number of Records, Security Profile, Active Telnet, Menu
Substitution, and Context ID. The session context detail displays information about the current
workspace (domain). One user session can be associated with multiple contexts if programs have
been activated in more than one workspace. You can also monitor the status of sessions for
maintenance programs, reports, and inquiries using Connection Manager.
Active Directory Authentication
For information on Active Directory authentication, refer to the Security Administration Guide.
Note As of the QAD Enterprise Applications — Enterprise Edition 2018 release, client-side
Active Directory authentication is no longer supported. Only server-side Active Directory
authentication is supported.
Configuring Default Client Folder Name
By default, the QAD .NET UI client download is installed in a folder named C:\Program
Files\QAD\QAD Enterprise Applications Version
, where Version is the version of the
product. Typically, this is the appropriate folder to use for client installations. If you prefer,
however, you can change
Version to a different value by modifying the options.js file on the
Home Server in the
TomcatInstallDir/webapps/qadhome/client directory. For example,
for QAD Enterprise Applications 2011- Enterprise Edition,
options.js includes:
var Vers=" 2011 EE"
With this setting, the QAD .NET UI client will be installed to C:\Program Files\QAD\QAD
Enterprise Applications 2011 EE
by default. However, if you change options.js to:
var Vers=" 2011 Special"
The QAD .NET UI client will be installed to C:\Program Files\QAD\QAD Enterprise
Applications 2011 Special
by default.

Administration Features and Functions 5
Comments? Go to goo.gl/MfwKHm
Shortcut Options
You can add startup options to the QAD .NET UI shortcut on your desktop:
1 Right-click the shortcut icon for the QAD .NET UI on your desktop.
2 Select the Shortcut tab in the Properties dialog.
3 You can now add options to the command in the Target field. By default, Target will have:
"C:\Program Files\QAD\QAD Enterprise Applications 2011 EE\QAD.Applications.exe"
4 You can add options, such as specifying the default user ID as “abc”, password as “123”, and
configuration as “test”:
"C:\Program Files\QAD\QAD Enterprise Applications 2011 EE\QAD.Applications.exe"
-user:abc -password:123 -config-name:test
The following options are available:
Option Description
-user
Specifies the user ID, as entered on the Login window’s User field. You
must also specify the user’s password (if not specified, the -user setting is
ignored).
-password
Specifies the password for the user, as entered on the Login window’s
Password field. Use with caution.
-config-name Specifies the environment configuration name, as entered on the Login
window’s Log on to field.
-workspace
Specifies the name of the workspace you want to be in after you log in.
-guideme Specifies whether Guide Me is enabled (-guideme.enabled:true or -
guideme.enabled:false).
-log-level
Specifies the logging level or turns it off (-log-level:off).
-log-file
Specifies the location of the log file if you do not want to use the default
location, which is %APPDATA%/QAD/shell.
-enable
Specifies a plugin to enable ( -enable:qad.plugin.example).
-param.url:file
Specifies the location of a local file that contains the options.
-param.url:http
Specifies the URL of a file that contains the options.
You can put these options in a file on your machine and reference them from the Target setting.
Here is an example where the settings are in a file
C:/params.pf:
"C:\Program Files\QAD\QAD Enterprise Applications 2011 EE\QAD.Applications.exe" -
param.url:file:///c:/params.pf
The params.pf file is a simple text file that contains:
-config-name:test
-user:mfg
-password:(blank)
Instead of locating the file on a local drive, you can locate it on the network, accessible from a
URL. For example:
"C:\Program Files\QAD\QAD Enterprise Applications 2011 EE\QAD.Applications.exe" -
param.url:http://hostname/.../params.pf

6 QAD .NET User Interface Administration Guide
Questions? Visit community.qad.com
E-mail Action Options
The Action/Email feature in programs running in Desktop mode allows you to create an e-mail
with a QAD Shell URI (
qadsh://) to a Desktop program. Prior to QAD .NET UI 2.9.5, there was
an inconsistency in this feature because different e-mail clients handle the QAD Shell URI
differently, some recognizing it and allowing the e-mail recipient to launch the link and some not
recognizing it and instead requiring the recipient to copy the link and paste it into a web browser.
Starting with QAD .NET UI 2.9.5, options are available to:
• Allow an administrator to set (using client-session.xml) whether they want the QAD
Shell URI to be used directly (which is and has been the default) or if they want to wrap this
QAD Shell URI in an HTTP URI (
http://), which is more widely recognized by e-mail
clients.
• Provide an option to turn on or off the inclusion of the full URI in the email. (By default two
links are put in the email; the first is the program label that links to the URI and the second is
the full URI. This option controls the second link.)
• Provide an option to create the link as text instead of HTML (for e-mail clients or settings that
are text based).
These options are controlled by the following settings, which can be added to client-session.xml:
<EmailAction.UseHTTP>true</EmailAction.UseHTTP>
When set to true, the HTTP URI is used in the e-mail. When false, the direct QAD Shell
URI is used.
<EmailAction.IncludeURI>true</EmailAction.IncludeURI>
When set to true, the full URI is added as a link in the e-mail. When set to false, it is not
included.
<EmailAction.UseText>true</EmailAction.UseText>
When set to true, the link will be text. When set to false, the link will be HTML.
Configuring Menus, Programs, and Workspaces
Using Menu System Maintenance
With Menu System Maintenance (36.4.4), you can assign menu labels and execution files (such as
programs) to menu numbers. When users type the menu number, either in the QAD
.NET UI’s
Menu Search field in the application area or in the character UI, the execution file runs. If you
want to move a menu item’s location in the menu system, or have it run a different execution file,
you can make those changes using Menu System Maintenance.
Understanding the Menu System
The menu system controls what displays when a user logs in. It is designed like a product
structure, recorded as single-level relationships between a parent menu item and a child item. At
the top level in the character UI, the parent item is the Main Menu (Menu 0).
Note The menu groups represented by the folders in the QAD .NET UI are referenced through
the letter A. For example A.1 is Sales, A.2 is Manufacturing and so on.
Administration Features and Functions 7
Comments? Go to goo.gl/MfwKHm
At lower levels, the parent item is a submenu such as the Call Management Menu (11.1) or an
executable function.
Menus are stored in a table indexed by language ID. Each user has a default language. When a user
logs on, the system determines the user language and displays menu text in that language.
As a user moves through menus and make
s selections, the Execution File specified in Menu
System Maintenance controls the function or submenu that displays.
QAD applications are delivered with all of
fered menus and functions. You can remove menus for
programs that you do not use by either taking them off the menu or controlling them with menu
security.
Note It is easier to update your software releases if menus are not modified. Instead, use menu
security for functions you do not use. In the character UI, you can set up User Menus for
commonly used menus and functions. In the QAD .NET UI, each user can define a personal menu
su
bsystem of commonly used functions using the Favorites feature.
Configuring the Menu System
Note
Menu System Maintenance changes might be lost during software updates when menus are
reloaded.
Important Menus are cached in memory when you log in to the system. You must log out and log
in again to see any changes made with this program. In addition, if you add menu items, you must
grant access to them before anyone can see them.
In the QAD .NET UI, when you first start Men
u System Maintenance, you must first specify the
language to which the changes apply.
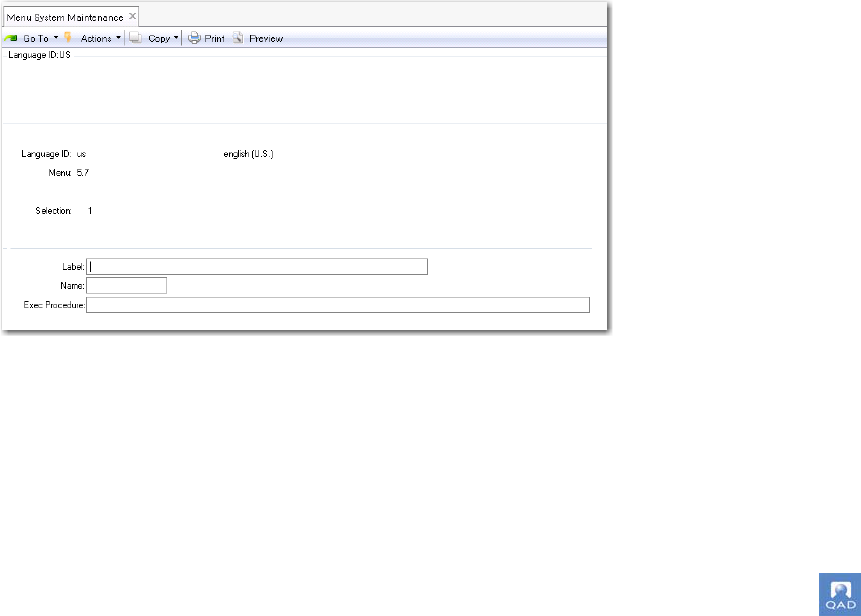
Fig. 2.1
Menu System Maintenance Settings
Language. Specify the language code to which the changes will apply.
As you modify or create a menu item, complete the following fields:
Menu. Specifies the code that places the menu item within the hierarchy of the menu system.
Note that the menu groups represented by folders in the QAD .NET UI are referenced through
the letter
A. For example, A.1 is Distribution, A.2 is Manufacturing, and so on.

8 QAD .NET User Interface Administration Guide
Questions? Visit community.qad.com
Selection. Specifies the code that, together with the menu code, identifies the menu item
number. For example, for Purchase Approvals Maintenance, Menu is 5.1 and Selection 1,
resulting in a menu item number of 5.1.1. If you enter 5.1.1 in the application pane’s Menu
Search field, you will get Purchase Approvals Maintenance.
Label. Specifies the menu label associated with the menu item. For example, the default menu
label for the execution file sosomt.p is Sales Order Maintenance.
Name. Specifies a shortcut name for the menu item, so that rather than entering the full
program name or number, users can just enter the shortcut to access the menu item.
Exec Procedure. Specifies the execution procedure. For example, sosomt.p is the execution
file for Sales Order Maintenance. The execution procedure can be one of the following:
• A menu number such as 1.1
•
A Progress program such as sosomt.p
•
A component-based function specified in the form of a uniform resource name (URN)
such as
urn:cbf:BCreditor.Modify
•
A process map specified in the form of a URN such as
urn:pmap:IndustryProcessLevel1
• A browse collection specified in the form of a URN such as
urn:collection:fcb4af10-e778-4db5-9461-766f5b7e2891
To delete a menu item, click the Delete icon at the t
op of the screen.
To save the changes you have made so far
, click the Save icon at the top of the screen.
Defining Program Information
The program information table contains a record for each menu-level program, defining
characteristics that affect the way it runs. Each program in the QAD .NET UI must have a record
bo
th in Menu System Maintenance (36.4.4) and in Program Information Maintenance (36.3.21.1).
In addition to menu-level Desktop programs, lookups must be defined in order for the look-up icon
to display next to a field in an Desktop screen.
Note Reports created using the Report Resource Designer do not require an entry in Program
Information Maintenance.
Program information records are loaded
with other default data during system installation and can
be viewed in Program Information Maintenance or Program Information Browse (36.3.21.2). You
must manually create records for any custom programs that you want users to be able to access
from the QAD .NET UI.
The following table lists the default settings for dif
ferent program types.
Program Type Web Logic Implemented Type
Browses, lookups Yes Blank
Special Desktop programs such as Browse
Maintenance and Kanban workbenches
Yes Blank
Desktop reports and inquiries No Desktop
Desktop maintenance programs No Desktop

Administration Features and Functions 9
Comments? Go to goo.gl/MfwKHm
The Multi Domain field indicates a program that updates data that applies to all domains in a
database. When this is set to Yes, the string All Domains displays in the Menu Properties window
for the associated menu program. Otherwise, the domain name displays.
Appropriate default settings for the Multi Domain field are set during installation. For example,
generalized codes apply to each domain separately so Multi Domain is set to No by default for
Generalized Codes Maintenance (36.2.13). Country codes apply to the database as a whole so
Multi Domain is set to Yes by default for Country Code Maintenance (2.14.1).
You can update the setting for your custom programs or change it if you want the current working
domain to continue to display even when a user is updating a table that applies across domains.
This change affects what displays on the UI only. The program continues to update data for all
domains.
Adding Records
To execute a program from the QAD .NET UI menus, add a record to Program Information
Maintenance for each custom program.
If you want to create records for a number of programs at once, use Program Information Update
(36.3.21.23.18) to scan them and automatically create records.
To create program information records:
1 Enter a custom program name.
2 Indicate if this program updates data for all domains in the database.
3 Click Next to continue.
4 Set Web Logic Implemented to Yes if this is a browse written according to QAD standards. Set
Web Logic Implemented to No if this is a maintenance program, report, or inquiry.
5 Leave the Type field blank for a browse. Specify Desktop for a maintenance program, report,
or inquiry.
Adding Records Automatically for Custom Programs
Use Program Information Update (36.3.21.23.18) to automatically add records for custom
programs to Program Information Maintenance. Use this utility as an alternative to adding records
manually. It is especially useful for initially populating records with referenced tables.
Domain/Workspaces Configuration
With the introduction of Enterprise Financials, workspaces are partitioned by domain and entity.
This has a dramatic impact on the number of workspaces, the amount of memory used, usability
and migration. For this reason, you can configure the behavior of workspaces in your system using
two configuration settings in the
client-session.xml file:
• Workspace.Provider
This setting controls the type of plugin used to display workspaces. It has two options:
• QAD.Plugin.Services.DomainWorkspaceProvider

10 QAD .NET User Interface Administration Guide
Questions? Visit community.qad.com
This option displays one workspace per domain.
• QAD.Plugin.Services.DomainEntityWorkspace
Provider
QAD.Plugin.Services.DomainEntityWorkspace
Provider displays one workspace per domain and entity
• Workspace.Format
This setting lets you customize the workspace display name. The following variables have
been defined to allow flexible naming.
db-name
domain-name
domain-id
currency
entity-name
entity-id
culture-name
Example
QAD.Plugin.Services.DomainWorkspaceProvider = ${domain-name}
QAD.Plugin.Services.DomainEntityWorkspaceProvider = ${domain-id} ${domain-name}
[${currency}] ${entity-id} > ${entity-name}
-->
<Workspace.Format>${domain-id} ${domain-name} [${currency}] > ${entity-id} ${entity-
name}</Workspace.Format>
Configuring Lookups for Multiple Return Values
The majority of field lookups in Character mode return one value to the calling field. However a
number of fields return values to several screen fields. You can now provide this functionality for
QAD
.NET UI screens.
This can be accomplished by editing the lookupreturnfields.xml file, which is stored in
tomcat/webapps/<appname>/net/lookups/.
The format of each entry is as follows:
<program name="<program name>" screenid="<frame:field>" lookupfield="<lookup field>">
<returnvalue screenfield="<screen field>" fieldinlookup="<field in lookup>"/>
</program>
<program name> is the menu-level program name.
<frame:field> is a combination (separated by a colon) of the frame name and the first
enabled field on that frame.
<lookup field> is the name of the field that the lookup is attached to. Use Ctrl+F to view
the name of the field.
<screen field> is the name of the field that the lookup should return data to. Use Ctrl+F to
view the name of the field.
<field in lookup> is the field in the lookup that the data will be returned from. It can be
determined by running the lookup, right-clicking on the column of the data you are interested
in returning, and selecting Properties.
If you require more than one additional return value, add another <returnvalue> element with
the appropriate attributes.

Administration Features and Functions 11
Comments? Go to goo.gl/MfwKHm
Once you have added your data into the XML document, save it, close down the QAD .NET UI,
and then restart the application.
The lookupreturnfields.xml file contains a number of examples of the above format.
If the QAD .NET UI version is 2.8 or greater running on QAD Enterprise Applications SE SP10
and above or QAD Enterprise Applications EE SP5 and above, you can also enable this feature
using Drill-Down/Lookup Maintenance (36.4.8.1), which has additional fields that provide this
functionality.
Program Message Color and Font Options
You can specify the color and font of program messages by setting the Message Color and
Message Font options available in Tools|Options. Note that Message Color and Message Font
apply to the messages automatically displayed by programs. (Message Color and Message Font
options do not apply to workflow messages: these settings apply only to program messages.)
Configuring Toolbar Colors
You can configure QAD .NET UI client toolbar colors in the client session configuration file
(
client-session.xml) file. The toolbar colors can vary based on the workspace, which gives
you a helpful way of reminding users that they have changed environments or workspaces. For
example, you might use red to indicate a test environment and silver to indicate a production
environment.
To set the primary toolbar color, use <Workspace.DefaultToolBarColor>, specifying the
color as RGB values:
<Workspace.DefaultToolBarColor>233,233,233</Workspace.DefaultToolBarColor>
To set the secondary toolbar color, use <Workspace.DefaultToolBarColor2>, specifying the
color as RGB values:
<Workspace.DefaultToolBarColor2>233,233,233</Workspace.DefaultToolBarColor2>
You can specify individual workspaces to have different toolbar colors based on the workspace ID,
which typically has the format
domain-id.entity_id. For example:
<Workspace.workspaceid1.ToolBarColor>Silver</Workspace.workspaceid1.ToolBarColor>
<Workspace.workspaceid1.ToolBarColor2>LightGray</Workspace.workspaceid1.ToolBarColor2>
<Workspace.workspaceid2.ToolBarColor>LightGray</Workspace.workspaceid2.ToolBarColor>
<Workspace.workspaceid2.ToolBarColor2>Silver</Workspace.workspaceid2.ToolBarColor2>
Configuring Menu Images
The menu items listed in the left-hand Applications panel include small (16 x 16 pixels) icons to
indicate the type of menu item. Process maps, maintenance programs, browses, reports, and
collections all have default icons, but you can now include your own custom icons. Custom icons
should be the same size as the default icons (16 x 16 pixels) and accessible from some URL path
that you specify in the client session configuration file (
client-session.xml) file.
The images are as follows:

ProcessMap.png
Maint.png
Browse.png
Report.png
Report-new.png
Group.png
12 QAD .NET User Interface Administration Guide
Questions? Visit community.qad.com
By default, the following statements in the client session configuration file (client-
session.xml
) file specify the default images for process maps, maintenance programs, browses,
reports, and collections:
<Menu>
<Image name="process">ProcessMap.png</Image>
<Image name="maint">Maint.png</Image>
<Image name="browse">Browse.png</Image>
<Image name="report">Report.png</Image>
<Image name="qrfreport">Report-new.png</Image>
<Image name="collection">Group.png</Image>
</Menu>
These statements specify which images to use for the menu items. The name attribute maps to the
Image field in Program Information Maintenance. The
name attribute must be in lower-case.
If you would like to use dif
ferent images for the process, maint, browse, report, or
collection menu items, you can specify a different file along with a URL to where you have
located the file. For example, the following specifies
NewMaint.png, located in
http://url_path/, to be the image file for maint (maintenance program) menu items:
<Menu>
...
<Image name="maint">http://url_path/NewMaint.png</Image>
...
<Menu>
If you have a custom menu item type, you can define an image for it as follows, where custom is
what you have specified in Program Information Maintenance’s Image field:
<Menu>
<Image name="process">ProcessMap.png</Image>
<Image name="maint">Maint.png</Image>
<Image name="browse">Browse.png</Image>
<Image name="report">Report.png</Image>
<Image name="qrfreport">Report-new.png</Image>
<Image name="collection">Group.png</Image>
<Image name="custom">http://url_
path/custom.png</Image>

Administration Features and Functions 13
Comments? Go to goo.gl/MfwKHm
</Menu>
Note Custom images should be 16 x 16 pixels.
Browse Performance Controls
If not developed carefully, custom browses can cause performance issues. If custom browses are
causing performance issues, you can configure the system to identify those browses, send
warnings to the Message Inbox, and cancel the browses after a specified time.
Canceling the browses after a specified time prevents long-running browse queries from adversely
affecting application server performance, which can affect all the users of the system. You can
have the system identify, report, and eventually cancel long-running browses. You can alert
administrators that a performance problem could be developing by having the system periodically
send messages to the Messages Inbox. The browse name and query conditions are included in the
messages to help administrators identify problematic browses and their user-specified conditions.
In general, performance issues can often center around just a few browses. To track particular
types of browses, you can use regular expressions to specify the names of the browses you want to
monitor and possibly cancel after some specified time. To configure the system to identify, report,
and cancel such browses, use the following settings in the client session configuration file
(
client-session.xml):
<NotifyRole> indicates which role (or group) of users gets notified on any browse alert.
Notification is sent to the Messages Inbox.
<NotifyEmail> specifies a comma-separated list of e-mail addresses to which browse alerts
will be sent.
For example:
<NotifyEmail>[email protected],[email protected]</NotifyEmail>
(The SMTP elements in this file need to be configured for your SMTP server for this setting to
work.)
<timeout browseId="browse_name" warnAt="interval" cancelAfter=
"interval"/>
specifies a browse performance warning or cancelation, where:
browseId specifies a browse ID. The browse ID is the first two letters of the browse name,
followed by the number (without the
br or .p in the browse name). For example, the browse
ID of Item Browse (
ppbr100.p) is pp100. You can also enter a regular expression. For
example,
pp* specifies all browses whose browse IDs start with pp. The default is blank.
warnAt specifies the interval in minutes for sending warning messages to users in the
<NotifyRole> role (or group). The warning messages can alert administrators that a
performance problem could be developing because of a long-running browse query. The
messages include the browse name and the query conditions entered by the user.
cancelAfter specifies the minutes after which the browse will be canceled, with 0
specifying no cancellation.
Use warnAt and cancelAfter to have the system report warnings up to some time after which
the browse is canceled automatically. For instance, in
<timeout browseId="pp*" warnAt=
"2" cancelAfter="10"/>,
the system reports warnings every two minutes for all browses
running whose names start with
pp. After ten minutes, those browses are canceled.

14 QAD .NET User Interface Administration Guide
Questions? Visit community.qad.com
The following is an example of settings in client-session.xml:
<Browse>
<Notification>
...
<NotifyRole>qadadmin</NotifyRole>
<timeout browseId="" warnAt="2" cancelAfter="3"/>
<timeout browseId="ppbr100.p" warnAt="2" cancelAfter="5"/>
<timeout browseId="so*" warnAt="2" cancelAfter="5"/>
...
</Notification>
</Browse>
By default, the settings are not active; they are included as comments in client-session.xml.
To use the settings, remove the comment markers (
<!-- ... -->) and edit the default values.
Disabling Browse Total Count Thread
The <MaximumBrowseRecordsToCount> configuration setting in the client session
configuration file (
client-session.xml) limits the total count of records for browses, which
controls excessive database server load if the query corresponds to a large set of records. (The
default is 50,000 records.)
However, counting the records can also have a performance impact. Generally, the greater the
number of records that satisfy the query, the longer it takes for the count to complete. In some
cases, the count operation can pose such a demand on system resources that disabling it might be
warranted. Custom browses (defined using Browse Maintenance) can include pre- and post-
processor logic that can cause the total count thread to impact performance, since the logic would
have to be executed across the entire data set to count the records properly. In such cases, you can
either change the logic of the custom browses or disable the total count thread for the system.
To disable the total count thread, set <MaximumBrowseRecordsToCount> to a value less than or
equal to zero (for instance, 0 or -1).
Browse Timeout
The browse timeout feature provides a mechanism to set the timeout on a browse “get all records”
request to a single value with a
<TreatGetAllAsOneRequest> setting in the client-
session.xml
configuration file. The “get all records” request is actually a series of requests to
the server. Setting the parameter to false will treat each request separately for timeout. Setting the
parameter to true will use one timer for the set of requests. Suppose the timeout value is 5 minutes
and 3 calls are made, each taking 4 minutes. A false setting would not time out, as no single
request exceeds 5 minutes. A true setting will time out on the second request, as the 5 minutes is
used up.
Browse Initial Database Query Suppression
By default, browses run with an initial database query, which can cause performance issues with
some browses. To improve performance, you can configure whether browses run with an initial
database query. You can suppress the initial query for all browses or just specified browses. If you
suppress all browses, you can then specify exceptions, allowing only specified browses to run with

Administration Features and Functions 15
Comments? Go to goo.gl/MfwKHm
an initial database query. To configure the system, use the following settings in the client session
configuration file (
client-session.xml):
<Browse>
<!-- Browse specific override -->
<override>
<suppressinitialload>
<!-- To suppress browse launch for specific browses
enter the browseid in the suppressinitialload section.
Use "*" to suppress all
-->
<!--
<id>pp100</id>
<id>gp340</id>
-->
</suppressinitialload>
<doinitialload>
<!-- If "*" used above, allow specific browses to load -->
<!--
<id>mg003</id>
-->
</doinitialload>
</override>
</Browse>
In <suppressinitialload>, list the IDs of browses whose initial database query you want to
suppress or use an asterisk (
*) to suppress the initial database query of all browses. If you suppress
all, you can then specify exceptions in
<doinitialload>, where you list the IDs of browses that
you want to run with an initial database query.
Examples
To suppress all browses:
<suppressinitialload>
<all id="*"/>
</suppressinitialload>
To suppress Item Browse (pp100) and Sales Order Browse (so009):
<suppressinitialload>
<id>pp100</id>
<id>so009</id>
</suppressinitialload>
To suppress all browses except Item Browse (pp100), Sales Order Browse (so009), and Supplier
View (BCreditor.View):
<suppressinitialload>
<all id="*"/>
</suppressinitialload>
<doinitialload>
<do id="pp100"/>
<do id="so009"/>
<do id="BCreditor.View"/>
</doinitialload>
Browse Performance Controls in AIA Environments
The browse performance controls, which enable the system to identify, report, and cancel long-
running browses, work for environments using AIA. This feature requires that QAD Enterprise
Applications be using Progress 10.2B.

16 QAD .NET User Interface Administration Guide
Questions? Visit community.qad.com
Request Timeouts in AIA Environments
The browse performance controls apply in AIA environments, but for other types of requests in
AIA environments, you can configure the AIA timeout setting in the client-session.xml
files’s <AppServer>...<Timeout> setting (in seconds). The default setting of 0 directs the
system to use the Progress default, which is 100 seconds.
Defining Menu Collections
You can define collections of menu items such as programs, browses, process maps, and
dashboards using Menu Collection Maintenance. You can place menu collections in any folder in
the Applications pane. The default location for menu collections is the Menu Collections folder,
and you can use drag and drop to place the collection in any other menu.
Fig. 2.2
Menu Collection Maintenance
Note Menu Collection Maintenance is only available if you have access to the Administration
menu.
To define a menu collection:
1 Choose Administration|Menu Collection Maintenance.
2 In the Name field, enter a name for the menu collection. The Name field drop-down sorts
collections alphabetically and a scrollbar displays for long lists of collections. Additionally,
collections starting with the letters you enter in the Name field are listed automatically.
3 In the Location field, if you want to place the menu collection in a particular menu, drag-and-
drop the menu folder from the Applications area to the Location field. This replaces the Menu
Collections default location with the new menu folder. If you leave the field blank, the new
menu collection is placed in the Menu Collections folder (In Collections).

Administration Features and Functions 17
Comments? Go to goo.gl/MfwKHm
Fig. 2.3
Changing Default Location
4 In the Items box, drag-and-drop one or more menu items from the Applications area to the
Items box. These are the items that will be in the menu collection.
5 Click Save.
To edit a menu collection:
1 Right-click on the menu collection and choose Edit, or choose Administration|Menu
Collection Maintenance.
2 In the Name field, use the drop-down menu to select the name of the menu collection you want
to edit.
3 To change the placement of the menu collection, drag-and-drop a menu folder from the
Applications area to the Location field. The menu collection now moves from its current
location to the menu folder you drag-and-drop to the Location field.
4 To change the order of a menu item in the collection’s Items box, click on a menu item in
Items and use the up and down arrow buttons located next to the box.
5 To delete a menu item from the collection, in the Item box, click on a menu item and press the
Delete key on your keyboard.
6 Click Save.
To delete a menu collection:
1 Right-click the menu collection and choose Delete. Alternatively, choose Administration|
Menu Collection Maintenance.
2 In the Name field, use the drop-down menu to select the name of the menu collection you want
to delete, and click the Delete icon.
Defining Browse Collections
To help you browse and maintain related item, site, sales, location, and customer data, you can
define collections of related browse and maintenance programs using Browse Collection
Maintenance.

18 QAD .NET User Interface Administration Guide
Questions? Visit community.qad.com
Fig. 2.4
Browse Collection Maintenance
Note Browse Collection Maintenance is only available if you have access to the Administration
menu.
In a browse collection, a main browse drives the fields selected
in the other browses and programs.
The QAD .NET UI displays the other browses and programs in the lower part
of a horizontal split-
screen, with the main browse located in the upper part. For example, you could define a browse
collection called Sales that includes a Sales Order browse with a Site browse, Customer browse,
and Sales Order Maintenance program.
If you click on a record in Sale
s Order, the associated browses and Sales Order Maintenance
program automatically have the data for that order entered. You can just click on the Customer tab
to see the information on the customer for that order, or click on the Sales Order Maintenance tab
to see the sales order.
Using Browse Collection Maintenance
, you can define your own browse collections that you can
then save under Favorites.There is no limit to the number of programs and browses you can
include in a Browse Collection. However, when defining the collection, you should consider that a
large collection takes longer to display on the screen, and there may be a performance issue if it is
to be in constant use by a large number of users. In this case, you should consider multiple smaller
collections.
Browse collections are stored by default in the Collections folder in the
Applications area. When
you right-click the Collection name and select Design, you can open the collection directly in
Browse Collection Maintenance. This option lets you modify collection properties from the
desktop without having to run the maintenance program.

Administration Features and Functions 19
Comments? Go to goo.gl/MfwKHm
Fig. 2.5
Browse Collection Design Option
To define browse collections:
1 Select Administration|Browse Collection Maintenance.
2 To start a new collection, click the New button. (To edit an existing program group, click
Load.)
3 In the Name field, enter a name for the browse collection.
You can specify a label term as a name for the browse collection
. The advantage of doing this
is that you can use a label term whose associated description has been translated into a
supported language. To find an existing label term, open Label Master Browse (36.4.17.2). To
quickly find a label term you might want to use, use the browse’s Search function. For
example, if you want to find a label term that includes
Item, set the Search fields to Term
contains Item
and click Search.
In the browse, the Term column lists the label terms that include
Item and the Long Label
column displays the associated descriptions. Next, in Browse Collection Maintenance’s Name
field, enter the label term in the format
${Term}.
For example, if the label term is
ALL_ITEMS, enter ${ALL_ITEMS} in the Name field. After
the browse collection is saved, in the Applications Pane, the browse collection name takes the
description associated with the
ALL_ITEMS label term.
If the
${Term} name is not converted immediately to the label term’s description, log out and
log back in again to refresh the Application Pane’s display.
4 In the Location field, if you want to place the browse collection in a menu folder other than the
Collections default menu, drag-and-drop a menu folder from the Applications area to the
Location field. The new menu replaces Collections as the collection location. If you leave the
field blank, the new menu collection is placed in the Browse Collections folder (in
Collections).
Note Placing the collection into a menu folder is often used to restrict access of the collection
to particular user groups. Only users who have access to the menu folder will see the collection
on their menus. Use Menu Security Maintenance (36.3.10, Standard Edition) and Role
Permissions Maintain (36.3.6.6, Enterprise Edition) to define permissions for menus.
5 Drag-and-drop the browse you want to use as the parent browse from the Application area to
the gray area in the Browse Collection Maintenance screen.

20 QAD .NET User Interface Administration Guide
Questions? Visit community.qad.com
6 For example, drag Sales Order Browse from the Applications area to the gray area in Browse
Collections Maintenance. Sales Order Browse is now the parent browse in the browse
collection.
Note The parent browse must contain some data or you will not be able to add child browses
and create a browse collection.
7 Next, you add child browses to the parent browse. You can either drag-and-drop browses from
the Applications area or click the Add Browse button.
8 For example, you can drag-and-drop Customer Address Browse from the Applications pane.
9 In the gray area, click on the name of the browse you have just added as a child browse. For
example, click on Customer Address Browse as displayed in the gray area under Sales Order
Browse.
10 Next, use the table with the Target Field and Source Field columns to specify the relationship
between the parent browse and the child browse.
11 The Target Field column includes the fields that can be driven by whatever source fields you
want to select.
12 To select a source field, go to the appropriate source field cell and select a field from the pull-
down menu, which lists all the available fields from the browse you first selected. Note that
programs allow only one field to be the target. For example, for Customer Address Browse,
the Target Field can be Customer and the corresponding Source Field can be Sold-To.
13 Now the data displayed in the child browse will be driven by the current row in the parent
browse.
You can also drive URLs from browses.
1 Select Customer Browse and click the Web Browser button.
2 In the Title field, enter Google Address Search. In the URL field, enter:
http://maps.google.com/maps?q=#b#ad_zip#e#
Now Customer Address Browse automatically drives a Google Maps query.
3 If you decide you want to remove one of the browses or programs, select the browse or
program and click the Delete button just above the gray area.
4 To preview the collection, click Preview.
5 To save the program group as a favorite, click Save. The system prompts you to name the
browse collection. The browse collection definition is saved as an XML file on your local
machine where you are running the QAD
.NET UI.
Adding Browse State Data
You can add state data (for example, charts or summaries) to a browse. When you then drill down
by right-clicking on the browse running inside Collection Maintenance, the system saves that state
with the collection. This also means that you can create child drill-downs in the running browse
instance in this screen, rather than having to use the collection maintenance UI to add a child
program. This also means that you can deploy browses with state to the menu using Collection
Maintenance.

Administration Features and Functions 21
Comments? Go to goo.gl/MfwKHm
Configuring Dashboards
Dashboards bring together browses, web pages, business intelligence, and metrics within panels.
Each panel offers a quick summary; to find out more, you click on the panel. As a user, you can
create, edit, and delete dashboards directly in the QAD
.NET UI. To create a new dashboard, you
open Create Dashboard and then add content. You can also copy and edit an existing dashboard.
As an administrator, you can also do the following:
• Change the number of panels allowed in a dashboard.
• Copy dashboards between systems.
• Identify the data files associated with each dashboard.
• Set dashboard characteristics in the client session configuration file (client-
session.xml
).
• Configure access to the BI portal so you can include BI panels on dashboards.
Changing the Number of Panels Allowed in a Dashboard
By default, a dashboard can include up to 12 panels. As a system administrator, you can change the
default setting of 12 to some other number by editing the MaxPanels setting in the
client-
session.xml
file on the home server:
<!-- Maximum number of panels allowed in a Dashboard. Set to zero for unlimited. -->
<MaxPanels>12</MaxPanels>
Copying Dashboards Between Systems
Dashboard definitions are saved on the server in XML files. The XML files are located in user-
data directories and in the system-level directory: dashboards created by users are stored in the
user-data dashboard directories, while system-level dashboards (such as published dashboards and
those downloaded from the QAD Store and installed on your system) are stored in the system-level
dashboard directory. The XML files use a naming convention based on a key identifier (for
example,
7c430916-1494-475e-b5a1-18f574e9708d.xml).
User-data Directories
Dashboard definitions for each user are saved on the server in XML files in the user-data
dashboard storage directory:
TomcatInstallationDirectory/webapps/qadhome/configurations/EnvironmentName/storage/user-
data/UserName/dashboards
System-level Directory
Dashboard definitions for the system can be placed in the system-level storage directory:
TomcatInstallationDirectory/webapps/qadhome/configurations/EnvironmentName/storage/dash-
boards

22 QAD .NET User Interface Administration Guide
Questions? Visit community.qad.com
Copying the Dashboard Definitions
To copy dashboard definitions from one system to another, go to the various dashboards storage
directories and copy the
.xml files from there to the dashboard directories of the other system.
Note that the dashboard definitions can reference browses and metrics, so you also need to copy
any referenced browse definitions and metric definitions not on the destination system.
Within a given system, the dashboard definition XML file names must be unique. For instance, if
an XML file in a user-data dashboard directory has the same filename as a file in the system-level
dashboard directory, the QAD
.NET UI will not open properly.
Identifying Files Associated with Specific Dashboards
The XML files use a naming convention based on a unique key (for example, 7c430916-1494-
475e-b5a1-18f574e9708d.xml
). To find out which file is associated with which dashboard on
the QAD
.NET UI, from the QAD .NET UI menu, right-click on a dashboard menu item and
choose Properties. In the General tab, the Key field indicates the unique key, with a DB_ prefix
(for example: DB_7c430916-1494-475e-b5a1-18f574e9708d). You can then identify the filename
associated with the dashboard. Note that if the dashboard was created by some user, the dashboard
will be located in that user’s user-data directory rather than in the system-level directory.
Dashboard Settings in client-session.xml File
The dashboard settings section in the client session configuration file (client-session.xml)
include:
<!-- Dashboard options-->
<Dashboard>
<!-- Comma separated list of roles with administration privileges
These users can manipulate system level dashboard templates -->
<AdminRoles>superuser,qadadmin</AdminRoles>
<Padding>10</Padding>
<!-- Maximum number of panels allowed in a Dashboard. Set to zero for unlimited. -->
<MaxPanels>12</MaxPanels>
<!-- Provider specific panel strip colors -->
<ProviderColors>
<QAD.OPMetrics.dashboard.OpMetricsDashboard>0xc0,0x39,0x2b</QAD.OPMetrics.dash-
board.OpMetricsDashboard>
<QAD.RolePage.UrlRoleTarget>0x8e,0x44,0xad</QAD.RolePage.UrlRoleTarget>
<QAD.Plugin.BI.DashboardProvider>0x27,0xae,0x60</QAD.Plugin.BI.DashboardProvider>
<QAD.Browse.dashboard.BrowseDashboardTarget>0xf3,0x9c,0x12</QAD.Browse.dash-
board.BrowseDashboardTarget>
</ProviderColors>
</Dashboard>
<AdminRoles>
Specifies a comma-separated list of roles with dashboard administration privileges. A dashboard
administrator can associate dashboards with roles, publish dashboards, and edit or delete published
dashboards.
In this example, the superuser and qadadmin roles have dashboard administration privileges:
<AdminRoles>superuser,qadadmin</AdminRoles>
<Padding>
Specifies the spacing between panels in pixels.

Administration Features and Functions 23
Comments? Go to goo.gl/MfwKHm
Example:
<Padding>10</Padding>
<MaxPanels>
Specifies the maximum number of panels allowed on a dashboard.
Example:
<MaxPanels>12</MaxPanels>
<ProviderColors>
Specifies the border colors for different types (browses, metrics, etc.) of panels in RGB Hex
values. Under <ProviderColors>, we have settings for each type of panel content. The default
settings for each type of panel are as follows:
Type Setting Default Color RGB Hex Value
Browses <QAD.Browse.dashboard.BrowseDashboardT
arget> Orange (#F39C12) 0xf3,0x9c,0x12
Operational Metrics <QAD.OPMetrics.dashboard.OpMetricsDashboar
d> Red (#C0392B) 0xc0,0x39,0x2b
Web Pages <QAD.RolePage.UrlRoleTarget> Purple (#8E44AD) 0x8e,0x44,0xad
BI <QAD.Plugin.BI.DashboardProvider> Green (#27AE60) 0x27,0xae,0x60
Example:
<QAD.OPMetrics.dashboard.OpMetricsDashboard>0xc0,0x39,0x2b</QAD.OPMetrics.dash-
board.OpMetricsDashboard>
<QAD.RolePage.UrlRoleTarget>0x8e,0x44,0xad</QAD.RolePage.UrlRoleTarget>
<QAD.Plugin.BI.DashboardProvider>0x27,0xae,0x60</QAD.Plugin.BI.DashboardProvider>
<QAD.Browse.dashboard.BrowseDashboardTarget>0xf3,0x9c,0x12</QAD.Browse.dash-
board.BrowseDashboardTarget>
Configuring Business Intelligence (BI) Portal for Dashboards
If you have the QAD Business Intelligence (BI) portal, you need to specify the URLfor accessing
BI in the client session configuration (client-session.xml) file’s
<BI.Dashboard.URL> setting so that the QAD .NET UI can locate and access the BI portal.
The
BI portal must be accessible for the availability of BI panels on dashboards. (If the BI portal is
not accessible, the BI panel option will not be available on Create Dashboards.) The setting in
client-session.xml is:
<BI.Dashboard.URL>http://ip_address_of_BI:port_number/qadbi</BI.Dashboard.URL>
In addition, to access the BI portal, the login / password for the QAD .NET UI client must match
the login / password for the BI portal.
Attachment Maintenance
As a system administrator, you can use Attachment Maintenance to specify which programs can
have attachments and can control attachment display. This option also lets you define multiple
attachment areas for programs, in which you can define different attachments for different

24 QAD .NET User Interface Administration Guide
Questions? Visit community.qad.com
program fields. Attachment Maintenance uses a drag-and-drop facility, which means you can drag
and drop attachments (such as product pictures, or text files or spreadsheets containing contact
phone numbers) onto the attachment area from your desktop or Windows folder.
Once you have defined an attachment for a field in a program, an attachment area is created for
that field, and is visible when you run the program. You can define attachments for a field (for
example, for Sales Order Number) or for a value for a field (for example, SO1234). When the
attachments you define are linked to the field value you select, and are available when you select
that field value in another program. For example, when you add contact phone numbers as a text
file to the site 10000 in Purchase Order Maintenance, the attachment is visible and accessible on
screen when you select this site while creating a sales order in Sales Order Maintenance.
The attachments you define in Attachme
nt Maintenance can be deleted from within the program,
and can be replaced with another attachment.
When you define an attachment for
a field in the initial frame of a program, for example, for Sales
Order in
sosont.p, the attachment area is visible throughout the program. If, however, you define
an attachment in a subsequent frame of the program, for example, for the field Item in Sales Order
Maintenance, the attachment area is visible only when the field is on-screen.
Fig. 2.6
Attachments Areas on Purchase Order Maintenance
Using Attachment Maintenance
Use Attachment Maintenance to define attachments and attachment areas for fields and programs.
The Attachment Maintenance screen has three areas:
• Document Type
• Program Name
• Attachment Area

Administration Features and Functions 25
Comments? Go to goo.gl/MfwKHm
Fig. 2.7
Attachment Maintenance
Document Type
Use this area to identify the attachments in the system. When you have defined a document type
and label, the system searches for the document type when you run the program, and displays the
attachment defined for the field value associated with this document type.
Data Type. Specify a data type identifier for organizing attachments. The data type name
should relate to the program to which you are adding attachments.
Label. Specify a label for the attachment area.
For translation purposes, if you use the $ variable to specify the
label, the system looks for the
label in the database and translates the term accordingly. For example, if you use the label
${SALES_ORDER}, the system retrieves the translation for the term and displays the term
Orden Ventas in a Latin Spanish installation.
Program Name
Program Name.
Specify a program for which you want to include attachments. You must also
specify a field. The wild card character * can be used to match a range of programs, for
example "so*.p" A blank program name matches the field anywhere.
Key Field. Specify a field that will trigger acceptance of attachments (required).
Note You delete a document type or program name by clicking the arrow to the left of the row to
select the row, and pressing Delete.
Attachments Area
This area displays attachments for the selected data type in the Document Type area. You associate
attachments with specific values for a given field. The lower part of the area displays possible field
values. When you click on one of these values, the attachments associated with the value are
displayed in the upper part of the area.

26 QAD .NET User Interface Administration Guide
Questions? Visit community.qad.com
Enabling Attachments
To enable attachments for a program field:
1 In the Document Type area, enter a data type and label for organizing attachments.
2 In the Program Name area, enter a program name (optional) and a key field (required). If you
do not enter a program name, the ability to add attachments will be available whenever the
focus is on the specified field. If you do enter a program name, the ability to add attachments
will be available when the focus is on the field in the specified program.
Adding Attachments
In the Attachments area, you specify a field value and select an attachment as follows:
1 Select a document type. This displays the fields already defined for this document type, if any.
2 Place the cursor in the Field Value area and right-click.
3 Select the Insert option. This positions the cursor in the name field.
4 Type the value of the field. For example, to add an attachment to the Purchase Order 114,
select the type, position the cursor in the Field Value area, right-click to select Insert, and type
the code.
Fig. 2.8
Entering a Field Value
5 Place the cursor in the upper part of the Attachments area, right-click, and choose Attach.
(Alternatively, you can click the Attach button.)
Fig. 2.9
Defining an Attachment
6 Browse to a file on your local computer and select it.
7 Click Save.
You can also drag-and-drop an attachment from your desktop area
or Windows Explorer
folder.
8 Run the program to view the attachment for the specified field.

Administration Features and Functions 27
Comments? Go to goo.gl/MfwKHm
Fig. 2.10
Purchase Order with Attachment
Deleting an Attachment
The Delete function is a right-click option either in Attachment Maintenance, or in the
Attachments area of the program. In Attachment Maintenance:
1 Place the cursor in the upper part of the Attachments area, right-click, and choose Delete.
(Alternatively, you can click the Delete button.)
Attachment Properties
You can view the key used for attachment areas by right-clicking the area and selecting Properties.
This key also displays the location of the attachment.
Fig. 2.11
Attachment Properties
Attachment Security
You can restrict the use of Attachment Maintenance by specifying attachment administrators in the
<AttachmentAdministrationRoles> field in the client-session.xml file:
<AttachmentAdministrationRoles>role1,role2</AttachmentAdministrationRole
s>
where role1,role2 is a comma-separated list of roles.
28 QAD .NET User Interface Administration Guide
Questions? Visit community.qad.com
The default administrator roles are qadadmin and superuser.
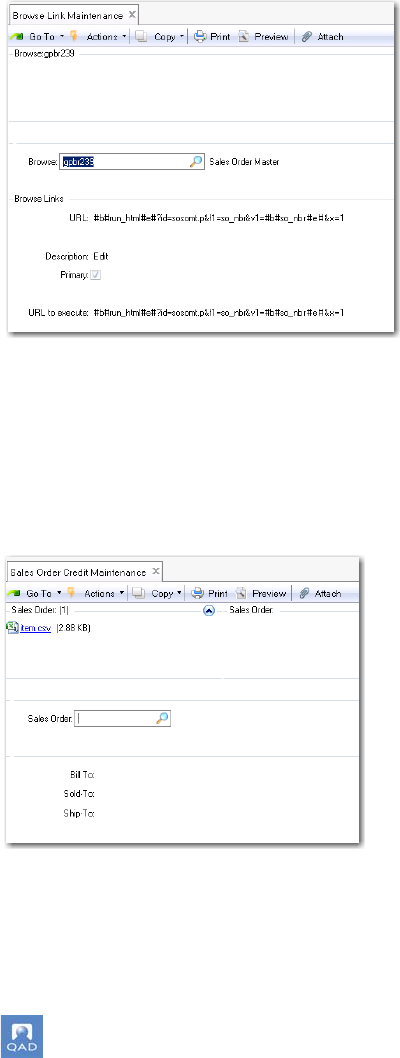
Automatic Attachment Areas
The system automatically creates attachment areas for certain program fields.
Some lookup browses within programs are defined wi
th additional Edit program links. For
example, the Sales Order Browse lookup (
gpbr239) is defined in Browse Link Maintenance with
an Edit link to Sales Order Maintenance, which ensures that Sales Order Maintenance is a right-
click option on sales order records when you run the browse.
Fig. 2.12
Sales Order Lookup, Browse Link Maintenance
Because the Sales Order lookup has an edit link for Sales Order Maintenance, the lookup field has
an automatic attachment area, based on the name of the edit program (Sales Order Maintenance).
Lookup fields with Edit links display an automatic attachment area in every program in which the
lookup field is used. For example, this lookup is also used in Sales Order Credit Maintenance, and
this program also displays the automatic attachment area.
Fig. 2.13
Sales Order Credit Maintenance
Use Browse Link Maintenance to create Edit links for lookups, and to identify existing links.

Administration Features and Functions 29
Comments? Go to goo.gl/MfwKHm
Attachment Storage
By default, attachments are stored in TomcatInstallDir/webapps/qadhome/
configurations/config-name/storage/attachments, where subdirectories organize the
attachments based on domain, program, type, and field. Each directory includes an underscore
character (_) at the end by default to account for the possibility of using a blank. In addition to the
default storage option, two other options for storing attachments are available. For more
information on attachment storage, see the following:
• “Default Attachment Storage” on page 50
• “Single WebDAV Repository Attachment Storage” on page 51
• “Database and WebDAV Repository Attachment Storage” on page 51
Adding Links to Application Help
You can add links to the Application Help for programs using the Field Help Maintenance
(36.4.13) program.
In Field Help Maintenance, by leaving both the Calling Field and Calling Procedure fields blank,
the content you enter in the Text field applies to all program help.
Enter brief HTML-formatted statements in the Text field.
To add a URL to a graphic such as your company logo, enter an <img> statement. For example,
the following would include the graphic in
logo.gif located in
http://www.yourintranet.com:8080/images:
<img src="http://www.yourintranet.com:8080/images/logo.gif">
To add a URL to a document such as a Word (.doc) document explaining company procedures, use
an
<a href> statement. For example, the following would provide a link to a
proceduresA1.doc file located in http://www.yourintranet.com:8080/procedures/:
<a href="http://www.yourintranet.com:8080/procedures/proceduresA1.doc">
Procedures</a>
In general, you can add a link to any URL using the <a href> tag.
You can link to programs in the QAD .NET UI. See “Viewing Process Maps with QAD Shell
URL” on page 46. For example, the following would link to Sales Order Maintenance:
<a href="qadsh://menu/invoke?menuitem-alias=sosomt.p"> </a>
Enabling QAD Guide Me
The QAD Guide Me feature provides immediate mouse over descriptions of fields in both
component and non-component programs, and is disabled by default.
Note Field help for non-component based programs is also displayed by pressing the F1 key
when the cursor is positioned in the field.
The QAD Guide Me feature is enabled in the following ways:
• By selecting Tools|Options and setting the Guide Me Enabled parameter to True.

30 QAD .NET User Interface Administration Guide
Questions? Visit community.qad.com
• By setting the Guide Me parameter in the client-session.xml file to True.
• By setting the option to True in the local QAD.Client.exe.config file or on the command
line.
• By adding a parameter to the shortcut path for QAD Applications.
When you right-click the shortcut icon for the QAD .NET UI on your desktop area and select
the Shortcut tab in the Properties dialog, you can add the following line to the Target
command:
-guideme.enabled:true
For example:
"C:\Program Files\QAD\QAD Enterprise Applications 2010
EE\QAD.Applications.exe" -guideme.enabled:true
This enables the Guide Me feature when you run the client, over-riding the environment
setting in the
client-session.xml file.
You can disable the feature by changing the above settings to false or by disabling the Guide Me
plugin in the
client-bootstrap.xml file.
client-session.xml File
The following settings affect the Guide Me feature.
• GuideMe.Enabled. This setting enables or disables Guide Me feature. The default value is
true.
• GuideMe.Debug. This debugging setting displays unresolved tokens and enables browser
context menu. The default value is false.
• GuideMe.ShowDelay. This sets the delay in milliseconds before the ToolTip is displayed.
The default value is 500.
• GuideMe.HideDelay. This sets the delay in milliseconds before the ToolTip is hidden. A
value of zero indicates the ToolTip is not hidden until the mouse leaves the control region. The
default value is zero.
• GuideMe.Animation. This enables and disables tooltip animation affects. When set to true
(the default), this ensures that the Guide Me screen is displayed gradually on the screen,
instead of immediately displaying and disappearing.
Like all application settings, these may also be set in the local QAD.Client.exe.config file or
on the command line, as follows:
-guideme.enabled:true
-guideme.debug:false
-guideme.showdelay:250
-guideme.hidedelay:0
-guideme.animation:true
client-bootstrap.xml File
You can also disable the Guide Me plugin in the client-bootstrap.xml on the home application
server:
<disable>qad.plugin.guideme</disable>
This option can also be performed on the command line, as follows:
-disable:qad.plugin.guideme

Administration Features and Functions 31
Comments? Go to goo.gl/MfwKHm
Connection Manager Access
Access to the Connection Manager is controlled by Tomcat’s \WEB-
INF\conf\securityfilter-config.xml
file, which controls which groups have access to
Tomcat administration functions. The
<role-name> element controls which groups have access
to the administration functions:
<security-constraint>
<web-resource-collection>
<web-resource-name>Administrative Functions</web-resource-name>
<url-pattern>/admin/*</url-pattern>
</web-resource-collection>
<auth-constraint>
<!-- NOTE: This role is not present in the default users file -->
<role-name name="mfgadmin">qadadmin</role-name>
</auth-constraint>
</security-constraint>
The default setting specifies that only users in the group (or role) qadadmin are allowed access.
Additional entries must be added here for additional groups (or roles). Further, to make sure
Connection Manager is available on the QAD
.NET UI menu, be sure the <Security> section in
the menu extension configuration file
(
TomcatInstallDir/webapps/qadhome/configurations/
config-name/menus/plugin-menu.xml) specifies all the roles for administrative users using
the
<Role> element:
<Security>
<SecurityConstraint key="admin" constraint="allow">
<Role>admin</Role>
<Role>dtadmin</Role>
<Role>qadadmin</Role>
<User>mfg</User>
</SecurityConstraint>
</Security>
Groups have access to the administration functions:
<security-constraint>
<web-resource-collection>
<web-resource-name>Administrative Functions</web-resource-name>
<url-pattern>/admin/*</url-pattern>
</web-resource-collection>
<auth-constraint>
<!-- NOTE: This role is not present in the default users file -->
<role-name name="mfgadmin">qadadmin</role-name>
</auth-constraint>
</security-constraint>
The default setting specifies that only users in the group (or role) qadadmin are allowed access.
Additional entries must be added here for additional groups (or roles). Further, to make sure
Connection Manager is available on the QAD
.NET UI menu, be sure the <Security> section in
the menu extension configuration file
(
TomcatInstallDir/webapps/qadhome/configurations/config-
name/menus/plugin-menu.xml
) specifies all the roles for administrative users using the
<Role> element:

32 QAD .NET User Interface Administration Guide
Questions? Visit community.qad.com
<Security>
<SecurityConstraint key="admin" constraint="allow">
<Role>admin</Role>
<Role>dtadmin</Role>
<Role>qadadmin</Role>
<User>mfg</User>
</SecurityConstraint>
</Security>
Using the Connection Manager
This section describes using the Connection Manager in the QAD .NET UI.
Note You need access to the Administration menu in order to access the Connection Manager. If
you do not have access, contact your system administrator.
The Connection Manager controls the pool of telne
t sessions used for Desktop maintenance
programs, lookups, reports, and inquiries.
Fig. 2.14
Example of the Connection Manager
The Connection Manager lets you:
• Close, start, and reset Connection Manager.
• Update configuration settings.
• View a log file of Connection Manager actions.
• Monitor connections in the connection pool.
• Monitor users and close user sessions, if needed.
Note QAD .NET UI only displays Administration programs such as the Connection Manager for
users who have security privileges or who are members of a defined administration group.
Connection Manager is composed of several administrative functions and views that he
lp you
manage the pool of telnet connections. The initial Connection Manager page includes the
following menus:
• “Functions Menu” on page 33
• “Connections Menu” on page 34
• “Users Menu” on page 35

Administration Features and Functions 33
Comments? Go to goo.gl/MfwKHm
Functions Menu
The Connection Manager’s Functions menu includes the following:
Close Connection Manager. Terminates all active Desktop connections. Any data being
processed by active sessions is lost. Any processes begun by active sessions are terminated.
Restart Connection Manager. Shuts down and restarts Connection Manager. This option has
the same effect as Close Connection Manager, but also restarts it after complete shutdown.
Reset failed init count. Resets the initialization failed counter. The system maintains a count of
the number of times Connection Manager unsuccessfully attempts to start a session. When this
counter reaches the maximum number, as indicated in Maximum Failures on the Connection
Manager configuration page, it stops further automatic attempts to start the session.
This number is automatically reset when a successful connection is made.
Delete HTML cache. This option clears all cached HTML maintenance screens. Removing the
cache is required whenever updates are made to screen elements—such as adding lookups to a
field—to ensure that the new screen information is read by the system. This is a legacy feature
and does not apply to Desktop programs running in the QAD
.NET UI.
Update configuration settings. It displays the “Configuration Parameters Page” on page 33,
which is used to set up and configure the Connection Manager options.
Configuration Parameters Page
The Configuration Parameters page includes the following settings:
Host. The machine name or IP address of the SSH or telnet server.
Port. The port number for SSH or telnet. The default is 22 (SSH). For telnet, the port number
is 23.
Protocol. Specifies the connection protocol as ssh (the default) or telnet.
Startup Script. The server log-in prompts and the responses to these prompts, separated with
the pipe symbol (|). The standard order is:
loginPrompt|userid|passwordPrompt|$PASSWD|osPrompt|cd UIConfigDir|
osPrompt|startScript
For example:
login:|mfg|Password:|$PASSWD|$|cd /user/mfg/work|$|exec
/user/mfg/work/scripts/connmgr.wrap
The same startup script can be used for both SSH and telnet. If using SSH, the login
credentials in the script will be ignored if they are specified in the Server Startup User and
Server Startup Password settings. For SSH, if you have defined Server Startup User and
Server Startup Password, you can remove the login credentials from the script but the first
four token delimiters must still be included in the script. For example, for telnet, the script
might be:
login:|mfg|Password:|$PASSWD|$|cd /user/mfg/work|$|exec
/user/mfg/work/scripts/connmgr.wrap
For SSH, however, with the login credentials defined in Server Startup User and Server
Startup Password, the script can be:

34 QAD .NET User Interface Administration Guide
Questions? Visit community.qad.com
||||$|cd /user/mfg/work|$|exec
/user/mfg/work/scripts/connmgr.wrap
Server Startup User. Specifies the user ID of the server startup user, if not specified in the
startup script. (This setting is only used for SSH.)
Server Startup Password. The password for the session startup script, if not specified in the
startup script. It is encrypted on entry.
Minimum Connections. The minimum number of open connections that the system should
maintain.
Maximum Connections. The maximum number of open connections that the system should
allow.
Maximum Failures. Number of times Connection Manager should attempt to restart an
unsuccessful connection.
Connections Monitor Frequency. Number of milliseconds between checks for all connections.
Wait Time for Idle Connection. The maximum wait time in milliseconds for a requested
connection from the Connection Manager. If the maximum number of connections has been
reached, or if new connections are in the initializing state, the wait time may expire. The
default value is 20000 (20 seconds).
Connection Timeout. Number of milliseconds a session can remain inactive before Connection
Manager closes it. The default value is 3600000 (60 minutes).
Processing Timeout. How often, in milliseconds, a locked or busy screen is pinged (that is,
checked for changes). A locked or busy screen is considered to be in processing mode, which
is when the underlying program is processing and is not prompting for user input. The default
value is 2000 (2 seconds).
Initializing Timeout. Number of milliseconds Connection Manager will wait for a session to
successfully initialize. The default value is 180000 (3 minutes).
Operating System Win32/NT. True if the Progress sessions are executing on a computer with a
Windows operating system.
Wait Time. Number of milliseconds between checks of a session while it runs reports. The
default value is 2000 (2 seconds).
Connections Menu
The Connection Manager’s Connections menu displays the pool of active sessions based on
session status. Each session can have one of the following statuses:
Initializing. The session is starting and is not available for use.
Idle. The session is active and available for the next user request.
Busy. The session is executing a user request.
Pause. The session is waiting for a response from the user. For example, the user might need
to press the spacebar to continue.

Administration Features and Functions 35
Comments? Go to goo.gl/MfwKHm
Processing. The session is actively updating the Progress database and database records are
locked.
Force Disconnect. This is a temporary state that occurs when the administrator closes an
initializing session.
Disconnected. This is a temporary state that occurs when idle sessions are closed.
Click one of the options under Connections to see a listing of sessions based on status. The session
information includes the following: Status, ID, Process ID, User ID, Device, User IP, Maximum
Connections, Program, and User Connected Time.
All. Display all sessions.
Busy. Only display sessions with Busy, Pause, or Processing status.
Idle. Only display sessions with Idle status.
Initializing. Only display sessions with Initializing status.
Users Menu
The Connection Manager’s Users menu displays a list of currently logged in users.
• Click a User ID to see information related to that user, including the following: Status, ID,
Process ID, User ID, Device, User IP, Maximum Connections, Program, and User Connected
Time.
• Click Refresh to update the display.
• Click Close to close a user session. This might be needed if a user has locked a database record
and left their session running.
Using QAD Shell URL (qadsh:// protocol)
You can access QAD .NET UI using a URL defined by QAD called the qadsh:// protocol:
• The qadsh:// protocol is registered on a user basis, allowing different users to access
different versions of the QAD .NET UI client on the same machine.
• The qadsh:// protocol is registered during the launch of the QAD .NET UI, ensuring that the
protocol is defined correctly.
• The qadsh:// protocol is only registered if the registry setting for the currently running QAD
.NET UI client is different than the one already registered.
• The qadsh:// protocol always points to the last QAD .NET UI version that was launched
rather than the version most recently installed.
• The user registry settings do not require administrative permissions, enabling XCOPY
installations.
• You can copy (and paste) qadsh:// links to Desktop programs and browses by choosing
Actions
| Copy Link To Clipboard. You can then paste the URL into a browser to run the
Desktop program or browse.
The qadsh:// protocol has the following format:

36 QAD .NET User Interface Administration Guide
Questions? Visit community.qad.com
qadsh://menu/invoke?argument_list where argument_list can include optional
arguments for
workspace-key, menu-key, menuitem-key, and menuitem-alias.
The following summarizes the argument_list options:
Argument Value Description Required Multiple
workspace-key
A workspace key If provided the container will activate
the workspace before forwarding the
request to any service providers.
No No
menu-key
A menu key The menus that should be searched for
the menu keys and aliases. If not
specified all menus in the activated
workspace will be searched.
No Yes
menuitem-key
A menu item key The keys identifying menu items to
execute.
You can customize the display of
menu items using the following
para
meters:
&target=tab: Open the program
in
tab view.
&target=tabgroup/Sales:
Open in a tab group called Sales.
&target=window: Open in a
detached window)
&target=fullscreen: Open
in full screen mode)
No Yes
menuitem-
alias
A menu item alias The aliases identifying menu items to
execute.
No Yes
browse-search
A table name, a field
name, an operator,
start value, and end
value (optional).
The fields are comma delimited and
multiple search conditions can be
applied by adding additional
parameters to the URL.
The operator can be one of the
following:
=
>=
<>
<
>
contains
range
isnull
isnotnull
The start value specifies the value or
the start of a value range if the
optional end value is included.
No No
Example qadsh://menu/invoke?workspace-key=Domain1.1000&menuitem-key=
5.1.1
starts the QAD .NET UI client installed on your machine and opens Purchase Approvals
Maintenance in Domain 1.
Example qadsh://menu/invoke?menuitem-key=7.1.1&target=fullscreen starts the
QAD .NET UI client and opens Sales Order Maintena
nce in your default domain in full screen
mode.

Administration Features and Functions 37
Comments? Go to goo.gl/MfwKHm
Example qadsh://menu/invoke?menuitem-alias=ppptmt.p starts the QAD .NET UI
client and opens Item Master Maintenance in your default domain.
Example qadsh://menu/invoke?menuitem-alias=mgbr003.p&browse-search=
brw_mstr,brw_name,=,ad001
starts the QAD .NET UI client and opens a browse with a single
search condition.
Example qadsh://menu/invoke?menuitem-alias=mgbr003.p&browse-search=
brw_mstr,brw_name,=,ad001&browse-search=brw_mstr,brw_name,=,ad002
starts the
QAD
.NET UI client and opens a browse with multiple search conditions.
Example qadsh://menu/invoke?menuitem-alias=mgbr003.p&browse-search=
brw_mstr,brw_name,range,ad001,ad022
starts the QAD .NET UI client and opens a
browse with a range condition.
Example qadsh://menu/invoke?menuitem-alias=mgbr003.p&browse-search=
lbl_mstr%2Clbl_long%2Ccontains%2C%252C
starts the QAD .NET UI client with comma
delimited values, where a comma is encoded as
%2C.
Note If you have installed multiple instances of the QAD .NET UI client on a machine, the
qadsh:// URL will invoke the most recently opened instance.
Using QAD Shell URL to Run Reports
You can use the QAD URL Shell to run reports, in a similar way to running browses.
The report-search parameter lets you specify the report to be run, and you can also specify the
value of a report field.
Example qadsh://menu/invoke?menu-key=A.6&menuitem-key=
36.4.21.12.6&report-search=tt_ca_mstr,ca_bill,=,10000
In this example, the Call Quote Print Sample report (tt_ca_mstr) is run from the command line,
and the Bill To field (
ca_bill) is auto-populated with the value 10000.
The autorun=true can also be added to the command for the report, which causes the report to
automatically run when launched, avoiding the need to click Run on the toolbar.
Example qadsh://menu/invoke?menu-key=A.6&menuitem-key=
36.4.21.12.6&autorun=true
This example runs Call Quote Print Sample and automatically runs the report:
Important You should be aware of possible performance issues when using the autorun
parameter. If you automatically run multiple reports without careful filtering the search criteria, the
number of system queries required can have an impact on system resources and result in lengthy
delays.
Report Invoke Command
You can also run reports on the command line using the following qadsh:// command:
qadsh://report/invoke?report-code=36.4.21.12.6, provider=c1, label=
TestReport

38 QAD .NET User Interface Administration Guide
Questions? Visit community.qad.com
where report-code is the report menu number or program name, provider is an optional
parameter to identify the report builder (which defaults to
c1 for Component One), and label is
the description you enter to overwrite the default tab text that appears on the report when you run
it.
You can enter multiple search conditions and search range conditions into the command syntax.
Example qadsh://menu/invoke?menu-key=A.6&menuitem-key=
36.4.21.12.6&report-search=tt_ca_mstr,ca_bill,range,1000,2000
This command runs the Call Quote Print Sample report (tt_ca_mstr), and creates a range for the
Bill To field
ca_bill.
Heartbeat URLs for Load Balancing
System administrators setting up a load balancer for multiple Tomcat instances can access
heartbeat URLs to check connection status for each instance.
Load balancing scripts (or other custom status scripts) can access the following links under
http://TomcatHost:TomcatPort/heartbeat/:
• status.jsp — returns a status message containing the number of agents that are All, Idle,
Init, or Busy.
• idle.jsp — returns a page containing the number of idle connections
• busy.jsp — returns a page containing the number of busy connections
• init.jsp — returns a page containing the number of initializing connections
The pages are installed in TomcatInstallDir/webapps/heartbeat/.
Enhancing Reports
You can display selected non-component based reports in an enhanced format. The enhanced
format improves the appearance of reports, including:
• Enhanced report header and footer
• Report header inclusion of company logo
• Data representation using HTML tables
• True Type font support
• Different colors for alternate rows
The upper-right area displays the date and time. Additionally, to improve readability, the program
name and number are at the bottom of a report rather than at the top near the report title.

Administration Features and Functions 39
Comments? Go to goo.gl/MfwKHm
Setting Report Format
You can specify whether to use the enhanced format on selected reports or the standard format on
a system-wide basis as follows:
1 To use the enhanced format, edit the settings.dat file in the
QADInstallDir/qadui/com/mfgpro directory, setting beautifyReports to yes.
For information on the setting.dat file, see
“Editing setting.dat File” on page 39.
2 The selected reports that display in the enhanced format are specified in the
beautifyReports.lst file. For more information on using the
beautifyReports.lst file to select which reports use the enhanced format, see
“Selecting Which Reports Use Enhanced Format” on page 39.
3 To use the standard format, set beautifyReports to no. By default,
beautifyReports is set to yes.
4 Restart the Connection Manager for the changes to take effect.
5 Finally, all users must clear the QAD .NET UI’s cache of temporary Internet files before
running further reports.
Editing setting.dat File
The setting.dat file is located in the QADInstallDir/qadui/com/mfgpro directory.
However, you must also edit the additional
setting.dat file located in the
QADInstallDir/qadui/com/qad/mfgpro directory.
The setting.dat file in the QADInstallDir/qadui/com/mfgpro directory is compiled from
the
setting.dat file in the QADInstallDir/qadui/com/qad/mfgpro directory. When you
change the files in the
QADInstallDir/qadui/com/mfgpro directory, you see the effect of the
change right after you edit the file.
When you change the files in the QADInstallDir/qadui/com/qad/mfgpro directory, you do
not see the effect of the change until after a compile, at which time the files in the
QADInstallDir/qadui/com/mfgpro directory are over-written by the new files compiled
from the files in the
QADInstallDir/qadui/com/qad/mfgpro directory.
After you make changes to the setting.dat file, you must restart the Connection Manager for
the changes to take effect.
Selecting Which Reports Use Enhanced Format
The beautifyReports.lst file in the QADInstallDir/qadui/com/mfgpro directory lists
the reports that will use the enhanced format when the
beautifyReports setting in the
setting.dat file is set to yes.
The reports listed in beautifyReports.lst have been tested to display using the enhanced
format. You can include other reports in this list but QAD recommends only using the reports
listed by default in
beautifyReports.lst. If you do modify the beautifyReports.lst file,
be sure to restart the Connection Manager and have all users clear the QAD
.NET UI’s cache of
temporary Internet files before running further reports.

40 QAD .NET User Interface Administration Guide
Questions? Visit community.qad.com
As with the two setting.dat files, the beautifyReports.lst file is located in the
QADInstallDir/qadui/com/mfgpro directory. However, you must also edit the additional
beautifyReports.lst file located in the QADInstallDir/qadui/com/qad/mfgpro
directory.
The beautifyReports.lst file in the QADInstallDir/qadui/com/mfgpro directory is
compiled from the
beautifyReports.lst file in the
QADInstallDir/qadui/com/qad/mfgpro directory. When you change the files in the
QADInstallDir/qadui/com/mfgpro directory, you see the effect of the change right after you
edit the file. When you change the files in the
QADInstallDir/qadui/com/qad/mfgpro
directory, you do not see the effect of the change until after a compile, at which time the files in the
QADInstallDir/qadui/com/mfgpro directory are over-written by the new files compiled
from the files in the
QADInstallDir/qadui/com/qad/mfgpro directory.
Including Company Logo
With the enhanced format, the upper-left area can include your company’s logo. To include a logo:
1 Locate the Tomcat installed images directory (for example,
TomcatInstallDir/webapps/qadui/images).
2 Place any graphics files containing company logos in this directory. For example, place a file
named
myLogo.jpg that contains the logo you want to use. By default, the directory includes
companyLogo.jpg, which contains the QAD logo. For example, place a file named
myLogo.jpg that contains the logo you want to use. By default, the directory includes
companyLogo.jpg, which contains the QAD logo.
Note Use companyLogo.jpg as the file name so that you do not have to modify the setting.dat file
as described in the next step.
Note If the height of the logo exceeds 60 pixels, report page formatting can be affected.
3 To add your company’s logo to the report, edit the setting.dat file in the
QADInstallDir/qadui/com/mfgpro directory, setting reportCompanyLogoImage to
the graphics file (for example,
images/myLogo.jpg). By default,
reportCompanyLogoImage is set to image/companyLogo.jpg. (Note that the file name
is case-sensitive.) For information on the
setting.dat file, see “Editing setting.dat File” on
page 39.
4 If you do not want to display a logo on reports, set reportCompanyLogoImage to blank (do
not enter any graphics file).
5 Finally, all users must clear the QAD .NET UI’s cache of temporary Internet files before
running further reports.

Administration Features and Functions 41
Comments? Go to goo.gl/MfwKHm
Removing Report Footer
The enhanced report footer now includes the program name and number at the bottom of the
report. If required, you can remove the footer information as follows:
1 Edit the TomcatInstallDir/webapps/qadui/css/
AppReportStandard.css file, changing the div.reportFooter statement to the
following:
div.reportFooter {display:none;}
2 Finally, all users must clear the QAD .NET UI’s cache of temporary Internet files before
running further reports.
Setting Default Browser Text Size
To have reports use your default browser text size setting, edit the setting.dat file in the
QADInstallDir/qadui/com/mfgpro directory, setting allowBrowserFontSize to yes.
The default setting is
no. (Note that to set the default browser text size setting in Internet Explorer,
select View|Text Size). For information on the
setting.dat file, see “Editing setting.dat File” on
page 39.
Different Colors for Alternate Rows
If a report includes different colors for alternate rows, to have the different colors display, select
Tools|Internet Properties and click the Advanced tab. In the Settings view, scroll down to Printing
and select Print background color and images.
Saving Enhanced Reports to Excel
In general, you cannot export reports from the QAD .NET UI to Microsoft Excel. While in a
report, right-clicking and selecting Internet Explorer’s Export to Microsoft Excel will not export
the report data to Excel. However, you can quickly copy data from an enhanced report and place it
into Excel. To do so, while in an enhanced report, right-click and select Select All (Ctrl+A) and
then select Copy (Ctrl+C). Next, open Excel and select Paste. Excel places the report data into
appropriate columns and rows in Excel.
Configuring Multiple Language Support for Terminal
Client
Supporting multiple languages requires the <TerminalEncoding> setting in the client session
configuration file to be synchronized with the
cpstream setting for the character Progress
session. When starting a Progress client session, you must include the
-cpstream <encoding>
parameter, which directs Progress to transform the internal database encoding sent to the client.
The client must know which encoding is being sent in order to display the correct characters on the
screen and return the correct data to the Progress client.
For Windows, the <TerminalEncoding> setting must be UTF-8 for all languages.

42 QAD .NET User Interface Administration Guide
Questions? Visit community.qad.com
Note Progress on a Windows Server does not support the display of double-byte characters
through its terminal client. Consequently, if your system uses Progress on a Windows server, the
QAD .NET UI will not receive the data
it needs to display double-byte characters such as Japanese
and Chinese.
For UNIX, refer to the following
table, which identifies the TerminalEncoding setting based on
the QAD language code and Progress codepage (
cpstream) language code:
QAD Language Code Language
Progress Codepage
cpstr
eam Setting
Terminal Encoding
Setting
us English iso8859-1 iso-8859-1
jp Japanese shift-jis shift-jis
ch Simplified Chinese gb2312 gb2312
ge German iso8859-1 iso-8859-1
bu Bulgarian 1251 windows-1251
cz Czech 1250 windows-1250
da Danish iso8859-1 iso-8859-1
du Dutch iso8859-1 iso-8859-1
fr French iso8859-1 iso-8859-1
it Italian iso8859-1 iso-8859-1
no Norwegian iso8859-1 iso-8859-1
po Portuguese iso8859-1 iso-8859-1
cs Castilian Spanish iso8859-1 iso-8859-1
sw Swedish iso8859-1 iso-8859-1
hu Hungarian 1250 windows-1250
pl Polish 1250 windows-1250
ro Romanian 1250 windows-1250
ru Russian 1251 windows-1251
tu Turkish 1254 windows-1254
tw Traditional Chinese cp950 cp950
ko Korean ksc5601 ksc5601
fi Finnish iso8859-1 iso-8859-1
lt Lithuanian 1257 windows-1257
ua Ukrainian 1251 windows-1251
Configuring Terminal Script Parameters
With the User Option Telnet Maintenance program, you can specify the login scripts that initiate
the telnet sessions for running the terminal mode programs in the QAD .NET UI. Each line in a
telnet
login script is a single record containing a combination of three values: pattern, value, and
status. Use the Script Pattern, Script Value, and Script Status fields to enter these values to
generate as many script lines as needed. For the Script Value, after specifying the script file, you
can include the following parameters:
${d} – Domain
${u} – User ID

Administration Features and Functions 43
Comments? Go to goo.gl/MfwKHm
${e} – Entity
${c} – Code Page
Any number of these can be included, with each separated by a space. For example:
/dr01/scripts/telnet.ksh ${d} ${u} ${e} ${c}
These will then be available in the telnet script as standard parameters (${1} ${2} ${3} ${4}).
Configuring Terminal Encoding By Domain
You can have terminal encoding change dynamically based on the domain’s code page as follows:
1 Use the ${c} parameter in User Option Telnet Maintenance’s Script Value field (see
“Configuring Terminal Script Parameters” on page 42). For example:
/dr01/scripts/telnet.ksh ${c}
2 Add a <TerminalEncodingMap> section to the client session configuration file (client-
session.xml
) with <CodePage> elements for each code page for the domains. For
example:
<TerminalEncodingMap>
<CodePage Progress="iso8859-1">iso-8859-1</CodePage>
<CodePage Progress="1251">windows-1251</CodePage>
</TerminalEncodingMap>
The value in the Progress attribute is the code page specification recognized by Progress
4GL (that is, the value assigned to the domain). The value within the
<CodePage> elements is
the value used by the terminal. (Note the commented section in the
client-session.xml
file that specifies these mappings, which can be used as a reference to create these entries.)
3 Restart the QAD .NET UI so that the changes can take effect.
Defining Custom Key Mappings
A system administrator can define custom key mappings for use in the QAD .NET UI’s terminal
mode.
Use an XML file to define the key mappings. Name the file keymapping.xml and place it in the
directory defined by the HomeServer configuration value, which is defined at installation time.
(The HomeServer configuration value is typically
TomcatInstallDir/webapps/qadhome.)
The system identifies the
keymapping.xml file through the <TerminalKeyMapUrl> element
in the client session configuration file. If the element is not in the file by default, you must add it.
For example, in the client session configuration file, you can add a <TerminalKeyMapUrl>
element and set it to
${HomeServer}/keymap.xml as follows:
<TerminalKeyMapUrl>${HomeServer}/keymapping.xml</TerminalKeyMapUrl>
The keymapping.xml file includes a <KeyMapping> element that includes one or more
<KeyMap> elements, whose key and value attributes define a key mapping.
Note You can change the name and location of the XML file provided you also change the value
of the
<TerminalKeyMapUrl> setting accordingly.

44 QAD .NET User Interface Administration Guide
Questions? Visit community.qad.com
In this example, the keymapping.xml file directs the number pad keys "/" and "*" to act as F1
and F4 keys in terminal mode:
<KeyMapping>
<KeyMap key="/" value="\u001bOP" />
<KeyMap key="*" value="\u001bOS" />
</KeyMapping>
For a listing of possible key settings, see Microsoft Developer Network’s .NET Framework Class
Library for Key Enumeration (
http://msdn2.microsoft.com/en-
us/library/system.windows.forms.keys(vs.71).aspx).
The following table lists the possible value settings:
Terminal Mode Key Value
F1
"\u001bOP"
F2
"\u001bOQ"
F3
"\u001bOR"
F4
"\u001bOS"
F5
"\u0004"
F6
"\u001b[17~"
F7
"\u001b[18~"
F8
"\u001b[19~"
F9
"\u001b[20~"
F10
"\u001b[21~"
F11
"\u0002"
F12
"\u001b[24~"
F13
"\u001b[25~"
F14
"\u001b[26~"
F15
"\u001b[28~"
F16
"\u001b[29~"
F17
"\u001b[31~"
F18
"\u001b[32~"
F19
"\u001b[33~"
F20
"\u001b[34~"
0 (keypad)
"0"
1 (keypad)
"1"
2 (keypad)
"2"
3 (keypad)
"3"
4 (keypad)
"4"
5 (keypad)
"5"
6 (keypad)
"6"
7 (keypad)
"7"
8 (keypad)
"8"
9 (keypad)
"9"
/ (keypad)
"/"

Administration Features and Functions 45
Comments? Go to goo.gl/MfwKHm
Process Map Configuration
For Enterprise Edition, the process maps are delivered separately from the QAD .NET UI. The
process maps are included with the QAD Enterprise Edition release media and are available on the
QAD Store
(http://store.qad.com). The QAD Deployment Toolkit (QDT) installs the process map
components (including the viewer and editor) along with the process map content as part of the
overall installation process for the product. However, you should then get the latest process map
content from the QAD Store.
Process Map Configuration Settings
As of Enterprise Edition 2013, QDT installs the process map viewer, editor, and related
components on the home server as a stand-alone web application named pronav
(tomcat/webapps/pronav). The following settings in the client session configuration file
(client-session.xml) specify the default configuration:
<!-- Process map settings -->
<ProcessMapBaseUrl>${DesktopProtocol}://${DesktopHost}:${DesktopPort}/pronav</ProcessMap-
BaseUrl>
<qad.url.process.editor>${ProcessMapBaseUrl}/ProcessEditor.jsp</qad.url.process.editor>
<qad.url.process.viewer>${ProcessMapBaseUrl}/ProcessViewer.jsp</qad.url.process.viewer>
Previously, the process viewer and editor were in /tomcat/webapps/<environment> and
the process map content was in /tomcat/webapps/<environment>/WEB-
INF/pronav.
Now process maps are included in an environment named pronav
(/tomcat/webapps/pronav) by default. A benefit of this approach is that you can now
define a single process map installation that can be shared across multiple environments.
Note The configuration setting for the process map images (QAD_IMG), set in Administration >
Process Admin, now requires a fully qualified domain name. The settings now include a
QAD_PMAP_ROOT setting to specify the URL to the process map installation
(http://server.domain.com:port/pronav/) and then the QAD_IMG setting is
{QAD_PMAP_ROOT}images/.
Process Map Storage and Multiple Language Support
Process maps look up the appropriate label text to display for the user’s current language when the
QAD
.NET UI displays the process map. The system identifies the label text to display based on a
label key and the user’s language.
* (keypad)
"*"
- (keypad)
"-"
+ (keypad)
"+"
Tab
"\u0009"
Shift Tab
"\u001bOP\u0009"
Page Up
"\u001b[5~"
Page Down
"\u001b[6~"
Terminal Mode Key Value

46 QAD .NET User Interface Administration Guide
Questions? Visit community.qad.com
Maintaining the label text for the supported languages in these properties files makes it easier for
QAD
.NET UI administrators to modify the label text of process maps for the language that they
must support.
Note Use the Language button in Preview mode to view maps in other languages.
Enabling New Language Support for Process Maps
You use the Process Label Maintenance option to store process map labels in different languages.
The translated labels are stored in the
properties_language.xml file in the
/pronav/properties directory. Each language has its own XML file – for example, the file for
the label text in English is
properties_en.xml.
To add a new language to the drop-down language list in Process Label Maintenance, you must
create a
properties_<language>.xml for the language, add a line for the new language to the
process-config.xml file (as shown below), and restart the web appserver when you have
updated the file:
<PropertySet id="locale" name="locale_Castilian_Spanish" value=
"es_es" />
<PropertySet id="locale" name="locale_Dutch" value="nl" />
<PropertySet id="locale" name="locale_English" value="en" />
<PropertySet id="locale" name="locale_French" value="fr" />
<PropertySet id="locale" name="locale_German" value="de" />
<PropertySet id="locale" name="locale_Italian" value="it" />
<PropertySet id="locale" name="locale_Japanese" value="ja" />
<PropertySet id="locale" name="locale_Latin_America_Spanish"
value="es_mx" />
<PropertySet id="locale" name="locale_Polish" value="pl" />
<PropertySet id="locale" name="locale_Portuguese" value="pt" />
<PropertySet id="locale" name="locale_Simplified_Chinese" value=
"zh_cn" />
<PropertySet id="locale" name="locale_Traditional_Chinese" value=
"zh_tw" />
Note On the Home Server the current property files are found in the
packages/plugins/base.code/data.zip file on the home server.
Viewing Process Maps with QAD Shell URL
You can also view and edit process maps using the QAD Shell URL.
To view a process map using the QAD Shell URL, use the following format:
qadsh://process/view?ProcessName=<process_name>
To edit a process map using the QAD Shell URL, use the following format:
qadsh://process/edit?ProcessName=<process_name>

Administration Features and Functions 47
Comments? Go to goo.gl/MfwKHm
Regional Display Setting Control
The language code associated with a QAD application user in User Maintenance (36.3.1)
determines the language of strings displayed on the user interface. Other regional settings such as
date and number format are determined in different ways, depending on which type of program or
browse the user is executing.
• QAD .NET UI screens displayed in the default Desktop mode—the mode using native .NET
technology—are formatted based on the regional settings of the user’s client PC, set by
choosing Start|Control Panel|Regional and Language Options|Regional Options and editing
the Standards and Formats section.
• QAD .NET UI screens displayed in terminal or HTML mode as well as character UI screens
always derive regional settings based on the country code associated with the user in User
Maintenance and country-specific settings in the
locale.dat file located in the application
installation directory.
Typically, the settings in the locale.dat file and the available regional settings on the user’s
computer are in agreement according to ISO locales. However, in some situations, this is not the
case. This can result in inconsistent formatting depending on which type of screen the user is
viewing. To avoid this inconsistency, a new setting can be used to control how the system applies
regional settings.
For example, to configure settings for a user who wants to view screens in English but dates and
numbers in the French format, follow these steps:
1 In User Maintenance (36.3.1), set the language to US and country code to FR.
2 Make sure the alternate country code for FR defined in Country Code Data Maintenance
(2.14.1) is also the ISO code
FR.
3 Edit the locale.dat file and add a line with the combination of settings that the user wants
to be displayed. For example, for a user whose associated language is
US and country is FR,
locale.dat should include the following line:
US,en,FR,,dmy,European
Where US is the user’s language code, en is the ISO language code associated with US, FR is
the ISO country code associated with the user’s country code, the optional variant is blank
(indicated by
,,), dmy (day/month/year) is the date format, and European is the numeric
format (period as the decimal separator; comma as the thousand separator).
4 In the client-session.xml file (located under
TomcatInstallDir/webapps/qadhome), set the following new parameter to false:
<UseLocalDateAndNumberFormats>false</UseLocalDateAndNumberFormats>
The default setting is true, which results in the behavior seen in prior releases of the
QAD
.NET UI. When set to false, all types of UIs derive locale settings from the same
locale.dat file, ensuring consistency regardless of which screen is being viewed.

Chapter 3
Configuring System
Environments
This section provides information for system administrators on how to administer and configure
the QAD
.NET User Interface.
This section covers the following topics:
Multiple Instance and Environment Recommendations 50
Configuration Storage Directories 50
Configuration Files 53
Client Bootstrap Configuration File 55
Client Session Configuration File 57
Menu Extension Configuration File 64

50 QAD .NET User Interface Administration Guide
Questions? Visit community.qad.com
Multiple Instance and Environment Recommendations
One QAD .NET UI Tomcat home server can support multiple environments. However, as a best
practice, one home server should not be used for testing, production, and development
environments. Instead, these should each run under its own home server. For example, your test
environment should be under one home server, your production environment should be under
another home server, and so on. The main reason this is recommended as a best practice is because
of updates. Updates to a home server are pushed out to all the QAD
.NET UI clients for that home
server. If all the environments are all under the same home server, the updates will apply to all the
environments. By having the environments under different home servers, you can test the updates
against a test environment under one home server before applying them to a different home server
where the production environment is located.
Configuration Storage Directories
The following sections describe the configuration storage directories for browse collections, menu
collections, favorites, and attachments.
Browse Collection Storage
Browse collections are stored in TomcatInstallDir/webapps/qadhome/configurations/
config-name/storage/browse-collections. Each browse collection is assigned a unique
ID by the system.
Menu Collection Storage
Menu collections are stored in TomcatInstallDir/webapps/qadhome/configurations/
config-name/storage/menu-collections. Each menu collection is assigned a unique ID
by the system.
Favorites Storage
Favorites are stored in TomcatInstallDir/webapps/qadhome/configurations/
config-name/storage/user-data, where subdirectories based on user ID and domain
maintain
UserMenu.xml files that include favorites information.
Attachments Storage
Default Attachment Storage
By default, attachments are stored in TomcatInstallDir/webapps/qadhome/
configurations/config-name/storage/attachments, where subdirectories organize the
attachments based on domain, program, type, and field. Each directory includes an underscore
character (
_) at the end by default to account for the possibility of using a blank.

Configuring System Environments 51
Comments? Go to goo.gl/MfwKHm
Single WebDAV Repository Attachment Storage
Instead of using the default attachment storage location, you can configure the system to have a
single WebDAV repository of attachments across multiple installations.
Instead of using the default path, you can specify a path (a WebDAV location) using the
<Attachment>... <WebDAVRoot> setting in the client session configuration file (client-
session.xml
) file. By default, the setting is commented out. The setting’s default path is
${HomeServer}/webdav/attachments
), so that all attachments are stored on the Home
Server in
/webdav/attachments. To use this path, simply remove the comment delimiters (<!--
and -->) around the statement. To use another location, edit the setting to use a path to some other
server; for example:
<Attachment>
<WebDAVRoot>ServerURL/webdav/attachments</WebDAVRoot>
</Attachment>
Note that the WebDAV location should be UTF-8 enabled to support the WebDAV standard.
With the <WebDAVRoot> setting, you have a way to have all the attachments located on a common
server.
Database and WebDAV Repository Attachment Storage
Instead of using the default attachment storage or the single WebDAV repository attachment
storage, you can maintain the attachment information in the system database while the attachments
are stored in a specified WebDAV directory.
This approach gives you the option of storing attachment information in the system database,
which provides better control and extra tagging information on the attached files. The actual files
remain in a WebDAV-accessible directory defined by QAD Enterprise Applications.
Note This feature currently applies only to non-component based programs (programs based on
procedural, Progress-based technology) and requires QAD Enterprise Applications 2011–
Enterprise Edition (or later). Using this feature with a version of QAD Enterprise Applications
prior to 2011–Enterprise Edition will require assistance from QAD Services to update the database
schema.
This feature introduces the following Document Attachments menu items:
• Document Attachment Application Maintenance — Configure the system so that document
attachment information will be stored in the database.
• Document Tag Maintenance — Define the tags available for document attachments.
• Document Maintenance — Select the tags and other metadata for a document attachment.
• Documents browse
• Document Tags browse — List all the tags, and right-click on a record to list all documents
associated with a tag.
• Document Tags by Language Code browse — List all tags and language codes.
• Document Attachment Applications browse — List all the Application IDs defined in
Document Attachment Application Maintenance.

52 QAD .NET User Interface Administration Guide
Questions? Visit community.qad.com
To set up Document Attachments for non-component based programs:
1 Open Document Attachment Application Maintenance.
2 Set Application ID to mfg (enter mfg for attachments to non-component based programs).
3 Set Repository to the WebDAV location where you are storing attachments. For example:
http://host.domain.com/.../webdav/.../configurations/default/storage/
attachments.
Note The default path for storing attachments (TomcatInstallDir/webapps/qadhome/
configurations/config-name/storage/attachments) and the storage location in
specified in the
config-session.xml file’s <Attachment>...<WebDAVRoot> setting is
ignored. Instead, the default path for storing attachments is the path specified in the Repository
field.
4 Set Repository Type to webdav.
Now, when you add an attachment to a non-component based program, the attachment’s properties
include additional information after Key, including Title, Last Author, Audience, Revision, Label,
and Tags.
You can define tags you want to have available using Document Tag Maintenance by entering a
tag string in the Tag Name field. You can use label terms (for example,
${SALES_ORDERS}) for
tags that you want to be translated.
To assign tags you have defined to a particular document attachment, open Document
Maintenance and select the document in the Field Name field. Under Tags, select from the tags
defined in Document Tag Maintenance. You can include up to 10 tags. Note that you can also
define Title, Description, File Type, Audience, Revision fields here.
To determine the document attachments associated with a particular tag, in Document Tags
browse, right-click on a row (tag record) and choose Documents by Tag Name. Documents by Tag
Name launches in a tab under Document Tags, listing all the documents associated with the tag.
The columns in Documents by Tag Name include: Tag Name, Description, Tag Translation, File
Name (the file name of the document attachment), Title (title of the document attachment), File
Size, File Type, Last Author, and Timestamp.
Additionally, Document Attachment Applications lists the Applications IDs. Right-click on an
Application ID and choose Documents by Application ID to list all the documents associated with
a particular application ID (for example,
mfg).
Attachment Storage Path for Operating System Subdirectory Limit
Operating systems can have an upper limit to the number of files or subdirectories that a directory
can have. For example, on some versions of Linux, the limit can be 32,768 (32K). Although this
limit is almost never reached, in certain circumstances it is possible to approach it. For instance, if
your process of adding attachments to programs in the QAD
.NET UI is automated in such a way
that an attachment is being added for each invoice, over time the default mechanism for storing the
attachment files on the home server can approach the operating system’s limit. If you have an
automated process for including many attachments and are running the QAD home server on an
operating system with a limit that you might exceed, QAD provides an alternative mechanism for
storing attachment files.

Configuring System Environments 53
Comments? Go to goo.gl/MfwKHm
The alternative approach uses a hashing algorithm such that the number of subdirectories for
storing attachments will always be less than 16,384 (16K). With the alternative mechanism, the
directory path used for storing attachments (such as invoices) for item numbers in Item Master
Maintenance (ppptmt.p) will change from the default path
(attachments/domain_/ppptmt.p__/item-number_) to
(attachments/32k/domain_/ppptmt.p_/hash/item-number_).
You can configure whether to use the default mechanism by setting
<Bypass32kAttachmentLimit> in the client session configuration file (client-
session.xml). The default value for this setting is false. If set to true, attachments will be
stored using the hashing mechanism.
Note that if you change the setting from false to true, the attachments previously stored using the
default mechanism will continue to be available to the system while new attachments will be
stored using the hashing mechanism. No conversion steps are needed. However, if you then go
back to the default mechanism, attachments stored using the hashing mechanism will not be
visible to the system. The attachment files are all still there in the directory structure, but by going
back to the default mechanism for storing and accessing attachments from the system, the system
will not have the ability to access the attachments stored using the hashing mechanism.
Document Attachment Applications Maintenance and QAD Web UI
Note This information only applies if you are using the QAD Web UI with QAD Enterprise
Applications.
In the QAD .NET UI, Document Attachment Applications Maintenance specifies how
attachments are stored:
• If no Application ID is specified (the Application ID field is blank), the QAD .NET UI uses
the home server default for storing attachments.
• If the Application ID is mfg and the Repository Type is webdav, the QAD .NET UI uses
WebDAV for storing attachments under the URL specified in the Repository field.
Additionally, for implementations of QAD Enterprise Applications with the QAD Reference
Architecture (QRA) that are using the QAD Web UI:
• If Application ID is mfg and the Repository Type is qra, the QAD .NET UI uses a web
service for storing attachments with the URL specified in the Repository field.
With this approach, attachments to programs in the QAD .NET UI can be associated with QAD
Web UI views (and vice versa). Note that this is only available if you are using the QAD Web UI
with your implementation. For more information, see the QAD Web UI documentation.
Changing the location (as specified in the Repository field) requires that the directory under the
previous location be copied to the new location; otherwise, the files cannot be accessed.
Configuration Files
For system administrators, the default configuration files are consolidated in a
TomcatInstallDir/webapps/qadhome/configurations/
default directory. This directory includes the following:

54 QAD .NET User Interface Administration Guide
Questions? Visit community.qad.com
• Client bootstrap configuration file (client-bootstrap.xml): defines parameters for the
QAD
.NET UI client that apply to all system environments associated with the home server
(
TomcatInstallDir/webapps/qadhome). For more information, see “Client Bootstrap
Configuration File” on page 55.
• Client session configuration file (client-session.xml): defines session characteristics of a
client session. For more information, see
“Client Session Configuration File” on page 57. Note
that the client-session.xml.sample file included in the configurations directory
provides an example backup copy of
client-session.xml.
• Menu extension configuration file (.../menus/plugin-menu.xml): defines menu items
added to the QAD
.NET UI outside of the standard programs and functions, along with
security settings. For more information, see
“Menu Extension Configuration File” on page 64.
In the configurations directory, the default directory provides the system-wide default
settings for the home server (
TomcatInstallDir/webapps/qadhome). Because it is the
default, the default system environment does not appear in the “Log on to” pull-down on the Login
window. Be sure not to delete the
/configurations/default directory, which specifies the
system-wide defaults and is a useful reference when you define other system environments.
You define additional system environments by creating additional directories under the
configurations directory. For example, to create a system environment named demo, create a
/configurations/demo directory. Copy the client-session.xml file from the
/configurations/default directory to the /configurations/demo directory, and copy
/configurations/default/menus/plugin-menu.xml to
/configurations/demo/menus/plugin-xml. You can now modify the settings in
/demo/client-session.xml and /demo/menu/plugin-menu.xml to the demo system
environment. Meanwhile, the
/default/client-bootstrap.xml file continues to define
system-wide settings. (You should not remove or rename the default directory.) When users log in
to the QAD
.NET UI client, they will now see the demo system environment available in the “Log
on to” pull-down menu on the Login window.
In the configurations directory, the storage directory is where menu collections and browse
collections are stored when they are saved from Menu Collection Maintenance or Browse
Collection Maintenance. The
/configurations/storage/menu-collections directory
contains XML files representing menu collections and the
/configurations/storage/browse-collections directory contains XML files
representing browse collections. Menu and browse collections included with the QAD
.NET UI
are in the menu-collections and browse-collections directories under the
.../default/storage
directory (
TomcatInstallDir/webapps/qadhome/configurations/
default). To access the menu and browse collections when you set up a system environment, you
must copy the menu-collections and browse-collections directories (and their contents) under the
appropriate system environment directory. For example, if you have set up a system environment
named demo, you need to set up a
/configurations/demo/storage directory with the menu-
collections
and browse-collections subdirectories.
Note Starting with QAD .NET UI 2.9.3, for QAD Enterprise Applications–Enterprise Edition,
you no longer have to copy the files from the default directory. Instead, the QDT-based installation
process does that for you based on the system environments you specify while using QDT. This
only applies to Enterprise Edition, which uses QDT; for Standard Edition, you must copy the files
from the default directory.

Configuring System Environments 55
Comments? Go to goo.gl/MfwKHm
Client Bootstrap Configuration File
The client bootstrap configuration file defines parameters for the QAD .NET UI client that apply
to all system environments associated with the home server
(
TomcatInstallDir/webapps/qadhome).
Some configuration parameters must be resolved prior to the selection of a system environment.
These parameters are identified as bootstrap only and apply to all system environments for the
home server. The other parameters can be configured on a system environment basis by
commenting or removing the definition from the client bootstrap configuration file and adding
definitions in the various client session configuration files for each system environment.
The variable ${installation/directory} expands to the directory in which the executing
instance of the QAD
.NET UI is installed.
${[pluginkey]/installation/directory} identifies the directory in which a specific
plugin is installed.
All other variable references are resolved first as configuration parameter references and if not
resolved as environmental variables on the client.
By default, the client bootstrap file is located in
TomcatInstallDir/webapps/qadhome/configurations/
default/client-bootstrap.xml.
File Usage
The client bootstrap file must be placed in the /configurations/default directory, as
follows:
TomcatInstallDir/webapps/qadhome/configurations/
default/client-bootstrap.xml.
File Format
The client bootstrap configuration file’s top-level XML element is <Configuration>, which
then includes the elements listed in the next section.
File Elements
Element Description Default
<log.level> Specifies a threshold limiting the type of information
that will be logged for all logging contexts in which
a threshold has not been set (OFF, ERROR, WARN,
INFO, DEBUG). Bootstrap only.
INFO
<log.file> Specifies the location of the file on the client where
logging output should be written. Value type: file
system path. Bootstrap only.
${storage/directory}
\QAD.Applications.lo
g
<log.file.size> Specifies the maximum size of the log file in
kilobytes. When the maximum size is reached, the
log file is renamed as a backup and a new log file is
created. Value type: integer. Bootstrap only.
5000

56 QAD .NET User Interface Administration Guide
Questions? Visit community.qad.com
<log.file.backups> Specifies the number of log file backups that should
be retained. When the maximum number of backups
is reached, the oldest log file backup is deleted.
Value type: integer. Bootstrap only.
5
<style.enabled> When true, application styling is enabled. Value
type: boolean (
true or false). Bootstrap only.
true
<style.path> Specifies the location of a file that configures the
look and feel of the application. Value type: file
system path. Bootstrap only.
${installation/direc
tory}\container\
QAD.Applications.Sty
le.isl
<style.reload> When true, changes to the style file will be
automatically reapplied. Value type: boolean (true
or false). Bootstrap only.
false
<storage.directory> Specifies the directory on the client where local state
may be stored where
${APPDATA} resolves to the
user-specific %APPDATA% environment
variable.Value type: file system path. Bootstrap only.
${APPDATA}\QAD\Shell
<webdav.uri> Specifies a URI locating a WebDAV service where
shared state may be stored. Value type: URI.
Bootstrap only.
${homeserver}/webdav
<check.updates> When true, the version of the installed client will be
compared with the version of the client available on
the configuration server. If the configuration server
has a newer version available, the user will be
prompted to update their local installation. Value
type: boolean (
true or false). Bootstrap only.
true
<allow.multiple> When false, a check will be made to see if the client
is already running on the target computer. If it is, the
user will be notified, and the existing instance will
be activated. Value type: boolean (
true or
false). Bootstrap only.
true
<show.workspace
selector>
When true, a navigation bar will be displayed on the
bottom of the application with a button for each
enabled workspace. Clicking on a button switches
the active workspace to the workspace represented
by the button. Value type: boolean (
true or
false). Bootstrap only.
true
<perf> Controls whether performance metrics will be
collected and printed to the log file. May be set to
true or false, or to an integer value that
specifies a threshold in milliseconds to limit the
output to timed tasks whose duration was equal to or
greater than the threshold. Value type: boolean or
integer. Bootstrap only.
false
<disable> Specifies that a plugin deployed on the client that
should not be initialized. Multiple plugins can be
disabled by repeating this configuration. Value type:
plugin key. Bootstrap only.
(blank)
<config.ignore.errors> Allows the client to continue even if configuration
errors are reported. Value type: boolean (
true or
false). Bootstrap only.
false
Element Description Default

Configuring System Environments 57
Comments? Go to goo.gl/MfwKHm
Client Session Configuration File
The client session file defines client session characteristics of the QAD .NET UI.
By default, the file is located in
TomcatInstallDir/webapps/qadhome/configurations/
default/client-session.xml.
The default client-session.xml file also includes parameters for QAD Enterprise
Applications–Enterprise Edition’s Financials module, starting from
<!-- QAD Financials
Settings -->
to the end of the file. Each parameter includes comment sections that describe
parameter usage. These parameters only apply if you are using QAD Enterprise Applications–
Enterprise Edition. They do not apply if you are using QAD Enterprise Applications–Standard
Edition.
You can view the configuration settings directly from the QAD .NET UI client by choosing Help |
View Configuration.
Note The client-session.xml.sample file in the
TomcatInstallDir/webapps/qadhome/configurations/
default/ directory includes extensive comments with examples of using the parameters for
each file entry. Be sure to refer to this file for more information about the client session
configuration.
File Usage
You can define client session files for each system environment by placing them in appropriate
sub-directories under the
/configurations directory, as follows:
TomcatInstallDir/webapps/qadhome/configurations/
config-name/client-session.xml
Where config-name is the system environment name that you select when you log in to the
QAD
.NET UI.
File Format
The client session configuration file’s top-level XML element is <Configuration>, which then
includes the elements listed in the next section.
File Elements
This section summarizes settings available in client-session.xml. For a complete listing with
comments and examples, be sure to refer to the
client-session.xml.sample file in the
TomcatInstallDir/webapps/qadhome/configurations/default/ directory.

58 QAD .NET User Interface Administration Guide
Questions? Visit community.qad.com
Element Description Default
<Attachment> Includes elements for specifying attachment
properties, including <AttachmentsEnabled>,
<MaxFileSize> and <ValidFileTypes>.
<Attachment
AdministrationRoles>
Specifies the administrator roles that have
permission to use Attachment Maintenance. For
example:
<AttachmentAdministrationRoles>
<role1, role2>
<AttachmentAdministrationRoles>
None
<Attachments
Enabled>
Specifies whether attachments are enabled (true or
false). Included in
<Attachment>...</Attachment> element.
true
<Browse> Specifies various browse notification and
performance controls (see “Browse Performance
Controls” on page 13).
(Refer to examples in client-
session.xml.
)
<BrowseRecordsFor
PrintWarning>
When this number of records is reached or exceeded
during printing, a warning is displayed on the client.
10000
<BrowseRecordsFor
ExcelWarning>
When this number of records is reached or exceeded
during export to Excel, a warning is displayed on the
client.
10000
<ChartElementsFor
ChartWarning>
Rendering charts with many elements can be CPU
intensive. To prevent users from attempting to
render large charts that could degrade their
computer’s performance, the system checks the
number of elements in a chart before rendering the
chart and provides a warning if the number of
elements exceeds the value specified here. In a chart
without grouping, the number of elements in a chart
is the number of records in the browse display. In a
chart with grouping, the number of elements is the
number of groups of records.
100
<ConnectionProtocol> Specifies the application server (AppServer)
protocol. Enter one of the following:
AppServer — Unsecured connection to the
name server.
AppServerS — Secure connection to the name
server.
AppServerDC — Unsecure connection to the
AppServer broker.
AppServerDCS — Secure connection to the
AppServer broker.
AppServer
<ConnectionHost> Specifies the host name of the Progress Name Server
if
<ConnectionProtocol> is set to
AppServer or AppServerS. Specifies the
Progress AppServer broker host name if
<ConnectionProtocol> is set to
AppServerDC or AppServerDCS.
$NameServerHost

Configuring System Environments 59
Comments? Go to goo.gl/MfwKHm
<ConnectionPort> Specifies the NameServer port number if
<ConnectionProtocol> is set to
AppServer or AppServerS. The default
NameServer port number is 5164. Specifies the
AppServer broker port number if
<ConnectionProtocol> is set to
AppServerDC or AppServerDCS.
$NameServerPort
<ConnectionService> Specifies the name of the Progress AppServer
created for this configuration.
$AppServerBrokerName
<ConnectionSecure
Protocol>
Specifies the AppServer secure protocol used during
authentication.
AppServer
<ConnectionSecure
Service>
Specifies the protocol to use when launching
Desktop maintenance programs within the
QAD .NET UI. This may be changed to https for
that kind of communication.
$AppServerBrokerName
<ConnectionSecure
Host>
Specifies the secure AppServer host name. $NameServerHost
<ConnectionSecure
Port>
Specifies the secure AppServer port number. $NameServerPort
<Dashboard> Specifies the dashboard configuration settings,
including administration roles, padding, maximum
number of panels, and border colors (see
“Dashboard Settings in client-session.xml File” on
page 22).
(Refer to examples in client-
session.xml.)
<DefaultRefreshRate> Specifies the default rate in seconds at which
browses are automatically refreshed. QAD .NET UI
users can start the automatic refresh by choosing
Refresh|Start and can stop it by choosing Refresh|
Stop. They can change the refresh rate by choosing
Refresh|Rate, right-clicking, and editing the value.
30
<DesktopProtocol> Specifies the protocol for connecting to the
AppServer. Valid values are
http or https.
http
<DesktopHost> Specifies the name of the machine that Tomcat is
running on.
$TomcatHostName
<DesktopPort> Specifies the port number that Tomcat listens on; by
default this is 8080, but could be 8443 if
<DesktopProtocol> is https.
$TomcatPort
<DesktopService> Specifies the name of the UI configuration directory
under Tomcat
webapp directory.
$DesktopWebappName
<DesktopAPI> Specifies the program used to run Desktop
maintenance programs; it does not change.
shell.jsp
<DesktopBaseUrl> Specifies the Desktop base URL.
${DesktopProtocol}:/
/${DesktopHost}:${De
sktopPort}/
${DesktopService}
<DesktopHelp
Service>
Specifies the link to the program that delivers the
QAD Desktop help service.
com/qad/desktop/inte
rface/wsep1.p
<DesktopUsercount
Servlet>
Specifies the name of the servlet used to track user
log-ins; it does not change.
UsercountServlet
Element Description Default

60 QAD .NET User Interface Administration Guide
Questions? Visit community.qad.com
<DesktopUtf8
Conversion>
Set to false if Tomcat has <Connector>
with URIEncoding=”UTF-8” in
server.xml. Otherwise, set it to true (the
default).
true
<DotNetBrowseMainte
nanceShowIndexInfor
mation>
Specfies a performance check on the index use of a
new browse definition when you save it from
Browse Maintenance. The performance check, Show
Index Information, will help to avoid the creation of
poorly performing browses with non-indexed fields
in joins, filters, and sorts.
true
<GoOnLastField> Specifies whether a program screen (frame) will be
automatically submitted when the cursor leaves the
last field on the frame. Enter true or false.
false
<GuideMe.Debug> When set to “true” unresolved tokens are displayed
and the Browser context menu is enabled. Tokens
are in the form {help:program:field} and by default
unresolved tokens are not displayed.
false
<GuideMe.Enabled> Enables/disables the GuideMe feature.
false
<GuideMe.
ShowDelay>
Sets the time in milliseconds the mouse must hover
over a control region before displaying the GuideMe
tooltip.
500
<GuideMe.
HideDelay>
Sets the time in milliseconds to display the GuideMe
tooltip before hiding the tooltip. A value of zero
indicates the tooltip will not be hidden until the
mouse leaves the control region.
0
<GuideMe.
Animation>
Enables/disables GuideMe animation. Animation
can cause performance issues in Citrix environments
and can be disabled using this setting.
true
<HomePage.Enabled> Specifies whether the home page feature is enabled
or disabled by default. Enter
true or false.
false.
<HomePage.Url> Specifies the default home page URL. The URL can
be any valid URL, including qadsh:\\ links.
http://www.qad.com.
<HelpService> Specifies the help service program. This is an
administration setting; it does not change.
mfwb01.p
<ImageFont> In operational metrics, specifies the font used in
saved images. Included in
<Metrics>...</Metrics> element.
Microsoft Sans
Serif, 8.25pt
<MaxFileSize> Specifies the maximum file size (in kilobytes) that
users can attach. Zero (0) specifies no limit. Included
in <Attachment>...</Attachment>
element.
0
<MaxBrowseRecords
ForCount>
In opertaional metrics, specifies the maximum
number of records for count metrics. Included in
<Metrics>...</Metrics> element.
100000
<MaxBrowseRecords
Returned>
In operational metrics, specifies the maximum
number of records returned to the client when
requested. Included in
<Metrics>...</Metrics> element.
50000
<MaximumBrowse
RecordsToCount>
Specifies the maximum number to check for (count)
before a > symbol is displayed on a client.
50000
Element Description Default

Configuring System Environments 61
Comments? Go to goo.gl/MfwKHm
<MaximumBrowse
RecordsToDownload>
Specifies the maximum number of records that a
client can download.
50000
<Menu>...<Image> Specifies a path to a custom image for a custom
menu item type.
<Menu>
<Image name=
"custom">http://url_path/custom.png
</Image>
</Menu>
<Metrics> Includes elements for operational metrics, including:
<MaxBrowseRecordsForCount>,
<MaxBrowseRecords Returned>,
<ShowTextOnImage>, and <ImageFont>.
As listed
<QAD.Message.Poller.
Frequency>
Specifies the frequency to retrieve Inbox messages
from the server in milliseconds.
300000 (five minutes).
<RequestTimeout> This parameter sets the number of seconds after
which a web request times out. The range is 10 to
120 seconds.
30 seconds.
<ShowServer
Timezone>
You can configure the workspace title to include the
server time zone by setting this parameter to
true.
false
<ShowTextOnImage> In operational metrics, specifies whether to show the
title and date on saved images. Included in
<Metrics>...</Metrics> element.
true
<SshProviderUrl> Specifies the location for the DLL file
(
Routrek.granados.dll) to be
downloaded to the clients when they use SSH for
terminal connections. Note that the file is not
included with QAD software because of exportation
laws regarding encryption software. When installing
QAD software, you must download the file from
http://www.routrek.co.jp/suppor
t/download/varaterm/
granados200.tar.gz. and place the file in
the location specified by the
<SshProviderUrl> so that the file is
downloaded to clients. For additional information,
see the comments in the client session configuration
file (
client-session.xml) for the
<SshProviderUrl> element.
${HomeServer}/
Routrek.granados.dll
<TerminalProtocol> Specifies the protocol used for terminal connections.
Options include
telnet, ssh1, and ssh2. The
telnet option is the default setting for typical non-
secure Telnet implementations. The ssh1 option
is for Secure Shell protocol 1 (SSH1). The
ssh2
option is for Secure Shell protocol 2 (SSH2). Note
that Telnet uses port 23 and SSH protocols use port
22. The port number is set in User Option Telnet
Maintenance (36.20.10.3). Also see:
“Configuring
Georgia Softworks for both Telnet and SSH” on
page 64.
telnet
<TerminalEncoding> Specifies the encoding for terminal connections. UTF-8
Element Description Default

62 QAD .NET User Interface Administration Guide
Questions? Visit community.qad.com
<TerminalEncoding
Map>
Specifies code pages (such as <CodePage
Progress="iso8859-1">iso-8859-
1</CodePage> ) for configuring terminal
encoding by domain (see
“Configuring Terminal
Encoding By Domain” on page 43).
(Refer to examples in client-
session.xml.)
<Terminal
Authentication>
Specifies the credentials to use for terminal
connections. Valid values are
ShellUser,
ScriptUser, or PromptUser. (The values
are case-insensitive.) ShellUser specifies to
use the QAD
.NET UI user ID and password when
logging into the server. ScriptUser specifies
to use the user ID and password defined in User
Option Telnet Maintenance (36.20.10.3). With
PromptUser, when a terminal screen is
launched, the user is prompted for a user ID and
password to log into the server. These credentials are
used throughout the current session, so the user is
not prompted again until they log in again to the
QAD
.NET UI.
ShellUser
<UseLocalDateAnd
NumberFormats>
Specifies whether the QAD .NET UI uses the
regional settings on a user’s computer. Enter true
or false.
true
<ValidFileTypes> Specifies a comma-separated list of file types
allowed for attachment. Includes a size attribute so a
particular file type has a larger size than the default
(as specified in <MaxFileSize>). For example,
<ValidFileTypes size=
"3096">zip</ValidFileTypes> specifies
that .zip files can be up to 3096 kilobytes. Also
includes a typeid attribute to overwrite the default
for a particular program. For
example,<ValidFileTypes typeid=
"sosomt.p" size=
"0">zip</ValidFileTypes> specifies no
limit on the size of .zip files that can be attached to
Sales Order Maintenance. <ValidFileTypes> is
included in the
<Attachment>...</Attachment> element.
<WebDAVRoot> By default, attachments are stored in
TomcatInstallDir/webapps/qadhom
e/configurations/config-name/
storage/attachments, where
subdirectories organize the attachments based on
domain, program, type, and field. Each directory
includes an underscore character (_) at the end by
default to account for the possibility of using a
blank.
Instead of using the default attachment path, you can
specify a different path (WebDAV location) using
the
<Attachment> <WebDAVRoot>
setting. By default, the setting is commented out and
the default path is used.
Note that the WebDAV location should be UTF-8
enabled to support the WebDAV standard.
${HomeServer}/webdav
/attachments
Element Description Default

Configuring System Environments 63
Comments? Go to goo.gl/MfwKHm
<Web.Connection
Limit>
Specifies the maximum number of Web connections. 11
<Web.DnsRefresh
Timeout>
Specifies the DNS refresh timeout limit in
milliseconds.
7200000 (two hours)
<Web.MaxService
PointIdleTime>
Specifies the session “keep alive” limit in
milliseconds.
10000 (10 seconds).
<Web.WebdavUtf8
Conversion>
Set to false if Tomcat has <Connector>
with URIEncoding=”UTF-8” in
server.xml. Otherwise, set it to true (the
default).
true
<Workspace.Default
ToolBarColor>
Specifies toolbar colors. To set the primary toolbar
color, use
<Workspace.DefaultToolBarColor>,
specifying the color as RGB values. To set the
secondary toolbar color, use
<Workspace.DefaultToolBarColor2
>
, specifying the color as RGB values. You can
specify individual workspaces to have different
toolbar colors based on the workspace ID, which
typically has the format
domain-
id.entity_id
. For example:
<Workspace.workspaceid1.ToolBar
Color>Silver</Workspace.workspa
ceid1.ToolBarColor>
233,233,233
<Workspace.Provider> Specifies the workspace provider as
QAD.Plugin.Services.DomainWorks
paceProvider
, which creates one workspace
per domain, or
QAD.Plugin.Services.DomainEntit
yWorkspaceProvider
, which creates one
workspace per domain plus entity.
QAD.Plugin.Services.
DomainEntity
WorkspaceProvider.
<Workspace.Format> Specifies the format of a workspace display name.
You can use the following to customize the
workspace name:
${db-name} (the database name)
${domain-name} (the domain name)
${domain-id} (the domain ID)
${currency} (the currency)
${entity-name} (the entity name)
${entity-id} (the entity ID)
${culture-name} (the culture name)
${domain-timezone} (server timezone
name for domain)
${domain-tzoffset} (server timezone
offset for domain, +HH:MM format)
${domain-codepage} (server codepage used
for domain)
${domain-id}
${domain-name}
[${currency}] >
${entity-id}
${entity-name}
Element Description Default

64 QAD .NET User Interface Administration Guide
Questions? Visit community.qad.com
Configuring Georgia Softworks for both Telnet and SSH
You can configure the Georgia Softworks Universal Terminal Server to run both Telnet and SSH
on the same machine by configuring some registry settings:
1 Make sure that you are running Georgia Softworks Universal Terminal Server (GSW UTS)
version V6.50.0038 or later.
2 Change the parameter:
HKEY_LOCAL_MACHINE\SYSTEM\CurrentControlSet\Services\GS_Tnet\Paramete
rs\AllowTelnetWithSSH
to a setting of 1.
3 Change the parameter:
HKEY_LOCAL_MACHINE\SYSTEM\CurrentControlSet\Services\GS_Tnet\Paramete
rs\LsnOnLoopbackOnly
to a setting of 0.
4 Restart the GSW UTS service.
Menu Extension Configuration File
The menu extension configuration file defines menus added to the QAD .NET UI outside of the
standard programs and functions. By default, the menu extension configuration file is located in
TomcatInstallDir/webapps/qadhome/configurations/
default/menus/plugin-menu.xml.
File Usage
You can define menu extension configuration files for each system environment by placing them
in appropriate subdirectories under the
/configurations directory, as follows:
TomcatInstallDir/webapps/qadhome/configurations/
config-name/menus/plugin-menu.xml
Where config-name is the system environment name that you select when you log in to the
QAD
.NET UI.
File Format
The default menu configuration file is located in
TomcatInstallDir/webapps/qadhome/configurations/menus/plugin-menu.xml.
The file contains hierarchical XML elements. The top-level element is
<PluginExtender>.
File Elements
The file includes the following XML elements:

Configuring System Environments 65
Comments? Go to goo.gl/MfwKHm
<PluginExtender>
The <PluginExtender> element is the top-level container for the menu extension configuration
file.
Contains
<ResourceFile>
<Security>
<Workspaces>
Contained By
Not contained by any other element.
Attributes
Name Description Default Req?
provider Identifies the originator of the menu
extension
s.
QAD Ye s
key Specifies the element identifier
. blank Yes
version Specifies the version of the menu
ext
ension file definition.
1.0.0.0 Yes
Example
<PluginExtender provider="QAD" key="" version="1.0.0.0">
<Security>
The <Security> element contains a set of security constraints.
Contains
<SecurityConstraint>
Contained By
<PluginExtender>
Attributes
N/A
Example
<Security>
<SecurityConstraint key="admin" constraint="allow">
<Role>admin</Role>
<Role>dtadmin</Role>
<Role>qadadmin</Role>
<User>mfg</User>

66 QAD .NET User Interface Administration Guide
Questions? Visit community.qad.com
</SecurityConstraint>
</Security>
<SecurityConstraint>
The <SecurityConstraint> element defines a security constraint key and whether the
constraint is to allow or deny access.
Contains
<Role>
<User>
Contained By
<Security>
Attributes
Name Description Default Req?
key
Specifies a security constraint key, which
identifies a shell menu security group
consisting of various roles and users. The
menus made available by a given
<ShellMenu> element are only available
to roles and users within the security
constraint key.
admin Yes
constraint
Define a listing of allowed (allow) or
denied (deny) roles or users.
allow Yes
Example
<Security>
<SecurityConstraint key="admin" constraint="allow">
<Role>admin</Role>
<Role>dtadmin</Role>
<Role>qadadmin</Role>
<User>mfg</User>
</SecurityConstraint>
</Security>
<Role>
The <Role> element specifies a role subject to a security constraint.
Contains
N/A

Configuring System Environments 67
Comments? Go to goo.gl/MfwKHm
Contained By
<SecurityConstraint>
Attributes
N/A
Example
<Role>admin</Role>
<User>
The <User> element specifies a user subject to a security constraint.
Contains
N/A
Contained By
<SecurityConstraint>
Attributes
N/A
Example
<User>mfg</User>
<Workspaces>
The <Workspaces> element contains the workspace elements within which the menu extensions
are available.
Contains
<Workspace>
Contained By
<PluginExtender>
Attributes
N/A
Example
<Workspaces>
<Workspace key="all" image="" label="">
...

68 QAD .NET User Interface Administration Guide
Questions? Visit community.qad.com
</Workspace>
<Workspaces>
<Workspace>
The <Workspace> specifies the workspace within which the menu extensions are available. By
default, the key attribute is set to all so that it applies to all the workspaces.
Contains
<ShellMenus>
Contained By
<Workspaces>
Attributes
Name Description Default Req?
image
Specifies the element identifier. all Yes
key
Specifies an image for the workspace. blank Yes
label
Specifies a label for the workspace. blank Yes
Example
<Workspace key="all" image="" label="">
<ShellMenus>
....
</ShellMenus>
<ShellMenus>
....
</ShellMenus>
</Workspace>
<Properties>
The <Properties> element specifies a set of properties. Specifies a property whose type is
defined as
string, config or label. Properties defined as a label are translated using Label
Master. The
config properties are resolved using configuration values. The string properties
are resolved using any combination of properties or literal strings.
Note The entries for this element do not typically require any changes by a system administrator.
This section is provided for informational purposes only.
Contains
N/A

Configuring System Environments 69
Comments? Go to goo.gl/MfwKHm
Contained By
<PluginExtender>
Attributes
N/A
<Property>
The <Property> element under <Properties> specifies a property whose type is defined as
string, config or label. Properties defined as a label are translated using Label Master. The
config properties are resolved using configuration values. The string properties are resolved
using any combination of properties or literal strings.
Note The entries for this element do not typically require any changes by a system administrator.
This section is provided for informational purposes only.
Contains
N/A
Contained By
<Properties>
Attributes
Name Description Default Req?
name
The name of the property, which
is resolved from an item such as a
label defined in the format
$(name).
N/A Yes
value
The value of the property, which
the system uses to look up the
translation for the name
N/A Yes
type
The type of the property. The type
of the property is set to string by
default if type is not included.
string No
Example
You have defined a shell menu with the label set as ${Processes}, as follows:
<ShellMenus>
<ShellMenu key="process" menuType="application" label "${Processes}">
...
</ShellMenu>
</ShellMenus>
The system resolves the string inside the dollar sign and brackets and identifies the value to look
up the label based on an entry for the string in a
<Property> element’s name attribute:

70 QAD .NET User Interface Administration Guide
Questions? Visit community.qad.com
<Property name="Processes" value="PROCESSES" type="label"/>
The system looks up the actual string for the label based on the PROCESSES value and displays the
string as the label in the QAD
.NET UI.
<ShellMenus>
The <ShellMenus> element contains the <ShellMenu> elements that define a particular menu
extension.
Contains
<ShellMenu>
Contained By
<Workspace>
Attributes
N/A
Example
<ShellMenus>
<ShellMenu key="process" menuType="application" label="Processes">
...
</ShellMenu>
</ShellMenus>
<ShellMenu>
The <ShellMenu> element specifies a menu extension consisting of one or more
<ShellMenuItem> elements.
Contains
<ShellMenuItem>
Contained By
<ShellMenus>
Attributes
Name Description Default Req?
key
Specifies the element identifier. N/A Yes
menuType
Specifies the menu type, such as application. N/A Yes

Configuring System Environments 71
Comments? Go to goo.gl/MfwKHm
Example
<ShellMenu key="process" menuType="application" label="Processes">
<ShellMenuItem key="process.0" label="Inventory" image="ProcessMap">
...
</ShellMenuItem>
</ShellMenu>
<ShellMenuItem>
The <ShellMenuItem> specifies a menu item.
Contains
<Command>
<Parameter>
<Property>
Contained By
<ShellMenu>
Attributes
label
Specifies the name of the menu as it appears on
the QAD .NET UI.
N/A Yes
security
Specifies a security constraint key, defined
using the <SecurityConstraint> element.
N/A No
Name Description Default Req?
key
Specifies the element identifier. N/A Yes
label
Specifies the name of the menu item as it appears on the QAD .NET
UI.
N/A Yes
Name DescriptionDefaultReq?

72 QAD .NET User Interface Administration Guide
Questions? Visit community.qad.com
image
Specifies an image to be associated with the menu item on the
QAD .NET UI. A 16x16 pixel icon is returned and converted to a
bitmap. There are two methods for resolving image names. The first
method uses internal images and can be referenced by a case-
insensitive canonical name. If the image cannot be found internally,
the image is retrieved from the operating system. Images resolved
by the operating system can reference file names or file extensions.
For example, image="print" uses the internal print image and
image=".pdf" uses the image associated with a PDF file.
Standard image keys include the following:
• Help
• AddTable
• OpenFolder
• ClosedFolder
• Cut
• Paste
• Copy
• Excel
• Document
• Forms
• Mail
• Save
• Search
• Print
• PrintPreview
• Views
• Filter
• Chart
N/A Yes
Name Description Default Req?

Configuring System Environments 73
Comments? Go to goo.gl/MfwKHm
image
• Quantity
• Browse
• Maint
• Report
• ProcessMap
• Fields
• FirstPage
• LastPage
• PrevPage
• NextPage
• Load
• ClearResults
• Go
• Add
• Remove
• Globe
• Admin
• Bom
• BomComponent
• NewNode
• NewFile
• Refresh
• Cancel
• Home
• Favorites
• UndoProductStructure
• UndoComponent
• NewNode
• NewFile
• Refresh
• Cancel
• Home
• Favorites
• UndoProductStructure
• UndoComponent
• BrowseGrid
• ChartDesignIcon
• Clear
• SaveAs
• Edit
• MenuCollection
N/A Yes
Name Description Default Req?

74 QAD .NET User Interface Administration Guide
Questions? Visit community.qad.com
Examples
The following example adds a process map:
<ShellMenuItem key="process.3" label="Inventory" image="ProcessMap">
<Command type="QAD.Commands.ProcessViewerCommand">
<Parameter value="${DesktopBaseUrl}/ProcessViewer.jsp?ProcessName=
Inventory" type="System.Uri,System"/>
<Property name="Text" value="Inventory"/>
</Command>
</ShellMenuItem>
The following example adds Microsoft Notepad:
<ShellMenuItem key="apps.word" label="Notepad" image="notepad.exe">
<Command type="QAD.Commands.ProcessCommand">
<Property name="StartInfo.FileName" value="notepad.exe"/>
</Command>
</ShellMenuItem>
image
• GoTo
• Action
• Sort
• SortUp*
• SortDown*
• GridColumnHeaderBackground*
• CompanyLogo*
• CloseActive*
• CloseInactive*
• CloseInactiveMouseOver*
• CloseActiveMouseOver*
• TabHeaderBackground*
• TabSeparator*
• ChartSampleColumn*
• ChartSampleColumn3D*
• ChartSampleBar*
• ChartSampleBar3D*
• ChartSamplePie*
• ChartSamplePie3D*
• ChartSampleStackedColumn*
• ChartSampleStackedColumn3D*
• ChartSampleStackedBar*
• ChartSampleStackedBar3D*
• ActiveTabBackground*
• Bullet*
• BulletWithTail*
• Arrow*
• BulletTriangle*
• ToolbarBackground*
• Delete*
• QADIcon*
The asterisk (*) indicates that images that are not 16x16 pixels in
size.
N/A Yes
security
Specifies a security constraint key, defined using the
<SecurityConstraint> element.
N/A No
Name Description Default Req?

Configuring System Environments 75
Comments? Go to goo.gl/MfwKHm
The following adds Microsoft Word:
<ShellMenuItem key="apps.word" label="Word" image=".doc">
<Command type="QAD.Commands.ProcessCommand">
<Property name="StartInfo.FileName" value="WinWord.exe"/>
</Command>
</ShellMenuItem>
The following adds Microsoft Excel:
<ShellMenuItem key="apps.excel" label="Word" image=".xls">
<Command type="QAD.Commands.ProcessCommand">
<Property name="StartInfo.FileName" value="Excel.exe"/>
</Command>
</ShellMenuItem>
The following adds Microsoft Internet Explorer:
<ShellMenuItem key="apps.iexplore" label="WebBrowser" image=".html">
<Command type="QAD.Commands.ProcessCommand">
<Property name="StartInfo.FileName" value="about:blank"/>
</Command>
</ShellMenuItem>
<Command>
The <Command> element specifies a QAD-defined command for a menu item.
Contains
<Parameter>
<Property>
<Method>
Contained By
<ShellMenuItem>
Attributes
Name Description Default Req?
type
Specifies the command type as made available by QAD. Examples
of command type include the following:
QAD.CommandsProcessCommand
QAD.CommandsProcessViewerCommand
QAD.CommandsStackedCommand
QAD.CommandsWebBrowserCommand
QAD.CommandsPlayListCommand
QAD.CommandsRoleListCommand
N/A Yes
Example
<Command type="QAD.Commands.ProcessViewerCommand">
<Parameter>
The <Parameter> element specifies a parameter associated with a particular command or
method.

76 QAD .NET User Interface Administration Guide
Questions? Visit community.qad.com
Contains
N/A
Contained By
<Command>
<Method>
Attributes
Name Description Default Req?
value
Specifies a path or program as required by a
<Command> or <Method> element.
N/A Yes
type
Specifies the value type. N/A No
Example
<Parameter value="${DesktopBaseUrl}/ProcessViewer.jsp?ProcessName=
Inv
entory" type="System.Uri,System"/>
<Parameter value="gpbr348.p" type="System.String" />
<Parameter value="popomt.p,sosomt.p" />
<Property>
The <Property> element under <Command> specifies a property associated with a particular
command.
Contains
N/A
Contained By
<Command>
Attributes
Name Description Default Req?
name
Specifies the name of the property. N/A Yes
value
Specifies the value of the property. N/A Yes
Example
<Property name="Text" value="Inventory"/>
<Method>
The <Method> element specifies a method associated with a particular command.
Contains
<Parameter>

Configuring System Environments 77
Comments? Go to goo.gl/MfwKHm
Contained By
<Command>
Attributes
Name Description Default Req?
name
Specifies the name of the method. N/A Yes
Example
<Method name="AddMenuItemAliases">
<Parameter value="popomt.p,sosomt.p" />
...
</Method>
Setting Menu Extension Security
With the <SecurityConstraint> element, you can define a key that specifies a group of roles
and users that are subject to a security constraint. You can then refer to that key as an attribute in a
<ShellMenu> or <ShellMenuItem> element, which specify the external menus and menu
items. In this way, you can limit the availability of menus or menu items.
For example, you could define an admin security constraint key that
applies to some roles (admin,
qadadmin) and users (mfg), as follows:
<SecurityConstraint key="admin" constraint="allow">
<Role>admin</Role>
<Role>qadadmin</Role>
<User>mfg</User>
</SecurityConstraint>
With the constraint attribute set to allow, only the admin roles or users can access menus defined in
a <ShellMenu> element that includes a security attribute set to admin:
<
ShellMenu key="images" menuType="application" label="Example Menu"
sec
urity="admin">
...
</ShellMenu>
Use of the security attribute in <ShellMenu> is optional, so if it is not used there are no security
constraints on that particular menu set.
With the above setup, you will see Example Menu and everything under it in the QAD .NET UI
only if you are
the user mfg or have the admin or qadadmin roles.
The menu extension configuration file does not define the roles and users in the system; it only
identifies the
ones to which it applies security constraints.
You can also define a security constraint
key with constraint=deny. In this case, the roles and users
in the security constraint key definition are denied access to any <ShellMenu> (or
<ShellMenuItem>) element with the security attribute set to that key. Further, those roles and

78 QAD .NET User Interface Administration Guide
Questions? Visit community.qad.com
users are denied access to any items defined below the initially denied element in the hierarchy,
even if another security constraint key further down in the hierarchy has been set that allows them
access.
You can control how the menu extension configuration file gets applied depending on how it is
named and where you put it, which can affect how security constraints are applied.
Defining Labels
In the menu extension configuration file, you can map label names as used in the file to label
values that display in the QAD
.NET UI.
The <Properties> element maps a label name to a label value as follows:
<Properties>
<Property name="LabelName" value="Label Value" type="label"/>
...
...
</Properties>
In the menu extension configuration file, you can now use ${LabelName} in your menu item
definitions. When the label displays as a menu item in the QAD
.NET UI, the menu item label is
displayed as Label Value.
For example, in the following <ShellMenu> definition with the label ${Admin} will be
transformed to
Administration in the QAD .NET UI because the <Property> element maps
Admin to Administration.
<Properties>
<Property name="Admin" value="ADMINISTRATION" type="label" />
...
...
...
</Properties>
...
...
...
<ShellMenu key="images" menuType="application" label="${Admin}" security=
"admin">
<ShellMenuItem ...>
...
</ShellMenuItem>
...
...
...
</ShellMenu>
Adding URIs as Shell Menu Items
You can add URI links as shell menu items within any shell menu set. For example, the
<ShellMenuItem> element for adding a link to Google is as follows:
<ShellMenuItem key="example.1" label="Google">
<Command type="QAD.Commands.WebBrowserCommand">
<Parameter value=”http://www.google.com” type="System.Uri,System">
<Property name="Title" value="Google"/>

Configuring System Environments 79
Comments? Go to goo.gl/MfwKHm
</Command>
</ShellMenuItem>
Similarly, a URI link to FedEx is as follows:
<ShellMenuItem key="spec.3" label="FedEX">
<Command type="QAD.Commands.WebBrowserCommand">
<Parameter value="http://www.fedex.com" type="System.Uri,System" />
<Property name="Title" value="FedEX" />
</Command>
</ShellMenuItem>
Adding Process Maps
To add process maps to the QAD .NET UI, you must add them in the menu extension
configuration file using the
<ShellMenuItem> element. The format for adding a process map
using the
<ShellMenuItem> element is as follows:
<ShellMenuItem key="process.N" label="ProcessMapName" image=
"ProcessMap">
<Command type="QAD.Commands.ProcessViewerCommand">
<Parameter value="${DesktopBaseUrl}/ProcessViewer.jsp?ProcessName=
ProcessMapName" type="System.Uri,System"/>
<Property name="Text" value="ProcessMapName"/>
</Command>
</ShellMenuItem>
The first process map defined in the file includes <ShellMenuItem key="process.0"..., the
next map includes
<ShellMenuItem key="process.1"..., and so on. If the last process map
defined in the file includes
<ShellMenuItem key="process.9"..., then the next map you
add should include
<ShellMenuItem key="process.10".... Next, references to the process
name need to be included in the
<ShellMenuItem>’s label attribute, the <Parameter>
element’s value attribute, and the
<Property> element’s value attribute. For example, the
following adds a process map named
MapExample as the 11th map defined in the file:
<ShellMenuItem key="process.10" label="MapExample" image="ProcessMap">
<Command type="QAD.Commands.ProcessViewerCommand">
<Parameter value="${DesktopBaseUrl}/ProcessViewer.jsp?ProcessName=
MapExample" type="System.Uri,System"/>
<Property name="Text" value="MapExample"/>
</Command>
</ShellMenuItem>

Chapter 4
Configurable Screens
This chapter describes using Configurable Screens in the QAD .NET UI:
Using Configurable Screens 82
Assigning Configurable Screen Templates 83
Impact of System Changes to Configurable Screens 83
Configurable Screen Error Handling 84
Resolving Configurable Screen UI Template Conflicts 84
Setting up Configurable Screens 84
Designing a Template 85
Creating a Template 86
Configuring Program Screens 87
Adding Fields and Frames 90
Restricting Configurable Screens by Domain 96
Configurable Screens Report 96

82 QAD .NET User Interface Administration Guide
Questions? Visit community.qad.com
Using Configurable Screens
This section describes using Configurable Screens in the QAD .NET UI.
QAD provides a design tool for configuring selected screens. The design tool lets users in a
designated UI design group disable fields for input, hide fields, set a predefined default value for a
field, mark a field as required, add fields and frames, and indicate that navigation through a frame
should occur automatically. By combining these features, designers can create a screen sequence
that greatly streamlines data input for users.
Screen definitions are stored as UI templates, which can be assigned to user groups so that the
screen appearance and behavior can vary based on the user’s role within an organization. Tools are
provided so that administrators can resolve any conflicts that occur regarding screen assignment
when a user belongs to more than one user group.
Configuring screens enables you to help the individuals in your company get their jobs done
quicker and more effectively. By eliminating fields that are not used at your site, you can also
reduce training time and potential data input errors. However, you must have a very clear
understanding of how a particular function is being used before you change the data input
requirements. Because of the inherent flexibility of the software, each company that implements a
particular function may use different features. This can affect which fields are required and which
are optional.
The following are a few examples of how this can occur:
Example Generalized codes validation. Many programs support the use of generalized codes. If
codes have been defined for a field in Generalized Codes Maintenance (36.2.13), built-in
validation results in an error when the field is left blank. However, if no codes are defined, the field
can be left blank and an error is not generated. Hiding a validated field without providing a valid
default value creates a problem in the first scenario but not in the second.
Example Optional modules. The behavior of some programs is affected by the implementation of
optional related modules. For example, different fields and pop-ups display in Sales Order
Maintenance depending on whether you are using available-to-promise features, Enterprise
Material Transfer, or updating the Service/Support Management installed base. In addition,
Container and Line Charges, Customer Consignment Inventory, and Logistics Accounting affect
sales orders.
Example Control settings. Settings in control programs can determine whether a field is required
or even whether it displays on the interface. For example, the Invoice From Recording setting in
Call Management Control determines if certain fields display in the last frame of Call Activity
Recording (11.1.1.13).
These examples highlight that you must take care in planning the changes you want to implement.
You must also thoroughly test the templates you create before using them in a production
environment.
Note The Configurable Screens function is available for non-component-based screens only. You
can customize component-based screens using component-based Design Mode.

Configurable Screens 83
Comments? Go to goo.gl/MfwKHm
Assigning Configurable Screen Templates
A set of changes to a particular program’s user interface is stored as a template. Templates are then
assigned to user groups. In QAD Enterprise Applications - Standard Edition, groups are defined in
User Group Maintenance (36.3.4) and then assigned to users in User Maintenance (36.3.1). The
system displays all groups defined in User Group Maintenance. In addition, you can assign a
generic template to all users. The system activates a template assigned to all users only when a
specific template is not assigned to users, based on their group membership.
Specific group assignments always take precedence over generic templates. However, it is still
possible for a user to belong to more than one group with different assigned templates. In this case,
the system chooses the template based on an internal identifier, which might not be what is wanted
or expected. However, the UI Template Conflicts screen allows the administrator to specify the
template.
The system also provides a UI Template Conflicts administrative function that lets you view UI
template assignment conflicts and manually determine which template should be used
When you design your templates, you should plan how you want to assign users and determine if
your existing groups accommodate the way you want to develop your templates. Since security
groups often reflect functional responsibility within an organization, they typically already
represent different views of an organization that can be supported by different templates. However,
you may find that you need to add new groups to be able to use templates to the best advantage in
your particular implementation.
Impact of System Changes to Configurable Screens
UI templates are based on the order and organization of a specific user interface. Certain changes
to screens can invalidate existing UI templates, resulting in unexpected behavior during execution.
These changes include:
• Key fields are added or removed.
• The initial focus field or the first field of a frame is changed. These fields are points of
reference for other field information in the template.
• The internal Progress frame name is changed.
• The location of a frame on the screen is changed; for example, moving a frame from the top of
the screen to the bottom. This changes the x and y coordinates of the frame, which are used as
location identifiers.
These types of changes are not common.
You should be aware of possible UI impacts when:
• You customize any supported programs.
• You install QAD service packs or upgrade QAD releases.
Be sure to check the release notes provided with the release or service pack to see if these kinds of
program changes occurred.
The following kinds of UI changes do not adversely affect UI templates:
• Adding or removing fields from frames, other than the initial focus field or first field
mentioned previously.

84 QAD .NET User Interface Administration Guide
Questions? Visit community.qad.com
• Adding or removing frames.
• Changing the sequence that frames appear as long as the frames remain in the same screen
location.
Configurable Screen Error Handling
To help you during testing, an additional message displays when a program error is generated
because a template does not allow entering a field that is validated by the system.
For example, a frame can have a field that is validated by the system. If that field is hidden so that
the user cannot supply a value, the user will not be able to proceed through the program.
In this case, the system displays additional information with the error indicating that a
configurable screen setting caused the error, like the following example:
The following error was caused by a configurable screen setting.
Please contact your System Administrator.
ERROR: Country code does not exist. Please re-enter.
Resolving Configurable Screen UI Template Conflicts
Use the Configurable Screen UI Template Conflicts screen to resolve conflicting template
assignments. These conflicts can occur because users belong to more than one group.
For example, John Smith belongs to the Sales1 user group and Manager1 group. The UI designer
creates a UI template for Sales Order Maintenance and assigns it to group Sales1. The designer
also creates a second Sales Order Maintenance template for managers and assigns it to group
Manager1. When John logs in and uses Sales Order Maintenance, the system has no way of
knowing which version of the UI to present.
In these situations, the system chooses the template based on an internal identifier, which might
not be what is wanted or expected. The system notes this as a conflict to be resolved by the UI
Template Conflicts function. You can view and manage these conflicts using the UI Template
Conflicts function, accessible from the Configurable Screens table on the Configurable Screens
Admin screen.
The UI Templates Conflict screen lists all users that belong to more than one group with an
assigned template. The administrator can use the drop-down list in the Conflict column to select
the group assignment that the system should prioritize.
Setting up Configurable Screens
To set up configurable screens:
1 Choose Administration|Configurable Screens.
2 Click Configurable Screens Setup.

Configurable Screens 85
Comments? Go to goo.gl/MfwKHm
Fig. 4.1
Configurable Screens Setup
You must specify values for the following fields:
Enable Configurable Screens. Select this field to enable members of the group specified for
UI Design Group to create screen templates and assign them to users.
• Enabled: Members of the UI design group can create templates, and templates assigned to
user groups are active when those users access the associated program.
• Disabled: Templates cannot be created and any that exist are not active even if assigned to
users.
UI Design Group. Enter the name of a user group that is authorized to create and modify
screen templates. Only members of this group can create configurable screen templates. In
QAD Enterprise Applications - Standard Edition, predefine groups in User Group
M
aintenance (36.3.4) and then associate them with users in User Maintenance (36.3.1).
Click Save to apply this setting.
Setting Up Configurable Screens in Enterprise Edition
In QAD Enterprise Applications - Standard Edition, you assign templates to user groups, which
you define in User Group Maintenance (36.3.4) and then assign to users in User Maintenance
(36.3.1).
In QAD Enterprise Applications - Enterprise Edition, the user group function is replaced by the
role fu
nction. To enable Configurable Screens in Enterprise Edition, you therefore enter the name
of the role to which you want to assign the function in the UI Design Group setup field. The users
to which this role has been assigned are then authorized to create and modify templates for
Configurable Screens.
Designing a Template
When you configure screens, you create templates and assign them to user groups. Each template
defines how fields display, whether they are required and enabled, if default values are supplied,
and any automatic navigation from frame to frame.
To create a new template, select on
e of the programs in the menu system, such as Customer
Maintenance. Right-click to display options and choose Design.
Note This option is enabled only when you are logged in as a member of the UI Design Group.
To move through the sequence of frames in a program, you must either c
reate a new record or
modify an existing one. However, when you are in configure mode, none of the changes that you
make to database records are saved. You use the record simply as a way to move through the
screen.

86 QAD .NET User Interface Administration Guide
Questions? Visit community.qad.com
In cases where new records are assigned sequential numbers, it may be better not to create new
records. Although the records are not saved, number sequences are incremented. For example, if
you create a new sales order in configure mode, the new order is not saved. However, the next
sales order number in Sales Order Control (7.1.24) is incremented, leaving a gap in sales order
numbers.
On the other hand, testing of template changes is simplified when you create a new record, rather
than editing an existing one. When a new record is created, many fields that require data may be
initially blank. For an existing record, these would already have values. If you hide a required field
and test with an existing record that has a field value, no error is generated. Later when a user
attempts to create a new record, template errors may occur because a field that needs input cannot
be updated.
Important To support rolling back changes when you exit design mode, some database records
may remain locked during the entire time you are in simplify mode. To reduce any adverse effects
of record locking on other users of the system, designers should create and modify UI templates
when other users are not actively using the system.
Creating a Template
The Configurable Screens Setup screen is displayed when you right-click on a program in the
Applications area and choose Design. Use this screen to manage the UI templates for the selected
program.
Fig. 4.2
Configurable Screens Template
To create a new template, follow these steps:
1 Enter a name (up to 40 characters) for the new template in the Template column of the
Configurable Screens Setup screen.
2 Enter the template description (up to 60 characters) to indicate its purpose.
3 Indicate if you want this template to be a generic template assigned to all users. If you want
this template to be used whenever a more specific one is not found, select the All Users field.
When this option is selected, you cannot assign any specific groups.
4 If this is not a generic template, select one or more user groups to assign to this template. The
Select Groups list displays all defined groups in the system.
Select one or multiple user groups to which to assign the template.

Configurable Screens 87
Comments? Go to goo.gl/MfwKHm
5 Click Delete to delete the selected template, Copy to create a copy of the selected template, or
Preview to display the template as it applies to the current program screen.
6 Click Configure to display the Configure screen and program screen, and to begin the template
design, as described in the next section.
Configuring Program Screens
Once you click Configure, you view the program screen in configurable mode. The fields in the
current frame are highlighted when you mouse over their borders. Grab this highlighted area to
move fields around the screen.
Fig. 4.3
Configure
Use the Configure screen to add or remove fields, modify field properties, set the tabbing order on
the screen, add new frames, and set the navigation properties on frames.
You can click the Save button at any time to save your cha
nges and leave configuration mode.
Your changes are also saved each time you click Next or Back to access a new frame.
Field Descriptions
Frame
Title.
This field displays the title of the current frame in read-only format. When you create a
new frame, use this field to specify a name (up to 36 characters).
Auto-Navigate. Select from None (the default), Next, Next (bidirectional), and Back. You can
use the Next, Next (bidirectional), and Back options to simplify data entry by skipping entire
frames. Use these settings only with careful planning. To skip an entire frame without

88 QAD .NET User Interface Administration Guide
Questions? Visit community.qad.com
generating an error, the proper defaults must exist for all required fields. Next and Back have a
similar effect; use them to skip the display of a frame. Which one you use depends on the
normal screen navigation.
To proceed from one frame to the next, you normally use the Next command. However, when
you are in a frame that lets you enter multiple lines—such as sales order detail or customer
banks—you use the Back command to indicate you are through entering lines and ready to
display the next frame.
So, for example, if you do not want a particular user group to modify bank accounts associated
with customers or even see them, set the Back option on the Bank Accounts frame in
Customer Maintenance.
When users execute the program, that frame does not display. Typically, Next and Back
prevent the display of a frame. However, in some cases, the screen may be visible before the
navigation reaches that point.
For example, if you set Next on the bottom frame of the first screen in Customer Maintenance,
the frame will still be visible when the screen is launched. When the user navigation reaches
that frame, it will then be skipped.
Next (bidirectional) has the same effect as the Next option (which causes the configured
program to automatically navigate through a frame), but in addition, the Next (bidirectional)
option prevents that automatic Next from being bypassed when a user is navigating Back
through the frame. That is, Next (bidirectional) applies while the user is navigating forward
and backward. By default, when a user navigates backward (using the Back button) to a frame
that has Auto Navigate set to Next, the system bypasses execution of that automatic Next to
prevent navigation from returning to the frame it started on. However, there are some cases
where this bypassing is not desired. In those cases the option Next (bidirectional) can be used
to override this default behavior.
Add Frame. Click to add a frame to the program. See “Adding Fields and Frames” on page 90.
Available Fields. This area displays the user-defined fields you can add to the current frame or
to a new frame. These fields are defined for each program in the
configscreens.xml file.
See
“Adding New Fields and Tables to Programs” on page 90.
Selected Fields. This area displays the fields selected for use on the current frame.
Field Properties
Use this area to view and modify the properties of a field selected in the Selected Fields area.
You can assign more than one option to a field; for example, you can provide a default value for a
field as well as disabling or hiding it.
If you plan to mark fields as required, you should consider marking all fields that are validated by
the application logic as required, and not just newly added fields.
You can configure all types of enabled fields in a frame except for fields that are represented with
drop-down lists, such as the Line Format field in Sales Order Maintenance (7.1.1). None of the
field-level commands can be used with this type of field. When you right-click the Line Format
field, the commands are disabled.

Configurable Screens 89
Comments? Go to goo.gl/MfwKHm
Default Value. You can add a default value to existing or new fields, which is displayed in red
on the screen. A drop-down list of default values (None, True, or False) is displayed beside
logical-type fields.
Defaults you specify for a template override any other defaulting
logic associated with a field.
Defaults are only applied to new records; when a record is being edited, no field values are
overridden.
The following is a list of the programs for which the Default
Value option for fields is
available:
adcsmt.p icunrc01.p remove.p sfoptr06.p
advnmt.p kbcdrp01.p renplf.p sfscrap.p
aprvmt.p kbcdrp03.p rescrap.p soivmt.p
apvomt.p poblmt.p reset.p sosomt.p
bmpsmt.p popomt.p rewadj.p sosopk.p
dsdopk01.p poporc.p rework.p sososl.p
fscamt.p pppsmt01.p rqrqmt.p sqqomt.p
fsrmamt.p ppptmt.p rspomt.p wobkfl.p
icccaj.p ppptmt04.p rwopmmt.p woopmt.p
iclomt.p rcpsmt.p rwromt.p wowois.p
iclotr02.p rcsomt.p rwromt01.p wowoisrc.p
iclotr03.p rcssmt.p sfoptr01.p wowomt.p
icrsrc.p rebkfl.p sfoptr02.p woworc.p
icsorc.p redt.p sfoptr03.p woworl.p
icunis.p reject.p sfoptr04.p woworl01.p
icunrc.p relbr.p sfoptr05.p
Blank Default. Select this field to set a blank default for the selected field.
Disabled. Select this field to disable the selected field in the screen. The field label remains on
the screen, the value box is removed from the screen, and the user cannot update it.
You can remove both field name and value box from the screen by selecting the field in the
Se
lected Fields area and using the arrow key to return it to the Available Fields area. Existing
fields are moved to the Standard Fields section of the Available Fields area, and new fields are
moved to the User Fields section.
Required. Select this field to prevent users from advancing through the current frame without
supplying a value for this field. In configurable mode, the field name is bolded, changed to a
blue color, and marked with an asterisk (*) at run-time.
New. Click to display the New field screen, in which you add a new field to the list of
Available Fields. This option is only available for Enterprise Edition applications.
Edit. Select a field in the Available Fields area and click Edit to display the field properties.
See “Editing Field Properties” on page 91.
Note You cannot edit the properties of a Standard Field.
Tab Order. The tabbing order is the sequence in which you access fields using the Tab key.
Click to display the tabbing order of fields in the current frame. Use the Up and Down buttons
to change the order, if required.

90 QAD .NET User Interface Administration Guide
Questions? Visit community.qad.com
Apply. Click to apply your field properties changes.
Save. Click to save your template changes.
Adding Fields and Frames
In component-based screens in QAD Enterprise Edition, you can add a new field to a table and
then add the new field to the current screen.
In Standard Edition, the list of fields that you can add to a screen is displayed in the Available
Fields area of the Configure screen. The Available Fields area has two sections:
• Standard Fields
These are existing data fields for the program. The Standard fields area only displays fields
that have been hidden from the screen as part of a previous customization.
• User Fields
These are the default user customization fields that are defined for all tables.
Adding New Fields and Tables to Programs
When you design a program, the user fields available to add to the screen are displayed in the
Available Fields area. You can add these to existing frames, or create a new frame to contain one or
more of these fields.
By default, only specific tables and fields are displayed for a particular program. These tables and
fields are defined in the
configscreens.xml file.
The <tableaccess> section of this file lists the tables associated with some of the programs that
are available for Design mode.
By default, you can only add fields that follow these naming conventions:
*__chr..
*__dte..
*__log..
*__dec..
*_user1
*_user2
These names correspond to the following field types:
character
date
logical
decimal
integer
These fields are reserved for customization and can be added as values for any table.
The <userfields> section of the file allows additional fields to appear in the User Fields section
of the Configure screen.

Configurable Screens 91
Comments? Go to goo.gl/MfwKHm
Warning The default fields that follow the naming convention above are safe to add to screens
because they are specifically reserved for customizations. However, when adding other fields to
the
<userfields> section of configscreens.xml, you must be very familiar with the fields
and the side effects that can be caused by adding them to the screen. Some fields are heavily
validated and verified by the standard code. If they are added to the screen using this mechanism,
this validation and verification will be bypassed—causing data corruption.
In the example, the <tableaccess> section of the configscreens.xml file lists the tables for
woworl01.p and wowor1.p.
The default value of each program displays the default table that appears first in the Available
Fields area of the Design window.
<configscreens>
<tableaccess>
<program name="woworl01.p" default="wo_mstr">
<table name="wo_mstr"/>
<table name="pt_mstr"/>
</program>
<program name="woworl.p" default="wo_mstr">
<table name="wo_mstr"/>
<table name="pt_mstr"/>
</program>
…
</tableaccess>
<userfields>
<table name="pt_mstr">
<field name="pt_desc1"/>
<field name="pt_desc2"/>
</table>
</userfields>
</configscreens>
There are two copies of configscreens.xml, in the com/qad/mfgpro and com/mfgpro
folders. You must modify both files to enable your additional field changes.
Adding Available Fields to Screens
To add a field to the current frame, select the field in the Available Fields area and use the arrow
button to move the field to the Selected Fields area. Before moving the field, click Edit to view and
modify the field properties. The Edit button is only available for user fields in the Available Fields
area.
Editing Field Properties
The Edit Field screen displays read-only properties for the selected field, and lets you modify the
field label and validation.
Note The Edit Field screen is not available for Standard Fields.

92 QAD .NET User Interface Administration Guide
Questions? Visit community.qad.com
Fig. 4.4
Edit Field
Field Descriptions
Table.
This read-only field displays the database table for which this field is defined.
Name. This read-only field displays the field name.
Data Type. This field displays the field type: character, date, logical, decimal, user 1, or user 2.
Format. This read-only field displays the field data format; for example, the maximum number
of characters for a character field.
Label. This field displays the field label. You can modify the label up to a maximum of 35
characters. Note that the system will translate the value you put in the Label field if the value is
a label term. Otherwise, the system will just use the value for the label.
Validations
Use this area to define how the field is to be validated.
Generalized Code Validation. Check this field to ensure that the values for this field are based
on the valued specified in Generalized Code Maintenance (36.2.13). You can use Generalized
Codes Validation Rpt (36.2.15) to view a list of database fields that have schema validation
assigned.
Note When adding values in Generalized Codes Maintenance, you must specify the full table
and field name. For example, if specifying values for the field
pt_chr01, you enter the table
and field name
pt_mstr.pt_chr01.
Program. Use this field to enter the name of a user-defined Progress program that validates the
field.
You can use the program template
gpvalidate.p to create your own Progress programs.
This template is stored in the
QADInstallDir/qadui/com/qad/shell/interface
directory and contains instructions for usage. Copy the template and rename it appropriately.
Adding New Frames to Screens
Click the Add Frame button to add a new frame to the program.

Configurable Screens 93
Comments? Go to goo.gl/MfwKHm
Fig. 4.5
Add Frame
The button is only available when there are available fields to add. A default message (8622, ‘See
User Guide for adding User Fields’) is displayed when no fields are available.
The new frame is displayed behind
the Configure screen. To add fields to the screen, use the arrow
key to move fields from the Available Fields area to the Selected Fields area. Use the cursor to
position fields in the frame, and click the Tab Order button to set the tabbing order for the frame.
Click Save to save this frame and
insert it into the program sequence, or Remove Frame to remove
the frame from the sequence. When you remove a frame, the fields are selectable again in the
Available Fields area.
When you create a new frame, save y
our updates, and exit Configure Screens, the frame is
displayed immediately following the current frame when you next launch the program.
Note A technical limitation with underlying Progress program transactions can prevent data from
being saved in frames that are added using Configurable Screens design tool. In particular, adding
a configured frame after the last frame of a program can be a problem. The design tool cannot
determine which programs are affected by this and thus cannot prevent a frame from being added
in the trouble spots. Instead of placing a configured frame after the last frame in a program,
consider the following alternative approaches:
• Move the configured frame to be located earlier in the program. For example, if configuring
Item Planning Maintenance, put the configured frame before the Item Planning Data frame.
This will properly save the data in the configured frame.
• Add fields to existing frames that will put them in the proper transaction scope. If there is not a
lot of available space in an existing frame it is still possible, in some cases, to place fields in
that frame in spaces that appear too small to fit and which cause overlap with other fields. At
run-time, the frame will be expanded to accommodate this and the fields will appear spaced
properly.
• Using the design tool, drag around the existing fields on a frame to make space available for
adding additional fields.
• Customize the underlying Character UI code to add the additional frame within the transaction
scope (this would not involve using the Configurable Screens design tool).

94 QAD .NET User Interface Administration Guide
Questions? Visit community.qad.com
• QAD Services has a customization tool kit (ICT), which provides a nonintrusive
customization mechanism that can handle some customizations that Configurable Screens
cannot handle. (Implementing this requires more effort than the previous options.)
Note There is a technical limitation with Configurable Screens regarding existing transactions of
the underlying Progress program. This limitation can prevent data from being saved in frames that
are added using the Configurable Screens design tool. Adding a configured frame after the last
frame of a program can sometimes be a challenge. The design tool cannot determine at design time
which programs are affected by this and thus cannot prevent a frame from being added in the
trouble spots. Nevertheless, there are some alternatives:
• The configured frame can be moved earlier in the program. For example, in the case of Item
Planning Maintenance, the configured frame can be added before the Item Planning Data
frame. This will properly save the data in the configured frame.
• Fields can be added to existing frames that put them in the proper transaction scope. If there is
not a lot of available space in an existing frame it is still possible, in some cases, to place fields
in that frame in spaces that appear too small to fit and that cause overlap with other fields. At
run-time the frame will be expanded to accommodate this and the fields will appear spaced
properly. The workability of this varies depending on the frame but it can be a very workable
option.
• The existing standard fields on a frame can be dragged around, using the design tool, to free up
space to add additional fields.
• The underlying CHUI code itself can be customized to add the additional frame within the
transaction scope. (This would not utilize the Configurable Screens mechanism.)
• QAD Services has a customization tool kit (ICT), which provides a nonintrusive
customization mechanism that can handle some customizations that Configurable Screens
cannot. Note that implementing this is a larger scope than the above options.
Adding Lookups to a User-Defined Field
Note To add a lookup to a user-defined field, you must use the full field name when you set up
the lookup in Drill Down/Lookup Maintenance. The full field name includes the table name and
the field name in the format
table_name.field_name. View the screen and enter Ctrl+F on the
added field. You will see the full field name (for example,
ad_mstr.ad__chr02, where
ad_mstr is the table name and ad_chr02 is the field name).
You can remove fields you have added by clicking Delete. (You can only remove the fields you
have added.)
Warning When you create your own field and frame, you add the field to the schema, and as the
program is used, users add values to it. When you delete, you delete the field and all its stored
values from the database. Use the Disable or remove options to remove a field from the screen
without deleting it from the database.
Using New Fields in Character Code
The Configurable Screens functionality for Enterprise Edition allows New Fields that are not part
of the existing schema to be added to screens via the Configure dialog-box. These New Fields are
not physically part of the master tables but are stored in a side table and thus require a different
way to access their values from the CHUI code.

Configurable Screens 95
Comments? Go to goo.gl/MfwKHm
For this purpose, the include file gpgenfld.i gives access to the values of these new fields
through function calls.
Note This function is only used when modifying character code.
To access to the function calls, include the following file at the top of the program that will use
them:
{com/qad/mfgpro/gpgenfld.i}
The get function calls provided by gpgenfld.i are as follows:
GetFieldValueChar returns character (pTable as character, pField as character,
pRecordID as decimal, pRefresh as logical).
GetFieldValueDec returns decimal (pTable as character, pField as character,
pRecordID as decimal, pRefresh as logical).
GetFieldValueInt returns integer (pTable as character, pField as character,
pRecordID as decimal, pRefresh as logical).
GetFieldValueDate returns date (pTable as character, pField as character, pRecordID
as decimal,
pRefresh as logical).
GetFieldValueLog returns logical (pTable as character, pField as character,
pRecordID as decimal, pRefresh as logical).
Where:
pTable is name of the table.
pField is name of the new field that is being accessed.
pRecordId is the OID value of the specific record of table pTable.
pRefresh specifies whether the function should read the record fresh or use a cached value.
The first call for a particular OID value will always read the record. From then on, the cached
record will be used for additional function calls, unless the call specifies
yes for this
parameter. Then the record will be reread.
For example: GetFieldValueDec("so_mstr", "so_field1", oid_so_mstr, yes).
The set function calls provided by gpgenfld.i are as follows:
SetFieldValueChar returns logical (pTable as character, pField as character,
pRecordID as decimal, pValue as function-dependent datatype).
SetFieldValueDec returns logical (pTable as character, pField as character, pRecordID
as decimal,
pValue as function-dependent datatype).
SetFieldValueInt returns logical (pTable as character, pField as character, pRecordID
as decimal,
pValue as function-dependent datatype).
SetFieldValueDate returns logical (pTable as character, pField as character,
pRecordID as decimal, pValue as function-dependent datatype).
SetFieldValueLog returns logical (pTable as character, pField as character,
pRecordID as decimal, pValue as function-dependent datatype).
Each function returns a logical that indicates if the operation was successful and accepts the
parameters as follows:
pTable is the name of the table.

96 QAD .NET User Interface Administration Guide
Questions? Visit community.qad.com
pField is the name of the new field that is being accessed.
pRecordId is the OID value of the specific record of table pTable.
pValue is the value to assign (the datatype varies depending on which function is called).
Example SetFieldValueDec("so_mstr", "so_field1", oid_so_mstr, 5.6).
Restricting Configurable Screens by Domain
By default, the Configurable Screens function does not take into account the user's domain when
providing access to the Configurable Screens templates. This means that if you have access to a
template in one domain, access is granted across all domains. You can, however, restrict this
function by domain by resetting the
configByDomain parameter in the setting.dat files
for the environment.
For example, you have access to a template as a member of the group/role G1 in domain D1. If
configByDomain=no, the template is applied regardless of the domain you are logged in to. If
configByDomain=yes, however, the template is applied only when you are logged in to domain
D1. If, however, a group/role named G1 is also available in a different domain D2, the template is
also applied in domain D2. This is because templates are assigned to groups/roles and not
specifically to domains.
The setting.dat files are located in two directories:
QADInstallDir/qadui/com/mfgpro, and QADInstallDir/qadui/com/qad/mfgpro
and you must apply this change to both files:
1 Locate the following parameter in the setting.dat files:
/* Restrict Configurable Screens by Domain */ configByDomain=No
2 Set configByDomain=Yes in both files.
3 Exit the files and log in to the application.
4 Select Connection Manager and click Restart Connection Manager.
Configurable Screens Report
Configurable Screens Report (36.20.10.17) lists all screens that have been configured. The Report
details the fields that have been modified or added, and you can generate a report on individual
configured screens or on all screens.
Note The Configurable Screens Report is available in QAD Enterprise Applications Standard
Edition 2009 or greater, and QAD Applications 2009 Enterprise Edition or greater, or if you have
installed the patch ECO Q1WY.


Product Information Resources
QAD offers a number of online resources to help you get more information about using QAD
products.
QAD Forums (community.qad.com)
Ask questions and share information with other members of the user community, including
QAD experts.
QAD Knowledgebase (knowledgebase.qad.com)*
Search for answers, tips, or solutions related to any QAD product or topic.
QAD Document Library (documentlibrary.qad.com)
Get browser-based access to user guides, release notes, training guides, and so on; use
powerful search features to find the document you want, then read online, or download and
print PDF.
QAD Learning Center (learning.qad.com)*
Visit QAD’s one-stop destination for all courses and training materials.
*Log-in required


Index
Numerics
2.14.1 47
36.2.21.1 8
36.20.10.17 96
36.3.1 47
36.3.24 4
36.4.22 4
36.4.4 6
A
Active Directory 4
adding links to application help 29
attachment
document type 25
properties 27
security 27
storage location 50
attachment area 24
automatic 28
Attachment Maintenance 23
auto-navigate
in Configurable Screens 87
B
beautifyReports.lst 39
browse collection
storage location 50
Browse Collection Maintenance 17
Browse Link Maintenance
and attachments 28
browse state data 20
C
client-bootstrap.xml 30, 54, 55
file elements 55
client-session.xml 30, 54, 57
4
file elements 57
Collections folder 18
configscreens.xml 90, 91
Configurable Screens
error handling 84
restricting by domain 96
system impact 83
Configurable Screens Report 96
configurations directory 54
Connection Manager 31–35
control settings
and required fields 82
Country Code Data Maintenance 47
custom key mappings 43
D
dashboards 21
design mode
for component-based screens 82
E
enabling and disabling Guide Me 29
error handling
Configurable Screens 84
F
Favorites
and browse collections 18
storage location 50
field default values 89
Field Help Maintenance 29
field properties 88
fields
adding new in Configurable Screens 90
frames
adding new in Configurable Screens 92
G
generalized code validation
and fields in Configurable Screens 92
generalized codes validation 82
get function calls 95
Guide Me
enabling and disabling 29
H
heartbeat URL 38
K
keymapping.xml 43
L
locale.dat 47
lookups
adding to user-defined fields 94
M
menu
labels 6
numbers 6
menu collection
storage location 50
Menu Collection Maintenance 16
menu numbers 7
Menu System Maintenance 6

Questions? Visit community.qad.com
102 QAD .NET User Interface Administration Guide
multiple language support for terminal client 41
P
plugin-menu.xml 54, 64
file elements 64
Process Label Maintenance 46
process maps
and language support 45
Program Information Maintenance 8
properties_language.xml 46
Q
QAD Shell URL 35
and process maps 46
R
regional display settings 47
reports
enhancing 38
in QAD URL Shell 37
S
Security Control 4
Session Master Maintenance 4
set function calls 95
setting.dat 39, 96
T
tabbing order
in Configurable Screens 89
tables
adding new in Configurable Screens 90
U
UI design group 85
UI template
conflicts 84
UI templates
conflicts 83
for configurable screens 82
user group
v. role in EE 85
User Maintenance 47
user password authentication 4
user session 4
