
Apple Pay
Merchant Integration Guide
January 2024

Introduction 3
Getting started 4
Guidelines ...............................................................................................................................................4
Apple Pay vs In-App Purchases ...............................................................................................................4
App Store Review Guidelines ....................................................................................................................4
Apple Pay on the Web Acceptable Use Guidelines ................................................................................4
E-Commerce Platforms and Payment Service Providers ....................................................................4
Understanding Apple Pay 5
Payment flow ..........................................................................................................................................5
Get set up for Apple Pay 6
Confirm your Payment Service Provider (PSP) supports Apple Pay ..................................................6
Set up your Server .................................................................................................................................6
Register for an Apple developer account .............................................................................................6
Design your Apple Pay solution 7
Assess your Checkout flow ...................................................................................................................7
Apply the Apple Pay design principles .................................................................................................7
Review the Human Interface Guidelines ...............................................................................................7
Build your Apple Pay solution 8
Configure Apple Pay ..............................................................................................................................8
Create a Merchant ID .................................................................................................................................8
Configure Apple Pay on the Web ..........................................................................................................9
Verify your domain(s) ................................................................................................................................9
Create a Merchant Identity Certificate ....................................................................................................9
Export and test your Merchant Identity Certificate ..............................................................................10
Present Apple Pay as a payment option .............................................................................................12
Display the Apple Pay button ..................................................................................................................12
Apple Pay Mark .........................................................................................................................................12
Check for Apple Pay Availability .............................................................................................................12
Present the Payment Sheet .................................................................................................................13
Construct your Payment request ............................................................................................................13
Complete Merchant Validation ...............................................................................................................13
Shipping and Billing .................................................................................................................................14
Respond to Payment sheet interactions ................................................................................................14
Recurring, Deferred, Automatic Reload, and Multi-token payments ..................................................15
Error handling ...........................................................................................................................................15
Map customer and payment data .......................................................................................................18
Map Customer Information .....................................................................................................................18
Authorize Payment with your PSP ..........................................................................................................18
Complete payment ...................................................................................................................................18
Test your Apple Pay integration ..............................................................................................................19
Frequently asked questions 20
Troubleshooting 20
API Diagrams 21
Merchant Integration Guide
Jan 2024
2
Contents

Introduction
Apple Pay provides an easy and secure way to make payments in iOS, iPadOS, and
watchOS apps, and on the web when using compatible browsers. By using Face ID,
Touch ID, or double-clicking Apple Watch, users can quickly and securely provide
their payment, shipping, and contact information to check out.
This guide outlines the steps needed to enable Apple Pay in app and on the web. To
experience an Apple Pay test transaction on a compatible device, visit the Apple Pay
demo site at applepaydemo.apple.com.
Integrating Apple Pay is often a cross-functional effort involving designers,
developers, server administrators and payment teams within an organization. This
guide supports each of these roles through the end-to-end process of enabling
Apple Pay in your app or on the web, and the typical role responsible for each task
will be noted at beside the task checkbox.
Merchant Integration Guide
Jan 2024
3
UX DESIGNER
PAYMENTS TEAM
ACCOUNT ADMIN
SERVER ADMIN
DEVELOPER

Getting started
Before enabling Apple Pay, it is important that developers understand how Apple
Pay differs from an In-App purchase, and make sure their implementation follows
the guidelines. There are many ways to implement Apple Pay, with some of the most
popular Payment Service Providers and E-Commerce platforms offering an
ApplePay SDK or JavaScript API as a quick and reliable way to support Apple Pay in
an app or on a website.
Guidelines
Apple Pay vs In-App Purchases
Apple Pay can be used in your app to sell physical goods like groceries, clothing, and appliances; for
services such as club memberships, hotel reservations, and events tickets; and for donations. In-App
Purchase are used to sell virtual goods such as premium content for your app, and subscriptions for
digital content.
App Store Review Guidelines
Before submitting your app for review, make sure it follows these guidelines to help progress smoothly
through the review process.
ဂ App Store Review guidelines
ApplePay on the Web Acceptable Use Guidelines
Before deploying ApplePay on your website, make sure your implementation follows these guidelines.
ဂ Apple Pay on the Web Acceptable Use Guidelines
E-Commerce Platforms and Payment Service Providers
The most popular e-commerce platforms and payment service providers support ApplePay within
apps and on the web. Using an ApplePay SDK or JavaScript API from a payment provider is the
quickest and most reliable way to support ApplePay in your app or on your website..
ဂ View E-Commerce platforms and Payment Service Providers
Merchant Integration Guide
Jan 2024
4

Understanding Apple Pay
Most active Apple devices are compatible with Apple Pay. It works in apps, on Safari
and in web views on iOS or iPadOS devices, and through Safari on macOS. Any
transaction type you currently support for regular debit and credit cards can be
performed with Apple Pay, including refunds.
Payment flow
Apple Pay uses device-specific tokenized credit or debit card credentials (DPAN) in place of a Payment
Account Number (PAN). When users authenticate the payment using Face ID, Touch ID or their
passcode, the tokenized card data is returned to your app or website. This token can then be passed to
your Payment Service Provider (PSP) to process as you would for a typical online credit or debit card
payment.
Merchant Integration Guide
Jan 2024
5
Merchant App/Website
Sends the Apple Pay payment object to merchant server
Merchant Server
Receives payment object and maps data to PSP API or SDK
Payment Service Provider
Decrypts Apple Pay payment object and formats a 3D Secure authorization
message
Acquirer
Sends payment for authorization
Payment Network
De-tokenizes payment data and sends PAN to issuer for authorization
Customer
Authenticates with biometrics or passcode. Payment Data is encrypted and
returned to the app/website
!
"
#
$
%
&
'
Issuer
Authorizes payment

Get set up for Apple Pay
To enable Apple Pay on your app or website, you need to confirm that you have the
correct options configured on your server, are set up to accept Apple Pay Payments
and register for an Apple Developer account.
Confirm your Payment Service Provider (PSP) supports Apple Pay
Check the list of currently supported gateways at the link below. If you do not see your PSP on the list,
contact them directly to confirm availability.
ဂ Supported E-Commerce platforms and Payment Service Providers
Set up your Server
For Apple Pay on web only, ensure that your server meets the set up requirements for secure
communications with Apple Pay.
ဂ Setting up your server
Register for an Apple developer account
Both Apple Pay in apps and Apple Pay on the web require an Apple developer account, which must be
renewed yearly. You can enroll as an individual or as an organization, and you can use the same Apple
developer account that you use today to publish apps to the App Store.
You can’t use an Apple Developer Enterprise Program account to enable Apple Pay within an app or on the web.
ဂ Enroll for an Apple Developer account
Merchant Integration Guide
Jan 2024
6
!"
!"
!"
PAYMENTS TEAM
ACCOUNT ADMIN
SERVER ADMIN

Design your Apple Pay solution
Apple Pay creates a streamlined checkout process, allowing customers to authorize
payments and complete transactions promptly. Consider where and when in your
customers journey would be best to utilize Apple Pay to help drive conversion and
enhance the customer experience.
Assess your Checkout flow
To help drive conversion and enhance your user’s experience, carefully consider the location of the
Apple Pay button. The best user experiences place the Apple Pay button as early in the checkout
process as possible in order to leverage Apple Pay provided information, and minimize data entry.
Apply the Apple Pay design principles
There are several key Apple Pay design principles that help drive conversion, increase usage and
engagement, and provide an excellent user experience. Please review our best practice
recommendations in Planning for Apple Pay.
ဂ Planning for Apple Pay
Review the Human Interface Guidelines
Refer to the Apple Pay Human Interface Guidelines for additional information on how to best
incorporate Apple Pay in your app or website.
ဂ Apple Pay Human Interface Guidelines
Merchant Integration Guide
Jan 2024
7
!"
!"
!"
UX DESIGNER
PAYMENTS TEAM
UX DESIGNER
UX DESIGNER

Build your Apple Pay solution
Now that you have designed your solution for Apple Pay, it’s time to start building
your implementation into your app or website. This section will link to relevant
sources within the API documentation, as well as provide additional detail to support
you in the process.
Configure Apple Pay
To support Apple Pay on your website or app, you need to complete a few set up steps in your
developer account: registering a merchant ID, creating certificates, and verifying your web domain(s).
Completing the setup enables you to use the Apple Pay web APIs and/or app APIs.
ဂ Configure Apple Pay for Apps
ဂ Configure Apple Pay on the Web
Create a Merchant ID
Your Merchant ID uniquely identifies your business as a merchant able to take payments. A merchant
Identifier never expires, and can be used for multiple Apps and websites.
1.
In Certificates, Identifiers & Profiles, click Identifiers in the sidebar, then click the add button (+)
on the top left.
2.
Select Merchant IDs, then click Continue.
3.
Enter the merchant description and identifier name, then click Continue.
4.
Review the settings, then click Register.
Alternatively, you can create a merchant identifier in Xcode.
Create a Payment Processing Certificate
A Payment Processing Certificate is associated with your merchant ID and used to secure transaction
data. To generate a certificate you will need to upload a Certificate Signing Request (CSR) to the
Developer portal. If your PSP is decrypting the data, they will supply you with a CSR. If you plan to
decrypt the Apple Pay data yourself, follow the steps at the link below to generate your own CSR.
ဂ Create a Certificate Signing Request
1. In Certificates, Identifiers & Profiles, click Identifiers in the sidebar.
2. Under Identifiers, select Merchant IDs using the filter on the top right.
3. On the right, select your merchant identifier.
4. Under Apple Pay Payment Processing Certificate, click Create Certificate.
5. Create a certificate signing request on your Mac, then click Continue.
6. Click Choose File.
7. In the dialog that appears, select the certificate request file (a file with a .certSigningRequest
file extension), then click Choose.
8. Click Continue.
9. Click Download. The certificate file (a file with a .cer file extension) appears in your Downloads
folder.
The Payment Processing Certificate is valid for 25 months, after which you’ll need to renew it.
Merchant Integration Guide
Jan 2024
8
!"
!"
ACCOUNT ADMIN
ACCOUNT ADMIN

Configure Apple Pay on the Web
If you’re developing websites using Apple Pay on the Web, you can use the same merchant ID and
Payment Processing Certificate for your website and your app. However, Apple Pay on the web requires
additional setup.
ဂ Configure Apple Pay on the Web
Create a Merchant ID
Your Merchant ID uniquely identifies your business as a merchant able to take payments. Follow the
steps in the previous section to create a Merchant ID.
Create a Payment Processing Certificate
A certificate associated with your merchant ID, used to encrypt Apple Pay transaction data. Follow
steps in previous section to create a Payment Processing Certificate.
Verify your domain(s)
You must register and verify all top-level domains and subdomains where you display the Apple Pay
button.
1. In Certificates, Identifiers & Profiles, click Identifiers in the sidebar, then select Merchant IDs from
the pop-up menu on the top right.
2. On the right, select your merchant identifier.
3. Under Merchant Domains, click Add Domain.
4. Enter the fully qualified domain name, then click Save.
5. Click Download, place the downloaded file in the specified location, then click Verify.
6. Click Done.
For successful domain validation, domains can’t be behind a proxy or redirect, and must be accessible
to the Apple servers listed in the section Setting up your server.
Create a Merchant Identity Certificate
A certificate associated with your merchant ID, used to authenticate sessions with the Apple Pay
servers. The steps to create this certificate are similar to those for the Payment Processing Certificate,
but you must generate the CSR yourself.
1. In Certificates, Identifiers & Profiles, click Identifiers in the sidebar, then select Merchant IDs from
the pop-up menu on the top right.
2. On the right, select your merchant identifier.
3. Under Apple Pay Merchant Identity Certificate, click Create Certificate.
4. Create a certificate signing request on your Mac, then click Continue.
5. Click Choose File.
6. In the dialog that appears, select the certificate request file (a file with a .certSigningRequest
file extension), then click Choose.
7. Click Continue.
8. Click Download. The certificate file (a file with a .cer file extension) appears in your Downloads
folder.
9. Double-click the Merchant Identity Certificate you just downloaded to add it to your Mac Keychain.
Merchant Integration Guide
Jan 2024
9
!"
!"
!"
!"
ACCOUNT ADMIN
ACCOUNT ADMIN
ACCOUNT ADMIN
ACCOUNT ADMIN

Export and test your Merchant Identity Certificate
You should now have a private key and corresponding certificate in your keychain. The Merchant
Identity Certificate and key will need to be exported and packaged into a .p12 file before you are able to
use it to generate a session with the Apple Pay servers. Follow the steps below to export and then test
your certificate.
1. Open the Keychain app.
2. Click on ‘Keys’ from the menu and search for the key you generated.
3. Click on the disclosure arrow beside the key, which should display your Merchant Identity
Certificate.
4. Right-click on the certificate and click Export <name of certificate>.
5. Choose a directory to save the certificates, and enter a password to protect the file.
Now you have a .p12 file that contains the key and certificate for Merchant Validation.
To test that your Apple Pay Merchant Identity certificates are working correctly, complete these steps:
1. Open Terminal and use the following commands to split the .p12 into the corresponding key and
certificate, where ApplePayMerchantID_and_privatekey.p12 is the name of your .p12 file:
2. Use the following cURL command to post the certificates and JSON up to Apple servers. Ensure
you change the merchantIdentifier and initiativeContext to the correct values, and
that you are using straight double quotes (") and not curly double quotes (“).
openssl pkcs12 -in ApplePayMerchantID_and_privatekey.p12 -out ApplePay.crt.pem
-nokeys
openssl pkcs12 -in ApplePayMerchantID_and_privatekey.p12 -out ApplePay.key.pem
-nocerts
curl --location 'https://apple-pay-gateway-cert.apple.com/paymentservices/
paymentSession' \
--header 'Content-Type: text/plain' \
--data '{
"merchantIdentifier": "merchant.XXXXXX",
"displayName": "Example Merchant",
"initiative": "web",
"initiativeContext": "www.example.com"
}' \
--cert ApplePay.crt.pem \
--key ApplePay.key.pem
Merchant Integration Guide
Jan 2024
10
!"
DEVELOPER
ACCOUNT ADMIN

3. If the connection succeeds and the session validated, you should see a print out in Terminal similar
to the following:
This is the opaque session object, and is used to start a session for Apple Pay on the Web.
A general guide to debugging common issues can be found in the troubleshooting section. If your
issue is not resolved after reviewing the guide, you can get further assistance by contacting Apple
Developer Support directly.
ဂ Apple Pay Developer Support
{“epochTimestamp”:15445664606792,”expiresAt”:154167344466792,”
merchantSessionIdentifier”:”
SSHC45CBB9C8073415198E3AB7314791C6D_916523AAED1343F5BC5815E12BEE9250AFFDC1A17C
46B0DE5A943F0F94927C24”,”nonce”:”
8f47a9c1”,"merchantIdentifier":"20C8BB48576962AD936399118741FFEA6130838BDF69A5
0B9A3CE4E7","domainName":"www.example.com","displayName":"Example
Merchant”,"signature":"308006092a864886f70d010702a0803080020101310f300d0609608
6480165030402010500308006092a864886f70d0107010000a080308203e63082038ba00302010
202086860f699d9cca70f300a06082a8648ce3d040302307a312e302c06035504030c254170706
c8274854054658569d4170706c652043657274696669636174696f6e20417574686f7269747931
133011060355040a0c0a4170706c6520496e632e310b3009060355040613025553301e170d3136
303630333138313634305a170d32313036303231383.......}
Merchant Integration Guide
Jan 2024
11

Present Apple Pay as a payment option
With your configuration complete, you can now move on to add an Apple Pay button to your app or
website. There are several Apple Pay button types and styles you can use, and it is important that you
do not create your own Apple Pay button design or attempt to mimic the system-provided button
designs.
Display the Apple Pay button
The button will be rendered by the appropriate PassKit or Javascript API, which will display the most up
to date version of the button as well as perform the appropriate localizations.
ဂ Display the Apple Pay button - Apple Pay on web
ဂ Display the Apple Pay button - PassKit
Apple Pay Mark
Use the Apple Pay mark in your app or website to show that Apple Pay is an available payment option.
The Apple Pay mark isn’t a button and shouldn’t be used to launch the payment sheet. Use only the
artwork Apple provides, with no alterations other than height.
ဂ Apple Pay mark and Marketing Guidelines
Check for Apple Pay Availability
To ensure that you only display the Apple Pay button to customers with a supported device, check for
Apple Pay availability.
canMakePayments()
Verifies that the device is capable of making Apple Pay payments; it doesn’t verify that the user has a
provisioned card for use with Apple Pay on the device.
ဂ Web - canMakePayments()
ဂ App - canMakePayments()
PaymentRequest.canMakePayment()
Verifies that the device is capable of making Apple Pay payments, and that the user has at least one
provisioned card.
ဂ PaymentRequest.canMakePayment()
Merchant Integration Guide
Jan 2024
12
!"
!"
!"
DEVELOPER
DEVELOPER
DEVELOPER

Present the Payment Sheet
To present the payment sheet to the customer, construct a payment request containing information
that describes the purchase. This includes merchant information, supported payment networks, line
items including the total, currency code, billing and shipping contact, and more.
Construct your Payment request
Your app or website specifies what the payment sheet displays, but it doesn’t control the users
interaction with the sheet. You must decide if it makes sense to present shipping and billing
information, shipping method, and other line items to the user. For the best results, only request the
information necessary to process and service the transaction.
Complete Merchant Validation
Once the system launches the payment sheet, the merchant validation process is automatically
triggered and a call to onmerchantvalidation is made. In order for merchant validation to be
successful, you’ll need to request a merchant session object from the Apple Pay servers.
Inside the onmerchantvalidation event handler, make a call to an endpoint on your server asking
for a new session to be created. For security purposes the request to the Apple Pay servers needs to
come from your server and not from the browser directly. Your server will then need to post your
request data alongside the Merchant Identity Certificate to obtain the session object.
Pass the session object into the complete method from the event to finish the Merchant Validation
process and allow the customer to authenticate the transaction.
When testing with sandbox cards, you’ll make the call to a different endpoint. Be sure to make the call
to the production endpoint before pushing to your live environment.
POST https://apple-pay-gateway.apple.com/paymentservices/paymentSession
{
merchantIdentifier: "merchant.com.example.mystore",
displayName: "MyStore",
initiative: "web",
initiativeContext: "mystore.example.com"
}
Merchant Integration Guide
Jan 2024
13
!"
!"
DEVELOPER
DEVELOPER
Web only

Shipping and Billing
In the payment request, you can specify the required customer information by setting the relevant
boolean values in the paymentOptions dictionary. Required data can include billing address,
shipping address, name, email address, and phone number.
Setting requestShipping to true presents redacted address information in a callback event prior
to the user authenticating the transaction, similar to the example shown below.
Apple Pay provides the information in a redacted form to protect a person’s privacy, and can vary
based on geographic location – in the UK for example, only the first part of the postal code is returned
prior to authorization. Use this information to provide relevant shipping options within the
paymentDetails array, or to calculate any taxes due on the transaction and then update the payment
sheet accordingly.
Once a person authenticates the transaction with Face ID, Touch ID or their passcode, you will receive
the complete set of requested contact information.
Respond to Payment sheet interactions
If a customer changes their address in the payment sheet, you can update shipping methods or
shipping costs using the request.onshippingaddresschange method.
ဂ request.onshippingaddresschange
To display the coupon code field within the payment sheet, add supportsCouponCode to your
payment request with an empty couponCode field if there is no initial coupon code. If a customer
enters a coupon code within this field, respond to that event by adding an event listener to the
shippingaddresschange event and checking the event.methodDetails.couponCode
property.
{
country: “US”,
addressLine: [],
region: “NC”,
city: “Raleigh”,
dependentLocality: “”,
postalCode: “27601”,
sortingCode: “”,
recipient: “”,
phone: “”
}
{
country: "US",
addressLine: ["2399 Elm St"],
region: "NC",
city: "Raleigh",
dependentLocality: "",
postalCode: "27601",
sortingCode: "",
organization: "",
recipient: "Allison Cain",
phone: ""
}
Merchant Integration Guide
Jan 2024
14
!"
DEVELOPER
!"
DEVELOPER

Recurring, Deferred, Automatic Reload, and Multi-token payments
A typical payment request is for a one-time payment, but there are occasions when you may want to
request a recurring payment, or an automatic reload. To support these different types of payment
requests, provide one of the following options in the payment request modifier:
recurringPaymentRequest
Recurring payments, such as subscriptions, can feature different payment intervals (for example,
annually or monthly), and either regular or trial billing cycles.
ဂ Recurring Payment Request Modifer
automaticReloadPaymentRequest
Automatic reload payments, such as store card top-ups, feature a balance threshold and a reload
amount. The card automatically reloads with the reload amount when the account drops below the
balance threshold.
ဂ Automatic Reload Payment Request Modifer
deferredPaymentRequest
Deferred payments, such as for a Hotel booking or a per-order, allow you to specify a free cancellation
period and specify the date when payment will be taken.
ဂ Deferred Payment Request Modifer
multiTokenContexts
Set up multi token transactions to process and display payment requests with multiple merchants on
one payment sheet, for example, a booking site where a user pays for a hotel, flight, and car rental from
different merchants.
ဂ Multi Token Payment Request Modifer
Error handling
When you determine that there’s a problem with an address or contact information on the payment
sheet, you can use ApplePayError to create a customized error message. Apple Pay highlights the
area with an error and displays your message, making it easier for users to correct errors.
ဂ ApplePayError
Merchant Integration Guide
Jan 2024
15
!"
DEVELOPER
UX DESIGNER
!"
DEVELOPER

The following sample code demonstrates Error Handling for a shipping contact
const paymentResponse = await paymentRequest.show();
switch (paymentResponse.methodName) {
case "https://apple.com/apple-pay":
if (paymentResponse.details.shippingContact) {
const errors = validateAddress(paymentResponse.details);
if (errors.length) {
await paymentResponse.retry({
paymentMethod: errors,
});
}
}
// Handle authorization with valid details here.
break;
case "https://...":
// Other payment method changes here.
break;
}
}
function validateAddress({shippingContact}) {
const errors = [];
// Validate shipping ZIP code here.
if (!isValidZipCode(shippingContact.postalCode)) {
const error = new ApplePayError(
"shippingContactInvalid",
"postalCode",
`ZIP code doesn’t match city`
)
errors.push(error);
}
//validate other parts of address
return errors;
}
Merchant Integration Guide
Jan 2024
16

The following example demonstrates an implementation of Error Handling for a coupon code
paymentRequest.addEventListener("shippingaddresschange", (event) => {
switch (event.methodName) {
case "https://apple.com/apple-pay":
if (event.methodDetails.couponCode) {
event.updateWith(
validCouponCode(event.methodDetails.couponCode)
);
return;
}
if (event.methodDetails.type) {
// Handle payment method type changes here.
}
break;
case "https://...":
// Other payment method changes here.
break;
}
});
async function validCouponCode(couponCode) {
const paymentMethodErrors = [];
// Validate coupon code here against server.
if (!(await isValidCouponCode(couponCode))) {
paymentMethodErrors.push(
new ApplePayError(
"couponCodeInvalid",
undefined,
`Coupon code "${couponCode}" is invalid`
)
);
}
return { paymentMethodErrors };
}
Merchant Integration Guide
Jan 2024
17

Map customer and payment data
The requested customer data is returned in full when the customer has authenticated the payment
with Face ID, Touch ID or their Passcode. The information provided by the customer is not validated or
verified by Apple.
Map Customer Information
Once customer information has been verified, map the values provided in Billing and Shipping
information field to your typical order fulfillment systems, along with the result of the payment
authorization.
Authorize Payment with your PSP
Apple Pay passes payment information to your app or website in the form of a PKPayment object
(app) or of an ApplePayPayment object (web). Unencrypted data, such as billing and shipping
address, or email and phone contacts, are held within this object alongside encrypted payment
credentials inside a PKPaymentToken object (app) or an ApplePayPaymentToken object (web).
Depending on your PSP, you can pass the encrypted payment credentials directly to their systems for
authorization and capture. Alternatively, the payment credentials can be decrypted by you and then
sent to your PSP. For more information on decrypting the payment credentials yourself, refer to the
documentation at the link below.
ဂ Decrypting the Apple Pay Payment Token
Complete payment
Once you have passed the data to your PSP and received their response, pass the success or failure
back into the Apple Pay APIs. This will inform the user if the payment was successful, and dismisses
the payment sheet.
ဂ Web - complete
ဂ App - PKPaymentAuthorizationResult
Merchant Integration Guide
Jan 2024
18
!"
!"
!"
DEVELOPER
DEVELOPER
PAYMENTS TEAM
PAYMENTS TEAM
DEVELOPER
PAYMENTS TEAM

Te st y ou r A pp l e Pay in te gr at i on
Apple provides sandbox accounts and Apple Pay Cards that you can use to run tests in the Apple Pay
Sandbox environment. Attempting to use these cards with a live production environment will result in
your PSP rejecting the transaction. More information on how to set up the sandbox accounts and cards
can be found on the developer website linked below.
ဂ Sandbox Testing
Apple recommends testing a live transaction with a real bank card before publishing your app or
website to end users.
ဂ Participating Banks
Merchant Integration Guide
Jan 2024
19
!"
DEVELOPER
PAYMENTS TEAM

Frequently asked questions
Where does the customer information come from in the payment sheet"
The information comes from Wallet & Apple Pay defaults in Settings, if available, as well as the My Card
in Contacts. It could also come from previous Apple Pay transactions. You can set up your My Card by
going to Settings > Contacts > My Info.
Is the customer information that comes from Apple Pay verified by Apple"
Customer information is shared as-is, and is not verified by Apple. You will need to validate it on your
platform and communicate through the Apple Pay API if fields should be corrected. For more
information visit the Error Handling section of this guide.
What customer information can I pull from Apple Pay"
Customer information includes shipping and billing address, name, phone number and email address.
What does the Apple Pay payment token contain"
The structure, format, and data included in the PKPaymentToken can be found in the Payment Token
Format Reference. PKPaymentToken only contains information on processing the payment; the
customer information is included in the PKPayment object. The PKPayment encapsulates the customer
information and the PKPaymentToken.
ဂ Payment Token Format Reference
What do I do if my PSP is unable to decrypt my payment"
You may need to regenerate your payment processing certificates. Please follow the steps in this guide
to generate your payment processing certificates and work with your PSP to understand where the
issue may lie.
Will I get liability shift with Apple Pay"
Please check with your PSP. Depending on your specific agreement, you may get liability shift with
certain card networks.
Can I use the same Apple developer account for all countries I process payments in"
Yes; you do not need to have separate Apple developer accounts for multiple markets. You can also
use the same Apple Merchant ID if you wish
Troubleshooting
Further information and troubleshooting steps to debug common issues with Apple Pay can be found
in the below guide.
ဂ Apple Pay on the Web Troubleshooting Guide
Merchant Integration Guide
Jan 2024
20

API Diagrams
Merchant Integration Guide
Jan 2024
21
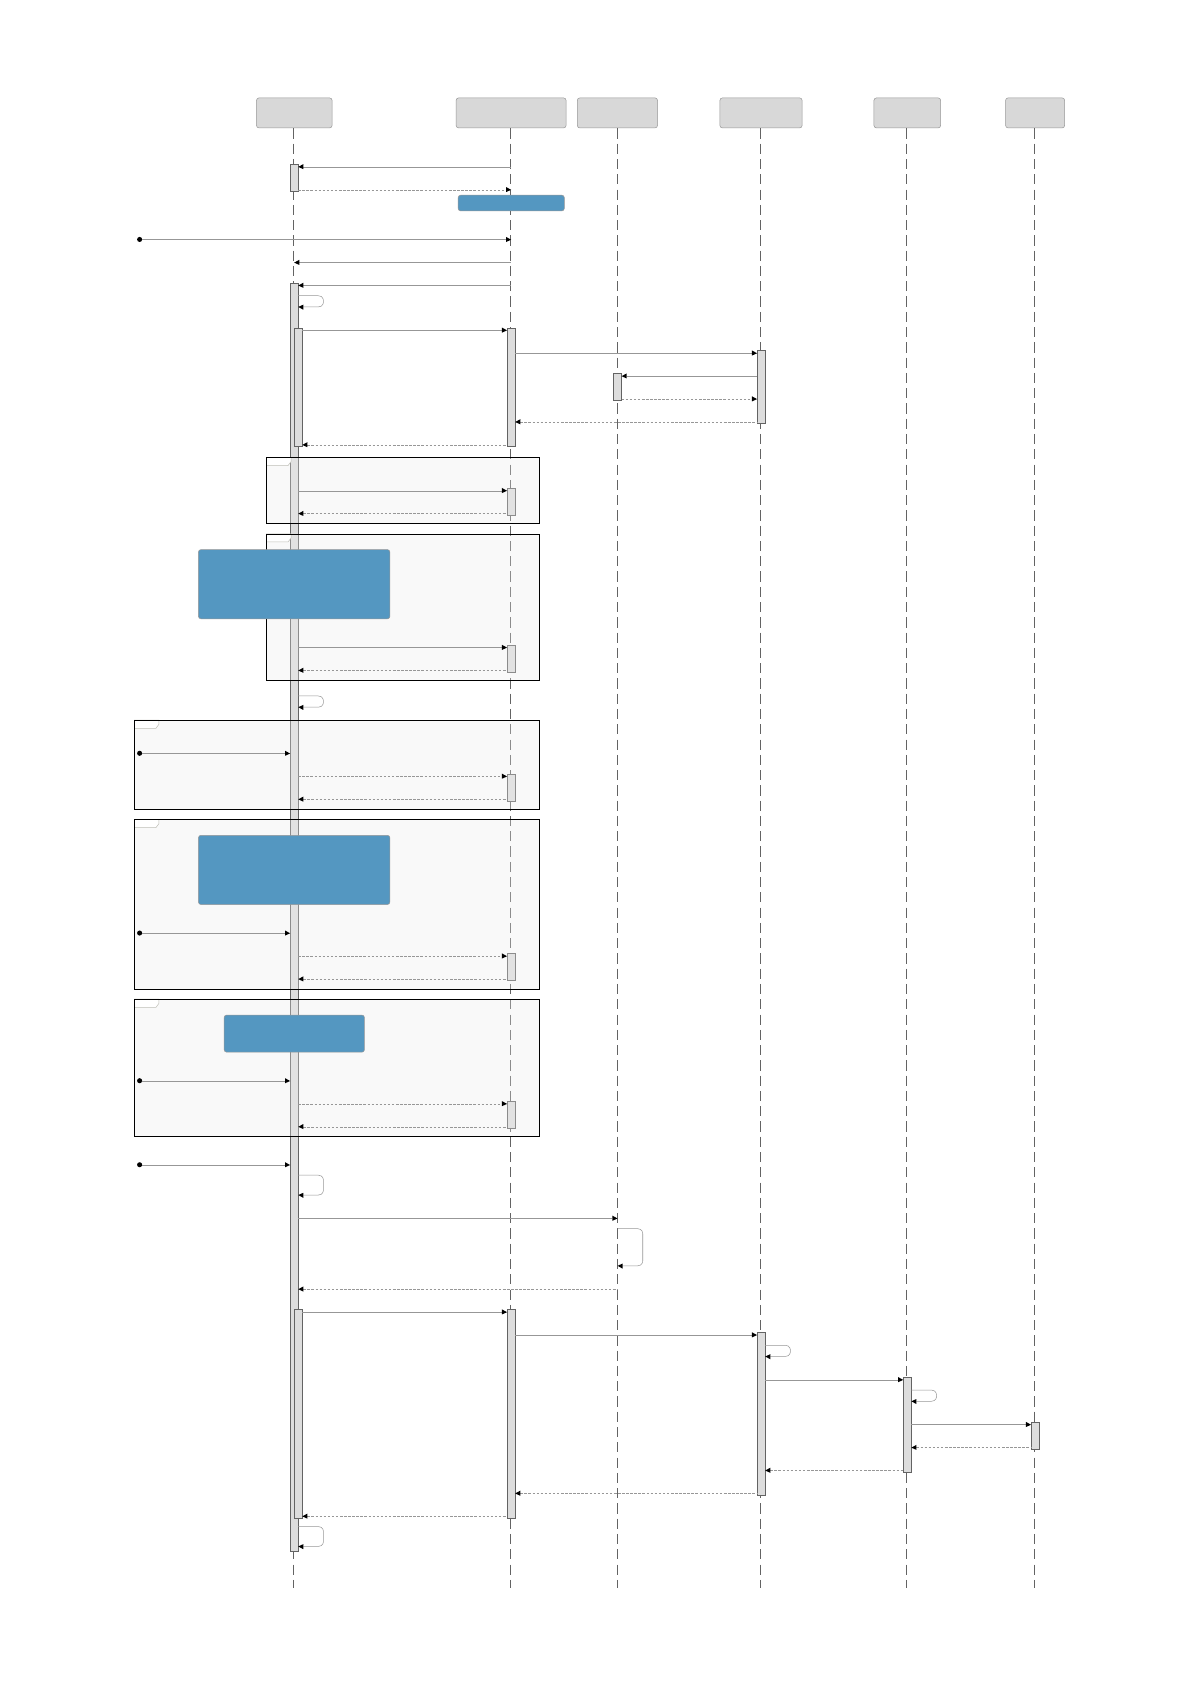
Apple Pay on the web
iOS / Safari Website Merchant Server Apple Server PSP/Acquirer Network Issuer
opt [payment method event]
opt [shipping contact event]
opt [payment method changed event]
opt [shipping contact changed event]
opt [shipping method changed event]
[1] canMakePayments() / canMakePaymentsWithActiveCard()
[2] true / false
[3] User taps Apple Pay button
[4] create ApplePayPaymentRequest and new ApplePaySession()
[5] session.begin()
[6] Payment Sheet is presented
[7] onvalidatemerchant event
[8] request a new merchant session
[9] request a new merchant session
[10] return merchant session blob
[11] return merchant session blob
[12] completeMerchantValidation()
[13] onpaymentmethodselected event
[14] completePaymentMethodSelection()
[15] onshippingcontactselected event
[16] completeShippingContactSelection()
[17] Payment Sheet is activated
[18] User changes payment method
[19] onpaymentmethodselected event
[20] completePaymentMethodSelection()
[21] User changes shipping contact / address
[22] onshippingcontactselected event
[23] completeShippingContactSelection()
[24] User changes shipping method
[25] onshippingmethodselected event
[26] completeShippingMethodSelection()
[27] User authenticates with Touch ID / Face ID
[28] Apple Pay payment data
is generated on device
[29] payment data sent to Apple Server
[30] Apple encrypt
payment data using public key
(associated with Payment
Processing Certificate)
[31] encrypted payment data returned to iOS
[32] onpaymentauthorized event
[33] send user data and ecnrypted payment data to server
[34] send user data and ecnrypted payment data to psp
[35] PSP decrypts Apple Pay payment data
[36] decrypted payment data sent to PNO
[37] PNO detokenises Apple Pay token
[38] card data sent for authorisation
[39] authorisation response
[40] authorisation response
[41] authorisation response
[42] authorisation response
[43] completePayment()
[44] Payment outcome displayed
and payment sheet dismissed
show / hide Apple Pay button
Event only triggered if shipping contact
fields are requested in the
ApplePayPaymentRequest.
Only a partial address is provided at this stage.
Full address is only provided after the user authenticates.
Event only triggered if shipping contact
fields are requested in the
ApplePayPaymentRequest.
Only a partial address is provided at this stage.
Full address is only provided after the user authenticates.
Event only triggered if shipping methods
are included in the
ApplePayPaymentRequest.
Merchant Integration Guide
Jan 2024
22
Apple Pay on the web:
PSP hosted payment page, merchant registered via API
iOS / Safari Hosted Payment Page Apple Server PSP/Acquirer Network Issuer
opt [payment method event]
opt [shipping contact event]
opt [payment method changed event]
opt [shipping contact changed event]
opt [shipping method changed event]
[1] canMakePayments() / canMakePaymentsWithActiveCard()
[2] true / false
[3] User taps Apple Pay button
[4] create ApplePayPaymentRequest and new ApplePaySession()
[5] session.begin()
[6] Payment Sheet is presented
[7] onvalidatemerchant event
[8] request a new merchant session
[9] request a new merchant session
[10] return merchant session blob
[11] return merchant session blob
[12] completeMerchantValidation()
[13] onpaymentmethodselected event
[14] completePaymentMethodSelection()
[15] onshippingcontactselected event
[16] completeShippingContactSelection()
[17] Payment Sheet is activated
[18] User changes payment method
[19] onpaymentmethodselected event
[20] completePaymentMethodSelection()
[21] User changes shipping contact / address
[22] onshippingcontactselected event
[23] completeShippingContactSelection()
[24] User changes shipping method
[25] onshippingmethodselected event
[26] completeShippingMethodSelection()
[27] User authenticates with Touch ID / Face ID
[28] Apple Pay payment data
is generated on device
[29] payment data sent to Apple Server
[30] Apple encrypt
payment data using public key
(associated with Payment
Processing Certificate)
[31] encrypted payment data returned to iOS
[32] onpaymentauthorized event
[33] send user data and ecnrypted payment data to server
[34] PSP decrypts Apple Pay payment data
[35] decrypted payment data sent to PNO
[36] PNO detokenises Apple Pay token
[37] card data sent for authorisation
[38] authorisation response
[39] authorisation response
[40] authorisation response
[41] completePayment()
[42] Payment outcome displayed
and payment sheet dismissed
show / hide Apple Pay button
Event only triggered if shipping contact
fields are requested in the
ApplePayPaymentRequest.
Only a partial address is provided at this stage.
Full address is only provided after the user authenticates.
Event only triggered if shipping contact
fields are requested in the
ApplePayPaymentRequest.
Only a partial address is provided at this stage.
Full address is only provided after the user authenticates.
Event only triggered if shipping methods
are included in the
ApplePayPaymentRequest.

Merchant Integration Guide
Jan 2024
23
Apple Pay in app
iOS App Merchant Server Apple Server PSP/Acquirer Network Issuer
opt [payment method event]
opt [shipping contact event]
opt [payment method changed event]
opt [shipping contact changed event]
opt [shipping method changed event]
[1] canMakePayments() / canMakePayments(usingNetworks:)
[2] true / false
[3] User taps Apple Pay button
[4] create PKPaymentRequest
[5] instantiate PKPaymentAuthorizationController(paymentRequest:)
[6] present(completion:)
[7] Payment Sheet is presented
[8] paymentAuthorizationController(_: didSelectPaymentMethod: handler:)
[9] completion(PKPaymentRequestPaymentMethodUpdate(paymentSummaryItems: ))
[10] paymentAuthorizationController(_: didSelectShippingContact: handler:)
[11] completion(PKPaymentRequestShippingContactUpdate(errors: shippingMethods: ))
[12] Payment Sheet is activated
[13] User changes payment method
[14] paymentAuthorizationController(_: didSelectPaymentMethod: handler:)
[15] completion(PKPaymentRequestPaymentMethodUpdate(paymentSummaryItems: ))
[16] User changes shipping contact / address
[17] paymentAuthorizationController(_: didSelectPaymentMethod: handler:)
[18] completion(PKPaymentRequestPaymentMethodUpdate(paymentSummaryItems: ))
[19] User changes shipping method
[20] paymentAuthorizationController(_: didSelectShippingMethod: handler:)
[21] completion(PKPaymentRequestShippingMethodUpdate(paymentSummaryItems: ))
[22] User authenticates with Touch ID / Face ID
[23] Apple Pay payment data
is generated on device
[24] payment data sent to Apple Server
[25] Apple encrypt
payment data using public key
(associated with Payment
Processing Certificate)
[26] encrypted payment data returned to iOS
[27] paymentAuthorizationController(_: didAuthorizePayment: handler :) {
[28] send user data and ecnrypted payment data to server
[29] send user data and ecnrypted payment data to psp
[30] PSP decrypts Apple Pay payment data
[31] decrypted payment data sent to PNO
[32] PNO detokenises Apple Pay token
[33] card data sent for authorisation
[34] authorisation response
[35] authorisation response
[36] authorisation response
[37] authorisation response
[38] completion(PKPaymentAuthorizationResult(status: errors:))
[39] Payment outcome displayed
and payment sheet dismissed
show / hide Apple Pay button
Event only triggered if shipping contact
fields are requested in the
PKPaymentRequest.
Only a partial address is provided at this stage.
Full address is only provided after the user authenticates.
Event only triggered if shipping contact
fields are requested in the
PKPaymentRequest
Only a partial address is provided at this stage.
Full address is only provided after the user authenticates.
Event only triggered if shipping methods
are included in the
PKPaymentRequest.
