
1 | P a g e
excerpted from Microsoft Office Help
Change the size of a picture, shape, text box, or WordArt
Applies To:
Excel 2010
, Word 2010
, PowerPoint 2010, Publisher 2010
You can easily resize pictures, text boxes, shapes, and WordArt in your file. You can also crop pictures or
return them to their original size.
Resize a picture, shape, text box, or WordArt
Resizing stretches or shrinks the dimensions of an object.
Resize manually
1. Click the picture, shape, text box, or WordArt that you want to resize.
2. To increase or decrease the size in one or more directions, drag a sizing handle away from or
toward the center, while doing one of the following:
o To keep the center of an object in the same place, press and hold CTRL while you drag
the sizing handle.
o To maintain the object's proportions, press and hold SHIFT while you drag the sizing
handle. NOTE: This is the type of resizing option you need to use when working with
the FEW logo to maintain its correct proportions.
o To both maintain the object's proportions and keep its center in the same place, press
and hold both CTRL and SHIFT while you drag the sizing handle.
Please be sure to maintain a round configuration of the FEW logo when resizing. The below examples
are incorrect renditions of the FEW logo.
Please ensure you are using the FEW logo including the Registered Trademark symbol ®.

2 | P a g e
excerpted from Microsoft Office Help
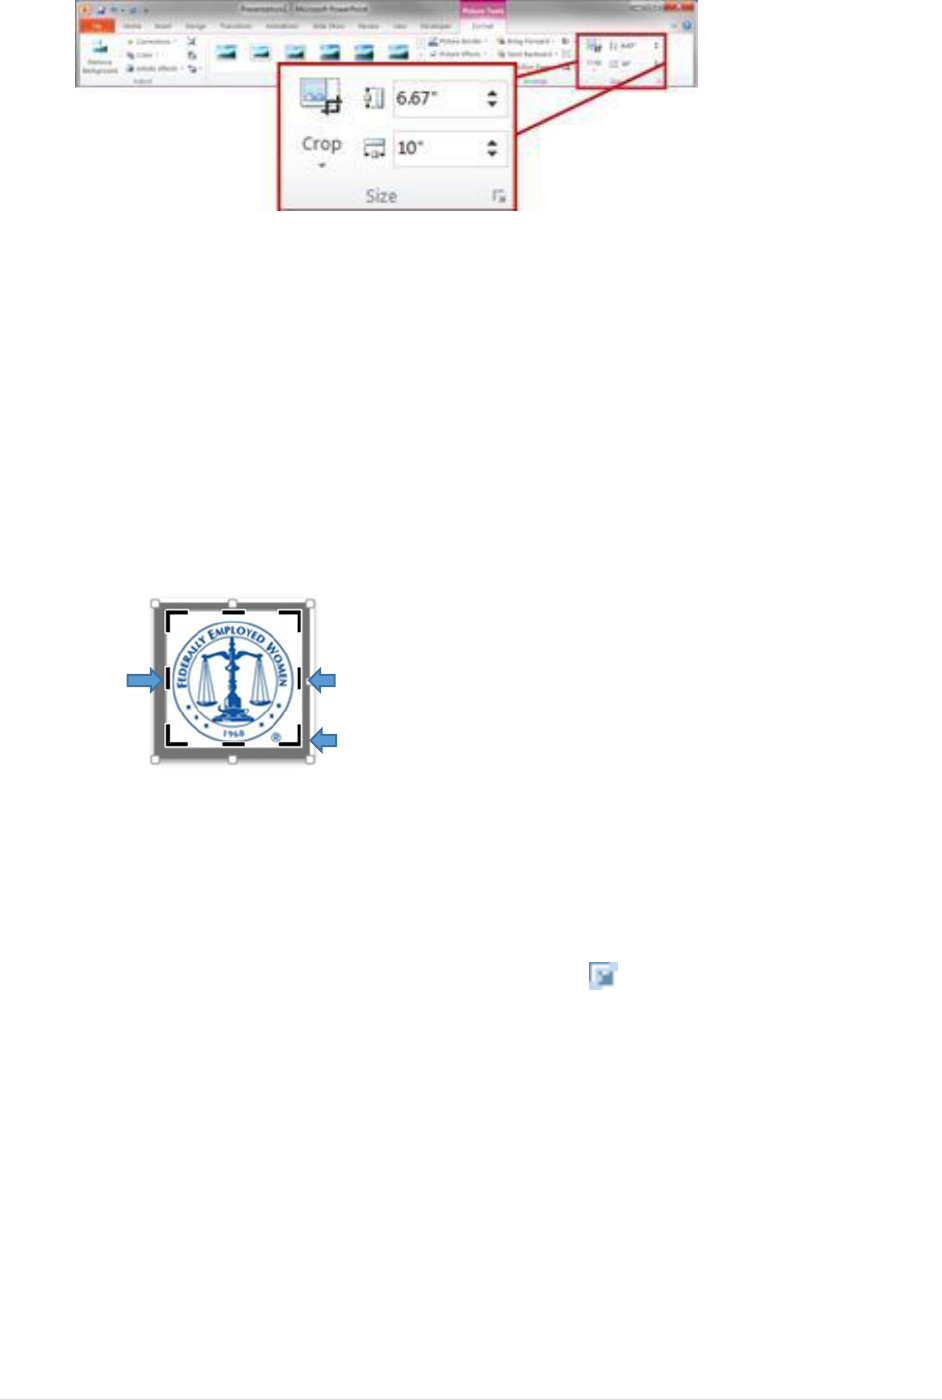
Resize to an exact height and width
1. Click the picture, shape, text box, or WordArt that you want to resize.
2. Do one of the following:
o To resize a picture, under Picture Tools, on the Format tab, in the Size group, enter the
measurements that you want into the Height and Width boxes.
Note: If you do not see the Picture Tools and Format tabs, make sure that you selected
a picture. You might have to double-click the picture to open the Format tab.
o To resize a shape, text box, or WordArt, under Drawing Tools, on the Format tab, in the
Size group, enter the measurements that you want into the Height and Width boxes.
Note: If you do not see the Drawing Tools and Format tabs, make sure that you selected
a picture, shape, text box, or WordArt. You might have to double-click the picture to
open the Format tab.
3. In the Size group, click the Size and Position dialog box launcher .
4. On the Size tab, under Size and rotate, clear the Lock aspect ratio check box.
Resize to an exact proportion
1. Click the picture, shape, text box, or WordArt that you want to resize.
2. Do one of the following:
o To resize a picture, under Picture Tools, on the Format tab, in the Size group, click the
Size and Position dialog box launcher .

3 | P a g e
excerpted from Microsoft Office Help
Remember: If you do not see the Picture Tools and Format tabs, make sure that you
selected a picture. You might have to double-click the picture to open the Format tab.
o To resize a shape, text box, or WordArt, under Drawing Tools, on the Format tab, in the
Size group, click the Size and Position dialog box launcher .
Note: If you do not see the Drawing Tools and Format tabs, make sure that you selected
a picture, shape, text box, or WordArt.
3. On the Size tab, under Scale, enter the percentages of the current height and width that you
want to resize to, in the Height and Width boxes.
4. Clear the Lock aspect ratio check box.
Tip: To apply the same height and width to different objects, select all objects that you want to have the
same dimensions, and then in Size group, enter the dimensions that you want in the Height and Width
boxes. To select multiple objects, click the first object, and the press and hold CTRL while you click the
other objects.
Crop a picture
Cropping reduces the size of a picture by removing vertical or horizontal edges. Cropping is often used
to hide or trim a part of a picture, either for emphasis or to remove unwanted portions.
You can always restore a resized or a cropped picture to its original appearance. You can also outcrop a
picture, which adds a margin.
You can crop any picture, except an animated GIF picture, by using the Crop feature. To crop an
animated GIF, trim the picture in an animated-GIF editing program, and then insert the picture again.
1. Select the picture that you want to crop.
2. Under Picture Tools, on the Format tab, in the Size group, click Crop.
NOTE: The frame around the
logo is for demonstration
purposes only.
4 | P a g e
excerpted from Microsoft Office Help
Remember: If you do not see the Picture Tools and Format tabs, make sure that you selected a
picture. You might have to double-click the picture to open the Format tab.
3. Do one of the following:
To crop one side, drag the center cropping handle on that side inward.
To crop equally on two sides at once, press and hold CTRL while you drag the center
cropping handle on either side inward.
To crop equally on all four sides at once, press and hold CTRL while you drag a corner
cropping handle inward.
Notes:
To crop your picture to exact dimensions, do the following:
1. Under Picture Tools, on the Format tab, in the Size group, click the Size
and Position dialog box launcher .
2. In the Format Picture dialog box, on the Crop tab, under Crop position,
enter the size numbers that you want in the Left, Width, Top, and
Height boxes.
To reduce the file size of your picture and delete the cropped parts of the
picture from the file, under Picture Tools, on the Format tab, in the Adjust
group, click Compress Pictures.
To undo a crop before you save your document, click Reset Picture in the Adjust
group.
To outcrop (or add a margin around a picture) drag the cropping handles away
from the center of the picture.
Ctrl +
Ctrl +

5 | P a g e
excerpted from Microsoft Office Help
Return a picture to its original size
Warning: You cannot return a picture to its original size if you previously cropped and saved it, or if you
selected the following options from the Compression Settings dialog box (to open the Compression
Settings dialog box, under Picture Tools, on the Format tab, in the Adjust group, click Compress
Pictures, and then click Options): the Delete cropped areas of pictures check box, and either Print (220
ppi): excellent quality on most printers and screens or Screen (150 ppi): good for Web pages and
projectors.
1. Select the picture that you want to return to its original size.
2. Under Picture Tools, on the Format tab, in the Size group, click the Size and Position dialog box
launcher .
Remember: If you do not see the Picture Tools and Format tabs, make sure that you selected a
picture. You might have to double-click the picture to open the Format tab.
3. In the Format Picture dialog box, click the Size tab, under Original size, clear the Lock aspect
ratio check box, and then click Reset.
Save the original version of an edited picture
When you modify an image with the Graphics Interchange Format (.gif), Joint Photographic Experts
Group File Interchange Format (.jpg), or Portable Network Graphics (.png) file format, you can save the
original version of the edited picture.
1. Right-click the edited picture, and then click Save as Picture on the shortcut menu.
2. In the Save As Picture dialog box, click the arrow next to Save, and then click Save Original
Picture.
Reduce the file size of a picture
Pictures can dramatically increase the file size of your Office document. You can control this file size by
making choices about the resolution of an image and the quality or compression of an image. One easy
way to balance this tradeoff is to match the picture resolution to the use of the document. For example,
if you are emailing the picture, you can specify a lower picture resolution to reduce the file size. On the
other hand, if picture quality is more important to you than file size, you can specify that the pictures
are never compressed.

6 | P a g e
excerpted from Microsoft Office Help
To save room on your hard disk drive or to reduce download times or load times on Web sites, you can
reduce picture resolution, apply compression with no visible loss of quality, and discard unwanted
information, such as the cropped parts of a picture or other picture editing information.
When you add a picture to your document it is automatically compressed using the number specified in
the Image Size and Quality options on the Advanced tab of the program options. By default this is set
for print (220 ppi), but you can change this.
Important: Compressing a picture to reduce the size of the file changes the amount of detail retained in
the source picture. This means that after compression, the picture can look different than before it was
compressed. Because of this, you should compress the picture and save the file, before applying an
artistic effect. You can change or undo the compression even after saving the file as long as you have not
closed the program you are working in, if the compression plus the artistic effect is not the look you
want.
Change the resolution of a picture
When you do not need every single pixel in an image to get an acceptable version of it for your target
destination, you can reduce or change the resolution. Reducing or changing the resolution can be
effective with images that you have scaled to be smaller, because their dots per inch (dpi) actually
increase in that case. Changing the resolution can affect image quality.
1. Click the picture or pictures that you want to change the resolution for.
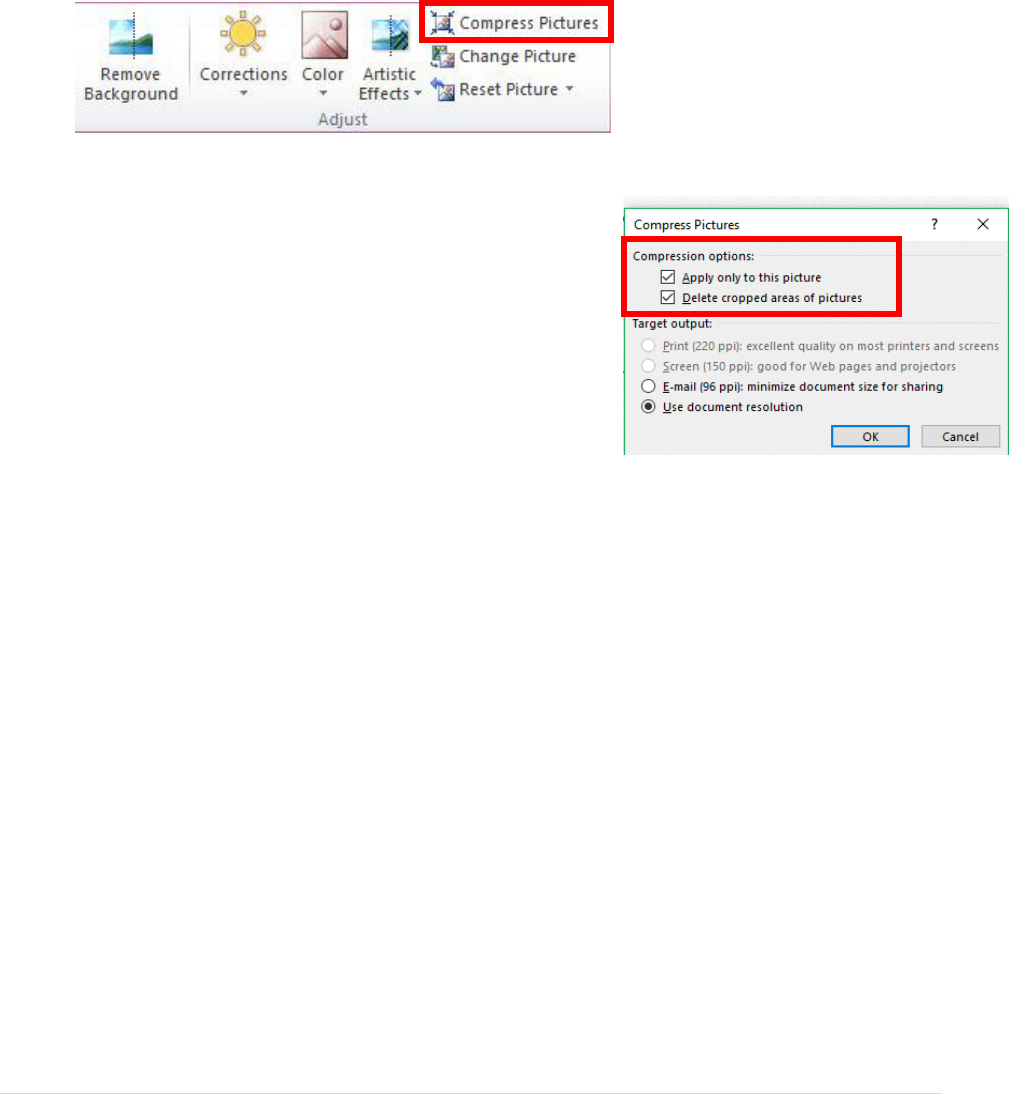
2. Under Picture Tools, on the Format tab, in the Adjust group, click Compress Pictures.
If you do not see the Picture Tools and Format tabs, make sure that you selected a picture. You
may have to double-click the picture to select it and open the Format tab.
3. To change the resolution for the selected pictures only and not all of the pictures in the
document, select the Apply only to this picture check box.
4. Under Target output, click the resolution that you want.
Note: The Use document resolution option uses the resolution set in the Microsoft Office
Backstage view. By default this is set to print or 220 ppi, but you can change this default picture
resolution.

7 | P a g e
excerpted from Microsoft Office Help
Set default picture resolution for all pictures in a document
Important: This setting applies only to pictures in the current document or the document selected in the
list next to Image Size and Quality. By default it is set to a target of Print (220 ppi).
1. Click the File tab.
2. Click Options and then click Advanced.
3. Under Image Size and Quality, click the document that you want to set the default picture
resolution for.
4. In the Set default target output to, click the resolution that you want.
Compress a picture
Depending on how many colors are used in a picture, you can reduce the color format of the image
(compress) to make its file size smaller. Compressing a picture makes the color take up fewer bits per
pixel, with no loss of quality.
1. Click the picture or pictures that you want to compress.
2. Under Picture Tools, on the Format tab, in the Adjust group, click Compress Pictures.
If you do not see the Picture Tools and Format tabs, make sure that you selected a picture. You
may have to double-click the picture to select it and open the Format tab.
3. To compress the selected pictures only and not all of the pictures in the document, select the
Apply only to this picture check box.
Clearing the Apply only to this picture checkbox will override any previous changes you have
made for other individual pictures in this document.
4. Under Target Output, click the resolution that you want.
Notes:
o The Use document resolution option uses the
resolution set in the Backstage view. By default
this is set to a target of Print (220 ppi), but you
can change this default picture resolution.
o If you are want the highest quality picture
resolution and are willing to accept a larger file
size, you can turn compression off.
8 | P a g e
excerpted from Microsoft Office Help
o Compression changes are made when you close this dialog box and the changes can be
seen in your document immediately. If the results are unsatisfactory, you can undo the
changes.
Delete cropped areas of picture
If you have cropped a picture, you can delete the cropped areas of the picture to reduce the file size.
1. Click the picture or pictures that you want to discard unwanted information from.
2. Under Picture Tools, on the Format tab, in the Adjust group, click Compress Pictures.
Note: If you do not see the Picture Tools and Format tabs, make sure that you selected a
picture. You may have to double-click the picture to select
it and open the Format tab.
3. To remove cropped areas for the selected picture or
pictures only and not all of the pictures in the document,
select the Apply only to this picture check box.
4. Under Compression Options, select the Delete cropped
areas of pictures check box.
Delete all picture editing data
If you have cropped a picture or made other changes to the picture, such as applying an artistic effect or
changing the brightness or contrast, information to reverse those changes is stored in your file. You can
reduce the size of your file by deleting this editing data. Checking this option will reduce your document
size, but if you want to undo your edits, you will need to reinsert the picture into your document if you
want to undo any changes you have made.
1. Click the File tab.
2. Click Options and then click Advanced.
3. Under Image Size and Quality, click the document that you want to remove picture editing data
from.
4. Under Image Size and Quality, select the Discard editing data checkbox.
Note: This setting applies only to pictures in the current document or the document selected in the list
next to Image Size and Quality.
Be sure to save any changes you have made to your graphics or your document, spreadsheet, or
presentation in order to maintain the changes you have made to your graphics. Please also reference
the Federally Employed Women Style Guide located under the Members Only / Chapter Resources
section. You will need to be logged in to access the section.
