
ELECTRONIC FEDERAL TAX PAYMENT SYSTEM
BATCH PROVIDER SOFTWARE USER MANUAL
Document 5301 (Rev. 5-2023) Catalog Number 71493J Department of the Treasury Internal Revenue Service publish.no.irs.gov
2
CONTENTS
SECTION NAME PAGE
INTRODUCTION .......................................................................................................................................... 5
1.1
WELCOME TO EFTPS .................................................................................................................................... 5
1.2
RECOMMENDED SYSTEM REQUIREMENTS .............................................................................................. 5
1.3
OVERALL PROCESS AND TIMING ............................................................................................................... 6
INSTALLATION AND SETUP ...................................................................................................................... 8
2.1
INSTALLING EFTPS BATCH PROVIDER SOFTWARE ................................................................................. 8
2.2
RUNNING ON A NETWORK ENVIRONMENT ............................................................................................... 9
2.3
LAUNCHING THE SOFTWARE ...................................................................................................................... 9
SOFTWARE OVERVIEW ............................................................................................................................11
3.1
NAVIGATING THE SOFTWARE ................................................................................................................... 11
3.2
USING WIZARDS .......................................................................................................................................... 11
3.3
REQUESTING A SYNCHRONIZATION LOG ............................................................................................... 11
3.4
RECEIVING ERROR MESSAGES ................................................................................................................ 12
3.5
INTERPRETING STATUSES ........................................................................................................................ 12
3.6
REINSTALLING SOFTWARE ....................................................................................................................... 13
3.7
RECEIVING SOFTWARE UPDATES ............................................................................................................ 13
REGISTRATION .........................................................................................................................................14
4.1
CREATING A NEW REGISTRATION ........................................................................................................... 14
4.2
YOUR REGISTRATION WELCOME PACKET ............................................................................................. 16
4.3
RECEIVING YOUR MASTER PIN ................................................................................................................. 17
4.4
OBTAINING A MASTER PASSWORD ......................................................................................................... 17
4.5
CREATING ADDITIONAL REGISTRATIONS ............................................................................................... 18
4.6
EDITING A REGISTRATION ......................................................................................................................... 18
4.7
EDITING A REGISTRATION’S FINANCIAL INFORMATION ....................................................................... 19
4.8
EDITING A MASTER PIN .............................................................................................................................. 20
3
4.9
EDITING A MASTER PASSWORD ............................................................................................................... 20
4.10
CHOOSING YOUR PAYMENT METHODS .................................................................................................. 20
ENROLLMENTS .........................................................................................................................................22
5.1
CREATING AN ENROLLMENT ..................................................................................................................... 22
5.2
EDITING ENROLLMENT INFORMATION .................................................................................................... 25
5.3
EDITING ENROLLMENT FINANCIAL INFORMATION................................................................................. 26
5.4
DELETING AN ENROLLMENT ..................................................................................................................... 27
5.5
TERMINATING AN ENROLLMENT .............................................................................................................. 27
5.6
ARCHIVING AN ENROLLMENT ................................................................................................................... 28
5.7
VIEWING ARCHIVED ENROLLMENTS ........................................................................................................ 28
5.8
ACTIVATING ARCHIVED ENROLLMENTS .................................................................................................. 29
5.9
PERFORMING ENROLLMENT INQUIRIES ................................................................................................. 29
5.10
IMPORTING EXISTING ENROLLMENTS FROM A TEXT FILE .................................................................. 30
5.11
EXPORTING ENROLLMENTS TO A FILE ................................................................................................... 30
5.12
REVOKING A THIRD-PARTY AUTHORIZATION ........................................................................................ 30
PAYMENTS ................................................................................................................................................31
6.1
PAYMENT SCREEN OVERVIEW ................................................................................................................. 31
6.2
CREATING PAYMENTS ............................................................................................................................... 31
6.3
SYNCHRONIZING PAYMENT HISTORY ..................................................................................................... 33
6.4
IMPORTING PAYMENT DATA ..................................................................................................................... 33
6.5
CHECKING FOR DUPLICATE PAYMENTS ................................................................................................. 34
6.6
CANCELING PAYMENTS ............................................................................................................................. 34
6.7
PERFORMING PAYMENT INQUIRIES ........................................................................................................ 35
6.8
EXPORTING PAYMENTS TO A FILE ........................................................................................................... 36
6.9
COPYING AND PASTING PAYMENTS ........................................................................................................ 36
6.10
MAKING PAYMENTS BY PHONE ................................................................................................................ 36
6.11
AFFORDABLE CARE ACT (ACA) SHARED RESPONSIBILITY PAYMENTS ............................................. 36
6.12
CONFRIMATION EMAIL ............................................................................................................................... 37
USER ADMINISTRATION ...........................................................................................................................38
4
7.1
DETERMINING USER ROLES ..................................................................................................................... 38
7.2
ADDING USERS AND DEFINING ROLES ................................................................................................... 39
7.3
EDITING AND DELETING USERS AND ROLES ......................................................................................... 39
NOTIFICATIONS .........................................................................................................................................40
8.1 NOTIFICATIONS ........................................................................................................................................... 40
8.2
CALENDAR ................................................................................................................................................... 41
8.3
EMAIL COMMUNICATIONS AND SECURITY ............................................................................................. 41
TROUBLESHOOTING ................................................................................................................................43
GLOSSARY ................................................................................................................................................45
APPENDIXES .............................................................................................................................................47
APPENDIX A RECORD LAYOUT FOR IMPORTING ENROLLMENTS .......................................................48
APPENDIX B RECORD LAYOUT FOR IMPORTING NEW PAYMENTS .....................................................49
APPENDIX C RECORD LAYOUT FOR EXPORTING PAYMENTS ............................................................50
APPENDIX D HOW TO APPLY PROXY SETTINGS ..................................................................................51
APPENDIX E FEDERAL RESERVE BANK HOLIDAYS ..............................................................................53
APPENDIX F IMPORTANT PHONE NUMBERS .........................................................................................53

5
INTRODUCTION
INTRODUCTION
1.1
WELCOME TO EFTPS
The Electronic Federal Tax Payment System (EFTPS) is a free service of the U.S. Department of the
Treasury. The system has been in use since 1996, with millions of businesses and individual taxpayers
and thousands of tax professionals making payments through channels, including EFTPS.gov, a voice
response system, and the batch provider software.
1.1.1 Who should use this guide?
•
Tax professionals who wish to make multiple federal tax payments electronically for clients.
•
Taxpayers who wish to make multiple federal tax payments electronically for several
businesses or subsidiaries.
1.2
RECOMMENDED SYSTEM REQUIREMENTS
Operating
Systems
Microsoft
Windows
Apple
Macintosh
Linux
Processor
Intel i5-2400 Sandy
Bridge Quad-Core or
above, or AMD Ryzen 5
2600 or above
1.0 GHz Intel Core i5
Intel i5-2400 Sandy Bridge
Quad-Core or above, or AMD
Ryzen 5 2600 or above
Memory 4 gigabytes with at
least 1 gigabyte free
4 gigabytes with at
least 1 gigabyte free
4 gigabytes with at least 1
gigabyte free
Disk Space 250 gigabytes with at
least 10% free
250 gigabytes with at
least 10% free
250 gigabytes with at least
10% free
Internet
Connection
Broadband
recommended
Broadband
recommended
Broadband recommended
You will also need to have an Internet connection, either broadband (DSL or cable modem) or dial-up. Broadband
recommended for Mac. *Installation and use of the software requires OSX with Java Runtime Version 1.4.2 or greater.
6
INTRODUCTION
1.3
OVERALL PROCESS AND TIMING
1.
Install
software.
(See
Section
2.1)
2.
Complete
your
registration.
(See
Section
4.1)
3.
Receive by
mail:
a. Your
Registration
ID.
b. In
a
separate
mailing,
Master
PIN
and
instructions
for
obtaining
a
Master
Password.
4.
Obtain
your
Master
Password
by
calling
1.800.945.7337
.
5.
Change
your
Master
Password.
(See
Section
4.4)
6.
Synchronize
your
Registration.
(See
Section
4.6.3)

8
INSTALLATION AND SETUP
INSTALLATION AND SETUP
2.1
INSTALLING EFTPS BATCH PROVIDER SOFTWARE
Please Note: For Windows to install the Batch Provider Client correctly, it must be executed
as an Administrator. If you do not have administrative privileges, please contact your system
administrator.
1.
Go to EFTPS.gov and click Help and Information.
2.
Select Downloads, Software.
3.
Scroll to System Requirements and click the correct “Download” link for your operating
system.
4.
Click “Download” again.
5.
Click “Run.”
6.
Click “Run” again.
7.
On the Install Anywhere Introduction window, click “Next.”
8.
Accept the license agreement and click “Next.”
9.
Select the default C: Folder Path and click “Next.”
10.
Review the database security information and click “Next.”
11.
Select Single User and click “Next.”
12.
Create User Name and Password (both case sensitive).
13.
Click “Install.”
9
INSTALLATION AND SETUP
2.2
RUNNING ON A NETWORK ENVIRONMENT
1.
Install the software on the server first.
2.
Install the software on the computers that network through the server.
3.
If you need to use a proxy server to connect outside of a firewall, you must place the proxy
server address in one of the batch provider software files on your hard drive. Contact your
Network Administrator to obtain the specific proxy server address, port, and any realm, user
name, or password information. (see Appendix D)
Precaution
The application must not be started more than once on a particular server.
To control this, set the File Permissions on the BatchProvider.exe file to allow only one user
(or a controlled set of users) to have execute permissions on the server installation. This will
prevent unauthorized or accidental start-up of the application. A controlled set of users would
need to coordinate start-up of the application so that it is only started once at any given time.
2.3
LAUNCHING THE SOFTWARE
1.
Log on using the Administrator’s User ID and Password.
2.
Click the User Administration tab to create any other roles and User IDs. (see Section 7)
2.3.1 Setting the Database Passwords
Upon installation of the
Batch Provider software, the administrator must set the values
for the
database admin password and the database encryption password.
These values must be
updated subsequently every 13 months. You will receive warning prompts to update these
passwords once they are within 60 days of expiration.
1.
Navigate to ‘‘Administration’’ > ‘‘Set Database Passwords’’ to update the
admin
and
encryption passwords.
Note
-
If the database admin and encryption passwords have not been set or if they
have expired, you will be prompted to update these passwords before any users are
able
to proceed within the application.
2. Specify values for the database admin and database encryption passwords.
Each password
value must comply with the following:
-
Must be between 12 and 30 characters in length
-
Must contain at least 1 upper-case letter
-
Must contain at least 1 lower-case letter
-
Must contain at least 1 number
-
Must contain at least 1 of the following special characters (!, @, #, $, *, +, -)
-
Must not contain double characters (no 2 consecutive characters can be the
same value)
-
Must not be the same as any of the 5 previous passwords used
3.
Click “Update.”
The database admin and encryption passwords are changed immediately and
the database will be re-encrypted.
10
INSTALLATION AND SETUP
2.3.2 To use this software with a new registration
1.
Start
the
application
and
log
on
using
the
Administrator’s
User
ID
and
Password.
2.
Click
the
Registration
tab
and
follow
the
steps
to
create
a
new
Registration.
(See
Section
4.1)
3.
Using your PIN (which you will receive in the mail) and your batch provider identification
number, obtain
your Master Password by calling
1.800.945.7337
.
4.
Change
your
Master
Password.
(See
Section
4.4)
5.
Download
your
new
Registration
by
synchronizing.
(See
Section
4.6.3)
2.3.3 To use this software if you are already enrolled in EFTPS as a taxpayer
1.
Log
on
using
the
Administrator’s
User
ID
and
Password.
2.
Perform
the
Express
Registration
process
described
in
Section
4.1.1.
3.
Using your
Self-Selected
Master
PIN
and
batch provider
identification number,
obtain your
Master
Password
by calling
1.800.945.7337
.
4.
Change
your
Master
Password.
(See
Section
4.4)
5.
Upload
the
new
Registration
by
synchronizing.
(See
Section
4.6.3)

11
SOFTWARE OVERVIEW
SOFTWARE OVERVIEW
You can organize your taxpayer and tax payment information within five major tabs and their subtabs:
1. Registration Manage your Registration(s).
User Administration
Create user accounts and assign roles and responsibilities for your software users.
3. Notifications
Receive messages from EFTPS and communicate between your users.
a. Messages
View message history from EFTPS.
b. Calendar (optional)
Make notes, schedule activities, and send and receive messages from other
users.
4. Enrollments
Manage your enrollments.
a. Send Enrollments
Add and submit new taxpayer enrollments.
b. Enrollment Inquiry
View your current taxpayer enrollments and synchronize your enrollments with
EFTPS.
5. Payments
Manage your taxpayer payments.
a. Send Payments
Add and submit new tax payments.
b. Cancel Payments
Submit tax payment cancellations to EFTPS.
c. Payment Inquiry
View your current tax payments and synchronize your payments with EFTPS.
3.1
NAVIGATING THE SOFTWARE
Navigate the software by clicking on the five tabs and their subtabs and using the
following buttons to take action:
Add View
Edit Copy
Paste Import
Delete Submit
Print Terminate
Sync Archive
NOTE
You must be connected to the Internet to “Submit” or “Sync.”
3.2
USING WIZARDS
Step-by-step wizards will guide you through the Registration and Enrollment processes.
3.3
REQUESTING A SYNCHRONIZATION LOG
In the synchronization authorization window, select “Generate a Synchronization Log” before
clicking “Submit.” This will generate a report that shows how many records were inserted and
updated.
12
SOFTWARE OVERVIEW
3.4
RECEIVING ERROR MESSAGES
An error message is displayed if required information is left blank or a discrepancy is found. The
message will describe the error and provide instructions for correcting the error.
3.5
INTERPRETING STATUSES
Each Registration, Enrollment, and Payment transaction is assigned a status. The status appears on
the summary listings on the Registration, Enrollments, and Payments tabs.
3.5.1 Registration and enrollment statuses
• Active—the transaction has been completed, submitted to EFTPS, accepted, and processed.
• Inactive—the transaction has been archived and is not currently active. This applies to
enrollments only.
• Pending—the transaction has been completed, submitted to EFTPS, and accepted but not
processed.
• Pending Error—the transaction has been completed, submitted to EFTPS, and is pending
but has an error. To correct the error, select the applicable Registration and click “Edit”; or,
for enrollments, select the applicable enrollment and click “View.”
• Pending Terminate—the enrollment has been selected to be terminated, submitted to
EFTPS, and accepted but not processed. This applies to enrollments only.
• Rejected—the transaction has been completed and submitted to EFTPS but has been
rejected.
• Submitted—the transaction has been completed and submitted to EFTPS but is not yet
accepted or processed by EFTPS.
• Terminated—the enrollment has been selected to be terminated, submitted to EFTPS,
accepted, and processed. The enrollment is removed permanently from the EFTPS
system.
• Suspended—the enrollment has been suspended because Shared Secrets information
required by the Third Party Authorization disclosure was not provided. Payments that were
made for this enrollment before the suspension will be processed, but no new payments
can be made for an enrollment that is in a suspended status.
13
SOFTWARE OVERVIEW
3.5.2 Payment statuses
• New—the payment has not been submitted to EFTPS. A payment in New status has no outstanding
validation errors and may be edited.
• New Cancel—the payment has been selected to be canceled. Cancellation requests cannot be
edited.
• Rejected—the payment was submitted to EFTPS and was rejected. The payment can be edited
and resubmitted.
• Rejected Cancel—the cancellation request was rejected. The request must be resubmitted or
deleted and re-created/resent.
• Submitted—the payment has been submitted and is currently being processed by EFTPS. The
payment cannot be edited.
• Submitted Cancel—the cancellation request has been submitted.
3.6
REINSTALLING SOFTWARE
To reinstall your software, follow the procedures outlined in Section 2.1. After you reinstall
the software, follow the procedures to synchronize Registration(s) first, then Enrollments,
and then Payments.
NOTE
When you completely reinstall the software, all “Create Payment” dates default to the
reinstallation date.
3.7
RECEIVING SOFTWARE UPDATES
EFTPS will notify you if updates are available through batch provider software messaging.

14
REGISTRATION
REGISTRATION
Login/Exit Help
Five Main
•
Click columns to sort information in ascending/descending order.
•
Drag and drop columns to reorder positions.
•
Summary listing of entries.
Submit
Sync
Registration
function buttons
Banking information change
4.1
CREATING A NEW REGISTRATION
4.1.1 Step 1: Registration information
1. Click the Registration tab and click “Add.”
2. Enter a registration description. This description can be based on the types or groups of
clients. For example: you might have a registration that contains your 1040ES clients only
and enter “1040ES” as the description. You can have more than one registration.
3.
Select Business or Individual (i.e., Sole Proprietor).
4.1.1.1 If you are already using EFTPS as a taxpayer—Express Registration
If you are already an EFTPS batch provider or have an active EFTPS enrollment as a taxpayer,
you can speed up the Registration process by clicking the Express Registration box.
15
REGISTRATION
4.1.1.1.1 If you are using your existing batch provider registration
1. Click the Registration radio button.
2. Enter your existing batch provider ID.
3. Enter your existing Master PIN.
4. Enter a self-selected Master PIN for this registration.
4.1.1.1.2 If you are using your existing EFTPS taxpayer enrollment
1. Click the Enrollment radio button.
2. Enter the Taxpayer Identification Number (EIN or SSN) in the batch provider EIN/SSN field.
3. Enter your EFTPS online PIN.
4. Enter your EFTPS online Password.
5. Enter a self-selected Master PIN for this registration.
6. Skip to Step 3 to continue your registration.
4.1.2 Name and TIN
Enter your company name exactly as it appears on your tax documents and your Employer
Identification Number (EIN) if you are registering as a business or your Social Security
Number (SSN) if you are registering as an individual.
4.1.3 Contact information
Enter your contact information:
•
Name
•
Phone Number
•
Address
•
Email Address optional
•
City, State, ZIP Code
The mailing address you enter will be verified by EFTPS and may be modified slightly to
match IRS records.
4.1.4 Email notification
You can choose to receive an automated email notification of the receipt of your file. If more
than one person should receive an email, you can enter up to three email addresses. If you do
not wish to be notified through email, do not check either of these boxes. In that case, an
EFTPS message will be sent to you using the software’s messaging capability for each
accepted and/or rejected file.
16
REGISTRATION
NOTE
The email notification does not serve as an acceptance of the file.
4.1.5 Step 5: Financial institution information
You can have tax payments made from:
•
Master Account—complete the requested bank account information.
•
Each taxpayer’s account—enter the bank account information when you enroll the client.
•
Master Account and taxpayers’ accounts—enter both accounts as described above.
4.1.6 Step 6: Disclosure information
Check one or more of the Disclosure Authorization forms that you now have or will
have on file with the IRS. To make federal tax payments on behalf of clients, you
must have a signed authorization from the taxpayer.
4.1.7 Step 7: Authorization agreements
Language that indicates you are responsible for submitting and handling tax information on
behalf of taxpayers is displayed.
NOTE
You must sign the Registration record with an electronic signature. Enter your name and title,
signifying that you have the authority to execute this Registration.
4.1.8 To submit
After you enter the information, click the Registration tab. The tab displays your new
Registration(s). You can review or change anything before submitting.
1.
Click “Submit.”
2.
Click “Submit” again to confirm.
The system will immediately respond with “accepted” or “rejected.” If “accepted,” your
Registration Identification Number will be displayed on the summary with the Registration
status of “Submitted.” Once submitted, the Registration is locked and cannot be edited until
the process is complete.
4.2
YOUR REGISTRATION WELCOME PACKET
Within ten days after submitting your registration, you will receive via the mail a packet containing a
registration status letter. This information is mailed to the contact name and address on your
registration.
17
REGISTRATION
4.3
RECEIVING YOUR MASTER PIN
Within ten days after submitting your Registration, you will receive your Master PIN in a separate
mailing, along with instructions to obtain a Master Password. You will use your Master Password to
log on for secure access to EFTPS through your software.
Your Master PIN is mailed to the address of record on file with the IRS.
If you do not receive your Master PIN within ten days, call Customer Service at 1.800.945.0966.
4.4
OBTAINING A MASTER PASSWORD
To
obtain
your
Master
Password,
call
1.800.945.7337
.
You will be asked to enter your Registration Identification Number and Master PIN. The voice
response system will read your Master Password.
After you obtain your Master Password from the VRS, you must change the Master Password to a
new value:
1.
Return
to
the
main
Registration
tab.
2.
Select
the
correct
Registration.
3.
Click
‘‘Edit
Password’’
4.
Enter
your
Master
PIN
and
Master
Password.
5.
Specify
a
New
Master
Password.
(See
Section
4.9)
6.
Confirm
the
New
Master
Password.
7.
Click
‘‘Submit.’’
After
you
have
changed
your
Master
Password:
1.
Return
to
the
main
Registration
tab.
2.
Select
the
correct
Registration.
3.
Click
‘‘Sync.’’
4.
Enter
your
Master
PIN
and
Master
Password.
5.
Click
‘‘Submit.’’
18
REGISTRATION
4.5
CREATING ADDITIONAL REGISTRATIONS
You can maintain several Registrations. For example: you may want one registration that contains
all your business clients and a separate registration that contains all your individual clients.
1.
Click the Registration tab.
2.
Click “Add.” Follow the steps to complete a new Registration. (see Section 4.1)
You will receive a new Master PIN and must obtain a new Master Password for each
registration you add. To obtain a new Master Password, call 1.800.945.7337.
4.6
EDITING A REGISTRATION
You can edit all registration information before submitting to EFTPS. Once the registration has
been successfully submitted and processed, you can edit the registration information (except the
financial information) using the “Edit” button. To do that, you must use the “Edit Fin” feature. (see
Section 4.7)
4.6.1 To edit a registration
1.
Click the Registration tab.
2.
Click on the Registration you wish to edit.
3.
Click “Edit.” Make your changes. When finished, click “Save.”
5. The Registration’s status will appear as Active–Edited on the summary list of registrations.
4.6.2 To submit the registration changes to EFTPS
1.
Select Registration.
2.
Click “Submit.”
3.
Enter your Master PIN and Master Password.
4.
Click “Submit” to confirm.
4.6.3 To synchronize your registration
1.
Select the Registration you wish to synchronize.
2.
Click “Sync.”
3.
Enter your Master PIN and Master Password.
4.
Click “Submit.”
19
REGISTRATION
5.
When synchronization is complete, click “OK” to return to the main Registration tab.
The status of your Registration will appear as “Active” and can be used to enroll your clients.
4.7
EDITING A REGISTRATION’S FINANCIAL INFORMATION
4.7.1 To edit a registration’s financial information
1.
Click the Registration tab.
2.
Select the Registration you wish to edit.
3.
Click “Edit Fin” and edit.
4.
Click “Save.”
The change will appear as a new row in the bottom half of the Registration workspace.
4.7.2 To submit the financial information changes to EFTPS
1.
Click on the change that you wish to send.
2.
Click “Submit.”
3.
Enter your Master PIN and Master Password.
4.
Click “Submit.”
NOTE
You cannot change the account if you are removing the Master Bank Account and you
have enrollments that use only this account.
4.7.3 To view the transactions impacted by the financial information change:
1.
Click on the change that you wish to review.
2.
Click “Impacts” in the changes to banking information section of the window.
NOTE
You cannot change the account if you have future payments that are scheduled to be made
from the account you are changing. However, you can:
1.
Select a different change effective date (beyond when you have payments scheduled);
or
2.
Cancel the pending payments and reschedule them for a date after your new account
will take effect.
20
REGISTRATION
4.8
EDITING A MASTER PIN
1.
Click the Registration tab.
2.
Click on the Registration you wish to edit.
3.
Click “Edit Master PIN.”
4.
Enter the information. Your new Master PIN must be four numbers and cannot be 0000 or
9999.
5.
Click “Submit.”
6.
Enter your current and new Master PIN and Master Password.
7.
Click “Submit.”
The Master PIN changes immediately. Use the new Master PIN the next time you synchronize or
submit.
4.9
EDITING A MASTER PASSWORD
•
Your Master Password must be at least twelve characters long but no more than thirty
characters long.
•
Passwords
must
comply
with
the
following:
-
May contain uppercase letters (A, B, C, etc.)
-
May contain lowercase letters (a, b, c, etc.)
-
May contain numbers (1, 2, 3, etc.)
-
May contain the following characters (!, @, #, $, *, +, -)
-
Must
not
contain
double
characters
(no
two
consecutive
characters
can
be
the
same)
-
Must
not
be
the
same
as
any
of
the
five
previous
passwords
used
NOTE
You will have a unique Master Password for each EFTPS Master PIN. Do not disclose your
Master Password or PIN to unauthorized individuals.
4.10
CHOOSING YOUR PAYMENT METHODS
You can make payments from a taxpayer’s banking account, from a Master account that you
maintain, or both.
•
To make payments from your clients’ banking accounts, enter their banking account
information when you enroll them.
•
To make payments from a Master Account, enter your financial institution information
during Registration.
21
REGISTRATION
4.10.1 To change the payment method
1.
Select the Registration or Enrollment record from the main Registration or Enrollment tab.
2.
Click “Edit Fin.”
3.
Edit the information.
4.
Click “Save.”
4.10.2 To submit the changes to EFTPS
1.
Click “Submit” on the main Registration or Enrollment tab.
2.
Enter your Master PIN and Master Password.
3.
Click “Submit.”

22
ENROLLMENTS
ENROLLMENTS
•
Click columns to sort information in ascending/descending order.
•
Drag and drop columns to reorder positions.
Active Registration
Five Main
Tab
Subtabs
Summary listing
of entries
Submit button
Enrollment Function buttons
5.1
CREATING AN ENROLLMENT
1.
Click the Enrollments tab.
2.
Select the Registration to be used for this enrollment.
3.
Click “Add.”
5.1.1 TIN and Name
1.
Select Business or Individual.
2.
Enter the name and EIN or SSN.
3.
Check the box to indicate that you have a Disclosure Authorization on file for the client (if
applicable).
23
ENROLLMENTS
5.1.2 Disclosure authorization
Select the authorization you will have on file for this taxpayer. If you have a Third-Party
Authorization on file, you must complete the Shared Secrets information at the bottom of the page.
Each taxpayer for whom you will be submitting payments is required to provide authorization
permitting the batch provider to exchange information with the IRS. An electronic Third-Party
Authorization may be completed during this enrollment, which will generate an EFTPS Individual
Enrollment with Third-Party Authorization, Form 9783T. This authorization requires a five-digit,
self-selected Signature PIN. The taxpayer’s date of birth and prior year’s adjusted gross income
must be provided for authentication. This electronic authorization will be transmitted to EFTPS.
5.1.3 Contact information
Enter the taxpayer contact information:
•
Address
•
City, state, ZIP code
•
Telephone
number
•
Email (optional)
5.1.4 Financial information
Select Debit or Credit:
•
Debit (for business and individual taxpayers). Select Taxpayer Account or Master Account:
− Taxpayer Account: enter the client’s banking account information
− Master Account: indicate that you will use the banking account information you
supplied in your batch provider registration
•
Credit (for business taxpayers only) clients enrolled using the credit method of payment
cannot make payments using the batch provider software. Contact your financial institution
for assistance with making payments through the credit method.
5.1.5 Optional tax form limits
You can set amount limits for a client’s tax forms.
For example: If a client’s Form 941 payment usually does not exceed $5,000, you might enter
that as a limit. When making a Form 941 payment for that client, a warning message will
appear if the payment exceeds $5,000. You can:
1.
Abandon the payment.
2.
Override the amount limit warnings and proceed with payment.
3.
Change the limits by editing the taxpayer’s enrollment record and submitting the change to
EFTPS. (see Section 5.2)
24
ENROLLMENTS
5.1.6 Optional self-selected enrollment PIN/system-generated taxpayer inquiry PIN
Enter a self-selected PIN to protect unauthorized payments for this client. You can use the same
PIN for multiple clients. The Enrollment PIN must be four numbers and cannot be 0000 or 9999.
•
If you do not enter a PIN, the system will generate one for you.
As part of the taxpayer enrollment, the system will auto-generate an inquiry PIN for your client.
•
The Taxpayer Inquiry PIN will allow the client to check his or her payment history at
EFTPS.gov or by phone. The Inquiry PIN will not give the taxpayer the ability to make or
cancel payments.
•
EFTPS will send your client a unique mailing:
−
Explaining the reasons for receiving the Inquiry PIN letter and the ability to view
payment history online or by phone.
−
Including a PIN letter and instructions on how to obtain an Internet Password.
•
To obtain an Internet Password, clients will call 1.800.982.3526.
•
Clients should have their PIN letter available when they call to enter:
−
Taxpayer Identification Number (EIN or SSN)
−
PIN
−
Last eight numbers of the Enrollment Number
NOTE
If the enrollment requires third-party authorization, the 9783T form will be
presented for printing and signing after this step.
5.1.7 To submit entered enrollments
1.
Click the Send Enrollments tab, which will display a list of the newly entered enrollments.
You can review or change anything before submitting.
2.
Select the enrollments to be submitted.
3.
Click “Submit.”
4.
Enter your Master PIN and Master Password.
5.
Click “Submit.”
25
ENROLLMENTS
5.1.8 To synchronize enrollments
You should synchronize your enrollment database 15–20 minutes after you submit an
enrollment.
1.
Click the Enrollment tab.
2.
Click the Enrollment Inquiry subtab.
3.
Select the applicable Registration.
4.
Click “Sync.”
5.
Enter your Master PIN and Master Password.
6.
Enter the date the enrollments were submitted in “From Date.”
7.
Click “Submit.”
5.2
EDITING ENROLLMENT INFORMATION
You can change:
•
Contact Information (This information is not sent to EFTPS and is for your use only. You do
not have to submit changes to EFTPS.)
•
Payment Thresholds
•
Enrollment PIN
•
Disclosure Authorization Information
5.2.1 To edit an existing enrollment
1.
Click the Enrollment main tab.
2.
Select the correct subtab:
a.
If this enrollment has not been sent to EFTPS, click the Send Enrollments subtab.
b.
If this enrollment has been sent to EFTPS, click the Enrollment Inquiry subtab.
3.
Select the applicable Registration.
a.
If you are on the Enrollment Inquiry subtab, search for the enrollment you wish to edit.
4.
Select the enrollment.
5.
Click “Edit.”
6.
Make changes and click “Save.”
26
ENROLLMENTS
5.2.2 To submit changes
1.
Click the Send Enrollments subtab.
2.
Select the edited enrollment.
3.
Click “Submit.”
4.
Enter your Master PIN and Master Password.
5.
Click “Submit.”
The next time you synchronize enrollments the changes will appear in the taxpayer’s
enrollment record.
5.3
EDITING ENROLLMENT FINANCIAL INFORMATION
You can edit:
•
Payment Method (Credit or Debit)
•
Master or Taxpayer account
•
Bank Routing and Transit Number (RTN)
•
Bank Account Number
•
Enrollment PIN
5.3.1 To edit the financial information
1.
Click the Enrollments main tab.
2.
Select the correct subtab:
a.
If this enrollment has not been sent to EFTPS, click the Send Enrollments subtab.
b.
If this enrollment has been sent to EFTPS, click the Enrollment Inquiry subtab.
3.
Select the applicable Registration.
Select the enrollment you wish to edit and click “Edit.” A tabbed summary of the taxpayer’s
editable financial information will display.
4.
Make changes and click “Save.”
NOTE
Changing the financial information creates a new enrollment for the taxpayer.
27
ENROLLMENTS
5.3.2 To submit the financial information changes to EFTPS
1.
Click the Send Enrollments subtab.
2.
Select the edited enrollment.
3.
Click “Submit.”
4.
Enter your Master PIN and Master Password.
5.
Click “Submit.”
The next time you synchronize enrollments the changes will appear in the taxpayer’s enrollment
record.
5.4
DELETING AN ENROLLMENT
You can delete enrollments that have not been submitted to EFTPS only.
1.
Click the Enrollments main tab.
2.
Select the enrollment you wish to delete.
3.
Click “Delete.”
4.
Click “Yes” to confirm.
5.5
TERMINATING AN ENROLLMENT
Terminating an enrollment permanently removes it from EFTPS.
5.5.1 To terminate an enrollment
1.
Click the Enrollments tab.
2.
Click the Enrollment Inquiry subtab.
3.
Enter search criteria to find the enrollment you wish to terminate.
4.
Click “Search.”
5.
Select the enrollment you wish to terminate.
6.
Click “Terminate.”
7.
Click “Yes” to confirm.
28
ENROLLMENTS
5.5.2 To submit a terminated enrollment to EFTPS
1.
Click the Send Enrollments subtab.
2.
Select the terminated enrollment.
3.
Click “Submit.”
4.
Click “Yes” to confirm.
5.6
ARCHIVING AN ENROLLMENT
You can archive inactive taxpayers within your database to streamline enrollment and payment
reports. Archived (Inactive) enrollments will not be included on standard inquiry search results.
However, you can still make payments on an archived enrollment.
Inactive enrollments can be made active again (and used immediately). The active/inactive status is
only a designation of an enrollment within your batch provider software and does not affect the
enrollment’s status with EFTPS.
5.6.1 To archive an enrollment:
1.
Click the Enrollments tab.
2.
Click the Enrollment Inquiry subtab.
3.
Enter search criteria to find the enrollment you wish to archive (make Inactive).
4.
Click “Search.”
5.
Select the enrollment you wish to archive.
6.
Click “Archive.”
7.
Click “Yes” to confirm.
5.7
VIEWING ARCHIVED ENROLLMENTS
1.
Click the Enrollments tab.
2.
Click the Enrollment Inquiry subtab.
3.
Select “All Archived Enrollments” from the query drop-down field.
4.
Click “Search.”

29
ENROLLMENTS
5.8
ACTIVATING ARCHIVED ENROLLMENTS
1.
Click the Enrollments tab.
2.
Click the Enrollment Inquiry subtab.
3.
Select “All Archived Enrollments” from the query drop-down field.
4.
Click “Search.”
5.
Select the enrollment you wish to make Active.
6.
Click “Un-Archive.”
7.
Click “Yes” to confirm.
5.9
PERFORMING ENROLLMENT INQUIRIES
You can query your EFTPS enrollment database by using a variety of search criteria. This function
allows you to create a group of enrollments and print a report or export the information to another file
format.
1.
Click the main Enrollments tab.
2.
Click the Enrollment Inquiry subtab.
3.
Click the Query drop-down arrow to display the available searches:
a.
General
b.
All Active
c.
All Archived Enrollments
d.
Requiring Disclosure Authorization
The search criteria that can be used for a General Query are:
EIN/SSN
Taxpayer Name
RTN
Bank Account Number
Status
User ID
Processed (Enrollment) Date
4.
Enter your search criteria and click “Search.”
5.
You can View, Edit, Export, Archive, Terminate, or Print any or all of the enrollment results.
30
ENROLLMENTS
5.10
IMPORTING EXISTING ENROLLMENTS FROM A TEXT FILE
1.
Click the Enrollments tab.
2.
Click “Import.”
3.
Use only Fixed Width Field Format. (see Appendix A for record layout format)
4.
Select the file you wish to import from the existing files on your computer.
5.
Click “Open” to import the file into your EFTPS Enrollments database and display the
information on the Send Enrollments tab.
5.11
EXPORTING ENROLLMENTS TO A FILE
1.
Click the Enrollments tab.
2.
Click the Enrollment Inquiry subtab.
3.
Perform query (see Section 5.9) to display the enrollments you wish to export to a file.
4.
Select the enrollments to export.
5.
Click “Export.”
6.
Choose the appropriate format:
a.
Fixed Width Field Format.
b.
Comma-Delimited
Format.
7.
Select an existing file from the displayed file browser or create a new file for the enrollment
information.
8.
Click “Open” to export the enrollments to the selected or new file. (see Appendix A for record
layout format)
5.12
REVOKING A THIRD-PARTY AUTHORIZATION
A taxpayer can revoke a Third-Party Authorization agreement. To terminate the enrollment and
revoke the third-party authorization, the taxpayer can write “REVOKE” across Form 9783T and send
a copy of the form to the batch provider and/or EFTPS Customer Service. The copy must include a
current taxpayer signature.

31
PAYMENTS
PAYMENTS
6.1
PAYMENT SCREEN OVERVIEW
•
Click columns to sort information in ascending/descending
•
Drag and drop columns to reorder positions.
Active
drop-down list
Payment Sub
tabs
Check to make Bulk
payments from a
Master Account
Total number
of payments
selected
Total amount
selected
Payment Function
Submit
6.2
CREATING PAYMENTS
•
Deadline for tax payments: 8 p.m. ET at least one calendar day before the due date.
•
You can send up to 5,000 payments in one transaction.
32
PAYMENTS
6.2.1 To add a payment
1.
Click the Payments tab.
2.
Select the applicable registration.
3.
Click “Add.”
4.
Enter or select the applicable taxpayer’s EIN/SSN. To select:
a.
Click “Select” next to the EIN/SSN field.
b.
Either select an active enrollment from the list or enter all or part of an EIN/SSN and click
“Go” to search for the specific EIN/SSN.
5.
Highlight the EIN/SSN and click “Select.” The remaining taxpayer information is prefilled.
6.
Select the Tax Form.
7.
Select the Tax Type.
The Payment Detail will appear.
8.
Enter the payment amount, separating dollars and cents with a decimal point.
9.
If applicable, select the Tax Period Month from the drop-down menu. Enter the Tax Period
Year for the payment.
10.
Enter the Settlement Date or select the future date from the calendar provided.
If you wish to store the current payment details as the default information for this taxpayer,
check the Lock This Transition box at the bottom of the screen. Otherwise, the last payment
made for this taxpayer will be displayed the next time you add a payment for the client.
11.
Click “Save.”
a.
The payment appears in the Send Payments tab.
b.
You can View, Edit, or Delete a payment prior to submitting. After submitting, the payment is
locked.
NOTE
Payment data can be imported using the Import functionality. (see Section 6.4)
6.2.2 To submit entered payments
1.
Review the:
a.
Total number of payments.
b.
Total dollar amount.
2.
If you wish the payments to be withdrawn as a single transaction from your Master Account,
click the Bulk Debit Payments check box. If you do not check this box, each transaction will
generate a separate record in EFTPS and your banking account.
33
PAYMENTS
3.
Click “Submit.”
4.
Enter your Master PIN and Master Password.
5.
Click “Submit.”
NOTE
You can make payments as frequently as necessary.
6.2.3 To synchronize payments
1.
Click the Payment Inquiry subtab.
2.
Click “Sync.”
3.
Enter your Master PIN and Master Password.
4.
The “Date From:” field must be equal to or before the date that the payments were submitted.
The “Date To:” field defaults to the current date.
5.
Check the box to create a Synchronization Log.
6.
Click “Submit.”
7.
Click “OK” to close the sync screen.
NOTE
Payments in “Scheduled” status that were made before an enrollment was suspended will be
processed as normal. However, no new payments can be made for an enrollment that is
suspended.
6.3
SYNCHRONIZING PAYMENT HISTORY
Avoid lengthy processing time by entering a time frame around payment history synchronization
requests, i.e., “January 2007–March 2007.” As your payment history grows, the synchronization
time will increase and require significant time to process. The EFTPS system will cue up your
request, but if your request has not been processed after thirty minutes, it will be dropped, and
you will need to make another request.
6.4
IMPORTING PAYMENT DATA
The batch provider software allows you to import payment information from another file.
1.
Click “Import” on the Send Payments tab.
2.
Use only Fixed Width Field Format. (see Appendix B for record layout format)
3.
Select the file you wish to import from the existing files on your computer.
4.
Click “Open” and the file will be imported into your EFTPS Payments database and displayed
on the Send Payments tab.
34
PAYMENTS
NOTE
Your imported files must be in the same format as the data stored in the software. (see
Appendix B)
6.5
CHECKING FOR DUPLICATE PAYMENTS
1.
Click “Duplicates” on the bottom of the Send Payment subtab.
2.
The system will highlight any payments considered to be duplicates.
3.
You can change payment information by editing, overriding, or deleting the duplicate
payments.
4.
Click “Refresh” to remove the duplicates from the displayed payments.
6.6
CANCELING PAYMENTS
You can cancel a scheduled payment up until 8 p.m. ET two business days before the settlement
date.
1.
Click the Payments tab.
2.
Click the Cancel Payments subtab.
3.
Select the applicable Registration. All of that Registration’s payments that are eligible for
cancellation will be displayed.
4.
Select the payment(s) you wish to cancel.
5.
Click “Cancel.”
6.
Enter your Master PIN and Master Password.
7.
Click “Submit.”
8.
Click “Refresh” on the main Cancel Payments screen after the payment cancellation
transmission is complete.
a.
The payment status will appear as “Submitted.”
b.
When you synchronize your payments after the cancellation date, the status of the payment
will appear as “Canceled.”
35
PAYMENTS
6.7
PERFORMING PAYMENT INQUIRIES
1.
Click the Payments tab.
2.
Click the Payment Inquiry subtab to query your payment database for one or more of the
search criteria:
a.
General Query (all search criteria can be used)
i.
EIN/SSN
ii.
Tax Form
iii.
EFT Number
iv.
Status of the Payment (returned, scheduled, etc.)
v.
Payment Amount
vi.
User ID (any of the user IDs you have created)
vii.
Settled Date (or range of dates)
b.
Search by Time frame (30-60-90-180-365 days or 16 months)
3.
Select the applicable Registration.
4.
Click “Sync.”
5.
Enter your Master PIN and Master Password.
6.
Enter a date in the “From Date” field.
7.
Click “Submit.”
8.
After synchronization, enter your search criteria and click “Search.”
You can:
•
Highlight the payment(s) you wish to view.
•
Sort payments by column headings.
•
Print or export all payments.
•
Copy any payment.

36
PAYMENTS
6.8
EXPORTING PAYMENTS TO A FILE
1.
Click the Payments tab.
2.
Click the Payment Inquiry subtab.
3.
Perform your query (see Section 6.7) to display the payments you wish to export.
4.
Click “Export.”
5.
Choose the appropriate format:
a.
Fixed Width Field Format. (see Appendix B for record layout format)
b.
Comma-Delimited Format. (see Appendix C for record layout format)
6.
Select an existing file from your browser or create a new file for the enrollment information.
7.
Click “Open” and the file will be exported to the specified location.
6.9
COPYING AND PASTING PAYMENTS
1.
Highlight the payments in the Payments Inquiry tab.
2.
Click “Copy.”
3.
Click “Paste” in the Send Payments tab.
6.10
MAKING PAYMENTS BY PHONE
If you are away from your computer and need to make a payment for a client, make your payment
by phone. You need the payment information and the taxpayer’s enrollment TIN and PIN. The
payments you make by phone will appear in your EFTPS database when you synchronize.
To make a payment via phone, call 1.800.555.3453.
The system is available 24 hours per day and 7 days per week.
6.11
AFFORDABLE CARE ACT (ACA) SHARED RESPONSIBILITY
PAYMENTS
The Affordable Care Act contains comprehensive health insurance reforms
and includes tax provisions that affect individuals, families, businesses,
insurers, tax-exempt organizations and government entities. These tax
provisions contain important changes, including how individuals and families
file their taxes. The law also contains benefits and responsibilities for other
organizations and employers.
37
PAYMENTS
6.12
CONFRIMATION EMAIL
Payers can Opt In/Opt out of receiving Confirmation emails while making
payments through EFTPS. Confirmation email option is easy. To get started
supply a valid email address during the payment process. There are 5
generated responses.
Confirmation of Scheduled Transaction – You have scheduled a transaction.
Confirmation of Cancelled Transaction – You have cancelled a transaction.
Notification of Returned Transaction – You IRS EFTPS transaction could not
be processed.
Reminder of Scheduled Transaction – You have scheduled a transaction.
Confirmation of Modified Email Address – The email address associated with
your EFTPS profile has been updated.
38
USER ADMINISTRATION
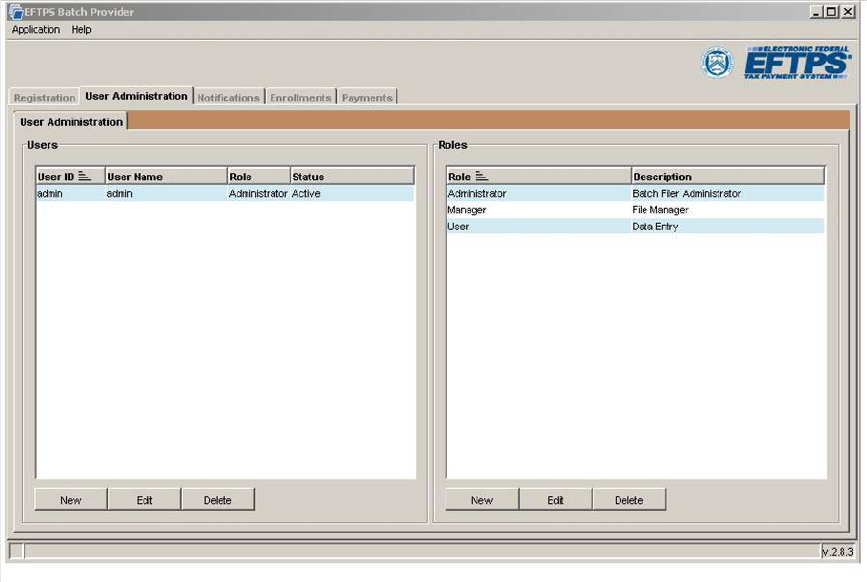
USER ADMINISTRATION
The User Administration section allows you to set roles and responsibilities for multiple users.
7.1
DETERMINING USER ROLES
If more than one person will be using your software, you may want to define the access levels for
each user. This feature:
•
Allows you to control who can view, update, add, or remove payments from the database.
•
Allows you to set User Passwords for each user.
The software contains three predefined roles:
1.
“Admin” (program administrator)—has full access to the complete functionality of the program.
2.
“Manager”—can do everything except set up the software.
3.
“User”—can view and update information but cannot add or remove information.
39
USER ADMINISTRATION
7.2
ADDING USERS AND DEFINING ROLES
7.2.1 To add a user
1.
Click the main User Administration tab.
2.
Click “New” under Users.
3.
Create and enter a unique User ID for this user. User IDs can be descriptions or nicknames.
4.
Enter the User’s full name.
5.
Select the User Role.
6.
Set a User Password.
7.
Click “Save.”
7.2.2 To define a role
1.
Click the main User Administration tab.
2.
Click “New” under Roles and enter the Role Name (Administrator, Manager, or User).
3.
Enter a description for the Role that defines the User’s job description.
4.
Check the assignments for the Role, i.e., what functions they can perform within the software
for Setup, Registration, Enrollment, Payment, File Query, and Reporting.
5.
Choose Add, Delete, Edit, or View for each function.
6.
Click “Save.”
7.3
EDITING AND DELETING USERS AND ROLES
1.
Highlight the User or Role.
2.
Click “Edit” or “Delete.” 3. Follow the instructions.
40
NOTIFICATIONS
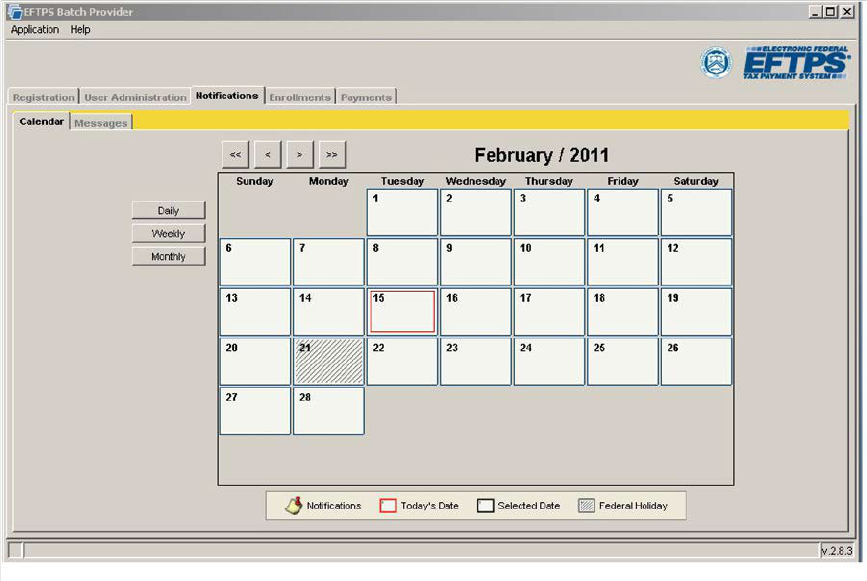
NOTIFICATIONS
The Notifications section contains a tab showing any messages you may receive from EFTPS and
a calendar for making notes, sending notes to other users, and indicating payment dates.
8.1 NOTIFICATIONS
8.1.1 To check for new messages
1.
Click the Notifications tab.
2.
Click the Messages subtab.
3.
Choose the applicable Registration.
4.
Click “Sync.”
5.
Enter your Master PIN and Master Password.
6.
Click “Submit.”
Any new messages will be displayed after previous current messages.
8.1.2 To read messages
1.
Click the Notifications tab.
2.
Click the Messages subtab.
3.
Select the message you wish to read.
4.
Click “View.”
8.1.3 To delete a message
1.
Click the Notifications tab.
2.
Click the Messages subtab.
3.
Select the message you wish to delete.
4.
Click “Delete.”
41
NOTIFICATIONS
8.2
CALENDAR
The Calendar allows you to:
•
View dates by month, week, or day for up to three years in advance.
•
Use the arrows at the top of the calendar to go forward or back by month (< >) or by year (<< >>).
•
View by week and day.
•
Add notes or appointments to any given date by double-clicking on the date. A scheduling window will appear, where
you can record activities or schedule future activities.
•
View federal holidays and notes you have added.
Double-click on any date and a separate window will open to reveal the information for that date.
8.3
EMAIL COMMUNICATIONS AND SECURITY
You will only receive email notifications confirming successful transmissions. You will not receive emails
indicating successful transaction processing.
NOTE
Sync your payments to receive your EFT numbers.

42
NOTIFICATIONS
As a matter of security
•
You will not receive email messages from EFTPS containing any specific account
information, such as Registration ID, PIN, or dollar amounts.
•
EFTPS will not request account or personal information overemail.
•
If you receive an email that appears to come from EFTPS and it requests personal
information, contact EFTPS batch provider Customer Service at 1.800.945.0966
immediately.
The email messages you will receive from EFTPS will look like this:

43
TROUBLESHOOTING
TROUBLESHOOTING
PROBLEM
POSSIBLE SOLUTION
Registration
Failed/Invalid
If you receive a message or notification that your Registration is invalid, check the following:
•
The business name was entered exactly as it appears on your tax return.
•
Your address is correct.
•
The TIN you used is the correct TIN for the business name you entered.
Rejected Files
If you receive a message or notification that your enrollment or payment file(s) were rejected, log
on to the software and perform a Sync request to receive further details.
Files/Dates
Won’t
Synchronize
If you attempted to synchronize your data and the process failed, check the following:
•
You are connected to the Internet.
•
The proper Registration ID, Master Password, and Master PIN were entered.
•
The “From Date” field includes the date that the enrollment or payment was submitted.
•
The Registration you selected is Active.
Cannot
Import/Export
If you have problems Importing enrollment or payment files, check the following:
•
The selected Import file is formatted as Fixed Field Width.
•
You are Importing a Text (.txt) file.
•
Review the File Formats in the Appendix.
If you have problems Exporting Payment files, check the following:
•
The payment(s) to be exported are highlighted.
•
The “.txt” extension appears at the end of the file name.
Cannot Cancel
Payment
Only payments that are scheduled to settle at least two business days in the future may be
canceled. Check the following:
•
The payment you wish to cancel is highlighted.
•
You are connected to the Internet.
•
You have clicked “Cancel” in the Cancel Payments tab.
Cannot Edit
Information
The software has three predefined Roles:
1. “Admin” (program administrator)—has full access to the complete functionality of the program.
2. “Manager”
—can do everything except set up the software.
3. “User”
—can view and update information but cannot add or remove information.
You may not have the correct privileges assigned to edit information.
To verify that you have the authority to View, Update, Add, or Remove information, check the
following:
1. Click the User Administration tab.
2. Highlight your Role.
3. Click “Edit.”
Review the privileges that have been assigned to you. If you are not assigned as the
Administrator, you cannot make changes to the Role. Contact your Administrator.

44
TROUBLESHOOTING
Lost or Misplaced
Master Password or
Master PIN
If you lose, forget, or misplace your Master Password, call the batch provider VRS to obtain a
new Master Password. Call 1.800.945.7337. Have your Registration ID and PIN available when
you call.
If you lose, forget, or misplace your Master PIN, call EFTPS batch provider Customer
Service to request a new PIN. Customer Service is available Monday–Friday, 8 a.m.–8
p.m. ET. Call 1.800.945.0966. Have your Registration ID available when you call.
45
GLOSSARY
GLOSSARY
•
ACH Trace Number—Unique number found on every EFTPS debit payment.
•
Administrator’s User ID and Password—ID and Password you create when you install the software.
These are the keys for administering the software, not for sending or receiving information from
EFTPS.
•
Archive—You can archive—or make inactive—enrollments within your database. This allows you to
refine enrollment and payment reports, because inactive enrollments will not be displayed on the
normal inquiry search results. Inactive enrollments can be made Active again (and used immediately).
The Active/Inactive status is only a designation of an enrollment within your batch provider software
and does not affect the enrollment’s status with EFTPS
Note: Enrollments with outstanding payments (either New or Submitted) cannot be archived. Archived
enrollments will not display; however, the PIN will remain active until the enrollment is terminated..
•
Database Admin Password—Password associated with a local database admin account that is used by the
Batch Provider software to interact with the locally installed database.
•
Database Encryption Password—Password that serves as the encryption key associated with the local
Batch Provider database and is used to encrypt its stored data.
•
EFT Number—Unique Electronic Funds Transfer number assigned to payments and cancellations for
tracking purposes. This number is your receipt for the transaction.
•
EIN—Employer Identification Number. Unique nine-digit number assigned by the IRS and used to
identify a business taxpayer.
•
Email Notification—Receiving email messages is optional. After you send enrollments or payments to
EFTPS, the system will respond with a secure email with the status of your file (accepted or rejected).
You can enter up to three email addresses during Registration.
•
Enrollment PIN—Every enrollment has a unique Personal Identification Number (PIN) for added
security. The PIN can be self-selected or you can choose to have EFTPS assign a PIN. A PIN must
be four numbers, cannot be 0000 or 9999, and cannot duplicate another TIN/PIN combination within
the system.
•
Express Registration—Is available only if you have an existing batch provider Registration or an
EFTPS online enrollment. Express Registration allows you to generate a new Registration using the
name and TIN of an existing EFTPS online enrollment or batch provider Registration.
•
Internet Password—If you want a client to be able to view his or her payment history at EFTPS.gov,
you will need to request that a Taxpayer Inquiry PIN be sent to the client. After receiving that PIN, the
client will go to EFTPS.gov and create an additional credential, an Internet password.
•
Master Account—You can choose to make payments for clients from a single Master Bank Account
that you maintain.
•
Master Password —The Master Password is used with your Registration ID and Master PIN so you
can send and receive EFTPS transactions securely. Master Passwords must be 12–30 characters
long, may contain uppercase letters, may contain lowercase letters, may contain numbers, may
contain special characters (!, @, #, $, *, +, -), cannot contain repeating characters, and cannot be
the same as any of the five previous passwords used.
•
Master PIN—A four-digit Personal Identification Number assigned by EFTPS and used with the
Master Password to protect your batch provider account. You are responsible for protecting the
46
GLOSSARY
Master PIN. Do not give this information to anyone and store any references to this PIN in a secure
location. A PIN must be four numbers and cannot be 0000 or 9999.
•
Registration Authorization Information—Window that appears before you send information to EFTPS.
It asks for your Registration ID, Master PIN, and Master Password. By entering this information, you
are authorizing the transaction.
•
Role—The software provides three predefined roles (“Admin,” “Manager,” and “User”) and that each
has a specific level of responsibilities and authority.
•
RTN—Routing Transit Number. A unique nine-digit bank identification number that is part of every
ACH transaction and identifies a specific financial institution.
•
SSN—Social Security Number. The unique nine-digit taxpayer identification number assigned to an
individual taxpayer by the IRS.
•
Settlement Date—Business date on which funds are withdrawn from the designated bank account.
Payments must be scheduled by 8 p.m. ET at least one calendar day before the settlement date.
•
Submit—When you provide information to EFTPS through the software and a secure Internet
connection.
•
Sync—When you receive current enrollment and payment information from EFTPS through a secure
Internet connection.
•
Taxpayer Inquiry PIN—Four-digit Personal Identification Number assigned and sent to an enrolled
taxpayer. The Inquiry PIN, along with an Internet password, allows clients to check their payment
history. They cannot make or cancel payments.
•
Threshold Amount—When you enroll a client, you can choose to set payment dollar amount limits for
each of the client’s tax types. When you make a payment for that client and tax type, the system will
compare your payment amount against your stated limit and provide a warning if you exceed the limit.
You can choose to override the warning.
•
TIN—Taxpayer Identification Number. Nine-digit Employer Identification Number (EIN) for a business
or nine-digit Social Security Number (SSN) for an individual. The TIN is assigned by the IRS.
•
User—A person designated to use the software by the Administrator.
•
User ID—The description or nickname of a person using the software.
•
VRS—Voice Response System. The automated telephone system used to obtain a Password.
47
APPENDIX
APPENDIXES

48
APPENDIX
APPENDIX A RECORD LAYOUT FOR IMPORTING ENROLLMENTS
Imported files must conform to the length and validation rules outlined below. Imported enrollments
will be saved to the Send Enrollments grid with a status of “New.”
Field Name
Type
Length
Field Edits
Batch Filer ID Numeric 9 Must be 9 digits
Master Inquiry PIN
Numeric
4
Must be 4 digits
File Date
Numeric
8
Must be valid date YYYYMMDD
Filer Sequence Number Numeric 3 Must be unique within day
Enrollment Number
Numeric
4
Must be ascending within a file
Action Code
Char
1
Must contain valid
value A = Add
Taxpayer Name
Char
35
Must contain at least 2 characters
Taxpayer Type
Char
1
Must contain valid values
B = Business
I = Individual
Taxpayer TIN
Numeric
9
Must be 9 digits
Taxpayer PIN
Numeric
4
Must be 4 digits
Secondary TIN
Numeric
9
Must be blank
Country Code
Char
2
Must be non-blank, using ISO country codes
State
Char
2
Must be valid state if country code = US
ZIP Code
Numeric
9
Must be non-blank if country code = US and at least 5 digits
Signature Equivalent Numeric 4 Must contain “8655”
(confirms 8655 has been submitted to IRS)
Remittance Method
Char
1
Must contain valid value
C= EFTPS ACH Credit
D= EFTPS ACH Debit
Primary Input Method
Char
1
Must contain valid value if remittance method equal “D,” else
equal blank
B = batch provider
Master Account Flag
Char
1
Must contain valid value if remittance method equals “D,” else
equal blank
Y = Use Batch Filer Account
N = Use Taxpayer Account
Routing Transit Number
Numeric
9
If Master Account flag equals “N” and if remittance method
equals “D,” else equal blank. Must contain 9 digits
Account Number
Char
17
If Master Account flag equals “N” and if remittance method
equals “D,” else equal blank
Account Type
Char
1
If Master Account flag equals “N” and if remittance method
equals “D,” else equal blank. Must contain valid value
C = Checking
S = Savings

49
APPENDIX
APPENDIX B RECORD LAYOUT FOR IMPORTING NEW PAYMENTS
Imported files must conform to the length and validation rules outlined below. Imported payments will
be saved to the Send Payments grid with a status of “New.”
Field Name Type Length Field Edits
Batch Filer ID Numeric 9 Must be 9 digits
Master Inquiry PIN
Numeric
4
Must be 4 digits
File Date
Numeric
8
Must be valid date YYYYMMDD
Filer Sequence Number Numeric 3 Must be unique within day
Payment Reference
Number
Numeric
4
Must be ascending within a file
Action Code
Char
1
Must contain valid
value P = Payment
Taxpayer TIN
Numeric
9
Must be 9 digits
Taxpayer PIN
Numeric
4
Must be 4 digits
Taxpayer Type
Char
1
Must be valid value
B = Business
I = Individual
Tax Type Code Numeric 5 Must be valid tax type code
Tax Period
Numeric
6
Must be a valid date YYYYMM
Settlement Date
Numeric
8
Must be a valid date YYYYMMDD
Payment Amount
Numeric
15
Must be greater than 0 and less than 100,000,000
Subcategory code 1
Numeric
3
Not a required field; if present, must be a valid IRS code
Subcategory amount 1
Numeric
15
Not a required field; if present, sum of all subcategory
amounts must equal payment amount
Subcategory code and
amount repeated up to 5
Subcategory code 5 Numeric 3 Not a required field; if present, must be valid IRS code
Subcategory amount 5 Numeric 15 Not a required field; if present, sum of all subcategory
amounts must equal payment amount
50
APPENDIX
APPENDIX C RECORD LAYOUT FOR EXPORTING PAYMENTS
(COMMA-DELIMITED FILE FORMAT)
The comma-delimited payment export file includes the fields below in the following order:
1.
EIN/SSN
2.
Taxpayer Type Code, B (Business) or I (Individual)
3.
Electronic Funds Transfer (EFT) Number
4.
Original EFT Number (used for payments returned from the ACH banking system)
5.
Cancellation EFT Number (used for canceled payments)
6.
Bulk Debit Trace Number
7.
Bulk Debit Cancellation Number
8.
Payment Input Method (batch, phone, credit, etc.)
9.
Tax Form
10.
Tax Form Description
11.
Tax Type
12.
Tax Period
13.
Total Payment Amount
14.
Settlement Date
15.
ACH Trace Number
16.
Payment Status
17.
Transaction Code
18.
Input Date
19.
Input Time
51
APPENDIX
APPENDIX D HOW TO APPLY PROXY SETTINGS
File Configuration:
If you need to use a proxy server to connect outside of a firewall, you must place the proxy server
address in one of the EFTPS batch provider software files on your hard drive. Contact your
Network Administrator to obtain the specific proxy server address, port, and any realm, user name,
or password information.
Application File System:
1.
Obtain the following property values from your Network Administrator:
a.
Proxy Host Name
b.
Proxy Port
2.
Determine whether your network requires the following and obtain the proper values:
a.
Proxy Realm
b.
Proxy Username
c.
Proxy Password
Application Properties file
1.
Close the EFTPS batch provider application while modifying the file.
2.
Open the application.properties file in the applicable location:
Please note Windows 7 and earlier versions are no longer supported.
For all platforms: APPLICATION_HOME\conf directory
(C:\Program Files\EFTPS batch provider Client\conf\application.properties)
3.
Modify proxyPort=
proxyHost=
useProxy=
The proxyRealm, proxyPassword, and proxyUserName are not always required. Ask your Network
Administrator which properties are needed and what the values should be.
52
APPENDIX
Example of application.properties file with modified proxy settings:
#stored
#Mon Nov 21 10:30:24 MST 2005
SoftwareID=00000010
networkedServer=false
panel.info.background.color=207,228,255
window.gov.eftps.batchprovider.ui.MainFrameTabbed.
height=621 build.number=200510261611
dbPortNumber= http.timeout=300000
build.date=10/26/2005 04\:11 PM dbServerName=
SoftwareName=Eftps batch provider
proxyRealm=
db.driver=com.pointbase.jdbc.jdbcUniversalDriver
proxyPassword=
ProcessType=T
window.gov.eftps.batchprovider.ui.MainFrameT
abbed.y=0 networkedClient=false
version.number=0.9.9.9.8
window.gov.eftps.batchprovider.ui.MainFrameTabbed.x=0
proxyPort=8080
panel.error.background.color=255,255,194
db.url=jdbc\:pointbase\:embedded\:batchproviderdb
gov.eftps.batchprovider.rao.hostUrl=https\://192.168.85.10\:84
52/services panel.dialog.background.color=242,244,252
proxyHost=cacsecvr01.fdcsg.1dc.com useProxy=true
proxyUserName=
window.gov.eftps.batchprovider.ui.MainFrameTabbed.width=923 applicationDir=c:\Program
Files\EFTPS batch provider Client
Using the modified and saved proxy settings:
Once you have successfully modified and saved your proxy settings, you can connect to EFTPS to
complete batch provider functions.
Any Problems
If you cannot connect to EFTPS with the newly modified proxy settings:
1.
Verify that the proxy settings are entered into Microsoft Edge.
2.
Review the proxy configurations to make sure they are correct.
If you still have problems connecting, contact Customer Service: 1.800.945.0966, Monday–
Friday, 8 a.m.–8 p.m ET.

53
APPENDIX
APPENDIX E FEDERAL RESERVE BANK HOLIDAYS
Tax payments will not be processed through the FedACH or Fedwire Funds
®
on the
following Federal Reserve Bank holidays:
New Year’s Day
Washington’s Birthday
Juneteenth
Labor Day
Veterans Day
Christmas Day
APPENDIX F IMPORTANT PHONE NUMBERS
Batch Provider Customer Service
1.800.945.0966
8 a.m.–8 p.m. ET, Monday–Friday
Batch Provider Master Password VRS
1.800.945.7337
Birthday of Martin Luther King, Jr.
Memorial Day
Independence Day
Columbus Day
Thanksgiving Day
