Set up iPhones/iPads to receive calls
Your Google Voice number lets you make and receive calls at voice.google.com or using the
Voice mobile app. You can also link to phone numbers you want to get calls on if you don't
answer from Voice. Calls to your Voice number will ring any linked number you forward calls
to.
Add a number where you want to get calls
You can set up any phone number to take your Voice calls and texts.
1. On your iPhone or iPad, open the Voice app .
2. At the top left, tap Menu Settings.
3. Under Account, tap Devices and linked numbers.
4. Tap New linked number.
5. Enter the phone number to link.
6. To verify your number, Voice provides a six-digit code:
If it's a mobile number, tap Send code and Voice sends the code in a text message
to the phone.
If it's a landline number, tap the verify by phone link, and then tap Call. Voice
calls the phone number and gives the code.
7. Enter the code and then tap Verify.
You can link up to 6 numbers. If you link a number, calls to your Voice number also ring your
linked numbers. You can't link a number that's linked to a different Google Voice number.
Change where you get calls
You can change which devices get Voice calls.
1. On your iPhone or iPad, open the Voice app .
2. At the top left, tap Menu Settings.
3. Under Calls, tap Incoming calls.
4. Under My devices, turn off any devices you don't want to get calls on.
Change your device's number
When you set up Voice, you can link to your mobile device's number. Voice uses this number to
make calls if an internet connection isn't available. If you didn't link to your device's number
during sign-up, you can link to it later.
1. On your Android device, open the Voice app .
2. At the top left, tap Menu Settings.

3. Under Account, tap Devices and linked numbers.
4. Under This device, tap Change device number.
5. Select one of these options:
Your device’s number: Voice links to your device's number.
No number—Voice isn't linked to a device number.
New linked number—Voice links to a new number you enter. Voice verifies the
number before linking.
6. Tap Save.
Remove a linked number
You can remove a linked number at any time.
1. On your iPhone or iPad, open the Voice app .
2. At the top left, tap Menu Settings.
3. Under Account tap Devices and linked numbers.
4. Next to your linked number, tap Remove .
5. To confirm, tap Delete.
Call someone
You can make domestic and international calls from your Google Voice number.
Important: You can't make emergency calls using Google Voice. To make an emergency call, use
your device’s phone app.
1. On your iPhone or iPad, open the Voice app .
2. At the bottom, tap Calls .
3. If the person is in your recent calls list, next to their name, tap Call .
1. Or, choose one of these methods:
In the search bar at the top, enter the person's name or phone number.
Select them from the list of contacts that appears.
Tap Dial and enter the number.
For international calls, enter the country code before the number (for
example, +55 for Brazil).
2. Tap Call .
Note: To make calls from Google Voice using your mobile carrier, you need to turn on caller ID for
your phone. If you turn off caller ID, you can't make Google Voice calls using your mobile carrier.
You see a different number when calling
Know how much a call costs

Almost all Google Voice calls to the U.S. and Canada are free when you're calling from the
U.S.
Calls to a few places in the U.S. and Canada cost 1 cent per minute (USD), or the listed
rate for your local currency
Calls to places outside the U.S. are at listed rates
Domestic and international calls use minutes from your mobile phone plan, and you might be
charged long-distance rates. If you have a U.S. number and try to make a call when you're in
another country/region, you'll be charged international rates.
Call emergency services
Important: You can't make emergency calls using Google Voice. To make an emergency call, use
your device’s phone app.
You can get help in an emergency by calling your local emergency services number from Google
Voice. Emergency calls placed through Google Voice have limitations compared to calls placed
through traditional landline or mobile services. Review the information below to learn how
emergency calling works in Google Voice. For a complete description of Google Voice emergency
calling, visit our service terms.
In the event of a power outage, loss of your internet connection, or a Google Voice service outage,
emergency calling will not be available on Google Voice. Use an alternative phone service to dial
emergency services instead. Any phone, including mobile phones without an account or service
plan, can call emergency services and be connected to emergency responders.
For your convenience, we've provided an emergency call warning label you can download, print
and place on or near your phone as a reminder that your phone service may be limited or
unavailable during a loss of broadband connection.
Make calls over the internet on Voice
You can call from a computer or mobile device. Calls use approximately 0.2 MB of data per minute.
Whether on a computer or mobile device, you can't use incoming call options. These options include
call recording or call transfer. And, if you use a Bluetooth
®
device, you might not be able to use the
buttons on it to answer calls or hang up.
To use Google Voice to make calls through your mobile carrier, link your mobile number. The
amount of data you use depends on your carrier’s network quality and speed.
Turn on Wi-Fi calling
1. Open the Google Voice app .
2. At the top left, tap Menu Settings.
3. Under Calls, tap Make and receive calls.
4. Select Prefer Wi-Fi and mobile data.

Make a call using Wi-Fi
To use Wi-Fi for a call, start the call from the Voice app. For details, see Call someone.
Important: If you start a call from your device’s phone app instead of the Voice app, the call uses
minutes from your mobile phone plan.
Turn off Wi-Fi calling
1. Open the Google Voice app .
2. At the top left, tap Menu Settings.
3. Under Calls, tap Make and receive calls.
4. Select Use carrier only.
Archive or delete messages, calls, or
voicemails
You can hide messages and conversations or delete them from Google Voice.
Archive text conversations, calls, or voicemails
You can hide a conversation from your inbox without deleting it. If someone replies to a conversation
you've archived, the messages will show up again in your inbox.
1. On your iPhone or iPad, open the Voice app .
2. Open the tab for Messages , Calls , or Voicemail .
3. Touch and hold the conversation, call, or voicemail you want to hide.
Optional: To hide multiple items, touch and hold the first conversation, call, or voicemail, then
tap the rest of the items.
4. At the top right, tap Archive .
Bring back text conversations, calls, or voicemails you
archived
1. On your iPhone or iPad, open the Voice app .
2. Tap Menu Archive.
3. Touch and hold the conversation, call, or voicemail you want to bring back.
Optional: To bring back multiple archived items, touch and hold the first conversation, call, or
voicemail, then tap the rest of the items.
4. At the top right, tap Unarchive .

Delete a text conversation, call, or voicemail
After you delete a conversation, call, or voicemail, you can't see it again.
Important: You can't delete multiple text conversations, calls, or voicemails at the same time. You
must delete each one individually.
1. On your iPhone or iPad, open the Voice app .
2. Open the tab for Messages , Calls , or Voicemail .
3. Tap the conversation, call, or voicemail you want to remove.
4. Tap More Delete.
5. Tap Delete to confirm.
Delete text messages
After you delete a text message, you can't see it again, but it could show up on the devices of the
people you chatted with.
1. On your iPhone or iPad, open the Voice app .
2. Open the tab for Messages .
3. Tap the conversation.
4. Touch and hold a message you want to remove, then tap Select.
Optional: To remove multiple messages, touch and hold the first message, then tap the rest
of the messages.
5. In the top right, tap Delete .
6. Tap Delete to confirm.
Block unwanted calls, abuse, and spam
You can stop people from contacting you on Google Voice.
When you block a phone number in Voice:
The number is also blocked in Hangouts
Existing calls and texts from the number will be marked Blocked .
When the number calls you, the person will hear a "Number not in service" message
When the number texts you, you won't get the message
Block someone
1. On your iPhone or iPad, open the Voice app .
2. Open the tab for Messages , Calls , or Voicemail .
3. Open the text message, call, or voicemail.
4. Tap More Block number.
5. Tap Block to confirm.

Unblock someone
1. On your iPhone or iPad, open the Voice app .
2. Open the tab for Messages , Calls , or Voicemail .
3. Open the text message, call, or voicemail.
4. Tap More Unblock number.
5. Tap Unblock to confirm.
Remove a call or message from Spam
1. On your iPhone or iPad, open the Voice app .
2. At the top left, tap Menu Spam.
3. Open the text message, call, or voicemail.
4. Tap More Unmark as spam.
Unwanted calls from unknown callers
Automatically ignore known spam numbers
If a number that Google knows is spam tries to contact you, all their calls, texts, and voicemails will
be automatically moved to your Spam folder.
1. On your iPhone or iPad, open the Voice app .
2. At the top left, tap Menu Settings.
3. Under Security, turn Filter spam On .
If a number is incorrectly marked as spam, you can unblock it.
1. At the top left, tap Menu Spam.
2. Open the text message, call, or voicemail.
3. Tap Unmark as Spam.
Stop getting nuisance calls
Contact your telephone provider to block an unwanted number or unwanted calls.
Stop getting forwarded calls
If you verified your personal number in error or as part of a scam, your number could be linked to
someone else's Google Voice account. To stop getting forwarded calls, reclaim your phone number
by adding it as a linked number to a new or existing Google Voice account.

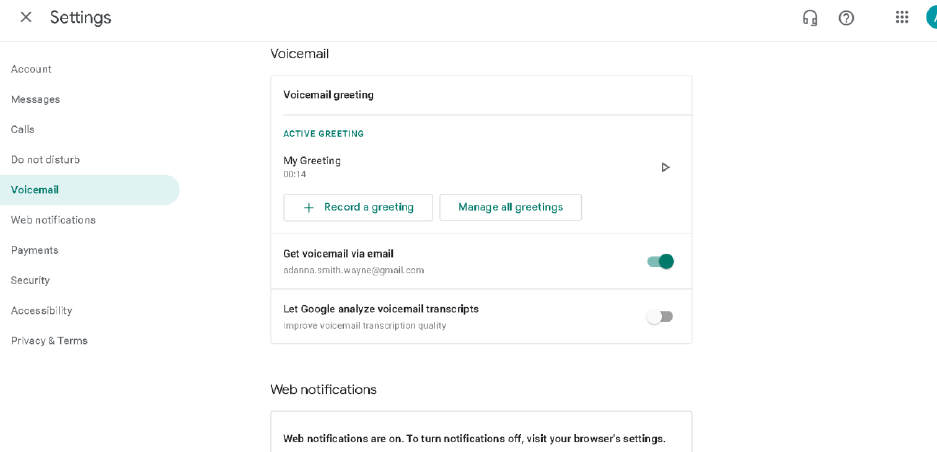
You can set up your own voicemail greeting and choose whether or not you would like to
receive missed calls and voicemails through your Gmail account. You can also choose to
receive calls exclusively through your computer. Please refer to the following pictures.