
Continuous Delivery Director Integrations 1.0

Continuous Delivery Director Integrations 1.0
Table of Contents
Integrations........................................................................................................................................... 5
Manage Plug-ins...................................................................................................................................6
Plug-in Proxies............................................................................................................................................................... 11
Manage Plug-in Proxies............................................................................................................................................13
Set Up a Plug-in Proxy............................................................................................................................................. 13
Configure Plug-in Proxies......................................................................................................................................... 18
Register an On-Premise Plug-in with Proxy.............................................................................................................19
Run Docker Image With Docker Compose.............................................................................................................. 19
Handy Docker Compose Commands................................................................................................................ 21
Run Docker Image Without Docker Compose......................................................................................................... 22
Containerized Plug-ins...................................................................................................................................................23
Run Containerized Plug-ins using Docker Engine................................................................................................... 24
Run Containerized Plug-ins using Kubernetes.........................................................................................................27
Set Up Multiple Containerized Plug-in Managers.....................................................................................................29
Plug-ins................................................................................................................................................31
Apache Tomcat Plug-in..................................................................................................................................................33
Atlassian Bitbucket Plug-in...........................................................................................................................................34
Atlassian JIRA Plug-in................................................................................................................................................... 37
Automic
®
Continuous Delivery Automation Plug-in.................................................................................................. 42
Configure a CDA Plug-in Endpoint...........................................................................................................................44
Start Application Workflow........................................................................................................................................ 44
Start General Workflow.............................................................................................................................................47
AWS CodeDeploy Plug-in..............................................................................................................................................48
AWS Elastic Beanstalk Plug-in..................................................................................................................................... 50
Azure DevOps Server Plug-in....................................................................................................................................... 52
Configure an Azure DevOps Server Endpoint......................................................................................................... 53
Import Work Items (Azure DevOps Server)..............................................................................................................54
Get Files (Azure DevOps Server).............................................................................................................................55
Run Build (Azure DevOps Server)........................................................................................................................... 56
Create Work Item (Azure DevOps Server)...............................................................................................................57
Update Work Item (Azure DevOps Server).............................................................................................................. 58
Wait for Approval (Azure DevOps Server)............................................................................................................... 58
BlazeMeter
®
Plug-in....................................................................................................................................................... 59
Cucumber for Java Plug-in........................................................................................................................................... 63
Get Test Assets (Cucumber for Java)...................................................................................................................... 65
Cucumber for Ruby Plug-in.......................................................................................................................................... 66
2

Continuous Delivery Director Integrations 1.0
Docker Plug-in................................................................................................................................................................ 69
DX App Experience Analytics Plug-in......................................................................................................................... 71
DX App Synthetic Monitor Plug-in............................................................................................................................... 73
Configure a DX App Synthetic Monitor Plug-in Endpoint.........................................................................................73
Activate and Deactivate Monitors............................................................................................................................. 74
Email Plug-in...................................................................................................................................................................74
Endevor Software Change Manager Plug-in............................................................................................................... 76
Flowdock Plug-in............................................................................................................................................................80
GitHub Plug-in................................................................................................................................................................ 81
GitLab Plug-in................................................................................................................................................................. 84
Gradle Testing Plug-in................................................................................................................................................... 87
Helm Plug-in....................................................................................................................................................................89
Configure a Helm Plug-in Endpoint.......................................................................................................................... 90
Install Release by Helm Chart..................................................................................................................................92
Upgrade Release by Helm Chart............................................................................................................................. 92
Rollback Release...................................................................................................................................................... 93
Uninstall Releases.....................................................................................................................................................93
Jenkins Plug-in............................................................................................................................................................... 94
JetBrains TeamCity Plug-in...........................................................................................................................................96
JFrog Artifactory Plug-in...............................................................................................................................................97
Kubernetes Plug-in.........................................................................................................................................................99
Configure a Kubernetes Plug-in Endpoint.............................................................................................................. 100
Create Deployment................................................................................................................................................. 102
Delete Deployment..................................................................................................................................................102
Set Image................................................................................................................................................................ 102
Import Files from AWS S3 (Kubernetes)................................................................................................................ 103
Maven Testing Plug-in................................................................................................................................................. 103
Micro Focus ALM Plug-in............................................................................................................................................106
Microsoft Teams Plug-in..............................................................................................................................................110
Nolio Release Automation Plug-In............................................................................................................................. 113
Rally
®
Plug-In................................................................................................................................................................116
Get Test Assets (Rally)........................................................................................................................................... 122
Red Hat Ansible Plug-in.............................................................................................................................................. 124
Red Hat Ansible Tower Plug-in.................................................................................................................................. 126
Red Hat OpenShift Plug-in.......................................................................................................................................... 129
Configure an OpenShift Endpoint........................................................................................................................... 130
Create Deployment (OpenShift)..............................................................................................................................132
Delete Deployment (OpenShift).............................................................................................................................. 133
Edit BuildConfig (OpenShift)................................................................................................................................... 133
Set Image (OpenShift)............................................................................................................................................ 134
3

Continuous Delivery Director Integrations 1.0
Start Build (OpenShift)............................................................................................................................................ 135
REST Plug-In.................................................................................................................................................................135
Example: Integrate with a Third Party REST API.................................................................................................. 139
Robot Framework Plug-in........................................................................................................................................... 145
Runscope Plug-in......................................................................................................................................................... 147
ServiceNow Plug-in...................................................................................................................................................... 149
Slack Plug-in................................................................................................................................................................. 153
SonarQube Plug-in....................................................................................................................................................... 155
TestCafe Plug-in........................................................................................................................................................... 156
Twistlock Plug-in.......................................................................................................................................................... 158
Veracode Plug-in.......................................................................................................................................................... 160
Develop Custom Plug-ins............................................................................................................... 163
Develop Custom Plug-in HTTP Service..................................................................................................................... 165
Create the Plug-in Manifest.........................................................................................................................................173
Sample Plug-in..............................................................................................................................................................177
Integrate with CI Tools.................................................................................................................... 195
Plug-in for Jenkins.......................................................................................................................................................195
Configure Plug-in for Jenkins..................................................................................................................................197
Send Build Notifications from a Jenkins Freestyle Project.....................................................................................197
Configure Jenkins to Send Git Commit IDs........................................................................................................... 200
Send Build Notifications from Jenkins Pipeline...................................................................................................... 201
Create Release from File Source in Jenkins Pipeline............................................................................................202
Plug-in for JetBrains TeamCity...................................................................................................................................204
Plug-in for Microsoft Team Foundation Server........................................................................................................ 207
4

Continuous Delivery Director Integrations 1.0
Integrations
Integrate with other continuous delivery tools through configurable plug-ins
You can integrate Continuous Delivery Director with other continuous delivery tools through configurable plug-ins. Plug-ins
give you the flexibility to orchestrate your end-to-end continuous delivery process in a single release workflow.
Integration through plug-ins lets you extend Continuous Delivery Director functionality and can provide the following
capabilities:
•
Application Models from Deployment Tools
Plug-ins can import application models from Automic@ Continuous Delivery Automation for use in Continuous Delivery
Director.
•
Continuous Delivery Task Instrumentation
Plug-in tasks let you instrument important actions in your continuous delivery pipeline from remote components in the
context of Continuous Delivery Director releases.
•
Release Content from Tracking Tools
Plug-ins can integrate with tracking tools to annotate releases with related work items.
You can also develop custom plug-ins for integrations that are not provided in a packaged plug-in.
This site describes how to work with packaged plug-ins and develop custom plug-ins.
Instructional Video
The following video shows how to use plug-ins to extend the capabilities of Continuous Delivery Director so it can
communicate with other products:
5

Continuous Delivery Director Integrations 1.0
Manage Plug-ins
Integrate plug-ins with Continuous Delivery Director to enable essential integrations with remote components.
This document describes how to install plug-ins and integrate them with your Continuous Delivery Director installation. For
information about the functionality provided by each plug-in, see the online documentation.
Continuous Delivery Director provides the following plug-ins that are packaged and installable out-of-the-box:
[A] [B] [C] [D] [E] [F] [G] [H] [J] [K] [M] [N] [P] [R] [S] [T] [V]
A
•
Atlassian Bitbucket
•
Atlassian JIRA
•
Apache Tomcat
•
Automic
®
Continuous Delivery Automation
•
AWS CodeDeploy
•
AWS Elastic Beanstalk
•
Azure DevOps Server (formerly Microsoft Team Foundation Server)
B
•
BlazeMeter
®
C
•
Cucumber for Java
•
Cucumber for Ruby
D
•
Docker
•
DX App Experience Analytics
•
DX App Synthetic Monitor Plug-in
E
•
Email
•
Endevor SCM
F
•
Flowdock
G
•
GitHub
•
GitLab
•
Gradle Testing
6

Continuous Delivery Director Integrations 1.0
H
•
Helm Plug-in
J
•
Jenkins
•
JetBrains TeamCity
•
JFrog Artifactory
K
•
Kubernetes
M
•
Maven Testing
•
Micro Focus ALM
•
Microsoft Teams
N
•
Nolio Release Automation
P
•
Playwright
R
•
Rally
®
(formerly CA Agile Central)
•
Red Hat Ansible
•
Red Hat Ansible Tower
•
Red Hat OpenShift
•
REST
•
Robot Framework
•
Runscope
S
•
ServiceNow
•
Slack
•
SonarQube
T
•
TestCafe
•
Twistlock
V
•
Veracode
7

Continuous Delivery Director Integrations 1.0
The following steps represent the high-level plug-in management workflow:
1. Install plug-ins.
2. Register plug-ins.
3. Use endpoints to connect to remote component systems.
4. Import data from remote components, such as content or application model.
5. Use automatic tasks that are provided by the plug-ins to execute operations on the remote components.
6. (Optional) Synchronize plug-ins to apply the latest changes to the plug-in.
7. (Optional) Remove plug-ins.
TIP
Steps 2, 3, 4 (application model), 6, and 7 require a product Administrator role. Steps 4 (content) and 5 require a
product Designer role.
Install Plug-ins
TIP
Plug-in installation is not required for SaaS users unless you need to install a custom plug-in that you have
developed. Packaged plug-ins are preinstalled with the SaaS instance.
NOTE
You can run packaged plug-ins on your own on-premise network.
From the support site https://casupport.broadcom.com, download the packaged plug-in, then deploy this plug-in
on a Tomcat 8 web container.
All packaged plug-ins require Tomcat 8.
Install plug-ins on the same server as Continuous Delivery Director or on remote servers. Consider the anticipated load on
the plug-ins before deciding to distribute, such as:
•
The amount, frequency, and potential concurrency of task execution
•
The size, frequency, and potential concurrency of imports (both application models and content)
•
The number of connected endpoints per plug-in
A remote plug-in server for packaged plug-in installation requires Tomcat 8 and Java 1.8 to be running on the remote
server.
In general, Continuous Delivery Director custom plug-ins can be developed using any programming language (Java,
Python, PhP, and so on) and can be hosted by any web container (Tomcat, JBoss, IBM Liberty, and so on). All Continuous
Delivery Director packaged plug-ins require Apache Tomcat 8.
Install a single instance of each required plug-in. One plug-in instance can support multiple endpoint connections.
Follow these steps:
Note: These steps might vary for custom plug-ins based on your implementation method. For example, if the plug-in
package is a .war file, you might want to deploy to a different servlet container or on the CDD Server Tomcat instance.
1. Download the .war files for the packaged plug-ins.
2. Stop the Apache Tomcat service on the plug-in server.
3. Copy the plug-in .war file into the webapps folder of the Tomcat installation directory.
TIP
Plug-ins that you are installing on the same server as the CDD Server component can be installed at the
same time as the CDD Server.
8

Continuous Delivery Director Integrations 1.0
4. Start the Apache Tomcat service.
The plug-ins are installed.
Register Plug-ins
Register remote and custom plug-ins to make their capabilities available from Continuous Delivery Director. Packaged
plug-ins that are installed on the Continuous Delivery Director Server are registered automatically.
TIP
As a SaaS user, when you log in for the first time, all existing plug-ins are automatically registered for you.
Plug-in registration is only required for SaaS users when new plug-ins are added to the SaaS instance after
your initial login. Monitor the What's New section to be notified of new plug-ins, which you register using this
procedure.
Packaged plug-ins are installed as .war files in an Apache Tomcat server. The .war file includes a manifest.json file. The
plug-in manifest specifies the plug-in capabilities and the URL for each of the plug-in services. To register a plug-in, you
enter the path to the manifest file in the UI.
While custom plug-in implementation methods can vary, all plug-ins require a manifest.json file. The manifest path might
differ if you implement a custom plug-in differently than the packaged plug-ins, but the concept is the same.
TIP
You can also register plug-ins using the REST API. For more information, see REST API Reference.
Follow these steps:
1. In Continuous Delivery Director, select Administration, and Plug-Ins.
2. Click Register Plug-In.
3. Specify the URL of the plug-in manifest. The plug-in manifest is the location of the JSON file.
On-Premise Examples:
–
Automic@ Continuous Delivery Automation plug-in manifest URL
http://<host>:<port>/cdd-ara-plugin/manifest.json
–
CA REST plug-in manifest URL
http://<host>:<port>/cdd-rest-plugin/manifest.json
These examples can represent locally or remotely installed plug-ins.
NOTE
If you configure the product to use HTTPS communication, you must update existing plug-in registrations
that previously used HTTP. For more information, see Secure Communications.
Example:
•
https://myhost:443/cdd-slack-plugin/manifest.json
4. Click Register.
The plug-in is discovered and registered and shows in the Plug-Ins page.
NOTE
Register Plug-ins
Add Endpoints
To connect an endpoint with an instance of a remote component, add an endpoint for a registered plug-in. Each plug-in
uses a single endpoint type (Endpoint Template) and can connect to multiple endpoint instances of that type. For example,
you can connect a ServiceNow plug-in to multiple ServiceNow servers, if needed.
9

Continuous Delivery Director Integrations 1.0
The information that is required for each endpoint connection varies by the plug-in. For more information, see the
documentation for each plug-in.
Follow these steps:
1. Go to Administration, Endpoints, and click Add Endpoint.
2. Specify the Name, Description, and select the Endpoint Type.
Each plug-in has an endpoint type. When you register a plug-in, its endpoint type becomes available to add in this
dialog.
3. Specify the information that is required for the endpoint type you selected, and click Add.
The endpoint is added.
NOTE
Manage Endpoints
Import Plug-in Data
Plug-ins can support the import of the following data from their remote component:
•
Application models
•
Content Items
Import application models during the administration phase before you create releases. You can then add applications and
environments from the remote component to your releases, phases, and tasks.
Import content items during the release design phase to associate specific work items with a release.
NOTE
•
Manage Applications and Environments
•
Design and Create Releases
Use Plug-in Tasks
Tasks let you instrument functionality in the remote component. You add tasks to phases and provide the appropriate
input values to execute the provided functionality in your release. For example, the Check Test Case Results task that is
provided by the Rally plug-in queries the results of a test case in Rally.
You add tasks to releases during the design phase and execute them when you run the release. For more information
about the required inputs for each task, see the detailed documentation for each packaged plug-in.
NOTE
•
Design and Create Releases
•
Plug-ins
Synchronize Plug-ins
When you upgrade to a higher, or downgrade to a lower, plug-in version, synchronize the plug-in. This
synchronization captures the latest plug-in manifest. We also recommend that you synchronize the plug-in when you
update remote components or plug-in versions. For example, to synchronize with the latest Automic@ Continuous
Delivery Automation application model changes, synchronize the Automic@ Continuous Delivery Automation plug-in.
Follow these steps:
1. Select Administration, and Plug-Ins.
2. Mouse over the name of the plug-in, select the information icon, and select Sync Plugin.Continuous Delivery Director
updates the plug-in registration with the new plug-in capabilities based on the new plug-in manifest. For example,
the import application model capability is added, or a task is updated and shows under the plug-in name.
10

Continuous Delivery Director Integrations 1.0
Remove Plug-ins
You can remove a plug-in from your workspace at any time. When you remove a plug-in:
•
All related endpoints are permanently deleted
•
The task configuration in all related tasks is permanently deleted
•
The task type in all related tasks reverts to Manual
Follow these steps:
1. From the Administration menu, select Plug-ins.
2. Select the relevant plugin, click the actions icon, then Delete Plug-in.
3. Only for OnPrem and SaaS instances running plug-in proxy—On the plug-in server, remove the deleted plug-in
folder and .war file from the webapps folder of the Tomcat installation directory.
Plug-in Proxies
You configure plug-in proxies to execute on-premise plug-in services that run behind a firewall. You can assign multiple
plug-in proxies to a single plug-in.
Users select plug-ins when creating or editing endpoints, tasks, test/work item/commit/file sources. When selecting a plug-
in, both the plug-in name and any assigned plug-in proxy name are shown in the format {plug-in name}/{proxy
display name}.
For example, a user edits a Rally Update task. In the task type dropdown list, they see Rally/Dev, Rally/QA, and
Rally/Deploy, meaning that different plug-in proxies named Dev, QA, and Deploy, are assigned to the Rally plug-in.
You can also see plug-in proxy names in exported DSL: "plugin": "EMEA|Rally/Dev",
Why Do I Need a Plug-in Proxy?
Let us say that you want to integrate Continuous Delivery Director SaaS with on-premise DevOps components, such as
Automic Continuous Delivery Automation, your corporate GitHub or JFrog Artifactory.
However, these on-premise components reside inside your corporate network. These components are protected by the
corporate firewall from unauthorized internet access. The use of the firewall means that Continuous Delivery Director
SaaS cannot easily connect to these components from outside your corporate network.
Continuous Delivery Director has developed a solution that is based on a plug-in proxy. This solution allows Continuous
Delivery Director SaaS users to execute plug-in services through on-premise components securely, despite the firewall.
How does the Plug-in Proxy Work?
The following diagram shows the plug-in proxy architecture:
11

Continuous Delivery Director Integrations 1.0
Figure 1: CDD Plug-in Proxy
Plug-in Proxy Workflow
1. Plug-in proxy is deployed inside the customer (tenant) on-premise network
2. Plug-in proxy connects to the remote Continuous Delivery Director system on behalf of the customer (tenant) through
secured WebSocket protocol (wss ).
Note: If your organization uses a Web proxy, the plug-in proxy connects to Continuous Delivery Director through that
web proxy.
3. Plug-in proxy retrieves the plugin registration/execution requests
4. Plug-in proxy routes these requests to the on-premise Continuous Delivery Director plug-ins that are running inside the
customer on-premise network
5. Plug-in proxy is delivered as a Docker image through the CA JFrog Bintray repository
6. The customer runs the plug-in proxy as a Docker container on a Docker engine machine running inside the customer
on-premise network
7. Plug-in proxy is authenticated in Continuous Delivery Director SaaS by the customer tenant ID and the customer API
key.
NOTE
The plug-in proxy cannot connect to https://cddirector.io if the WebSocket WSS protocol is blocked by on-
premise network elements such as the network router, firewall, and so on). The corporate firewall must be
configured to enable the WebSocket WSS protocol.
WebSocket connections generally work even if a firewall is in place. The connections succeed because
WebSocket connections use ports 80 and 443 which are also used by HTTP connections.
12

Continuous Delivery Director Integrations 1.0
Sometimes WebSocket connections are blocked over port 80. If so, a secure SSL connection using WSS over
port 443 should successfully connect.
NOTE
You can run multiple different tenants on Continuous Delivery Director SaaS.
Manage Plug-in Proxies
You manage plug-in proxies in the Plug-in Proxies page. This page lists proxy details including connectivity status and
lets you edit, enable/disable, and delete proxies.
To manage plug-in proxies, you need the Can manage plug-in proxy permission.
To access the Plug-in Proxies page, click the cross-project settings icon, then Plug-in Proxy.
To enable/disable a plug-in proxy, click the actions menu on the right of a table row and choose Enable/Disable.
To delete a plug-in proxy, click the actions menu on the right of a table row and choose Delete.
1. To edit a plug-in proxy: in the Plug-in Proxies page, either select a name in a table row, or click the actions menu on
the right of a table row and choose Edit.
2. Configure and set values for the following parameters:
•
Display Name in UI
Specify the plug-in proxy name to be shown in the user interface. If left empty, the proxy ID is shown.
•
Choose which IP addresses can connect
Determine whether only whitelisted or all IP addresses are allowed to connect to the plug-in proxy.
•
IP Addresses
Specify the IP addresses that can connect to the plug-in proxy. Ex. 192.19.250.253. You can enter IP addresses
manually when the whitelist option is disabled. Any IP addresses through which you have connected will be listed.
If the whitelist option is enabled, only whitelisted IP addresses will be listed.
3. Click Save.
Set Up a Plug-in Proxy
To enable a plug-in proxy, you need a Docker engine and a Docker image pulled from the CA JFrog Bintray repository.
NOTE
The plug-in proxy is contained inside a Docker image. There are two methods for running the Docker image:
•
With Docker Compose – Choose this method if you want to run all the available on-premise plug-ins and
services concurrently.
•
Without Docker Compose – Choose this method if you only want to run specific on-premise plug-ins and
services.
•
The plug-in proxy connects to Continuous Delivery Director by use of the WebSocket protocol.
•
Firewall access is enabled from the plug-in proxy server to Continuous Delivery Director over the WebSocket protocol.
13
Continuous Delivery Director Integrations 1.0
NOTE
Continuous Delivery Director SaaS runs at https://cddirector.io port 443.
•
A server with Docker Engine 19.x or higher is allocated inside your on-premise network.
•
For usage type: With Docker Compose. The plugins Docker image has been pulled from the CA JFrog Bintray. For
more information, see Download a Docker Image.
•
For usage type: Without Docker Compose. You have configured a local Apache Tomcat instance.
To download the docker image, follow these steps.
1. On the Docker engine server (the server which also hosts the required plug-ins, create a local folder.
2. For the newly-created local folder, assign write permissions for all users.
This step enables the Docker container logs to be written.
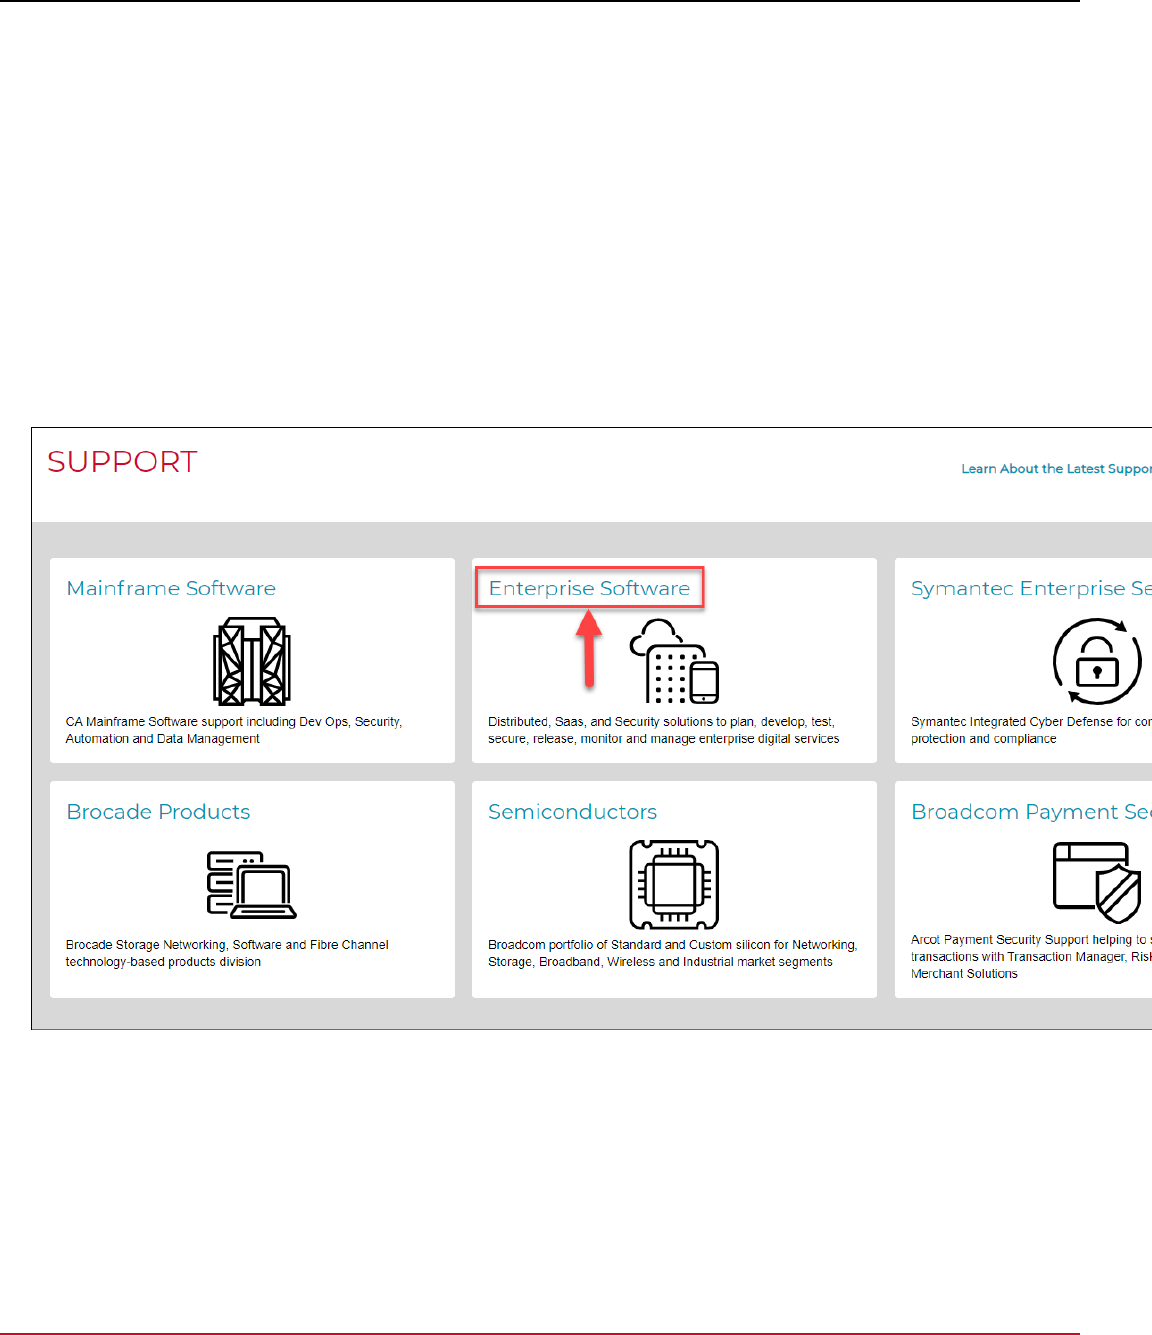
3. In a Web browser, enter the URL https://support.broadcom.com/ and log in to Broadcom Support.
4. In the Support page, click Enterprise Software:
Figure 2: Support Portal - Enterprise Software
14

Continuous Delivery Director Integrations 1.0
5. Click Product Downloads:
Figure 3: Support Portal - Product Downloads
15

Continuous Delivery Director Integrations 1.0
6. In the Download Management page, search for Continuous Delivery Director:
Figure 4: Support Portal - Download Management
16

Continuous Delivery Director Integrations 1.0
7. Click one of the available download names:
Figure 5: Support Portal - Available Downloads
8. Select the version, and click the Docker icon.
If you do not see a Docker icon, change the service pack number.
17
Continuous Delivery Director Integrations 1.0
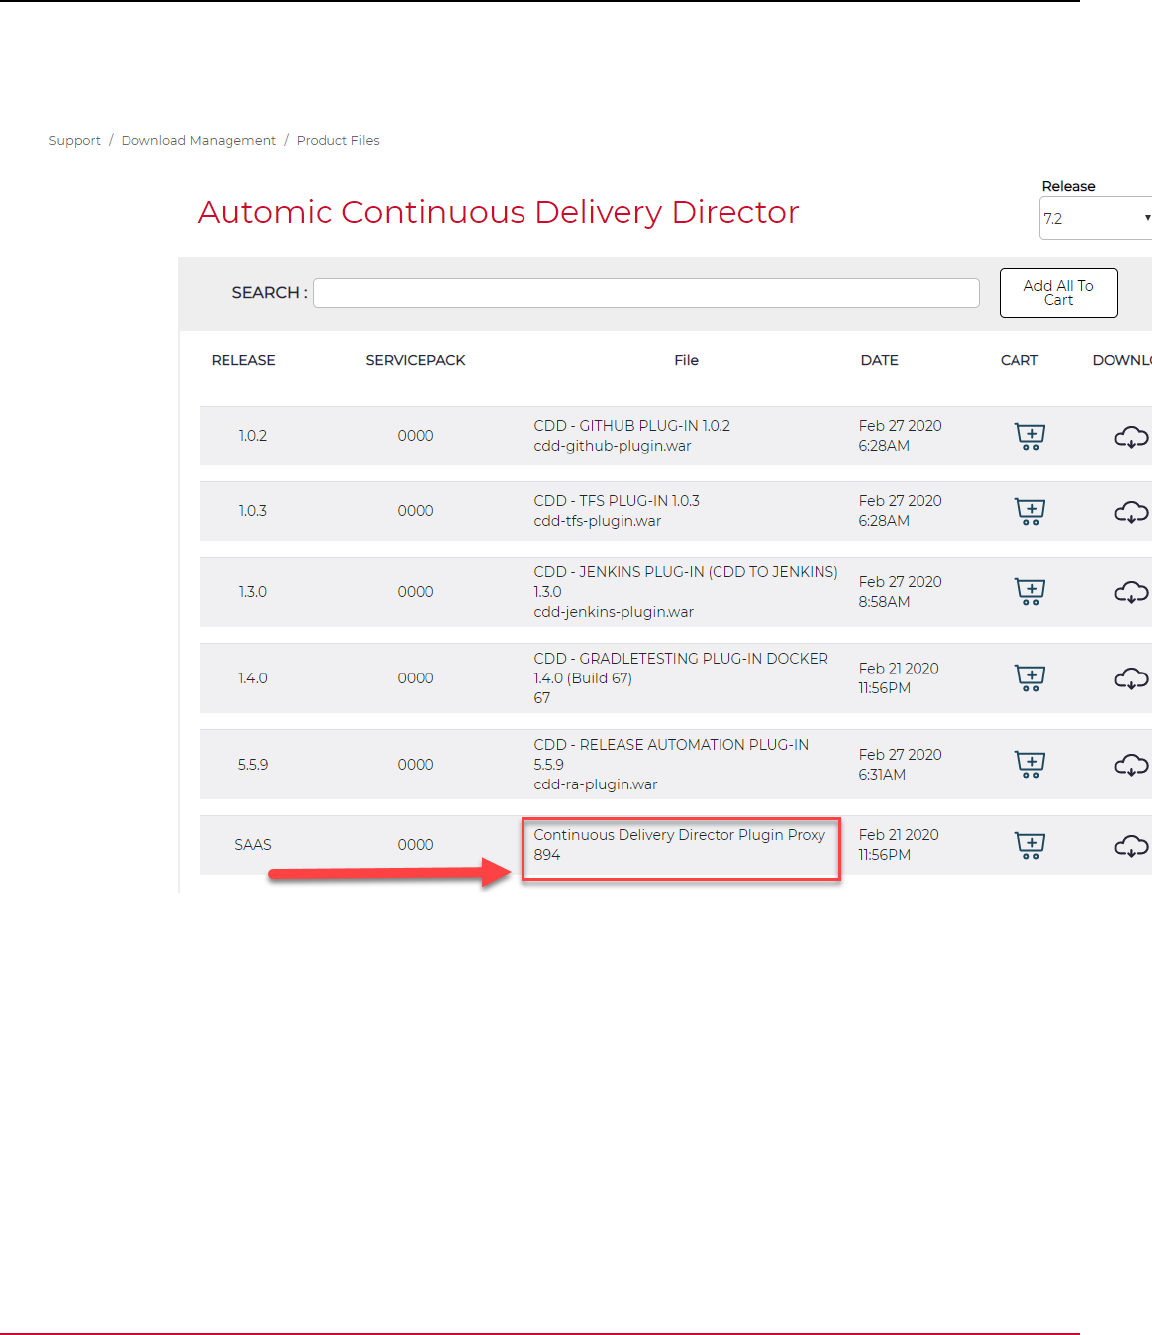
9. Log in to the private registry for secure download, then pull the image.
10. In the download components list, find and download Continuous Delivery Director Plugin Proxy:
Figure 6: Support Portal - Download Continuous Delivery Director Plugin Proxy
Configure Plug-in Proxies
You can edit settings.properties to support multiple plug-in proxies
•
To enable plug-in proxies, in settings.properties (/home/cdd/.cdd/conf/settings.properties), ensure
that the following line is set to true:
cdd.pop.enabled = true
•
To specify an optional unique ID of the plug-in proxy instance either in setttings.properties or in environment
variables:
cdd.plugins_proxy.id = {proxy ID}
NOTE
The proxy ID is limited to 200 characters which can include alphanumeric characters, hyphens, dots, and
underscores.
•
To define heartbeat intervals that indicate normal operation, edit the following line in settings.properties:
18

Continuous Delivery Director Integrations 1.0
cdd.plugins_proxy.cdd.heartbeat_interval_in_millis = {number of milliseconds}
•
To enable/disable message services for plug-in proxies such as Kafka or RabbitMQ, edit the following line in
settings.properties:
cdd.plugins_proxy.message_queue.enabled =
cdd.plugins_proxy.id=Dev
cdd.plugins_proxy.cdd.heartbeat_interval_in_millis = 30000
cdd.plugins_proxy.message_queue.enabled = false
Register an On-Premise Plug-in with Proxy
After you enable the plug-in proxy, you can register on-premise plug-ins (that run behind a firewall) to use that proxy in
Continuous Delivery Director.
Only proxies that connect with an API key assigned the Can connect plug-in proxy permission can connect to
Continuous Delivery Director.
1. Click Administration, then Plug-ins.
2. Click Register Plug-in.
3. Specify the plug-in manifest URL.
https://cdd_plugin_server:8443/cdd-ra-plugin/manifest.json
4. In Select Proxy, choose the required proxy from the dropdown list.
5. Click Register.
The plug-in is discovered and registered and appears in the Plug-Ins page.
Run Docker Image With Docker Compose
After you have pulled the Docker image from the support site, you run the image through Docker Compose, a tool for
defining and running multi-container Docker applications.
To enable the communication of the plug-in proxy through WebSocket, you must authenticate to Continuous Delivery
Director with the API key of an administrator. You must set up a Docker secret to hold your API key.
In this method, you use a YAML file to configure your plug-ins and services. Then, with a single command, you can create
and start all the plug-ins and services from your configuration.
CAUTION
If the administrator permissions of the user whose API key is used are removed, the communication fails!
NOTE
You can register two plug-ins with the same name but with different plug-in proxies.
1. From the Docker Engine server command line, change the directory to the required base folder.
/home/cdd
2. Enter the following command to create a working directory to use for the Docker Compose file and the proxy logs:
mkdir cdd-plugins-proxy && cd cdd-plugins-proxy
3. Grant write permissions on this folder to all users:
chmod -R 777 ../cdd-plugins-proxy
NOTE
This step enables the Docker container logs to be written.
19

Continuous Delivery Director Integrations 1.0
4. Initialize swarm mode:
docker swarm init
5. Create a Docker secret to hold your Continuous Delivery Director API key:
echo "{Your API KEY}" | docker secret create cdd_plugins_proxy_api_key -
NOTE
To find your API key, in Continuous Delivery Director, go to the User Settings menu.
6. Pull the plugins-proxy docker image from CA JFrog Bintray. Paste the commands that you saved when you
downloaded the docker image from the support site.
docker pull cdd.packages.ca.com/com/ca/cdd/{cdd-version}/plugins-proxy
7.
a) Create a docker-compose.yaml file.
b) Copy the following code block:
version: '3.1'
services:
cdd-plugins-proxy:
image: "cdd.packages.ca.com/com/ca/cdd/{cdd-version}/plugins-proxy:{plug-in-proxy-latest-docker-
image-tag}"
environment:
CDD_PLUGINS_PROXY_ID: {plugin-proxy-id}
CDD_PLUGINS_PROXY_CDD_API_KEY_PATH: '/run/secrets/cdd_plugins_proxy_api_key'
CDD_PLUGINS_PROXY_CDD_TENANT_ID: {cdd-tenant-id}
CDD_PLUGINS_PROXY_PLUGINS_WHITE_LIST: {plugin-white-list}
CDD_PLUGINS_PROXY_CDD_URL: {cdd-web-address}
volumes:
- /home/cdd/.cdd:/home/cdd/.cdd
secrets:
- cdd_plugins_proxy_api_key
deploy:
replicas: 1
restart_policy:
condition: on-failure
secrets:
cdd_plugins_proxy_api_key:
external: true
c) Replace the following values in the YAML indicated by the curly brackets '{}':
CAUTION
Do not change the code except for the values within the curly brackets '{}'. Doing so may cause
unpredictable results, including data loss.
Do not change the indentation or use tab characters.
•
{plug-in-proxy-latest-docker-image-tag}
•
{plugin-proxy-id}
•
{cdd-tenant-id}
•
{plugin-white-list}
•
{cdd-web-address}
Explanation of parameters:
•
HOME_FOLDER_LOCATION
20

Continuous Delivery Director Integrations 1.0
Path to the base folder configured on the Docker Engine server with the subfolder cdd-plugins-
proxy. Example: /home/cdd/cdd-plugins-proxy
•
CDD_PLUGINS_PROXY_ID
Unique ID of the plug-in proxy
CAUTION
To avoid possible conflicts with other plug-in proxies, make sure that the proxy ID you enter is unique.
•
CDD_PLUGINS_PROXY_CDD_API_KEY_PATH
Path to the Docker secret file on the Docker Engine server
•
CDD_PLUGINS_PROXY_CDD_TENANT_ID
The Continuous Delivery Director tenant ID. To find your tenant ID, in Continuous Delivery Director, go to the
User Settings menu.
•
CDD_PLUGINS_PROXY_PLUGINS_WHITE_LIST
A list of the on-premise plug-ins server addresses.
•
CDD_PLUGINS_PROXY_CDD_URL
The web address of Continuous Delivery Director SaaS. Value: https://cddirector.io/
version: '3.1'
services:
cdd-plugins-proxy:
image: "cdd.packages.ca.com/com/ca/cdd/{cdd-version}/plugins-proxy:1024"
environment:
CDD_PLUGINS_PROXY_ID: 3129aac3-9f35-4f81-87a4-8b0ce5223402
CDD_PLUGINS_PROXY_CDD_API_KEY_PATH: '/run/secrets/cdd_plugins_proxy_api_key'
CDD_PLUGINS_PROXY_CDD_TENANT_ID: 96b98c94-b041-4ef5-9e85-c41c942c211c
CDD_PLUGINS_PROXY_PLUGINS_WHITE_LIST: abcdev003773.mycompany.net
CDD_PLUGINS_PROXY_CDD_URL: https://abcapi01704.mycompany.net:8080
volumes:
- /home/cdd/.cdd:/home/cdd/.cdd
secrets:
- cdd_plugins_proxy_api_key
deploy:
replicas: 1
restart_policy:
condition: on-failure
secrets:
cdd_plugins_proxy_api_key:
external: true
8. Deploy the new Docker stack:
docker stack deploy --compose-file=docker-compose.yaml cdd-plugins-proxy-stack
9. Check that the Docker stack is ready:
docker stack services cdd-plugins-proxy-stack
The plug-in proxy is enabled and is available for use for on-premise plug-ins.
Handy Docker Compose Commands
You may find the following commands useful when you manage the plug-in proxy Docker image with Docker Compose.
You enter these commands from the Docker engine server command line.
21
Continuous Delivery Director Integrations 1.0
To do this... Enter
Validate Docker stack is available docker stack services cdd-plugins-proxy-
stack
Stop a running Docker stack docker stack rm cdd-plugins-proxy-stack
Create a Docker secret file echo "{Your API KEY}" | docker secret create
cdd_plugins_proxy_api_key -
List existing Docker secret files docker secret ls
Remove a Docker secret file docker secret rm cdd_plugins_proxy_api_key
Run Docker Image Without Docker Compose
After you have downloaded the Docker image from the support site, you run the image through a command sequence.
Use this method if you want to run specific on-premise plug-ins only.
This method requires a local Apache Tomcat 8.x instance on which you install the required on-premise plug-ins.
ATTENTION
To enable the communication of the plug-in proxy through WebSocket, you must authenticate to Continuous
Delivery Director with the API key of an administrator. You set up a Docker secret to hold your API key.
CAUTION
If the administrator permissions of the user whose API key is used are removed, the communication will fail!
1. Use the following command to run the Docker image:
docker tag cdd.packages.ca.com/com/ca/cdd/plugins-proxy plugins-proxy:latest docker run -d \
--name plugins-proxy \
--restart=on-failure \
-v <local-home-folder-location>:/home/cdd/.cdd \
-e CDD_PLUGINS_PROXY_ID=<plugins-proxy-id> \
-e CDD_PLUGINS_PROXY_CDD_API_KEY=<cdd-api-key> \
-e CDD_PLUGINS_PROXY_CDD_TENANT_ID=<tenant-id> \
-e CDD_PLUGINS_PROXY_PLUGINS_WHITE_LIST=<plugin-server1,plugin-server2,...> \
-e CDD_PLUGINS_PROXY_CDD_URL=https://cddirector.io \ plugins-proxy:<cdd-docker-tag>
If your organization uses a web proxy, to run the Docker image, add the following lines:
docker tag cdd.packages.ca.com/com/ca/cdd/plugins-proxy plugins-proxy:latest
docker run -d \
--name plugins-proxy \
--restart=on-failure \
-v <local-home-folder-location>:/home/cdd/.cdd \
-e CDD_PLUGINS_PROXY_ID=<plugins-proxy-id> \
-e CDD_PLUGINS_PROXY_CDD_API_KEY=<cdd-api-key> \
-e CDD_PLUGINS_PROXY_CDD_TENANT_ID=<tenant-id> \
-e CDD_PLUGINS_PROXY_PLUGINS_WHITE_LIST=<plugin-server1,plugin-server2,...> \
-e CDD_PLUGINS_PROXY_CDD_URL=https://cddirector.io \
-e CDD_PLUGINS_PROXY_INTERNET_PROXY_URL=http://proxy:8080 \
-e CDD_PLUGINS_PROXY_INTERNET_PROXY_USERNAME=username \
-e CDD_PLUGINS_PROXY_INTERNET_PROXY_PASSWORD=password \
plugins-proxy:<cdd-docker-tag>
Explanation of parameters:
•
CDD_PLUGINS_PROXY_ID
22

Continuous Delivery Director Integrations 1.0
Unique ID of the plug-in proxy
CAUTION
To avoid possible conflicts with other plug-in proxies, make sure that the proxy ID you enter is unique.
•
CDD_PLUGINS_PROXY_CDD_API_KEY
Continuous Delivery Director API key. To find your API key, in Continuous Delivery Director, go to the User
Settings menu.
•
CDD_PLUGINS_PROXY_CDD_TENANT_ID
Continuous Delivery Director Tenant ID. To find your tenant ID, in Continuous Delivery Director, go to the User
Settings menu.
•
CDD_PLUGINS_PROXY_PLUGINS_WHITE_LIST
List of Continuous Delivery Director plug-in servers. A CSV list of the on-premise server addresses of Continuous
Delivery Director plug-ins.
•
CDD_PLUGINS_PROXY_CDD_URL
Web address of Continuous Delivery Director SaaS. Value: (default) https://cddirector.io/
•
cdd-docker-tag
The tag of the Docker image as specified by the docker pull command. Value: (default) latest
Explanation of parameters for web proxy only:
•
CDD_PLUGINS_PROXY_INTERNET_PROXY_URL
Web address to access organization web proxy.
•
CDD_PLUGINS_PROXY_INTERNET_PROXY_USERNAME
(Optional) Username to authenticate access to the organization web proxy.
•
CDD_PLUGINS_PROXY_INTERNET_PROXY_PASSWORD
(Optional) The password to authenticate access to the organization web proxy.
NOTE
Location of plug-in proxy log files
The plugins_proxy.log files are created in the logs sub-folder of the <local-home-folder- location> local folder.
For example:
/home/cdd/.cdd/logs/ plugins_proxy.log
2. After you enter the command, check plugins_proxy.log to verify that the command has run and that the plug-in proxy is
enabled. The plugins_proxy.log file is located in the /logs folder under the local home folder location.
When the command has run, the plug-in proxy is enabled and is available for use for on-premise plug-ins.
Containerized Plug-ins
Continuous Delivery Director provides some integrations as container images, referred to as containerized plug-ins. These
plug-ins automate the configuration of integrated environments.
Version 2.2
Figure 7: To download the latest plug-in version, click the following icon:
23

Continuous Delivery Director Integrations 1.0
Version History
The following updates were made for version 2.2:
•
The containerized plug-in manager lets you run Continuous Delivery Director docker-based plugins on Kubernetes
(and not just on Docker engine).
•
You can configure settings.properties to support multiple container management platforms.
Overview
Containerized plug-ins are based on Integration-as-a-Service, which is a cloud service delivery model for integration.
These plug-ins deliver an integration solution that can greatly reduce the time involved in setting up third-party clients
and servers as part of your continuous delivery pipeline. This solution allows release managers to quickly put together
integration flows and implement orchestrations, thereby accelerating development time.
Containerized plug-ins are stored in a registry that is either private or public on a repository, such as Artifactory.
A single containerized plug-in can be deployed as multiple identical containers on multiple container management
platforms.
Containerized plug-ins are comprised of system libraries, system tools, and other platform settings a third-party service
provider needs to run on container management platforms.
Continuous Delivery Director has developed a tool, the Containerized Plug-in Manager, that enables you to work with
the following container management platforms:
•
Docker Engine
•
Kubernetes
Continuous Delivery Director provides the following containerized plug-ins:
•
Cucumber for Java Plug-in
•
Cucumber for Ruby Plug-in
•
Gradle Testing Plug-in
•
Maven Testing Plug-in
•
Red Hat Ansible Plug-in
•
Robot Framework Plug-in
•
TestCafe Plug-in
Run Containerized Plug-ins using Docker Engine
Learn how to set up containerized plug-ins to work in Continuous Delivery Director using Docker Engine.
•
A home folder is set up and includes containerized folders. For more information, see Configure the Home Folder.
•
A Docker Engine machine is provisioned, preferably running Red Hat Linux 7.4.
•
For Continuous Delivery Director SaaS users, a plug-in proxy is defined so that the Docker Engine machine is included
in the approved list. For more information, see Plug-in Proxies.
•
The containerized manager war file and a containerized plug-in tar file (which holds the required docker images) have
been downloaded to the Docker Engine machine.
NOTE
Enhanced Security
24

Continuous Delivery Director Integrations 1.0
Optional. To restrict the access to the Docker remote API port to allow localhost origin only, follow all the steps in
the following Enhanced Security notes.
1. Enable access to Docker containers and images.
a) From the command line, as a root user, create a user with the name cdd and the uid 1010 , and a group with the
name cdd and the gid 1010 on the Docker Engine machine. Add the user cdd to the existing docker group
to allow this user to run Docker images. This step enables the Docker container to read and write the required
settings and logs to a persistent volume on the Docker Engine machine:
groupadd 1010 -g 1010 cdduseradd 1010 -u 1010 -g 1010 -G docker cdd
NOTE
The purpose of the cdd user and cdd group is to limit read-write permissions between the host machine
and the Docker containers to authorized users only.
All cdd services are run on behalf of the cdd OS user. All Continuous Delivery Director artifacts are
stored in the cdd home folder using cdd user access permissions.
b) Set a password for the cdd user:
passwd cdd {provide a password}
2. Enable access to the Docker remote API port for communication between the containerized plug-in and the Docker
Engine:
a) Create the docker.service.d directory:
mkdir /etc/systemd/system/docker.service.d
b) Create the docker-external.conf configuration file:
vi /etc/systemd/system/docker.service.d/docker-external.conf
c) Add the following content to the docker-external.conf file:
[Service] ExecStart=ExecStart=/usr/bin/dockerd -H tcp://0.0.0.0:4550 -H unix:///var/run/docker.sock
NOTE
Enhanced Security
Replace 0.0.0.0 with 127.0.0.1 or with the server name of the Docker Engine machine.
d) Reload and restart the Docker daemon:
systemctl daemon-reload systemctl restart docker
3.
a) Connect as the cdd user:
su - cdd
b) Prepare the docker images:
NOTE
In the following command, replace:
{path-to-local-containerized-plug-in-tar-file}
with the download location of the docker images on the Docker Engine machine.
docker load -i {path-to-local-containerized-plug-in-tar-file}
25

Continuous Delivery Director Integrations 1.0
4. Create a settings.properties file with the following content and place this file under the /home/cdd/.cdd/
conf folder:
NOTE
In the following code block, make sure you provide a value for the
cdd.plugins.containerized.container_engine.host parameter.
NOTE
Enhanced Security
When you configured the docker-external.conf file in a previous step, if you replaced 0.0.0.0 with another
value for enhanced security in the following line:
ExecStart=/usr/bin/dockerd -H tcp://0.0.0.0:4550 -H unix:///var/run/docker.sock
Set the cdd.plugins.containerized.container_engine.host parameter to the same value, for
example, 127.0.0.1.
#Provider
cdd.plugins.containerized.platform_provider=docker
#Container Template
cdd.plugins.containerized.container.port=8080
cdd.plugins.containerized.container.user_id=1010
cdd.plugins.containerized.container.group_id=1010
cdd.plugins.containerized.container.volumes.logs=/home/1010/.cdd/logs
#Container Readiness
cdd.plugins.containerized.container_readiness.check_intervals=25
cdd.plugins.containerized.container_readiness.check_interval_duration_ms=1000
#Container (Docker) Engine
cdd.plugins.containerized.container_engine.host=
cdd.plugins.containerized.container_engine.port=4550
cdd.plugins.containerized.container_engine.home_folder=/home/1010/.cdd
#Registry
cdd.plugins.containerized.registry.url=cdd.packages.ca.com
cdd.plugins.containerized.registry.password=
cdd.plugins.containerized.registry.username=
cdd.plugins.containerized.registry.email=
#Container
cdd.plugins.containerized.ansiblecore.container.image_name=isl-dsdc.ca.com:5000/com/ca/cdd/
trunk/7.2/ plugins/ansiblecore:82
cdd.plugins.containerized.ansiblecore.container.port=8080
cdd.plugins.containerized.ansiblecore.container.name_prefix=ac
5. Verify that the docker-engine hostname was added. Run the following command:
NOTE
In the following command, replace {hostname} with the Docker Engine machine name or IP address.
more /home/cdd/.cdd/conf/settings.properties | grep {hostname}
26

Continuous Delivery Director Integrations 1.0
6. Optionally, run the containerized manager as a docker container. Alternatively, you can run the containerized manager
as a standard Tomcat war file. If you choose to run the containerized manager as a docker container, from the
command prompt enter the following:
NOTE
Enhanced Security
Run the containerized plug-in using the network of the Docker Engine host (add --network=host to the
following docker run command).
Running the containerized plug-in using the network of the Docker Engine host may create a port conflict
between the docker container and the Docker Engine machine ('Address in use' error message). In this case,
do not use port 8080 as the Tomcat port of the containerized plugin. Instead, in the following command,
replace {port} with an available port on the Docker Engine machine.
docker run --name containerized-plugin --network=host -e CONNECTOR_PORT={port} -e
SECURITY_FLAG=false -e CDD_HOME_FOLDER=/home/cdd/.cdd -v /home/cdd/.cdd:/home/cdd/.cdd -d isl-
dsdc.ca.com:5000/com/ca/cdd/trunk/7.0/plugins/containerized:31
7. Register the containerized plug-in.
For more information, see Manage Plug-ins.
NOTE
In the following command, replace {hostname} with the server or IP address of the machine running the
containerized plug-in and replace {port} with the external Tomcat port of the containerized plug-in.
http://{hostname}:{port}/containerized/plugins/cdd-{name of containerized plugin}-plugin/manifest.json
http://10.121.64.90:8080/containerized/plugins/cdd-ansiblecore-plugin/manifest.json
Run Containerized Plug-ins using Kubernetes
Learn how to set up containerized plug-ins to work in Continuous Delivery Director using Kubernetes.
•
A cdd home folder is set up and includes containerized folders. For more information, see Configure the Home Folder
•
You are familiar with Kubernetes and the concepts of Persistent Volume and Persistent Volume Claim. For more
information, see Kubernetes documentation.
•
For Continuous Delivery Director SaaS users, the plug-in proxy is defined so that the Kubernetes machine is included
in the approved list. For more information, see Plug-in Proxy.
•
The containerized manager war file has been downloaded to the Kubernetes machine.
•
A containerized plug-in tar file which holds the required docker images has been downloaded to the Kubernetes
machine.
1. Create a namespace with the name cdd . From the command prompt:
kubectl create ns cdd
2. Create a persistent volume for the cdd home folder (/home/cdd/.cdd):
kubectl create -f PersistentVolume.yaml
3. Add the following content to PersistentVolume.yaml.
apiVersion: v1
kind: PersistentVolume
metadata:
name: cdd
labels:
name: cdd
27

Continuous Delivery Director Integrations 1.0
spec:
capacity:
storage: 2Gi
accessModes:
- ReadWriteMany
storageClassName: hostpath
persistentVolumeReclaimPolicy: Retain
hostPath:
path: /home/cdd/.cdd
type: DirectoryOrCreate
4. Create a persistent volume claim at the cdd namespace:
kubectl create -n cdd -f PersistentVolumeClaim.yaml
5. Add the following content to PersistentVolumeClaim.yaml.
kind: PersistentVolumeClaim
apiVersion: v1
metadata:
name: cdd
namespace: cdd
spec:
selector:
matchLabels:
name: cdd
accessModes:
- ReadWriteMany
storageClassName: hostpath
resources:
requests:
storage: 1Gi
volumeName: cdd
6. Create a settings.properties file with the following content and place this file under the /home/cdd/.cdd/
conf folder:
#Provider
cdd.plugins.containerized.platform_provider=kubernetes
#Cluster
cdd.plugins.containerized.cluster.namespace=
cdd.plugins.containerized.cluster.username=
cdd.plugins.containerized.cluster.password=
cdd.plugins.containerized.cluster.server_url=
cdd.plugins.containerized.cluster.persistence_volume_claim_name=
cdd.plugins.containerized.cluster.access_token=
7. Register the containerized plug-in. For more information, see Manage Plug-ins.
NOTE
In the following command, replace {hostname} with the server or IP address of the machine running the
containerized plug-in and replace {port} with the external Tomcat port of the containerized plug-in.
http://{hostname}:{port}/containerized/plugins/cdd-{name of plugin}-plugin/manifest.json
http://10.121.64.90:8080/containerized/plugins/cdd-ansiblecore-plugin/manifest.json
28

Continuous Delivery Director Integrations 1.0
Set Up Multiple Containerized Plug-in Managers
You can configure settings.properties to support multiple container management platforms.
You can use multiple container management platforms to run containerized plug-ins (for example, either for multiple
Docker Engines, or for Docker Engine and Kubernetes). To support this scenario, you set up a containerized manager
instance for each container management platform. You can configure settings.properties with multiple
containerized plug-in manager settings.
You must set the CDD_CONTAINERIZED_ID environment variable to specify the unique ID of each containerized manager
instance per container management platform instance. Each containerized manager instance must run using a unique
value of the CDD_CONTAINERIZED_ID environment variable. The value of the CDD_CONTAINERIZED_ID environment
variable is free text.
You can update the settings.properties file and add the concrete value of {cdd-containerized-id} right after
the cdd.plugins.containerized. prefix.
If the {cdd-containerized-id} prefix is not found, the plug-in reverts to the same property name without the {cdd-
containerized-id} prefix.
You have a Docker Engine platform and a Kubernetes platform. You need two containerized manager
instances, one instance with CDD_CONTAINERIZED_ID set to 1, and the other instance with
CDD_CONTAINERIZED_ID set to 2. Your settings.properties file includes the following lines:
cdd.plugins.containerized.1.platform_provider=docker
cdd.plugins.containerized.2.platform_provider=kubernetes
Your settings.properties file includes the following sections:
settings.properties
==================================
cdd.plugins.containerized.{cdd-containerized-id-1}.platform_provider=docker
cdd.plugins.containerized.{cdd-containerized-id-1}.container_engine.home_folder_base_url=http://
cdddev001234.mpc.mycompany.net
cdd.plugins.containerized.{cdd-containerized-id-1}.container_engine.home_folder=/home/cdd/.cdd
cdd.plugins.containerized.{cdd-containerized-id-1}.container_engine.host=http://
cdddev001234.mpc.mycompany.net
cdd.plugins.containerized.{cdd-containerized-id-1}.container_engine.port=4550
cdd.plugins.containerized.{cdd-containerized-id-2}.platform_provider=kubernetes
cdd.plugins.containerized.{cdd-containerized-id-2}.cluster.namespace=
cdd.plugins.containerized.{cdd-containerized-id-2}.cluster.username=
cdd.plugins.containerized.{cdd-containerized-id-2}.cluster.password=
cdd.plugins.containerized.{cdd-containerized-id-2}.cluster.server_url=
cdd.plugins.containerized.{cdd-containerized-id-2}.cluster.persistence_volume_claim_name=
cdd.plugins.containerized.{cdd-containerized-id-2}.cluster.access_token=
cdd.plugins.containerized.{cdd-containerized-id-1}[email protected]
cdd.plugins.containerized.{cdd-containerized-id-1}.registry.password=Cdd1234$
cdd.plugins.containerized.{cdd-containerized-id-1}.registry.url=docker-release-candidate-
local.artifactory-xyz.broadcom.net
cdd.plugins.containerized.{cdd-containerized-id-1}.registry.username=bld_cdd_build
cdd.plugins.containerized.{cdd-containerized-id-1}.container.volumes.artifacts=/home/cdd/.cdd/
artifacts
29

Continuous Delivery Director Integrations 1.0
cdd.plugins.containerized.{cdd-containerized-id-2}.cucumberjvm.container.image_name=docker-release-
candidate-local.artifactory-xyz.mycompany.net/com/cdd/trunk/8.0/plugins/cucumberjvm\:15
cdd.plugins.containerized.{cdd-containerized-id-2}.cucumberjvm.container.volumes.artifacts=/home/
cdd/.cdd/artifacts
cdd.plugins.containerized.{cdd-containerized-
id-2}.cucumberjvm.container.volumes.artifacts.volumes=dependencies\:/home/cdd/.m2
cdd.plugins.containerized.{cdd-containerized-id-2}.cucumberjvm.container.volumes.logs=/home/
cdd/.cdd/logs
You also have multiple instances of the same container management platform type, docker. Your
settings.properties file includes the following lines:
cdd.plugins.containerized.1.platform_provider=docker
cdd.plugins.containerized.2.platform_provider=docker
30
Continuous Delivery Director Integrations 1.0
Plug-ins
Plug-ins enable users of third-party solutions to execute Continuous Delivery Director processes and deployments from
within the specific solution.
Continuous Delivery Director provides the following plug-ins that are packaged and installable out-of-the-box:
[A] [B] [C] [D] [E] [F] [G] [H] [J] [K] [M] [N] [P] [R] [S] [T] [V]
A
•
Atlassian Bitbucket
•
Atlassian JIRA
•
Apache Tomcat
•
Automic
®
Continuous Delivery Automation
•
AWS CodeDeploy
•
AWS Elastic Beanstalk
•
Azure DevOps Server (formerly Microsoft Team Foundation Server)
B
•
BlazeMeter
®
C
•
Cucumber for Java
•
Cucumber for Ruby
D
•
Docker
•
DX App Experience Analytics
•
DX App Synthetic Monitor Plug-in
E
•
Email
•
Endevor SCM
F
•
Flowdock
G
•
GitHub
•
GitLab
•
Gradle Testing
H
•
Helm Plug-in
31

Continuous Delivery Director Integrations 1.0
J
•
Jenkins
•
JetBrains TeamCity
•
JFrog Artifactory
K
•
Kubernetes
M
•
Maven Testing
•
Micro Focus ALM
•
Microsoft Teams
N
•
Nolio Release Automation
P
•
Playwright
R
•
Rally
®
(formerly CA Agile Central)
•
Red Hat Ansible
•
Red Hat Ansible Tower
•
Red Hat OpenShift
•
REST
•
Robot Framework
•
Runscope
S
•
ServiceNow
•
Slack
•
SonarQube
T
•
TestCafe
•
Twistlock
V
•
Veracode
Each plug-in has unique characteristics, including:
32

Continuous Delivery Director Integrations 1.0
•
Required information for endpoint connections
•
Required security for endpoint connections
•
Task types
•
Import capabilities
•
Task input values
This section provides detailed content for each packaged plug-in to help you use its capabilities in your releases.
Apache Tomcat Plug-in
Use this plug-in to deploy WAR files stored in a Maven repository to Tomcat using the Tomcat Web Application Manager.
Figure 8: Click the icon to download the latest plug-in version
Plug-in Version 1.4
This plug-in helps you to automatically deploy a built war file to a Tomcat instance. Both Artifactory and Nexus type
repositories are supported.
Supported Versions
This plug-in supports Apache Tomcat 8.x.
What's New
The following updates were made for plug-in version 1.4:
•
Bugfix: Tomcat plug-in uses the snapshot version of the pom record instead of the snapshot version of the artifact
record.
The following updates were made for plug-in version 1.3:
•
A new output parameter in the Deploy Artifact task, Artifact URL, returns a clickable URL to the deployed artifact.
Configuration
Register the plug-in and create endpoints as described in Manage Plug-ins
The URL of the Tomcat manifest for plug-in registration is http://<plugin-server>:<port>/cdd-tomcat-plugin/manifest.json.
Select the Tomcat plug-in in the ADD ENDPOINT dialog to create an endpoint for the Tomcat plug-in. The following
Tomcat information is required wtomhen you create an endpoint:
•
Tomcat URL
Enter the Tomcat URL with the target location for the deployed artifact.
Syntax: http://${tomcat-server}:${port}
NOTE
The URL can be specified as http or https
•
Tomcat Username
Specify a user name to authenticate to Tomcat.
•
Tomcat Password
33

Continuous Delivery Director Integrations 1.0
Specify a password to authenticate to Tomcat.
•
Maven Repository URL
Enter the required Maven repository URL. This is the base URL prefix of the remote artifact repository. For example,
http://artifactory.acme.net/artifactory or https://repository.apache.org.
NOTE
An Artifactory URL must end with: [/artifactory]. A Nexus URL must end with: [/repository].
•
Repository Name
Specify the name of the Maven repository where the project artifacts are stored, for example, maven-repository.
•
Maven Repository Credentials
Specify the authentication method for the Maven repository, either Basic or Bearer.
•
Basic
–
Maven Repository Username
Specify the username to authenticate to the Maven repository.
–
Maven Repository Password
Specify the password to authenticate to the Maven repository.
•
Bearer
–
Maven Repository Access Token
Specify the Maven repository access token
Deploy Artifact
This task helps you to deploy a Maven artifact in WAR format to a Tomcat container.
Configure the following input parameters:
•
Tomcat Context Path
Specify the context path part of the URL under which your application will be published in Tomcat, with or without a
preceding slash [/]. For example: [tomcatPluginApp] or [/tomcatPluginApp].
•
Build Number
Specify the build number to be deployed.
•
Artifact Package Group Name
Specify the package group of the repository.
•
Artifact Package Name
Specify the artifact name.
•
Artifact File Path
Specify the path to the folder location where the artifact is stored.
•
Artifact Classifier
Specify the artifact classifier.
•
Request Timeout in Seconds
Specify the request timeout for each operation: download and upload.
Output Parameters
•
Artifact URL
Returns the full URL of the specified artifact, either release or snapshot. You can use this URL in the phase or release.
Atlassian Bitbucket Plug-in
This plug-in lets you use Bitbucket as your source control system to retrieve commit messages so you can track planned
vs actual work.
34

Continuous Delivery Director Integrations 1.0
Figure 9: Click the icon to download the latest plug-in version
Plug-in Version 2.3
This plug-in also lets you use Bitbucket as your file source, a connection to a JSON format representation of a
release. Additionally, you can also use file sources to manage JSON files that reference other JSON files.
IMPORTANT
Only on-premise Bitbucket instances are supported by this plug-in.
What's New
The following updates were made for plug-in version 2.3:
•
Assorted bug fixes.
The following updates were made for plug-in version 2.2:
•
A new Trust Any SSL Certificate endpoint parameter lets you allow untrusted and unsigned SSL/TLS certificates.
The following updates were made for plug-in version 2.1:
•
A new optional endpoint parameter, Project Key, was added.
The following updates were made for plug-in version 2.0:
•
You can now use Bitbucket as your source control system to retrieve commit messages so you can track planned
vs actual work. To support this change, a Bitbucket Get Commit Messages task is now available in the Set Source
Control Connection page.
The following updates were made for plug-in version 1.1:
•
Support was added for Java 11.
Configuration
Register the plug-in and create endpoints as described in Manage Plug-ins
The URL of the Bitbucket manifest for plug-in registration is http://<plugin-server>:<port>/cdd-bitbucket-plugin/
manifest.json.
Select the Bitbucket plug-in in the ADD ENDPOINT dialog to create an endpoint for the Bitbucket plug-in. The following
Bitbucket information is required when you create an endpoint:
•
Bitbucket API URL
Enter the URL of the remote Bitbucket instance to be used for connection purposes.
Example: https://myBitbucket.mycompany.com:7990
Note: The URL can be specified as http or https
•
Username
Specify a user name to authenticate to Bitbucket.
•
Password
Specify a password to authenticate to Bitbucket.
•
Project Key
Specify the project key of the Bitbucket repository.
•
Trust Any SSL Certificate
35

Continuous Delivery Director Integrations 1.0
Select this option if you want to allow untrusted and unsigned SSL/TLS certificates.
Get Commit Messages
The Bitbucket plug-in lets you retrieve and parse commit messages. Use this capability when you deploy applications in a
release to see the status of related work items.
Optionally, you can configure paths to include and exclude files from the list of changed files that are part of test coverage
metrics. For example, you might not want your tests (written in Java) to be counted as files that are not covered.
Follow these steps:
1. In a release, expand the Apps & Work Items tree on the left menu, and select the version number.
2. Select Set Source Control Connection.
Note: This option is only enabled if a work item source, such as Rally
®
, has been configured.
3. Configure the following parameters, then select Set:
–
Source Control - Select Bitbucket and Get Commit Messages.
–
Select Endpoint - Select a Bitbucket endpoint.
–
Project Key - Specify the project key of the Bitbucket repository.
–
Repository - Specify the source control repository to bring the commit messages from. This should be the
repository that corresponds with the project in the build server that you configure to send notifications to this
application version.
Example: https://myBitbucket.mycompany.com/[organization]/[Repository]
–
Regular Expression - (Optional) Specify a regular expression with which to parse the commit comments for work
item IDs.
–
Include Path - (Optional) Specify one or more paths to map the packages and/or classes to include in test
coverage.
Syntax: app/src/java/**
–
Exclude Path - (Optional) Specify one or more paths to map the packages and/or classes to exclude from test
coverage.
Syntax: app/src/tests/**
When the source control connection is configured, the plug-in returns a list of commit IDs with the following information:
Note: The list of commit IDs is not visible in the user interface.
•
The commit message
•
The user who made the commit (author)
•
The files that have been changed
•
The time of the commit
Get Files
The Bitbucket plug-in lets you use Bitbucket as a file source so that releases are automatically created and run whenever
you make changes to the JSON file.
NOTE
To use this capability, first create a top-level folder in the relevant repository with the following name: CDD-
FileSource. Place all release-related JSON files in this folder.
NOTE
The CDD-FileSource folder does not apply if you use file sources to manage JSON files that reference other
JSON files.
36

Continuous Delivery Director Integrations 1.0
Follow these steps:
1. From RELEASES, select New File Source.
2. In CREATE FILE SOURCE, configure the following parameters, then select Create:
–
Name - Specify a name for the file source.
–
Select Source Control - Select BITBUCKET and Get Files.
–
Project Key - Specify the project key of the Bitbucket repository.
–
Repository - Specify the name of the Bitbucket repository to bring the files from.
–
Branch - Specify the branch name.
–
Releases Created On Behalf Of (API Key) - Specify the API key of a user on whose behalf future releases will be
created.
Example: The API key of the product owner.
–
Send Error Notifications To - Specify one or more recipients to receive error notifications.
3. Save your changes. A COPY WEBHOOK popup is displayed containing an auto-generated webhook. This webhook
supports the connection between Continuous Delivery Directorand Bitbucket. Copy this webhook and paste it into
Bitbucket.
The newly-created file source is added to the FILE SOURCES page.
NOTE
More Information
•
How to Set Up Webhooks in your Source Control
Atlassian JIRA Plug-in
Plug-in Version 2.4
Figure 10: Click the following icon to download the latest plug-in version:
The Jira plug-in integrates with the issue tracking and project management capabilities that Jira provides.
Supported Versions
The Jira plug-in supports the following Jira versions:
•
6.0
•
5.0
Capabilities
The Jira plug-in lets you perform the following tasks:
•
Import content from a Jira instance into an application version.
•
Update application content in Jira from a task in a release.
What's New
The following updates were made for plug-in version 2.4:
37

Continuous Delivery Director Integrations 1.0
•
You can now retrieve child issues together with parent issues in one API call if an embed parameter is present in the
request. Previously, you could only retrieve parent and child issues in separate API calls. Additionally, the getContent
API call is now asynchronous; previously, this API call was synchronized.
The following updates were made for plug-in version 2.3:
•
The following issue was resolved: Import Content Items failed with an IO Exception: Too many open files error. This
error was due the number of file descriptors that were opened exceeding the maximum number of open files permitted.
The following updates were made for plug-in version 1.2.3:
•
Support was added for Java 11.
Configuration
Register the plug-in and create endpoints as described in Manage Plug-ins.
The URL of the manifest for Jira plug-in registration is http://<plugin-server>:<port>/cdd-Jira-plugin/manifest.json.
To add an endpoint for the Jira plug-in, select the Jira Endpoint Type in the ADD ENDPOINT dialog. When you create
endpoints, the following Jira information is required:
•
Name
Specifies the name of the endpoint.
•
URL
Specifies the URL to access the Jira instance.
•
User Name
Specifies the user name to access the Jira instance.
•
Password
Specifies the password to access the Jira instance.
•
Use Proxy
{Optional} Determines whether a proxy server is used.
Note: If selected, the Proxy Host, Proxy Port, Proxy Username, Proxy Password, and Use HTTPS fields appear.
•
Proxy Host
Specifies the HostName or IP for the proxy server.
•
Proxy Port
Specifies the port for the proxy server.
•
Proxy Username
Specifies the user name for the proxy server.
•
Proxy Password
Specifies the password for the proxy server.
•
Use HTTPS
Specifies whether the Jira connection uses an SSL connection.
•
Time Out
Specifies the time to wait until the operation is complete before timing out, in seconds.
Tasks
The Jira plug-in lets you select one of the following task types:
Note: Each task type requires execution stage information.
TIP
For task fields where you can select a value from the Jira instance, type the @ symbol to receive a list of
available values to choose from.
38

Continuous Delivery Director Integrations 1.0
Add Jira Issues Comment
Required Fields:
Issue Key
Specifies the Jira project key that is used for the issue. This is usually the Jira project initials.
Comment
Specifies a comment to add to the specified Jira issue.
Role
Specifies the role that can view the comment. Roles belong to project issues. If null, the default value is all roles. If you
select Others, use the Other Role field to define a customized role.
Create Jira Issue
Required Fields:
Input Parameters
Jira Project Key
Specifies the Jira project key that is related to the issue. This is usually the Jira project initials.
Issue Type
Select one of the following issue types that is defined in the project to which the issue belongs:
•
Task
•
Sub-task
•
Story
•
Bug
•
Epic
Note: If you select Epic, specify the Epic name.
Epic Name
Specifies the associated epic name in the Jira agile boards. This input is only valid when you select Epic in the Issue Type
field.
Summary
Specifies a summary of the issue.
Priority
Specifies the priority level of the issue.
Due Date
Specifies the issue due date in the format YYYY-MM-DD.
Example: 2013-9-29
Show Advanced Settings
Displays the following additional fields:
Affects Versions
Specifies an array of affected versions separated by a semicolon. Each element is a version. Jira lets you track different
versions for software projects. You can assign issues to version that are configured in project administration.
Fix Versions
Specifies an array of versions separated by a semicolon. Each element is a version. Jira lets you track different versions
for software projects. You can assign issues to version that are configured in project administration.
Assignee
39

Continuous Delivery Director Integrations 1.0
Specifies the issue assignee. This field defaults to the current logon user. Use the user name used to log in instead of the
first name and last name values associated with the user.
Reporter
Specifies the issue reporter. This field defaults to the current logon user. Use the user name used to log in instead of the
first name and last name values associated with the user.
Environment
Specifies environment details relevant to the issue such as operating system, software platform, or hardware
specifications.
Description
Specifies the Jira issue description.
Labels
Specifies an array of issue labels separated by a semicolon. Each element is a label. Labels cannot contain spaces.
Custom Fields
Specifies a list of custom field names and values. The following Jira custom field types and JSON syntax are supported:
•
Text Field (single line)
Syntax: {"field_name":"textual_value"}
•
Select List (single choice)
Syntax: {"field_name":"choice_1"}
•
Checkboxes
Syntax: {"field_name":["check_1.","check_2"]}
•
Cascade field - A cascading select list with two levels of select lists. What you see in the second select list depends on
what you choose in the first select list.
Syntax: {"field_name":["Parent Value", "Child Value"]}. If you want to enter the parent value only, the
syntax is {"field_name":["Parent Value", ""]} (that is, no space between the double quotes).
Note: If a standard field and a custom field have identical field names, the merged field displays the custom field value.
Values: You can update multiple values in the following JSON syntax:
{"field1":"value1","field2":"value2"...}
Examples:
{"Links":"Reporter","Votes":"Watcher","Updated":"Remaining"} .
For Cascade: {"Task Type":["Tests","Run UI Test"]}
Output Parameters
Note: You can store the returned values in tokens (except for built-in tokens) for use in other release items.
Issue Key
Returns the key of the created issue.
Example: AP-51
Issue ID
Returns the ID of the created issue.
Self Link
Returns the URL of the created issue.
•
Update Jira Issue Status
Required Fields:
Issue Key
Specifies the key that is used for the Jira issue. This is usually the Jira project initials.
40

Continuous Delivery Director Integrations 1.0
Transition I would like to perform
Select from the following transitions:
•
Resolve Issue
•
Reopen
•
Closed
•
Start Progress
•
Stop Progress
•
Start Work
•
Stop Work
•
Define
•
Accept
•
Restart Work
•
Block
•
Complete
•
Verified
•
Assign
•
To Do
•
In Progress
•
Done
•
Others
Resolution
Specifies how the issue is resolved if you are resolving the issue. Select from an available resolution, or add custom
codes to the Jira default codes. In some workflows, this field is mandatory. Refer to your Jira workflow configuration.
Comment
Specifies a comment for a reopened issue. In some workflows, this field is mandatory. Refer to your Jira workflow
configuration.
Wait for Approval
The Wait for Approval task lets you determine that tasks are queued until the completion and approval of a specified
issue.
Required Fields:
Jira Issue ID
Specifies the ID of a Jira issue to be completed and approved before the next task starts.
Required Status
Specifies the required status for the selected Jira issue to reach before the next task starts.
Poll Interval
Specifies the length of time in seconds between system requests for the Jira issue status.
Default: 120 seconds
Import Work Items
The Jira plug-in uses the Jira Query Language (JQL), to import Jira work items into a release. Use this capability when
you deploy a release to see the related Jira issue information.
Follow these steps:
1. In a release, click the Work Items tab on the left menu.
2. Select Add Work Items.
41

Continuous Delivery Director Integrations 1.0
The ADD WORK ITEMS window opens.
3. Enter a name for the work items source.
Example: Jira Feed
4. Under Work Items Source, select the Jira plug-in and a configured Jira endpoint.
5. Provide information in the required parameter fields. You can import the following Jira metadata into a release by
entering a JQL query into the Query field:
–
Summary Example: summary = issue ID_123456
–
Type Example: type = bug and status = resolved
–
External Id Example: External issue ID ~ YourID_123456
–
Display Type Example: type = status = open
–
Status Example: status = open and priority = urgent and assignee = jsmith
Tutorial Video
The following video shows how to configure Continuous Delivery Director integration with Jira:
Automic
®
Continuous Delivery Automation Plug-in
Release automation is a key component of your continuous delivery pipeline. The Automic Continuous Delivery
Automation (CDA) plug-in enables you to apply core CDA deployment modeling (applications, environments, and so
on) and deployment capabilities.
Figure 11: To download the latest plug-in version, click the following icon:
This plug-in lets you start both Application and General workflows directly from the Continuous Delivery Director user
interface.
NOTE
This plug-in is available for both on-premise installations and SaaS (through a plug-in proxy).
Plug-in Version 4.0
Plug-in Version History
The following updates were made for plug-in version 4.0:
•
A new CDA plug-in was developed, replacing the previous CDA plug-in, with the following changes:
ATTENTION
The CDA Deployments Report is not yet compatible with the new plug-in as of November 2020. This issue
will be addressed shortly.
–
Import Application from CDA to Continuous Delivery Director
The previous plug-in imported a CDA application as a Continuous Delivery Director application. The new plug-in
imports a CDA component as a Continuous Delivery Director application.
NOTE
A Continuous Delivery Director application is equivalent to a CDA component and a Continuous Delivery
Director business application is equivalent to a CDA application.
–
Create Package
42

Continuous Delivery Director Integrations 1.0
In the CD pipeline, each component requires a separate build job, and the package must be created from the
artifacts created by all the build jobs.
The previous plug-in used Jenkins to create the package, meaning that if you wanted to create a CD pipeline, you
had to set up a separate package for each component.
The new plug-in can automatically create packages. If a build of any of the components is ready, the plug-in
automatically creates a package and runs the deployment.
–
Plug-in Downloads
The old plug-in was only available from the Automic Marketplace. Users can now download the new plug-in from
the Continuous Delivery Director home page.
Supported Versions
The CDA plug-in supports CDA 12.0 and above.
To learn more about CDA, see https://docs.automic.com/documentation
Capabilities
This plug-in lets you perform the following activities:
•
Import applications and environments from a CDA instance. You can include all CDA applications and their
environments in releases, phases, tasks, and reports.
•
Start a workflow in CDA from a task in a release.
Import CDA Applications and Environments
You can import applications and environments from your CDA endpoint to be used in the continuous delivery orchestration
pipeline.
NOTE
You must make any changes to the applications or environments directly within your CDA instance.
Continuous Delivery Director converts any imported CDA environments with the same name to a single shared
environment.
TIP
Import applications and environments from CDA before using this CDA plug-in.
For more information about application and environment model import, see Applications and Environments.
Workflows
In CDA, workflows are used to carry out physical deployments. A workflow describes all necessary steps for the
deployment of your application.
Workflows consist of a set of tasks or actions, which are organized in a combination of sequential and parallel execution
paths, which are combined with conditions, loops, pre-conditions, and post-conditions. Each action can run in parallel or
sequentially for one or multiple deployment targets within an environment.
In Continuous Delivery Director, after you configure CDA workflows using the CDA plug-in, you can execute workflows
at any time or schedule workflows to run at a specific time. You can monitor the executions to see how the workflows are
progressing. You can also take action to influence the execution process, such as rolling back to a specific task, when the
execution fails or gets delayed.
The CDA plug-in supports the following types of workflows:
43

Continuous Delivery Director Integrations 1.0
•
Application workflows. For more information, see Start Application Workflow.
•
General workflows. For more information, see Start General Workflow.
ATTENTION
Application workflows are stored in folders with the application (no separate access control), whereas general
workflows are stored in separate folders.
Configure a CDA Plug-in Endpoint
You are familiar with Automic Continuous Delivery Automation (CDA).
You have been granted the Can create endpoints permission.
1. Register the plug-in as described in Manage Plug-ins.
The manifest for the CDA plug-in is http://<host>:<port>/cdd-cda-plugin/manifest.json .
2. From the Administration menu, click Endpoints > Add Endpoint.
3. In the ADD ENDPOINT dialog, select the CDA plug-in.
4. Configure the following endpoint parameters:
•
CDA URL
Specify the URL to the required CDA instance.
•
Username/Password
Specify the credentials of a CDA user (client/name/department and password) with sufficient permissions to
execute a CDA application (the equivalent of a Continuous Delivery Director business application) deployment.
5. Click Test Connection to check the connection to CDA.
6. Click Add.
Start Application Workflow
This task lets you run an Automic Continuous Delivery Automation (CDA) application workflow in the context of
Continuous Delivery Director phases and releases.
One or more CDA endpoints are available.
Applications and environments have been imported from CDA.
Application workflows combine and orchestrate different component workflows for complete end-to-end application
deployment. You can use application workflows for installations, updates, and removal of one or more components that
are involved in deployment for a specific application. To provide a clear structure that is easier to build and to monitor,
application workflows are made up of two kinds of workflows:
•
Application deployment workflow
Defines the overall process of an application deployment by defining the components which are deployed.
An application workflow typically has only one main purpose, for example, installing a program, deploying an update,
or provisioning a new instance.
•
Component workflow
Orchestrates the deployment of an individual component (or parts of it) on one or more deployment targets within an
environment. Here you define the steps for the deployment of a single component of an application. You can regard
components as the building blocks for application deployment.
For example, a website may have frontend, backend, and database components. Each component should be
independent of the other components so that only those components that have been updated are deployed.
44

Continuous Delivery Director Integrations 1.0
This task creates a package upon build notification and uses the Continuous Delivery Director applications of the task as
the component names,
1. In a release, create an automatic task as described in Create Automatic Tasks.
2. Configure the following input parameters:
TIP
Values: Applies to the Application, Application Workflow, Package, and Deployment Profile properties.
To define a value, do one of the following actions:
•
To select from a list of possible values, type an at sign "@" in the field
Example: Deploy Tomcat
•
To select from a list of built-in tokens (reusable placeholders that are used to create generic workflows),
type a percent sign "%" in the field
•
Type free text
•
Enter a combination of free text and tokens
•
Application
Specify a CDA application name to execute an application workflow. You can find the application names in the
Applications pane if you imported the CDA deployment model and assigned the relevant applications to the
release.
•
Workflow
Specify the name of the application workflow to be executed.
•
Provide a Package
Specify an existing package to execute an application workflow. A package is an instance (a version, a revision, a
tag, and so on) of an application and defines the content to deploy.
NOTE
If you enter a package name, you cannot select the Create a Package? option.
•
Create a Package?
Select this option if you want to create a package to execute an application workflow. The following fields appear:
NOTE
If you select this option, you cannot specify a package name in Provide a Package.
–
Package Name Prefix
Specify a prefix for the package name. This plug-in appends the current timestamp to this prefix to generate a
unique name.
–
Package Type
Specify the package type, such as Deployment, Generic, and so on.
–
Artifacts
Specify the artifacts for the package in JSON format. An artifact is a version of a file to be deployed, located in
a specific repository. In a deployment package, an artifact is created for each component. For each component
specify the following:
•
Package Name Prefix
Specify a prefix for the package name. This plug-in appends the current timestamp to this prefix to generate a
unique name.
•
Package Type
Specify the package type, such as Deployment, Generic, and so on.
•
Artifacts
Specify the artifacts for the package in JSON format. For each component specify the following:
•
Component Name
45

Continuous Delivery Director Integrations 1.0
Component name to assign to package. Specified components must match applications added to this
task.
•
Artifact Source
Specify artifact source name from which to retrieve the artifact.
•
Artifact Name
Specify artifact name to include in the package.
JSON format:
{
"Artifacts": [
{
"Component Name": "{component name}",
"Artifact Source": "{artifact source}",
"Artifact Name": "{artifact name}"
}
]
}
Example:
{
"Artifacts": [
{
"Component Name": "Joe-Comp1",
"Artifact Source": "ArtifactSource",
"Artifact Name": "PetShop.war"
}
]
}
•
Deployment Profile
Specify a deployment profile to execute an application workflow. A deployment profile links an application to one
specific environment. Typically a profile is an intersection between the application components and the environment
deployment targets. The deployment profile is used during the deployment execution and defines the target
deployment location.
•
Installation Mode
Select one of the following options:
–
SkipExisting to only deploy the application on deployment targets where the package has not yet been
deployed.
–
OverwriteExisting to deploy the package on every deployment target and overwrite existing components.
•
Dynamic Property
(Optional). Specify a dynamic property to use as an input parameter for the workflow execution. Select a dynamic
property and a value to pass on.
•
Value
(Optional). If you have specified a dynamic property to be used as an input parameter for the workflow execution,
specify a value to pass on.
•
Additional Dynamic Properties
(Optional). Specify additional dynamic properties and values (in JSON format) to pass on.
•
Compensation Parameters
Define parameters for a compensation workflow to be executed if the CDA status of the main workflow is rejected,
revoked or canceled.
46

Continuous Delivery Director Integrations 1.0
–
Workflow
–
Dynamic Property
–
Value
–
Additional Dynamic Properties
3. Configure the following output parameters:
•
Package Name
Specify the package name that is created in CDA.
•
ExecutionID
Specify the ID of the execution.
•
RunID
Specify the run ID in the Automation Englne.
4. Click Create.
Start General Workflow
This task lets you run an Automic Continuous Delivery Automation general workflow in the context of Continuous Delivery
Director phases and releases.
One or more CDA endpoints are available.
Applications and environments have been imported from CDA.
General workflows are available as an option for more generic tasks (as the name implies), such as a single starting
point for larger-scale process automation, maintenance tasks, or for any action that does not require access to the CDA
object model. General workflows are used for generic CDA processes only (such as checking an internal CDA resource).
Typically, any actions outside of deployment are executed here.
General workflows are most often used for the orchestration of multiple application deployments alongside other tasks,
or for user-triggered maintenance tasks. General workflows do not belong to any CDA application (equivalent to a
Continuous Delivery Director business application).
This task lets you orchestrate core CDA activities at a high level. For example, a Continuous Delivery Director release
might include multiple applications that you can deploy through the CDA deployment model.
1. In a release, create an automatic task as described in Create Automatic Tasks.
2. Configure the following input parameters:
TIP
Values: Applies to the Application, Application Workflow, Package, and Deployment Profile properties.
To define a value, do one of the following actions:
•
To select from a list of possible values, type an at sign "@" in the field
Example: Deploy Tomcat
•
To select from a list of built-in tokens (reusable placeholders that are used to create generic workflows),
type a percent sign "%" in the field
•
Type free text
•
Enter a combination of free text and tokens
•
Workflow
Specify the name of the general workflow to be executed.
•
Dynamic Property
47

Continuous Delivery Director Integrations 1.0
(Optional). Specify a dynamic property to use as an input parameter for the workflow execution. Select a dynamic
property and a value to pass on.
•
Value
(Optional). If you have specified a dynamic property to be used as an input parameter for the workflow execution,
specify a value to pass on.
To define a value, perform one of the following actions:
–
To select from a list of possible values, type an at sign "@"
–
To select from a list of built-in tokens (reusable placeholders that are used to create generic workflows), type a
percent sign "%"
–
Type free text
–
Enter a combination of free text and tokens
•
Additional Dynamic Properties
(Optional). Specify additional dynamic properties and values (in JSON format) to pass on.
•
Compensation Parameters
Define parameters for a compensation workflow to be executed if the CDA status of the main workflow is rejected,
revoked or canceled.
–
Workflow
–
Dynamic Property
–
Value
–
Additional Dynamic Properties
3. Configure the following output parameters:
•
ExecutionID
Specify the ID of the execution.
•
RunID
Specify the run ID in the Automation Englne.
4. Click Create.
AWS CodeDeploy Plug-in
Plug-in Version 1.2
Figure 12: Click the following icon to download the latest plug-in version:
The AWS CodeDeploy plug-in lets you deploy to AWS cloud environments from a GitHub repository.
The task progress is displayed during execution. To stop the execution, click Stop Task. Error details, including a list of
failed instances, are displayed.
Supported Versions
The AWS CodeDeploy plug-in supports the core AWS CodeDeploy SaaS solution.
For more information, see the AWS CodeDeploy documentation at https://aws.amazon.com/documentation/codedeploy/
48

Continuous Delivery Director Integrations 1.0
What's New
The following updates were made for plug-in version 1.2:
•
Support was added for Java 11.
Configuration
Register the plug-in and create endpoints as described Manage Plug-ins.
Manifest URL
For plug-in registration, use the following AWS CodeDeploy manifest URL:
http://<plugin-server>:<port>/cdd-AwsCodeDeploy-plugin/manifest.json
Endpoint Parameters
The following input parameters are required to create an endpoint:
•
Name
Specifies the name of the endpoint
•
Region
Specifies the AWS region
Example: eu-west-1
•
Access Key ID
Specifies the Access Key ID that is used to access the AWS CodeDeploy instance
•
Secret Access Key
Specifies the secret access key that is used to access the AWS CodeDeploy instance
•
Source
Specifies the application source type
Example: GitHub
•
GitHub Repository Owner
Specifies the name of the GitHub repository owner
•
GitHub Repository
Specifies the name of the GitHub repository
Example: RepositoryName
•
GitHub User Name
(Optional) Specifies the GitHub user name
•
GitHub Password
(Optional) Specifies the password for the GitHub user
To check the connection to AWS CodeDeploy and to GitHub, use the endpoint Test Connection option. The Test
Connection option returns the following results:
•
Success
Both connections were successful
•
Failure
One or more connections failed
Tasks
The following task types are available in the AWS CodeDeploy plug-in:
49

Continuous Delivery Director Integrations 1.0
Create Deployment
The Create Deployment task requires the following fields:
Input Parameters
•
Application
Specifies the name of the application as the application appears in your AWS account in the endpoint region
•
Deployment Group
Specifies the name of the deployment group that is a member of the application
Note: If you do not have a deployment group that is configured, first create a deployment group in AWS.
•
Deployment Configuration
(Optional) Specifies the name of a deployment configuration that is associated with the applicable IAM user or AWS
account
Default: The value that is configured in the deployment group
•
Commit ID
(Optional) Specifies the SHA1 commit ID of the GitHub commit that represents the bundled artifacts for the application
revision
Default: The head of the master branch
Values: Free text, or a combination of text and tokens
Note: For a list of available AWS CodeDeploy tokens, enter the percent sign (%).
•
Description
(Optional) Specifies a description of the deployment
AWS Elastic Beanstalk Plug-in
The AWS Elastic Beanstalk plug-in lets you deploy web applications from Amazon S3 cloud storage to AWS Elastic
Beanstalk application container environments.
Plug-in Version 2.1
Figure 13: Click the following icon to download the latest plug-in version:
NOTE
You can deploy web applications that are packaged in a web application archive (WAR) file.
Supported Versions
The AWS Elastic Beanstalk plug-in supports the core AWS Elastic Beanstalk SaaS solution.
For more information, see the AWS Elastic Beanstalk documentation at https://docs.aws.amazon.com/console/quickstarts
/
What's New
The following updates were made for plug-in version 2.1:
•
Support was added for Java 11.
Configuration
Register the plug-in and create endpoints as described in Manage Plug-ins.
50

Continuous Delivery Director Integrations 1.0
Manifest URL
For plug-in registration, use the following AWS Elastic Beanstalk manifest URL:
http://<plugin-server>:<port>/cdd-awselasticbeanstalk-plugin/manifest.json
Endpoint Parameters
The following parameters are required to create an endpoint:
•
Access Key ID
Specifies the AWS Access Key ID that provides permission to access the AWS Elastic Beanstalk instance
Example: AKIAIOSFODNN7EXAMPLE
•
Secret Access Key
Specifies the AWS secret access key that is used to access the AWS Elastic Beanstalk instance
Example: wJalrXUtnFEMI/K7MDENG/bPxRfiCYEXAMPLEKEY
•
AWS Region
Specifies the AWS region
Example: eu-west-1
•
Source
Specifies the source type
Example: S3
•
S3 Bucket
Specifies the name of the Amazon S3 bucket that is used to cache your source archives
To check the connection to AWS Elastic Beanstalk and to Amazon S3, use the endpoint Test Connection option. The
Test Connection option returns the following results:
•
Success
Both connections were successful
•
Failure
One or more connections failed
Tasks
The following task types are available in the AWS Elastic Beanstalk Plug-in:
Deploy
The Deploy task contains the following fields:
Input Parameters
•
Application Name
Specifies the logical name of the application as the name appears in your Amazon S3 account
Values: Free text, or a combination of text and tokens
Note: For a list of available values, enter the commercial at sign (@). For a list of available tokens, enter the
percent sign (%)
•
Environment Name
Specifies the name of the AWS Elastic Beanstalk environment to update
Values: Free text, or a combination of text and tokens
Note: For a list of available values, enter the commercial at sign (@). For a list of available tokens, enter the percent
sign (%)
Example: Tomcat 8
•
S3 Key
51

Continuous Delivery Director Integrations 1.0
Specifies the WAR file name or a folder name as these items appear in your Amazon S3 account
•
Values: Free text, or a combination of text and tokens
Note: For a list of available tokens, enter the percent sign (%)
•
Build Number
Specifies the build number that is associated with the selected WAR file
Values: Free text, or a combination of text and tokens
Note: For a list of available tokens, enter the percent sign (%)
•
Description
(Optional) Specifies a description of the deployment
Output Parameters
•
Application URLSpecifies the URL of the deployed application
Values: Free text or a combination of text and tokens
Note: For a list of available tokens, enter the percent sign (%).
Tutorial Videos
Configuration
The following video shows how to configure Continuous Delivery Director integration with AWS Elastic Beanstalk:
Azure DevOps Server Plug-in
Plug-in Version 1.1.1
Figure 14: Click the following icon to download the latest plug-in version:
This plug-in synchronizes work items between Azure DevOps Server (formerly Team Foundation Server (TFS) and Visual
Studio Team System (VSTS) and Continuous Delivery Director. This integration allows Azure DevOps Server to be used
as any other content source for a release in Continuous Delivery Director.
Content synced includes features, epics, code review requests, tasks, test cases, and bugs. You can also import content
into Continuous Delivery Director from Azure DevOps Server.
Supported Versions
The TFS plug-in supports TFS 2017, TFS 2018, Azure DevOps Server 2019 and above, Azure DevOps Services (Cloud).
To learn more about Azure DevOps Server, see https://azure.microsoft.com/en-us/services/devops/server/
Capabilities
The Azure DevOps Server supports the following capabilities:
•
Release Tasks
52

Continuous Delivery Director Integrations 1.0
–
Run Build
–
Create Work Item
–
Update Work Item
–
Wait for Approval
•
Get Files
•
Import Work Items
Change History
The following updates were made for plug-in version 1.1.1:
•
This plug-in was renamed to the Azure DevOps Server plug-in to allowing with the vendor (Microsoft) name change
decision. Formerly, this plug-in was named the Microsoft Team Foundation Server plug-in.
The following updates were made for plug-in version 1.1:
•
You can now use TFS/VSTS as a file source so that releases are automatically created and run whenever you make
changes to the JSON file.
•
A new endpoint parameter has been added, TFS Version.
The following updates were made for plug-in version 1.0.3:
•
Support was added for Java 11.
Configure an Azure DevOps Server Endpoint
Enable communication and synchronization of assets between Azure DevOps Server and Continuous Delivery Director.
You are familiar with Azure DevOps Server (formerly Team Foundation Server (TFS) and Visual Studio Team System
(VSTS).
You have been granted the Can create endpoints permission.
1. Register the plug-in as described in Manage Plug-ins.
The manifest for the Azure DevOps Server plug-in is http://<host>:<port>/cdd-tfs-plugin/
manifest.json .
2. From the Administration menu, click Endpoints > Add Endpoint.
3. In the ADD ENDPOINT dialog, select the Azure DevOps Server plug-in.
4. Configure the following endpoint parameters:
•
URL
Enter the URL of your Azure DevOps Server machine or Azure DevOps Services instance.
•
Collection
Enter the name of your team project collection (a group of team projects).
•
Authentication Type
Select one of the following methods to authenticate to the TFS service:
–
Personal Access Token
–
NTLM
For Personal Access Token
–
Azure DevOps Server Username
Enter the user name to authenticate to the Azure DevOps Server service.
–
Personal Access Token
Enter your personal access token to authenticate to the TFS service.
53

Continuous Delivery Director Integrations 1.0
For NTLM
–
Azure DevOps Server Username
Enter the user name to authenticate to the Azure DevOps Server service.
–
Azure DevOps Server Password
Enter your password to authenticate to the Azure DevOps Server service.
–
Domain
Enter the Azure DevOps Server domain.
Example: ca.com
•
Version
Select an option:
–
(Default) TFS 2018 Update 3
5. Click Test Connection to check the connection to Playwright.
6. Click Add.
Import Work Items (Azure DevOps Server)
The Azure DevOps Server plug-in lets you sync work items between Azure DevOps Server and Continuous Delivery
Director releases. Use this capability when you create a release to see the related Azure DevOps Server information.
You have configured an endpoint between Azure DevOps Server and Continuous Delivery Director as described in
Configure an Azure DevOps Server Endpoint.
You can also connect applications to Azure DevOps Server to see which work items are being developed and entering
your release pipeline on every notification arrival from your build server. To set up this configuration, follow the instructions
in Set Work Items Connection.
1. In a release, click the Work Items tab on the left menu.
2. Select Add Work Items.
The ADD WORK ITEMS window opens.
3. Select External Items.
4. Enter a name for the work items source.
Azure Feed
5. Under Work Items Source, select the Azure DevOps Server plug-in and a configured Azure DevOps Server
endpoint.
6. In Import Using, select either Filter or WIQL. WIQL lets you write queries in Work Item Query Language to import
content.
7. Provide information in the required parameter fields. These fields let you build a query that searches Azure DevOps
Server for work items that match the specified criteria.
WIQL
•
Query
Specify a WIQL query to import work items. For example:
SELECT [System.ID],[System.WorkItemType],[System.Title],[System.State]
FROM WorkItems
WHERE [System.TeamProject] = 'TFS Demo'
Filter
Use the following fields to filter the work item import results:
54

Continuous Delivery Director Integrations 1.0
TIP
Values: To select from a list of possible values, type an at sign "@" in the field. You cannot combine values
with free text or tokens. Applies to all fields except Work Item Tags.
•
Team Project
Specify the name of the Azure DevOps Server team project that contains the content you want to import. Type an
at sign "@" to select from a list of team projects in the Azure DevOps Server endpoint. Type the at sign "@" in other
fields to select from a dynamic list of entities that are associated with the selected team project.
Values: An alphanumeric string.
–
Must not contain any Unicode control characters or surrogate characters
–
Must not contain the following characters: / : \ ~ & % ; @ ' " ? < > | # $ * } { , + = [ ]
–
Must not start with an underscore (_)
–
Must not start or end with a period (.)
•
Area Path
Specify the area path that is defined for the team project.
•
Iteration Path
Specify the iteration path that is defined for the team project.
•
Work Item Type
Specify the type of work item that you want to import.
•
Work Item State
Specify the work item states to import. This field lets you filter what is imported based on the state.
Example: Import only work items that are in the Done state.
•
Work Item Tags
Specify the work item tags stored in Azure DevOps Server. This field lets you filter what work items are imported as
long as the items contain at least one specified tag.
8. Select Create.
The content source is saved and a list of the returned work items is displayed under the application in the left menu.
These work items are now available to assign to tasks in phases to associate with the release.
Get Files (Azure DevOps Server)
Use Azure DevOps Server as a file source so that releases are automatically created and run whenever you make
changes to a JSON file in source control.
•
You have configured an endpoint between Azure DevOps Server and Continuous Delivery Director as described in
Configure an Azure DevOps Server Endpoint.
•
You have created a top-level folder in the relevant repository in Azure DevOps Server with the following name: CDD-
FileSource and placed all release-related JSON files in this folder.
1. Do one of the following:
•
From RELEASES, click File Source, then New File Source.
•
From the Administration menu, click File Sources, then New File Source.
2. In CREATE FILE SOURCE, configure the following parameters:
•
Name
Enter a name for the file source.
•
Select Source Control
55

Continuous Delivery Director Integrations 1.0
Select Azure Devops Server and Get Files.
•
Select Endpoint
•
SCM Type
Select either Git or TFVC, according to the source control management system used in Azure Devops Server.
•
Project
Specify a Azure Devops Server project name or ID.
•
Repository
Specify the name of the Azure Devops Server repository from which to import the files.
•
Branch
Specify a branch used by the specified project. To allow processing of webhook notifications from all repository
branches, keep this field empty.
•
Releases Created On Behalf Of (API Key)
Specify the API key of a user on whose behalf future releases will be created. For example, the API key of the
product owner.
•
Send Error Notifications To
Specify one or more recipients to receive error notifications.
3. Click Create.
A COPY WEBHOOK popup is displayed containing an auto-generated webhook.
4. Copy this webhook and paste it into Azure Devops Server.
The newly-created file source is added to the FILE SOURCES page.
NOTE
For more information, seeHow to Set Up Webhooks in your Source Control.
Run Build (Azure DevOps Server)
Run Azure DevOps Server project builds in the context of Continuous Delivery Director phases and releases.
One or more Azure DevOps Server endpoints are available.
1. In a release, create an automatic task as described in Create Automatic Tasks.
2. Configure the following parameters:
TIP
Values: To define a value, do one of the following actions:
•
To select from a list of possible values, type an at sign "@" in the field
Example: Deploy Tomcat
•
To select from a list of built-in tokens (reusable placeholders that are used to create generic workflows),
type a percent sign "%" in the field
•
Type free text
•
Enter a combination of free text and tokens
Input Parameters
•
Project Name
Specify the name of an Azure DevOps Server team project.
•
Build Definition Name
Specify the name of an Azure DevOps Server build definition related to the specified project.
•
Ignore Warnings
56

Continuous Delivery Director Integrations 1.0
Determine whether warnings are suppressed at the build level.
•
Agent Queue
Specify the agent queue used by the specified build definition.
•
Branch
Specify the version control branch used by the project.
•
Parameters
Specify the parameters for an Azure DevOps Server parametrized build to pass to the specified build configuration.
Define the parameters in JSON format. Syntax:
{“param1”:”value”, “param2”:”value” }
Output Parameters
•
Build Number
Returns the ID of the build that was run.
•
Build Result
Returns the status of the build that was run.
•
Source Version
Returns a link to the change-set of the build.
3. Click Create.
Create Work Item (Azure DevOps Server)
Create a work item and return the work item ID for future use.
One or more Azure DevOps Server endpoints are available.
1. In a release, create an automatic task as described in Create Automatic Tasks.
2. Configure the following parameters:
TIP
Values: To define a value, do one of the following actions:
•
To select from a list of possible values, type an at sign "@" in the field
Example: Deploy Tomcat
•
To select from a list of built-in tokens (reusable placeholders that are used to create generic workflows),
type a percent sign "%" in the field
•
Type free text
•
Enter a combination of free text and tokens
Input Parameters
•
Team Project
Specify the name of an Azure DevOps Server team project where you want to create the work item.
•
Work Item Type
Specify the type of work item that you want to create.
NOTE
(For Azure DevOps Services) Enter a valid Azure DevOps Services work item type. This field is case-
sensitive.
•
Work Item Title
Specify the name of the work item that you want to create.
•
Work Item Tags
57

Continuous Delivery Director Integrations 1.0
Specify the work item tags to be added to the work item that you want to create. Use simple text and separate
multiple tags with commas. Syntax: tag1, tag2, ...
•
Additional Fields
Specify one or more "field name":"value" pairs. You can update multiple fields using the following format:
{"field1":"value1","field2":"value2"…}. You can use this parameter for both standard and custom fields. For
example, {"System.Description": "Follow the code samples from MSDN"}
Output Parameters
•
Work Item ID
Specifies the ID of the newly-created work item.
3. Click Create.
Update Work Item (Azure DevOps Server)
Update an existing work item with customized fields.
One or more Azure DevOps Server endpoints are available.
1. In a release, create an automatic task as described in Create Automatic Tasks.
2. Configure the following parameters:
TIP
Values: To define a value, do one of the following actions:
•
To select from a list of possible values, type an at sign "@" in the field
Example: Deploy Tomcat
•
To select from a list of built-in tokens (reusable placeholders that are used to create generic workflows),
type a percent sign "%" in the field
•
Type free text
•
Enter a combination of free text and tokens
Input Parameters
•
Work Item IDs
Specify one or more IDs of work items to update. Separate multiple IDs with commas.
NOTE
The fields to update must be common to all work items you list here.
•
Fields to Update
Specify one or more "field name":"value" pairs. You can update multiple fields using the following format:
{"field1":"value1","field2":"value2"…}. You can use this parameter for both standard and custom fields. For example:
{"System.Description": "Follow the code samples from MSDN"}
3. Click Create.
Wait for Approval (Azure DevOps Server)
Determine what tasks are queued until the completion and approval of a specified work item.
58

Continuous Delivery Director Integrations 1.0
One or more Azure DevOps Server endpoints are available.
1. In a release, create an automatic task as described in Create Automatic Tasks.
2. Configure the following parameters:
TIP
Values: To define a value, do one of the following actions:
•
To select from a list of possible values, type an at sign "@" in the field
Example: Deploy Tomcat
•
To select from a list of built-in tokens (reusable placeholders that are used to create generic workflows),
type a percent sign "%" in the field
•
Type free text
•
Enter a combination of free text and tokens
Input Parameters
•
Work Item ID
Specify the ID of a work item to be completed and approved before the next task starts.Note: (For VSTS) Enter a
valid VSTS work item type. This field is case-sensitive.
NOTE
(For Azure DevOps Services): Enter a valid Azure DevOps Services work item type. This field is case-
sensitive.
•
Required State
Specify the required state for the selected work item to reach before the next task starts.
•
Poll Interval
Specify the length of time in seconds between system requests for the work item state. Default: 120 seconds
3. Click Create.
BlazeMeter
®
Plug-in
The BlazeMeter plug-in lets you run load and performance tests as part of your releases. This plug-in also lets you import
test suites from BlazeMeter to run Adaptive Testing tasks.
Plug-in Version 3.7
Figure 15: To download the latest plug-in version, click the following icon:
This plug-in automatically registers the BlazeMeter load testing capabilities with Continuous Delivery Director.
Watch the following video for a summary of how Continuous Delivery Director works with the BlazeMeter plug-in:
Supported Versions
The BlazeMeter plug-in supports the core BlazeMeter SaaS solution.
For more information, see the BlazeMeter documentation at https://guide.blazemeter.com/
59

Continuous Delivery Director Integrations 1.0
What's New
The following update was made for plug-in version 3.7:
•
A new execution parameter, Enable JMeter Parameters, was added to the Get Test Assets (import tests/test
suites) function in the Adaptive Testing Catalog. This parameter lets you import BlazeMeter tests with the taurus
configuration type with a JMeter executor.
•
Thecdd_BlazeMeter_plugin.log file was renamed as cdd-blazemeter-plugin.log.
The following updates were made for plug-in version 3.6:
•
Four optional filter fields were added to the Get Test Assets (import tests/test suites) function in the Adaptive Testing
Catalog:
–
Test Configuration Type
–
Test Execution Type
–
Test Script Type
–
Test Executor Type
These filters are available for the Test option only and are not applicable to the Multi Test option.
•
Users can now view a BlazeMeter report without logging in to BlazeMeter.
•
A new dynamic endpoint parameter, Use Proxy, was added. This parameter determines whether to use a proxy
server.
•
Support was added for the enhanced API key authentication. To support this enhancement, two new parameters were
added to the Authentication Type field, API Key ID and API Key Secret.
The following updates were made for plug-in version 3.1:
•
Support for the test advisor was enhanced. This plug-in can now recognize new and updated test suites.
The following updates were made for plug-in version 2.3:
•
Support was added for Java 11.
Configuration
Register the plug-in and create endpoints as described in Manage Plug-ins.
Manifest URL
For plug-in registration, use the following BlazeMeter manifest URL:
http://<plugin-server>:<port>/cdd-blazemeter-plugin/manifest.json
Endpoint Parameters
The following parameters are required to create an endpoint:
•
Name
Specify the name of the endpoint.
•
URL
Specify the URL that is used to access the BlazeMeter instance.
Default: https://a.blazemeter.com
•
Authentication Type
Select one of the following methods to authenticate to the BlazeMeter service:
NOTE
For more information on API keys, see the BlazeMeter documentation.
–
Legacy
–
Advanced
60

Continuous Delivery Director Integrations 1.0
For Legacy only
–
API Key
Specify the unique identifier for the BlazeMeter user.
Values: A string of alphanumeric characters.
For Advanced only
–
API Key ID
Specify the enhanced BlazeMeter API Key ID.
–
API Key Secret
Specify the enhanced BlazeMeter API Key Secret.
•
Use Proxy
{Optional} Determines whether a proxy server is used
Note: If selected, the Proxy Server URL, Proxy Server Username, and Proxy Server Password fields appear.
–
Proxy Server URL
Specify the web address that is used to access the proxy server
–
Proxy Server Username
{Optional} Specify the username that is used to authenticate to the proxy server
–
Proxy Server Password
{Optional} Specify the password that is used to authenticate to the proxy server
Test Failure Criteria
You can define test failure criteria in BlazeMeter to set your test pass / fail criteria for various metrics, such as response
times, errors, hits/s, test duration, and so on.
If test failure criteria have been defined in BlazeMeter, Continuous Delivery Director will show test pass/fail results of
BlazeMeter tests. If test failure criteria have not been defined in BlazeMeter, Continuous Delivery Director will always
show the tests as passed. In BlazeMeter, the test results appear as not set.
Tasks
The following task types are available in the BlazeMeter plug-in:
TIP
To select from a list of available BlazeMeter Values, enter the commercial At symbol (@) in the task field.
Run Test
The Run Test task requires the following fields:
•
Workspace
Specify the name of the workspace to which the test creator belongs
•
Project
Specify the project where the test is defined
•
Test
Specify the test to run
Run Collection
The Run Collection task requires the following fields:
•
Workspace
Specify the name of the workspace to which the test collection belongs
•
Project
61

Continuous Delivery Director Integrations 1.0
Specify the project where the test is defined
•
Collection
Specify the test collection to run
Get Test Assets
This plug-in lets you import test suites into the Adaptive Testing Catalog.
Follow these steps:
1. Select Tests, then Adaptive Testing Catalog.
2. Specify the Application and the Application Version. The menu next to the application name and version is
activated.
3. Select Get Test Assets.
4. Fill in the following fields:
–
Test Source Name
–
Plug-in
Select BlazeMeter and Import Test Suites.
–
Endpoint
Select a BlazeMeter endpoint.
–
Workspace Name
Specify the name of the BlazeMeter workspace where the test suites you want to import are located.
–
Project Name
Specify the name of the BlazeMeter project where the test suites you want to import are located. If left empty, test
suites will be imported from all sub-projects.
–
Type
Select either Test to import a specific test suite or Multi Test to import multiple test suites. If you select Test, the
following filters appear:
•
Test Configuration Type.
Possible Values: "external", "externalFunctionalMobile", "followme", "functionalApi", "functionalGui", "http",
"jmeter", "taurus", "webdriver"
•
Test Execution Type
Possible Values: "blazemeterImage", "taurusCloud"
•
Test Script Type
Possible Values: "jmeter", "selenium", "taurus"
•
Test Executor Type
Possible Values: "gatling", "grinder", "jmeter", "locust", "newman", "pbench", "selenium", "siege", "taurus",
"tsung"
–
Is Public Report
Select this option to enable users to access a link to the test report without logging in to BlazeMeter.
–
Enable JMeter Parameters
Select this option to enable the Jmeter Parameters text box.
NOTE
This option is applicable for BlazeMeter tests with thetaurus configuration type with a JMeter executor.
•
Specify a JSON array of "key"/"value" pairs. On execution, the BlazeMeter test source sets the JMeter properties
of all taurus tests with a JMeter executor to this JSON array.
–
Tags
Select one or more tags to execute test suites tagged with your selection. Leave empty to execute all the test suites
under the application version.
Example: Type bl to retrieve all test suites tagged with labels beginning with bl, such as blazemeter.sanity.test
62

Continuous Delivery Director Integrations 1.0
Cucumber for Java Plug-in
This plug-in lets you easily add Cucumber Java-based features as test suites to your release pipeline.
Plug-in Version 1.4.1
This plug-in integrates with Cucumber-JVM, a pure Java implementation of Cucumber. The Cucumber for Java plug-in
is containerized and supports Adaptive Testing functionality. You can import features from Cucumber-JVM to run as test
suites within release pipelines. This plug-in provides you with a Cucumber test automation framework for Java-based Git
and SVN builds that is open-source and application-independent.
Download the latest plug-in version
This plug-in is available as a Docker image on the customer support portal which has specific requisites and installation
steps:
The plug-in is also available as a tar file on the customer support portal for customers who cannot use docker pull .
Figure 16: To download the latest plug-in version, click the following icon:
What's New
The following updates were made for plug-in version 1.4.1:
•
A new execution parameter, Custom Reports, has been added to the Get Test Assets task, with the following
options, Default, Maven Cucumber Reporting, and Cluecumber. This field lets you store and present custom
cucumber reports based on the project pom.xml settings.
The following updates were made for plug-in version 1.3.2:
•
Support was added for importing Cucumber JVM repositories with multiple projects. To support this enhancement, two
new import parameters have been added to the Get Test Assets task: Settings File Path and Update Snapshots.
The following updates were made for plug-in version 1.3.1:
•
Bugfix: A missing Maven POM file error was invoked when trying to import from a subfolder.
The following updates were made for plug-in version 1.3:
•
Two new parameters, Settings File Path, and Update Snapshots were added to the Run Adaptive Testing task.
•
Bugfix: Import test suites failed, because of missing Two new parameters, Settings File Path, and Update Snapshots
were added to the Run Adaptive Testing task.
The following updates were made for plug-in version 1.2:
•
A new parameter, Cucumber Tags was added to the Run Adaptive Testing task.
The following updates were made for plug-in version 1.1:
•
Support was added for missing values in 1.x report.
63

Continuous Delivery Director Integrations 1.0
Prerequisites
•
A Linux machine is provisioned with Docker Engine installed and an OS user has been created whose UID/GID are
1010/1010 and a home folder created at /home/cdd/. For more information, see Set Up Containerized Plug-ins.
•
The docker remote API port (4550) is open. For more information, see Set Up Containerized Plug-ins.
•
A Tomcat 8.5 server is installed with the containerized-manager plug-in deployed.
•
The Tomcat server is owned and run by an OS user whose UID/GID are 1010/1010 .
•
You are working with JVM (Java Virtual Machine) 8 or 11.
Set Up the Cucumber Plug-in
1. Connect to support.broadcom.com with your Broadcom support account and continue to https://
support.broadcom.com/enterprise-software/download-center.
2. Select either Continuous Delivery Director or Continuous Delivery Director SaaS and click the Docker button.
Follow the on-screen instructions to pull the image to your localhost.
3. In the settings.properties file under /home/cdd/.cdd/conf/, add the following lines:
cdd.plugins.containerized.cucumberjvm.container.image_name=cdd.packages.ca.com/com/ca/cdd/v720/7.2/
plugins/cucumber:51
cdd.plugins.containerized.cucumberjvm.container.volumes.artifacts.volumes=dependencies:/home/cdd/.m2
4. Restart the containerized-manager service.
5. Register the new plug-in using the following manifest URL: http://<plugin-server>:<port>/
containerized/plugins/cdd-cucumberjvm-plugin/manifest.json.
Configure the Cucumber Plug-in
You configure the Cucumber plug-in either for the initial setup, or whenever a change to the test build configuration is
required.
Endpoint Parameters
The following parameters are required to create an endpoint:
•
Build Tool
Specify the tool used to manage your project builds.
•
Version Control System
Specifies the version control system where your source project resides.
•
Git/SVN Project URL
Specify the URL to access the Git or SVN project repository.
•
Git/SVN Username
Specify the user name to access GitHub or SVN
•
Git/SVN Password
Specify the password to access GitHub or SVN
To check the connection to Cucumber and to the version control system, select Test Connection. The Test Connection
action returns the following results:
•
Success
The connection was successful
•
Failure
The connection failed
64

Continuous Delivery Director Integrations 1.0
Tasks
The Cucumber plug-in supports the Run Adaptive Testing task type.
Prerequisites:
•
One or more application versions are specified.
•
One or more Cucumber test suites exist for the application versions specified.
Branch
Specify the branch name.
Features Folder
Specify the relative path of the folder where the required features are located. The specified folder path must be relative to
the project base directory.
Glue
Specify the glue for the features.
Cucumber Tags
(Optional) Specify a list of cucumber tags.
Example:
(@Demo or @Sanity) and not @Ignore
Settings File Path
(Optional) Specify an alternate path for the user settings.xml file.
Update Snapshots
(Optional) Select to force a check for missing releases and updated snapshots on remote repositories.
JVM Parameters
(Optional) Specify space-separated JVM parameters to customize individual instances.
Example: \"-Dtest.HOST=google.com\" - Overrides the IP address or hostname of URL used by the browser to
execute tests. To enable detailed error and debug logs, add switches such as -X and -e.
Get Test Assets (Cucumber for Java)
This plug-in lets you import test suites into the Adaptive Testing Catalog.
1. Select Tests, then Adaptive Testing Catalog.
2. Specify the Application and the Application Version. The menu next to the application name and version is
activated.
3. Select Get Test Assets.
4. Fill in the following fields:
NOTE
Use the @ symbol in the following fields to select from a dynamic list of entities associated with the selected
project.
•
Test Source Name
•
Plug-in
65

Continuous Delivery Director Integrations 1.0
Select Cucumber JVM and Import Tests (Cucumber JVM).
•
Endpoint
Select a Cucumber JVM endpoint.
•
Project Base Directory
Specify the relative path to the project base directory. This is the location of the project pom.xml. Default is . which
is the project root folder.
•
Branch
Specify the branch name.
•
Features Folder
Specify the relative path of the folder where the required features are located. Features are the equivalent of test
suites. The specified folder path must be relative to the project base directory.
•
Glue
Specify the glue for the features.
•
Cucumber Tags
(Optional) Specify a list of cucumber tags.
Example:
(@Demo or @Sanity) and not @Ignore
•
Settings File Path
(Optional) Specify an alternate path for the user settings.xml file.
•
Update Snapshots
(Optional) Select this option to force a check for missing releases and updated snapshots on remote repositories.
•
JVM Parameters
(Optional) Specify space-separated JVM parameters to customize individual instances.
Example: \"-Dtest.HOST=google.com\" - Overrides the IP address or hostname of URL used by the browser
to execute tests. To enable detailed error and debug logs, add switches such as -X and -e.
•
Tags
Select or create one or more tags to label the imported tests.
The test results for the specified build appear on the Adaptive Testing Results page, together with links to the
associated reports in Cucumber JVM.
Cucumber for Ruby Plug-in
This plug-in lets you easily trigger Cucumber acceptance tests automatically from your releases.
Cucumber is a popular tool that developers use for testing software. Cucumber executes test specifications written in a
human-readable language called Gherkin and produces reports indicating whether the software behaves according to the
specification.
The Cucumber plug-in is containerized and supports Adaptive Testing functionality. This plug-in provides you with a
Cucumber test automation framework for Git builds that is open-source and application-independent.
Prerequisites
•
A Linux machine is provisioned with Docker Engine installed and an OS user has been created whose UID/GID are
1010/1010 and a home folder created at /home/cdd/. For more information, see Set Up Containerized Plug-ins.
•
The docker remote API port (4550) is open. For more information, see Set Up Containerized Plug-ins.
•
A Tomcat 8.5 server is installed with the containerized-manager plug-in deployed.
•
The Tomcat server is owned and run by an OS user whose UID/GID are 1010/1010 .
66

Continuous Delivery Director Integrations 1.0
This plug-in is available as a Docker image on the customer support portal which has specific requisites and installation
steps.
The plug-in is also available as a tar file on the customer support portal for customers who cannot use docker pull .
Figure 17: To download the latest plug-in version, click the following icon:
What's New
The following updates were made for plug-in version 1.4:
•
The plug-in name was changed to Cucumber for Ruby. This plug-in supersedes the previous Cucumber plug-in.
•
This plug-in now executes all the test suites that are selected by the Test Advisor in batch mode. Additionally, if the
user decides to run all tests, all test suites are run in batch mode, regardless of whether the test suites are selected by
the Test Advisor.
•
Support for Apache Subversion repositories was added.
Set Up the Cucumber Plug-in
1. Connect to support.broadcom.com with your Broadcom support account and continue to https://
support.broadcom.com/enterprise-software/download-center.
2. Select either CONTINUOUS DELIVERY DIRECTOR or CONTINUOUS DELIVERY DRCTR SAAS and click the
Docker button. Follow the on-screen instructions to pull the image to your localhost.
3. Create the following folder structure under the user /home/cdd/ directory:
mkdir /home/cdd/.cdd
mkdir /home/cdd/.cdd/logs
mkdir /home/cdd/.cdd/conf
mkdir /home/cdd/.cdd/artifacts
mkdir /home/cdd/.cdd/certificates
4. Create a settings.properties file under /home/cdd/.cdd/conf/ and add the following lines:
cdd.plugins.containerized.container_engine.home_folder=/home/cdd/.cdd
cdd.plugins.containerized.container_engine.port=4550
cdd.plugins.containerized.container.volumes.artifacts=/home/cdd/.cdd/artifacts
cdd.plugins.containerized.container.volumes.logs=/home/cdd/.cdd/logs
cdd.plugins.containerized.cucumber.container.image_name=cdd.packages.ca.com/com/ca/cdd/v720/7.2/plugins/
cucumberruby:101
5. Restart the containerized-manager service.
6. Register the new plug-in using the following manifest URL: http://<plugin-server>:<port>/
containerized/plugins/cdd-cucumber-plugin/manifest.json.
Configure the Cucumber Plug-in
You configure the Cucumber plug-in either for the initial setup, or whenever a change to the test build configuration is
required.
67

Continuous Delivery Director Integrations 1.0
Endpoint Parameters
The following parameters are required to create an endpoint:
•
Version Control System
Specify the version control system where your source project resides, either Git or Apache Subversion (SVN).
•
Git/SVN Repository URL
Specify the URL to access the Git or SVN project repository
•
Git/SVN Username
Specify the user name to access GitHub/SVN.
NOTE
For GitHub, only required if the Git repository is not a public repository.
•
Git/SVN Password
Specify the password to access GitHub/SVN.
NOTE
For GitHub, only required if the Git repository is not a public repository.
To check the connection to Cucumber and to the version control system, select Test Connection. The Test Connection
action returns the following results:
•
Success
The connection was successful
•
Failure
The connection failed
Tasks
The Cucumber plug-in supports the Run Adaptive Testing task type. You can import test suites from the Adaptive Testing
Catalog through the Get Test Assets command.
For more information, see Setting Up the Test Module
Prerequisites:
•
One or more application versions are specified.
•
One or more Cucumber test suites exist for the application versions specified.
Branch
Specify the branch name.
Root Folder
Specify the relative path to the folder where the required features are located. When left empty, tests are imported from
the root folder.
Tags
Select one or more tags to execute test suites tagged with your selection. Leave empty to execute all the test suites under
the application version.
Example: Type ro to retrieve all test suites tagged with labels beginning with ro, such as robot.sanity.test
Build/Commit id
Specify the commit ID (Git) of the code to test.
TIP
To select from a list of available tokens, enter the percent sign (%) in the task field.
68

Continuous Delivery Director Integrations 1.0
Run a subset of test suites selected by the Test Advisor
Choose this option to run only the test suites that the Test Advisor selects. The test advisor selects test suites that are
likely to fail fast.
Docker Plug-in
Plug-in Version 1.2
Figure 18: To download the latest plug-in version, click the following icon:
The Docker plug-in lets you deploy Docker images to run and to remove containers, and to run commands within
containers. Optionally, for the Run Container task, you can run a readiness probe to notify you when the container is
ready to accept traffic.
Supported Versions
The Docker plug-in supports the core Docker solution.
For more information, see the Docker documentation at https://docs.docker.com/.
What's New
The following updates were made for plug-in version 1.2:
•
A new Remove Image task lets you remove specified images from a container.
The following updates were made for plug-in version 1.1:
•
Support was added for Java 11.
Configuration
Register the plug-in and create endpoints as described in Manage Plug-ins.
Manifest URL
For plug-in registration, use the following Docker manifest URL:
http://<plugin-server>:<port>/cdd-docker-plugin/manifest.json
Endpoint Parameters
To create endpoints, provide the following parameters:
•
Docker Engine Host
Specify the Docker Engine hostname
•
Docker Engine Port
Specify the Docker Engine port
•
Registry Host
Specify the path to the Docker registry host
Example: my.registry.address:port/repositoryname
•
Registry User
69

Continuous Delivery Director Integrations 1.0
Specify the username to authenticate to the Docker registry.
•
Registry Password
Specify the password to authenticate to the Docker registry.
To check the connection to Docker and to GitHub, use the endpoint Test Connection option. The Test Connection option
returns the following results:
•
Success
Both connections were successful
•
Failure
One or more connections failed
Tasks
The following task types are available in the Docker plug-in:
Run Container
The Run Container task contains the following fields:
Input Parameters
•
Image Name
Specify the Docker image name.
•
Container Environment Variable
Specify environment variables that are available to processes running inside the container
Example: CDD_DATABASE_NAME=name1,X=2,Y=3
•
Ports to Expose
Specify one or more ports to expose to provide services or to listen on.
Example: 9090:8080,7070:7070
•
Map Volumes
Enter a list of comma-separated key:value pairs.
Values: key = name of the volume on the host machine, and value = the path where the file or directory is mounted
in the container.
Example: myvol7:/root/cdd/home/myvol7/.cdd
•
Container NameSpecify the name of the container to run.
•
Build Number
Specify the build number associated with the Docker image provided.
•
Readiness Relative Path
Specify the relative path to the readiness probe REST call.
Example: GET https://www.cdd.com/cdd/execution/0000/v1/readiness
•
Initial Delay (in Seconds)
Specify the number of seconds after the container starts to run before the readiness probe is initiated.
Minimum: 1
•
Probe Frequency
Specify how often (in seconds) to perform the probe.
Default: 10 (seconds)
Minimum: 1
•
Timeout (in Seconds)
Specify the number of seconds to elapse after which the probe times out.
Minimum: 1
•
Maximum Number of Failed Attempts
Specify the maximum number of failed probe attempts allowed before the task is failed.
Minimum: 1
70

Continuous Delivery Director Integrations 1.0
Output Parameters
•
Container ID
Specifies the container ID.
Remove Container
The Remove Container task contains the following fields:
Input Parameters
•
Container ID
Specify the ID of the container to remove.
Run Command in Docker
The Run Command in Docker task contains the following fields:
NOTE
If the run command execution status is 0, the task will be marked as finished, otherwise the task will be marked
as failed.
Input Parameters
•
Image Name
Specify the Docker image name.
•
Command
Specify a single command or a call for execution file.
Example: ls; /home/{username}/run.sh
•
Arguments
Specify arguments to append to the command.
Example: -a -l ...
Remove Image
The Remove Image task contains the following fields:
Input Parameters
•
Image
Specify the name or the ID of the image to remove.
Example: alpine:latest
DX App Experience Analytics Plug-in
NOTE
Formerly known as CA App Experience Analytics
Plug-in Version 1.1
Figure 19: Click the following icon to download the latest plug-in version:
71

Continuous Delivery Director Integrations 1.0
The DX App Experience Analytics, or DX AXA, plug-in lets you monitor application usage, user interactions, and
performance.
Supported Versions
The DX App Experience Analytics plug-in supports the core DX App Experience Analytics SaaS solution.
For more information, see the DX App Experience Analytics documentation at App Experience Analytics - Getting Started.
What's New
The following updates were made for plug-in version 1.1:
•
Support was added for Java 11.
Configuration
Register the plug-in and create endpoints as described in Manage Plug-ins.
Manifest URL
For plug-in registration, use the following CA App Experience Analytics manifest URL:
http://<plugin-server>:<port>/cdd-axa-plugin/manifest.json
Endpoint Parameters
The following parameters are required to create an endpoint:
•
URL
Specifies the URL to the DX App Experience Analytics instance
Example: https://axa.ca.com
•
API Key
Specifies the DX App Experience Analytics access token that you obtain as the result of the Authentication API
For more information, see the DX App Experience Analytics REST API documentation.
Example: a3bdf820-1eaf-47f4-acd6-7caca7fe17d2
To check the connection to DX App Experience Analytics, use the endpoint Test Connection option. The Test
Connection option returns the following results:
•
Success
Both connections were successful
•
Failure
One or more connections failed
Tasks
The following task types are available in the DX App Experience Analytics plug-in:
Monitor
Use this task to monitor application performance, usage, and user experience in real time
This task requires the following fields:
72

Continuous Delivery Director Integrations 1.0
TIP
To load a list of external values, enter the commercial at sign @ in the task field. To select from a list of available
tokens, enter the Percent sign (%). You can also use free text alone or together with tokens.
Input Parameters
•
Application
Specifies the name of the application
Value: Application name as registered with DX App Experience Analytics
•
Time Range
Specifies the time range to monitor the application.
Value: Dynamic value. Enter the commercial at sign @ to load the possible dynamic values: last hour, last 12 hours,
last 24 hours, last week
DX App Synthetic Monitor Plug-in
This plug-in lets you control site and application performance monitoring from your release pipeline.
Plug-in Version 1.0
Figure 20: Click the following icon to download the latest plug-in version:
https://storage.googleapis.com/cdd-plugins/cdd-asm-plugin.war
DX App Synthetic Monitor (formerly CA App Synthetic Monitor) helps you ensure that users can access sites and
applications 24/7, regardless of their location or the device they are using. This tool lets you check site and application
performance and quickly pinpoint problems. Unlike most monitoring tools that depend on actual user transactions, DX App
Synthetic Monitor mimics real user behavior with synthetic transactions. These transactions take place 24 hours a day
through a global network of nearly 100 monitoring stations across six continents.
For more information about DX App Synthetic Monitor, see DX App Synthetic Monitor SaaS documentation.
You can use this plug-in to perform the following task:
•
Activate and Deactivate Monitors
To connect to a specific instance of DX App Synthetic Monitor, add an endpoint. For more information, see Configure a DX
App Synthetic Monitor Plug-in Endpoint.
Configure a DX App Synthetic Monitor Plug-in Endpoint
You are familiar with DX App Synthetic Monitor.
You have the Can create endpoints permission.
1. Register the plug-in as described in Manage Plug-ins.
The manifest for the DX App Synthetic Monitor plug-in is http://<host>:<port>/cdd-asm-plugin/
manifest.json .
2. From the Administration menu, click Endpoints > Add Endpoint.
3. In the ADD ENDPOINT dialog, select the DX App Synthetic Monitor plug-in.
4. Configure the following input parameters:
•
ASM API URL
Specify the DX App Synthetic Monitor API URL. Syntax: https://api.asm.ca.com
•
Authentication Method
Select a method to authenticate to the DX App Synthetic Monitor API.
73

Continuous Delivery Director Integrations 1.0
Basic
–
Username
Enter the user name to log into DX App Synthetic Monitor.
–
Password
Enter the API password set in the DX App Synthetic Monitor account settings.
NOTE
This is not the password you use to log into DX App Synthetic Monitor.
Bearer
–
Access Token
Specify the access token you use to access DX App Synthetic Monitor.
•
Use Proxy
Select this option to connect to a remote endpoint through a proxy server.
–
Proxy Server URL
–
Proxy Server Username
–
Proxy Server Password
5. To check the connection to DX App Synthetic Monitor and to the source control system, click Test Connection.
6. Click Add.
Activate and Deactivate Monitors
This task lets you activate and deactivate monitors from a DX App Synthetic Monitor instance in your release pipeline.
One or more DX App Synthetic Monitor endpoints are available.
DX App Synthetic Monitor offers several types of monitors that you can use to measure page performance. Monitors
also check whether your website is serving or providing content correctly. If performance issues occur, the monitors send
alerts.
1. In a release, create an automatic task as described in Create Automatic Tasks.
2. Configure the following input parameters:
•
Activate or Deactivate
From the dropdown, select either Activate or Deactivate to activate or deactivate the monitors specified in the
Monitor Name parameter.
•
Folder Name
Specify the name of the folder in which the monitors are located.
•
Monitor Name
Specify the name of a monitor to activate/deactivate. If left empty, all the monitors in the selected folder will be
activated/deactivated.
3. Click Create.
Email Plug-in
Figure 21: Click the following icon to download the latest plug-in version:
74
Continuous Delivery Director Integrations 1.0
Plug-in Version 1.3
This plug-in lets you send preconfigured auto-generated email messages from your continuous delivery pipeline.
Capabilities
The email plug-in lets you send preconfigured auto-generated email messages in the context of releases, phases, and
tasks.
What's New
The following updates were made for plug-in version 1.3:
•
Connection timeout fixed.
The following updates were made for plug-in version 1.2:
•
Added From Name and Address to the Send Email task.
The following updates were made for plug-in version 1.1:
•
Support was added for Java 11.
Configuration
Register the plug-in and create endpoints as described in Manage Plug-ins.
The URL of the Email manifest for plug-in registration is http://<plugin-server>:<port>/cdd-email-plugin/manifest.json.
Select the Endpoint plug-in in the ADD ENDPOINT dialog to create an endpoint for the Email plug-in. The following
information is required when you create an endpoint:
•
Host
Specify the URL of the SMTP server
•
Port
Specify the SMTP server port
•
Use Secure Connection
Select this option to use SSL to connect to the SMTP server
•
From Address
Specify an email address to send all emails from this email account
•
Sender Display Name
Enter free text to be used as the sender name. If the field is empty, only the From Address is displayed
•
Username/Password
Specify access credentials to authenticate to the SMTP server
•
Send Test Email To:
Enter a valid email address to receive the test email when Test Connection is selected
Tasks
The Email plug-in provides the Send Email task.
For more information about creating tasks, see Tasks.
Send Email
The Send Email task lets you send preconfigured auto-generated email messages from a phase. This task requires the
following information:
75

Continuous Delivery Director Integrations 1.0
Input Parameters
•
To/CC/BCC
Enter email addresses that are separated by a comma. Use % prefix for tokens. You can also use free text
alone or together with tokens. For example, you create a token that is named BCC-Email with a value of
•
Subject
Enter the email subject text. Use % prefix for tokens. You can also use free text alone or together with tokens.
•
Body
Enter the email body text. Use % prefix for tokens. You can also use free text alone or together with tokens.
Endevor Software Change Manager Plug-in
This plug-in lets you automate deployments of mainframe software through Endevor Software Change Manager (Endevor
SCM) by generating Endevor packages dynamically throughout the lifecycle. Tasks are available for the creation and
management of packages within your Continuous Delivery Director pipeline.
Plug-in Version 1.1
A package is a set of actions that may require approval before the actions can be executed. Packages usually contain
Move actions only, because the primary use of a package is to move a group of related elements from stage to stage in
the software lifecycle.
Supported Versions
This plug-in supports Endevor SCM versions 18.0 and higher. You must have web services installed on the Endevor SCM
host.
This plug-in is REST API-based and is distributed as a war file.
Figure 22: To download the latest plug-in version, click the icon:
What's New
The following updates were made for plug-in version 1.1:
•
This plug-in is now REST API-based. Previously, this plug-in was Brightside-based.
Capabilities
The Endevor SCM plug-in provides tasks to perform the following package-related operations:
•
Approve or deny a package
•
Create a package
•
Cast a package
•
Execute a package
•
Backout a package
•
Ship a package
•
Delete a package
Configuration
Register the plug-in and create endpoints as described in Manage Plug-ins.
The URL of the Endevor manifest for plug-in registration is http://<plugin-server>:<port>/cdd-endevor-
plugin-manifest.json.
76

Continuous Delivery Director Integrations 1.0
To create an endpoint for the Endevor plug-in, in the ADD ENDPOINT dialog, select the Endevor SCM plug-in The
following Endevor SCM information is required when you create an endpoint:
•
Hostname
Enter the Endevor SCM host name.
•
Port
Enter the port number for the Endevor SCM host.
•
Instance
Enter the Endevor SCM Web Services data source name.
•
Username/Password
Enter valid credentials for the Endevor SCM host.
•
Use HTTPS
Specify whether to use HTTPS or HTTP to connect to the Endevor SCM REST API.
•
Trust any SSL Certificate
Specify whether to allow untrusted and unsigned TLS/SSL certificates. If your Endevor SCM instance uses a valid
certificate, do not change this value to True.
•
URL Resource
Enter the base URL for the Endevor REST API. If needed, specify a context root to override the default of /
EndevorService/rest.
•
Package Naming Convention
Enter a regular expression to validate that the package name meets the naming convention requirements. If you leave
this field empty, any package name is allowed.
Tasks
The Endevor SCM plug-in includes the following tasks:
For more information about creating tasks, see Tasks.
Create Package Based on Selection Criteria
The Create Package Based on Selection Criteria task lets you create a new package in Endevor SCM from the
Continuous Delivery Director pipeline.
Input Parameters
•
Package Name
Specify a name for the new package. If a naming convention regex pattern is specified in the endpoint, the name must
follow this pattern, or else the task will fail.
•
Package Description
Specify a package description.
•
Set Options
Specify only the options to apply. Use the SCL syntax as described in Endevor SCM documentation. Do not add
the command 'Set Options' - this is added by the Endevor plugin. For example:\"CCID 'DEMO' COMMENTS
\"Demonstration\" .\
NOTE
The SCL (Software Control Language) is the language used for the non-interactive (batch) execution of
Endevor SCM. SCL is a freeform language, with English-like statements, that allows you to manipulate
elements, environment definitions, and packages within Endevor SCM.
•
System
Specify the Endevor SCM system where your project resides.
•
Subsystem
Specify the Endevor SCM subsystem where your project resides.
•
Environment
77

Continuous Delivery Director Integrations 1.0
Specify the Endevor SCM environment where your project resides.
•
Stage Number
Specify the Endevor SCM stage number where your project resides.
•
CCID
Specify the Generate CCID associated with an element.
NOTE
Change Control Identifiers (CCIDs) provide a means of grouping and manipulating similar kinds of change
activity.
•
Type
Specify the name of the Endevor SCM element type.
•
Urgency Type
Select the urgency type - \"Standard\" or \"Emergency\".
•
Element Action
Select the element action; either Generate or Move.
•
Promotion
Select this option to define the package as a promotion package.
•
Sharable
Select this option to determine that the package can be edited by more than one person when in 'In-edit' status.
•
No Backout
Select this option to deny a backout facility for this package.
•
Error Level
Specify the return code of a failed action. Any returned code with a value greater than the specified code will
fail the task. Possible values: NORMAL(\"0000\"), WARNING(\"0004\"), CAUTION(\"0008\"), ERROR(\"0012\"),
SEVERE(\"0016\"), INTERNAL(\"0020\").
•
Cast the Package
Select this option to freeze the contents of the package in Endevor SCM and to prevent further changes to the
package.
•
Execute the Package
Select this option to execute a package in Endevor SCM with a status of 'Approved' or 'Exec-failed'.
Cast Package
The Cast Package task lets you freeze the contents of the package in Endevor SCM and to prevent further changes to
the package.
Input Parameters
•
Package Name
Specify a package name to be cast.
•
Error Level
Specify the return code of a failed action. Any returned code with a value greater than the specified code will
fail the task. Possible values: NORMAL(\"0000\"), WARNING(\"0004\"), CAUTION(\"0008\"), ERROR(\"0012\"),
SEVERE(\"0016\"), INTERNAL(\"0020\").
Approve/Deny Package
The Approve/Deny Package task lets you change the status of a package to Approved or Denied.
Input Parameters
•
Package Name
Specify a package name to be approved/denied.
•
Error Level
78

Continuous Delivery Director Integrations 1.0
Specify the return code of a failed action. Any returned code with a value greater than the specified code will
fail the task. Possible values: NORMAL(\"0000\"), WARNING(\"0004\"), CAUTION(\"0008\"), ERROR(\"0012\"),
SEVERE(\"0016\"), INTERNAL(\"0020\").
•
Approve/Deny
Define whether to approve or deny the package.
Execute Package
The Execute Package task lets you execute packages that have a status of Approved or Execfailed.
Input Parameters
•
Package Name
Specify a package name to be executed.
•
Error Level
Specify the return code of a failed action. Any returned code with a value greater than the specified code will
fail the task. Possible values: NORMAL(\"0000\"), WARNING(\"0004\"), CAUTION(\"0008\"), ERROR(\"0012\"),
SEVERE(\"0016\"), INTERNAL(\"0020\").
Backout Package
The Backout Package task lets you return all the outputs affected by the execution of a package to their prior state:
Input Parameters
•
Package Name
Specify a package name to backout.
•
Error Level
Specify the return code of a failed action. Any returned code with a value greater than the specified code will
fail the task. Possible values: NORMAL(\"0000\"), WARNING(\"0004\"), CAUTION(\"0008\"), ERROR(\"0012\"),
SEVERE(\"0016\"), INTERNAL(\"0020\").
•
Statement Number
Specify the SCL statement number for the element action you want to back out.
•
Element Name
Specify the element name for the element action you want to back out.
Ship Package
The Ship Package task lets you send packages to predefined destinations and to confirm the transmission of packages
per destination.
Input Parameters
•
Package Name
Specify a package name to be shipped.
•
Error Level
Specify the return code of a failed action. Any returned code with a value greater than the specified code will
fail the task. Possible values: NORMAL(\"0000\"), WARNING(\"0004\"), CAUTION(\"0008\"), ERROR(\"0012\"),
SEVERE(\"0016\"), INTERNAL(\"0020\").
•
Destination
Specify the name of the remote site to which you want to ship the specified package.
Delete Package
The Delete Package task lets you delete packages of a specified status and age.
Input Parameters
•
Package Name
79
Continuous Delivery Director Integrations 1.0
Specify the package name to delete. You can use a wildcard to delete multiple packages.
•
Status to Delete
Specify the statuses of the Packages that you are deleting. If you do not specify the package status, the DELETE
PACKAGE action deletes Packages of any status type.This option is available only when using a wildcarded
Package name and ignored when the Package name is fully specified. Possible values: "ALLSTATE", "INEDIT",
"INAPPROVAL", "APPROVED", "INEXECUTION", "EXECUTED", "EXECFAILED", "COMMITTED", "DENIED"
•
Older Than (days)
Specify the minimum age of the package you are deleting. A package must be older than the number of days you
specify. This option is available only when using a wildcarded package name and is ignored when the package name
is fully specified.
•
Error Level
Specify the return code of a failed action. Any returned code with a value greater than the specified code will
fail the task. Possible values: NORMAL(\"0000\"), WARNING(\"0004\"), CAUTION(\"0008\"), ERROR(\"0012\"),
SEVERE(\"0016\"), INTERNAL(\"0020\").
Flowdock Plug-in
The Flowdock plug-in lets you automatically post release and application-related messages from Continuous Delivery
Director to a designated flow.
Plug-in Version 1.0.2
Figure 23: Click the following icon to download the latest plug-in version:
In Flowdock, a flow is a team workspace that contains a chat room and a shared inbox.
Supported Versions
The Flowdock plug-in supports the core Flowdock REST API.
For more information, see the Flowdock REST API documentation at https://www.flowdock.com/api/rest.
Capabilities
The Flowdock plug-in lets you send messages to a designated flow.
What's New
The following updates were made for plug-in version 1.0.2:
•
Support was added for Java 11.
Configuration
Continuous Delivery Director and Flowdock use OAuth 2.0 for authentication. To set up OAuth, you first register a new
app with the Flowdock service. When you register the new app, you provide the application name and an OAuth Redirect
URI.
1. In Continuous Delivery Director, register the plug-in as described in Manage Plug-ins.
2. Go to https://www.flowdock.com/oauth/applications
The New application form opens.
80

Continuous Delivery Director Integrations 1.0
Note: The only mandatory fields are Name and OAuth Redirect URL.
3. In Name, enter the application name to be used to post messages.
Value: An alphanumeric string, up to a maximum of 16 characters.
Example: CDD2FlowApp
4. In OAuth Redirect URI, enter a URL to redirect back to.
Note: For testing purposes, use: urn:ietf:wg:oauth:2.0:oob
5. Click Save.
The landing page for the app you simply created opens.
6. In the Create a new source section, select a flow and generate a source token.
Important: Copy the source token and store it in a safe location. This token is the flow token that you need to create
the endpoint. You cannot generate the source token again.
7. Create an endpoint as described in Manage Plug-ins.
Manifest URL
For plug-in registration, use the following Flowdock manifest URL:
http://<plugin-hostname>:<port>/cdd-flowdock-plugin/manifest.json
Endpoint Parameters
The following parameters are required to create an endpoint:
•
URL
Specifies the URL to connect to the Flowdock REST API
Value: https://api.flowdock.com
•
Flow Token
Specifies the source token of the flow where you want the notifications to go.
To check the connection to Flowdock, use the endpoint Test Connection option.
Tasks
The Flowdock plug-in provides the following task:
•
Post Message
Post Message
The task lets you send a free-text message to a flow.
This task requires the following information:
•
Message
Specifies the text to send to the flow inbox. For more information, see: https://www.flowdock.com/api/messages
GitHub Plug-in
This plug-in lets you use GitHub as your source control system to retrieve commit messages.
Plug-in Version 1.0.3
81

Continuous Delivery Director Integrations 1.0
Figure 24: Click the following icon to download the latest plug-in version:
This plug-in also enables you to use GitHub as your file source, a connection to a JSON format representation of a
release. Additionally, you can use file sources to manage JSON files that reference other JSON files.
What's New
The following updates were made for plug-in version 1.0.3:
•
A new endpoint parameter, Owner, was added.
•
In the Branch field of the Get Files task, you can now enable the processing of GitHub webhook notifications from all
repository branches.
The following updates were made for plug-in version 1.0.2:
•
Support was added for Java 11.
Configuration
Register the plug-in and create endpoints as described in Manage Plug-ins
The URL of the GitHub manifest for plug-in registration is http://<plugin-server>:<port>/cdd-github-plugin/manifest.json.
Select the GitHub plug-in in the ADD ENDPOINT dialog to create an endpoint for the GitHub plug-in. The following
GitHub information is required when you create an endpoint:
•
GitHub API URL
Enter the URL of the remote GitHub instance to be used for connection purposes.
Example: http://api.github.com
Note: The URL can be specified as http or https
•
Username
Specify a user name to authenticate to GitHub.
•
Password
Specify a password or a personal access token to authenticate to GitHub.
NOTE
You can generate personal access tokens in GitHub.
•
Owner
Specify either the organization name for GitHub Enterprise or the owner name for public and private GitHub accounts.
Get Commit Messages
The GitHub plug-in lets you retrieve and parse commit messages. Use this capability when you deploy applications in a
release to see the status of related work items.
Follow these steps:
1. From Administration, click Applications.
2.
–
In the Applications list, select one or more application rows.
–
In the Applications list, click an application name.
NOTE
The Application Management page opens.
3. From the Actions menu, click Set Source Control Connection.
Note: This option is only enabled if a work item source, such as Rally
®
, has been configured.
82

Continuous Delivery Director Integrations 1.0
4. Configure the following parameters, then select Set:
–
Source Control - Select GitHub and Get Commit Messages.
–
Owner - Specify either the organization name for GitHub Enterprise or the owner name for public and private
GitHub accounts.
–
Repository - Specify the source control repository to bring the commit messages from. This should be the
repository that corresponds with the project in the build server that you configure to send notifications to this
application version.
Example: https://myGitHub.mycompany.com/[organization]/[Repository]
–
Regular Expression - Specify a regular expression with which to parse the commit comments for work item IDs.
–
Include Path - (Optional) Specify one or more paths to map the packages and/or classes to include in test
coverage.
Syntax: app/src/java/**
–
Exclude Path - (Optional) Specify one or more paths to map the packages and/or classes to exclude from test
coverage.
Syntax: app/src/tests/**
When the source control connection is configured, the plug-in returns a list of commit IDs with the following information:
Note: The list of commit IDs is not visible in the user interface.
•
The commit message
•
The user who made the commit (author)
•
The files that have been changed
•
The time of the commit
Get Files
The GitHub plug-in lets you use GitHub as a file source so that releases are automatically created and run whenever you
make changes to the JSON file.
NOTE
To use this capability, first create a top-level folder in the relevant repository with the following name: CDD-
FileSource. Place all release-related JSON files in this folder.
NOTE
The CDD-FileSource folder does not apply if you use file sources to manage JSON files that reference other
JSON files.
Follow these steps:
1. From RELEASES, select New File Source.
2. In CREATE FILE SOURCE, configure the following parameters, then select Create:
–
Name - Specify a name for the file source.
–
Select Source Control - Select GitHub and Get Files.
–
Select Endpoint
–
Owner - Specify the owner of the GitHub repository.
–
Repository - Specify the name of the GitHub repository to bring the files from.
–
Branch - Specify the branch name. To allow processing of GitHub webhook notifications from all repository
branches, keep this field empty.
–
Releases Created On Behalf Of (API Key) - Specify the API key of a user on whose behalf future releases will be
created.
Example: The API key of the product owner.
–
Send Error Notifications To - Specify one or more recipients to receive error notifications.
83

Continuous Delivery Director Integrations 1.0
3. Save your changes. A COPY WEBHOOK popup is displayed containing an auto-generated webhook. This webhook
supports the connection between Continuous Delivery Directorand GitHub. Copy this webhook and paste it into
GitHub.
The newly-created file source is added to the FILE SOURCES page.
NOTE
More Information
•
How to Set Up Webhooks in your Source Control
GitLab Plug-in
This plug-in lets you use GitLab SCM (Source Control Management) as your source control system to and to .
Plug-in Version 1.7
Figure 25: Click the following icon to download the latest plug-in version:
This plug-in enables you to:
•
Retrieve commit messages
•
Import GitLab issues, including linked issues
•
Use GitLab SCM as your file source, a connection to a JSON format representation of a release. Additionally, you can
use file sources to manage JSON files that reference other JSON files.
•
Import applications from GitLab repositories using the External Applications button on the Applications page
What's New
The following updates were made for plug-in version 1.7:
•
You can now import files from GitLab repositories as applications.
The following updates were made for plug-in version 1.6:
•
You can now retrieve linked issues (work items) from GitLab.
The following updates were made for plug-in version 1.5:
•
You can now synchronize issues (work items) between GitLab and Continuous Delivery Director and assign issues to
release tasks.
The following updates were made for plug-in version 1.4:
•
In the Branch field of the Get Files task, you can now enable the processing of GitLab webhook notifications from all
repository branches.
•
A new Trust Any SSL Certificate endpoint parameter lets you allow untrusted and unsigned SSL/TLS certificates.
Configuration
Register the plug-in and create endpoints as described in Manage Plug-ins
The URL of the GitLab SCM manifest for plug-in registration is https://<plugin-server>:<port>/cdd-gitlab-plugin/
manifest.json.
•
GitLab API URL
84

Continuous Delivery Director Integrations 1.0
Enter the URL of the remote GitLab instance to be used for connection purposes.
Syntax: http://api.gitlab.com for public and private GitLab accounts or https://[hostname]/api/v4 for
on-premise GitLab instances.
Note: The URL can be specified as http or https
•
Authentication Method
Select one of the following authentication methods:
–
OAuth2 Token
Specify a OAuth2 token to authenticate to GitLab.
–
Personal Access Token
Specify a Personal Access Token to authenticate to GitLab.
•
Trust Any SSL Certificate
Select this option if you want to allow untrusted and unsigned SSL/TLS certificates.
WARNING
Use at your own risk! Selecting this option can expose your environment to "man in the middle" attacks.
CA Technologies does not accept responsibility for security vulnerabilities that are caused by selecting this
option.
•
GitLab Owner
Specify a GitLab owner name.
Import Work Items
This plug-in lets you sync issues between GitLab and Continuous Delivery Director releases. Use this capability when you
create a release to see the related GitLab information.
Follow these steps:
1. In a release, click the Work Items tab on the left menu.
2. Select Add Work Items.
The ADD WORK ITEMS window opens.
3. Select External Work Items.
4. Enter a name for the work items source.
Example: GitLab Feed
5. Under Work Items Source, select the GitLab plug-in and a configured GitLab endpoint.
6. Provide information in the required parameter fields. These fields let you build a query that searches GitLab for issues
that match the criteria.
–
Repository
Specify a repository from which to import issues. A repository contains the codebase in GitLab that is updated with
version control. A repository is part of a GitLab project.
–
Issue State
Select the required state to return issues; 'Opened', 'Closed', or 'All' to return all issues.
–
Issue Labels
Specify a comma-separated list of required issue labels to return. Enter 'None' to return all issues without a label.
Enter 'Any' to return all issues with at least one label.
–
Issue Milestone
Specify a milestone title to return issues. Enter 'None' to return all issues without a milestone. Enter 'Any' to return
all issues that have an assigned milestone.
–
Search Filter
Specify a filter text to search issues against their title and description.
–
Is Confidential?
Select this option to filter issues that are either public or visible only to authorized members of a GitLab project.
–
Is Archived?
85

Continuous Delivery Director Integrations 1.0
Select this option to return issues only from non-archived projects. Clear this option to return issues from both
archived and non-archived projects.
–
Issue Scope
Select the value to return issues for the given scope: 'Created by Me', 'Assigned to Me' or 'All'.
7. Click Create.
The work items source is saved and a list of the returned issues is displayed under the application in the left menu.
These issues are now available to assign to tasks in phases to associate with the release.
Get Commit Messages
The GitLab plug-in lets you retrieve and parse commit messages. Use this capability when you deploy applications in a
release to see the status of related work items.
Follow these steps:
1. In a release, expand the Applications tree on the left menu, and select the version number.
2. Select Set Source Control Connection.
Note: This option is only enabled if a work items source, such as Rally
®
, has been configured.
3. Configure the following parameters, then select Set:
–
Source Control - Select GitLab and Get Commit Messages.
–
Repository - Specify the source control repository to bring the commit messages from. This should be the
repository that corresponds with the project in the build server that you configure to send notifications to this
application version.
Example: https://mygitlab.mycompany.com/[organization]/[Repository]
–
Regular Expression - Specify a regular expression with which to parse the commit comments for work item IDs.
–
Include Path - (Optional) Specify one or more paths to map the packages and/or classes to include in test
coverage.
Syntax: app/src/java/**
–
Exclude Path - (Optional) Specify one or more paths to map the packages and/or classes to exclude from test
coverage.
Syntax: app/src/tests/**
When the source control connection is configured, the plug-in returns a list of commit IDs with the following information:
Note: The list of commit IDs is not visible in the user interface.
•
The commit message
•
The user who made the commit (author)
•
The files that have been changed
•
The time of the commit
Get Files
The GitLab plug-in lets you use GitLab as a file source so that releases are automatically created and run whenever you
make changes to the JSON file.
NOTE
To use this capability, first create a top-level folder in the relevant repository with the following name: CDD-
FileSource. Place all release-related JSON files in this folder.
NOTE
The CDD-FileSource folder does not apply if you use file sources to manage JSON files that reference other
JSON files.
86

Continuous Delivery Director Integrations 1.0
Follow these steps:
1. From RELEASES, select New File Source.
2. In CREATE FILE SOURCE, configure the following parameters, then select Create:
–
Name - Specify a name for the file source.
–
Select Source Control - Select GitLab and Get Files.
–
Select Endpoint
–
Repository - Specify the name of the GitLab repository to bring the files from.
–
Branch - Specify the branch name. To allow processing of GitHub webhook notifications from all repository
branches, keep this field empty.
–
Releases Created On Behalf Of (API Key) - Specify the API key of a user on whose behalf future releases will be
created.
Example: The API key of the product owner.
–
Send Error Notifications To - Specify one or more recipients to receive error notifications.
3. Save your changes. A COPY WEBHOOK popup is displayed containing an auto-generated webhook. This webhook
supports the connection between Continuous Delivery Directorand GitLab SCM. Copy this webhook and paste it into
GitLab SCM.
The newly-created file source is added to the FILE SOURCES page.
NOTE
More Information
•
How to Set Up Webhooks in your Source Control
Gradle Testing Plug-in
The Gradle testing plug-in lets you automate JUnit testing on Git and Apache Subversion (SVN) builds. This plug-in is
containerized and supports Adaptive Testing functionality.
This plug-in is available as a Docker image on the customer support portal which has specific requisites and installation
steps.
The plug-in is also available as a tar file on the customer support portal for customers who cannot use docker pull .
Figure 26: Click the following icon to download the latest plug-in version:
Plug-in Version 1.9
Supported Versions
The Gradle testing plug-in supports the following Gradle versions:
•
5.4.1
•
4.1
•
4.4
•
4.0.2
•
3.5
For more information, see the Gradle documentation at https://gradle.org/.
87

Continuous Delivery Director Integrations 1.0
What's New
The following updates were made for plug-in version 1.9:
•
The New or Updated Test Suites heuristic is now supported for SVN test suites. This metric is a weighting factor
when the Test Advisor intelligently selects a subset of test suites to run in subsequent test cycles.
•
Fixed - DE473431. Test suites configured to be skipped were not calculated in the test execution result.
Manifest URL
For plug-in registration, use the following manifest URL:
http://<plugin-server>:<port>/cdd-gradletesting-plugin/manifest.json
Configuration
You configure the Gradle testing plug-in either for the initial setup, or whenever a change to the test build configuration is
required.
Endpoint Parameters
The following parameters are required to create an endpoint:
•
Gradle Version
Specify the version of Gradle to use in automated testing.
•
Version Control System
Specify the version control system where your source project resides.
•
Git/SVN Project URL
Specify the URL to access the Git or SVN project repository.
•
GitHub/SVN Username
Specify the user name to access GitHub or SVN
•
GitHub/SVN Password
Specify the password to access GitHub or SVN
To check the connection to Gradle and to the version control system, select Test Connection. This action returns the
following results:
•
Success
The connection was successful
•
Failure
The connection failed
Tasks
The Gradle plug-in supports the Run Adaptive Testing task type.
Prerequisites:
•
One or more application versions are specified.
•
One or more Gradle test suites exist for the application versions specified.
•
Tags
Select one or more tags to execute test suites tagged with your selection. Leave empty to execute all the test suites
under the application version.
Example: Type gr to retrieve all test suites tagged with labels beginning with gr, such as gradle.sanity.test
•
Build/Commit id
88

Continuous Delivery Director Integrations 1.0
Specify the commit ID (Git) or build number (SVN) of the code to test.
TIP
To select from a list of available tokens, enter the percent sign (%) in the task field.
Get Test Assets
The Gradle plug-in lets you import test suites into the Adaptive Testing Catalog.
Follow these steps:
1. Select Tests, then Adaptive Testing Catalog.
2. Specify the Application and the Application Version.
The menu next to the application name and version is activated.
3. Select Get Test Assets.
4. Fill in the following fields:
–
Test Source Name
–
Plug-in
Select Gradle Testing and Import Test Suites.
–
Endpoint
Select a Gradle Testing endpoint.
–
Branch
For Git, specify the name of the branch where the test suites you want to import are located.
For SVN, specify the path of the branch where the test suites you want to import are located.
–
Gradle Project
Specify the name of the Gradle project where the test suites you want to import are located. If left empty, test suites
will be imported from all sub-projects.
–
Source Set
Specify the name of the source set where the Java source files of the test suites you want to import are located. If
left empty, the Java source files will be imported from all source sets.
–
Extra Execution Parameters
Specify comma-separated name: value pairs to pass to Gradle.
Example: HOST:google.com,PORT:8080
–
JVM Parameters
Specify space-separated JVM parameters to customize individual instances.
Example: -Dtest.HOST=google.com Overrides the IP address or host name of URL used by the browser to
execute tests.
–
Tags
Specify one or more tags to find possible test suite matches.
Example: Type gr to retrieve all test suites tagged with labels beginning with gr, such as gradle.sanity.test
Helm Plug-in
This plug-in helps you streamline the installation and management of Kubernetes/Openshift applications or resources
using Helm Charts.
Plug-in Version 1.0
Figure 27: Click the following icon to download the latest plug-in version:
https://storage.googleapis.com/cdd-plugins/cdd-helm-plugin.war
89

Continuous Delivery Director Integrations 1.0
Helm uses a packaging format called charts. A chart is a collection of files that describe a related set of Kubernetes/
Openshift resources. You can use this plug-in to perform the following chart-related tasks:
•
Install Release by Helm Chart
•
Upgrade Release by Helm Chart
•
Rollback Release
•
Uninstall Releases
The Helm plug-in is containerized.
To connect to a specific instance of Helm, add an endpoint. For more information, see Configure a Helm Plug-in Endpoint.
For more information about Helm version 3, see Helm version 3 documentation.
Supported Versions
This plug-in supports Helm versions 2 and 3.
NOTE
For Helm version 2, the Tiller component is assumed to be installed already on Kubernetes/Openshift server
side. If not, then run the following commands to install the Tiller component on the cluster to support Helm
operations.
kubectl -n kube-system create serviceaccount tiller
kubectl create clusterrolebinding tiller --clusterrole cluster-admin --serviceaccount=kube-
system:tiller
helm init --service-account tiller
For more information about Helm version 2, see Helm version 2 documentation.
Configure a Helm Plug-in Endpoint
You are familiar with Helm and Kubernetes/OpenShift.
You have been granted the Can create endpoints permission.
1. Register the plug-in as described in Manage Plug-ins.
The manifest for the Helm plug-in is http://<host>:<port>/containerized/plugins/cdd-helm-plugin/
manifest.json .
2. From the Administration menu, click Endpoints > Add Endpoint.
3. In the ADD ENDPOINT dialog, select the Helm plug-in.
4. Configure the following input parameters:
•
Cluster URL
Specify the Kubernetes/OpenShift cluster URL.
•
Authentication Method
Select a method to authenticate to Helm.
API Token
–
API Token
Specify the cluster API token.
Kubeconfig
–
Kubeconfig File Path
Specify the Kubeconfig file path.
–
Kubeconfig Context
90

Continuous Delivery Director Integrations 1.0
Specify the Kubeconfig context to use.
•
Helm Version
Specify the Helm version.
–
Source Control
Select the required source control system to connect to your Helm chart repository.
GitHub
•
GitHub API URL
•
GitHub Owner
•
GitHub Repository
•
GitHub Branch
•
GitHub Username
•
GitHub Password
GitLab
•
GitLab API URL
•
Authentication Method
Select either OAuth2 Token or Personal Access Token.
•
GitLab Owner
•
GitLab Repository
•
GitLab Branch
Bitbucket
•
Bitbucket API URL
•
Account Name/Project Key
Specify the Bitbucket account name or project key.
•
Bitbucket Repository
•
Bitbucket Branch
•
Bitbucket Username
•
Bitbucket Password
Helm Chart Repository
•
Helm Chart Repository API URL
•
Helm Chart Repository Username
•
Helm Chart Repository Password
AWS S3
•
Service API URL
•
Region
•
Access Key
•
Secret Key
•
Bucket Name
–
Trust Any SSL Certificate
Select this option if you want to allow untrusted and unsigned SSL/TLS certificates.
WARNING
Use at your own risk! Selecting this option can expose your environment to "man in the middle"
attacks. CA Technologies does not accept responsibility for security vulnerabilities that are caused by
selecting this option.
91

Continuous Delivery Director Integrations 1.0
5. To check the connection to Helm and to the source control system, click Test Connection.
6. Click Add.
Install Release by Helm Chart
This task installs a Helm chart or chart reference into a release.
One or more Helm endpoints are available.
1. In a release, create an automatic task as described in Create Automatic Tasks.
2. Configure the following input parameters:
•
Helm Chart Directory
Specify the Helm Chart directory or Chart Key if Helm Chart Repository is the source control system in use.
•
Helm Chart Settings
Define a list of keys/value pairs. Enter each key/value pair in a separate line.
•
Commit Updated Settings
Select this option to commit the updated Helm Chart settings into the selected source control system.
•
Helm Release Name
Specify the Helm release name.
•
Cluster Namespace
(Optional) Specify the cluster namespace.
•
Wait
Select this option to wait until all pods, PVCs, services, and a minimum number of pods of a deployment,
StatefulSet, or ReplicaSet are in a ready state before marking the release as successful. The maximum time to wait
is defined in the Timeout Duration field. The deployment ensures that only a certain number of pods are down
during the update. By default, at least 75% of the required number of pods are up (a maximum of 25% of the pods
are unavailable).
•
Timeout Duration
Specify a period in seconds to wait for any individual Kubernetes operation to complete.
3. Click Create.
Upgrade Release by Helm Chart
This task upgrades a release to a new version of a chart.
One or more Helm endpoints are available.
1. In a release, create an automatic task as described in Create Automatic Tasks.
2. Configure the following input parameters:
•
Helm Chart Directory
Specify the Helm Chart directory or Chart Key if Helm Chart Repository is the source control system in use.
•
Helm Chart Settings
Define a list of keys/value pairs. Enter each key/value pair in a separate line.
•
Commit Updated Settings
Select this option to commit the updated Helm Chart settings into the selected source control system.
•
Helm Release Name
Specify the Helm release name.
•
Cluster Namespace
92

Continuous Delivery Director Integrations 1.0
(Optional) Specify the cluster namespace.
•
Wait
Select this option to wait until all pods, PVCs, services, and a minimum number of pods of a deployment,
StatefulSet, or ReplicaSet are in a ready state before marking the release as successful. The maximum time to wait
is defined in the Timeout Duration field. The deployment ensures that only a certain number of pods are down
during the update. By default, at least 75% of the required number of pods are up (a maximum of 25% of the pods
are unavailable).
•
Timeout Duration
Specify a period in seconds to wait for any individual Kubernetes operation to complete.
3. Click Create.
Rollback Release
This task rolls back a release to a previous version.
One or more Helm endpoints are available.
1. In a release, create an automatic task as described in Create Automatic Tasks.
2. Configure the following input parameters:
•
Helm Release Name
Specify the Helm release name.
•
Rollback to Release Version
Specify the release version number to which you want to roll back. Leave empty to roll back to the previous
release.
•
Cluster Namespace
(Optional) Specify the cluster namespace.
•
Wait
Select this option to wait until all pods, PVCs, services, and a minimum number of pods of a deployment,
StatefulSet, or ReplicaSet are in a ready state before marking the release as successful. The maximum time to wait
is defined in the Timeout Duration field. The deployment ensures that only a certain number of pods are down
during the update. By default, at least 75% of the required number of pods are up (a maximum of 25% of the pods
are unavailable).
•
Timeout Duration
Specify a period in seconds to wait for any individual Kubernetes operation to complete.
3. Click Create.
Uninstall Releases
This task takes a Helm release name and uninstalls the release.
One or more Helm endpoints are available
Running this task removes all of the resources associated with the last release of the chart as well as the release history,
freeing up the release for future use.
1. In a release, create an automatic task as described in Create Automatic Tasks.
2. Configure the following input parameters:
•
Helm Release Name
Specify the Helm release name.
•
Cluster Namespace
93

Continuous Delivery Director Integrations 1.0
(Optional) Specify the cluster namespace.
•
Timeout Duration
Specify a period in seconds to wait for any individual Kubernetes operation to complete.
3. Click Create.
Jenkins Plug-in
This plug-in lets you execute Jenkins jobs from within a release pipeline.
Figure 28: Click the following icon to download the latest plug-in version:
Plug-in Version 1.3.0
The Jenkins plug-in provides an interface in Continuous Delivery Director for running project builds in Jenkins. The
integration allows you to start and stop existing project builds through the Jenkins REST API and get their status (failed,
passed). This helps you to leverage existing jobs defined in Jenkins, including build, deploy, and testing activities.
NOTE
This plug-in uses the Jenkins basic REST API only and does not work with any third-party Jenkins plug-in.
What's New
The following updates were made for plug-in version 1.3.0:
•
Added support for CloudBees Request Filter Plugin and tree query parameters.
The following updates were made for plug-in version 1.0.3:
•
Support was added for Java 11.
Configuration
Register the plug-in and create endpoints as described in Manage Plug-ins
The URL of the Jenkins manifest for plug-in registration is http://<plugin-server>:<port>/cdd-jenkins-plugin/manifest.json.
Select the Jenkins plug-in in the ADD ENDPOINT dialog to create an endpoint for the Jenkins plug-in. The following
Jenkins information is required when you create an endpoint:
•
Jenkins Server URL
Enter the URL of the remote Jenkins instance to be used for connection purposes.
Example: http://35.201.71.157
Note: The URL can be specified as http or https
•
Authentication Method
Select an authorization method to use to establish a connection to Jenkins. You have to enter additional information,
depending on your choice.
Values: Basic, Authentication Token
–
Basic authentication is based on using Jenkins authentication credentials (login/password). You use the same
credentials to establish a connection to Jenkins through your web browser. You can:
a) Ask your system administrator to provide you with personal authentication credentials, or
b) Check the global security configuration in Jenkins, or
94

Continuous Delivery Director Integrations 1.0
c) Directly access the Jenkins security configuration page at http://<your-Jenkins-URL>/
configureSecurity/ .
–
Authentication Token is used to create an anonymous connection to a Jenkins instance. This method is based on
a special token that can be created in Jenkins projects by selecting the Trigger builds remotely Jenkins option.
Note: Jenkins lets you create a new token for each project, so that, in most cases, you will have different string
tokens for different projects. When you use the authentication token method, one endpoint is assigned to each
project.
Note: You can configure your Jenkins instance to use the Anyone can do anything, or Logged-in users can do
anything, or Allow anonymous read access authorization methods. A project-based matrix authorization strategy,
that is, user and group-based, prevents access with tokens. Remote users can only connect to Jenkins with basic
authorization credentials (user/password).
•
Task Start Delay
(Optional) Enter the amount of time (in seconds) between the scheduled start of a build and the time Jenkins is
triggered to start that build.
Values: None - use Jenkins configuration, 0 (seconds) - start immediately
Note: Maximum delay allowed is 1800 seconds, that is, half an hour
•
Task Execution Timeout
Enter the length of time (in seconds) that is allowed to pass after the task starts before the job is marked as failed. The
count starts as soon as the task execution starts, so any delay (low Jenkins machine CPU time/memory, time lags due
to overloaded execution threads) can result in a timeout execution fail message.
Note: The timeout parameter value must be greater than the delay parameter value.
Values: Minimum: 5 seconds; maximum: 43,200 seconds, that is, 12 hours.
Note: If your Jenkins project is configured to build concurrently, then each task launch causes a different build job to be
queued. If your Jenkins execution queue does not have a free execution thread, then any build task is postponed and can
trigger a timeout execution fail.
Tasks
The Jenkins plug-in provides the Run Build task.
For more information about creating tasks, see Tasks.
Run Build
The Run Build task lets you run Jenkins project builds in the context of Continuous Delivery Director phases and
releases. This task requires the following information, which must match the corresponding Jenkins values:
•
Project Name
Specifies a Jenkins project name.
•
Build Parameters (Optional)
Specifies the parameters for a Jenkins parameterized build. Define the parameters in JSON format.
Example: {"parameter": [{"name":"id", "value":"123"}, {"name":"verbosity",
"value":"high"}]}
Tutorial Video
The following video shows how to configure Continuous Delivery Director integration with Jenkins, and how to run Jenkins
jobs within the release pipeline.
95

Continuous Delivery Director Integrations 1.0
JetBrains TeamCity Plug-in
Plug-in Version 1.1
Figure 29: Click the following icon to download the latest plug-in version:
The JetBrains TeamCity plug-In lets you easily add completed builds to your pipeline for deployment, testing, and
production.
The TeamCity integration enables zero-touch continuous delivery, continuous testing, and continuous deployment. This
plug-in fully integrates TeamCity CI and build functionality into the robust Continuous Delivery Director pipeline planning,
management, and orchestration functionality. Enable the TeamCity plug-in to connect TeamCity builds directly to the
Continuous Delivery pipeline so that a successful build triggers pipeline execution.
What's New
The following updates were made for plug-in version 1.1:
•
Support was added for Java 11.
Configuration
Register the plug-in and create endpoints as described in Manage Plug-ins
The URL of the TeamCity manifest for plug-in registration is http://<plugin-server>:<port>/cdd-teamcity-plugin/
manifest.json.
Select the TeamCity plug-in in the ADD ENDPOINT dialog to create an endpoint for the TeamCity plug-in. The following
TeamCity information is required when you create an endpoint:
•
TeamCity Server URL
Enter the URL of the remote TeamCity instance to be used for connection purposes.
Example: http://35.201.71.157
Note: The URL can be specified as http or https
•
Username
Specify the username to authenticate to the TeamCity server.
•
Password
Specify the username to authenticate to the TeamCity server.
•
Trust Any SSL Certificate
Select this option if you want to allow untrusted and unsigned SSL/TLS certificates.
Warning: Use it at your own risk! Selecting this option can expose your environment to "man in the middle" attacks.
CA does not accept responsibility for security vulnerabilities caused by the selection of this option.
Tasks
The TeamCity plug-in provides the Run Build task.
For more information about creating tasks, see Tasks.
Run Build
The Run Build task lets you run TeamCity project builds in the context of Continuous Delivery Director phases and
releases. This task requires the following information, which must match the corresponding TeamCity values:
96

Continuous Delivery Director Integrations 1.0
Input Parameters
•
Build Configuration ID
Specify a unique ID of a TeamCity build configuration.
•
Parameters
Specify the parameters for a TeamCity parametrized build. Define the parameters in JSON format.
Syntax: {“param1”:”value”, “param2”:”value” }
Output Parameters
•
Build Number
Specifies the TeamCity build number.
JFrog Artifactory Plug-in
Plug-in Version 2.2
Figure 30: Click the following icon to download the latest plug-in version:
The JFrog Artifactory plug-in lets you sync Docker images between Artifactory and Bintray through the Continuous
Delivery Director user interface. Also, you can copy items from one Artifactory repository to another repository. This
integration enables you to use Artifactory as a key component of a continuous delivery pipeline for applications in Docker
containers.
Supported Versions
The Artifactory plug-in supports Artifactory 4.x and above.
To learn more about Artifactory, see https://www.jfrog.com/
Capabilities
The Artifactory plug-in lets you sync Docker images between Artifactory and Bintray.
What's New
The following updates were made for plug-in version 2.2:
•
Source Repository in the Copy Items task is now optional; previously, this field was mandatory. If you leave this field
empty, you can provide the repository name as part of the Source File Path value.
You can now either rename the source filename or keep the existing source filename. In Source File Path, you
provide the file path including the file name.
If Target File Path does not contain a file name (for example: maven-integration-local/com/ca/cdd/
release-candidate/cdd-artifactory-plugin/), the artifact is copied with the same name as in Source File
Path.
To keep the same file name as in Source File Path, provide the target file path only. The file name in the target file
path will be identical to the file name in the source file path.
If you provide a source file path up to the folder level, you can copy the entire content without changing the file names.
Provide the target repository and the target file path up to the folder level, and the file names will match.
Target File Path is optional. If the field is empty, the files in Source File Path are copied to Target File Path.
The following updates were made for plug-in version 2.1:
97

Continuous Delivery Director Integrations 1.0
•
Support was added for Java 11.
The following update was made for 2.0:
•
A new task, Copy Item, has been added. This task lets you copy an artifact or folder from a local Artifactory repository
to another repository.
Configuration
Register the plug-in and create endpoints as described in Manage Plug-ins.
The URL of the Artifactory manifest for plug-in registration is http://<plugin-server>:<port>/cdd-artifactory-plugin/
manifest.json.
Select the Artifactory plug-in in the ADD ENDPOINT dialog to create an endpoint for the Artifactory plug-in. The following
Artifactory information is required when you create an endpoint:
•
Registry
Enter the URL of your Artifactory instance.
•
Username/Password
Enter the access credentials of an Artifactory user.
Tasks
The Artifactory plug-in provides the Copy Item and Distribute Artifact tasks.
For more information about creating tasks, see Tasks.
Copy Item
The Copy Item task lets you copy an artifact or folder from one Artifactory repository to another repository. This task
requires the following information:
Input Parameters
•
Source Repository
(Optional) Specify the local repository from which you want to copy an artifact or a folder.
NOTE
If you leave this field empty, you can provide the repository name as part of the Source File Path value.
Example: docker-release-candidate-local
•
Source File Path
Specify the file path under the local repository of the artifact or folder you want to copy. You can include file names.
Example: com/mycompany/cdd/trunk/7.0/server/CDD.last_successful_change
•
Target Repository
Specify the repository to which you want to copy the specified artifact or folder.
Example: docker-release-candidate-local
•
Target File Path
(Optional) Specify the file path under the repository to which you want to copy the specified artifact or folder. You can
add new folders to the file path to create at runtime.
NOTE
To keep the same file name as in Source File Path, provide the target file path only. The file name in the
target file path will be identical to the file name in the source file path.
98

Continuous Delivery Director Integrations 1.0
If you provide a source file path up to the folder level, you can copy the entire content without changing the
file names. Provide the target repository and the target file path up to the folder level, and the file names will
match.
If Target File Path is empty, the files in Source File Path are copied to Target File Path.
Example: com/mycompany/cdd/release-candidate/server/CDD.last_successful_change
•
Dry Run
Select this option to simulate moving your specified artifact or folder to Bintray without actually distributing this item.
Distribute Artifact
The Distribute Artifact task lets you sync Docker images between Artifactory and Bintray, in the context of Continuous
Delivery Director phases and releases. This task requires the following information, which must match the corresponding
Artifactory values:
TIP
Values: Applies to the Source Repository, Tag, and Distribution Repository properties.
To define a value, do one of the following actions:
•
To select from a list of possible values, type an at sign "@" in the field.
Example: Deploy Tomcat
•
To select from a list of built-in tokens (reusable placeholders that are used to create generic workflows), type
a percent sign "%" in the field.
•
Type free text
•
Enter a combination of free text and tokens
Input Parameters
•
Source Repository
Specify the name of the source repository in Artifactory where the Docker image is located
•
Image
Specify the name of the Docker image to upload to Bintray
TIP
Values: To define a value, do one of the following actions:
•
To select from a list of built-in tokens (reusable placeholders that are used to create generic workflows),
type a percent sign "%" in the field
•
Type free text
•
Enter a combination of free text and tokens
•
Tag
Specify the name of the tag that is stored for the Docker image to upload to Bintray
•
Distribution Repository
Specify the name of the distribution repository through which the Docker image should be uploaded to Bintray
Kubernetes Plug-in
This plug-in lets you deploy containerized applications in a clustered environment and manage related, distributed
components across varied infrastructures.
99

Continuous Delivery Director Integrations 1.0
Plug-in Version 2.3.1
Figure 31: Click the following icon to download the latest plug-in version:
You can use this plug-in to perform the following Kubernetes-related tasks:
•
Create Deployment
•
Delete Deployment
•
Set Image
•
Import Files from AWS S3 (Kubernetes)
To connect to a specific instance of Kubernetes, add an endpoint. For more information, see Configure a Kubernetes
Plug-in Endpoint.
For more information about Kubernetes, see Kubernetes documentation.
The following task types are available in the Kubernetes plug-in:
Supported Versions
The Kubernetes plug-in supports the core Kubernetes solution.
What's New
The following updates were made for 2.3.1:
•
You can now select GitLab, AWS S3, and Web Service as source control systems from which to import YAML files.
Previously, you could only select GitHub and Bitbucket. These new options have been added to the Source Control
endpoint parameter.
•
You can now use AWS S3 as a file source, a connection to JSON format representations of releases.
The following updates were made for 2.0:
•
The method to authenticate to the Kubernetes service account has been changed from Basic (username/password) to
Bearer tokens.
•
Support was added for Java 11.
Configure a Kubernetes Plug-in Endpoint
You are familiar with Kubernetes.
You have the Can create endpoints permission.
1. Register the plug-in as described in Manage Plug-ins.
The manifest for the Kubernetes plug-in is http://<host>:<port>/cdd-kubernetes-plugin/manifest.json
.
2. From the Administration menu, click Endpoints > Add Endpoint.
3. In the ADD ENDPOINT dialog, select the Kubernetes plug-in.
4. Configure the following input parameters:
•
URL
100

Continuous Delivery Director Integrations 1.0
Specify the URL of the Kubernetes API. Example: https://api.cluster.com/
•
API Token
Specify the Bearer token to authenticate to your Kubernetes service account.
•
Source Control
Select the required source control system to connect to your file repository.
GitHub
–
GitHub API URL
–
GitHub Owner
–
GitHub Repository
–
GitHub Branch
–
GitHub Username
–
GitHub Password
GitLab
–
GitLab API URL
–
Authentication Method
Select either OAuth2 Token or Personal Access Token.
–
GitLab Owner
–
GitLab Repository
–
GitLab Branch
Bitbucket
–
Bitbucket API URL
–
Account Name/Project Key
Specify the Bitbucket account name or project key.
–
Bitbucket Repository
–
Bitbucket Branch
–
Bitbucket Username
–
Bitbucket Password
AWS S3
–
Service API URL
–
Region
–
Access Key
–
Secret Key
–
Bucket Name
Web Service
–
Web Service API URL
–
Web Service Username
–
Web Service Password
•
Trust Any SSL Certificate
Select this option if you want to allow untrusted and unsigned SSL/TLS certificates.
WARNING
Use at your own risk! Selecting this option can expose your environment to "man in the middle" attacks.
CA Technologies does not accept responsibility for security vulnerabilities that are caused by selecting
this option.
101

Continuous Delivery Director Integrations 1.0
5. To check the connection to Kubernetes and to the source control system, click Test Connection.
6. Click Add.
Create Deployment
This task lets you deploy your containerized applications on top of a running Kubernetes cluster from your release
pipeline.
One or more Kubernetes endpoints are available.
1. In a release, create an automatic task as described in Create Automatic Tasks.
2. Configure the following input parameters:
•
Namespace
(Optional) Specify the Kubernetes virtual cluster namespace. For more information about namespaces, see
Kubernetes documentation.
•
Branch
Specify the source control branch.
•
Manifest File Path
Specify the file path to a YAML file in the source control repository.
•
YAML Settings
Specify a list of key/value pairs to update in the deployment YAML manifest. Example: To update the image.tag
element of a manifest file, specify: image.tag: saas-dev-1.6.0.7 . Start a new line for each keys/value pairs
you specify.
3. Click Create.
Delete Deployment
This task lets you delete a Kubernetes deployment from your release pipeline.
One or more Kubernetes endpoints are available.
1. In a release, create an automatic task as described in Create Automatic Tasks.
2. Configure the following input parameters:
•
Namespace
(Optional) Specify the Kubernetes virtual cluster namespace. For more information about namespaces, see
Kubernetes documentation.
•
Branch
Specify the source control branch.
•
Manifest File Path
Specify the file path to a YAML file in the source control repository.
3. Click Create.
Set Image
This task lets you identify which builds Kubernetes has deployed.
102

Continuous Delivery Director Integrations 1.0
One or more Kubernetes endpoints are available.
TIP
Add the build ID to the docker image as a tag to enable this plug-in to read the tag and return that tag as the
build ID. This action allows tasks and reports to display the build ID.
1. In a release, create an automatic task as described in Create Automatic Tasks.
2. Configure the following input parameters:
•
Namespace
Specify the Kubernetes virtual cluster namespace. For more information about namespaces, see Kubernetes
documentation.
•
Deployment Name
Specify the Kubernetes deployment name.
•
Container Name
Specify an image container name.
•
Image Name
Specify an image name.
3. Click Create.
Import Files from AWS S3 (Kubernetes)
The Kubernetes plug-in lets you use AWS S3 as your file source, a connection to JSON format representations of
releases.
You have been granted Can create file source permissions.
1. Open the CREATE FILE SOURCE dialog as described in File Sources.
2. In Select Source Control, choose Import from AWS S3.
3. Configure the following input parameters:
•
Namespace
Specify the Kubernetes virtual cluster namespace. For more information about namespaces, see Kubernetes
documentation.
•
Releases Created On Behalf Of (API Key)
Specify the API key of the user on whose behalf future releases will be created.
•
Send Error Notifications To
Specify recipient/s for error notifications.
4. Click Create.
Maven Testing Plug-in
This plug-in lets you import and execute tests of a Maven-based Java project supporting TestNG and JUnit test framework
in your release pipeline.
The Maven Testing plug-in is containerized and supports Adaptive Testing functionality. This plug-in is available as a
Docker image on the customer support portal which has specific requisites and installation steps.
The plug-in is also available as a tar file on the customer support portal for customers who cannot use docker pull .
103

Continuous Delivery Director Integrations 1.0
Figure 32: To download the latest plug-in version, click the following icon:
Plug-in Version 1.5
Supported Versions
This plug-in has been tested with the following Maven versions:
•
3.6.2
•
3.6.3
What's New
The following updates were made for plug-in version 1.5:
•
The functionality of the Maven Project parameter in the Get Test Assets (Import Test Suites) task has changed.
Previously, you specified the name of a project from which to import test suites. Now you specify one or more relative
paths to subprojects separated by commas from which to import test suites.
•
The New or Updated Test Suites heuristic is now supported for SVN test suites. This metric is a weighting factor
when the Test Advisor intelligently selects a subset of test suites to run in subsequent test cycles.
The following updates were made for plug-in version 1.4:
•
A Project Base Directory parameter was added to the Get Test Assets task.
Manifest URL
For plug-in registration, use the following manifest URL:
http://<plugin-server>:<port>/cdd-maventesting-plugin/manifest.json
Configuration
To use this plug-in through the Containerized Manager, add the following lines to the Continuous Delivery Director
settings.properties file:
cdd.plugins.containerized.maventesting.container.image_name=docker-release-candidate-local.artifactory-
lvn.broadcom.net/com/ca/cdd/trunk/8.0/plugins/maventesting:29
cdd.plugins.containerized.maventesting.container.volumes.artifacts.volumes=dependencies:/home/cdd/.m2
cdd.plugins.containerized.maventesting.container.name_prefix=mt
Endpoint Parameters
The following parameters are required to create an endpoint:
•
Version Control System
Specify the version control system where your source project resides.
–
Git/SVN
•
Git/SVN Project URL
Specify the URL to access the Git/SVN project repository
•
Git/SVN Username
104

Continuous Delivery Director Integrations 1.0
Specify the Git/SVN user name to authenticate to Git/SVN.
•
Git/SVN Password
Specify the password for the Git/SVN user to authenticate to Git/SVN.
To check the connection to Maven and to the version control system, select Test Connection. The Test Connection
action returns the following results:
•
Success
The connection was successful
•
Failure
The connection failed
Get Test Assets
The Maven plug-in lets you import test suites into the Adaptive Testing Catalog.
Follow these steps:
1. Select Tests, then Adaptive Testing Catalog.
2. Specify the Application and the Application Version.
The menu next to the application name and version is activated.
3. Select Get Test Assets. The Import Test Suites dialog opens.
4. Fill in the following fields:
–
Branch
Specify the branch name.
–
Project Base Directory
Specify the relative path to the project base directory. This is the location of the project pom.xml.
–
Maven Project
Specify one or more relative paths to subprojects separated by commas from which to import test suites. Leave
empty to import from all subprojects.
NOTE
Subprojects (submodules) are regular Maven projects that inherit their configuration and dependencies
from a parent POM.
–
Source Set
(Optional). Specify the name of a source set from which to import test suites. Leave empty to import from all
projects and sub-projects.
NOTE
A source set is a collection of Java source files and additional resource files that are compiled and
assembled together to be executed. The main idea of source sets is to group files with a common
meaning for the project, without the need to separate those files in another project.
–
Additional Execution Parameters
(Optional) Specify comma-separated name: value pairs of parameters to pass on to Maven.
Example: HOST:google.com,PORT:8080
–
JVM Parameters
(Optional) Specify space-separated JVM parameters to customize individual instances.
Example: -Dtest.HOST=google.com Overrides the IP address or host name of URL used by the browser to
execute tests.
–
Tags
Select one or more tags to execute test suites tagged with your selection. Leave empty to execute all the test suites
under the application version.
Example: Type ro to retrieve all test suites tagged with labels beginning with ma, such as maven.sanity.test
105

Continuous Delivery Director Integrations 1.0
Micro Focus ALM Plug-in
The Micro Focus Application Lifecycle Management (ALM) plug-in enables you to import and run functional test sets as
your applications progress through your CI/CD pipeline.
Plug-in Version 2.4
Figure 33: Click the following icon to download the latest plug-in version:
NOTE
Micro Focus Application Lifecycle Management was formerly known as HP Application Lifecycle Management
(HP ALM).
This integration allows you to take advantage of all ALM UFT (Unified Functional Test) features while harnessing the
power of Continuous Delivery Director. By running functional test sets in the release pipeline, you get real-time execution
of functional tests. You also get the test results so you can see the context and status of the testing process.
This page explains how to link an ALM account to Continuous Delivery Director and how to configure ALM-related tasks.
Supported Versions
The ALM plug-in supports Application Lifecycle Management 12.xx.
NOTE
For OnPrem users: The ALM plug-in is not autoregistered. You can only run the ALM plug-in on a Windows
server.
For SaaS users: The ALM plug-in is not autoregistered. You can only run the ALM plug-in on an on-prem
Windows server connected to Continuous Delivery Director with the plug-in proxy.
For more information, see the ALM documentation at https://software.microfocus.com/en-us/solutions/software-
development-lifecycle.
What's New
The following updates were made for plug-in version 2.4:
•
Fixed: When a user stopped a phase while an ALM Adaptive Testing task was running, the plug-in did not abort the
run.
The following updates were made for plug-in version 2.2:
•
Tests can now run in batch mode. Previously, tests could only run one-by-one.
•
The Test Advisor can now run ALM test suites according to the New and Updated tests heuristic.
Set Up the Plug-in Server
The ALM plug-in uses ALM client tools which can run only on Windows. Therefore, you must install the plug-in on a
Windows server with Tomcat pre-installed. You also install the ALM client tools on the same Windows server and enable
the tools to work with the ALM application.
If Continuous Delivery Director is installed on a Windows server, you can install the ALM plug-in on the same Windows
server.
106

Continuous Delivery Director Integrations 1.0
If Continuous Delivery Director is not installed on a Windows server, install the ALM plug-in on a separate Windows
server.
ALM Plug-in System Landscapes
Example 1: Continuous Delivery Director installed on a Windows Server
Figure 34: ALM Plug-in 1
Explanation of Example 1
Three servers are used in this scenario:
•
Server A is a Windows server and contains the Continuous Delivery Director, the ALM plug-in, and the ALM client tools
installation files.
•
Server B contains the ALM installation files.
•
Server C contains the UFT (Unified Functional Testing) installation files.
Example 2: Continuous Delivery Director installed on a Linux Server
107

Continuous Delivery Director Integrations 1.0
Figure 35: ALM Plug-in 2
Explanation of Example 2
Four servers are used in this scenario:
•
Server A is a Linux server and contains the Continuous Delivery Director installation files.
•
Server B is a Windows server and contains the ALM plug-in and the ALM client tools installation files.
•
Server B contains the ALM installation files.
•
Server C contains the UFT (HP Unified Functional Test) installation files.
Follow these steps:
1. Provision a Windows server for the ALM plug-in.
Note:
–
If Continuous Delivery Director is installed on a Windows server, you can install the plug-in on the same Windows
server.
–
If Continuous Delivery Director is not installed on a Windows server, install the plug-in on a separate Windows
server.
2. On the Windows server, install Apache Tomcat 8.x.
3. From either the support site https://casupport.broadcom.com or the Continuous Delivery Director Integration Hub,
download the ALM packaged plug-in (*.*war file).
108

Continuous Delivery Director Integrations 1.0
4. On the Windows server, copy the ALM plug-in *.*war file.
5. Still in the Windows server, open Microsoft Internet Explorer as an administrator.
Note: Continuous Delivery Director supports Microsoft Internet Explorer versions 11 and higher.
6. Enter the URL: http://<ALM-Server>:<ALM-Port>/qcbin/start_a.jsp?common=true. The ALM
Management web page opens.
7. Follow the instructions in the tools section in the ALM management web page and deploy the following ALM client
tools on this server:
–
HP ALM Connectivity
–
HP ALM Client Registration
–
Shared Deployment for Virtual Environments
8. On the UFT server, verify that the DCOM configuration properties for that computer give you the proper permissions to
launch and configure the UFT COM server.
What's New
The following updates were made for plug-in version 2.1:
•
Support was added for Java 11.
Configuration
Register the plug-in and create endpoints as described in Manage Plug-ins.
Manifest URL
For plug-in registration, use the following ALM manifest URL:
http://<plugins-server>:<port>/cdd-alm-plugin/manifest.json
Endpoint Parameters
To create endpoints, provide the following parameters:
•
URL
Specify the ALM URL
Syntax: http://<ALM server name>[<:port number>]/
•
Username
Specify the ALM account user name
•
Password
Specify the ALM account password
To check the connection to ALM, use the endpoint Test Connection option. The Test Connection option returns the
following results:
•
Success
The connection was successful
•
FailureThe connection failed
Tasks
The following task types are available in the ALM plug-in:
Run Functional Test Set
The Run Functional Test Set task lets you schedule automated tests that are preconfigured in ALM. Tests in this test set
use server-side execution. This task contains the following fields:
109

Continuous Delivery Director Integrations 1.0
Input Parameters
•
Domain
Specify the ALM domain that contains the group of ALM projects where the required test set resides. Type an at sign
@ to get a list of domains for which you are authorized.
•
Project
Specify the ALM project where the required test set resides. Type an at sign @ to get a list of domain projects that you
are authorized to access.
•
Folder
Specify the name of the folder where the required test set resides.
Syntax: Root\Folder1\Folder2
•
Test Set Name
(Optional) Specify the name of the test set to run. If left empty, all test sets in the specified folder run. Type an at
sign @ to get a list of all the test sets of the specified folder.
•
Test Name
(Optional) Specify a single test to run. If left empty, all the tests in the specified test are set to run. Type an at sign @ to
get the list of all the tests of the specified test set.
•
Host Name
Specify the hostname of the UFT server.
•
Timeout
(Optional) Specify the number of seconds allowed to pass before the test execution fails.
When the tests run, you can view the status of the current test by hovering over the status icon of the task. The tasks fail if
one or more tests have failed during the run.
Import Functional Test Sets
The Import Functional Test Sets task lets you import preconfigured automated tests that are stored in ALM. This task
contains the following fields:
Input Parameters
•
Domain
Specify the ALM domain that contains the group of ALM projects where the required test sets reside. Type an at sign
@ to get a list of domains for which you are authorized.
•
Project
Specify the ALM project where the required test sets reside. Type an at sign @ to get a list of domain projects that you
are authorized to access.
•
Folder
Specify the name of the folder where the required test sets reside.
Syntax: Root\Folder1\Folder2
•
Host Name
Specify the host name of the UFT server.
•
Timeout
(Optional) Specify the number of seconds allowed to pass before the import job fails.
Microsoft Teams Plug-in
Use this plug-in to integrate Microsoft Teams real-time messaging with your release pipeline.
The messages that are posted are in the form of Teams message cards.
110
Continuous Delivery Director Integrations 1.0
Plug-in Version 1.2
Figure 36: To download the latest plug-in version, click the following icon:
What's New
The following changes were added for plug-in version 1.2:
•
You can now send messages to different teams and channels using the same webhook which saves you unnecessary
effort. To support this change, a new parameter, Webhook Suffix has been added to the Post Message task. This
parameter overrides the endpoint webhook suffix.
•
Additional Facts
You can now specify additional facts in the Post Message task in addition to the facts you specify in the Fact 1-3
Name and Fact Value 1-3 parameters. Previously, you could only define up to three facts.
The following changes were added for plug-in version 1.1:
•
You can now use a proxy server for the Teams plug-in. To support this functionality, a checkbox, Use Proxy, was
added to the endpoint parameters. If selected, the following fields appear:
–
Proxy Server URL
–
Proxy Server Username
–
Proxy Server Password
Supported Versions
The Teams plug-in supports the core Teams SaaS solution.
For more information, see the Teams documentation at https://teams.microsoft.com/.
Configuration
Register the plug-in and create endpoints as described in Manage Plug-ins.
Manifest URL
For plug-in registration, use the following Teams manifest URL:
http://<plugin-server>:<port>/cdd-msteams-plugin/manifest.json
Endpoint Parameters
The following parameters are required to create an endpoint:
•
Webhook URL
Copy and paste the URL of an incoming Webhook connector as defined in the channel settings.
•
Use Proxy
Select this option to connect to a remote endpoint through a proxy server
NOTE
If selected, the Proxy Server URL, Proxy Server Username, andProxy Server Password fields appear.
•
Proxy Server URL
111

Continuous Delivery Director Integrations 1.0
Specify the proxy URL including protocol, domain name/IP and port. Syntax: <protocol>://<hostname>:<port>. Ex.:
\"http://192.168.0.101:8080\".
•
Proxy Server Username
Specify a user name to authenticate to the proxy server. Leave empty if authentication is not needed (the proxy server
is public).
•
Proxy Server Password
Specify a password to authenticate to the proxy server. Leave empty if authentication is not needed (the proxy server
is public).
To check the connection to Teams, use the endpoint Test Connection option. The Test Connection option returns the
following results:
•
Success
Both connections were successful.
•
Failure
One or more connections failed.
Tasks
The following task types are available in the Teams plug-in:
Post Message
To send a message through your Teams incoming webhook, you post a JSON payload to the webhook URL. This payload
is in the form of a Teams message card. The Post Message task requires the following fields:
Input Parameters
TIP
You can use tokens in input parameters. To select from a list of available tokens, enter the percent sign (%) in
the task field.
•
Webhook Suffix
Specify a webhook suffix to override the value in the Webhook URL endpoint parameter. This parameter lets you send
messages to different teams and channels using the same webhook which saves you unnecessary effort.
•
Title
Specify a title to be displayed at the very top of the card.
•
Text
Specify text to be displayed in a normal font below the card title. Use text to display content, such as the description of
the entity being referenced, or an abstract of a news article. You can use simple Markdown, such as bold or italics to
emphasize words, and links to external resources.
•
Theme Color
Specify a custom brand color for the card in Hex code, for example, FF0000 for red and 00FF00 for green.
•
Additional Facts
(Optional) Specify facts as name/value pairs in JSON format, in addition to the facts you specify in the Fact 1-3 Name
and Fact Value 1-3 parameters. Facts are presented in a two-column layout - Name, and Value. The fact name is
rendered in a slightly more prominent font. Keep fact names short.
•
Fact 1 Name
Specify a fact name. Facts are presented in a two-column layout - Name, and Value. The fact name is rendered in a
slightly more prominent font. Keep fact names short.
•
Fact 1 Value
Specify the fact value. You can use Teams message card Markdown formatting.
•
Fact 2 Name
112

Continuous Delivery Director Integrations 1.0
Specify a fact name. Facts are presented in a two-column layout - Name, and Value. The fact name is rendered in a
slightly more prominent font. Keep fact names short.
•
Fact 2 Value
Specify the fact value. You can use Teams message card Markdown formatting.
•
Fact 3 Name
Specify a fact name. Facts are presented in a two-column layout - Name, and Value. The fact name is rendered in a
slightly more prominent font. Keep fact names short.
•
Fact 3 Value
Specify the fact value. You can use Teams message card Markdown formatting.
Nolio Release Automation Plug-In
This plug-in lets you leverage core Nolio application modeling and deployment capabilities.
Plug-in Version 5.5.9
Figure 37: Click the following icon to download the latest plug-in version:
NOTE
Formerly CA Release Automation
The Nolio Release Automation (Nolio) plug-in lets Continuous Delivery Director use Nolio applications and deployment
plans in release deployments.
Note: This plug-in is only available for on-premise installations.
Supported Versions
The Nolio plug-in supports Nolio 5.5.1 and above.
Capabilities
The Nolio plug-in lets you do the following tasks:
•
Import a full application model from a Nolio instance. You can include all Nolio applications models and their
environments in releases, phases, tasks, reports, and widgets.
•
Run a deployment plan in Nolio from a task in a release.
•
Run a deployment plan.
What's New
The following updates were made for plug-in version 5.5.9:
•
Support was added for Java 11.
Configuration
Register the plug-in and create endpoints as described in Manage Plug-ins.
The URL of the Nolio manifest for plug-in registration is http://<plugin-server>:<port>/cdd-ra-plugin/manifest.json.
113

Continuous Delivery Director Integrations 1.0
Select the Release Automation Endpoint Type in the ADD ENDPOINT dialog to create an endpoint for the Nolio plug-in.
The following Nolio information is required when you create an endpoint:
•
URL
Enter a valid access URL for the Nolio instance. The URL can be specified as http or https. The default Nolio
management server port is 8080.
Example: http://<ra-server>:8080
•
Username/Password
Enter the credentials of a Nolio user. The user must be authorized to view applications or create/execute a deployment
on the remote Nolio instance.
Tasks
The Nolio plug-in provides the following tasks:
•
Run Deployment
•
Run Process
Run Deployment Task
Release automation is a key component of your continuous delivery pipeline. The Run Deployment Task lets you
run a Nolio deployment plan in the context of Continuous Delivery Director phases and releases. This task lets you
orchestrate core Nolio activities at a high level. For example, a Continuous Delivery Director release might include multiple
applications that you can deploy through the applications Nolio deployment plans.
The Run Deployment task requires the following information, which must match the corresponding Nolio deployment plan
values:
TIP
Tokenize these values to enter them only once per release across phases and insulate yourself from changes
during the release execution process.
•
Application
Specifies the Nolio application name. Find application names in the Applications pane if you imported the Nolio
application model and assigned the relevant applications to the release.
Note: In Nolio, the application name on most Release Operations Center screens are in the top menu bar.
TIP
Type the @ symbol into the Application field to select from a list of applications in the Nolio instance.
After you populate the Application field, you can use the @ symbol in other fields to select from dynamic
parameters based on the application name. For example, the Project field provides a list of all projects
associated with the selected application.
•
Deployment Plan
Specifies the Nolio deployment plan name. Find the deployment plan name in the Deployment Plans by Projects
page in Release Operations Center. Select the relevant project for your application to see all deployment plans in a
table.
•
Build
Specifies the build number associated with the selected deployment plan. Every deployment plan requires a build
number. Find the build number on the Deployment Plans by Project page in the Deployment Plans table.
Note: For a list of available builds depending on application, project, and deployment plan, type the at symbol (@) in
the Build field.
•
Project
Specifies the project name under which you created the deployment plan. Find the project name in the left pane on the
Deployment Plans by Project page in Release Operations Center.
•
Environment
114

Continuous Delivery Director Integrations 1.0
Specifies the Nolio environment on which to perform the deployment. If you imported the application model from Nolio,
you can find the environments associated with that application on the Applications and Environments page on the
ADMINISTRATION tab of the Continuous Delivery Director UI. You can also find the environments associated with the
application on the Environments, Environments and Tags page of the Release Operations Center UI.
•
Deployment
Specifies the name of the deployment created by the Run Deployment task when you have chosen not to use a
manifest.
•
Manifest
Defines the XML with deployment parameters. You can also add values to the manifest using Continuous Delivery
Director tokens. At runtime, Continuous Delivery Director uses the manifest values when creating the release. Note:
Each process has its own unique manifest. To get the manifest:
a. In Nolio, select the relevant deployment tag.
b. From the right-click menu, select Generate Manifest. Your browser downloads the manifest file.
c. Using a text editor, open the manifest and specify the required values.
d. Copy and paste the updated manifest text into the Manifest field for the Run Deployment task.
Format: Free text
Limits: 10240 characters
Example:
<?xml version="1.0" encoding="UTF-8"?
>
<DeploymentManifest name="CounterWebApp-DeploymentPlan" project="CounterWebApp-
Project" build="1.0">
<properties></properties>
<Initialization>
<step name="STEP">
<PRE-PROCESS></PRE-PROCESS>
</step>
</Initialization>
<Deployment>
<step name="STEP 2">
<SampleProcess>
<Application_Parameters>
<DELAY_PARAMETER templateProperty="false">60</DELAY_PARAMETER>
</Application_Parameters>
</SampleProcess>
</step>
</Deployment>
<Post-Deployment></Post-Deployment>
</DeploymentManifest>
•
Fail This Task When Step Errors Occur In:
Specify that the Run Deployment task fails if a step in a selected stage is in failed paused status. A task in the failed
paused status indicates a problem with the deployment. To resolve the issue, go to the Nolio user interface, locate the
error, and select Resume Error.
Run Process Task
The Run Process task lets you use the Nolio API to run deployment tasks that are not part of a deployment plan.
This task has the following parameters:
Note: Except for Manifest, the following parameters are provided through the dynamic parameters function.
115
Continuous Delivery Director Integrations 1.0
•
Application
The application in Nolio that contains the process that you want to run
•
Environment
The Nolio environment that contains the process that you want to run
•
Process
The process that you want to run
•
Tag
•
Manifest
Defines the XML with release scope parameters and values for process execution. Note: Each process has its own
unique manifest. To get the manifest:
a. In Release Automation, select the relevant process tag.
b. From the right-click menu, select Generate Manifest. Your browser downloads the manifest file.
c. Using a text editor, open the manifest and specify the required values.
d. Copy and paste the updated manifest text into the Manifest field for the Run Process task.
Format: Free text
Limits: 10240 characters
The task shows the process status and progress.
To stop the task and the process execution, select Stop task.
The task succeeds when the process succeeds, and the task fails if the process fails.
Note: If the task fails, select the failed status to show the error details.
A task in the failed paused state indicates a problem with the process. To resolve the issue either:
•
Stop or skip the task.
•
Go to the Nolio UI, locate the error, and select Resume Error.
Application Model Import
During product configuration, you can import the application and environment models from Nolio. Using Nolio application
models lets you tie release activities and content to real applications and environments.
For more information about application model import, see Applications and Environments.
Rally
®
Plug-In
This plug-in integrates with project tracking and change management capabilities
NOTE
Formerly CA Agile Central
Plug-in Version 2.18
Figure 38: Click the following icon to download the latest plug-in version:
Agile management tools, like Rally, enhance release and application communication and insight across the continuous
delivery pipeline.
116

Continuous Delivery Director Integrations 1.0
Supported Versions
The Rally plug-in supports the core Rally SaaS solution.
The plug-in supports version 2.0 of the Rally API.
Capabilities
The Rally plug-in lets you perform the following tasks:
•
Import content from a Rally instance into an application version
•
Update application content in Rally from a task in a release
What's New
The following updates were made for plug-in version 2.18
•
Bugfix: Work items in Rally with Released status are not treated in Continuous Delivery Director as completed work
items. A green checkmark indicating Complete status is not assigned to any associated work items with the Rally
statuses Accepted and Released.
The following updates were made for plug-in version 2.17
•
Bugfix: Multiple duplicate copies of "actual" work items were generated when applications were shared with multiple
releases.
The following updates were made for plug-in version 2.16
•
You can now import and execute manual test suites
The following updates were made for plug-in versions 2.12-2.15
•
Assorted bug fixes
The following updates were made for plug-in version 2.11
•
A new field, Success Rate, has been added to the Check Test Case Results task. Users can enter the percentage of
tests that are required to pass for the task to succeed.
•
Support has been added for the Multi-Value Dropdown List, a Rally custom field type.
The following updates were made for plug-in version 2.5:
•
Support was added for Java 11.
The following updates were made for plug-in version 2.4:
•
Two new input parameters have been added, Additional Filters, and Import from Child Projects.
Configuration
Register the plug-in and create endpoints as described in Manage Plug-ins.
The URL of the manifest for Rally plug-in registration is http://<plugin-server>:<port>/cdd-rally-plugin/manifest.json
Select the Rally Platform Endpoint Type in the ADD ENDPOINT dialog to add an endpoint for the Rally plug-in. The
following Rally information is required when you create an endpoint:
•
URL
Specifies the URL to access the Rally instance.
Example: https://rally1.rallyserver.com
•
Workspace Name
117

Continuous Delivery Director Integrations 1.0
Specifies the name of the workspace that contains the project information to include as content for release application.
To see available workspaces in the Rally interface, click the building icon at the top left next to the project name.
•
API Key
Specifies the API Key that provides permission for API-based access to Rally information. To obtain an API key,
contact your administrator.
TIP
•
To generate an API Key by user in Rally, use the following link when logged in to Rally:
https://<rallyserver>/login/accounts/index.html#/keys
•
For security purposes, we recommend that you create a user in Rally for Continuous Delivery Director
and generate a key specific to that user.
WARNING
When you create an API key in Rally, ensure that the ALM WSAPI Read-only check box is cleared.
Otherwise, Rally tasks may fail with the error Update Task - HTTP/1.1 401 Unauthorized .
For more information, see KB000106976.
Tasks
The Rally plug-in provides the following tasks:
•
Update Content Item Status
•
Check Test Case Results
118

Continuous Delivery Director Integrations 1.0
TIP
For task fields where you can select a value from the Rally instance, type the @ symbol to receive a list of
available values to choose from.
Update Content Item Status
This task is named Rally Update in the UI. The task lets you dynamically update the status of a Rally work item from a
task.
Example: If you cannot close a story until the release deployment, this task closes the story after the deployment is
complete.
This task requires the following information:
•
Project Name
Specifies the name of the Rally project that contains the work item to update. The project name appears in the upper
left corner of the Rally interface.
•
Type
Specifies the work item type (Defect or Task).
•
Rally Item ID
Specifies the ID number of the specific work item to update.
Example: DE143243
•
New Item Status
Specifies the new status of the work item.
Example: Select Completed to close the work item when the task completes.
Check Test Case Results
This task allows you to view test case results for specific Rally stories and defects. The plug-in retrieves the results of all
test cases for the specified user stories and defects.
This task requires the following information:
•
Project Name
Specify the name of the Rally project that contains the test cases to query. The project name appears in the upper left
corner of the Rally interface.
•
Work Item IDs
Specify a list of user stories, test sets, and defect ID numbers for which you want to check test case results. Separate
the ID numbers with commas.
•
Test Case Type
Select the appropriate test case type from the drop-down list.
•
Success Rate
Specify the percentage of successful tests required for this Check Test Case Results task to succeed.
This field is mandatory, and the default value is 100%.
Example: If you enter 80 and less than 80% of the tests pass, the task fails.
Import Work Items
The Rally plug-in lets you import Rally work items into an application. Use this capability when you deploy applications in a
release to see information about related stories, tasks, and defects.
Follow these steps:
1. In a release, click the Work Items tab on the left menu.
2. Select Add Work Items.
119

Continuous Delivery Director Integrations 1.0
The ADD WORK ITEMS window opens.
3. Enter a name for the work items source.
Example: Rally Feed
4. Under Work Items Source, select the Rally plug-in and a configured Rally endpoint.
5. Provide information in the required parameter fields. The following fields let you filter the work item import results:
–
Project Name
Specifies the name of the Rally project that contains the content you want to import. The project name appears in
the upper left corner of the Rally interface. Use the @ symbol to select from a list of projects in the Rally endpoint.
Use the @ symbol in other fields to select from a dynamic list of entities associated with the selected project.
–
Release Name
Specifies the name of the release to import from. For a list of release names, select Portfolio, Release Planning
on the Rally interface.
–
Iteration Name
Specifies the iteration name. Populate this field to limit the imported content to a specific iteration. Select Track,
Iteration on the Rally interface to access a list of iteration names.
Example:
Deploy a release for Iteration 4 and show only Iteration 4 content.
–
Type
Specifies the type of work item you want to import.
–
Item Status
Specifies the item status types to import. This field lets you filter what is imported based on status.
Example:
Import only work items that are in the Done state.
–
Tags
Specify one or more tags to filter work items. Separate tags with commas.
–
Additional Filters
Specify one or more "field name":"value" pairs in JSON format to filter the imported work items. You can specify
either built-in or custom fields. The values set here override matching field values in the import dialog.
Syntax:
•
Date: {"field_name":"yyyy-mm-dd"}
•
Boolean: {"field_name":"true or false"}
List of standard Rally fields that support the Additional Filters parameter, including usage examples.
120

Continuous Delivery Director Integrations 1.0
•
Accepted Date: {"Accepted Date":"2020-01-09"}
•
Attachments: {"Attachments":["Bill.jpg"]}
•
Blocked: {"Blocked":"true"}
•
Blocked Reason: {"Blocked Reason":"blocked"}
•
Children: {"Children":["Fix the problem with the test criteria"]}
•
Creation Date: {"Creation Date":"2020-01-09"}
•
Defects: {"Defects":["Defect name"]}
•
Defect Status: {"Defect Status":["Some closed"]}
•
Description: {"Description":"description text"}
•
Display Color: {"Display Color":"#21a2e0"}
•
Expedite: {"Expedite":"true"}
•
Feature: {"Feature":"F94042"}
•
Flow State: {"Flow State":"New"}
•
Formatted ID: {"Formatted ID":"US643202"}
•
In Progress Date: {"In Progress Date":"2020-01-08"}
•
Iteration: {"Iteration":"CDD 7.2-7"}
•
Last Update Date: {"Last Update Date":"2020-01-23"}
•
Milestones: {"Milestones":["milestone1"]}
•
Name: {"Name":"Execute - Java Test Frameworks (Maven)"}
•
Notes: {"Notes":"notes text"}
•
Owner: {"Owner":"[email protected]"}
•
Plan Estimate: {"Plan Estimate":"21"}
•
Ready: {"Ready":"true"}
•
Release: {"Release":"CDD7.2"}
•
Risks {"Risks":["risk1"]}
•
Schedule State: {"Schedule State":"New"}
•
Submitted by: {"Submitted by":"[email protected]"}
•
Tags: {"Tags":["tag1","tag2"]}
•
Task Actual Total: {"Task Actual Total":"32"}
•
Task Estimate Total: {"Task Estimate Total":"32"}
•
Task Remaining Total: {"Task Remaining Total":"32"}
•
Task Status: {"Task Status":["In progress","Completed"]}
•
Tasks: {"Tasks":["Coding"]}
•
Test Case Status: {"Test Case Status":["None"]}
•
Test Cases: {"Test Cases":["Testcase1","Testcase3"]}
•
User: {"field_name":"e-mail address"}
–
Import from Child Projects
Select this option to import work items from projects that are children of the parent project specified in the Project
parameter.
6. Select Create.
Tutorial Videos
Overview
The following video shows an overview of how Continuous Delivery Director integrates with Rally, and how to use the
integration to manage and monitor multi-application release content:
121

Continuous Delivery Director Integrations 1.0
Configuration
The following video shows how to configure Continuous Delivery Director integration with Rally:
Get Test Assets (Rally)
The Rally plug-in lets you import test suites into the Adaptive Testing Catalog.
1. Select Tests, then Adaptive Testing Catalog.
2. Specify the Application and the Application Version. The menu next to the application name and version is
activated.
3. Select Get Test Assets.
4. Fill in the following fields:
TIP
Open your Rally instance so that you can check input values.
NOTE
Use the @ symbol in the following fields to select from a dynamic list of entities associated with the selected
project.
•
Test Source Name
•
Plug-in
Select Rally and Import Test Suites (Rally).
•
Endpoint
Select a Rally endpoint.
•
Project Name
Specify the name of a Rally project that contains the test suites that you want to import. The project name appears
in the upper left corner of the Rally interface. Use the @ symbol to select from a list of projects in the Rally
endpoint.
•
Release Name
Specify the name of the required release. For a list of release names, on the Rally interface, select Portfolio, then
Release Planning.
•
Iteration Name
Specify the iteration name. Populate this field to limit the imported test sets to a specific iteration. To access a list of
iteration names, on the Rally interface, select Track, then Iteration.
•
Test Case Type
Select a Rally Test Case Type, such as Regression.
•
Tags
Select one or more tags to import manual tests. For example, type tst01 to retrieve all test suites tagged with
labels beginning with tst01, such as tst01.regression.test.
•
Additional Filters
Specify one or more "field name":"value" pairs in JSON format to filter the imported test suites items. You can
specify either built-in or custom fields. The values set here override matching field values in the import dialog.
Syntax:
–
Date: {"field_name":"yyyy-mm-dd"}
–
Boolean: {"field_name":"true or false"}
List of standard Rally fields that support the Additional Filters parameter, including usage examples.
122

Continuous Delivery Director Integrations 1.0
–
Accepted Date: {"Accepted Date":"2020-01-09"}
–
Attachments: {"Attachments":["Bill.jpg"]}
–
Blocked: {"Blocked":"true"}
–
Blocked Reason: {"Blocked Reason":"blocked"}
–
Children: {"Children":["Fix the problem with the test criteria"]}
–
Creation Date: {"Creation Date":"2020-01-09"}
–
Defects: {"Defects":["Defect name"]}
–
Defect Status: {"Defect Status":["Some closed"]}
–
Description: {"Description":"description text"}
–
Display Color: {"Display Color":"#21a2e0"}
–
Expedite: {"Expedite":"true"}
–
Feature: {"Feature":"F94042"}
–
Flow State: {"Flow State":"New"}
–
Formatted ID: {"Formatted ID":"US643202"}
–
In Progress Date: {"In Progress Date":"2020-01-08"}
–
Iteration: {"Iteration":"CDD 7.2-7"}
–
Last Update Date: {"Last Update Date":"2020-01-23"}
–
Milestones: {"Milestones":["milestone1"]}
–
Name: {"Name":"Execute - Java Test Frameworks (Maven)"}
–
Notes: {"Notes":"notes text"}
–
Owner: {"Owner":"[email protected]"}
–
Plan Estimate: {"Plan Estimate":"21"}
–
Ready: {"Ready":"true"}
–
Release: {"Release":"CDD7.2"}
–
Risks {"Risks":["risk1"]}
–
Schedule State: {"Schedule State":"New"}
–
Submitted by: {"Submitted by":"[email protected]"}
–
Tags: {"Tags":["tag1","tag2"]}
–
Task Actual Total: {"Task Actual Total":"32"}
–
Task Estimate Total: {"Task Estimate Total":"32"}
–
Task Remaining Total: {"Task Remaining Total":"32"}
–
Task Status: {"Task Status":["In progress","Completed"]}
–
Tasks: {"Tasks":["Coding"]}
–
Test Case Status: {"Test Case Status":["None"]}
–
Test Cases: {"Test Cases":["Testcase1","Testcase3"]}
–
User: {"field_name":"e-mail address"}
•
Import from Child Projects
Select this option to import test sets from projects that are children of the parent project specified in the Project
parameter.
•
Build Number
Enter the tested build number.
•
Execution Duration in Hours
•
Polling Period in Minutes
•
Tags
Select or create one or more tags to label the imported tests.
NOTE
To import manual test results from Rally, enter the tag Manual.
123

Continuous Delivery Director Integrations 1.0
The test results for the specified build appear on the Adaptive Testing Results page, together with links to the associated
reports in Rally.
Red Hat Ansible Plug-in
This plug-in connects Continuous Delivery Director to Ansible, allowing you to run playbooks.
Plug-in Version 2.0
This plug-in is available as a Docker image on the customer support portal which has specific requisites and installation
steps.
The plug-in is also available as a tar file on the customer support portal for customers who cannot use docker pull .
Figure 39: Click the following icon to download the latest plug-in version:
Ansible is an open-source automation engine that automates IT tasks such as software provisioning, configuration
management, and application deployment.
The main components of Ansible are playbooks, written in YAML format. Playbooks can be used to manage
configurations of and deployments to remote machines. Playbooks are stored in the project base path for each project.
Supported Versions
The Ansible plug-in supports Ansible 2.7.5 and higher.
For more information, see the Ansible documentation at https://www.ansible.com/
What's New
The following updates were made for plug-in version 2.0:
•
This plug-in now supports the capability to add multiple applications to tasks and to assign different build numbers
to each application. To support this capability, the Build input parameter for the Run Playbook task is now optional;
previously this parameter was mandatory.
The following updates were made for plug-in version 1.3:
•
A new Build parameter was added to the input parameters for the Run Playbook task.
The following updates were made for plug-in version 1.1:
•
Support was added for Java 11.
Capabilities
Runs Ansible playbooks according to specified input parameters.
Prerequisites
•
A Docker Engine machine is provisioned.
•
The containerized-manager plug-in is deployed on a Docker Engine machine.
•
The required Docker images have been pulled and enabled on the Docker Engine machine.
•
The Ansible Core plug-in is registered in your Continuous Delivery Director system.
124

Continuous Delivery Director Integrations 1.0
NOTE
•
Set Up Containerized Plug-ins
Manifest URL
For plug-in registration, use the following Ansible manifest URL:
http://<plugin-hostname>:<port>/containerized/plugins/cdd-ansiblecore-plugin/manifest.json
Endpoint Parameters
The following parameters are required to create an endpoint:
•
Git Project URL
Specify the URL to access the Git project repository where the Ansible playbooks are located.
•
Git Username
Specify the username to authenticate to the Git project repository.
Note: Required only when the Git repository is not a public repository.
•
Git Password
Specify the password to authenticate to the Git project repository.
Note: Required only when the Git repository is not a public repository.
•
Target Machine Authentication TypeSpecify the method to authenticate to the target machine.
–
None
–
SSH
•
Username
Specify the username to authenticate to the target machine.
•
Private Key
Specify the SSH private key to authenticate to the target machine.
•
Private Key Passphrase
Specify the passphrase if the SSH private key is protected.
–
Credentials
•
Username
Specify the username to authenticate to the target machine.
•
Password
Specify the password to authenticate to the target machine.
•
Vault ID
Specify an Ansible vault identifier.
•
Vault Password
Specify the Ansible vault password.
•
Use Become (Privilege Escalation)
Select this option to enable the login/remote user to execute tasks and create resources with the identity and
permissions of another user.
NOTE
To enable the Use Become (Privilege Escalation) option:
1. Ensure that the following lines are configured in the inventory file. This file (by default, Ansible uses a
simple INI format) describes hosts and groups in Ansible and should be located in the Git project repository
where the Ansible playbooks are located.
2. Replace <password> with a suitable Ansible password:
[all:vars]
125

Continuous Delivery Director Integrations 1.0
ansible_become_method=su
ansible_become_pass=<password>
•
Run As User
Run operations as this user. If left empty, root is used.
To check the connection, select Test Connection.
Tasks
The Ansible plug-in provides the following task:
•
Run Ansible Playbook
Run Ansible Playbook
This task requires the following information:
Input Parameters
•
Playbook Branch
Specify the branch with which to work.
•
Playbook Path
Specify the path to the folder inside the remote project that contains the playbook you want to run.Example:
playbooks/myplaybook.yml
•
Inventory Path
(Optional) Specify the path to the folder inside the remote project that contains the inventory.
Example: inventory/myinventory
•
Tags To Run
(Optional) Only run plays and tasks whose tags do not match the specified tags (comma-separated).
•
Build
(Optional) Specify an Ansible build/change number to mark a change as deployed and to promote as a successful
build/change to the next phase. You can use tokens such as last_successful_build.
•
Tags To Skip
(Optional) Only run plays and tasks whose tags do not match the specified tags (comma-separated).
•
Task To Start At
(Optional) Start the playbook at the task matching the specified name.
•
Number Of Parallel Processes (Forks)
(Optional) Specify the number of parallel processes to use (default=5).
•
Hosts Limit
(Optional) Run the playbook only against one or more members of the host group. You can specify single or multiple
hostnames (comma-separated), a group or a negated limit.
Example: all:!host1
•
Extra Variables(Optional) A list of {\"field name\":\"value\"} pairs. You can provide multiple fields in the following
format: {\"field1\":\"value1\",\"field2\":\"value2\"...}.
•
Verbosity(Optional) Determine the level of detail of the debug output Ansible produces as the playbook
executes.Values: Normal, Verbose, More Verbose, Debug, Connection Debug
Red Hat Ansible Tower Plug-in
This plug-in connects Continuous Delivery Director to Red Hat Ansible Tower, allowing you to execute jobs and view the
job output details.
126

Continuous Delivery Director Integrations 1.0
Plug-in Version 2.3.1
Figure 40: Click the following icon to download the latest plug-in version:
This plug-in downloads and stores job outputs in the artifacts folder under the plug-in home directory: ({cdd-home-
folder}/artifacts/{current-date-yyyymmdd}/{tenant-id}/plugins/ansibletower/{executionId}).
You must mount the home directory on a shared file system to enable user access.
When a job is run, the plug-in generates a URL to the job output file. In the Continuous Delivery Director user interface,
users can click a link to view or download the file. Users who do not have permission to access the shared folder will not
be able to download the file.
REMEMBER
To free up disk space, if you download output files, purge the old output files.
Supported Versions
The Ansible Tower plug-in supports Red Hat Ansible Tower 3.x.
For more information, see the Ansible Tower documentation at https://www.ansible.com/
Capabilities
Runs Ansible Tower jobs, according to templates and template parameters.
Change History
The following update was made for plug-in version 2.3.1:
•
Bugfix: Entering a build number in the Run Job Template task is now optional, because builds are not relevant in user
scenarios such as hardware provisioning and network configuration.
The following update was made for plug-in version 2.3:
•
Bugfix: When a Run Job Template task fails, the job ID token value is not saved in Continuous Delivery Director.
The following update was made for plug-in version 2.2:
•
The Build/Change ID field in the Run Job Template task was renamed to Build Number (Deprecated). This field is
deprecated; you can now specify the build number per application in the Builds For Applications section of this task.
The following update was made for plug-in version 2.1:
•
Fixed:Template Name field. Entering a value which included a colon ":" generated an error.
The following update was made for plug-in version 2.0:
•
You can now retrieve Ansible Tower log files.
The following update was made for plug-in version 1.0.5:
•
Support was added for Java 11.
The following update was made for 1.0.4:
•
A new Authentication Method endpoint parameter has been added. In addition to Basic authentication, a new
method, Bearer, is now available. This method allows the Ansible Tower plug-in to interface with systems that allow
authentication with an API token.
127

Continuous Delivery Director Integrations 1.0
The following update was made for 1.0.2:
•
A new Build/Change ID field was added to the Run Job Template task.
Configuration
Follow these steps:
1. Install the Ansible Tower application according to Red Hat Ansible Tower requirements.
–
For more information about how to install and configure Ansible Tower, see the Ansible Tower installation
documentation at https://www.ansible.com/.
2. Register the plug-in and create endpoints as described in Manage Plug-ins.
3. Ensure that the plug-in home folder is mounted to a shared file system.
Manifest URL
For plug-in registration, use the following Ansible Tower manifest URL:
http://<plugin-hostname>:<port>/cdd-ansibletower-plugin/manifest.json
Endpoint Parameters
The following parameters are required to create an endpoint.
•
Ansible Tower Server URL
Enter the URL of the remote Ansible Tower instance to be used for connection purposes.
Example: https://example.testansibleserver.com:443/
•
Authentication Method
Select an authorization method to use to establish the connection to Ansible Tower.
Values: Basic, Bearer
–
Basic
•
Username/Password
Specify valid credentials to authenticate to Ansible Tower.
–
Bearer is used to interface with systems that allow authentication with API keys.
•
API TokenSpecify an Ansible Tower API token.
•
Trust Any SSL Certificate
Select this option if you want to allow untrusted and unsigned SSL/TLS certificates.
Warning: Use at your own risk! Selecting this option can expose your environment to "man in the middle" attacks. CA
does not accept responsibility for security vulnerabilities that are caused by selection of this option.
•
Store Job Output
Select this option to download and store the output file in the plug-in shared home folder: ({cdd-home-folder}/
artifacts/{current-date-yyyymmdd}/{tenant-id}/plugins/ansibletower/{executionId})
Warning: Use at your own risk! Selecting this option can expose your environment to "man in the middle" attacks. CA
does not accept responsibility for security vulnerabilities that are caused by the selection of this option.
•
Shared File System Location
This field appears only if the Store Job Output option is selected.
Provide the shared file system path. CDD will concatenate the file location and will provide an
accessible link. For example, if the base URL is: \\fs01\cdd\, the task displays the URL \\fs01\cdd
\artifacts\20190428\00000000-0000-0000-0000-000000000000\plugins\ansibletower
\45797_825_5cadd64cf3b92918903sc0da\job_5107.txt. If you do not enter a value, the task displays the
local path on the plug-in server machine.
To check the connection to Ansible Tower, use the endpoint Test Connection option.
128

Continuous Delivery Director Integrations 1.0
Note: The connectivity test enables a registry scan from the Defender (specified in the Defender Host Name endpoint
parameter).
Tasks
The Ansible Tower plug-in provides the following task:
•
Run Job Template
Run Job Template
The task lets you run an Ansible Tower job.
This task requires the following information:
Input Parameters
•
Template name
Specify the name of an existing Ansible Tower job template.
•
Template Parameters
Specify the Ansible Tower job parameters in JSON format. Example:
{
"extra_vars": {"message":"A message to be passed", "pauseInSec":1}
}
"message" and "pauseInSec" are both extra variables to be passed to the Ansible Tower job.
•
Build Number (Deprecated)
This field is deprecated; you can now specify the build number per application in the Builds For Applications section
of this task.
Output Parameters
•
Job Id
Specify the Ansible Tower job ID to be returned as a response from the Ansible Tower job. You can create a token
parameter that contains this value.
Value: An integer
NOTE
How to Integrate Ansible Tower with CA Continuous Delivery Director.pdf
Red Hat OpenShift Plug-in
This plug-in lets you control your Kubernetes environment from your CI/CD pipeline.
Plug-in Version 2.2
Figure 41: Click the following icon to download the latest plug-in version:
OpenShift is an open-source container application platform based on the Kubernetes container orchestrator for enterprise
application development and deployment. You can use this integration to containerize and manage your existing
applications and automate routine configuration tasks.
129

Continuous Delivery Director Integrations 1.0
Use this plug-in to link a source control system, such as Bitbucket or GitHub to Continuous Delivery Director. When
connected to Continuous Delivery Director, any updates to containers that are managed by OpenShift are seamlessly
referenced in your CD/CI pipeline. This plug-in allows Continuous Delivery Director to display information about
your OpenShift development activity in the corresponding release.
This page explains how to link a source control system and an OpenShift project to Continuous Delivery Director and how
to configure OpenShift-related tasks.
Supported Versions
The OpenShift plug-in supports the core OpenShift solution.
For more information, see the OpenShift documentation at https://docs.openshift.com
What's New
The following updates were made for 2.2
•
Support was added for the following source control systems: GitLab, AWS S3, Web Services.
•
Basic authentication using a username and password was added.
•
A Branch parameter was added to the GitHub endpoint parameters.
•
A Trust Any SSL Certificate option was added to the endpoint parameters.
•
A YAML Settings field was added to the Create Deployment task.
The following updates were made for 2.1
•
Multiple bug fixes.
The following updates were made for 2.0
•
Namespace support changes.
The following updates were made for 1.3
•
Minor fix for connectivity testing.
The following updates were made for 1.1
•
Support was added for Kubernetes versions 1.9 and higher.
•
Support was added for Java 11.
Release Tasks
Tasks
The OpenShift plug-in supports the following task types in your Continuous Delivery Director release pipeline:
•
Create Deployment
•
Delete Deployment
•
Edit BuildConfig
•
Set Image
•
Start Build
Configure an OpenShift Endpoint
You are familiar with OpenShift.
130

Continuous Delivery Director Integrations 1.0
You have the Can create endpoints permission.
1. Register the plug-in as described in Manage Plug-ins.
The manifest for the OpenShift plug-in is http://<host>:<port>/cdd-openshift-plugin/manifest.json .
2. From the Administration menu, click Endpoints > Add Endpoint.
3. In the ADD ENDPOINT dialog, select the OpenShift plug-in.
4. Configure the following input parameters:
•
URL
Specify the URL of the OpenShift repository. Example: http://ec2-17-04-196-us-
east-6.compute.amazonaws.com/openshift
•
Namespace
Specify the OpenShift project to use.
NOTE
In OpenShift, a project is a Kubernetes namespace with additional annotations.
•
Username
Specify a user name to authenticate to your cluster.
•
Password
Specify a password to authenticate to your cluster.
•
Source Control
Select the required source control system to connect to your file repository.
GitHub
–
GitHub API URL
–
GitHub Owner
–
GitHub Repository
–
GitHub Branch
–
GitHub Username
–
GitHub Password
GitLab
–
GitLab API URL
–
Authentication Method
Select either OAuth2 Token or Personal Access Token.
–
GitLab Owner
–
GitLab Repository
–
GitLab Branch
Bitbucket
–
Bitbucket API URL
–
Account Name/Project Key
Specify the Bitbucket account name or project key.
–
Bitbucket Repository
–
Bitbucket Branch
–
Bitbucket Username
–
Bitbucket Password
AWS S3
131

Continuous Delivery Director Integrations 1.0
–
Service API URL
–
Region
–
Access Key
–
Secret Key
–
Bucket Name
Web Service
–
Web Service API URL
–
Web Service Username
–
Web Service Password
•
Trust Any SSL Certificate
Select this option if you want to allow untrusted and unsigned SSL/TLS certificates.
WARNING
Use at your own risk! Selecting this option can expose your environment to "man in the middle" attacks.
CA Technologies does not accept responsibility for security vulnerabilities that are caused by selecting
this option.
5. To check the connection to OpenShift and to the source control system, click Test Connection.
6. Click Add.
Create Deployment (OpenShift)
This task lets you create an OpenShift deployment to run in the context of Continuous Delivery Director phases and
releases.
One or more OpenShift endpoints are available.
This task creates a deployment package upon the arrival of a build notification. Each time a deployment is triggered, a
deployer pod is started and manages the deployment
1. In a release, create an automatic task as described in Create Automatic Tasks.
2. Configure the following input parameters:
TIP
Values: To define a value, do one of the following actions:
•
To select from a list of possible values, type an at sign "@" in the field
Example: Deploy Tomcat
•
To select from a list of built-in tokens (reusable placeholders that are used to create generic workflows),
type a percent sign "%" in the field
•
Type free text
•
Enter a combination of free text and tokens
•
Namespace
(Optional) Specify the OpenShift virtual cluster namespace. For more information about namespaces, see the
OpenShift documentation at https://docs.openshift.com.
Values: If not specified, the plug-in checks that the YAML file indicated in the Manifest File Path field for the
namespace. If no other namespace is found, the plug-in uses the OpenShift default namespace.
•
Branch
(Optional) Specify the source control branch with which you want to work.
•
Manifest File Path
Specify the file path to a YAML file in the source control repository. Example: app/deployment.yaml
•
YAML Settings
132

Continuous Delivery Director Integrations 1.0
Specify a list of key/value pairs to update in the deployment YAML manifest. For example: in order to update the
image.tag element of a manifest file, specify image.tag: saas-dev-1.6.0.7 . You can specify multiple key/
value pairs separated by lines.
3. Click Create.
Delete Deployment (OpenShift)
One or more OpenShift endpoints are available.
1. In a release, create an automatic task as described in Create Automatic Tasks.
2. Configure the following input parameters:
TIP
Values: To define a value, do one of the following actions:
•
To select from a list of possible values, type an at sign "@" in the field
Example: Deploy Tomcat
•
To select from a list of built-in tokens (reusable placeholders that are used to create generic workflows),
type a percent sign "%" in the field
•
Type free text
•
Enter a combination of free text and tokens
•
Namespace
(Optional) Specify the OpenShift virtual cluster namespace. For more information about namespaces, see the
OpenShift documentation at https://docs.openshift.com.
Values: If not specified, the plug-in checks that the YAML file indicated in the Manifest File Path field for the
namespace. If no other namespace is found, the plug-in uses the OpenShift default namespace.
•
Branch
(Optional) Specify the source control branch with which you want to work.
•
Manifest File Path
Specify the file path to a YAML file in the source control repository. Example: app/deployment.yaml
3. Click Create.
Edit BuildConfig (OpenShift)
This task lets you modify an existing OpenShift build configuration.
One or more OpenShift endpoints are available.
In OpenShift, a build configuration describes a single build definition and a set of triggers for when a new build should be
created. A build configuration is defined by a BuildConfig, which is a REST object that can be used in a POST to the API
server to create a new instance.
1. In a release, create an automatic task as described in Create Automatic Tasks.
2. Configure the following input parameters:
TIP
Values: To define a value, do one of the following actions:
•
To select from a list of possible values, type an at sign "@" in the field
133

Continuous Delivery Director Integrations 1.0
Example: Deploy Tomcat
•
To select from a list of built-in tokens (reusable placeholders that are used to create generic workflows),
type a percent sign "%" in the field
•
Type free text
•
Enter a combination of free text and tokens
•
Namespace
(Optional) Specify the OpenShift virtual cluster namespace. For more information about namespaces, see the
OpenShift documentation at https://docs.openshift.com.
Values: If not specified, the plug-in checks that the YAML file indicated in the Manifest File Path field for the
namespace. If no other namespace is found, the plug-in uses the OpenShift default namespace.
•
BuildConfig Name
Specify a unique ID of an OpenShift build configuration.
•
Dockerfile
(Optional) Specify the container name in the OpenShift deployment. Example: docker.bintray.io/jfrog/ca-
cdd:8.2.0
•
Image Stream Name
Specify the name of an image stream.
•
Image Stream Tag
(Optional) Specify the tag or tags that are associated with the image stream
3. Click Create.
Set Image (OpenShift)
This task lets you update existing container image(s) of resources.
One or more OpenShift endpoints are available.
1. In a release, create an automatic task as described in Create Automatic Tasks.
2. Configure the following input parameters:
TIP
Values: To define a value, do one of the following actions:
•
To select from a list of possible values, type an at sign "@" in the field
Example: Deploy Tomcat
•
To select from a list of built-in tokens (reusable placeholders that are used to create generic workflows),
type a percent sign "%" in the field
•
Type free text
•
Enter a combination of free text and tokens
•
Namespace
(Optional) Specify the OpenShift virtual cluster namespace. For more information about namespaces, see the
OpenShift documentation at https://docs.openshift.com.
Values: If not specified, the plug-in checks that the YAML file indicated in the Manifest File Path field for the
namespace. If no other namespace is found, the plug-in uses the OpenShift default namespace.
•
Deployment Name
Specify the OpenShift deployment name.
•
Container Name
Specify the container name in the OpenShift deployment.
•
Image Name
Specify the name of the image to set.
134

Continuous Delivery Director Integrations 1.0
3. Click Create.
Start Build (OpenShift)
Automatically start a new build from an existing build configuration in your current OpenShift project.
One or more OpenShift endpoints are available.
1. In a release, create an automatic task as described in Create Automatic Tasks.
2. Configure the following input parameters:
TIP
Values: To define a value, do one of the following actions:
•
To select from a list of possible values, type an at sign "@" in the field
Example: Deploy Tomcat
•
To select from a list of built-in tokens (reusable placeholders that are used to create generic workflows),
type a percent sign "%" in the field
•
Type free text
•
Enter a combination of free text and tokens
•
Namespace
(Optional) Specify the OpenShift virtual cluster namespace. For more information about namespaces, see the
OpenShift documentation at https://docs.openshift.com.
Values: If not specified, the plug-in checks that the YAML file indicated in the Manifest File Path field for the
namespace. If no other namespace is found, the plug-in uses the OpenShift default namespace.
•
BuildConfig Name
Specify a unique ID of an OpenShift build configuration.
•
Build Number
Specify an OpenShift build number. You can use tokens such as last_successful_build to promote
applications across environments.
3. Click Create.
REST Plug-In
This plug-in provides an interface to perform REST operations in a release.
Plug-in Version 2.6
Figure 42: Click the following icon to download the latest plug-in version:
The REST plug-in provides a way to interact with REST-enabled remote components that do not have a packaged plug-in.
Use the REST plug-in to perform HTTP operations on any web-based remote application that has a REST API.
NOTE
We recommend that you test your REST API calls before you set up generic RESTful tasks.
Capabilities
The REST plug-in lets you execute a REST (HTTP) call in a task. This plug-in supports REST 2.0.
135

Continuous Delivery Director Integrations 1.0
What's New
The following updates were made for plug-in version 2.6:
•
You can now use top-level domain names that do not appear in a list of valid generic top-level domains. To support this
capability, a new property was added to the settings.properties file of the REST plug-in:
cdd.plugins.rest.url_validator.valid_generic_top_level_domain=
By default, this property is empty. You can enter multiple top-level domains separated by commas. For example:
cdd.plugins.rest.url_validator.valid_generic_top_level_domain=broadcom,testca,caqa
You can also add this property to your custom on-premise settings.properties file (/home/cdd/.cdd/conf/
settings.properties)
The following updates were made for plug-in version 2.5:
•
A new Authentication Method endpoint parameter has been added. In addition to Basic authentication, a
new method, Bearer, is now available. This method allows the REST plugin to interface with systems that allow
authentication with an API token.
•
Support was added for Java 11.
Configuration
Register the plug-in and create endpoints as described in Manage Plug-ins.
The URL of the REST manifest for plug-in registration is http://<plugin-server>:<port>/cdd-rest-plugin/manifest.json.
The following information is required when you create an endpoint:
•
Base URL
Specify the base URL of the REST API. The base URL is common to all REST task instances that use the endpoint.
Include in the base URL the remote component address and port, and the http schema (http or https).
Example: https://www.googleapis.com/gmail/v1/users
Each REST task specifies a specific URL postfix to append to the base URL of the endpoint.
•
Authentication Method
Select an authorization method to use to establish the connection to the REST API.
Values: Basic, Bearer
–
Basic
•
Username/Password
Specify valid credentials for accessing the REST API that you want to call.
–
Bearer is used to interface with systems that allow authentication with API keys.
–
API TokenSpecify an API token to authenticate to the API.
•
Proxy Server URL
Specify the proxy server URL. This URL must contain the protocol, domain name or IP, and the port (if the port is not
standard).
Example: https://192.168.0.1:8443
•
Proxy Server Username/Proxy Server Password (Optional)
Specify access credentials for the proxy server. If your proxy server does not require any authorization credentials,
leave this field empty.
Tasks
The REST plug-in provides the following task:
•
REST
136

Continuous Delivery Director Integrations 1.0
REST Task
The REST task lets you execute a REST API call within a release. The task has the flexibility to interface with any remote
component that has a REST interface.
The REST task requires the following information:
Input Parameters
•
URL
Specifies the URL postfix for the REST call you make. The URL postfix is appended to the base URL that you enter
when you configure the base endpoint.
Example: /userId/drafts/id
In this case, the complete URL is: https://www.googleapis.com/gmail/v1/users/userId/drafts/id.
Note: The URL task field only requires the postfix value.
Warning: Do not specify tokens in the URL field.
•
Method
Specifies the method of the REST call.
Values: GET, POST, PUT, PATCH, DELETE, HEAD
•
JSON Body(Optional)
Specifies the full JSON body of the request.
Limits: 1024 characters
•
Post Script (Optional)
Specifies a JavaScript snippet (with a limit of 1024 characters) that runs after the REST call executes. It should
process its response to determine the task result and status. It can contain the following parameters:
–
REST JSON response code
The "responseCode" JavaScript variable holds the HTTP response status code that the remote REST endpoint
returns.
–
REST JSON response
The "response" JavaScript object holds the JSON response that the remote REST endpoint returns.
–
Task status text
The "status" JavaScript variable defines the expected task status text that is displayed on the UI.
–
Task state
The returned JavaScript Boolean code controls the task state.
Values: true (success), false (failure)
Note: Set the JavaScript snippet source code inline as the value of this task parameter.
Example: A REST call may return a response like the following:
{
"data": [
{
"state": "Failed Verification"
}
]
}
Here is an example post-script to handle this type of response:
if (responseCode == 200){
status=response.data[0].state; // The task status displays the state field of the
first data element of the JSON response.
if (status=="Failed Verification") return false; // If the state equals “Failed
Verification” the task fails.
} else {
137

Continuous Delivery Director Integrations 1.0
status="Operation Failed";
return false;
}
Note: The format of the response object is different for each REST call. In this example, the response.data[0].state
shows a case where the returned response JSON has an array type data field that contains a state field.
You can embed tokens in the JavaScript snippet as input parameters to this post script. In the preceding example,
you can use a token name to hold the Failed Verification string.
Note: You cannot use tokens as output parameters of this post script. You can only use tokens as input parameters,
and you cannot set the token values.
Note: If you do not supply a post script, any REST call is considered successful, even if, for example, its status
code is 401 Unauthorized. This allows you to make the decision on how to handle any type of condition, including
mixed conditions whose state may be unclear.
•
Headers
Specifies a list of HTTP headers of the request. The list contains header name and header value pairs that are
separated by colons.
Example:
accept:*/*
accept-encoding:gzip, deflate
accept-language:en-GB,en;q=0.8,en-US;q=0.6,he;q=0.4
authorization:SAPISIDHASH 64219e71abad
content-length:300
content-type:application/x-www-form-urlencoded;charset=UTF-8
cookie:NID=76=zn-Jcx6; SID=DQQ-n-rc; APISID=xHX/AsO0
origin:https://www.google.co.uk
referer:https://www.google.co.uk/
user-agent:Mozilla/5.0 (Windows NT 6.1) Chrome/48.0.2221.27
x-client-data:CKJjKAQ==
•
Status Check
Activates a status check for this task.
Note: The following fields appear only if the Status Check checkbox is selected.
•
Status URL
Specifies the REST call to run for the status check.
•
Status Post Script
Specifies a script to determine the status of the task using the returned JSON.
Example:
if (responseCode == 200) {
status = response.data[0].state; // The task status displays the state field of the
first data element of the JSON response.
if (status == "Failed Verification") {
return false;
} else {
return true;
} // If the state equals “Failed Verification” the task fails.
} else {
status = "Operation Failed";
return false;
}
return true;
•
Polling Interval
138

Continuous Delivery Director Integrations 1.0
Specifies the interval in milliseconds in which the status is checked by the user in milliseconds.
•
Task Timeout
Specifies the timeout for the entire task execution in milliseconds.
Output Parameters
•
Output Parameter
Specifies the output format for the response.
Note: The output parameter returns a value only if the JavaScript snippet in the Post Script field is configured to
support an output value.
Example: To set the value of the output parameter, use the following syntax in the post script:
“output=response.data[0].something;”
The code in the plug-in sets the output value of Output Parameter to be the value that is returned in the JSON path
that is specified in the post script.
Example: Integrate with a Third Party REST API
The following scenario shows how to use the Continuous Delivery Director CA REST plug-in to integrate with third-party
REST APIs. The Jenkins integration tool is used in this example.
Prerequisites
To integrate with a third-party REST API, first configure the Continuous Delivery Director REST plug-in.
Methods
•
Create a New Jenkins Build
This API creates a build of Project-Name project with the project parameters.
Type: POST
URL: /job/Project-Name/buildWithParameters?Param1=value1
•
Get the Status of the Last Jenkins Build
This API gets the status of the last build of the Project-Name project.
Type: GET
URL /job/Project-Name/lastBuild/api/json
Configuration
This example invokes Jenkins Build jobs that are based on the Jenkins build status. The Continuous Delivery Director task
is updated to take the next logical action.
Follow these steps:
1. Log in to Jenkins and create a project. Name the project test-project, and provide the following build definition:
Note: This definition accepts the parameter UserName:
139

Continuous Delivery Director Integrations 1.0
2. Log in to Continuous Delivery Director.
3. Go to Administration, Endpoints, and click Add Endpoint.
4. Complete the fields in the ADD ENDPOINT box.
Note: To integrate with Jenkins, the following fields are required for an endpoint.
–
Endpoint Type
Specify a REST Endpoint to use
Example: CDE REST Plugin
–
Base URL
Specify the base URL that is used to access Jenkins
Format: http://<Jenkins-Server-IP/Hostname>:<PORT>
Example: http://jenkins-dev:8080
5. Navigate to RELEASES and add an application and a phase, for example, DEV-phase.
NOTE
For more information, see Design and Create Releases
6. Create and configure two REST plug-in tasks in the phase:
7. a. Provide the following details for the Jenkins Call task:
•
Task Name
•
Description
•
OWNERS
•
TASK TYPE
Value: REST
•
ENDPOINT
Name of the endpoint that is created in step 3.
•
URL
Value: /job/Project-Name/Jenkins-Action-To-Perform
Example: /job/test-project/buildWithParameters?UserName=testuser@ca.com
Note: The UserName parameter is configured in the Jenkins test-project. Refer to step 1.
•
Method
140

Continuous Delivery Director Integrations 1.0
Value: POST
b. Provide the following details for the Get Last Output task:
•
Task Name
Example: Get Last Output
•
Description
•
Owners
•
TASK TYPE
Value: REST
•
ENDPOINT
141

Continuous Delivery Director Integrations 1.0
Name of the endpoint that is created in step 3.
•
URL
Value: job/Project-Name/Jenkins-Action-To-Perform
Example: job/test-project/lastBuild/api/json
•
Method
Value: GET
•
Postscript
Defines the JavaScript script to run to process the JSON response.
Value: see the following example
Example:
if (responseCode == 200){
returnStatus=false;
status=response.fullDisplayName + "Build ";status+=response.result;
if(response.result.toUpperCase()=="SUCCESS")
{
returnStatus=true;
return returnStatus;
}else
{returnStatus=false;
return returnStatus;}
}else{status+=" REST Call Operation Failed"
return false;
}
142

Continuous Delivery Director Integrations 1.0
The following screen capture shows the two tasks
143

Continuous Delivery Director Integrations 1.0
Note: The status is the keyword that is used by Continuous Delivery Director to show the task status.
8. Save the tasks and run the phase.
The Continuous Delivery Director REST plug-in is integrated with Jenkins.
In the following screen capture, the task status text is highlighted in Red:
144

Continuous Delivery Director Integrations 1.0
NOTE
Each API that the JSON object return is different. Modify the preceding JavaScript example to parse the
returned JSON object.
Robot Framework Plug-in
This plug-in provides you with a test automation framework for Git and SVN builds that is open-source and application-
independent. The Robot Framework plug-in is containerized and supports Adaptive Testing functionality.
This plug-in is available as a Docker image on the customer support portal which has specific requisites and installation
steps.
The plug-in is also available as a tar file on the customer support portal for customers who cannot use docker pull .
145

Continuous Delivery Director Integrations 1.0
Figure 43: Click the following icon to download the latest plug-in version:
Plug-in Version 1.7
What's New
The following updates were made for plug-in version 1.7:
•
The New or Updated Test Suites heuristic is now supported for SVN test suites. This metric is a weighting factor
when the Test Advisor intelligently selects a subset of test suites to run in subsequent test cycles.
Manifest URL
For plug-in registration, use the following manifest URL:
http://<plugin-server>:<port>/containerized/plugins/cdd-robot-plugin/manifest.json
Configuration
You configure the Robot Framework plug-in either for the initial setup, or whenever a change to the test build configuration
is required.
Endpoint Parameters
The following parameters are required to create an endpoint:
•
Version Control System
Specify the version control system where your source project resides.
•
Git/SVN Project URL
Specify the URL to access the Git or SVN project repository.
•
GitHub/SVN Username
Specify the user name to access GitHub or SVN. Only required if the Git or SVN repository is not a public repository.
•
GitHub/SVN Password
Specify the password to access GitHub or SVN.
To check the connection to the Robot Framework and to the version control system, select Test Connection. The Test
Connection action returns the following results:
•
Success
The connection was successful
•
Failure
The connection failed
Tasks
The Robot Framework plug-in supports the Run Adaptive Testing task type.
Prerequisites:
•
One or more application versions are specified.
•
One or more Robot Framework test suites exist for the application versions specified.
Tags
146

Continuous Delivery Director Integrations 1.0
Specify one or more tags to find possible test suite matches.
Example: Type ro to retrieve all test suites tagged with labels beginning with ro, such as robot.sanity.test
Build/Commit id
Specify the commit ID (Git) of the code to test.
TIP
To select from a list of available tokens, enter the percent sign (%) in the task field.
Get Test Assets
The Robot Framework plug-in imports test suites into the Adaptive Testing Catalog.
Follow these steps:
1. Select Tests, then Adaptive Testing Catalog.
2. Specify the Application and the Application Version.
The menu next to the application name and version is activated.
3. Select Get Test Assets.
4. Fill in the following fields:
–
Test Source Name
–
Plug-in
Select Robot Framework and Import Test Suites.
–
Endpoint
Select a Robot Framework endpoint.
–
Branch
Specify the name of the Git branch where the test suites you want to import are located.
–
Root Folder
Specify a path to the folder where the test suites you want to import are located. If left empty, test suites will be
imported from the entire repository.
–
Extra Execution Parameters
Specify additions to the robot framework execution command. You can write multiple commands to run before the
tests are executed. You can include shared tokens. Separate the commands with a semi-colon ";".
Example: -v SUT_HOST:sut.com
–
Tags
Select one or more tags to execute test suites tagged with your selection. Leave empty to execute all the test suites
under the application version.
Example: Type ro to retrieve all test suites tagged with labels beginning with ro, such as robot.sanity.test
Runscope Plug-in
This plug-in lets you can add an Adapting Testing task to your release pipeline that executes a Runscope API test.
Plug-in Version 1.0
Figure 44: To download the latest plug-in version, click the following icon:
147

Continuous Delivery Director Integrations 1.0
You add this task after your API has been deployed and is ready for testing. After the Runscope API is triggered, the plug-
in waits for the test run to finish (or time out). If the API test task is successful, your pipeline will continue to the next task
in your pipeline; however, if the task fails (or times out), the build is marked as failed.
Configuration
Register the plug-in and create endpoints as described in Manage Plug-ins
The URL of the Runscope manifest for plug-in registration is https://<plugin-server>:<port>/cdd-runscope-plugin/
manifest.json.
Select the Runscope plug-in in the ADD ENDPOINT dialog to create an endpoint for the Runscope plug-in. The following
Runscope information is required when you create an endpoint:
•
URL
Specify the URL of the Runscope instance to use for connection purposes.
Syntax: https://[Runscope server]:443/
Note: The URL can be specified either as http or https
•
Access Token
Specify an access token to authenticate to Runscope.
Get Test Assets
This plug-in lets you import test suites into the Adaptive Testing Catalog.
Follow these steps:
1. Select Tests, then Adaptive Testing Catalog.
2. Specify the Application and the Application Version. The menu next to the application name and version is
activated.
3. Select Get Test Assets.
4. Fill in the following fields:
–
Test Source Name
–
Plug-in
Select Runscope and Import Test Suites.
–
Endpoint
Select a Runscope endpoint.
–
Bucket Name
Specify the name of the Runscope bucket (project) where the test suites you want to import are located.
–
Environment Name
Specify the name of the Runscope environment to use when running test suites. An environment is a group of
configuration settings (initial variables, locations, notifications, integrations, and so on).
NOTE
There are two types of environments you can define in Runscope: test-specific environments and shared
environments. The former can be applied to a single test; the latter can be applied across multiple tests.
This plug-in supports shared environments only.
–
Tags
Select one or more tags to execute test suites tagged with your selection. Leave empty to execute all the test suites
under the application version.
Example: Type ru to retrieve all test suites tagged with labels beginning with ru, such as runscope.api.test
Tasks
This plug-in supports the Run Adaptive Testing task type.
148

Continuous Delivery Director Integrations 1.0
Prerequisites:
•
One or more application versions are specified.
•
One or more Runscope test suites exist in the Adaptive Testing Catalog for the application versions specified.
Tags
Specify one or more tags to find possible test suite matches.
Example: Type ru to retrieve all test suites tagged with labels beginning with ru, such as runscope.api.test
Build/Commit id
Specify the commit ID (Git) of the code to test.
TIP
To select from a list of available tokens, enter the percent sign (%) in the task field.
ServiceNow Plug-in
This plug-in helps you to automate the approval process and to reduce manual steps that delay delivery to production.
Plug-in Version 2.3.1
Figure 45: Click the following icon to download the latest plug-in version:
The ServiceNow plug-in helps you to automate the approval process and to reduce manual steps that delay delivery
to production. The plug-in matches tickets that are defined in ServiceNow with their appropriate release and creates
visualizations. These features help you to see the ticket status, and act accordingly.
This plug-in also optimizes and fully automates the information flows between the different systems. Tickets are therefore
updated based on the progress of the release.
Supported Versions
The ServiceNow plug-in supports the core ServiceNow SaaS solution.
For more information, see the ServiceNow documentation at http://wiki.servicenow.com
What's New
The following update was made for plug-in version 2.3.1:
•
Bug fix.
The following update was made for plug-in version 2.3:
•
Commas in JSON definitions in task input parameter fields generated task failures.
The following update was made for plug-in version 2.2:
•
Support was added for Java 11.
Configuration
Register the plug-in and create endpoints as described in Manage Plug-ins.
149

Continuous Delivery Director Integrations 1.0
Manifest URL
For plug-in registration, use the following ServiceNow manifest URL:
http://<plugin-server>:<port>/cdd-servicenow-plugin/manifest.json
Endpoint Parameters
The following parameters are required to create an endpoint:
•
Server URL
Specifies the URL that is used to access the ServiceNow instance
•
Username
Specifies the user name that is used to authenticate to the ServiceNow instance
•
Password
Specifies the password that is used to authenticate to the ServiceNow instance
•
Use Proxy
{Optional} Determines whether a proxy server is used
Note: If selected, the Proxy URL, Proxy Username, and Proxy Password fields appear
•
Proxy URL
{Optional} Specifies the web address that is used to access the proxy server
•
Proxy Username
{Optional} Specifies the username that is used to authenticate to the proxy server
•
Proxy Password
{Optional} Specifies the password that is used to authenticate to the proxy server
To check the connection to ServiceNow, use the endpoint Test Connection option.
Import Work Items
The ServiceNow plug-in lets you sync work items between ServiceNow and Continuous Delivery Director releases. Use
this capability when you create a release to see the related ServiceNow information.
Follow these steps:
1. In a release, click the Work Items tab on the left menu.
2. Select Add Work Items.
The ADD WORK ITEMS window opens.
3. Enter a name for the work items source.
Example: ServiceNow Feed
4. Under Work Items Source, select the ServiceNow plug-in and a configured ServiceNow endpoint.
5. Provide information in the required parameter fields. These fields let you build a query that searches ServiceNow for
work items that match the criteria.
TIP
Values: To select from a list of possible values, type an at sign "@" in the field. You cannot combine values
with free text or tokens.
–
Item
Specifies the type of content to import.
Example: Incident
–
Category
Specifies the category to which the item belongs.
Example: For an Incident, the category is Software.
–
Priority
150

Continuous Delivery Director Integrations 1.0
Specifies how quickly the service desk should handle the item.
–
Assignment Group
Specify an assignment group, from which an individual agent or vendor is selected to complete a work item.
–
Tags
Specifies the work item tags stored in ServiceNow. This field lets you filter what work items are imported provided
that the items contain at least one specified tag.
–
Custom Fields
Specifies a list of custom field names and values.
Values: You can update multiple values in the following JSON format: {"field1":"value1","field2":"value2"...}
6. Select Create.
The work item source is saved and a list of the returned work items is displayed under the application in the left menu.
These work items are now available to assign to tasks in phases to associate with the release.
Tasks
The following task types are available in the ServiceNow plug-in:
Create Change Request
You typically create change requests when you determine that fixing issues or incidents requires a change to the
environment. The Create Change Request task creates a change request and returns the ID of the request for future use.
This task requires the following fields:
Input Parameters
•
Short Description
Provides enough information for a user to complete the change request
•
Change Request Content
Specifies a list of ServiceNow field names and values.
Values: The field name must be Identical to the name in the ServiceNow change request table. You can update
multiple values in the following JSON format: {"field1":"value1","field2":"value2"...}
Examples: {"Name":"myName","Category":"my Category","Type":"myType"}
Output Parameters
•
Change Request ID
Specifies the ID or name of the request that is created
Update Ticket
The Update Ticket task updates an existing ticket with a new status or updates a ticket with a customized field. This task
requires the following fields:
Input Parameters
•
Ticket Type
Select one of the following types of ticket:
–
Change Request-
A proposal to add, modify or remove an IT service-related item. If selected, the following fields appear:
•
Change Request ID
Specifies the ID or the name of the change request you want to update.
•
Change Request Content
Specifies a list of ServiceNow field names and values
151

Continuous Delivery Director Integrations 1.0
Values: The field name must be Identical to the name in the ServiceNow change request table. You can update
multiple values in the following JSON format: {"field1":"value1","field2":"value2"...}
Examples: {"Name":"myName","Category":"my Category","Type":"myType"}
–
Request -
A request for an IT support service. If selected, the following fields appear:
•
Request ID
Specifies the ID or the name of the request you want to update
•
Request Content
Specifies a list of ServiceNow field names and values
Values: The field name must be Identical to the name in the ServiceNow change request table. You can update
multiple values in the following JSON format: {"field1":"value1","field2":"value2"...}
Examples: {"Name":"myName","Category":"my Category","Type":"myType"}
Create Task
You create a task to organize and track the work that is required to complete an existing service request. Create Task
creates a task under a service request and returns the task ID for future use. This task requires the following fields:
Input Parameters
•
Ticket Type
Select one of the following types of ticket:
–
Change Request - A proposal to add, modify or remove an IT service-related item. If selected, the following fields
appear:
•
Change Request ID
Specifies the ID or the name of the change request you want to update
•
Change Task Content
Specifies a list of ServiceNow field names and values
Values: The field name must be Identical to the name in the ServiceNow change request table. You can update
multiple values in the following JSON format: {"field1":"value1","field2":"value2"...}
Examples: {"Name":"myName","Category":"my Category","Type":"myType"}
–
Request Item - Add an item to a request. If selected, the following fields appear:
•
Request Item ID
Specifies the ID or the name of the request you want to update
•
Request Item Task Content
Specifies a list of ServiceNow field names and values
Values: The field name must be Identical to the name in the ServiceNow change request table. You can update
multiple values in the following JSON format: {"field1":"value1","field2":"value2"...}
Examples: {"Name":"myName","Category":"my Category","Type":"myType"}
Output Parameters
•
Task ID
Specifies the ID or the name of the task that is created
Update Task
Update Task updates a ServiceNow task. This task requires the following fields:
Input Parameters
•
Task Type
Select one of the following types of task:
152

Continuous Delivery Director Integrations 1.0
–
Change Request - A proposal to add, modify or remove an IT service-related item. If selected, the following fields
appear:
•
Change Request ID
Specifies the ID or the name of the change request you want to update
•
Change Task Content
Specifies a list of ServiceNow field names and values
Values: The field name must be Identical to the name in the ServiceNow change request table. You can update
multiple values in the following JSON format: {"field1":"value1","field2":"value2"...}
Examples: {"Name":"myName","Category":"my Category","Type":"myType"}
–
Request Item - Add an item to a request. If selected, the following fields appear:
•
Request Item ID
Specifies the ID or the name of the request you want to update
•
Request Item Task Content
Specifies a list of ServiceNow field names and values
Values: The field name must be Identical to the name in the ServiceNow change request table. You can update
multiple values in the following JSON format: {"field1":"value1","field2":"value2"...}
Examples: {"Name":"myName","Category":"my Category","Type":"myType"}
Wait for Approval
The Wait for Approval task specifies that the next task starts upon the completion and approval of the specified
ServiceNow change request. This task requires the following fields:
Input Parameters
•
Ticket Type
Select one of the following types of ticket:
–
Change Request - A proposal to add, modify or remove an IT service-related item. If selected, the following fields
appear:
•
Change Request ID
Specifies the ID or the name of the change request you want to update
•
Status Field
Specifies the name of the field you want to check the status of
•
Required Status
Specifies the required status of the field you want so that the task can continue
•
Poll Interval
Specifies the interval in seconds in which the status is checked
–
Request - A request for an IT support service. If selected, the following fields appear:
•
Request ID
Specifies the ID or the name of the request you want to update
•
Status Field
Specifies the name of the field you want to check the status of
•
Required Status
Specifies the required status of the field you want so that the task can continue
•
Poll Interval
Specifies the interval in seconds in which the status is checked
Slack Plug-in
This plug-in provides your team with powerful, real-time messaging capabilities.
153

Continuous Delivery Director Integrations 1.0
Plug-in Version 1.1
Figure 46: Click the following icon to download the latest plug-in version:
Supported Versions
The Slack plug-in supports the core Slack SaaS solution.
For more information, see the Slack documentation at https://slack.com/.
What's New
The following update was made for plug-in version 1.1:
•
Support was added for Java 11.
Configuration
Register the plug-in and create endpoints as described in Manage Plug-ins.
Manifest URL
For plug-in registration, use the following Slack manifest URL:
http://<plugin-server>:<port>/cdd-slack-plugin/manifest.json
Endpoint Parameters
The following parameters are required to create an endpoint:
•
Webhook URL
The URL that contains the integration token. To copy this URL, go to your Slack account, search for incoming
webhooks, and create a new incoming webhook configuration. Copy and paste the incoming webhook URL into
the Webhook URL field.
Example: https://hooks.slack.com/services/T4TAH927P/B4T7VLH0A/VuUOyuAs6j8Uks9namGQCHK
To check the connection to Slack, use the endpoint Test Connection option. The Test Connection option returns the
following results:
•
Success
Both connections were successful
•
Failure
One or more connections failed
Tasks
The following task types are available in the Slack plug-in:
TIP
To select from a list of available tokens, enter the percent sign (%) in the task field.
Post Message
The Post Message task requires the following fields:
154

Continuous Delivery Director Integrations 1.0
Input Parameters
•
Post to Channel
Specifies a channel, or a direct message, to which to publish.
Values: For channels, use #[channel name]. For Direct messages, use @[direct name].
Note: Empty channel messages are posted to the channel that is defined in the endpoint
•
Sender
Specifies the name of the message sender
•
Message
Defines the message text
SonarQube Plug-in
This plug-in lets you check the health of your project against quality gates.
Plug-in Version 1.1
Figure 47: Click the following icon to download the latest plug-in version:
SonarQube quality gates contain a set of Boolean conditions based on metrics such as code coverage on new code, no
new blocker issues, and so on.
Supported Versions
The SonarQube plug-in supports SonarQube 6.7.5 and higher.
For more information, see the SonarQube documentation at https://docs.sonarqube.org/latest/.
What's New
The following update was made for plug-in version 1.1:
•
Support was added for Java 11.
Configuration
Register the plug-in and create endpoints as described in Manage Plug-ins and Manage Endpoints.
Manifest URL
For plug-in registration, use the following SonarQube manifest URL:
http://<plugin-server>:<port>/cdd-sonarqube-plugin/manifest.json
Endpoint Parameters
To create endpoints, provide the following parameters:
•
Url
Specify the URL to connect to the SonarQube instance
•
Authentication Type
155

Continuous Delivery Director Integrations 1.0
Select an authentication type
•
User Token
–
User TokenSpecify the SonarQube-generated token to access the SonarQube instance
•
Basic Authentication
–
SonarQube Username
Specify the username to authenticate to the SonarQube instance.
–
SonarQube Password
Specify the password to authenticate to the SonarQube instance.
•
Use Proxy
{Optional} Determines whether a proxy server is used
Note: If selected, the Proxy URL, Proxy Username, and Proxy Password fields appear
–
Proxy URL
{Optional} Specifies the web address that is used to access the proxy server
–
Proxy Username
{Optional} Specifies the username that is used to authenticate to the proxy server
–
Proxy Password
{Optional} Specifies the password that is used to authenticate to the proxy server
To check the connection, select Test Connection.
Tasks
The following task types are available in the SonarQube plug-in:
Check Project Status
The Check Project Status task contains the following fields:
Input Parameters
•
Project Key
Specify the SonarQube project key.
•
Fail on "Warning"
Select this option to fail this task if the status of the project quality gate is WARN.
Output Parameters
•
Quality Gate
Specify the quality gate identifier.
TestCafe Plug-in
This plug-in lets you execute TestCafe test suites as part of your release pipeline.
Plug-in Version 1.0
This plug-in integrates with TestCafe, a node.js tool to automate end-to-end web testing. The TestCafe plug-in is
containerized and supports Adaptive Testing functionality. You can import tests from TestCafe to run as test suites within
release pipelines.
TestCafe allows you to write tests using TypeScript, JavaScript, or CoffeeScript. To create a test, you create a new .js
or .ts file. TestCafe test files are organized into categories called fixtures. A JavaScript, TypeScript file with TestCafe tests
can contain one or more fixtures.
156

Continuous Delivery Director Integrations 1.0
Download the latest plug-in version
Figure 48: Click the icon to download the latest plug-in version
This plug-in is also available on the customer support portal.
Configure the TestCafe Plug-in
You configure the TestCafe plug-in either for the initial setup, or whenever a change to the test build configuration is
required.
Register the new plug-in using the following manifest URL: http://<plugin-server>:<port>/containerized/
plugins/cdd-testcafe-plugin/manifest.json.
Endpoint Parameters
The following parameters are required to create an endpoint:
•
Version Control System
Specifies the version control system where your source project resides.
•
Git Repository URL
Specify the URL of the Git project repository.
•
Git Username
Specify the Git user name. This action is only required when the repository you specified is not a public repository.
•
Git Password
Specify the Git password. This action is only required when the repository you specified is not a public repository.
To check the connection to TestCafe and to the version control system, select Test Connection. The Test Connection
action returns the following results:
•
Success
The connection was successful
•
Failure
The connection failed
Tasks
The TestCafe plug-in supports Adaptive Testing functionality. You can import test suites from the Adaptive Testing Catalog
through the Get Test Assets command.
For more information, see Setting Up the Test Module
Prerequisites:
•
One or more application versions are specified.
•
One or more TestCafe test suites exist for the application versions specified.
Fill in the following input parameters to import TestCafe test suites:
Branch
Specify the version control branch name.
Tests Folder
157
Continuous Delivery Director Integrations 1.0
(Optional) Specify the relative path to the folder where the required tests are located. When left empty, tests will be
imported from the root folder.
Browser
(Optional) Specify the web browser name. For example, chromium:headless; firefox:headless.
For the list of browsers supported by TestCafe, see TestCafe documentation: https://devexpress.github.io/testcafe/
documentation.
Additional Execution Parameters
(Optional) Specify additional execution parameters in JSON format where the key is the command line argument. For
example: {\"--speed\": \".05\",\"--page-load-timeout\": \"5\" }.
For more information, see TestCafe documentation: https://devexpress.github.io/testcafe/documentation.
Environment Variables
(Optional) Specify the environment variables to be used during test execution in JSON format. Syntax:
{\"environment1\": \"value1\",\"environment2\": "value2\" }
Start Node Package Manager?
Select this option to start the node package manager for this project before running the TestCafe tests. You can use this
option to set up the application you are going to test.
Node Package Manager Initialization Delay
(Optional) Specify the time (in milliseconds) allowed for an application to initialize. For example, 60000.
Twistlock Plug-in
This plug-in lets you run a static registry scan for Common Vulnerabilities and Exposures (CVE) on an application image
that is hosted on a given registry.
Plug-in Version 1.1
Figure 49: Click the following icon to download the latest plug-in version:
You can scan your applications as early as the development phase to avoid or resolve potential issues before you commit
your code. You can view the scan results in Continuous Delivery Director or Twistlock.
Supported Versions
The Twistlock plug-in supports the core Twistlock SaaS solution.
For more information, see the Twistlock documentation at https://twistlock.desk.com/
Capabilities
Runs a static registry scan for vulnerabilities on an application image that is hosted on a given registry.
Example: JFrog Artifactory
158

Continuous Delivery Director Integrations 1.0
What's New
The following update was made for plug-in version 1.1:
•
Support was added for Java 11.
Configuration
Follow these steps:
1. Install the Twistlock components (Console and Defender). You can use two options for installation:
–
onebox - Install both Console and Defender onto your host machine
–
Separate - Install Console and Defender on separate machines
For more information about how to install and configure Twistlock, see the Twistlock installation documentation
at https://twistlock.desk.com/
2. Register the plug-in and create endpoints as described in Manage Plug-ins.
Manifest URL
For plug-in registration, use the following Twistlock manifest URL:
http://<plugin-hostname>:<port>/cdd-twistlock-plugin/manifest.json
Endpoint Parameters
The following parameters are required to create an endpoint:
•
Address
Specifies the URL to connect to Console, the Twistlock management interface
Value: http://domain-name:port
Example: http://example.test.com:8081/
•
Twistlock Username
Specifies the user name to authenticate to Twistlock
•
Twistlock Password
Specifies the password that is used to authenticate to Twistlock
•
Registry
Specifies the registry that contains the images you want Twistlock to scan
Example: repo.com:5000
•
Registry Username
Specifies the user name to authenticate to the registry
•
Registry Password
Specifies the password to authenticate to the registry
•
Defender Host Name
(Optional) Specifies the host name of the Defender that performs the registry scan
Note: If this parameter is empty, a registry scan is enabled by default. The scan originates from the Defender that is
installed on the same machine as Console (onebox).
To check the connection to Twistlock, use the endpoint Test Connection option.
Note: The connectivity test enables a registry scan from the Defender (specified in the Defender Host Name endpoint
parameter).
Tasks
The Twistlock plug-in provides the following task:
•
Run Static Scan
159

Continuous Delivery Director Integrations 1.0
Run Static Scan
The task lets you run a static scan.
This task requires the following information:
•
Repository
Specifies the image repository on which to run the scan.
Example: com/example/test/1.2
•
Tag
Specifies the label that is applied to an image in a repository. Tags are how various images in a repository are
distinguished from each other.
Example: latest
•
Severity
Specifies the severity level of the CVE that trigger alerts
Example: Medium
•
CVSS
Specifies the the score of the option that is specified in the Severity drop-down list according to the CVSS (Common
Vulnerability Scoring System)
Value: An integer between 0 to 10
Example: You specify a severity level of Medium in the Severity drop-down list, and a score of 4 in the CVSS field.
When a scan is run, threats of a severity level of Medium trigger alerts, as long as the CVSS score is 4 or higher.
Threats of a security level higher than Medium automatically trigger alerts.
•
Task Timeout
Specifies the number of minutes before the static scan stops
Value: An integer
Default: 30
Veracode Plug-in
This plug-in lets you run a dynamic security scan for a deployed web application.
Plug-in Version 1.0.2
Figure 50: Click the following icon to download the latest plug-in version:
Supported Versions
The Veracode plug-in supports the following Veracode API versions:
•
summaryreport.do – version 3.0
•
getappbuilds.do – version 4.0
•
getdynamicstatus.do – version 5.0
•
rescandynamicscan.do – version 5.0
•
submitdynamicscan.do – version 5.0
•
getapplist.do – version 5.0
For more information, see the Veracode documentation at https://www.veracode.com/.
Manifest URL
For plug-in registration, use the following Veracode manifest URL:
160

Continuous Delivery Director Integrations 1.0
http://<plugin-server>:<port>/cdd-veracode-plugin/manifest.json
What's New
The following update was made for plug-in version 1.0.2:
•
Support was added for Java 11.
Configuration
You configure the Veracode plug-in either for the initial setup, or whenever a change to the dynamic scan configuration is
required. To use the Veracode API, you must first generate API credentials.
Follow these steps:
1. Navigate to the Veracode platform (https://analysiscenter.veracode.com, and create an application profile.
2. In the application profile, click Start a Dynamic Scan.
The Dynamic Scan wizard opens.
3. Complete each step to configure the dynamic scan: Scan Configuration, Login Instructions, Crawl
Instructions, Advanced Options, and Scan Options. On the Scan Options page, click Run Prescan now.
4. Submit your first dynamic scan.
Note: After the scan is finished and results are ready, you can create and run a task to automate this scan
in Continuous Delivery Director. Once the scan completes, the results are available in the Veracode platform. You can
run the Continuous Delivery Director task repeatedly without the need to configure the Veracode platform again.
5. Go to the user account menu, select API Credentials, and click Generate API Credentials. Veracode generates your
ID and secret key.
Important: Copy these strings and keep them secure. You only see these credentials once. If you forget these
credentials, you must regenerate a new ID and secret key.
6. In Continuous Delivery Director, register the plug-in and create endpoints as described in Manage Plug-ins.
Endpoint Parameters
The following parameters are required to create an endpoint:
•
API Credentials ID
Specifies the Veracode API credentials ID that provides permission to access the Veracode API
•
API Credentials Secret Key
Specifies the Veracode API credentials secret key that provides permission to access the Veracode API
To check the connection to Veracode, use the endpoint Test Connection option. The Test Connection option returns the
following results:
•
Success The connection was successful
•
Failure The connection failed
Tasks
The following task types are available in the Veracode plug-in:
TIP
To select from a list of available tokens, enter the percent sign (%) in the task field.
Run Dynamic Scan
The Run Dynamic Scan task requires the following field:
161

Continuous Delivery Director Integrations 1.0
Application Specifies the name of the application added to the Veracode application security platform
162

Continuous Delivery Director Integrations 1.0
Develop Custom Plug-ins
Create custom plug-ins to add remote endpoints to your release pipeline that are outside the scope of the plug-ins
included in Continuous Delivery Director.
The effectiveness of Continuous Delivery Director depends on the ability of the product to interact with the remote
endpoints in your continuous delivery pipeline. If the library of packaged plug-ins does not contain integration with a key
remote endpoint in your continuous delivery pipeline, you have the following options:
•
Use manual entities in Continuous Delivery Director to simulate an integration point. For example, you can manually
add the stories that are affected by an application release as content if a packaged plug-in is not available for your
change management tool. You can also create a manual task for operations in other continuous delivery remote
endpoints that simply remind the user to complete the operation manually in the remote endpoint. This is not an ideal
solution and can cause high margins for error and a higher release management workload.
•
Use the REST task that is provided by the CA REST packaged plug-in to make REST API calls to remote endpoints
not supported with a packaged plug-in. As long as the remote endpoint has a REST API, you can instrument
operations using the REST plug-in without developing a full custom plug-in.
This option works for tasks but does not cover content and application import use cases. Therefore, we do not
recommend this option for production usage.
•
Develop a custom plug-in to integrate with the remote endpoint. This is the recommended option. This section
describes how to develop a custom plug-in.
Continuous Delivery Director includes a full plug-in framework that supports packaged plug-in integrations and custom
plug-in development. The plug-in framework supports the following capabilities:
•
Configure and test connectivity to a remote endpoint
•
Create automated tasks that instrument operations in the remote endpoint
•
Import application and environment models from the remote endpoint
•
Import content from the remote endpoint
The architecture of the plug-in framework is intended to allow for quick and flexible development of integrations with
remote endpoints in your continuous delivery pipeline.
You can use utilities and helpers to retrieve dynamically a list of possible values from a remote endpoint. You can use
dynamic values to enable end users to select values for task and import content item operations.
You can write your custom plug-in code in any programming language and can deliver the custom plug-in code to any
Web service container such as Apache Tomcat or IBM WebSphere.
To develop a custom plug-in, you must adhere to the following requirements:
•
The plug-in must be an HTTP service that can accept a POST request, instrument the requested operation, and can
return a response.
•
The plug-in must include a manifest.json file that details the plug-in capabilities.
After you finish plug-in development, see Manage Plug-ins for information about how to install and register the plug-in.
Enable Java Custom Plug-in
Developers working in Java to develop a custom plug-in need to download a DTO .jar file from the CA Support Web site.
This .jar file declares the Java interfaces and input and output arguments required in the sample plugin code to enable the
plug-in to integrate with Continuous Delivery Director.
163

Continuous Delivery Director Integrations 1.0
Follow these steps:
1. Enter the URL https://casupport.broadcom.com/ in a Web browser and log in to CA Support.
2. From the menu, select Download Management:
3. Search for Continuous Delivery Director and select Product Downloads Available:
4. Click the required Continuous Delivery Director release.
5. Look for CUSTOM PLUG-IN DTO in the results list and download.
164
Continuous Delivery Director Integrations 1.0
Develop Custom Plug-in HTTP Service
The plug-in code must be an HTTP service that listens to and processes an incoming HTTP POST request from
Continuous Delivery Director. The service executes any type of request at the remote endpoint.
Outside of this requirement, the nature of the plug-in code is flexible in the following areas:
•
Programming language
•
Network API of the remote endpoint (HTTP, TCP, or other network protocol)
•
Packaging
All packaged plug-ins are Java web applications that are packaged as Tomcat 8 WAR files that you deploy locally or
remotely from the core product installation. You can also deploy plug-ins on a private or public cloud over the Internet.
The following diagram shows how the interface between the product, the plug-in, and the remote endpoint work:
165

Continuous Delivery Director Integrations 1.0
Figure 51: plugin flow
1. The CDD Server makes an HTTP POST request to the plug-in when the invocation of a plug-in service occurs.
2. The plug-in uses the information in the POST request to format the appropriate call to the remote endpoint.
3. The endpoint may return a response to the plug-in while the operation is still running on the endpoint side
(asynchronous operation).
4. The plug-in sends an HTTP POST response to the CDD server asking CDD to poll in x seconds.
5. The CDD Server makes repeated HTTP POST requests for the service querying the status of the operation on the
endpoint side.
6. The plug-in sends an HTTP POST response with the operation status to the CDD Server.
7. When the status indicates that the operation has completed, CDD stops polling the plug-in.
The plug-in HTTP service must perform the following functions:
Understand input values from the manifest
Input values from the manifest are typically requested to construct the full request to the remote endpoint. The code must
understand the values that are specified by the user when the task or other plug-in service is created. The code must
properly use the values to construct the request to the remote endpoint.
Example: The plug-in code uses each of the potential input values to construct the request URL of the remote endpoint.
166

Continuous Delivery Director Integrations 1.0
Use input values to construct a full request to the remote endpoint
The plug-in manifest must contain definitions for each supported plug-in service. Continuous Delivery Director uses these
manifest definitions to collect the required input field values from the user and deliver the values to the plug-in. The plug-in
uses these input field values to construct and execute the full request that is required for each operation.
Example: The plug-in code can contain a base REST API call with variables to hold the user input values.
Provide a POST response to display in the UI
The plug-in code must produce a POST response that is based on the result of the request to display as status
information in the UI. The JSON scheme in the plug-in framework provides the following inputs that you can leverage for
this purpose. A CDD plug-in may support one or more of the following plug-in services:
•
Execute task (request JSON, response JSON - syntax, description, and an example)
•
Import applications
•
Import content items
•
Test connectivity
•
Retrieve dynamic values
externalTaskExecutionStatus
Provides a high-level status for the task. Set this input to one of the following values:
•
RUNNING
•
FAILED
•
FINISHED
executionContent
Provides a field in which to store the service execution content. The task execution context data might include
a collection of key/value pairs of runtime information for this specific task execution. CA Continuous Delivery
Director persistently stores this context as an opaque data object and delivers the object at the next invocation of this API
for this specific task execution.
Type: Map <String,Sting>
Context Key Limit: 230 characters
Context Value Limit: 4000 characters
Notes:
•
If the response does not include the context element, CA Continuous Delivery Director keeps the context as is.
•
If the response includes an empty context element, CA Continuous Delivery Director clears the context for this task
execution.
taskState
Provides a summary of the task status. This status appears on the UI next to the task status icon.
The status is returned at the statusDescription field of the Task REST API response and displayed on the UI.
Type: String
Limits: 255 characters
Example: Task Failed
detailedInfo
Provides a detailed summary of the task status. The status is returned at the detailedStatusDescription field of the Task
REST API response. This detailed status appears when you click on the high-level status in the UI.
167

Continuous Delivery Director Integrations 1.0
Type: String
Limits: 10,000 characters
Example: Endpoint value is incorrect. Provide valid endpoint details.
progress
Provides a progress indicator to display.
Type: Float
delayTillNextPoll
Specifies when Continuous Delivery Director initiates the next invocation of this API for this specific task execution (if at
all).
Type: Long
Sample Plug-in Requests
Test Connectivity
URL
${SCHEME}://${HOST}:${PORT}/cdd-twistlock-plugin/api/connectivity-test/connect
Input
{ "endPointProperties": { "address": "http://twistlockonesrv:8081", "twistlockUsername": "admin",
"twistlockPassword": "admin", "registry": "isl-dsdc.ca.com:5000", "registryUsername": "bld_ra_build",
"registryPassword": "Summer12$" } }
Output
{success=true, errorMessage='null'}
Task Execution
URL
${SCHEME}://${HOST}:${PORT}/cdd-twistlock-plugin/api/run-static-scan
Input
{ "endPointProperties": { "address": "http://twistlockonesrv:8081", "twistlockUsername": "admin",
"twistlockPassword": "admin", "registry": "isl-dsdc.ca.com:5000", "registryUsername": "bld_ra_build",
"registryPassword": "Summer12$" }, "taskProperties" : { "repo" : "com/ca/cdd/trunk/6.5/server", "tag" :
"latest", "Severity" : "low", "CVSS" : "0", "TaskTimeout" : "60" } }
Output
{
"externalTaskExecutionStatus": "FINISHED",
"taskState": "Finished",
168

Continuous Delivery Director Integrations 1.0
"detailedInfo": "No vulnerability was found",
"progress": 100.0,
"executionContext": {},
"outSystemParameters": {},
"delayTillNextPoll": -1
}
Dynamic Values
URL
${SCHEME}://${HOST}:${PORT}/cdd-veracode-plugin/api/dynamic-values/applications?max_results=10&filter=myApp
Input
{ "endPointProperties": { "apiId": "6a18092e96013b24da2fc52ca2c4782c", "apiSecretKey":
"7f110a26c3e8dfb7e45861f294cd91362c18a598415226c5e2f4b819a049a81ffcd0e841340b85844d4bb3f0631f6bfcdf8b51623384048d4f61981296f2a3b5" } }
Output
{"values":[{"key":"301530","value":"Ahaz First Application"},
{"key":"304580","value":"AppWithConfiguredDS_not_prescanned"},{"key":"312510","value":"CA Modern
Software Factory - Raffle"},{"key":"299867","value":"CA Raffle"},{"key":"299866","value":"CA Raffle
Web Site"},{"key":"300118","value":"CA Release Automation 6.4"},{"key":"306471","value":"http://
cdbu.io"},{"key":"320737","value":"http://CDBU.io" Win site"},{"key":"317208","value":"CDD QA test 1"},
{"key":"317169","value":"CDD QA Yonatan 01"},{"key":"124089","value":"Demo - 3rd Part - Published w/
Mitigation"},{"key":"155589","value":"Demo - 3rd Party - Request"},{"key":"163261","value":"Demo - 3rd
Party - Results NOT Published"},{"key":"176640","value":"Demo - Vendor Paid"},{"key":"294705","value":"Demo
App 17"},{"key":"294707","value":"Demo App 18 - Prescan Complete"},{"key":"186511","value":"Lesley\u0027s
test application v7.0.9"},{"key":"303216","value":"LironApp3"},{"key":"303018","value":"LironsApp2"},
{"key":"303725","value":"LironsApp4"},{"key":"307128","value":"LironsApp6"},{"key":"321198","value":"Medrec
Application DOD 0"},{"key":"321193","value":"Medrec Application DOD 1"},{"key":"322165","value":"Medrec
Application DOD 10"},{"key":"322166","value":"Medrec Application DOD 11"},{"key":"322155","value":"Medrec
Application DOD 12"},{"key":"322167","value":"Medrec Application DOD 13"},{"key":"322168","value":"Medrec
Application DOD 14"},{"key":"322169","value":"Medrec Application DOD 15"},{"key":"322170","value":"Medrec
Application DOD 16"},{"key":"322171","value":"Medrec Application DOD 17"},{"key":"322172","value":"Medrec
Application DOD 18"},{"key":"322173","value":"Medrec Application DOD 19"},{"key":"321194","value":"Medrec
Application DOD 2"},{"key":"322174","value":"Medrec Application DOD 20"},{"key":"322158","value":"Medrec
Application DOD 3"},{"key":"322159","value":"Medrec Application DOD 4"},{"key":"322160","value":"Medrec
Application DOD 5"},{"key":"322161","value":"Medrec Application DOD 6"},{"key":"322162","value":"Medrec
Application DOD 7"},{"key":"322163","value":"Medrec Application DOD 8"},{"key":"322164","value":"Medrec
Application DOD 9"},{"key":"305890","value":"OferApp"},{"key":"302991","value":"ROBOT Application
With Dynamic Scans"},{"key":"302992","value":"ROBOT Application With Dynamic Scans \u0026 Static
Scans"},{"key":"302990","value":"ROBOT Application Without Scans"},{"key":"306607","value":"RobotApp1"},
{"key":"306922","value":"RobotApp2"},{"key":"306924","value":"RobotApp3"},
{"key":"307126","value":"RobotApp4"},{"key":"307127","value":"RobotApp5"},
169

Continuous Delivery Director Integrations 1.0
{"key":"307629","value":"RobotApp6"},{"key":"307040","value":"RobotNotReadyApp1"},
{"key":"305538","value":"RonenTest"},{"key":"299127","value":"test for bug"},
{"key":"304569","value":"testApp1"},{"key":"304572","value":"testApp2"},{"key":"316288","value":"Travel App"},
{"key":"261605","value":"wer"}],"numOfResults":59}
Import Data
URL
${SCHEME}://${HOST}:${PORT}/cdd-jira-plugin/content-source/contents
Input
{"endPointProperties":{"password":"123456AB","url":"https://
assafshlomi.atlassian.net","username":"shlas01"},"contentSourceProperties":{"query":"type \u003d bug"}}
Output
{
"contents": [{
"content": "bug for CAW 1",
"type": "DEFECT",
"displayType": "Bug",
"status": "To Do",
"id": "NAC-22",
"externalId": "15903"
}, {
"content": "bug for CAW 1",
"type": "DEFECT",
"displayType": "Bug",
"status": "To Do",
"id": "NAC-21",
"externalId": "15902"
}, {
170

Continuous Delivery Director Integrations 1.0
"content": "bug for CAW 1",
"type": "DEFECT",
"displayType": "Bug",
"status": "To Do",
"id": "NAC-20",
"externalId": "15901"
}
]
}
Import Apps
URL
${SCHEME}://${HOST}:${PORT}/cdd-awselasticbeanstalk-plugin/api/application-source/applications
Input
{
"endPointProperties":
{
"accessKeyID": "AKIAIGEKPUS7UOKGPHGQ",
"secretAccessKey": "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",
"region": "eu-west-1",
"s3Bucket": "liron.elastic.beanstalk"
}
}
Output
{
"applications":
[{
"id": "Twistlock_Robot_App",
"name": "Twistlock_Robot_App",
"environments": []
},
{
"id": "EB_PluginRobotApp",
"name": "EB_PluginRobotApp",
171

Continuous Delivery Director Integrations 1.0
"environments": [
{
"id": "e-fzeypxhnt6",
"name": "EB-RobotEnv-2-1500298217"
},
{
"id": "e-fphiirivpz",
"name": "EB-RobotEnv-1-1500298217"
},
{
"id": "e-dn2vegwnnx",
"name": "EB-RobotEnv-2-1500297850"
},
{
"id": "e-cmbx3r8frb",
"name": "EB-RobotEnv-1-1500297850"
}
]
},
{
"id": "EB_PluginRobotApp_3",
"name": "EB_PluginRobotApp_3",
"description": "Please don\u0027t delete it (used in robot tests) !!!",
"environments": []
},
{
"id": "EB_PluginRobotApp_2",
"name": "EB_PluginRobotApp_2",
"description": "Please don\u0027t delete this app!!! \nit is used in robot tests...",
"environments": []
},
{
"id":
"mySampleApp",
"name": "mySampleApp",
"environments": []
},
{
"id": "QA01",
"name": "QA01",
"environments": []
},
{
"id": "CDD",
"name": "CDD",
"environments": [
{
"id": "e-zd7chudif3",
"name": "acceptance",
"description": "Clone of load"
},
{
"id": "e-qg3inbp8qq",
172

Continuous Delivery Director Integrations 1.0
"name": "load",
"description": ""
}
]
}
]
}
To view and download sample plug-in code, see Sample Plug-in.
Create the Plug-in Manifest
Every plug-in requires a manifest.json file that describes the plug-in capabilities (plug-in services). The manifest.json file
requires a specific JSON format that includes the following information:
•
Basic plug-in information such as name and version
•
An endpoint template that describes the name and required parameters for connecting to a remote endpoint for that
plug-in
•
Information for each service that the plug-in provides, such as execute task, import content items, import applications,
and so on
Always place the manifest.json file at the top level of your plug-in package.
Sample Manifest File
To download a sample manifest file for a reference point and a template for your custom plug-in manifest, see Sample
Plug-in.
Basic Plug-in Information
The following basic information is required at the top of the manifest file:
name
Specifies the name of the plug-in, which appears on the UI in the Administration, Plug-ins page.
Example: BlazeMeter
vendor
Specifies the plug-in vendor, which appears on the UI in the Administration, Plug-ins page.
Example: CA Technologies
uniqueId
Specifies a unique identifier that distinguishes the plug-in from other plug-ins on the system. The unique ID should be a
concatenation of vendor and name
Example: CA Technologies BlazeMeter
description
Specifies a description for the plug-in.
version
Specifies the plug-in version number, which appears on the UI in the Administration, Plug-ins page. As a best practice,
the version should be written in the form [numeric major version].[numeric minor version], for example, "1.2". Every
change in the plug-in implementation and in the manifest should increment the version number, either minor or major.
Incrementing the version number facilitates version control, change management, and tracking.
173

Continuous Delivery Director Integrations 1.0
Endpoint Template Information
The following information is required in the manifest file to enable a connection to remote endpoints of that plug-
in. A plug-in has only one endpoint template (also known as the endpoint type). This information appears under the
endpointTemplate section of the manifest. The endpoint template specification includes all parameters that are
required for connecting to the remote endpoint. For example, URL, user name, password, and so on. The list of
parameters of the endpoint template is specific to each plug-in.
name
Specifies the name of the endpoint template. As a best practice, set this name to the name of the plug-in. The name
appears as an Endpoint Type option when you click Add Endpoint on the Endpoints page in the UI.
uniqueId
Specifies a unique identifier that distinguishes the service information in this section from the other services within your
manifest, such as tasks and content import. Set this value to "ENDPOINT" as a best practice.
description
Specifies a description for the endpoint type.
servicetype
Specifies the type of plug-in service you are describing. Always specify ENDPOINT for this property.
endPointType
Specifies the name of the endpoint type. Always specify ENDPOINT for this property.
url
Specifies a URL that is associated with this endpoint. Always specify ENDPOINT for this property.
parameters
Specifies the parameters that are required to establish a connection to the remote endpoint, such as URL, user
name, password, and so on. These parameters appear on the UI when the Endpoint Type is selected in the ADD
ENDPOINT dialog. The list of parameters holds the data type of each parameter and does not include the concrete
values. The concrete values are specified by the user when they create a specific endpoint instance based on this
endpoint template definition.
For more information, see Service Parameter Information.
Service Information
The following information is required in the manifest file to enable the services supplied by the plug-in, such as tasks,
content import, and application import. A plug-in can have as many services as necessary. This information appears under
the services section of the manifest.
name
Specifies the name of the plug-in service. This name appears as an option when you select from the available Task
Type values in the CREATE TASK dialog or when you select from the available Content Source Types on the CREATE
CONTENT SOURCE dialog.
uniqueId
Specifies a unique identifier that distinguishes the service information in this section from the other services within your
manifest. Set this value to the name of this service as a best practice. This value must not change in future versions of
this service.
description
174

Continuous Delivery Director Integrations 1.0
Specifies a description for the service.
servicetype
Specifies the type of plug-in service that is described. Specify one of the following service types:
•
Task: "TASK"
•
Content import: "CONTENT"
•
Application import: "APPLICATION"
•
Test connectivity: "CONNECTIVITY_TEST"
url
Specifies a URL that is used by Continuous Delivery Director when you build the API call to execute this plug-in service
using the provided parameter values. Ensure that the URL is relative to the base URL of the plug-in package in the
manifest file location. For more information, see Manifest Best Practices.
inputParameters
Specifies the input parameters that are required to execute the plug-in service. These parameters appear on the UI when
the Task Type is selected in the CREATE TASK or CREATE CONTENT SOURCE dialog.
For more information, see Service Parameter Information.
outputParameters
Specifies the output parameters that are returned by the execution of the plug-in service. These parameters appear on the
UI when the Task Type is selected in the CREATE TASK or CREATE CONTENT SOURCE dialog. A user can configure a
token in an output parameter, and Continuous Delivery Director will set the token value as the output parameter value that
is returned by the execution of the plug-in service. The token can also be used as the input parameter of another plug-in
service.
For more information, see Service Parameter Information.
Service Parameter Information
Service parameters are input values that are required for the underlying HTTP request to instrument the service. For
endpoint templates, service parameters are typically connection information. For other services, parameters provide
the information that is required to instrument task execution, and so on that is based on the requirement for that plug-in
service. For example, deployment plan information to run a deployment. Parameters appear as fields when you select the
relevant task type, content source type, or endpoint type on the UI.
Input Parameters
name
Specifies a name for the parameter. This value must not change in future versions of this service parameter.
displayName
Specifies the parameter name that appears as the field name for inputs in the UI. This value can be modified without any
effect on the plug-in service execution.
uniqueId
Specifies a unique identifier that distinguishes the parameter in this section from the other parameters of this plug-in
service.
description
Includes a description of the field that appears when you hover over the field in the UI.
175

Continuous Delivery Director Integrations 1.0
type
Specifies the type of input value. Enter one of the following values:
string
A string value.
textarea
Displays a text box for an input value up to 1024 characters. Use this type for longer values such as code snippets.
password
An encrypted value. Use this type for passwords.
boolean
A boolean value, true or false . In the UI, the boolean type appears as a checkbox.
isOptional
Specifies whether the value is required or optional.
defaultValue
Specifies the default value that appears in the field before any other value is supplied.
possibleValues
Defines a set of static possible values for the field that are selectable in the UI from a drop-down list for a string
parameter or checkbox for a boolean parameter (true or false ). Each possible value can be associated with a further
list of parameters that appear whenever the option associated with this value is selected in the UI.
Output parameters
Output parameters provide the ability to return plug-in values and use the values in a later task and phases
name
Specifies a name for the parameter. This value must not change in future versions of this service parameter.
displayName
Specifies the parameter name that appears as the field name for inputs in the UI. This value can be modified without any
effect on the plug-in service execution.
uniqueId
Specifies a unique identifier that distinguishes the parameter in this section from the other parameters of this plug-in
service.
description
Includes a description of the field that appears when you hover over the field in the UI.
Manifest Best Practices
Consider the following best practices as you build your manifest file:
Portable Manifest
•
Keep the content of the manifest portable and agnostic to the exact location of the plug-in server container.
A portable manifest lets the administrator relocate and deploy the plug-in on any server. Avoid hard coding specific
server addresses and ports inside the plug-in manifest. The plug-in manifest should not be tightly coupled to its server
container.
176

Continuous Delivery Director Integrations 1.0
For example, all URL values in the plug-in manifest should use relative values such as tasks/task1.
Sensitive Information
•
Store all sensitive information, such as passwords, API keys, and so on, as endpoint parameters.
Do not store sensitive information in task or content source parameters. The endpoint is a central location that plug-in
tasks and content sources share. This best practice prevents the repeated entry of sensitive data. This practice also
prevents the replication of sensitive data across release tasks and content sources.
Example: If a password value is updated for a remote component, you only have to update one location (endpoint
details) in Continuous Delivery Director.
This best practice also lets you implement different security levels for the endpoint creator and the task creator. The
endpoint creator can hide the concrete password value from all task creators that use this endpoint.
•
Store the network connectivity details of remote components as endpoint parameters.
Do not store network connectivity information in task or content source parameters. Use this best practice for central
management and maintenance of all remote servers that plug-ins access over the system network.
When you use this best practice, the ENDPOINTS page lists all remote servers that the plug-ins access. You do not
have to inspect all tasks to detect which network elements Continuous Delivery Director accesses.
Example: If an IP address of a remote component changes, you would only need to update one location (endpoint
details) in Continuous Delivery Director.
Packaging
•
Ensure the manifest is part of the plug-in package. We do not recommend that you store the manifest separately from
the rest of the plug-in.
•
Ensure the manifest resides at the root of the plug-in package.
If the base URL of the plug-in package is /cdd-ra-plugin/ , the manifest resides directly under the root of the plug-in
package: /cdd-ra-plugin/manifest.json
Naming and Versioning
•
Do not create multiple plug-ins with the same name and definitely not for the same vendor..
Ensure that each plug-in name and plug-in vendor name is globally unique. Using a distinct plug-in name helps to
distinguish the plug-ins in the UI.
•
Ensure the unique ID of the plug-in is a string that includes the plug-in name and the vendor.
Example: CA Technologies Continuous Delivery Automation
•
After you have published the plug-in to the community, do not change the plug-in name and vendor in subsequent
versions.
•
Update the plug-in version every time you modify and release the plug-in.
Sample Plug-in
This page presents full sample plug-in materials as a reference example and starting point for plug-in development.
Sample Plug-in Details
This sample plug-in provides basic artifacts to get you familiar with the required format of the manifest file and provide a
common way of writing the plug-in code. The plug-in is a blank sample without any capabilities but provides key examples
of important concepts in the basic formatting of the manifest and the code.
You can download each of these artifacts from this page and use them as starting points for your own custom plug-in.
Sample Plug-in Manifest
Here is the sample plug-in manifest file:
177

Continuous Delivery Director Integrations 1.0
{
"name": "Sample",
"vendor": "CA Technologies",
"uniqueId": "CA Technologies Sample",
"description": "Sample Plugin for Continuous Delivery Director",
"version": "1.0",
"iconUrl": "CA.svg",
"endpointTemplate": {
"uniqueId": "Endpoint",
"name": "Sample Endpoint",
"description": "A Sample plugin endpoint",
"serviceType": "ENDPOINT",
"endPointType": "Endpoint",
"url": "Endpoint",
"parameters": [
{
"uniqueId": "URL",
"name": "URL",
"displayName": "URL",
"type": "string",
"isOptional": false,
"defaultValue": null,
"description": "URL"
},
{
"uniqueId": "username",
"name": "username",
"displayName": "Username",
"type": "string",
"isOptional": false,
"defaultValue": null,
"description": "Username"
},
{
"uniqueId": "password",
"name": "password",
"displayName": "Password",
"type": "password",
"isOptional": false,
"defaultValue": null,
"description": "Password"
},
{
"uniqueId": "useProxy",
"name": "useProxy",
"displayName": "Use Proxy",
"type": "boolean",
"isOptional": true,
"defaultValue": "false",
"description": "Connect through a proxy",
"possibleValues": [
{
"value": "false"
178

Continuous Delivery Director Integrations 1.0
},
{
"value": "true",
"parameters": [
{
"uniqueId": "proxyUrl",
"name": "proxyUrl",
"displayName": "Proxy Url",
"type": "string",
"isOptional": false,
"defaultValue": null,
"description": "Proxy Url"
},
{
"uniqueId": "proxyUsername",
"name": "proxyUsername",
"displayName": "Proxy Username",
"type": "string",
"isOptional": true,
"defaultValue": null,
"description": "Proxy Username"
},
{
"uniqueId": "proxyPassword",
"name": "proxyPassword",
"displayName": "Proxy Password",
"type": "password",
"isOptional": true,
"defaultValue": null,
"description": "Proxy Password"
}
]
}
]
}
]
},
"services": [
{
"uniqueId": "Task1",
"name": "Task1",
"description": "Description of the first task",
"serviceType": "TASK",
"url": "tasks/task1",
"inputParameters": [
{
"uniqueId": "parameter1",
"name": "parameter1",
"displayName": "Parameter1",
"type": "string",
"isOptional": false,
"defaultValue": null,
"description": "Description of the first parameter of the first task",
179

Continuous Delivery Director Integrations 1.0
"url": "tasks/task1/parameter1/values"
},
{
"uniqueId": "parameter2",
"name": "parameter2",
"displayName": "Parameter2",
"type": "string",
"isOptional": false,
"defaultValue": "GET",
"description": "Description of the second parameter of the first task",
"possibleValues": [
{
"value": "GET"
},
{
"value": "POST"
},
{
"value": "PUT"
}
]
},
{
"uniqueId": "parameter3",
"name": "parameter3",
"displayName": "Parameter3",
"type": "textarea",
"isOptional": true,
"defaultValue": null,
"description": "Description of the third parameter of the first task",
"url": "tasks/task1/parameter3/values",
"dependencies": [
"parameter1"
]
}
],
"outputParameters": [
{
"uniqueId": "output_parameter1",
"name": "output_parameter1",
"displayName": "output_parameter1",
"description": "description of output_parameter1"
}
]
},
{
"uniqueId": "Import Application Model",
"name": "Import Application Model",
"description": "Description of import application model",
"serviceType": "APPLICATION",
"url": "application-sources/application-source",
"inputParameters": null
},
180

Continuous Delivery Director Integrations 1.0
{
"uniqueId": "Import Content Items",
"name": "Import Content Items",
"description": "Description of import content items",
"serviceType": "CONTENT",
"url": "content-sources/content-source/content-items",
"outputParameters": [
{
"uniqueId": "parameter1",
"name": "Parameter1",
"displayName": "Parameter1",
"type": "string",
"isOptional": false,
"defaultValue": null,
"description": "Description of the first parameter of the first import content items"
}
]
},
{
"name": "Connectivity Test",
"description": "Connection Test",
"serviceType": "CONNECTIVITY_TEST",
"url": "connectivity-tests/connectivity-test",
"uniqueId": "Connectivity Test"
}
]
}
Download the sample manifest here to use it as a template for your custom plug-in manifest.
This manifest presents the following manifest information in an abstract, sample format:
•
Basic plug-in information that you can change for your custom plug-in
•
A basic endpoint template with three template parameters: user name, password, and URL. All recommended best
practices for endpoint information values are applied.
•
Template information for two tasks, content import, and application import. The template services provide examples of
several of the parameter types described in Create the Plug-in Manifest.
•
The manifest uses relative URLs for all services. For example, tasks/task1 is the URL for the first task. This is simply
an identifier that is passed to the plug-in code, which can then use the supplied input values to execute the task. The
sample plug-in code shows how the code can interpret the relative URLs to make the appropriate HTTP request.
Configure Plug-in Icons
Plug-in icons appear in the PLUG-INS page and on tasks in the RELEASES page. The source images for plug-in icons
are located in the plug-in *.*war file.
Plug-in manifests contain a JSON declaration that points to the source image in the plug-in *.*war file.
Example:
"iconUrl": "CA.svg",
To add or change a plug-in icon, replace the source image in the plug-in *.*war file and update the plug-in manifest.
Note: You cannot specify an absolute URL in the plug-in manifest to indicate the location of the source image. If you do
not add or update a source image, or if the declaration is not correctly formatted, the CA icon "CA.svg " is used instead.
181

Continuous Delivery Director Integrations 1.0
Tomcat-Based Java .WAR Sample
Note: For general specifications, see Develop Custom Plug-in HTTP Service.
Java Specific Specifications
A plug-in task might continue to run after the plug-in returns a response to Continuous Delivery Director. In this case, the
plugin sets externalTaskExecutionStatus to RUNNING.
The plugin might create an execution context. The execution context is a collection of key and value pairs that are
dynamically created by the plug-in and hold a plug-in-specific execution context of the plugin task. The execution context
might hold a runtime key/value that allows the plug-in to check the execution status/progress.
The plugin sets delayTillNextPoll to polling duration (in seconds) to specify when Continuous Delivery Director checks
the status/progress again.
Continuous Delivery Director executes the task again after this polling duration has passed to check the task status/
progress. The polling request includes the execution context so the plug-in is aware that this is not a new request for task
execution.
The ExternalTaskResult Java class represents the JSON response on task execution request.
The ExternalTaskResult JSON is returned from a plugin to Continuous Delivery Director and includes the following fields:
externalTaskExecutionStatus
Provides a high-level status for the task. Set this input to one of the following values:
•
RUNNING
•
FAILED
•
FINISHED
executionContent
Provides a field in which to store the service execution content. The task execution context data might include a collection
of key/value pairs of runtime information for this specific task execution. Continuous Delivery Director persistently stores
this context as an opaque data object and delivers the object at the next invocation of this API for this specific task
execution.
Type: Map <String,Sting>
Context Key Limit: 230 characters
Contest Value Limit: 4000 characters
Notes:
•
If the response does not include the context element, Continuous Delivery Director keeps the context as is.
•
If the response includes an empty context element, Continuous Delivery Director clears the context for this task
execution.
taskState
Provides a summary of the task status. This status appears on the UI next to the task status icon.
The status is returned at the statusDescription field of the Task REST API response and displayed on the UI.
Type: String
Limits: 255 characters
Example: Task Failed
detailedInfo
182

Continuous Delivery Director Integrations 1.0
Provides a detailed summary of the task status. The status is returned at the detailedStatusDescription field of the Task
REST API response. This detailed status appears when you click on the high-level status in the UI.
Type: String
Limits: 10,000 characters
Example: Endpoint value is incorrect. Provide valid endpoint details.
progress
Provides a progress indicator to display.
Type: Float
delayTillNextPoll
Specifies when Continuous Delivery Director initiates the next invocation of this API for this specific task execution (if at
all).
Type: Long
Note: To view and download sample plug-in code, see Sample Plug-in.
Example:
A Java task may use the following to indicate that the task is still running, and ask Continuous Delivery Director to check
the status/progress in POLLING_INTERVAL seconds:
taskInputs.getExecutionContext().put(OPERATION_ID, operationId);
return ExternalTaskResult.createResponseForRunning("Operation started", description, 0f, POLLING_INTERVAL,
taskInputs.getExecutionContext());
When you stop a task, Continuous Delivery Director calls the task and sets the action to the following query parameters:
EXECUTE_ACTION
The standard action specified on task execution.
STOP_ACTION
The standard action specified when the task is stopped.
Example:
@POST
@Produces(MediaType.APPLICATION_JSON)
public ExternalTaskResult execute(@QueryParam(TaskConstants.ACTION_PARAM) String action, ExternalTaskInputs
taskInputs) {
ExternalTaskResult externalTaskResult;
if (TaskConstants.EXECUTE_ACTION.equalsIgnoreCase(action)) {
externalTaskResult = executeTask(taskInputs);
} else if (TaskConstants.STOP_ACTION.equalsIgnoreCase(action)) {
externalTaskResult = stopTask(taskInputs);
} else {
throw new IllegalArgumentException("Unexpected invalid action '" + action + "' while trying to execute
task.");
}
return externalTaskResult;
}
183

Continuous Delivery Director Integrations 1.0
Sample Plug-in Code
The following plugins-dto-1.11.jar file declares the Java interfaces and input and output arguments required in the sample
plugin code.
Here is sample code for a single task described in the manifest:
The entry point for this SampleTask file is the execute method (line 40):
public ExternalTaskResult execute(@QueryParam(TaskConstants.ACTION_PARAM) String action, ExternalTaskInputs
taskInputs)
This method has two input arguments:
•
action of type String
•
taskInputs of type ExternalTaskInputs
This method has one output:
•
externalTaskResult of type ExternalTaskResult
package com.ca.cdd.plugins.sample;
import com.ca.rp.plugins.dto.model.*;
import org.glassfish.jersey.client.authentication.HttpAuthenticationFeature;
import javax.ws.rs.*;
import javax.ws.rs.client.Client;
import javax.ws.rs.client.ClientBuilder;
import javax.ws.rs.client.Entity;
import javax.ws.rs.client.Invocation;
import javax.ws.rs.core.MediaType;
import javax.ws.rs.core.Response;
import java.util.Map;
/**
* Created by admin on 24/02/2016.
* A sample task that can be used as a template for Continous Delivery Edition plugin tasks
*/
@Path("tasks/task1")
public class SampleTask {
184

Continuous Delivery Director Integrations 1.0
private static final String PARAMETER1 = "parameter1";
private static final String PARAMETER2 = "parameter2";
private static final String PARAMETER3 = "parameter3";
private static final String FILTER = "filter";
@POST
@Produces(MediaType.APPLICATION_JSON)
public ExternalTaskResult execute(@QueryParam(TaskConstants.ACTION_PARAM) String action, ExternalTaskInputs
taskInputs) {
ExternalTaskResult externalTaskResult;
if (TaskConstants.EXECUTE_ACTION.equalsIgnoreCase(action)) {
externalTaskResult = executeTask(taskInputs);
} else if (TaskConstants.STOP_ACTION.equalsIgnoreCase(action)) {
externalTaskResult = stopTask(taskInputs);
} else {
throw new IllegalArgumentException("Unexpected invalid action '" + action + "' while trying to execute
task.");
}
return externalTaskResult;
}
@POST
@Path("/parameter1/values")
@Consumes(MediaType.APPLICATION_JSON)
@Produces(MediaType.APPLICATION_JSON)
public DynamicValuesOutput getDynamicValuesForParameter1(DynamicValuesInput dynamicValuesInput,
@DefaultValue("") @QueryParam(FILTER) String filter) throws Exception {
DynamicValuesOutput dynamicValuesOutput = null;
dynamicValuesOutput = getDynamicValues(dynamicValuesInput, filter);
return dynamicValuesOutput;
}
private ExternalTaskResult executeTask(ExternalTaskInputs taskInputs) {
ExternalTaskResult externalTaskResult;
try {
Map < String, String > taskProperties = taskInputs.getTaskProperties();
Map < String, String > endpointProperties = taskInputs.getEndPointProperties();
185

Continuous Delivery Director Integrations 1.0
String username;
String password;
String url;
if (endpointProperties != null && !endpointProperties.isEmpty()) {
username = endpointProperties.get("username");
password = endpointProperties.get("password");
url = endpointProperties.get("URL");
} else {
externalTaskResult = ExternalTaskResult.createResponseForFailure("Missing endpoint", "Unexpected invalid
empty endpoint while trying to execute task");
return externalTaskResult;
}
// These are the task inputs
String parameter1 = taskProperties.get(PARAMETER1);
String parameter2 = taskProperties.get(PARAMETER2);
String parameter3 = taskProperties.get(PARAMETER3);
Client httpClient = ClientBuilder.newClient();
if (username != null && !username.isEmpty()) {
HttpAuthenticationFeature feature = HttpAuthenticationFeature.basic(username, password);
httpClient.register(feature);
}
// http header support
Invocation.Builder request = httpClient.target(url).request();
try {
addHeaders(request);
} catch (Exception e) {
externalTaskResult = ExternalTaskResult.createResponseForFailure("Failed to execute",
"Could not parse headers " + e.getLocalizedMessage());
return externalTaskResult;
}
Response response;
String method = "GET";
String body = null;
response = request.method(method, Entity.json(body));
if (response != null) {
int responseCode = response.getStatus();
String responseBody = response.readEntity(String.class);
186

Continuous Delivery Director Integrations 1.0
return ExternalTaskResult.createResponseForFinished("Rest operation ended successfully", responseBody);
} else {
return ExternalTaskResult.createResponseForFailure("Failed to execute",
"No response");
}
} catch (Exception e) {
externalTaskResult = ExternalTaskResult.createResponseForFailure("Failed to execute",
e.getLocalizedMessage());
}
return externalTaskResult;
}
private ExternalTaskResult stopTask(ExternalTaskInputs taskInputs) {
ExternalTaskResult externalTaskResult;
externalTaskResult = ExternalTaskResult.createResponseForFailure("Failed to stop task", "Cannot stop");
return externalTaskResult;
}
private void addHeaders(Invocation.Builder request) {
request.header("Content-Type", "application/json");
return;
}
private DynamicValuesOutput getDynamicValues(DynamicValuesInput dynamicValuesInput, String filter) throws
Exception {
return null;
}
}
Download the sample code here to use it as a template for your custom plug-in code.
The plug-in code does the following:
•
Calls the relative URL referenced in the manifest file for the URL, in this case, tasks/task1. This ensures the proper
routing of the task execution.
•
Constructs the appropriate API call that plugs in task input values to complete the request.
•
Builds a POST response to send status back to the UI based on that task state and what issue changed to what status.
Here is sample code for an application import:
package com.ca.cdd.plugins.sample;
187

Continuous Delivery Director Integrations 1.0
import com.ca.rp.plugins.dto.model.*;
import java.util.List;
import java.util.Map;
import javax.ws.rs.*;
import javax.ws.rs.core.MediaType;
/**
* Created by admin on 24/02/2016.
* A sample application source that can be used as a template for Continous Delivery Edition plugin
application sources
*/
@Path("application-sources/application-source")
public class SampleApplicationSource {
@POST
@Path("/application-source")
@Consumes(MediaType.APPLICATION_JSON)
@Produces(MediaType.APPLICATION_JSON)
public ExternalApplicationsResponse execute(ExternalApplicationSourceInput externalApplicationSourceInput)
throws Exception {
ExternalApplicationsResponse externalApplicationsResponse;
externalApplicationsResponse = getApplicationsAndEnvironments(externalApplicationSourceInput);
return externalApplicationsResponse;
}
private ExternalApplicationsResponse getApplicationsAndEnvironments(ExternalApplicationSourceInput
externalApplicationSourceInput) throws Exception {
ExternalApplicationsResponse externalApplicationsResponse;
List < ExternalApplication > externalApplications;
Map < String, String > endPointProperties = externalApplicationSourceInput.getEndPointProperties();
externalApplications = getListOfExternalApplications(endPointProperties);
188

Continuous Delivery Director Integrations 1.0
for (int i = 0; i < externalApplications.size(); i++) {
ExternalApplication externalApplication;
List < ExternalEnvironment > externalEnvironments;
externalApplication = externalApplications.get(i);
externalEnvironments = getListOfEnvironmentByApplication(externalApplication, endPointProperties);
externalApplication.setEnvironments(externalEnvironments);
}
externalApplicationsResponse = new ExternalApplicationsResponse();
externalApplicationsResponse.setApplications(externalApplications);
return externalApplicationsResponse;
}
private List < ExternalApplication > getListOfExternalApplications(Map < String, String > endPointProperties)
{
List < ExternalApplication > externalApplications = null;
return externalApplications;
}
private List < ExternalEnvironment > getListOfEnvironmentByApplication(ExternalApplication
externalApplication, Map < String, String > endPointProperties) {
List < ExternalEnvironment > externalEnvironments = null;
return externalEnvironments;
}
}
Download this sample code here to use it as a template for your custom plug-in application import.
This sample code does the following:
•
Calls the relative URL referenced in the manifest file for the application import URL. This ensures the proper routing of
an application import request.
•
Runs requests to get the applications and environments associated with a specific endpoint.
Here is sample code for a connectivity test:
package com.ca.cdd.plugins.sample;
import com.ca.rp.plugins.dto.model.ConnectivityInput;
import com.ca.rp.plugins.dto.model.ConnectivityResult;
189

Continuous Delivery Director Integrations 1.0
import javax.ws.rs.Consumes;
import javax.ws.rs.POST;
import javax.ws.rs.Path;
import javax.ws.rs.Produces;
import javax.ws.rs.core.MediaType;
import java.util.Map;
/**
* Created by admin
*/
@Path("connectivity-tests/connectivity-test")
public class SampleConnectivityTest {
@POST
@Consumes(MediaType.APPLICATION_JSON)
@Produces(MediaType.APPLICATION_JSON)
public ConnectivityResult connect(ConnectivityInput connectivityInput) {
ConnectivityResult connectivityResult = new ConnectivityResult(true, null);
boolean status = true;
String errorMessage = null;
Map < String, String > endpointProperties = connectivityInput.getEndPointProperties();
if ( status == false )
{
connectivityResult.setSuccess(status);
connectivityResult.setErrorMessage(errorMessage);
}
return connectivityResult;
}
}
Download this sample code for a connectivity test here.
This sample code provides a URL that is called to test an endpoint connection.
Sample Tomcat web.xml File
The following web.xml file uses a Jersey servlet container:
For more information, see the jersey.java.net website.
<?xml version="1.0" encoding="UTF-8"?>
<!-- This web.xml file is not required when using Servlet 3.0 container,
see implementation details http://jersey.java.net/nonav/documentation/latest/jax-rs.html -->
190

Continuous Delivery Director Integrations 1.0
<web-app version="2.5" xmlns="http://java.sun.com/xml/ns/javaee" xmlns:xsi="http://www.w3.org/2001/XMLSchema-
instance" xsi:schemaLocation="http://java.sun.com/xml/ns/javaee http://java.sun.com/xml/ns/javaee/web-
app_2_5.xsd">
<servlet>
<servlet-name>CA Technologies Sample Plugin</servlet-name>
<servlet-class>org.glassfish.jersey.servlet.ServletContainer</servlet-class>
<init-param>
<param-name>jersey.config.server.provider.packages</param-name>
<param-value>com.ca.cdd.plugins.sample</param-value>
</init-param>
<load-on-startup>1</load-on-startup>
</servlet>
<servlet-mapping>
<servlet-name>CA Technologies Sample Plugin</servlet-name>
<url-pattern>/servlet/*</url-pattern>
</servlet-mapping>
</web-app>
Download the sample web.xml File here.
Sample Tomcat Logger Configuration
The following file presents a sample logback configuration for a Tomcat-based Java plug-in:
<?xml version="1.0" encoding="UTF-8"?>
<configuration>
<!--<include resource="org/springframework/boot/logging/logback/base.xml"/>-->
<!--<jmxConfigurator/>-->
<property name="LOG_HOME" value="../logs" />
<appender name="STDOUT" class="ch.qos.logback.core.ConsoleAppender">
<layout class="ch.qos.logback.classic.PatternLayout">
<Pattern>
%d{yyyy-MM-dd HH:mm:ss} [%thread] %-5level %logger{36} - %msg%n
</Pattern>
</layout>
</appender>
<appender name="FILE-LOG"
class="ch.qos.logback.core.rolling.RollingFileAppender">
<file>${LOG_HOME}/cdd_sample_plugin.log</file>
<encoder class="ch.qos.logback.classic.encoder.PatternLayoutEncoder">
<Pattern>
%d{yyyy-MM-dd HH:mm:ss} [%thread] %-5level %logger{36} - %msg%n
</Pattern>
</encoder>
<rollingPolicy class="ch.qos.logback.core.rolling.TimeBasedRollingPolicy">
<!-- rollover daily -->
<fileNamePattern>${LOG_HOME}/archived/cdd_sample_plugin.%d{yyyy-MM-dd}.%i.log
</fileNamePattern>
<timeBasedFileNamingAndTriggeringPolicy
class="ch.qos.logback.core.rolling.SizeAndTimeBasedFNATP">
<maxFileSize>10MB</maxFileSize>
</timeBasedFileNamingAndTriggeringPolicy>
</rollingPolicy>
</appender>
191

Continuous Delivery Director Integrations 1.0
<!-- Send logs to both console and file audit -->
<logger name="com.ca.cdd.plugins.sample"
additivity="false">
<appender-ref ref="FILE-LOG" />
<appender-ref ref="STDOUT" />
</logger>
<root level="debug">
<appender-ref ref="FILE-LOG" />
</root>
</configuration>
Download this sample file here to use it as a template for your logback configuration.
In this file, you should change values in the following lines to reflect the artifacts for your plugin:
•
Line 17 specifies the log file name to which to log plugin messages.
•
Line 24 specifies archiving behavior.
•
Line 37 specifies the Java package for the plugin.
These three locations should be updated based on the artifacts for your plugin.
Should include logback.jar and other third-party files with a logback implementation.
Sample Tomcat WAR Folder and File Structure
When you develop a sample plug-in using a Tomcat-based Java architecture, your WAR folder structure will look like the
following:
./WEB-INF
./WEB-INF/classes
./WEB-INF/classes/com
./WEB-INF/classes/com/ca
./WEB-INF/classes/com/ca/cdd
./WEB-INF/classes/com/ca/cdd/plugins
./WEB-INF/classes/com/ca/cdd/plugins/sample
./WEB-INF/lib
./META-INF
The files included in the plug-in are as follows:
# Plugin manifest
./manifest.json
# WAR manifest
./META-INF/MANIFEST.MF
# Tomcat web.xml
./WEB-INF/web.xml
# WAR class files
./WEB-INF/classes/logback.xml
192

Continuous Delivery Director Integrations 1.0
./WEB-INF/classes/com/ca/cdd/plugins/sample/SampleTask.class
./WEB-INF/classes/com/ca/cdd/plugins/sample/SampleConnectivityTest.class
./WEB-INF/classes/com/ca/cdd/plugins/sample/SampleApplicationSource.class
# WAR jar files
./WEB-INF/lib/plugins-dto-1.11.jar
./WEB-INF/lib/dtos.jar
./WEB-INF/lib/javax.annotation-api-1.2.jar
./WEB-INF/lib/javax.ws.rs-api-2.0.1.jar
./WEB-INF/lib/javax.inject-2.4.0-b31.jar
./WEB-INF/lib/javax.inject-1.jar
./WEB-INF/lib/jersey-media-json-jackson-2.21.jar
./WEB-INF/lib/jersey-client-2.22.1.jar
./WEB-INF/lib/jersey-media-jaxb-2.22.1.jar
./WEB-INF/lib/jersey-entity-filtering-2.21.jar
./WEB-INF/lib/jersey-server-2.22.1.jar
./WEB-INF/lib/jersey-common-2.22.1.jar
./WEB-INF/lib/jersey-apache-connector-2.21.jar
./WEB-INF/lib/jersey-container-servlet-core-2.22.1.jar
./WEB-INF/lib/jersey-guava-2.22.1.jar
./WEB-INF/lib/logback-core-1.1.3.jar
./WEB-INF/lib/logback-classic-1.1.3.jar
./WEB-INF/lib/log4j-over-slf4j-1.7.12.jar
./WEB-INF/lib/slf4j-api-1.7.12.jar
./WEB-INF/lib/jcl-over-slf4j-1.7.12.jar
./WEB-INF/lib/commons-logging-1.2.jar
./WEB-INF/lib/httpcore-4.4.3.jar
./WEB-INF/lib/httpasyncclient-4.0.2.jar
./WEB-INF/lib/httpcore-nio-4.3.2.jar
./WEB-INF/lib/httpclient-4.5.1.jar
./WEB-INF/lib/httpmime-4.3.6.jar
./WEB-INF/lib/unirest-java-1.4.5.jar
./WEB-INF/lib/jackson-jaxrs-json-provider-2.5.4.jar
./WEB-INF/lib/jackson-jaxrs-base-2.5.4.jar
193

Continuous Delivery Director Integrations 1.0
./WEB-INF/lib/jackson-databind-2.5.4.jar
./WEB-INF/lib/jackson-annotations-2.5.4.jar
./WEB-INF/lib/jackson-module-jaxb-annotations-2.5.4.jar
./WEB-INF/lib/jackson-core-2.6.2.jar
./WEB-INF/lib/javassist-3.18.1-GA.jar
./WEB-INF/lib/json-simple-1.1.1.jar
./WEB-INF/lib/json-20140107.jar
./WEB-INF/lib/hk2-api-2.4.0-b31.jar
./WEB-INF/lib/hk2-utils-2.4.0-b31.jar
./WEB-INF/lib/hk2-locator-2.4.0-b31.jar
./WEB-INF/lib/commons-codec-1.9.jar
./WEB-INF/lib/hamcrest-core-1.3.jar
./WEB-INF/lib/junit-4.12.jar
./WEB-INF/lib/validation-api-1.1.0.Final.jar
./WEB-INF/lib/osgi-resource-locator-1.0.1.jar
./WEB-INF/lib/aopalliance-repackaged-2.4.0-b31.jar
./WEB-INF/lib/mockito-all-1.10.19.jar
194

Continuous Delivery Director Integrations 1.0
Integrate with CI Tools
Set up an integration with a third-party Continuous Integration (CI) tool that automatically feeds changes into Continuous
Delivery Director.
CI tools provide rapid feedback to help you identify and correct defects as soon as possible. You can use CI tools to
automate testing and build a document trail to help prevent integration problems.
Continuous Delivery Director supports integration with the following Continuous Integration tools:
•
Jenkins
•
JetBrains TeamCity
•
Microsoft Team Foundation Server (TFS)
Once the CI tool is successfully building a new build for a specific application version, a notification is sent to Continuous
Delivery Director. This notification triggers the execution of the related release for that application version.
Plug-in for Jenkins
Use this plug-in to send build notifications from Jenkins to Continuous Delivery Director.
Plug-in Version 3.2.12
Figure 52: Click the following icon to download the latest plug-in version:
Jenkins notifies Continuous Delivery Director of any new successful build including application and build information.
Continuous Delivery Director maps this change notification to the relevant releases and triggers the corresponding release
executions.
Prerequisites
You need JRE 1.8 or JRE 11 to install and configure the Jenkins plug-in.
Change History
The following update was made for plug-in versions 3.2.12
•
You can now create releases by specifying a file source in Groovy pipeline syntax. To support this change, you can
now specify the following parameters in Groovy for the sendNotificationToCDD step:
–
fileSourceName
–
fileSourceParameters
–
dslFilename
–
dslParameters
The following update was made for plug-in versions 3.2.9 - 3.2.10
•
The order of the input parameters in the Send notification to CDDirector post-build action was changed.
The following updates were made for plug-in version 3.2.8:
•
Two new options have been added to the Send notification to CDDirector post-build action:
–
Create a release and/or execute an existing one
If you select this option, the following parameters display:
195

Continuous Delivery Director Integrations 1.0
•
Update Token Values in CDDirector (pre-existing)
•
Ignore Nonexistent CDD Application (pre-existing)
•
DSL Parameter (new)
–
Only run my tests in CDD
If you select this option, the following parameters display:
•
Test Data (new)
•
Run a subset of test suites selected by the Test Advisor (new)
•
A new field has been added to the Send notification to CDDirector post-build action: Source Control Connection
Parameters.
•
Two new section headings have been added to the Send notification to CDDirector post-build action:
–
Set Application Name
–
Set Application Version Name
The following updates were made for plug-in version 3.2.7:
•
A new option has been added to freestyle projects, Ignore Nonexistent CDD Application? You select this option to
prevent the failure of a Jenkins post-build action in any of the following cases:
–
The specified application does not exist in Continuous Delivery Director
–
The specified application version does not exist in Continuous Delivery Director
–
No release exists that is associated with the specified application version
A similar Boolean parameter, ignoreNonexistentApplication, has been added to Jenkins pipeline projects.
•
You can now click a link in Jenkins to open a release in Continuous Delivery Director that is triggered by a specific
Jenkins Pipeline build. These links appear on the left panel of a Jenkins build in the format CDD {release-name}
Release.
The following update was made for plug-in version 3.2.4:
•
You can now determine whether your Jenkins project uses a repository name as the application name or an application
name that you provide. You can also determine whether your project uses a Git branch name as the application
version or an application version that you provide. This enhancement applies to Pipeline, Freestyle project, and
Multibranch Pipeline projects and is available if you integrate Jenkins with GitHub, GitLab, Bitbucket Server, or
Bitbucket (SaaS). To support this enhancement, new radio buttons and fields were added to the Send notification to
CDDirector post-build action:
–
Use Source Code Repository Name as Application Name
–
Use Application Name
–
Use Source Code Branch Name as Application Version
–
Use Application Version
The following update was made for plug-in version 3.1:
•
Support was added for Jenkins Pipeline. When a Jenkins Pipeline build ends successfully, a change notification is sent
to Continuous Delivery Director with the configured application version and build information.
•
You can now configure the notification sending functionality to work with different local settings per project.
You can now override the global connectivity details of Continuous Delivery Director for any project. To support
this feature, an Override CDDirector Configuration option has been added. If you select this option, the list of
Continuous Delivery Directorconfiguration parameters appears, with the global values as defaults. Any changes to the
global Continuous Delivery Director configuration will not affect this project.
The following update was made for plug-in version 2.0.13:
•
Support was added for Java 11.
Related Links
Configure Plug-in for Jenkins on page 197
196

Continuous Delivery Director Integrations 1.0
Send Build Notifications from a Jenkins Freestyle Project on page 197
You can update an existing Jenkins project or create a new project to send notifications to Continuous Delivery Director.
Configure Jenkins to Send Git Commit IDs on page 200
You can configure the plug-in for Jenkins to automatically send the commit IDs of Jenkins builds to Continuous Delivery
Director.
Send Build Notifications from Jenkins Pipeline on page 201
You can configure the plug-in for Jenkins to send build notifications from Jenkins Pipeline to Continuous Delivery Director.
Configure Plug-in for Jenkins
1. Download the cdd-jenkins-<version>.hpi file from the https://casupport.broadcom.com site.
2. Upload Continuous Delivery Director plug-in for Jenkins to your Jenkins instance.
3. In your Web browser, open http://<jenkins-server>:<port>/jenkins/configure.
4. Configure and set values for the following parameters:
•
CDDirector Server Name
•
CDDirector Server Port
•
Is CDDirector Secured Communication?
•
Tenant ID
–
For an on-prem install of Continuous Delivery Director, the tenant ID is
00000000-0000-0000-0000-000000000000
–
For Continuous Delivery Director SaaS, you can find the tenant ID under User Settings.
•
API Key – you can find the API key under User Settings.
•
Internal Proxy URL Specify the web address to access the organization web proxy.
•
Internet Proxy Username
•
Internet Proxy Password
5. Save your configuration.
The Continuous Delivery Director plug-in for Jenkins is configured and ready for use.
Related Links
Plug-in for Jenkins on page 195
Use this plug-in to send build notifications from Jenkins to Continuous Delivery Director.
Send Notifications from Jenkins on page 197
You can update an existing Jenkins project or create a new project to send notifications to Continuous Delivery Director.
Configure Jenkins to Send Git Commit IDs on page 200
You can configure the plug-in for Jenkins to automatically send the commit IDs of Jenkins builds to Continuous Delivery
Director.
Send Build Notifications from Jenkins Pipeline on page 201
You can configure the plug-in for Jenkins to send build notifications from Jenkins Pipeline to Continuous Delivery Director.
Send Build Notifications from a Jenkins Freestyle Project
You can update an existing Jenkins project or create a new project to send notifications to Continuous Delivery Director.
Continuous Delivery Director can automatically create and execute a new release every time a new application
(component) version is built by Jenkins. Continuous Delivery Director can automatically create a release and run any
relevant tests on the arrival of a build notification (with a preconfigured create new release request).
197

Continuous Delivery Director Integrations 1.0
You can use this plug-in to update and deploy business applications that contain a subgroup of applications
(components). You can also attach DSL files to business applications to use as templates for releases. A build notification
that comes from any of the business application child applications (components) can trigger the creation of a release
based on a template.
You can use this plug-in to update a test source template, which is a test source that defines the tests to execute for a
specific application (component). You can enter the test parameters in Jenkins. On the arrival of a build notification (with a
preconfigured create new test source request),Continuous Delivery Director can automatically create a release and a test
source on-the-fly without the need for any preconfiguration.
You can also specify source control connection parameters in Jenkins instead of in Continuous Delivery Director. This
specification supports the Run Relevant Tests and Planned vs Actual features.
1. Open the Jenkins project configuration screen and add a post-build action.
2. Select the Send notification to CDDirector post-build type and configure the following parameters:
•
Override CDDirector Configuration
Select this option to show the following list of Continuous Delivery Director configuration parameters, with the
global values as defaults:
–
CDDirector Server Name
Specify the server name to log into Continuous Delivery Director
–
CDDirector Port Name
Specify the server port to log into Continuous Delivery Director.
–
Is CDDirector Secured Communication
Select this option to use secure communication when logging into Continuous Delivery Director (https)
–
Tenant ID
Specify your tenant ID or leave empty if you are not using multi-tenancy.
•
For an on-prem install of Continuous Delivery Director, the tenant ID is
00000000-0000-0000-0000-000000000000
•
For Continuous Delivery Director SaaS, you can find the tenant ID under User Settings.
–
API Key
Specify the Continuous Delivery Director API key, accessible from the User Settings page.
–
Internal Proxy URL
Specify the web address to access the organizational web proxy.
–
Internal Proxy Username
Specify the username to authenticate to the organizational web proxy.
–
Internal Proxy Password
Specify the password to authenticate to the organizational web proxy.
•
Use Source Code Repository Name as Application Name
Select this option only if the Source Code Management setting in the project is for a single Git or Bitbucket server.
•
Use Application Name
Select this option to use the application name that you specify.
–
Application Name
Specify an application name.
–
Ignore Nonexistent CDD Application?
Select to fail the Jenkins build if the specified application does not exist in Continuous Delivery Director.
•
Use Source Code Branch Name as Application Version
Select this option only if the Source Code Management setting in the project is for a single Git or Bitbucket server.
•
Use Application Version
Select this option to use the application version you specify in Application Version.
198

Continuous Delivery Director Integrations 1.0
–
Application Version
Specify an application version.
–
Update Token Values in CDDirector
(Optional) Specify pairs of [token name - value] in the format: {"token_name1":"value1",
"token_name2":"value2"} . You can use parameters from the Jenkins build server in the list of tokens. In
every release that gets the notification, if a token with the specified name exists, that token is updated with the
value specified for the token.
When token values are updated before a change notification triggers a phase, the updated values are used in
that phase.
–
Source Control Connection Parameters
Enter one or more "field name":"value" pairs. The "field name" must be the corresponding
name that appears in Continuous Delivery Director when you create a source control connection
in the Application Management page. You can update multiple fields using the following format:
{"field1":"value1","field2":"value2" ...}. When a build notification is sent to Continuous Delivery Director, the
specified field is updated with the specified value and is used to create or update a test source, For example,
{"Repository":"MyApp"}
–
Test Data
Enter the name of the test source and then a key:value pair list with the parameters you want to update.
Example: [{"name": "JUnit_Test_Source", "parameters":
{"Branch":"myBranch","key2":"value2"...}}] .
•
Execute an existing release
Execute an existing release in Continuous Delivery Director.
•
Create a release
–
DSL Parameter
Enter one or more "parameter name":"value" pairs. You can update multiple parameters using the
following format: {"parameter":"value1","parameter":"value2"…} . When a build notification is sent
to Continuous Delivery Director, the specified parameter is updated in the DSL with the specified value. Ex.
{"EnvironmentName":"${GIT_BRANCH}"} .
•
Only run my tests in CDD
Select this option to run tests without triggering a build in Continuous Delivery Director.
–
Run a subset of test suites selected by the Test Advisor
Choose this option to run in Continuous Delivery Director only the test suites that the Test Advisor selects. The
test advisor selects test suites that are most relevant to recent changes and are likely to fail fast.
3. Save your configuration.
When you trigger your Jenkins build, Jenkins shares the last_successful_build parameter with Continuous Delivery
Director. You can use these parameters within tasks.
You have a business application named Web Banking that comprises three applications (components):
WebBank-DBSVC.war, WebBank-GUI.war, and WebBank-BackEnd.war As a developer, you make a change
and create a new feature branch for WebBakGui.war. When the build is run, you want a Continuous Delivery
Director release to be automatically created to perform all of the following actions:
•
Deploy all three applications
•
Use the new version of WebBankGui.war
•
Run the relevant tests
When your build is ready, the release is created with the required settings, without the need to set up a new
release manually.
199

Continuous Delivery Director Integrations 1.0
To include these parameter values within tasks, make sure to select the relevant Application Version content checkbox.
The last_successful_build parameter can be used as a token (you simply add the % (percent) prefix and select the
relevant token).
Related Links
Plug-in for Jenkins on page 195
Use this plug-in to send build notifications from Jenkins to Continuous Delivery Director.
Configure Plug-in for Jenkins on page 197
Configure Jenkins to Send Git Commit IDs on page 200
You can configure the plug-in for Jenkins to automatically send the commit IDs of Jenkins builds to Continuous Delivery
Director.
Send Build Notifications from Jenkins Pipeline on page 201
You can configure the plug-in for Jenkins to send build notifications from Jenkins Pipeline to Continuous Delivery Director.
Configure Jenkins to Send Git Commit IDs
You can configure the plug-in for Jenkins to automatically send the commit IDs of Jenkins builds to Continuous Delivery
Director.
Continuous Delivery Director uses these commit IDs to retrieve the related work items that are associated with this
Jenkins build. Examples of external work item data sources are Rally, Jira, and so on). This capability is based on Source
Code commit IDs.
A Source Code commit ID is an SHA-1 hash that uniquely identifies the source code commit. The source code information
includes the list of changed source files, the commit message, the commit date, the committer name, and email address,
the ID of the previous commit, and so on.
To enable this capability, install and configure the Git plug-in available in Jenkins.
1. In Jenkins, go to Manage Jenkins, then Manage Plugins.
2. From the Available tab, install the Git plug-in. This plug-in integrates Jenkins with Git.
3. Go back to the Dashboard and create or select a project.
4. Select Configure.
5. In Source Code Management, select Git.
6. Configure and set values for the following parameters:
•
Repository URL
•
Credentials
•
Branch Specifier
•
(Optional) Repository browser
7. Save your changes.
The Git plug-in is now enabled, and the plug-in for Jenkins can send commit IDs to Continuous Delivery Director.
Related Links
Plug-in for Jenkins on page 195
Use this plug-in to send build notifications from Jenkins to Continuous Delivery Director.
Configure Plug-in for Jenkins on page 197
Send Notifications from Jenkins on page 197
You can update an existing Jenkins project or create a new project to send notifications to Continuous Delivery Director.
Send Build Notifications from Jenkins Pipeline on page 201
You can configure the plug-in for Jenkins to send build notifications from Jenkins Pipeline to Continuous Delivery Director.
200

Continuous Delivery Director Integrations 1.0
Send Build Notifications from Jenkins Pipeline
You can configure the plug-in for Jenkins to send build notifications from Jenkins Pipeline to Continuous Delivery Director.
This plug-in supports three types of project:
•
Freestyle project
•
Pipeline
•
Multibranch Pipeline
The configuration for Pipeline and Multibranch Pipeline involves creating a Jenkinsfile (a Groovy syntax text file). The
Jenkinsfile contains the definition of a Jenkins Pipeline which sends build notifications to Continuous Delivery Director that
can be checked into your source control system.
1. Create a Jenkinsfile.
Customize the following sample for the Jenkinsfile syntax:
pipeline {
agent {
label 'master'
}
environment {
CDD_API_KEY = credentials('CDD_API_KEY')
CDD_APPLICATION_NAME = "${env.GIT_URL}"
CDD_APPLICATION_VERSION_NAME = "${env.GIT_BRANCH}"
CDD_GIT_COMMIT_ID = "${env.GIT_COMMIT}"
CDD_PREVIOUS_GIT_COMMIT_ID = "${env.GIT_PREVIOUS_SUCCESSFUL_COMMIT}"
CDD_SERVER_NAME = "ibndev003773.bpc.broadcom.net"
CDD_SERVER_PORT = "8080"
CDD_TENANT_ID = "00000000-0000-0000-0000-000000000000"
CDD_USE_SSL = "false"
GIT_BRANCH = "${env.GIT_BRANCH}"
BRANCH_NAME = "${env.BRANCH_NAME}"
GIT_LOCAL_BRANCH = "${env.GIT_LOCAL_BRANCH}"
}
stages {
stage("Stage Name") {
steps {
echo '**** Build ****'
}
}
}
post {
success {
echo '----------Sending Build Notification to CDD--------------'
echo "Environment variables: GIT_BRANCH: [$GIT_BRANCH], BRANCH_NAME: [$BRANCH_NAME], GIT_LOCAL_BRANCH:
[$GIT_LOCAL_BRANCH]"
sendNotificationToCDD useSourceCodeRepositoryNameAsApplicationName: true,
appName: "${CDD_APPLICATION_NAME}",
useSourceCodeRepositoryBranchNameAsApplicationVersionName: true,
appVersion: "${CDD_APPLICATION_VERSION_NAME}",
gitCommit: "${CDD_GIT_COMMIT_ID}",
gitPrevSuccessfulCommit: "${CDD_PREVIOUS_GIT_COMMIT_ID}" ,
overrideCDDConfig: [
201

Continuous Delivery Director Integrations 1.0
customApiKey: "${CDD_API_KEY}",
customProxyPassword: '',
customProxyUrl: '',
customProxyUsername: '',
customServerName: "${CDD_SERVER_NAME}",
customServerPort: "${CDD_SERVER_PORT}",
customTenantId: "${CDD_TENANT_ID}",
customUseSSL: "${CDD_USE_SSL}"
],
releaseTokens: '{}',
ignoreNonexistentApplication: true
echo '----------CloudBees Jenkins Pipeline completed successfully--------------'
}
}
}
2. In the Jenkinsfile, customize the following lines as required.
Change the label master to specify the label of the Jenkins nodes to run this pipeline:
agent {
label 'master'
}
Update the following lines as needed:
CDD_SERVER_NAME = "ibndev003773.bpc.broadcom.net"
CDD_SERVER_PORT = "8080"
CDD_TENANT_ID = "00000000-0000-0000-0000-000000000000"
CDD_USE_SSL = "false"
3. In your Jenkins instance (http://<jenkins-server>:<port>/jenkins/credentials/store/system/
domain/_/), create new credentials of the Secret text type with the credential ID CDD_API_KEY .
Related Links
Plug-in for Jenkins on page 195
Use this plug-in to send build notifications from Jenkins to Continuous Delivery Director.
Configure Plug-in for Jenkins on page 197
Send Notifications from Jenkins on page 197
You can update an existing Jenkins project or create a new project to send notifications to Continuous Delivery Director.
Configure Jenkins to Send Git Commit IDs on page 200
You can configure the plug-in for Jenkins to automatically send the commit IDs of Jenkins builds to Continuous Delivery
Director.
Create Release from File Source in Jenkins Pipeline
You can create releases by specifying a file source in Groovy pipeline syntax.
This plug-in supports three types of project:
•
Freestyle project
•
Pipeline
•
Multibranch Pipeline
202

Continuous Delivery Director Integrations 1.0
The configuration for Pipeline and Multibranch Pipeline involves creating a Jenkinsfile (a Groovy syntax text file). The
Jenkinsfile contains the definition of a Jenkins Pipeline which sends a build notification with a command to create a
release from a file source to Continuous Delivery Director. This Jenkinsfile can be checked into your source control
system, such as GitHub.
Creating a Jenkinsfile and committing that file to source control lets you:
•
Automatically create a Pipeline build process for all branches and pull requests
•
Establish a single source of truth for the Pipeline, which can be viewed and edited by multiple members of your project
For more information about file sources, see File Sources .
1. Create a Jenkinsfile.
In your source control, for example, GitHub, customize the following sample for the Jenkinsfile syntax:
sendNotificationToCDD useSourceCodeRepositoryNameAsApplicationName: true,
appName: '',
useSourceCodeRepositoryBranchNameAsApplicationVersionName: true,
appVersion: '',
commitSource: '',
fileSourceName: 'FS1',
fileSourceParameters: '{"branch":"testBranch"}',
dslFilename: 'CDD-FileSource/relWithAppVerBranch.json',
dslParameters: '{"appName":"cdd-dsl-demo","appVerName":"testBranch","relName":"app scope
release branch", "envName": "test"}',
ignoreNonexistentApplication: true,
onlyIntelligentTestSuites: true,
overrideCDDConfig: [
customApiKey:
'eyJhbGciOiJIUzUxMiJ9.eyJ1c2VybmFtZSI6InN1cGVydXNlckBjYS5jb20iLCJ0ZW5hbnRJZCI6IjAwMDAwMDAwLTAwMDAtMDAwMC0wMDAwLTAwMDAwMDAwMDAwMCIsInVzZXJJZCI6MSwianRpIjoiMjI4NjQyN2YtZjZhMS00Njg5LWJmOGEtNDU0OTk0NTdlY2Q0IiwiZXhwIjoxNjEzOTAzMTU4fQ.jHT41IlEDYq1vcpNZSEjIfEaT4hlR8wJOvC1HDsYCrTn5-
WLVogN93LD360UWcKTqt48p5nFKk8yDhdpx1bhQw',
customProxyPassword: '',
customProxyUrl: '',
customProxyUsername: '',
customServerName: 'lvnapi022959.bpc.broadcom.net',
customServerPort: 8080,
customTenantId: '00000000-0000-0000-0000-000000000000',
customUseSSL: false
],
releaseTokens: '',
scope: 'APPLICATION',
testSources: ''
}
}
}
2. In the Jenkinsfile, update the following lines as needed and commit:
fileSourceName: 'FS1',
fileSourceParameters: '{"branch":"testBranch"}',
dslFilename: 'CDD-FileSource/relWithAppVerBranch.json',
dslParameters: '{"appName":"cdd-dsl-demo","appVerName":"testBranch","relName":"app scope
release branch", "envName": "test"}',
203

Continuous Delivery Director Integrations 1.0
Plug-in for JetBrains TeamCity
Use this plug-in to register a build completed successfully webhook event.
TeamCity notifies Continuous Delivery Director of any new successful build including application and build information,
and Continuous Delivery Director maps the event to the relevant releases.
Configure the TeamCity Plug-in
Follow these steps:
1. Download and install (Upload plug-in zip) one of the following TeamCity webhook plug-in versions from the indicated
URL:
Note: TeamCity Plug-ins are managed at the following URL: http://<teamcity-server>:<teamcity-port>/TeamCity-
<teamcity-version>/admin.html?item=plugins
–
TeamCity webhook plug-in version 0.9.80.83 or higher version of 0.9.X:
https://github.com/tcplugins/tcWebHooks/releases/tag/v0.9.80.83
–
TeamCity webhook plug-in version 1.1-alpha7.122.138 or higher version of 1.1.X:
https://github.com/tcplugins/tcWebHooks/releases/tag/v1.1-alpha7.122.138
2. Restart the TeamCity service
3. Create a TeamCity Text Configuration Parameter whose name is "webhook.body" with the following JSON value:
Note: TeamCity Configuration Parameters are managed at the following URL: http://<teamcity-server>:<teamcity-
port>/TeamCity-<teamcity-version>/admin/editProject.html?projectId=<teamcity-project>&tab=projectParams
Syntax:
{
"applicationName":"WhatsApp",
"applicationVersionName":"1.0",
"applicationVersionBuildNumber":${buildNumber}
}
Parameters:
–
applicationName
Holds the application name
204

Continuous Delivery Director Integrations 1.0
Example: WhatsApp
–
applicationVersionName
Holds the application version name
Example: 1.0
4. Add a webhook with the following URL at the project level or at the build level: http://<cdd-server>:<cdd-
port>/cdd/design/0000/v1/applications/application-versions/application-version-builds
Notes:
–
Build level webhooks are managed at the following URL: http://<teamcity-server>:<teamcity-port>/TeamCity-
<teamcity-version>/project.html?projectId=<teamcity-project>&tab=webHooks
–
Project level webhooks are managed at the following URL: http://<teamcity-server>:<teamcity-port>/TeamCity-
<teamcity-version>/webhooks/index.html?projectId=<teamcity-project>
5. Select the following checkboxes:
–
Enabled
–
On Completion: Trigger when build is Successful
6. Set the Payload Format to Tailored JSON in body
7. Click Save
205

Continuous Delivery Director Integrations 1.0
8. Set the Continuous Delivery Director username and password for this webhook.
a. Add the following “auth” element (marked in red and bold) to the specific webhook section in the plugin-
settings.xml configuration file on the TeamCity server.
The plugin-settings.xml is at the following folder on the TeamCity server:
~/.BuildServer/config/projects/<teamcity-project>/pluginData/plugin-settings.xml
<settings>
<webhooks enabled="true">
<webhook url="http://<cdd-server>:<cdd-port>/cdd/design/0000/v1/applications/application-
versions/application-version-builds" enabled="true" format="tailoredjson">
<auth enabled="true" type="userpass" preemptive="true">
<auth-parameters>
<param name="password" value="<cdd-username>" />
<param name="realm" value="" />
<param name="username" value="<cdd-password>" />
</auth-parameters>
</auth>
</webhook>
</webhooks>
</settings>
b. Replace “<cdd-username>” and “<cdd-password>” with Continuous Delivery Director user name & password of
a user with authorization to run the related release for the specified application version.
9. Restart the TeamCity service.
206

Continuous Delivery Director Integrations 1.0
Build Notification HTTP Request
Whenever a successful build is added in TeamCity, the TeamCity plug-in sends the following REST call to initiate the build
notification in Continuous Delivery Director:
HTTP POST /cdd/design/{tenant-id}/v1/applications/application-versions/application-version-builds
{
"applicationName": "string",
"applicationVersionName": "string",
"applicationVersionBuildNumber": "string"
}
Plug-in for Microsoft Team Foundation Server
Use the Continuous Delivery Director plug-in for Microsoft Team Foundation Server (TFS) to trigger the execution of a
release in Continuous Delivery Director when a TFS build has completed. TFS notifies Continuous Delivery Director of
any new successful build including application and build information. Continuous Delivery Director then maps the event to
the relevant releases.
NOTE
This plug-in is also applicable for Visual Studio Team Services (VSTS)
Configure the TFS Plug-in
You configure the following Microsoft PowerShell script which uses the Invoke-RestMethod to send an HTTP or HTTPS
request to a TFS RESTful web service:
#This method sends a build notification to CDD using the API key and the unique tenant
ID.
$headers = @{}
$headers.Add("Content-Type", "application/json")
$headers.Add("Accept", "application/json")
#CDD SaaS API Key
$headers.Add("Authorization", "Bearer {cdd-api-key}")
#JSON Body
$body = @{
applicationName = '{cdd-application-name}'
applicationVersionName = '{cdd-application-version}'
applicationVersionBuildNumber = $Env:BUILD_BUILDNUMBER
releaseTokens = @(@{
name = "{cdd-release-token-name}"
value = "{cdd-release-token-value}"
207

Continuous Delivery Director Integrations 1.0
}
{name = "Build.SourceVersion"
value = $env:BUILD_SOURCEVERSION
})
}
$json = (ConvertTo-Json $body)
$url = "https://{cdd server}:{cdd port}/cdd/design/{cdd-tenant-id}/v1/applications/
application-versions/application-version-builds"
Invoke-RestMethod -Method POST -Headers $headers -Uri $url -Body $json
Explanation of parameters
Replace the following values:
•
cdd-api-key
Your Continuous Delivery Director API key. You can find the API Key under User Settings. For more information,
see User Settings.
•
cdd-application-name
Holds the application name. For more information, see Applications and Environments.
•
cdd-application-version
Holds the application version. For more information, see Set Application Version Dependencies.
•
cdd-application-version-build-number
Holds the application version-build number.
•
cdd-release-token-name
Holds the release token name that appears in the release in Continuous Delivery Director
•
cdd-release-token-value
Holds the release token value that appears in the release in Continuous Delivery Director
•
build.SourceVersion A built-in TFS variable representing the latest version control change that is included in this
build.
Example: Git - the commit ID
•
cdd-tenant-ID
Your unique 36-character Continuous Delivery Director tenant ID. You can find the tenant ID under User Settings. For
more information, see User Settings.
•
cdd-server:cdd-port
For Continuous Delivery Director SaaS, enter cddirector.io:443
Example:
#This method sends a build notification to CDD using the API key and the unique tenant
ID.
208

Continuous Delivery Director Integrations 1.0
$headers = @{}
$headers.Add("Content-Type", "application/json")
$headers.Add("Accept", "application/json")
#CDD SaaS API Key
$headers.Add("Authorization", "Bearer
A7D3360XXXXXXXXXXXXXXXXXXXXXXXXXXXXXXXXX7015EC08GB2")
#JSON Body
$body = @{
applicationName = 'myAzureApp'
applicationVersionName = '1.0'
applicationVersionBuildNumber = $Env:BUILD_BUILDNUMBER
releaseTokens = @(@{
name = "SUThostname"
value = "myhost"
}
{name = "Build.SourceVersion"
value = $env:BUILD_SOURCEVERSION
})
}
$json = (ConvertTo-Json $body)
$url = "https://cddirector.io:443/cdd/design/ykosgu8w-8ptw-kkz5-gbau-k3ddgynvrrbm/v1/
applications/application-versions/application-version-builds"
Invoke-RestMethod -Method POST -Headers $headers -Uri $url -Body $json
Use a Proxy
To use a proxy, edit the Invoke-RestMethod line:
Invoke-RestMethod -Method POST -Headers $headers -Uri $url -Body $json -Proxy {proxy-
http-schema}://{proxy-address}:{proxy-port} -ProxyCredential {proxy-credentials}
Replace the following values:
209

Continuous Delivery Director Integrations 1.0
•
proxy-http-schema
•
proxy-address:proxy-port
Host name and port of the proxy server
•
proxy-credentials
Credentials to authenticate to the proxy server
Build Notification HTTP Request
Whenever a successful build is added in TFS, this plug-in sends the following REST call to initiate the build notification
in Continuous Delivery Director:
HTTP POST /cdd/design/{tenant-id}/v1/applications/application-versions/application-
version-builds
{
"applicationName": "string",
"applicationVersionName": "string",
"applicationVersionBuildNumber": "string"
}
210

