
INTRODUCTION TO
TABLEAU
Center for Data, Analytics and Reporting (CeDAR)
Authored by Amy D. Such

What is Tableau
Tableau is a data visualization tool that lets us analyze virtually any
type of structured data and produce highly interactive and attractive
graphs, dashboards, and reports in minutes.
Using Tableau Effectively
Tableau makes it easier to create powerful, visual information that
communicates what is important better than a spreadsheet or text
table. Tableau has advanced capabilities for more technical users,
but it dramatically lowers the bar for creating dashboards and
performing analytical analysis for non-technical analysts and
information consumers.”
– Dan Murray, Interworks
2

As an introduction, let’s take a step back and give the 100,000 foot
view of Tableau. It’s important to understand how or why you might
be working with your data and to assess what your level of usage
might be. Below are some important questions to consider:
Will I be creating my own reports or will I only access reports others
have created?
Will others need to access the reports I create?
Will reports I create need to be available to the general public?
Do I need a license?
The answer to each of these questions will determine the type of
access you’ll need and how you’ll need to handle the distribution or
publication of your material.
3

Here at Princeton, we use Tableau in a manner similar to the way in
which we use the data warehouse. Differences arise from the structure
of the tool itself.
Tableau Desktop is central to the creation of all Tableau visualization
and data sources. In fact, if you only want to create reports but do
not have a need for circulation or wider consumption, the desktop
version would be all you need.
Tableau Server is used when you have a visualization that has been
designed to be consumed by others. If you have a specific, restricted
audience and would like to control the manner in which they interact
with your work, they should be defined on the server and you would
publish your work to be accessed.
4

5
Tableau Public is a version of server but security has been setup such
that the visualizations published here may be accessed without
authentication. This is where you would publish work that you want
anyone at all to view and consume. An example of this would be a
graph demonstrating historical applications to the university. This might
be included on the Princeton public website.
CeDAR takes a role in the Princeton Tableau world by centrally
managing the Tableau Desktop licenses and providing training. We
also maintain the Tableau Servers (Development, Production, and
Public). Finally we coordinate the Princeton Tableau User Group
where we can all share experiences and ask questions of one another.
6

The goal for this course is to introduce Tableau within the context of
its usage at Princeton University. Upon completion, you should
understand:
How Tableau is used at Princeton
Basics of the Tableau reporting tool
Basic calculations
Common visualization types
Creating a basic Dashboard
Publishing and sharing
7

GETTING YOUR DATA READY

Choose a connection or an existing workbook from the Tableau
Welcome Page.
Note: Upon installing Tableau, check your local drive for My Tableau
Repository
9

Once you choose your data source, you (and it) are brought to the
Data Source Page where you can format your metadata.
10
Sheets on the left navigation pane behave like tables in a database.

11

Splitting
String fields can be split into multiple fields for easier analysis
Automatic or custom split options
Aliasing
Roles (time, ship date/order date)
Binning (high/low sales)
Renaming
Data types
Geographic roles
Calculated fields
Pivoting
Data interpreter
Helps clean up data
12

THE INTERFACE

We work in workbooks which contain worksheets, dashboards, and
stories
Worksheets are also known as Views of your data
We drag and drop fields from the data source onto Shelves
Rows, Columns, Filters …
Items that appear on shelves are called Pills
If the Pill is blue, it is a Dimension
If the Pill is green, it is a Measure
14

When you bring your data into Tableau, it automatically places the
fields into one of two categories. Dimensions or Measures.
Dimensions are fields that organize your data into categories (or
buckets).
Individual dimension values are called Members
Usually Non-numerical and provide critical, contextual meaning
to a Measure.
Who, what, when, where, why
Measures return numeric values for “measuring” different
dimensions.
Usually aggregated (sum, average, min, max, etc.)
Things you can do math on that are generally meaningless
without context
15

Revenue grew $22m during Q2
2017 in the Eastern Region for
Technology
!
16

Change between data source, worksheets, and dashboards
using the tabs at the bottom
You can also add new worksheets, dashboards, or story
boards using the “new” buttons.
17

Once you’ve connected to data and evaluated
available dimensions and measures in the Data
pane, you’ll need to decide where to drag desired
dimensions and measures. You may choose to
drag directly onto the visualization or onto a
particular shelf or card.
The most common shelves are the Columns and
Rows. Dragging dimensions and measures to
these determines the layout of your visualization.
Use cards to navigate pages, filters, and marks on a
worksheet.
The Page shelf acts as a modified Filters shelf
allowing you to page through values.
The Filters shelf allows you to narrow data down.
The Marks card allows you to customize the
display of the ‘marks’ that make up your chart.
18

Use dashboards to organize and interact with multiple worksheets
19
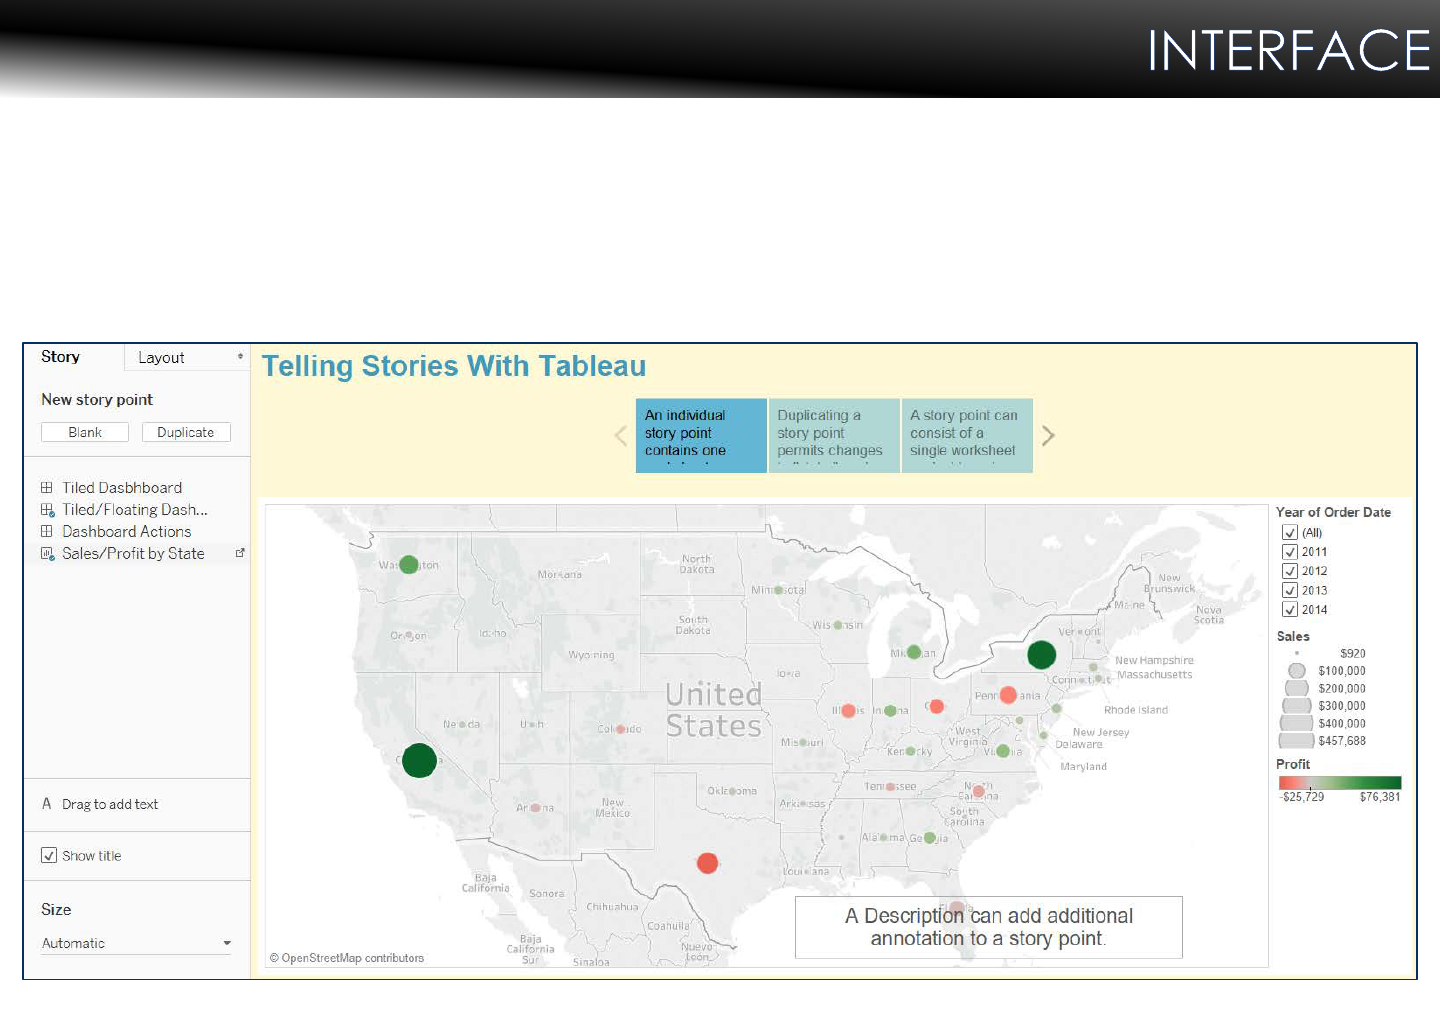
Use stories to combine elements and create directed, interactive
analysis
20

Use Show Me to select or change between
different visualizations.
Anytime you’re editing a new or existing
worksheet, you’ll notice the Show Me tab at
the upper right of the screen.
Show Me displays a series of thumbnail images
representing the different types of charts you
can create with just a few clicks.
If you’ve already created a chart but would
like to switch to another, clicking a new
thumbnail from the Show Me dialog box will
change your current visualization.
Note: Only thumbnails for visualizations that are
applicable to the dimensions and measures
you’ve selected from your data pane will be
active.
21

Add Dimensions and/or Measures from the Data pane to the Shelves
and Cards to create visualizations.
22

Objective: Open Tableau, connect to data, build a basic visuali zation to show Sales for each
Sub-Catego ry broken down by Order D ate Year vs. Category. Use color show sum of Profit.
1. Open Tableau.
2. Connect to Excel.
3. Navigate to Excel Data Source per class instructions
Typically under this path:
My Tableau Repository > Datasources > 10.x > en_US-US > Vital Stock Supplies.xls
4. Click Open.
5. This is the Data Source screen. Here, we will add sheets from the Excel file to act as the
fields for our visualization.
6. Under Sheets, drag Orders to where it says “Drag sheets here”. Our data appears in
the bottom pane.
7. In the bottom portion of the left pane, under the Go to Worksheet prompt, click Sheet.
8. In the left pane, within the Data tab, under Dimensions, drag Order Date to the
Columns shelf and Category and Sub-Category to the Rows shelf.
9. Under Measures, find and drag Sales to the Columns shelf and Profit to the Color mark
on the Marks card.
10. Double-click the bottom of the worksheet and rename it to Bar Chart.
23

Sum of Sales for each Sub-Category broken down by Order Date Year vs. Category. Color shows sum of
Profit. The view is filtered on Order Date Year, which keeps 2014, 2015, 2016 and 2017.
24
25
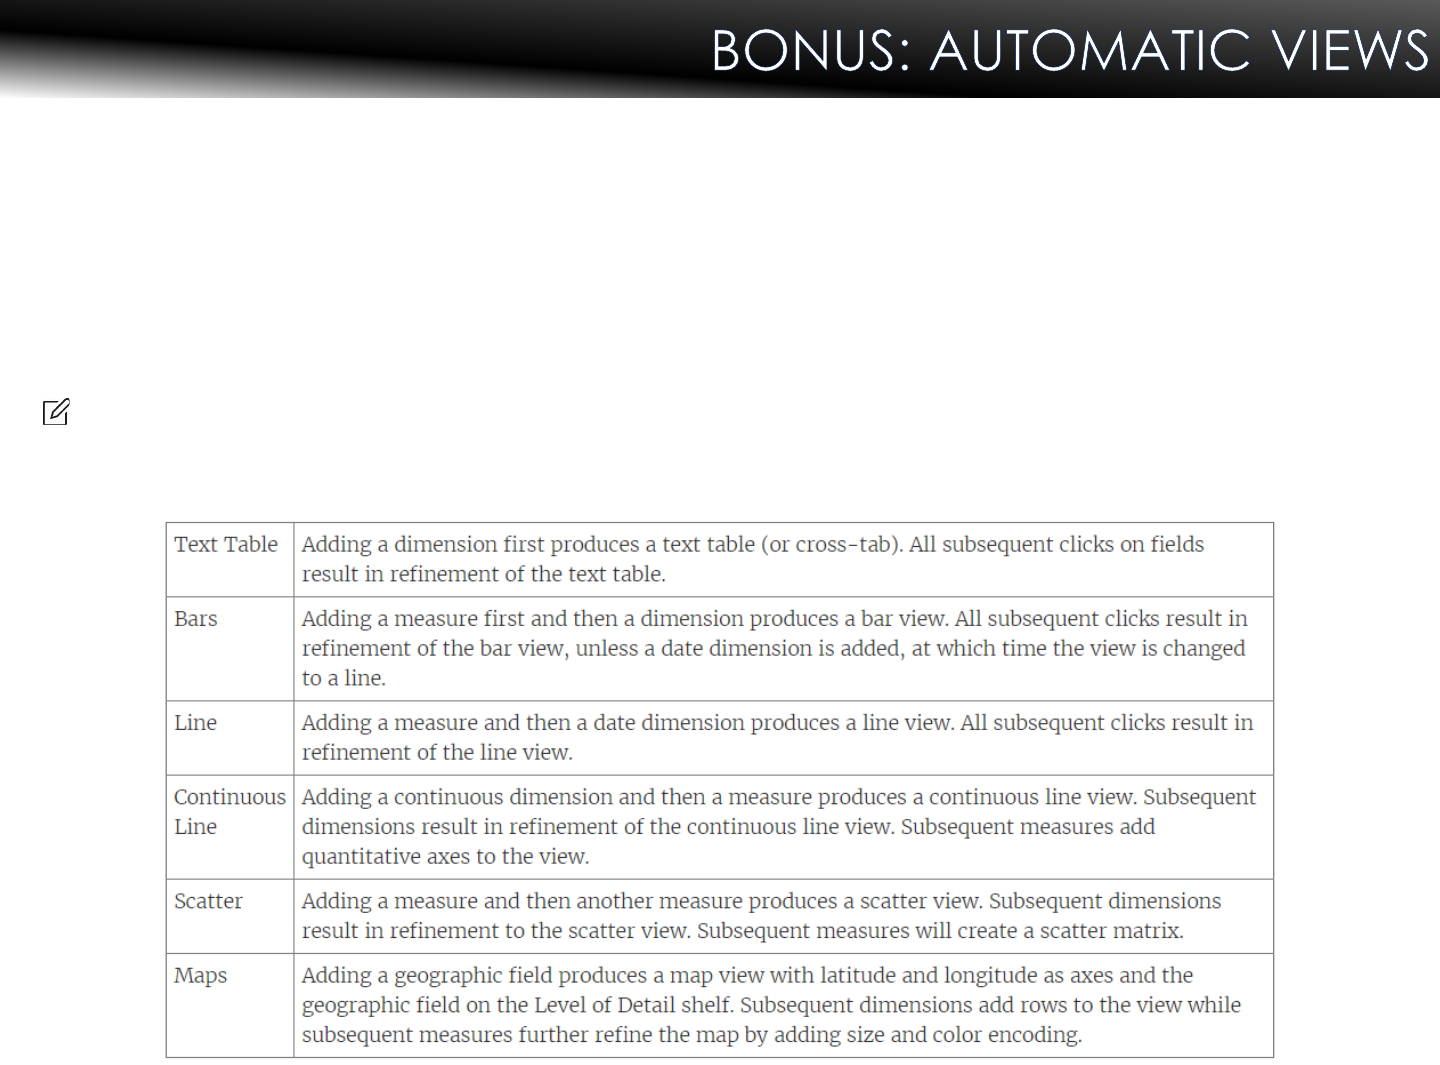
Tableau supports an additional method for automatically generating
views of data called Automatic Double-Click. To use this method,
double-click fields in the Data pane that you’d like to see in your
visualization. Each double-click results in a “best guess” for how you
would like the field to be presented in your view.
Note: The order in which you double-click a measure or a dimension
is signification.

SORTING & FILTERING
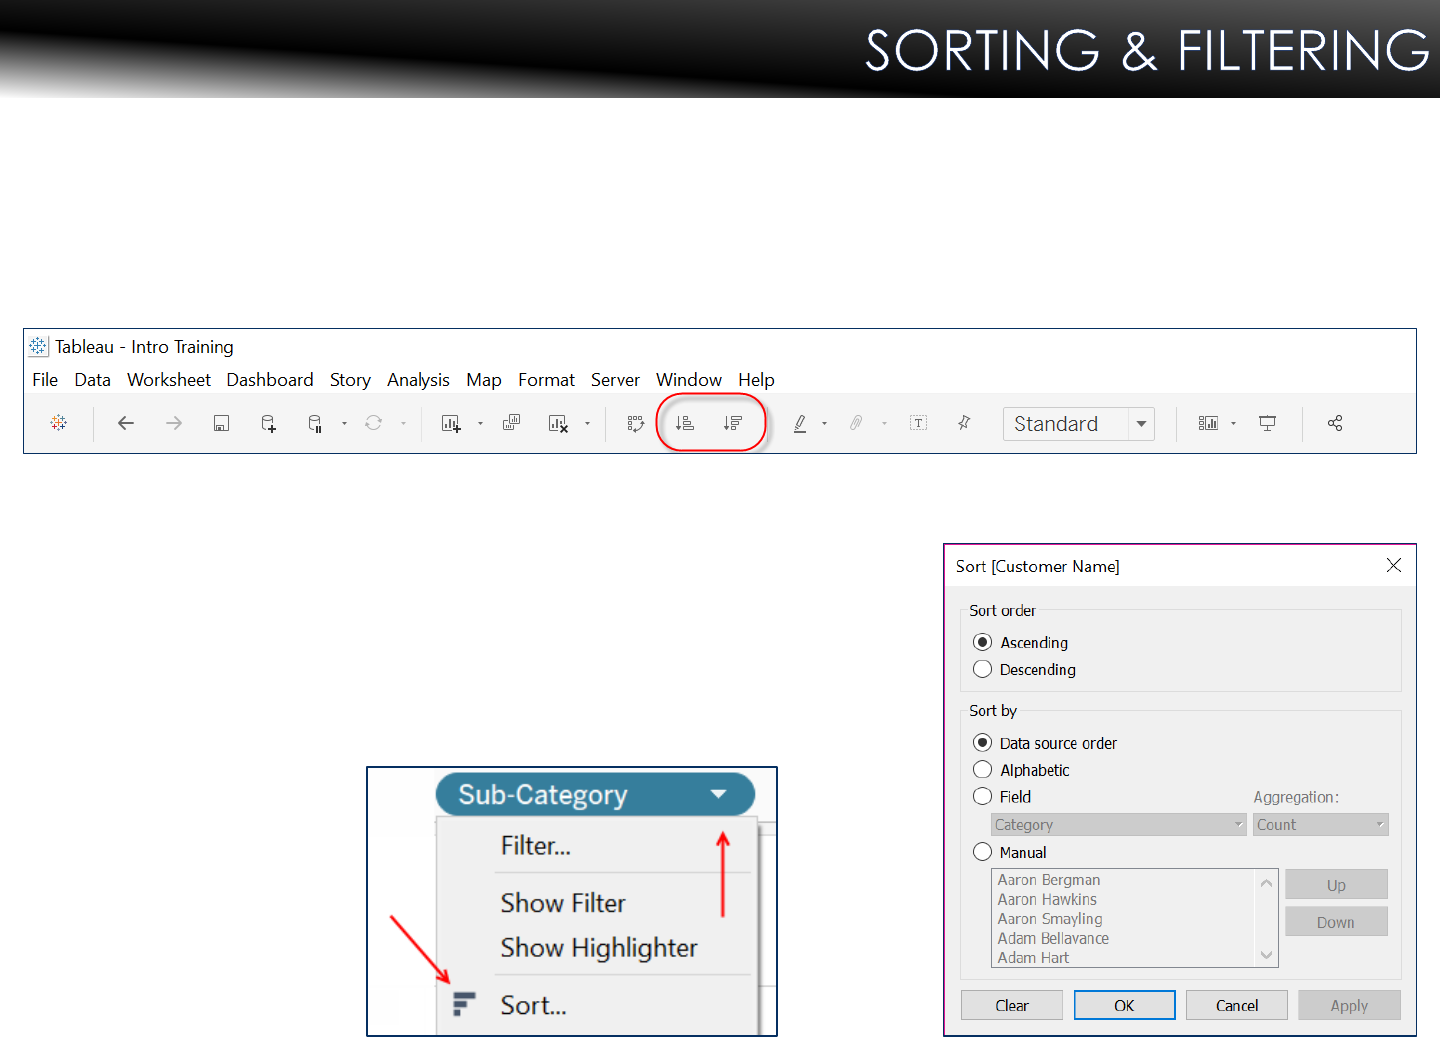
Analysis can be enhanced by sorting results
Sorting can be done using buttons for simple sorting
Or … manually through the advanced
sorting dialog which is achieved by right-
clicking on a Pill from the Shelf and
clicking Sort.
27
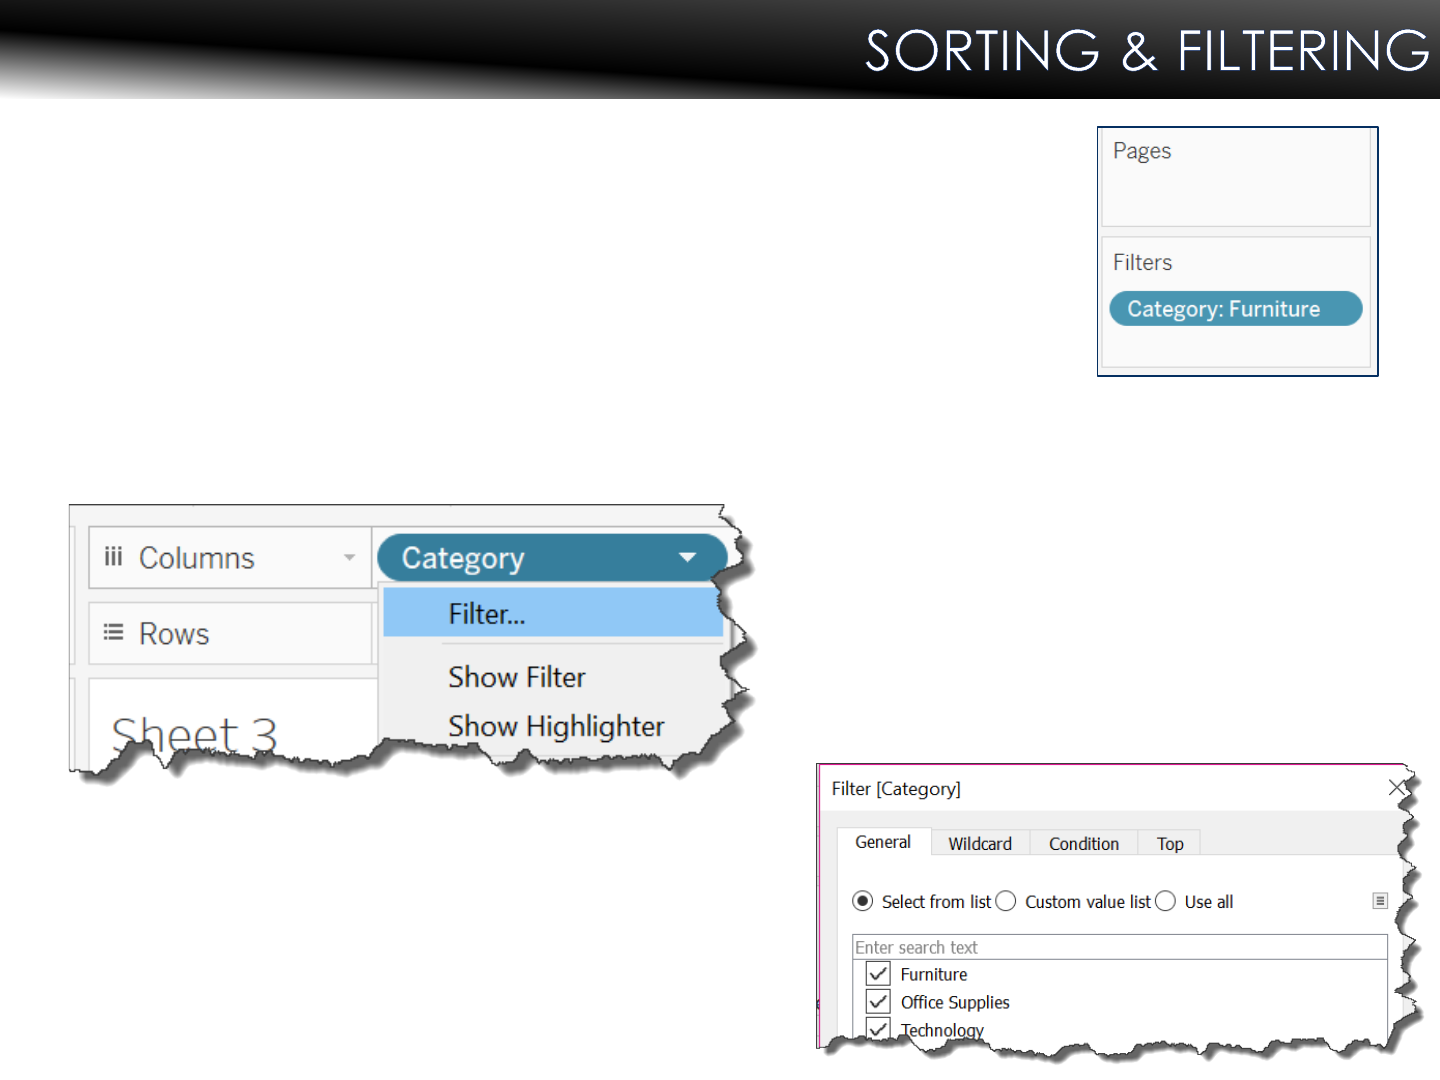
Filtering results allows you to focus on particular
aspects of your data
Filter by dragging data fields from the Data pane
to the Filters card
Filtering can also be created by right-clicking a Pill on a Shelf
In either case, a Filter dialog box will
reflect the data type chosen and
prompt you for additional criteria
28

Numeric Filter Dialog Box Text Filter Dialog Box
29
Filtering Data
Simple filtering can be done by
selecting the headers or marks in a
View and choosing the Keep Only or
Exclude options
The Dimension members are removed
from the View and the filtered fields
are added to the Filters shelf
When selecting headers that are part
of a hierarchy all of the next level
members are selected automatically
Individual marks can be selected on a
View, making it easy to focus on or
remove outliers
30
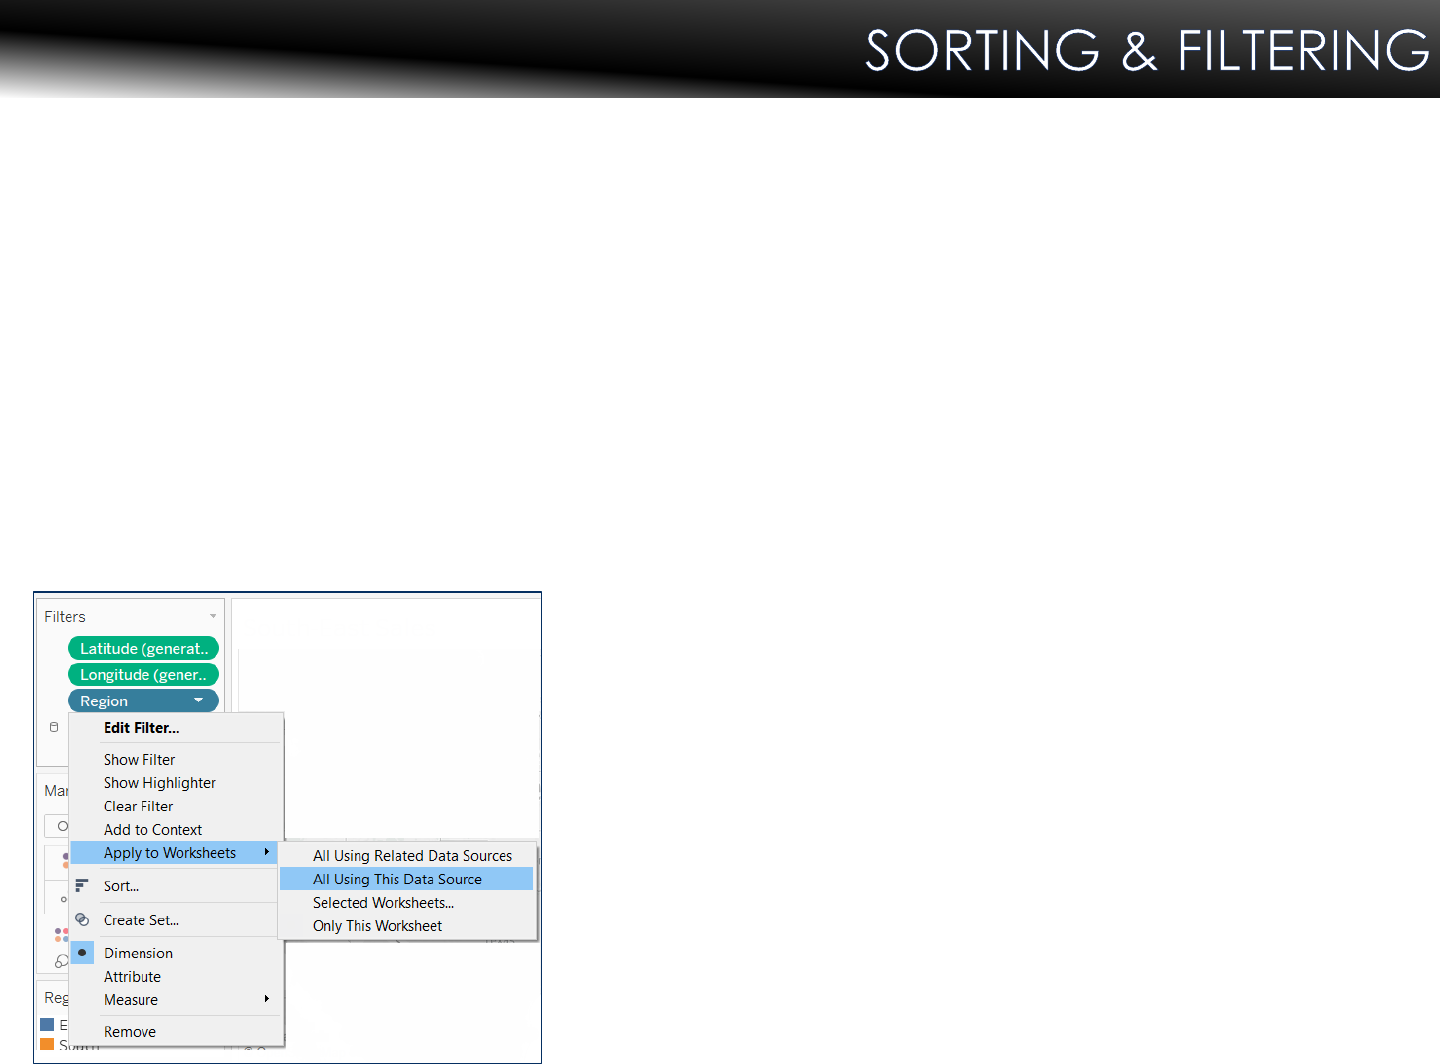
Apply Filters to Multiple Worksheets
When you had a filter to a worksheet, be default it applies to the
current worksheet.
Sometimes, however, you might want to apply the filter to other
worksheets in the workbook.
You can select specific worksheets to apply the filter to or apply it
globally to all worksheets that use the same data source or related
data sources.
On the Filters shelf, right-click the field
and select: Apply to Worksheets > All
Using Related Data Sources
Filters that use this option are global
across the workbook.
31

Objective: We see a potential problem with the profitability of the furniture category. Let’s
enhance our results from the last exercise by performing a simple sort, and filtering the
results by the furniture cat egory.
1. Right-click the Bar Chart worksheet and select Duplicate.
2. Now, rename your new worksheet New Bar Chart.
3. Click the last column in the chart.
4. From the toolbar at the top of the screen, click the Sort Descending button to sort
latest year Sales descending.
5. Let’s reduce the data set results by dragging Category to the Filters card.
6. From the Filter dialog box, uncheck Office Supplies and Technology.
7. Click OK.
8. Right-click Category in the Filters card and choose Show Filter to reveal the Filter card.
Note: Filter cards can be moved (dragged) from their default location (which tends to
hide under the Show Me box when it’s expanded.
9. Under Dimensions on the Data pane, right-click Region. Select Show Filter.
10. Explore.
32

Sum of Sales for each Sub-Category broken down by Order Date Year vs. Category. Color shows sum of
Profit. The data is filtered on Region, which keeps Central, East, South and West.
The view is filtered on Category, which keeps Furniture.
33

FORMATTING

Tableau allows for extensive formatting of
your views and can be done for an entire
worksheet or down to the specific/individual
parts.
There are several ways to initiate formatting
in Tableau. You may choose options from
the Format drop-down menu or right-click
any element and choose Format from the
context menu.
Formatting can include changing some or all
of the following:
Fonts
Alignment
Shading
Borders
Lines
35

Highlighters
Highlighters are used to quickly find and highlight data on a
visualization
These come in handy when adding a mark (like color) to a
visualization makes it too confusing or hard to read
Used when there’s already a color mark assigned to the visualization
Previously done through legends and dashboard actions
Can be used with reference bands and lines
Highlighter legend supports text
searches and dropdown
Multiple highlighters can be
added to a single visualization
36

Objective: We want to be able to quickly find patterns and trends in our data. If our
visualization already contains a color mark, a highlighter is the perfect enhancement to
assist the u ser in understanding what we’re trying to focus on.
1. Create a New worksheet. Rename it Sub-Category Highlight.
2. Add Order Date to the Columns shelf and Sales to the Rows.
3. Maybe we want to be able to see the profit when you hover on a line but not have it
displayed in the actual Line Chart itself. To do this, drag Profit to the Tooltip.
4. Drag Region to the Color mark.
5. We want to increase the number of marks on this, so add Sub-Category to the Detail
mark. The Detail mark increases the context of our visualization.
6. Without reducing the highlighted number of marks, this is difficult to read. We could
use a filter, but that would remove the context of the selected marks in relation to the
other sub-categories. So … we will add a highlighter instead.
37
Continued on next page

7. In the Marks card, right-click the Sub-Category Pill and select Show Highlighter.
8. The Highlighter Legend Box will appear/dock and show the different Sub-
Categories. As you mouse over each Sub-Category, you’ll notice each being
highlighted in the visualization.
9. Explore.
Note: Selecting Entire View from the drop-down in the tool bar will expand the
visualization to make it more legible.
38

The trend of sum of Sales for Order Date Year. Color shows details about Region.
Details are shown for Sub-Category.
39

The Marks card provides other options to customize the appearance
of your chart. You can change the color, size, shape, and label of
your marks as well as customizing your tooltips.
Tooltips are small pop-up text boxes that appear when you hover your
mouse over a mark. By default, tooltips show values for all relevant
fields included somewhere on your visualization.
40
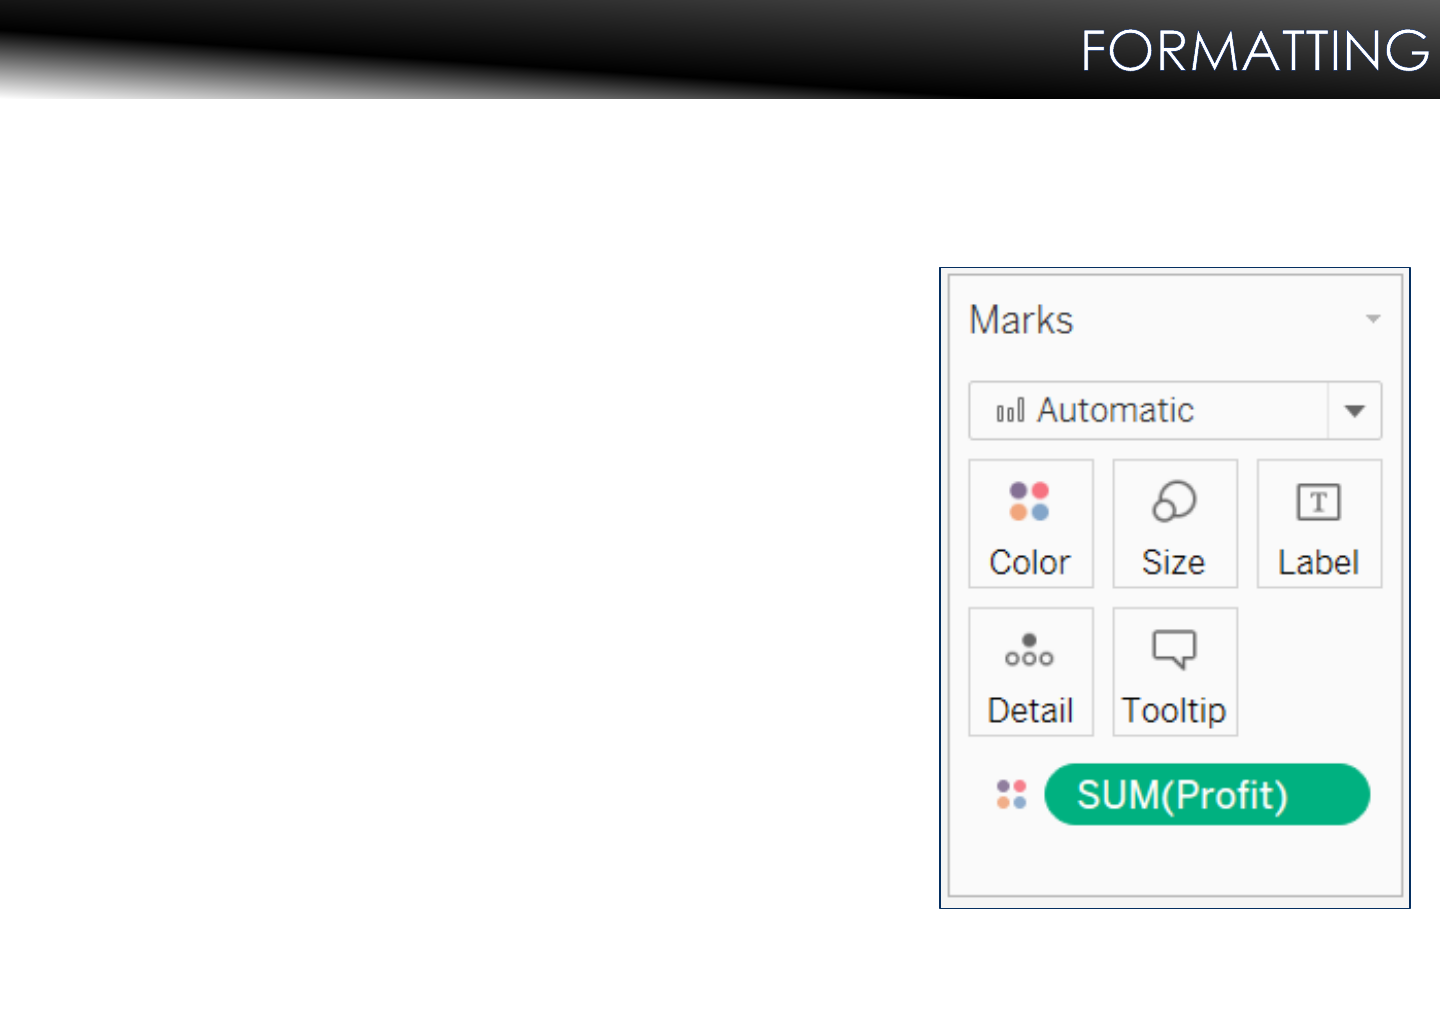
The Marks Card
Use the Marks card to refine and
enhance results
Color represents data using different
colors
Size encodes data by assigning
different sizes to the marks on your
views
Label assigns text labels to the marks
on your Views
Drop a dimension on the Detail box to
separate the marks per the members
of the dimension
Tooltips are details that display when
you hover over one or more marks in
the View
41

The Marks Card
Additional marks are available when using certain visualization
types
Shapes are available when the Mark type supports members being
displayed as shapes, like when a Scatter Plot is being used
Built-in shapes are available and custom shape palettes can be
created
Angles are available when using pie charts
There are other context-sensitive marks
which are available with other, more intricate
visualization types.
42

Scatter Plots
Scatter Plots provide a way to show correlations between numerical
values
Scatter plots require at least two measures
One on each of the columns and rows
Creates a simple Scatter Plot
Creates Matrix of Scatter Plots
43

Objective: Create a scatter plot using colors and shapes to show the correlation between
sales and profit of different product sub-categories by catego ry and region .
1. Create a New worksheet. Rename it Sales & Profit.
2. From Measures, drag Sales to the Columns shelf and Profit to the Rows shelf.
3. Drag Sub-Category to the bottom (empty) portion of the Marks card.
4. To distinguish our Sub-Categories, add Category to Color.
5. Add Region to Shape.
6. Right-click anywhere in the scatter plot and choose Trend Lines > Show Trend Lines.
This will show us linear trend lines.
44

Sum of Sales vs. sum of Profit. Color shows details about Category. Shape shows details about Region.
Details are shown for Sub-Category.
45

Objective: Display the numbers associat ed with a data view.
1. Right-click any of the visualizations we’ve created thus far.
2. Select Duplicate as Crosstab.
A new sheet will automatically be created beside your visualization, displaying the same
information as data in rows and columns of text.
46
A crosstab, sometimes referred to as a Pivot Table, is a table that summarizes data in
rows and columns of text.
Sometimes, even in Tableau, you just want to see the data and not a visualization.
You can easily convert your visualization into a crosstab.

BASIC CALCULATIONS
Basic Calculations
Calculations are created to enhance the dashboard.
Tableau takes granular data and aggregates them in the
View.
Calculations help in extending the usage of aggregations.
If we’re looking for a particular dimension or measure that
does not seem to exist in our data source, we can form them
from calculations.
48

Aggregating Data
When a Measure is placed on a Shelf,
Tableau automatically aggregates the
data.
Tableau defaults to Sum.
You can change the aggregation
to other types (Average, Max, Min)
by clicking on the Pill, navigating to
Measure (Sum) and selecting from
the list of other choices.
Note: You can disaggregate data by
navigating to the Analysis Menu and
deselecting Aggregate Measures.
49
Aggregating Data
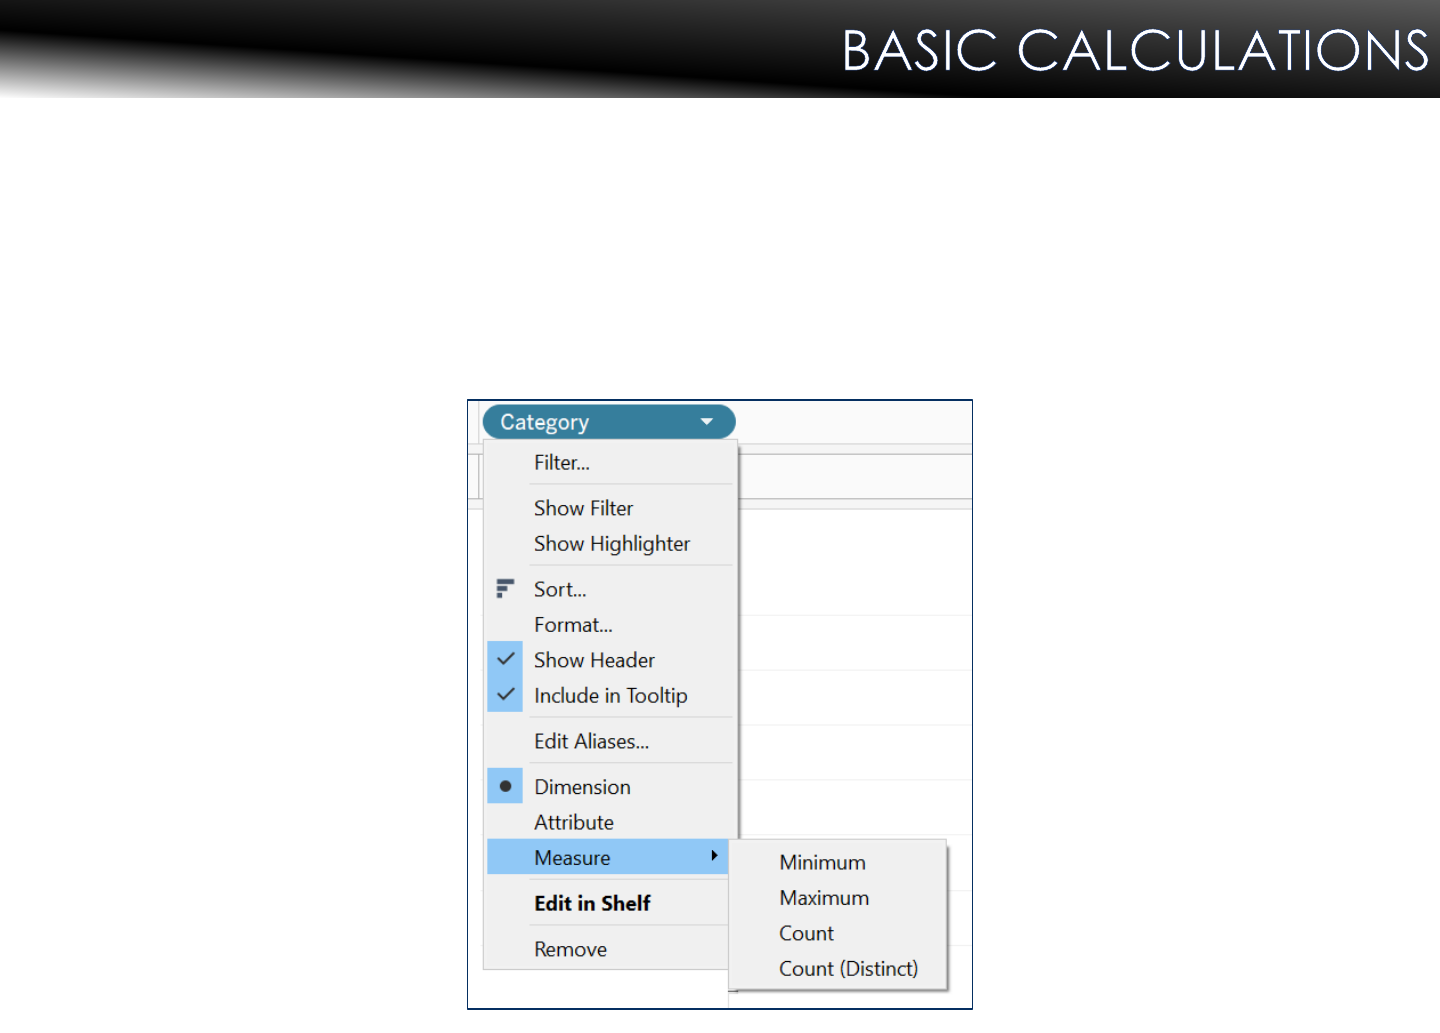
Dimensions can also be aggregated by right-clicking the Pill,
selecting Measure, and choosing from the list of options
available:
50

Granularity of Data
Data granularity refers to the level of detail or depth of data
in a View
Defined by the Dimension fields
If a Dimension is dragged to Detail, it will change the
granularity of the visualization
Dragging a Measure to Detail will have no effect
51
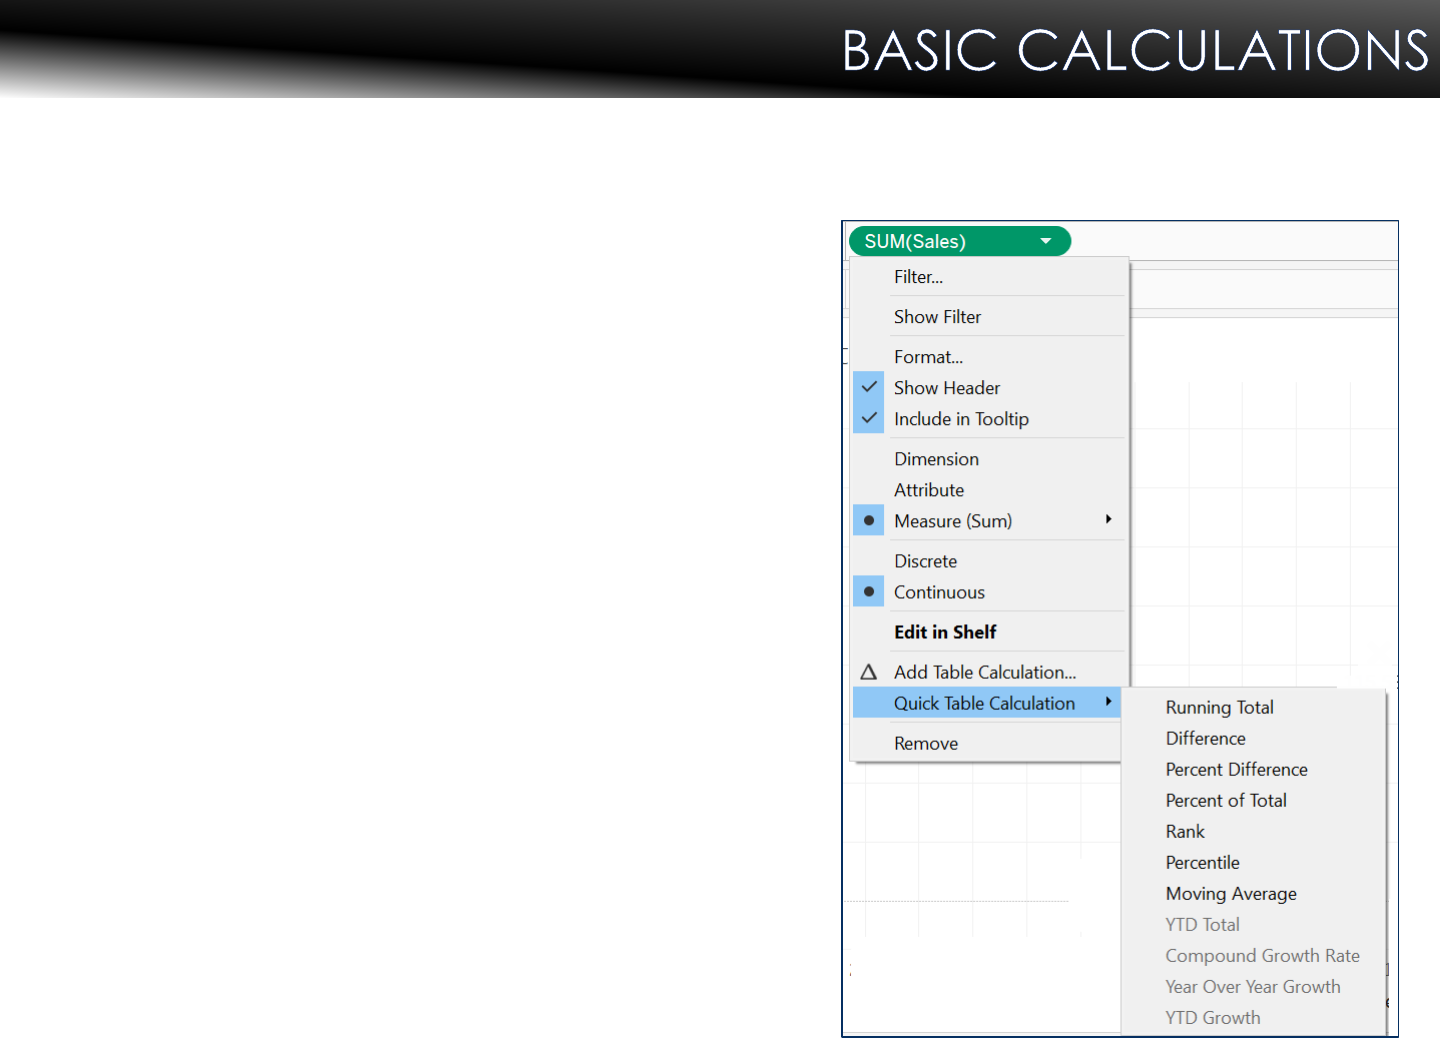
Quick Table Calculations
A quick table calculation is a
one-step process where you
choose a common, pre-defined
calculation type from a list.
Tableau automatically applies
the most typical settings for that
calculation type.
To apply a quick table calculation,
simply right-click a measure from a
Shelf or Mark and choose Quick
Table Calculation from the context
menu.
52

Calculated Fields
When your data source doesn’t contain all the fields you need, you
can add new ones as calculated fields
The calculated fields are saved as part of the data source and can
be used as often as necessary
There’s several ways to create calculated fields. You can do this
easily by using the calculation editor from the drop-down, by
double-clicking a Shelf or a Field on a Shelf, or by right-clicking
“white space” on the Data pane under Dimensions or Measures
Calculated fields can be created from existing calculations
Calculations are based on Formulas and Fields
53

Formulas Make Up Calculated Fields
Formulas can contain functions, fields, operators, parameters, or
comments
The Calculation Editor provides color coding based on the Field
added
Functions: Light Blue
Fields: Orange
Operators: Black
Parameters: Purple
Comments: Grey
Note: Tableau makes attempts to guess what you’re trying to do
and provides you with the tools you need for brackets and
parenthesis. You should not have to do much typing or guessing.
*Don’t “fight” the tool!
54
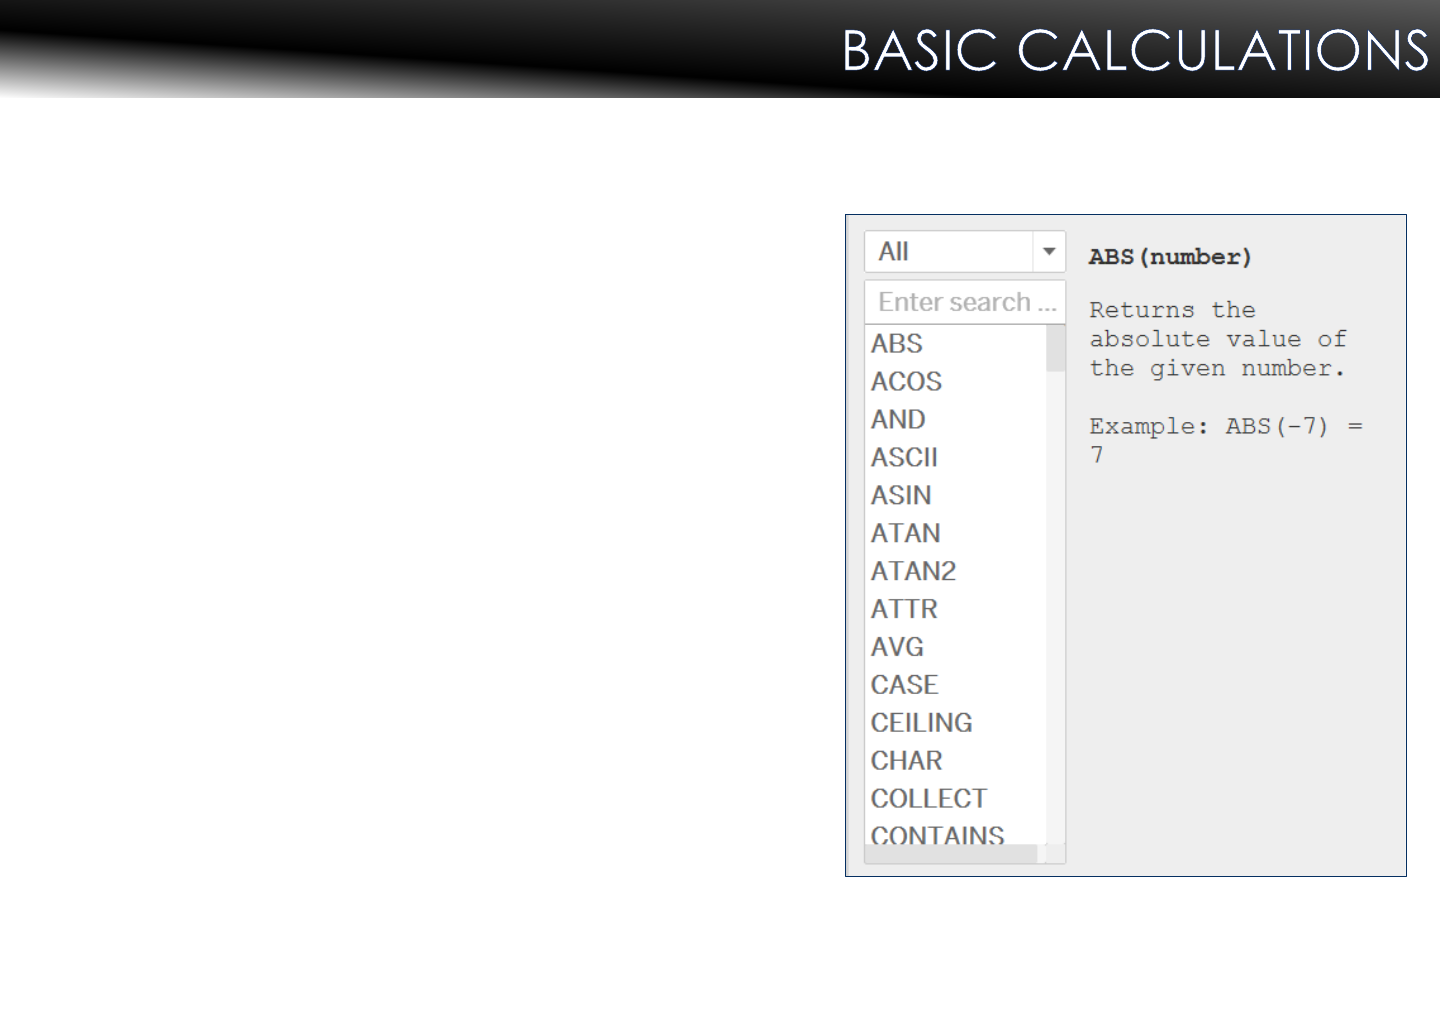
Functions
Functions can be filtered by
category
Use the Enter search … box to find
specific functions
Clicking on a function provides tips
and examples to guide you
55
Comments
Comments can provide context
or detail on calculations
Define comments using two
forward slashes
Auto-Completion for Formulas
Tableau will automatically attempt to fill in a formula
First attempts to find based on starts with then contains
Clicking Enter will enter your formula or function into your forming
calculation
If you first type a [ auto-complete will show fields, parameters, or
sets instead of functions
If you’re using multiple data sources, auto-complete will add the
fully-qualified name of the Field so you can see exactly where things
are being pulled from
56
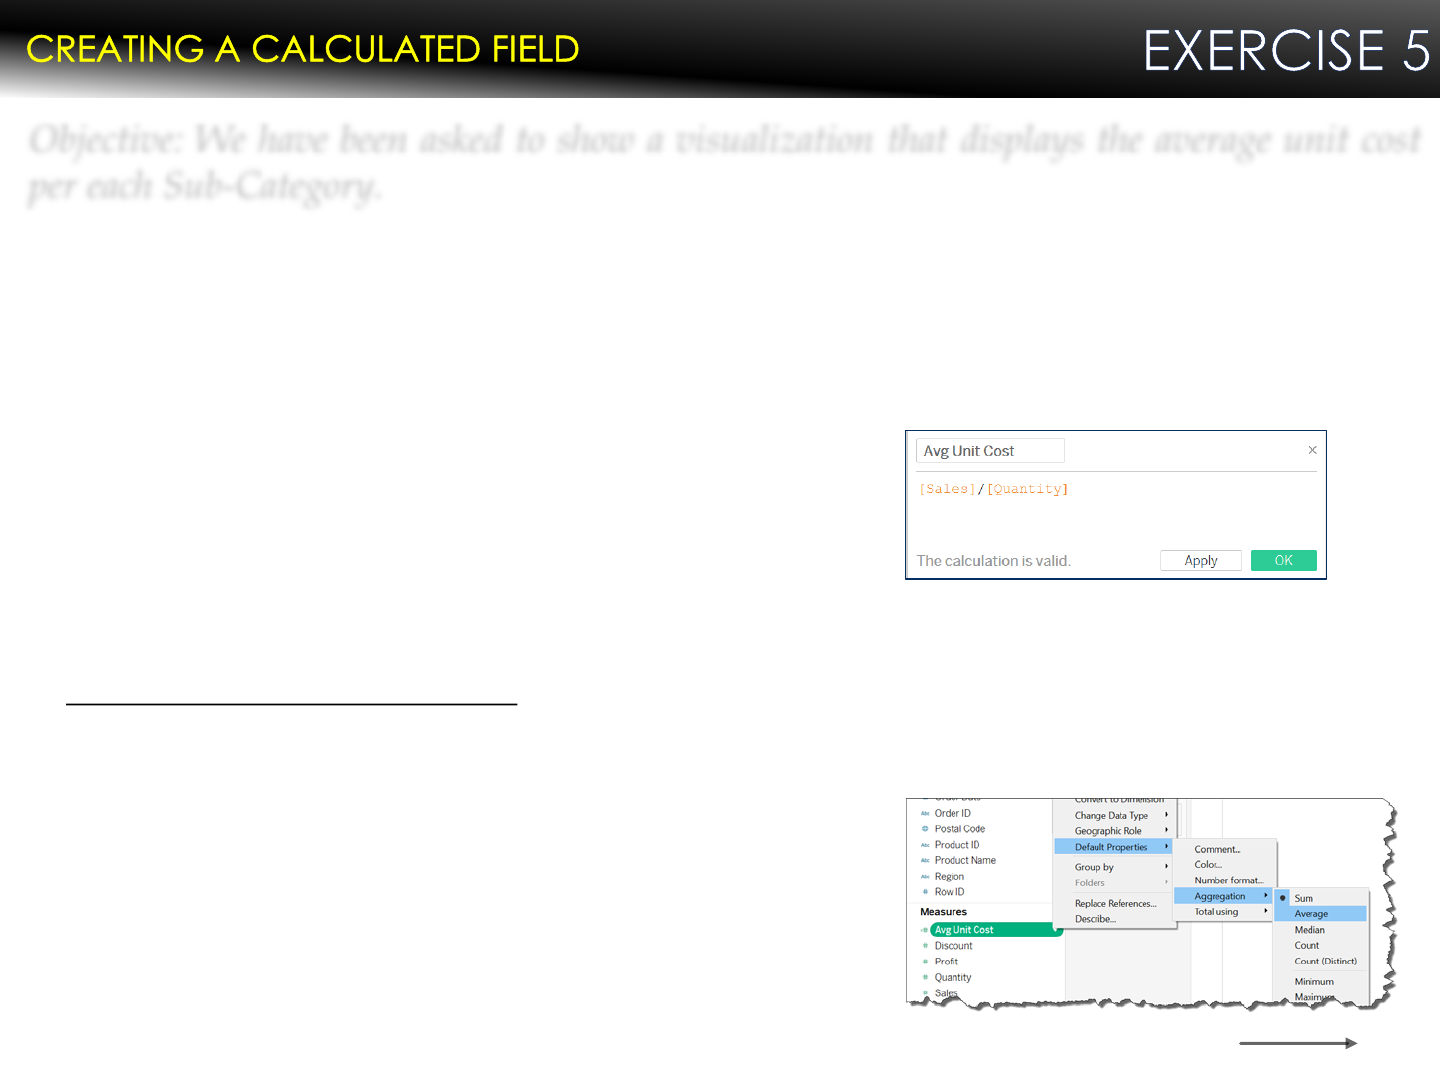
Objective: We have been asked to show a visualization t h at displays the average unit cost
per each Sub-Category.
1. Create a New worksheet. Rename it Avg Unit Cost.
2. To find the cost per unit, we need to create a calculated field. Click the drop-down
next to the Data pane and select Create calculated field.
3. Name the field Avg Unit Cost.
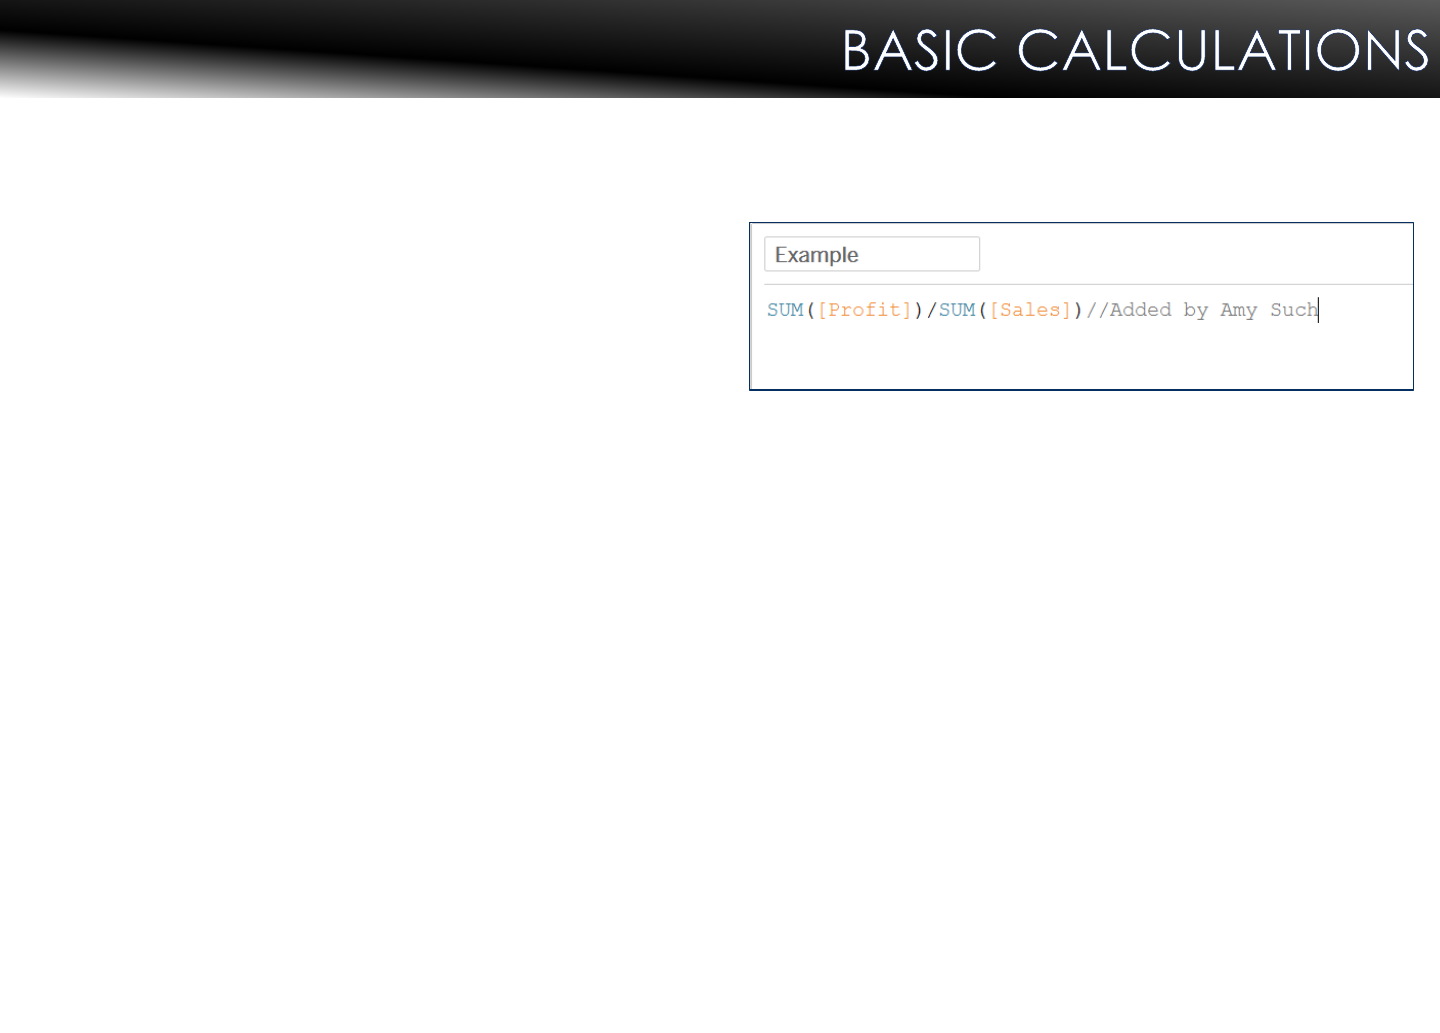
4. In the expression box, use the following formula:
[Sales]/[Quantity]
5. Click OK.
6. The default aggregation for Avg Unit Cost is “Sum”, but this is not what we’re after.
We need to see the Average
.
7. In the Measures pane, right-click the Avg Unit Cost field, and select Default properties
> Aggregation > Average.
8. Right-click the measure again and select Default
properties > Number Format… then select Currency
(Standard).
9. Click OK.
57

10. Add Sub-Category to the Columns Shelf and from the Measures pane, drag the newly
created Avg Unit Cost to Rows.
11. Click the T button at the top of your screen to add Labels to your visualization.
We would like to be able to select which years to include.
12. Drag Order Date to the Filters card.
13. Select Years and click Next.
14. Select the last 2 years shown in the list.
15. Click OK.
16. Click the down arrow in the Year Filter pill and
select Show Filter to make it interactive.
58
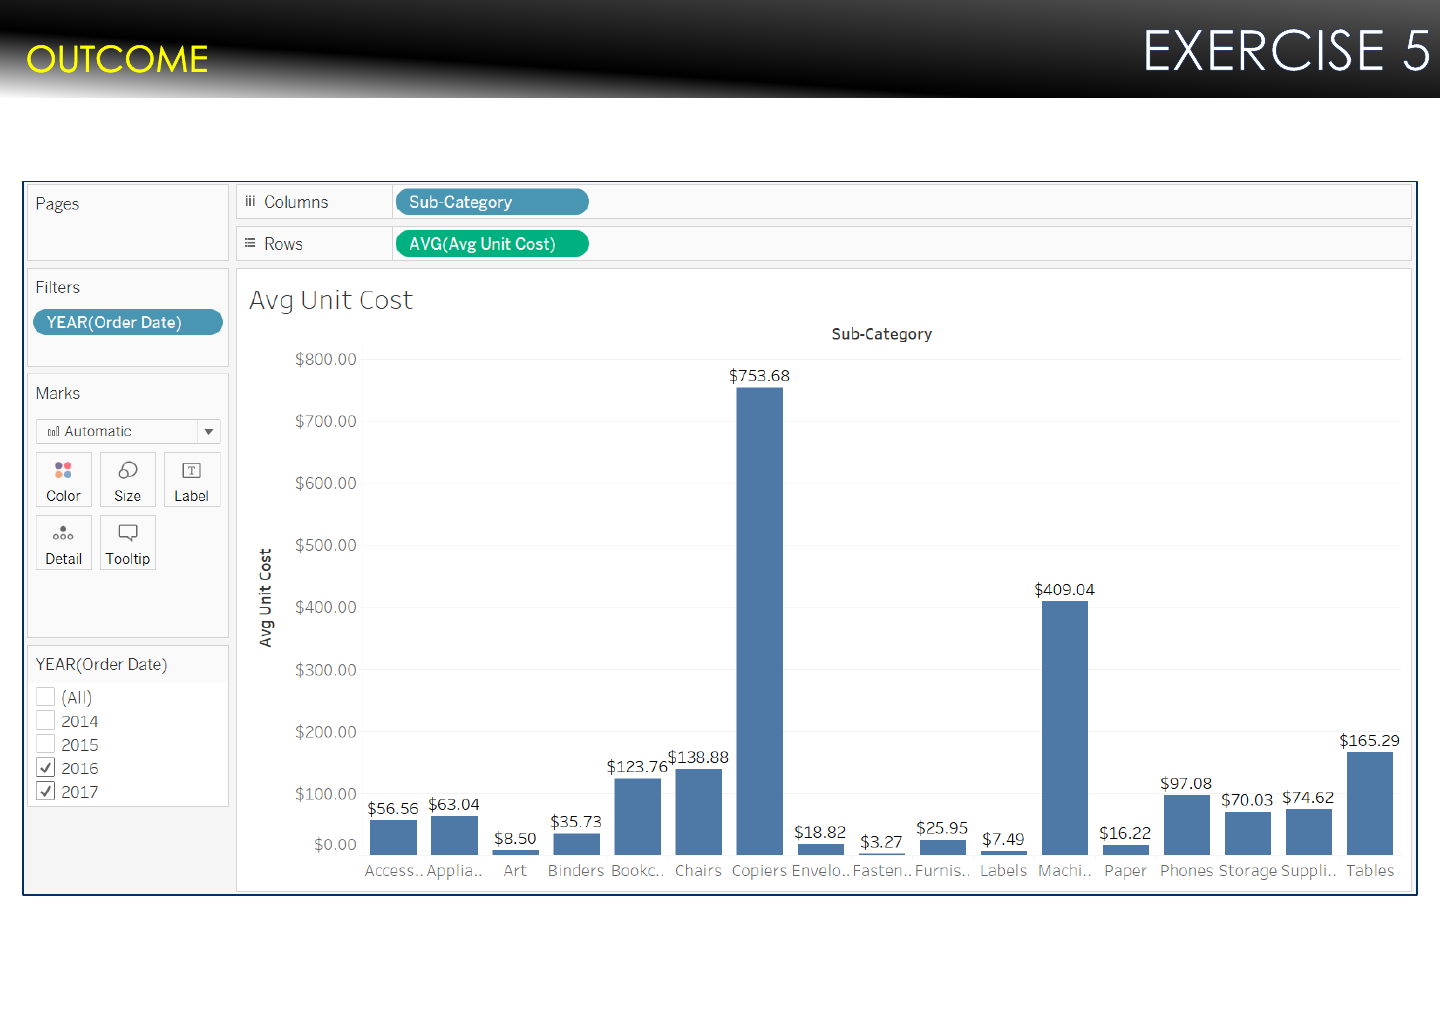
Average of Avg Unit Cost for each Sub-Category.
The data is filtered on Order Date Year, which keeps 2016 and 2017.
59

Calculations can be used for exception highlighting. In Tableau, this is
known as Spotlighting.
Spotlighting is based on thresholds set for a selected measure
It is a technique for showing discrete thresholds based on the values
of a measure. For instance, you might want to color-code Sales so
that those over $10,000 appear green and those below $10,000
appear red.
A spotlighting calculation is just a special case of a calculation that
results in a discrete measure.
A discrete measure is a calculation that is a dependent variable (and
therefore a measure), but which results in a discrete result (as opposed
to a continuous result). Thus the name discrete measure.
60
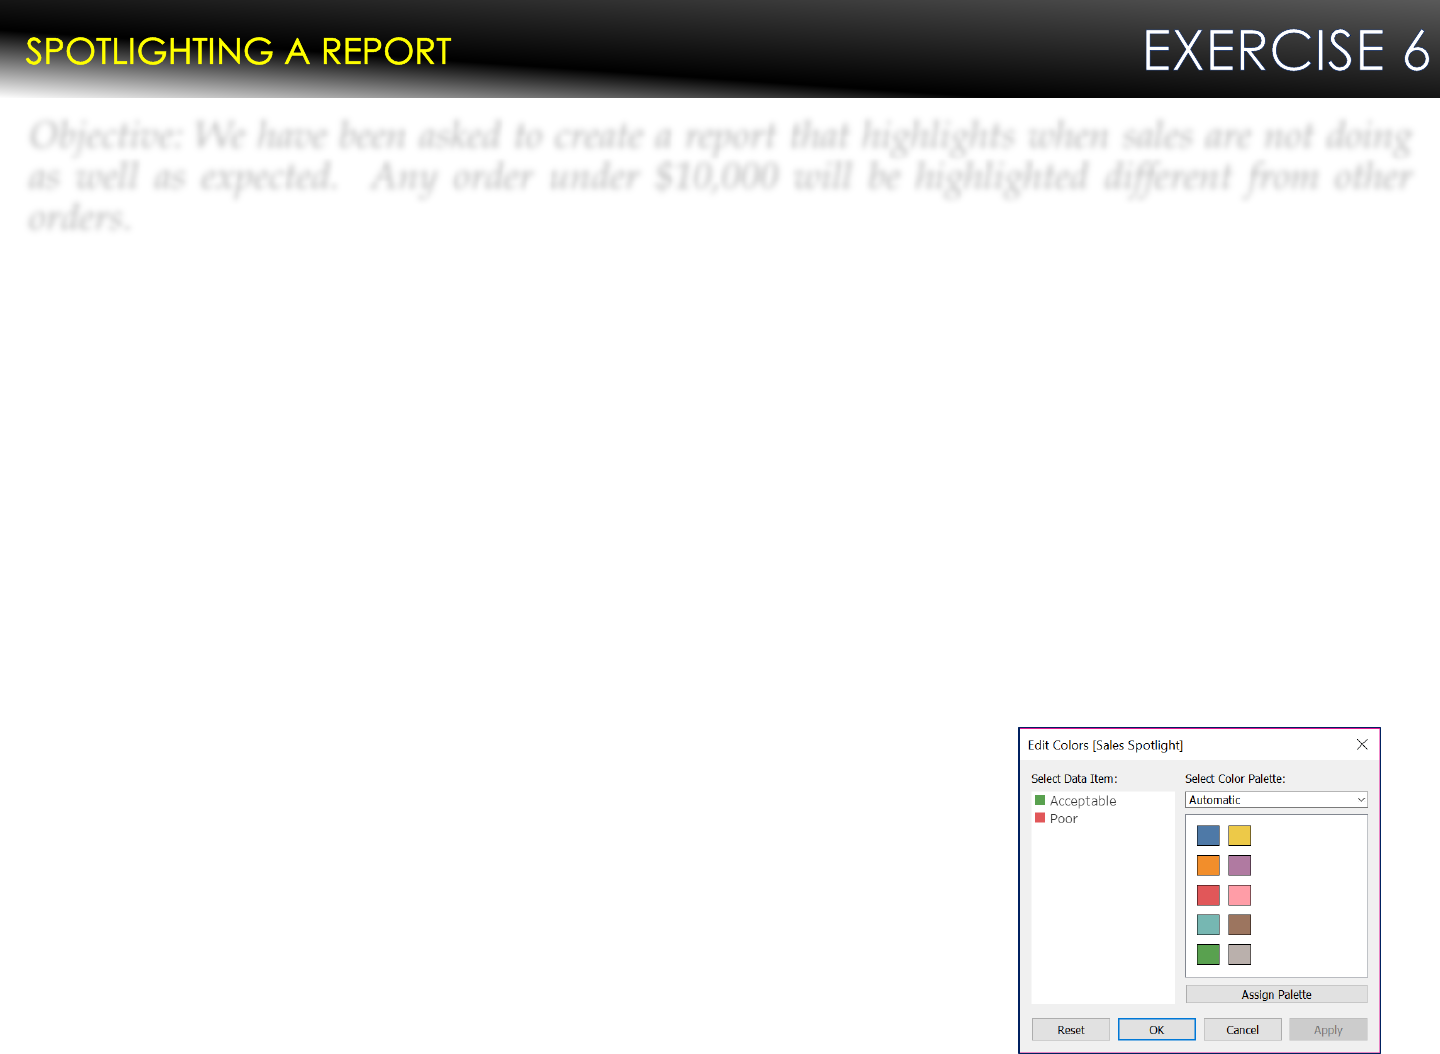
Objective: We have been asked to c reate a report that highlights when sales are not doing
as wel l as expected. Any order under $10,000 will be highlighted d ifferent f rom other
orders.
1. Create a New worksheet. Rename it Sales Spotlight.
2. Create a Calculated field called Sales Spotlight.
3. In the expression box, use the following formula:
IF SUM([Sales])>10,000 THEN "Acceptable" ELSE "Poor" END
4. Click OK.
5. Add Segment to the Columns shelf and Category to the Rows shelf. Also, add Sub-
Category to the Rows shelf (to the right of Category).
6. For our measure, we will drop Sales onto Text in the Marks card.
7. To provide the desired highlighting, drag our newly created Sales Spotlight onto
Color.
8. Click the drop-down arrow of the Sales Spotlight
Legend and select Edit Colors.
9. Change “Acceptable” to Green and “Poor” to Red.
61

Sum of Sales broken down by Segment vs. Category and Sub-Category.
Color shows details about Sales Spotlight.
62

1. Under the Office Supplies section of our chart,
Ctrl+Click Envelopes, Fasteners, and Labels.
2. When they are highlighted, right-click and select
the Paperclip icon to Group them.
3. Right-click the highlighted Group and choose
Edit Alias.
4. Rename the group Small Stuff.
Note: To ungroup, right-click the Group Small Stuff
and select Ungroup.
Objective: Let’s simplify the display data. Adding a grou p creates a new dimension wi th
grouped members.
63
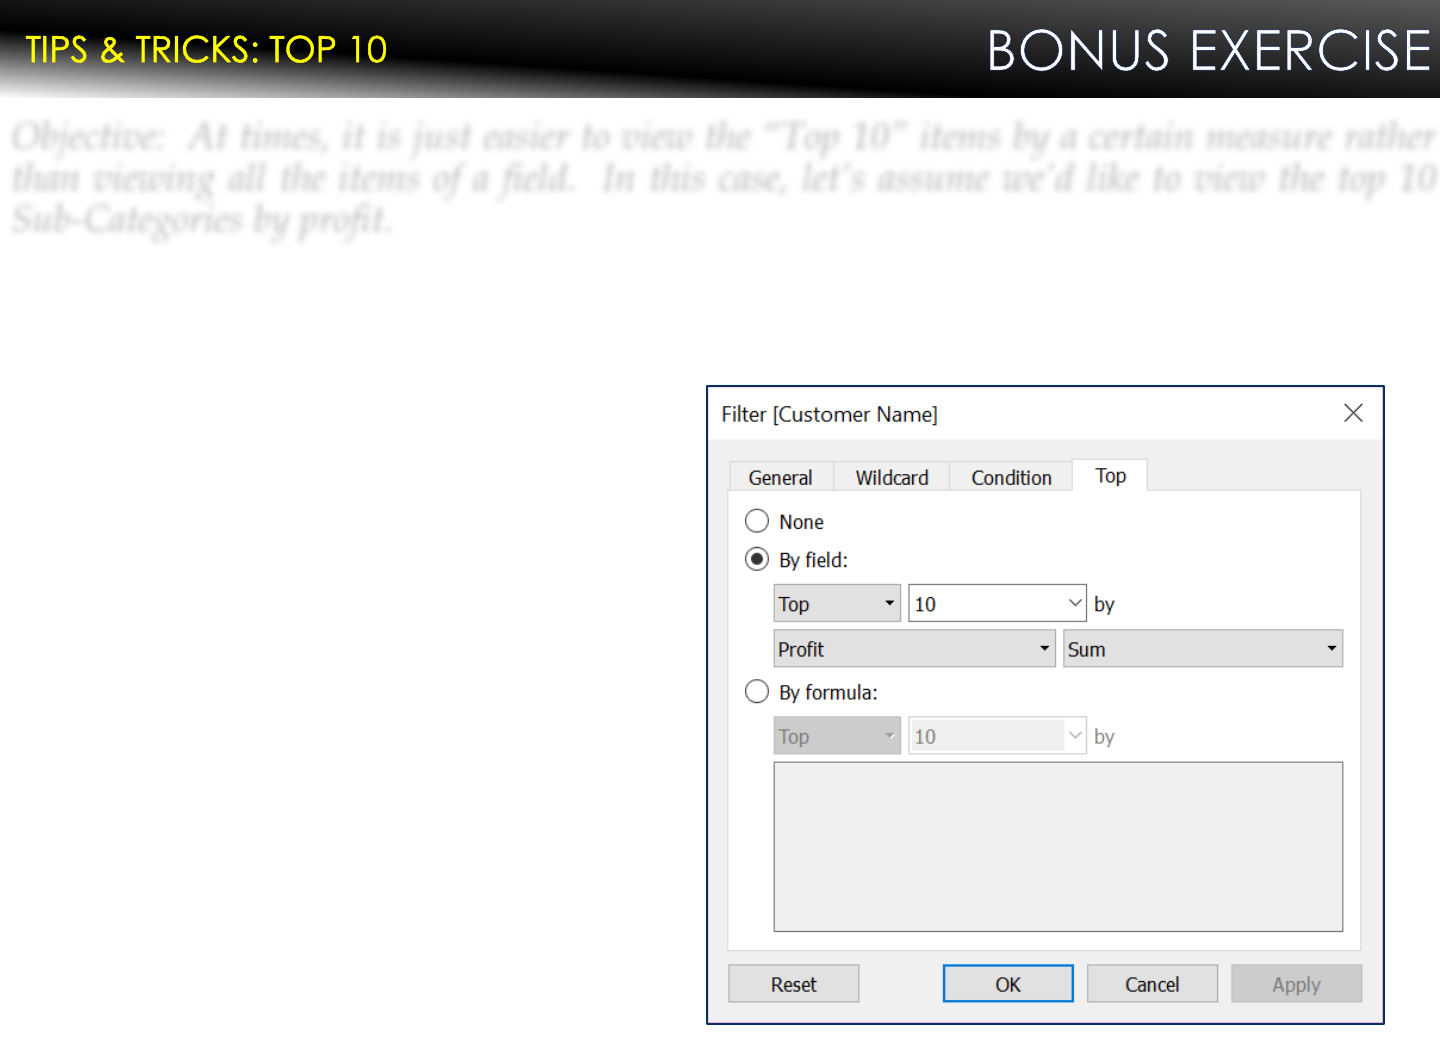
1. Create a New worksheet. Rename it Top 10 by Total Profit.
2. Drag Sub-Category to Rows.
3. Drag Profit to Text.
4. Drag Sub-Category to the Filters shelf.
5. Click the Top tab in the Filter
[Sub-Category] options box.
6. Check the By field option.
7. Select Top, 10, by Profit, Sum
8. Click OK.
Objective: At times, it is just easier to view the “Top 10” items by a certain measure rath er
than viewing all the items of a field. In this case, let’s assume we’d like to view the top 10
Sub-Catego ries by profit.
64

POPULAR VISUALIZATION TYPES

Bar Charts
Bar Charts are excellent to compare data across categories
To create a bar chart, add a dimension to the Rows shelf and a
measure to the Columns shelf or vice versa
Adding the dimension (blue) to the Columns shelf and the measure
(green) to the Rows shelf will result in a Vertical Bar Chart.
Adding the measure (green) to the Columns shelf and the
dimension (blue) to the Rows shelf will result in a Horizontal Bar
Chart.
66

Objective: We have been asked to create a bar chart that displays total sales over a
four year period. In addition, our users want to see the data by shipping methods
but only for the West Region.
1. Create a New worksheet. Rename it Sales by Ship Mode.
2. Add Order Date to the Columns shelf and Sales to the Rows shelf.
Note: Because we have a date and measure on our visualization, Tableau
automatically created a line chart. We need to change this.
3. In the Marks pane, change the mark type in the drop-down menu from Automatic to
Bar.
4. Our next requirement is to show the data by shipping method. To do this drag Ship
Mode to Color. This changes our bar to a stacked bar.
5. Click the T on the toolbar to add Labels to our visualization.
6. Finally, to add to our Filter, right-click Region from the Dimensions pane and click
Show Filter.
7. Click the down-arrow in the Region legend and select Single Value List.
67

Sum of Sales for each Order Date Year. Color shows details about Ship Mode.
The data is filtered on Region, which keeps Central.
68

Heat Maps
In a Heat map, data is represented in terms of colors. They provide
a quick visual summary of the data.
Heat maps are best used for showing geographical representation
of data where each individual value are shown as color.
Heat maps enable you to compare data in various categories using
different colors.
Example: Heat Map
69
Objective: Create a H eat Map to display the Order Date Quarter for each Catego ry.
1. Create a New worksheet. Rename it Heat Map.
2. Drag Order Date to the Columns shelf.
3. Expand to show Quarter.
4. Right-click the Year pill and select Remove.
5. Drag Category to the Rows shelf.
6. Drag Profit to Color.
7. Drag Sales to Size.
8. Right-click the Quarter pill and select the Quarter from the second tier to show the
Quarter and Year. This will convert the dimension to a measure.
9. Change the Marks Type to Square.
10. Click Size and advance the slider to increase the size of the marks.
70
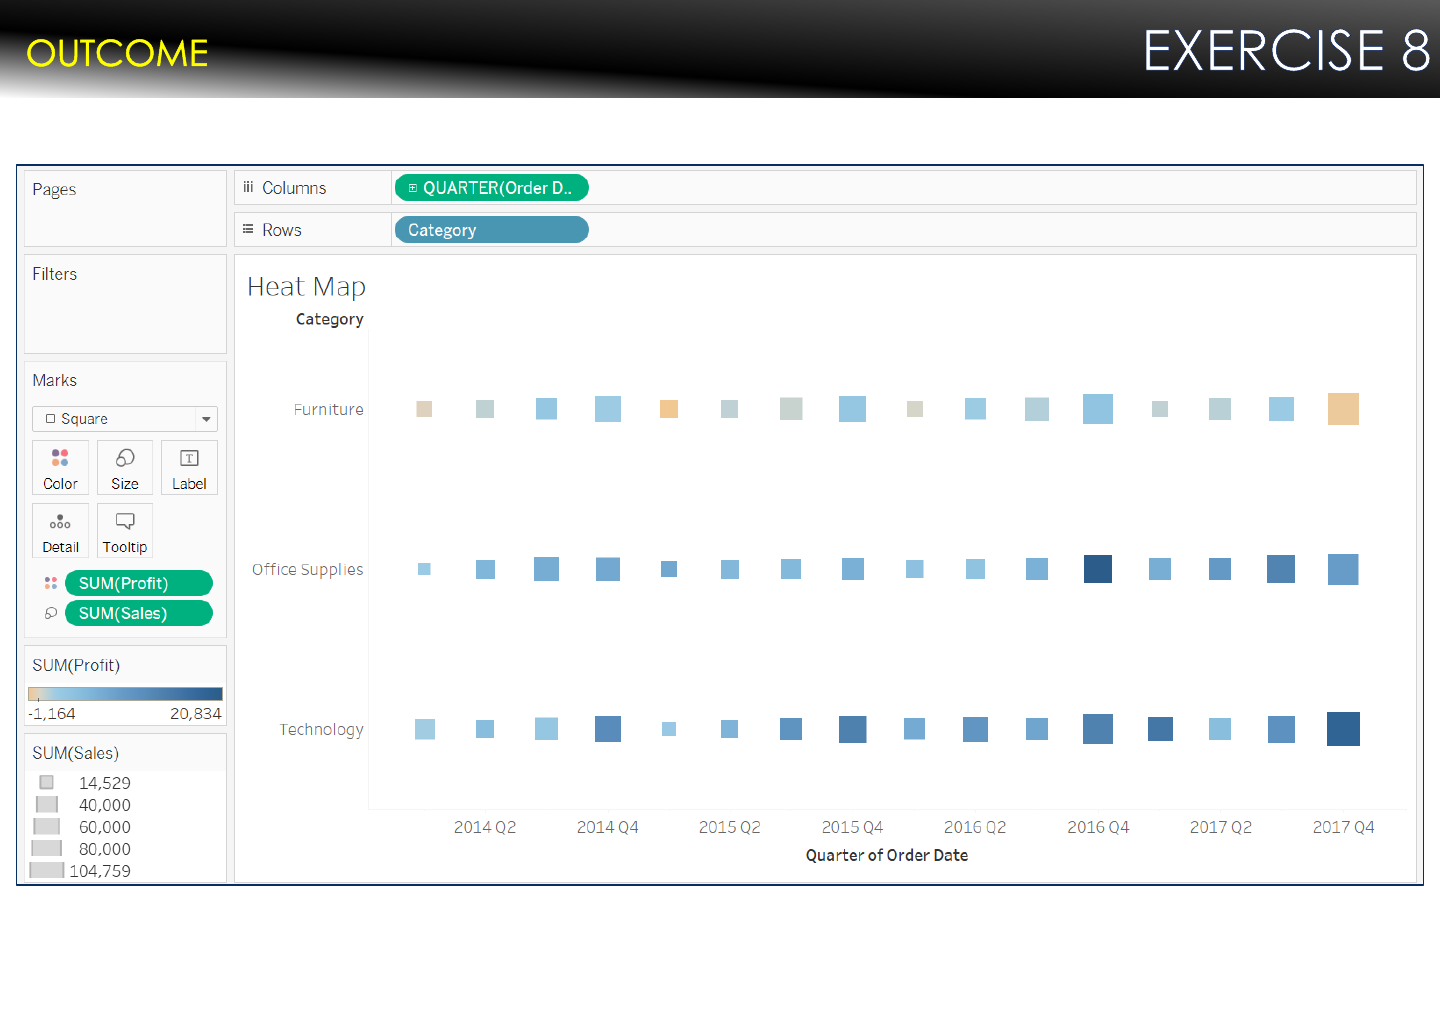
Order Date Quarter for each Category. Color shows sum of Profit.
Size shows sum of Sales.
71

Scatter Plots
Scatter Plots can provide a very meaningful visualization of two
related numeric measures
Two different analyses that scatter plots help consider:
Comparison/Correlation of the two measures
Concentration of data/existence of outliers
Effective scatter plots include either a small enough number of
marks following a general trend to draw quick conclusions about
the individual dimensions or a large concentration of marks to draw
general conclusions
Example: Scatter Plot
72

Objective: Create a Scatter Plot displaying Sum of Sales vs Sum of Profit.
1. Create a New worksheet. Rename it Scatter Plot.
2. Drag Sales to the Columns shelf.
3. Drag Profit to the Rows shelf.
4. Drag Category to Color.
5. Drag Segment to Shape.
6. Drag Sales to Label.
7. Click Size and advance the slider to increase the size of the marks.
8. Click the drop-down arrow on the Legend for Segment
to edit the shapes used in the visualization.
9. Change the shape by
selecting Edit Shape and
assigning the KPI palette.
10. Click OK.
73

Sum of Sales vs. sum of Profit. Color shows details about Category. Shape shows details about Segment.
The marks are labeled by sum of Sales.
74

Pie Charts
Do the parts make up a meaningful whole?
If not, use a different chart. Only use a pie chart if you can define the
entire set in a way that makes sense to the viewer.
Are the parts mutually exclusive?
If there is overlap between the parts, use a different chart.
Do you want to compare the parts to each other or the parts to the
whole?
If the main purpose is to compare between the parts, use a different
chart. The main purpose of the pie chart is to show part-whole
relationships.
How many parts do you have?
If there are more than five to seven,
use a different chart. Pie charts with
lots of slices (or slices of very different size)
are hard to read.
75

Objective: Create a Create a Pi e Chart with Multiple Mark Labels to display Customer Segment,
sum of Sales, a nd % of Total Sales
1. Create a new worksheet. Rename it Pie with Multiple Marks.
2. Change the Marks Type to Pie.
Notice the “Contextual” Marks card appears for Angle.
4. Drag Segment to Color.
5. Drag Segment to Label.
6. Drag Sales to Label.
7. Hover over the Sales Pill and click the drop-down arrow.
8. Select Quick Table Calculation, Percent of Total.
9. Drag Sales to Label (again).
Notice your bar chart still has all equal parts.
10. Drag Sales to Angle.
11. Click Label.
12. Click the ellipse (More Button …) beside Text.
13. Select <Segment>, increase the font size and make it bold.
* Did you expand your view?
76
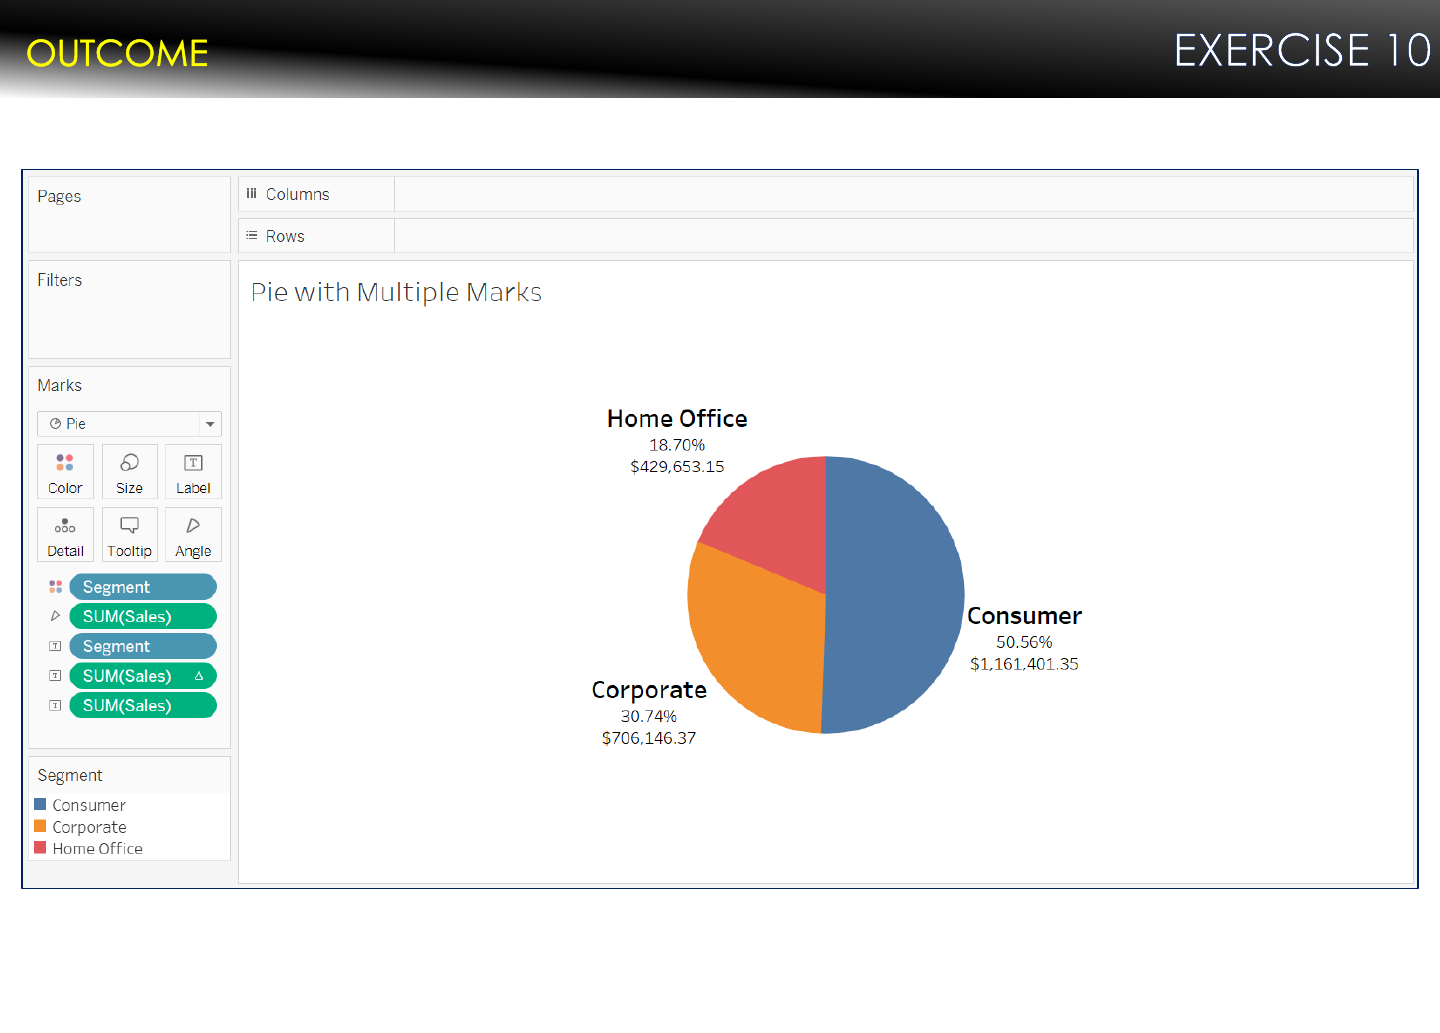
Segment, % of Total Sales and sum of Sales. Color shows details about Segment.
The marks are labeled by Segment, % of Total Sales and sum of Sales.
77
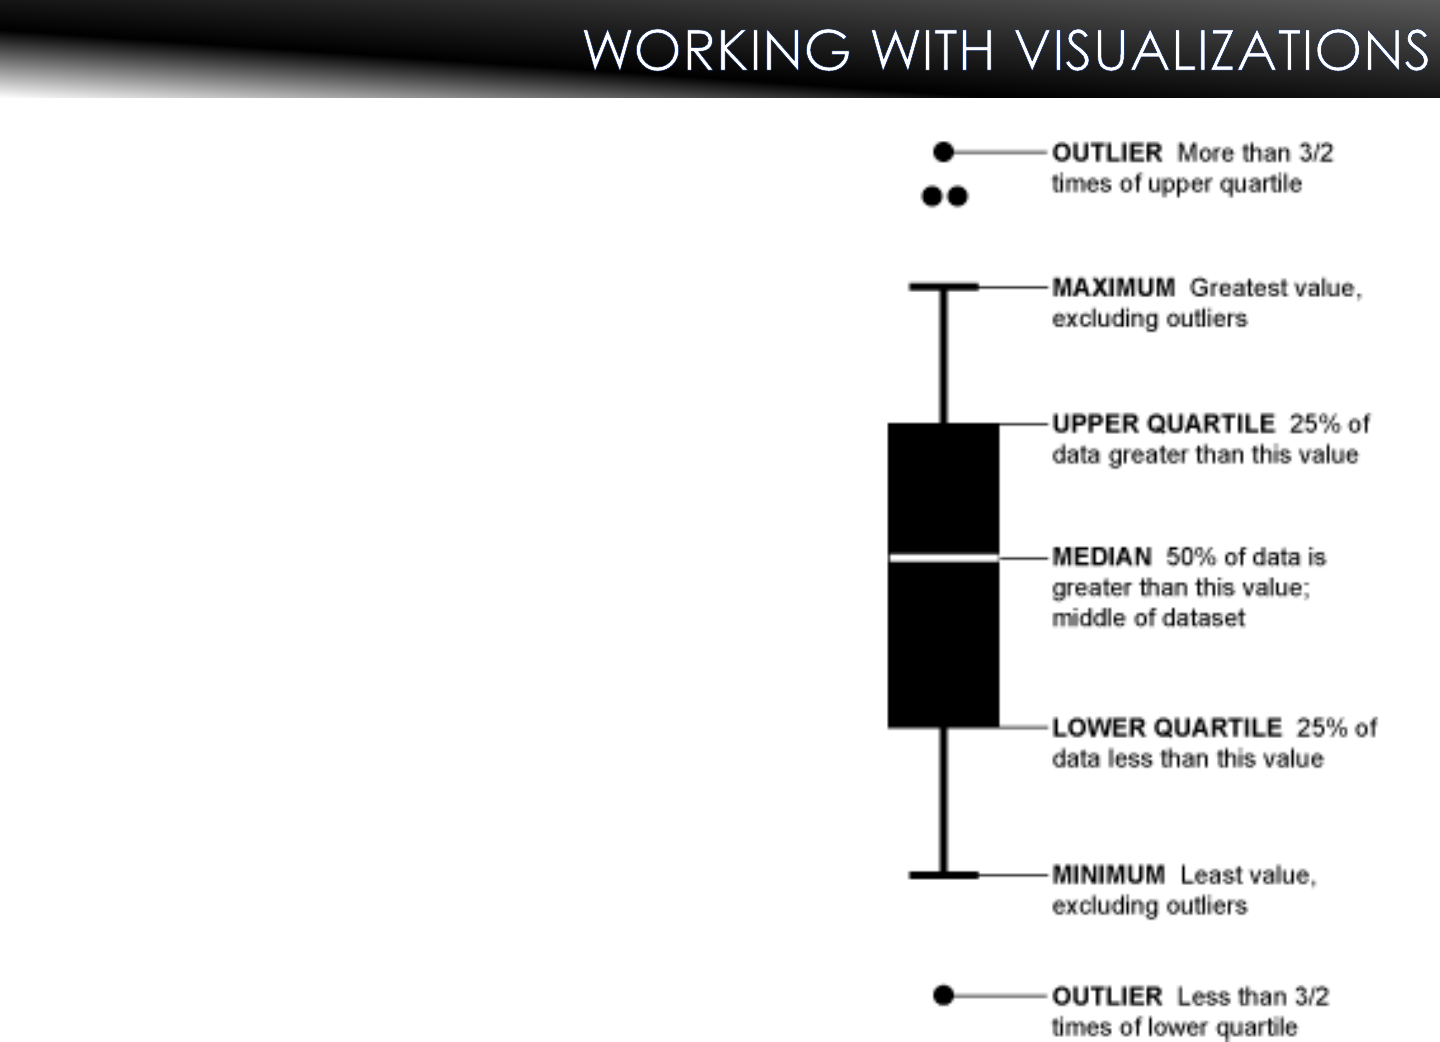
Box Plot
Also known as Box and Whisker Plot
Used to show the distribution of data
78

Objective: Create a Box Plot displaying Sum of Profit for ea c h Category.
1. Create a New worksheet. Rename it Box Plot.
2. Ctrl+Click each of the following: Category, Sub-Category, Profit
3. Expand the Show Me Dialog Box.
4. Select the Box Plot thumbnail.
5. Drag Category to Color.
6. Click the Size Mark and advance the slider
to increase the marks of the size on your view.
79

Sum of Profit for each Category. Color shows details about Category.
Details are shown for Sub-Category.
80

Tree Maps
Treemaps are an alternative way of
visualizing the hierarchical structure of a
diagram while also displaying quantities
for each category via area size
Each category is assigned a rectangle
area with their sub-category rectangles
nested inside of it.
When a quantity is assigned to a
category, its area size is displayed in
proportion to that quantity and to the
other quantities within the same parent
category in a part-to-whole relationship.
The area size of the parent category is
the total of its sub-categories.
Tree maps start from top left (largest) to
bottom right (smallest)
81

Objective: Display sum of Sales and Profit for Regions and States using a Tree Map where Sal e s
is indicated by color and Profit is indicated by size.
1. Create a New worksheet. Rename it Tree Map.
2. Ctrl+Click each of the following: Sales, Profit, Region, State
3. Expand the Show Me Dialog Box.
4. Select the Tree Map thumbnail.
5. To edit the colors of your Tree Map, click the drop-down arrow on the legend for Sum
of Sales.
6. Select Edit Colors.
7. Choose a palette to your liking.
8. Click OK.
82

Region and State. Color shows sum of Sales. Size shows sum of Profit.
The marks are labeled by Region and State.
83

Area Charts
Area charts are commonly used to showcase data that depicts a
time-series relationship
Unlike Line charts, they can also visually represent volume
Information is graphed on two axes, using data points connected
by line segments. The area between the axis and this line is
commonly emphasized with color or shading for legibility
Typically used when you need to:
Know the magnitude of a change
Compare a small number of
categories
Compare between trends
and not exact values
84

Objective: Create an Area Chart to display sales for ea c h Order Date month in 2016 & 2017. Let
the details about Order Date Year be shown in color.
1. Create a new worksheet. Rename it Area Chart.
2. Drag Order Date to the Columns shelf.
3. Drag Sales to the Rows shelf.
4. Change the line mark to Area.
5. Drag Order Date to Color.
6. From the Analysis menu, select Stack Marks
and turn the marks Off.
85

Sum of Sales for each Order Date Month. Color shows details about Order Date Year.
The view is filtered on Order Date Year, which keeps 2016 and 2017.
86

Objective: We’ve been asked to provide a visualization that represents the sales in cities in both
the East and South regions.
1. Create a New worksheet. Rename it South-East Sales.
2. Ctrl+Click City and Sales from both Dimensions and Measures.
3. Click Show Me to expand its dialog box and choose the recommended thumbnail for
the Symbol Maps visualization.
4. Drag Region to the Filters shelf and place a check in the box next to both East and
South.
5. Filter in the data for the unknown values show at the bottom-right of your map.
6. Click Size and use the slider to increase the size of your marks.
7. Add Region to Color.
87

Map based on Longitude (generated) and Latitude (generated). Color shows details about Region. Size
shows sum of Sales. Details are shown for City. The data is filtered on Order Date Year, which keeps 2016
and 2017. The view is filtered on Latitude (generated), Longitude (generated) and Region. The Latitude
(generated) filter keeps non-Null values only. The Longitude (generated) filter keeps non-Null values only.
The Region filter keeps East and South.
88

CREATING DASHBOARDS
Dashboards
Dashboards are collections of worksheets
They allow you to analyze multiple views at once
Dashboards are shown at the bottom as tabs like worksheets
Update automatically when data from the source is updated
Supports all the same formatting as worksheets
90

Dashboards
When creating a new dashboard, the data
pane is replaced with a list of worksheets and
objects
Objects can be added by simply dragging
them over to the dashboard
By default, objects are “tiled” when they are
added but can be changed to “floating” to
allow overlap
91

Adding Dashboard Objects
Dashboard objects allow you to enhance a dashboard with non-
worksheet items.
Objects include:
Text boxes
Images
Web Pages
Blank Space
92

Organizing Dashboards
You have the ability to show and/or hide specific parts of a
dashboard as desired.
Title
Caption
Legends
Filters
Parameters
93

Organizing Dashboards
Dashboards can be sized based on the following options:
Automatic: dashboards adjust as needed
Exactly: fixed width, scrollable if larger than window
Range: scales between min and max size
Presets: select from common sizes
94

Objective: We have created numerous worksheets. Our users would like to see some of these
views on a single page. We will create a dashboard from 3 of our worksheets to enhance it with
a global filter.
1. Create a New dashboard. Rename it with your name: (Example Amy’s Dashboard)
2. Start by changing the size of the dashboard. In the dashboard pane, click the drop-
down under Size, click the drop-down arrow next to Fixed Size, and select Automatic.
3. From the Dashboard pane, drag South-East Sales to your dashboard.
4. Drag Avg Unit Cost below Sales by City until the bottom half of the screen is gray (this
splits the dashboard screen).
5. Next, drag the Sales Spotlight to the bottom right side until the lower half of the screen
is gray.
6. Highlight the Year of Order Date filter, click the small drop-down, choose Apply to
Worksheets>All Using This Data Source. This will make Year of Order Date a global filter
that applies to all of the worksheets in
our new dashboard.
7. To change the color of the background,
and titles, click the Dashboard menu and
select Format.
95

96

PUBLISHING & SHARING

Publishing & Sharing
Workbooks can be shared with other Tableau Desktop users, like
any other file
Alternatively, workbooks can be published to private servers
Princeton Tableau Server
Princeton Tableau Public
Tableau Public
You can publish worksheets, dashboards, or stories
98

Publishing & Sharing
Workbooks can be exported and published
Multiple formats are available to use the output in applications such
as PowerPoint, Word, or Excel
When saving, you can save:
Workbooks (.twb)
all sheets, dashboards, and stories
Packaged workbook (.twbx)
All sheets, dashboards, stories, and all reference local data file and images
in a single file
99

OTHER SESSIONS & NEXT STEPS

Tableau Users Group
Tableau: An Introduction
Tableau for Interactors
Tableau for Server Administrators
Tableau Fanalytics
101

HELPFUL LINKS & RESOURCES

We in CeDAR are here to answer any questions you may have. In
addition, we have provided a few links that should prove to be useful.
Resource Link
Princeton’s Tableau Production Server
https://tableau.princeton.edu
Princeton’s Tableau Development Server https://tableaud.princeton.edu
Princeton’s Tableau Public Server https://tableaupublic.princeton.edu
Tableau Website www.tableau.com
Tableau Knowledge Base http://kb.tableau.com
Tableau Support Community https://community.tableau.com
Princeton Tableau Users Group (TUG) Tableau_Users@princeton.edu
Tableau Conference Library http://tclive.tableau.com/Library
CeDAR Website https://cedar.princeton.edu
103

104
