
How to Print and Use Time Machine
A Guide for Using Time Machine and
Bonjour Printing with your WNDRMAC Router
©2011 NETGEAR, Inc. All rights reserved.
Technical Support
Thank you for selecting NETGEAR products.
Locate the serial number on the label of your product and use it to register
your product at http://www.NETGEAR.com/register. Registration is required
before you can use the telephone support service. Registration at the
NETGEAR website is strongly recommended.
Go to http://support.netgear.com for product updates and Web support.
For complete DoC please visit the NETGEAR EU Declarations of
Conformity website at:
http://kb.netgear.com/app/answers/detail/a_id/11621
Trademarks
NETGEAR, the NETGEAR logo, ReadyNAS, NeoTV, ProSafe, Smart
Wizard, and Auto Uplink are trademarks or registered trademarks of
NETGEAR, Inc. Time Machine is a registered trademark and Bonjour is a
trademark of Apple Inc. Other brand and product names are registered
trademarks or trademarks of their respective holders.
Statement of Conditions
In the interest of improving internal design, operational function, and/or
reliability, NETGEAR reserves the right to make changes to the products
described in this document without notice. NETGEAR does not assume
any liability that may occur due to the use or application of the product(s) or
circuit layout(s) described herein.
3
This document describes how to run the Time Machine® and
Bonjour™ printing applications for use with your NETGEAR
WNDRMAC router.
Setting Up Time Machine
Note: If you are already using Time
Machine software with your
USB hard drive, you can skip
Steps 1 through 3 and go to
Step 4.
Step 1:
Physically connect the USB hard drive to your Mac.
Step 2: On your Mac, go to the magnifying glass at the top right of
the desktop, and search for disk utility.
4
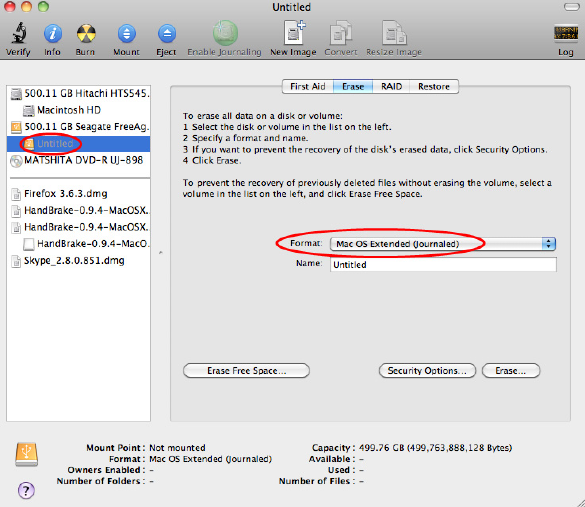
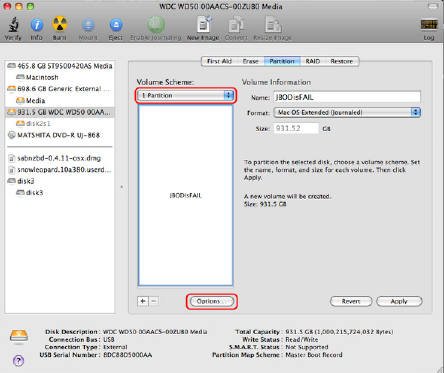
Step 3: Open the Disk Utility and format your drive, as shown
here.
5
Note: The WMDRMAC router supports
GUID and MBR partitions only.
To see how to change the
partition scheme, see “Changing
the Partition Scheme” on
page 16.
Step 4:
You can now use Time Machine wirelessly by connecting
the USB hard drive to your WNDRMAC router.
To access the connected USB hard drive from your Mac or PC:
• On a Mac:
Go > Connect to Server >
type: smb://readyshare
• On a PC:
Start > Run >
type: //readyshare
Step 5: From your MAC Desktop, open Macintosh HD.
Step 6: Click the Connect As button. In the pop-up window,
select Registered User, and enter admin as the user name and
password as the password. Click Connect.


7
Step 8: Click the Use for Backup button to complete your
selection.
Step 9: Enter the password (password) and backup begins.
8
Before You Back up a Large Amount of Data
Before you back up a large amount of data with Time Machine,
NETGEAR recommends that you do the following to ensure a
successful operation:
Step 1: Upgrade the operating system of the Mac machine.
Step 2: Verify and repair the backup disk and the local disk.
Step 3: Verify and repair the permissions on the local disk.
Step 4: Set Energy Saver.
a. From the Apple menu, select
System Preferences.
b. From the View menu, select Energy Saver.

9
c. On the Energy Saver screen, select
Wake for Ethernet network access.
d. Click the Back arrow to exit this screen. Your changes
will be saved.
10
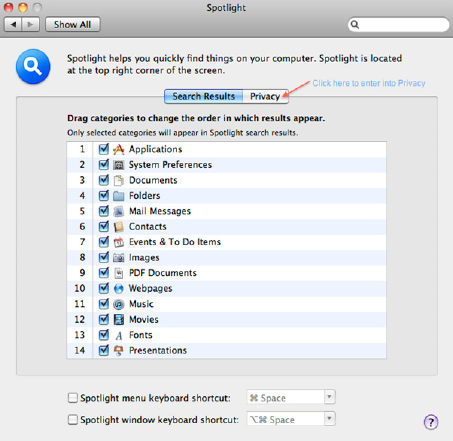
Step 5: Modify your Spotlight settings.
a. From the Apple menu, select
System Preferences.
b. Click Spotlight.
c. On the Spotlight screen, click Privacy.

11
d. On the Privacy screen, click Add (+).
12
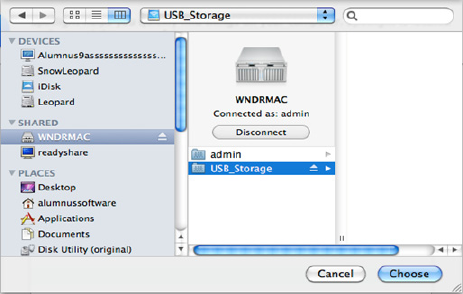
e. From the Finder, select WNDRMAC from the list of
shared devices (that you want to exclude from
backups).
f. If Readyshare is available on the Finder list, exclude it
from Spotlight (Privacy) as you did for the WNDRMAC
shared disk in the previous step.

13
g. When Time Machine Backups is shown on the Finder
list, exclude it from Spotlight (Privacy) as you did for
WNDRMAC and Readyshare.
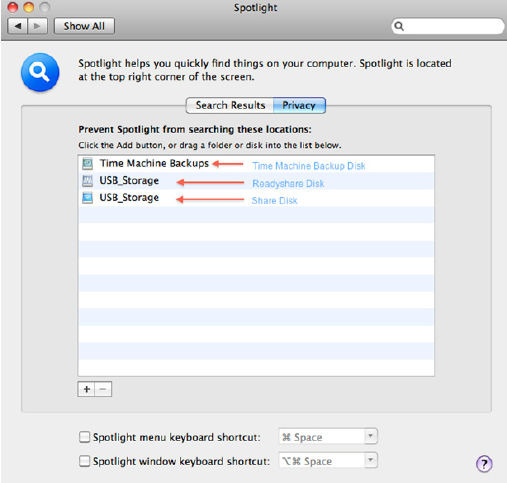
14
Your Spotlight settings will look like the following
screen when you are finished:
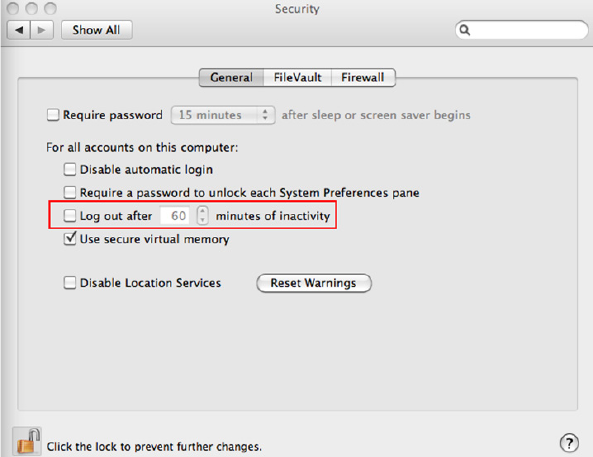
Step 6: Modify your Security settings.
a. From the Apple menu, select System Preferences.
b. From the View menu, select Seurity.
c. On the Security screen, leave the Log out after
minutes of inactivity check box unchecked.
16
Changing the Partition Scheme
To run with the WNDRMAC router, the partition scheme on your
Mac must be set to either GUID or MBR. To make sure the partition
scheme is set to one of these supported schemes:
Step 1: Open the Disk Utility and select your USB drive.
Step 2: Select the Partition tab.
Step 3: Select Volume Scheme and set the number of partitions
you would like to use.
17
Step 4: Click Options, and the Partition options appear.
Step 5: Select GUID Partition Table or Master Boot Record
(MBR).
Step 6: Click OK.
18
Setting Up Bonjour Printing on the Mac
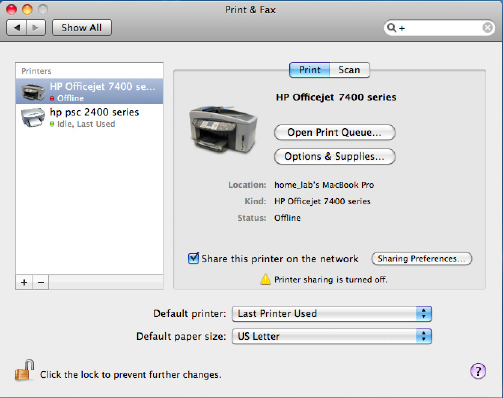
Step 1: Connect your USB printer to the WNDRMAC router.
Step 2: Open up your System Preferences.
Step 3: Then select Print & Fax.

19
Step 4: Click the + button to add a Printer.
20
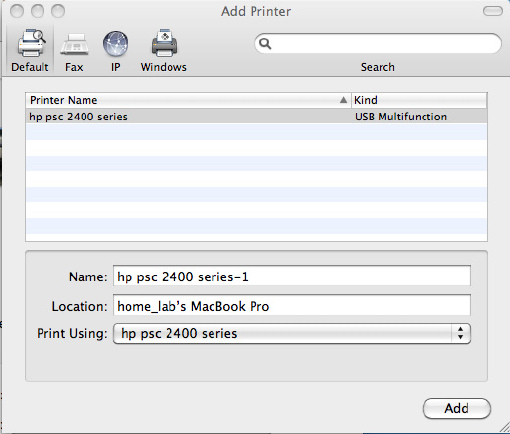
Step 5: Select the printer from the list and select Add.
21
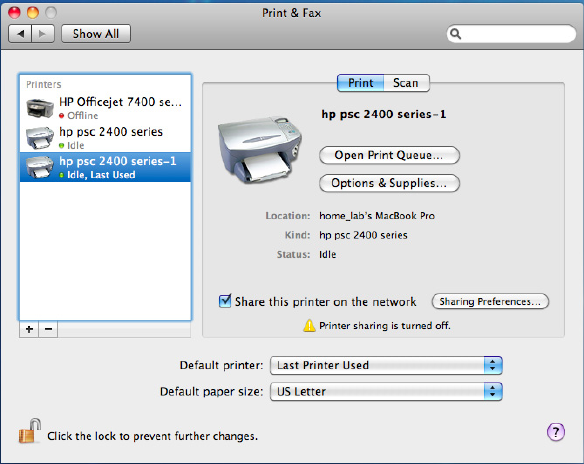
Step 6: The printer is added to the Printers window.
You can now begin printing.

22
Setting Up Bonjour Printing for Windows
Step 1: Go to http://support.apple.com/kb/DL999 to download
Bonjour Print Services for Windows.
Step 2: Click BonjourPSSetup.exe to start the installation.
Step 3: Follow the install wizard to complete the installation.
Step 4: When the installation is complete, click the desktop
shortcut Bonjour Printer Wizard.

23
Step 5: Select the printer you want from the list and click Next.

24
Step 6: To install the printer driver, select the driver from the list,
or click Have Disk if you have a specific driver for this printer.
Step 7: Click Next to continue installing the printer.
Step 8: On the Bonjour Printer Wizard completion screen, click
Finish.
Your printer installation is complete.

NETGEAR, Inc.
350 East Plumeria Drive
San Jose, CA 95134 USA
April 2011
