1
How to Convert a PDF to a Word Document and Create a Fillable Form
Create the Word Document:
1. Make sure the Export PDF tool is added to your left Navigation Shortcuts bar. It is one of the Create and Edit
Category. Click on the Open button to add it as a shortcut.
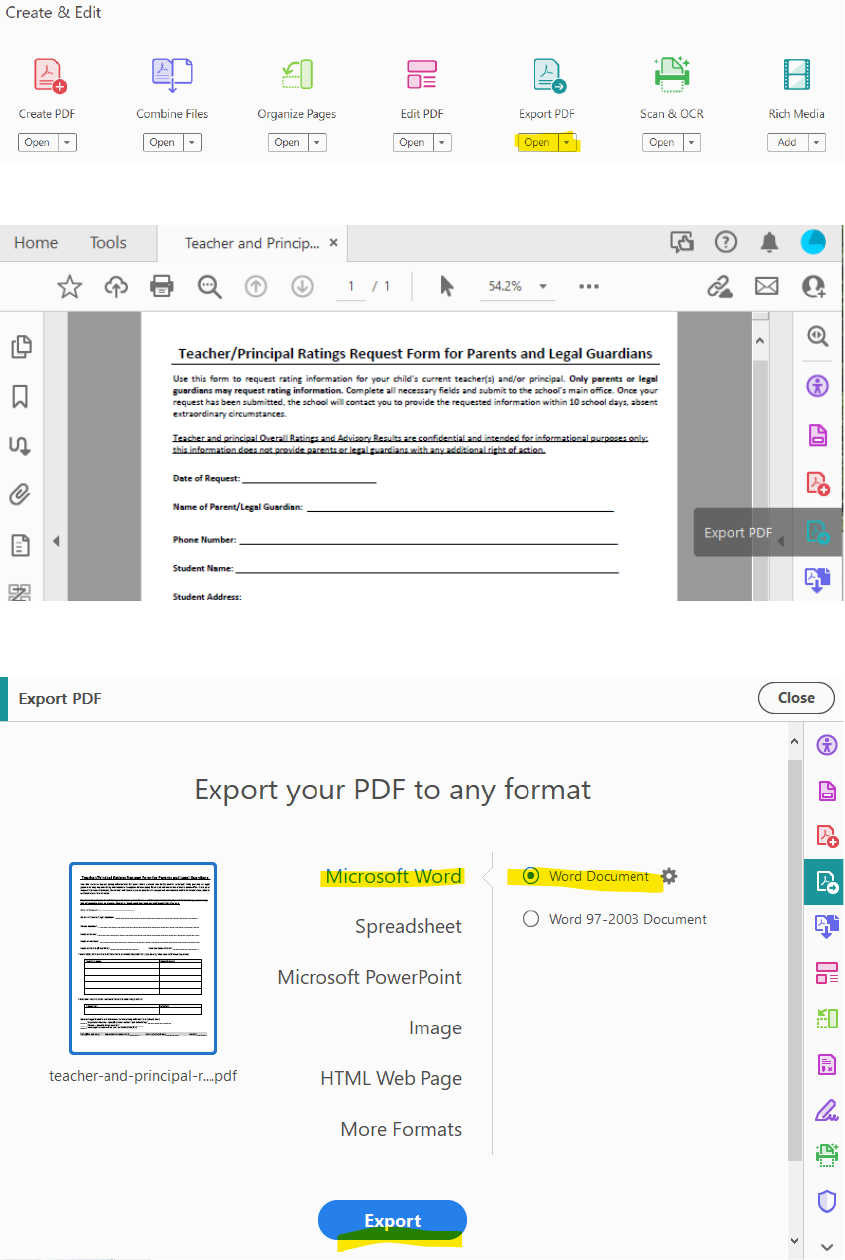
2. Open the PDF you want to convert in Adobe Acrobat. Click on Export PDF in the left navigation bar
3. Select Microsoft Word, select the first radio button to create a .docx output file (older file types are not
accessible) click on the export button.

2
4. Select Microsoft Word, select the first radio button to create a .docx output file (older file types are not
accessible) click on the export button. Select the folder destination and file name for your word export.
5. Open the newly created word file. Open the Navigation panel (shows the Heading Structure) on the left and the
Accessibility panel (shows accessibility errors and warnings) on the right.
6. The above screen clip shows the exported document has no headings, and there are accessibility issues correct.
7. Open the navigation panel (shows the Heading Structure) on the left and the Accessibility panel (shows
accessibility errors and warnings) on the right.
a. Issues Flagged – there is no H1: Add an H1 and H2's and H3's as appropriate.
b. Correct the accessibility issues flagged.
c. Other things to do:
i. Remove unnecessary images:
1. In this dated form, the underline under the first line is an image – delete the line
ii. Remove any unnecessary tables:
1. Tables used for formatting (see below) These fields should appear correctly formatted,
but uses a table for formatting:
2. Tables used for single field entry:
Remove these two fields from the table and format them as text in this manner:
3. This table is a true table: s used for single field entry:

3
Word still flags the table asking you to check the reading order. This is corrected by
Highlighting the table and selecting Table Design in the header:
Once in Table Design. Select a format you like (stay away from low contrast or heavily
colored versions. Click the box on the left corner indicating the table includes a header
row. Once done, you can select the table's Header row and select a shading color
updated to identify the header row visually.
So now the check table reading order warning is resolved, and the updated table looks
like this:
iii. Determine if there are other formatting changes:
1. Check Boxes would make more sense in this form than text boxes:
Switch them by selecting the first line you want to update. Click on developer, And the
box with the checkmark and switch the underscore to a checkbox.

4
Switch them by selecting the first line you want to update. Click on developer, And the
box with the checkmark and switch the underscore. Once you have the first check box,
you can resize it as desired. The updated form now looks like this:
8. Verify the word version of your form is fully accessible and the content and formatting are what you desire.
Save the Word Document and Create The PDF:
1. Save the file and add a title Save As > More Options:
2. Then add a title:
3. Save the Word as a PDF: Select File type PDF and click save:
Open the PDF in Adobe Acrobat and Complete Accessibility Checks and Solve Issues
1. Save the file and add Click on enable editing:
2. Run the accessibility checker and solve all remaining issues:
a. Ensure there is only 1 H1.
b. See the document "Adobe Accessibility Error Corrections" for more complete Adobe fixes.
i. Typical errors are:
1. Logical Reading Order – Needs Manual Check – Right-click and select Pass
2. Color Contrast – Needs Manual Check – Right-click and select Pass
3. Tab Order - Failed – Right-click and select Fix
c. Go to the tags panel of Adobe and remove all empty paragraph tags
d. Once all the errors are corrected in Adobe – rerun the accessibility check and save the .pdf.

5
Save the Clean PDF with a New Name Indicating it will be Fillable
1. Run the accessibility checker again to verify it is clean.
Create the Form Using the Prepare Form Tool
2. Make sure the Prepare Form tool is added to your left Navigation Shortcuts bar. It is one of the Forms and
Signatures Category. Click on the Open button to add it as a shortcut.
3. Open the PDF you want to convert in Adobe Acrobat. Click on Prepare Form in the left navigation bar
4. Adobe will display this screen and click on start:
5. Adobe will now do its best to automatically create the form and label the forms fields. This is where clean
formatting (such as "Field Name: _______________") and appropriate use of tables pays off. Adobe does its
best to automatically add fields and field names.

6
Now you can massage the resulting form. Here are some general guidelines:
a. Were any Form fields created that are not needed:
i. Left-click on the field that should be deleted and click delete:
b. Please review all fields to make sure they are formatted correctly via field properties. These are the
most common items to look out for:
i. General Tab
1. Determine if a field is required or optional
2. Make sure the Name and Tool Tip fields are present and meaningful
ii. Appearance tab
1. Ensure the font size Is appropriate for the expected value. Select a specific font size or
Auto – allows the values to select an appropriate font size.
iii. Position Tab
1. Defines the position and sizing of a form field
iv. Options Tab
1. Determine if default values are correct:
2. If a field is sized for multiple line response – click multi-line
3. For paper forms – make sure Scroll long text is not clicked as long responses will not be
visible once the form is printed
4. If the field is always a specific number of characters (e.g., OSIS number), then uncheck –
Check spelling and select comb of and enter the number of characters:
v. Actions Tab (I am not sure how to use this)
vi. Format Tab:
1. Allows you to define format types – frequently used options are
a. None
b. Number
c. Percentage
d. Date
e. Time
f. Special (zip code, phone number, social security number, other mask)
vii. Validate Tab (I am not sure how to use this)
viii. Calculate Tab
7
1. I have used simple calculations – for example, adding all the fields in a column. If you
do use Calculate, remember to click the Locked checkbox at the bottom of the box.
c. Adobe has many options to manually add form fields and signatures to your form. Click on any of the
field types in the top toolbar and place your cursor where you would like to place the field and
configure. Manual field creation requires multiple steps not covered in this document.
d. Verify the tab order
i. Always verify the tab order of your form
ii. If Adobe can auto-create all the fields in your form, then the tab order should be correct.
iii. If you manually create some form fields, they will be added to the bottom of your form.
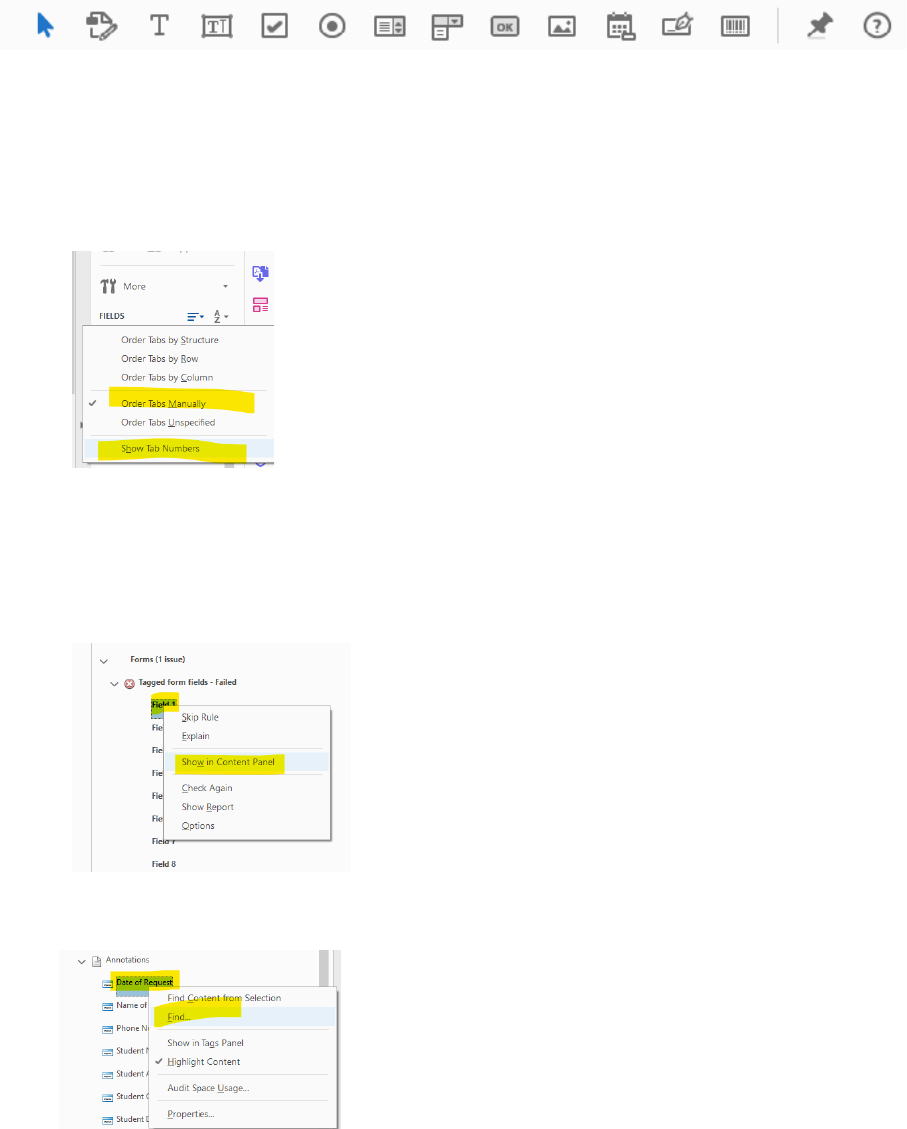
iv. To change the tab order, you need to set the fields options to – order tabs manually and show
tab numbers.
v. You will then be able to drag and drop the fields in the fields pane to set the correct tab order
6. Once you have the form functioning correctly and the field tab order is correct. Close prepare forms and return
to the Accessibility Tool.
a. Rerun the Accessibility Check
i. It will flag two errors > Tab Order Failed > Forms – Tagged Form Fields – Failed.
ii. Left-click on the first field in tagged Form fields failed and select Show in Content Panel
Left-click on the first field and click on Find…
The find element box will open up. Click on Unmarked Annotations, search document, and find

8
Adobe will find the first unmarked annotation. Click on Tag Element:
Select the type Form (you do not need to enter a title) and click ok
Because you have selected search document above, Adobe will move to flag the next field. Again
select Tag Element, Type Form, and ok. Adobe will do this for all the fields. And will close when
you are done.
a. Rerun the Accessibility Check – resolve the other accessibility errors, and you are done. If you are
missing a ToolTip on a form field, you will have to go back and add it in the Prepare Form Tool. Keep
going until the accessibility report has no errors.
Final Notes:
1. Remember to save your work often. Adobe will not allow you to undo certain steps. It can be helpful to save and
then rename your file to ensure you have a prior point to return to.
2. You want to retain three versions of every form you create for future edits:
o Accessible Word Document (.docx)
o Accessible PDF
o Accessible PDF form
