
Data Wave
User
Gu
i
de
8.7

Gold Client 8.7 Data Wave
2 © 2003-2020 Qlik Analytics (ISR) Ltd.
Copyright
© 2021 Qlik Analytics (ISR) Ltd. All rights reserved.
No part of this document may be reproduced or transmitted in any form or for any purpose
without the express permission of Qlik Analytics (ISR) Ltd.
Attunity makes no warranties or representations with respect to the content hereof and
assumes no responsibility for errors in this document. Qlik shall not be liable for special,
indirect, incidental, or consequential damages, including without limitation, lost revenues or
lost profits which may result from the use of these materials. The information contained in this
document is subject to change without notice.
Trademarks
Gold Client and the Gold Client logo are registered trademarks of Qlik Analytics (ISR) Ltd.
SAP, SAP NetWeaver, ABAP and other SAP products and services mentioned herein as well as
their respective logos are trademarks or registered trademarks of SAP AG in Germany and in
several other countries all over the world.
All other product and company names herein may be trademarks of their respective owners.

Gold Client 8.7 Data Wave
3 © 2003-2020 Qlik Analytics (ISR) Ltd.
Table of Contents
Introduction
Data Wave Screens
Data Wave Process
Support Information
Gold Client 8.7 Data Wave
4 © 2003-2020 Qlik Analytics (ISR) Ltd.
Introduction
In Gold Client 8.7.1, Data Wave has been redesigned for better management and
execution of Client Construct and Data Echo data copies for client refresh. Data
Wave uses existing Gold Client functionality, organized in a new way, to build new
and refresh existing clients with little manual intervention.
A Data Wave Export ID may contain all or a selection of master data and a
transactional data slice. It may be scheduled on a periodic basis or as a one-time
task.
There is no extra configuration required for Data Wave. It leverages the data types
already configured in the Data Framework so no further customization is needed.
Other Gold Client functionality such as Data Transformation and Subset Sync are
also available as part of the Data Wave process. Import Options can be used to
automatically execute data imports in the target system upon export completion so
no manual intervention is needed. In addition, Post Processing utilities can be
configured as the final step in the import process to fully automate it.

Gold Client 8.7 Data Wave
5 © 2003-2020 Qlik Analytics (ISR) Ltd.
Data Wave Screens
Data Wave can be executed using the Data Wave button on the main Gold Client
screen (Fig 1.0).
Figure 1.0

Gold Client 8.7 Data Wave
6 © 2003-2020 Qlik Analytics (ISR) Ltd.
The main Data Wave screen (Fig. 1.1) contains the following functions.
Figure 1.1
• Schedule Jobs - This button allows you to schedule the Data Wave process.
• Export Dashboard - The Export Dashboard provides information about Gold Client
exports including ones exported using Data Wave. It displays helpful information for
monitoring like Job Name, Status, Start Date and Time, and Duration.
• Refresh – Updates the status of Data Wave Exports.
• Sort Ascending – Sorts the Data Wave Export ID in ascending order for the columns
selected.
• Sort Descending – Sorts the Data Wave Export ID in descending order for the columns
selected.
• Change – Places the screen in Change mode to edit Owner and Data Wave Description
fields.
• Create – Creates a new Data Wave Export ID. Enter a description and click Continue to
create and save the new Data Wave Export ID. Clicking on the Data Wave ID will show the
Data Wave detail screen including data types, containers, and scenarios that are part of
that chosen Export ID.
• Delete – Deletes selected Data Wave Export ID.
• Show All/Show My – Show All displays all Data Wave Export IDs regardless of owner.
Show My displays only the Data Wave Export IDs owned by the current user.
• Import Options – Set data import options for selected Data Wave Export IDs.
• Data Transform – Review and select Transformation Rules for each data type included in
the Data Wave Export ID.
• Data Exclusions - Allows specific areas of data to be excluded from the export at
runtime. This can help with large data volumes.
• Subset Sync - Review and select Subset Sync configuration for connected data types that
are included in the Data Wave Export ID.
• Adjust Date Utility – This utility modifies the date range in the scenario’s date field
selection criteria for the selected Export ID. It can be executed manually prior to the job
scheduling using this button. It can be executed as part of the job scheduling.
• Job Monitor – Launches a new SAP window with transaction SM37, filtering on Gold Client
jobs for the past 7 days.

Gold Client 8.7 Data Wave
7 © 2003-2020 Qlik Analytics (ISR) Ltd.
Data Wave Details
To see what is contained in a Data Wave Export ID, click on the Export ID number (Fig. 1.2).
Figure 1.2
The top of the screen will display information about the Data Wave Export ID, and the Data
Wave toolbar is found below it (Fig. 1.3).
Figure 1.3
The Data Wave toolbar includes some standard Gold Client functionality as well as existing
functionality repurposed for Data Wave use.
• Refresh – The Refresh button updates the status of the screen.
• Add Data Type – Scenarios can be added to the Data Wave ID with three different
methods:
▪ Client Construct – It is a selection of Client Construct master data types as
configured in the Client Construct framework. This is found under ZGOLD –
Configuration – Data Framework – Client Construct. Master data types allowed
for Data Wave selection are set to active (Fig. 1.4). This is customizable in the
Client Construct framework to allow or disallow data types for this process.

Gold Client 8.7 Data Wave
8 © 2003-2020 Qlik Analytics (ISR) Ltd.
Figure 1.4
▪ Intelligent Slice – It is a group of Data Echo data types as configured in the
Data Echo framework for use with Intelligent Slice. This is found under ZGOLD –
Configuration – Data Framework – Data Echo. Data types available for
Intelligent Slice selection are designated as Primary (Fig. 1.5). This is
configurable allow or disallow data types for use with Intelligent Slice.
Figure 1.5
By default, when displaying the Data Echo framework, it is filtered by Primary
Data Type. It is also available as a filter on the main toolbar (Fig. 1.6).
Figure 1.6
Creating scenarios with this method is the same as using the Intelligent Slice
button from the main Gold Client screen except it is used as part of the Data
Wave Export ID instead of the standard Export Control Export ID.
▪ Data Snap – Select any data type from the Data Echo Framework for inclusion
in the Data Wave Export ID. This is executed in the same way as Data Snap.
After selection criteria is entered for a given data type, use Save as Scenario to
save the Data Snap selection criteria to a scenario. It will also add the new
scenario to the Data Wave Export ID. If the Data Snap criteria needs to be
updated, select the data type and click the Data Type Manager button and edit
as with standard Gold Client configuration. Please Note: Any Data Snap
configuration changes made within this context will update the configuration
globally.

Gold Client 8.7 Data Wave
9 © 2003-2020 Qlik Analytics (ISR) Ltd.
• Post Processing – Post processing activities (Fig. 1.7) can be executed
automatically in the target system after the data import is completed. These are
activities typically executed manually after data import. For Data Wave, the intent is
to reduce the manual effort for a refresh. The ability to include the Post Processing as
part of the Data Wave data export scheduling allows the client rebuild/refresh process
to be efficient with little manual intervention. The Post Processing options are all
available as part of standard Gold Client.
Figure 1.7
Please Note: The functionality of the buttons below may differ slightly by SAP GUI
theme. For some, you may see a checkbox to select and others an icon that looks like
a sheet of paper that must be clicked on to highlight the whole row.
• Delete – Using Delete removes the selected container from the Data Wave Export ID.
It does not remove the scenario from Gold Client but only the container from the
given Data Wave Export ID. It will still be available as a scenario for the data type,
and if the same scenario is used in multiple Export IDs, the others will not be
affected.
• Data Type Manager – Data Type Manager is used to display the Gold Client
configuration for the selected Data Echo data type. It works in the same way as it
does on the standard Data Snap screen. The advantage to having it available in Data
Wave is that if the user wants to add a Data Snap scenario to the selected Export ID,
the data type’s configuration can be easily updated within the Data Wave screen if
desired.
• Data Type Hierarchy – The Data Type Hierarchy report is a standard Gold Client
report. It shows recipient data types for the selected data type. It can be executed for
all recipient data types or only for those that are active. It shows only the top-level
recipient data types and can be expanded to drill down further into each data type.
Gold Client 8.7 Data Wave
10 © 2003-2020 Qlik Analytics (ISR) Ltd.
Data Wave Process
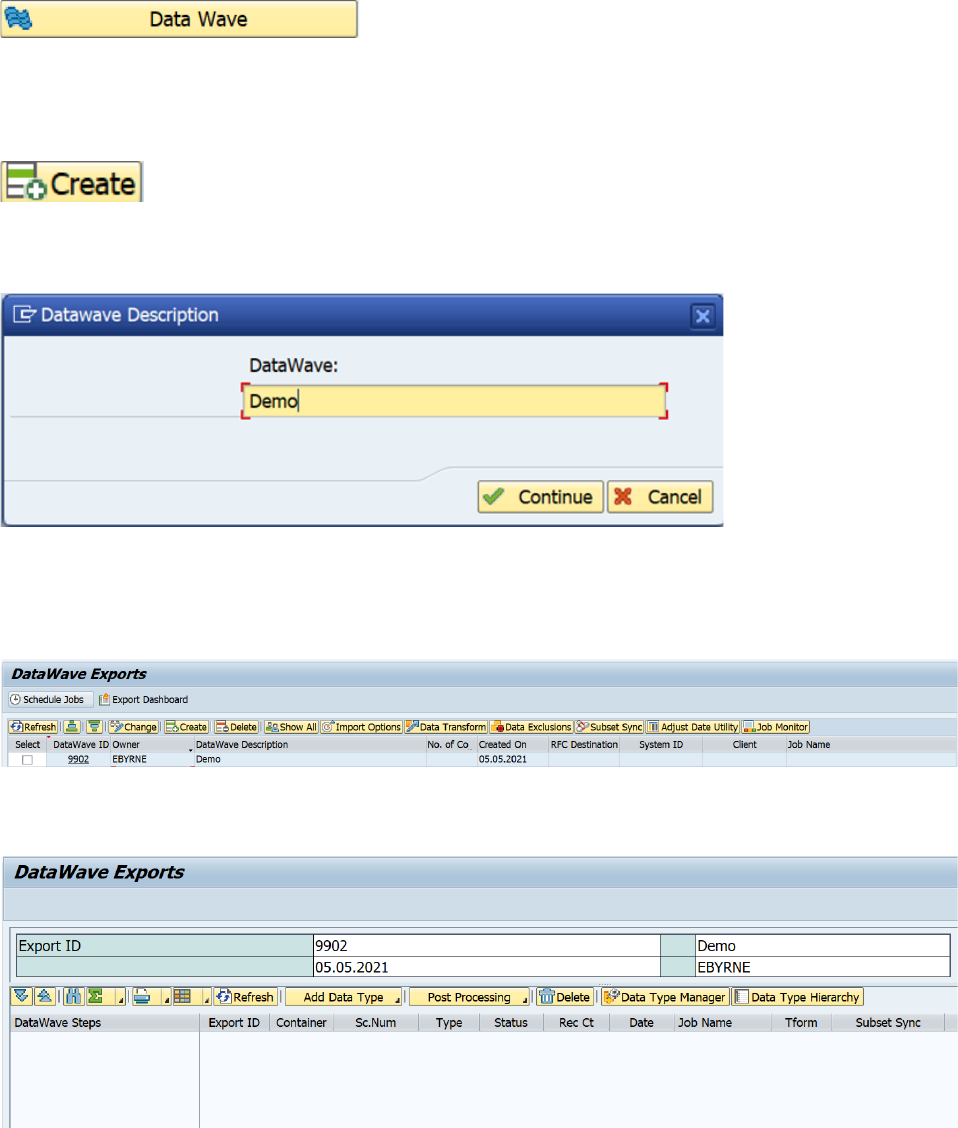
Execute transaction ZGOLD and click on the Data Wave button (Fig. 2.0).
Figure 2.0
Click the Create button (Fig. 2.1).
Figure 2.1
Enter Data Wave Description for the new Export ID and click the Continue button (Fig. 2.2).
Figure 2.2
Click on the Data Wave ID number for the new Export ID (Fig. 2.3).
Figure 2.3
This shows the contents of the Data Wave Export ID which is empty at this point (Fig. 2.4).
Figure 2.4
Gold Client 8.7 Data Wave
11 © 2003-2020 Qlik Analytics (ISR) Ltd.
Add Data Type
To create scenarios and add containers for Client Construct, Intelligent Slice, or Data Snap,
click Add Data Type.
Add Data Type – Client Construct
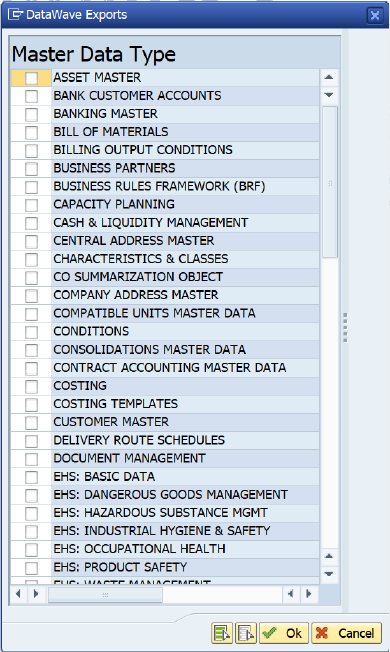
To export all master data with full table copies, select Client Construct. A selection of Client
Construct master data types will display (Fig. 2.5). This list is customizable in the Client
Construct Framework, as referenced on page 7. Select the needed master data types using
either the Select All button or by selecting them one at a time. When finished, click the OK
button.
Figure 2.5

Gold Client 8.7 Data Wave
12 © 2003-2020 Qlik Analytics (ISR) Ltd.
The Client Construct data types will be returned to the Export ID screen (Fig. 2.6).
Figure 2.6
Add Data Type – Intelligent Slice
To export a slice of master or transactional data, under Add Data Type, select Intelligent
Slice. It will display a selection screen (Fig. 2.7) where export criteria can be entered. The
selection criteria entered on this screen will be used across all data types. Most often, the
first field, Date Range, is used to export a time slice of data.
Figure 2.7

Gold Client 8.7 Data Wave
13 © 2003-2020 Qlik Analytics (ISR) Ltd.
Once the selection criteria is entered, click Execute. The example below is exporting a time
slice from July 1, 2013 – December 31, 2013 (Fig. 2.8).
Figure 2.8
A list of data types designated for Intelligent Slice use will display (Fig. 2.9). This list is
customizable in the Data Echo Framework, as referenced on page 8.
Figure 2.9

Gold Client 8.7 Data Wave
14 © 2003-2020 Qlik Analytics (ISR) Ltd.
Select the desired data types using either the Select All button or by selecting them one at a
time (Fig. 2.10). When finished, click the OK button. Please Note: If moving all master data
with Client Construct, it is not necessary to select any master data types for Intelligent Slice.
Figure 2.10
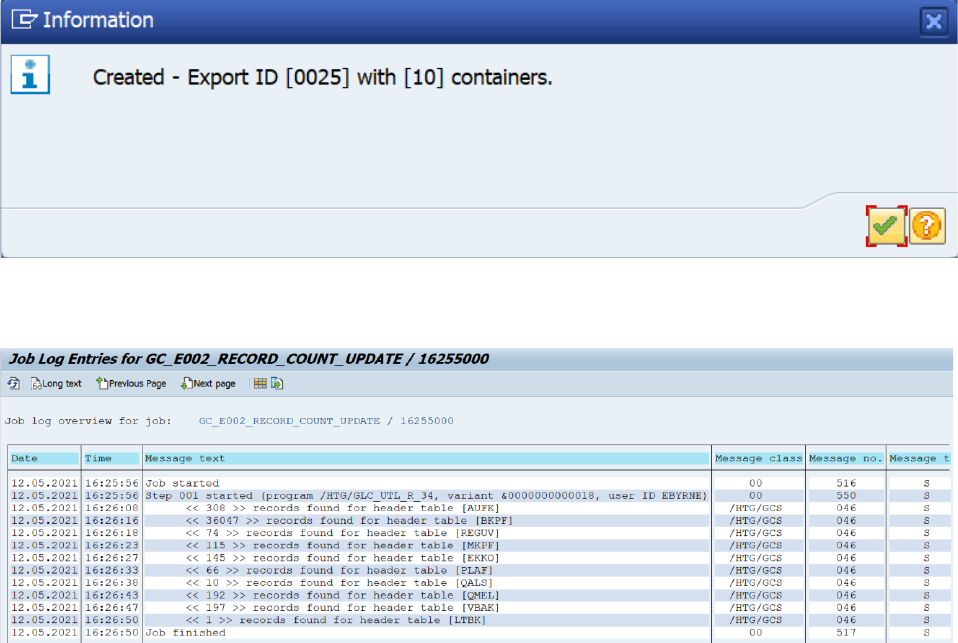
Two informational messages appear. The first gives a job name that can be monitored in
transaction SM37 (Fig. 2.11). This job does a calculation on the number of records found for
each scenario created. The second (Fig. 2.12) gives the Export ID number and number of
containers created.
Figure 2.11
Gold Client 8.7 Data Wave
15 © 2003-2020 Qlik Analytics (ISR) Ltd.
Figure 2.12
Example job log showing the record calculation for each scenario (Fig. 2.13).
Figure 2.13
Clicking Enter through both informational messages will come back to the Data Wave Export
ID where the new Data Echo containers have been added after the Client Construct ones
(Fig. 2.14). When the scenario count job is finished, if records are found for the selection
criteria entered, the Status column will show a green light and the Record Count column will
give the number of records. If no records are found, the Status column will show a yellow
light and the Record Count column will show 0. Please Note: This count is for the header
table only for the given data type.

Gold Client 8.7 Data Wave
16 © 2003-2020 Qlik Analytics (ISR) Ltd.
Figure 2.14
Add Data Type – Data Snap
To export additional data, under Add Data Type, select Data Snap. This can be used for other
scenarios that fall outside of the Intelligent Slice data export criteria. It is good for single
Data Echo selections. Use the Data Type Search features to find the Data Echo data type
needed to create the additional Data Snap scenario (Fig. 2.15).
Figure 2.15

Gold Client 8.7 Data Wave
17 © 2003-2020 Qlik Analytics (ISR) Ltd.
An example of this is for text data. If the text for all materials is desired, a Data Snap
scenario could be added since this would not be included as an Intelligent Slice data type or
scenario. The data type can be searched for using any of those three search tab options
(Fig. 2.16). It will give a response to the search (Fig. 2.17). Double-click to accept the
proposed data type or highlight it and click Enter.
Figure 2.16
Figure 2.17
The Data Snap selection screen will display (Fig. 2.18). By default, it shows the Data Snap
fields currently configured for the data type.
Figure 2.18
Gold Client 8.7 Data Wave
18 © 2003-2020 Qlik Analytics (ISR) Ltd.
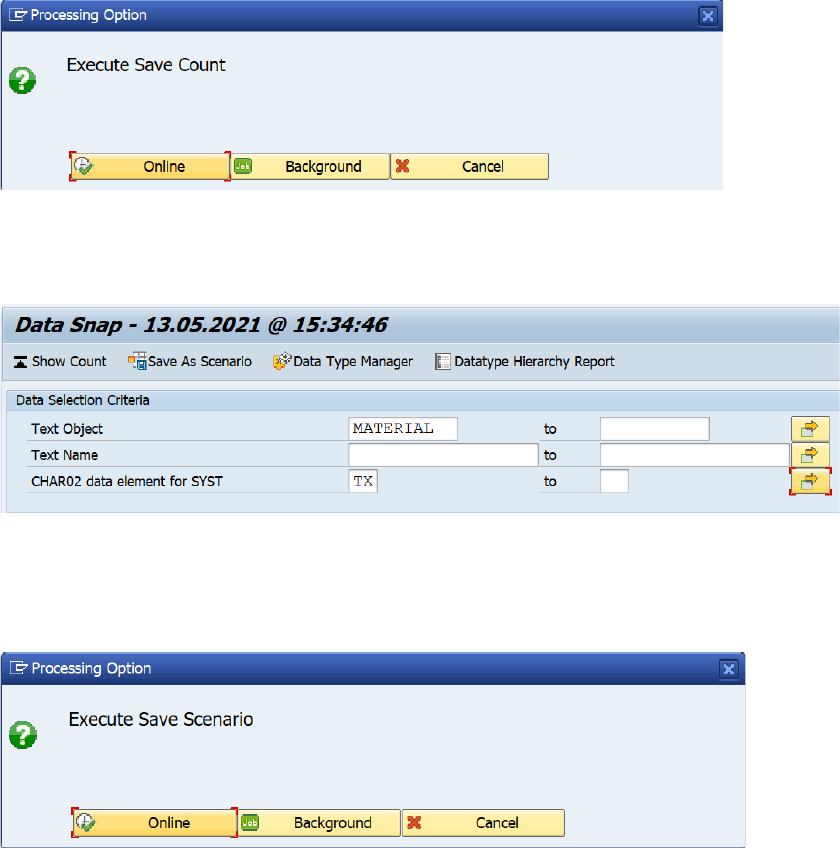
• Show Count - Once data selection criteria is entered, use Show Count to calculate the
number of header records that will be retrieved by the scenario when exported (Fig.
2.19). Click Online to run the record count in the foreground or click Background to
launch a background job to complete the record count. In most cases, using Online is
acceptable.
Figure 2.19
• Save as Scenario - Enter the selection criteria for the new Data Snap scenario and
click Save as Scenario (Fig. 2.20).
Figure 2.20
It will prompt to save the scenario (Fig. 2.21). Click Online to run the record count
and save in the foreground or click Background to launch a background job to complete
the record count. In most cases, using Online is acceptable.
Figure 2.21
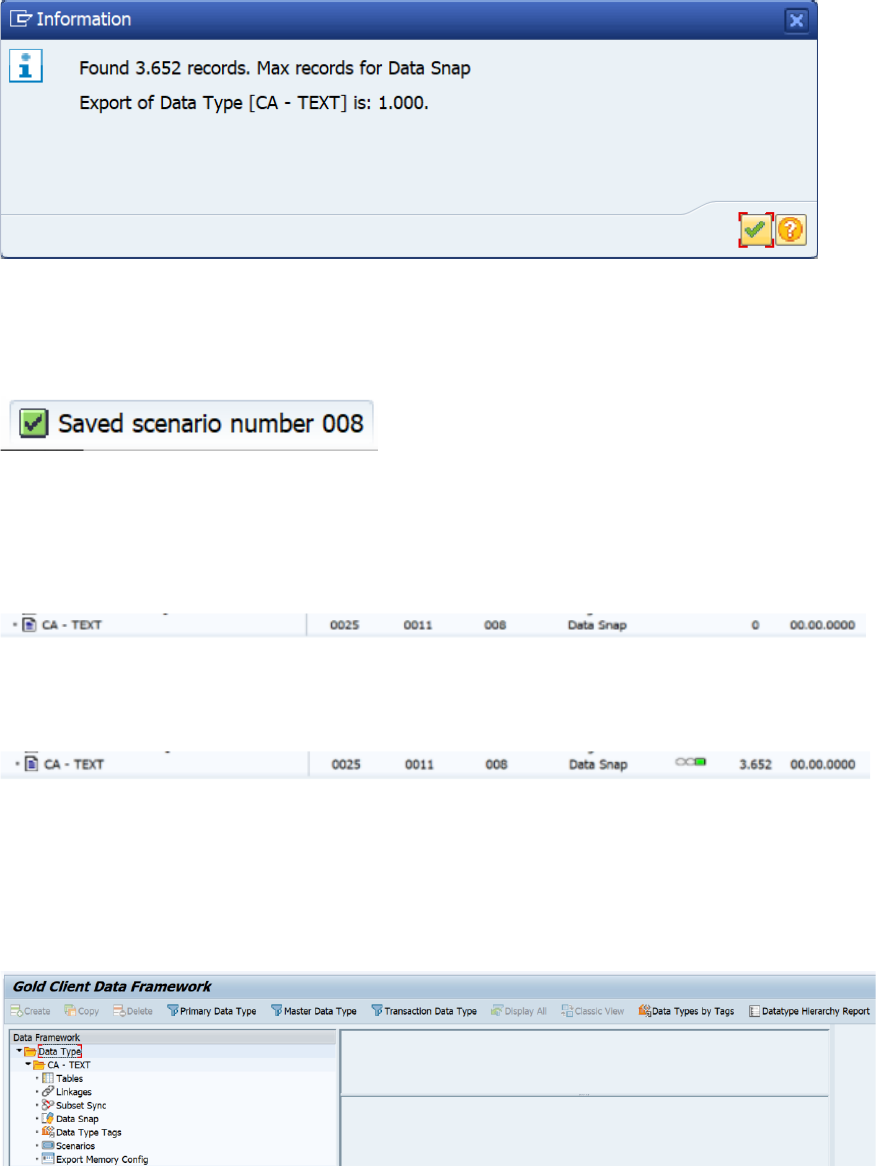
In addition to saving the scenario, it returns a count for the number of header records
in the data type. In this example, it is for header table STXL (Fig. 2.22). It also returns
a maximum record count, but it is not relevant for Data Wave processing because it
will export all records for the scenario. Click Enter.
Gold Client 8.7 Data Wave
19 © 2003-2020 Qlik Analytics (ISR) Ltd.
Figure 2.22
It will confirm the scenario is saved and give a scenario number (Fig. 2.23). Please
Note: When a scenario is created, it can be shared across Gold Client processes. This
scenario can be used in Export Control for standard Gold Client use.
Figure 2.23
The new scenario will be added to the bottom of the container list (Fig. 2.24). It will
show a 0 record count until it is refreshed (Fig. 2.25).
Figure 2.24
Figure 2.25
• Data Type Manager - If additional fields are needed or if the required field selection
must be changed, click Data Type Manager. The Data Snap configuration can be
updated in the same way as standard Gold Client. Open the data type, double-click on
Data Snap, and adjust the configuration as needed (Fig. 2.26).
Figure 2.26
• Data Type Hierarchy Report - Another option from the Data Snap scenario screen is
the Data Type Hierarchy Report. The Data Type Hierarchy report is a standard Gold
Client report. It shows recipient data types for the selected data type if any exist. For
this example, there are no recipient data types for CA – TEXT.
Gold Client 8.7 Data Wave
20 © 2003-2020 Qlik Analytics (ISR) Ltd.
After the containers are added, some columns will update. Using Refresh will give a record
count for the header table for any Data Echo containers. The Status column is yellow until the
Data Wave Export ID is executed for the first time. The lightbulb will turn yellow in the
Transformation and Subset Sync columns if they are applicable to the data type.
Once the Data Wave Export ID contains the desired data types and scenarios, the user may
choose to back out to the main Data Wave screen to initiate the export process. However,
there is an optional set of post processing utilities that can be configured to execute after the
data import completes in the target system. This further enhances the export/import
automation, and the post processing utilities do not need to be manually executed in the
target system. Please Note: There are four utilities offered but not all may be required in
your target system.
Post Processing
The Post Processing options detailed below are all available as part of standard Gold Client.
For Data Wave, they can be configured for each Export ID to execute as part of the import
process. This should be executed in conjunction with the Import Options functionality where
the import process is automated. The goal of this is to execute any needed import post
processing utilities without manual intervention.
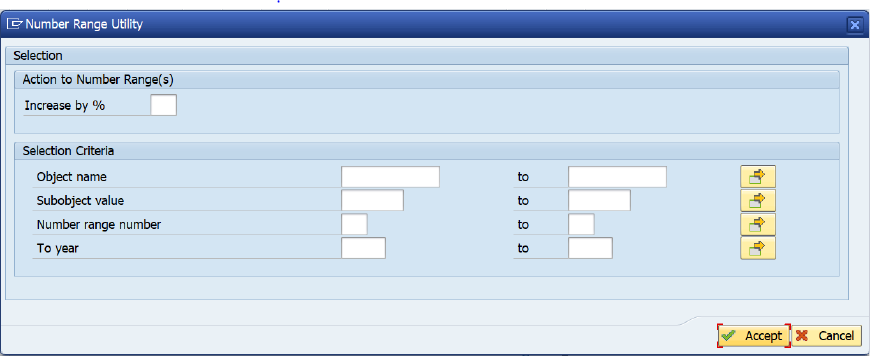
• Number Range Utility (Fig. 2.27) - This utility artificially inflates the number range
statuses (current numbers) in the target system. The table updated with this utility is
NRIV. It creates a buffer between the new data natively created in the target system
and the data imported from a source system using Gold Client. This avoids a duplicate
record error when additional data is imported from the source system and allows for
more flexibility to copy more data after the initial refresh.
Enter the percentage by which to inflate the number range status (current number) for
number ranges in the target system. The number range statuses, found on table NRIV,
are updated by the percentage increase requested in the utility. By default, all number
ranges are updated, but under Selection Criteria, this can be customized.
Figure 2.27

Gold Client 8.7 Data Wave
21 © 2003-2020 Qlik Analytics (ISR) Ltd.
• Update Change Document Client (Fig. 2.28) - If a change document object ID contains
the MANDT (client) value in the record, a conversion from the source client number to
target client number should be executed. This is needed so it is viewable in the target
client. Tables updated with this utility are CDHDR and CDPOS. Please Note: This is
required only for certain change document objects (Ex: object class BELEG). If the source
system and target system have the same client number, this is not required.
This utility will update field Object Value (CDHDR-OBJECTID) so the data can be
viewed in the target system. Enter the “old” client value of the source system used for
the data export and the “new” client value of the target system where the data will be
imported. The Change Document Object Class (CDHDR-OBJECTCLAS) should also be
entered. For Max Records to Process, enter a value greater than what is expected to
need converting. Only particular types of change documents need to be converted so
it is not necessary to run this for all change document types.
Figure 2.28
• Client Text Object Updater (Fig. 2.29) - If a text name contains the MANDT (client)
value in the record, a conversion from the source client number to target client number
should be executed. This is needed so it is viewable in the target client. Tables updated
with this utility are STXH, STXL, and STXB. Please Note: This is required only for
certain text objects (Ex: text object AUFK). If the source system and target system
have the same client number, this is not required.
This utility will update field Text Name (STXL-TDNAME) so the data can be viewed in
the target system. Enter the “old” client value of the source system used for the data
export and the “new” client value of the target system where the data will be imported.
The Text Object (STXL-TDOBJECT) should also be entered. Text ID (STXL-TDID) can be
entered if desired. For Max Records to Process, enter a value greater than what is
expected to need converting. Only particular text objects need to be converted so it is
not necessary to run this for all text data.

Gold Client 8.7 Data Wave
22 © 2003-2020 Qlik Analytics (ISR) Ltd.
Figure 2.29
• Person Where-Used Address (Fig. 2.30) - If an address application key contains the
MANDT (client) value in the record, a conversion from the source client number to
target client number should be executed. This is needed so it is viewable in the target
client. The table updated with this utility is ADRVP. Please Note: This is required only
for certain objects (Ex: SOUD). If the source system and target system have the same
client number, this is not required.
This utility will update field application table key (ADRVP-APPL_KEY) so the data can be
viewed in the target system. Enter the “old” client value of the source system used for
the data export and the “new” client value of the target system where the data will be
imported. Application table name (ADRVP-APPL_TABLE) should also be entered.
Application table field name (ADRVP-APPL_FIELD) can be entered if desired. For Max
Records to Process, enter a value greater than what is expected to need converting.
Figure 2.30
Once the scenarios are ready and any desired parameters are set inside the Data Wave Export
ID, return to main Data Wave screen. To begin the job scheduling process, select at least one
checkbox on the Data Wave Export ID row. Before scheduling the job, there are other optional
settings that can be used as part of the export/import process.

Gold Client 8.7 Data Wave
23 © 2003-2020 Qlik Analytics (ISR) Ltd.
Import Options - There are automated data import options that can be set for the selected
Data Wave Export IDs (Fig. 2.31). This is the same process as in standard Gold Client. To fully
automate the process for the export and import of data, the Import Options must be utilized.
Figure 2.31
• RFC Destination – Select target system(s) for automatic import. Please Note: The
allowed values are configured under ZGOLD – Configuration - Administration -
Configure Auto Import RFC.
• Parallel Processing on Import – When active, uses multiple background processes
during import. Please Note: The target system’s allowed application servers and
number of jobs are configured under ZGOLD – Configuration - Administration - Parallel
Processing.
• Replace Conflicting Data – Overwrites existing records during import.
• Skip Conflicting Data – Imports only new records into the target system and skips
those which already exist in the database.
• Delete Table Data Before Import – Relevant for Client Construct imports only, this
setting removes all records from the exported master data tables before importing.
When no existing data should be retained, this setting allows a clean master data
import.
• Target System ID and Target Client ID - Restricts data import at the target system
and client level. If values are specified, data cannot be imported into other
systems/clients.
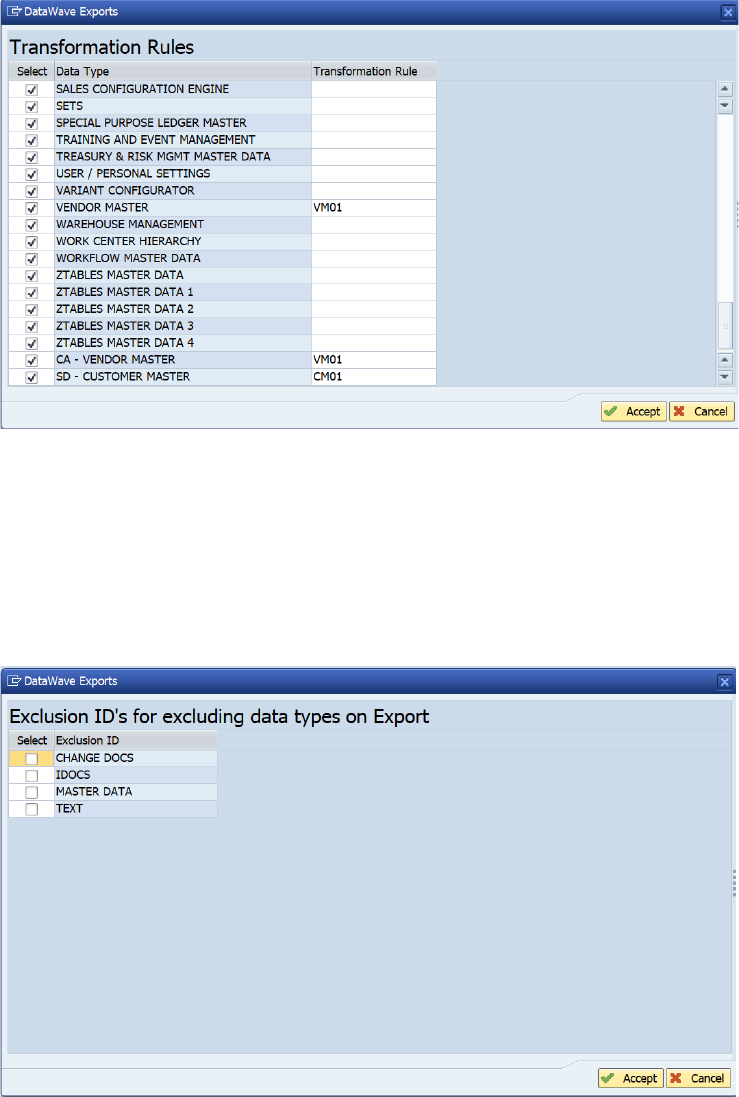
Data Transform - Review and select transformation rules for each data type included in the
Data Wave Export ID (Fig. 2.32). Client Construct and Data Echo data types can be configured
to execute by default with a particular transformation rule selected. To keep this configuration
in place, no action is needed because the data types will automatically export with that rule
Gold Client 8.7 Data Wave
24 © 2003-2020 Qlik Analytics (ISR) Ltd.
applied. At runtime, if the transformation is not needed, the rule can be deselected to allow
the data to export with no data transformation.
See ZGOLD – Transformation Rules for more information on rule setup and default data types
for each.
Figure 2.32
Data Exclusions - Allows specific areas of data to be excluded from the export at runtime.
This can help with large data volumes. The data exclusions are not activated by default and
must be selected at runtime. To run the export with selected data excluded, select any of the
data areas listed (Fig. 2.33).
See ZGOLD - Configuration - Data Framework - Additional Tools - Maintain Data Exclusions for
the configuration of data types and data areas permitted for exclusion.
Figure 2.33

Gold Client 8.7 Data Wave
25 © 2003-2020 Qlik Analytics (ISR) Ltd.
Subset Sync - Review and select Subset Sync configuration for connected data types that are
included in the Data Wave Export ID (Fig. 2.34). Data types can be configured to execute by
default with Subset Sync configured. To keep this configuration in place, no action is needed
because the data types will automatically export with that Subset Sync logic applied.
See ZGOLD - Configuration - Data Framework - Data Echo for the configuration of Subset
Sync for data types.
Figure 2.34
At runtime, if the Subset Sync job is not needed in the companion system, the checkbox can
be deselected to allow the data to export with no Subset Sync execution. Conversely, if
Subset Sync is configured but not active by default, it can be selected if it should execute with
the Data Wave job stream.
Subset Sync is configured as part of the Data Echo configuration. See ZGOLD – Configuration
– Data Framework – Data Echo for a data type’s specific configuration details.
Adjust Date Utility - This utility (Fig. 2.35) modifies the date range in the Data Echo
scenario’s date field selection criteria for the selected Export ID. If a scenario does not have a
date field populated, no action is taken.
It can be executed manually prior to the job scheduling using this button. It can also be
executed as part of the job scheduling to automate the export process further.

Gold Client 8.7 Data Wave
26 © 2003-2020 Qlik Analytics (ISR) Ltd.
Figure 2.35
• Processing Options - Summary Report is selected by default. It can be executed this
way as a test to see what the results would be. Update Database will update the dates
in the scenarios using the selected criteria when executed.
• Selection Criteria - The Export ID is populated with any Data Echo Export IDs
selected on the main Data Wave screen at runtime. It can be updated with additional
Export IDs if needed.
• Action to Date Range - This area dictates how the scenario dates will be updated.
Start Date will automatically populate with the current system date, but it can be
modified. The options for updating the scenario’s date range are Last 7 Days, Last 30
Days, Last 90 Days, and Last nn days (where nn can be set to 999 or less).
• Calculated Date Range - This shows how the date range will be updated with the
given parameters. Figure 2.35 above shows the calculated date range to be April 29,
2021 – May 6, 2021, when choosing to update for the last 7 days with a starting date
of May 6, 2021.
Job Monitor – Launches a new SAP window with transaction SM37, filtering on Gold Client
jobs for the past 7 days for the current user.
Once the scenarios are ready and any optional settings are selected, the job can be
scheduled. Be certain at least one checkbox on the Data Wave Export ID row is chosen and
select Schedule Jobs.

Gold Client 8.7 Data Wave
27 © 2003-2020 Qlik Analytics (ISR) Ltd.
Schedule Jobs - This button (Fig. 2.36) allows you to schedule the Data Wave process.
Figure 2.36
▪ Job Name – Enter the name for the new Data Wave job. This is the only required
field on this screen.
▪ Start Options
o Select when the Data Wave job will execute. It can be run immediately, run
once for a particular date/time in the future, or scheduled for a particular
frequency. For any option other than Immediate, consider both the date and
time fields, especially for jobs that will run as part of a repeatable process
for a given time interval.
o Parallel Processing – Enabled by default, this setting uses multiple
background processes during export. Please Note: The allowed application
servers and number of jobs in the source system are configured under
ZGOLD – Configuration - Administration - Parallel Processing.
o Start Date and Start Time - Define the start date and start time for the job.
For jobs that will be executed daily, weekly, or monthly, the date will
increment in the job schedule accordingly, and the selected time for
execution will remain. If this needs to be updated for future runs, the job
can be modified with transaction SM37.

Gold Client 8.7 Data Wave
28 © 2003-2020 Qlik Analytics (ISR) Ltd.
▪ Date Utility - This date utility is optional and is executed with the below
parameters. It modifies the date range in the scenario’s date field selection criteria
for the selected Export ID. This can be used for automated jobs that will execute as
part of a repeatable process. If selected to run, it will execute as the first step of
the job stream.
o Run Date Utility - Set to active to execute the Adjust Date Range utility for
this scheduled job.
o Start Date - This is the date from which the utility will begin its update. If
left blank, the current system date is used at runtime.
o Last Days - Select the number of days for the scenario date calculation. It
will use the Start Date field as its starting point. The options for updating
the scenario’s date range are Last 7 Days, Last 30 Days, Last 90 Days, and
Last nn days (where nn can be set to 999 or less).
Export Dashboard
Once the Data Wave jobs are executing, the Export Dashboard (Fig. 2.37) provides
information about Gold Client exports including ones exported using Data Wave. Its content
can be filtered by Start Date, User Name, and Job Name. The dashboard displays helpful
information for monitoring like Job Name, Status, Start Date and Time, and Duration.
It also includes other useful details like whether the export included data transformation
and/or Subset Sync functionality. The Export Progress report can be launched from the
dashboard also. If there are any failed export jobs, they can be rescheduled from this screen.
Figure 2.37

Gold Client 8.7 Data Wave
29 © 2003-2020 Qlik Analytics (ISR) Ltd.
Once the export is complete, the Data Wave screen will update. The main screen shows the
Job Name is populated with the last run job name (Fig. 2.38).
Figure 2.38
Inside the Data Wave Export ID, fields Date and Job Name are updated with the last run
information (Fig. 2.39). The record counts for Client Construct data types are also populated.
Figure 2.39
Please Note: The standard SAP Change Layout button can be used to customize the columns
seen in the Data Wave Export ID.
Target System
On the import side, if you used the Import Options to automate the process, you can use
SM37 to monitor the import jobs in the target system. The export job that finishes last will
give the import job name at the end of the job log. Please Note: The import job initiated by
Import Options uses the configured RFC. This means the import jobs will be owned by the RFC
user and not the user’s own ID.
If the Import Options was not used or if you want more information about the export, go to
the Client Importer and Import Control. They can be used in the same manner as standard
Gold Client to import the data or run reports on it for the respective Client Construct and Data
Echo exports.

Gold Client 8.7 Data Wave
30 © 2003-2020 Qlik Analytics (ISR) Ltd.
Support Information
Qlik Analytics (ISR) Ltd. can be contacted either by telephone or via email. Any support
related issue regarding problems with or use of the Gold Client software and process can be
reported for resolution.
If our offices are closed, or staff is unable to directly respond to a support request, we will
respond within 24 hours of the initial call. Problems related to the export or import processing
may require code enhancements. If a code enhancement or fix is required, resolution time
may vary.
As per the maintenance agreement, any repairs or enhancements to the Gold Client software
will immediately be deployed to all customers up-to-date with their maintenance contract. It is
the choice of the customer as to if and when such enhancements are implemented. In
addition, customers may request a planning session with Qlik to review changes in the
software and how the changes might impact their environment.
We can also be contacted to discuss application or feasibility of using the Gold Client process
to resolve a current challenge the project team faces. When this is required, a planning
session can be scheduled in advance to ensure proper participation by both Qlik and the
client.
Corporate Offices:
QLIK TECHNOLOGIES INC.
211 South Gulph Road
Suite 500
King of Prussia, PA 19406
United States
Website:
https://www.qlik.com/us/products/qlik-gold-client
Contact:
goldclient.support@qlik.com
1-877-484-8982 (Toll Free in the USA)
