
django-formset
Release 0.13.4
Jacob Rief
Jun 13, 2023

CONTENTS:
1 Introduction 3
1.1 Use Forms as Logical Entities . . . . . . . . . . . . . . . . . . . . . . . . . . . . . . . . . . . . . . 3
1.2 What are Web Components? . . . . . . . . . . . . . . . . . . . . . . . . . . . . . . . . . . . . . . . 5
1.3 Annotation . . . . . . . . . . . . . . . . . . . . . . . . . . . . . . . . . . . . . . . . . . . . . . . . 6
1.4 Contributing . . . . . . . . . . . . . . . . . . . . . . . . . . . . . . . . . . . . . . . . . . . . . . . 6
2 Installation 7
3 Working with a single Form 9
3.1 Using a Native Django Form . . . . . . . . . . . . . . . . . . . . . . . . . . . . . . . . . . . . . . . 10
3.2 Using an Extended Django Form . . . . . . . . . . . . . . . . . . . . . . . . . . . . . . . . . . . . 11
3.3 Rendering a Django Form Field-by-Field . . . . . . . . . . . . . . . . . . . . . . . . . . . . . . . . 11
4 Web Component <django-formset> 13
5 Styling Forms with django-formset 15
5.1 Default Styling . . . . . . . . . . . . . . . . . . . . . . . . . . . . . . . . . . . . . . . . . . . . . . 16
5.2 Bootstrap . . . . . . . . . . . . . . . . . . . . . . . . . . . . . . . . . . . . . . . . . . . . . . . . . 17
5.3 Bulma . . . . . . . . . . . . . . . . . . . . . . . . . . . . . . . . . . . . . . . . . . . . . . . . . . 19
5.4 Foundation . . . . . . . . . . . . . . . . . . . . . . . . . . . . . . . . . . . . . . . . . . . . . . . . 20
5.5 Tailwind . . . . . . . . . . . . . . . . . . . . . . . . . . . . . . . . . . . . . . . . . . . . . . . . . 21
5.6 UIKit . . . . . . . . . . . . . . . . . . . . . . . . . . . . . . . . . . . . . . . . . . . . . . . . . . . 23
6 Submit Button Controls 25
6.1 Action Queues . . . . . . . . . . . . . . . . . . . . . . . . . . . . . . . . . . . . . . . . . . . . . . 25
6.2 Buttons without a Form . . . . . . . . . . . . . . . . . . . . . . . . . . . . . . . . . . . . . . . . . 27
7 Form Collections 29
7.1 Simple Collection . . . . . . . . . . . . . . . . . . . . . . . . . . . . . . . . . . . . . . . . . . . . 29
7.2 Nested Collection . . . . . . . . . . . . . . . . . . . . . . . . . . . . . . . . . . . . . . . . . . . . 30
7.3 Collections with Siblings . . . . . . . . . . . . . . . . . . . . . . . . . . . . . . . . . . . . . . . . . 31
7.4 Sortable Collections with Siblings . . . . . . . . . . . . . . . . . . . . . . . . . . . . . . . . . . . . 33
8 Fieldsets 35
8.1 Example . . . . . . . . . . . . . . . . . . . . . . . . . . . . . . . . . . . . . . . . . . . . . . . . . 35
9 Creating Forms from Models 37
9.1 Detail View for ModelForm . . . . . . . . . . . . . . . . . . . . . . . . . . . . . . . . . . . . . . . 38
10 Creating Collections from related Models 41
10.1 One-to-One Relations . . . . . . . . . . . . . . . . . . . . . . . . . . . . . . . . . . . . . . . . . . 41
i

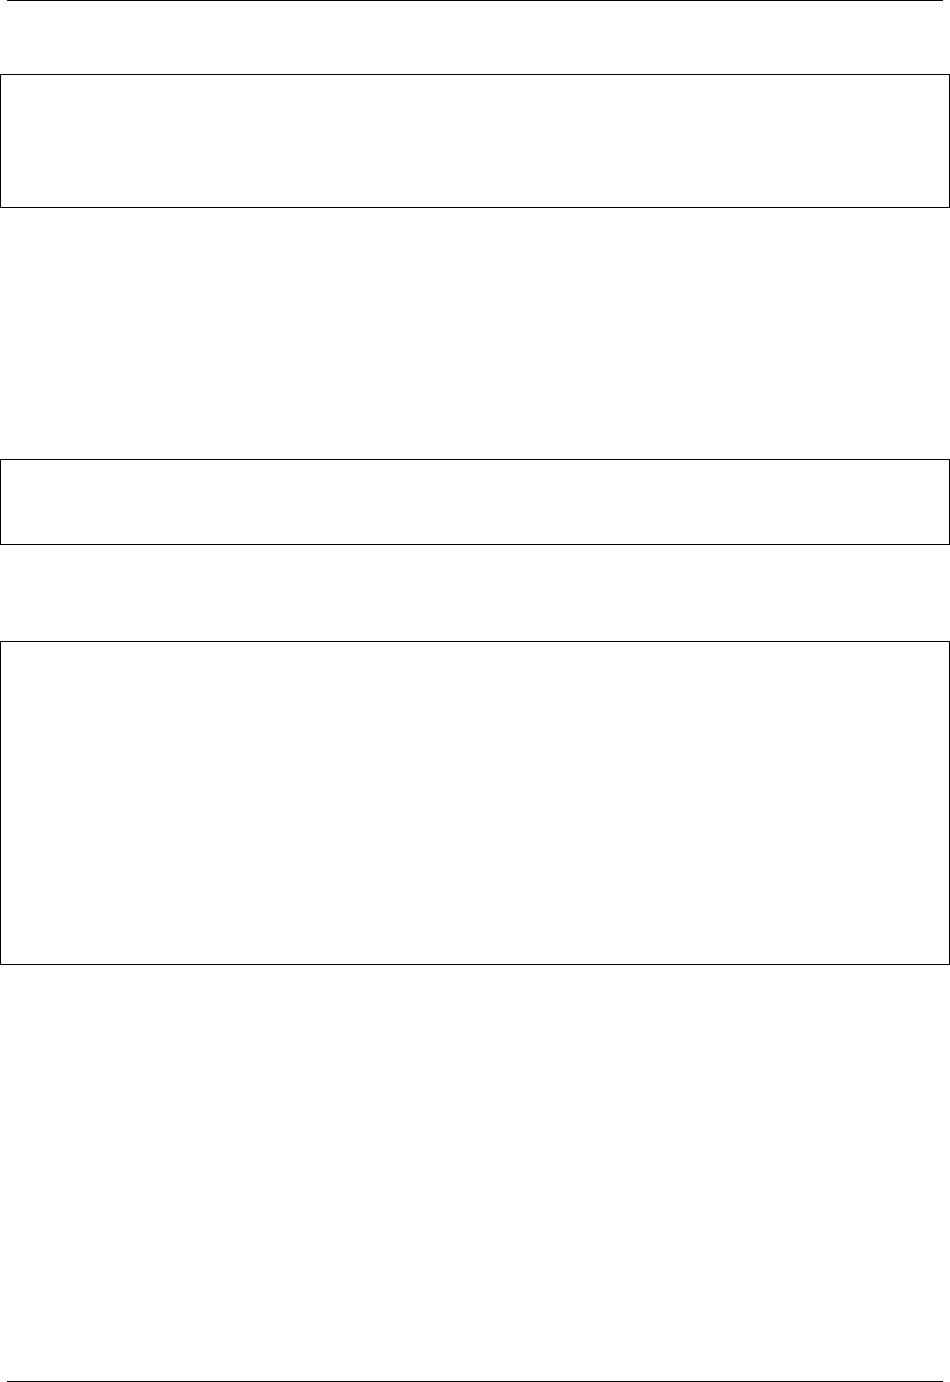
10.2 One-to-Many Relations . . . . . . . . . . . . . . . . . . . . . . . . . . . . . . . . . . . . . . . . . 43
11 Form Renderers 45
11.1 Form Grid Example . . . . . . . . . . . . . . . . . . . . . . . . . . . . . . . . . . . . . . . . . . . 45
11.2 Inline Form Example . . . . . . . . . . . . . . . . . . . . . . . . . . . . . . . . . . . . . . . . . . . 47
12 Conditional Field and Fieldset Expressions 49
12.1 Example Form . . . . . . . . . . . . . . . . . . . . . . . . . . . . . . . . . . . . . . . . . . . . . . 49
12.2 Example Fieldset . . . . . . . . . . . . . . . . . . . . . . . . . . . . . . . . . . . . . . . . . . . . . 50
13 Uploading Files and Images 51
13.1 Example . . . . . . . . . . . . . . . . . . . . . . . . . . . . . . . . . . . . . . . . . . . . . . . . . 51
14 Selectize Widget 53
14.1 Usage with fixed Number of Choices . . . . . . . . . . . . . . . . . . . . . . . . . . . . . . . . . . 53
14.2 Usage with dynamic Number of Choices . . . . . . . . . . . . . . . . . . . . . . . . . . . . . . . . 53
14.3 Endpoint for Dynamic Queries . . . . . . . . . . . . . . . . . . . . . . . . . . . . . . . . . . . . . . 54
14.4 Implementation Details . . . . . . . . . . . . . . . . . . . . . . . . . . . . . . . . . . . . . . . . . 54
15 Dual Selector Widget 59
15.1 Features . . . . . . . . . . . . . . . . . . . . . . . . . . . . . . . . . . . . . . . . . . . . . . . . . . 59
15.2 Usage . . . . . . . . . . . . . . . . . . . . . . . . . . . . . . . . . . . . . . . . . . . . . . . . . . . 60
15.3 Grouping Options . . . . . . . . . . . . . . . . . . . . . . . . . . . . . . . . . . . . . . . . . . . . 61
15.4 Sortable Dual Selector Widget . . . . . . . . . . . . . . . . . . . . . . . . . . . . . . . . . . . . . . 62
16 Preselect Options 65
17 Edit Rich Text 67
17.1 Configuration . . . . . . . . . . . . . . . . . . . . . . . . . . . . . . . . . . . . . . . . . . . . . . . 68
17.2 Implementation . . . . . . . . . . . . . . . . . . . . . . . . . . . . . . . . . . . . . . . . . . . . . . 69
17.3 Richtext as a Model Field . . . . . . . . . . . . . . . . . . . . . . . . . . . . . . . . . . . . . . . . 69
18 Slug Input Field 73
18.1 Implementation . . . . . . . . . . . . . . . . . . . . . . . . . . . . . . . . . . . . . . . . . . . . . . 73
19 Developing in django-formset 75
19.1 Setting up and running Tests . . . . . . . . . . . . . . . . . . . . . . . . . . . . . . . . . . . . . . . 75
19.2 Building the Parser . . . . . . . . . . . . . . . . . . . . . . . . . . . . . . . . . . . . . . . . . . . . 76
19.3 Building the Client . . . . . . . . . . . . . . . . . . . . . . . . . . . . . . . . . . . . . . . . . . . . 76
19.4 Running the Django Test App . . . . . . . . . . . . . . . . . . . . . . . . . . . . . . . . . . . . . . 76
20 Contributing to the Project 77
20.1 Writing Code . . . . . . . . . . . . . . . . . . . . . . . . . . . . . . . . . . . . . . . . . . . . . . . 77
20.2 Reporting Bugs . . . . . . . . . . . . . . . . . . . . . . . . . . . . . . . . . . . . . . . . . . . . . . 77
20.3 Adding new Features . . . . . . . . . . . . . . . . . . . . . . . . . . . . . . . . . . . . . . . . . . . 77
20.4 Quoting . . . . . . . . . . . . . . . . . . . . . . . . . . . . . . . . . . . . . . . . . . . . . . . . . . 78
20.5 Lists versus Tuples . . . . . . . . . . . . . . . . . . . . . . . . . . . . . . . . . . . . . . . . . . . . 78
21 Indices and tables 79
ii

django-formset, Release 0.13.4
Building beautiful Forms in Django with a contemporary User eXperience has never been easier.
<django-formset> is a web component to let the browser pre-validate one or more standard Django Form-s.
Django-4.0 introduced a long awaited feature to render form fields using a template. Until version 3.2 this was left to
the infamous function BaseForm._html_output(), which rendered the form fields hard-coded in HTML and hence
there was little scope for modification. This new feature now makes it possible to write special renderers for adding
functionality as implemented by this library.
CONTENTS: 1

django-formset, Release 0.13.4
2 CONTENTS:

CHAPTER
ONE
INTRODUCTION
django-formset tries to solve a problem, which occurs in almost every project using the Django framework: The way
forms are handled. Compared to the solutions most modern JavaScript frameworks offer nowadays, having to reload a
page if a form does not validate, is not contemporary anymore. Therefore, Django developers often use a combination
of one of these client frameworks together with the Django REST framework, which then indeed provides a much better
User eXperience. However, those JavaScript frameworks impose their own way of getting stuff done and usually don’t
share the same mindset with Django. For instance, in Django we distinguish between bound and unbound forms. This
concept however doesn’t make sense in most JavaScript frameworks, and hence is not implemented. We therefore often
must work around those problems, which leads to cumbersome and un-DRY solutions.
With django-formset we get a web component explicitly written to handle Django forms and collections of forms
(hence “formset”) with the User eXperience only modern JavaScript frameworks can offer. This means that fields are
validated by the client, giving immediate feedback on invalid field values. If the form’s content then is sent to the server
and fails to validate there, those error messages are sent back to the client and show up nearby the fields containing
invalid data. Giving feedback on a form which did not validate doesn’t require a page reload anymore. The nice thing
about this approach is, that we can reuse all of our current Django forms (unaltered), can use our existing Django
views (with a small modification), but neither have to add any extra code nor endpoints to the URL routing of our
application.
1.1 Use Forms as Logical Entities
The django-formset library separates the logical layer of a Django Form from their HTML entity <form>.
What does that mean? In Django we can define a form as a group of fields with certain data-types. Often these forms
are derived from a Django model. On the client, this form then is rendered, can be filled with data and submitted back
to the server.
Typically there is one form per page, because the HTML standard does not allow you to submit more than one form in
one submission. With the introduction of FormSets, Django provides a workaround for this use-case. It however relies
on prefixing each field from the forms making up a “FormSet” with a unique identifier, so that those Django forms can
be wrapped into one HTML <form>-element. This makes the handling of multiple forms per page cumbersome and
difficult to understand.
By using django-formset on the other hand, each Django form corresponds to its own self-contained <form>-element.
Inside each of these forms, all field names remain unmodified and on submission, each form introduces its own names-
pace, so that the form data is submitted as a dictionary of field-value-pairs. By doing so, we can even nest forms deeply,
something currently not possible with Django FormSets.
3
django-formset, Release 0.13.4
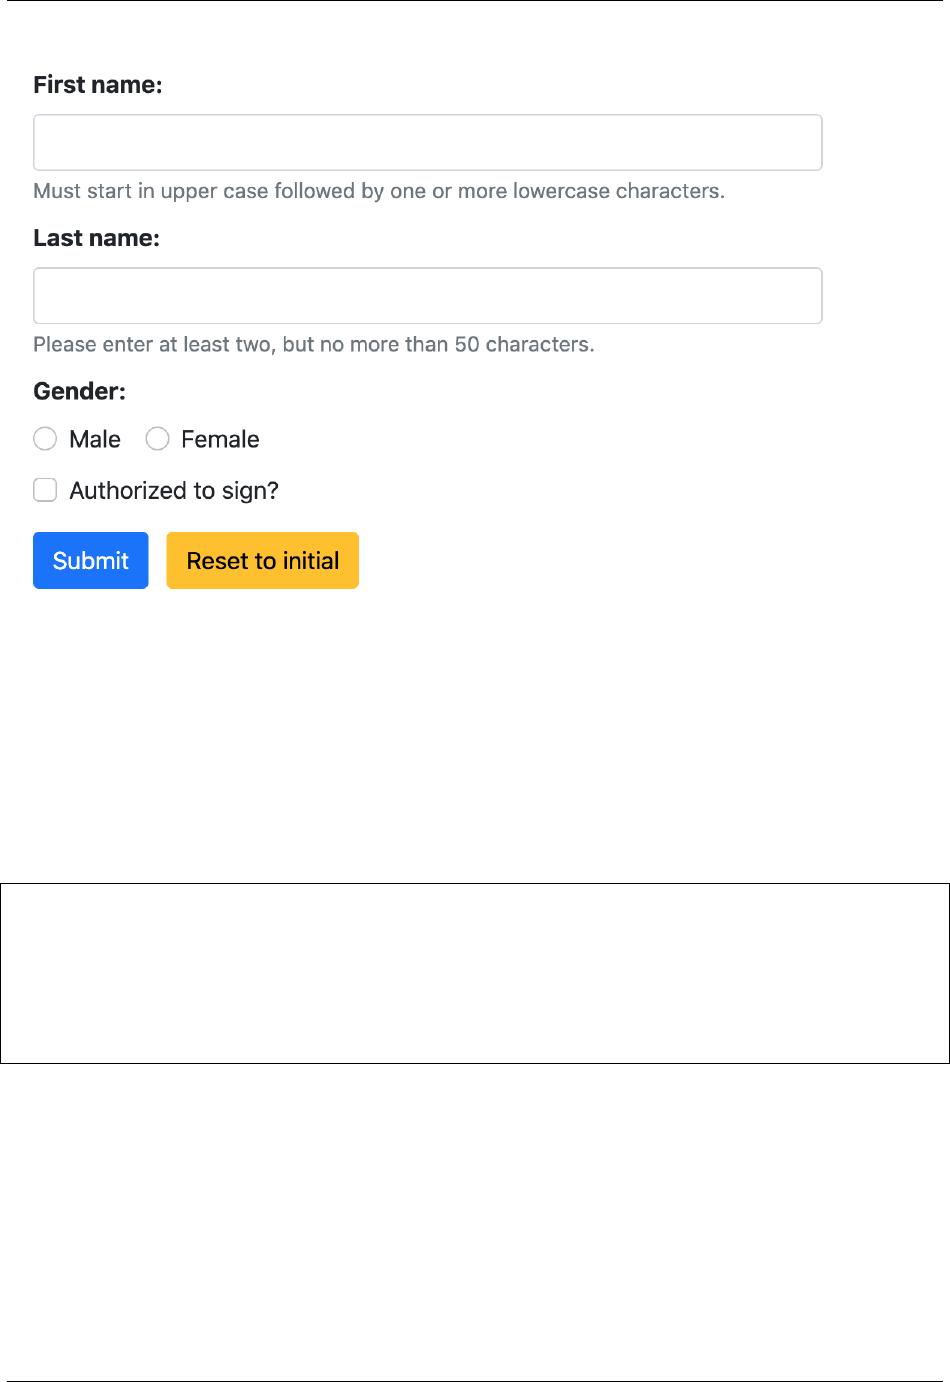
Example
Consider having a standard Django Form instance, say
from django.forms import forms, fields
class RegisterPersonForm(forms.Form):
first_name = fields.RegexField(
r'^[A-Z][a-z -]+$',
label="First name",
error_messages={'invalid': "A first name must start in upper case."},
help_text="Must start in upper case followed by one or more lowercase characters.
˓→",
)
last_name = fields.CharField(
label="Last name",
min_length=2,
max_length=50,
help_text="Please enter at least two, but no more than 50 characters.",
)
def clean(self):
"""
Raise a ValidationError for undesirable persons.
"""
...
In Django, we typically render an instance of the above form using a template rendered by a FormView. With this
approach, data entered into the form fields must be sent to the server for validation. If one or more of those fields
fail to validate, the form is re-rendered, annotating the fields containing invalid data with some error messages. The
latter would require to fully reload the whole page. Looking at modern JavaScript frameworks, it is obvious that this
approach isn’t contemporary anymore.
With the web component <django-formset> we instead can use the above Django form and render it using a slightly
modified Django view and a template such as
{% load formsetify %}
<django-formset endpoint="{{ request.path }}" csrf-token="{{ csrf_token }}">
{% render_form form %}
<button type="button" click="submit">Submit</button>
<button type="button" click="reset">Reset to initial</button>
</django-formset>
When looking at the rendered HTML code, there are a few things, which admittedly, may seem unusual to us:
• What is that <django-formset> HTML element?
• The <form> tag neither contains a method nor an action attribute.
• The “Submit” and “Reset” buttons are located outside of the <form> element.
In this example we wrap the form into a special HTML element named <django-formset>. This web component
then is used to embed one or more <form> elements. The content of those form fields then is submitted to the same
endpoint in our Django application, which is responsible for rendering that form.
4 Chapter 1. Introduction

django-formset, Release 0.13.4
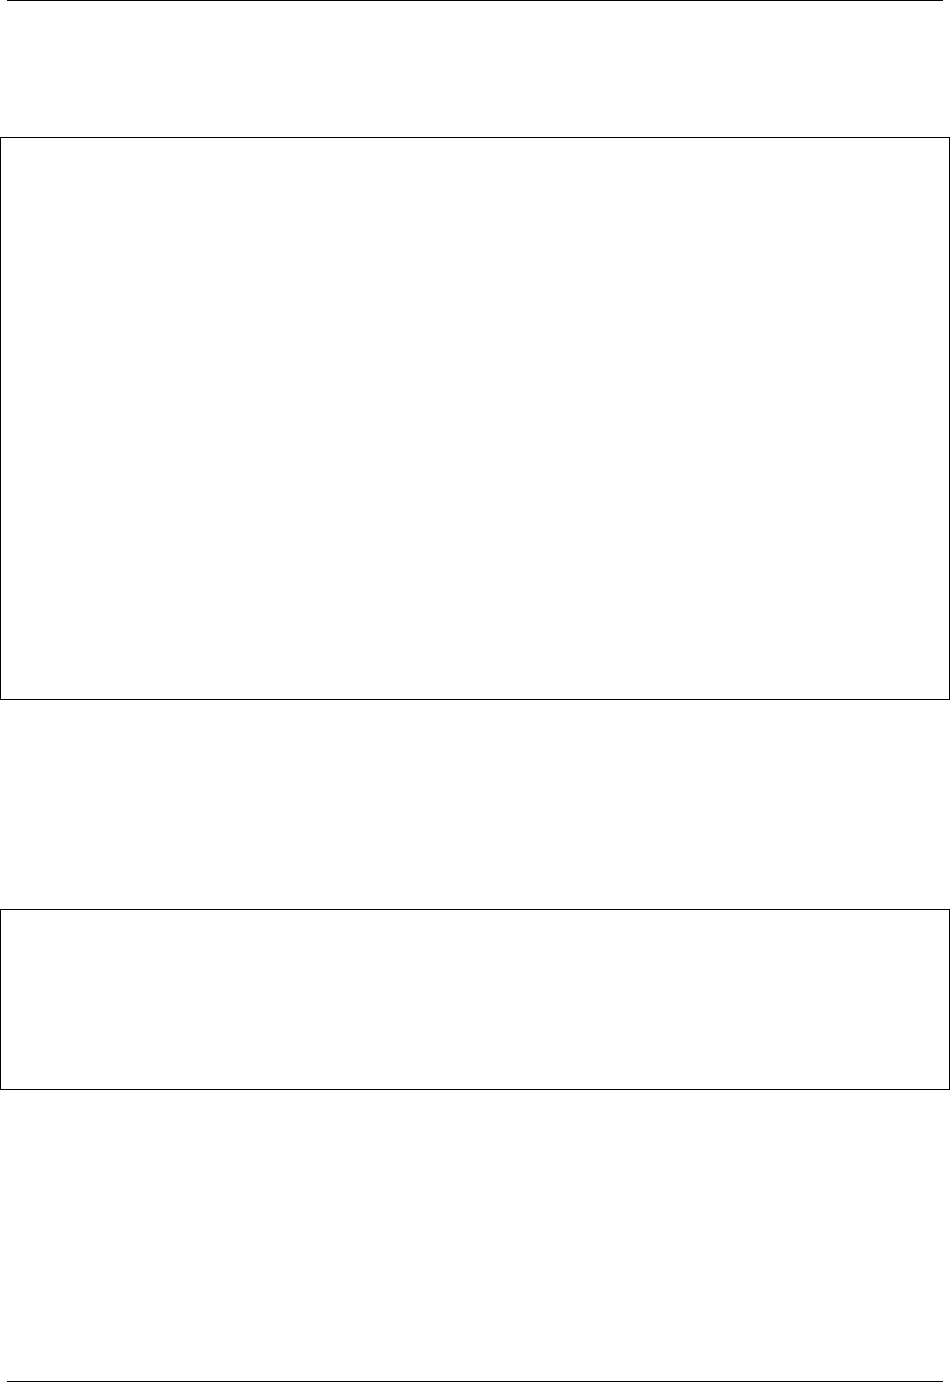
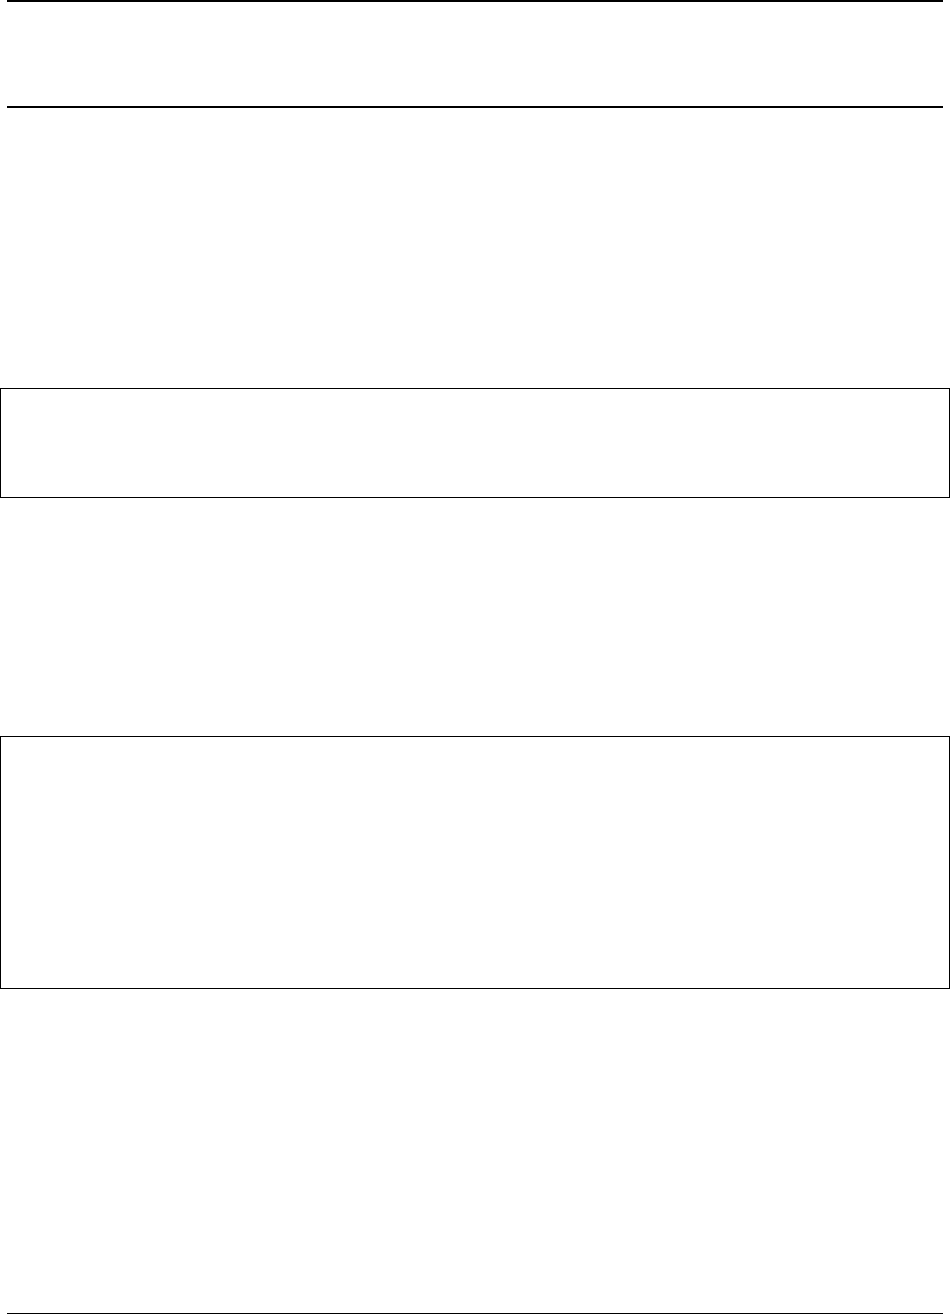
Fig. 1: Interacting with that form, shows validation errors immediately.
Note: When using Django’s internal formset, the field names have to be prefixed with identifiers to distinguish their
form affiliation. This is cumbersome and difficult to debug. By using django-formset, we can keep the field names,
since our wrapper groups them into plain JavaScript objects.
In this example, the form is rendered by the special templatetag {% render_form form %}. This templatetag can be
parametrized to use the correct style-guide for each of the supported CSS frameworks. It can also be used to pass in
our own CSS classes for labels, fields and field groups. More on this can be found in chapter Using a Native Django
Form.
It also is possible to render the form using the classic approach with mustaches, ie. {{ form }}. Then however the
form object can’t be a native Django form. Instead it has to be transformed using a special mixin class. More on this
can be found in chapter Using an Extended Django Form.
Another approach is to render the form field-by-field. Here we gain full control over how each field is rendered, since
we render them individually. More on this can be found in chapter Rendering a Django Form Field-by-Field.
1.2 What are Web Components?
According to webcomponents.org, web components are a set of web platform APIs that allow you to create new custom,
reusable, encapsulated HTML tags to use in web pages and web apps. Custom components and widgets built upon the
web component standards, will work across modern browsers, and can be used with any JavaScript library or framework
that works with HTML.
Web components are based on existing web standards. Features to support web components are currently being added
to the HTML and DOM specs, letting web developers easily extend HTML with new elements with encapsulated styling
and custom behavior.
The JavaScript behind this component now handles the following functions:
1.2. What are Web Components? 5

django-formset, Release 0.13.4
• Client-side validation of our form fields using the constraints defined by our form.
• Serializes the data entered into our form fields.
• Handles the submission of that data, by sending it to the server’s endpoint.
• Receives server-side validation annotations and marks all fields containing incorrect data.
• On success, performs a different action, usually a redirect onto a success page.
• Handles various actions after the user clicked on the button. This is useful to make the button behave more
interactively.
Note: Form data submitted by the web component <django-formset> is not send using the default enctype
application/x-www-form-urlencoded. Instead the data from all forms is packed together into a JavaScript object
and submitted to the server using enctype application/json. This means that our Django view receiving the form
data, must be able to process that data using a slightly modified handler.
1.3 Annotation
When designing this library, one of the main goals was to keep the programming interface as near as possible to
the way Django handles forms, models and views. It therefore is possible to reuse existing Django form declarations
with a minimal modification to existing code.
1.4 Contributing
Please read chapter Contributing to the Project before opening issues or pull requests.
6 Chapter 1. Introduction
CHAPTER
TWO
INSTALLATION
Just as with any other third party Django app, install this package using
pip install django-formset
and add this app to the project’s settings.py:
INSTALLED_APPS = [
...
'formset',
...
]
Include Stylesheets
If the CSS framework to be used is installed via npm, I strongly suggest to configure the lookup path as
STATICFILES_DIRS = [
('node_modules', BASE_DIR / 'node_modules'),
]
By doing so, the CSS file for Bootstrap can for instance be included as
{% load static %}
...
<head>
...
<link href="{% static 'node_modules/bootstrap/dist/css/bootstrap.min.css' %}" rel=
˓→"stylesheet">
...
</head>
Other CSS frameworks behave similarly. Except for Tailwind CSS, django-formset provides only two very short CSS
files. This is because it relies on the styling definitions of the underlying CSS framework rather than imposing their
own styles on the components shipped with this library.
Note: When loading CSS files from other domains such as a CDN or Google Fonts, then use <link href=”.. . ”
crossorigin=”anonymous”>. This is because django-formset parses some CSS rules, but Google Chrome refuses to
do that for files from foreign origins.
There are two optional CSS files, which might be imported depending on the application’s setup:
7
django-formset, Release 0.13.4
<link href="{% static 'formset/css/bootstrap5-extra.css' %}" rel="stylesheet">
It adjusts the styling of the Dual Selector widget. Useful if used in a Bootstrap 5 context.
<link href="{% static 'formset/css/collections.css' %}" rel="stylesheet">
This adds borders, backgrounds and some icons to form collections. Mandatory if used in combination with Collections
with Siblings, otherwise neither an “Add” nor a “Delete” button will be rendered. This style definition style sheet can
be applied to all CSS frameworks.
Only one JavaScript file has to be included into the head or body of the main template:
Include JavaScript
Many components from Bootstrap require their own JavaScript. This can optionally be included in a very similar way
as shown for the CSS above. One JavaScript file which always must be included is that one, providing the functionality
of our web component:
{% load static %}
...
<head>
...
<script type="module" src="{% static 'formset/js/django-formset.js' %}"></script>
...
</head>
Note: The provided JavaScript file is optimized for modern browsers, which can handle EcmaScript-ES2020, or later.
These browsers are Chrome 94+, Edge 94+, Firefox 93+, Safari 15+ and Opera 81+. In the rare occasion that you have
to support a legacy browser, choose an appropriate target from the TypeScript build options and recompile the sources.
8 Chapter 2. Installation

CHAPTER
THREE
WORKING WITH A SINGLE FORM
In Django we typically assign a single form to a FormView class. Requests arriving with method GET will create an
empty or prefilled form instance and render it using the template specified in the view class. This view class then is
connected to our URL router:
Listing 1: urls.py
from formset.views import FormView
from myproject.forms import RegisterPersonForm
urlpatterns = [
...
path('register_person', FormView.as_view(
form_class=RegisterPersonForm,
template_name='native-form.html',
success_url=success_url,
)),
...
]
When we navigate to the given URL, our form will be rendered by the class FormView. Until here, there is no difference
on how Django renders a form. In case your project already defined a proprietary class inheriting from FormView which
can not be refactored, django-formset provides a special mixin class named formset.views.FormViewMixin to be
inherited by that view.
The difference to a classic Django form appears when the view receives data sent by a POST request. First of all,
received data now is encoded as application/json, instead of multipart/form-data, as with standard form
submissions. And secondly, the response of that processed view is neither an HTTP redirect nor a HTML page, but just
a data object, again encoded in JSON. If that form validates successfully, that response object just contains the success
URL with a status code of 200. On the other hand, if the form does not validate, then that response object contains the
error messages of the fields submitting invalid data, indexed by their field names. The status code of such a response
then is 422, which stands for “Unprocessable Entity”. Having the server respond with a status code indicating an error,
makes it easier for the client to distinguish between validated and invalid forms.
For invalid forms, the client’s JavaScript code handling the web component <django-formset>, then fills the place-
holders near the invalidated input fields with those error messages. It also puts the HTML form element into an invalid
state, so that it can not be re-submitted before editing. The response on validated forms can be used to update the
database or do other processing before telling the browser where to go next. Instead of sending a HTTP redirect, the
server now sends the success URL wrapped in a JavaScript object. When receiving this response, the browser just
loads the page with that URL. This also prevents users to accidentally submit the form data twice, in case they click on
the browser’s reload button.
A Django form using django-formset can be rendered using three different methods:
9

django-formset, Release 0.13.4
3.1 Using a Native Django Form
Working with a native Django form, presumably is the most frequent use case. Here we add an instantiation of that
form to the rendering context. Then that form instance is rendered using the special template tag render_form. The
template responsible for rendering shall be written as:
{% load render_form from formsetify %}
<django-formset endpoint="{{ request.path }}" csrf-token="{{ csrf_token }}">
{% render_form form field_classes="mb-2" form_classes="rounded-xl" %}
<button type="button" click="submit -> proceed">Submit</button>
</django-formset>
What we see here is that in addition to the form object, we pass a few CSS classes to the renderer. These are named
field_classes and form_classes. Let’s explain how we can use them to style our form. When rendered, the above
form will roughly turn into HTML such as:
<django-formset endpoint="/path/to/form-view" csrf-token="{{ csrf_token }}">
<form id="id_registerpersonform"></form>
<div class="rounded-xl dj-form">
<div class="dj-form-errors"><ul class="dj-errorlist"></ul></div>
<django-field-group class="mb-5 dj-required">
<label class="formset-label">First name:</label>
<input class="formset-text-input" form="id_registerpersonform" type="text" name=
˓→"first_name" required="" pattern="^[A-Z][a-z -]+$">
<div role="alert" class="dj-field-errors">
<django-error-messages value_missing="This field is required." type_mismatch="A␣
˓→first name must start in upper case." pattern_mismatch="A first name must start in␣
˓→upper case." bad_input="Null characters are not allowed."></django-error-messages>
<ul class="dj-errorlist"><li class="dj-placeholder"></li></ul>
</div>
</django-field-group>
<!-- other form fields snipped away -->
</div>
<button type="button" click="submit -> proceed">Submit</button>
</django-formset>
Compared to the way the native Django form renderer works, we see a few differences here: The most obvious one
is that input fields are not wrapped into their <form>-element. Instead they refer to the form they belong to by ID
using the attribute form="id_registerpersonform". This is so that forms can logically be nested into each other.
Remember: It is invalid HTML to nest one <form>-element into another one, but using that trick we can mimic that
behviour.
Also note that each input field is wrapped into a <django-field-group>-element. Even though this tag may look
like another web component, it just is a non-visual HTML element. Its purpose is to group one or more input elements
(in Django we name them widgets) belonging to one field together. Remember that in HTML radios and multiple
checkboxes have more than one input element, but in Django they are considered as a single form field.
Moreover, CSS frameworks such as Bootstrap require to group the label and their input fields into one HTML element,
typically a <div>. This is what the <django-field-group> does, in addition to grouping the input elements. When
adding the parameter field_classes="mb-5" to the templatetag render_form, that CSS class is added to each
instance of the group, ie. it then is rendered as <django-field-group class="mb-5">.
Another unknown HTML-element in the rendered form is <django-error-messages ...>. This element simply
keeps all the potential error messages, in case a field validation fails on the client. Remember that HTML5 introduced
10 Chapter 3. Working with a single Form

django-formset, Release 0.13.4
a bunch of form controls which are mapped to their Django counterparts. If, for instance, the pattern of an input field of
type="text" does not match the specified regular expression, then the text from attribute type_mismatch is shown
as an error below that field.
3.2 Using an Extended Django Form
One of the tasks the templatetag render_form must do, is to modify the signature of the given form class. This is
required, because the layout of the rendered HTML differs substantially from the default by the Django form field
renderers. Sometimes however, we may prefer to render the complete form instance using its built-in __str__()-
method. In this use case, our form class has to additionally inherit from formset.utils.FormMixin. Such a form
could for instance be defined as:
from django.forms import forms, fields
from formset.utils import FormMixin
class RegisterPersonForm(FormMixin, forms.Form):
first_field = ...
The template required to render such a form then shall look like:
<django-formset endpoint="{{ request.path }}" csrf-token="{{ csrf_token }}">
{{ form }}
<button type="button" click="submit -> proceed">Submit</button>
</django-formset>
Let’s discuss these lines of HTML code step by step:
Since the JavaScript implementing web component <django-formset> communicates via Ajax with the server, hav-
ing a hidden field containing the CSRF-token doesn’t make sense. Instead we pass that token value as an attribute to
the web component <django-formset>. Since that value is available in the rendering context, we always add it as
<django-formset csrf-token="{{ csrf_token }}">.
Having set up the form’s template this way, allows us to render the form instance as a string. This is what {{ form }}
does. On the first sight, this may seem more cumbersome than the solution shown before when Using a Native Django
Form. In some situations however, it might be simpler to change the signature of the form class in Python code, rather
than changing the code in the template.
Another use case would be to have a form with more than one renderer, each configured differently. We then can reuse
a Django template but for instance render the form with different CSS classes. If such a setup might make sense in your
project, please check the section about Form Renderers.
3.3 Rendering a Django Form Field-by-Field
In some occasions, we need an even more fine grained control over how fields shall be rendered. Here we iterate over
the form fields in our own loop or by accessing the fields by name. This way we can render field by field and depending
on the field’s name or type, we could render it in different manners. Let’s have a look at such a template:
{% load formsetify %}
...
{% formsetify form %}
<django-formset endpoint="{{ request.path }}" csrf-token="{{ csrf_token }}">
<form id="{{ form.form_id }}"></form>
(continues on next page)
3.2. Using an Extended Django Form 11

django-formset, Release 0.13.4
(continued from previous page)
{% include "formset/non_field_errors.html" %}
{% for field in form %}
{% if field.is_hidden %}
{{ field }}
{% elif field.name == "my_special_field" %}
{% include "myproject/my_special_field.html" %}
{% else %}
{% include "formset/default/field_group.html" %}
{% endif %}
{% endfor %}
<button type="button" click="submit -> proceed">Submit</button>
</django-formset>
Let’s discuss these lines of HTML code step by step:
First we have to “formsetify” our form. This is required in order to change the signature of the form class as described
in the previous section. If the form instance already inherits from formset.utils.FormMixin, then this operation
can be skipped.
We then iterate over all form fields. Here we must distinguish between hidden and visible input fields. While the latter
shall be wrapped inside a <django-field-group> each, the former shall not. We can then further specialize our
rendering logic, depending on which field we want to render.
Rendering a form field-by-field shall only be used as a last resort, because it inhibits the reuse of the rendering templates.
If fields have to be styled explicitly, for instance to place the input field for the postal code on the same line as the input
field for the “city”, then a better approach is to adopt the Form Renderers.
12 Chapter 3. Working with a single Form

CHAPTER
FOUR
WEB COMPONENT <DJANGO-FORMSET>
When a form is rendered using a Django template, we must wrap it inside the web component <django-formset>.
This component then takes care of the client-part, such as the form validation, submission, error handling and many
other features.
A mandatory attribute of each web component <django-formset> is its endpoint. This is the URL pointing onto
a Django view and this is how the client-part communicates with the server. Typically that endpoint is connected to a
view inheriting from formset.views.FormView. We can either inherit from that class, specialize into our own view
class and register it in the URL router,
from formset.views import FormView
class RegisterPersonFormView(FormView):
template_name = 'path/to/register-person-form.html'
form_class = RegisterPersonForm
success_url = '/success'
or use the class FormView directly in urls.py while defining the routing:
urlpatterns = [
...
path('register-person', FormView.as_view(
template_name='path/to/register-person-form.html',
form_class=RegisterPersonForm,
success_url = '/success',
)),
...
]
In this example, the endpoint would point onto /register-person, but in order to make our form rendering templates
reusable, we’d rather write
<django-formset endpoint="{{ request.path }}" csrf-token="{{ csrf_token }}">
...
</django-formset>
We can do this, because the endpoint is located on the same URL as the view rendering the form.
13
django-formset, Release 0.13.4
Enforcing Form Submission
<django-formset endpoint="{{ request.path }}" force-submission csrf-token="{{ csrf_token␣
˓→}}">
...
</django-formset>
An optional attribute to this web component is force-submission. By adding this attribute, we can force a submission
to the server, even if the form did not validate on the client side. The default is to always validate all form fields on the
client, and only if all of them pass, proceed with the submission to the server.
Withholding Feedback
<django-formset endpoint="{{ request.path }}" withhold-feedback="..." csrf-token="{{␣
˓→csrf_token }}">
...
</django-formset>
An optional attribute to this web component is withhold-feedback. By setting this to messages, errors,
warnings, success, or any combination of thereof, we can withhold the feedback, which is shown immediately
after the user types into a field or when a field loses focus. When combining two or more “withhold feedback” values,
separate them by spaces, for instance withhold-feedback="warnings success".
Adding messages to withhold-feedback="..." means that the error message below the field will not be rendered
when the user blurs a field with invalid data.
Adding errors to withhold-feedback="..." means that the border does not change color (usually red) and the
field does not show an alert symbol, when the user blurs a field with invalid data.
Adding warning to withhold-feedback="..." means that the field does not show a warning symbol (usually or-
ange), when a field has focus, but its content does not contain valid data (yet). If only attribute errors has been added
to withhold-feedback="...", then the warning symbol will remain even if the field loses focus.
Adding success to withhold-feedback="..." means, that the border does not change color (usually green) and
the field does not show a success symbol, when the user blurs a field with valid data.
The attribute withhold-feedback="..." only has effect while editing the form fields. Whenever the user clicks on
the submit button of a form containing invalid data, then all fields which did not validate, will show their error message
together with an alert symbol and an alert border (usually red).
Non-field errors need more validation logic and therefore are always determined on the server, usually by the clean()-
method of the form class.
14 Chapter 4. Web Component <django-formset>

CHAPTER
FIVE
STYLING FORMS WITH DJANGO-FORMSET
django-formset ships with renderers, each one specialized to render all possible Django form widgets, for five different
CSS frameworks.
• Input fields of type text, with validation for minimum and maximum input length.
• Input fields of type text with pattern matching.
• Input fields of type number, with validation on their input range.
• Input fields of type date. This currently uses the default date widget from the browser, but future versions will
offer their own native date widget.
• Checkboxes for a single input. They can be styled by reversing the label with its input field.
• Radio buttons with support for option groups. They can be arranged to align either horizontally or vertically.
• Multiple checkboxes with support for option groups. They can be arranged to align either horizontally or verti-
cally.
• Select widgets with predefined options.
• Select widgets with autocomplete behavior.
• Select widgets allowing a limited number of multiple selections.
• Select widgets with a source and target field, allowing a large number of multiple selections. This widget usually
is used for fields mapping a many-to-many relation.
• Textarea fields.
• Rich textarea fields.
• Slug input fields.
• File upload fields with asynchronous upload and drag & drop support.
Currently not supported widgets:
• Geospatial fields
15

django-formset, Release 0.13.4
5.1 Default Styling
The default django-formset styling intentionally renders all the fields as the browser would by default. This admittedly
looks very rough and we only use it, if we want to style every aspect of our website. This requires us to write the CSS
ourselves. If we use one of the known CSS frameworks, then instead we will proceed with one of the specialized
renderers. The concept for rendering a form remains the same, independently of the CSS framework.
Say we have a typical Django form
from django.forms import forms, fields
class RegisterPersonForm(forms.Form):
first_name = fields.RegexField(
r'^[A-Z][a-z -]+$',
label="First name",
error_messages={'invalid': "A first name must start in upper case."},
help_text="Must start in upper case followed by one or more lowercase characters.
˓→",
)
last_name = fields.CharField(
label="Last name",
min_length=2,
max_length=50,
help_text="Please enter at least two, but no more than 50 characters.",
)
gender = fields.ChoiceField(
label="Gender",
choices=[('m', "Male"), ('f', "Female")],
widget=widgets.RadioSelect,
error_messages={'invalid_choice': "Please select your gender."},
)
authorized = fields.BooleanField(
label="Authorized to sign?",
)
When rendered using the view class formset.views.FormView together with this template
{% load formsetify %}
<django-formset endpoint="{{ request.path }}" csrf-token="{{ csrf_token }}">
{% render_form form %}
<button type="button" click="submit -> proceed">Submit</button>
</django-formset>
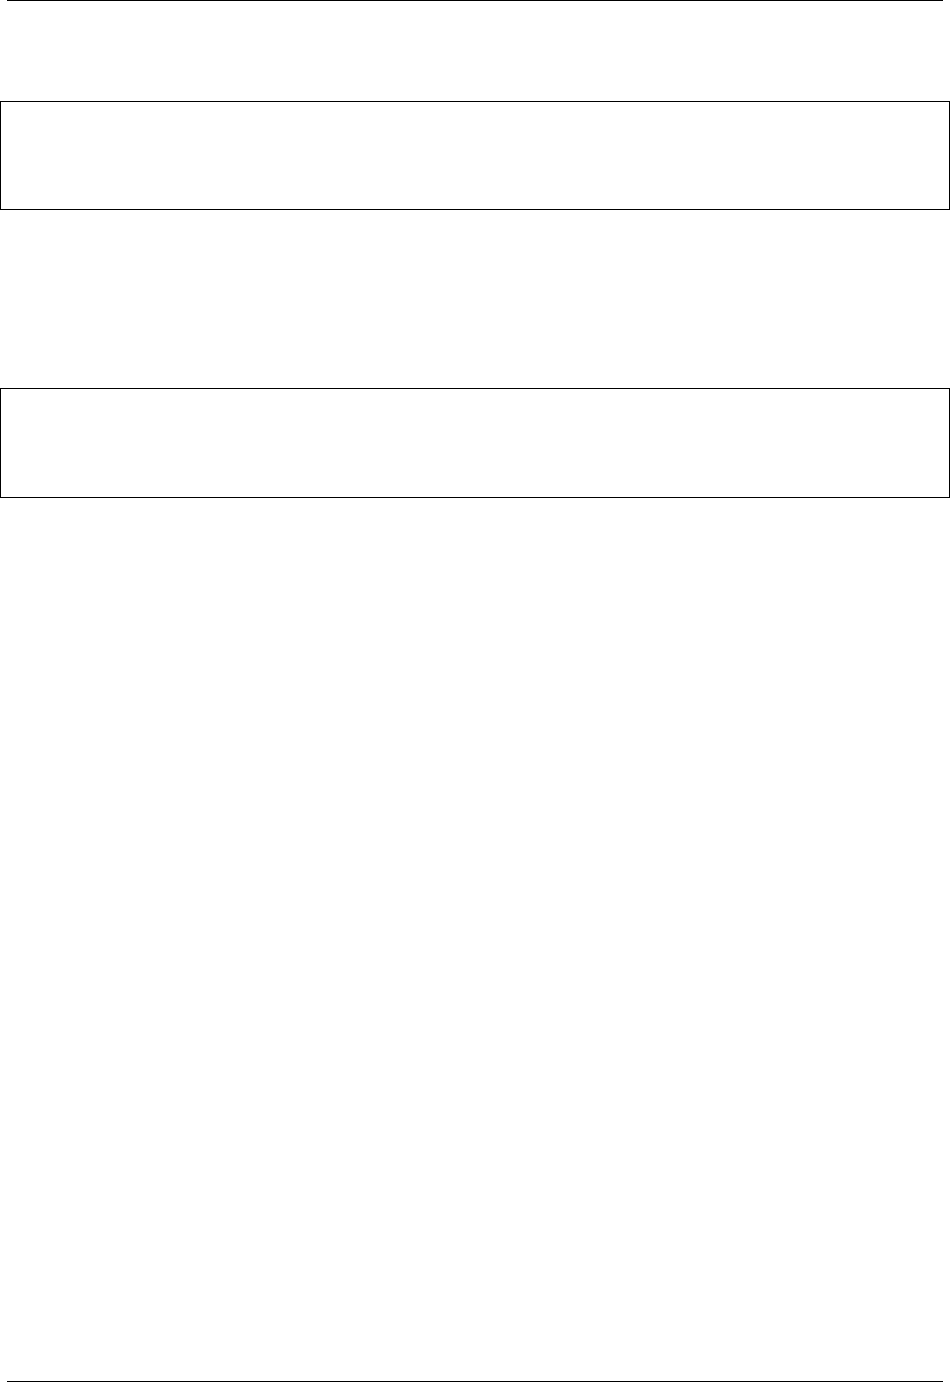
That form displays two text input fields, one for the person’s first- and its last name. Here we declared two constraints
on the first two fields: The first name must start in upper case and contain at least one additional character in lower case,
while the last name must consist of at least two, but no more than 50 characters. Additionally the user has to choose
his gender using two radio input fields and a mandatory checkbox input to accept the terms and conditions.
16 Chapter 5. Styling Forms with django-formset

django-formset, Release 0.13.4
Styling this form now is up to you. Use this as a starting point, if you edit the CSS of your project anyway. There are a
few HTML tags and CSS classes, which might help styling:
• django-fieldgroup > label: The label right above the input element.
• django-fieldgroup input[type="..."]: The input element. Use the correct type here.
• django-fieldgroup > .dj-help-text: Some optional help text below the input field(s).
• django-fieldgroup > ul.dj-errorlist li.dj-placeholder: This list-element usually is empty. If
filled, it contains the validation error message.
Always remember to add
<script type="module" src="{% static 'formset/js/django-formset.js' %}"></script>
anywhere inside the <head>-element of the page.
5.2 Bootstrap
Bootstrap is probably the most popular CSS framework nowadays, and django-formset offers a renderer, which renders
all its input fields as proposed by the Bootstrap’s form usage guide.
In the template from above, we simply replace the templatetag against
{% render_form form "bootstrap" field_classes="mb-2" %}
and get the same form instance rendered in a much nicer looking way:
5.2. Bootstrap 17
django-formset, Release 0.13.4
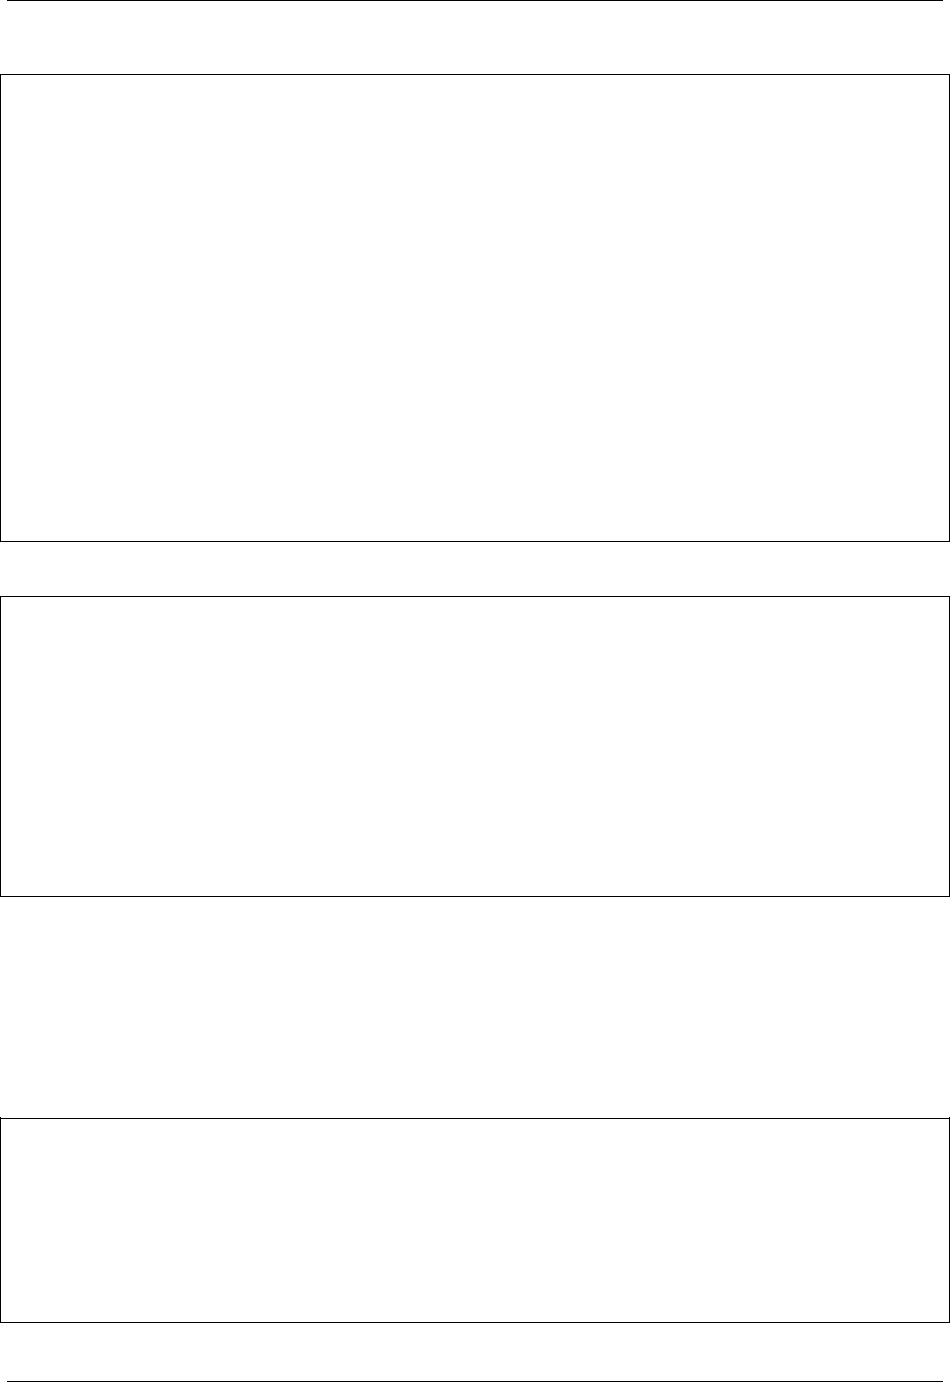
Compared to the unstyled form shown in the previous section, we notice that the radio fields are inlined and that the
checkbox is positioned before its label. This is intended behavior.
According to the Bootstrap’s usage guide, checkboxes shall be placed on the left side of their label. Django can’t handle
this by itself, because it does not distinguish between checkbox input fields and other types of fields.
5.2.1 Inlining Form Fields
By using slightly different parameters, a form can be rendered with labels and input fields side by side, rather than
beneath each other. This can be achieved by applying these CSS classes to the templatetag
<django-formset endpoint="{{ request.path }}" csrf-token="{{ csrf_token }}">
{% render_form form "bootstrap" field_classes="row mb-3" label_classes="col-sm-3"␣
˓→control_classes="col-sm-9" %}
<div class="offset-sm-3">
<button type="button" click="submit -> proceed">Submit</button>
</div>
</django-formset>
and we get a form rendered as
18 Chapter 5. Styling Forms with django-formset

django-formset, Release 0.13.4
5.2.2 Inlining Radio Buttons and Multiple Checkboxes
In django-formset, radio buttons and/or multiple checkboxes can be inlined, if there are only a few of them. The
default threshold is 4 and can be modified with the parameter max_options_per_line. It can be passed in through
the templatetag
{% render_form form "bootstrap" max_options_per_line=3 %}
If the number of radio buttons and/or multiple checkboxes exceeds this threshold, those fields are rendered below each
other.
5.3 Bulma
Bulma is another popular CSS framework nowadays, and django-formset offers a renderer, which renders all its input
fields as proposed by Bulma’s form control usage guide.
In the template from above, we simply replace the templatetag against
{% render_form form "bulma" field_classes="mb-2" %}
and get the form instance rendered as:
5.3. Bulma 19

django-formset, Release 0.13.4
5.4 Foundation
Foundation claims to be the most advanced responsive front-end framework in the world. django-formset offers a
renderer, which renders all its input fields as proposed by Foundation’s form control usage guide.
In the template from above, we simply replace the templatetag against
{% render_form form "foundation" %}
and get the form instance rendered as:
20 Chapter 5. Styling Forms with django-formset
django-formset, Release 0.13.4
Note: Foundation currently does not get full support.
5.5 Tailwind
Tailwind CSS has attracted a lot of attention in the near past. It probably is the second most popular CSS framework
after Bootstrap these days. The way Tailwind handles primitive elements such as input fields, requires an opinionated
set of CSS classes as provided with a sample file for this project. Since Tailwind does not provide a form control usage
guide, it’s up to the developers to define those classes for their project.
In the template from above, we must include the opinionated style definitions for our form elements or replace them
against our individually styled ones. The form then is rendered with
...
<link href="/static/testapp/css/tailwind.css" rel="stylesheet" type="text/css">
...
{% render_form form "tailwind" %}
and looks as expected
5.5. Tailwind 21
django-formset, Release 0.13.4
To adopt the form element styles, django-formset provides these CSS classes:
• formset-label: Styling for the input label.
• formset-text-input, formset-email-input, formset-date-input, formset-select,
formset-select-multiple, formset-number-input, formset-textarea, formset-password-input:
Styling the input field of the corresponding type.
• formset-dual-selector-select: Styling of the two <select multiple> fields.
• formset-dual-selector-lookup: Styling of the two <input> fields used for option lookup.
• formset-checkbox, formset-checkbox-multiple: Styling of the checkbox input fields.
• formset-radio-select: Styling of the radio input fields.
• formset-inlined: Styling for the wrapper of inlined checkbox and/or radio input fields.
• formset-help-text: Styling of the <span> element with a help text below input fields.
• dj-choose-file: Styling of the button to open the file browser.
• dj-delete-file: Styling of the button to delete a selected file.
• dj-download-file: Styling of the button to download a selected file.
22 Chapter 5. Styling Forms with django-formset

django-formset, Release 0.13.4
5.6 UIKit
UIKit claims to be a lightweight and modular front-end framework for developing fast and powerful web interfaces. It
has been added for completeness to test the form rendering capabilities of django-formset when working with exotic
CSS frameworks. It offers a renderer, which renders all input fields as proposed by UIKit’s form rendering guide.
Unless there is a strong community interest, support for this framework might be removed in the future, since I do not
see any benefit using UIKit compared to any of the much more popular and advanced CSS frameworks listed here.
5.6. UIKit 23

django-formset, Release 0.13.4
24 Chapter 5. Styling Forms with django-formset

CHAPTER
SIX
SUBMIT BUTTON CONTROLS
In HTML each form must be submitted through a user defined action. This normally is done using either an input
field, or a button with type submit. This <button type="submit">Submit</button> or <input type="submit"
value="Submit"> must be placed inside the <form>...</form>-element.
django-formset has a different approach: Submit buttons shall be able to do much more than just triggering an event,
which then proceeds with submitting its form content to the server. Instead, a button when clicked, can perform a whole
chain of actions. This allows us to trigger more than one event, whenever a user clicks on a button.
All controlling buttons must be placed inside the <django-formset>-element. A typically submit button therefore
may look like
<django-formset ...>
<!-- some forms with fields -->
...
<button click="disable -> submit -> proceed !~ scrollToError">Submit</button>
</django-formset>
6.1 Action Queues
What we see here are 4 actions: disable, submit, proceed and scrollToError. Let’s explain their functionality:
• In disable, the button disables itself. This is useful to prevent double submissions and should be used whenever
possible.
• In submit, the content of the form(s) inside the <django-formset> is submitted to the server through the given
endpoint. This function can take extra values which are submitted along with the form data. If for example we
use submit({foo: "bar"}) then that extra submit data is available in our FormView instance connected to
the given endpoint. That extra submitted data then can be accessed by calling self.get_extra_data().
• If the submission was successful, proceed tells the client what to do next. If called without arguments, the
default is to load the page given by the success_url provided by our Django view handling the request. If
instead we use proceed("/path/to/success/page"), that page is loaded on successful form submission.
This allows web designers to specify that URL like a link, rather than having to rely on a response from the
server.
A submission which did not validate on the server is considered as failed and the response status code is 422, rather
than 200. This is where the !~ comes into play. It acts similar to a catch-statement and everything after that symbol is
executed on submission failure.
Note: According to RFC4918 Section 12.1, a status code of 422 can be used if a request body contains well-formed
(i.e., syntactically correct), but semantically erroneous, instructions. Even though the cited RFC applies to XML,
25

django-formset, Release 0.13.4
invalid form data submitted via JSON can as well be interpreted as “semantically erroneous”.
• In scrollToError the browser scrolls to the first field, which was marked to contain invalid input data.
The above 4 functions are the most useful ones, but there are many more functions to be used as queued actions for
buttons in django-formset:
• enable is used to re-enable a previously disabled button. By default, every button is put into the state just before
having clicked on it, regardless if the submission was successful or not. Therefore this action is rarely of usage.
• reset is used to reset all form fields to their state when loading the form. It usually should be used on a separate
button which explicitly is labeled to reset the form.
• reload this is used to reload the page. Useful to reload the form after a successful submission, for instance in
buttons labeled “Save and continue editing”.
• delay(1000) delays all further actions by one second. This sometimes can be useful to add an extra delay (in
milliseconds) during the submission.
• spinner if the button contains a decorator element, ie. a child with class="dj-button-decorator", then that
element is replaced by a rotating spinner symbol. Useful to give feedback before time consuming submissions.
• okay if the button contains a decorator element, ie. a child with class="dj-button-decorator", then that
element is replaced by an animated okay tick. Useful to give feedback after a successful form submission. This
action takes an optional delay argument in milliseconds, in order to visualize the animation before proceeding.
• bummer if the button contains a decorator element, ie. a child with class="dj-button-decorator", then that
element is replaced by an animated bummer symbol. Useful to give feedback after a failed form submission. This
action takes an optional delay argument in milliseconds, in order to visualize the animation before proceeding.
• addClass("foo") adds the CSS class “foo” to the button class. After submission, this class is automatically
removed from the class.
• removeClass("foo") removes the CSS class “foo” to the button class.
• toggleClass("foo") toggles the CSS class “foo” on the button class.
• confirm("A question?") opens a confirmation popup with the given message string together with a “Cancel”
and an “OK” button. If the user clicks on “Cancel”, the action chain is interrupted. This action typically precedes
the submit-action to prompt the user for confirmation.
• alertOnError typically is added after the !~ operator. In case the form submission generated an non-form-
validation error, for instance “permission denied”, this error is shown in an alert box.
• emit("event name") emit a named event to the DOM.
• intercept intercepts the response object after submission and prints it onto the console. This is only useful for
debugging purposes.
• clearErrors clears all error annotations from a previously failed form validation.
• noop does nothing and can be used as a placeholder.
By combining these button actions, we gain a huge set of possibilities to improve the user experience. If for instance,
form processing takes more than say one second, we shall somehow signal to the user that the submission might take
some time. This is where the spinner action renders a spinning wheel. After a successful submission, we might want
to signalize to the user that everything is okay, before proceeding to the next page without notification. This is where
the okay action displays an animated tick. In case of an unsuccessful submission attempt, we might want to signalize
to the user that it failed. This is where the bummer action displays an animated failure.
This is an example of a click action on a button for a form requiring some processing time:
26 Chapter 6. Submit Button Controls

django-formset, Release 0.13.4
<button type="button" click="disable -> spinner -> submit -> okay(1500) -> proceed !~␣
˓→enable -> bummer(9999)">
Submit
<span class="dj-button-decorator"><img class="dj-icon" src="/path/to/icon" /></
˓→span>
</button>
Here we delay the okay tick by 1.5 seconds before proceeding to the next page.
In case of failure, we render the bummer symbol for 10 seconds before resetting it to the default.
6.2 Buttons without a Form
Sometimes we just need to send a certain event to the server, without having to fill out a form. Consider a blog
application, where the blog post model contains a boolean field named published. We want our application to show a
preview page of our blog post, so after editing and submitting the main content, the detail page of that post shall appear.
There we add a button to publish the page. With django-formset, we can reuse the same edit view.
This is the final part of the template rendering the detail view of our blog post:
{# the detail view of our blog post #}
{% if is_owner %}
<django-formset endpoint="{{ editview_url }}" csrf-token="{{ csrf_token }}">
{# no <form> element is rendered here, because single field `published` is handled␣
˓→through action buttons #}
{% if post.published %}
<button type="button" click="submit({published: false}) -> proceed">
Unpublish Post
</button>
{% else %}
<button type="button" click="submit({published: true}) -> proceed">
Publish Post
</button>
{% endif %}
<button type="button" click="proceed('{{ editview_url }}')">
Change Post
</button>
</django-formset>
{% endif %}
Here editview_url points onto the view used to edit the blog post:
Listing 1: edit_view.py
class EditBlogPostView(LoginRequiredMixin, FormViewMixin, UpdateView):
model = BlogPost
form_class = BlogPostForm
template_name = 'edit-blog-post.html'
(continues on next page)
6.2. Buttons without a Form 27

django-formset, Release 0.13.4
(continued from previous page)
def post(self, request, *args, **kwargs):
if extra_data := self.get_extra_data():
if 'published' in extra_data:
instance = self.get_object()
instance.published = extra_data['published']
instance.save(update_fields=['published'])
return JsonResponse({'success_url': self.get_success_url()})
return super().post(request, *args, **kwargs)
# other methods
What we do here is to bypass form validation if we find out that besides “form data”, some extra_data is submitted.
This data originates from the submit({published: true/false}) buttons from above.
This neat trick allows us to reuse the edit view class for a similar purpose.
28 Chapter 6. Submit Button Controls
CHAPTER
SEVEN
FORM COLLECTIONS
A very powerful feature of django-formset is the ability to create a collection of forms. In Django we quite often
create forms out of models and want to edit more than one of those forms on the same page and post them in a single
submission. By using a prefix on each Django Form, it is possible to name the fields uniquely and on submission we
can reassign the form data back to each individual form. This however is limited to one nesting level and in order to add
extra forms dynamically, we must create our own JavaScript function, which is not provided by the Django framework.
In django-formset on the other hand, we can create a form collection and explicitly add existing forms as members of
those collections. It’s even possible to add a collection as a member of another collection, in order to build a pseudo
nested
2
structure of forms.
The interface for classes inheriting from formset.collection.FormCollection is intentionally very similar to that
of a Django Form class. It can be filled with a data dictionary as received by a POST request. It also can be initialized
with an initial dictionary. Since collections can be nested, the data and initial dictionaries must contain the
same shape as the nested structure.
Furthermore, a FormCollection offers a clean()-method, which returns a cleaned representation of the data pro-
vided by a client’s submission.
7.1 Simple Collection
We use this kind of collection, if we just want to group two or more forms together.
Listing 1: my_forms.py
from formset.collection import FormCollection
class MyFormCollection(FormCollection):
form1 = MyForm1()
form2 = MyForm2()
Note: The above example will render the form with the default style. To render the form with a specific CSS framework
you need to specify the default_renderer attribute on your FormCollection.
Example:
from formset.collection import FormCollection
from formset.renderers.bootstrap import FormRenderer
(continues on next page)
2
HTML does not allow nesting <form>-elements. However, we can wrap those <form>-s into our own web components which themselves are
nested and hence mimic that behavior.
29
django-formset, Release 0.13.4
(continued from previous page)
class MyFormCollection(FormCollection):
default_renderer = FormRenderer()
form1 = MyForm1()
form2 = MyForm2()
All supported CSS frameworks define a FormRenderer that can be imported with a path similar to the one de-
fined in the example, for instance formset.renderers.bulma.FormRenderer, formset.renderers.tailwind.
FormRenderer, etc.
Collections must be rendered using the special View class formset.views.FormCollectionView: The template
used to render this Form Collection must ensure that the CSRF-token is set; this is done by passing that CSRF token
value as attribute to the web component <django-formset>. Otherwise this View just behaves like an ordinary Form
View embedded in a django-formset.
Listing 2: my-collection.html
<django-formset endpoint="{{ request.path }}" csrf-token="{{ csrf_token }}">
{{ form_collection }}
</django-formset>
Finally add a route to the View:
Listing 3: urls.py
from django.urls import path
from formset.views import FormCollectionView
from .my_forms import MyFormCollection
urlpatterns = [
...
path('contact', FormCollectionView.as_view(
template_name='my-collection.html'
collection_class=MyFormCollection,
success_url='/path/to/success',
)),
...
]
7.2 Nested Collection
A Form Collection can not only contain other Django Forms, but also other Form Collections. This means that we can
nest collections into each other up to currently 10 levels (this limit can be increased if required).
Just as with simple collections, form data sent by the browser is already structured using the same hierarchy as the
collections themselves.
30 Chapter 7. Form Collections

django-formset, Release 0.13.4
7.3 Collections with Siblings
If a class inheriting from formset.collection.FormCollection contains one of the attributes min_siblings,
max_siblings or extra_siblings, it is considered as a collection with siblings. They then behave similar to what
we already know as Django’s InlineModelAdmin objects. The difference though is, that we can use this feature outside
of the Django-Admin, and moreover, that we can nest collections into each other recursively.
Whenever a collection is declared to have siblings, its member collections are rendered from zero, once or multiple
times. For each collection with siblings there is one “Add” button, and for each of the child collections there is a
“Remove” button. To avoid having too many “Remove” buttons, they are invisible by default and only become visible
when moving the cursor over that collection.
Legend
Just as HTML-elements of type <fieldset> can contain a legend, a form collection may optionally also contain a
<legend>...</legend>-element. It is placed on top of the collection and shall be specified as attribute legend =
"..." inside classes inheriting from formset.collection.FormCollection, or as a parameter when initializing
the collection.
Help Text
A form collection may optionally render a <div>...</div>- or <p>...</p>-element (depending on the best prac-
tices of the CSS framework) at its end, containing a help text string. It shall be specified as attribute help_text =
"..." inside classes inheriting from formset.collection.FormCollection, or as a parameter when initializing
the collection.
Label for “Add” button
The parameter add_label shall contain a human readable string, telling the user what kind of collection to add as a
sibling. If unset, the “Add” button just contains the + symbol.
Minimum Number of Siblings
The parameter min_siblings tells us how many collections the parent collection must contain as minimum. If unset,
it defaults to 1.
Maximum Number of Siblings
The parameter max_siblings tells us how many collections the parent collection may contain as maximum. If unset,
there is no upper limit.
7.3. Collections with Siblings 31

django-formset, Release 0.13.4
Extra Siblings
The parameter extra_siblings tells us how many empty collections the parent collection starts with. If unset, it
defaults to 0, which means that the user must explicitly add a new sibling by clicking on the “Add” button below the
last sibling.
Note that a collection with siblings behaves differently, when deleting a child collection. If that child collection was
initialized and thus loaded from the server, then it is rendered with a streaked background pattern, which signalizes to
be removed on submission.
If on the other side that child collection was just added by clicking on the “Add” button below the last sibling, then that
collection will be deleted immediately. This is because for initialized collections, while submitting we have to keep a
placeholder in order to tell the server how to change the underlying model.
Ignore collections marked for removal
Adding the boolean parameter ignore_marked_for_removal to a class inheriting from formset.collection.
FormCollection tells the clean()-method how to proceed with collections marked for removal. If unset or False
(the default), such collections contain the special key value pair '_marked_for_removal_': True inside their
returned cleaned_data structure. This information shall be used, when the backend has to locate the proper model in
order to delete it. If ignore_marked_for_removal = True, then collections marked for removal do not even appear
inside that cleaned_data structure returned by the clean()-method.
32 Chapter 7. Form Collections

django-formset, Release 0.13.4
7.4 Sortable Collections with Siblings
Whenever we work with a list of form collections, it might make sense to reorder the given entities. This allows the user
to sort the siblings of a collection. To achieve this, either add is_sortable = True when declaring the collection
class, or instantiate the collection class by passing is_sortable=True to its constructor.
Form collections declared to by sortable, render a small drag area on their top right corner. By dragging that handle,
the user can reorder the chosen collections. On form submission, that new order is reflected inside the list of transferred
fields. When using a sortable collection to edit a (query-)set of models, it therefore is mandatory to include the primary
key of each object as a hidden input field. Otherwise it will not be possible to reorder those objects afterwards in the
database.
7.4. Sortable Collections with Siblings 33
django-formset, Release 0.13.4
One must note that it is only possible to reorder collections inside its direct parent collection. It therefore is not possible
to drag a sub collection into another collection.
34 Chapter 7. Form Collections
CHAPTER
EIGHT
FIELDSETS
In HTML the <form>-element is just a data-abstraction layer. It has no display properties and is not intended to be
styled or annotated. Its purpose is to group one or more input fields, in order to submit their gathered input data to the
server altogether.
On the other side, we might want to visually group those input fields and optionally add a legend tag to create a caption
for the form. We also might want to group related input fields visually by surrounding them with a border. For this
purpose the HTML standard defines the <fieldset> tag. Django itself does not offer any abstraction for this HTML
tag. If one wants to use it, this has to be done on the template level when rendering the form.
To fill this gap, django-formset introduces a Python class to handle the <fieldset>-element. From a technical point
of view, a fieldset behaves exactly like a single form and in HTML it always must be wrapped inside a <form>-element.
If we want to use more than one fieldset, then we have to group them using Form Collections, just as we would do with
normal forms.
Another purpose of using fieldsets, appart from adding a border and legend to a form, is to use Conditional Field and
Fieldset Expressions. This allows us to hide or disable the whole fieldset depending on the context of other fields.
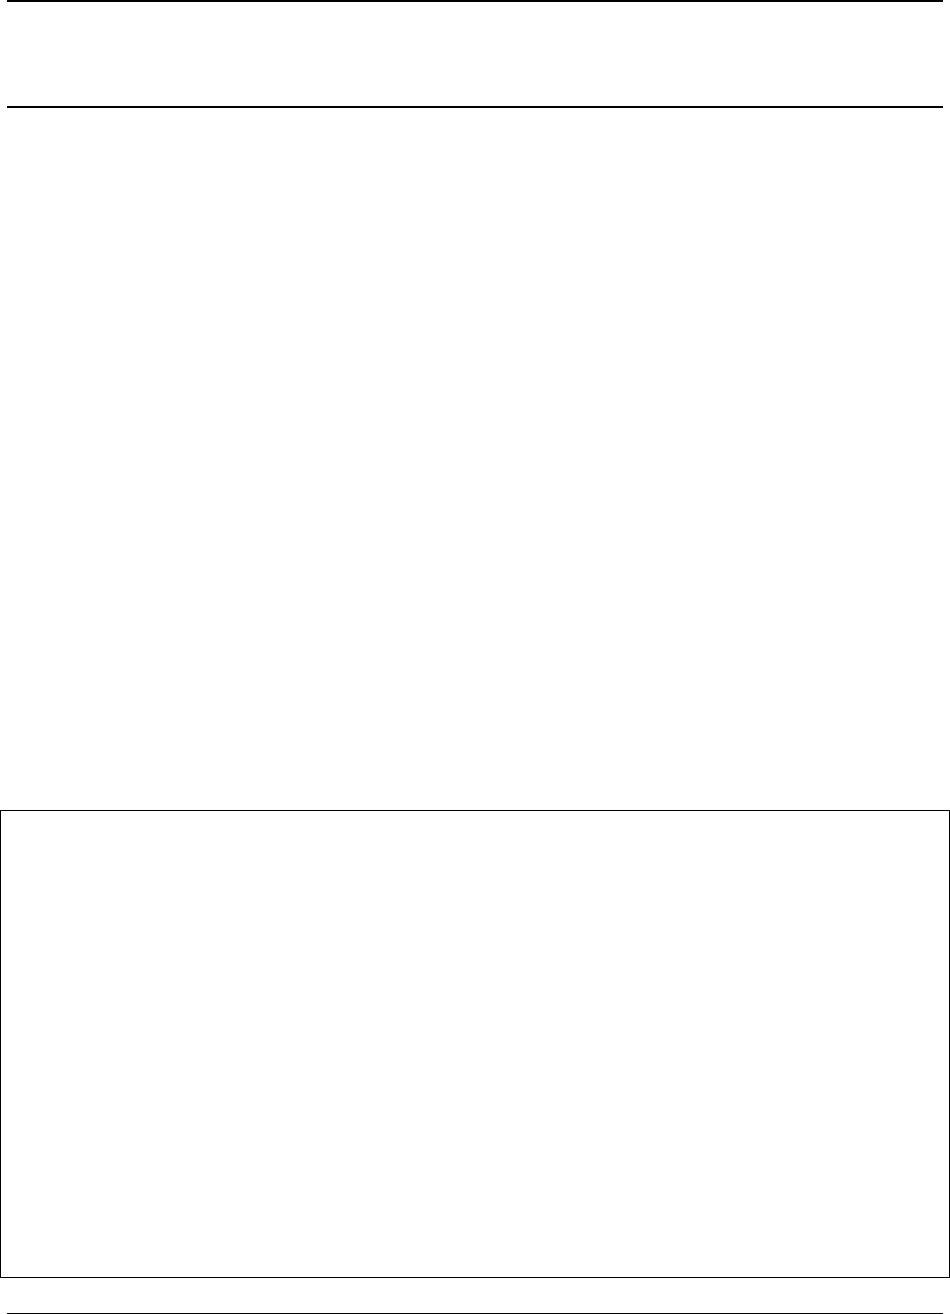
8.1 Example
In this example we use two forms nested in a FormCollection. Remember, a Fieldset behaves exactly as a Form
instance and can be used as a replacement, although with additional styling possibilities.
from django.forms import fields, forms
from formset.fieldset import Fieldset
from formset.collection import FormCollection
class CustomerForm(Fieldset):
legend = "Customer"
hide_if = 'register.no_customer'
recipient = fields.CharField()
address = fields.CharField()
class RegisterForm(forms.Form):
no_customer = fields.BooleanField(
label="I'm not a customer",
required=False,
)
class CustomerCollection(FormCollection):
customer = CustomerForm()
register = RegisterForm()
35
django-formset, Release 0.13.4
When rendered, this Form Collection may look like:
The interesting part of this collection is that we can hide the fieldset by clicking on the checkbox named “I’m not a
customer”. This means that by using conditionals, we can dynamically adjust the visibility of a complete form.
36 Chapter 8. Fieldsets
CHAPTER
NINE
CREATING FORMS FROM MODELS
Just as in Django, forms can be created from models and rendered by django-formset.
Say, we use the same model as described in the Django documentation, ie. myapp.models.Article, and then we use
that model to create a form class:
class ArticleForm(ModelForm):
class Meta:
model = Article
fields = ['pub_date', 'headline', 'content', 'reporter']
There however is a caveat here: django-formset offers some widgets, which greatly enhance the functionality of some
input elements, compared to their pure HTML counterpart.
Replacing Widgets for Choice Fields
These widgets are the formset.widget.Selectize, formset.widget.SelectizeMultiple, and formset.
widget.DualSelector. They shall be used as a replacement to default widgets offered by Django. This can be
done by mapping the named fields to alternative widgets inside the form’s Meta class:
from formset.widgets import DualSelector, Selectize, SelectizeMultiple
class ArticleForm(ModelForm):
class Meta:
...
widgets = {
'single_choice': Selectize,
'multiple_choice': SelectizeMultiple, # or DualSelector
...
}
Please read the sections Selectize Widget and Dual Selector Widget for details about enhancing the <select> and
<select multiple="multiple"> widgets.
37

django-formset, Release 0.13.4
Replacing Widgets for File- and Image Fields
In case we want to map a model field of type django.db.models.FileField or django.db.models.ImageField,
we must replace the default input widget by formset.widgets.UploadedFileInput. This is required because in
django-formset files are uploaded before form submission. Please read the section Uploading Files and Images for
details about file uploading.
from formset.widgets import UploadFileInput
class ArticleForm(ModelForm):
class Meta:
...
widgets = {
'image': UploadFileInput(),
...
}
Replacing Widget for TextField
In case we want to offer a widget to Edit Rich Text but prefer to use the model field django.db.models.TextField,
we have to map this widget in the Meta class of the form class instantiating the model.
from formset.richtext.widgets import RichTextarea
class ArticleForm(ModelForm):
class Meta:
...
widgets = {
'text': RichTextarea(),
...
}
Usually you don’t want to use the default control elements for that rich text editor, but instead configure your own
preferences.
The model field formset.richtext.fields.RichTextField maps to widget RichTextarea by default, but again
you may prefer to use your own configuration of control elements and hence you have to map the widget in the Meta
class of the form class instantiating the model.
9.1 Detail View for ModelForm
In a CRUD application, we usually add a Django View to add, update and delete an instance of our model. The Django
documentation proposes to create one view for each of these tasks, a CreateView, an UpdateView and a DeleteView.
With django-formset we instead can combine them into one view class. This is because we can add extra context data
to the form control buttons, which then is submitted together with the form data. An example:
from django.contrib.auth.mixins import LoginRequiredMixin
from django.views.generic import UpdateView
from formset.views import FileUploadMixin, FormViewMixin
class ArticleEditView(FileUploadMixin, FormViewMixin, LoginRequiredMixin, UpdateView):
(continues on next page)
38 Chapter 9. Creating Forms from Models
django-formset, Release 0.13.4
(continued from previous page)
model = Article
template_name = 'myapp/edit-form.html'
form_class = ArticleForm
success_url = reverse_lazy('address-list') # or whatever makes sense
extra_context = None
def get_object(self, queryset=None):
if self.extra_context['add'] is False:
return super().get_object(queryset)
def form_valid(self, form):
if extra_data := self.get_extra_data():
if extra_data.get('delete') is True:
self.object.delete()
success_url = self.get_success_url()
response_data = {'success_url': force_str(success_url)} if success_url␣
˓→else {}
return JsonResponse(response_data)
return super().form_valid(form)
We now must adopt the template used to render the edit form
<django-formset endpoint="{{ request.path }}" csrf-token="{{ csrf_token }}">
{% render_form form %}
{% if add %}
<button type="button" click="submit({add: true}) -> proceed">{% trans "Add" %}</
˓→button>
{% else %}
<button type="button" click="submit({update: true}) -> proceed">{% trans "Update" %}
˓→</button>
<button type="button" click="submit({delete: true}) -> proceed">{% trans "Delete" %}
˓→</button>
{% endif %}
</django-formset>
The interesting part here is that we use the context variable add to distinguish between the Add- and the Update/Delete-
Views. This context variable is added using the extra_context parameter, see below.
Additionally the submit buttons “Add”, “Update” and “Delete” have the ability to pass some extra data together with
the submitted form data. We use that information in the form_valid-method in our view to distinguish between the
creation, the update or the deletion of an instance, see above.
Finally we must attach that view class to our URL routing. Here we reuse our form view class ArticleEditView and
use the parameter extra_context to modify the behavior of that view.
urlpatterns = [
...
urlpatterns = [
path('', AddressListView.as_view(), name='address-list'), # list view not handled␣
˓→here
path('add/', ArticleEditView.as_view(extra_context={'add': True}),
name='address-add',
),
(continues on next page)
9.1. Detail View for ModelForm 39

django-formset, Release 0.13.4
(continued from previous page)
path('<int:pk>/', ArticleEditView.as_view(extra_context={'add': False}),
name='address-edit',
),
...
]
Note: The list view is not handled explicitly here, because it doesn’t differ compared to a classic Django view.
40 Chapter 9. Creating Forms from Models

CHAPTER
TEN
CREATING COLLECTIONS FROM RELATED MODELS
In more complex setups, we often want to change the contents of related models altogether. This is when we start to
use Form Collections to edit more than one ModelForm. This is similar to what Django’s Model formsets functionality
is intended for, but implemented in a more flexible way.
10.1 One-to-One Relations
Let’s start with a simple example. Say that we want to extend the Django User model with extra fields, for instance
a phone number field. Since we don’t want to substitute the User model against our own implementation, instead we
must extend it using a one-to-one relation.
from django.conf import settings
class ExtendUser(models.Model):
user = models.OneToOneField(
settings.AUTH_USER_MODEL,
on_delete=models.CASCADE,
related_name='extend_user',
)
phone_number = models.CharField(
verbose_name="Phone Number",
max_length=25,
blank=True,
null=True,
)
In a typical application we would like to edit this model together with the default User model. If we do this in the
Django admin, we have to create an InlineModelAdmin with exactly one extra form in the formset. This however
implies that our model ExtendUser has a foreign relation with the User model rather than a one-to-one relation[#1]_.
In django-formset we handle this by declaring one ModelForm for User and ExtendUser each, and then group those
two forms into one FormCollection.
from django.contrib.auth import get_user_model
from django.forms.models import ModelForm
from formset.collection import FormCollection
class UserForm(ModelForm):
class Meta:
model = get_user_model()
(continues on next page)
41

django-formset, Release 0.13.4
(continued from previous page)
fields = '__all__'
class ExtendUserForm(ModelForm):
class Meta:
model = ExtendUser
fields = ['phone_number']
class UserCollection(FormCollection):
user = UserForm()
extend_user = ExtendUserForm()
When this form collection is rendered and completed by the user, the submitted data from both forms in this collection
is, as expected, unrelated. We therefore have to tell one of the two forms, how their generating models relate to each
other. For this to work, each FormCollection and each Django Form can implement two methods, model_to_dict
and construct_instance.
model_to_dict(main_object, fields=None, exclude=None)
This method creates the initial data for a form starting from main_object as reference. It is inspired by Django’s
global function model_to_dict(instance, fields=None, exclude=None) which returns a dict containing the
data in argument instance suitable for passing as a form’s initial keyword argument.
The main_object is determined by the view (inheriting from formset.views.EditCollectionView) which han-
dles our form collection UserCollection, using the get_object-method (usually by resolving a primary key or
slug).
construct_instance(main_object, data)
This method takes the cleaned_data from a validated form and applies it to one of the model objects which
are related with the main_object. It is inspired by Django’s global function construct_instance(form,
instance, fields=None, exclude=None) which constructs and returns a model instance from the bound form’s
cleaned_data, but does not save the returned instance to the database.
Since form collections can be nested, method model_to_dict can be used to recursively create a dictionary to ini-
tialize the forms, starting from a main model object. After receiving the submitted form data by the client, method
construct_instance can be used to recursively traverse the cleaned_data dictionary returned by the rendered
form collection, in order to construct the model objects somehow related to the main_object.
To get the example from above to work, we therefore have to implement those two methods in our ExtendUserForm:
from django.forms.models import construct_instance, model_to_dict
class ExtendUserForm(ModelForm):
...
def model_to_dict(self, user):
try:
return model_to_dict(user.extend_user, fields=['phone_number'])
except ExtendUser.DoesNotExist:
return {}
def construct_instance(self, main_object, data):
(continues on next page)
42 Chapter 10. Creating Collections from related Models

django-formset, Release 0.13.4
(continued from previous page)
try:
extend_user = main_object.extend_user
except ExtendUser.DoesNotExist:
extend_user = ExtendUser(user=main_object)
form = ExtendUserForm(data=data, instance=extend_user)
if form.is_valid():
construct_instance(form, extend_user)
form.save()
What both of these methods do, is to resolve the relation starting from the main object, in this case the User object.
Since we have a one-to-one relation, there can only be no or one related ExtendUser object. If there is none, create it.
The view class serving as endpoint for UserCollection then can be written as
from django.contrib.auth import get_user_model
from formset.views import EditCollectionView
class UserCollectionView(EditCollectionView):
model = get_user_model()
collection_class = UserCollection
template_name = 'form-collection.html'
and added to the urlpatterns in the usual way. The template referenced by that view shall contain HTML with
containing something such as:
<django-formset endpoint="{{ request.path }}" csrf-token="{{ csrf_token }}">
{{ form_collection }}
<button type="button" click="submit -> proceed !~ scrollToError">Submit</button>
</django-formset>
10.2 One-to-Many Relations
One of the most prominent use-cases is to edit a model object together with child objects referring to itself. By children
we mean objects which point onto the main object using a Django ForeignKey. Let’s again explain this using an
example. Say, we want to extend the previous example and allow more than one phone number per user. For this we
replace the OneToOneField for our model field user against a ForeignKey. In practice, this means that we now have
a flexible list of phone numbers instead of just one. To solve this, django-formset offers the possibility to let form
collections have siblings. We then can rewrite our collection as:
class ExtendUserForm(ModelForm):
id = IntegerField(required=False, widget=HiddenInput)
class Meta:
model = ExtendUser
fields = ['phone_number']
class ExtendCollection(FormCollection):
min_siblings = 0
extend = ExtendUserForm()
def model_to_dict(self, user):
(continues on next page)
10.2. One-to-Many Relations 43

django-formset, Release 0.13.4
(continued from previous page)
opts = self.declared_holders['contact']._meta
return [{'contact': model_to_dict(contact, fields=opts.fields)}
for contact in user.contacts.all()]
def construct_instance(self, user, data):
for data in data:
try:
contact_object = user.contacts.get(id=data['contact']['id'])
except (KeyError, UserContact.DoesNotExist):
contact_object = UserContact(user=user)
form_class = self.declared_holders['contact'].__class__
form = form_class(data=data['contact'], instance=contact_object)
if form.is_valid():
if form.marked_for_removal:
contact_object.delete()
else:
construct_instance(form, contact_object)
form.save()
class UserCollection(FormCollection):
user = UserForm()
extend_list = ExtendCollection()
Here we also have to implement the two methods model_to_dict and construct_instance ourselves. Since the
collection class ExtendCollection is declared to allow siblings, its children forms are rendered as many times as
objects of type ExtendUser point onto the main object, in short the User object.
Here method model_to_dict instantiates a list. This list is a serialized representation of all objects of type
ExtendUser referring to the User (main) object.
After a submitted form has been validated, we start constructing as many models of type ExtendUser, as the collections
provides. Since we must link each form to its associated object, each sub-form contains the primary key of that object
as a hidden field. Forms which have been deleted by the user are marked for removal and will be removed from the
main object.
44 Chapter 10. Creating Collections from related Models
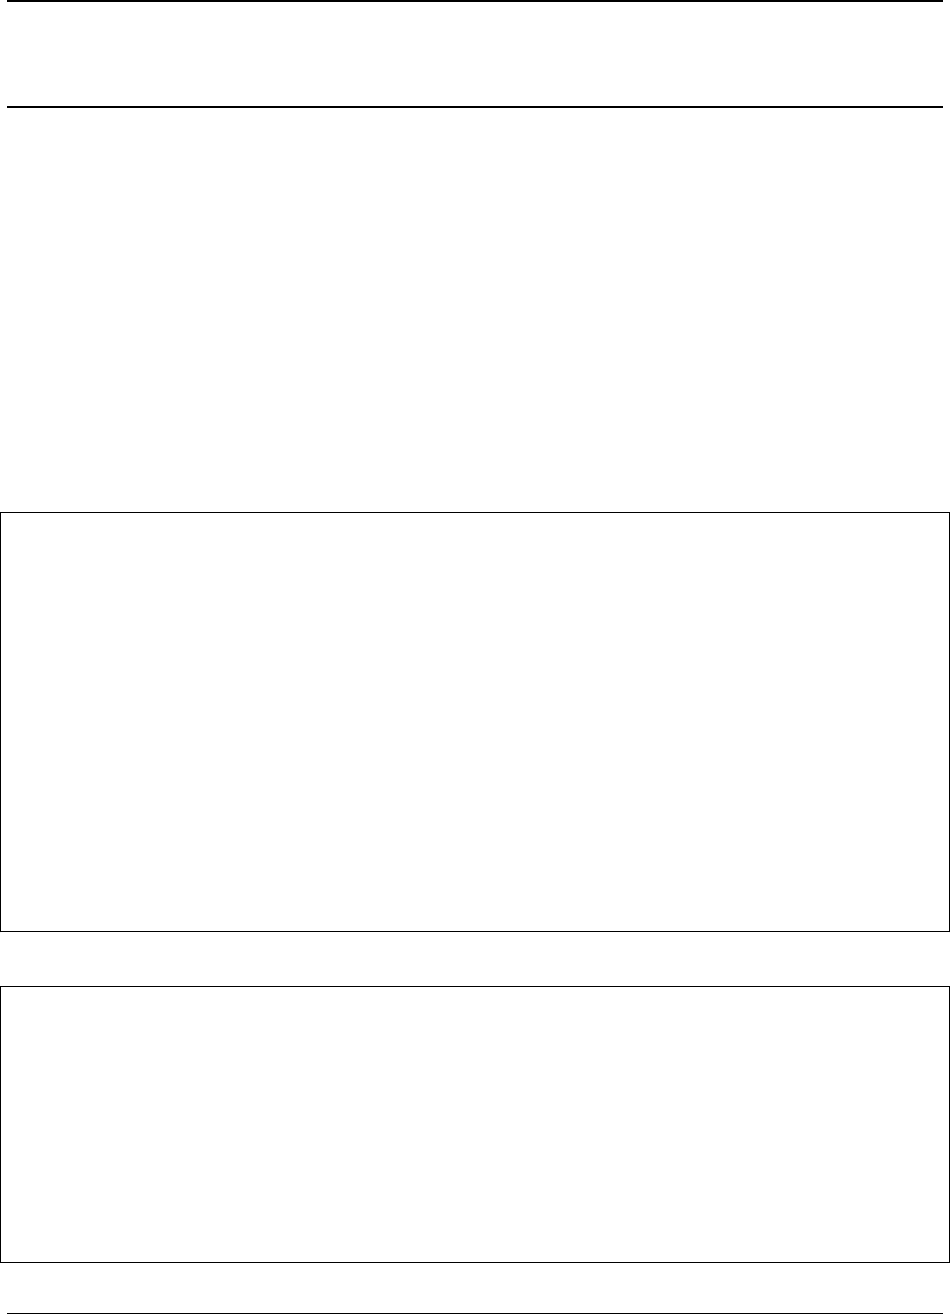
CHAPTER
ELEVEN
FORM RENDERERS
Since Django-4.0 each form can specify its own renderer. This is important, because it separates the representation
layer from the logical layer of forms. And it allows us to render the same form for different CSS frameworks without
modifying a single field. The only thing we have to do, is to replace the default form renderer with an alternative one.
11.1 Form Grid Example
Say, we have a form to ask for the recipient’s address:
from django.forms import forms, fields
class AddressForm(forms.Form):
recipient = fields.CharField(
label="Recipient",
max_length=100,
)
postal_code = fields.CharField(
label="Postal Code",
max_length=8,
)
city = fields.CharField(
label="City",
max_length=50,
)
this form, typically be rendered using a template such as
{% load formsetify %}
<django-formset endpoint="{{ request.path }}" csrf-token="{{ csrf_token }}">
{% render_form form %}
<p class="mt-3">
<button type="button" click="submit -> proceed" class="btn btn-primary">Submit</
˓→button>
<button type="button" click="reset" class="ms-2 btn btn-warning">Reset to initial</
˓→button>
</p>
</django-formset>
45
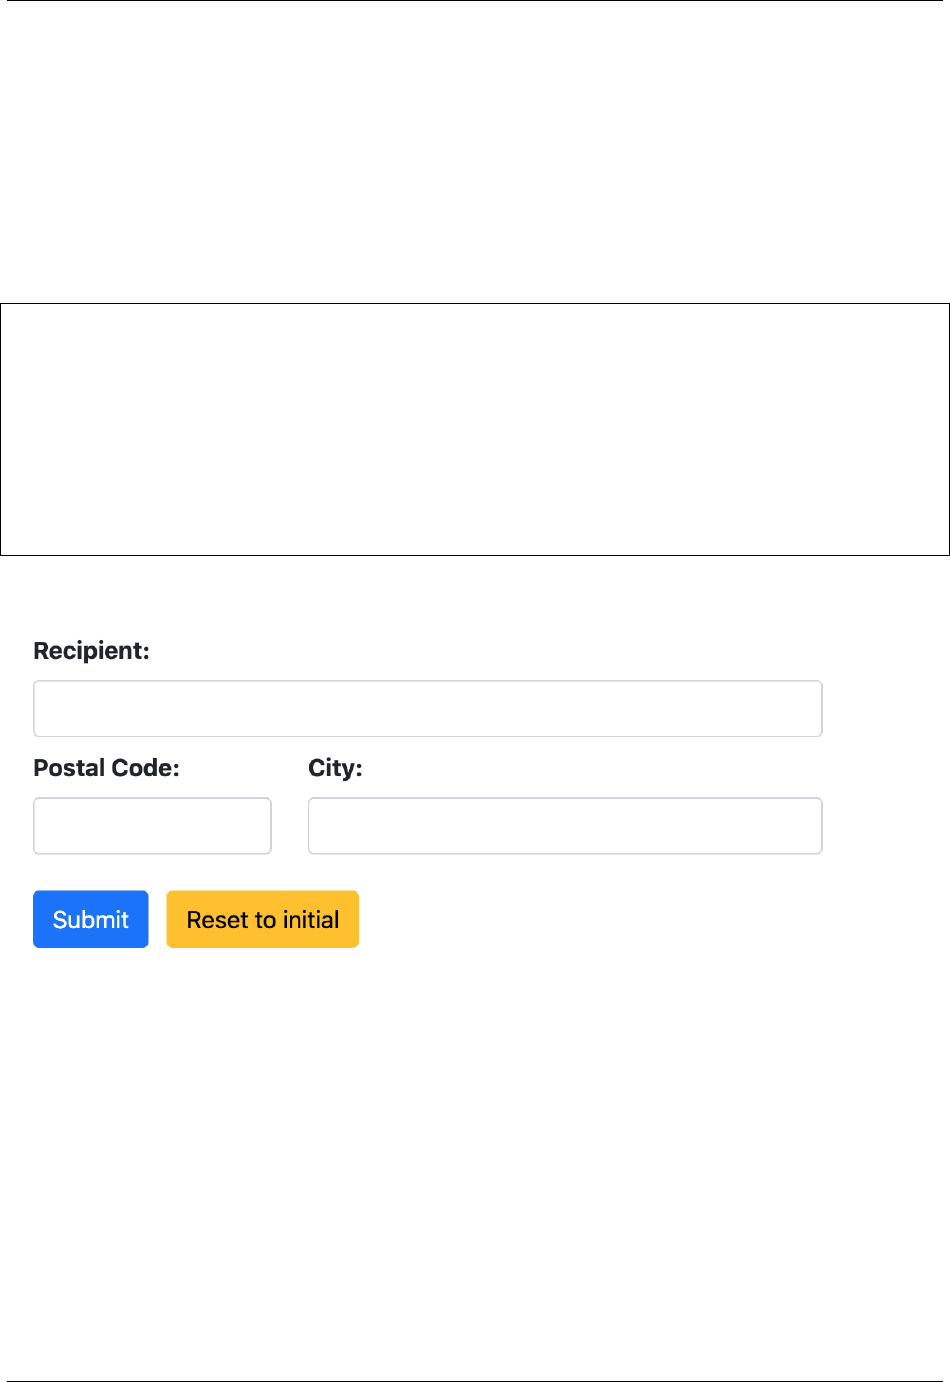
django-formset, Release 0.13.4
Usually we prefer to keep the postal code and the destination city on the same row. When working with the Bootstrap
framework, we therefore want to use the form grid for form layouts that require multiple columns, varied widths, and
additional alignment options. We therefore have to add the CSS classes row and col-XX to the wrapping elements,
while rendering the form. One possibility would be to create a template and style each field individually; this is the
method described in Rendering a Django Form Field-by-Field. This however requires creating a template for each
form, which contradicts the DRY-principle.
We therefore parametrize the provided renderer class. For each supported CSS framework, there is a Form Renderer.
For Bootstrap, that class can be found at formset.renderers.bootstrap.FormRenderer.
We now can add that renderer to the above form class and parametrize it as follows
from formset.renderers.bootstrap import FormRenderer
class AddressForm(forms.Form):
default_renderer = FormRenderer(
form_css_classes='row',
field_css_classes={'*': 'mb-2 col-12', 'postal_code': 'mb-2 col-4', 'city': 'mb-
˓→2 col-8'},
)
# form fields as above
When rendered in a Bootstrap-5 environment, that form will look like
Here we pass a few CSS classes into the renderer. In form_css_classes we set the CSS class added to the <form>
element itself. In field_css_classes we set the CSS classes for the field groups. If this is a string, the given CSS
classes are applied to each field. If it is a dictionary, then we can apply those CSS classes to each field individually, by
using the field’s name as a dictionary key. The key * stands for the fallback and its value is applied to all fields which
are not explicitly listed in that dictionary.
46 Chapter 11. Form Renderers
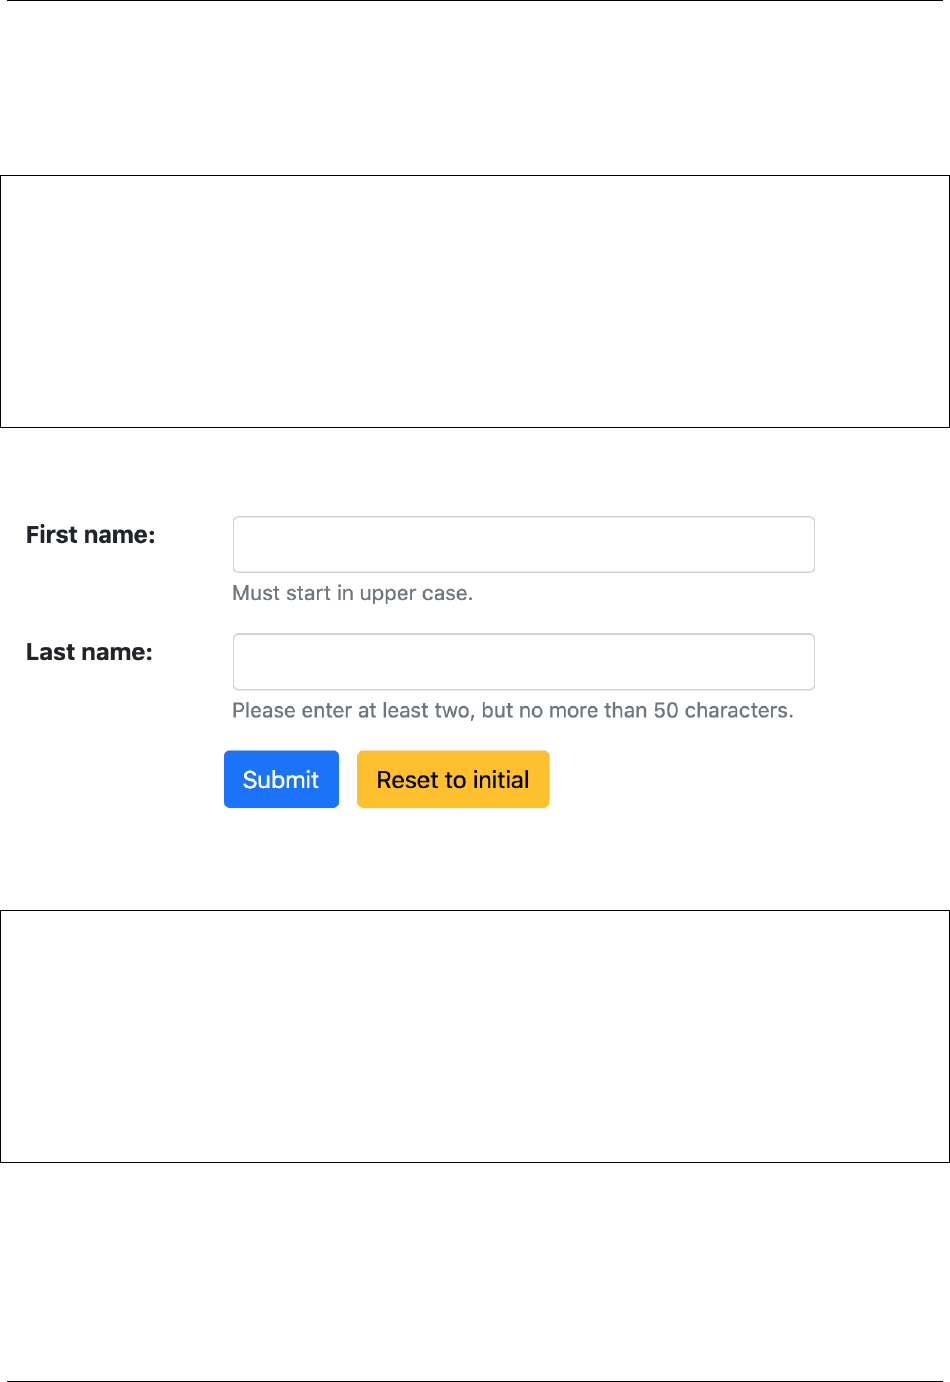
django-formset, Release 0.13.4
11.2 Inline Form Example
By using slightly different parameters, a form can be rendered with labels and input fields side by side, rather than
beneath each other. This can simply be achieved by replacing the form renderer using these parameters.
from formset.renderers.bootstrap import FormRenderer
class AddressForm(forms.Form):
default_renderer = FormRenderer(
field_css_classes='row mb-3',
label_css_classes='col-sm-3',
control_css_classes='col-sm-9',
)
# form fields as above
When rendered in a Bootstrap-5 environment, that form will look like
The same effect can be achieved by rendering this form, parametrizing our well known templatetag:
<django-formset endpoint="{{ request.path }}" csrf-token="{{ csrf_token }}">
{% render_form form "bootstrap" field_classes="row mb-3" label_classes="col-sm-3"␣
˓→control_classes="col-sm-9" %}
<div class="offset-sm-3">
<button type="button" click="submit -> proceed" class="btn btn-primary">Submit</
˓→button>
<button type="button" click="reset" class="ms-2 btn btn-warning">Reset to initial</
˓→button>
</div>
</django-formset>
11.2. Inline Form Example 47

django-formset, Release 0.13.4
48 Chapter 11. Form Renderers

CHAPTER
TWELVE
CONDITIONAL FIELD AND FIELDSET EXPRESSIONS
Sometimes it doesn’t make sense to render all fields of a form. Consider for instance a questionnaire of a radiologist,
who wants to know if the patient is pregnant. If that patient is a male, he might even be offended by that question. The
most user-friendly solution to this is to hide or disable such a field.
For this purpose django-formset offers three conditionals:
• show-if="condition": The field or fieldset is only shown if the condition evaluates to true.
• hide-if="condition": The field or fieldset is only shown if the condition evaluates to false.
• disable-if="condition": The field or fieldset is disabled if the condition evaluates to true.
The condition can be any logical JavaScript expression. It can contain comparison operators such as ==, < or != and
logical operators such as &&, || and !. This conditional expression also has access to all the values in the complete
context of <django-formset>. Values from fields in the same form can be accessed using a relative path, starting
with dot, for instance .fieldname. Values from fields in other forms can be accessed by specifying the complete path
to that field, for instance formname.fieldname. This also works for deeply nested forms.
Note: Fields using the conditionals show-if="..." or hide-if="..." shall use the attribute required=False
during initialization. This is because otherwise Django’s form validation rejects that field as required, meanwhile it has
been hidden by the client. In case only visible fields are required, adopt the validation code of the clean()-method in
the corresponding form class.
12.1 Example Form
This form uses a conditional where the value of one field influences if another field is visible.
from django.forms import fields, forms, widgets
class QuestionnaireForm(forms.Form):
full_name = fields.CharField(
label="Full Name",
)
gender = fields.ChoiceField(
label="Gender",
choices=[('m', "Male"), ('f', "Female")],
widget=widgets.RadioSelect,
)
(continues on next page)
49
django-formset, Release 0.13.4
(continued from previous page)
pregnant = fields.BooleanField(
label="Are you pregnant?",
required=False,
widget=widgets.CheckboxInput(attrs={'show-if': ".gender=='f'"})
)
Here we add the conditional show-if=".gender=='f'" to the checkbox asking for pregnancy. Only if the field
gender contains value f, then that checkbox is visible. The path for accessing that variable is relative here, if it starts
with a dot, then the named field from the same form is evaluated.
12.2 Example Fieldset
Conditionals can also be used on a Fieldset element. For example by using
class CustomerForm(Fieldset):
legend = "Customer"
hide_if = 'register.no_customer'
we can use the value of another field, here register.no_customer to hide the whole fieldset if that value evaluates
to true.
50 Chapter 12. Conditional Field and Fieldset Expressions

CHAPTER
THIRTEEN
UPLOADING FILES AND IMAGES
In traditionally rendered forms, the payload of files to be uploaded is submitted together with the form data. This
approach is not very user friendly, because submitting such a form can take a considerable amount of time on slow
Internet connections. Even worse, if the form does not validate on the server, that upload must be repeated again.
Moreover, if a form contains more than one file to be uploaded, the maximum size a client can upload to the server
must be shared for all of them
3
,
4
.
Therefore django-formset handles file uploads asynchronously. This means that the payload of a file is uploaded to
the server as soon as the user opens the file dialog or drags a file on the area nearby the file input button. While the
payload of that file is transferred, the user can fill out other fields. The uploaded file is stored in a temporary folder on
the server. After successful file upload, a unique and signed handle is returned to the client. On form submission, this
handle then is used to refer to the previously uploaded file inside the temporary folder. If the form validation passed
successfully, that file then is moved to its final destination.
13.1 Example
A Django form accepting files for upload can be converted easily to django-formset’s asynchronous file uploads,
simply by replacing the widget.
from django.forms import forms, fields
from formset.widgets import UploadedFileInput
class UploadForm(forms.Form):
avatar = fields.FileField(
label="Avatar",
widget=UploadedFileInput,
required=True,
)
Remember, the Django view accepting the form data, must inherit from formset.views.FileUploadMixin. No
extra endpoint is required to activate this feature.
If an uploaded file contains an image renderable by the browser, that image is resized on the server and a thumbnail
version is returned to the client. For other file types, a symbolic icon is returned.
3
On Apache this parameter is configured through the LimitRequestBody directive.
4
On NGiNX this parameter is configured through the client_max_body_size directive.
51

django-formset, Release 0.13.4
52 Chapter 13. Uploading Files and Images
CHAPTER
FOURTEEN
SELECTIZE WIDGET
Rendering choice fields using a <select>-element becomes quite impractical when there are too many options to
select from. For this purpose, the Django admin backend offers so-called auto complete fields, which loads a filtered
set of options from the server as soon as the user starts typing into the input field. This widget is based on the Select2
plugin, which itself depends upon jQuery, and hence it is not suitable for django-formset which aims to be JavaScript
framework agnostic.
14.1 Usage with fixed Number of Choices
Assume, we have an address form defining a ChoiceField to choose from a city. If this number of cities exceeds say
25, we should consider to render the select box using the special widget formset.widgets.Selectize:
from django.forms import fields, forms, widgets
from formset.widgets import Selectize
class AddressForm(forms.Form):
# other fields
city = fields.ChoiceField(
choice=[(1, "London"), (2, "New York"), (3, "Tokyo"), (4, "Sidney"), (5, "Vienna
˓→")],
widget=Selectize,
)
This widget waits for the user to type some characters into the input field for “city”. If the entered string matches the
name of one or more cities (even partially), then a list of options is generated containing the matching cities. By adding
more characters to the input field, that list will shrink to only a few or eventually no entry. This makes the selection
simple and comfortable.
14.2 Usage with dynamic Number of Choices
Sometimes we don’t want to handle the choices using a static list. For instance, when we store them in a Django model,
we point a foreign key onto the chosen entry of that model. The above example then can be rewritten by replacing the
ChoiceField against a ModelChoiceField. Instead of choices this field then requires an argument queryset. For the
form we defined above, we use a Django model named Cities with name as identifier. All cities we can select from,
are now stored in a database table.
53

django-formset, Release 0.13.4
from django.forms import fields, forms, models, widgets
from formset.widgets import Selectize
class AddressForm(forms.Form):
# other fields
city = models.ModelChoiceField(
queryset=Cities.objects.all(),
widget=Selectize(
search_lookup='name__icontains',
placeholder="Choose a city",
),
)
Here we instantiate the widget formset.widgets.Selectize using the following arguments:
• search_lookup: A Django lookup expression. For choice fields with more than 50 options, this instructs the
django-formset-library on how to look for other entries in the database.
• placeholder: The empty label shown in the select field, when no option is selected.
• attrs: A Python dictionary of extra attributes to be added to the rendered <select> element.
14.3 Endpoint for Dynamic Queries
In comparison to other libraries offering autocomplete fields, such as Django-Select2, django-formset does not require
adding an explicit endpoint to the URL routing. Instead it shares the same endpoint for form submission as for querying
for extra options out of the database. This means that the form containing a field using the Selectize widget must be
controlled by a view inheriting from formset.views.IncompleteSelectResponseMixin.
Note: The default view offered by django-formset, formset.views.FormView already inherits from
IncompleteSelectResponseMixin.
14.4 Implementation Details
The client part of the Selectize widget relies on Tom-Select which itself is a fork of the popular Selectize.js-library,
but rewritten in pure TypeScript and without any other external dependencies. This made it suitable for the client part
of django-formset, which itself is a self-contained JavaScript library compiled out of TypeScript.
14.4.1 SelectizeMultiple Widget
If the form field for “city” shall accept more than one selection, in Django we replace it by a django.forms.fields.
MultipleChoiceField. The widget then used to handle such an input field also must be replaced. django-formset
offers the special widget formset.widgets.SelectizeMultiple to handle more than one option to select from.
From a functional point of view, this behaves similar to the Selectize widget described before. But instead of replacing
a chosen option by another one, selected options are lined up to build a set of options.
54 Chapter 14. Selectize Widget

django-formset, Release 0.13.4
By default a SelectizeMultiple widget can accept up to 5 different options. This limit can be adjusted by increasing
the argument of max_items. This value however shall not exceed more than say 15 items, otherwise the input field
might become unmanageable. If you need a multiple select field able to accept hundreds of items, consider using the
Dual Selector Widget widget.
14.4.2 Handling ForeignKey and ManyToManyField
If we create a form out of a Django model, we explicitly have to tell it to either use the Selectize or the
SelectizeMultiple widget. Say that we have an address model using a foreign key to existing cities
from django.db import models
class AddressModel(models.Model):
# other fields
city = models.ForeignKey(
CityModel,
verbose_name="City",
on_delete=models.CASCADE,
)
then when creating the corresponding Django form, we must replace the default widget Select against our special
widget Selectize:
from django.forms import models
from formset.widgets import Selectize
class AddressForm(models.ModelForm):
class Meta:
model = AddressModel
fields = '__all__'
widgets = {
# other fields
'city': Selectize(search_lookup='label__icontains'),
}
The argument search_lookup is used to build the search query.
If we want to allow the user to select more than one city, we have to replace the ForeignKey against a
ManyToManyField – and conveniently rename “city” to “cities”. Then in the above example, we’d have to replace
the Selectize widget against SelectizeMultiple:
from django.forms import models
from formset.widgets import SelectizeMultiple
class AddressForm(models.ModelForm):
class Meta:
model = AddressModel
(continues on next page)
14.4. Implementation Details 55

django-formset, Release 0.13.4
(continued from previous page)
fields = '__all__'
widgets = {
# other fields
'cities': SelectizeMultiple(search_lookup='label__icontains'),
}
Remember that the view connecting this form must inherit from formset.views.
IncompleteSelectResponseMixin. This mixin class also handles the Ajax endpoint for the Dual Selector
Widget. Therefore, the only task we have to do when switching from a SelectizeMultiple to a DualSelector
widget, is to rewrite the widget mapping in the form’s Meta-class.
14.4.3 Grouping Options
Sometimes it may be desirable to group options the user may select from. As an example, consider the use case where
we want to choose a county in the United States. Here we use two models with a simple relationship:
Listing 1: models.py
class State(models.Model):
code = models.CharField(max_length=2)
name = models.CharField(
max_length=20,
db_index=True,
)
class Meta:
ordering = ['name']
def __str__(self):
return self.name
class County(models.Model):
state = models.ForeignKey(
State,
on_delete=models.CASCADE,
)
name = models.CharField(max_length=30)
class Meta:
ordering = ['state', 'name']
def __str__(self):
return f"{self.name} ({self.state.code})"
Since there are 3143 counties, many of them using the same name, it would be really confusing to show them in a
simple list of options. Instead we typically would render them grouped by state. To achieve this, we have to tell the
field county how to group them, by using the attribute group_field_name. This sets up the Selectize-widget to
use the named field from the model specified by the queryset for grouping.
56 Chapter 14. Selectize Widget

django-formset, Release 0.13.4
Listing 2: forms.py
class AddressForm(models.ModelForm):
# other fields
county = models.ModelChoiceField(
queryset=County.objects.all(),
widget=Selectize(
search_lookup='name__icontains',
group_field_name='state',
),
)
When rendered, the <option> elements then are grouped inside <optgroup>-s using the state’s name as their label:
14.4. Implementation Details 57

django-formset, Release 0.13.4
58 Chapter 14. Selectize Widget

CHAPTER
FIFTEEN
DUAL SELECTOR WIDGET
This widget is usually used to control the mapping of a many-to-many relation. It consists of two HTML elements of
type <select multiple ...> placed side by side. The left part contains the available options to select from, while
the right part contains the already selected options. Between those two select fields, six buttons are located. With the
first four, one can move selected options from left to right and vice versa. The last two buttons can be used to undo
and/or redo a missed assignment.
15.1 Features
The DualSelector widget is well known to Django admin users. There it is named filter_horizontal which is a somehow
misleading name. In django-formset, this widget however offers many more features than its Django’s counterpart.
15.1.1 Asynchronous loading
While assigning options, the Django model used to map from – can be huge and contain millions of entries. In such a
situation it would take a lot of resources to load all the options at once. Therefore django-formset only loads a small
portion of the available options. By scrolling to the end of the select element, another chunk of options will be loaded
from the server. So in case the mapping table contains too many options, it is advisable to use the search field located
on top of the select element rather than scrolling down and waiting for the next chunk of options to be loaded from the
server.
59
django-formset, Release 0.13.4
15.1.2 Search Fields
On top of the left- and right select fields, there is one search input field each. While typing, django-formset narrows
down the number of available options. Here the left input field sends the string typed into, to the server performing a
remote lookup. Using the database to search for an entry is much more efficient, rather than doing this using JavaScript
inside the browser.
15.1.3 Undo and Redo Buttons
While working with these kinds of widgets, it can easily happen to accidentally move the wrong options. Sometimes
the only solution to this is to reset the form and restart over again. By using the DualSelector widget, one can use the
undo and redo buttons to switch to the previous selections.
15.2 Usage
The DualSelector can be used as a widget together with Django’s choice fields of type MultipleChoiceField and Mod-
elMultipleChoiceField. When declaring a form, it shall be added as widget to the field’s arguments
from django.forms import fields, forms, models, widgets
from formset.widgets import DualSelector
class PersonForm(forms.Form):
# other fields
friends = models.ModelMultipleChoiceField(
queryset=Person.objects.all(),
widget=DualSelector(search_lookup='name__icontains'),
)
Since this field can perform remote lookups, we must tell it how to look for entries in the database. Here we use a simple
Django query lookup string. There is no need for a special endpoint, but the view handling the form must inherit from
formset.views.IncompleteSelectResponseMixin.
15.2.1 Comparison with SelectizeMultiple
The DualSelector widget can be considered as the big sibling of the SelectizeMultiple Widget widget. Both widgets
use the same lookup interface and hence can arbitrarily be swapped out against each other, by changing the widget
argument in the choice field.
From a usability point of view, the SelectizeMultiple widget probably is easier to understand, especially for inexpe-
rienced users. It is best suited when only a few options (say, less than 15) shall be selectable together. And since it’s
much more compact, it shall be used if rendering space is a concern.
On the other hand, the DualSelector widget shall be used whenever the users may select many options out of a list of
options. Therefore this widget does not limit the maximum number of selectable options. It also might make sense to
use this widget, whenever some kind of undo/redo functionality is required.
60 Chapter 15. Dual Selector Widget
django-formset, Release 0.13.4
15.3 Grouping Options
Sometimes it may be desirable to group options the user may select from. As an example, consider the use case where
we want to choose one or more counties in the United States. Here we use two models with a simple relationship:
Listing 1: models.py
class State(models.Model):
code = models.CharField(max_length=2)
name = models.CharField(
max_length=20,
db_index=True,
)
class Meta:
ordering = ['name']
def __str__(self):
return self.name
class County(models.Model):
state = models.ForeignKey(
State,
on_delete=models.CASCADE,
)
name = models.CharField(max_length=30)
class Meta:
ordering = ['state', 'name']
def __str__(self):
return f"{self.name} ({self.state.code})"
Since there are 3143 counties, many of them using the same name, it would be really confusing to show them in a
simple list of options. Instead we typically would render them grouped by state. To achieve this, we have to tell the
field counties how to group them, by using the attribute group_field_name. This sets up the DualSelector-widget
to use the named field from the model specified by the queryset for grouping.
Listing 2: forms.py
class PersonForm(models.ModelForm):
# other fields
counties = models.ModelChoiceField(
queryset=County.objects.all(),
widget=DualSelector(
search_lookup='name__icontains',
group_field_name='state',
),
)
15.3. Grouping Options 61
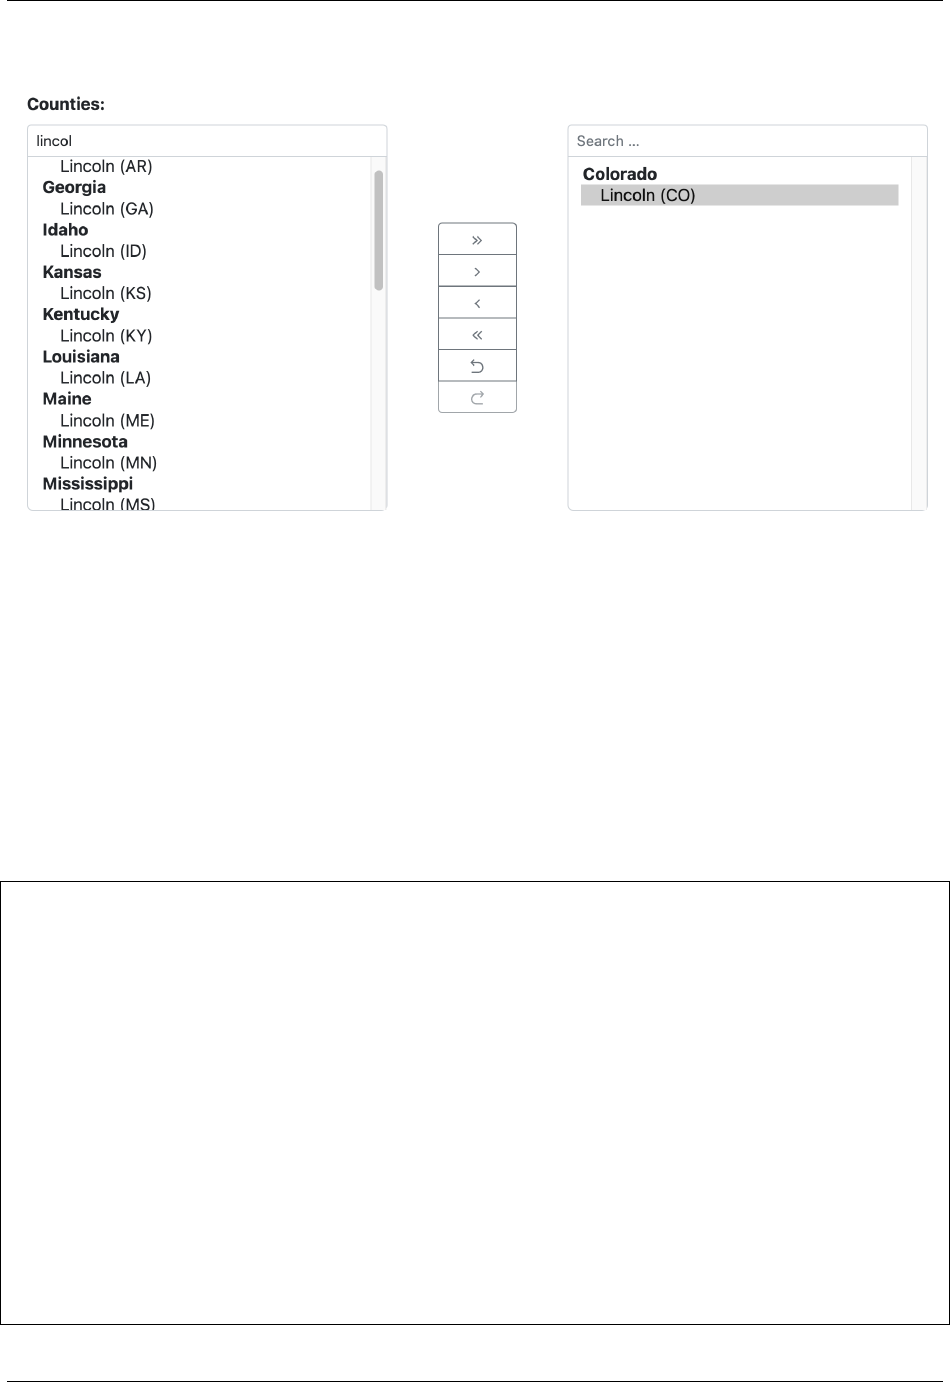
django-formset, Release 0.13.4
When rendered, the <option> elements then are grouped inside <optgroup>-s using the state’s name as their label:
15.4 Sortable Dual Selector Widget
By default, Django handles the necessary mapping model for a many-to-many relation by itself. In some situations
one might want to add additional fields to that intermediate mapping model, for example to sort the selected opinions
according to the user’s preference. This is where the special field SortableManyToManyField becomes useful.
Consider the case of a poll application where a user can select one or more opinions. We therefore need a many-to-
many relationship between the poll entity and the chosen opinions, so we typically would use a ManyToManyField
to represent this relationship. However, users shall also be allowed to weigh their chosen opinions. We can handle
this by providing our own intermediate many-to-many mapping model named WeightedOpinion, which contains two
foreign keys, one onto our PollModel, the other onto our OpinionModel and additionally a number field to specify
the weighting .
from django.db import models
from formset.fields import SortableManyToManyField
class OpinionModel(models.Model):
label = models.CharField(
"Opinion",
max_length=50,
)
class PollModel(models.Model):
weighted_opinions = SortableManyToManyField(
OpinionModel,
through='myapp.WeightedOpinion',
)
class WeightedOpinion(models.Model):
poll = models.ForeignKey(
PollModel,
(continues on next page)
62 Chapter 15. Dual Selector Widget
django-formset, Release 0.13.4
(continued from previous page)
on_delete=models.CASCADE,
)
opinion = models.ForeignKey(
OpinionModel,
on_delete=models.CASCADE,
)
weight = models.BigIntegerField(
default=0,
db_index=True,
)
class Meta:
ordering = ['weight']
After instantiating a form out of our PollModel, we replace the widget for handling the many-to-many relation against
a sortable variant named DualSortableSelector. Its behavior is the same as for the DualSelector widget as
explained above, but options inside the right select box can be sorted by dragging. This ordering value then is stored
in the field named weight used for ordering.
from django.forms import models
from formset.widgets import DualSortableSelector
from testapp.models import PollModel
class ModelPollForm(models.ModelForm):
class Meta:
model = PollModel
fields = '__all__'
widgets = {
'weighted_opinions': DualSortableSelector(search_lookup='label__icontains'),
}
When rendered this widget looks exactly the same as the DualSelector but options in its right panel can be dragged
to set their weight:
15.4. Sortable Dual Selector Widget 63

django-formset, Release 0.13.4
64 Chapter 15. Dual Selector Widget

CHAPTER
SIXTEEN
PRESELECT OPTIONS
Sometimes there are thousands of options a user can choose from a select-field. Since this is not practical using the
built-in HTML <select>-element, django-formset offers the alternative Selectize Widget, with lookup- and lazy-
loading functionality. Since the user has to type a word, at least partially, he already must know what he’s looking for.
This approach is not always practical. Consider an address form where a user must select a specific county. In the U.S.,
there are 3143 of them, many of them sharing the same name. For instance, there are 34 counties named “Washington”,
26 named “Franklin” and 24 named “Lincoln”. Using an auto-select field, would just show a long list of eponymous
counties.
To improve the user experience, we can add a field named “state” adjacent to the field named “county”. Since the user
usually knows in which state the desired county is located, that selection field then offers a reduced set of options,
namely the counties of just that state. Consider these models
Listing 1: models.py
from django.db import models
class State(models.Model):
name = models.CharField()
class County(models.Model):
state = models.ForeignKey(
State,
on_delete=models.CASCADE,
)
name = models.CharField(
verbose_name="Name",
max_length=30,
)
To make use of this feature, the widgets Selectize, SelectizeMultiple and DualSelector accept the optional
argument filter_by which must contain a dictionary where each key maps to an adjacent field and its value must
contain a lookup expression:
Listing 2: forms.py
from django.forms import forms, models
from formset.widgets import Selectize
from .models import County, State
class StateForm(forms.Form):
(continues on next page)
65

django-formset, Release 0.13.4
(continued from previous page)
state = fields.ChoiceField(
choices=lambda: [(state.id, state.name) for state in State.objects.all()],
required=False,
)
county = models.ModelChoiceField(
queryset=County.objects.all(),
widget=Selectize(
search_lookup=['name__icontains'],
filter_by={'state': 'state__id'},
),
)
Here, by selecting a state using the choice field state, the user can make a preselection. When the state is changed, the
other field county gets filled with all counties belonging to that state. This filtering is done using the lookup expression
state_id on the given queryset.
Setting up a form using this functionality can improve the user experience, as it reduces the available options the user
must choose from. This can be a better alternative rather than using option groups. This feature also works for the
special select widgets accepting multiple options, such as SelectizeMultiple and DualSelector.
66 Chapter 16. Preselect Options
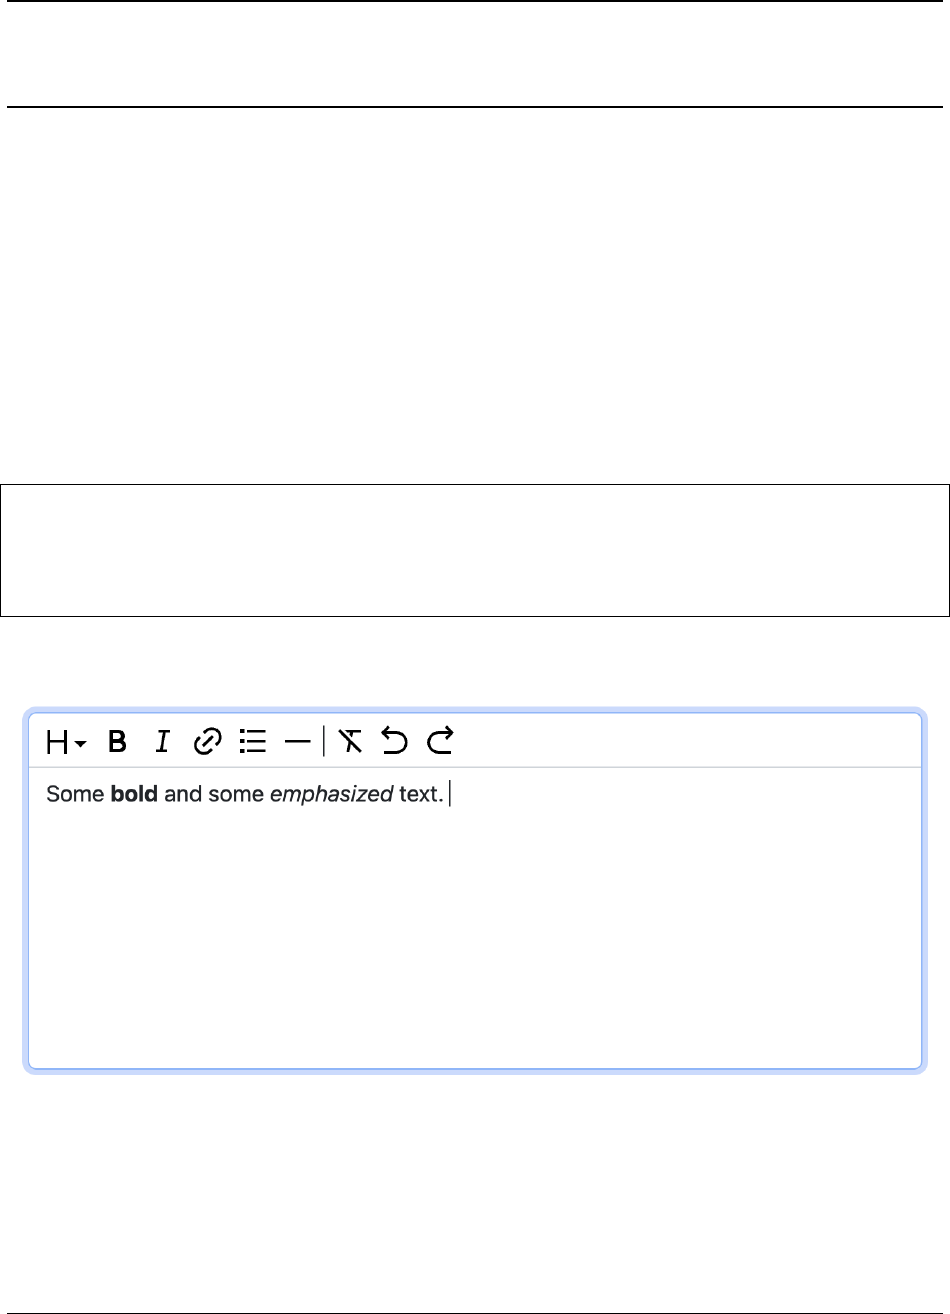
CHAPTER
SEVENTEEN
EDIT RICH TEXT
A Rich Textarea allows editing or pasting formatted text, similar to traditional “What you see is what you get” (WYSI-
WYG) editors. The current implementation offers common text formatting options such as paragraphs, headings, em-
phasized and bold text, ordered and bulleted lists, and hyperlinks. More text formatting options will be implemented
in the future.
The django-formset library provides a widget, which can be used as a drop-in replacement for the HTML element
<textarea>, implemented as web component. In a Django form’s CharField, we just have to replace the built-in
widget against formset.richtext.widgets.RichTextarea.
from django.forms import fields, forms
from formset.richtext.widgets RichTextarea
class SomeForm(forms.Form):
text = fields.CharField(widget=RichTextarea)
This widget can be configured in various ways in order to specifically enable the currently implemented formatting
options. With the default settings and using the Bootstrap renderer, this textarea will show up like:
67
django-formset, Release 0.13.4
17.1 Configuration
When offering a rich textarea, the default formatting options may not be appropriate. Therefore, the widget class
RichTextarea can be configured using various control elements.
from formset.richtext import controls
from formset.richtext.widgets RichTextarea
richtext_widget = RichTextarea(control_elements=[
controls.Bold(),
controls.Italic(),
])
This configuration would only allow to format text using bold and italic. Currently django-formset implements these
formatting options:
Heading
The class formset.richtext.controls.Heading can itself be configured using a list of levels from 1 through 6.
Heading([1, 2, 3]) allows for instance, to format a heading by using the HTML tags <h1>, <h2> and <h3>. If
provided without parameters, all 6 possible heading levels are available. If only one level is provided, for instance as
Heading(1), then the heading button does not provide a pull down menu, but instead is rendered as a single H1 button.
This allows placing heading buttons for different levels on the toolbar side by side.
Bold
The class formset.richtext.controls.Bold can be used to format a selected part of the text in bold variant of the
font. It can’t be further configured.
Italic
The class formset.richtext.controls.Italic can be used to format a selected part of the text in an emphasized
(italic) variant of the font. It can’t be further configured.
Underline
The class formset.richtext.controls.Underline can be used to format a selected part of the text as underlined.
This option rarely makes sense. It can’t be further configured.
BulletList
The class formset.richtext.controls.BulletList can be used to format some text as a bulleted list. It can’t be
further configured.
68 Chapter 17. Edit Rich Text

django-formset, Release 0.13.4
OrderedList
The class formset.richtext.controls.OrderedList can be used to format some text as ordered (ie. numbered)
list. It can’t be further configured.
HorizontalRule
The class formset.richtext.controls.HorizontalRule can be used to add a horizontal rule between paragraphs
of text. It can’t be further configured.
ClearFormat
The class formset.richtext.controls.ClearFormat can be used to remove the current format settings of selected
text. It can’t be further configured.
Undo and Redo
The classes formset.richtext.controls.Undo and formset.richtext.controls.Redo can be used to undo
and redo changes on the current text. They can’t be further configured.
Link
The class formset.richtext.controls.Link can be used to add a hyperlink to a selected part of some text. When
choosing this option, a modal dialog pops up and the user can enter a URL.
Separator
The class formset.richtext.controls.Separator has no functional purpose. It can be used to separate the other
buttons visually using a vertical bar.
17.2 Implementation
This richtext area is based on the Tiptap framework. This framework offers many more formatting options than currently
implemented by the django-formset library. In the near future I will add many more of those control elements. Please
help me to implement them by contributing to these projects.
17.3 Richtext as a Model Field
In the example from above, we used a Django form CharField and replaced the default widget provided by Django
(TextInput). A more common use case is to store the entered rich text in a database field. Here django-formset
offers two solutions:
17.2. Implementation 69
django-formset, Release 0.13.4
17.3.1 Storing rich text as HTML
Storing rich text as HTML inside the database using the field django.db.models.fields.TextField is the simplest solution.
It however requires to override the default widget (Textarea) against the RichTextarea provided by django-formset,
when instantiating the form associated with this model.
If the content of such a field shall be rendered inside a Django template, do not forget to mark it as “safe”, either by
using the function django.utils.safestring.mark_safe or by using the template filter {{ . . . |safe }}.
17.3.2 Storing rich text as JSON
Since HTML content has an implicit tree structure, an alternative approach to HTML is to keep this hierarchy unaltered
when storing. The best suited format for this is JSON. This approach has the advantage, that HTML is rendered during
runtime, allowing to adopt the result as needed.
django-formset provides a special model field class formset.richtext.fields.RichTextField. It shall be used
as a replacement to Django’s model field class TextField. This model field provides the widget RichTextarea using
the default settings. Often that might not be the desired configuration, and it may be necessary to re-declare that widget,
while creating the form from the model.
Since the content is stored in JSON, it has to be converted to HTML before being rendered. For this purpose django-
formset offers a templatetag, which can be used such as:
{% load richtext %}
{% render_richtext obj.content %}
Here obj is a Django model instance with a field of type RichTextField.
17.3.3 Overriding the Renderer
By postponing the conversion from JSON to a readable format, we can keep our document structure until it is rendered.
django-formset provides default templates for this conversion, but you may want to use your own ones:
{% load richtext %}
{% render_richtext obj.content "path/to/alternative/doc.html" %}
The template doc.html is the starting point for each document. Looking at the structure of a rich text document stored
in JSON, we see the hierachical structure:
{
"text": {
"type": "doc",
"content": [{
"type": "paragraph",
"content": [{
"type": "text",
"text": "This is "
}, {
"type": "text",
"marks": [{
"type": "bold"
(continues on next page)
70 Chapter 17. Edit Rich Text

django-formset, Release 0.13.4
(continued from previous page)
}],
"text": "bold"
}, {
"type": "text",
"text": " "
}, {
"type": "text",
"marks": [{
"type": "italic"
}],
"text": "and italic"
}, {
"type": "text",
"text": " text."
}]
}]
}
}
The type determines the template to use, whereas content is a list of nodes, rendered using their own sub-template
determined by their own type.
When rendered by the default richtext/doc.html template, its output looks like:
<p>This is <strong>bold</strong> <em>and italic</em> text.</p>
17.3. Richtext as a Model Field 71

django-formset, Release 0.13.4
72 Chapter 17. Edit Rich Text
CHAPTER
EIGHTEEN
SLUG INPUT FIELD
This widget is used to create a “slug” using the value of another input field, which typically is a text field. It usually is
used as the browser’s counterpart for a Django SlugField.
The Django Admin provides such client-side functionality, where one can specify that (slug) field to be prepopulated
using the content of another text input field. To emulate a similar behavior, django-formset provides a special widget
named SlugInput.
from django.forms import fields, forms
from formset.widgets import SlugInput
class ArticleForm(...):
...
title = fields.CharField(
label="Title",
max_length=100,
)
slug = fields.SlugField(
label="Slug",
widget=SlugInput('title'),
)
...
This widget takes a single attribute with the name of another field of the same form. That field’s input value then is
used to prepopulate the slug field, where the generated value is produced by concatenating the values of the source
fields, and then by transforming that result into a valid slug (e.g. substituting dashes for spaces, lowercasing letters and
rewriting unicode characters to ASCII letters).
Prefilled slug fields aren’t modified after a value has been saved as this usually is undesired behavior.
18.1 Implementation
This implementation of the SlugInput widget is based on the JavaScript library slug by Rich Trott and contributors.
73

django-formset, Release 0.13.4
74 Chapter 18. Slug Input Field

CHAPTER
NINETEEN
DEVELOPING IN DJANGO-FORMSET
django-formset is a 3rd party Django library partially written in Python, TypeScript and PEG.js. The last two appli-
cations are required for the client part and make up about one third of the code base.
The code can be found on GitHub. Please use the issue tracker only the report bugs. For questions and new ideas,
please use the Discussion board.
When building this library locally, it therefore is strongly recommended that you install the whole tool-chain required
to build the test application:
git clone https://github.com/jrief/django-formset.git
cd django-formset
python -m venv .venv
source .venv/bin/activate
pip install -r testapp/requirements.txt
pip install --no-deps -e .
npm install --also=dev
npm run tag-attributes
npm run tailwindcss
npm run build
testapp/manage.py migrate
testapp/manage.py runserver
Open http://localhost:8000/ in your browser. There is a long list of examples for all kinds of purposes.
19.1 Setting up and running Tests
Since there is a lot of interaction between the browser and the server, the client is tested using pytest together with
Playwright. The latter is a testing framework to run end-to-end tests using a headless browser. It must be initialized
using:
playwright install
Then run the testsuite
pytest testapp
75

django-formset, Release 0.13.4
19.2 Building the Parser
The content of the button attribute click, and the input field and fieldset attributes show-if, hide-if and
disable-if are parsed before being evaluated by the code implementing the web component. This parser is gen-
erated using PEG.js and compiles to a pure TypeScript module. The grammar describing this proprietary syntax can
be found in assets/tag-attributes.pegjs. The final parser is generated using npm run tag-attributes and
written to client/django-formset/tag-attributes.ts. It then is imported by the code implementing the web
component client/django-formset/DjangoFormset.ts.
19.3 Building the Client
The client part consists of a few TypeScript modules which all are compiled and bundled to JavaScript using npm run
esbuild. The default TypeScript compiler used in this project is esbuild, which currently is the fastest compiler of its
kind.
The client can be built in three ways:
npm run esbuild
This creates a bundle of JavaScript modules. The main entry point is found in file formset/static/
formset/django-formset.js. This file only contains the core functionality, ie. that one, required for
web component <django-formset>. The JavaScript code for all other web components, such as <select
is="django-selectize">, <django-dual-selector>, <textarea is="django-richtext">, etc. is loaded
automatically upon request.
This is the default setting.
npm run esbuild.monolith
This creates one single monolithic JavaScript module, named formset/static/formset/django-formset.js. In
some circumstances this might be preferable over many splitted modules.
npm run rollup
This works similar to esbuild. However instead of using the esbuild compiler it uses rollup + babel + terser.
I haven’t found any compelling reason why to use rollup instead of esbuild, since building the bundle takes much
longer and the output sizes are comparable. For reasons of code hygiene, one sample of the unit tests is run using this
setup.
19.4 Running the Django Test App
The unit tests and the application used to test the functionality, share a lot of code. In my opinion this is really important,
because when writing code for end users, manual testing is mandatory. Therefore all unit tests provided with this
application have been manually verified. Otherwise I could not guarantee a user experience which feels natural.
76 Chapter 19. Developing in django-formset

CHAPTER
TWENTY
CONTRIBUTING TO THE PROJECT
• Please ask question on the discussion board.
• Ideas for new features shall be discussed on that board as well.
• The issue tracker must exclusively be used to report bugs.
• Except for very small fixes (typos etc.), do not open a pull request without an issue.
20.1 Writing Code
Before hacking into the code, adopt your IDE to respect the projects’s .editorconfig file.
When installing from GitHub, you must build the project from scratch as described in section Developing in django-
formset.
20.2 Reporting Bugs
For me it often is very difficult to comprehend why this library does not work with your project. Therefore wheneever
you want to report a bug, report it in a way so that I can reproduce it.
Checkout the code, build the client and run the demo as decribed in the previous section. Every feature offered by
django-formset is implemented in the demo named testapp. If you can reproduce the bug there, report it. Otherwise
check why your application behaves differently.
If you have a special setup which triggers a bug, clone this project and rebuild an example in testapp, so that I can
run that sample in a reproducile way.
20.3 Adding new Features
If you want to add a new feature to django-formset, please first describe your intention on the discussion board. It will
save you and me hours of wasteless work, because I will not merge unsolicited pull requests.
Don’t hide yourself : I will not accept large pull requests from anonymous users, so please publish an email address in
your GitHub’s profile. Reason is that when refactoring the code, I must be able to contact the initial author of a feature
not added by myself. I also will not accept large pull requests from unsigned commits.
Don’t be offended, if I don’t respond immediatly. I have many projects on GitHub which all require their maintainance
share. Feel free to invite me to conferences or ping me on Twitter or LinkedIn.
If you add a new feature, there must be working example in testapp. Doing so has three benefits:
77

django-formset, Release 0.13.4
• I can understand way better what it does and how that new feature works. This increases the chances of being
accepted and merged.
• You can use that same code to adopt the test suite.
• Everybody can manually test, how that feature looks and feels in various CSS frameworks.
Remember: For UI-centric applications such as this one, where the client- and server-side are strongly entangled with
each other, I prefer end-to-end tests way more rather than unit tests. Reason is, that otherwise I would have to mock
the interfaces, which itself is error-prone and additional work.
20.4 Quoting
Please follow these rules when quoting strings:
• A string intended to be read by humans shall be quoted using double quotes: “. . . ”.
• An internal string, such as dictionary keys, etc. (and thus usually not intended to be read by humans), shall be
quoted using single quotes: ‘. . . ’. This makes it easier to determine if we have to extra check for wording.
There is a good reason to follow this rule: Strings intended for humans, sometimes contain apostrophes, for instance
“This is John’s profile”. By using double quotes, those apostrophes must not be escaped. On the other side whenever
we write HTML, we have to use double quotes for parameters, for instance ‘<a href=”https://example.org”>Click
here!</a>’. By using single quotes, those double quotes must not be escaped.
20.5 Lists versus Tuples
Unfortunately in Django, we developers far too often intermixed lists and tuples without being aware of their intention.
Therefore please follow this rule:
Always use lists, if there is a theoretical possibility that someday, someone might add another item. Therefore
list_display, list_display_links, fields, etc. must always be lists.
Always use tuples, if the number of items is restricted by nature, and there isn’t even a theoretical possibility of being
extended.
Example:
color = ChoiceField(
label="Color",
choices=[('ff0000', "Red"), ('00ff00', "Green"), ('0000ff', "Blue")],
)
A ChoiceField must provide a list of choices. Attribute choices must be a list because it is eligible for extension.
Its inner items however must be tuples, because they can exlusively containin the choice value and a human readable
label. Here we also intermix single with double quotes to distinguish strings intended to be read by the machine versus
a human.
78 Chapter 20. Contributing to the Project

CHAPTER
TWENTYONE
INDICES AND TABLES
• genindex
• modindex
• search
79
