
IMPORTANT
WEAR
SAFETY GLASSES
INSTALLATION INSTRUCTIONS
TACHOMETER
NOT Valid for Race Contingency.
Instr. No. 2650-909D
WARNING
Warranty will be void if connected
to coil on MSD ignitions. Attach
only to tach terminal.
The special design of the
tachometer base allows for a
variety of mounting possibilities.
Attach the base using screws
provided or use pop rivet tool.
NOTE: This tachometer operates on most early model, factory electronic and electronic racing ignitions, such as Hy Fire and MSD.
Calibration
Mounting
NOTE: This tachometer has an air core
meter. The tach pointer may not
always rest at zero. This is normal.
When 12 volt power is applied and the
engine is running, pointer will position
on the correct rpm.
IMPORTANT
This tachometer is factory
calibrated to operate on 8 cylinder
engines. For 4 or 6 cylinder engines,
it is necessary to make the proper
adjustments to adapt this tacho-
meter to your cylinder range. Simply
clip the necessary wire loops as
shown. Insulate wires with electrical
tape to prevent electrical shorts.
8 CYL.—NO adjustment is necessary.
6 CYL.—Clip BROWN wire loop only.
Insulate with electrical tape.
4 CYL.—Clip BROWN and ORANGE
wire loops. Insulate with
electrical tape.
CLIP NECESSARY WIRE
LOOPS. DO NOT PUSH
WIRES INTO CASE.
12V DASH LIGHTING
12V IGNITION SWITCH (+)
GROMMET
IN FIREWALL
GOOD
ENGINE
GROUND
Wiring
WHITE
RED
BLACK
BLACK
GREEN
EARLY
MODEL
IGNITION
ELECTRONIC
IGNITION
OR
GREEN
GREEN
COIL
Tach
Ter minal
TM
by
®
®
CAUTION!!!
As a safety precaution the RED wire of this product should be fused before
connecting it to the positive (+) side of the 12V DC battery. We recommend
using a 4 Amp, 3AG fast-acting type cartridge fuse (Littlefuse
®
# 312 004 or an equivalent) inline with the RED wire of our product.
FUSE
(See Caution Below)
FOR SERVICE SEND TO: AUTO METER PRODUCTS, INC. 413 W. Elm St., Sycamore, IL 60178 USA (815) 895-8141
Email us at service@autometer.com
2650-909D 1/8/04
by
S
H
I
F
T
-
S
E
T
TACHOMETER
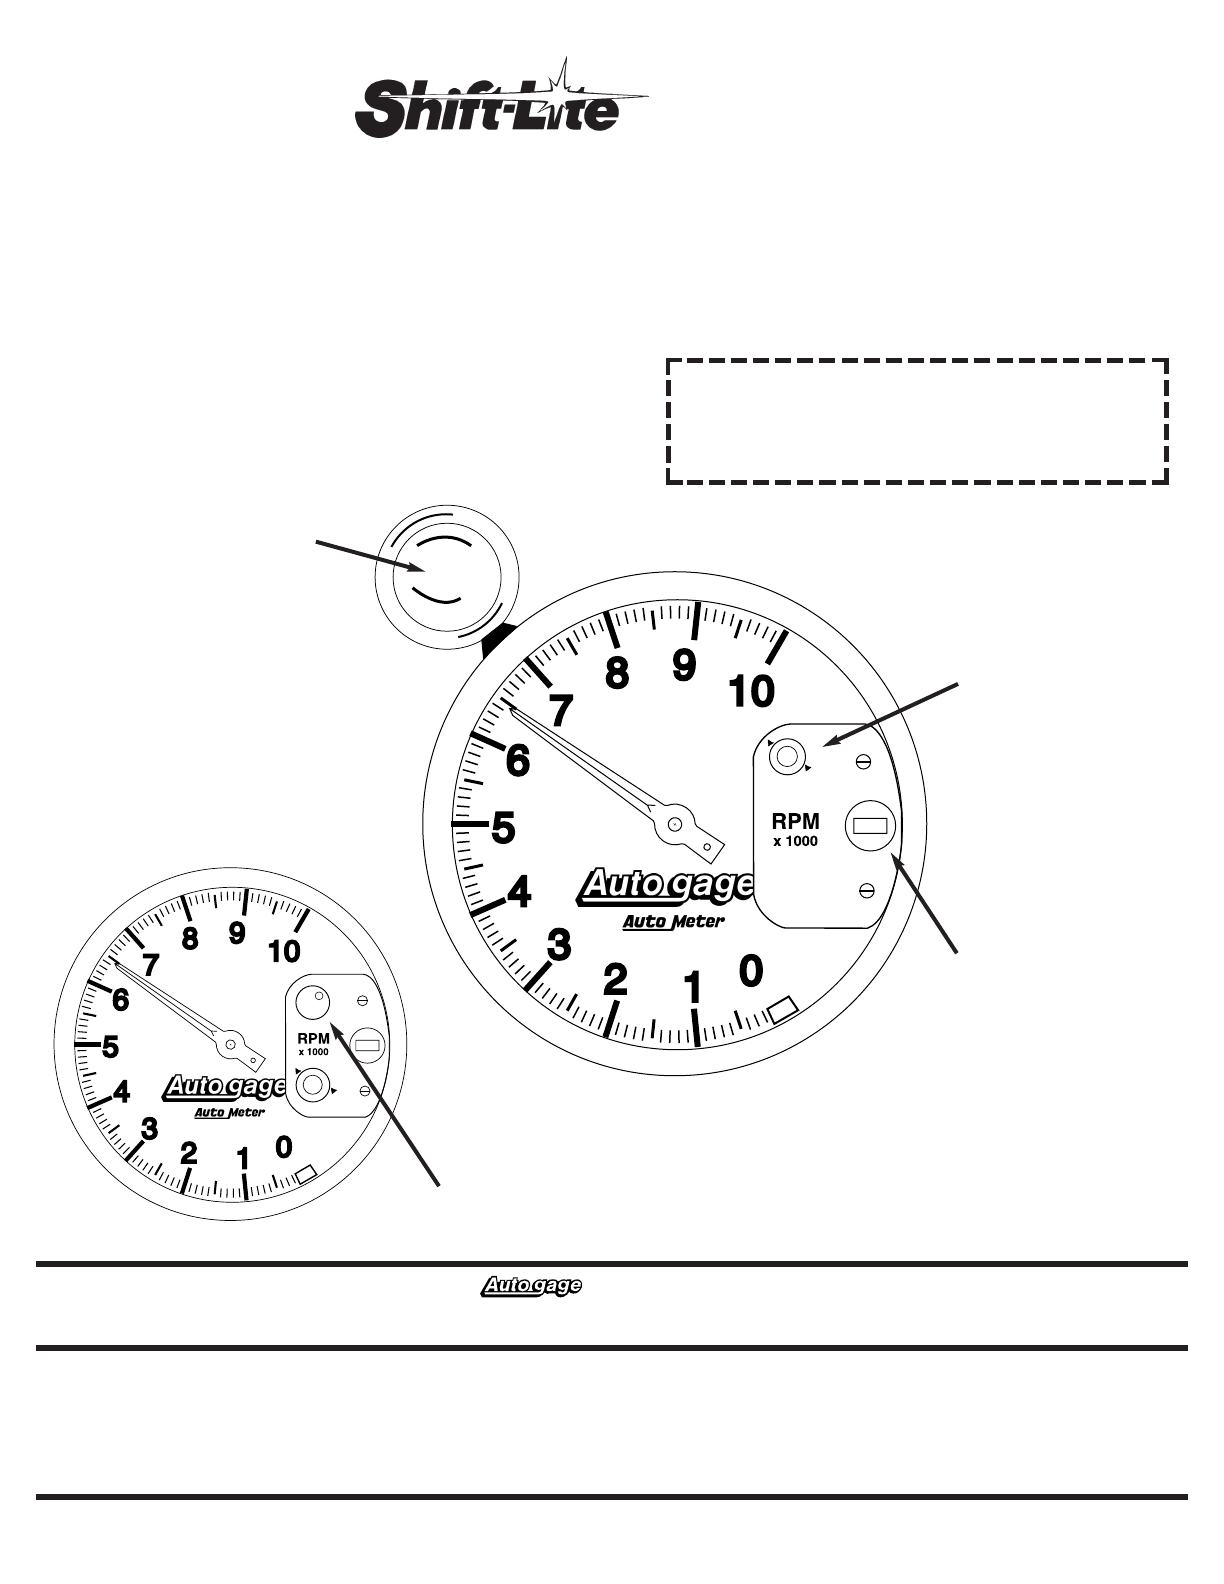
Shift-Point Selection
Dial light: For wedge
base bulb replacement,
order Auto Meter 3219
or GE 86 bulb. Turn
socket 1/8 turn counter-
clockwise to remove.
1. Determine your engine's shift point for maximum
horsepower (for example, 5400 rpm).
2. Turn on the power to the tach by turning the key on (Do Not
start the engine). Set the desired RPM by turning the adjust
knob on the tach; the pointer will move. Stop when it
reaches the desired shift point.
3. Turn the power off. The tach will now use the selected shift
point, until set differently.
4. During normal tachometer operation,the shift light will come
on when the tachometer reaches your set point. It will stay
on until the engine speed drops below the set point.
Shift-Set: To dial-in your
desired shift-point turn
the Shift-Set knob with
power on. (
See above for
complete details.)
Shift-lite: For shift-lite
bulb replacement,
remove three screws on
light. The bulb, located
in the rear section, is
easily removed by
pushing and rotating
it counter-clockwise.
Replace with #1076
automotive bulb.
TM
Note: The shift point setting can be checked anytime the
vehicle is started. Turn the ignition on and the shift point
setting will show on the dial.
WARNING
Check with engine builder for maximum recommended safe
shift point before setting shift point on tachometer. Failure to
do this could lead to over-revving of engine, causing serious
damage to engine and car.
SERVICE
For service send your product to Auto Meter in a well packed shipping carton. Please include a note explaining what the problem is along with your phone number. Please specify when you need
the product back. If you are sending product back for Warranty adjustment, you must include a copy (or original) of your sales receipt from the place of purchase.
Model 233904 Shown Here
Model 233903
by
S
H
I
F
T
-
S
E
T
233903 Shift-lite: The Shift-Lite on model 233903
is located on the dial face.
12 MONTH LIMITED WARRANTY
The manufacturer warrants to the consumer that this product will be free from defects in materials and workmanship for a period of twelve (12) months from the date of the original purchase. Products that fail
within this 12 month warranty period will be repaired or replaced at the manufacturer's option to the consumer, when determined by the manufacturer that the product failed because of defects in material or
workmanship. This warranty is limited to the repair or replacement of parts in the instrument and the necessary labor done by the manufacturer to affect the repair or replacement of the instrument. In no
event shall this warranty exceed the original purchase price of the instrument, nor shall the manufacturer be responsible for special, incidental or consequential damages or costs incurred due to failure of this
product. Warranty claims to the manufacturer must be transportation prepaid and accompanied with dated proof of purchase. This warranty applies only to the original purchaser of product and is non-
transferable. All implied warranties shall be limited in duration to the said 12 month warranty period. Breaking the meter seal, improper use or installation, accident, water damage, abuse, unauthorized repairs
or alterations voids this warranty. The manufacturer disclaims any liability for consequential damages due to breach of any written or implied warranty on all products made by the manufacturer.
© 2004 Auto Meter Products, Inc.
