
Biology
Laboratory Manual
Twelfth Edition
Darrell S. Vodopich
Baylor University
Randy Moore
University of Minnesota
vod00720_fm_i-xii.indd 1 10/16/18 1:57 PM

BIOLOGY LABORATORY MANUAL, TWELFTH EDITION
Published by McGraw-Hill Education, 2 Penn Plaza, New York, NY 10121. Copyright © 2020 by
McGraw-Hill Education. All rights reserved. Printed in the United States of America. Previous editions
© 2017, 2014, and 2011. No part of this publication may be reproduced or distributed in any form or by any
means, or stored in a database or retrieval system, without the prior written consent of McGraw-Hill Education,
including, but not limited to, in any network or other electronic storage or transmission, or broadcast for
distance learning.
Some ancillaries, including electronic and print components, may not be available to customers outside the
United States.
This book is printed on acid-free paper.
1 2 3 4 5 6 7 8 9 LMN 21 20 19
ISBN 978-1-260-20072-0 (bound edition)
MHID 1-260-20072-8 (bound edition)
ISBN 978-1-260-41330-4 (loose-leaf edition)
MHID 1-260-41330-6 (loose-leaf edition)
Portfolio Manager: Andrew Urban
Product Developer: Donna Nemmers
Marketing Manager: Kelly Brown
Content Project Managers: Jessica Portz & Sandra Schnee
Buyer: Laura Fuller
Design: David W. Hash
Content Licensing Specialist: Lorraine Buczek
Cover Image: ©Darrell S. Vodopich
Compositor: MPS Limited
All credits appearing on page are considered to be an extension of the copyright page.
Some of the laboratory experiments included in this text may be hazardous if materials are handled improperly
or if procedures are conducted incorrectly. Safety precautions are necessary when you are working with
chemicals, glass test tubes, hot water baths, sharp instruments, and the like, or for any procedures that generally
require caution. Your school may have set regulations regarding safety procedures that your instructor
will explain to you. Should you have any problems with materials or procedures, please ask your instructor
for help.
The Internet addresses listed in the text were accurate at the time of publication. The inclusion of a website
does not indicate an endorsement by the authors or McGraw-Hill Education, and McGraw-Hill Education does
not guarantee the accuracy of the information presented at these sites.
mheducation.com/highered
vod00720_fm_i-xii.indd 2 10/16/18 1:57 PM

iii
TOC–1
Preface v
Teaching and Learning Tools viii
Welcome to the Biology Laboratory ix
Exercise 1
Scientific Method: The Process of Science 1
Exercise 2
Measurements in Biology: The Metric System and Data Analysis 11
Exercise 3
The Microscope: Basic Skills of Light Microscopy 21
Exercise 4
The Cell: Structure and Function 33
Exercise 5
Solutions, Acids, and Bases: The pH Scale 49
Exercise 6
Biologically Important Molecules: Carbohydrates, Proteins, Lipids,
and Nucleic Acids 57
Exercise 8
Spectrophotome s and Determining
TheirConcentra
try: Identifying Solute
tion 81
Exercise 9
Diffusion and O ment of Molecules
in Biological Systems 93
Exercise 10
Cellular Membranes: Effects of Physical and Chemical Stress 105
Exercise 11
Enzymes: Factors Affecting the Rate of Activity 113
Exercise 12
Respiration: Aerobic and Anaerobic Oxidation of Organic Molecules 125
Exercise 13
Photosynthesis: Pigment Separation, Starch Production,
and CO
2
Uptake 137
Exercise 14
Mitosis: Replication of Eukaryotic Cells 149
Exercise 15
Meiosis: Reduction Division and Gametogenesis 159
smosis: Passive Move
Exercise 16
Molecular Biology and Biotechnology: DNA Isolation
and Genetic Transformation 171
Exercise 17
Genetics: The Principles of Mendel 179
Exercise 18
Evolution: Natural Selection and Morphological Change
in Green Algae 195
Exercise 19
Human Evolution: Skull Examination 207
Exercise 20
Ecology: Diversity and Interaction in Plant Communities 217
Exercise 21
Community Succession 227
Exercise 22
Population Growth: Limitations of the Environment 235
Exercise 23
Pollution: The Effects of Chemical, Thermal,
and Acidic Pollution 243
Exercise 24
Survey of Prokaryotes: Domains Archaea and Bacteria 253
Exercise 25
Survey of Protists: The Algae 269
Exercise 26
Survey of Protists: Protozoa and Slime Molds 283
Exercise 27
Survey of the Kingdom Fungi: Molds, Sac Fungi, Mushrooms,
and Lichens 293
Exercise 28
Survey of the Plant Kingdom: Liverworts, Mosses, and Hornworts
of Phyla Hepaticophyta, Bryophyta, and Anthocerophyta 307
Exercise 29
Survey of the Plant Kingdom: Seedless Vascular Plants of Phyla
Pterophyta and Lycophyta 317
Exercise 30
Survey of the Plant Kingdom: Gymnosperms of Phyla Cycadophyta,
Ginkgophyta, Coniferophyta, and Gnetophyta 329
Exercise 31
Survey of the Plant Kingdom: Angiosperms 339
vod00720_fm_i-xii.indd 3 10/16/18 1:57 PM
ContentsContents
Exercise 7
Separating Organic Compounds: Column Chromatography,
Paper Chromatography, and Gel Electrophoresis 71

iv
TOC–2
Exercise 32
Plant Anatomy: Vegetative Structure of Vascular Plants 355
Exercise 33
Plant Physiology: Transpiration 369
Exercise 34
Plant Physiology: Tropisms, Nutrition, and Growth Regulators 377
Exercise 35
Bioassay: Measuring Physiologically Active Substances 389
Exercise 36
Survey of the Animal Kingdom: Phyla Porifera and Cnidaria 395
Exercise 37
Survey of the Animal Kingdom: Phyla Platyhelminthes
and Nematoda 411
Exercise 38
Survey of the Animal Kingdom: Phyla Mollusca and Annelida 425
Exercise 39
Survey of the Animal Kingdom: Phylum Arthropoda 439
Exercise 40
Survey of the Animal Kingdom: Phyla Echinodermata and Chordata 453
Exercise 41
Vertebrate Animal Tissues: Epithelial, Connective, Muscular,
and Nervous Tissues 473
Exercise 42
Human Biology: The Human Skeletal System 489
Exercise 43
Human Biology: Muscles and Muscle Contraction 497
Exercise 44
Human Biology: Breathing 505
Exercise 45
Human Biology: Circulation and Blood Pressure 515
Exercise 46
Human Biology: Sensory Perception 529
Exercise 47
Vertebrate Anatomy: External Features and Skeletal
System of the Rat 539
Exercise 48
Vertebrate Anatomy: Muscles and Internal Organs of the Rat 547
Exercise 49
Vertebrate Anatomy: Urogenital and Circulatory Systems of the Rat 557
Exercise 50
Embryology: Comparative Morphologies and Strategies
of Development 569
Exercise 51
Animal Behavior: Taxis, Kinesis, and Agonistic Behavior 579
Appendix I
Dissection of a Fetal Pig 585
Appendix II
Conversion of Metric Units to English Units 592
vod00720_fm_i-xii.indd 4 10/16/18 1:57 PM

v
Contents
Preface
W
e have designed this laboratory manual for an intro-
ductory biology course with a broad survey of basic
laboratory techniques. The experiments and procedures are
simple, safe, easy to perform, and especially appropriate for
large classes. Few experiments require more than one class
meeting to complete the procedure. Each exercise includes
many photographs and illustrations, traditional topics, and
experiments that help students learn about life. Procedures
within each exercise are numerous and discrete so that an
exercise can be tailored to the needs of the students, the style
of the instructor, and the facilities available.
TO THE STUDENT
We hope this manual is an interesting guide to many areas
of biology. As you read about these areas, you’ll probably
spend equal amounts of time observing and experimenting.
Don’t hesitate to go beyond the observations that we’ve
outlined—your future success as a scientist and an informed
citizen depends on your ability to seek and notice things that
others may overlook. Now is the time to develop this ability
with a mixture of hard work and relaxed observation. Have
fun, and learning will come easily. Also, remember that this
manual is designed with your instructors in mind as well. Go
to them often with questions—their experience is a valuable
tool that you should use as you work.
TO THE INSTRUCTOR
This manual’s straightforward approach emphasizes experi-
ments and activities that optimize students’ investment of
time and your investment of supplies, equipment, and prepa-
ration. Simple, safe, and straightforward experiments are
most effective if you interpret the work in depth. Most exper-
iments can be done easily by a student in 2 to 3 hours. Ter-
minology, structures, photographs, and concepts are limited
to those that the student can readily observe and understand.
In each exercise we have included a few activities requiring
a greater investment of effort if resources are available, but
omitting them will not detract from the objectives.
This manual functions best with an instructor’s guid-
ance and is not an autotutorial system. We’ve tried to guide
students from observations to conclusions, to help students
make their own discoveries, and to make the transition from
observation to understanding biological principles. But
discussions and interactions between student and instructor
are major components of a successful laboratory experi-
ence. Be sure to examine the “Questions for Further Study
and Inquiry” in each exercise. We hope they will help you
expand students’ perceptions that each exercise has broad
application to their world.
DIGITAL INTEGRATION
As educators, we recognize that today’s students are digital
learners. Virtually every exercise of this manual is accom-
panied by tailor-made digital resources, including assign-
able questions and a variety of high-definition videos,
PowerPoint images, and other resources that demonstrate
basic techniques, emphasize biological principles, test for
understanding, and engage students as they learn biology
in the laboratory.
Digital resources are available to instructors at connect
.mheducation.com. Instructors will want to assign these
resources to help students know what they’ll be doing, what
principles they’ll be investigating, and what concepts they’ll
need to understand before coming to lab.
WHAT’S NEW IN THIS EDITION
Throughout the manual, we have expanded and improved
several of the most popular and effective features of
previous editions, including
∙
Learning Objectives have been updated to provide
an overview of what students will do and learn in the
exercise.
∙ Procedures and Doing Biology Yourself require stu-
dents to do biology as they apply skills they’ve learned
to develop and study hypotheses about biology.
∙ Questions throughout each exercise encourage students
to pause and think about their data and what they’ve
learned in lab.
∙ Questions for Further Study and Inquiry at the
end of each exercise help students apply what they’ve
learned to broader topics and issues in biology.
∙ Writing to Learn Biology encourages students to
develop their ideas about what they learned in lab.
P–1
vod00720_fm_i-xii.indd 5 10/16/18 1:57 PM

vi
∙
P–2
Caution and Safety First icons make students aware of
safety issues associated with the procedures they’ll use
in lab.
∙ Boxed readings titled Inquiry-Based Learning encourage
students to apply what they’ve learned to independently
answer questions about intriguing biological topics.
∙ Updated health-related exercises help students better
understand topics such as blood pressure, atherosclerosis,
and their risk of cardiovascular disease.
∙ Several illustrations have been replaced with photographs
to provide more realistic images to support the Exercise
content.
∙ Approximately 60 illustrations and photos have been
revised.
∙ Questions within procedures now include lines on which
students can write their answers.
∙ An assignable, updated library of videos and Connect
questions helps students prepare for lab and understand
the instruments and techniques that will be important
for their investigations. Instructors may assign these vid-
eos before class time to help ensure that students arrive
prepared for lab.
Exercise-Specific Changes
∙
Exercise 1—Additional explanation provided for both
mean and standard deviation
∙ Exercise 2—Mass, volume, and median are further
defined; new illustration in figure 2.3 on measuring the
volume of liquid; figure 2.4b has explanatory labels
added
∙ Exercise 3—Additional questions have been added to
Procedure 3.6 Using a dissecting microscope
∙ Exercise 4—Several illustrations have better labels; a new
photo is supplied for figure 4.6a Elodea cells; figure 4.13
has been redrawn to more directly correlate to the associ-
ated photo; a new question is added to Questions for Fur-
ther Study and Inquiry to compare plant and animal cells
∙ Exercise 6—Qualitative tests are defined; a new photo
has been added to figure 6.2 to explain Benedict’s test
∙ Exercise 7—Clarifying edits made to introductory
material
∙ Exercise 9—Explanations of hypotonic, hypertonic, and
isotonic are expanded
∙ Exercise 10—Steps of Procedures 10.1 and 10.2 are
clarified; a new question on experimental design has
been added to Questions for Further Study and Inquiry
∙
Exercise 13—Figure 13.2 caption is expanded
∙ Exercise 14—Explanation of the structure of chromatids
is expanded
∙ Exercise 15—Labels for figure 15.2 have been added
for paternal versus maternal chromosomes; description
of the structure of replicated versus nonreplicated
chromosomes has been clarified; figure 15.6 is new;
figure 15.7 is revised to clarify the state and number
of chromosomes in first polar bodies and second polar
bodies, and corpus albicans has been labeled and added
as a defined term in the text
∙ Exercise 16—Global prevalence of genetically trans-
formed crops has been updated to 2017 statistics
∙ Exercise 17—Figure 17.4 has a panel of 3 new photos
on sickle cell anemia; figure 17.6 contains improved
photos of hairlines
∙ Exercise 18—Definition of evolution is revised to
be more concise; questions about Hardy-Weinberg
genetics are expanded for clarity; a new question
about the effect of natural selection on sickle cell
anemia has been added to Questions for Further Study
and Inquiry
∙ Exercise 19—Figure 19.2 has been revised to better
illustrate lineages of human evolution; the term
“diastema” has been added and defined; figure 19.4
is relabeled for clarity
∙ Exercise 20—Procedure 20.4 is expanded to help
students design and implement experimental controls.
∙ Exercise 22—Formula for population growth is revised;
data for Figure 22.5 are updated to reflect 2018 predic-
tions; question 6 is expanded to include 2018 population
values and growth rates
∙ Exercise 23—Question 1 is revised to emphasize
hypothesis testing; table 23.3 is reorganized to accept
handwritten student data
∙ Exercise 24—Organization of domains and kingdoms
is updated to current taxonomy; table 24.1, prokaryotic
versus eukaryotic characteristics, is modified for preci-
sion; figure 24.2, structure of a bacterial cell, is revised
and contains a new photo; explanation of binary fission
is expanded to include protein FtsZ and its role in cell
separation
∙ Exercise 25—Explanations of Archaeplastida and the
term “protist” are clarified; in table 25.2 the list of
chlorophylls diagnostic to each type of algae is updated;
figure 25.4 is relabeled to clarify sexual versus asexual
reproductive paths; figure 25.8 contains a new photo of
Volvox colonies
vod00720_fm_i-xii.indd 6 10/16/18 1:57 PM

viiP–3
∙ Exercise 26—Photomicrograph and illustration of
African sleeping sickness blood cells and parasites are
revised to clarify their relationship
∙
Exercise 27—Explanations of fungal sporangiophores
and sporangia are expanded; figure 27.13 is modified
to better show the diagnostic reproductive structure,
ascus; Questions for Further Study and Inquiry has a
new question to explain the benefit of fungi to other
organisms
∙ Exercise 31—A learning objective is added on under-
standing flower structure and function; the explanation
of sporogenesis is expanded; a Question for Further
Study and Inquiry has been added to help students
understand flower parts
∙ Exercise 32—A new question is added to Questions
for Further Study and Inquiry on common leaf
morphologies
∙ Exercise 35—The definition of bioassay is revised
∙ Exercise 36—Introductions to terms animals, multi-
cellular, ancient, and primitive have been clarified;
description of intracellular versus extracellular digestion
in poriferans has been clarified
∙ Exercise 37—Taxonomic hierarchy of the classes and
subphyla of flatworms is updated; the groups Neoder-
mata and Turbellaria have been redefined and updated;
taxonomy of tapeworms is updated
∙ Exercise 39—Taxonomy of major arthropod classes has
been updated and reorganized to include Chelicerata,
Crustacea, Myriapoda, and Hexapoda; table 39.3 has
been relabeled to reflect updated arthropod taxonomy
∙ Exercise 40—The taxonomy of pre-vertebrate groups
has been updated; class Actinopterygidii has replaced
Osteichthyes; figure 40.21 of amphibian transitional
stages is revised
∙ Exercise 41—Figure 41.2 has revised labeling;
figure 41.3 is relabeled to distinguish flat cuboidal and
columnar cells more clearly; figure 41.4 is relabeled
to show Bowman’s capsule more clearly; figure 41.5
is relabeled to more clearly distinguish columnar cells;
figure 41.7 has been replaced to better show stratified
squamous epithelium; types of connective tissue have
been separated into connective tissue proper and special
connective tissue
∙ Exercise 42—Descriptions of the appendicular skel-
eton and the axial skeleton are added; the number of
skull, spine, and rib cage bones has been updated to
conventional values; figure 42.2 is new; Figure 42.4
has been replaced with improved images of normal and
osteoporotic bone; revisions to Questions for Further
Study and Inquiry
∙
Exercise 43—A new learning objective is added to
distinguish between isotonic and isometric contractions;
explanations of muscle load, muscle tone, and muscle
tension are expanded; figure 43.2 is relabeled to clearly
distinguish between flexion and extension; Procedure
43.1 concerning flexion and extension of the forearm
has been modified for clarity
∙ Exercise 44—Descriptions of negative pressure and its
role in breathing have been expanded; procedures to dis-
tinguish the role of intercostal muscles and breathing are
expanded and clarified; Procedure 44.1 has been modi-
fied for more consistent chest expansion measurements;
typical values for tidal, expiratory, inspiratory, and
residual volumes have been provided; directions for
measuring breathing rate in Procedure 44.7 are clarified
∙ Exercise 46—Figure 46.1 has been modified to illustrate
fovea centralis; Procedure 46.3 has been modified to
accommodate lab partners
∙ Exercise 47—A new Question 2 has been added;
Question 3 has been expanded to provide more
examples and practice with terms such as cranial,
caudal, lateral, distal, etc.; directions for the
skinning and abdominal incision during rat dissection
are expanded
∙ Exercise 48—Descriptions of the thyroid gland and
diaphragm are expanded; explanatory questions about
the lung structure and heart musculature are expanded
∙ Exercise 49—Figure 49.4 has been revised and enlarged
to better show the structure and cross section of a
kidney
∙ Exercise 50—Distinction has been enhanced between
the animal and vegetal poles
∙ Exercise 51—Directions are enhanced for Procedure
51.1 to examine kinesis in pill bugs; directions are
enhanced for Procedure 51.2 to study agonistic
behavior in fighting fish, to encourage better creativity
by the students in experimental design; a new question
has been added to Questions for Further Study and
Inquiry
∙ Appendix II has been updated to include upcoming
changes to how a basic unit of the metric system is
defined
vod00720_fm_i-xii.indd 7 10/16/18 1:57 PM

viii
Contents
Teaching and Learning Tools
McGraw-Hill Connect® Biology
McGraw-Hill Connect Biology
provides online presenta-
tion, assignment, and assessment solutions. It connects your
students with the tools and resources they’ll need to succeed
at connect.mheducation.com.
With Connect Biology, you can deliver assignments and
quizzes online. A robust set of questions and activities is
presented and aligned with this lab manual’s learning out-
comes. Pre-lab worksheets and Investigation worksheets
are also included within Connect. As an instructor, you can
edit existing questions and write entirely new questions.
Track students’ performance—by question, by assignment, or
in relation to the class overall—with detailed grade reports.
Integrate grade reports easily with Learning Management
Systems (LMS), such as Blackboard—and much more.
McGraw-Hill Create
TM
With McGraw-Hill Create, you can easily rearrange exer-
cises, combine material from other content sources, and
quickly upload content you have written, such as your course
syllabus or teaching notes. Find the content you need in Create
by searching through thousands of leading McGraw-Hill text-
books. Arrange your book to fit your teaching style. Create
even allows you to personalize your book’s appearance
by selecting the cover and adding your name, school, and
course information. Order a Create book and you’ll receive
a complimentary print review copy in 3–5 business days or a
complimentary electronic review copy (eComp) via e-mail in
minutes. Go to create.mheducation.com today and register
to experience how McGraw-Hill Create empowers you to
teach your students your way.
Laboratory Resource Guide
The Laboratory Resource Guide is essential for instructors
and laboratory assistants and is available free to adopters of
the Laboratory Manual within Connect under the Instructor
Resources tab.
T–1
vod00720_fm_i-xii.indd 8 10/16/18 1:57 PM

ix
Contents
Welcome to the Biology Laboratory
100
80
60
40
20
0
02040
A
B
C
D
F
60 80 100
Grade (%)
Attendance (% of classes attended)
W–1
vod00720_fm_i-xii.indd 9 10/16/18 1:57 PM
ways of learning about biology, nothing can replace the
W
elcome to the biology laboratory! Although reading
your textbook and attending lectures are important
importance of the laboratory. In lab you’ll get hands-on
experience with what you’ve heard and read about biology—
for example, you’ll observe organisms, do experiments, test
ideas, collect data, and make conclusions about what you’ve
learned. You’ll do biology.
You’ll enjoy the exercises in this manual—they’re
interesting and informative and can be completed within
the time limits of your laboratory period. We’ve provided
questions to test your understanding of what you’ve done; in
some of the exercises, we’ve also asked you to devise your
own experiments to answer questions that you’ve posed.
To make these exercises most useful and enjoyable, follow
these guidelines noted in the next sections.
THE IMPORTANCE OF COMING TO CLASS
Biology labs are designed to help you experience biology
firsthand. To do well in your biology course, you’ll need to
attend class and pay attention. To appreciate the importance
of class attendance as it relates to making a good grade in
your biology course, examine figure 1, which is a graph
showing how students’ grades in an introductory biology
Figure 1
Relationship of students’ grades in an introductory biology course to their rates of class attendance.

x
course correlate to their rates of class attendance. Data are
from a general biology class at the University of Minnesota.
On page xii, write an analysis of the data shown in figure 1.
What do these data mean?
BEFORE COMING TO LAB
Watch the lab video. Videos are provided for several of the
labs in this manual. Be sure to watch any assigned video
associated with the lab you will be completing. These videos
will help you know more about what you will be doing, what
principles you will be investigating, and what concepts you
need to understand before coming to lab.
Read the exercise before coming to lab. This will give
you a general idea about what you’re going to do, as well as
why you’re going to do it. Knowing this will not only save
time, it will also help you finish the experiments and make
you aware of any safety-related issues associated with the lab.
Review any of the lab safety concerns. Before doing
any procedures, you’ll encounter a section of each exercise
titled “SAFETY FIRST” that is marked with its icon:
This icon will warn you of safety concerns (e.g., solvents,
acids, bases, hotplates) associated with the work. If you have
questions about these safety issues, contact your lab instructor
before starting the lab work.
Notify your instructor if you are pregnant, are color-
blind, are taking immunosuppressive drugs, have allergies,
or have any other conditions that may require precautionary
measures. Also, before coming to lab, cover any cuts or
scrapes with a sterile, waterproof bandage.
WHEN IN LAB
1. Know what you are going to do. Read and understand
the lab before coming to lab.
2. Don’t start the exercise until you’ve discussed the
exercise with your laboratory instructor. She or he will
give you specific instructions about the lab and tell
you how the exercise may have been modified.
3. Work carefully and thoughtfully, and stay focused
as you work. You’ll be able to finish each exercise
within the allotted time if you are well prepared and
stay on task.
4. Discuss your observations, results, and conclusions
with your instructor and lab partners. Perhaps their
comments and ideas will help you better understand
what you’ve observed.
5. Always follow instructions and follow safety guide-
lines presented by your instructor.
6. If you have questions, ask your instructor.
SAFETY IN THE LABORATORY
Laboratory accidents can affect individuals, classes, or the
entire campus. To avoid such accidents, the exercises in this
manual were designed with safety as a top priority. You’ll
be warned about any potentially hazardous situations or
chemicals with this image:
When you see this image, pay special attention to the
instructions.
The laboratory safety rules listed in table 1 will help
make lab a safe place for everyone to learn biology. Remem-
ber, it is much easier to prevent an accident than to deal with
its consequences.
Read the laboratory safety rules listed in table 1. If
you do not understand them, or if you have questions, ask
your instructor for an explanation. Then complete table 1
and sign the statement at the bottom of page xii.
BEFORE YOU LEAVE LAB
Put away all equipment and glassware, and wipe clean your
work area.
AFTER EACH LABORATORY
Soon after each lab, review what you did. What questions
did you answer? What data did you gather? What conclu-
sions did you make?
Also note any questions that remain. Try to answer
these questions by using your textbook or visiting the
library. If you can’t answer the questions, discuss them with
your instructor. Welcome to the biology laboratory!
W–2
vod00720_fm_i-xii.indd 10 10/16/18 1:57 PM

xi
W–3
Table 1
Laboratory Safety Rules
Rule
Why is this rule important?
What could happen if this rule is not followed?
Behave responsibly. No horseplay or fooling around while in lab.
Do not bring any food or beverages into lab, and do not eat, drink, smoke,
chew gum, chew tobacco, or apply cosmetics when in lab. Never taste
anything in lab. Do not put anything in lab into your mouth. Avoid touch-
ing your face, chewing on pens, and other similar behaviors while in lab.
Always wear shoes in lab.
Unless you are told otherwise by your instructor, assume that all chemicals and
solutions in lab are poisonous, and act accordingly. Never pipette by mouth.
Always use a mechanical pipetting device (e.g., a suction bulb) to pipette solu-
tions. Clean up all spills immediately, and report all spills to your instructor.
Wear safety goggles when working with chemicals. Carefully read the labels
on bottles and know the chemical you are dealing with. Do not use chemicals
from an unlabeled container, and do not return excess chemicals back to their
container. Report all spills to your instructor immediately.
Unless your instructor tells you to do otherwise, do not pour any solutions
down the drain. Dispose of all materials as per instructions from your
instructor.
If you have long hair, tie it back. Don’t wear dangling jewelry. If you are
using open flames, roll up loose sleeves. Wear contact lenses at your own
risk; contacts hold substances against the eye and make it difficult to wash
your eyes thoroughly.
Treat living organisms with care and respect.
Your instructor will tell you the locations of lab safety equipment, including
fire extinguishers, fire blanket, eyewash stations, and emergency showers.
Familiarize yourself with the location and operation of this equipment.
If anything is splashed into your eyes, wash your eyes thoroughly and
immediately. Tell your lab instructor what happened.
Notify your instructor of any allergies to latex, chemicals, stings, or other
substances.
If you break any glassware, do not pick up the pieces of broken glass with
your hands. Instead, use a broom and dustpan to gather the broken glass.
Ask your instructor how to dispose of the glass.
Unless told by your instructor to do otherwise, work only during regular,
assigned hours when the instructor is present. Do not conduct any unau-
thorized experiments; for example, do not mix any chemicals without your
instructor’s approval.
Do not leave any experiments unattended unless you are authorized by your
instructor to do so. If you leave your work area, slide your chair under the lab
table. Keep walkways and desktops clean and clear by putting books, back-
packs, and so on along the edge of the room, in the hall, in a locker, or in an
adjacent room. Keep your work area as clean and uncluttered as possible.
Don’t touch or put anything on the surface of hotplates unless told to do
so. Many types of hotplates have no visible sign that they are hot. Assume
they are hot.
Know how to use the equipment in lab. Most of the equipment is expen-
sive; you may be required to pay all or part of its replacement cost. Keep
water and solutions away from equipment and electrical outlets. Report
malfunctioning equipment to your instructor. Leave equipment in the same
place and condition that you found it. If you have any questions about or
problems with equipment, contact your instructor.
Know what to do and whom to contact if there is an emergency. Know the
fastest way to get out of the lab. Immediately report all injuries—no matter
how minor—to your instructor. Seek medical attention immediately if needed.
If any injury appears to be life-threatening, call 911 immediately.
At the end of each lab, clean your work area, wash your hands thoroughly
with soap, slide your chair under the lab table, and return all equipment
and supplies to their original locations. Do not remove any chemicals or
equipment from the lab.
vod00720_fm_i-xii.indd 11 10/16/18 1:57 PM

xii
W–4
Name _________________________________________
Lab Section _________________________________________
Your lab instructor may require that you submit this page at the end of today’s lab.
1. In the space below, write an analysis of the data shown in figure 1.
After completing table 1, read and sign this statement:
2. I have read and I understand and agree to abide by the laboratory safety rules described in this exercise and discussed
by my instructor. I know the locations of the safety equipment and materials. If I violate any of the laboratory safety
rules, my instructor will lower my grade and/or remove me from the lab.
____________________________________________
Signature
____________________________________________
Name (printed)
____________________________________________
Date
vod00720_fm_i-xii.indd 12 10/16/18 1:57 PM

7–1 Separating Organic Compounds 71
EXERCISE
7
Separating Organic
Compounds
Column Chromatography, Paper Chromatography,
and Gel Electrophoresis
Learning Objectives
By the end of this exercise you should be able to:
1.
Explain how column chromatography, paper chromatography, and gel electrophoresis are used to separate
compounds from mixtures.
2. Use column chromatography, paper chromatog raphy, and gel electrophoresis to separate organic compounds
from mixtures.
Please visit connect.mheducation.com to review online resources tailored to this lab.
vod00720_ch07_071-080.indd 71 10/11/18 7:38 PM
t
C
ells are a mixture of the types of organic compounds
that you studied in Exercise 6 (“Biologically Impor-
ant Molecules”), including carbohydrates, proteins, lipids,
and nucleic acids. Biologists characterize and study these
compounds to understand how organisms function. This
requires that biologists separate the compounds, such as
amino acids and nucleotides, from mixtures.
Biologists often use chromatography to separate
mixtures. In this procedure, the mixture is dissolved in a fluid
that moves through a matrix made of materials such as beads,
paper, or a gel. During the process, the different parts of the
mixture move at different speeds, causing them to separate. In
today’s exercise you will use column chromatography, paper
chromatography, and gel electrophoresis to separate com-
pounds from mixtures. The procedures are simple and model
how these techniques are used by biologists in their research.
COLUMN CHROMATOGRAPHY
Column chromatography often separates molecules according
to their size and shape. The procedure is simple and involves
placing a sample onto a matrix that is a column of beads having
tiny pores. Molecules can move through the column of beads
in two ways: a fast route between the beads or a slower route
through the tiny pores of the beads. Molecules too big to fit into
the beads’ pores move through the column quickly, whereas
smaller molecules enter the beads’ pores and move through the
column more slowly (fig. 7.1). Movement of the molecules is
analogous to going through or walking around a maze: It takes
more time to walk through a maze than to walk around it.
The apparatus used for column chromatography is
shown in figure 7.2 and consists of a chromatography col-
umn, a matrix, and a buffer.
∙ The chromatography column is a tube having a frit
and a spout at its bottom. The frit is a membrane or
porous disk that supports and keeps the matrix in the
column but allows water and solutes to pass.
∙ The matrix is the material in the column that fraction-
ates, or separates, the chemicals mixed in the sample.
The matrix consists of beads having tiny pores and
internal channels. The size of the beads’ pores deter-
mines the matrix’s fractionation range, which is the
range of molecular weights the matrix can separate.
These molecular weights are measured in units called
daltons; 1 dalton ≈ 1 g mole
−1
. Different kinds of
matrices have different fractionation ranges. In today’s
exercise you’ll use a matrix having a fractionation
range of 1000 to 5000 daltons. As they move through
the matrix, small molecules spend much time in the
maze ofchannels and pores in the matrix. Large mol-
ecules donot.
∙ The buffer helps control the pH of the sample (see
Exercise 5). A buffer is a solution with a known pH
that resists changes in pH if other chemicals are added.
The pH of a buffer remains relatively constant. This
is important because the shapes of molecules such as
proteins often vary according to their pH. The buffer
carries the sample through the matrix, which separates
the chemicals mixed in the sample.
Column chromatography can also separate com-
pounds having the same molecular weight but different
shapes. Compact, spherical molecules penetrate the pores
and channels of the matrix more readily than do rod-shaped
molecules. Thus, spherical molecules move through a col-
umn more slowly than do rod-shaped molecules.

72 E
XERCISE
7 7–2
1
Chemical
mixture is
added to
column.
2 3 4 5 6
Beads exclude
large molecules.
Porous
beads
Organic molecules
separate by size;
larger molecules move
fastest and therefore
appear in the earlier
fractions.
Figure 7.1
Separation of organic molecules by column chromatography. As the solution flows through the column, the smaller molecules are slowed
down asthey pass through the pores of the beads. Medium-sized molecules will pass through a bead with pores less frequently, and the largest mol-
ecules will quickly flow around all the beads. The exiting fluid is collected in fractions. The first fractions collected will contain the largest molecules.
During column chromatography, the buffer containing the
sample mixture of chemicals moves through the column and is
collected sequentially in test tubes from the bottom of the col-
umn. Biologists then assay the content of the tubes to determine
which tubes contain the compounds in which they are interested.
SAFETY FIRST Before coming to lab, you were asked
to read this exercise so you would know what to do
and be aware of safety issues. In the space below,
briefly list the safety issues associated with today’s
procedures. If you have questions about these issues,
contact your laboratory assistant before starting work.
Question 1
In today’s exercise you will isolate colored compounds from
mixtures. However, it is important to note that most biological
samples are colorless. How would you determine the contents
of the test tubes if all of the samples were transparent?
Procedure 7.1
Separate compounds by column
chromatography
1. Label nine microtubes 1–9.
2. Obtain an apparatus for column chromatography and
carefully remove all of the buffer from above the beads
with a transfer pipet. Do not remove any of the matrix.
3. Obtain a sample to be separated. The sample is a mix-
ture of Orange G (molecular weight = 452 g mole
−1
)
and a rodlike polymer of glucose stained blue and
having a molecular weight of about 2,000,000 g mole
−1
.
vod00720_ch07_071-080.indd 72 10/11/18 7:38 PM

7–3 Separating Organic Compounds 73
©EDVOTEK, Inc.
Figure 7.2 Apparatus for column chromatography. A fraction is
being collected, drop by drop, in the beaker. Smaller fractions would
be collected in test tubes.
4. Use a transfer pipet to slowly load 0.2 mL of the sam-
ple onto the top of the beads. Drip the sample down
the inside walls of the column.
5. Place a beaker under the column.
6. Slowly open the valve. This will cause the sample to
enter the beads. Close the valve after the sample has
completely entered the beads (i.e., when the top of
the beads is exposed to air).
7. Use a transfer pipet to slowly cover the beads with
buffer. Add buffer until the reservoir is almost full.
8. Hold microtube 1 under the column and open the
valve until you have collected about 1.0 mL of
liquid.
9. Repeat step 8 for tubes 2–9. The sample will separate
in the column.
10. Identify the tubes containing (1) the most orange dye
and (2) the most blue dye that eluted from the column.
11. Refill the reservoir with buffer and cover the
reservoir with Parafilm.
Question 2
a. Was the color separation distinctive? Would you expect
a longer column to more clearly separate the com-
pounds? Why or why not?
b. Suppose your sample had consisted of a mixture of
compounds having molecular weights of 50,000,
100,000, and 1,000,000 g mole
−1
. What type of results
would you predict? Explain your answer.
PAPER CHROMATOGRAPHY
Biologists often analyze the amino acid content of samples
to determine protein sequences and enzyme structures.
Amino acids can be separated by partitioning them between
the stationary and mobile phases of paper chromatography.
The stationary phase is the paper fibers, and the mobile
phase is an organic solvent that moves along the paper.
Separation by paper chromatography begins by apply-
ing a liquid sample to a small spot on an origin line at one
end of a piece of chromatography paper. The edge of the
paper is then placed in a solvent. As the solvent moves up
the paper, any sample molecules that are soluble in the sol-
vent will move with the solvent. However, some molecules
move faster than others based on their solubility in the mobile
phase and their attraction to the stationary phase. These com-
peting factors are different for different molecular structures,
so each type of molecule moves at a different speed and
occurs at a different position on the finished chromatogram.
Amino acids in solution have no color but react read-
ily with molecules of ninhydrin to form a colored product.
A completed chromatogram is sprayed with a ninhydrin
solution and heated to detect the amino acids. The distance of
these spots from the origin is measured and used to quantify
the movement of a sample. The resulting R
f
value (retardation
factor) characterizes a known molecule in a known solvent
under known conditions and is calculated as follows:
Distance moved by sample
R
f
=
Distance from origin to solvent front
Procedure 7.2
Separate amino acids and
identify unknowns by paper chromatography
1. Obtain a piece of chromatography paper 15 cm
square. Avoid touching the paper with your fingers.
Use gloves, tissue, or some other means to handle
the paper because oils from your skin will alter the
migration of the molecules on the paper.
vod00720_ch07_071-080.indd 73 10/11/18 7:38 PM

74 E
XERCISE
7 7–4
Table 7.1
Chromatography Data for Determining Amino Acid Unknowns
Tick Mark
Number
Amino Acid or
Sample Number
Distance to
Solvent Front
Distance Traveled
by Sample R
f
Identity of
Unknown
1
2
3
4
5
vod00720_ch07_071-080.indd 74 10/11/18 7:38 PM
2. Lay the paper on a clean paper towel. Then use a pen-
cil to draw a light line 2 cm from the bottom edge of
the paper.
3. Draw five tick marks at 2.5 cm intervals from the left end
of the line. Lightly label the marks 1–5 below the line.
4. Locate the five solutions available for the chromatog-
raphy procedure. Three of the solutions are known
amino acids. One solution is an unknown. The last
solution is a plant extract or another unknown.
5. Use a wooden or glass applicator stick to “spot” one of
the solutions on mark #1. To do this, dip the stick in the
solution and touch it to the paper to apply a small drop
(2–3 mm in diameter). Let the spot dry; then make
three to five more applications on the same spot. Dry
between each application. Record in table 7.1 the name
of the solution next to the appropriate mark number.
6. Repeat step 5 for each of the other solutions.
7. Staple or paper clip the edges of the paper to form a
cylinder with the spots on the outside and at the bottom.
8. Obtain a quart jar containing the chromatography sol-
vent. The solvent should be 1 cm or less deep. The sol-
vent consists of butanol, acetic acid, and water (2:1:1).
9. Place the cylinder upright in the jar (fig. 7.3). The
solvent must be below the pencil line and marks.
Close the lid to seal the jar.
10. Keep the jar out of direct light and heat. Allow the
solvent to move up the paper for 2 hours (h) but not
all the way to the top.
11. Open the jar and remove the chromatogram. Unclip
and flatten the paper. Dry it with a fan or hair dryer.
Work under a fume hood if possible to avoid breath-
ing the solvent vapors.
12. Spray the chromatogram with ninhydrin. Carefully
dry the chromatogram with warm air.
13. Circle with a pencil each of the spots. Measure the
distance each of the spots has traveled and calculate
the R
f
for each spot. Record the values intable 7.1.
14. Determine the contents of the unknown solutions by
comparing R
f
values. Record the results in table 7.1.
GEL ELECTROPHORESIS
Gel electrophoresis separates molecules according to their
charge, shape, and size (fig. 7.4). Buffered samples (mix-
tures of organic chemicals) are loaded into a Jello-like gel,
after which an electrical current is placed across the gel.
This current moves the charged molecules toward either
the cathode or anode of the electrophoresis apparatus. The
speed, direction, and distance that each molecule moves are
related to its charge, shape, and size.
The apparatus for gel electrophoresis is shown in
figure 7.5 and consists of an electrophoresis chamber, gel,
buffer, samples, and a power supply.
∙ The gel is made by dissolving agarose powder (a deriv-
ative of agar) in hot buffer. When the solution cools,
it solidifies into a gel having many pores that function
as a molecular sieve. The gel is submerged in a buffer-
filled chamber containing electrodes.
∙ The buffer conducts electricity and helps control the pH.
The pH affects the stability and charge of the samples.
∙ The samples are mixtures of chemicals loaded into
wells in the gel. These samples move in the gel during
electrophoresis. Samples are often mixed with glycerol

7–5 Separating Organic Compounds 75
Jar with lid
Origin line
Cylindrical
chromatogram
Solvent
4
35
Figure 7.3
Apparatus for paper chromatography. Numbers on
the chromatogram indicate the positions of multiple samples applied
to the chromatog ram. The samples will move up the chromatogram
along with the solvent.
or sucrose to make them denser than the buffer so that
they will not mix with the buffer.
∙ The power supply provides a direct current across the
gel. Charged molecules respond to the current by moving
from the sample wells into the gel. Negatively charged
molecules move through the gel toward the positive elec-
trode (anode), whereas positively charged molecules move
through the gel toward the negative electrode (cathode).
The greater the voltage, the faster the molecules move.
The sieve properties of the gel affect the rate of move-
ment of a sample through the gel. Small molecules move
more easily through the pores than do larger molecules.
Consequently, small, compact (e.g., spherical) molecules
move faster than do large, rodlike molecules. If molecules
have similar shapes and molecular weights, the particles
having the greatest charge move fastest and, therefore, the
farthest.
Electric
current
turned on
Gel
(–)
(+)
Fragments of organic
molecules are loaded
into wells of a gel
Large fragment
s
Small fragments
Fragments that have
migrated through
the gel
Figure 7.4 Gel electrophoresis. This process separates DNA fragments, protein fragments, and other organic compounds by causing them to move
through an electrically charged gel. Because DNA molecules are negatively charged, the electrical field will push the molecules toward the positive
electrode. The fragments also move according to their size and shape, and some fragments move slowly and some move quickly. When their migration
is complete, the fragments can be stained and visualized easily. In the example shown here, the DNA fragments were separated by size.
vod00720_ch07_071-080.indd 75 10/11/18 7:38 PM
Procedure 7.3
Separate organic molecules by
gel electrophoresis
1. Obtain an electrophoresis chamber. Cover the ends of
the bed as shown in figure 7.6 and demonstrated by
your instructor.
2. Place a six-tooth comb in or near the middle set of
notches of the gel-cast bed. There should be a small
space between the bottom of the teeth and the bed.
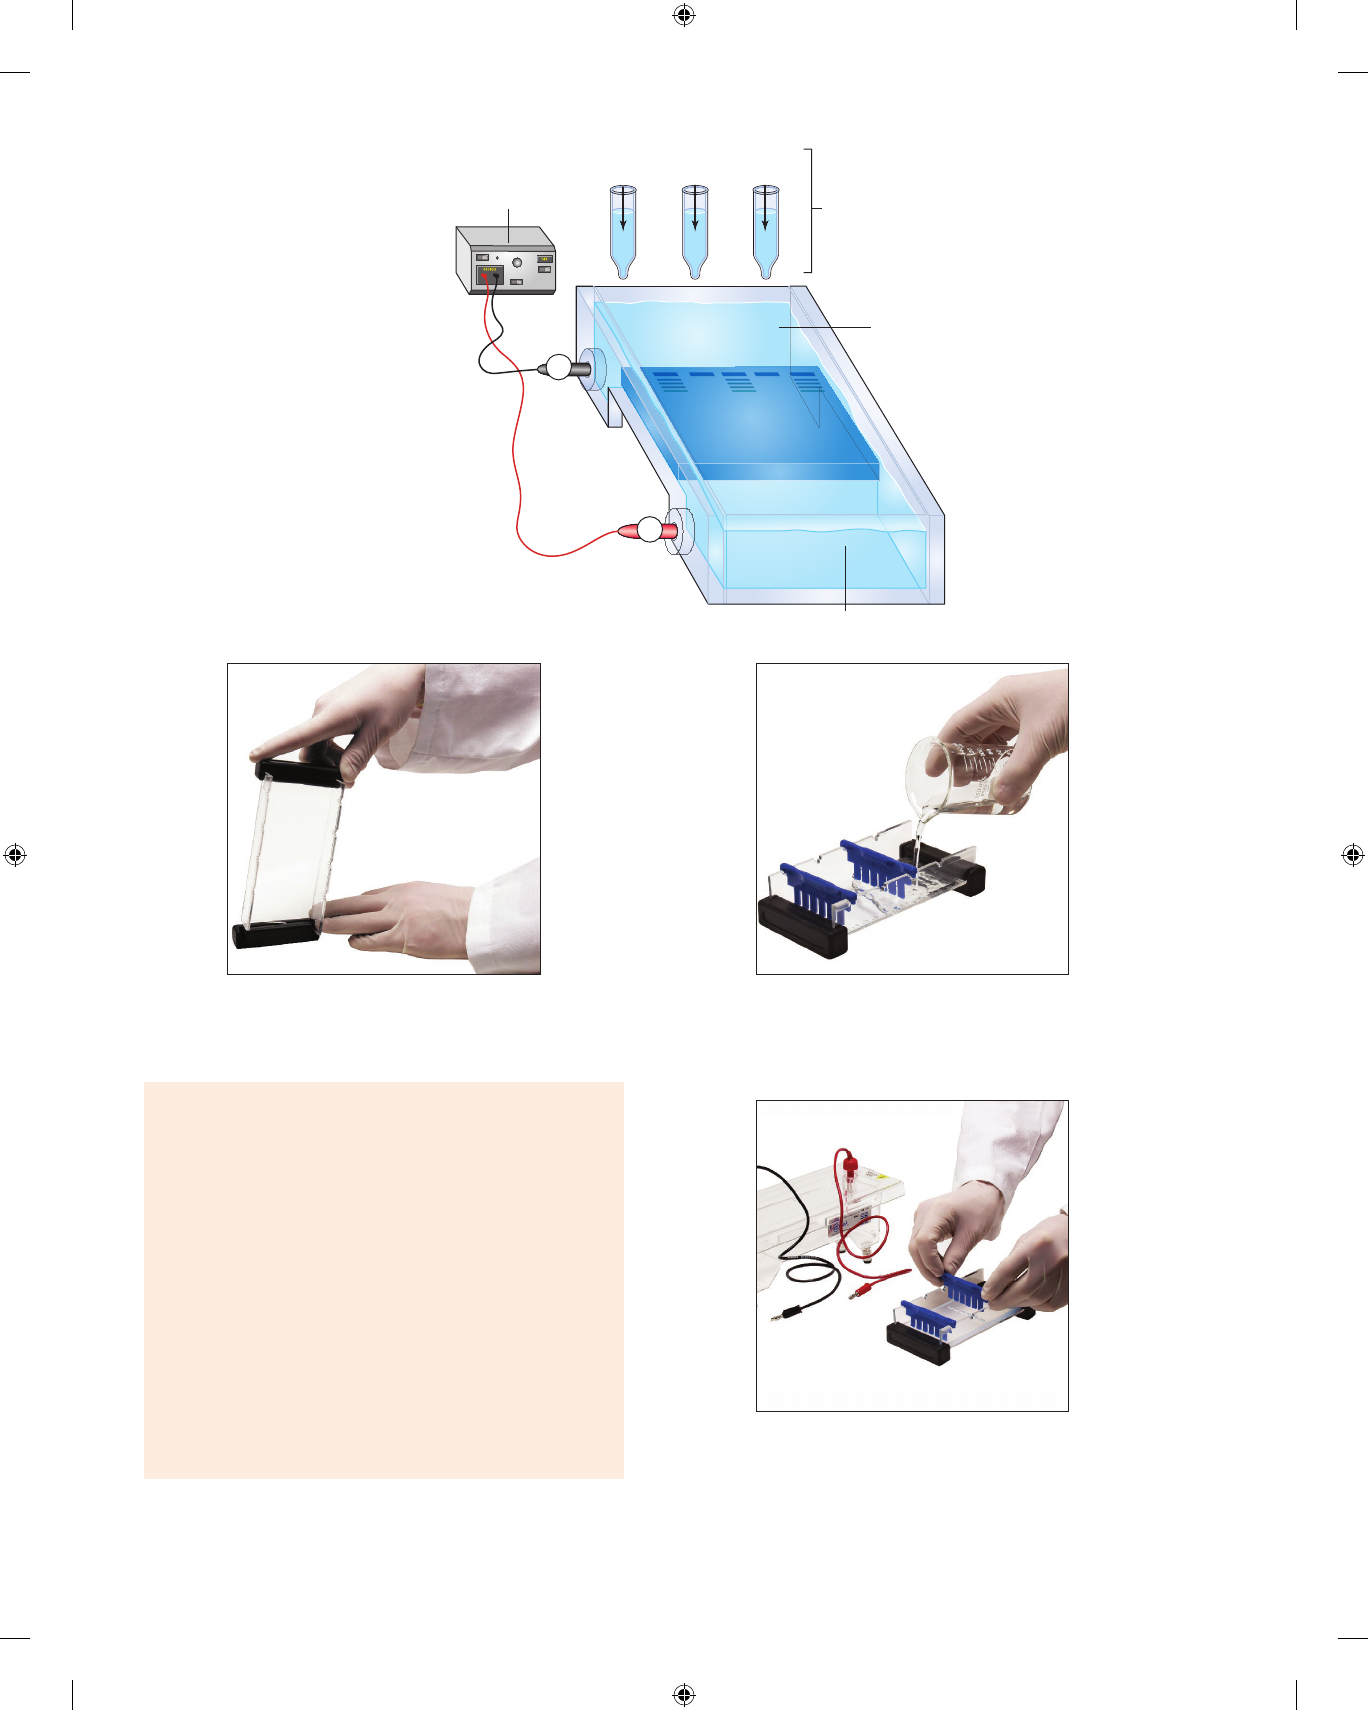
76 E
XERCISE
7 7–6
Figure 7.5 Apparatus for gel
electrophoresis. The power supply pro-
duces an electrical gradient between
the + and − poles and across the gel.
©EDVOTEK, Inc.
Figure 7.6 Cover the ends of the removable gel bed with rubber
end-caps ortape.
©EDVOTEK, Inc.
Figure 7.7 Place comb near the center set of notches of the gel
bed. Prepare the agarose solution and pour the gel.
3. Mix a 0.8% (weight by volume) mixture of agarose
powder in a sufficient volume of buffer to fill the gel
chamber. Heat the mixture until the agarose dissolves.
4. When the hot agarose solution has cooled to 50°C, pour
the agarose solution into the gel-cast bed (fig. 7.7).
5. After the gel has solidified, gently remove the comb
by pulling it straight up (fig. 7.8). Use of a plastic
spatula may help prevent tearing the gel. Use the
sketch in figure 7.9 to label the wells formed in the
gel by the comb.
6. Submerge the gel under the buffer in the electropho-
resis chamber.
7. You will study six samples:
Sample 1: Bromophenol blue (molecular weight =
670 g mole
−1
)
vod00720_ch07_071-080.indd 76 10/11/18 7:38 PM
©EDVOTEK, Inc.
Figure 7.8 After the gel solidifies, gently remove the rubber
end-caps (or tape) and pull the combs straight up from the gel.
Reaction
1
Reaction
2
Reaction
3
Mixture of DNA
fragments of
dierent sizes in
solution placed at
the top of “lanes” in
the gel
Gel
Buer
Lane
Anode
Cathode
Power
source
+
–

7–7 Separating Organic Compounds 77
(–)
(+)
123456
123456
Figure 7.9
Sketch of the wells formed in the gel by the comb as
viewed fromabove.
Sample 2: Methylene blue (molecular weight =
320 g mole
−1
)
Sample 3: Orange G (molecular weight =
452 g mole
−1
)
Sample 4: Xylene cyanol (molecular weight =
555 g mole
−1
)
Samples 5 and 6: Unknowns
Use a micropipettor or a simple pipet and bulb to
load the samples into the wells of the gel. If you use
a micropipettor, your instructor will demonstrate its
use. If you use a simple pipet and bulb, gently squeeze
the pipet bulb to draw Sample 1 into the pipet. Be sure
that the sample is in the lower part of the pipet. If the
sample becomes lodged in the bulb, tap the pipet until
the sample moves into the lower part.
8. To eliminate excess air, hold the pipet above the sam-
ple tube and slowly squeeze the bulb until the sample
is near the pipet’s opening.
9. Place the pipet tip into the electrophoresis buffer so it
is barely inside sample well 1 (fig. 7.10). Do not touch
the bottom of the sample well. Maintain pressure on
the pipet bulb to avoid pulling buffer into the pipet.
10. Slowly inject the sample into the sample well. Stop
squeezing the pipet when the well is full. Do not
©EDVOTEK, Inc.
Figure 7.10 Submerge the gel in the buffer-filled electrophoresis
chamber and load the samples into the wells of the gel.
release the pressure on the bulb. Remove the pipet
from the well.
11. Thoroughly rinse the pipet with distilled water.
12. Load the remaining five samples into the gel by
repeating steps 6–10 (fig. 7.10). Load Sample 2 into
the second well, Sample 3 into the third well, etc.
13. Carefully snap on the cover of the electrophoresis
chamber (fig. 7.11). The red plug in the cover should
be placed on the terminal indicated by the red dot.
The black plug in the cover should be placed on the
terminal indicated by the black dot.
14. Insert the plug of the black wire into the black (nega-
tive) input of the power supply. Insert the plug of the
red wire into the red (positive) input of the power
supply.
15. Turn on the power and set the voltage at 90 V. You’ll
soon see bubbles forming on the electrodes. Examine
the gel every 10 min.
16. After 30 min, turn off the power and disconnect the
leads from the power source. Gently remove the cover
from the chamber and sketch your results in figure 7.9.
vod00720_ch07_071-080.indd 77 10/11/18 7:38 PM
©EDVOTEK, Inc.
Figure 7.11 Attach the safety cover, connect the power source, and
run the electrophoresis.

78 E
XERCISE
7 7–8
Question 3
a. Bromophenol blue, Orange G, and xylene cyanol each
has a negative charge at neutral pH, whereas methylene
blue has a positive charge at neutral pH. How does this
information relate to your results?
b. Did Orange G, bromophenol blue, and xylene cyanol
move the same distance in the gel? Why or why not?
c. What compounds do you suspect are in Samples 5 and 6?
Explain your answer.
INTERPRETING A DNA-SEQUENCING GEL
Examine figure 7.12, which includes a photograph of a
gel used to determine the order, or sequence, of nucleo-
tides in a strand of DNA. To prepare the sample for
5
5
A
T G C T A T
Single-stranded DNA fragment to be sequenced
Reaction mixtures
contain DNA polymerase
+ddATP
G C T CC
A T GC T A T GC T CC
ddACGATACGAGG
Add TACGAGG
ddACGAGG
ddAGG
+ddCTP +ddGTP
ddA
+ddTTP
Smaller
fragments
Larger
fragments
Reaction products from
mixture containing
dideoxyATP (ddATP)
T
A
C
G
A
T
A
C
G
A
G
G
ddC ddG ddT
(a)
(b)
(c)
(d)
ATGC
(e)
Courtesy George Kantor
vod00720_ch07_071-080.indd 78 10/11/18 7:38 PM
Figure 7.12 Determining the sequence of nucleotides in DNA. (a) Treating DNA with sodium hydroxide (NaOH) denatures double-stranded
DNA into single-stranded DNA. One of the single strands of DNA to be sequenced is placed in each of four tubes. (b) The enzyme DNA poly-
merase is added to each tube along with a specific nucleotide-terminator. As polymerase replicates the DNA, the terminators are incorporated and
will terminate various lengths of fragments of DNA. For example, the terminator ddATP will halt the reaction wherever adenosine occurs. The
terminator ddATP (dideoxy adenosine triphosphate) will terminate a growing strand because it lacks a 3′ hydroxyl group and therefore cannot bond
with the next deoxynucleotide. (c) Each tube will contain a sample of all possible replicated fragment lengths corresponding to the positions of that
specific nucleotide. The sequences in red are the complement strands. (d) During electrophoresis, the fragments migrate at different rates according
to their length. (e) The lanes of the resulting gel are labeled according to their base: A, adenine; T, thymine; G, guanine; and C, cytosine. This tech-
nique is usually referred to as “Sanger” sequencing in honor of Fred Sanger, a Nobel laureate who, in 1977, first sequenced a piece of DNA.

7–9 Separating Organic Compounds 79
electrophoresis, samples of the DNA being investigated
were put into each of four tubes and induced to replicate.
Also, into the first tube, an adenine-terminator was added
in addition to all the other nucleotides. As the complemen-
tary strand was being constructed, the terminators were
occasionally incorporated wherever an adenine nucleotide
was used. This random incorporation resulted in all possi-
ble lengths of DNA pieces that had an adenine on the end.
The same process was conducted in the other tubes with
thymine-, guanine-, and cytosine-terminators; one treat-
ment for each of the four lanes in the gel. Electrophoresis
separated the replicated pieces of DNA by size. Stain-
ing the gel revealed which lengths of the complementary
DNA were terminated by which nucleotide-terminators.
Examine figure 7.12d.
The gel consists of four “lanes,” labeled A, T, G,
and C, indicating either adenine-, thymine-, guanine-, or
cytosine-terminated pieces of DNA. By “reading” down
the gel, you can determine the sequence of nucleotides in
the DNA. For example, the uppermost band of the gel is in
theT (thymine) lane. Therefore, the first base of the piece
of DNA is thymine. Similarly, the next bands are in the A,
C, G, and A lanes. Thus, the first five bases of the comple-
mentary strand DNA are T-A-C-G-A. List the next seven
nucleotides of the DNA as indicated by the gel. Also list
the sequence of the first 12 nucleotides in the original DNA
being investigated.
Question 4
a. How did the sequence of nucleotides revealed on the
gel differ from the sequence of the original strand of
DNA?
b. Assume that the gel shown in Figure 7.12d is from
blood collected at a murder scene. This blood does
not match that of the victim. You have collected DNA
from five people suspected of murder. Gels comparable
to the one shown in Figure 7.12d read as follows for
each of the suspects:
Suspect #1: T-A-C-G-A-T-A-C-G-A-C
Suspect #2: T-A-C-G-A-T-A-C-G-A-C
Suspect #3: T-A-C-G-A-C-A-C-G-C-G
Suspect #4: T-A-C-G-A-T-G-C-G-A-C
Suspect #5: T-A-C-G-A-T-C-C-G-T-C
What do you conclude from this evidence?
INQUIRY-BASED LEARNING I
Is there always room for improvement in laboratory techniques?
Carefully planned and refined procedures are critical for
laboratory techniques such as paper chromatography. The
sensitivity of these techniques depends on a variety of fac-
tors, including the many parameters associated with timing,
chemicals, measurements, and temperatures. In procedure
7.2 you were given a rather standardized protocol, but it can
always be improved for specific experiments. For example,
how would you modify the paper chromatography proce-
dure to better resolve two amino acids having approximately
the same R
f
values? What parameter(s) of the experimental
design might be tweaked to increase the technique’s resolv-
ing power? We suggest that you begin your investigation in
the following way:
a. List the parameters involved in paper chromatography.
Think carefully; many factors are involved.
b. Choose one or two parameters that you can test for their
impact on the chromatography results. Why did you
choose these?
c. Choose two amino acids for experimentation. Why did
you choose these two?
d. Choose your treatment levels for each parameter, and
then do your experiment.
e. What did you conclude?
vod00720_ch07_071-080.indd 79 10/11/18 7:38 PM

80 E
XERCISE
7 7–10
INQUIRY-BASED LEARNING II
What’s the best column length for effective column chromatography?
Observation: Column chromatography is a common means
of separating molecules according to their size and shape. The
movement of molecules through a column is affected by several
factors, including the column’s matrix and the column’s length.
Question: How does the length of a column affect the separa-
tion of molecules via column chromatography?
a. Establish a working lab group and obtain Inquiry-Based
Learning Worksheet 7 from your instructor.
b. Discuss with your group well-defined questions relevant
to the preceding observation and question. Choose and
record your group’s best question for investigation.
c. Translate your question into a testable hypothesis and
record it.
d. Outline on Worksheet 7 your experimental design and
supplies needed to test your hypothesis. Ask your instruc-
tor to review your proposed investigation.
e. Conduct your procedures, record your data, answer your
question, and make relevant comments.
f. Discuss with your instructor any revisions to your questions,
hypothesis, or procedures. Repeat your work as needed.
Questions for Further Study and Inquiry
1.
How are column chromatography, paper chromatography, and gel electrophoresis different? How are they similar?
2. How would the results of electrophoresis vary if the voltage was increased? If the agarose was made more dense? Or if
the migration was allowed to run twice as long?
3. How could knowing the nucleotide base sequence of a piece of DNA be important to a biologist?
4. How could knowing the nucleotide base sequence of a piece of DNA be important to someone trying to solve a crime?
5. How could knowing the nucleotide base sequence of a piece of DNA be important for someone studying a hereditary
disease?
6. How could knowing the nucleotide base sequence of a piece of DNA be important for someone wanting to improve the
yield of a crop such as corn?
WRITING TO LEARN BIOLOGY
Which of the methods discussed in this exercise
would best quantify the relative amounts of the mol-
ecules being separated? Why?
vod00720_ch07_071-080.indd 80 10/11/18 7:38 PM
