
User's Guide to the CSULB Luminex MUSE Cell Analyzer
Version 1.0*, August 2020
Emergency contact
In case of questions or emergencies, please contact:
1. Deborah Fraser (Dept. Biol. Sciences, [email protected], 562 985 7597)
*This version was developed with the support of CSULB BUILD Program (NIH Award#RL5GM118978)
© 2020 by Deborah Fraser. All rights reserved.

Luminex MUSE Cell Analyzer, MLSC 222
2
User's Guide to the CSULB Luminex MUSE Cell Analyzer
Table of Contents
Item
page
Introduction
3
System Specifications
4
Precautions
4
Planning Your Experiment:
Kits
Sample preparation tips
6
7
Before you start
8
Equipment Overview
8
A. Logbook
9
B. Fluid Levels
9
C. Empty Waste
9
D. Switching On
10
E. System Clean
F. System Check
10
11
G. Running Samples:
Analysis
12
Exporting Data
13
H. Shutting Down
14
I. Troubleshooting
15
J.Useful Links
15

Luminex MUSE Cell Analyzer, MLSC 222
3
User's Guide to the CSULB Luminex MUSE Cell Analyzer
INTRODUCTION
Flow cytometry is a powerful high-throughput technique to measure multiple parameters in 10s
to 100s of thousands of individual cells per sample. The MUSE Cell Analyzer uses miniaturized
fluorescent detection and microcapillary technology to deliver accurate, precise, quantitative cell
analysis. Laser-based fluorescence detection of each cell event can evaluate up to 3 cellular
parameters – cell size (forward scatter) and 2 colors (detected in the red and/or yellow channels).
The system uses a microcapillary and miniaturized optics, which occupy one-tenth the space of a
typical cytometer. A green diode laser is used for excitation, and a uniquely designed series of
retro-reflective lenses provide maximum light capture and sensitivity.
One major advantage is that the Muse features a highly intuitive touchscreen interface that
allows simple step-by-step operation, so easy that no flow expertise is required to run assays.
The touchscreen prompts you through simple on-screen instructions and guides you though
sample loading to simple setting adjustments to results—in just a few steps.
If you are being trained on the MUSE Cell Analyzer it is assumed that you have a basic
understanding of the technique of flow cytometry. If you are new to the concept of flow
cytometry, please watch the Introduction to Flow Cytometry videos on the CSULB Research
Training beachboard site, or available through the CSULB BUILD program. This video includes
useful tips on setting up your flow cytometry experiment, and data analysis. Additional useful
links are found in Section I at the end of this document. You will also need to provide proof that
you have taken the CNSM BSL-2 online training module. Please contact the CNSM safety office
if you require more information about this: http://www.csulb.edu/colleges/cnsm/safety.html. You
should also watch the MUSE Cell Analyzer Users Guide video prior to requesting training.
A copy of the official Luminex User Guide is also available in printed form, next to the MUSE
Cell Analyzer.

Luminex MUSE Cell Analyzer, MLSC 222
4
User's Guide to the CSULB Luminex MUSE Cell Analyzer
Essential system specifications
Lasers:
532nm – Green laser
Information on fluorophore excitation and emission frequencies is available on websites listed in
the “links” section J of this guide.
Detection:
Red or Yellow fluorescence. The Muse. Open Modules can be used for one- or two-color assays and
can be applied to a variety of experiments such as the study of extracellular and intracellular expression
of protein, as well as the screening and analysis of red fluorescent proteins. The modules allow
researchers to stain samples with their own fluorochrome-conjugated antibodies, dyes, or other reagents
that are excited by a 532-nm laser. The yellow parameter uses a detection channel with 576/28 emission
and can be used for the detection of fluorochromes such as Phycoerythrin (PE), Cy3, Alexa Fluor. 555,
and Dylight. 550. The red parameter uses a detection channel with 680/30 emission and can be used for
the detection of fluorochromes such asPE-Cy5, 7-AAD, and Propidium Iodide (PI).
PRECAUTIONS
• BIOSAFETY. This unit is used for the sorting of materials including those that may be
biohazardous including human cell lines and microbial pathogens. Operators must complete
CNSM (Biosafety Level 2 (BSL-2) training prior to using the cell analyzer. Appropriate
personal protective equipment (PPE) including gloves, lab coat and eye protection are required
during operations. The waste bottle should contain 10ml fresh bleach prior to each use.
• LASER SAFETY. This devise is considered a Class I laser product that does not produce
injurious laser emissions accessible to the operator under normal operating conditions. Within
the enclosed system is a higher power Class 3B potentially injurious laser operating at 532nm
(maximum output power of 23mW). Light shields within the instrument enclose the path of laser
radiation, and the instrument enclosure provides secondary protection from laser radiation.
NEVER attempt to remove equipment housing components or attempt to perform any internal
maintenance as this may result in hazardous exposure to laser radiation.
• ELECTRICAL SAFETY. Turn off the power to the system before removing the flowcell.
• CHEMICAL SAFETY. Some of the solutions used by the cell analzyer are hazardous. Bleach
and the ICS Cleaning Fluid used as sanitizers are corrosive. Appropriate personal protective
equipment (PPE) including gloves, lab coat and eye protection are required during operations.
• REMOVING FILES FROM THE MUSE CELL ANALYZER. The only safe way to remove
files from the MUSE is by copying them to a virus-free USB drive. Copy the files and transfer
them to your own computer in a timely manner. Files older than 1 month old are fair game for
deletion.

Luminex MUSE Cell Analyzer, MLSC 222
5
• KEEP THE AREA CLEAN. The MUSE Cell Analyzer resides in the Fraser lab. Please be
respectful of the space, and tidy up after yourself. If you need food or drink, do it outside– no
food or drink in MLSC 222! Also, please limit your specimen preparation in the lab. You are
welcome to use our gloves, pipets, 70% ethanol and paper towels as needed, but make sure to
leave the room clean when you’re finished.

Luminex MUSE Cell Analyzer, MLSC 222
6
PLANNING YOUR EXPERIMENT
Luminex MUSE Cell Analyzer Kits
A number of kits that have been optimized for analyzing your cells with the MUSE Cell
Analyzer are available: https://www.luminexcorp.com/flow-cytometry-kits-and-reagents/
Please follow the manufacturer’s recommendations and protocols for these kits. Kits include:
Muse Count & Viability Kit 40 mL
Muse Count & Viability Kit (200X)
Muse Annexin V & Dead Cell Kit
Muse Cell Cycle Kit
Muse Cell Dispersal Reagent
Muse Caspase-3/7 Kit
Muse MultiCaspase Kit
Muse Autophagy LC3-Antibody Based Kit
Muse Mitopotential Kit
Muse Oxidative Stress Kit
Muse Nitric Oxide Kit
Muse Ki67 Proliferation Kit
Muse Human CD4 T Cell Kit
Muse Human CD8 T Cell Kit
Muse Human B Cell Kit
Muse H2A.X Activation Dual Detection Kit
Muse EGFR-RTK Activation Dual Detection Kit
Muse PI3K Activation Dual Detection Assay Kit
Muse MAPK Activation Dual Detection Assay Kit
Muse Bcl-2 Activation Dual Detection Assay Kit
Muse Multi-Color DNA Damage Kit
Muse PI3K/MAPK Dual Pathway Activation Kit
Muse Malaria P.f-P.v. Detection Kit

Luminex MUSE Cell Analyzer, MLSC 222
7
Sample Preparation Tips:
Avoiding clumps:
Single cell suspensions are required for optimal staining. Aggregated cells will clog the flow
cytometer. If you are running “clumpy” samples, make sure you filter them through a 40-100uM
cell strainer before running flow cytometry. Flowmi pipet tip cell strainers (Belart.com,
H136800040) or Falcon filter-top tubes (Fisher 08-771-23) are ideal for this purpose.
Sample tubes:
You must use 1.5ml microtubes without a lid (or cut off the lid).
Fixed samples: Where possible, biohazardous samples should be fixed for analysis. Usually 1-
4% paraformaldehyde in PBS. You should check that your fluorophore is not sensitive to
fixation.
Unfixed samples: Avoid using buffer containing phenol red during your run as it can increase
background fluorescence. PBS or HBSS are usually used to run samples. Some people add 1%
BSA to keep their cells happier in solution, preventing clumping and non-specific antibody
binding. 0.05% sodium azide can also be added to prevent shedding or internalization of
antibodies. Sodium azide is highly toxic. Use appropriate safety measures. Do not add Calcium
or Magnesium to your buffers. They can form salt crystals in the tubing, and clog the machine.
Temperature: The appropriate temperature varies between cell types and staining conditions. For
analysis only, usually samples are kept on ice.
Light: Fluorescently stained samples should be kept dark until ready to analyze.
Number of cells: Optimal results are attained with cell concentrations between
1x10
4
to 1.2 x 10
6
cells/mL.
Multicolor flow: If you plan on staining your samples with multiple colors, there is an art to
combining color combinations. The links in section J should help. Some things to consider:
1. The brightness of your fluorochromes – use the brightest fluorochrome for the least
expressed protein and dimmest for the most highly expressed proteins.
2. Make sure the fluorochromes do not overlap in their emission spectra.
3. Advanced – chose combinations with low spectral overlap, and low photobleaching. This
will maximize your signal and reduce background and bleed-through.
4. Set up appropriate controls. At very least you will need:
negative control (unstained) sample
single-stained positive controls – one for each antibody-fluorophore you are using. Use
the sample that is most likely to be most positive for that marker

Luminex MUSE Cell Analyzer, MLSC 222
8
BEFORE YOU START
Please check with Dr. Fraser ([email protected]) prior to using the instrument to check
it is available. Include the day and time you will be using it in your email.
Please note: only authorized users, who have undergone the training may use this machine.
Violation of this policy will lead to restricted lab access to instrument use except for the lab PI.
Please bring with you:
Your samples in 1.5mL tubes with removable lids
Equipment Overview (MLSC 222)
Flowcell
access
hatch
Touchscreen
Sample loading arm
Waste
(10mL bleach)
ICS
fluid
Tube holder
Power
on
USB
port
Luminex MUSE Cell Analyzer, MLSC 222
9
GETTING STARTED
A. Fill out the user log book
We use this to keep track of usage of the instrument, and the labs that are using the machine. If
you do not fill out the log, your access to the machine will be rescinded.
B. Check Fluid Levels of ICF
Fill the cleaning solution bottle with ICF at the start of each day, and as needed. Do not allow the
bottle to empty. This will pull air into the fluid system and require that you prime the system
with water.
1. !"#$%&'()*&()+,-".(/%01()*&()02(0/()*&($3&4"-".(#03+)-0"(,0))3&5(
2. 6%&##(70'"(0"()*&($3&4"-".(#03+)-0"(,0))3&()0(%&3&4#&(-)(/%01()*&(+"-)5(8*&(,0))3&('-33(202(+2(
#3-.*)39(4330'-".(90+()0(%&10:&(-)5(
3. !"#$%&'()*&($425(
4. ;-33()*&(,0))3&()0()*&(/-33(3-"&('-)*(<+4:4(=>;5(
5. (?&234$&()*&($42(4"7(%&-"#)433()*&(,0))3&(-"()*&(-"#)%+1&")5(@3-."()*&(#*0'&%(-$0"(0"()*&(
,0))3&('-)*()*&("0)$*A3-"&(0"()*&(-"#)%+1&")5(6%&##(70'"(0"()*&(,0))3&()0(&".4.&(-)5
6. ?&$0""&$)()*&(/3+-7(3-"&()0()*&()02(0/()*&(,0))3&
C. Empty the waste bottle
B12)9()*&('4#)&(,0))3&(4)()*&(#)4%)(0/(&4$*(749C(4"7(4#("&&7&75(
1. !"#$%&'()*&()+,-".(/%01()*&()02(0/()*&('4#)&(,0))3&5(
2. 6%&##(70'"(0"()*&('4#)&(,0))3&()0(%&3&4#&(-)(/%01()*&(+"-)5(8*&(,0))3&('-33(202(+2(#3-.*)39(
4330'-".(90+()0(%&10:&(-)(
3. >4%&/+339(+"#$%&'()*&($425(
4. B12)9()*&($0")&")#(70'"()*&(#-"D('-)*($02-0+#(410+")#(0/('4)&%(%+""-".5
5. ?-"#&()*&(,0))3&('-)*('4)&%5(
6. @77(EF(1G(0/(,3&4$*()0()*&(&12)9('4#)&(,0))3&5(
7. ?&234$&()*&($42(4"7(%&-"#)433()*&(,0))3&(-"()*&(-"#)%+1&")5(
@3-."()*&()%4#*($4"(-$0"(0"()*&(,0))3&('-)*()*&("0)$*A3-"&(0"()*&(-"#)%+1&")5(6%&##(70'"(0"(
)*&(,0))3&()0(&".4.&(-)5(
8. ?&$0""&$)()*&(/3+-7(3-"&()0()*&()02(0/()*&(,0))3&5(

Luminex MUSE Cell Analyzer, MLSC 222
10
D. Switching On
1. Press the Power on button on the instrument
2. Log in as ‘Student’.
a. Password = 1234
E. Run a Complete System Clean
?+"()*&(>0123&)&(H9#)&1(>3&4"(/&4)+%&()0($3&4"()*&(+"-)(4)()*&(,&.-""-".(4"7(&"7(0/(&4$*(749(4"7(
,&)'&&"(4##49#(-/(4()*0%0+.*($3&4"-".(-#("&&7&75(I0+($4"(43#0(%+"()*-#($3&4"-".($9$3&()0(2%-1&()*&(
/3+-7(#9#)&1(0%(-/(90+(#+#2&$)()*&%&(-#(4-%(-"()*&(/3+-7(3-"(Always'ensure'the'cleaning'solution'bottle'
is'filled'with'ICF'whenever'you'run'the'Complete'System'Clean5(!#&()*&(?&#&)(;3+-7(G&:&3#(02)-0"()0(
%&#&)()*&(#)4)+#(-"7-$4)0%(/0%()*&('4#)&(,0))3&(4"7($3&4"-".(#03+)-0"(,0))3&(,4$D()0(EFFJ(4"7(EFFJ(
4/)&%(90+(*4:&(&12)-&7()*&('4#)&(,0))3&(4"7(/-33&7()*&($3&4"-".(#03+)-0"(,0))3&5(=)(-#(-120%)4")()0(
%&#&)()*&(/3+-7(3&:&3#(&4$*()-1&(90+(/-33(4"7(&12)9()*&(,0))3&#(#0()*4)()*&(-"#)%+1&")($4"(4$$+%4)&39(
7&)&%1-"&()*&(410+")(0/(/3+-7(-"(&4$*(,0))3&5(
E5((H&3&$)(Muse%System%Cleaning%+"7&%(B##&")-43(8003#(4)()*&(14-"(1&"+5(8*-#(/&4)+%&(-#(43#0(
4:4-34,3&(,9(#&3&$)-".(Clean%/%01()*&(H9#)&1(>*&$D(#$%&&"(0%(4"9(4##49(#$%&&"C()*&"(#&3&$)-".(
Complete%System%Clean%/%01()*&(3-#)(0/($3&4"-".(2%0)0$03#5((
K5(H&3&$)(Complete%System%Clean5((
(
(
L5(H&3&$)(Run%Complete%Clean5(
Displays(the(last(time(a(complete(system(clean(was(performed.((
This(means(I(can(check(if(you(performed(the(clean!(
M5(G047(4(/+33()+,&(0/(<+4:4(=>;(0"()*&(+"-)(4"7(#&3&$)(Run5(
(
(
N5(O*&"()*&(=>;($9$3&(-#($0123&)&C()*&(#9#)&1(2%012)#(90+(/0%(4()+,&(0/(P=(
'4)&%5(G047(4(/+33()+,&(0/(P=('4)&%(0"()*&(+"-)(4"7(#&3&$)(Continue5(
Luminex MUSE Cell Analyzer, MLSC 222
11
O*&"()*&(#9#)&1($3&4"-".(2%0$&7+%&(-#($0123&)&C()*&(>3&4"-".(G0.(422&4%#5(B4$*(&")%9(-"()*&(30.(
%&2%&#&")#(0"&(#9#)&1($3&4"-".(2%0$&7+%&5(8*&(3-#)(#*0'#()*&(+#&%('*0(2&%/0%1&7()*&($3&4"-".C()*&(
74)&(4"7()-1&()*&($3&4"-".('4#(2&%/0%1&7C('*&)*&%()*&($3&4"-".('4#(c0123&)&7(0%(4,0%)&7C(4"7()*&(
)92&(0/($3&4"-".(Q>0123&)&(H9#)&1(>3&4"(0%(BR)%&1&(>3&4"S5(
F. Running a System Check
Run a System Check at the start of each day that you use the instrument to ensure that it is performing
properly. Three replicates of the System Check Bead sample are acquired. The results are averaged to
determine if they are within the expected range.
Run a Complete System Clean at the start of each day and before performing the System Check
procedure.
A cleaning cycle will prime the fluid system and remove bubbles that may have formed in the tubing.
1. Prepare a 1:20 dilution of System Check Beads. Refer to the Muse® System Check Kit User’s Guide
for information. (usually 20uL beads in 380ul diluent). This kit is kept in the Fraser refrigerator.
2 Select System Check under Essential Tools at the main menu to display the System Check screen.
3 A message appears prompting you to check the fluid levels in thecleaning and waste bottles. Check the
fluids, then click Close.
Note: Always remember to reset the fluid levels when you fill the cleaning solution bottle and empty the
waste bottle.
The first time you run the procedure, enter the bead lot number, expiration date, and check code.
• Enter the Bead Lot # and press Done on the keypad.
• Touch the calendar icon in the Exp. Date field to select the expiration date. Touch outside the calendar
to close it.
• Touch the Check Code field and enter the code. All values are required and can be found on the
information card that comes with the bead kit. Once you enter this information, it will remain in the
software. Each time you run the procedure, check the information to ensure it is accurate. Update the
values when a new lot number of System Check Beads is used, if necessary.
(
4. Mix the tube of prepared beads and load it on the system.
5. Select Run.
6. The system performs a prime, then acquires the first replicate. The progress bar and fly wheel provide
indicators as to the status of acquisition. The progress bar is divided into three sections—one for each
replicate. If the fly wheel is turning but the progress bar in not advancing, the fluid system may be
clogged or the beads may have settled to the bottom of the tube. If the beads settled, select Abort,
unload the tube and mix. Then reload and select Run System Check again.
7. Remove the tube and vortex it to resuspend the beads.
8. Load the tube and select Run. The system acquires the second replicate.
9. Repeat steps 7 and 8 to acquire the third replicate. Upon completion, the system displays a PASS/FAIL
result and the Particles/mL value for each replicate, as well as the average.
10. If any result for Particles/mL falls outside 10% of the expected value, the result is outside the
acceptable range and appears in red. If the procedure fails, touch the Help button (?) to display
troubleshooting information.
Luminex MUSE Cell Analyzer, MLSC 222
12
G. Running Samples
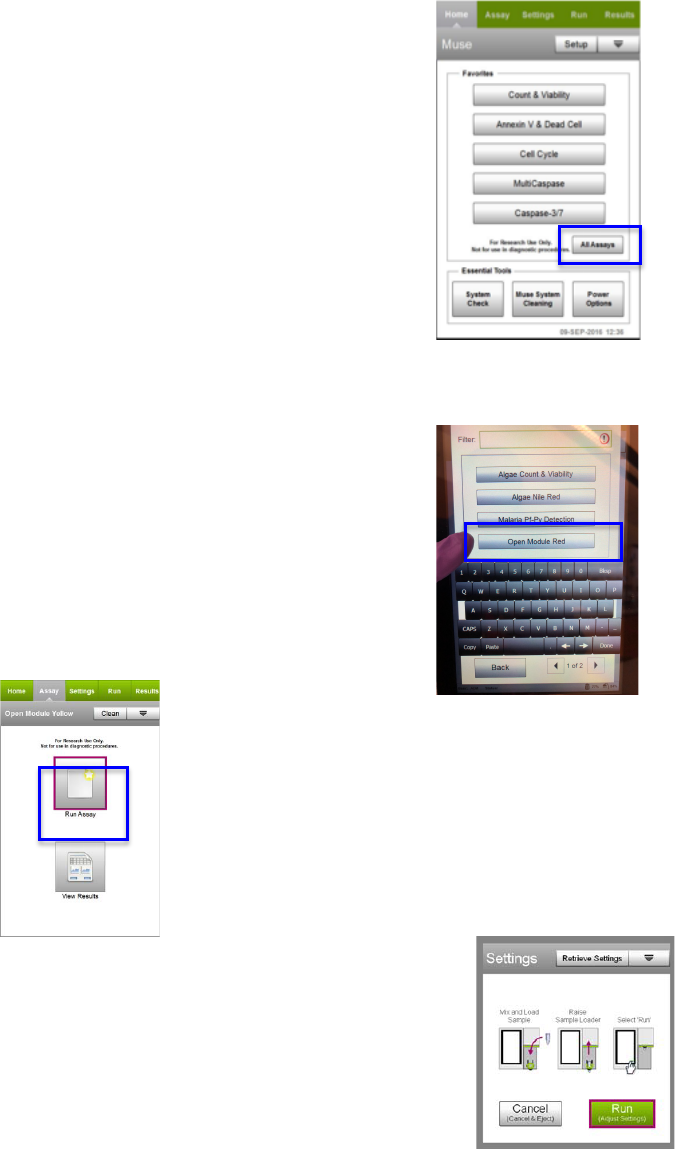
E5(H&3&$)()*&(4##49(90+('-#*()0(%+"(/%01()*&(3-#)(0/(;4:0%-)&#(0"()*&(14-"(
1&"+5(
=/()*&(4##49(70&#("0)(422&4%(+"7&%(;4:0%-)&#C(#&3&$)(All%Assays5(8*&(@##49(
H&4%$*(#$%&&"(422&4%#5(@33(4##49#(4%&(.%0+2&7(-")0(/0+%($4)&.0%-&#T(>&33(
U&43)*C(>&33(H-."43-".C(=11+"030.9C(4"7(V)*&%5((
=/(90+(4%&(%+""-".(4(W-)X,4#&7(4##49C(/0330'()*&(-"#)%+$)-0"#(0/()*&(D-)C(4"7(
0"(#$%&&"5(
(
(
K5(=/(90+(4%&(%+""-".(90+%(0'"(%&7(0%(9&330'X#)4-"&7(#4123&#C(#&3&$)(V2&"(Y07+3&(?&7(0%(V2&"(
Y07+3&(I&330'(
3. Select RUN ASSAY
3. Adjust the instrument settings.
Load a negative or isotype control to adjust the instrument settings and select Run
(Adjust Settings).
4. Fine tune the settings for the dot plot (Forward Scatter Log vs Yellow Log or Forward Scatter Log vs
Red Log), if necessary.

Luminex MUSE Cell Analyzer, MLSC 222
13
Use the Flow Rate button ( ) if you want to adjust the flow rate.
Check the desired box to set the flow rate to Very Low (0.12 μL/s), Low (0.24 μL/s), or Medium (0.59
μL/s). The default flow rate is Medium.
Follow instructions on the screen to set up controls, and run samples.
The software displays results immediately after each sample is acquired. The Yellow vs Red (or Red vs
Yellow) dot plot results include sample information, percentage of the cells in each quadrant, and mean
fluorescence intensity (MFI) of yellow fluorescence and red fluorescence for the cells in each quadrant.
Results can be displayed without plots or with plots.
Results from each run are stored in a data file, as well as its corresponding spreadsheet (CSV) file. The
spreadsheet file contains the following statistics:
• Sample Number
• Sample ID
• Total number of cells collected
• Total number of cells in the counting gate
• Dot plot: Count, concentration, percentage, mean and median intensity for yellow fluorescence and red
fluorescence in each quadrant.
• Histogram: Count, concentration, percentage, mean and median intensity for yellow fluorescence of
yellow-negative and -positive cells.
Retrieving'&'Exporting'Data'Files'
I0+($4"(02&"(4"(&R-#)-".(/-3&(/0%(%&:-&'(0%(4"439#-#5(I0+($4"(02&"(0"39(90+%(/-3&#Z("0)(/-3&#(/%01(
0)*&%(+#&%#C(+"3&##()*&9(4%&(-"()*&(6+,3-$(/037&%5(
I0+($4"(02&"(4"(&R-#)-".(74)4(#&)(4"7(422&"7(74)4()0()*-#(/-3&5(
1. H&3&$)()*&(4##49(/%01()*&(14-"(1&"+C()*&"(#&3&$)(View%Results%/%01()*&(4##49(#$%&&"5(

Luminex MUSE Cell Analyzer, MLSC 222
14
8*&(?&)%-&:&(P4)4(H&)(#$%&&"(422&4%#5((
(
K5(H&3&$)()*&(/-3&(4"7()*&"(#&3&$)(Retrieve5(
8*&(74)4(#&)(02&"#(4"7()*&(34#)(#4123&(-"()*&(#&)(-#(7-#2349&7(-"()*&(?&#+3)#(#$%&&"5(!#&()*&(#4123&(
3-#)(,+))0"()0(:-&'(433()*&(#4123&#(-"()*&(74)4(#&)5(V%C(+#&()*&(#$%033(4%%0'#()0(#$%033()*%0+.*()*&(3-#)(
0/(#4123((
L5(H&3&$)([02)-0"#\(
M5(BR20%)(74)4()0(!H]5(Q;0%(4"439#-#('-)*(;30'^0(#0/)'4%&C(&R20%)(4#(;>H(/0%14)S5
H. Shutdown Procedure
1. ?+"()*&(Complete%System%Clean%2%0$&7+%&(4)()*&(&"7(0/()*&(749(,&/0%&(#*+))-".(70'"()*&(
+"-)(Q#&&(#&$)-0"(BS5(=/(90+(%4"('*03&(,3007(#4123&#C(%+"(4"(BR)%&1&(>3&4"(-"#)&475(
2. (G&4:&()*&()+,&(0/(P=('4)&%(0"()*&(#4123&(3047&%5(
◆(O@?_=_<T(P0("0)(3&4:&(4()+,&(0/(<+4:4(=>;C(,3&4$*C(0%(4"9(0)*&%($3&4"-".(4.&")(3047&7(
0"()*&(-"#)%+1&")(0:&%"-.*)(0%(/0%(4"(&R)&"7&7(2&%-07(0/()-1&5(6%030".&7(&R20#+%&()0(
#)%0".(0R-7-`-".(4.&")#('-33(7414.&()*&(/30'($&335(@3'49#(3&4:&(4(/%&#*()+,&(0/(P=('4)&%(0"(
)*&(#9#)&1('*&"(#*+))-".(-)(70'"5(>*4".&()*&()+,&(0/('4)&%(%&.+34%39()0(&"#+%&(-)(-#($3&4"(
4"7(/%&&(0/(24%)-$3(
L(H&3&$)(Power%Options%/%01()*&(14-"(1&"+(+"7&%(B##&")-43(8003#5((
(
(
M(H&3&$)(Power%Off%)0()+%"(0//()*&(#9#)&15(
Luminex MUSE Cell Analyzer, MLSC 222
15
I. Troubleshooting
Follow these procedures first.
Run a Complete System Clean
Run a System Check
Consult the printed official Luminex MUSE Cell Analyzer Manual (next to MUSE)
If you have tried all of these, and are still having issues, then ask Dr. Fraser.
Last resort, call the Luminex technical support.
J. Useful Links
The following links describe flow cytometry, and designing a good experiment. Feel free to
forward suggestions of any others you find to be useful, so I can continue to build the list.
Introduction to Flow Cytometry for beginners:
1. “Introduction to Flow Cytometry” video and powerpoint by Dr. Deborah Fraser (Available
on CSULB CNSM Research Training webpage, and through CSULB BUILD)
2. Video training on MUSE Cell Analyzer by Dr. Deborah Fraser (Available on CSULB CNSM
Research Training webpage, and through CSULB BUILD)
3. Video training introductory course: http://www.bdbiosciences.com/us/support/s/itf_launch
4. online book: http://www.coulterflow.com/bciflow/practical/book/index.html
5. pdf: http://users.path.ox.ac.uk/~nrust/a_beginners_guide_to_flow_cytometry.pdf
Fluorophore / fluorochrome Selection
Note: there may be some bias from companies that produce their own fluorophores! Here are my
favorites:
1. https://www.lifetechnologies.com/content/dam/LifeTech/migration/en/filelibrary/cell-tissue-
analysis/pdfs.par.13383.file.dat/fluorophore-selection-guide-flow-cytometry.pdf
2. http://www.bdbiosciences.com/us/s/spectrumviewer
3. https://www.ebioscience.com/media/pdf/literature/multicolor-flow-cytometry-tech-resource-
guide.pdf
4. http://www.biolegend.com/multicolor_staining
