
Luminex Corporation
12212 Technology Blvd.
Austin, TX 78727
U.S.A.
Technical Support
Telephone: 512-381- 4 3 97
North America Toll Free: 1-877-785-2323
International Toll Free: + 800-2939-4959
Email: support@luminexcorp.com
www.luminexcorp.com
Muse
®
Oxidative Stress Kit
For Research Use Only. Not for use for diagnostic
procedures.
4600-3447, Rev C
Catalog No. MCH100111 (100 tests)
October 2019

Muse® Oxidative Stress Kit
For Research Use Only 1
Application
The Muse® Oxidative Stress Kit allows for the quantitative measurements of cellular populations undergoing oxida-
tive stress based on detection of Reactive Oxygen Species (ROS), namely superoxide.
The assay provides relative percentage of cells that are ROS negative and positive in both adherent and suspension
on the Guava® Muse Cell Analyzer. Minimal sample preparation is required in this no-wash, mix-and-read assay to
obtain accurate and precise results.
The Muse Oxidative Stress Kit is for use with the Guava Muse Cell Analyzer. The Muse System makes sophisticated
fluorescent-based analysis fast, easy, convenient, and affordable. After loading onto the Guava Muse Cell Analyzer,
intuitive software provides detailed or summary analysis of your cell sample in a few short steps.
Sufficient reagent is provided for the preparation and analysis of 100 tests.
For Research Use Only. Not for use in diagnostic procedures.
Test Principle
Reactive Oxygen Species (ROS) is a collective term that defines chemically reactive radicals and non-radical mol-
ecules derived from molecular oxygen such as superoxide, singlet oxygen, and peroxide.
1-2
In mammalian cells,
major sources of ROS include cellular respiratory and metabolic processes. ROS can be generated intracellularly as
by-products of mitochondria electron transport of aerobic respiration or by intracellular oxidoreductase enzymes
and metal catalyzed oxidations.
2
Further, ROS may be generated as essential biomolecules in cellular regulation or
as toxic by-products of aerobic metabolism. ROS is well known to play an important role in phagocytic cells as a
part of their defense mechanisms
3
but it is also known to have a broader role in all cell types in functions such as
cell signaling and regulation, activation of signaling cascades and apoptosis, and alternate death pathways.
4-7
The
ability to react with a variety of cellular targets, including enzyme active sites, nucleic acids and lipids results in a
wide range of pathologies associated with superoxide and ROS generation. Superoxide and ROS have thus been
implicated in the pathophysiology of multiple diseases ranging from cancer, Alzheimer, sepsis, diabetes, and car-
diovascular disease.
8-10
The Muse® Oxidative Stress Kit simultaneously determines the count and percentage of cells undergoing oxida-
tive stress based on the intracellular detection of superoxide radicals. The kit utilizes the Muse Oxidative Stress
Reagent for the detection of ROS in cells.
The Muse Oxidative Stress Reagent is based on dihydroethidium (DHE), a well characterized reagent that has
been extensively used to detect reactive oxidative species in cellular populations.
11
The reagent is cell permeable
and it has long been postulated that DHE upon reaction with superoxide anions undergoes oxidation to form the
DNA-binding fluorophore ethidium bromide or a structurally similar product which intercalates with DNA result-
ing in red fluorescence.
Two populations of cells can be distinguished in the assay:
• ROS(-): live cells
• ROS(+): cells exhibiting ROS

Muse® Oxidative Stress Kit
For Research Use Only 2
Figure 1: Representative plots from Muse® Oxidative Stress Assay
The first plot has a threshold marker for eliminating debris based on cell size, as well as a gate to gate on cells. The
second plot shows the histogram (and optional overlay) of gated cells with two markers providing data on two cell
populations: ROS(-) and ROS(+) cells.
Summary of Protocol
Culture cell including negative and positive
controls by desired method.
Prepare cell samples in 1X Assay Buer at 1 x 10
6
to 1 x 10
7
cells/mL
for incubation with the Muse® Oxidative Stress working solution.
Dilute Muse® Oxidative Stress Reagent 1:100
with 1X Assay Buer to make intermediate solution.
Dilute Muse® Oxidative Stress intermediate solution 1:80
with 1X Assay Buer to make Muse® Oxidative Stress
working solution.
Add 190 μL of Muse® Oxidative Stress
working solution to 10 μL of cells.
Incubate at 37°C
for 30 minutes.
Mix thoroughly and run
on Muse® Cell Analyzer.

Muse® Oxidative Stress Kit
For Research Use Only 3
Kit Components
• Muse® Oxidative Stress Reagent (Part No. 4700-1665, 100 tests/bottle)
• 1X Assay Buffer (Part No. 4700-1330, 100 mL)
Materials Required but Not Supplied
• Guava® Muse® Cell Analyzer
• Cell suspension, treated and untreated to undergo cellular stress
• Micropipettors
• Disposable micropipettor tips
• Microcentrifuge tubes with screw caps, 1.5 mL (VWR Catalog No. 16466-030, or equivalent)
• Vortex mixer
• 100% bleach solution
• Disposable gloves
• Deionized water
• Muse® System Check Kit (Catalog No. MCH100101)
• Muse® Cell Dispersal Kit (Catalog No. MCH100107), optional
• Muse® Count & Viability Kit (Catalog No. MCH100102 or Catalog No. MCH600103), optional
• Guava® ICF Instrument Cleaning Fluid (Catalog No. 4200-0140), optional
Precautions
• The Muse® Oxidative Stress Kit is intended for research use only.
• Wear proper laboratory attire (lab coat, gloves, safety glasses) when handling this reagent.
• The Muse Oxidative Stress Reagent contains dyes that may be carcinogenic and/or mutagenic. Exercise
standard precautions when obtaining, handling, and disposing of potentially carcinogenic and mutagenic
reagents. Refer to the SDS for specific information on hazardous materials.
• Avoid microbial contamination of the solution, which may cause erroneous results.
• All biological specimens and materials should be handled as if capable of transmitting infection and dis-
posed of with proper precautions in accordance with federal, state, and local regulations. Never pipette by
mouth. Avoid specimen contact with skin and mucous membranes.
• Exercise care to avoid cross contamination of samples during all steps of this procedure, as this may lead
to erroneous result.
• The instructions provided have been designed to optimize the kit's performance. Deviation from the kit's
instructions may result in suboptimal performance and may produce inaccurate data.
• The fluorescent dye in this reagent is light-sensitive. Store in the dark at –20°C and shield from excessive
exposure to light during use.
• During storage and shipment, small volumes of product may become entrapped in the seal of the product
vial. For maximum recovery of product, centrifuge the vial briefly prior to removing the cap.
• Do not use reagents beyond their expiration date.
• Safety Data Sheets (SDSs) for kit reagents are available from our website (www.luminexcorp.com) or by
contacting Technical Support.

Muse® Oxidative Stress Kit
For Research Use Only 4
Storage
• Upon receipt store the Muse® Oxidative Stress Kit at –20°C, desiccated and protected from light.
• For long term storage, divide the stock solution into small aliquots to minimize the freeze-thaw cycles.
When stored at –20°C, desiccated and protected from light, these aliquots are stable for at least 6 months.
• Store the 1X Assay Buffer at 2° to 8°C.
Before You Begin
We highly recommend that the cell samples be run shortly after the sample preparation has been completed.
While some cell types have been shown to yield stable results for up to 3 hours after staining with the Muse® Oxi-
dative Stress Kit, the stability of individual cell types may vary.
Time considerations: The process of staining cells with the Muse Oxidative Stress Kit using the recommended
protocol takes 30–40 minutes. Acquiring your data on your Guava® Muse Cell Analyzer takes less than 3 minutes
per sample, depending on the concentration and desired number of events to acquire. However, preparing your
cells for testing may require periodic maintenance and cultivation. Once you cultivate the proper number of cells
for the experiment, it takes and additional 2 to 48 hours of culture with various inducers to stimulate detectable
ROS.
NOTE: For details on how to culture and prepare cell samples, including positive and negative control samples,
see Appendix A: Cell Sample Preparation on page 14.
Always run a System Check prior to performing the assay. For details refer to the Guava Muse® Cell Analyzer User’s
Guide.
Reagent Preparation
Allow the Muse® Oxidative Stress Reagent and 1X Assay Buffer to warm to room temperature, protected from light.
Muse® Oxidative Stress Reagent Intermediate Solution
The intermediate solution must be prepared immediately before use. Store at room temperature, protected from
light.
1. Dilute the Muse® Oxidative Stress Reagent stock solution 1:100 in 1X Assay Buffer. For example, add 2 µL of
Muse Oxidative Stress Reagent stock solution to 198 µL of 1X Assay Buffer.
Muse® Oxidative Stress Reagent Working Solution
The working solution must be prepared immediately before use. Store at room temperature, protected from light.
1. Dilute the Muse® Oxidative Stress Reagent intermediate solution 1:80 in 1X Assay Buffer as suggested in the
following table:

Muse® Oxidative Stress Kit
For Research Use Only 5
NOTE: Quantities below include one or more extra tests to allow for sufficient volumes.
Staining Protocol
For instructions on preparing cell suspension, see Appendix A: Cell Sample Preparation on page 14. Make sure to
stain positive and negative controls.
1. Prepare cell samples in 1X Assay Buffer at 1 x 10
6
to 1 x 10
7
cells/mL.
2. Allow the Muse® Oxidative Stress Reagent and 1X Assay Buffer to warm to room temperature.
3. Add 10 µL of cells in suspension into each tube.
4. Add 190 µL of Muse Oxidative Stress Reagent working solution to each tube.
5. Mix thoroughly by pipetting up and down or vortexing at medium speed for 3 to 5 seconds. Loosely cap the tube.
Incubate samples for 30 minutes at 37°C. Samples are ready to run on the Guava® Muse Cell Analyzer.
Setup and Acquisition on the Guava® Muse® Cell
Analyzer
Run a System Check prior to performing the assay. For information on Muse® System Check, refer to the Guava®
Muse® Cell Analyzer User’s Guide.
1. Select Oxidative Stress from the main menu.
Solution 10 Tests 50 Tests 100 Tests
Muse® Oxidative Stress Reagent
intermediate solution
23.75 µL 118.75 µL 237.5 µL
1X Assay Buffer 1876.25 µL 9381.25 µL 18762.5 µL

Muse® Oxidative Stress Kit
For Research Use Only 6
2. Select Run Assay.
3. Adjust the instrument settings.
• Load a stained sample for adjusting the settings and select Run.
NOTE: Perform the adjust settings step using a negative control,
then verify the settings using a positive control.
• Or, to retrieve previously saved instrument settings, select Retrieve
Settings. For more information on retrieving settings, see the Guava
Muse Cell Analyzer User’s Guide.
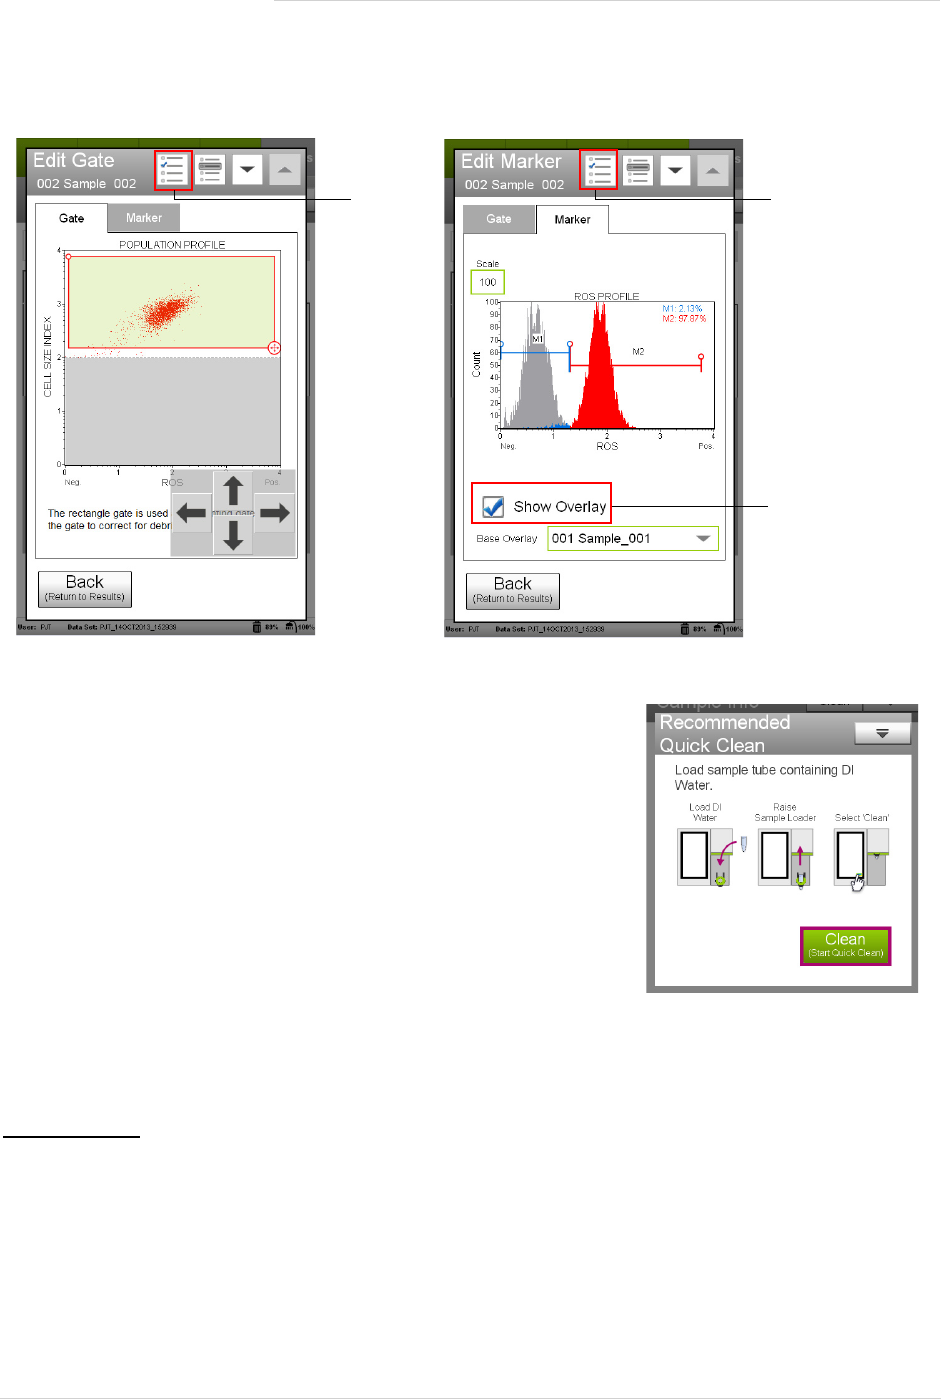
4. Fine tune the settings for the ROS vs. CELL SIZE INDEX plot, if neces-
sary.
• Adjust the CELL SIZE INDEX slider to the left of the plot to move the
cell population into the gate (green region).
• Drag the threshold to exclude any cellular debris. Touch the threshold and drag to make large changes.
Touch the arrow buttons located below the plot to make small changes. The arrow buttons appear after
you touch the threshold.
• Drag the upper-left or lower-right corner of the gate to encompass the cell population.

Muse® Oxidative Stress Kit
For Research Use Only 7
NOTE: If the acquisition times out (after 2 minutes), remove the tube and mix well before reloading. Then,
select Back to restart the adjust settings step. Or, select Next to accept the settings and continue to
the next step.
5. Select Next when you’ve completed the adjustments.
6. Fine tune the ROS histogram plot, if necessary.
• Touch the Scale at the top of the y-axis to change the count.
• Adjust the histogram markers, if necessary. To move the markers, touch the open circles at the top of each
end of the markers. Drag the markers left/right to make large changes, or touch the arrow buttons below
the plot to make small changes.
7. Select Next when the adjustments are complete.
This example data shows
typical gate and marker
settings. The threshold
was raised to remove
debris.
Touch threshold
to move up/
down.
Touch and drag
upper-left or lower-
right corner to
adjust the gate.
Touch open circles
to move the
markers left/right.
Touch to adjust the y-axis scale.

Muse® Oxidative Stress Kit
For Research Use Only 8
8. Verify the settings for the control sample. Then select Back and repeat steps 4 through 7 using a positive con-
trol. When the settings are correct, select Next.
9. Enter the sample ID by touching the field, then using the keypad to input the ID. Touch Done when you finish
entering the ID. If necessary, change the Events to Acquire and/or Dilution Factor by touching the field, then
selecting the value from the pop-up menu. Select Next.
Negative control Positive control

Muse® Oxidative Stress Kit
For Research Use Only 9
10. Mix the first sample and load it on the instrument. Select Run to run the sample.
11. When acquisition is complete, the results are displayed. If necessary, select Plots to display dot plots for the
sample.
You can view or change the sample ID, as well as add annotations for the current sample by selecting the
Sample Info tab. To print the results for the current sample select the printer tab.
12. (Optional) If changes are needed to the gate or markers, touch a plot to enlarge it, then adjust the cell size
gate or markers, as described in steps 4 and 6, respectively. You cannot adjust the cell size threshold after the
sample has been acquired.
If you wish to overlay histogram data from another sample, for example, the negative control, select the histo-
gram plot, then select Show Overlay. Select the base overlay sample from the Base Overlay field. The default
is the first sample. The base overlay histogram appears in grey behind the current sample histogram.
Muse® Oxidative Stress Kit
For Research Use Only 10
If you adjust the gate or markers and wish to apply the changes to other samples that you already acquired,
select the Apply Changes button () in the title bar. Select the samples you want to apply the changes to or
choose Select All, then select Apply. The sample you originally made changes to must be selected.
13. If no adjustments are needed, select Next Run and repeat steps 9 through 12 for the remaining samples.
NOTE: During the run, a message may appear prompting you to
load a tube of DI water for a Quick Clean. Load the water
then select Clean to perform the Quick Clean. Select Next
to continue with the run. The frequency of Quick Cleans
was set by your system administrator. Your administrator
may also have chosen to allow you to skip the Quick Clean
when the prompt appears. You can choose to perform
additional Quick Cleans at any time during a run by select-
ing Clean in the title bar, then Quick Clean from the menu.
14. When you have acquired the last sample, select Finish, enter a name
for the data set or leave the default and select OK.
15. (Optional) Select Options in the title bar to rename the data set,
export the data set, save the current instrument settings, or view the event log. Refer to the Guava Muse Cell
Analyzer User’s Guide for more information.
Results
Results from each run are stored in a data file, as well as its corresponding spreadsheet (CSV) file. The data file
and spreadsheet file contain the following statistics:
• sample number
• sample ID
Select to apply
changes to
other samples.
Apply
changes
Select to overlay a
histogram from
another sample in
the data set.

Muse® Oxidative Stress Kit
For Research Use Only 11
• Percent and concentration (cells/mL) of gated cells in each marker:
• M1: negative cells, ROS(–)
• M2: cells with ROS activity, ROS(+)
• Concentration and percentage of total cells
• Dilution factor (input value)
• Fluorescent intensity values for ROS(–) [M1] and ROS(+) [M2] cell populations
Figures A and B
143B cells were treated with 200 µM Menadione for 3 hours to induce ROS, and then stained with the Muse® Oxi-
dative Stress Kit acquired on the Guava® Muse Cell Analyzer. Figure A shows summary data with dot plot and his-
togram. Figure B shows summary data with optional overlaid histogram. The statistics show the percentages and
the concentration (cells/mL) for the gated events in each marker, as well as the concentration of total cells. The
first plot in Figure A and B shows ROS vs. Cell Size Index and the second plot shows ROS staining.
Technical Tips
1. Mix each cell sample thoroughly on a mixer before acquiring samples for consistent and accurate results.
However, avoid vigorous mixing, which can cause cellular breakdown and splashing, resulting in volume loss
and erroneous results.
2. The default number of events to acquire is 3000. You may select a different number; however, your statistical
error will increase as you decrease the number of acquisition events.
3. If results deviate from expected values, check that the correct value was entered for the dilution factor. You
can recalculate the cell counts by opening the data file and reentering the correct dilution factor for the spe-
cific sample. Cells counts will be recalculated automatically.
4. Periodically run Quick Clean using a tube of DI water (after every 20 sample acquisitions) to prevent a buildup
from cellular debris in the system. If your samples contain significant amounts of cellular debris, run the Quick
Clean cycle more often to prevent clogs or blockage.
5. If you are acquiring a sample but the progress bar is not moving, there is probably either insufficient volume to
continue to acquire the sample or a blockage of the flow system. First check to ensure that there is at least
100 µL of sample in the tube. If not, add additional buffer to bring the volume up to 100 µL or proceed to the
next sample. If the sample volume is greater than 100 µL, then the lack of events is probably due to a clog. A
AB

Muse® Oxidative Stress Kit
For Research Use Only 12
clog or blockage can be caused by cell aggregates, cell debris, bleach crystals, or other particulates. Perform a
Backflush to flush out the clog into a tube containing 20% bleach. Then run Quick Clean to remove bleach
residue. If this procedure does not alleviate the problem, refer to the Guava® Muse® Cell Analyzer User’s
Guide for additional troubleshooting tips, or contact Luminex Technical Support for help.
6. Muse Oxidative Stress Kit works best with samples in a homogeneous, single cell suspension. Cell aggregates
may clog or be excluded from the flow cell, affecting the accuracy of your results. If you want to use the kit
with a “clumpy” cell type, we recommend using Muse Cell Dispersal Kit (Catalog No. MCH100107) to disag-
gregate the cells. Contact Customer Service or visit our website at www.luminexcorp.com for detailed informa-
tion on the Muse Cell Dispersal Reagent and assay method.
Troubleshooting
Potential Problem Experimental Suggestion
Acquisition taking longer
than expected or progress
bar stops during acquisition
Ensure that the Muse® System Check (Part No. MCH100101) procedure was
run and passed. If the progress bar stops during acquisition, the fluid system
may be clogged. Run a Quick Clean procedure. It can be performed during or
after an assay. This will wash away any material forming within the glass capil-
lary walls.
Instrument clogging; too
many cells
• Cell concentration too high. Decrease the number of cells per microliter by
diluting the sample to 300–500 cells/µL. The Guava® Muse® Cell Ana-
lyzer give the most accurate data when the flow rate is less than 500 cells/
µL.
• Run a Quick Clean to clean out the capillary. This procedure can be per-
formed during or after an assay. This will wash away any material forming
within the glass capillary walls.
Low Cell Concentration
warning during acquisition
The sample concentration may be too low. The assay instructions are optimized
to give you a range of cells between 100-500 cells/µL in the final sample vol-
ume so accurate population count results are obtained. Repeat sample prepara-
tion with a lower dilution factor to allow for adequate cell numbers. A
substantial decrease in cell numbers can lead to difficulty in adjusting settings.
Ensure that cells are counted properly prior to beginning the experiment. The
assay instructions are optimized to give you a range of cells between 100-500
cells/ µL in the final sample for accurate results.
High Cell Concentration
warning during acquisition
If the concentration of the stained cell sample for acquisition is high (>500
cells/µL), the accuracy of data will most likely be compromised. Dilute the
sample further with 1X Assay Buffer to adjust the cell concentration below 500
cells/µL. For best results, we recommend that the cell concentration is in the
range of 200 to 300 cells/µL. The Guava Muse Cell Analyzer gives the most
accurate data when the flow rate is less that 500 cells/µL.

Muse® Oxidative Stress Kit
For Research Use Only 13
Background staining and/or
non-specific staining of cells
If all samples appear to be induced even when low levels of ROS are expected,
your cultured samples may be compromised. It is important to run negative
control samples for each experiment. The negative control should be a sample
from your cell culture, not treated to induce cellular stress or treated with an
ROS inhibitor. Typically, negative control samples show a low level of ROS, dis-
tinct from that of induced cells, because healthy cell cultures contain a small
number of ROS(+) cells. However, sub-optimal culture conditions may stress
cells in culture, causing them to generate ROS in the absence of an experimen-
tal induction treatment. The negative control from a stressed culture often
shows ROS reactivity.
Low level of staining
• If there are low levels of ROS staining, the Muse Oxidative Stress Reagent
may have been degraded. Verify proper storage and handling of the
reagent. Prepare fresh reagent immediately before staining cells.
• If there are no ROS(+) cells, the cells may not be fully induced or the Muse
Oxidative Stress Reagent may not have been taken up correctly by the cells
or the cell concentration range may be incorrect. The ROS staining results
can vary over time as induction progresses. To determine optimal stress
induction, conduct a time-course study to achieve the best results for ROS
staining. Also, positive control samples are recommended for each experi-
ment. Positive controls should be appropriate for comparison with the test
procedure or test cell population. Use a cell line previously characterized as
inducible for ROS production.
Poor separation of ROS(–)
and ROS(+) populations
• If the separation between populations is poor, the Muse Oxidative Stress
Reagent concentration may be too low. Muse Oxidative Stress Reagent has
been formulated for optimal performance using Jurkat, 143B, and HeLa
cells. Other cells may show different patterns of reactivity that require
adjustments to the amount of reagent used. For best results, titer the Muse
Oxidative Stress Reagent to determine the optimal amount for maximal
staining of cells.
• If the separation between populations is dimmer than expected, it is possi-
ble that the stained samples or Muse Oxidative Stress Reagent may have
been exposed to light. Repeat the staining using fresh reagents and avoid
prolonged exposure of reagents and stained samples to light.
Percent of ROS(+) cells
increases over time
If the percent of ROS(+) cells increases significantly over time, it is possible that
samples are not stable over the time required to acquire the data. The Muse
Oxidative Stress Assay uses live cells, hence, the staining profiles are dynamic
and can change as the cell sample ages. Stability of the stained cells can vary
between cell lines, and extended storage of stained samples may adversely
affect results. We recommend acquiring samples within 3 hours after sample
preparation.
Potential Problem Experimental Suggestion

Muse® Oxidative Stress Kit
For Research Use Only 14
Limitations
• The results of the assay are dependent upon proper handling of samples, reagents, and instruments.
• Cell types vary in the ROS content. The amount of ROS expressed intracellularly varies among cell types
after stress is induced.
• The Muse® Oxidative Stress Kit is designed for use on unfixed cells. Fixing cells may yield inaccurate
results.
• The Guava® Muse Cell Analyzer and Muse Oxidative Stress Kit yield optimal results when the stained cell
sample used for acquisition is between 5 x 10
4
to 5 X 10
5
cells/mL. To obtain the most accurate results,
adjust the cell concentration to within the recommended range. However, to optimize throughput, we rec-
ommend using between 1 x 10
5
to 5 x 10
5
cells/mL when possible.
Appendix A: Cell Sample Preparation
The following protocols describe how to harvest non-adherent and adherent cells cultured in 96-well plates or in
flasks or other tissue culture vessels.
Preparing Non-adherent Cells
1. Set up initial culture conditions, such that after culture and treatment, cells are resuspended at a concentra-
tion of 1 x 10
6
to 1 x 10
7
cells/mL (1 x 10
4
to 1 x 10
5
cells/sample) in 1X Assay Buffer.
2. Proceed to Staining Protocol on page 5.
Preparing Adherent Cells
For harvesting adherent cells, use your method of removal. Reagents such as EDTA or trypsin can be used to disso-
ciate the cells from the flask and should create single-cell suspensions. If using mechanical means to dislodge the
cells, Muse® Cell Dispersal Reagent (Catalog No. MCH100107) may be used to dissociate clumps.
1. Using your preferred method for dissociation, detach the cells from their culture vessel.
Variability in day-to-day
experiments
• If the results are inconsistent, check that the samples were well mixed prior
to acquisition. Cells may quickly settle in your samples and your results will
be inaccurate unless the cells are mixed just prior to acquisition.
• Monitor experimental cell cultures to ensure that cell viability and cell
numbers being analyzed are consistent. Any drop in cell numbers or viabil-
ity can influence experimental results.
• If there appears to be day-to-day variation of the staining pattern, ensure
the Guava Muse Cell Analyzer is working properly. Run the Muse System
Check (Catalog No. MCH100101) procedure to verify proper instrument
function and accuracy.
Potential Problem Experimental Suggestion

Muse® Oxidative Stress Kit
For Research Use Only 15
2. Wash cells to remove the dissociating reagent. Resuspend cells in 1X Assay Buffer so that the final concentra-
tion is between 1 x 10
6
to 1 x 10
7
cells/mL (1 x 10
4
to 1 x 10
5
cells/sample).
3. Proceed to Staining Protocol on page 5.
References
1. Apel K, Hirt H. Reactive oxygen species: metabolism, oxidative stress, and signal transduction. Annu Rev Plant
Biol. 2004;55:373-399.
2. Brieger K, Schiavone S, Miller FJ Jr, Krause KH. Reactive oxygen species: from health to disease. Swiss Med
Wkly. 2012;Aug 17:142.
3. Forman H.J, Torres M. Reactive oxygen species and cell signaling, respiratory burst in macrophage signaling.
Am J Respir Crit Care Med. 2002;166:S4-8.
4. Hancock JT, Desikan R, Neill SJ. Role of reactive oxygen species in cell signaling pathways. Biochem Soc Trans.
2001;29:345-350.
5. Burhans W, Heintz N. The cell cycle is a redox cycle: linking phase-specific targets to cell fate. Free Radic Biol
Med. 2009;47:1282-1294.
6. Li N, et al. Mitochondrial complex I inhibitor rotenone induces apoptosis through enhancing mitochondrial
reactive oxygen species production. J Biol Chem. 2003;278:8516-8525.
7. Chen Y, Azad MB, Gibson SB. Superoxide is the major reactive oxygen species regulating autophagy. Cell
Death Differ. 2009;16:1040-1052.
8. Waris G, Ahsan H. Reactive oxygen species: role in the development of cancer and various chronic conditions.
J Carcinog. 2006;5:14.
9. Valko M, Leibfritz D, Moncol J, Cronin MT, Mazur M, Telser J. Free radicals and antioxidants in normal physio-
logical functions and human disease. Int J Biochem Cell Biol. 2007;39:44-84.
10. Manton KG, Volovik S, Kulminski A. ROS effects on neurodegeneration in Alzheimer's disease and related dis-
orders: on environmental stresses of ionizing radiation. Curr Alzheimer Res. 2004;14:277-293.
11. Bindokas VP, Jordan J, Lee CC, Miller RJ. Superoxide production in rat hippocampal neurons: selective imaging
with hydroethidine. J Neurosci. 1996;16:1324-1336.

Muse® Oxidative Stress Kit
For Research Use Only 16
Related Kits
• Muse® System Check Kit – MCH100101
• Muse® Count & Viability Kit – MCH100102
• Muse® Annexin V and Dead Cell Kit – MCH100105
• Muse® Cell Dispersal Reagent Kit – MCH100107
• Muse® Caspase-3/7 Kit – MCH100108
• Muse® MultiCaspase Kit – MCH100109
• Muse® MitoPotential Kit – MCH100110
• Muse® Nitric Oxide Kit – MCH100112
• Muse® Ki67 Proliferation Kit – MCH100114
© 2019 Luminex Corporation. All rights reserved. No part of these works may be reproduced in any form without
permission in writing.
Muse and Guava are trademarks of Luminex Corporation, registered in the U.S. and other countries.
