
Watershed Modeling STEM Mini-Unit Teacher Guide www.wikiwatershed.org
Stroud Water Research Center Page 1
Watershed Modeling STEM Mini-Unit
Teacher Guide
Table of Contents
Mini-Unit Abstract
Model Overviews:
Runoff Simulation
Model My Watershed
®
Site Storm Model
Mini-Unit Overview and Teacher Preparation
Watershed Modeling STEM Mini-Unit Lessons:
Effects of Land Cover & Soils in Watersheds
Modeling Improvements to My Schoolyard
Extension Activities
Vocabulary
Appendix
Best Management Practices Resources
Samples of Schoolyard Maps

Stroud Water Research Center Page 2
Unit: Watersheds
Subject: Environmental Science and Earth Science
Grade Level: MS/HS
Mini-Unit Abstract
Teaching Environmental Sustainability - Model My Watershed
®
(TES-MMW) is a collaborative
project funded by the National Science Foundation that designs engaging guided inquiry-based
curriculum that includes scientific literacy, modeling, data analysis, place-based schoolyard
investigations, and extension activities. The lessons in this Watershed Modeling STEM Mini-unit were
adapted and updated from the TES-MMW project curriculum housed on the Innovative Technology in
Science Inquiry (ITSI) portal developed by the Concord Consortium, and highlighted in NSTA’s
Science Teacher (Marcum-Dietrich, Kerlin, Staudt, Daniels, 2018). TES-MMW incorporates two
innovative technologies to help students understand the impacts of human actions on the dynamics of
watersheds, and empowers students to make authentic decisions to protect and conserve watersheds. The
online Runoff Simulation is a model of a parcel of land that allows users to change land cover, soil
types, and rainfall amounts to determine hypothetical changes in evapotranspiration, infiltration, and
runoff rates. The Model My Watershed
®
Application is a watershed-modeling GIS web app that uses
scientific data from national databases to enable citizens, conservation practitioners, municipal decision-
makers, educators, and students to analyze land use and soil data, model stormwater runoff, and
compare different conservation or development scenarios that could modify runoff and water quality.
This Watershed Modeling STEM Mini-Unit was designed for middle school students to learn systems
thinking and geospatial analysis skills in the context of place-based problem-solving for watershed
science. This mini-unit consists of two interactive lessons where students use online GIS based
modeling tools to develop an understanding of stormwater dynamics within a watershed. Students will
discover how humans impact the water quality of their local watershed by altering the characteristics of
the land and changing how water moves through the environment. This place-based mini-unit is an
excellent addition to any watershed curricula as it provides real world context to water quality issues and
experience with land use planning and design practices. Lesson two includes an optional out of
classroom activity where students walk around the school property to discover and map the current
conditions at their school, which enhances their understanding of the concepts and empowers their voice
in developing actionable plans for improving their school grounds. Each lesson includes suggestions for
extension activities that teachers can employ to further the educational experiences for their students.
Teachers may find it appropriate to include discussions or activities before beginning the mini-unit that
introduces their students to foundational understandings of watershed concepts. Unit vocabulary can be
found near the end of this teacher’s guide.
Marcum-Dietrich, Nanette, et al. “Our Watershed.” Our Watershed, Feb. 2018, pp. 39–46.

Stroud Water Research Center Page 3
Model Overviews:
Runoff Simulation
The Model My Watershed
®
- Runoff Simulation is an interactive model used to investigate how
changing the type of land cover, amount of rainfall, and soil texture affects where water goes when it
rains. The Runoff Simulation animates results from applying the TR-55 runoff model developed by the
U.S. Department of Agriculture and the Small Storm Hydrology Model for Urban Areas developed by
Robert Pitt for a single 24-hour rain storm over a hypothetical small unit of land with a single land cover
class and a single hydrologic soil group. The Runoff Simulation (https://runoff.modelmywatershed.org/)
will work in any web browser.
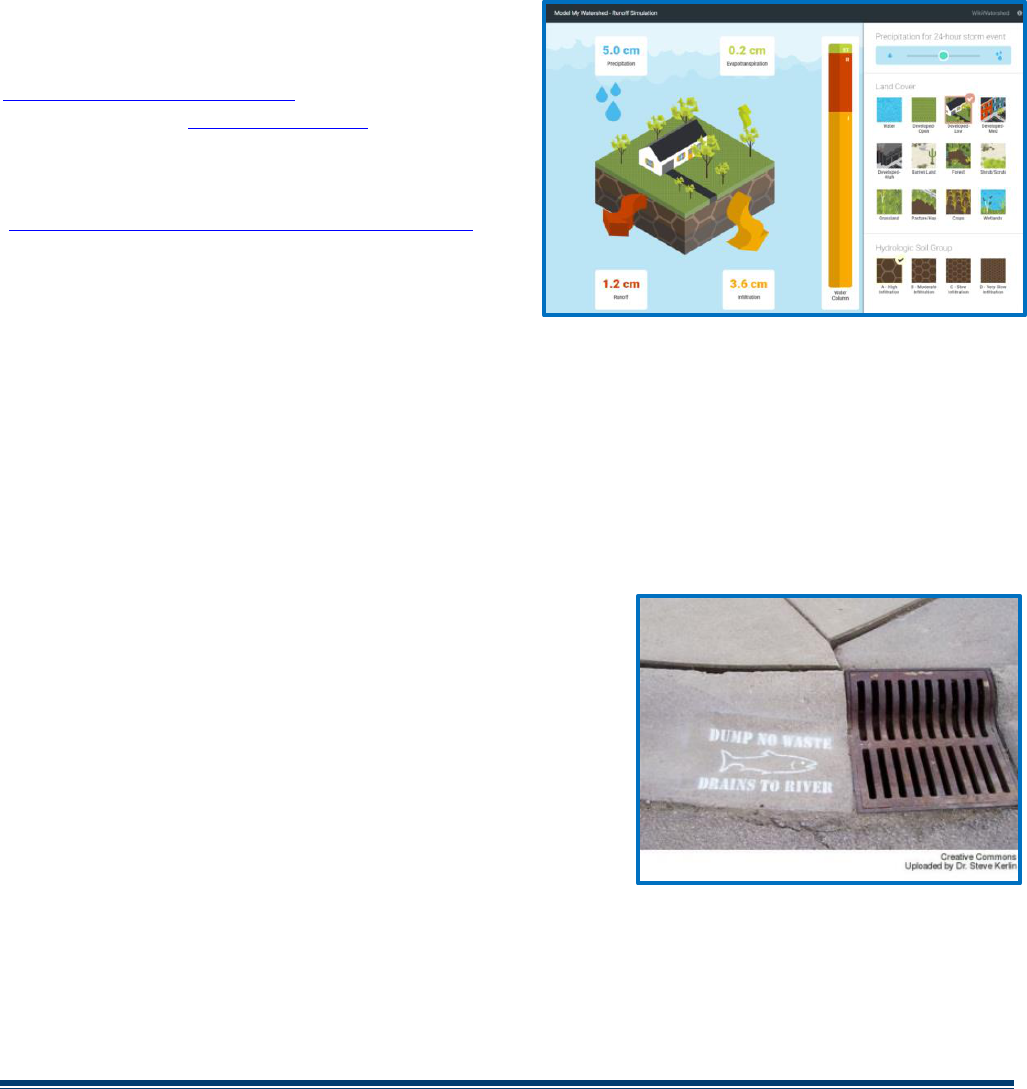
The Runoff Simulation includes a main graphic showing a parcel of land with Evapotranspiration,
Infiltration, and Runoff results indicated, and a control panel on the right side for the variables in the
model that can be manipulated. Users can change the amount of precipitation for a 24-hour storm event
by adjusting the slider at the top of the variable control panel (blue oval) on the right side of the Runoff
Simulation. The results are immediately calculated and shown in the simulation. Land Cover (green
oval) options are found below the precipitation slider. Descriptions can be seen by hovering the cursor
over one of the 12 Land Cover types, and the user can click any Land Cover to change this variable in
the simulation. Hydrologic Soil Group (red oval on the bottom of the variable control panel) works the
same way as descriptions can be seen and Soil Groups can be selected with the cursor, which results in a
recalculation and change in the model.

Stroud Water Research Center Page 4
Model My Watershed
®
Site Storm Model
The online GIS-based Model My Watershed
®
(MMW) Site Storm Model (https://modelmywatershed.org/)
is a component of the WikiWatershed
®
Toolkit (https://wikiwatershed.org/), a suite of web browser based
tools designed to help citizens, conservation practitioners, municipal decision-makers, researchers,
educators, and students advance their knowledge and stewardship of fresh water. The Site Storm
Model simulates storm runoff and water quality by applying the TR-55 & STEP-L water quality models
for a single 24-hour rain storm over a selected land area within the continental United States. The results
are calculated based on actual land cover data (from the USGS National Land Cover Database 2011,
NLCD2011) and actual soil data (from the USDA Gridded Soil Survey Geographic Database,
gSSURGO) for the selected land area of interest.
The Site Storm Model can be accessed online from any web browser at modelmywatershed.org and
works best on desktop and laptop computers. It is also optimized for the Firefox browser. MMW works
on touch-screen devices such as iPads, other tablets, and laptops with dual keyboard and touch-screen
functionality but users may experience some issues with overlapped formatting of tools due to screen
size and touch-screen sensitivity.
When you first navigate to the Model My Watershed® application you may be asked to share your
location data with the application. Sharing your location will automatically start the application at
approximately your current location, but is not necessary for the application to work. You may also see a
“login” pop-up window to be given a chance to sign in to the application. You do not need to “Login” to
use the MMW application, although creating a login allows you to save your work to return to later, and
to share your work with other users. Logging in as a guest gives you access to the full modeling and
scenario capabilities of the application, but will you not be able to save and share any data.
If you do not want to login, click on “Get started” to use the MMW app as a guest. If you have an
account already, simply type in your username and password and click "Login." New users can create an
account by clicking "Register" at the bottom of the Login pop-up window. Fill in all of the required

Stroud Water Research Center Page 5
fields and submit the form, then check your inbox for an activation email. You must click a link in the
activation email to finish the registration process. Check your spam/trash folders if you do not see the
account activation email in your inbox. These emails are sometimes blocked by institutional (e.g.
business, agency, or school) spam filters, so you may need to contact your systems administrator. For
students and teachers who are using the Innovative Technology in Science Inquiry (ITSI) portal, click
the "ITSI" button. The ITSI portal option will allow users to login with their ITSI credentials, or through
a Schoology account, which prevents users from needing to set up a new account for the application.
Once you have logged into the application, you will see a map looking much like Google maps. If you
shared your location, the application may zoom directly to your location; otherwise it will begin by
showing a map of the entire lower 48 states of the U.S. As with most online map tools, you can navigate
the map by clicking and dragging and zoom by pinching, using a scroll wheel, or using the zoom buttons
on the lower right. You can also search for a location by name or address using the "Search" box on the
upper right. To go or return to your current location, hit the “My Location” button with a picture of a pin
next to the zoom buttons on the lower left.
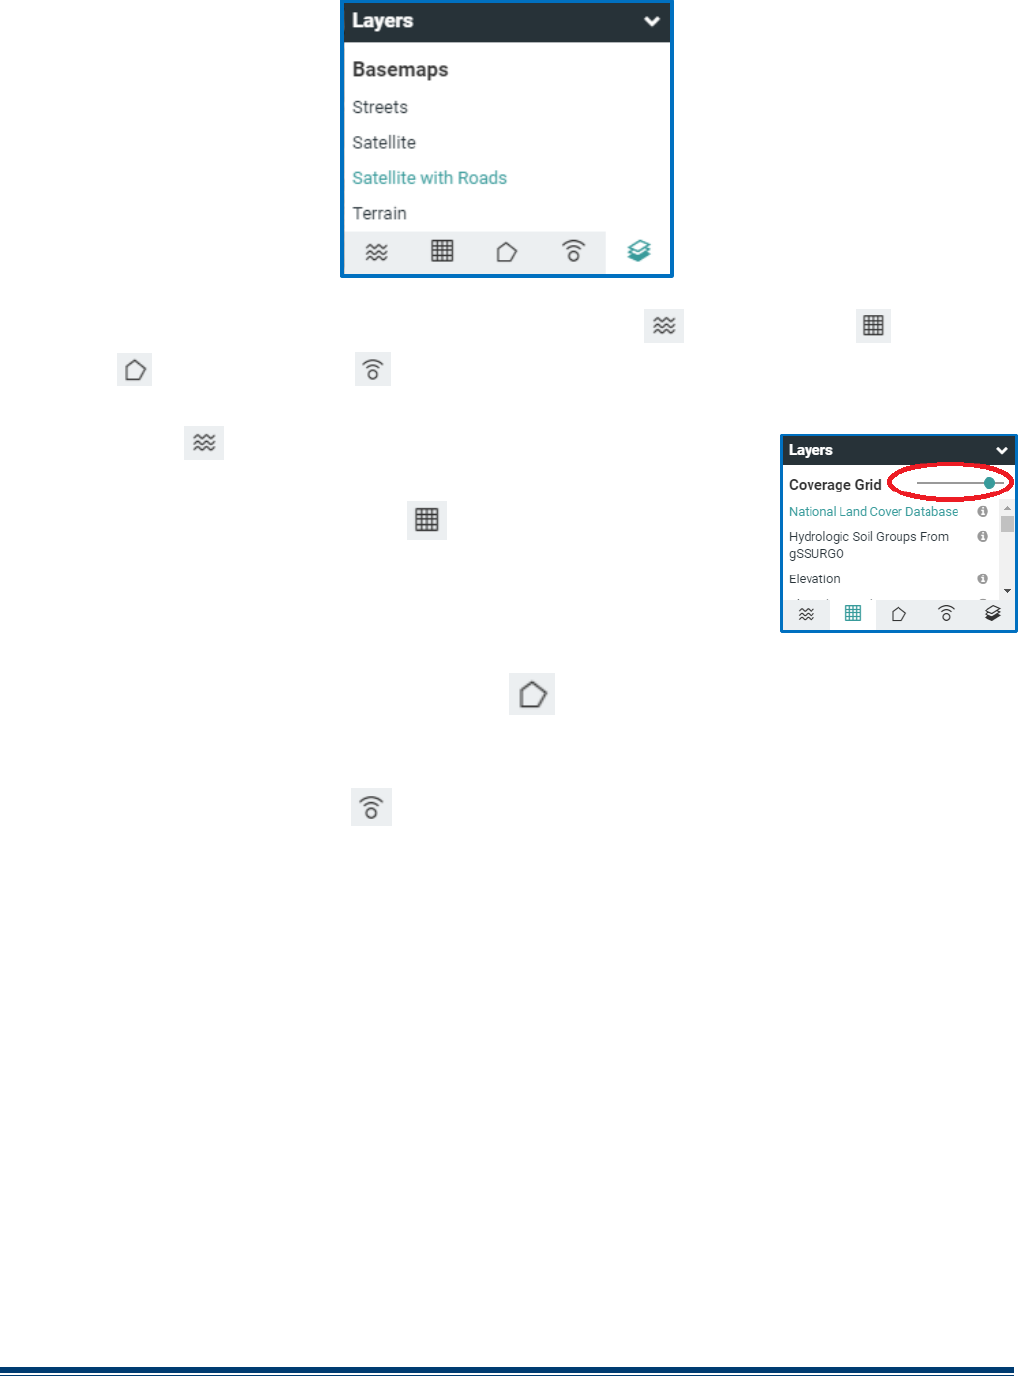
Just as Google maps allows you to switch between road and satellite maps, there are several options for
both the base map and data overlays on top of the map. Use the "Basemaps" ( ) tab of the "Layers"
control box to access these. You can select a basemap image and several different types of overlays. The
base maps themselves come directly from ESRI or Google Maps and are not built into the application. If
you have a very slow Internet connection, the base maps may be slow to load. The overlays include
boundary lines (like school districts and USGS hydrologic units) and color shading for land uses and soil
types.
Stroud Water Research Center Page 6
Other tabs in the "Layers" control box are for displaying streams ( ), coverage grid ( ),
boundary ( ), and observations ( ) overlays. Continental US medium resolution stream network,
Delaware River Basin high resolution stream network along with other stream overlays are enabled via
the "Streams" tab ( ). The Continental US and Delaware River Basin
stream network overlays are zoom dependent. Smaller streams are shown as
you zoom in. In the "Coverage Grid" tab ( ) of the "Layers" control box
you can enable color shading of the USGS National Land Cover Database, the
USDA Hydrologic Soils Groups, and other data. A slider tool allows you to
adjust the transparency of the color shading.
Boundary lines can be added in the "Boundary" tab ( ) of the "Layers" control box. You can add
boundaries (lines show up in pink) for USGS Subbasin units (HUC-8, HUC-10, HUC-12), county lines,
congressional districts, school districts, and municipalities (PA only). Additional watershed data is
available in the "Observations" tab ( ) of the "Layers" control box. These data include USGS and
other national river and weather monitoring stations. Please note that observation data is not available in
all locations!
Click on "Get Started" to begin modeling and viewing additional data. Next select the type of area you
would like to study and model. The first option is to "Select a boundary" area, with the same boundary
options as you saw in the "Layers" control. Additionally in this "Select a boundary" tool, once you select
a boundary you can then see the name of the defined areas when you hover over the map. Be aware of
your zoom level when selecting by boundaries. If you are at too high of a zoom level, you may not be
able to see the boundaries on your map. Your second choice is to "Draw area" with the options of free
drawing a polygon of any size and shape you choose or drawing a 1 square Km area to model. Your
third option is to "Delineate watershed". To use this option you must choose your stream resolution
(Continental US Medium Resolution or Delaware River Basin High Resolution) then place a blue
balloon anywhere on the map to define a point (purple circle). The delineate watershed function finds
the most direct point (blue circle) down slope where water would runoff into a body of water. From the
blue circle the app then finds the watershed boundary of all land surfaces that would drain to that point.
The last option is to "Upload file" in which you can upload a shapefile from another GIS program.

Stroud Water Research Center Page 7
As soon as you have selected an area, or closed the box of your custom area, the application will change
into geospatial analysis mode. The right side of the screen will now show the area you selected in bright
colors with the rest of the map greyed out. The left side of the screen will show the "Analyze" pane. The
"Analyze" pane contains a wealth of data including; stream network statistics, land cover distribution,
hydrologic soil group distribution, county-based estimated number of farm animals, permitted point
source discharges, as well as climate, terrain, and water quality data. These calculations and analyses are
done on the fly for each area based on nationally available data. You will not get some pre-computed
estimate or “canned” number. These are real values based on the most recently available national land
cover, soil type, and other datasets. Because of this, the analysis may take a few seconds to complete and
you may see a loading wheel as this happens (It is generally very fast with a good Internet connection).
In the analyze pane, you can view the land use, soil type, stream, climate, and other data (some in both
tabular and graphical form). Use the tabs at the top of the pane to switch between data types. You can
sort the tabular data by type, area, coverage percent, and other units. The bar graph coloring in the land
cover distribution matches the colors assigned by the National Land Cover Database and the bar graphs
can be used as legends for the land cover and soil group overlays.
The title at the top of the analyze pane will list the name of the area (if selected by boundary) and the
total size of the area. You can still change the map zoom and overlays in the map pane. Try turning on
the NLCD overlay to compare the layout of land covers on the map to the percent of each land cover in
the area. To see a larger area of the map and minimize the analyze pane you can click on the
expand/contract map arrows button near the zoom button in the bottom right of the map.

Stroud Water Research Center Page 8
If you realize you made a mistake in selecting your area, hit the "Change area" button at the bottom left
of the analyze pane. You will be taken back to the "Select Area" screen. To clear the map and start over
completely at any time, click the "Model My Watershed
®
" title at the top left of the screen. If you are
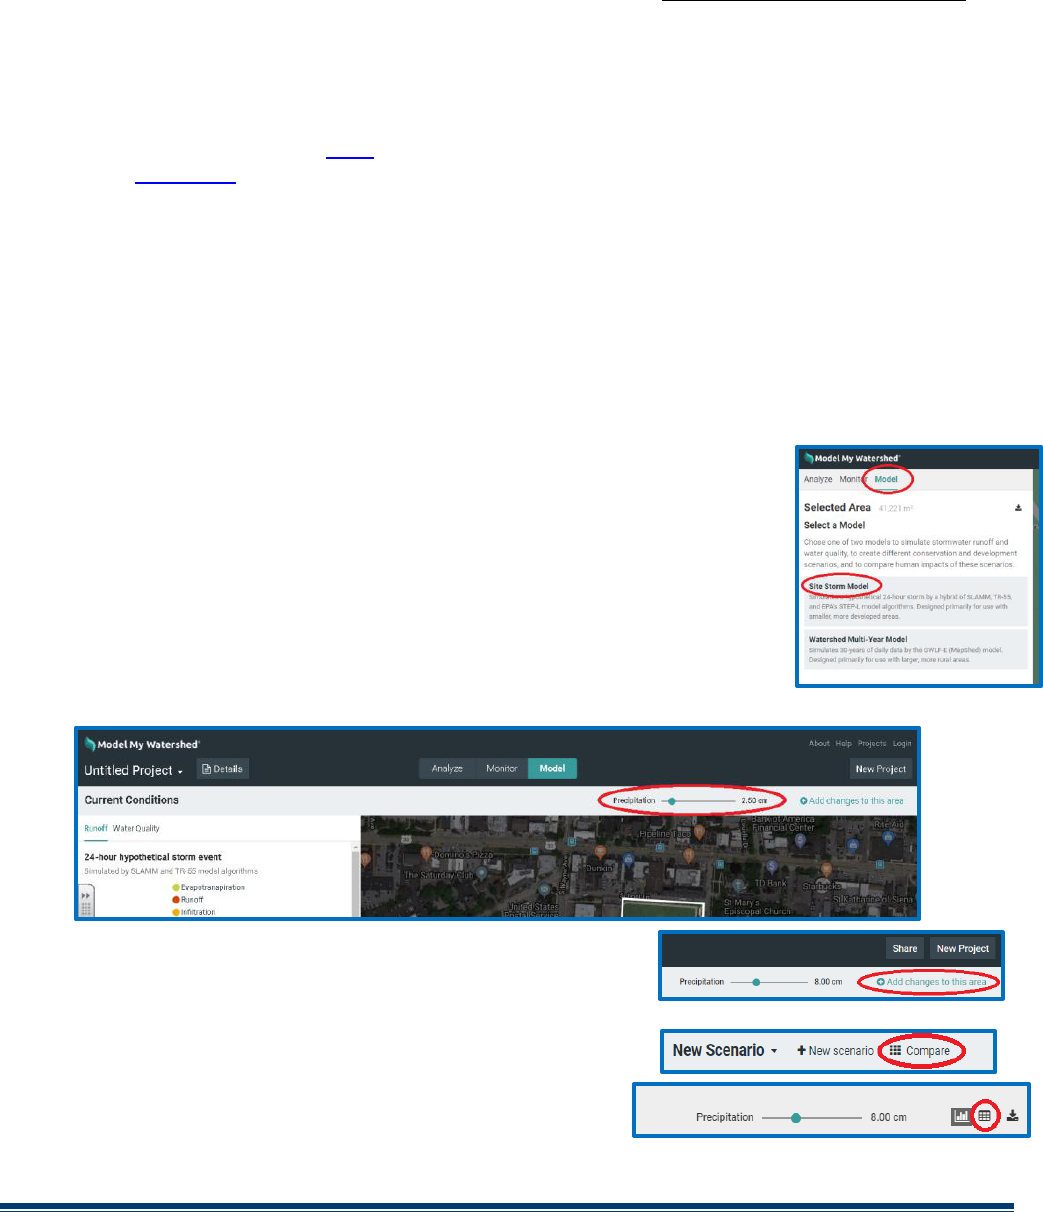
happy with the area you selected, you can move on to modeling and modifying the area by clicking the
"Model" tab (green circle in picture below) in the analyze pane on the left side, then selecting from the
options. The "Site Storm Model" choice models changes for a single storm event. Users of the NSF-TES
MMW curriculum should select "Site Storm Model" for their activities. The other choice, "Watershed
Multi-Year Model" shows users additional modeling results over longer spans of time.
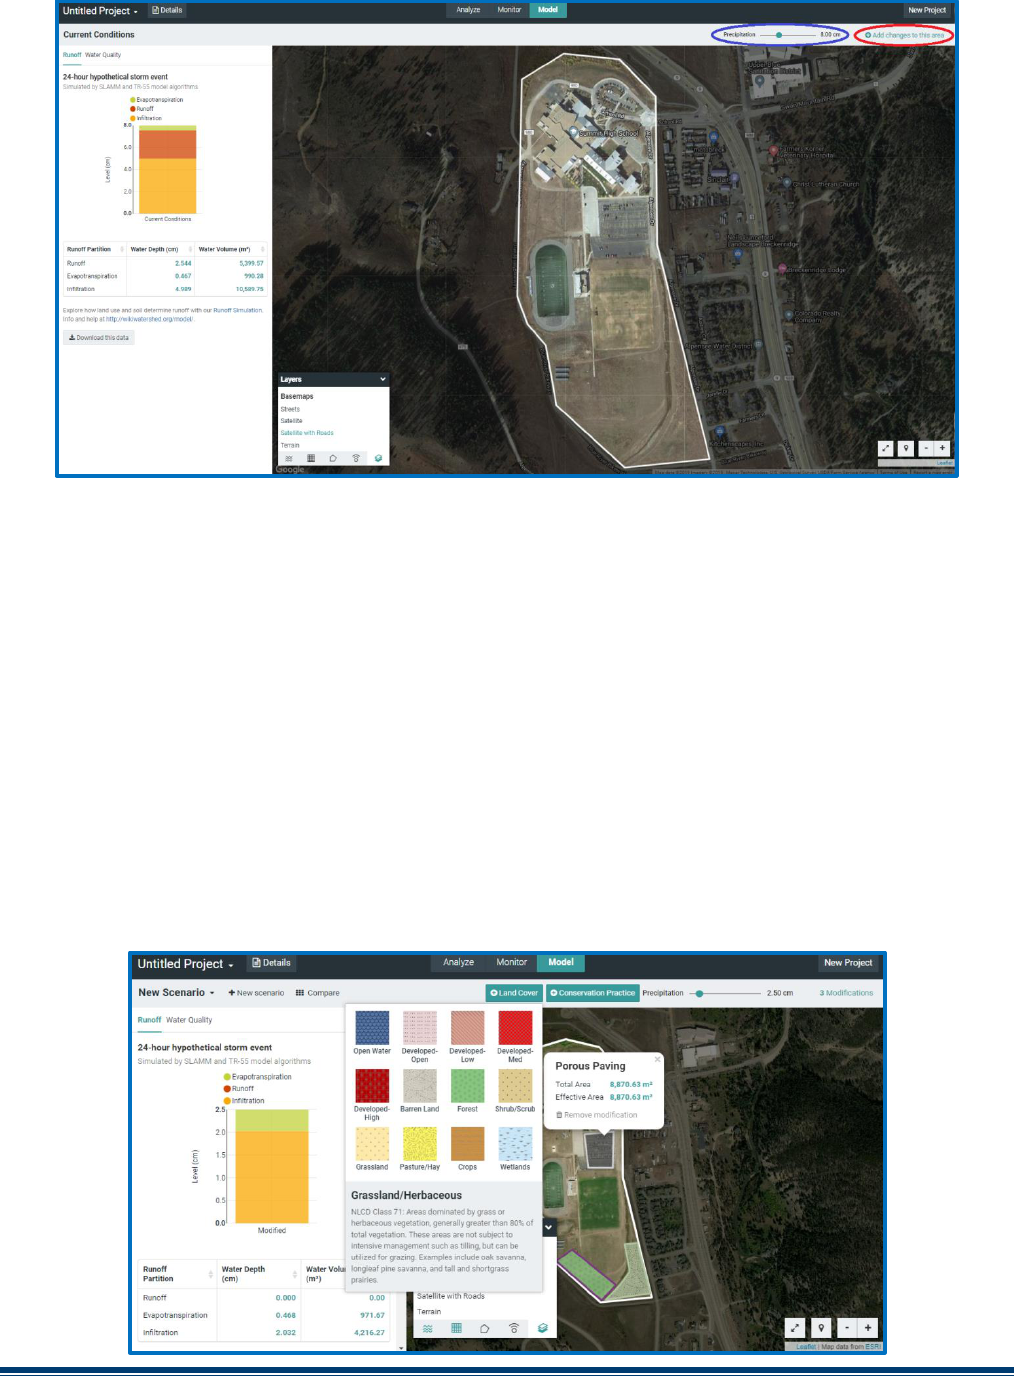
Once you have entered the modeling mode, the application will show runoff and water quality data for
the current conditions. The runoff quantities are calculated using a combination of the TR-55 runoff
model developed by the US Department of Agriculture and the Small Storm Hydrology Model for
Urban Areas developed by Robert Pitt for a single 24-hour rain storm. The water quality parameters are
calculated using the EPA's STEP-L water quality model. For more information on the specifics of these
calculations, see other documentation at WikiWatershed.org. The runoff tab shows the partitioning of
the rainwater into runoff, infiltration, and evapotranspiration as a stacked bar graph. In the water quality
tab, you will see both tabular and graphical data showing predicted water quality for any streams in the
selected area. Because the model is running with real data on your custom area, it may take some time
for the model to run and you may see a loading icon. The 24-hour rain event model is set for 2.50 cm by
default but can be changed using the slider near the top right of the map (circled in blue below).
Stroud Water Research Center Page 9
New scenarios, in which you can modify the landscape by changing the land cover type or applying
conservation practices can be modeled by first selecting "Add changes to this area" button in the top
right corner (circled in red above). At first, this "New Scenario" map and data look exactly like the
current conditions map but with two new tool boxes above the map, one for "Land Cover" and another
for "Conservation Practices". Each of these is a free-hand drawing tool to modify the current land use.
The model output pane also changes to show the original results from the "current conditions" tab and
the modified results as you change the landscape. Select a land use or conservation practice from the
toolboxes at the top of the screen and then click points on the map to draw an area over which to apply
it. As soon as you add a new land use or conservation practice, the model will re-run in the background
to calculate what has changed and all of the plots will be updated. You will see loading icons again in
the model pane as this happens. Remember that you can expand/contract the map pane to give more
screen space to work on landscape modifications. See other documentation for an explanation of how
the runoff and water quality contributions of conservation practices are calculated.

Stroud Water Research Center Page 10
As you add land cover changes or conservation
practices, you can see the amount of area changed by
clicking on any polygon you added. You can also see a
list of all of the modifications you made in the scenario
by clicking on the space in the upper right of the map
pane where it says “x modifications.” This gives a
“shopping cart” of modifications grouped by the type
of modification. You can delete any modification by
clicking the trashcan next to it. If it helps to decide
where to make changes, you can still use the "Layers"
control box to select which overlays to display on the
map.
You can create many possible scenarios of landscape modification by clicking on the "+ New Scenario"
next to the drop down list of current conditions and scenarios. This opens up a new scenario with no
modifications on it (a copy of “Current Conditions”). Scenarios can be renamed by clicking the three
dots "…" next to the scenarios in the scenarios drop down list. Select the “Duplicate” option to create a
copy of the scenario that you are working on to add or delete more changes while saving your “New
Scenario.” You can also rename your entire project by clicking the small down arrow (circled in blue
above) next to the "Untitled Project" text in the top left corner and, if you are logged in, share your
project through the same menu. If you have made your project publicly accessible and given someone
the link, they will be able to view all of your scenarios and results. They will not, however, be able to
modify it. Any public project can be made private again from the same menu.
Once you have created several scenarios, you can compare all of them by clicking “Compare” (circled in
green above) in the upper tool bar. This gives a side-by side comparison of all of the scenarios along
with the original conditions before any modifications. It also shows what the partitioning would be if the
landscape were 100% forested. This 100% forested condition will give the maximum amount of
infiltration for the landscape, given its soils. In the tool bar at the top of the Compare view you can

Stroud Water Research Center Page 11
select the type of output you would like to compare (runoff or water quality), change the amount of
precipitation in the 24-hour storm event, and toggle between viewing the data as a graph ( ) or a data
table ( ). At the top of each scenario is a map showing the original area and modifications. When you
hover the cursor over a scenario map, you will see a list of the modifications. To scroll through many
scenarios, use the "Navigate Scenarios" arrows on the right side of the Scenario maps. Click the in
the upper right hand corner to close the Compare window and return to the scenarios.

Stroud Water Research Center Page 12
Mini-Unit Overview and Teacher Preparation
Materials and Equipment (Student Worksheets & Computers)
Mini-unit Timeline
Optional Pre-lesson Review
Map of School Property (one per student or team) for Lesson Two
Materials and Equipment
Teachers should have copies of the student worksheets sets for the two lessons that follow made up
ahead of time (Lesson One, Lesson Two). Students should work in pairs to ensure an interactive
experience and each pair will need a computer with internet browsing access. Students will need colored
pencils (red, brown, & green) as well as a blue pen for Lesson Two part I.
Mini-Unit Timeline
Lesson One – Effects of Land Cover & Soils in Watersheds: one class period
Lesson Two – Modeling Improvements to My Schoolyard: one or two class periods.
One class option: Part I - Identifying Current Conditions of My Schoolyard is
completed in class as a warm-up to the rest of the lab.
Two classes option: Class 1 (Lesson two Part I) – students go outside to walk the
school property, map current conditions, and witness how pervious and impervious
surfaces affect the movement of water. Class 2 – Students complete the remainder of
lesson two in the classroom.
Background
It may be helpful for your students to review the terms associated with a watershed as preparation for
these lessons. In Lesson One, students will revisit the terminology associated with the water cycle,
watersheds, and land use. Students should have some background knowledge of point source and non-
point source pollution, and a basic understanding of a watershed. A watershed is a system defined by the
area of land over which all water drains downhill through a series of streams and rivers to a common
outlet (river, lake, bay or ocean). All land is comprised of watersheds. Smaller watersheds are nested
within larger ones. The largest watershed in the US is the Mississippi River watershed. It is comprised
of other large watersheds, such as the Ohio River and the Missouri River watersheds. Each of the
smaller watersheds is also comprised of smaller ones, until you get down to “first order” watersheds,
where the water drains off of nearby slopes into the stream channel. There are many more miles of first-
order watersheds than there are of larger (higher order) watersheds.
In part I of lesson two, Modeling Improvements to My Schoolyard,
students identify land areas on their school’s property that are
pervious and impervious. The teacher will need to follow the
instructions below to create a map of the school’s property to print,
copy, and hand out to each team at the beginning of lesson two.
Alternately, part I of lesson two could be a “pre-lesson” activity

Stroud Water Research Center Page 13
completed in the class period before lesson two begins. Taking students outside to explore the different
land covers on your school’s property and pouring water on the surfaces to discover if they are pervious
or impervious would be an impactful learning experience.
Creating the Map of the School Property & Answer Keys
The teacher should follow these instructions to make a map of the school’s property and the Answer
Keys before beginning lesson two. Every school will have different answers when analyzing the school
property. Answers will vary due to inconsistencies in delineating the property boundaries, although the
answers should be similar.
1. Launch the Model My Watershed
®
application (https://modelmywatershed.org/).
2. Login to Model My Watershed
®
(see the login instructions in the model overview for help).
3. In the left panel, click on Get Started.
4. In the “search” box at the top right hand corner of the map enter the name and address for your
school.
5. In the "Layers" control box (bottom left corner of map view), click the icon furthest to the right
( ) to change the "Basemap" to the map that works best for outlining your
school’s property (Streets, Satellite, or Satellite with roads). Often the “Streets” view will
indicate the boundaries of the property most clearly.
6. Zoom in or out, and drag the map to see the entire property in the map view screen.
7. In the left panel, click on the black down area in the “Draw Area”
box and select “Free draw” to create a polygon of the property for
your school.
8. Begin by placing the cursor on one corner of your
school’s property and clicking once. Move the
cursor clockwise around the map and click once at
each of the corners around the edge of your school’s
property until you click on the first mark to close
the polygon.
9. Your school’s property will be delineated and the
model will automatically analyze the area and give
you base information on the area you selected. If
you make a mistake, click on “Change area” at the
bottom of the left panel and try again.
10. Toggle between the basemap options and take a
screenshot of the map in the basemap that best shows the features of the property which can be
colored with a colored pencil or highlighter (the “satellite” basemap generally works well). Use
photo editing software or the copier tools to maximize the property map to fill a page of paper.
Print one map for each student or team of students.

Stroud Water Research Center Page 14
Satellite with Roads Satellite Streets
11. Create the answer key for lesson two part II – GIS Mapping and Analysis of My
Schoolyard: In the “Analyze” panel on left of the map, click on the “land” tab and screenshot
(snip) the Land Cover data for your answer key. Then click on the “soil” tab and screenshot the
Soil data for the other answer key. Save these for Lesson Two.

Stroud Water Research Center Page 15
12. Create the answer key for your school for lesson two Part III – Land Cover Model
Comparison:
In the left panel “Analyze” pane select the “Model” tab and
choose “Site Storm Model” to run a simulation of a 24 hour
storm event on your school’s property.
Click on the down arrow next to “Untitled Project” in the upper
right hand corner to rename and save the Schoolyard Map
Project.
Move the precipitation slider above the map to
8.0 cm (circled in blue).
Click on “Add changes to this area” near the top
right of the map (circled in red).
Click on “Compare” in the top of the panel on the left.
Click on the data table icon in the top menu to the right of
the precipitation slider to view an easy to read table of
the data.
Screenshot (or snip) a copy of the data in the table comparing your school’s current
conditions to the “Predominantly Forested” scenario for use in Lesson two Part II.
Example:

Stroud Water Research Center Page 16
Lesson One
Effects of Land Cover & Soils in Watersheds
Background
Lesson one leads students on an exploration of the dynamics of watersheds and the impacts of human
activity on local watersheds. Water moves through a watershed via the components of the water cycle.
Runoff, water that moves over the surface of an area, combines with pollutants on the ground and can
cause erosion. Many human activities intensify the impact of runoff by altering the properties of the land
cover, and by contributing to pollutants on the ground. The installation of impervious surfaces decreases
infiltration, increases stormwater runoff, and allows for more pollutants to be washed into the
waterways. Our understanding of the dynamics of watersheds has led to significant improvements in the
ways that humans affect the health of our watersheds by integrating Conservation Practices (also known
as Best Management Practices or BMPs) into our land planning policies and management procedures.
BMP is a way to describe acceptable practices that could be implemented to protect water quality and
promote soil conservation. A BMP can be a structural "thing" that you actually install “on-the-ground.”
Examples may include runoff diversions, stormwater retention basins, rain gardens, silt fences, stream
buffers, green roofs, installing porous (pervious) parking and sidewalk surfaces, and adding groundcover
vegetation over bare soil areas. A BMP could also be a land or facilities management decision to reduce
pollutants or conserve water. These include composting, xeriscaping, elimination or reduction in
hazardous chemicals (pesticides, fertilizers), no-idling policies, installing energy efficient equipment and
lighting, and installing water bottle refilling stations.
Students will work in pairs to review the hydro-dynamics of a watershed and then use the online Model
My Watershed
®
- Runoff Simulation to discover how land cover and soil type (Hydrologic Soil Group)
affect the movement of water during a 24-hour storm event. Students will assess their own schoolyard to
determine how the current conditions on their school’s property are impacting the water quality in their
local watershed.
Duration: This lesson is designed to be completed in one 50 minute class period
Materials:
Lesson one student worksheets
Computers with internet browsing access

Stroud Water Research Center Page 17
Standards
Performance Expectations:
MS-ESS3-2: Analyze and interpret data on natural hazards to forecast catastrophic events
and inform the development of technologies to mitigate their effects
MS-ETS1-4: Develop a model to generate data for iterative testing and modification of a
proposed object, tool, or process such that an optimal design can be achieved
HS-ESS2-2 Analyze geoscience data to make a claim that one change to Earth's surface can
create feedbacks that cause changes to other Earth systems
HS-ESS3-6 Use a computational representation to illustrate the relationships among Earth
systems and how those relationships are being modified due to human activity
Science & Engineering Practices
Disciplinary Core Ideas
Crosscutting Concepts
Developing and Using Models
Analyzing and Interpreting Data
Engaging in Argument from
Evidence
Constructing Explanations
ESS2.A Earth's materials and
systems
ESS2.C The roles of water in Earth's
surface processes
ESS3.B Natural hazards
ESS3.C Human impacts on Earth's
systems.
Cause and effect
Patterns
System and models.
Introduction
Essential Question: What can you do to improve water quality in your watershed?
Do you know of water in your area where fishing or swimming is not allowed or where the water is not
safe to drink? Water is a vital natural resource and protecting our water is a national priority. In 1972,
the United States Congress passed the Clean Water Act to protect the nation's water. The goal of this
important law is to make sure that our lakes, rivers, and streams are “fishable, swimmable, and
drinkable.” The United States Environmental Protection Agency or EPA is the federal agency
responsible for enforcing this law.

Stroud Water Research Center Page 18
However, many waterways in our country are still polluted. Almost fifty years after the Clean Water Act
was passed, there are still many places that we cannot safely use for fishing, swimming, and drinking.
But thanks to help from everyone, our water is improving due to improvements in land and water
conservation practices. A watershed is a system defined by the area of land over which all water
drains downhill through a series of streams and rivers to a common outlet (river, lake, bay or ocean).
Take a moment to review the parts of a watershed in the diagram on the next page to begin this activity.
All conservation starts with the land. Gravity, topography, soil type, and land cover play important
roles in watersheds. Gravity causes water to travel from the highest to the lowest elevation in a land
area. Topography refers to the elevation changes (slopes) and physical features (hills and valleys) of an
area that affect the direction and speed of water flow. Soil type impacts runoff and infiltration.
Different types of land cover in a watershed determines to what degree water infiltrates, accumulates
(remains as puddles), or flows over the land (runoff).
Precipitation (rain, sleet, snow or hail) that falls on land can either
evaporate directly from the surface back into the air, soak into the
ground (infiltration), or runoff.
Water that infiltrates into soil with vegetation can be absorbed by
the roots of plants and be released through leaves (called
transpiration).
Evapotranspiration is the term used to describe all of the water
that returns to the atmosphere directly by evaporation, or by
transpiration.
Precipitation that does not return to the atmosphere via
evapotranspiration may infiltrate downward through soil and rock
layers as groundwater. Groundwater is used to supply water to
many houses and cities, and it keeps streams and rivers flowing
(called recharge) during long time periods without any
precipitation (droughts).
Precipitation that moves downhill over the surface is called runoff.
Runoff can cause erosion when moving over land without
significant vegetation and carry sediment and pollution into
waterways.
Attributed to Dr. James Almendinger
St. Croix Watershed Research Station
2016
Modified from original
M. W. Toews Oct. 2007
Stroud Water Research Center Page 19
Learning Objectives
Students will identify how land cover, rainfall totals, and soil texture affect evapotranspiration,
runoff, and infiltration using an interactive computational model.
Students will interpret the impact of land cover and soil texture on the movement of water
through a watershed system.
Introducing the Simulation Model
The Model My Watershed
®
- Runoff Simulation is an interactive model used to investigate how
changing the type of land cover, amount of rainfall,
and soil type (Hydrologic Soil Group) affects where
water goes after it rains. On a computer, navigate to
runoff.modelmywatershed.org (or click on the link
below) to open the Runoff Simulation and discover
some of the important features.
Click here to start the Runoff Simulation.
In the Runoff Simulation, the column in the middle
has the labels ET (green in the bar graph), R (red in
the bar graph), and I (yellow in the bar graph). What do these labels stand for?
R = ______________________ I = __________________________
ET = ________________________________
Part I
Investigating Land Cover
The term “land cover” is used to explain what is happening on
a particular piece of land. Land cover describes the physical
features (types of vegetation, buildings, etc.) as well as how the
land is being used (farming, residential, commercial, and
undeveloped). Each land use type affects the movement of
water in a watershed differently. In areas where there is a lot of
pavement, for example, most rainwater runs off into storm
drains that take the water directly to storm sewers and then to
streams or rivers.
Land cover surfaces that prevent infiltration are called impervious. Land cover types that allow water
to infiltrate into the ground are called pervious. If the land has lots of trees or unmown grass, the water
can soak into the ground. Lawns are not good at soaking up water because the roots of grass are very
dense and mowing makes the ground too hard to allow much water through. The same is true of row
crop fields. Plowing the field into rows does the same thing that the mower does – making the soil hard.
Runoff
Infiltration
Evapotranspiration

Stroud Water Research Center Page 20
Use the Runoff Simulation to investigate how each land cover type affects where water goes when it
rains.
Notice that the model displays three sections along the right-hand side, representing three
different variables (precipitation at the top, land cover type in the middle, and soil group at the
bottom). Set the “Precipitation for a 24-hour storm event” to 8.0 cm of rain and set the
“Hydrologic Soil Group” to B-Moderate Infiltration (silt loam or loam).
Hover the cursor over each of the land cover choices to read the brief descriptions and answer the
following questions.
1. Which land cover type has the most impervious surfaces? _________________________
2. Which land cover type has the most vegetation (and give the amount in %)?
___________________________________ __________ %
3. Which land cover type has the least vegetation (and give the amount in %)?
___________________________________ __________ %
Click on the “Developed – High Intensity” icon to change the land cover and see what happens to
the amount of evapotranspiration, runoff, and infiltration. Record this data in the table below.
Continue clicking on each of the other land cover types and watch how the type of land cover
affects evapotranspiration, runoff, and infiltration.
Select two other land cover types around your school and record the evapotranspiration, runoff,
and infiltration results for each in the data table below (8.0 cm of precipitation / Soil Group B).
Land Cover
Evapotranspiration (cm)
Runoff (cm)
Infiltration (cm)
Developed - High Intensity
Which type(s) of land cover produces the most amount of runoff? Why?
____________________________________________________________________________________
____________________________________________________________________________________
____________________________________________________________________________________
____________________________________________________________________________________
What type(s) of land cover would increase the amount of water infiltration from a storm event?
____________________________________________________________________________________
____________________________________________________________________________________
____________________________________________________________________________________
____________________________________________________________________________________
Developed, High Intensity
Grassland > 80
Barren land < 15
>80
0.0 cm 6.4 cm 1.6 cm
Water Land Cover produces the most amount of runoff as the ground under the body of water is
already saturated (pores are filled with water) so the ground cannot absorb any more water which
prevents infiltration. There is also limited vegetation for transpiration. Developed land (including
High & Medium Intensity) and Barren Land also create a lot of runoff.
Answers may vary. Wetlands, Forests, Shrub/Scrub, and Grasslands allow for the most
infiltration due to the porous nature of the soils, which are enhanced by the roots of the
vegetation in these Land Cover types. All of the Land Cover Types (except for Open Water)
would increase infiltration when compared to Developed – High Intensity.
Answers will vary

Stroud Water Research Center Page 21
Part II
Investigating Hydrologic Soil Groups
The “dirt” in your yard is what scientists call soil. Soil is made up of broken down rocks, decomposed
roots, leaves, and other organic material. Soil also contains water, air, and living things like bacteria,
fungi, and protozoans. Soils have pores too, spaces between the pieces of rock and organic material that
are filled with air, which allows water to soak in (infiltrate) and move downwards. When scientists and
engineers look at different soils, they consider the size of the particles in the soil and its effect on pore
size and their ability to allow water to infiltrate the soil. Smaller soil particles create smaller pores that
make it harder for the water to pass through. The Runoff Simulation has four types of hydrologic soils:
A-High Infiltration, B-Moderate Infiltration, C-Slow Infiltration, and D-Very Slow Infiltration.
Set the Runoff Simulation to a land cover that best describes your schoolyard and record the land
cover you selected at the top of the Data Table. Check to make sure the precipitation bar is set to a
24-hour storm event of 8 cm. of precipitation and the soil group is set to A-High Infiltration
(sand). Record the amount of evapotranspiration, runoff, and infiltration that occurs.
Select each of the other soil group types and record the evapotranspiration, runoff, and infiltration
results for each in the data table below (8.0 cm of precipitation).
Land Cover at Your School:_____________________________________
Hydrologic Soil Group
Evapotranspiration (cm)
Runoff (cm)
Infiltration (cm)
A-High Infiltration
B-Moderate Infiltration
C-Slow Infiltration
D-Very Slow Infiltration
Progress Checkpoint: Compare the data in the table. Which soil group produces the least amount
of runoff? Why do you think this happens?
____________________________________________________________________________________
____________________________________________________________________________________
____________________________________________________________________________________
Analysis & Conclusion
Set the Runoff Simulation for the current conditions at your school by selecting the best match for Land
Cover and Soil Group and record your choices at the top of the data table. Run the simulation with an
8.0 cm 24-hour storm event and record the results for evapotranspiration, runoff, and infiltration.
Land Cover:_________________________ Soil Group:_______________________
Evapotranspiration (cm)
Runoff (cm)
Infiltration (cm)
The A – High Infitration Soil Group produces the least amount of runoff. This
happens because the soil is made of larger particles with larger pores to allow
water to pass through more easily.
Answers vary due to Land Cover Type selected
Answers depend on the conditions at your school
Answers will vary
Answers will vary due to selected Land Cover and Soil Group
Answers will vary

Stroud Water Research Center Page 22
Given the current conditions of your school’s land cover and soil type, how would you assess the impact
from your school’s property on the local watershed from runoff?
____________________________________________________________________________________
____________________________________________________________________________________
____________________________________________________________________________________
____________________________________________________________________________________
The Land Cover for most schools will fall into the “Developed” categories (Low, Medium, or High
Intensity). If more than half of the precipitation that falls on the property becomes runoff, then these
properties would have a negative impact on the local watershed. A possible “grading” scheme could
look like this:
Land Cover Type Assessment
Developed – High Intensity Significant Water Quality Impact
Developed – Medium Intensity Moderate Water Quality Impact
Developed – Low Intensity Low Water Quality Impact
Likewise, the selected Soil Group will also have a large impact on infiltration and runoff as soils with
slow and very slow infiltration rates will increase runoff and exacerbate the impact on local watersheds.
More runoff will likely result in more pollutants and sediments being carried into the local water ways
and storm management systems, which will negatively affect the local watershed. Students may also
consider the impact of local point source and non-point source pollution in their assessment. For
example, parking lots typically have impervious surfaces and often cars that are not properly
maintained will drip fluids.
Which condition (land cover or soil group) would be easiest to change at your school to protect the local
watershed, and why?
____________________________________________________________________________________
____________________________________________________________________________________
____________________________________________________________________________________
____________________________________________________________________________________
Application
Think about everything that you learned about runoff, infiltration, evapotranspiration, land cover,
soil type, and land use. What could your school do to reduce its impact on the local watershed?
Explain how and why your suggestions will work.
____________________________________________________________________________________
____________________________________________________________________________________
____________________________________________________________________________________
____________________________________________________________________________________
Students should use their understanding of the factors that influence runoff and
infiltration to “grade” their school’s property during precipitation events.
Students may include first hand experiences with conditions during large storms
in developing their assessment.
Students should identify Land Cover as the easiest condition to change on their school
grounds as changing the Soil Group would require excavating the area (including under
buildings) and replacing the soils and substrate. Many Land Cover changes are
relatively simple and include conservation and best management practices (BMPs).
Students should recognize that implementing land cover changes on their school
property would be the best way for the school to reduce its impact on the local
watershed. Any BMPs can be included in their plan such as; changing mown grass
areas to Pasture/Hay, Grasslands, or Forests, installing rain gardens, green roofs,
Stroud Water Research Center Page 23
____________________________________________________________________________________
____________________________________________________________________________________
____________________________________________________________________________________
____________________________________________________________________________________
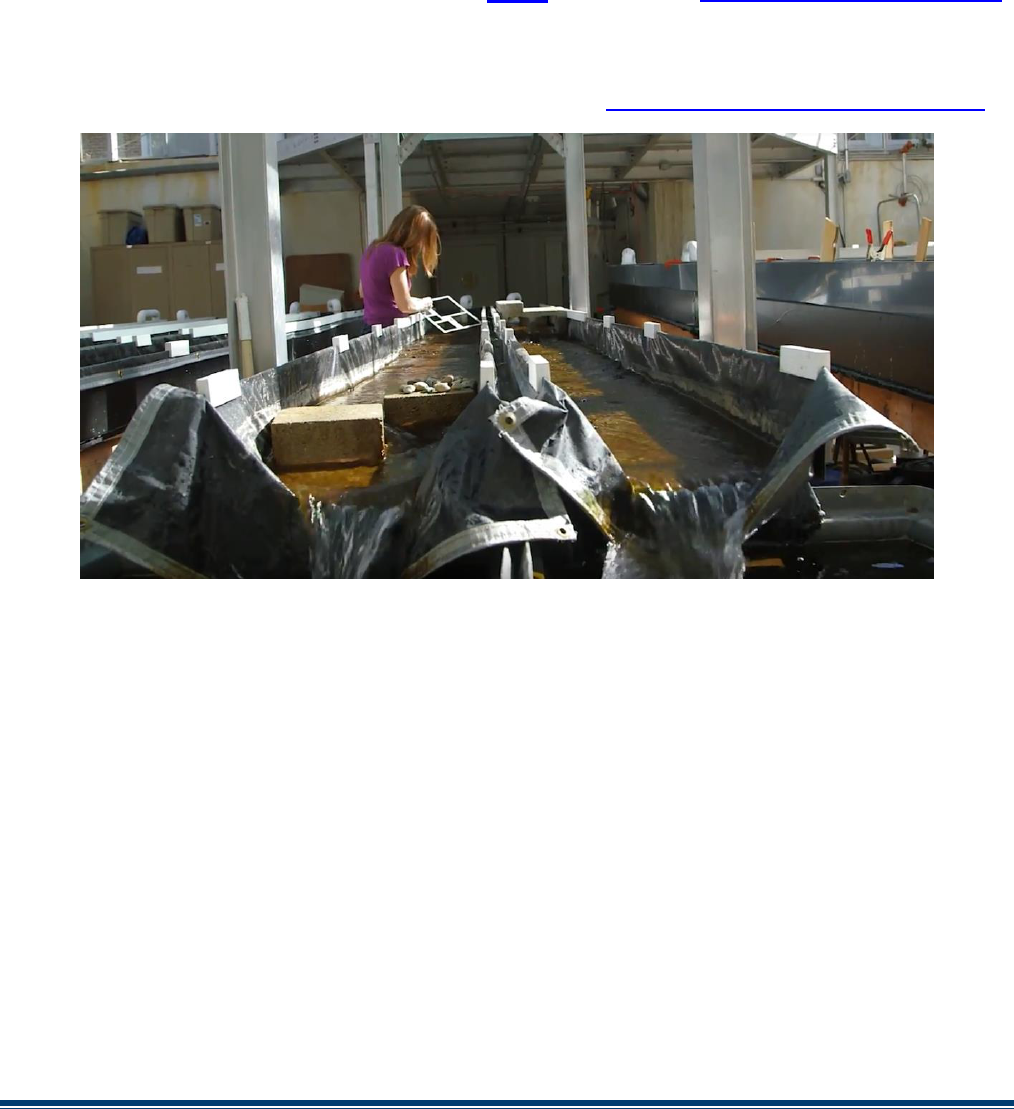
STEM Career Extension
What is a Fluvial Geomorphologist? Click on this LINK (or navigate to https://youtu.be/0teypmM5yeY)
to watch a video about how STEM education and skills led into an exciting career at Stroud Water
Research Center.
Teachers can play this video for the class by visiting https://youtu.be/0teypmM5yeY
What parts of the watershed does a fluvial geomorphologist study? How does Dr. Daniel's research
relate to the topic of runoff that you've been studying in this unit?
____________________________________________________________________________________
____________________________________________________________________________________
____________________________________________________________________________________
____________________________________________________________________________________
____________________________________________________________________________________
____________________________________________________________________________________
____________________________________________________________________________________
____________________________________________________________________________________
or porous paving/sidewalks, installing vegetation infiltration basins, or even
retrofitting existing stormwater drainage basins with vegetation. Ideally all
suggestions would work to reduce runoff (that can carry pollutants and
overwhelm local streams) and increase infiltration to protect the local watershed.
Fluvial Geomorphologists study the land in a watershed and how it changes due to
the flow of water and the interactions with the living and non-living things in the
watershed. Generally Fluvial Geomorphologists study the abiotic (non-living)
factors in a watershed, although the example that Dr. Daniel gives in the video is
about the effect of caddisfly webs in stabilizing rocks in the bottom of the streams.
Dr. Daniel’s research can help explain the changes or damage that can happen in a
watershed if there is too much runoff, as well as how to stabilize the structure of
rivers.

Stroud Water Research Center Page 24
Lesson Two
Modeling Improvements to My Schoolyard
Background
Lesson two allows students to discover how changes in Conservation Practices and Land Cover on their
school grounds will impact the local watershed. Students are introduced to six common conservation
practices, also known as best management practices (BMPs), which reduce runoff, promote infiltration,
and minimize pollution in streams. They will learn to use the Model My Watershed
®
(MMW) Site
Storm Model, to create a variety of scenarios with Conservation Practices (and/or Land Cover changes)
added to their school grounds to minimize the impact on the water quality in their local watershed. The
Site Storm Model is a powerful online GIS tool that includes real data from national data bases for land
cover, soil type, stream maps and data, water quality, and more. The Site Storm Model is a professional
grade application that can be used by teachers, students, land use planners, conservation planners,
scientists, citizen science groups, and the public to understand how human activities and the installation
of BMPs can protect and conserve the quality of water in their watersheds. In this culminating activity
students will create scenarios to reduce runoff and improve infiltration by modifying the actual
conditions at their location and developing a best land management proposal to protect the water quality
in their local watershed. Students should refer to the maps of the school property that they create in Part
I – Identifying Current Conditions of My Schoolyard to decide which conservation practices could
be applied and where they could be located. Students should be encouraged to choose conservation
practices and land cover changes that are plausible and make sense for their school grounds. They
should consider all of the current activities that take place on and around their schoolyard and think
about how conservation practices could be applied while still using the land for the same activities.
Conservation practices (also known as best management practices or BMPs) are actions and decisions
made during the design, preservation, construction, and management of built areas to reduce negative
impacts on the environment. As people develop the land by building houses or other structures they
cause an impact on the watershed. Certain construction choices (green building design) and land
management practices can preserve the health of a watershed by intercepting precipitation to minimize
runoff and the transportation of pollutants into streams and rivers. Conservation practices that can be
built into green buildings and grounds might include: rainwater capture for use in irrigation or flushing
toilets, waterless toilets, low flow faucets and showers, composting of leftover food scraps, green
(vegetated) roofs, rain gardens, rainwater retention basins or bio-swales, porous sidewalks or parking
lots (materials with connected pores that are pervious and allow water to infiltrate into the ground),
constructed wastewater wetlands, planting of trees along streams, restrictions on use of fertilizers or
harmful cleaning chemicals, no-till agriculture, cluster housing, etc.
Stroud Water Research Center Page 25
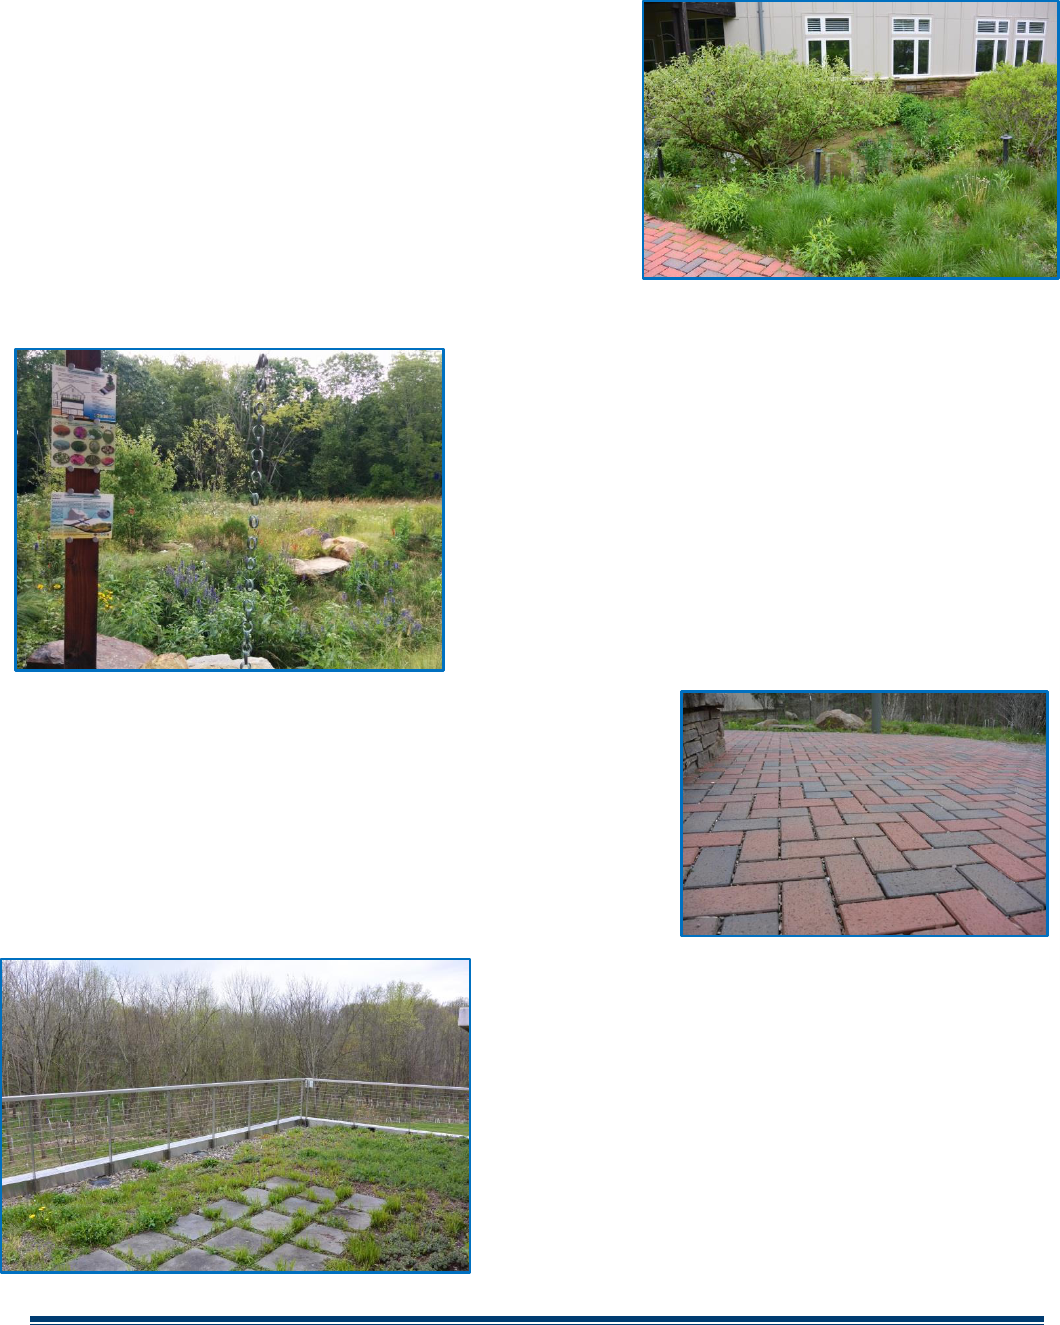
Rain Gardens
A rain garden is s conservation practice that reduces runoff
where a shallow depression in the landscape collects rain
water from a roof, driveway, or street and allows the water to
slowly infiltrate into the ground. Rain gardens are often
planted with native grasses and flowering perennials to
enhance infiltration and evapotranspiration, help filter out
pollutants, and provide food and shelter for butterflies, song
birds and other wildlife. More complex rain gardens with
drainage systems and amended soils are often referred to as
bioretention basins.
Vegetation Infiltration Basins
Vegetation infiltration basins are large landscaped
depressions designed to impound stormwater runoff to
prevent flooding and allow waters to infiltrate slowly into
the ground. The vegetation in these basins promotes
infiltration and evapotranspiration, prevent erosion, and
protect the quality of water in a watershed by mitigating
stormwater runoff.
Porous Paving
Porous paving is a conservation practice where the surface of
parking areas and walkways are constructed with materials that
have connected pores or spaces between the surface blocks that
allow water to infiltrate into the ground. A layer of gravel is
often installed below the surface to hold the water as it slowly
infiltrates into the ground underneath.
Green Roofs
Green roofs are flat or gradually sloped roofs that are
covered in layers of materials that include a waterproof
liner, a variety of drainage materials, growing media,
and topped with a layer of plants that are adapted to
surviving in high temperatures and drought conditions.
Green roofs can be designed to retain stormwater, slow
down runoff, and can improve the quality of the water as
certain plant species absorb pollutants.

Stroud Water Research Center Page 26
No-Till Agriculture
No-till agriculture is a best management practice whereby
farmers plant crops without disturbing the soil or removing
the plants that are already there. No-till agriculture improves
the infiltration rate of the soil, reduces erosion, and builds the
organic matter and nutrient cycling in the soil.
Cluster Housing
Cluster housing is a method of residential development where homes are built in groups close together
which allow for larger open spaces between the buildings. The larger open spaces are often planted with
trees and vegetation that enhances infiltration, reduces runoff and erosion, and provides recreational
space for the inhabitants.
For more information on conservation practices (BMPs) at Stroud Water Research Center, visit our
website: https://stroudcenter.org/about/facilities/mec/. Stormwater PA also publishes the PA BMP
Manual online (http://www.stormwaterpa.org/from-the-foreword.html).
Duration
This lesson is designed to be completed in one 50 minute class period (if Part I – Identifying Current
Conditions of My Schoolyard is completed in the classroom), or over two 50 minute class periods if
teachers are able to complete part I of lesson two by taking students outside to explore the different land
covers on your school’s property. Teachers can make this field trip of the school property an impactful
learning experience by pouring water on the different areas around the schoolyard to help students
discover the difference between pervious and impervious surfaces while students add these to their
school property maps.
Materials
The School Property Map (created by the teacher in the lesson preparations)
Colored pencils (red, brown, and green) and a blue pen
Lesson Two Student Worksheets
Computers with internet browsing access

Stroud Water Research Center Page 27
Standards
Performance Expectations:
MS-ETS1-1 Define the criteria and constraints of a design problem with sufficient precision to
ensure a successful solution, taking into account relevant scientific principles and potential impacts
on people and the natural environment that may limit possible solutions.
MS-ETS1-2 Evaluate competing design solutions using a systematic process to determine how
well they meet the criteria and constraints of the problem.
MS-ESS3-2 Analyze and interpret data on natural hazards to forecast catastrophic events and
inform the development of technologies to mitigate their effects.
MS-ESS3-4 Construct an argument supported by evidence for how increases in human population
and per-capita consumption of natural resources impact Earth’s systems.
HS-ESS2-2 Analyze geoscience data to make a claim that one change to Earth's surface can create
feedbacks that cause changes to other Earth systems.
HS-ESS3-6 Use a computational representation to illustrate the relationships among Earth systems
and how those relationships are being modified due to human activity.
Science & Engineering
Practices
Disciplinary Core Ideas
Crosscutting Concepts
Developing and Using Models
Analyzing and Interpreting Data
Engaging in Argument from
Evidence
Constructing Explanations and
Designing Solutions
ETS1.B: Developing Possible
Solutions
ETS1.C: Optimizing the Design
Solution
ESS2.A Earth's Materials & Systems
ESS2.C The Roles of Water in
Earth's Surface Processes
ESS3.B Natural hazards
ESS3.C Human impacts on Earth's
Systems
ESS3.A: Natural Resources.
Cause and Effect
Patterns
Stability and Change
System and System Models
Interdependence of Science,
Engineering, & Technology
Influence of Science,
Engineering, & Technology
on Society and the Natural
World
Introduction
Essential Question: How can I improve my watershed… starting with my schoolyard?
In this activity you will analyze your school’s property using online modeling software and develop
plans to reduce the amount of runoff from your school’s property. Runoff can be detrimental to the
health of a watershed as it can wash pollutants off the surface of the ground and carry them into local
waterways. Runoff can also create erosion and increase the amount of sediment suspended in the
waterways which makes the water “murky” and can clog the gills of organisms that breathe dissolved
oxygen from the water. Conservation practices (also known as best management practices or BMPs)
are actions and decisions made during the design, preservation, construction, and management of built
areas to reduce negative impacts on the environment. As people develop the land by building houses or
other structures they cause an impact on the watershed. Certain construction choices (green building
design) and land management practices can preserve the health of a watershed by intercepting
precipitation to minimize runoff and the transportation of pollutants into streams and rivers.

Stroud Water Research Center Page 28
Conservation practices that can be built into green buildings and grounds might include: rainwater
capture for use in irrigation or flushing toilets, waterless toilets, low flow faucets and showers,
composting of leftover food scraps, green (vegetated) roofs, rain gardens, rainwater retention basins or
bio-swales, porous sidewalks or parking lots (that are pervious and allow water to infiltrate into the
ground), constructed wastewater wetlands, planting of trees along streams, restrictions on use of
fertilizers or harmful cleaning chemicals, no-till agriculture, cluster housing, etc. For more information
on conservation practices (BMPs) at Stroud Water Research Center, visit our website:
https://stroudcenter.org/about/facilities/mec/.
Learning Objectives
Students will identify buildings and land areas as pervious and impervious, and discover
various green building and conservation practices that improve watersheds by increasing
infiltration and decreasing runoff.
Students will model possible changes in conservation practices and land cover on their school’s
property and describe the impact of these changes on their local watershed.
Students will design a watershed plan for their schoolyard that maximizes the health of the
watershed by implementing conservation practices and land cover changes.
Part I
Identifying Current Conditions of My Schoolyard
Your first job will be to assess the impact of your school’s property on the local watershed and then
create proposals for how to reduce this impact. First we need to consider the state of your school’s
property as it is today. Using the map that your teacher provides, work in pairs to identify the boundary
of your school’s property and then map the pervious and impervious areas at your school.
Use a red pencil to shade in the areas on your map of the School’s property that are impervious
(water cannot infiltrate) such as pavement, sidewalks, roofs, etc.
Use a brown pencil to shade in areas that are pervious to water and covered in vegetation.
Use a green pencil to shade in areas where conservation practices (BMPs) have already been
incorporated onto your school’s property (examples: green roofs, rain gardens, rain barrels, etc.).
Create a key on your map to define the various shaded areas on your
map (Show students the examples from Appendix 1.1 & 1.2)
Prediction
Use a blue pen to indicate the places on your map of the school’s property
where you predict you may be able to implement conservation practices
(BMPs) to reduce runoff and increase infiltration.
Part II
GIS Mapping of My Schoolyard
Students will recreate the Schoolyard map that they used in Part I in the online Site Storm Model.
Teachers should demonstrate this process on a display while the students follow along on their
computers. Students should use the Schoolyard map from part I to help them define the school property
by knowing where to click on the “corners.” If students have individual accounts they will be able to
save their project, share their work with a teacher (or others) and develop their plans further for
extension activities.

Stroud Water Research Center Page 29
The Model My Watershed
®
(MMW) Site Storm Model is an interactive watershed-modeling app that
allows users to delineate an area of land, identify and analyze specific characteristics (land cover, soil
group, climate, terrain, etc.) from professional data bases, model stormwater runoff and water quality
impacts, and compare the effects of various conservation or development scenarios. On a computer go
to ModelMyWatershed.org to open the Model My Watershed
®
App and investigate your school
grounds.
Click here to start the Model my Watershed
®
App
In the left panel, click on Get Started.
Type in the address for your school in the search bar in the top right corner of your map.
In the bottom left corner of the map you will see a “Layers” control box. Click on the furthest
icon to the right in the bottom of this dialogue box to select the “Basemaps” tab and select
“Satellite with Roads.”
Zoom in or out and drag the map to show all of your school’s property in the map viewing area.
In the left panel, click on the black down arrow in “Draw area”
and select “Free draw” to re-create the polygon of the property
for your school that matches the map your teacher gave you in
Part I. Begin by clicking on one corner of your school’s property. Moving clockwise click at
each of the corners around the edge of your school’s property until you click on the first mark to
close the polygon. Your school’s property will be delineated and the model will automatically
analyze the area and give you base information on the area you selected. If you make a mistake,
click on “Change area” at the bottom of the left panel and try again.
Click the tabs in the analyze box to learn about your school’s property, and record the
information below.
Stroud Water Research Center Page 30
Recording Data from the Analyze Box
1. What is the total “Selected Area” for your school’s property? m
2
2. Select the land tab and record the Land Cover types and percentages of coverage your your school:
________________________ _____ % ________________________ _____ %
________________________ _____ % ________________________ _____ %
________________________ _____ % ________________________ _____ %
________________________ _____ % ________________________ _____ %
________________________ _____ % ________________________ _____ %
3. Select the “Soil” tab and record the predominant Soil Group: ____________________________
Part III
Land Cover Model Comparison
Now we will use the Site Storm Model to investigate how changing the current
land cover conditions at your school to a forest would affect stormwater runoff
and water quality in the local watershed.
In the left panel “Analyze” pane select the “Model” tab, and then choose
“Site Storm Model” to run a simulation of a 24 hour storm event on your
school’s property.
Move the precipitation slider in the bar above the map to 8.0 cm.
Click on “Add changes to this area” in the bar above the
map right of the precipitation slider.
Then click on “Compare” in the top of the panel on the left
of the map.
Click on the data table icon in the top menu to the right of
the precipitation slider to toggle to an easy to read table
of the data.
Answers will vary depending on school’s
property. Land area should be “close” to
the Teacher’s Answer Key.
Answers for Land Cover % should be
“close” to the Teacher’s Answer Key
created when making the School
Property Map for part 1.
The answer for predominant Soil Group should be
“close” if not the same as the Teacher’s Answer Key.

Stroud Water Research Center Page 31
4. Record the Water Depth results for the first two land cover scenarios, “Predominantly Forested”
and “Current Conditions” in the data table below.
Land Cover
Evapotranspiration (cm)
Runoff (cm)
Infiltration (cm)
Predominantly Forested
Current Conditions
Toggle back to the Combined Hydrology graphs by clicking on the “graph” icon to the right of the
precipitation slider.
5. Look at the results for evapotranspiration, runoff, and infiltration in the data table, as well as the
Combined Hydrology graphs, and compare the “Current Conditions” at your school with the
“Predominantly Forested” scenario. Make some observations about the two scenarios and include
data on how evapotranspiration, runoff, and infiltration changed as a result of the land cover change.
_________________________________________________________________________________
_________________________________________________________________________________
_________________________________________________________________________________
_________________________________________________________________________________
_________________________________________________________________________________
_________________________________________________________________________________
_________________________________________________________________________________
_________________________________________________________________________________
Part IV
Modeling Conservation Practices at My School
Now you will use the site storm model to explore and model some Conservation Practices that could be
added to your school’s property to reduce runoff and improve infiltration.
Close the “Compare” window by clicking on the in the top right hand corner.
Click on the teal colored button to view the practices that you could add to the
scenario. Hover the cursor over each Conservation Practice to learn more about them.
Start by adding a Green Roof to the tops of some of the buildings
(flat or low slopes only) at your school by selecting “Green Roof”
and then click on one corner of your school’s roof in the map (zoom
in to make it easier to see the features of the roof). Moving
clockwise, click along the edges of the roof at each of the corners
until you click on the first mark to close the polygon and define
where the Green Roof would be installed. The simulation will install
the Green Roof and the data in the model will update. Repeat this
process until you have changed all of the flat roofs at your school to
Green Roofs.
Students should recognize a substantial decrease in the amount of runoff
and an increase in infiltration and evapotranspiration in the “Predominantly
Forested” land cover scenario. Students may quantify the results by
comparing the amounts involved, or by describing the change in relative
terms. Examples: The predominantly forested scenario had much less runoff
than the Current Conditions. The predominantly forested scenario reduced
runoff by 60%! The predominantly forested scenario reduced runoff to 2.03
cm from 5.02cm at our current condition during a 24 hour storm event of 8.0
cm. Evapotranspiration more than doubled by changing to predominantly
forested, while infiltration increased from 2.75 cm to 5.45 c.m
Answers for Water Depths should be “close” to the Teacher’s Answer Keys
created when creating the School Property Map for part 1.

Stroud Water Research Center Page 32
When you are finished adding Green Roofs, click on the down arrow next
to the “New Scenario” Title in the top left, move the cursor to the three
dots to the right of “New Scenario” in the drop down menu and click on
the three dots to “Rename” your project “Green Roofs.”
Then click on again to add a different plausible Conservation
Practice to your school’s property. Each time you select the
model will return to the original “Current Conditions” scenario.
To “Add” multiple Conservation Practices while saving each scenario
separately, return to the “Scenario” dropdown menu and select
“Duplicate.” This will create a duplicate scenario upon which you can
add more Conservation Practices. Likewise, if you want to remove some
practices, you can make a copy of a scenario, duplicate and rename the
copy, then click on a Conservation Practice to see the area
involved and to “Remove” the modification.
Create up to three scenarios for various plausible
combinations of proposed Conservation Practices at your
school. Develop a “best plan” for integrating Conservation Practices onto your school’s property to
protect your watershed by minimizing runoff and maximizing infiltration and evapotranspiration.
Be sure to consider the current activities at your school and propose installations of Conservation
Practices only in areas where they will not interrupt normal activities. Students should be
coached to avoid interrupting normal activities to create “plausible” conservation plans.
Changing the entire schoolyard and buildings to a forest is not typically feasible.
When you are finished, click on the button in the top left panel to analyze the results of
your proposed scenarios. You can delete excess scenarios by clicking on the three dots next to the
scenario you want to remove, and choosing “Delete.”
Toggle to the data table by clicking on the data
table icon to the right of the precipitation slider
to fill in the data below.

Stroud Water Research Center Page 33
If students are able to login to the Model my Watershed
®
platform, they should be directed to save
a copy of their project. The projects can be shared with the teacher to be used for grading
purposes as well as possible extension activities (ex. School Ground BMP Plan Competition).
Students could also be directed to capture screen shots of the results (Ctrl and PrtSc then paste
into a document (Word or Google) to be printed or shared with the teacher.
Conservation Plans
Predominantly
Forested
Current
Conditions
Green Roofs
Runoff (cm)
Evapotranspiration
(cm)
Infiltration (cm)
Analysis
6. Which scenario that you developed created the best outcome for protecting your watershed with the
least runoff and the most infiltration?
_________________________________________________________________________________
7. Are there any compromises or additional features you might need to include to assure that important
activities (e.g., parking, access to areas, sports fields, etc.) could still happen at your school?
_________________________________________________________________________________
_________________________________________________________________________________
_________________________________________________________________________________
_________________________________________________________________________________
_________________________________________________________________________________
Conclusion
Q: Describe the land conservation practices (BMPs) that you included in your “best plan” and
explain why you chose these features. Which conservation practices are appropriate for areas on
your school site? Explain how and why your design will improve your watershed. (Hint: Consider
the size of the areas, types of conservation practices, costs to implement the practices, and impact on
usage of the areas).
_________________________________________________________________________________
_________________________________________________________________________________
_________________________________________________________________________________
_________________________________________________________________________________
_________________________________________________________________________________
_________________________________________________________________________________
_________________________________________________________________________________
Students should describe their proposed changes and defend their plans with
plausible reasoning. Green roofs, porous paving, rain gardens, and vegetated
infiltration basins are appropriate for many school sites. These four conservation
practices can be applied to smaller areas and can be used for education
purposes. All of these, plus no-till agriculture and cluster housing are appropriate
for communities. No-till agriculture and cluster housing are used in larger areas
and will have larger effects on runoff and infiltration amounts.
Answers will vary based on the scenarios developed by the students. Students
should consider the changes to land cover and land use in their proposed scenario.
Some land normally used for outdoor activities (sports, fire drills, recess) may be
converted and would require those activities to be moved. New land activities or
learning stations may be created in these spaces as a result of their proposed changes.
Answers will vary based on the scenarios developed by the students.
Answers will vary based on the scenarios

Stroud Water Research Center Page 34
_________________________________________________________________________________
_________________________________________________________________________________
_________________________________________________________________________________
_________________________________________________________________________________
STEM Career Extension
What is an Environmental Data Manager & GIS Specialist? Navigate to https://youtu.be/f8nhf8q2yJA)
and watch a video about how STEM education and skills led into an exciting career at Stroud Water
Research Center.
Teachers can play this video for the class by visiting https://youtu.be/f8nhf8q2yJA
What does an Environmental Data Manager & GIS Specialist do to help further the research of
watershed scientists and educators? What background knowledge and experiences were critical in
helping Dr. Dow complete his work? How is Dr. Dow’s work connected to developing plans to install
Conservation Practices?
____________________________________________________________________________________
____________________________________________________________________________________
____________________________________________________________________________________
____________________________________________________________________________________
____________________________________________________________________________________
____________________________________________________________________________________
____________________________________________________________________________________
____________________________________________________________________________________
Dr. Dow is responsible for managing and storing all of the data gathered by the
scientists, and developing layers to showcase the data in GIS platforms. He
completes statistical analysis of the information that is collected and helps scientists
understand their findings. Dr. Dow’s childhood provided him with many opportunities
to play and explore creeks and streams that inspired him to want to help conserve
and protect these resources. His love of math and computers also helped him to
develop the skills he needed to be an Environmental Data Manager. Installing
conservation practices requires extensive planning and analysis to create effective
plans, so his understanding and use of GIS systems is instrumental in his work.

Stroud Water Research Center Page 35
Extension Activities
Lesson One Extensions
Exploring Land Cover and Soil Groups:
o Create a Campus Land Cover Report by taking pictures of impervious and pervious surfaces
around your school. Classify the examples as natural or man-made, and describe the impact of
each surface on the health of the watershed.
o Collect soil samples from various locations around your school and determine what Hydrologic
Soil Group you think best describes the soil at your school.
o Create a graph from the data you collected with the Runoff Simulation to compare the effects of
Land Cover or Soil Type on the movement of water.
o Using the Runoff Simulation, run the scenario again with current conditions for your house and
compare the results for your house with the results for your school. Create a graph of this data to
demonstrate the differences.
Lesson Two Extensions
BMP Watershed Conservation & Stewardship Plan for Your Community
Have the students identify an area of land in their community that they think is having a negative
impact on the health of their local watershed. Students should use Model My Watershed
®
to analyze the
location of their choice and experiment with different scenarios to develop watershed & stewardship
plans for the property they chose that maximizes the health of the watershed by implementing
conservation practices and land cover changes. Students should seek to create plans that lead to the
lowest amounts of runoff and greatest amounts of infiltration while keeping in mind all of the current
activities and uses of the land and/or improving public access and resources. Have the students present
their plans to the class, administrators, school board members, or the community.
School Grounds BMP Watershed Conservation & Stewardship Competition
Create a competition between the students in your class/school whereby students use Model My
Watershed
®
to design the best Watershed Conservation & Stewardship plans for your school by creating
scenarios with plausible land cover and conservation practices that maximizes the health of the
watershed. Students should experiment with different scenarios until they develop a schoolyard plan that
leads to the lowest amounts of runoff and greatest amounts of infiltration while keeping in mind all of
the current activities and uses of the land. Have students present their plans to their classmates and
defend their ideas and designs. Add a panel of judges to enhance the presentation challenge, provide
feedback on their plans, and vote on the best plans (consider inviting school administrators, facilities
managers, other teachers, and members from the community like planning commissioners, parks and
recreation managers, and school board members).

Stroud Water Research Center Page 36
School Expansion Project
Introduce a scenario where your school is planning to build a new building (or expand a current building) on
campus. Have students work in teams to develop plans for where the new construction would happen and include
Conservation Practices to offset the impact from additional runoff into their local watershed.
One Kilometer Land Use Comparison
Starting at modelmywatershed.org, have students click on “Draw area” and use the “Square Km” function to draw
a square kilometer in different areas (urban, suburban, rural) to collect data and compare how different land cover
areas affect local watersheds. Students could chose a few different sites, or each student could get assigned an
“area” to investigate and then all students could share and compare their findings.
Vocabulary
Cluster housing – When developers build a community, they can build the houses closer together and leave other
areas open and undeveloped where they plant trees and other plants that will soak up the rain. This reduces
flooding and allows water to soak back into the ground.
Conservation practice - Control measures consisting of managerial, vegetative, and structural practices that
reduce the loss or degradation of soil and water. Also known as best management practices (BMPs).
Developed land - Land areas where humans have altered the landscape and installed constructed materials
(asphalt, concrete, buildings, etc) over 30 percent or more of the area.
Elevation – The distance above sea level.
Erosion - The wearing away of land surfaces by wind or water, intensified by land-clearing practices related to
farming, residential or industrial development, road building, or logging.
Evaporation – The process of changing water from a liquid (water) to a gas (water vapor) by adding energy
(heat). Water vapor is water molecules that are suspended in the air. Warm air has more energy and can contain
more water molecules, which is why it often feels more humid in warm weather.
Evapotranspiration - The combined processes by which water moves from the land to the atmosphere by
transpiration from plants, and by evaporation from surface waters, soils, and other moist surfaces.
Flood - Any relatively high streamflow that overflows the natural or artificial banks of a stream. Floods may be
caused by long-lasting rainfall over a broad area, locally intense thunderstorms, rapid melting of snowpack, or
obstructions to normal stream flows.
Green roofs - A conservation practice where the roof of a building is partially or completely covered with
vegetation and a growing medium, planted over a waterproofing membrane. It may also include additional layers
such as a root barrier and drainage and irrigation systems.
Groundwater - Water found underground in the cracks and spaces (pores) in soil, sand and rock. Groundwater is
stored in and moves slowly through geologic formations of soil, sand and rocks called aquifers.

Stroud Water Research Center Page 37
Hydrologic Soil Group - A classification system used to describe the ability of a soil to allow infiltration and
movement of water through the soil. The soils are rated from High Infiltration (A) to Very Slow Infiltration (D).
Impervious – A land surface area that does not have connected pores and cannot allow liquids and gases
(including water) to infiltrate the ground which results in more runoff.
Infiltration – The process of water soaking into the ground.
Infrastructure - The physical and organizational structures and facilities (e.g., buildings, roads, and power
supplies) built by humans that are needed for the operation of a society or organization.
Irrigation – Application of water or wastewater to land areas to supply the water and nutrient needs of plants.
Nonpoint source pollution - Pollution from different sources that occur over a wide area and are not easily
identified from a single source. Nonpoint source pollution often results from runoff that picks up and carries
natural and human-made pollutants into lakes, rivers, wetlands, coastal waters, and groundwater.
No-till agriculture - An agricultural best management practice whereby farmers plant crops without disturbing
the soil or removing the plants that are already there. No-till agriculture improves the infiltration rate of the soil,
reduces erosion, and builds the organic matter and nutrient cycling in the soil.
Pervious - A land surface area that has connected pores which allows liquids and gases (including water) to pass
through the material and infiltrate into the ground.
Photosynthesis – The process by which plants and some other organisms use sunlight to make foods from carbon
dioxide and water. Photosynthesis in plants generally involves the green pigment chlorophyll and generates
oxygen as a byproduct.
Point source pollution - Any single identifiable source of pollution from which pollutants are discharged, such as
a pipe, ditch, ship or factory smokestack. Factories and sewage treatment plants are two common types of point
sources.
Pollution – Chemicals, pathogens and other harmful things that could have a negative effect on people and other
living things in an environment.
Porous - A material, rock, or soil that has connected pores that allows liquids or gases (including water) to pass
through. Porous land surfaces allow water to infiltrate into the ground.
Porous paving - A conservation practice where the surface of parking areas and walkways are constructed with
materials that have connected pores or spaces between the surface blocks that allow water to infiltrate into the
ground. A layer of gravel is often installed below the surface to hold the water as it slowly infiltrates into the
ground underneath.
Rain garden - A conservation practice that reduces runoff as a shallow depression in the landscape collects rain
water from a roof, driveway, or street and allows the water to slowly infiltrate into the ground. Rain gardens are
often planted with native grasses and flowering perennials to enhance infiltration and evapotranspiration, help
filter out pollutants, and provide food and shelter for butterflies, song birds and other wildlife. More complex rain
gardens with drainage systems and amended soils are often referred to as bioretention basins.

Stroud Water Research Center Page 38
Rain water capture – Catching rain water in a barrel or cistern in order to reuse it for another purpose.
Rainwater retention basin (or bioswale) - A long, channeled depression or trench that receives rainwater runoff
(as from a parking lot) and has vegetation (such as grasses, flowering herbs, and shrubs) and organic matter (such
as mulch) to slow water infiltration and filter out pollutants.
Runoff – Water that does not infiltrate into the ground and runs across the surface of the land, which can cause
erosion and carry pollutants and sediment into streams, rivers, lakes, storm-water basins, or sewers.
Sediment - Particles from rocks or biological materials that have been transported by, suspended in, or deposited
by air, water, or ice or that are accumulated by other natural processes. Some typical sediments are pebbles, sand,
clay, silt, salts, and diatomaceous earth.
Slope – The angle of the land compared to the horizontal, which affects the movement of water. Water flows from
higher to lower elevations, down the slopes of the land. Water will flow faster down a steep slope, and slower on
a gentle slope.
Soil moisture - The quantity of water contained in the soil.
Sustainability – An approach for human interactions that respects the value of the environment and employs
methods of using resources wisely so they are not depleted or permanently damaged. Sustainably designed
buildings conserve the use of resources such as water and energy.
Temperature - Measure of the amount of heat (kinetic energy) in a given area.
Topography - The physical features or shape of the land (mountains, hills, valleys, etc.), which affects where
water flows.
Transpiration - The process whereby plants release water back into the atmosphere through pores (stomata) on
the surface of leaves, stems, and flowers.
Tributary – A stream or river that flows into a larger stream, river, or lake.
Vegetated infiltration basin – A landscaped depression with permeable soils, and covered with plants, that catch
stormwater runoff to prevent flooding, enhance infiltration and evapotranspiration, and protect the quality of
water in a watershed.
Wastewater wetland – A constructed marsh or swamp area designed to treat sewage or stormwater with wetland
vegetation and natural biological processes that break down wastes and permeable soils that filter and clean the
water.
Water quality criteria - Levels of water quality expected to make a body of water suitable for its designated use.
Criteria are based on specific levels of pollutants that would make the water harmful if used for drinking,
swimming, farming, fish production, or industrial processes.
Watershed - A system defined by the area of land over which all water drains downhill through a series of
streams and rivers to a common outlet (river, lake, bay or ocean).
Wetlands – Land areas where the soil is almost always wet throughout most or all of the year. There may or may
not be water visible at the surface.

Stroud Water Research Center Page 39
Appendix
Best Management Practices Resources
Best Management Practices and Low Impact Development Explained: https://youtu.be/coFbdMB-q0U
Stormwater Pollution & Green Infrastructure Solutions: https://youtu.be/ATNy-vaIPXI
Innovative Stormwater Management at a Neighborhood Scale: https://youtu.be/emQ8p6LGByU
NYC Green Infrastructure: https://youtu.be/zrhw2cMTpJs
Intro to Easy Design of LID/BMP/GI Stormwater Controls:
https://www.youtube.com/watch?v=2Wyl1WemcKs
Stormwater PA BMP Manual: http://www.stormwaterpa.org/bmp-manual-introduction.html
Lesson Two Part 1 – Identifying Current Conditions Sample Schoolyard Map
Figure 1.1

Stroud Water Research Center Page 40
Figure 1.2
