Menlo Security
Integration Guide

Menlo Security Integration Guide
MetaDefender - Menlo Middleware
• Introduction
• System Requirements
• Configurations
▪ MetaDefender Configuration
▪ Server configuration
▪ HTTPS Configuration
▪ Logging
• Deployment
• Standalone app
• Kubernetes
• Integration with MetaDefender Cloud
• Integration with MetaDefender Core
• Menlo Security Configuration
• Test the integration
Troubleshooting
• How can I check the Middleware is running properly?
• Middleware is available, but it shows “Skipped” in Menlo logs
• How do I get the CA certificate?

MetaDefender - Menlo Middleware
Introduction
Menlo Security offers the ability to call an External API (called Sanitization API), that will offload the downloaded file
to 3rd parties for deeper analysis.
This integration will leverage Menlo’s Sanitization API and will require a middleware that will translate the Sanitiza-
tion API into MetaDefender API. This is a python based stateless application that can run on both Windows and Linux.
Being lightweight, it is recommended to deploy it in a container environment, using a container orchestration (for
e.g., Kubernetes).

System Requirements
The Middleware was written in python and requires python 3.5 (released in Sep 2015) or above.
You can install all the required dependencies by running:
python -r requirements.txt
This will install all the dependencies (preferably in a previously built virtual environment):
Since python’s GLI won’t allow it to scale vertically, low-end systems are recommended, starting with 2 vCPU and 2GB
memory for Linux based systems.
It is recommended to have multiple deployments, to avoid a single point of failure and ensure a high-available and
fault-tolerant system.
HTTPS configuration is required!
Menlo Security will only accept files for analysis over HTTPS. Since these files could contain sensitive information, you
wouldn’t want it any other way.
With that in mind, make sure to have the right ports open and the right certificates in place. More details available in
the Deployment section.
Configurations
The middleware offers the ability to connect to either MetaDefender Cloud or MetaDefender Core.
All the customizations can be done from the
config.yml file available in the middleware:

MetaDefender Configuration
First, to select integration via either your own deployment of MetaDefender Core or the MetaDefender Cloud SaaS
offering, set either
core or cloud for the configuration api > type in
config.yml
.
Based on your option, you’ll have to define:
• For MetaDefender Cloud:
° apikey is a mandatory field, otherwise, MetaDefender Cloud will reject requests as Unauthorized.
- In order to retrieve a valid apikey, you’ll have to register on portal.opswat.com. If you are already a registered
user, you should retrieve the MetaDefender Cloud apikey either from portal.opswat.com or from MetaDefender
Cloud > Account > Account Information:
° url can remain as it is since MetaDefender Cloud API v4 is the current production API version.
• For MetaDefender Cloud:
° url > core
You’ll be required to input the IP/URL to access MetaDefender Core. Depending on your networking
configuration, this could be a publicly accessible service, or you can allow it to accept requests only from the
middleware.
° If MetaDefender is accessible from outside the organization, it is advisable to use the public IP/URL, instead of
internal IPs since this information will be used to list a Report URL in Menlo Security reports.
Server configuration
Under the server configuration, you can modify the service’s running port. Even though by default it is set as `3000`, you
can modify it. If the goal is to run HTTPS using 443, it is recommended to place a reverse proxy (like nginx) in front of the
middleware cluster.
The current version of Menlo Security Sanitization API is v1, so you shouldn’t modify the api_version configuration.
HTTPS Configuration
As mentioned before, HTTPS is required for the middleware.
This can be set directly in the middleware, by using the configuration under
https. If you want the
middleware to run in HTTPS mode, you’ll have to set
load_local: true. This will force the app to load the
certfile and keyfile from the locations specified in the crt and key fields. These can be relative paths.
Self-signed certificates are allowed. But are required to be signed by a root CA.

If you would like to use self-signed certificates, it is required to have a server certificate that is signed by a rootCA. The
rootCA public certificate will be uploaded in the Menlo Security Admin console. If the wrong certificate is uploaded, the
requests will fail.
It is also recommended to use X509 certificates in pem format. Password protected certificates are not supported.
Logging
By default, logging is enabled at INFO level.
You should specify the absolute path for the
logfile and make sure that the path exists and the write permissions are
in place, otherwise, the middleware fails to initialize.
By default log rotation is set for 30 days, with a rotation interval of 1 day (24h).
Deployment
Standalone app
First, build the application.
To run the middleware is as straightforward as:
python -m metadefender_menlo
Make sure python is version 3.5 and above.
However, in a production environment, Tornado recommends running it behind a front-end proxy, that can also han-
dle HTTPS termination. A great example is nginx:
You’ll probably want to run it as daemon/service, to be able to recover and start at boot time. You can review the
official Tornado recommendation on how to achieve that.
Another great resource is this one, which explains how to run and leverage multiple python processes and how to put
them behind an nginx server.
Kubernetes
First, you’re required to build a container. There’s a Dockerfile in the repo, that you can use to build the container
and push it to your registry. Once you have it, you will have to modify
deployment.yaml and specify your own con-
tainer image.
Also, check the
deploy.sh script. It was built specifically for Google Cloud to leverage GKE (Google Kubernetes
Engine). But it can be easilyadapted to run in any Kubernetes supported environment.
The GCP specific part is building the cluster and (if needed) the static IP.

Modify the deploy script to use your own cluster and certificates as needed. If you don’t require self-signed certs, you
can remove the entire portion with openssl and jump directly to adding your certificates as Kubernetes secrets.
Check
deployment.yaml and place the real apikey (if you plan to use MetaDefender Cloud), or just remove that
environment variable entirely if it is not going to be used. You can also set the apikey in the config file, if you prefer to
have it hardcoded in the container image, instead of passing it as an environment variable.
Kubernetes
First, you’re required to build a container. There’s a Dockerfile in the repo, that you can use to build the container and
push it to your registry.
Once you have it, you will have to modify deployment.yaml and specify your own container image.
Also, check the deploy.sh script. It was built specifically for Google Cloud to leverage GKE (Google Kubernetes En-
gine). But it can be easilyadapted to run in any Kubernetes supported environment.
The GCP specific part is building the cluster and (if needed) the static IP.
Integration with MetaDefender Cloud
For MetaDefender Cloud you’ll just need to grab the apikey from portal.opswat.com
or metadefender.opswat.com/account.
Set that apikey in the config file (or pass it as an environment variable) and set the integration type to cloud - and you
are done.
There aren’t any configurations required on the MetaDefender Cloud side. The integration will automatically call
MetaDefender Cloud API with sanitization rule enabled.
Integration with MetaDefender Core
In the config.yml you need to specify that the middleware will connect to MetaDefender Core by setting
api.type: core and specifying the correct path to MetaDefender Core REST API in url.core.
Other than that, you can rely on the existing Workflow Rule in MetaDefender Core. It is recommended to enable the
following:
• Archive processing: this will increase the detection ratio, including for productivity files (Docx, Xlsx, etc.).
• Multiscanning: you can configure the maximum allowed file size for scanning and additional parameters for the
scanning process.
• Deep CDR: we strongly recommend to check “Enable for all file types” and “Block files if sanitization fails or
times out” (high probability that the failure is caused by invalid file structure):
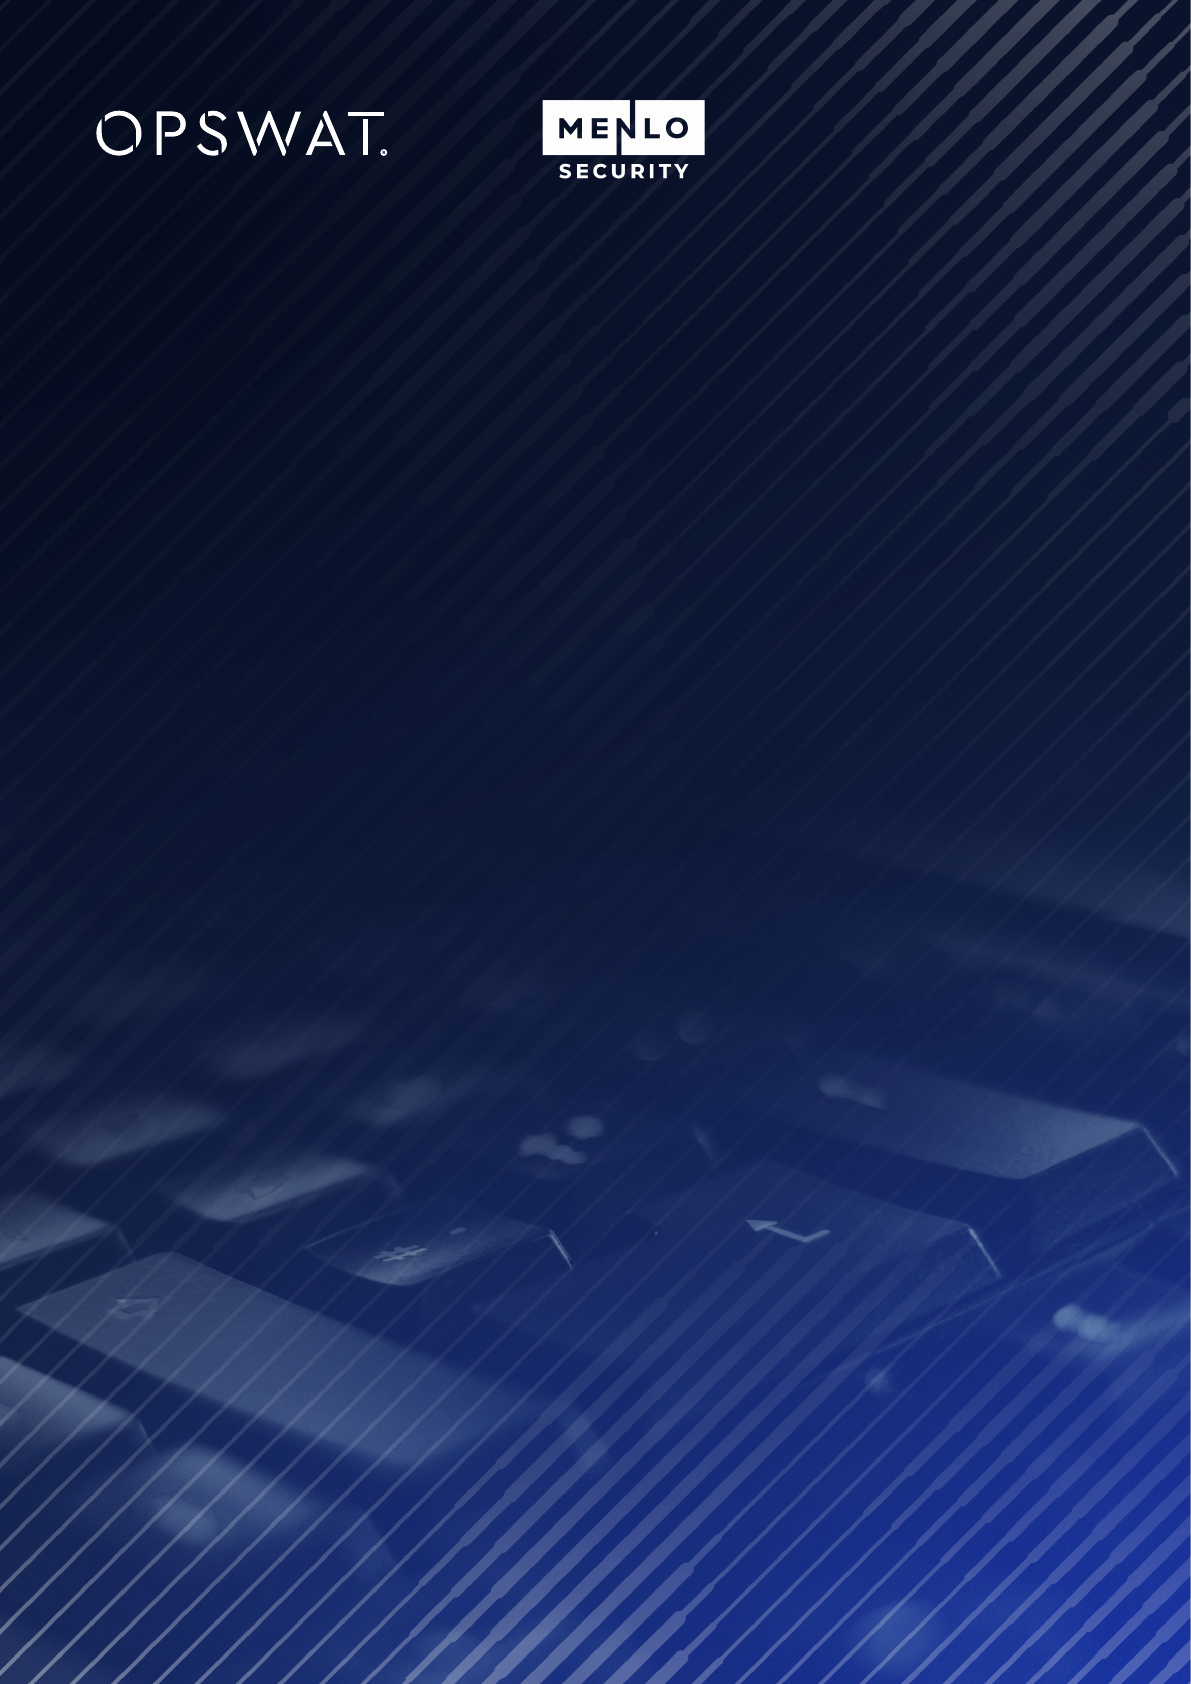
Another very important configuration would be to sanitize all the hyperlinks in documents. If a document is being
downloaded from the internet and has a potentially bad link, it could bypass the isolation and run on the local machine.
You can configure the Deep CDR engine to always sanitize the links and force them to go through Menlo Security to
ensure isolation:

Menlo Security Configuration
In order to connect with the middleware, you will have to configure the connection in Menlo’s Admin console. Navigate
to https://admin.menlosecurity.com/#/policy/inspection and edit Menlo Security Sanitization API (Web Policy > Content
Inspection > Menlo Security Sanitization API):
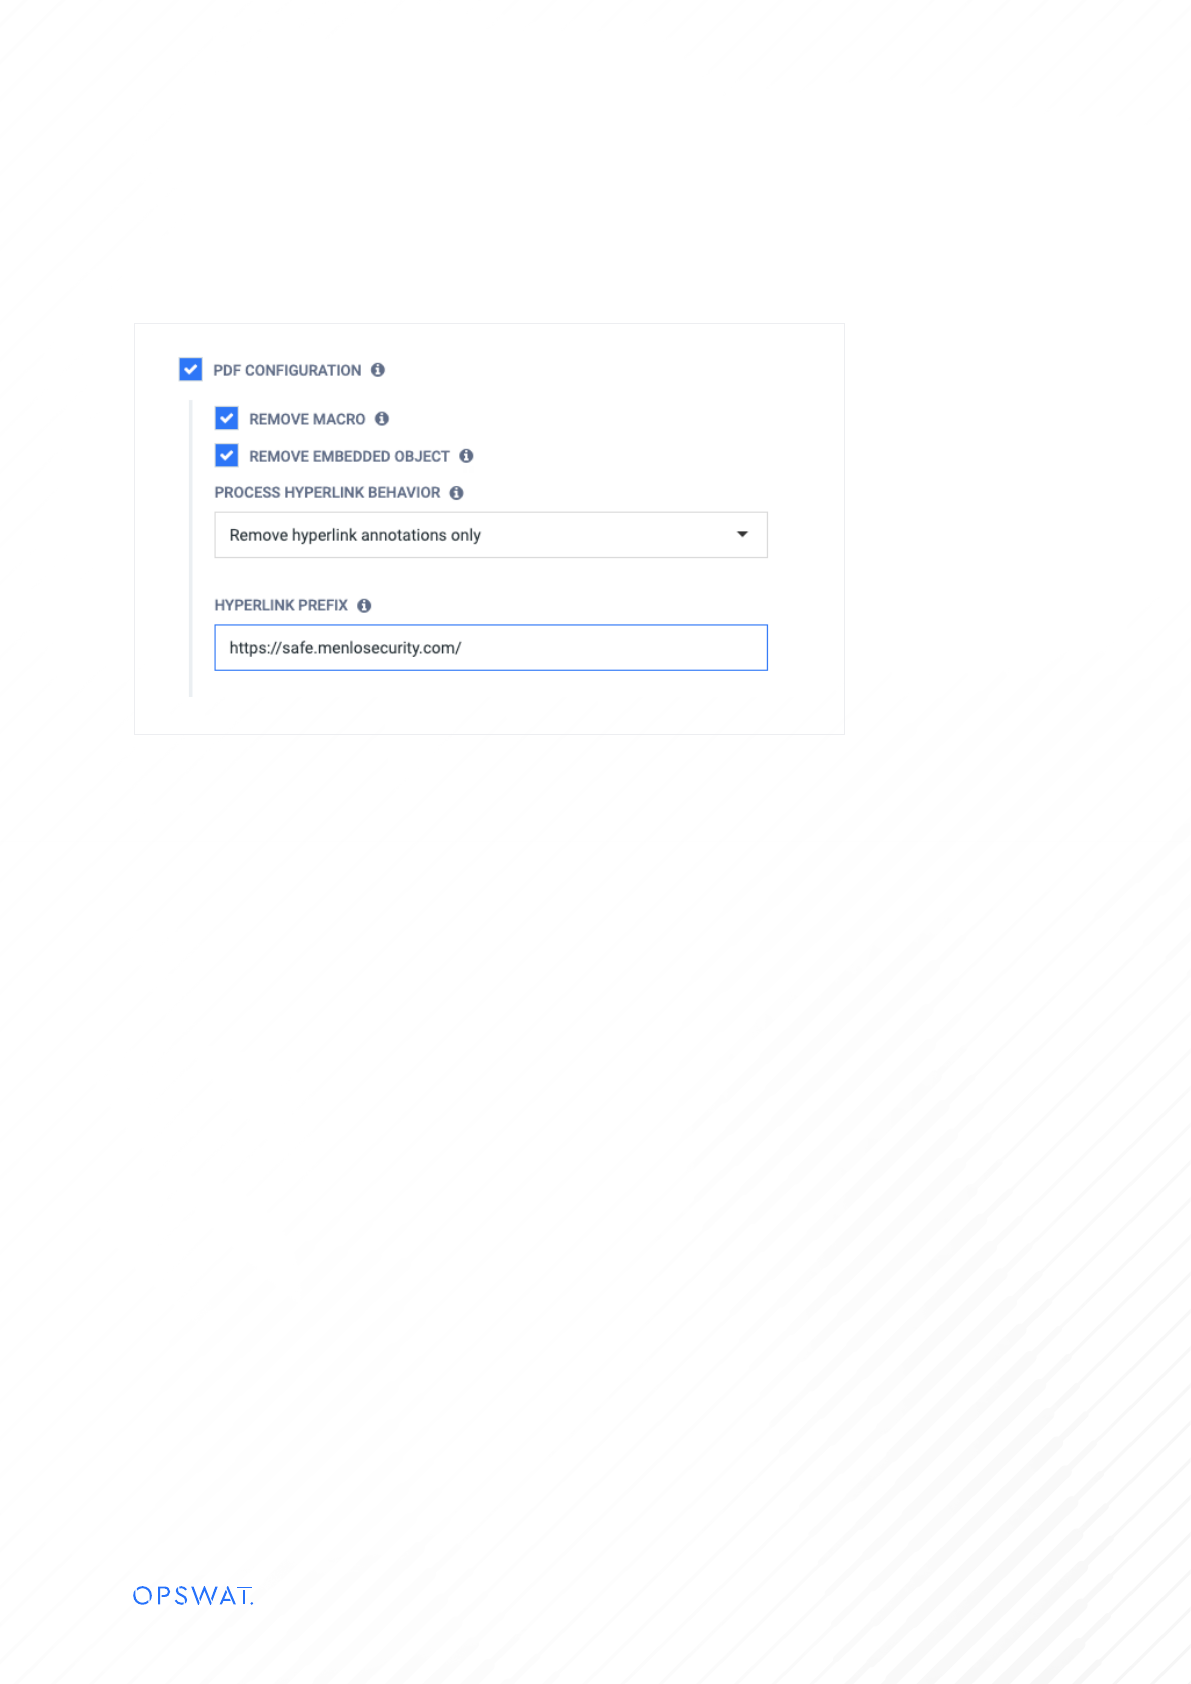
You will need to configure the fields in the modal:
• Plugin Name: Rename the plugin to the integration type (OPSWAT MetaDefender Core or OPSWAT MetaDefender
Cloud).
• Plugin Description: MetaDefender Core/Cloud REST API Server Integration.
• Base URL: This is the middleware URL (needs to be an HTTPS URL).
• Certificate: This should be the rootCA public certificate, that was used to sign the middleware certificate.
• Type of Transfer: Downloads, Uploads or both.
• Connection Timeout: you can leave the default as is.
• Process Timeout: in general the processing should happen within 1-2 seconds, but depending on the file size (or if it is
an archive), could take a little longer. Balance this configuration with file size, archive handling and allowed file types
configurations.
• Poll interval: How often Menlo will check if the analysis is completed.
• Max Size: For MetaDefender Core could be higher values, for MetaDefender Cloud check your max file size limit
permitted for your apikey.
• Allow File Replacement: make sure you check this since this will allow you to replace the original file with the
sanitized/redacted file.
• Unused fields:
▪ Authorization Header
▪ Metadata Check
▪ Hash check: can be used on MetaDefender Cloud, but it will provide only the scan report, not the sanitized/
redacted file. It is recommended to still submit the file.
▪ Leave Continue Inspection for the last 3 items.
See the following example:

Test The Integration
Navigate to safe.menlosecurity.com/ and start browsing. Search for a PDF/Docx on Google and try to open it. That will
trigger the Sanitization API and send the file for analysis to MetaDefender.
If you enabled ‘watermark’ in MetaDefender Core, your rendered/downloaded file should contain a watermark. If not, go to
the Menlo Security Admin console and check the Logs > Web Logs section and your first entry should have Request Type:
File Request. Click on it and scroll down in the right panel to see the MetaDefender inspection results.
If you selected MetaDefender Cloud integration, you can view the analysis report. If it was MetaDefender Core and is being
accessed by the public IP, you’ll be able to do the same. Otherwise, the Report URL won’t be accessible.
Troubleshooting
How can I check the Middleware is running properly?
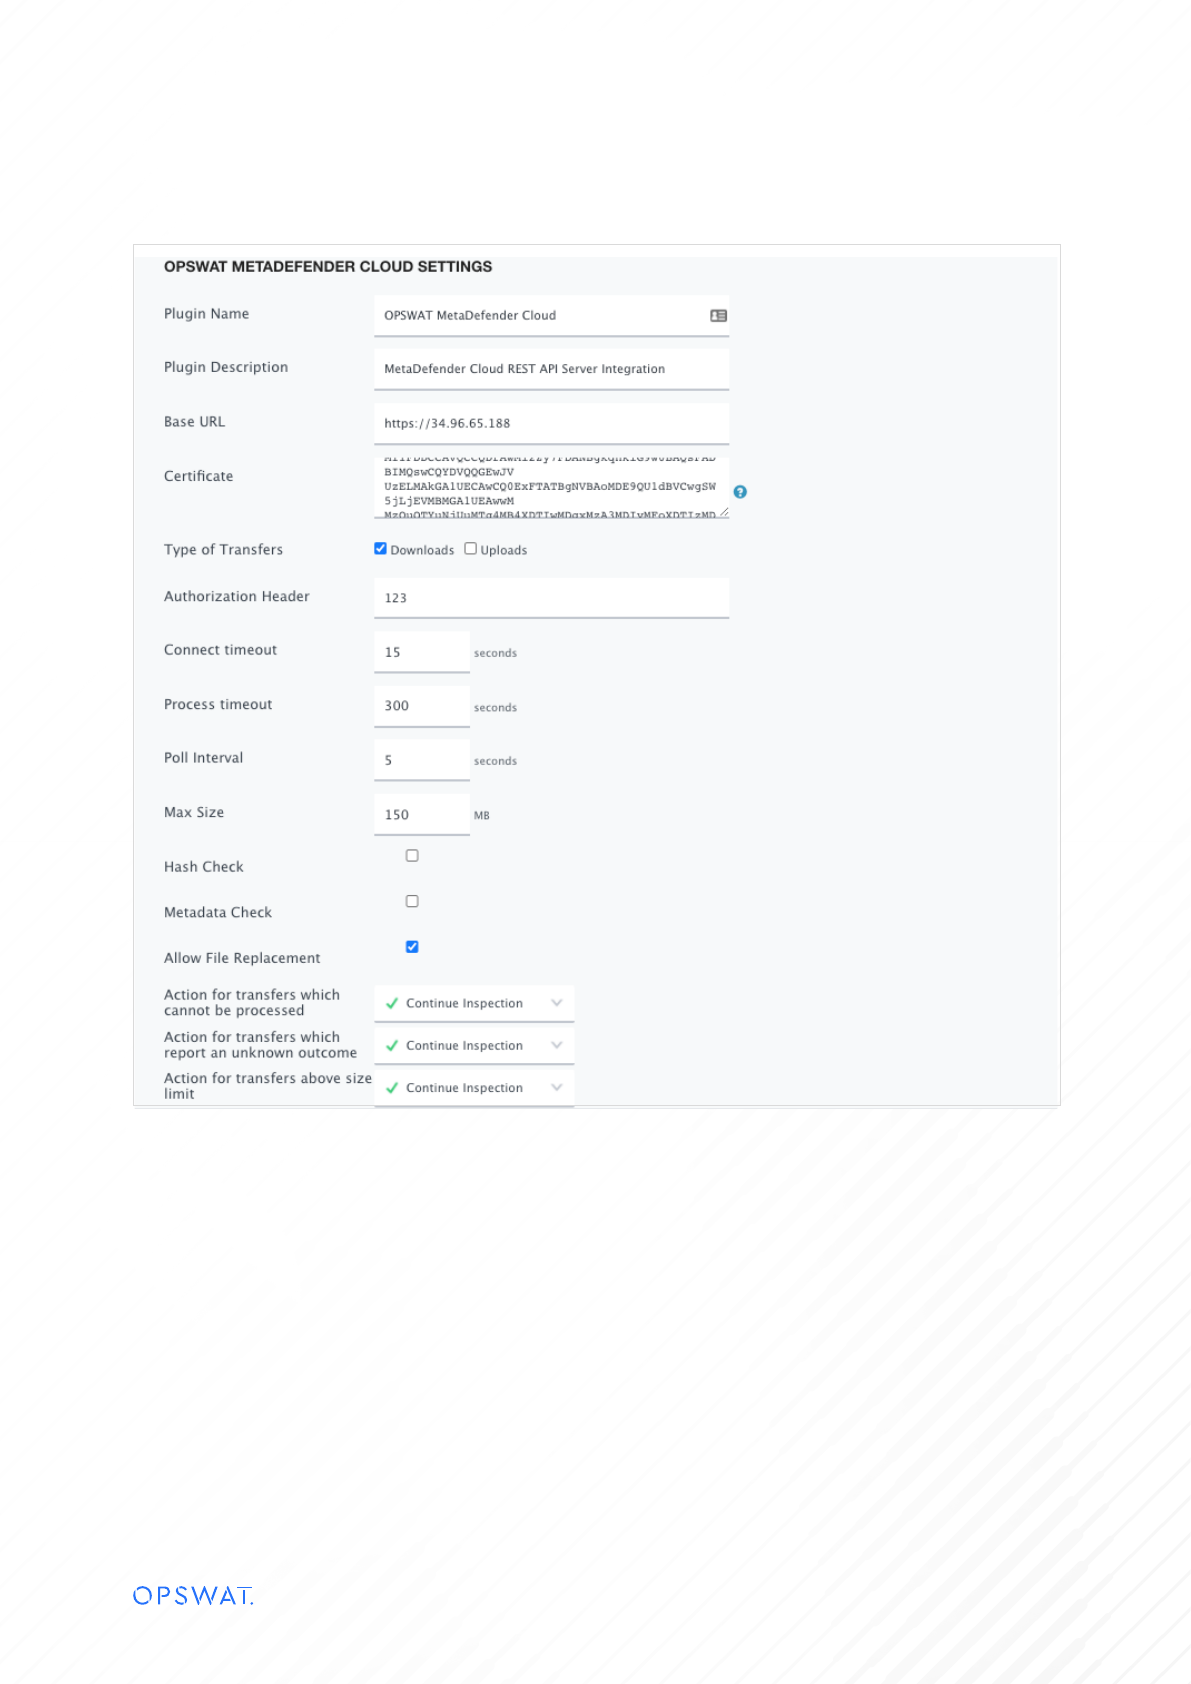
You have a postman collection in the repository.
Import it in your Postman app and set the proper base URL.
You should either import the certificate in Settings > Certificates > CA Certificates or disable SSL certificate verification in
Settings >General

Then do a quick check to see that file submission and analysis results work properly. You should also try to retrieve the
sanitized file, to make sure that the MetaDefender configuration was set properly and CDR configuration is enabled.
If any of the requests fail, check the middleware app logs.
Middleware is available, but it shows “Skipped” in Menlo logs
You can try to validate the integration by trying to mimic Menlo’s behavior.
In order to make sure the request is completed successfully, you should try to run the following (or similar):
In case the following request fails, you probably either specified the wrong URL or provided the wrong rootCA.crt. Check the error
message for hints.
Make sure that:
• You are using X509 certificates;
• CA Cert is in PEM format.
Middleware is available, but it shows “Skipped” in Menlo logs
You can try to retrieve the rootCA by using the following command:
openssl s_client -showcerts -servername server -connect server:443 >cacert.pem
curl --cacert rootCA.crt https://middleware.your-corporate.com:<<port>>/api/v1/health

