
Part of the DePuy Synthes Locking Compression Plate (LCP
®
) System
3.5 mm LCP
®
Distal
Humerus Plates
Surgical Technique

3.5 mm LCP
®
Distal Humerus Plates Surgical Technique DePuy Synthes 1
Introduction
Surgical Technique
Product Information
Table of Contents
3.5 mm LCP Distal Humerus Plates 2
AO Principles 4
Indications 5
Preparation 6
Summary of Surgical Technique 7
Reduce Fracture 8
Select Posterolateral Plate 9
Apply Posterolateral Plate With Lateral Support 10
Alternative Technique: 13
Apply Posterolateral Plate Without Support
Apply Medial Plate 14
Insert Screws in Plate Shafts 16
Optional Techniques with 18
Position and Compression Device
Postoperative Treatment 21
Implant Removal 21
Implants 22
Instruments 24
Set List 26
Image intensifier control
MR Information
The 3.5 mm LCP Distal Humerus Plates System has not been evaluated for safety and
compatibility in the MR environment. It has not been tested for heating, migration or
image artifact in the MR environment. The safety of the 3.5 mm LCP Distal Humerus
Plates System in the MR environment is unknown. Scanning a patient who has this
device may result in patient injury.
2 DePuy Synthes 3.5 mm LCP
®
Distal Humerus Plates Surgical Technique
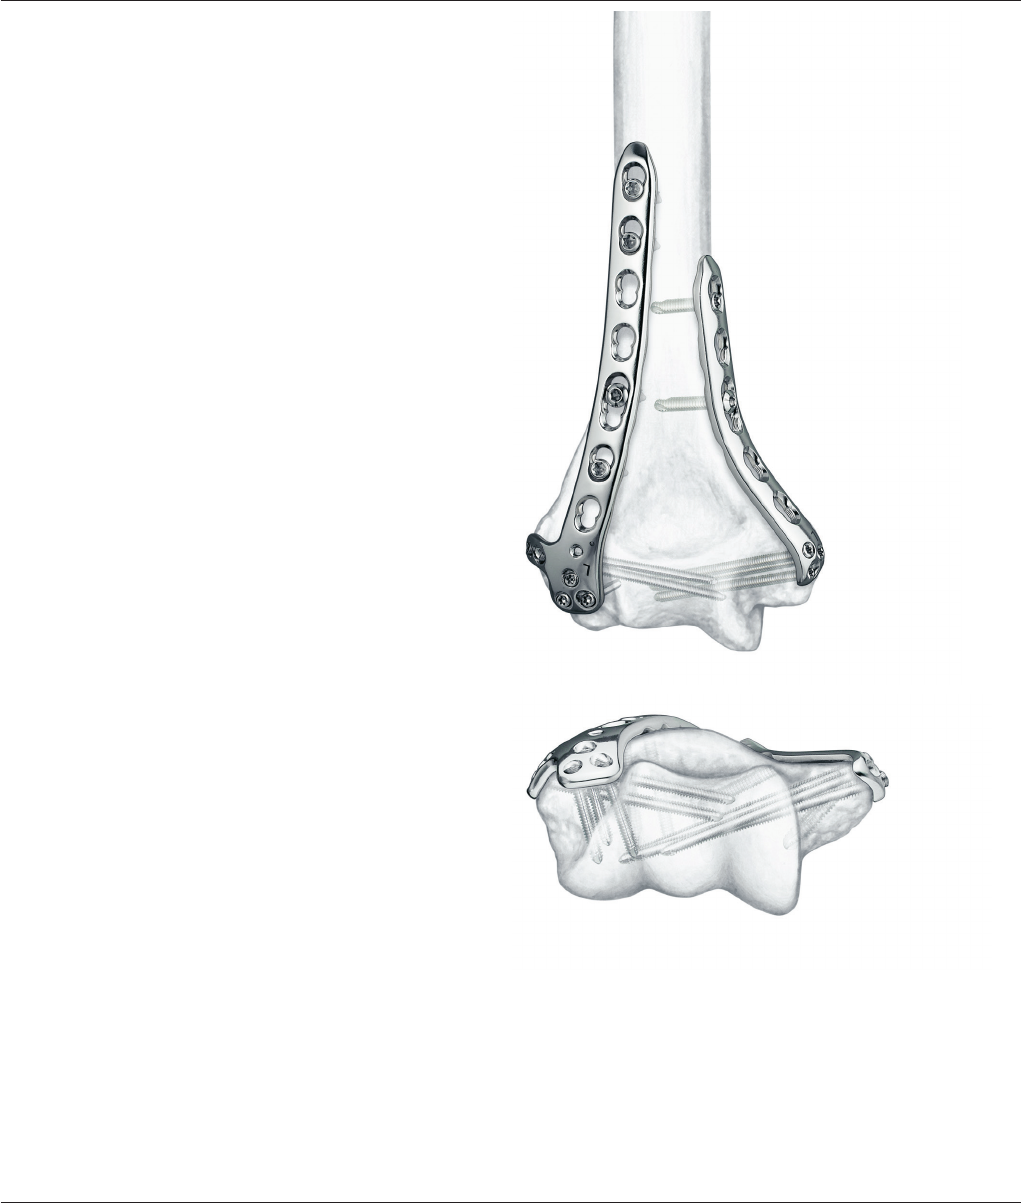
3.5 mm LCP Distal Humerus Plates
Plate features
– Thirty (30) posterolateral and medial plates allow implant
placement to address the individual fracture pattern.
– Plates are precontoured for anatomical t.
– Combi holes allow xation with locking screws in the
threaded section for angular stability, and cortex screws in
the dynamic compression unit (DCU) section for compression.
A xed-angle construct provides advantages in osteopenic
bone or multifragment fractures where traditional screw
purchase is compromised.
– Choice of ve lengths of each plate type eliminates the
need to cut plates.
– Posterolateral plates offer xation of the capitulum with
three distal screws.
Two-plate technique for distal humerus fractures
Increased stability can be gained from two-plate xation
of distal humerus fractures. The two-plate construct creates
a girder-like structure which strengthens the xation.
1
The posterolateral plate functions as a tension band during
elbow exion, and the medial plate supports the medial side
of the distal humerus.
1. Thomas P. Rüedi, et al, ed. AO Principles of Fracture Management,
New York: Thieme, 2000. p. 315.

3.5 mm LCP
®
Distal Humerus Plates Surgical Technique DePuy Synthes 3
Additional features
– Limited-contact design shaft with 3, 5, 7, 9, and 14
Combi holes
– The shaft holes accept 3.5 mm locking screws* in the
threaded portion or 3.5 mm cortex screws*, 4.0 mm
cortex screws** or 4.0 mm cancellous bone screws*
in the compression portion
– Available for left and right humeri
– Made of 316L stainless steel or commercially pure titanium
– Three distal locking holes accept 2.7 mm locking screws
or 2.4 mm cortex screws
– Posterolateral plate with lateral support offers the option
for two additional screws placed lateral to medial
3.5 mm LCP
®
Extra-articular Distal Humerus Plates are
also available.
3.5 mm LCP Posterolateral Distal
Humerus Plates, with support
3.5 mm LCP Posterolateral Distal
Humerus Plates
3.5 mm LCP Medial Distal
Humerus Plates
* Available in the Small Fragment LCP Instrument and Implant Set (105.434 or 145.434)
**Available in the stainless steel Modular Foot Set (105.100)
†
Please refer to 3.5 mm LCP Extra-articular Distal Humerus Plate specic literature.
3.5 mm LCP Extra-articular
Distal Humerus Plates
†
3.5 mm LCP Distal Humerus Plates

4 DePuy Synthes 3.5 mm LCP
®
Distal Humerus Plates Surgical Technique
AO Principles
1
4
2
3
4_Priciples_03.pdf 1 05.07.12 12:08
4 DePuy Synthes Expert Lateral Femoral Nail Surgical Technique
AO PRINCIPLES
In 1958, the AO formulated four basic principles, which
have become the guidelines for internal fixation
1, 2
.
1
Müller ME, M Allgöwer, R Schneider, H Willenegger. Manual of Internal
Fixation. 3rd ed. Berlin Heidelberg New York: Springer. 1991.
2
Rüedi TP, RE Buckley, CG Moran. AO Principles of Fracture Management.
2nd ed. Stuttgart, New York: Thieme. 2007.
Anatomic reduction
Fracture reduction and fixation to
restore anatomical relationships.
Early, active mobilization
Early and safe mobilization and
rehabilitation of the injured part
and the patient as a whole.
Stable fixation
Fracture fixation providing abso-
lute or relative stability, as
required by the patient, the injury,
and the personality of the
fracture.
Preservation of blood supply
Preservation of the blood supply
to soft tissues and bone by
gentle reduction techniques and
careful handling.
In 1958, the AO formulated four basic principles, which
have become the guidelines for internal xation.
1, 2
Anatomic reduction
Fracture reduction and xation to
restore anatomical relationships.
Early, active mobilization
Early and safe mobilization and
rehabilitation of the injured part
and the patient as a whole.
Stable xation
Fracture xation providing absolute
or relative stability, as required by
the patient, the injury, and the
personality of the fracture.
Preservation of blood supply
Preservation of the blood supply
to soft tissues and bone by gentle
reduction techniques and
careful handling.
1. Müller ME, Allgöwer M, Schneider R, Willenegger H. Manual of Internal Fixation.
3rd ed. Berlin, Heidelberg, New York: Springer-Verlag; 1991.
2.
Rüedi TP, RE Buckley, CG Moran. AO Principles of Fracture Management.
2nd ed. Stuttgart New York: Thieme; 2007.

3.5 mm LCP
®
Distal Humerus Plates Surgical Technique DePuy Synthes 5
Indications
The 3.5 mm LCP Distal Humerus
Plates
The 3.5 mm LCP Distal Humerus Plates
are indicated for intra-articular fractures
of the distal humerus, comminuted
supracondylar fractures, osteotomies,
and nonunions of the distal humerus.
The 3.5 mm LCP Extra-articular
Distal Humerus Plates
The 3.5 mm LCP Extra-articular Distal
Humerus Plates are indicated for fractures
of the distal humerus.

6 DePuy Synthes 3.5 mm LCP
®
Distal Humerus Plates Surgical Technique
Preparation
Radial
nerve
Ulnar
nerve
Incision
site
Ulnar
nerve
Radial
nerve
1
Patient position
The lateral decubitus position is usually
chosen. In severe C3 fractures, the
fully prone position can be used if
the patient is otherwise t. The arm
is rested on a padded bar allowing
elbow exion of 120°.
2
Approach
Fractures are approached through a
slightly curved posterior incision just
radial to the olecranon. The ulnar nerve
is identied; it may need to be isolated
and elevated at the ulnar epicondyle.
For comminuted fractures, a distally
pointed chevron olecranon osteotomy
exposes the fracture best and allows
stable xation.
Note: For information on xation
principles using conventional and locked
plating techniques, please refer to the
Small Fragment Locking Compression
Plate (LCP) System Technique Guide.
3.5 mm LCP
®
Distal Humerus Plates Surgical Technique DePuy Synthes 7
Summary of Surgical Technique
Summary of surgical technique
– Reduce articular surface
– Determine plate length and placement
– Choose 3.5 mm LCP Posterolateral Plate with or without
lateral support
– Bend plates if necessary
– Verify plate placement with 2.0 mm K-wires
– Apply posterolateral plate: insert rst screw in elongated
shaft hole, then insert distal screws
– Apply medial plate: insert rst screw in elongated shaft
hole, then insert distal screws
– Use 3.5 mm locking screws or 3.5 mm cortex screws
to x the shafts of the posterolateral and medial plates
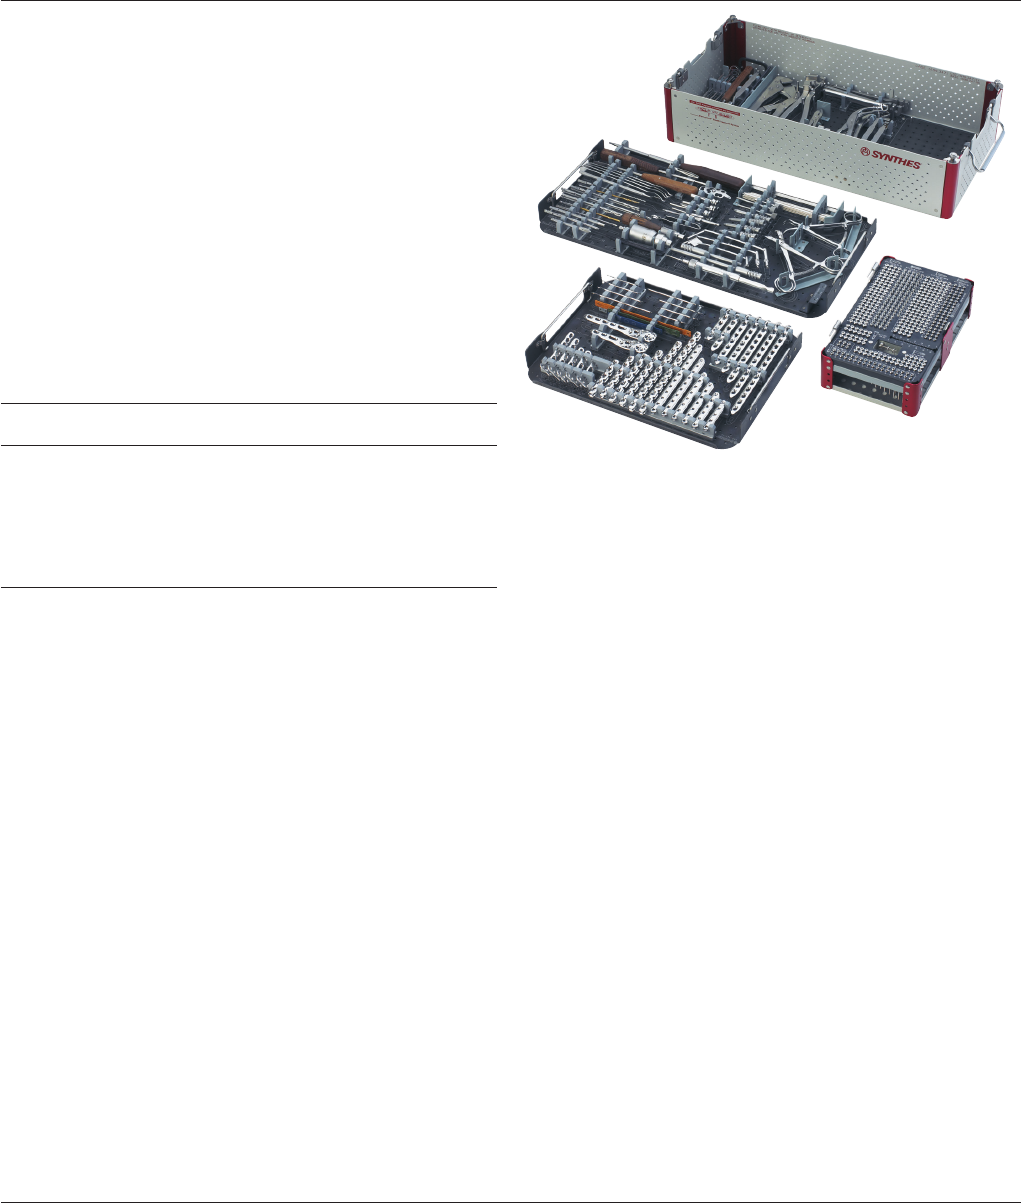
Required set
105.434 Small Fragment LCP Instrument and
Implant Set
or
145.434 Small Fragment LCP Instrument and
Titanium Implant Set

8 DePuy Synthes 3.5 mm LCP
®
Distal Humerus Plates Surgical Technique
Reduce Fracture
1
Reduce fracture and x temporarily
For C-type fractures, reduce the articular fragments of the
distal block under image intensication and use K-wires
and/ or pointed reduction forceps for temporary xation.
Temporarily x the distal block to the shaft using K-wires
and/ or forceps in both columns to ensure that the anatomy
of the distal humerus is restored. Ensure that K-wires or
forceps will not interfere with subsequent plate placement.
If necessary, reduce the articular surface using lag screws.
Note: LCP Locking Screws are not suitable for reduction, since
they cannot effect compression. The fracture must therefore
be reduced before inserting locking screws.
Precaution: If the plate is long, the radial nerve needs to be
elevated off the back of the humerus and the plate placed
underneath. Otherwise, the radial nerve rarely needs to be
identied by more than palpation and almost never needs
to be isolated or elevated with these fractures.
2
Determine plate length
Choose plate lengths that offer sufcient xation proximal to
the fracture lines. To prevent extensive diaphyseal stress, it is
recommended that the medial and lateral plates are not the
same length. For example, use a 5-hole medial plate with a
7-hole posterolateral plate.
Note: To achieve sufcient stability for early mobilization, use
the two-plate technique described on page 2.
Precaution: For fractures extending into the shaft always
use both dorsolateral and medial plates to have sufcient
strength, especially when using 9 or 14 hole plates.
Note: Use the AO preoperative planner template to determine
appropriate plate length. Templates are available for all three
plates: 3.5 mm LCP Posterolateral Distal Humerus Plate with
lateral support, 3.5 mm LCP Posterolateral Distal Humerus
Plate without support, and 3.5 mm LCP Medial Distal
Humerus Plate.

3.5 mm LCP
®
Distal Humerus Plates Surgical Technique DePuy Synthes 9
Select Posterolateral Plate
3
Select 3.5 mm LCP Posterolateral Plate with or
without support
For the posterolateral side, choose the type of implant to
be used. The posterolateral plates allow screw insertion in
a posterior-anterior direction. The plate with lateral support
allows additional screw insertion through the lateral epicondyle
in a lateral-medial direction.
Note: On very small humeri, the support may protrude
extensively over the lateral epicondyle, in which case the
use of the plate without support is recommended.
4
Bend the plate
Instruments
329.04 Bending Irons, for 2.7 mm and 3.5 mm plates
and
329.05
329.15 Bending Pliers
Due to varying patient anatomy, slight bending may be
necessary for the posterolateral and medial plates. Contour
plates as needed using the bending irons. Alternatively,
bending pliers may be used.
Bending the lateral support ange of the posterolateral plate
is not recommended since it may alter the screw trajectory
or prevent the use of a screw in the distal part of the lateral
plate, due to screw collision.
Precaution: If only cortex screws are used, the plates must
be congruent with the surface of the bone and bending may
be required. Bending should be limited to the region of
the Combi holes.

10 DePuy Synthes 3.5 mm LCP
®
Distal Humerus Plates Surgical Technique
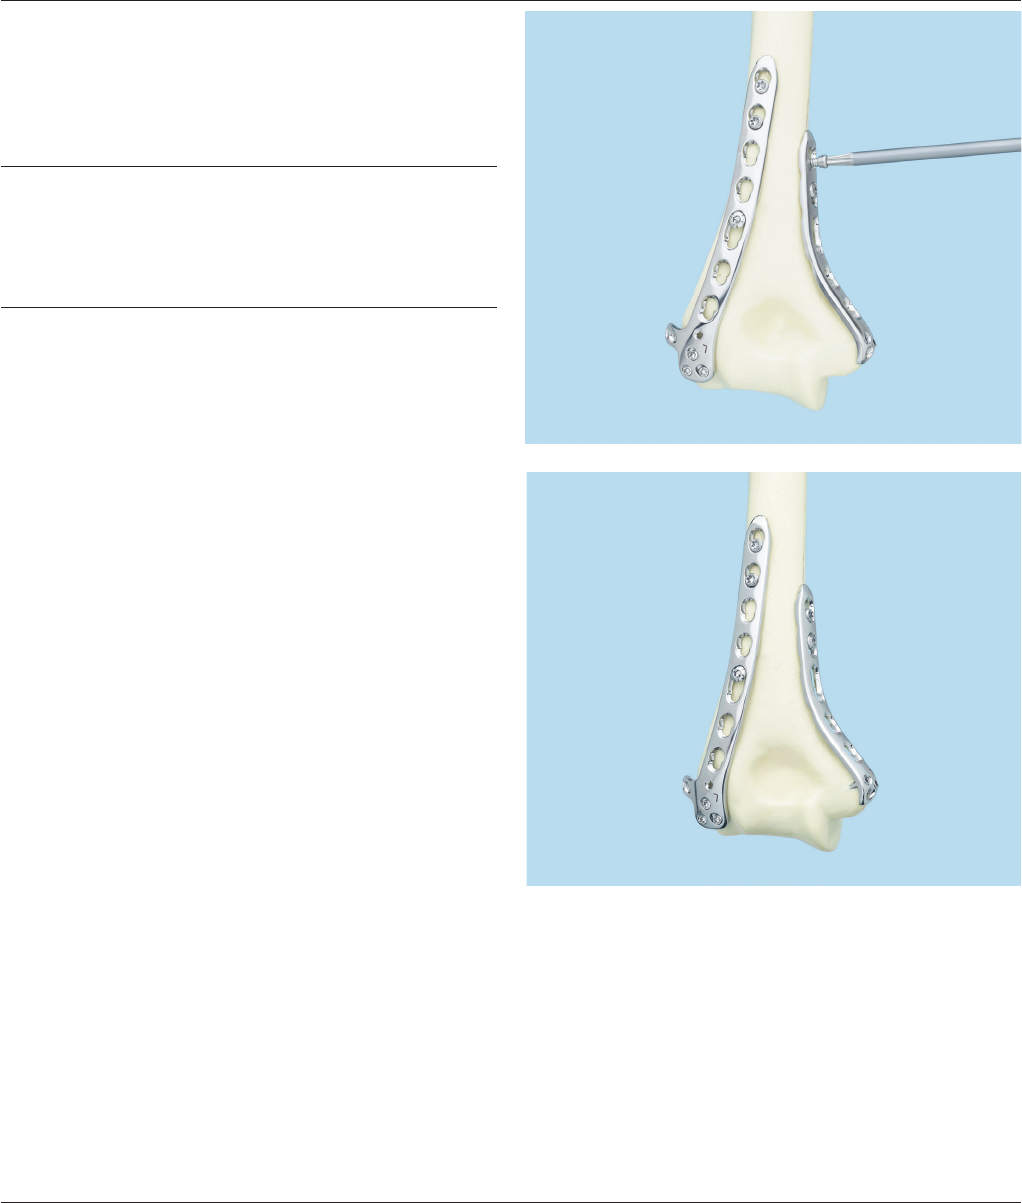
Apply Posterolateral Plate with Lateral Support
1
Determine placement of posterolateral plate
Instruments
292.20 2.0 mm Kirschner Wire, 150 mm
323.061 2.0 mm Threaded Drill Guide, with Depth
Gauge
Position the plate on the posterolateral aspect of the distal
humerus with the distal spoon-shape portion covering the
nonarticulating part of the capitulum, and with the lateral
support extending over the most protruding tip of the lateral
epicondyle, just proximal to the lateral collateral ligament
insertion. Ensure that the shaft portion is positioned at a
safe distance from the olecranon fossa.
The position of the plate should allow distal screw insertion
through the lateral ange to reach far into the trochlea. Screw
trajectory may be visualized with the 2.0 mm threaded drill
guide and a K-wire.
2
Preliminary xation of the plate shaft to the bone
Instruments
310.25 2.5 mm Drill Bit, quick coupling
311.43 Handle, with quick coupling
314.02 Small Hexagonal Screwdriver, with Holding
Sleeve
314.03 Small Hexagonal Screw driver Shaft
323.36 3.5 mm Universal Drill Guide
511.776 Torque Limiting Attachment, 0.8 Nm
After reducing the fracture, apply the plate and insert a 3.5 mm
cortex screw through the DCU portion of the elongated
Combi hole using the universal drill guide and the 2.5 mm
drill bit to predrill both cortices.
Insert the screw using the small hexagonal screwdriver for
manual insertion or the small hexagonal screw driver shaft
with a power drive or a handle. Do not tighten the screw.

3.5 mm LCP
®
Distal Humerus Plates Surgical Technique DePuy Synthes 11
3
Insert distal screws
Note: If a combination of cortex and locking screws is used,
a cortex screw should be inserted rst to pull the plate to
the bone.
Insert 2.4 mm cortex screw
Instruments
310.510 1.8 mm Drill Bit
323.202 2.4 mm Universal Drill Guide
Use the 2.4 mm universal drill guide with the 1.8 mm drill
bit for the threaded hole and the 2.4 mm drill bit for the
gliding hole. Determine the length of the screw by using
the depth gauge.
Insert 2.7 mm locking screw
Instruments
311.43 Handle with quick coupling
314.467 StarDrive
TM
Screwdriver Shaft, T8
314.468 Holding Sleeve, for StarDrive Screwdriver Shaft
319.006 Depth Gauge, for 2.0 mm and 2.4 mm screws
323.061 2.0 mm Threaded Drill Guide, with Depth Gauge
323.062 2.0 mm Drill Bit with depth mark
511.776 Torque Limiting Attachment, 0.8 Nm
Screw the 2.0 mm threaded drill guide into one of the
threaded holes of the distal part of the plate and predrill a
hole with the 2.0 mm drill bit. Check the depth of the drill
bit under image intensication. Determine the length of
the screw by using the scale on the drill guide. If a single
marking is visible on the drill bit, the scale from 0 mm– 30 mm
applies; if a double marking is visible, the scale from
34 mm– 60 mm applies.
Precaution: Screws directed towards the joint must be a
little shorter than the measured length.
Apply Posterolateral Plate with Lateral Support

12 DePuy Synthes 3.5 mm LCP
®
Distal Humerus Plates Surgical Technique
The depth gauge may also be used to establish approximate
screw length.
Note: Whenever possible, locking screws should be inserted
under power using the torque limiting attachment. The audible
“click” will notify the surgeon that the maximum torque value
has been reached and that power insertion is completed.
After screw insertion using the torque limiting attachment,
always check that the screws are fully inserted by hand
tightening them.
Warning: Never insert locking screws under power unless
using a torque limiting attachment.
Use the holding sleeve, for StarDrive Screwdriver Shaft,
if necessary. Repeat for all distal holes to be used.
Precautions:
– In the distal portion of the posterolateral plate, pay close
attention to the posterior to anterior screw holes during
drilling and screw insertion. Conrm screw placement and
length with image intensication during movement of the
elbow to ensure screws are not exiting through the joint.
– When inserting screws under power, nal tightening should
be done using manual screwdriver and Torque Limiter.
Apply Posterolateral Plate with Lateral Support

3.5 mm LCP
®
Distal Humerus Plates Surgical Technique DePuy Synthes 13
Alternative Technique: Apply Posterolateral Plate Without Support
1
Determine plate placement
Note: When using the posterolateral plate without support,
it is important to reduce and x the distal block with lag screws
according to the AO Principles of Fracture Management.
3
Reduce the distal block to the shaft using K-wires and reduction
forceps for temporary xation.
2
Preliminary xation of the plate shaft to the bone
After reducing the fracture, apply the plate and insert a
3.5 mm cortex screw through the DCU portion of the
elongated Combi hole (see page 10).
3
Insert distal screws (see page 11)
3. T. Rüedi, p.314.

14 DePuy Synthes 3.5 mm LCP
®
Distal Humerus Plates Surgical Technique
Apply Medial Plate
1
Position the plate
Instruments
292.20 2.0 mm Kirschner Wire, 150 mm
323.061 2.0 mm Threaded Drill Guide, with Depth
Gauge
Position the medial plate on the medial ridge and slightly
dorsal to the intermuscular septum, with the distal tip reaching
down to the insertion of the medial collateral ligament.
Distal screws should reach as far as possible into the bone.
Choose a plate position that allows the longest possible screws.
If necessary, bend the distal part of the plate to ensure optimal
position of the long screws through the articular block.
Note: Small adjustments in the position of the medial plate
impact the nal direction of the screws and will inuence
the choice of screw lengths.
Use the 2.0 mm threaded drill guide with depth gauge and
a K-wire to determine the optimal position of the plate.
2
Preliminary xation of the plate to the bone
After reducing the fracture, apply the plate and insert a
self-tapping 3.5 mm cortex screw through the DCU portion
of the elongated Combi hole (see page 10).

3.5 mm LCP
®
Distal Humerus Plates Surgical Technique DePuy Synthes 15
3
Fix the distal part of the plate to the bone
Use a procedure similar to that for the posterolateral plate to
insert the locking or cortex screws (see page 11 for details).
Precautions:
– Careful drilling is necessary as collision with the screws of
the posterolateral plate may occur. In case of collision stop
drilling and use adequate screw for xation. Use other
available holes for application of more screws.
– It is recommended to use minimum one screw on the
medial side and one screw on the lateral side which cross
the distal block. Screw length should be 40–60 mm
depending on the size of the humerus.
Apply Medial Plate

16 DePuy Synthes 3.5 mm LCP
®
Distal Humerus Plates Surgical Technique
Insert Screws in Plate Shafts
1
Fix the shaft of the posterolateral plate
Instruments
310.25 2.5 mm Drill Bit, quick coupling
310.288 2.8 mm Drill Bit, quick coupling
312.648 2.8 mm Threaded Drill Guide
314.116 StarDrive Screwdriver Shaft, T15
319.01 Depth Gauge, for 2.7 mm and small screws
323.36 3.5 mm Universal Drill Guide
511.770 Torque Limiting Attachment, 1.5 Nm
511.773 Torque Limiting Attachment, 1.5 Nm,
quick coupling
After xing the distal portion of the posterolateral and medial
plates, determine where locking or cortex screws will be used
in the shaft of the posterolateral plate. Use 3.5 mm locking
screws or 3.5 mm cortex screws to x the shaft of the plate
to the bone.
Note: If a combination of cortex and locking screws is used,
a cortex screw should be inserted rst to pull the plate to
the bone.
3.5 mm cortex screws
If compression is required, use the 3.5 mm universal drill
guide in compression mode and, with the 2.5 mm drill bit,
predrill both cortices. Use the depth gauge to determine
the cortex screw length. Insert the cortex screw.
3.5 mm locking screws
For 3.5 mm locking screws, screw the 2.8 mm threaded drill
guide into a Combi hole until fully seated. Drill to desired
depth using the 2.8 mm drill bit and remove the drill guide.
Use the depth gauge to determine screw length. Insert
locking screw.
3.5 mm LCP
®
Distal Humerus Plates Surgical Technique DePuy Synthes 17
2
Fix the shaft of the medial plate
Determine where locking or cortex screws will be used in the
shaft of the medial plate. Insert these screws as described on
page 14.
Note: In the surgical report, please mention the StarDrive
Recess in both the 2.7 mm locking screw and 2.4 mm cortex
screw. This will remind the surgeon to have a StarDrive
Screwdriver available if the implants are removed.
Insert Screws in Plate Shafts
18 DePuy Synthes 3.5 mm LCP
®
Distal Humerus Plates Surgical Technique
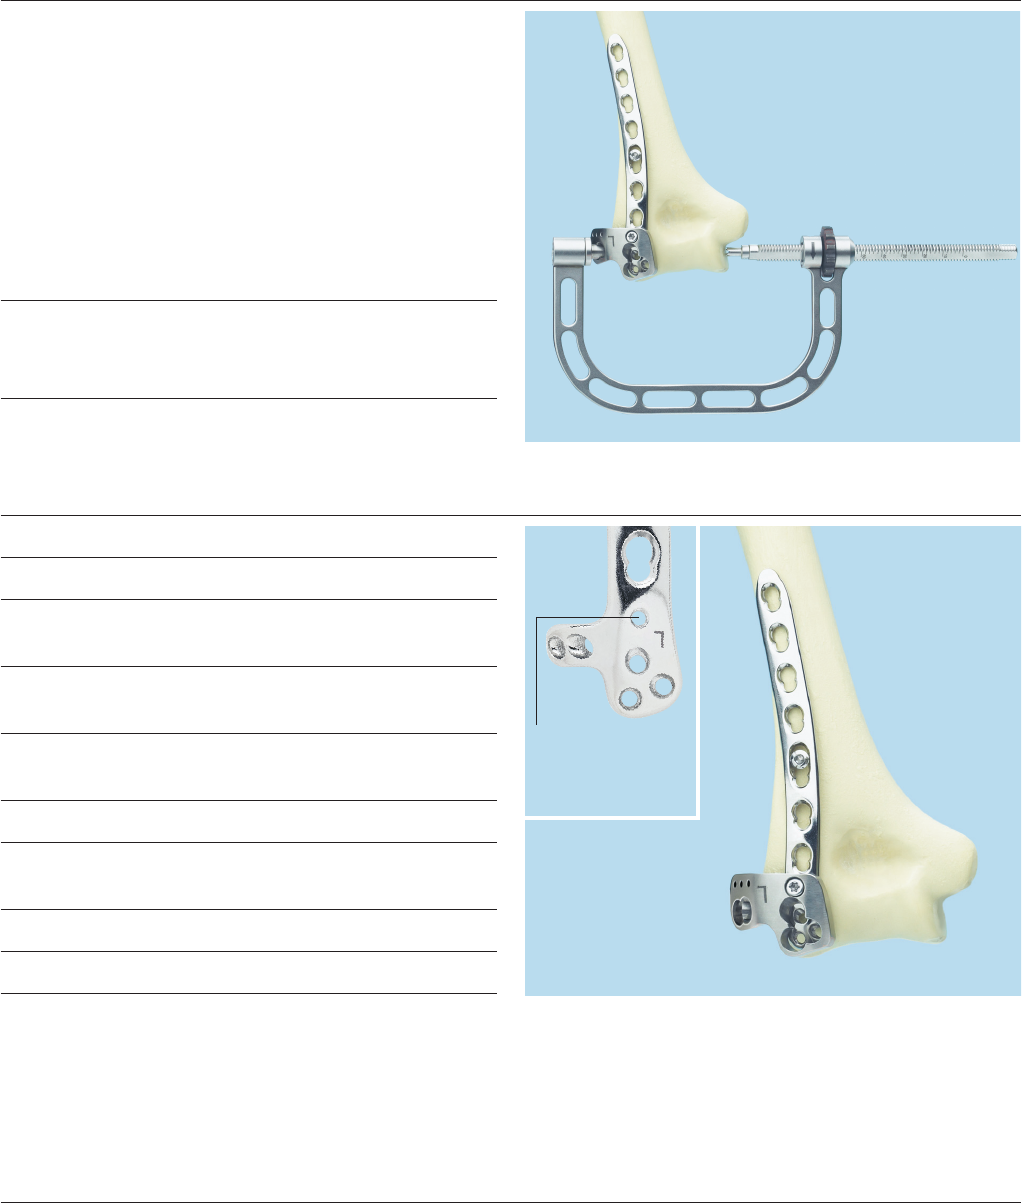
Optional Techniques with Position and Compression Device
Position and compression device (PCD),
for 3.5 mm LCP Distal Humerus Plates
– For easy application of distal screws
– Clear indication of exit point of screws
– Allows compression across the articular surface
– Includes length measurement
– Additionally available instrument
– For use with posterolateral plate
– Can be used to insert independent 3.5 mm cortex
screws on distal humerus
Note: For easier insertion of the drill sleeve, loosen the
connection screw in the aiming block, thread the drill sleeve
into the plate hole and tighten the connection screw.
Use the PCD to place a locking screw through the plate
Instruments
313.351 Insertion Guide, left, for Position and
Compression Device
313.352 Insertion Guide, right, for Position and
Compression Device
313.353 Drill Sleeve, for 2.0 mm Drill Bit for Position
and Compression Device
313.354 Position and Compression Device
313.355 2.7 mm Insert, for Position and
Compression Device
314.115 StarDrive Screwdriver, T15
323.062 2.0 mm Drill Bit with depth mark
Using the T15 StarDrive Screwdriver, screw the insertion
guide to the posterolateral plate with support.
Place the posterolateral plate in its approximate position
on the bone and x it with a 3.5 mm cortex screw inserted
through the DCU portion of the elongated hole.
Insertion guide is
attached to plate
through this hole

3.5 mm LCP
®
Distal Humerus Plates Surgical Technique DePuy Synthes 19
Place the 2.7 mm insert into the PCD (as shown).
Orient the PCD on the bone so that the insert can be placed
through the holes in the insertion guide, and advance the
medial spindle to secure it to the bone.
Place the 2.0 mm drill sleeve through the 2.7 mm insert
and secure it into the threaded plate hole. Use the 2.0 mm
drill bit to drill through the drill sleeve.
Option
K-wires through the insertion guide may be used for
temporary xation.
Tighten the spindle to compress the distal block. The point
of bone contact marks the exit point of the screw inserted
through the plate.
Optional Techniques with Position and Compression Device

20 DePuy Synthes 3.5 mm LCP
®
Distal Humerus Plates Surgical Technique
Check the trajectory of the screw to ensure good xation
in the bone. Read screw length from the spindle to choose
the appropriate screw length. Using a screw 2 mm to 5 mm
shorter than the indicated length will provide a safety margin
to the articular surface. Remove the drill sleeve.
Insert the 2.7 mm locking screw through the 2.7 mm insert.
Remove the PCD.
Use the PCD to place an independent 3.5 mm cortex
screw
Instruments
310.25 2.5 mm Drill Bit, quick coupling
313.354 Position and Compression Device
313.356 3.5 mm Insert, for PCD
313.357 Drill Sleeve, for 2.5 mm Drill Bit for PCD
319.01 Depth Gauge, for 2.7 mm and small screws
Place the 3.5 mm insert into the PCD. Place the drill sleeve
for 2.5 mm drill bit through the insert.
Position the spindle of the PCD on the medial side of the
trochlea and tighten the spindle to compress. The point
of bone contact marks the exit point of the screw inserted
through the hole of the plate.
Use the 2.5 mm drill bit to drill through the drill sleeve. Read
screw length from the spindle. The depth gauge may also be
used to determine screw length. Remove the drill sleeve and
insert a 3.5 mm cortex screw through the 3.5 mm insert.
Remove the PCD.
Optional Techniques with Position and Compression Device

3.5 mm LCP
®
Distal Humerus Plates Surgical Technique DePuy Synthes 21
Postoperative Treatment and Implant Removal
Postoperative treatment
Postoperative treatment with locking plates does not
differ from conventional internal xation procedures.
Implant removal
To remove locking screws, unlock all screws from the plate,
then remove the screws completely from the bone. This
prevents simultaneous rotation of the plate when unlocking
the last locking screw.

22 DePuy Synthes 3.5 mm LCP
®
Distal Humerus Plates Surgical Technique
Screws Used with the 3.5 mm LCP Distal Humerus Plates
Stainless steel and titanium
4.0 mm Cancellous Bone Screws
Found in the Small Fragment LCP System
– May be used in the DCU portion of the Combi holes
in the plate shaft or in round locking holes
– Compress the plate to the bone or create axial compression
– Fully or partially threaded shaft
3.5 mm Locking Screws
Found in the Small Fragment LCP System
– Create a locked, xed-angle screw/ plate construct
– Fully threaded shaft
– Self-tapping tip
– Used in the locking portion of the Combi holes
or in round locking holes
3.5 mm Cortex Screws
Found in the Small Fragment LCP System
– May be used in the DCU portion of the Combi holes
in the plate shaft or in round locking holes
– Compress the plate to the bone or create axial compression
– Fully threaded shaft

3.5 mm LCP
®
Distal Humerus Plates Surgical Technique DePuy Synthes 23
2.7 mm Locking Screws, self-tapping, with
T8 StarDrive Recess
– Same low-prole head size as 2.4 mm locking screws
– Threaded, conical head locks securely into the plate
to provide angular stability
– Locked screws allow unicortical screw xation and
load transfer to the near cortex
– StarDrive Recess mates with self-retaining screwdriver
and provides improved torque transmission
– 10 mm to 60 mm lengths (2 mm increments)
2.7 mm Cortex Screws
Found in the Small Fragment LCP System
– May be used in the distal locking holes
– Compress the plate to the bone
– Fully threaded shaft
2.4 mm Cortex Screws, self-tapping, with
T8 StarDrive Recess
– For use in distal round holes to provide compression
or neutral xation
– StarDrive Recess mates with self-retaining screwdriver
and provides improved torque transmission
– 10 mm to 40 mm lengths (2 mm increments)
Note: For more information on xation principles using
conventional and locked plating techniques, please refer
to the Small Fragment Locking Compression Plate (LCP)
Technique Guide.
Stainless steel screws are made of implant quality 316L stainless steel
Titanium screws are made of titanium alloy, Ti-6Al-7Nb
Screws Used with the 3.5 mm LCP Distal Humerus Plates
Stainless steel and titanium
24 DePuy Synthes 3.5 mm LCP
®
Distal Humerus Plates Surgical Technique
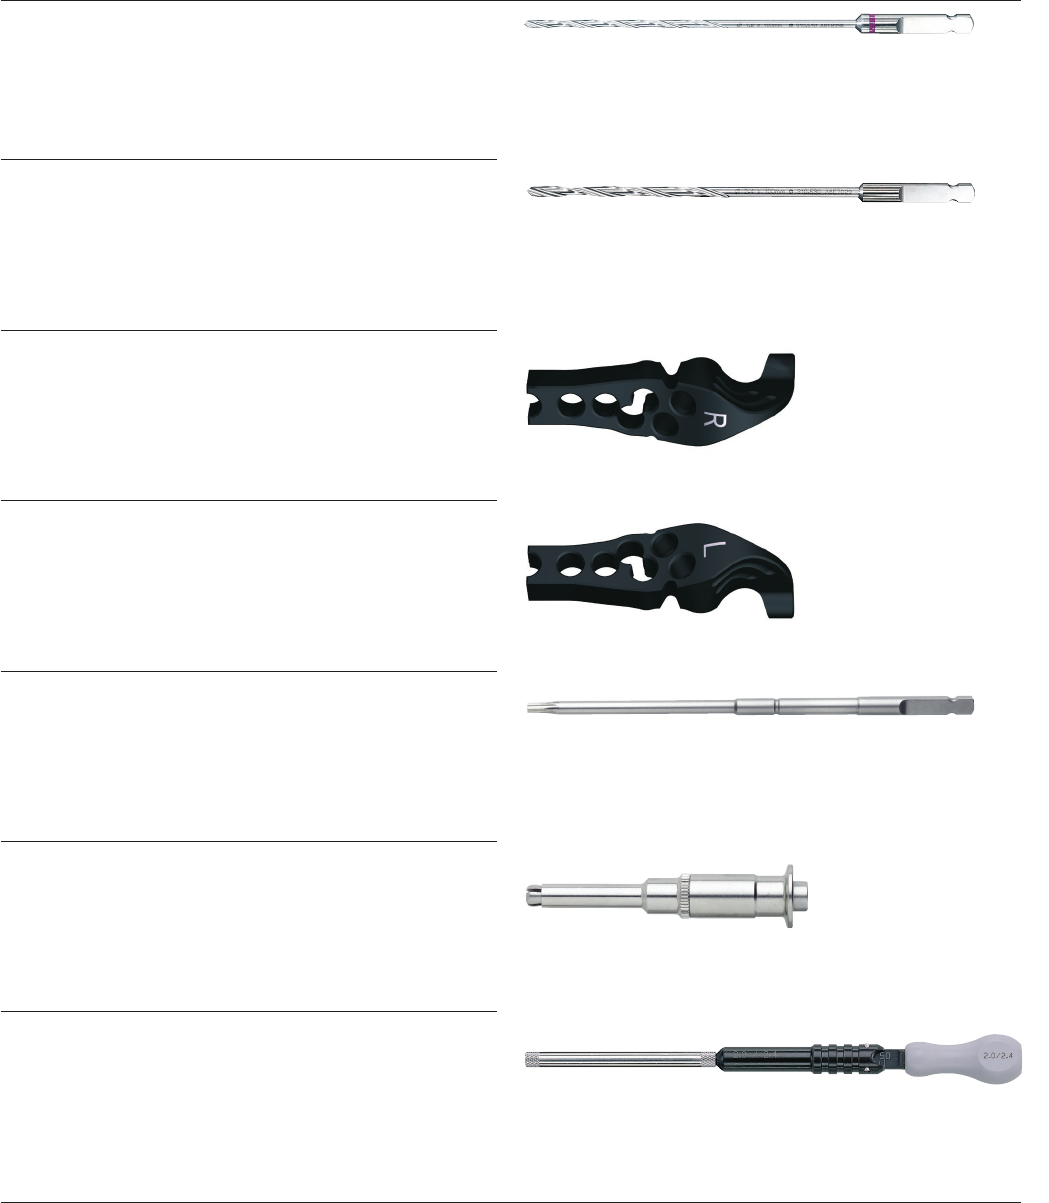
Instruments
310.510 1.8 mm Drill Bit, quick coupling, 100 mm
310.530 2.4 mm Drill Bit, quick coupling, 100 mm
314.467 StarDrive Screwdriver Shaft, T8, 105 mm
314.468 Holding Sleeve, for 314.467
319.006 Depth Gauge, for 2.0 mm and 2.4 mm screws
312.910 Guiding Block, for 3.5 mm LCP Olecranon
Plate, right
312.911 Guiding Block for 3.5 mm LCP Olecranon
Plate, left

3.5 mm LCP
®
Distal Humerus Plates Surgical Technique DePuy Synthes 25
323.202 2.4 mm Universal Drill Guide
399.98 Reduction Forceps, with points, 205 mm
length, ratchet
511.776 Torque Limiting Attachment, 0.8 Nm,
quick coupling
323.061 2.0 mm Threaded Drill Guide,
with Depth Gauge
323.062 2.0 mm Drill Bit with depth mark,
quick coupling, 140 mm
Instruments

26 DePuy Synthes 3.5 mm LCP
®
Distal Humerus Plates Surgical Technique
Graphic Cases
690.415 3.5 mm LCP Elbow System Graphic Case
Plate Set
690.417 3.5 mm Titanium LCP Elbow System Graphic
Case Plate Set
690.479 Retrot Kit for 3.5 mm Titanium LCP Elbow
System Graphic Case
Instruments
310.510 1.8 mm Drill Bit, quick coupling, 100 mm,
2 ea.
310.530 2.4 mm Drill Bit, quick coupling, 100 mm,
2 ea.
312.910 Guiding Block for 3.5 mm LCP Olecranon
Plate, right
312.911 Guiding Block for 3.5 mm LCP Olecranon
Plate, left
314.467 StarDrive Screwdriver Shaft, T8, 105 mm
314.468 Holding Sleeve, for 314.467
319.006 Depth Gauge, for 2.0 mm and 2.4 mm screws
323.061 2.0 mm Threaded Drill Guide, with Depth
Gauge, 2 ea.
323.062 2.0 mm Drill Bit with depth mark, quick
coupling, 140 mm, 2 ea.
323.202 2.4 mm Universal Drill Guide
399.98 Reduction Forceps, with points, 205 mm
length, ratchet
511.776 Torque Limiting Attachment, 0.8 Nm,
quick coupling
3.5 mm LCP Elbow System
Stainless steel (01.104.000) and Titanium (01.104.004)
Note: For additional information, please refer to the
package insert or www.e-ifu.com.
For detailed cleaning and sterilization instructions, please
refer to www.depuysynthes.com/hcp/cleaning-sterilization
or sterilization instructions, if provided in the instructions
for use.

3.5 mm LCP
®
Distal Humerus Plates Surgical Technique DePuy Synthes 27
Implants
2.4 mm Cortex Screws, self-tapping, with T8 StarDrive Recess,
2 ea.
Stainless Steel Titanium Length (mm)
201.760 401.760 10
201.762 401.762 12
201.764 401.764 14
201.766 401.766 16
201.768 401.768 18
201.770 401.770 20
201.772 401.772 22
201.774 401.774 24
201.776 401.776 26
201.778 401.778 28
201.780 401.780 30
201.782 401.782 32
201.784 401.784 34
201.786 401.786 36
201.788 401.788 38
201.790 401.790 40
2.7 mm Locking Screws, self-tapping, with T8 StarDrive Recess,
3 ea.
Stainless Steel Titanium Length (mm)
202.210 402.210 10
202.212 402.212 12
202.214 402.214 14
202.216 402.216 16
202.218 402.218 18
202.220 402.220 20
202.222 402.222 22
202.224 402.224 24
202.226 402.226 26
202.228 402.228 28
202.230 402.230 30
202.232 402.232 32
202.234 402.234 34
202.236 402.236 36
202.238 402.238 38
202.240 402.240 40
202.242 402.242 42
202.244 402.244 44
202.246 402.246 46
202.248 402.248 48
202.250 402.250 50
202.255 402.255 55
202.260 402.260 60
3.5 mm LCP Elbow System
Stainless steel (01.104.000) and Titanium (01.104.004)

28 DePuy Synthes 3.5 mm LCP
®
Distal Humerus Plates Surgical Technique
3.5 mm LCP Medial Distal Humerus Plates
Stainless
Steel Titanium Description Length (mm)
241.282 441.282 3 holes, right 58
241.283 441.283 3 holes, left 58
241.284 441.284 5 holes, right 83
241.285 441.285 5 holes, left 83
241.286 441.286 7 holes, right 110
241.287 441.287 7 holes, left 110
241.288 441.288 9 holes, right 136
241.289 441.289 9 holes, left 136
241.304 441.304 14 holes, right 201
241.305 441.305 14 holes, left 201
3.5 mm LCP Olecranon Plates
Stainless
Steel Titanium Description Length
(mm)
236.502 436.502 2 holes, right 86
236.503 436.503 2 holes, left 86
236.504 436.504 4 holes, right 112
236.505 436.505 4 holes, left 112
236.506 436.506 6 holes, right 138
236.507 436.507 6 holes, left 138
236.508 436.508 8 holes, right 164
236.509 436.509 8 holes, left 164
236.510 436.510 10 holes, right 189
236.511 436.511 10 holes, left 189
236.512 436.512 12 holes, right 215
236.513 436.513 12 holes, left 215
3.5 mm LCP Hook Plates, 2 each
Stainless
Steel Titanium Length (mm)
02.113.103 04.113.103 62
Required Set
105.434 Small Fragment LCP Instrument and Implant
Set
or
145.434 Small Fragment LCP Instrument and Titanium
Implant Set
Implants continued
3.5 mm LCP Posterolateral Distal Humerus Plates
Stainless
Steel Titanium Description Length (mm)
241.262 441.262 3 holes, right 65
241.263 441.263 3 holes, left 65
241.264 441.264 5 holes, right 90
241.265 441.265 5 holes, left 90
241.266 441.266 7 holes, right 116
241.267 441.267 7 holes, left 116
241.268 441.268 9 holes, right 142
241.269 441.269 9 holes, left 142
241.300 441.300 14 holes, right 208
241.301 441.301 14 holes, left 208
3.5 mm LCP Posterolateral Distal Humerus Plates,
with lateral support
Stainless
Steel Titanium Description Length (mm)
241.272 441.272 3 holes, right 65
241.273 441.273 3 holes, left 65
241.274 441.274 5 holes, right 90
241.275 441.275 5 holes, left 90
241.276 441.276 7 holes, right 116
241.277 441.277 7 holes, left 116
241.278 441.278 9 holes, right 142
241.279 441.279 9 holes, left 142
241.302 441.302 14 holes, right 208
241.303 441.303 14 holes, left 208
3.5 mm LCP Extra-Articular Distal Humerus Plates
Stainless
Steel Description Length (mm)
02.104.006 6 holes, right 158
02.104.008 8 holes, right 194
02.104.010 10 holes, right 230
02.104.026 6 holes, left 158
02.104.028 8 holes, left 194
02.104.030 10 holes, left 230
3.5 mm LCP Elbow System
Stainless steel (01.104.000) and Titanium (01.104.004)

3.5 mm LCP
®
Distal Humerus Plates Surgical Technique DePuy Synthes
313.351 Insertion Guide, left, for Position and
Compression Device
313.352 Insertion Guide, right, for Position and
Compression Device
313.353 Drill Sleeve for 2.0 mm Drill Bit, for Position
and Compression Device
313.354 Position and Compression Device, for Distal
Humerus Plates
313.355 2.7 mm Insert, for Position and Compression
Device
313.356 3.5 mm Insert, for Position and Compression
Device
690.416 Screw Rack, for LCP Distal Humerus Plate Set
Graphic Case
690.418 Screw Rack, for Titanium LCP Distal Humerus
Plate Set Graphic Case
3.5 mm Titanium LCP Extra-Articular Distal Humerus Plates
Description Length (mm)
04.104.006S 6 holes, right 158
04.104.008S 8 holes, right 194
04.104.010S 10 holes, right 230
04.104.026S 6 holes, left 158
04.104.028S 8 holes, left 194
04.104.030S 10 holes, left 230
Also Available

Limited Warranty and Disclaimer: DePuy Synthes products are sold with a limited warranty to the original purchaser against defects in workmanship
and materials. Any other express or implied warranties, including warranties of merchantability or tness, are hereby disclaimed.
Please also refer to the package insert(s) or other labeling associated with the devices identied in this surgical technique for additional information.
CAUTION: Federal Law restricts these devices to sale by or on the order of a physician.
Some devices listed in this technique guide may not have been licensed in accordance with Canadian law and may not be for sale in Canada. Please
contact your sales consultant for items approved for sale in Canada.
Not all products may currently be available in all markets.
© DePuy Synthes 2004–2021. All rights reserved.
DSUS/TRM/1016/1132 Rev B 05/21 DV
Synthes USA, LLC
1101 Synthes Avenue
Monument, CO 80132
Manufactured or distributed by:
Synthes USA Products, LLC
1302 Wrights Lane East
West Chester, PA 19380
To order (USA): 800-523-0322
To order (Canada): 844-243-4321
Note: For recognized manufacturer, refer to the product label.
www.depuysynthes.com
Synthes GmbH
Luzernstrasse 21
4528 Zuchwil, Switzerland
