
Installation Instructions

Installation Instructions
DUCATI MONSTER 1200 2014
TAIL TIDY
Product Reference - 11999
Kit Contents
1 x Main Mounting Bracket
A
1 x LH Arm
B
1 x RH Arm
C
1 x Licence Plate Holder
D
1 x Reflector and Bracket
E
1 x Cable Bracket (1200 Only)
F
1 x Licence Plate Light
G
2 x M5 - 50 Button Head Screws
K
2 x Indicator Mounting Plates
J
2 x M3 - 12 Button Head Screws
M
2 x Screw Head Caps
O
2 x Number Plates Screws and Nuts
N
1 x Wiring Connector Loom (1200 Only)
H
2 x Pair Bullet Connectors (1200 Only)
P
2 x Male Spade Connectors (821 Only)
Q
2 x Indicator Extension Wires (821 Only)
R
2 x M8 - 25 Button Head Screws (821 Only)
S
2 x M8 Mounting Spacers (821 Only)
T
2 x M8 Custom Washers (821 Only)
U
3 x M8 - 10 Button Head Screws (1200 Only)
V
3 x M6 Trunions
W
3 x M6 - 16 Countersink Screws
X
4 x Indicator Adapters
Y
4 x Mounting Bosses
Z
4 x M6 Custom Washers
AA
4 x M6 - 12 Button Head Screws
BB
6 x Cable Ties
CC
2 x Indicator Arms
I
2 x M5 - 12 Cap Head Bolt
L

Installation Instructions
1

Installation Instructions
2

Installation Instructions
3
V F
V
V

Installation Instructions
4

Installation Instructions
5
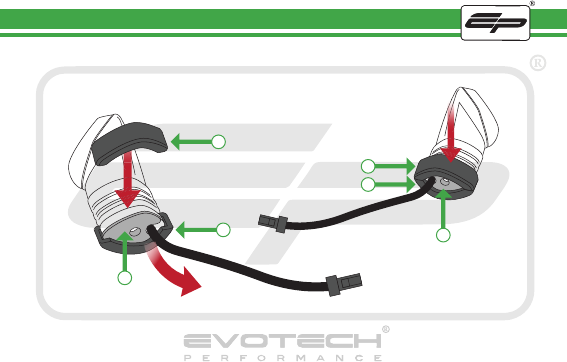
Caution
Carefully trace license plate
light cable back to the main loom.
Ensure any other cables that are
un-clipped are re-clipped once light
cable has been moved

Installation Instructions
6
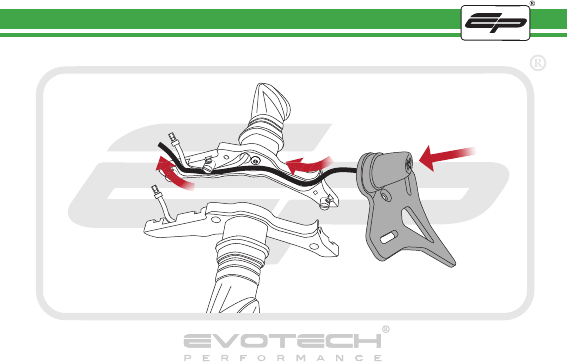
Caution
Carefully re-route license plate
light cable along rear sub-frame.
Leave lose on top at this stage.

Installation Instructions
7

Installation Instructions
8

Installation Instructions
9

Installation Instructions
10

Installation Instructions
11

Installation Instructions
12

Installation Instructions
13
Caution
Move indicator wires over to
the left hand side of the bike.
Route the licence plate light
from stage 6 under sub-frame
to the same location as the
indicator wires.

Installation Instructions
14

Installation Instructions
15

Installation Instructions
16

Installation Instructions
17
Installation Instructions
18
Y
Y
Y
J
J
Y

Installation Instructions
19
I
I

Installation Instructions
20
B
C
K
K

Installation Instructions
21
D
M
G
M
Installation Instructions
22
W
W
W
Installation Instructions
23

Installation Instructions
24
L
L
X

Installation Instructions
25
O
O

Installation Instructions
26
X
X
A
CC
CC

Installation Instructions
27
Z
Z
Z
Z

Installation Instructions
28
Caution
Feed wires through gap between
grab handles and undertray
ensuring they are free to move

Installation Instructions
29
AA BB
AA BB
AA BB
AA BB

Installation Instructions
30
H
P
P
G
OEM Wiring Loom

Installation Instructions
31

Reflector Bracket Installation
Installation Instructions
After installation of your tail tidy ensure that the licence
plate does not contact the rear tyre when
suspension is fully compressed.
Ensure all electrics including indicators, tail light, brake light
and licence plate light lights are working correctly
before riding the motorcycle.
It is recommended that periodic inspections are made
to ensure that all fixings are fully tightend.

www.evotech-performance.com
