
Installation Instructions

Installation Instructions
YAMAHA YZF-R1 2015
TAIL TIDY
Product Reference - 12265
Kit Contents
1 x Main Arm RH
A
1 x Main Arm LH
B
1 x License Plate Holder
C
1 x Trunion Spacer Plate
D
1 x Wiring Connector
E
1 x Neoprene Gasket
F
1 x M6 - 16 Socket Countersink Screw
G
1 x M5 - 12 Socket Cap Head Screw
H
1 x Reflector Bracket Kit (Plastic Nuts and Bolts, Reflecotr, Bracket)
J
1 x Licence Plate Light
K
1 x M5 Black Dome Cap
I
2 x Indicator Adapter A
L
2 x Indicator Adapter B
M
2 x Indicator Screw
N
2 x O-Rings
O
2 x M6 - 16 Centre Hole Trunion
P
2 x M6 - 13 Offset Hole Trunion
Q
2 x M5 - 25 Socket Cap Head Screw
R
2 x M3 - 12 Button Head Screws
S
3 x M6 - 30 Socket Cap Head Screw
U
6 x Male Bullet Connectors
V
6 x Female Bullet Connectors
W
3 x 5mm - 16mm Dowel pins
T

1
Installation Instructions

2
Installation Instructions

3
Installation Instructions
4
Installation Instructions
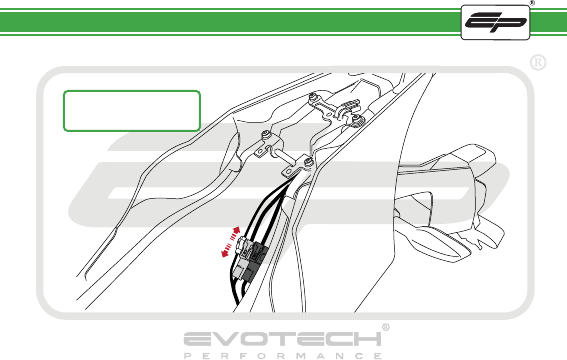
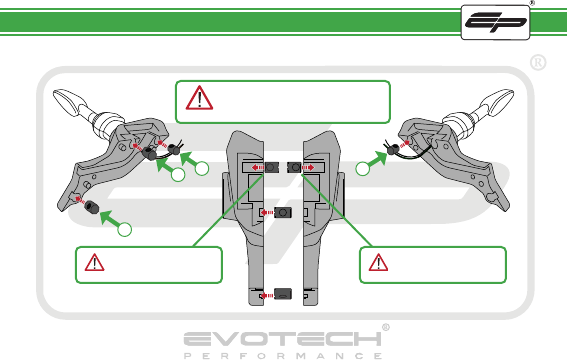
Disconnect both indicators and
the licence plate light from
the main wiring loom

5
Installation Instructions

6
Installation Instructions
7
Installation Instructions

8
Installation Instructions
9
Installation Instructions

10
Installation Instructions
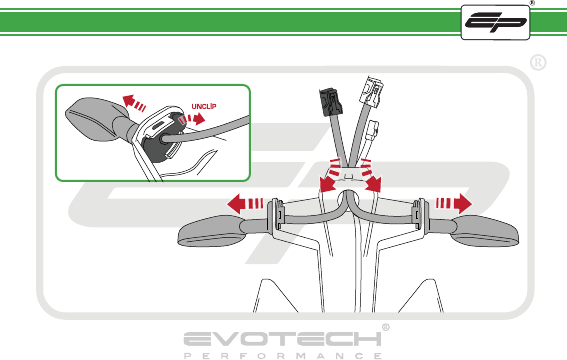
Repeat this stage for
both indicators

11
Installation Instructions
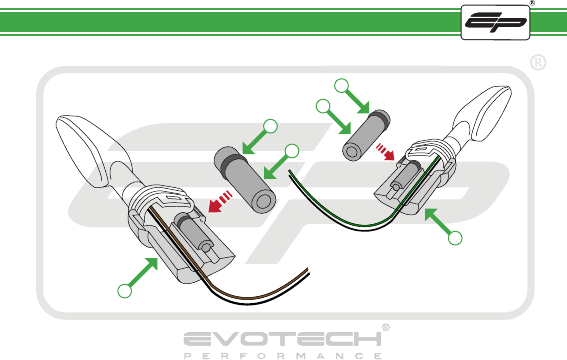
Repeat this stage for
both indicators
Cut through both wires leaving as
much wire on the indicator
side as possible.
12
Installation Instructions
O
O
N
L
M
N

13
Installation Instructions
L
M

14
Installation Instructions
B
R R
A

15
Installation Instructions
K
C
S
S

16
Installation Instructions
T
T
T
17
Installation Instructions
P
P
Q
Q
Caution
Trunion positions are critical.
Ensure SHORT trunions are installed at the
FRONT and in the correct orientation
Caution
Ensure hole is offset
to the OUTSIDE of the tail tidy
Caution
Ensure hole is offset
to the OUTSIDE of the tail tidy

18
Installation Instructions

19
Installation Instructions
H
20
Installation Instructions
I
G

21
Installation Instructions
Push Trunions out to the end of slots
before inserting spacing plate
D

22
Installation Instructions
F
23
Installation Instructions
Feed all of the wires up inside
the rear sub frame

24
Installation Instructions
U
U
U
OEM PART

25
Installation Instructions
E
V
V
Main Wiring Loom

26
Installation Instructions
W
V
W
V
Original Indicator LoomOriginal Indicator Loom
27
Installation Instructions

28
Installation Instructions
Reverse Stages
6 - 1

Reflector Bracket Installation
Installation Instructions
After installation of your tail tidy ensure that the licence
plate does not contact the rear tyre when
suspension is fully compressed.
Ensure all electrics including indicators, tail light, brake light
and licence plate light lights are working correctly
before riding the motorcycle.
It is recommended that periodic inspections are made
to ensure that all fixings are fully tightend.

www.evotech-performance.com
