
Installation Instructions MRC
Issue Date September 6, 2002
© 2002 Johnson Controls, Inc.
1
Part No. 24-9778-65, Rev. – www.johnsoncontrols.com
Modular Room Control (MRC) Software and Upgrade
Installation
CIS5 Installation Prerequisites
The computer on which you want to install CIS5
must meet the following requirements:
• IBM® Personal Computer (PC) or compatible
computer with a Pentium® processor or higher
• Microsoft® Windows® 2000 Professional
operating system installed
• 128 MB of Random Access Memory (RAM)
minimum
• 2 GB free disk space on the hard disk
Note: If possible, CIS5 should be installed on its
own partition, different from the drive C containing
the Windows 2000 system files.
• CD-ROM and floppy disk drive
• Super VGA (SVGA) or better display; 1024 x
768 resolution recommended
• mouse or similar pointing device
• Network Card supporting Transmission Control
Protocol/Internet Protocol (TCP/IP) if connecting
remote CIT5 terminals to the CIS server via
network. Network drivers and services should be
installed and operating prior to installing CIS5.
CIT5 Installation Prerequisites
The computer on which you want to install CIT5
must meet the following requirements:
• IBM PC or compatible computer with a
Pentium processor or higher
• Windows 98, Windows 2000 or Windows NT®
Version 4.0 workstation operating system
installed
• 64 MB of RAM minimum
• 2 GB free disk space on the hard disk
Note: If possible, CIT5 should be installed on its
own partition, different from the drive C containing
the Windows system files.
• CD-ROM and floppy disk drive
• SVGA or better display; 1024 x 768 resolution
recommended
• mouse or similar pointing device
• Network Card supporting TCP/IP protocol if
connecting the CIT5 terminal to the CIS server via
network. Network drivers and services should be
installed and operating prior to installing CIT5.
CIS5 Installation Procedure
To install CIS5:
1. Insert the CIS5/CIT5 Setup CD into the CD-ROM
drive.
2. Using My Computer or Windows Explorer, open
the Software\CIS5Setup_5XX folder on the CD
(XX=version) and double-click Setup.exe to begin
CIS5 installation. The Welcome window opens.
3. Click Next. The Software License Agreement
window appears. Click Yes to accept the software
license agreement. The Choose Destination
Location window appears. The default location of
C:\Program Files\Inncom\Cis5 should be used
under normal circumstances. The Select Program
Folder window appears.
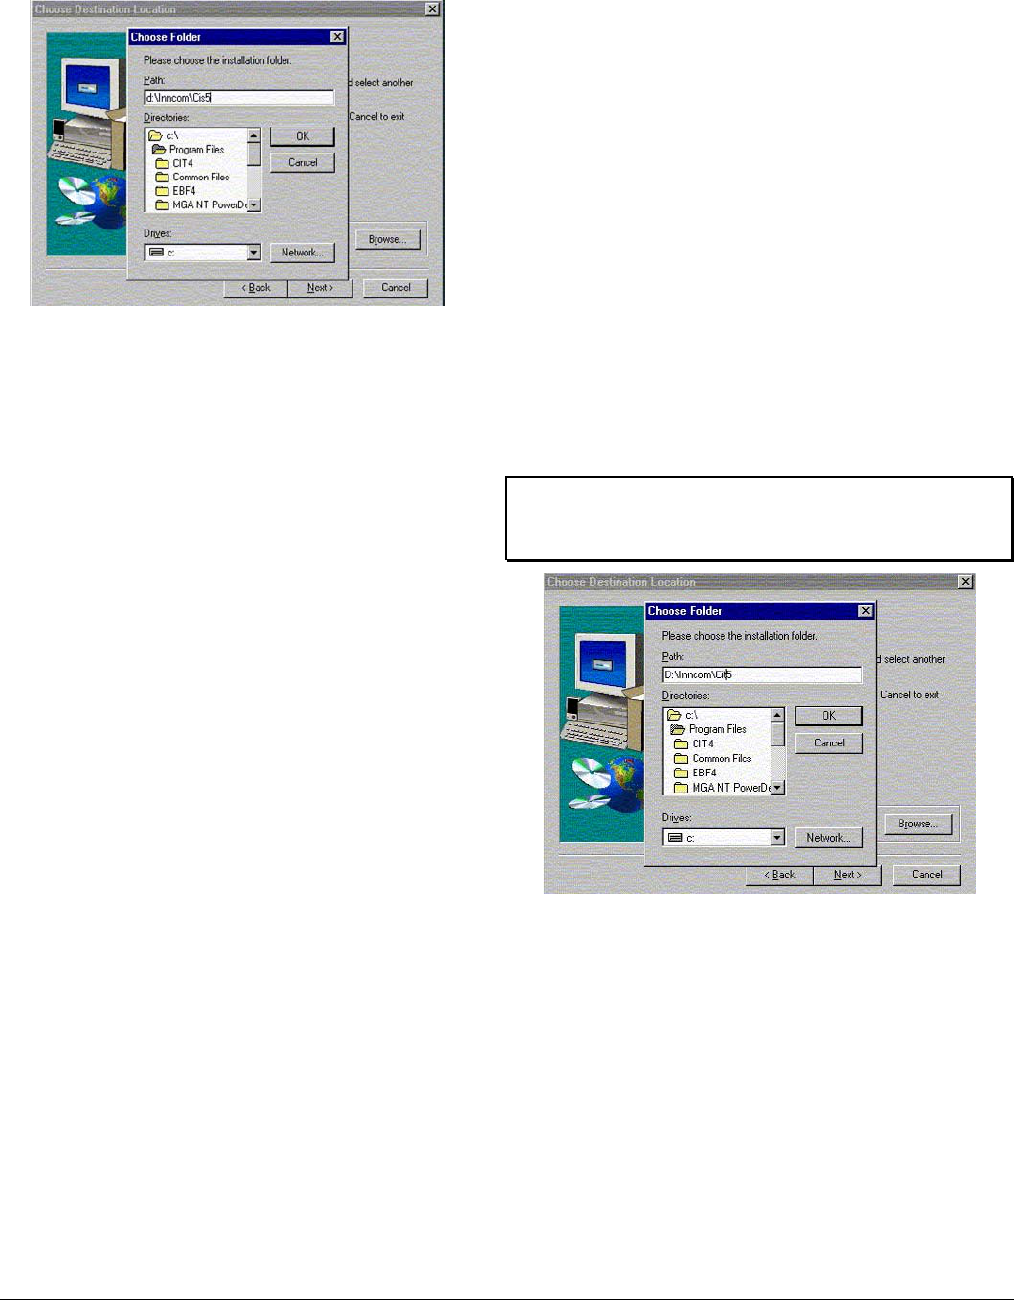
Note: To select a different location, click the Browse
button to open the Choose Folder window shown in
Figure 1. Enter the desired location in the Path: line then
click OK. Figure 1 shows CIS5 is installed in
D:\Inncom\Cis5. Verify the destination folder is correct
and click Next.
2 Modular Room Control (MRC) Software and Upgrade Installation Instructions
Figure 1: CIS5 Choose Installation Folder
4. Enter the program folder that the Inncom
CIS5 program should use in the Program
Folder entry box and click Next. This is the
folder listed when you select Start>Programs
from the Windows desktop. It is recommended
that you use Inncom as the folder name. You
may also choose from the existing program
folders listed.
Note: The Engineering Data Available? window
appears. Installation of CIS5 begins.
If an Engineering Data Disk has been provided,
insert the disk in the computer floppy drive, click the
Yes option and click Next. The Engineering Data
Disk contains information about the room and floor
structure of the hotel.
If an Engineering Data Disk has not been provided,
click the No option and then click Next. The room
and floor information can be loaded at a later time.
5. Wait for the next window after the Database
Installation dialog box appears.
6. Click OK to continue when the Windows Script
Host dialog box appears.
7. Click Next when the DB Installation window
appears; it indicates a Successfully installed
database.
8. Click Finish on the Setup Complete window to
complete the CIS5 installation.
CIT5 Installation Procedure
To install CIT5:
1. Using My Computer or Windows Explorer, open
the Software\CIT5Setup_5XX folder on the CD
(XX=version) and double-click on the Setup.exe file
to begin CIT5 installation. The CIT5 Welcome
window appears.
2. Click Next to open the Software License
Agreement dialog box. Click Yes to accept the
software license agreement. The Choose
Destination Location dialog box appears. The
default location is C:\Program Files\Inncom\CIT5.
If installing just CIT5, use the default location or click
the Browse button to open the Choose Folder
window shown in Figure 2 and select the location.
Click Next.
If installing CIT5 on the same computer as CIS5, the
\Inncom\Cis5 folder already exists. You must install
CIT5 into this existing Inncom folder. Click Next.
IMPORTANT: Make sure you type CIT5 and not
CIS5. Otherwise you overwrite the already installed
CIS5 files.
Figure 2: CIT5 Choose Installation Folder
4. Click OK when the IRG4Srv dialog box appears.
5. Click Finish when prompted to complete
CIT5 installation.
6. Close any open CIS5 installation windows by
clicking the X in the upper right corner of the
window.

Modular Room Control (MRC) Software and Upgrade Installation Instructions 3
CIS5/CIT5 Software Upgrade Instructions
Any software upgrades to the Inncom CIS5 and
CIT5 software are performed using one of the two
following methods:
• full upgrade of CIS5 and CIT5 to the new
version
A full CI5 upgrade replaces all files. An upgrade
CD is provided to the property with the
installation and setup programs required to
perform the upgrade.
Perform the preliminary steps listed in the
Preliminary Steps section to prepare the CIS5
and CIT5 computers for the upgrade, then
perform the steps listed in the Full Upgrade
Instructions section to complete the full upgrade.
• partial upgrade of existing CIS5 and CIT5
versions
A partial upgrade only replaces certain files
located in the software directories on the CIS5
and CIT5 computers. Typically, the upgrade file
is a compressed file (.zip) that contains the
upgrade files. This Zip® file is usually provided
to the property on a 3.5-inch floppy, or it can be
remotely loaded onto the Inncom CIS5 server
computer via a modem using PCAnywhere.
Once the zipped file is loaded onto the
computer, it is unzipped into the Inncom CIS5
and CIT5 folders, overwriting the existing files.
Perform the steps listed in the Preliminary Steps
section to prepare the CIS5 and CIT5 computers
for the upgrade, then perform the steps listed in
the Remote (Partial) Upgrade Instructions
section to complete the partial upgrade.
IMPORTANT: Any upgrade to CIS5 and
CIT5 involves upgrading the CIS5 software on the
server computer and upgrading the CIT5 software
on all CIT5 terminals. You are not able to log a
remote CIT5 terminal on to the CIS5 server if the
CIS5 and CIT5 versions do not match.
Preliminary Steps
Perform the following steps in the order listed prior
to starting either a full upgrade or partial upgrade.
These steps shut down CIT5 on all CIT5 terminals
and CIS5 on the server:
1. Go to each computer running CIT5 and select
User>Logout from the menubar across the top of
the CIT5 window. Select File>Exit from the
menubar to close CIT5.
Note: CIT5 may also be running on the same
computer that runs CIS5. If CIS5 and CIT5 are running
on the same computer, you must also log off and shut
down CIT5 on that computer.
Note: If you do not have access to a particular CIT5
terminal to log off and shut down, Step 2 forces any
remaining CIT5 terminals that may be logged on to the
CIS5 server to disconnect. All CIT5 terminals must be
disconnected from the CIS5 server before upgrading any
software.
2. Go to the server computer running CIS5. Select
Diagnostics>Disconnect CIT from the CIS5
menubar to make sure all CIT5 terminals are logged
off from CIS5.
Note: If a CIS Access Locked window appears when
you click on the CIS5 menubar, enter admin as the
username and cis5 as the password. Click OK. This is a
feature to prevent an unauthorized user from altering
CIS5 settings. You can now select
Diagnostics>Disconnect CIT from the CIS5 menubar.
3. Shut down CIS5 by selecting File>Exit from the
CIS5 menubar.
Full Upgrade Instructions
A full upgrade of CIS5 and CIT5 is identical to the
original installation procedure listed in the CIS5
Installation Procedure and CIT5 Installation Procedure
section. Please read the precautions listed below, and
then go to the Installation section to perform the full
upgrade.
1. Do not uninstall or remove the existing CIS5 and
CIT5 software before installing the full upgrade.
Doing so corrupts the Microsoft Structured Query
Language (MSSQL) database server installation on
the computer that the CIS5 software requires.
!
CAUTION: When prompted for the installation
location for CIS5 and CIT5 in the Installation section,
you must specify the current location where CIS5 and
CIT5 are installed. These locations are typically one of
the following:
“C:\Program Files\Inncom\Cis5” for CIS5 “C:\Program
Files\Inncom\Cit5” for CIT5
or
“D:\Inncom\Cis5” for CIS5
“D:\Inncom\Cit5” for CIT5

4 Modular Room Control (MRC) Software and Upgrade Installation Instructions
Remote (Partial) Upgrade Instructions
To install the CIS5 and CIT5 upgrade files:
1. Obtain the two self-extracting files that contain
the CIS5 and CIT5 Upgrade. They are called
CISUpdate_5XX.exe and CITUpdate_5XX.exe
where “XX” indicates the CIS5/CIT5 version
number.
2. Copy both files into a designated folder on the
hard disk for future use if needed again.
3. Using My Computer or Windows Explorer, find
the CISUpdate_5XX.exe file you just saved and
double-click it. The WinZip self-extractor utility
starts automatically.
4. Click the EXTRACT button and select the
location where you want to extract the update
files. This location should be where the current
CIS5 program is installed. Typically:
“C:\Program Files\Inncom\Cis5”
or
“D:\Inncom\Cis5”
5. Verify the Overwrite Files Without Prompting
check box is checked and then click the UNZIP
button to install the update files into the
directory.
6. Using My Computer or Windows Explorer, go
to the folder where you just installed the update
files and double-click on the CIS5 Update.BAT
file to begin the installation. Several notification
windows appear stating that a file has been
successfully registered.
7. Click OK for each.
Note: The CIS5 upgrade is complete. Continue with
the remaining steps to upgrade CIT5.
8. Using My Computer or Windows Explorer, find the
CITUpdate_5XX.exe file and double-click on it. The
WinZip® self-extractor utility automatically starts.
9. Click the BROWSE button and select the location
where you want to extract the update files. This
location should be where the current CIT5 program
is installed. Typically:
“C:\Program Files\Inncom\Cit5”
or
“D:\Inncom\Cit5”
9. Verify the Overwrite Files Without Prompting
check box is checked then click UNZIP to install the
update files into the directory.
10. Using My Computer or Windows Explorer, go to
the folder where you just installed the update files
and double-click on the CIT5 Update.BAT file to
begin the installation. Several notification windows
appear stating that a file has been successfully
registered.
11. Click OK for each. The CIT5 upgrade is complete.
Controls Group
507 E. Michigan Street
P.O. Box 423 Published in U.S.A.
Milwaukee, WI 53201 www.johnsoncontrols.com
